

Page 1
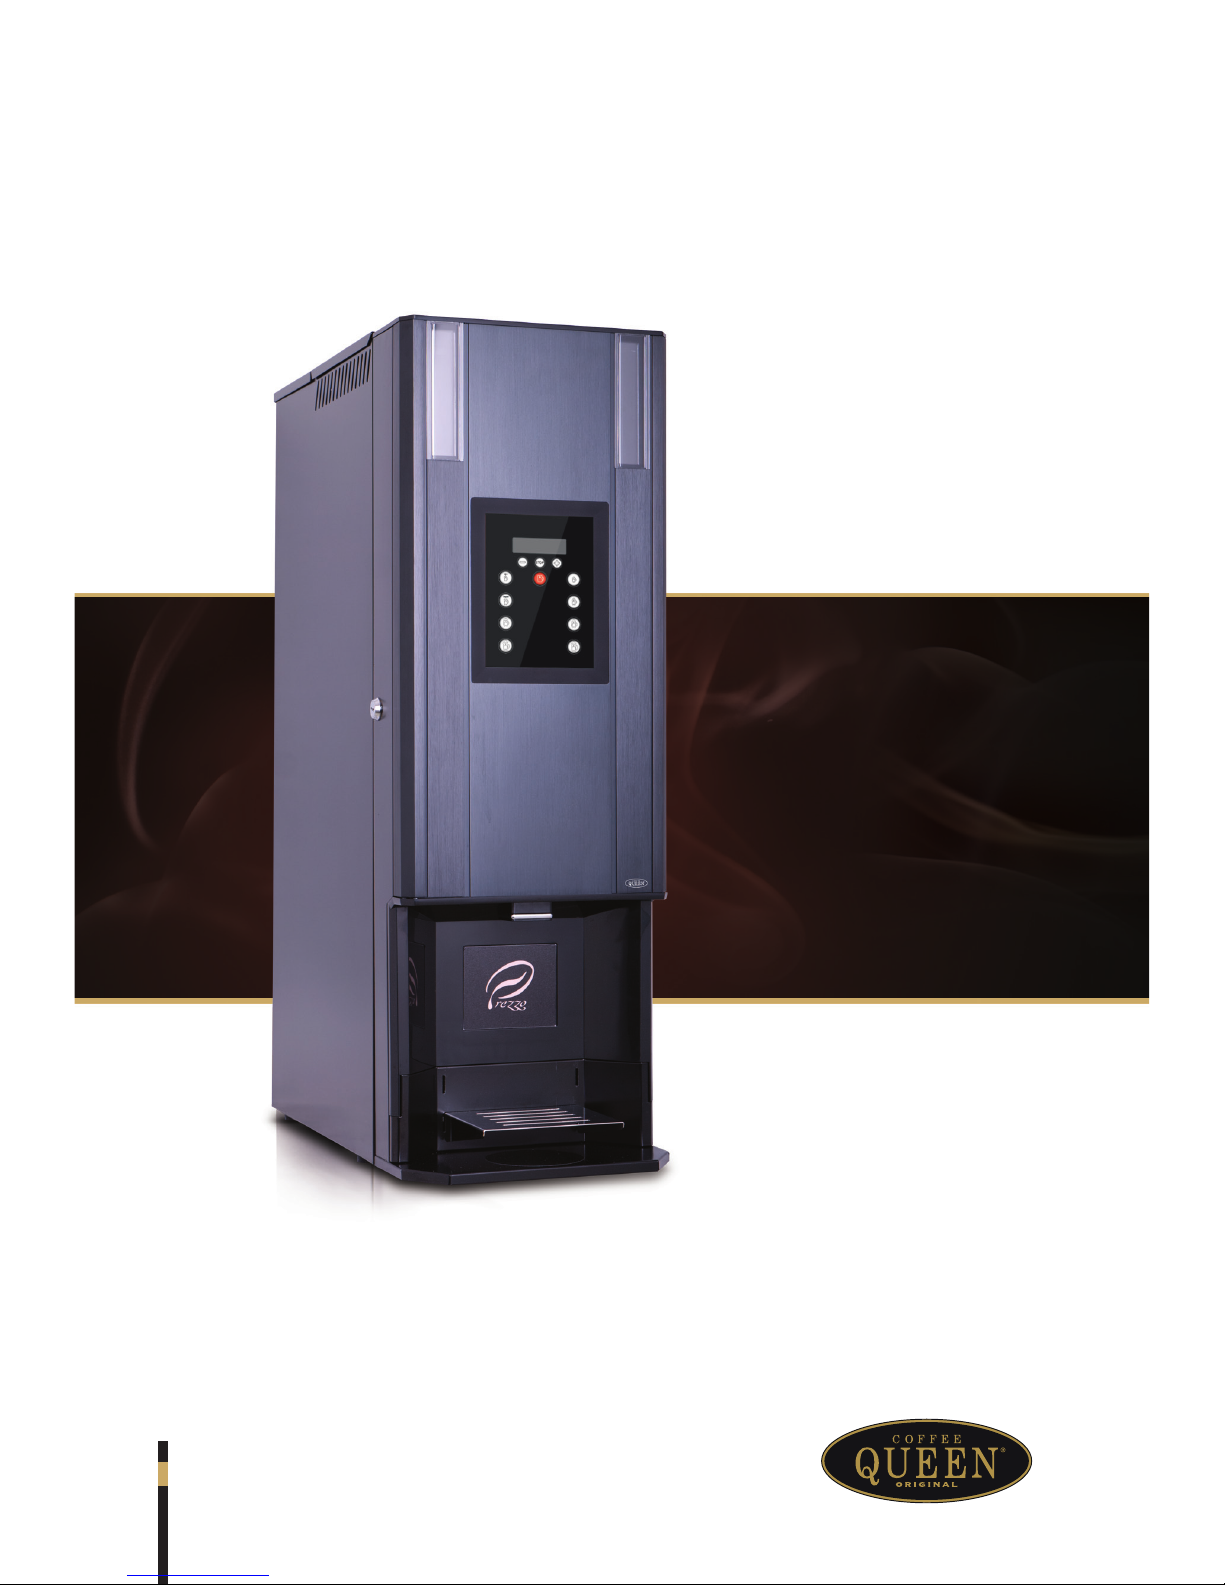
PREZZO
USER MANUAL
UM_EN
Part No.: 1764012_03
Page 2
2
PREZZO
CONTENT
CONTENT ...................................................................................................................................................................... 2
SYMBOL DESCRIPTION ........................................................................................................................................ 4
Hazard intensity levels ......................................................................................................................................................... 4
GENERAL ......................................................................................................................................................................... 5
Introduction ........................................................................................................................................................................... 5
Warnings ................................................................................................................................................................................. 5
Precautions ............................................................................................................................................................................. 5
Intended use ........................................................................................................................................................................... 5
TECHNICAL SPECIFICATIONS ......................................................................................................................... 6
Facts & weight ...................................................................................................................................................................... 6
OVERVIEW OF COMPONENTS ...................................................................................................................... 7
Front ........................................................................................................................................................................................ 7
Interior .................................................................................................................................................................................... 8
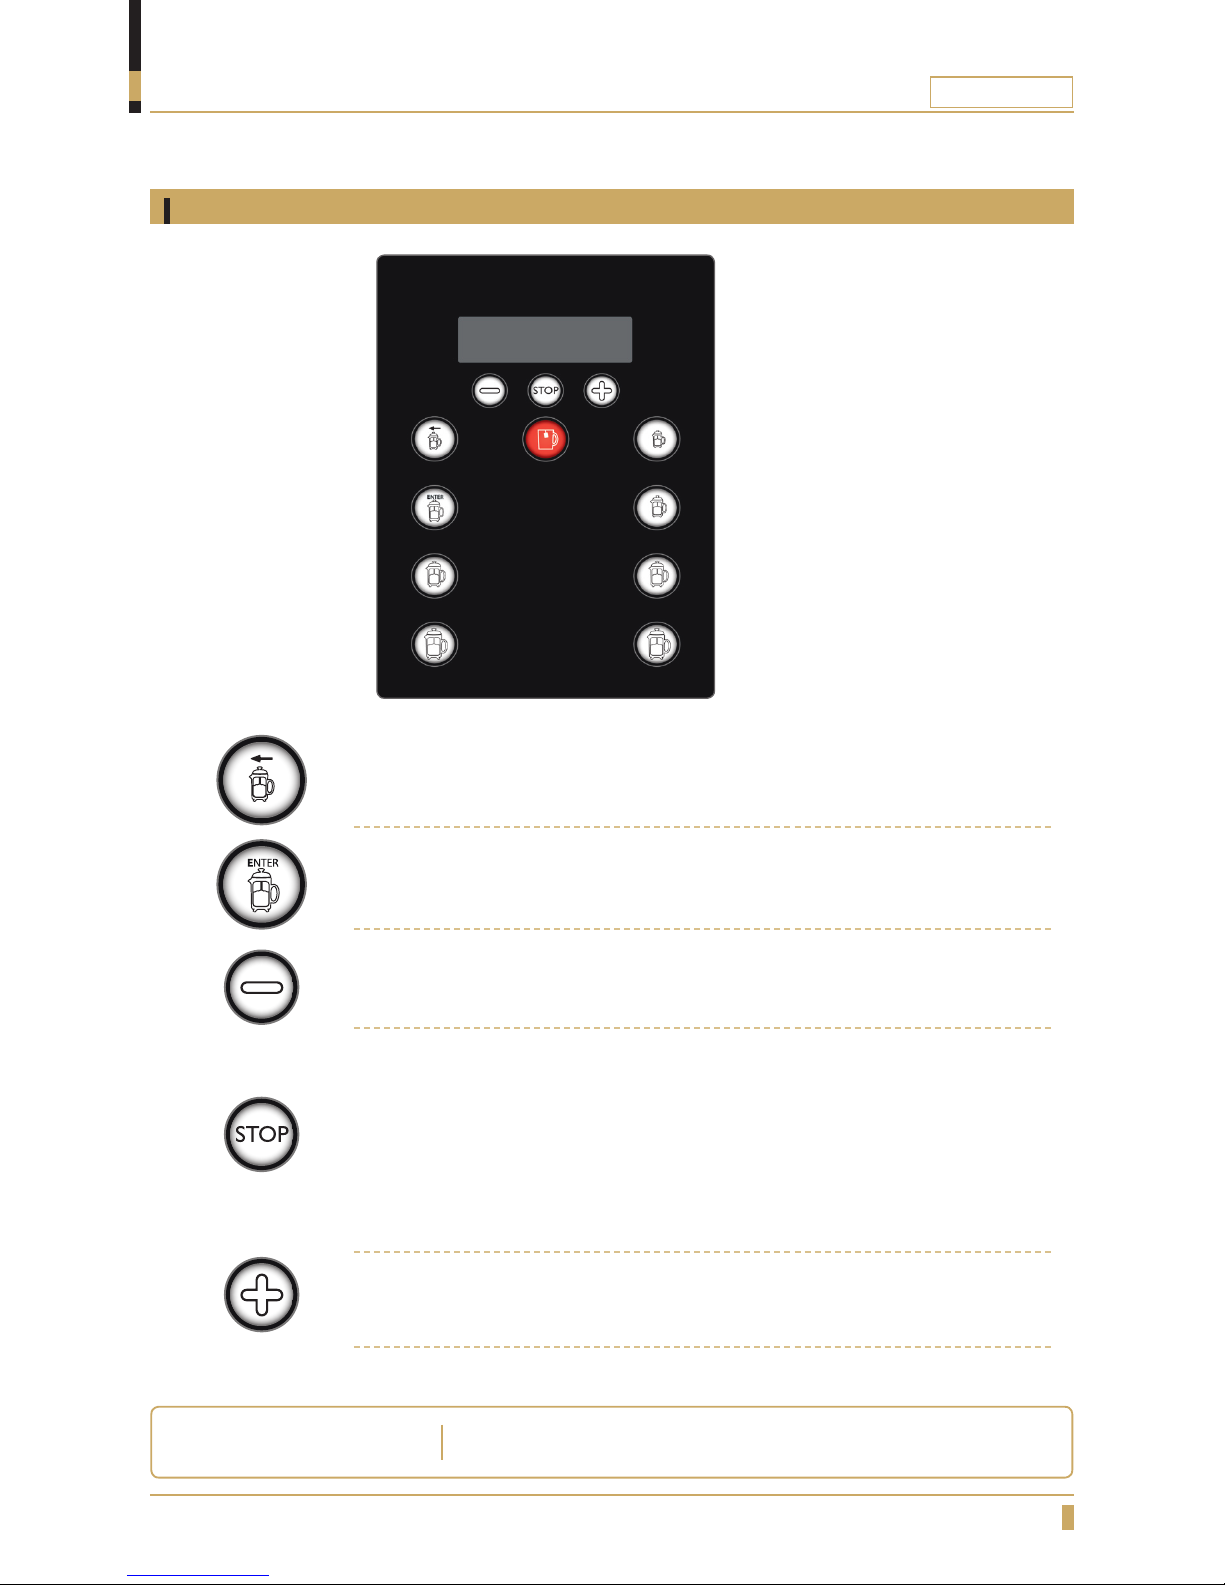
Membrane switch navigation .............................................................................................................................................. 9
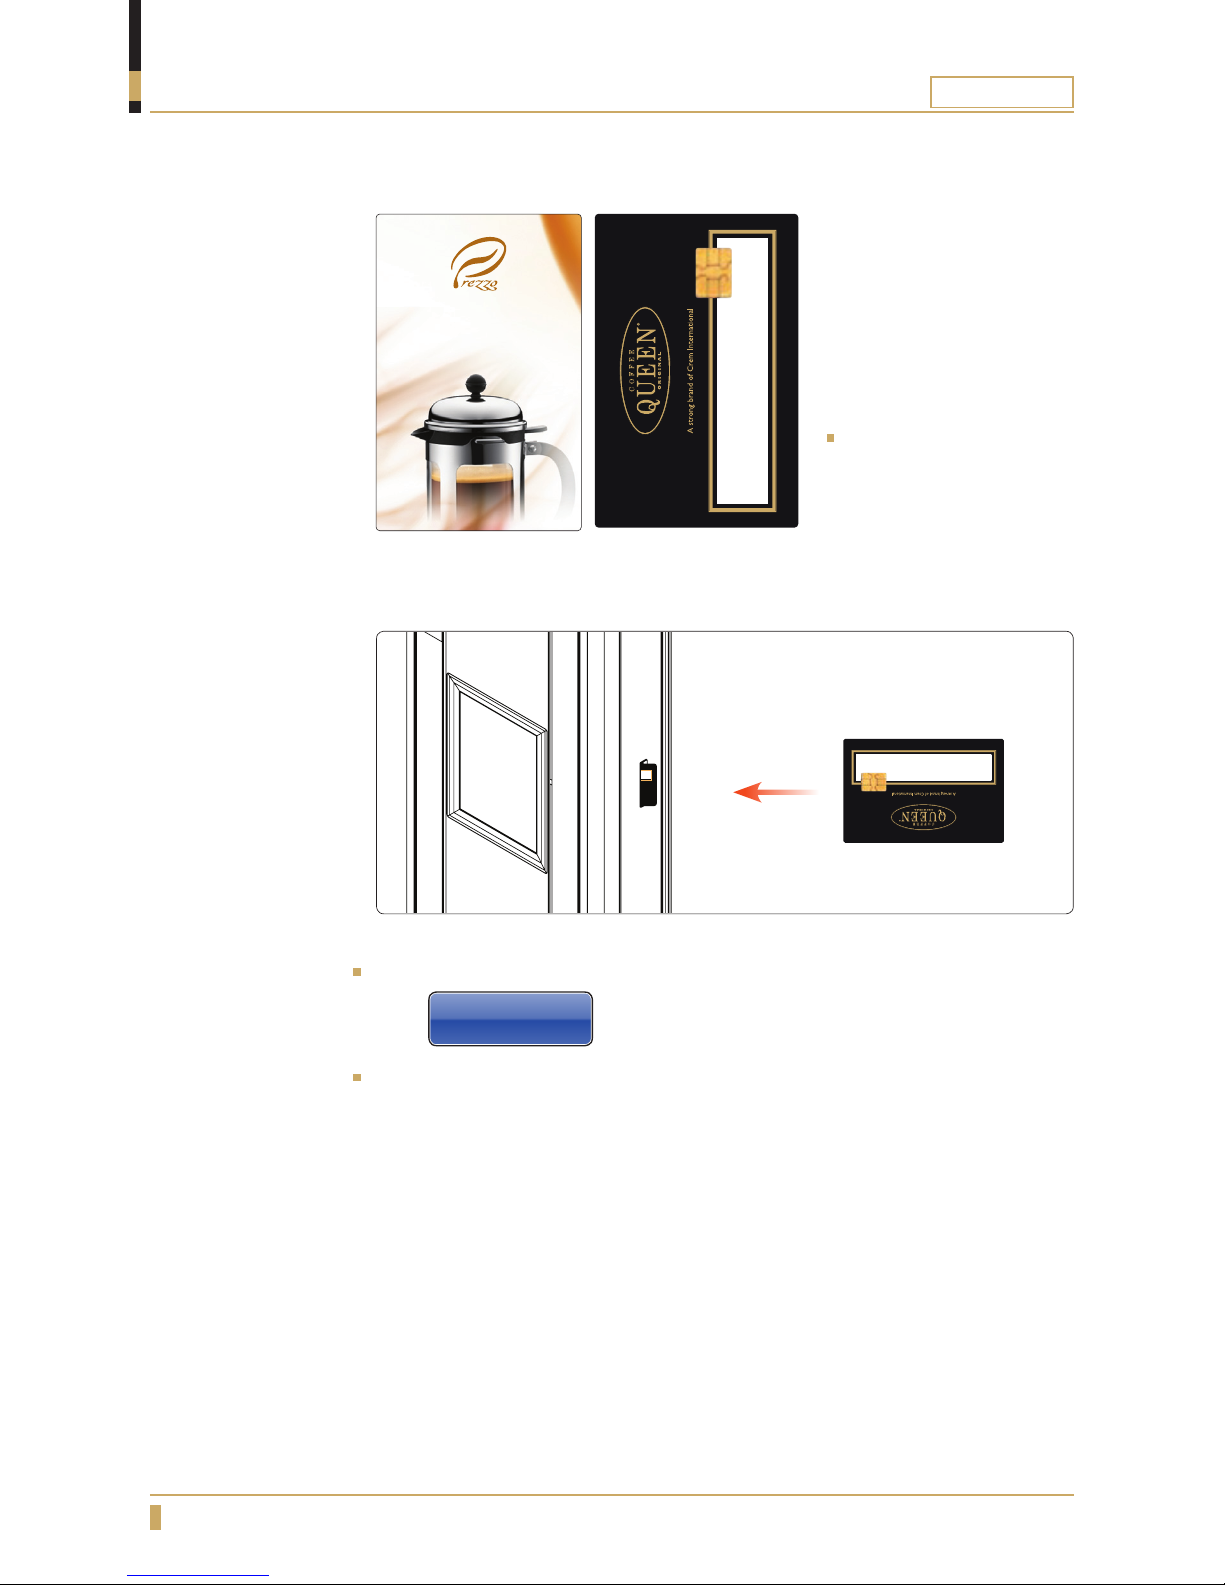
User card .............................................................................................................................................................................. 10
INSTALLATION AND START-UP ...................................................................................................................11
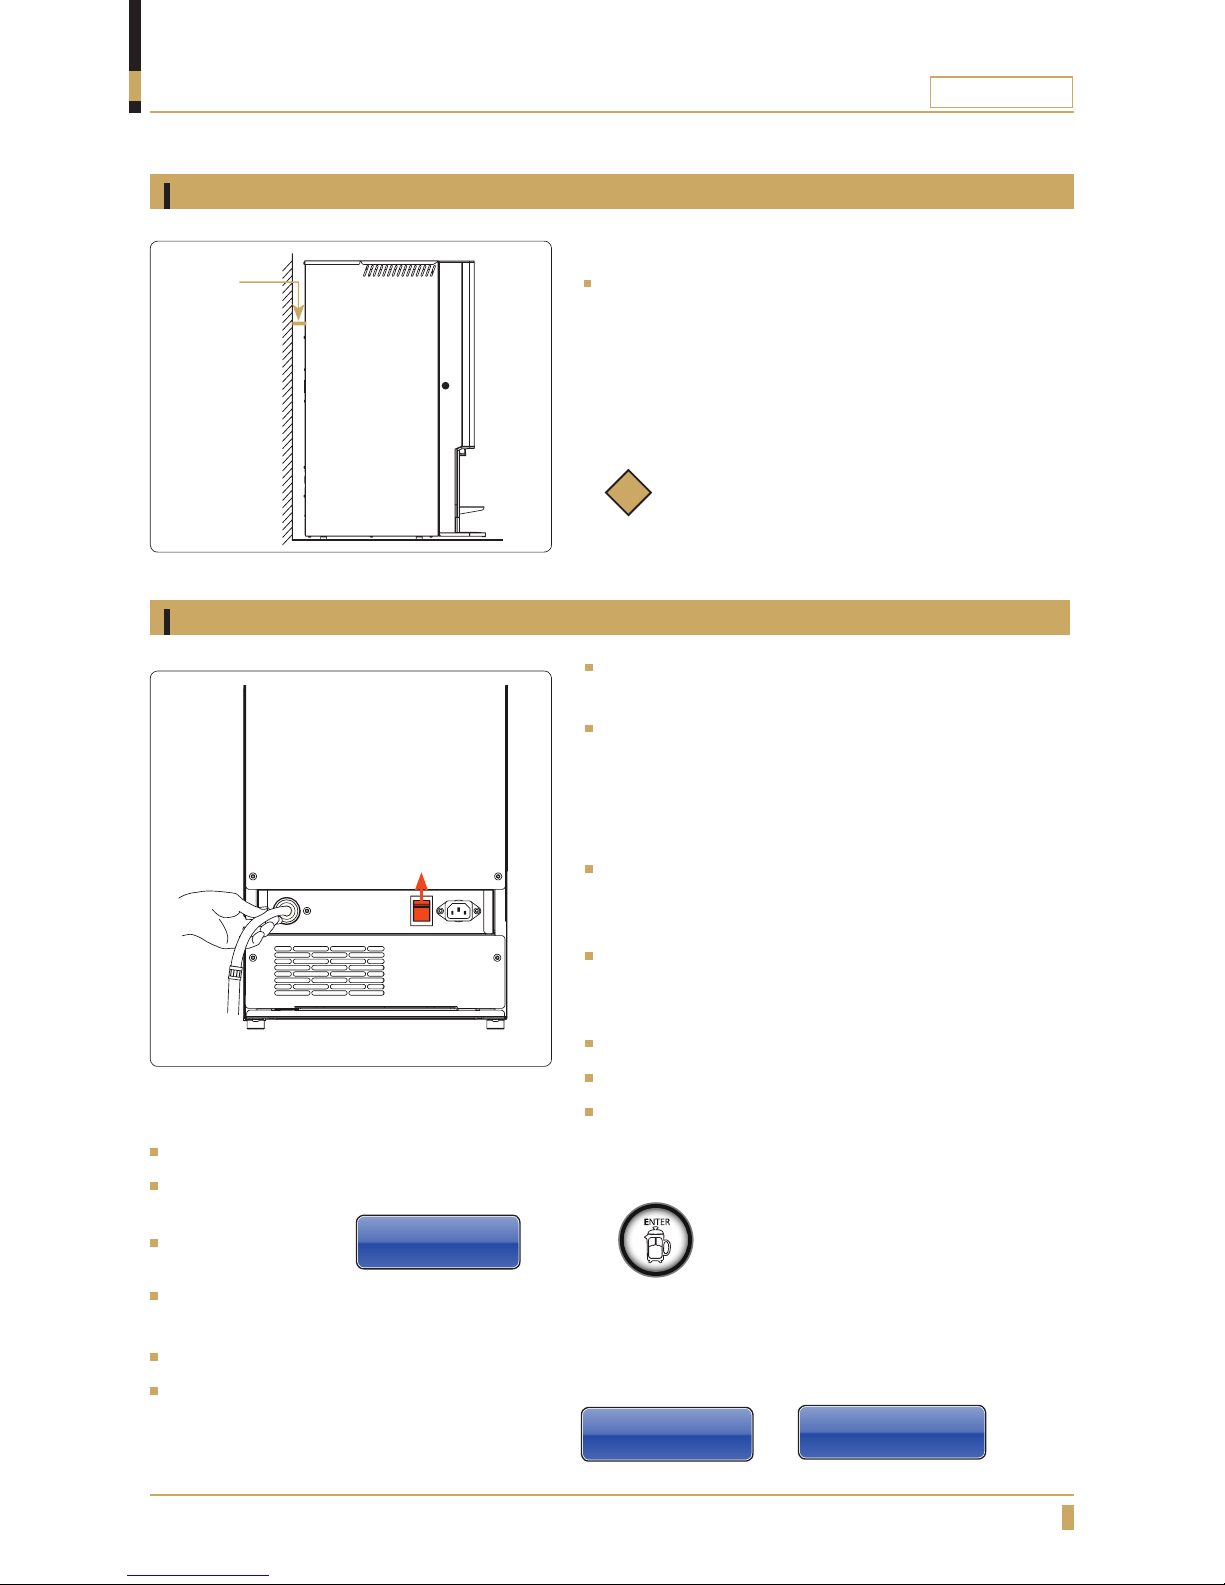
Positioning.............................................................................................................................................................................11
Machine startup procedure .............................................................................................................................................. 11
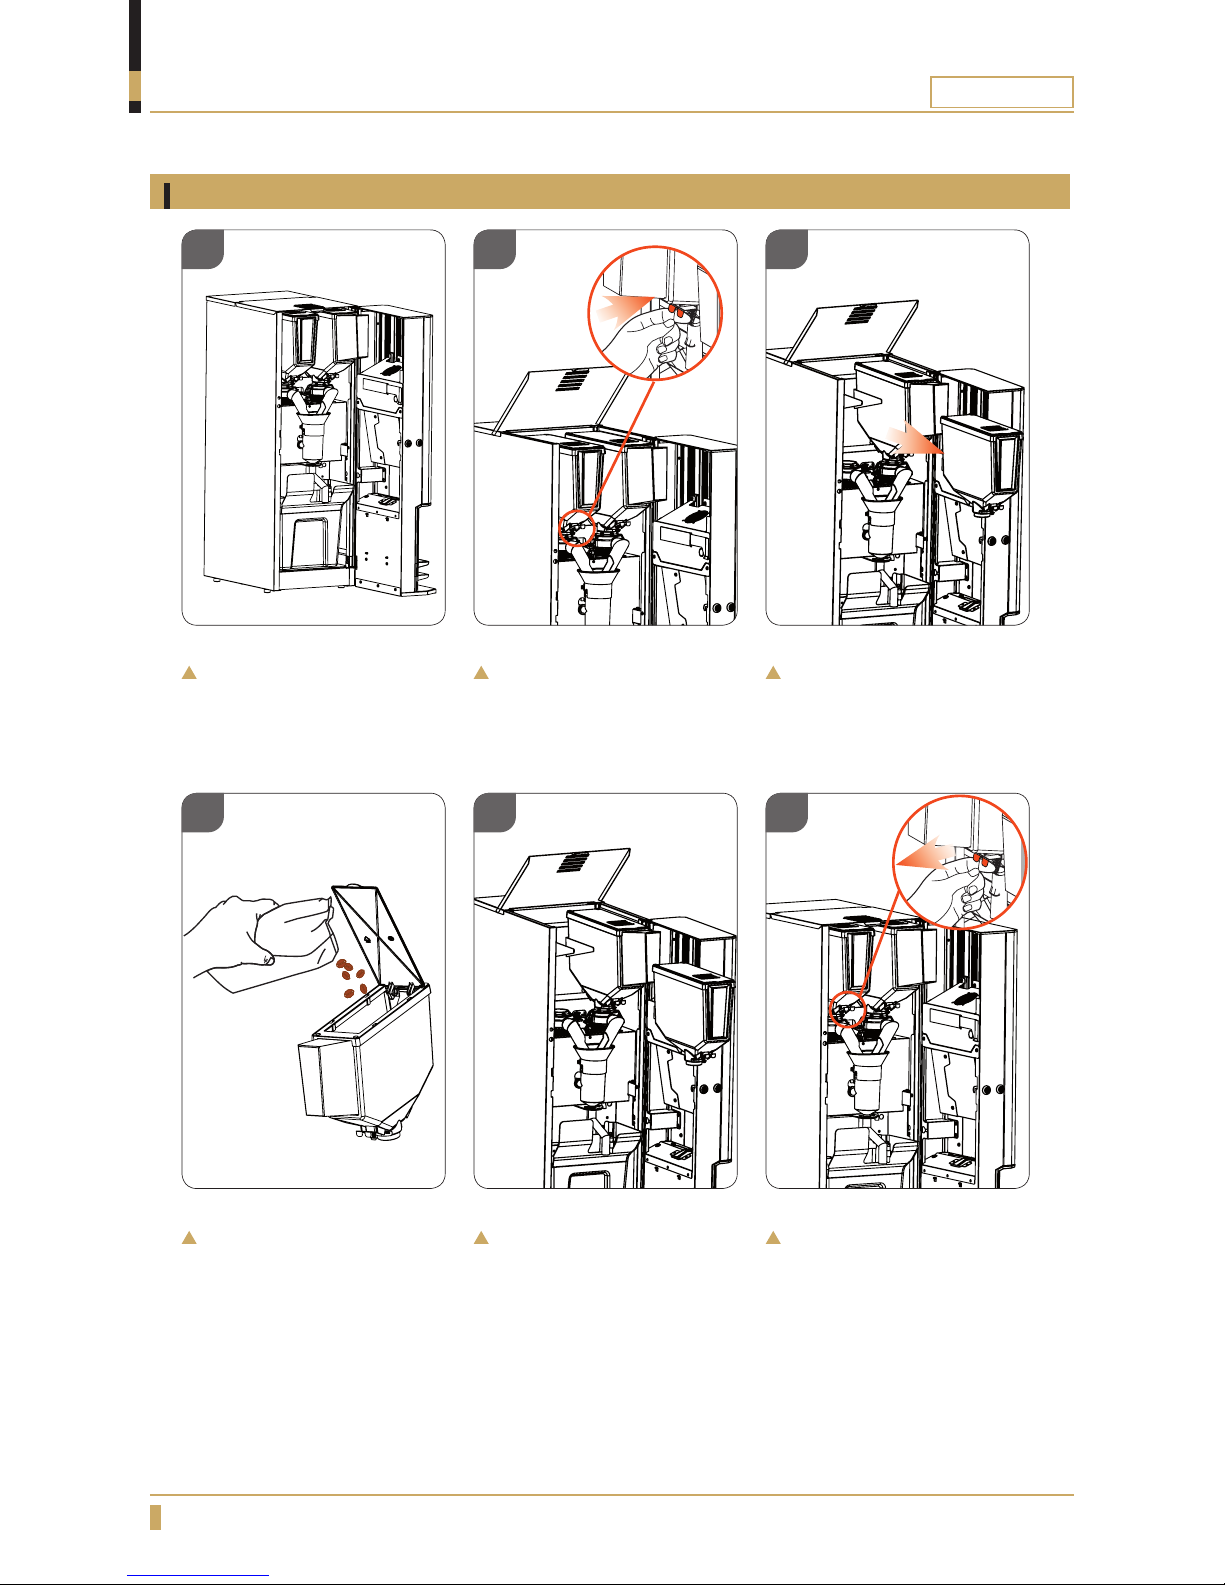
Fill bean hoppers ................................................................................................................................................................. 12
OPERATION ...............................................................................................................................................................13
Brewing a decanter of coffee............................................................................................................................................13
CLEANING PROGRAM ....................................................................................................................................... 14
Automatic rinsing of the mixing bowl ............................................................................................................................ 14
Automatic cleaning of dispenser valves ......................................................................................................................... 14
CLEANING AND CARE ......................................................................................................................................15
Weekly cleaning ................................................................................................................................................................... 15
Disassemble mixing system .............................................................................................................................................. 15
Reassemble mixing system .............................................................................................................................................. 15
Exterior cleaning ................................................................................................................................................................. 16
MESSAGE SHOWN ON DISPLAY ................................................................................................................17
PROGRAMMING .....................................................................................................................................................18
Activate programming with user card ............................................................................................................................18
Clean machine ..................................................................................................................................................................... 18
Counters ............................................................................................................................................................................... 19
Page 3
3
PREZZO
CONTENT
Beverage setup, Strength .................................................................................................................................................. 21
Beverage setup, Volume .....................................................................................................................................................22
Beverage setup, Drink Settings ........................................................................................................................................23
Beverage setup, Recipe Bank ........................................................................................................................................... 24
Beverage setup, Enable Beverage .................................................................................................................................... 25
Drink setup.......................................................................................................................................................................... 26
DIMENSION SKETCH .......................................................................................................................................... 27
Page 4
4
PREZZO
SYMBOL DESCRIPTION
Hazard intensity levels
There are three different levels of hazard intensity, identified by signal words DANGER, WARNING
and IMPORTANT. The level of hazard is determined by the following definitions.
Observe the statements to ensure safety, performance, prevent injury and machine damage.
Important:
Alerts against unsafe practices. Observe to ensure drink quality, machine performance, food
safety, to prevent minor personal injury or damage to the machine.
WARNING!
Indicates a potentially hazardous situation which, if not avoided, could result in scalding,
serious injury and even death.
DANGER!
INDICATES A IMMINENTLY HAZARDOUS SITUATION WHICH, IF NOT
AVOIDED, WILL RESULT IN SERIOUS INJURY AND EVEN DEATH.
Note:
Gives additional information which may be helpful during the cleaning procedure or
operation of the machine.
i
Page 5
5
PREZZO
GENERAL
Read the user guide before using the machine.
This guide contains important instructions for
proper and safe use of the vending machine.
Always keep this guide close at hand for future
reference.
Introduction
Thank you for choosing a PREZZO vending machine.
We hope you enjoy it !
Never immerse the machine, plug or mains
cable in water because there is a danger of
electric shock.
This appliance can be used by children aged
from 8 years and above and persons with
reduced physical, sensory or mental capabilities
or lack of experience and knowledge if they
have been given supervision or instruction
concerning use of the appliance in a safe way
and understand the hazards involved. Children
shall not play with the appliance. Cleaning and
user maintenance shall not be made by children
without supervision.
Children should be supervised to ensure they
do not play with the appliance.
Do not use the machine if the mains cable, plug
is damaged or the machine has fallen down.
If the mains cable is damaged it must be
replaced by the manufacturer, service agent or
similarly qualified persons in order to avoid a
hazard.
Only plug the machine into a properly installed
earthed safety socket whose line voltage
matches the technical data for the machine.
Do not use the machine outdoors so it can be
exposed to weather (rain, snow, frost). It will
cause material damage to the machine.
Do not try to open the machine or repair it in
any way. To avoid danger only have the machine
repaired in a technical workshop, Service
Centre or by a qualified person.
Remove the mains cable from the socket when
the machine is not in use for longer periods. To
do this, pull the plug not the cable.
This appliance must be placed in a horizontal
position which is resistant to any water that
may leak.
Place the machine out of the reach of children.
Position the mains cable so that people cannot
trip over it. Keep it away from sharp edges and
heat sources.
The new hose-sets supplied with this appliance
are to be used, old hose-sets must not be reused.
This appliance is not suitable for installation in
an area where a water jet could be used.
This appliance must not be cleaned by a water
jet.
This appliance is intended to be used in similar
applications such as:
- Staff kitchen areas in shops.
- Offices and other commercial working
environments.
- On agricultural estates.
- By clients in hotels, motels and other
residential type environments.
- Bed and breakfast type environments.
For the optimal performance of the machine
these parameters shall not be exceeded:
- Maximum permissible inlet water pressure :
800KPa (8Bar)
- Minimum permissible inlet water pressure:
200KPa (2Bar)
- Maximum working temperature: 40°ºC
- Minimum working temperature: 10°ºC
Warnings
Precautions
Intended use
Page 6
6
PREZZO
TECHNICAL SPECIFICATIONS
Facts & weight
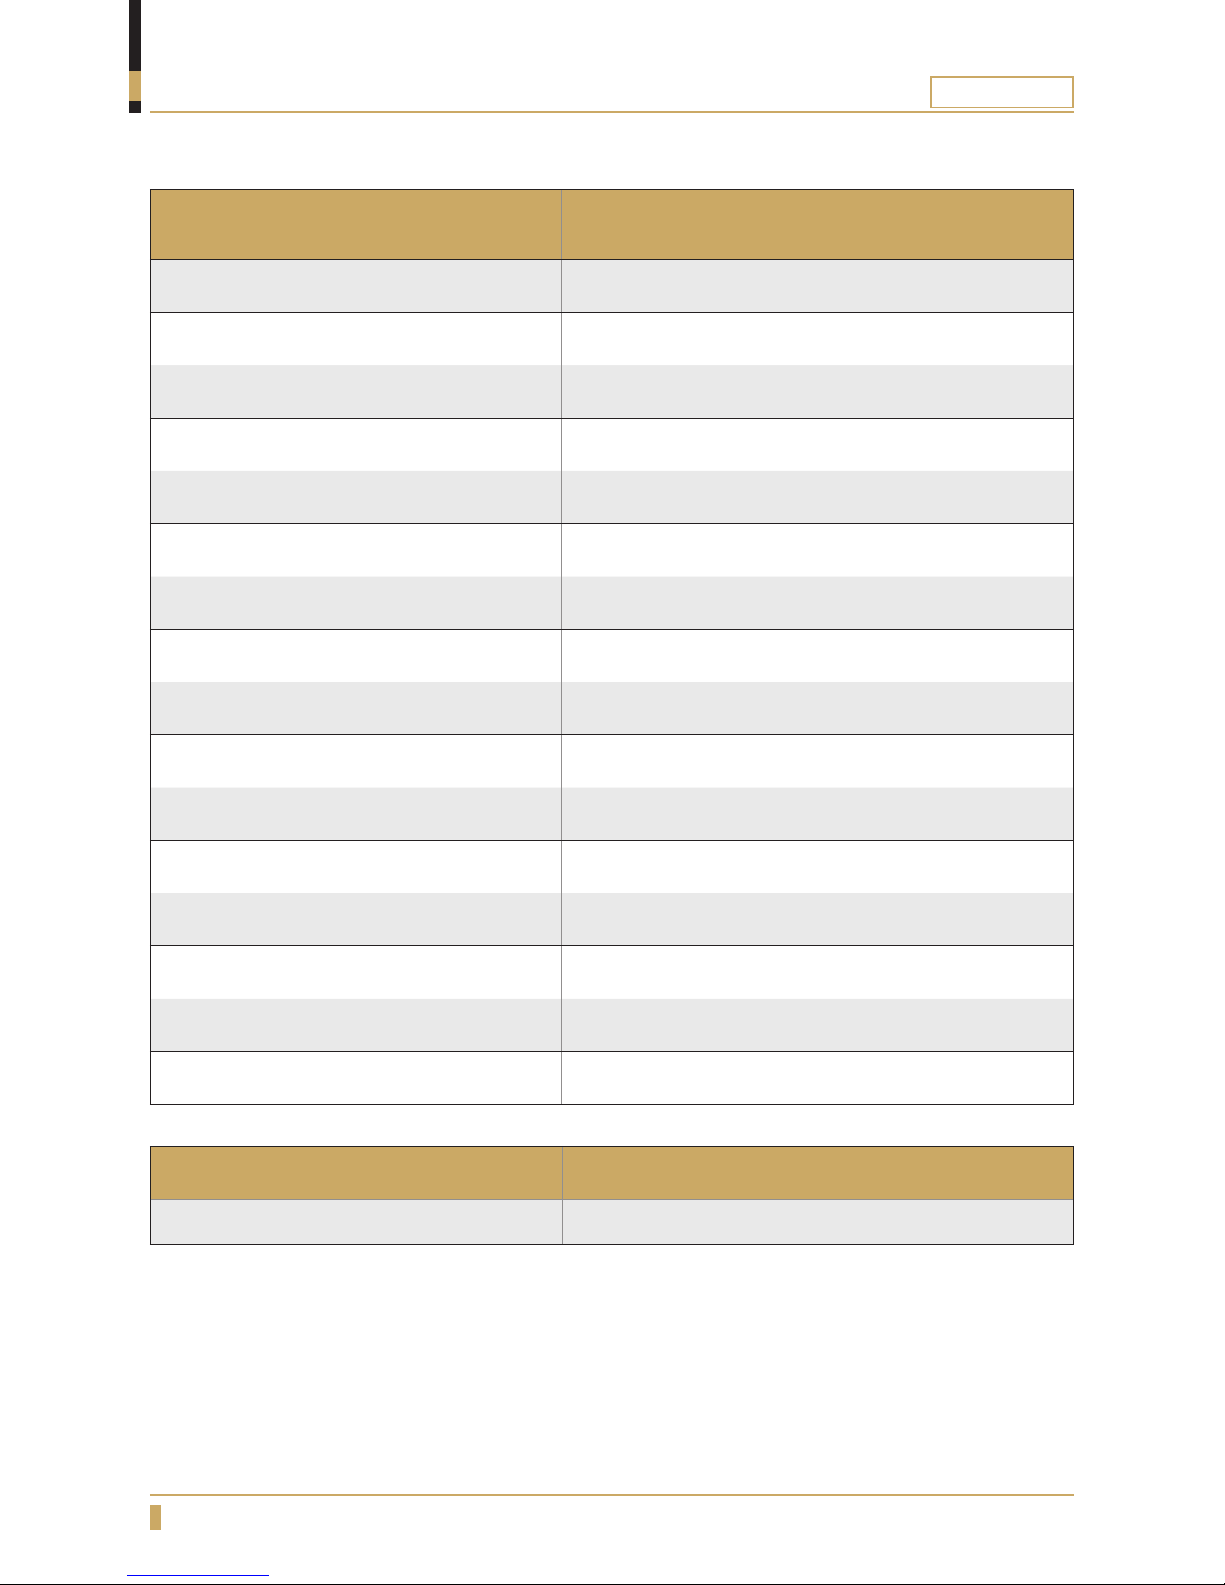
FACTS PREZZO
Built-in grinder
Ye s
Drink options
9
Ingredient canister
None
Bean hoppers
2
Brewing mechanism
None
Cleaning function by smart card
Ye s
Electronic temperature control
Ye s
Adjustable coffee strength
Ye s
Illumination of cup during brewing
Ye s
Base cabinet: large grounds container
None
Energy saving mode
Ye s
Height, Width, Depth
865, 290, 532mm
Tank volume
5 Litres
Power supply
380VAC, 50/60Hz/6600W
Cold water connection
½” External thread
Water purication lter
Option
MODEL/NAME WEIGHT
PREZZO
40kg
Page 7
7
PREZZO
OVERVIEW OF COMPONENTS
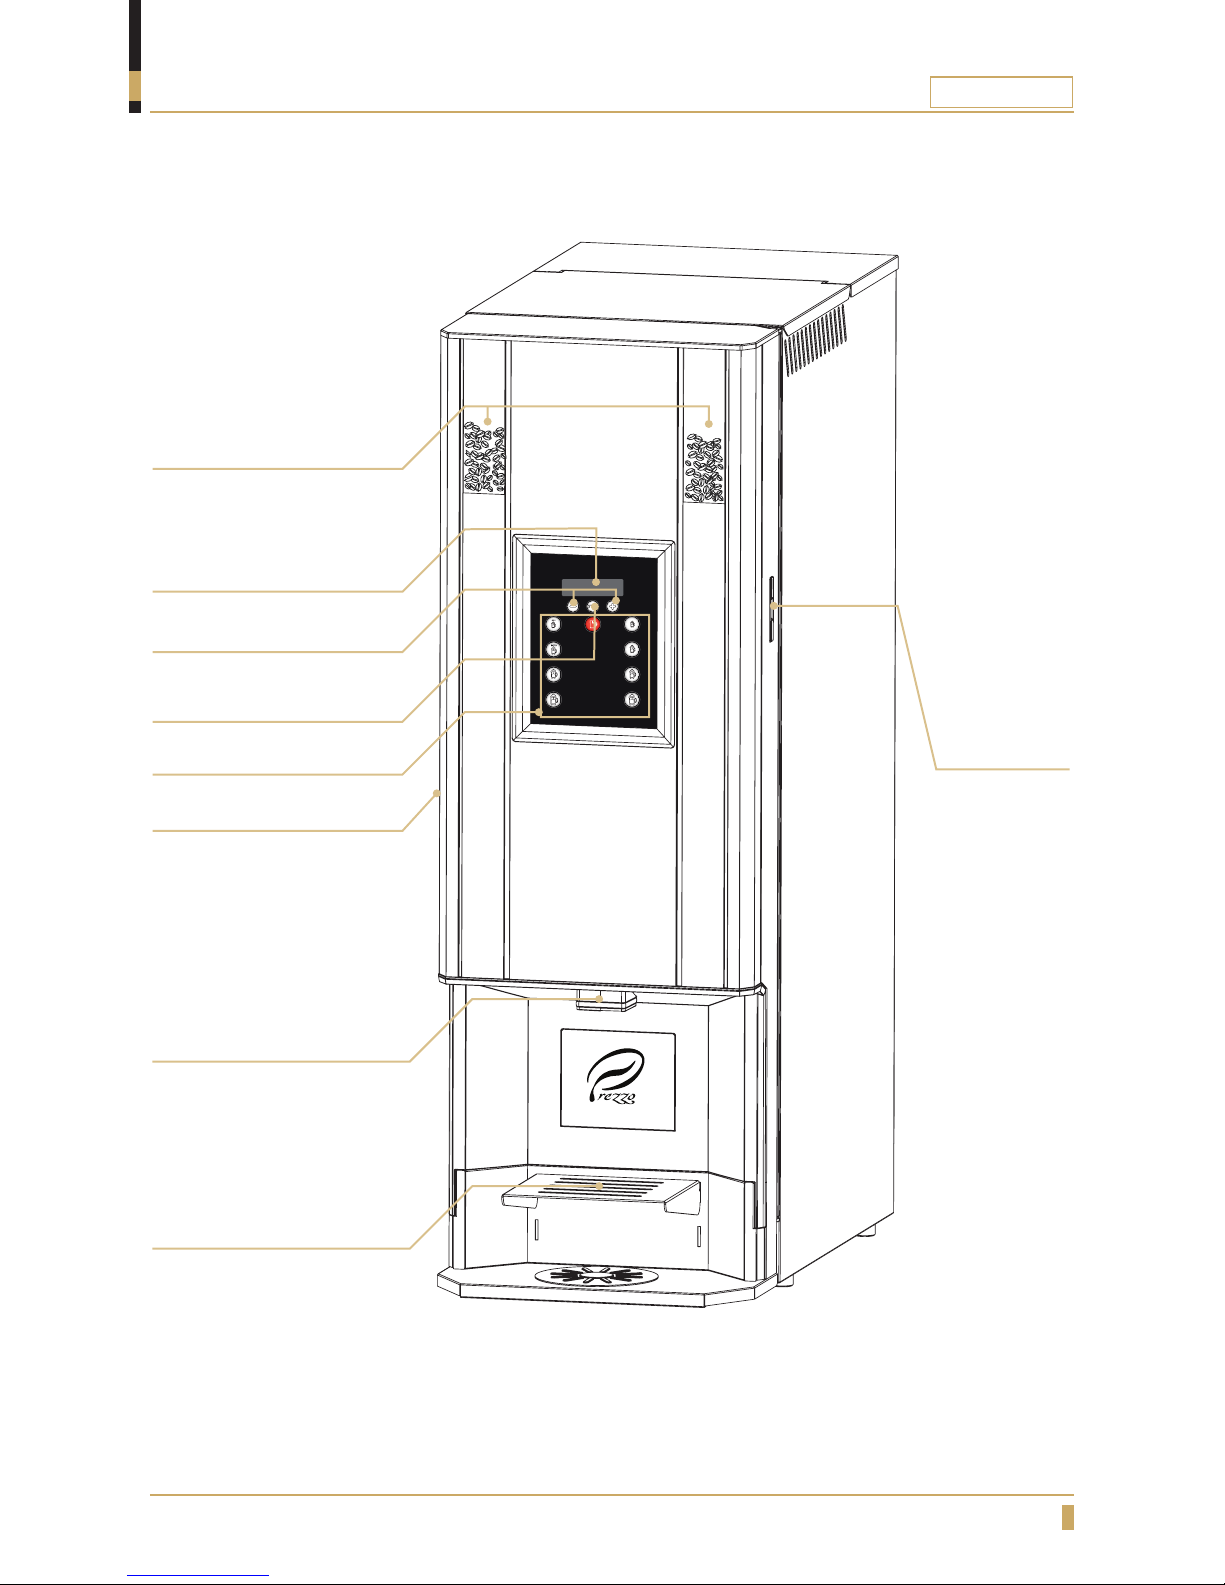
Front
Bean Hopper
Display
Strength Adjustment
Stop Energy Saving Mode
Drink Menu
Door Lock
Outlet Hot Drinks
Decanter Tray
Smart Card
Reader
Page 8
8
PREZZO
OVERVIEW OF COMPONENTS
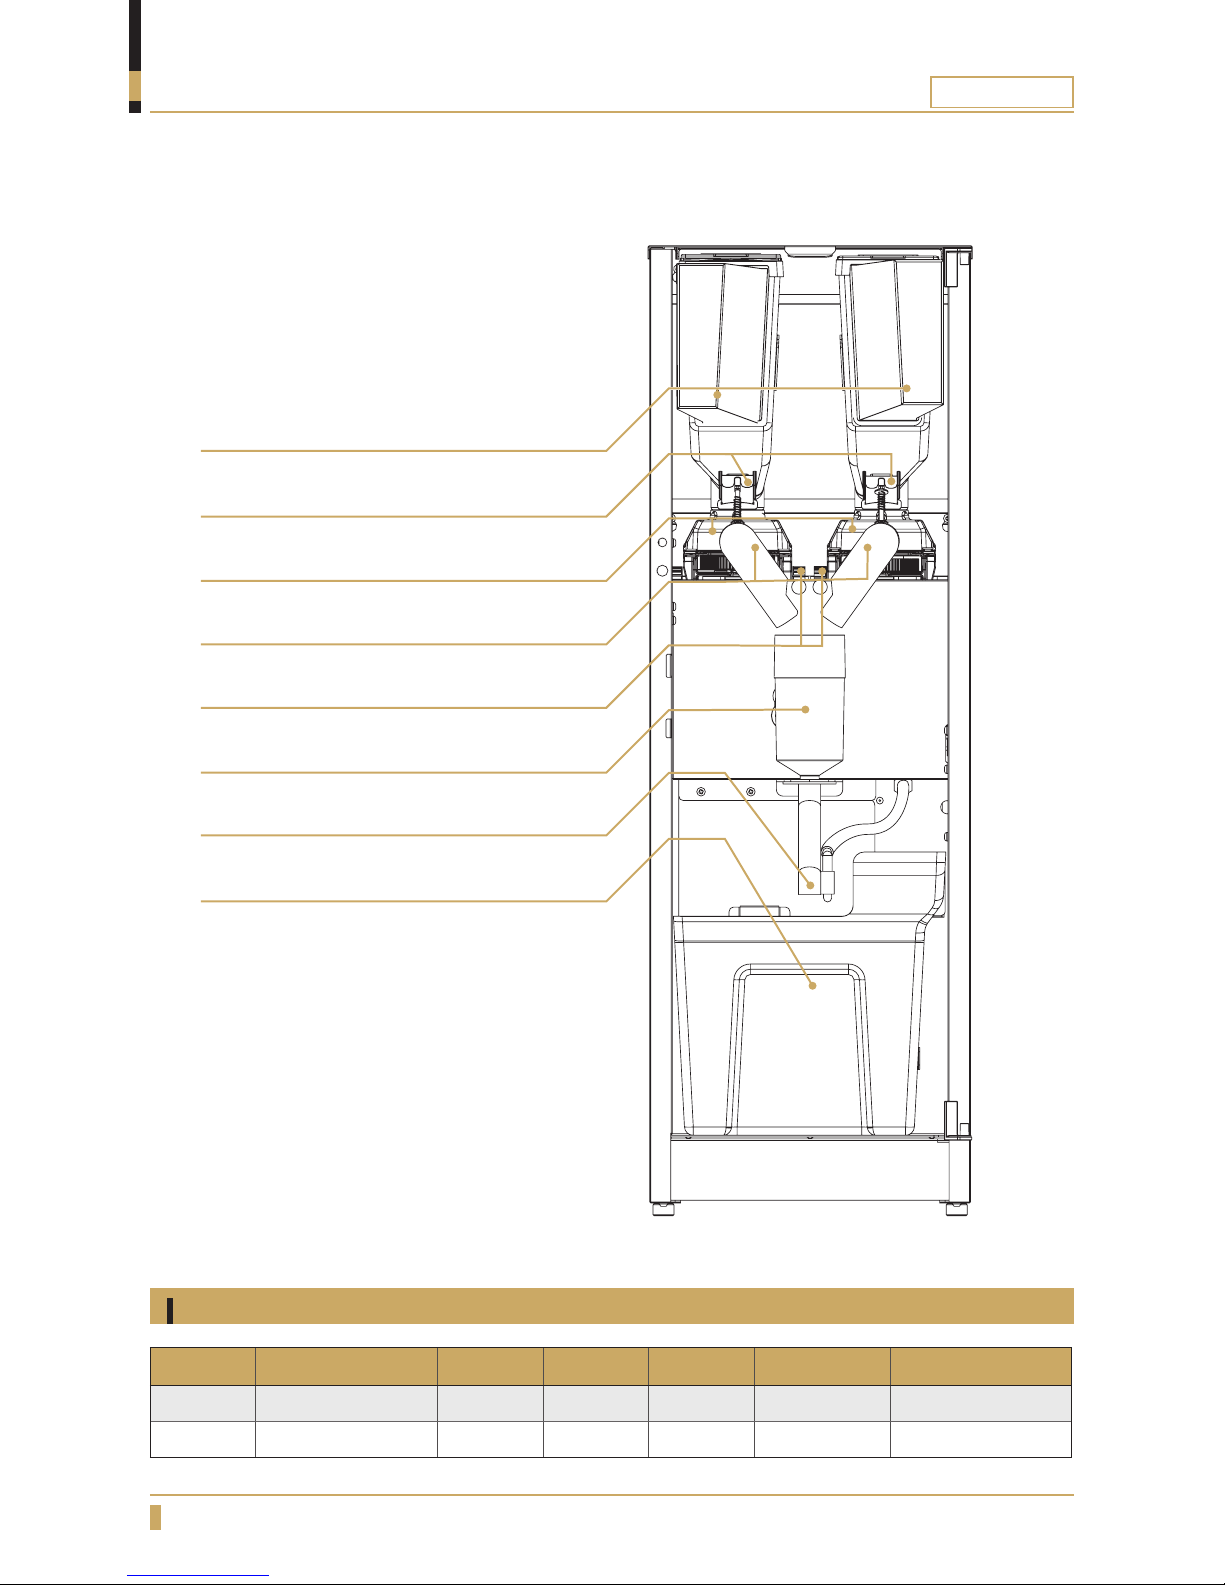
Interior
Bean Hopper
Bean Stop
Grinder
Grinder Outlet
Grinder Adjustment Wheel
Mixing bowl
Drink Outlet
Waste Box
Ingredient canisters
DETAIL INGREDIENTS WIDTH DEPTH HEIGHT CAPACITY DECANTERS
Hopper
Beans ---- ---- ---- 1.25kg ~20-65
Hopper
Beans ---- ---- ---- 1.25kg ~20-65
Page 9
9
PREZZO
OVERVIEW OF COMPONENTS
Membrane switch navigation
Button functions
Press the BACK button if you want to leave the submenu and go back in the
menu.
Press the ENTER button to select a menu function, confirm a set value or a
setting.
Press the MINUS button if you want to decrease a value or go back in the menu.
Press the STOP button if you want to return to the start menu.
To activate energy saving mode press and hold the STOP button for 5 seconds.
Display will show Energy Saving Mode.
You can abort decanter process by pressing STOP.
To return to normal mode press and hold the STOP button for 5 seconds while
the machine is in energy saving mode.
Press the PLUS button if you want to increase a value or go forward in the
menu.
The machine switches off the front display and decreases the
temperature in the water tank to 650C .
ENERGY SAVING MODE
Page 10
10
PREZZO
OVERVIEW OF COMPONENTS
User card
Insert the user card with the chip upwards as in the figure above. The display will
show
Service Menu
Clean Machine
and you can now browse forwards through the menu.
To use the machine again remove the user card and store it in a safe place.
User card
Is used for cleaning of
the machine. User card
is supplied by your
dealer.
Front Back
PREZZO
USER CARD
Page 11
11
PREZZO
Place the machine on a flat horizontal surface that will
support the weight of the machine.
Connect the water to the top cabinet on the
machine.
Connect the supplied water hose to the cold water
connection using a ½’’ R-connection. When pushing
the machine into position make sure there is no
interference to the hose to ensure proper water
flow.
If the inlet hose is new, flush the system with water
first to remove copper shavings. These can damage
the inlet valve.
The new tube set supplied with the appliance must be
used. Old tubes may not be re-used. Connection to a
closable valve is recommended.
Min. water pressure: 2 bar (200kPa).
Max. water pressure: 8 bar (800kPa).
Open the water tap.
Note:
Make sure air is able to circulate behind the
machine (minimum 10cm).
INSTALLATION AND START-UP
Positioning
Machine startup procedure
Min.10cm
Switch
Connect the mains cable to the machine (A) and insert the plug to a earthed wall socket.
Switch on the power switch on the rear of the machine. See figure.
The display indicates
Low Water Level
Press Enter Key
Press the button.
The water tank will now automatically fill with 5 litres of water. The element will not be powered on
until the water reaches the level sensor.
Set temperature is 90ºC.
Once the water heating is complete “Low temp” text will disappear from the display. (The display text
will start to rotate between these two screens
PREZZO COFFEE
and
SELECT PRODUCT
).
A
i
Page 12
12
PREZZO
INSTALLATION AND START-UP
Fill bean hoppers
Remove the bean hoppers
from the machine.
Pull out the bean stops (C)
on the bean hoppers to
open to allow the beans to
again flow into the grinders.
Close the machine lid
then close the door. The
machine is now ready to
use.
Raise the machine lid (A).
Push in the bean stops
on the bean hoppers to
prevent bean spillage (B).
Replace the hoppers back
into the machine.
Open the machine door.
Refill the hoppers with
fresh roasted coffee beans.
01
04
02
05
03
06
B
C
A
Page 13
13
PREZZO
OPERATION
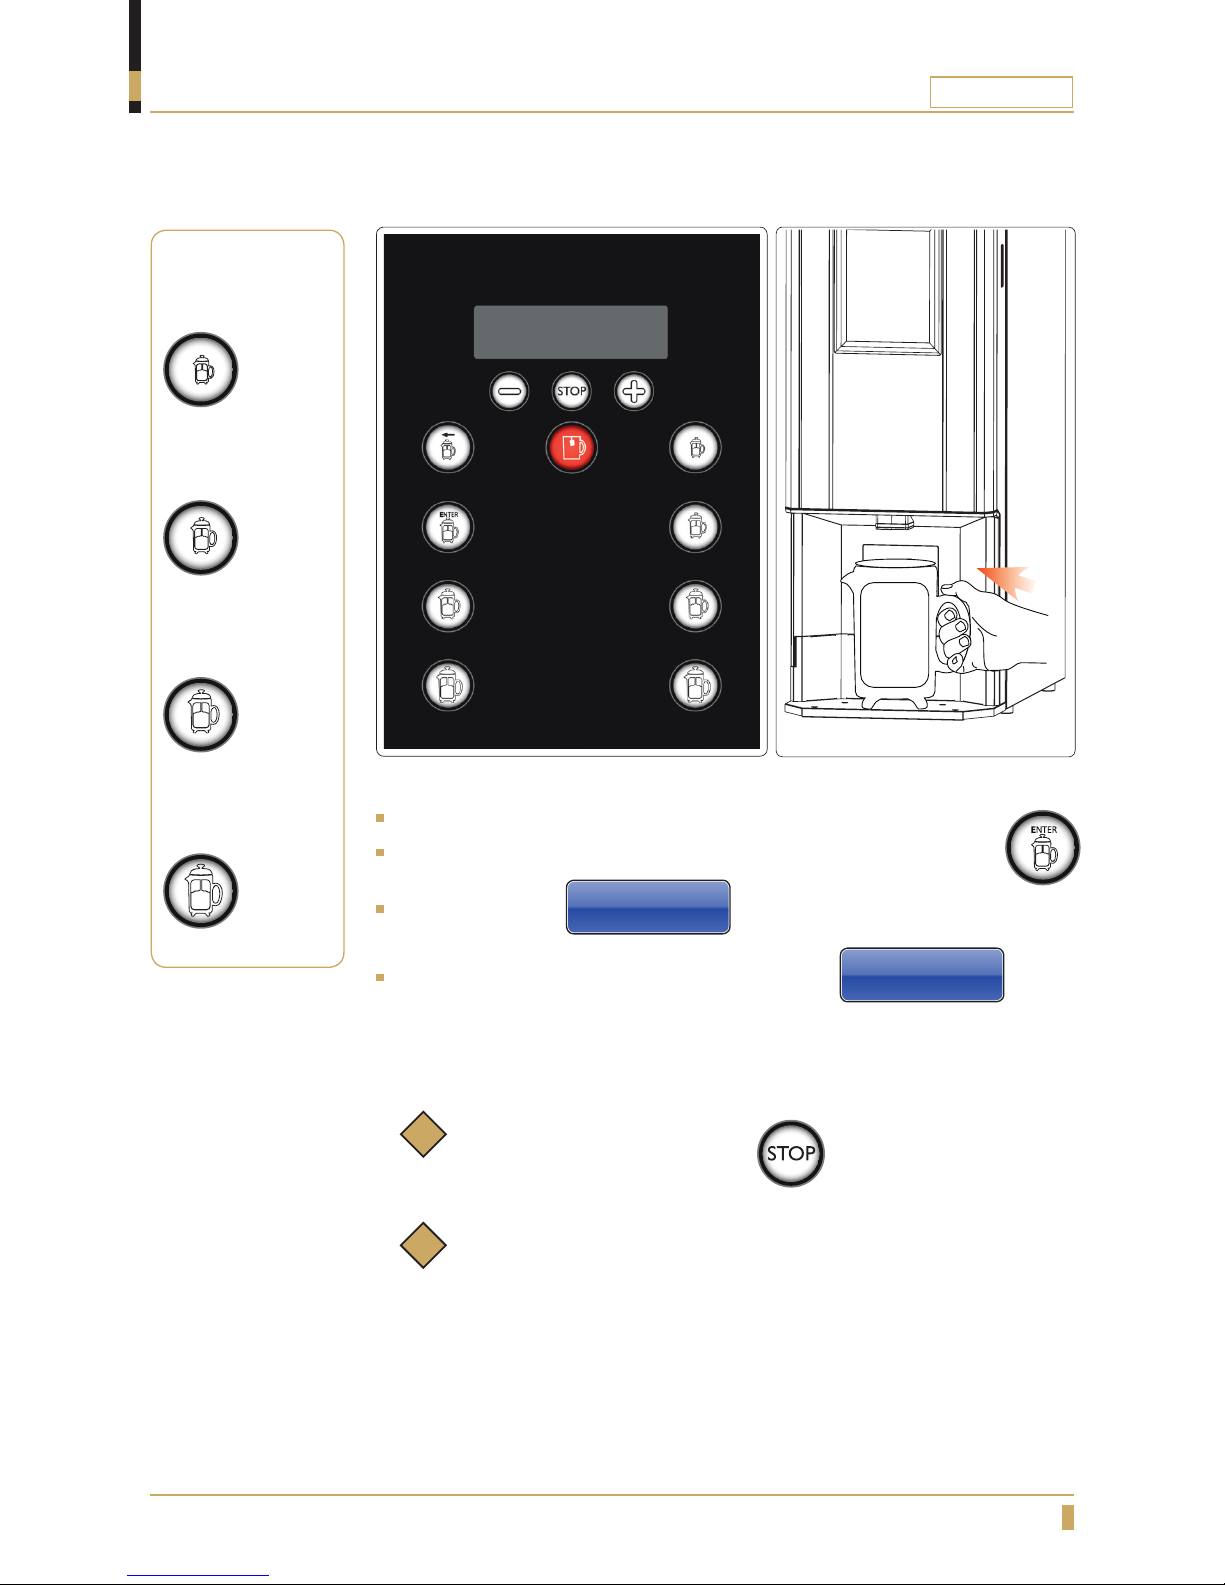
Brewing a decanter of coffee
Place a decanter under the outlet for hot drinks.
Select desired size by pressing any of these different decanter buttons .
The display shows:
Please wait...
The brewing starts and brew lamp is
turned on.
Wait until the brew lamp switches off and the text
Please wait...
has
disappeared from the display before removing the decanter.
Factory Settings
.........................................
Small Decanter
=250ml
~19g beans
.........................................
Medium Decanter
=500ml
~30g beans
.........................................
Large Decanter
=750ml
~45g beans
.........................................
Grand Decanter
=1000ml
~60g beans
Note:
To abort a brewing you can press button at any time.
Note:
The buttons to the left will use beans from left bean hopper.
The buttons to the right will use beans from right bean hopper.
i
i
Page 14
14
PREZZO
CLEANING PROGRAM
Note:
Cleaning means rinsing the mixing bowl with water.
Cleaning of the mixing bowl should be performed once per day.
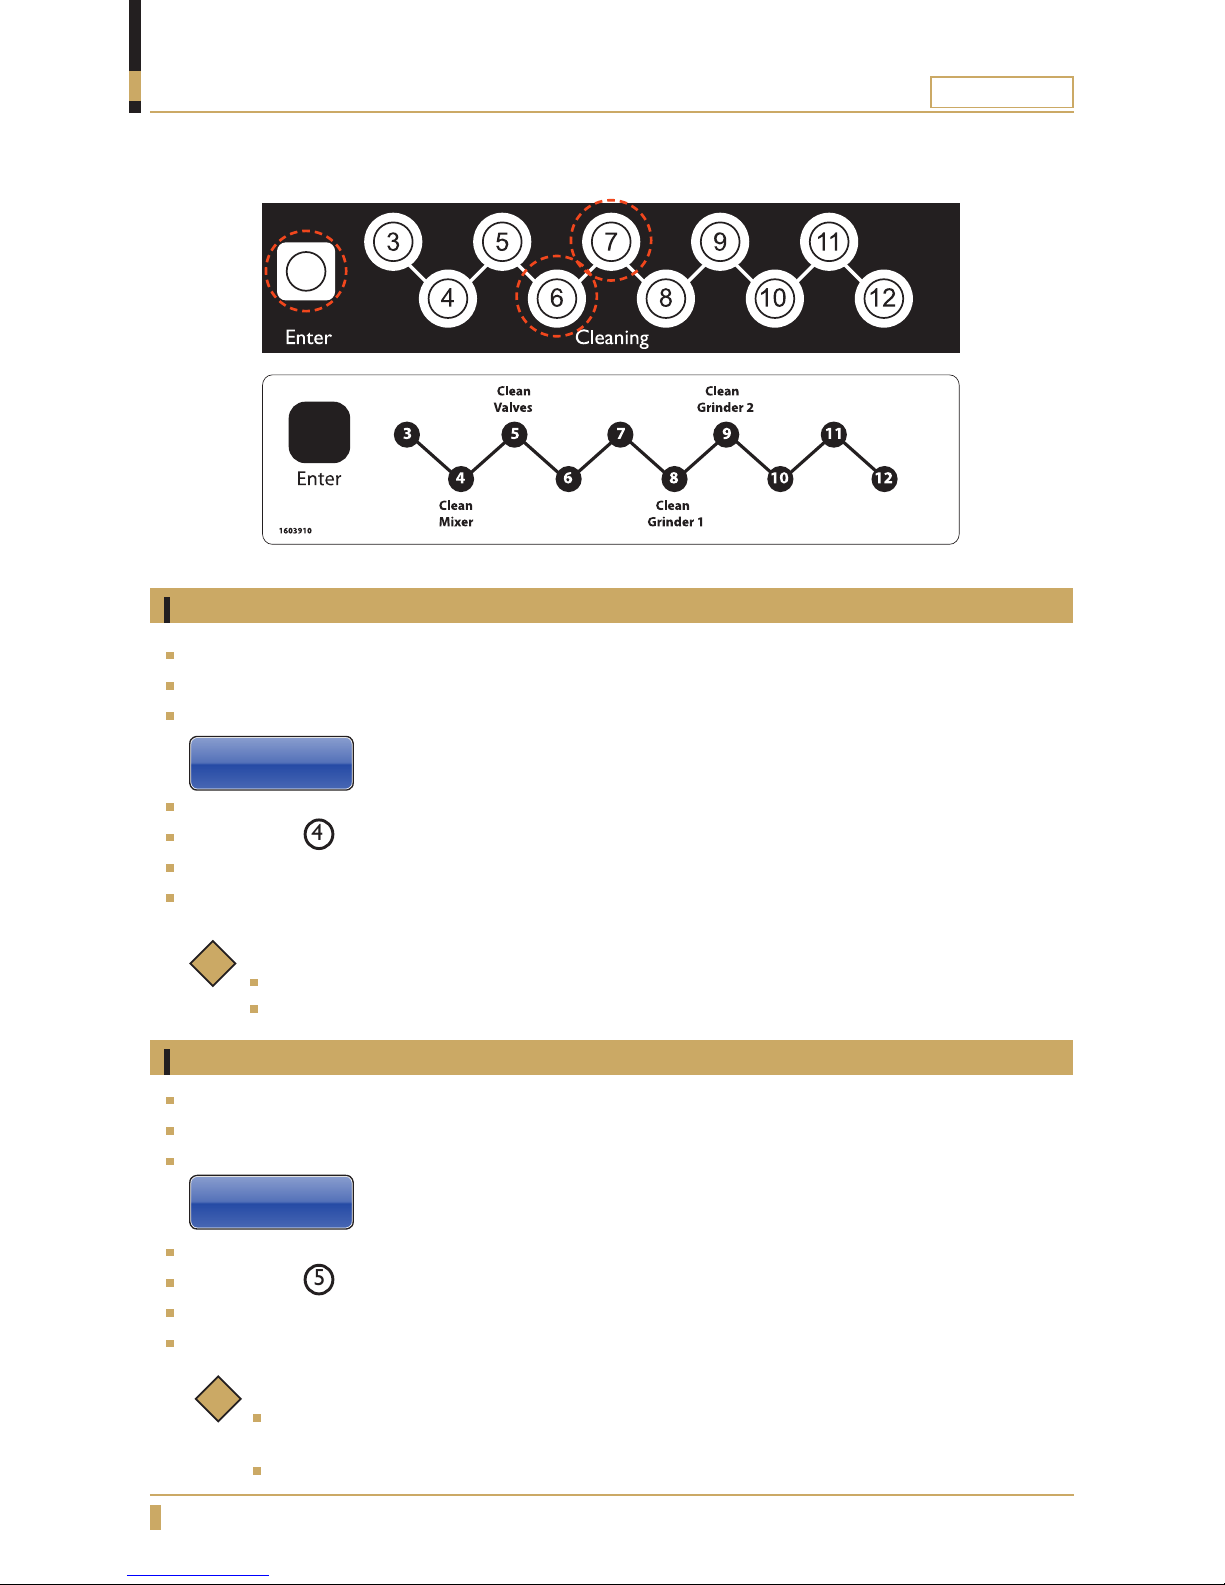
Cleaning panel
Automatic cleaning
Automatic rinsing of the mixing bowl
Open the door.
Press ENTER on the cleaning panel inside the door. (See Fig. A)
Cleaning Hot key appears on the display (cleaning panel is now active), the display shows:
Cleaning hot key
Put a container that holds at least 0.5 litres under the outlet for hot drinks.
Press button 4 (See Fig. B) on the cleaning panel.
The machine will now clean the mixing bowl for 5 seconds.
Close the door to exit cleaning mode and return to normal mode.
A
B
Automatic cleaning of dispenser valves
Open the door.
Press ENTER on the cleaning panel inside the door. (See Fig. A)
Cleaning Hot key appears on the display (Cleaning panel is now active). the display shows:
Cleaning hot key
Put a container that holds at least 0.5 litres under the outlet for hot drinks.
Press button 5 (See Fig. C) on the cleaning panel.
The machine will now clean the dispenser valves for 5 seconds.
Close the door to exit cleaning mode and return to normal mode.
Note:
Cleaning entails that the valves “knock” off any lime scale and other particles that may get
stuck in the cylinders and flushing them with water.
Repeat the cleaning procedures 2-3 times to get a better cleaning effect.
C
i
i
Page 15
15
PREZZO
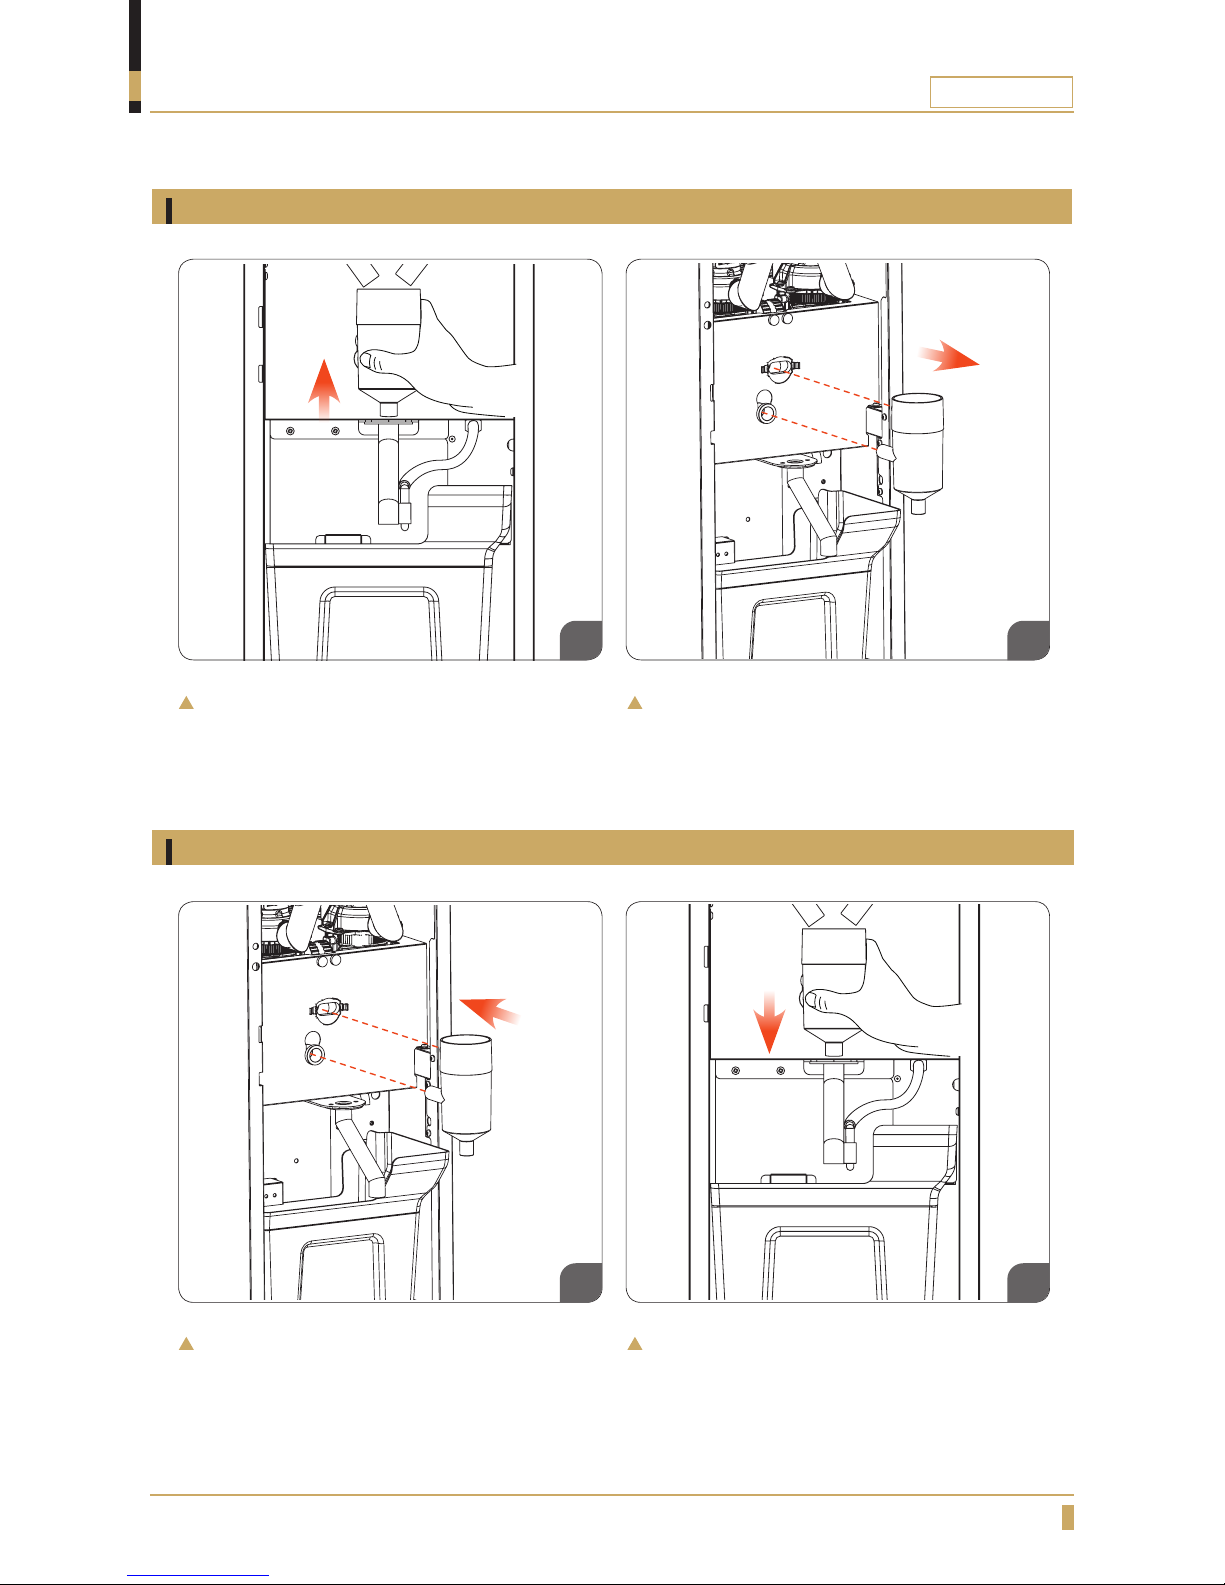
Disassemble mixing system
Weekly cleaning
CLEANING AND CARE
Lift up the mixer bowl so it detaches from the
outlet.
Push-fit the mixing bowl by pushing it as far in
as possible.
Pull the mixer bowl straight out, then clean
these parts.
Press down the mixer bowl as far as possible
into the outlet.
01
01
02
02
Reassemble mixing system
Page 16
16
PREZZO
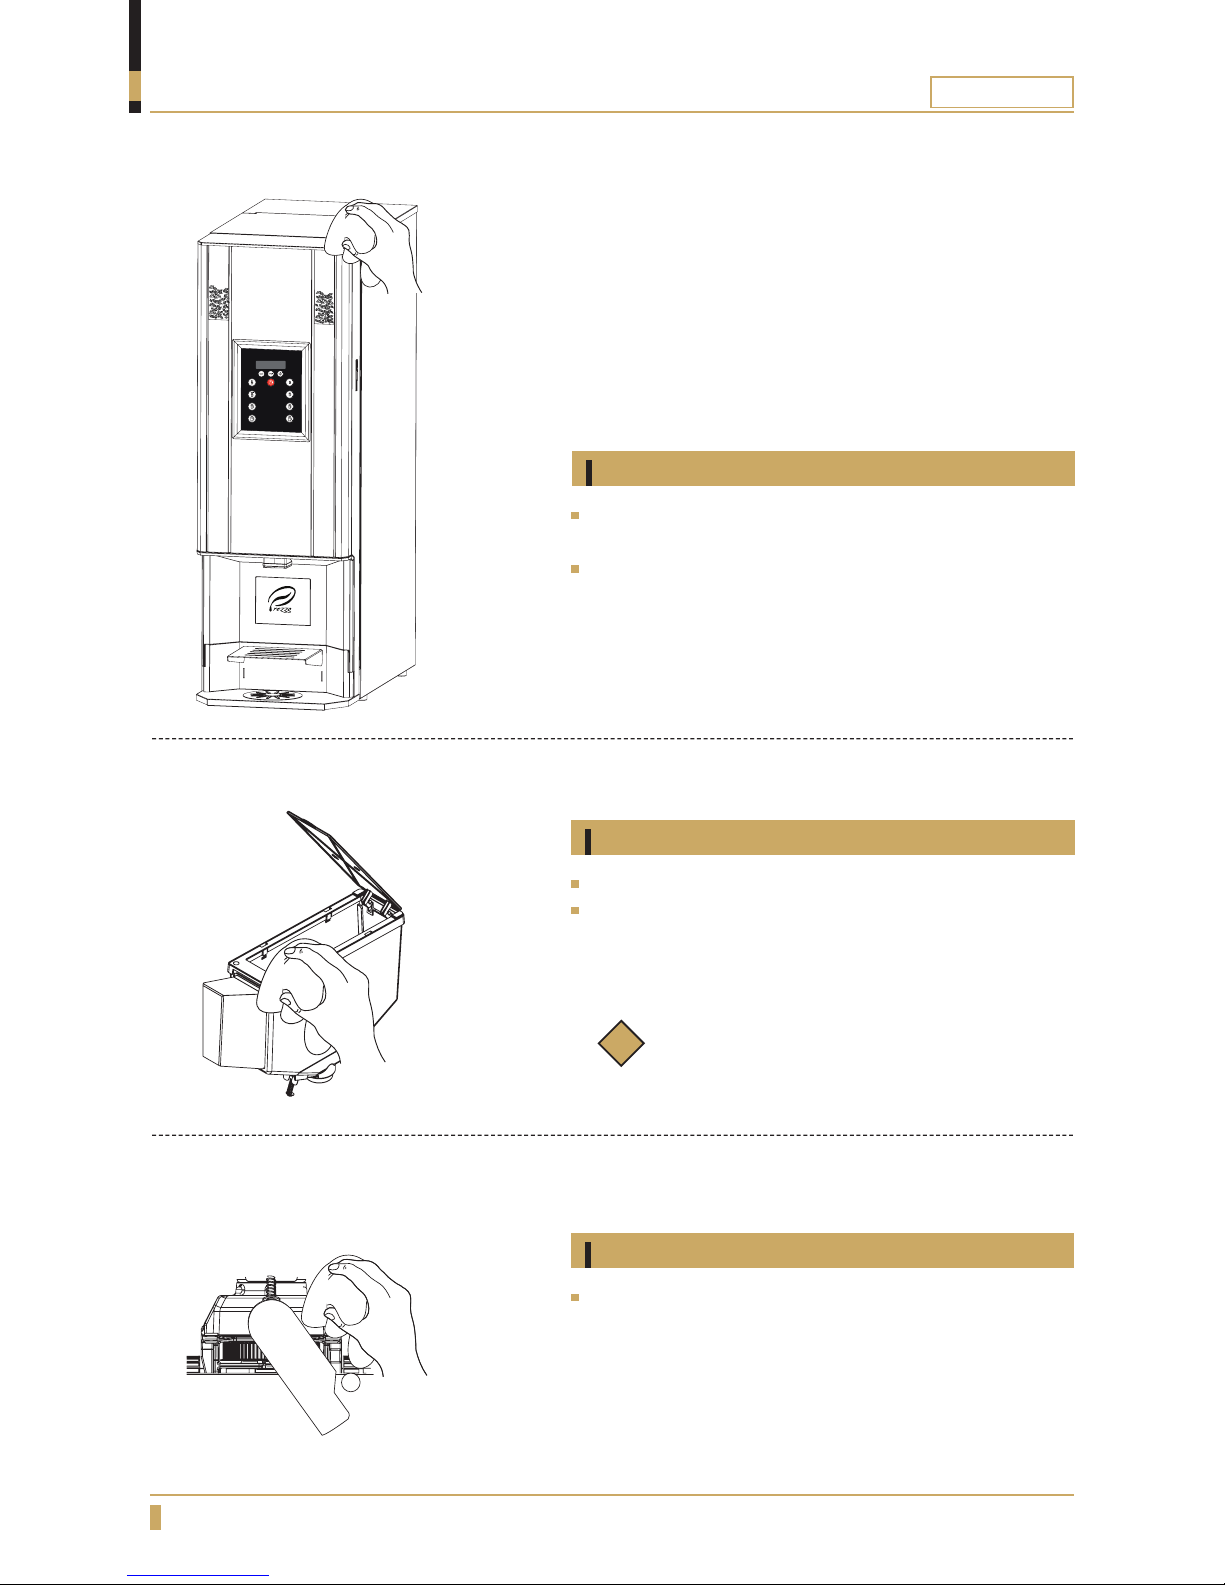
Exterior cleaning
CLEANING AND CARE
Exterior cleaning when necessary
Clean the bean hopper
Clean the grinder
To clean the exterior of the machine, use a soft cloth
and liquid cleaning agent that is non-abrasive.
If using a machine equipped with touch display do not
spray cleaning liquid directly on the display. Use only
LCD screen cleaner designed for touch display cleaning.
Cleaning of the grinder shall be performed once per
month in conjunction with technical maintenance.
Close the bean stop.
Lift the bean hopper up to remove it. Use a soft cloth
and liquid cleaning agent that is non-abrasive.
Note:
Ensure that the bean hopper is completely dry
before refitting.
i
Page 17
17
PREZZO
MESSAGE SHOWN ON DISPLAY
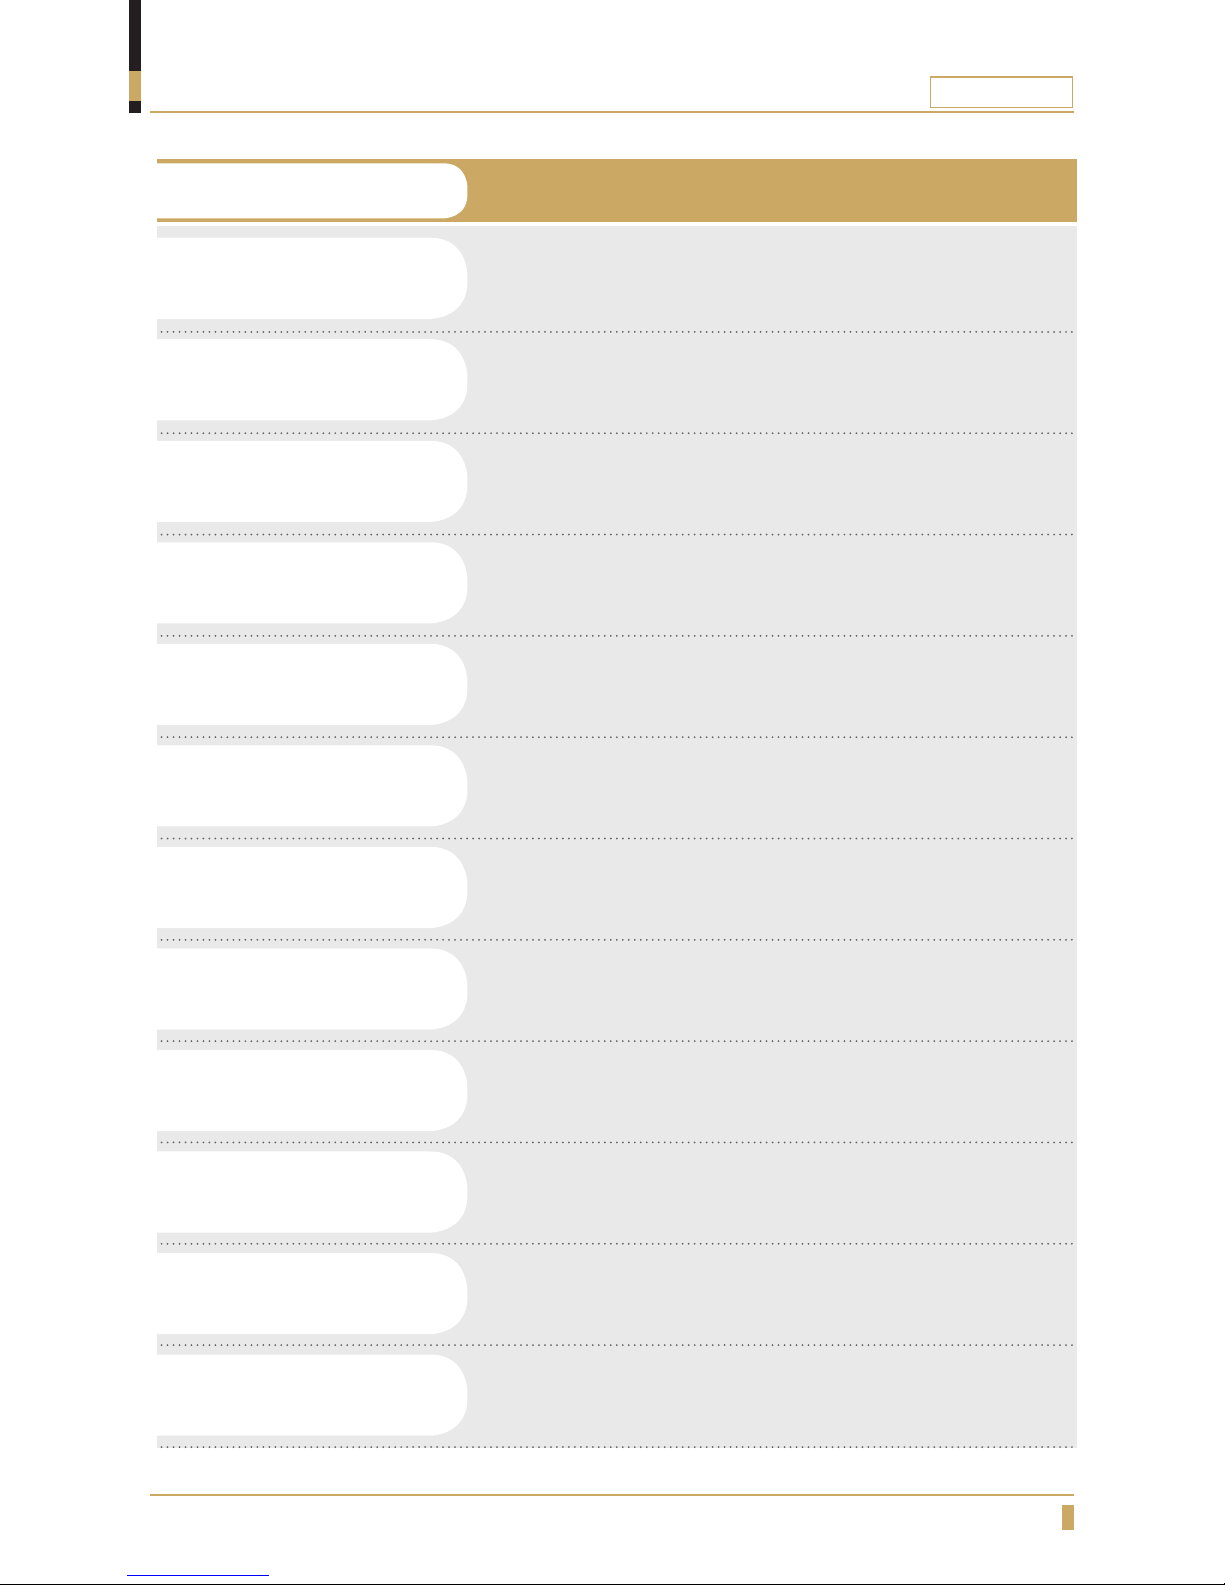
Message On Display
Indication
The machine is in energy saving mode.
Drink can not be selected as decanter.
Low temperature in the water tank, the machine is heating up
(blocked).
Low water level in water tank. Press enter key to start filling up
the water tank.
The machine is filling water.
Temperature is low, It is still possible to dispense drink.
Temperature is low, the machine is blocked.
The water level in the water tank is low, it is not possible to
dispense drink.
The water has not reached the correct level in the water tank,
check the water inlet hose, restart the machine.
The drink has been disabled.
The door is open.
The water filter needs replacing, press the button E to reset the
counter.
Energy Saving Mode
Not Available
Heating Water
Please Wait...
Low Water Level
Press Enter Key
Filling Water
Please Wait...
Warning
Low Temperature
Low temperature
Blocked
Low Water Level
Blocked
Check
Water Supply
Bev. Disabled
Door Open
Change
Water Filter
Page 18
18
PREZZO
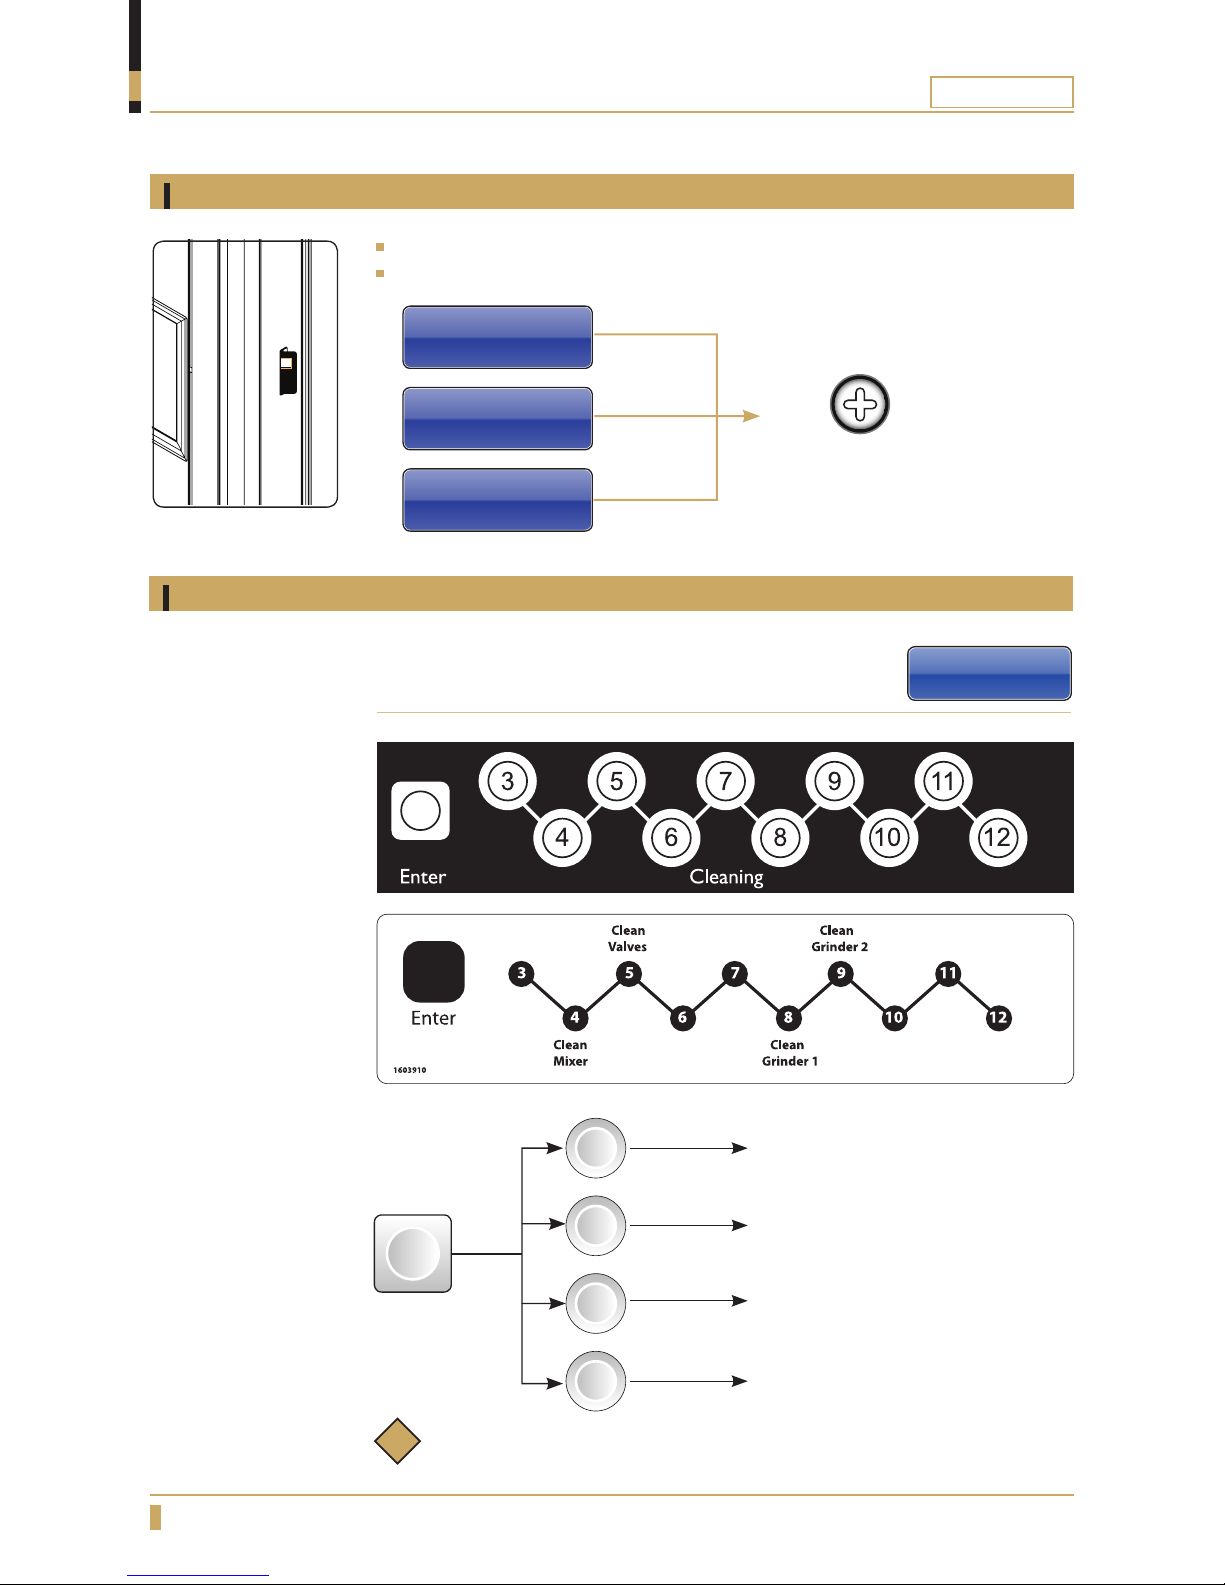
Activate programming with user card
Insert user card in the card reader (See Fig. A)
The display shows:
PROGRAMMING
Clean machine
Open the door. Press ENTER on the cleaning panel inside
the door. Choose button X for each cleaning.
Press
Press
Press
Press
Press
Note:
See the pages for cleaning programs in order to perform cleaning.
Clean Mixer
Clean Valves
Clean Grinder 1
Clean Grinder 2
Enter
Cleaning hot key
A
4
5
8
9
Service Menu
Clean Machine
Service Menu
Counters
Service Menu
Beverage Setup
Press button to scroll
between the different menus
i
Page 19
19
PREZZO
PROGRAMMING
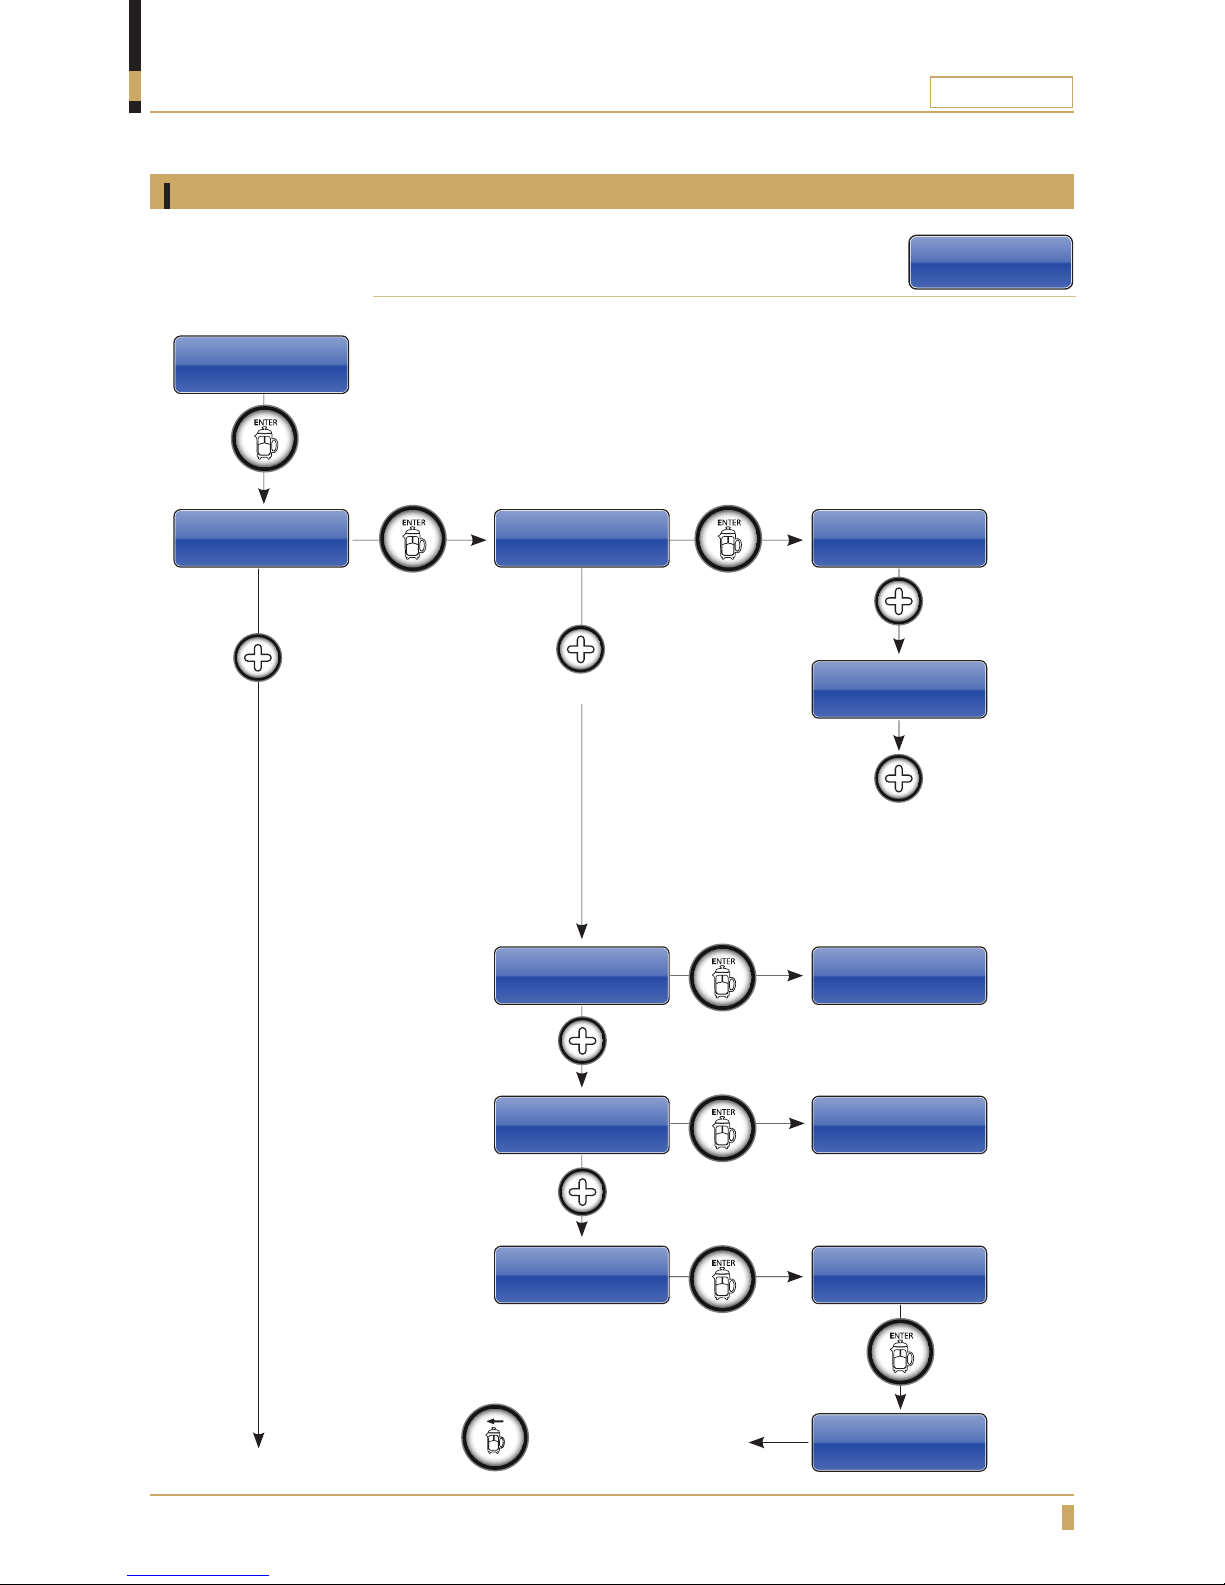
Counters
Service Menu
Counters
See the counter of each drink or total counters for all drinks.
It’s also possible to reset the drink counters.
Press
to go back in the menu
Service Menu
Counters
Counters
Beverages
Beverage Counters
Per Beverage
Beverage Counter
Total Served
Beverage Counter
Clear Counters
Drink 1
served xxx
Total Beverages
Served xxx
Hold Enter to
Clear Counters
Counters Cleared
Press Back
Drink 2
served xxx
Hold ENTER key
for 3 seconds
Press
Press
Press Press
Press
Press
Press
Press to
go forward in the menu
Press
Press
Press
Press
Master Total
Served xxx
Beverage Counter
Master Total
Page 20
20
PREZZO
PROGRAMMING
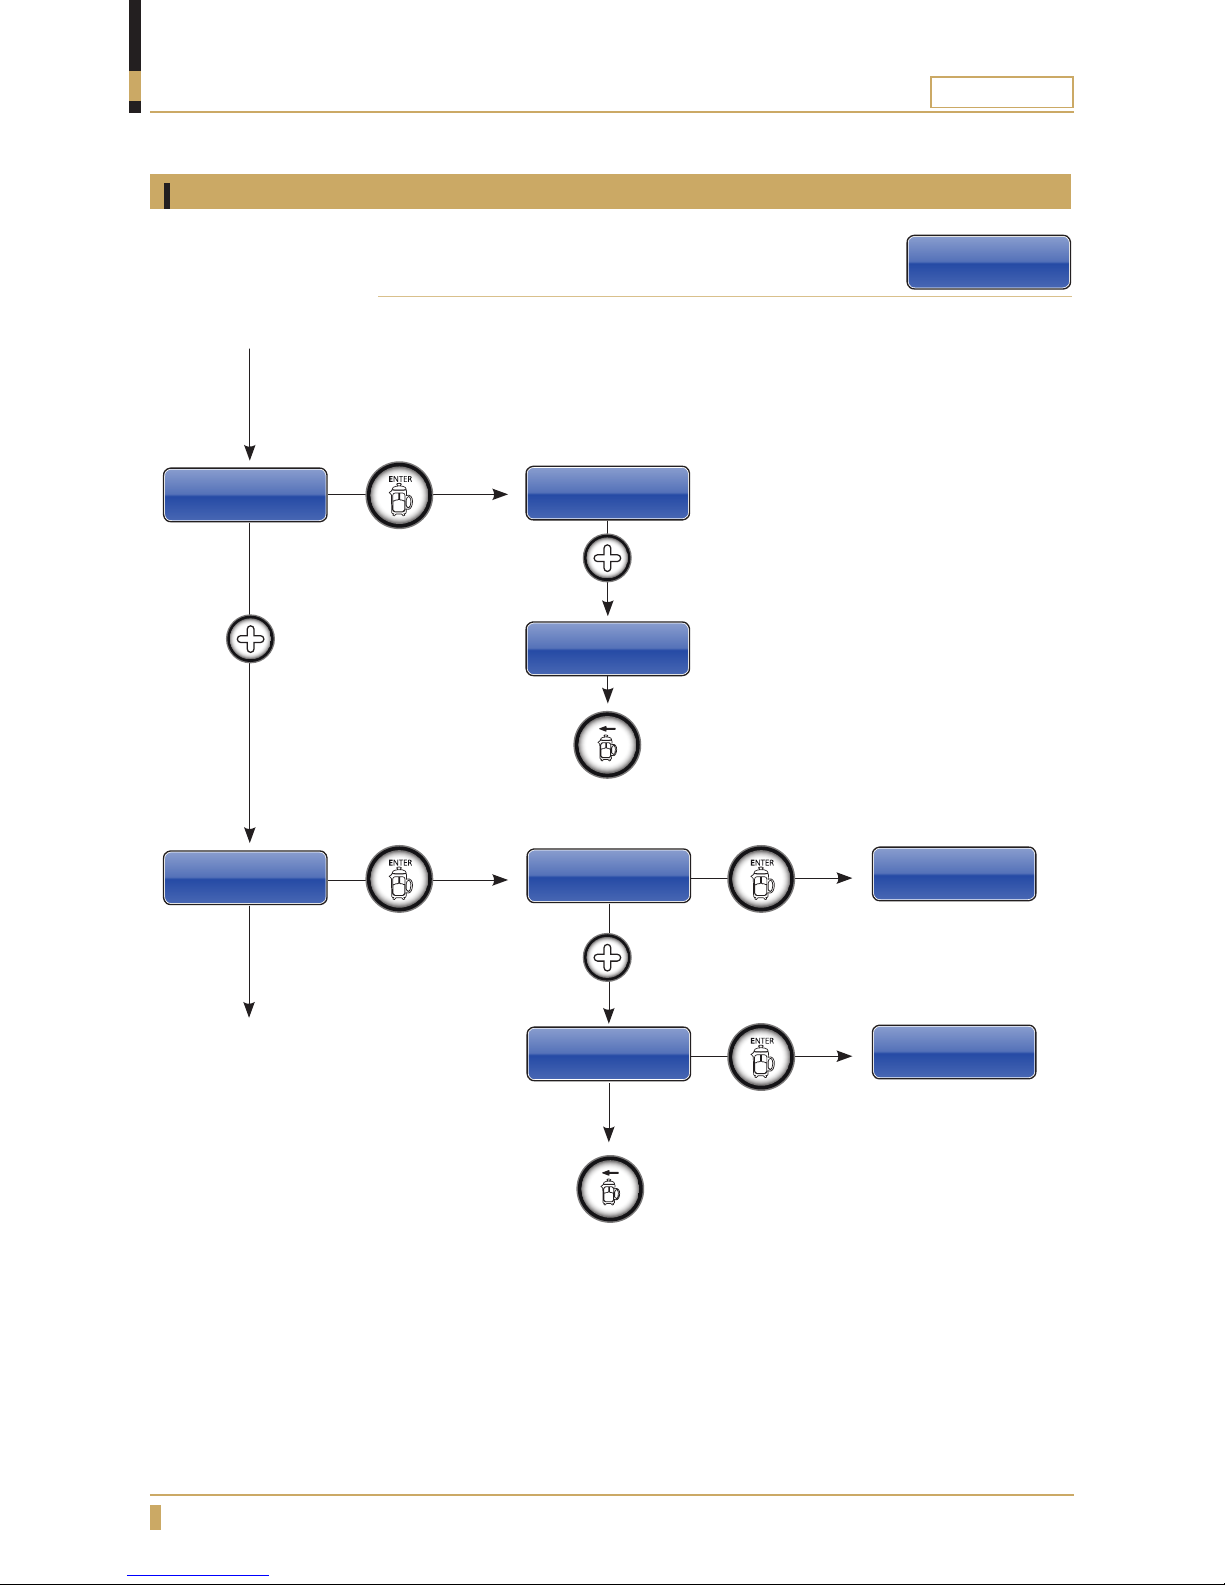
Counters
Counters
Clean Counter
Counters
Water Filter
Clean Counter
Brewer xxx
Clean Counter
Total xxx
Reset? NO/YES
Months Left 6
Water Filter
Interval 1-12
Water Filter
Interval 6
Water Filter
Reset Filter
Service Menu
Counters
See the number of times cleaning has been performed or
reset the water filter counter.
Press
to go back in the menu
Press
to go back in the menu
Standard=6 months
Press
to go forward in the menu
Press
to go forward in the menu
Press
Press
Press Press
Press
Page 21
21
PREZZO
PROGRAMMING
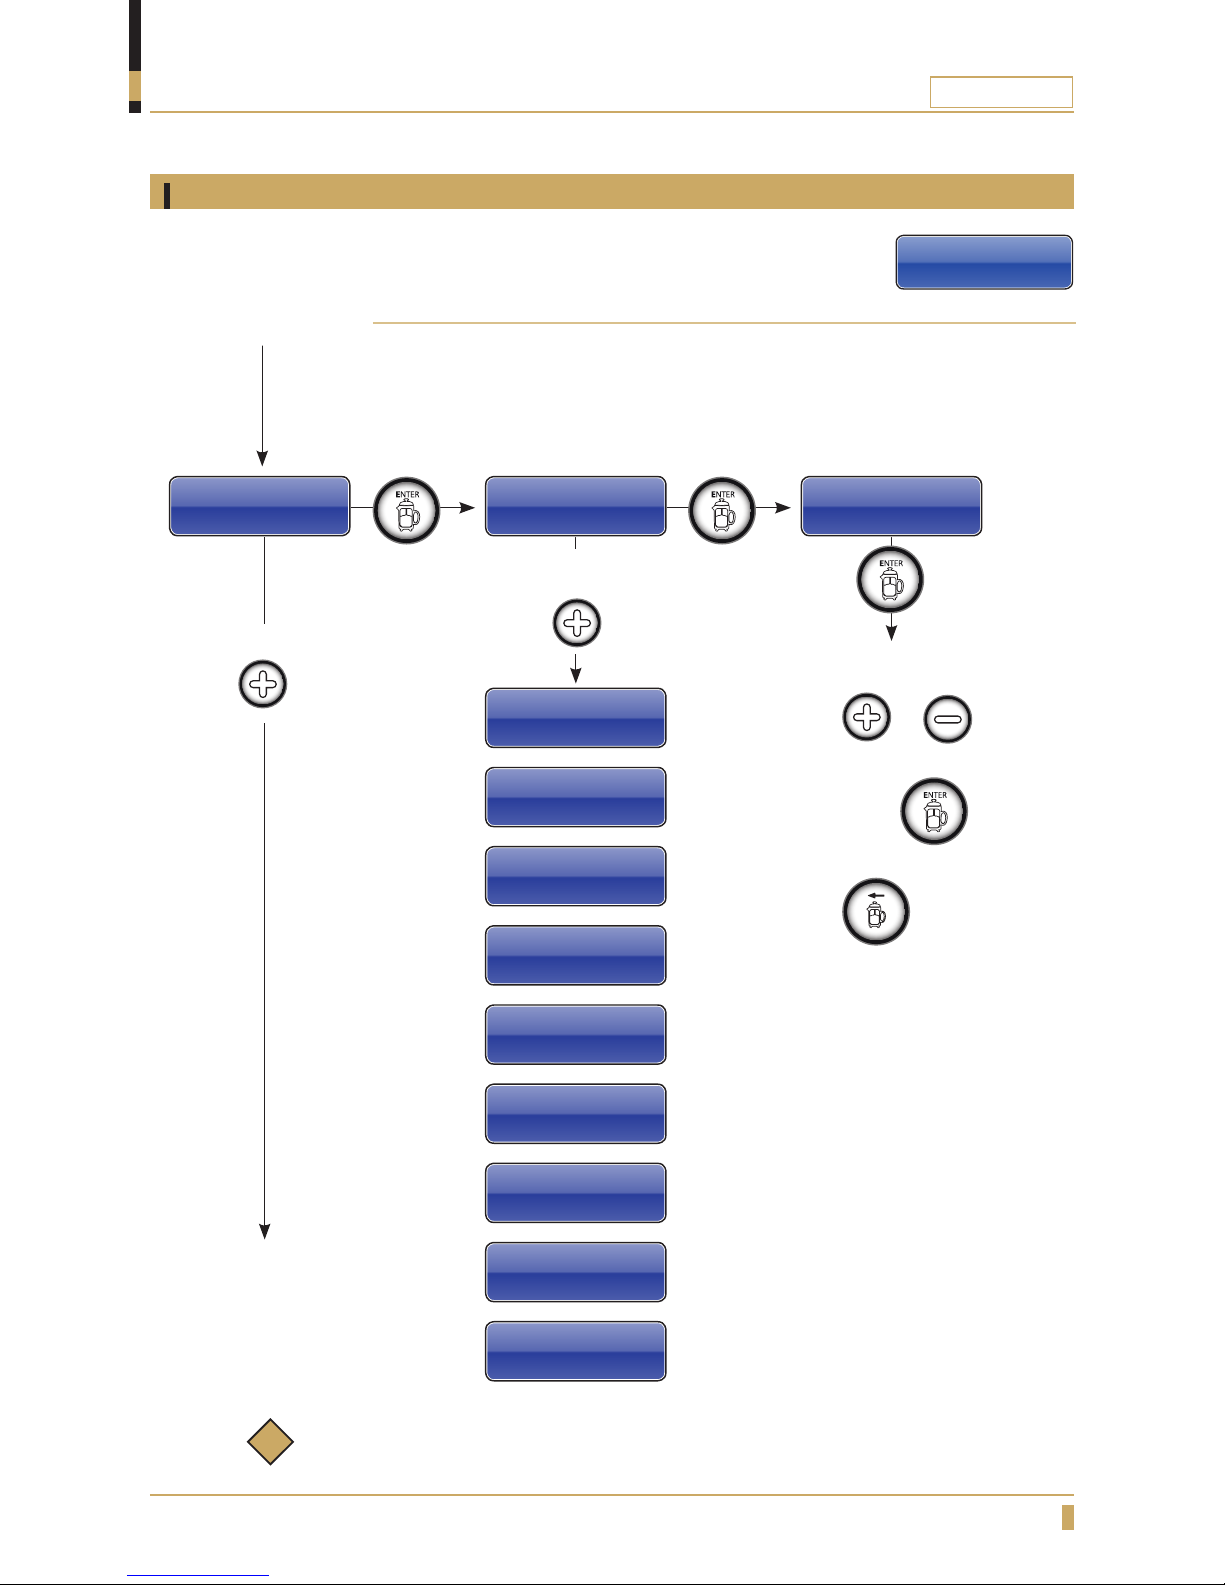
Beverage setup, Strength
Service Menu
Beverage Setup
Change strength of the different drinks. If you are using a
recipe with both grinders, Strenght will only change the
grinding time for the left grinder.
Beverage Setup
Strength
Drink 1
Strength xx%
Drink 2
Strength xx%
Drink 3
Strength xx%
Drink 4
Strength xx%
Drink 5
Strength xx%
Drink 6
Strength xx%
Drink 7
Strength xx%
Drink 8
Strength xx%
Drink 9
Strength xx%
Drink 10
Strength xx%
Drink 1
Strength xx%+0
STRENGTH
Factory default value
Increase
or reduce
value in %
To go forward in menu.
Choose another drink.
Press
To go forward in menu.
Press
Change the value of a drink,
Press or
Confirm the new setting by
pressing the
To step backwards in the Menu.
Press
Press
Note:
To see the standard settings, please go to page 24.
Press
Press
i
Page 22
22
PREZZO
Change the value of a drink,
Press or
Confirm the new setting by
pressing the
To step backwards in the Menu.
Press
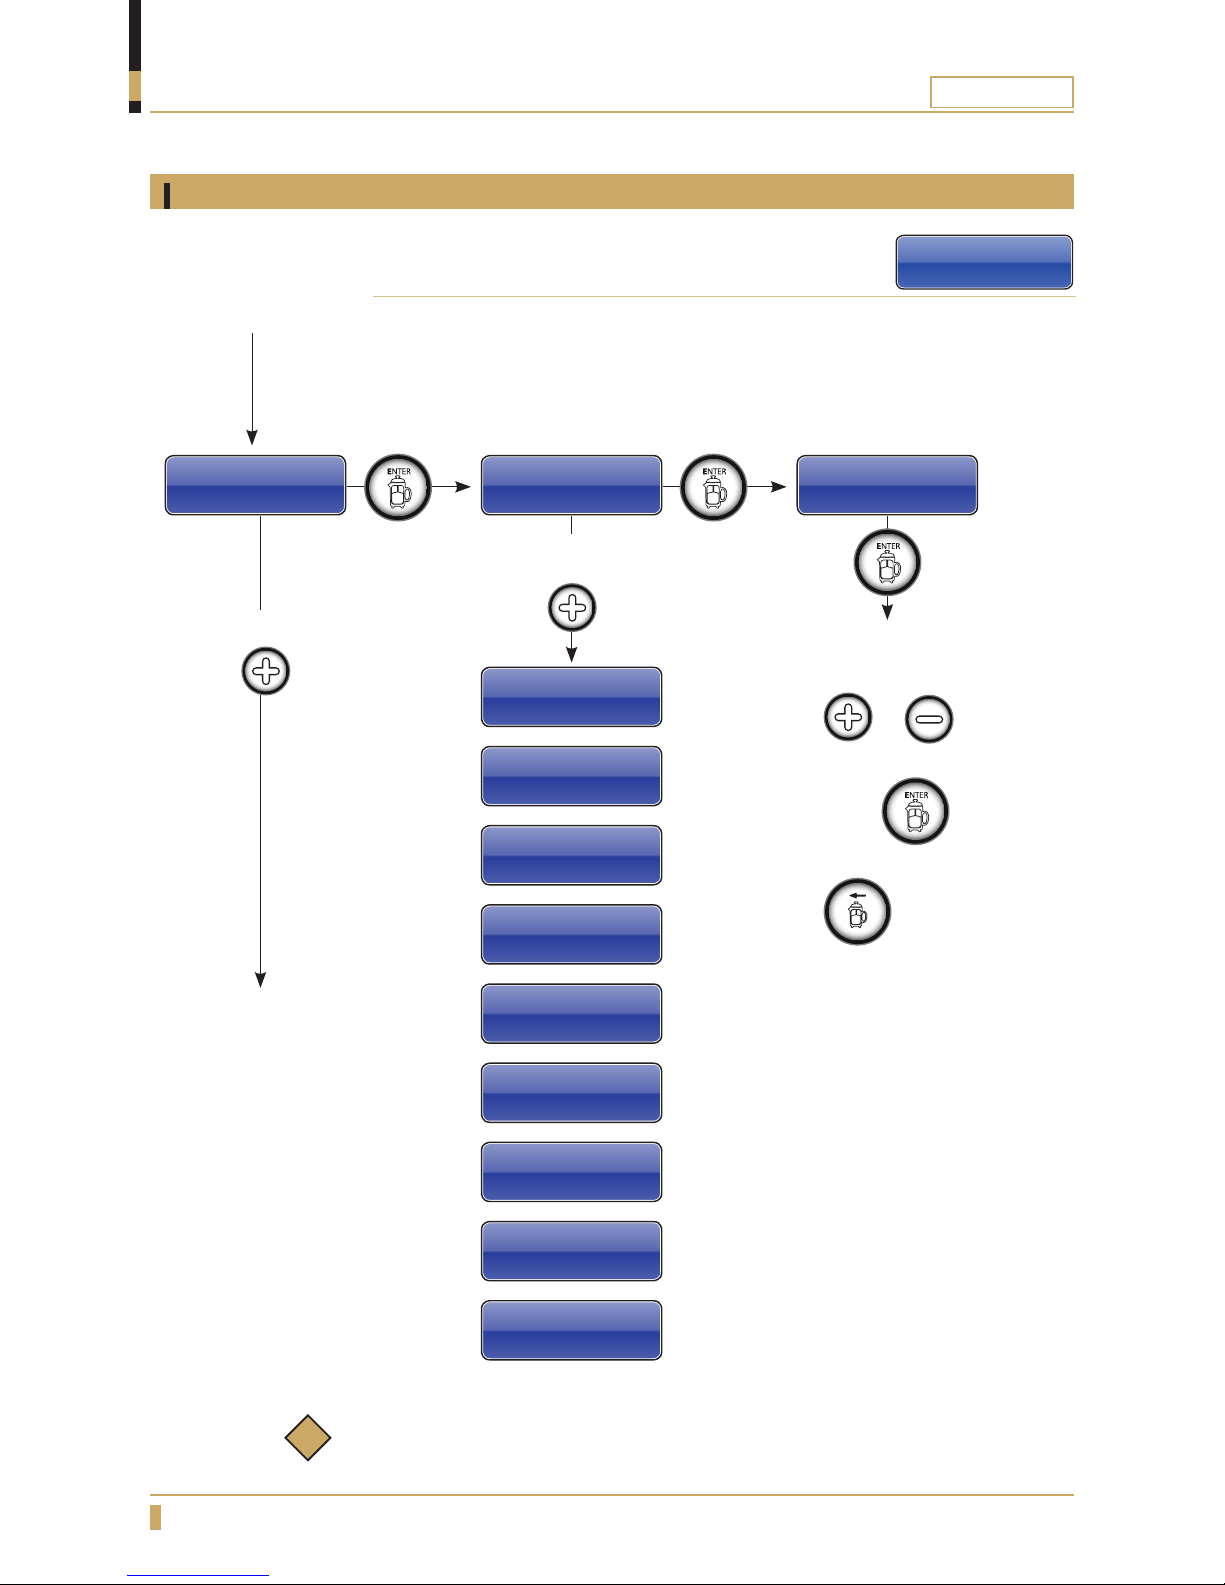
PROGRAMMING
Beverage setup, Volume
Service Menu
Beverage Setup
Change volume of the different drinks.
Beverage Setup
Volume
Drink 1
Volume xx ml
Drink 2
Volume xx ml
Drink 3
Volume xx ml
Drink 4
Volume xx ml
Drink 5
Volume xx ml
Drink 6
Volume xx ml
Drink 7
Volume xx ml
Drink 8
Volume xx ml
Drink 9
Volume xx ml
Drink 10
Volume xx ml
Drink 1
Volume xx ml
Factory default value
Increase
or reduce
value in ml
VOLUME
To go forward in menu.
Choose another drink.
Press
To go forward in menu.
Press
Note:
To see the standard settings, please go to page 24.
Press
Press
Press
i
Page 23
23
PREZZO
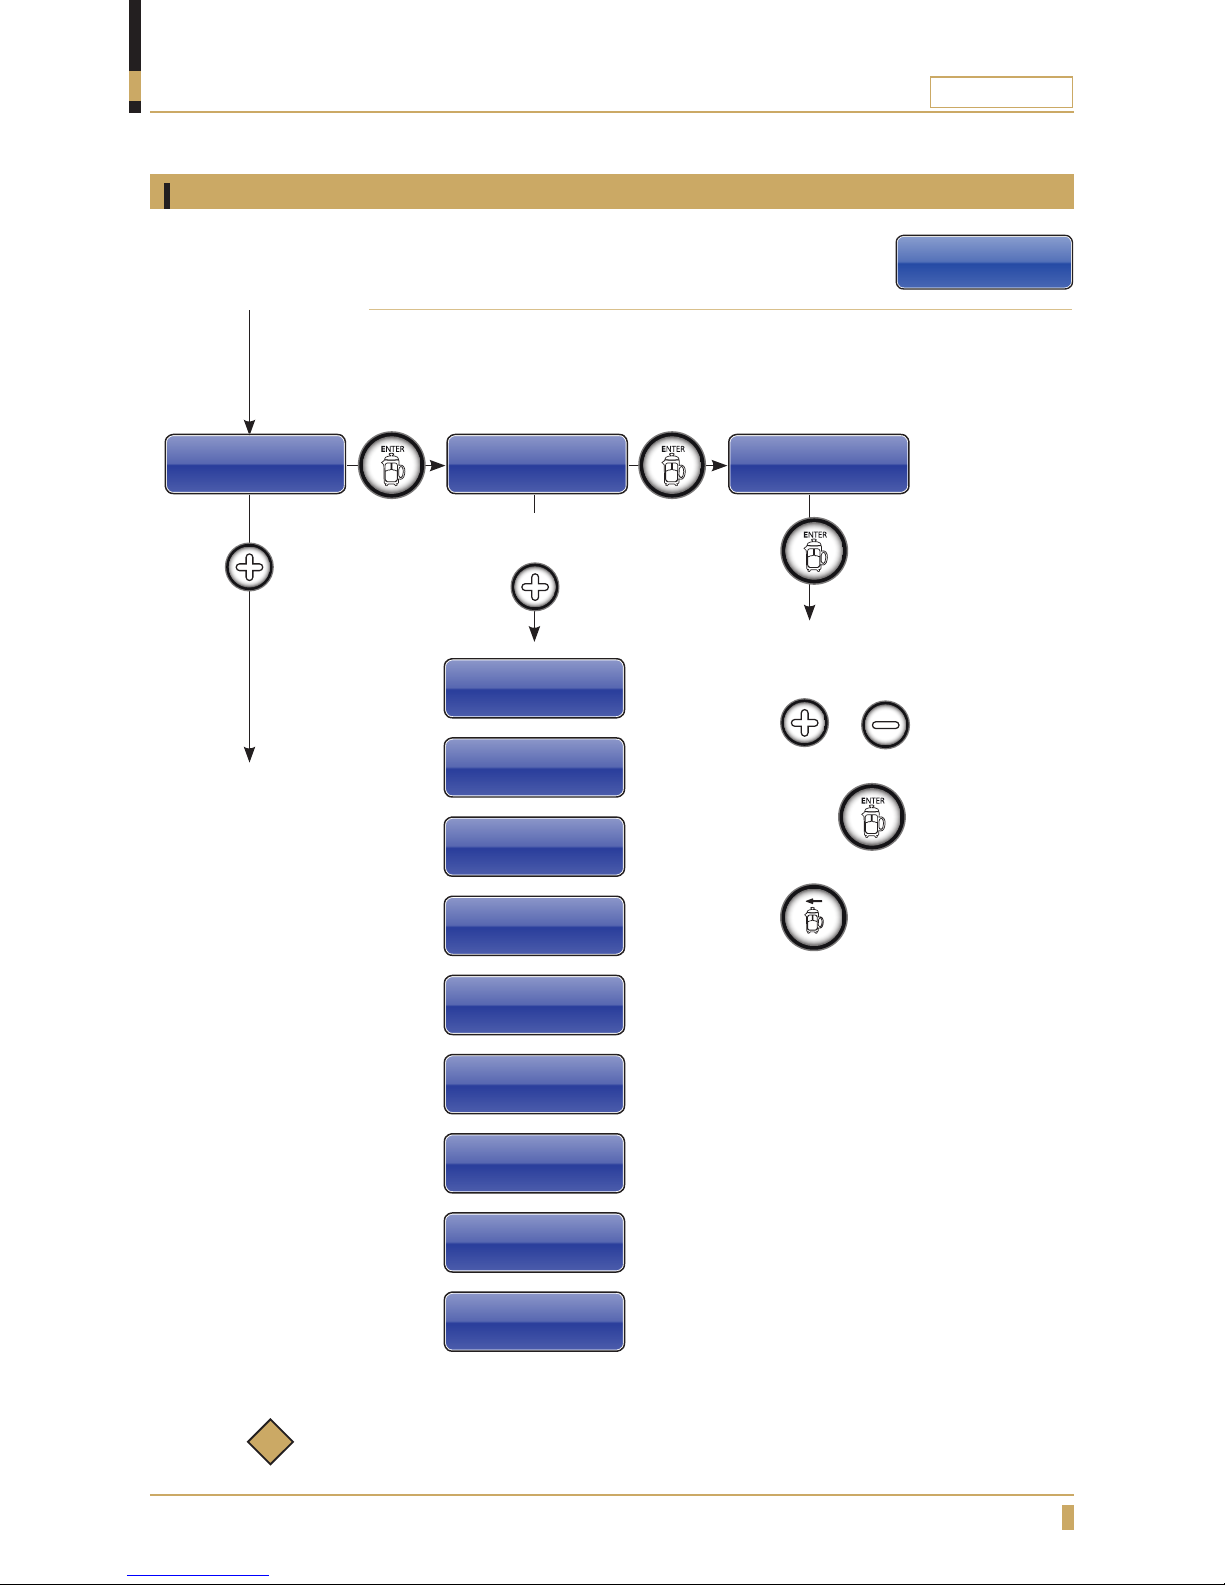
PROGRAMMING
Beverage setup, Drink Settings
Service Menu
Beverage Setup
Change grinding time for right grinder if you are using a
recipe with both grinders.
Drink 2
Drink 3
Drink 4
Drink 5
Drink 6
Drink 7
Drink 8
Drink 9
Drink 10
To go forward in menu.
Choose another drink.
Press
Beverage Setup
Drink Settings
Drink 1
Drink 1
CoffeeBea xx%+0
Factory default value
Increase or
reduce value
in %
DRINK SETTINGS
Press
Press
Change the value of a drink,
Press or
Confirm the new setting by
pressing the
To step backwards in the Menu.
Press
Press Press
Note:
To see the standard settings, please go to page 24.
i
Page 24
24
PREZZO
PROGRAMMING
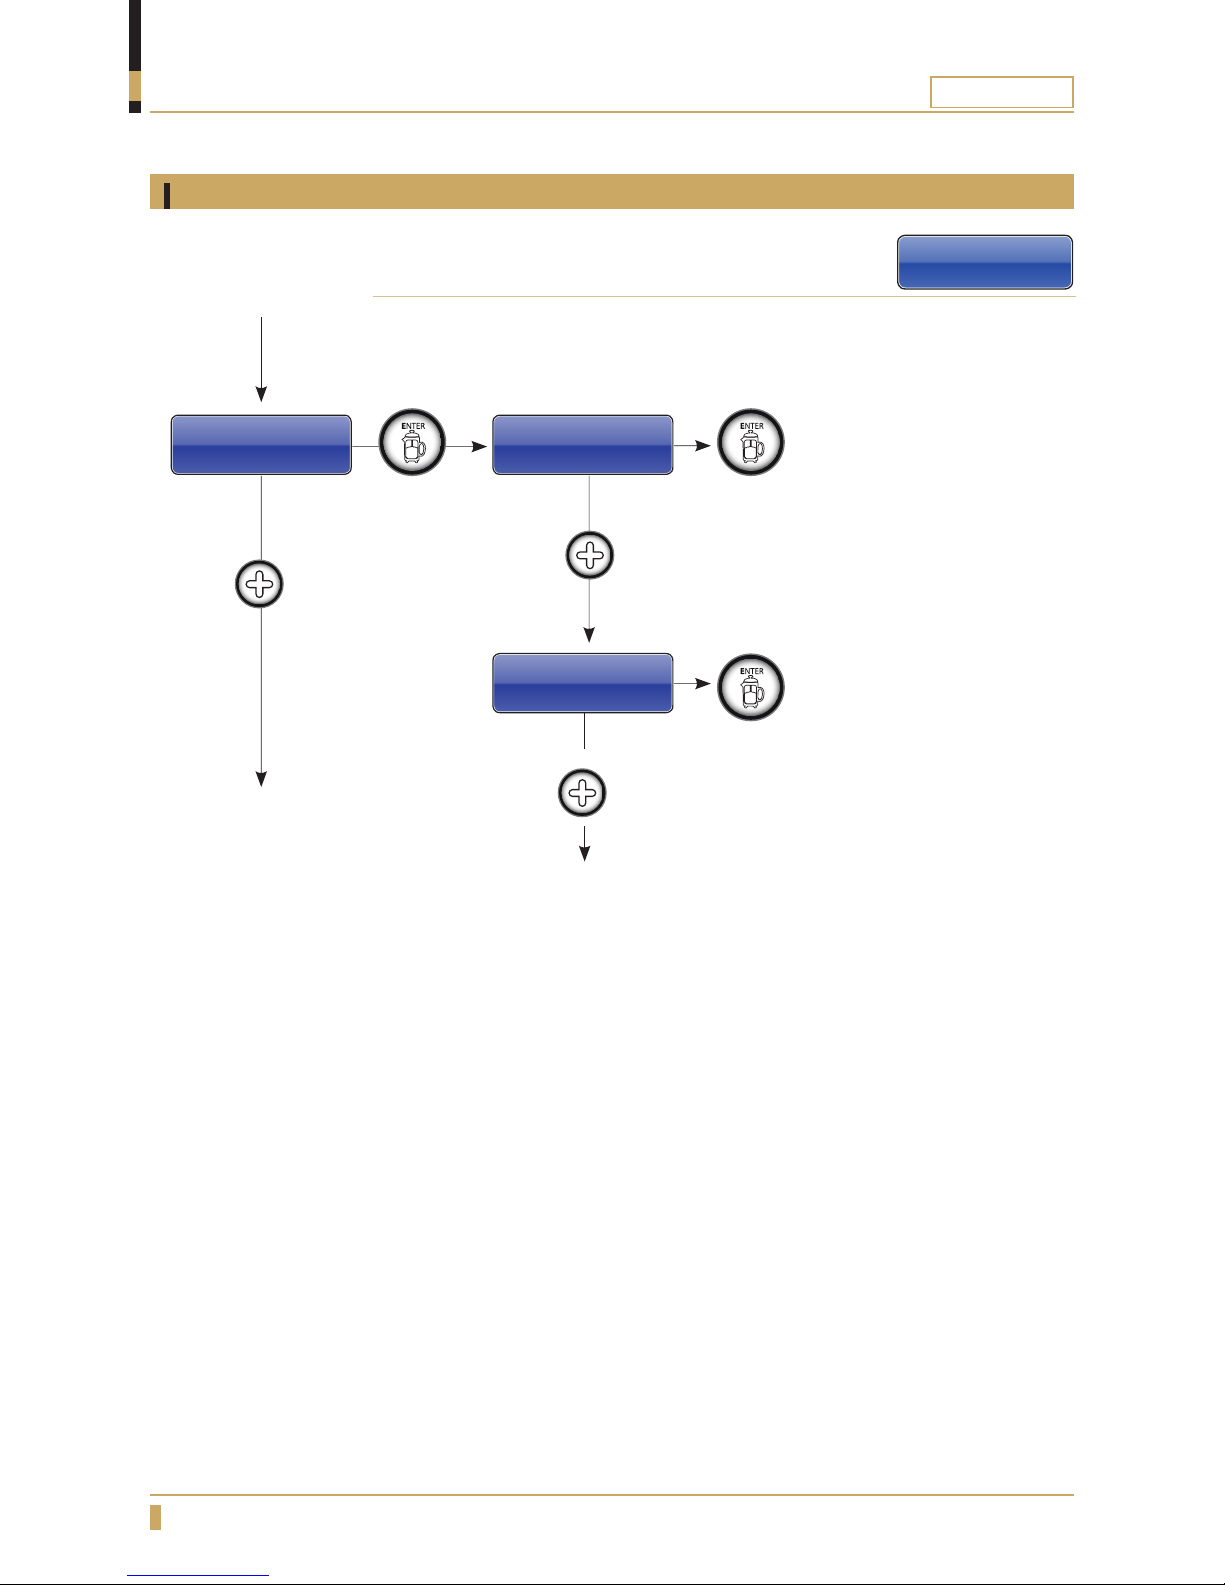
Beverage setup, Recipe Bank
Service Menu
Beverage Setup
Change recipe on different buttons. You can find all
recipes and drink codes on page 24.
Beverage Setup
Recipe Bank
Key#ZZ R#XXX
<Drink 1 name>
Key#ZZ R#XXX
<Drink 2 name>
Choose which drink key (key
#ZZ) that should be related to
which recipe (R#XXX) in the
recipe bank.
Confirm with ENTER.
Choose which drink key (key
#ZZ) that should be related to
which recipe (R#XXX) in the
recipe bank.
Confirm with ENTER.
To go forward in menu.
Press
Press Press
Press
Press
Press
Page 25
25
PREZZO
PROGRAMMING
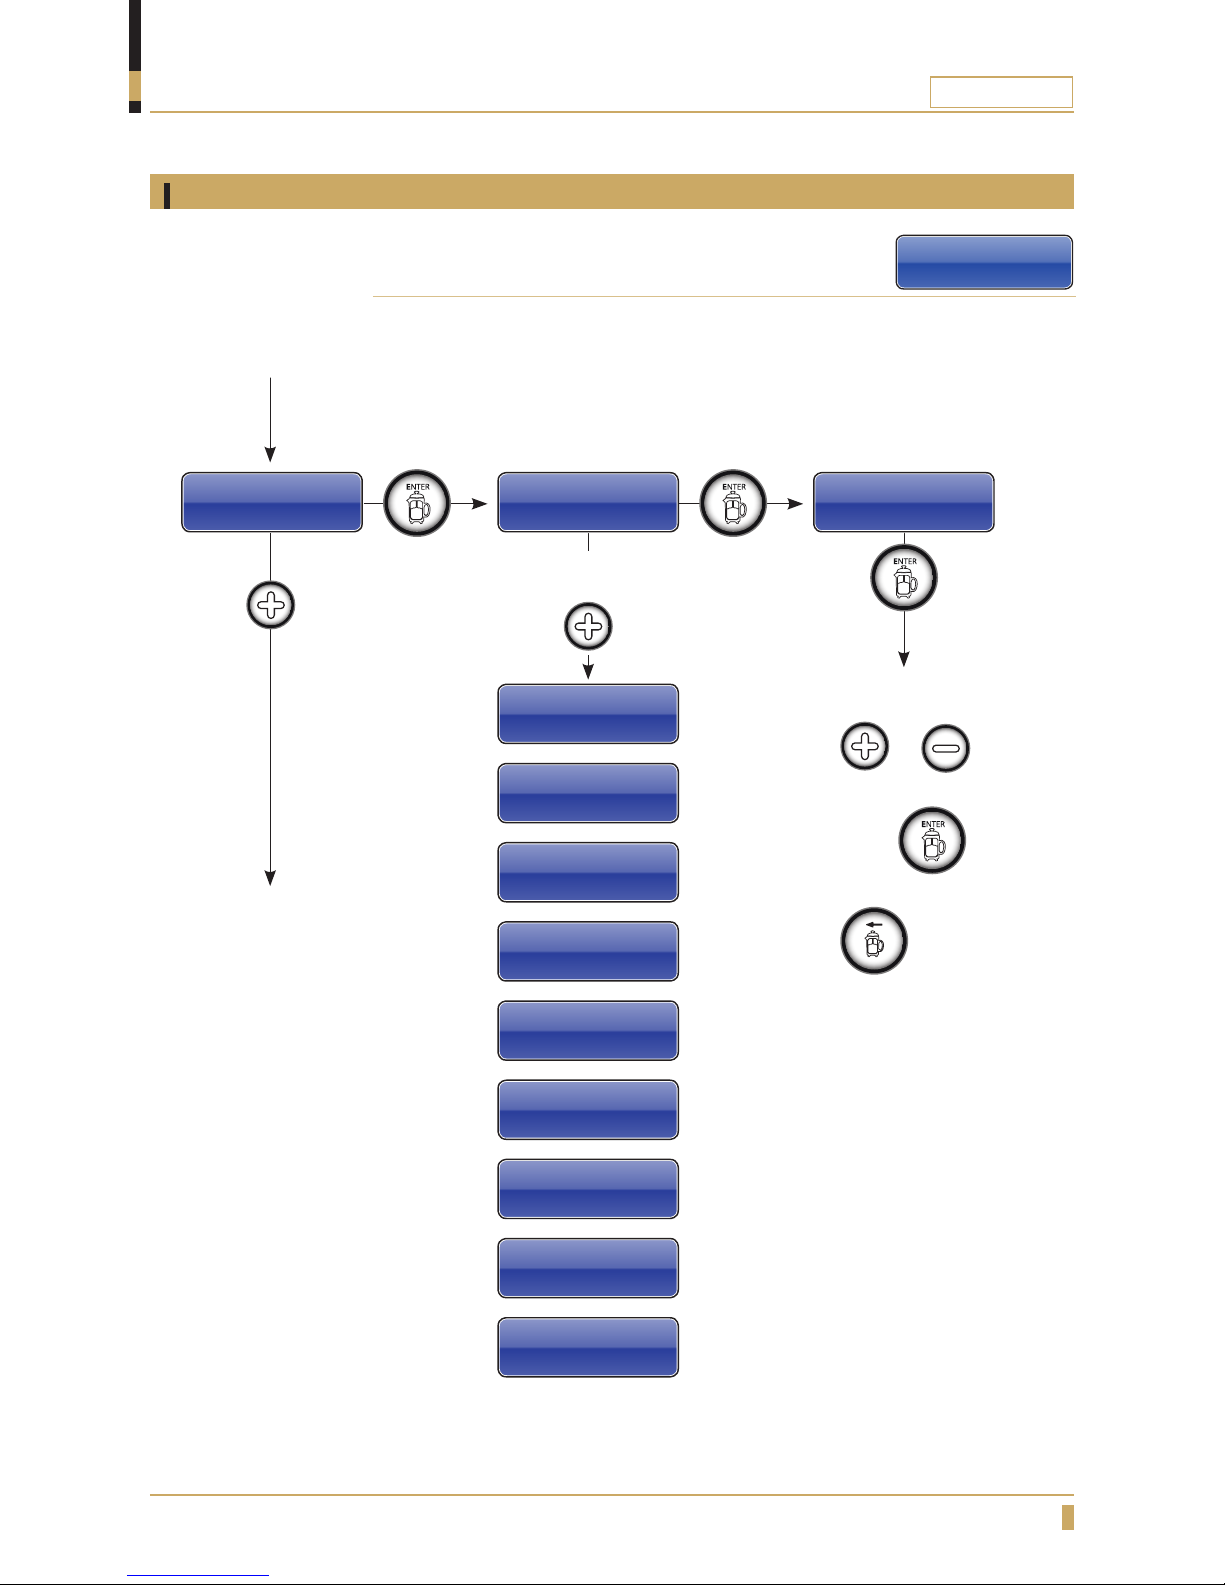
Beverage setup, Enable Beverage
Service Menu
Beverage Setup
Enable or disable different drinks and buttons.
Beverage Setup
Enable Beverage
Drink 1
Enable Bev ON
Drink 2
Drink 3
Drink 4
Drink 5
Drink 6
Drink 7
Drink 8
Drink 9
Drink 10
Drink 1
Enable Bev On-Off
To go forward in menu.
Choose another drink.
Press
ENABLE BEVERAGE
Press
Press
Press Press
Change the value of a drink,
Press or
Confirm the new setting by
pressing the
To step backwards in the Menu.
Press
Page 26
26
PREZZO
PROGRAMMING
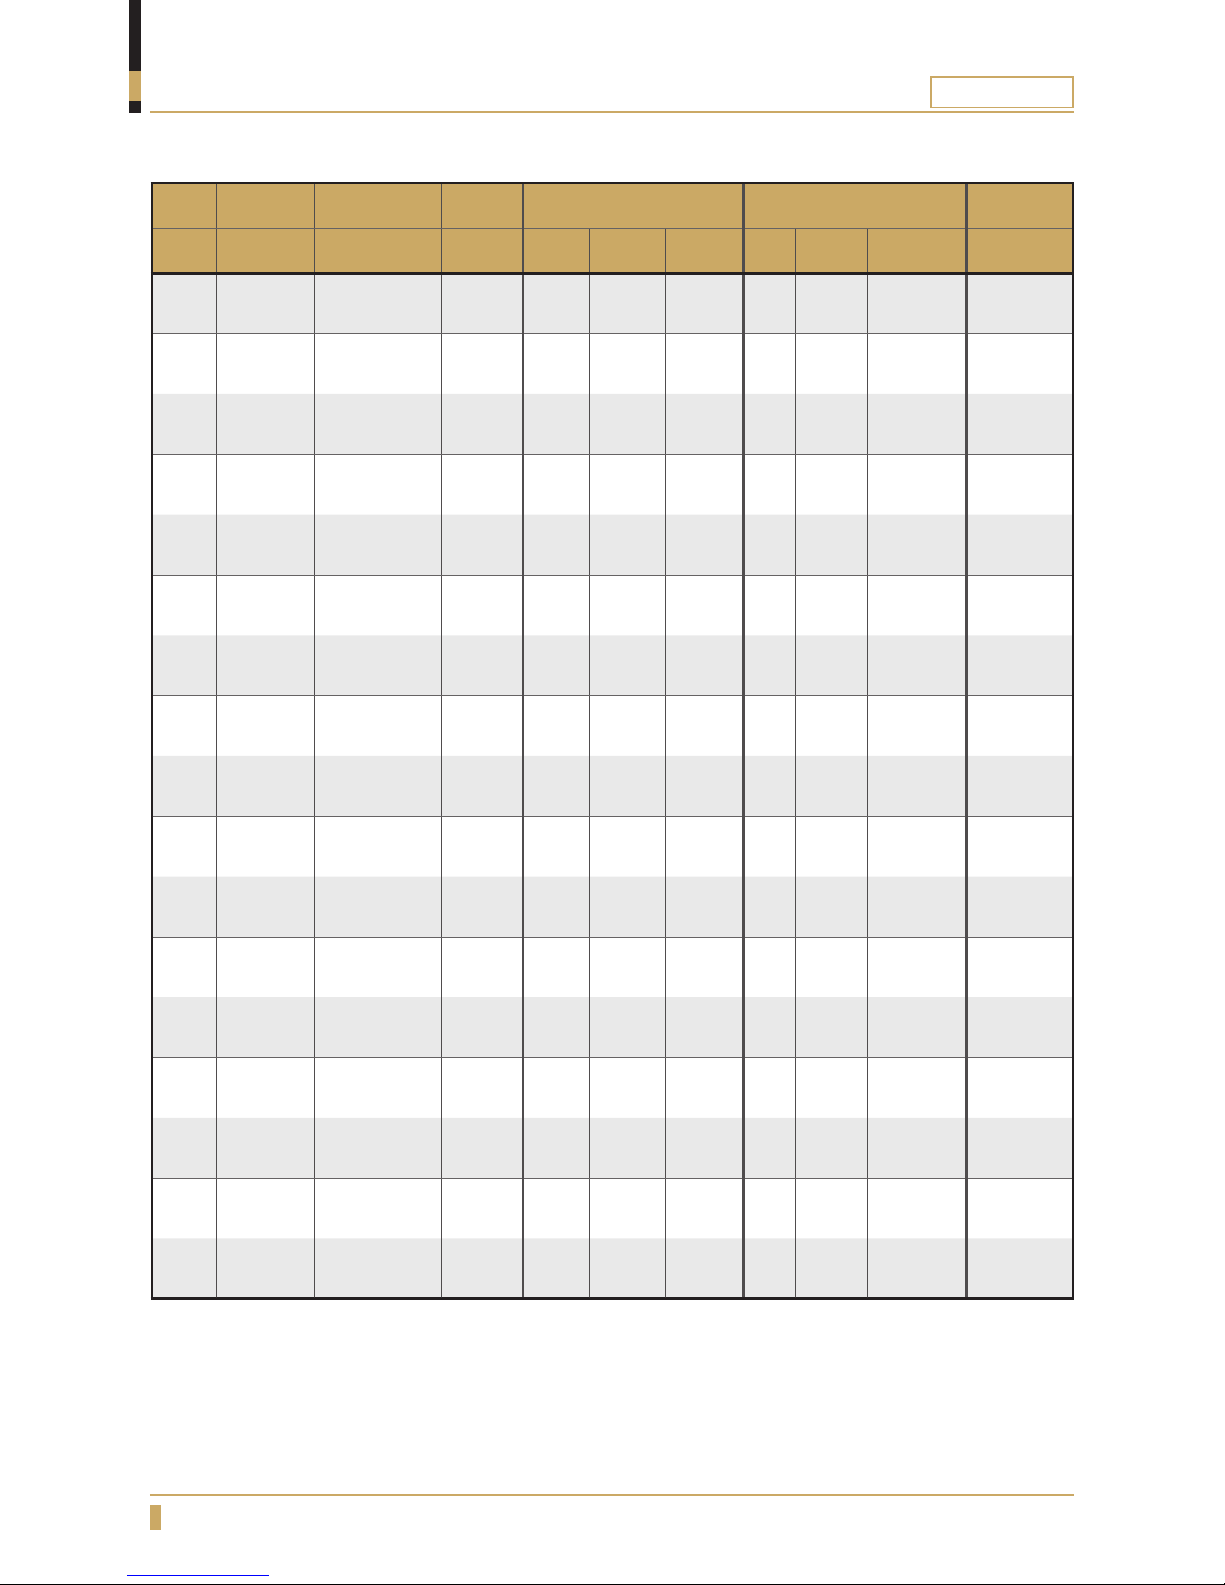
Drink setup
Button RB Code DRINKS Grinder VOLUME BEANS
Min Max Normal Min Max Normal % in machine
1 #R009 Small jug left Left 150ml 800ml 250ml 0g 60g 18.5g 31%
2 #R011 Medium jug left Left 150ml 1000ml 500ml 0g 70g 30g 43%
3 #R013 Large jug left Left 150ml 1500ml 750ml 0g 90g 45g 50%
4 #R015 Grand jug left Left 500ml 2000ml 1000ml 0g 120g 60g 50%
5 #R007
Hot water
continous
6
7
8
9 #R010 Small jug right Right 150ml 800ml 250ml 0g 60g 18.5g 31%
10 #R012
Medium jug
right
Right 150ml 1000ml 500ml 0g 70g 30g 43%
11 #R014 Large jug right Right 150ml 1500ml 750ml 0g 90g 45g 50%
12 #R016 Grand jug right Right 500ml 2000ml 1000ml 0g 120g 60g 50%
RB #R003 Dual small jug Dual 150ml 800ml 250ml 0g 35+35g 9+9g 26%+26%
RB #R004
Dual medium
Jug
Dual 150ml 1000ml 500ml 0g 40+40g 15+15g 37%+37%
RB #R005 Dual large jug Dual 150ml 1500ml 750ml 0g 50+50g 22.5+22.5g 45%+45%
RB #R006 Dual grand jug Dual 500ml 2000ml 1000ml 0g 60+60g 30+30g 50%+50%
RB #R008
Hot water
Dosed
50ml 200ml 150ml
Page 27
27
PREZZO
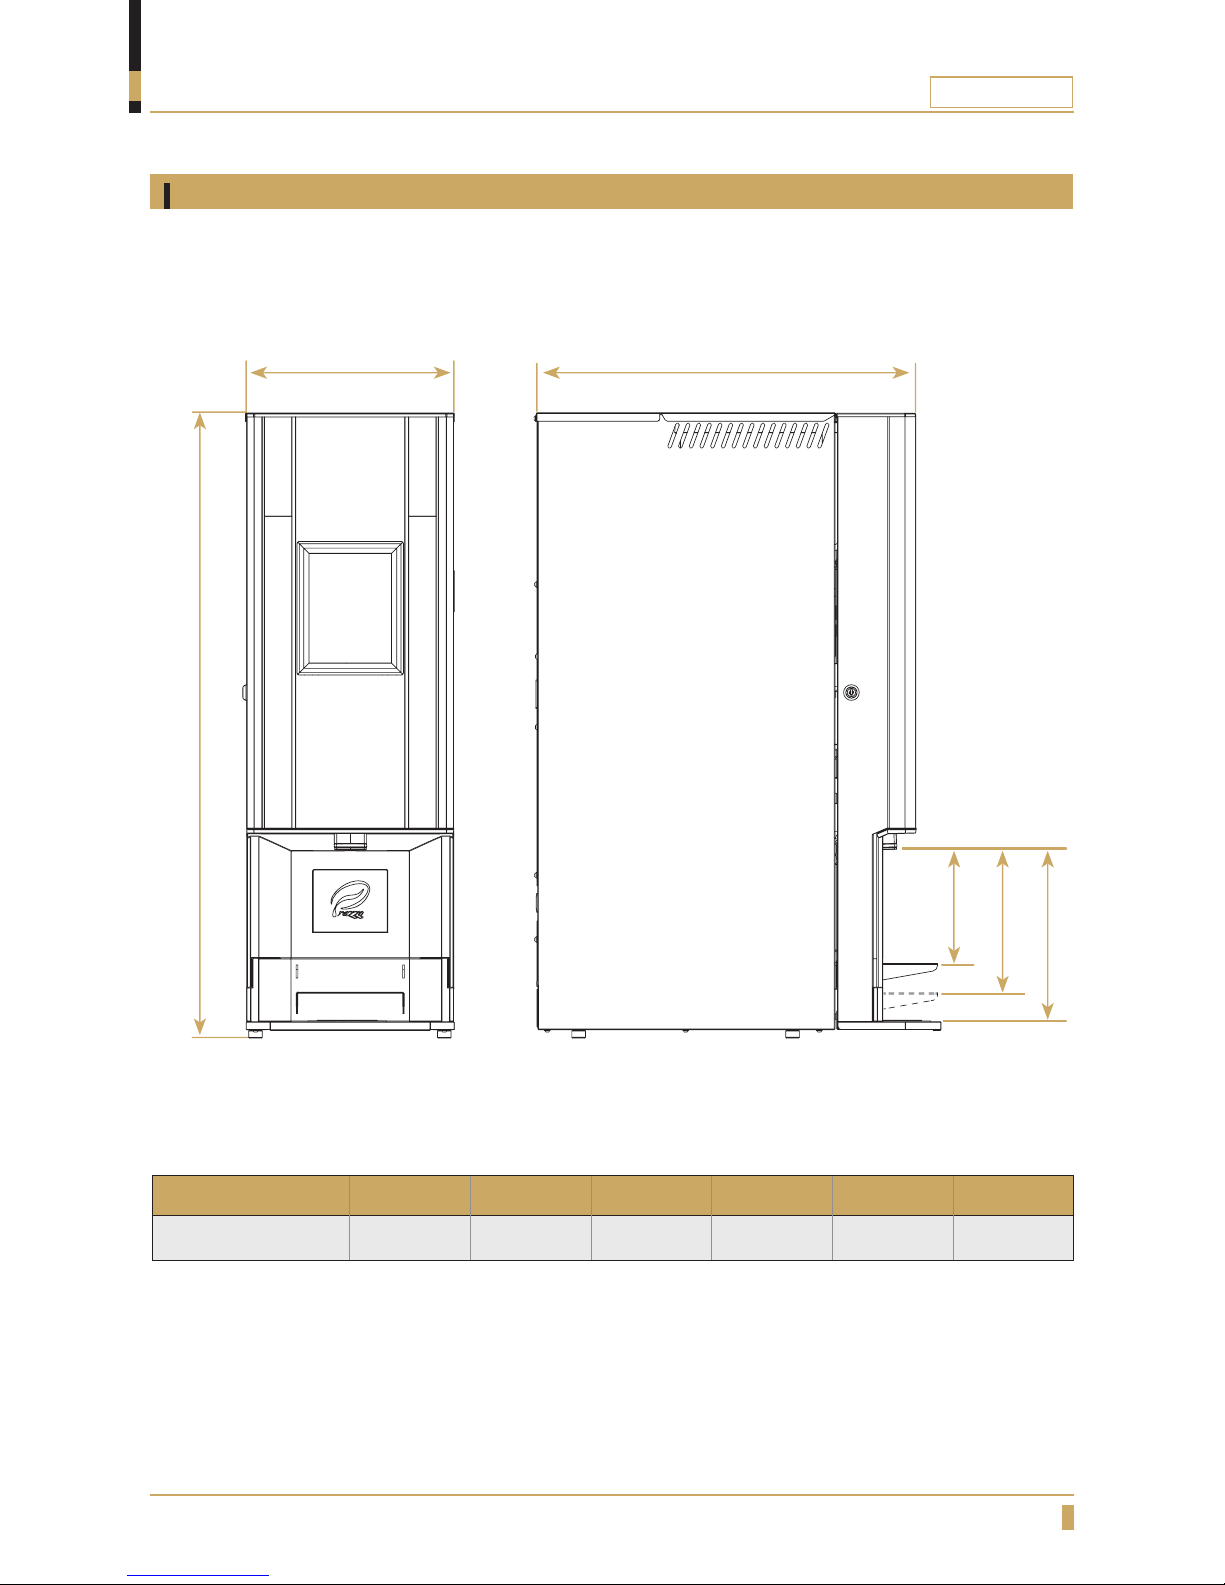
DIMENSION SKETCH
Model
A B C D E F
PREZZO 865mm 290mm 532mm 160mm 200mm 240mm
D
A
BC
EF
PREZZO
Page 28
Your Dealer
FOR SERVICE
Please contact your dealer
www.creminternational.com
For the warranty to be valid the conditions for maintenance must have been
followed according to our instructions, proper precaution has been made and
warranty claim been issued without delay.
The affected equipment may not be used during awaiting service if there is any risk
that the damage or defect would worsen.
The warranty will not cover consumption supplies such as glassware, normal
maintenance such as cleaning of filters, contaminations in water, lime, incorrect
voltages, pressure or adjustment of water amounts.
The warranty will not cover damages of defects caused by incorrect handling and
operation of the appliance.
 Loading...