

Page 1

ORIGINAL LINE A
USER MANUAL
UM_EN
Part No.: 1764024_01
Machines with automatic water lling
Page 2

ORIGINAL LINE A
2
CONTENT
CONTENT ........................................................................................................................................................ 2
GENERAL ........................................................................................................................................................... 4
Introduction ..............................................................................................................................................................4
Warnings ....................................................................................................................................................................4
Precautions ................................................................................................................................................................4
Intended use ..............................................................................................................................................................4
Facts & weight ...........................................................................................................................................................5
General function description.................................................................................................................................5
OVERVIEW OF COMPONENTS ........................................................................................................ 6
Front view ..................................................................................................................................................................6
A-2 ...............................................................................................................................................................................6
DA-4 ............................................................................................................................................................................7
Thermos A .................................................................................................................................................................8
Mega Gold A..............................................................................................................................................................9
Function................................................................................................................................................................... 10
A-2, DA-4 ................................................................................................................................................................ 10
Mega Gold A, Thermos A ..................................................................................................................................... 11
INSTALLATION AND START-UP ..................................................................................................... 12
Positioning............................................................................................................................................................... 12
Water connection ................................................................................................................................................. 12
Electrical connection ............................................................................................................................................ 13
Hot plate function ................................................................................................................................................. 13
First time start-up ................................................................................................................................................. 14
OPERATION ................................................................................................................................................. 15
Brewing with coffee .............................................................................................................................................. 15
To keep temperature and aroma ....................................................................................................................... 17
CLEANING AND CARE ........................................................................................................................ 18
Rinse thermos, decanter and serving station .................................................................................................. 18
Daily cleaning ......................................................................................................................................................... 19
Weekly cleaning ..................................................................................................................................................... 19
Cleaning serving station ...................................................................................................................................... 20
Exterior cleaning ................................................................................................................................................... 20
PROGRAMMING ....................................................................................................................................... 21
Adjust water amount ........................................................................................................................................... 21
Adjust brew time .................................................................................................................................................. 21
Page 3
ORIGINAL LINE A
3
CONTENT
POSSIBLE SOLUTION ............................................................................................................................ 22
Fault and solution .................................................................................................................................................. 22
DIMENSION .................................................................................................................................................. 23
A-2 ............................................................................................................................................................................ 23
DA-4 ......................................................................................................................................................................... 24
Thermos A .............................................................................................................................................................. 25
Mega Gold A........................................................................................................................................................... 26
Serving Station ....................................................................................................................................................... 27
IMPORTANT!
INFO.
CAUTION!
INFO.
More INFO.
INFO.
Some important information may appear in textboxes seen below
Note
Page 4

ORIGINAL LINE A
4
GENERAL
Read the user guide before using the machine.
This guide contains important instructions for
proper and safe use of the vending machine.
Always keep this guide close at hand for future
reference.
Introduction
Thank you for choosing a ORIGINAL LINE coffee brewer.
We hope you enjoy it !
Warnings
Never immerse the machine, plug or mains
cable in water because there is a danger of
electric shock.
The appliance is not intended for use by
persons (including children) with reduced
physical, sensory or mental capabilities, or
lack of experience and knowledge, unless they
have been given supervision or instruction
concerning the use of the appliance by a person
responsible for their safety.
Children should be supervised to ensure they
do not play with the appliance.
Do not use the machine if the mains cable, plug
is damaged or the machine has fallen down.
If the mains cable is damaged it must be
replaced by the manufacturer, service agent or
similarly qualified persons in order to avoid a
hazard.
Only plug the machine into a properly installed
earthed safety socket whose line voltage
matches the technical data for the machine.
Do not use the machine outdoors so it can be
exposed to weather (rain, snow, frost). It will
cause material damage to the machine.
Do not try to open the machine or repair it in
any way. To avoid danger only have the machine
repaired in a technical workshop, Service
Centre or by a qualified person.
Remove the mains cable from the socket when
the machine is not in use for longer periods. To
do this, pull the plug not the cable.
This appliance must be placed in a horizontal
position which is resistant to any water that
may leak.
Place the machine out of the reach of children.
Position the mains cable so that people cannot
trip over it. Keep it away from sharp edges and
heat sources.
The new hose-sets supplied with this appliance
are to be used, old hose-sets must not be reused.
This appliance is not suitable for installation in
an area where a water jet could be used.
This appliance must not be cleaned by a water
jet.
This appliance is intended to be used in
household and similar applications such as:
- Staff kitchen areas in shops.
- Ofces and other commercial working
environments.
- On agricultural estates.
- By clients in hotels, motels and other
residential type environments.
- Bed and breakfast type environments.
For the optimal performance of the machine
these parameters shall not be exceeded:
- Maximum permissible inlet water pressure :
800KPa (8Bar)
- Minimum permissible inlet water pressure:
200KPa (2Bar)
- Maximum working temperature: 40°ºC
- Minimum working temperature: 10°ºC
Precautions
Intended use
Page 5

ORIGINAL LINE A
5
GENERAL
General function description
FACTS A-2 DA-4 Thermos A Mega Gold A
Height, Width, Depth
428, 205, 410 mm428, 410, 410 mm557, 205, 410
mm
655, 205, 445
mm
Thermos/decanter volume 1.8 L 2x1.8 L 2.2 L 2.5 L
Power supply
220V
220-230V 1N
~ 2390W
50/60Hz
400V 2N
~ 4780 W
220-230V 1N
~ 2200W
50/60Hz
220-230V 1N
~ 2200W
50/60Hz
Power supply
110V
110-120V IN
~ 1800W
50-60Hz
110-120V IN
~ 3600W
50-60Hz
110-120V IN
~ 1600W
50-60Hz
110-120V IN
~ 1600W
50-60Hz
Brew Options 4-12 Cups 4-12 Cups 4-15 Cups 4-17 Cups
Capacity
15 L/h 30 L/h 15 L/h 19 L/h
Brew time
6min 6min 7min 8.5min
Hot plates
2 4
None None
Water connection
Cold water 1/2 R*
MODEL/NAME A-2 DA-4 Thermos A Mega Gold A
Weight 9 kg 15.5 kg 10 kg 11.5 kg
Facts & weight
The Coffee brewer is equipped with a key pad for automatic water lling.
The key pad allows you to adjust the number of cups for each brewing.
The water tank is tted with a oat switch that will activate heating unit when water is lled, this
starts the brew process. During the brewing process a lamp will be lit on the machine’s right side.
When the tank is empty of water the heater unit will be switched off and the lamp will be turned off.
A brew process takes around 6~8.5min to complete.
Page 6
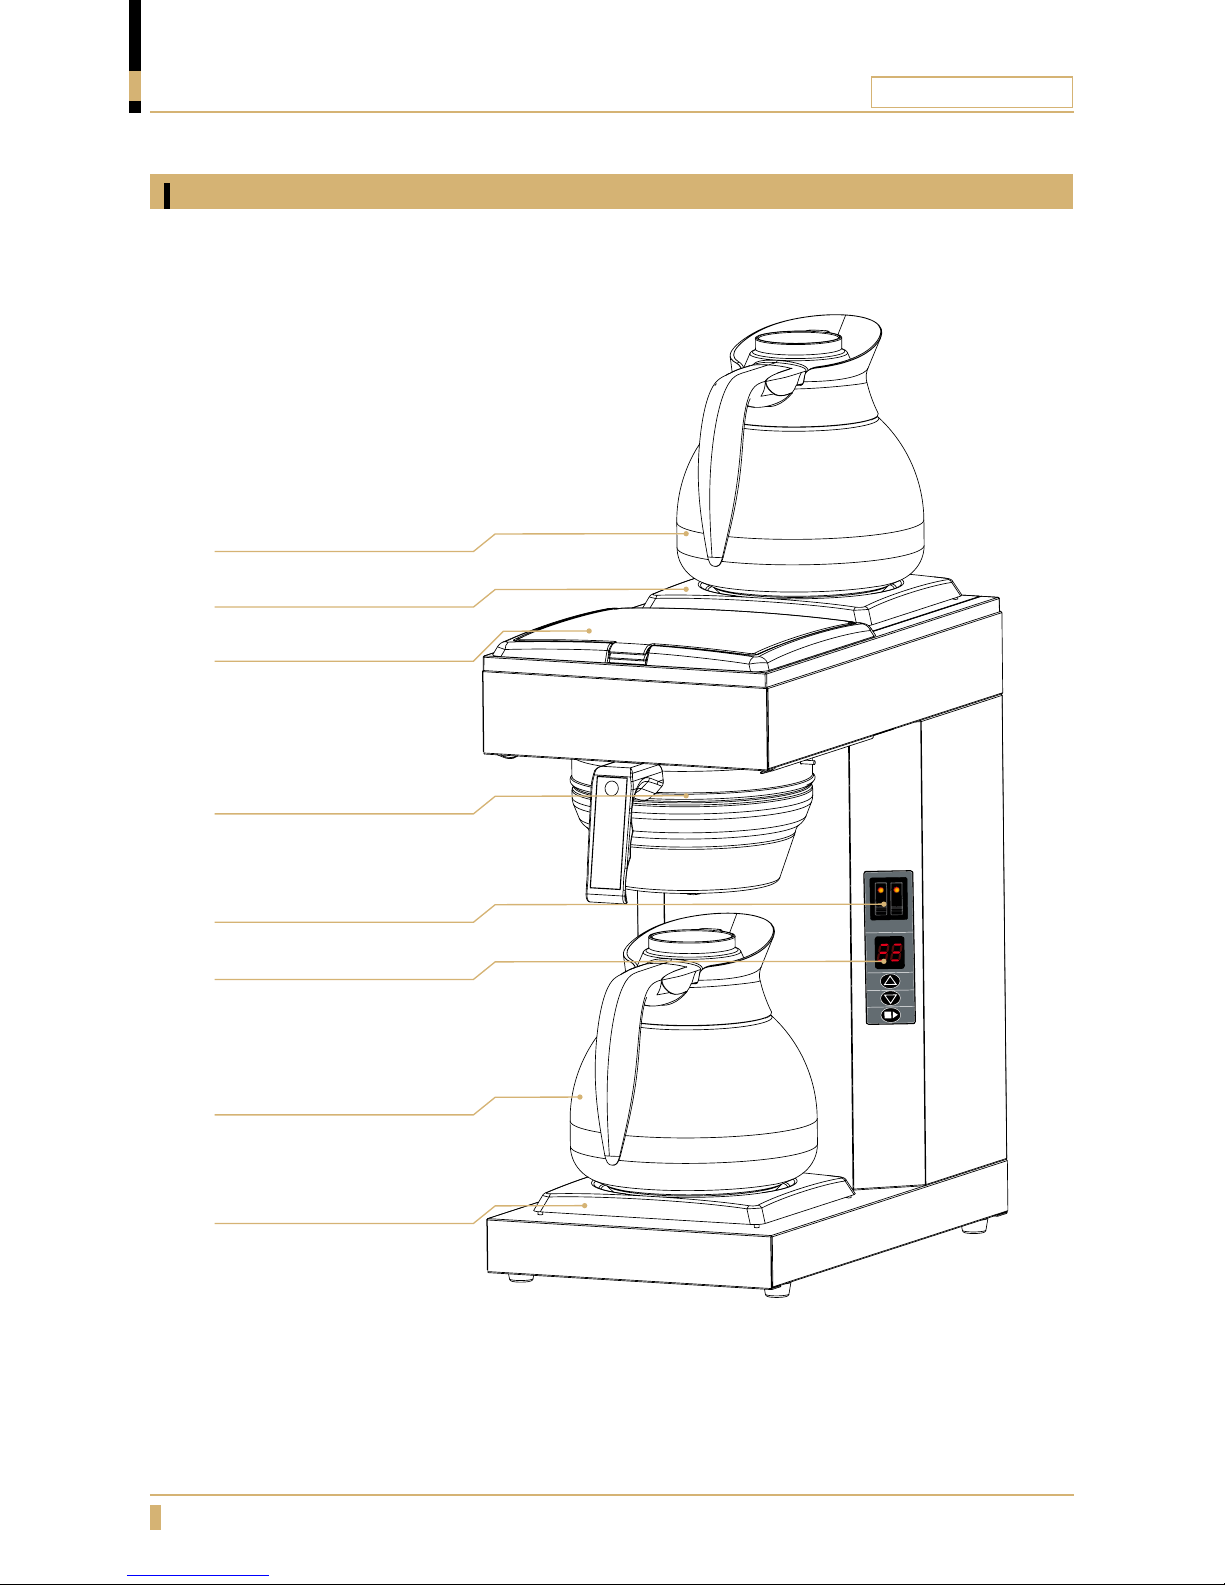
ORIGINAL LINE A
6
OVERVIEW OF COMPONENTS
A-2
Front view
Display
Power Switch
Filiter Holder
Tank Lid
Glass decanter
Glass decanter
Lower hot plate
Upper hot plate
Page 7
ORIGINAL LINE A
7
OVERVIEW OF COMPONENTS
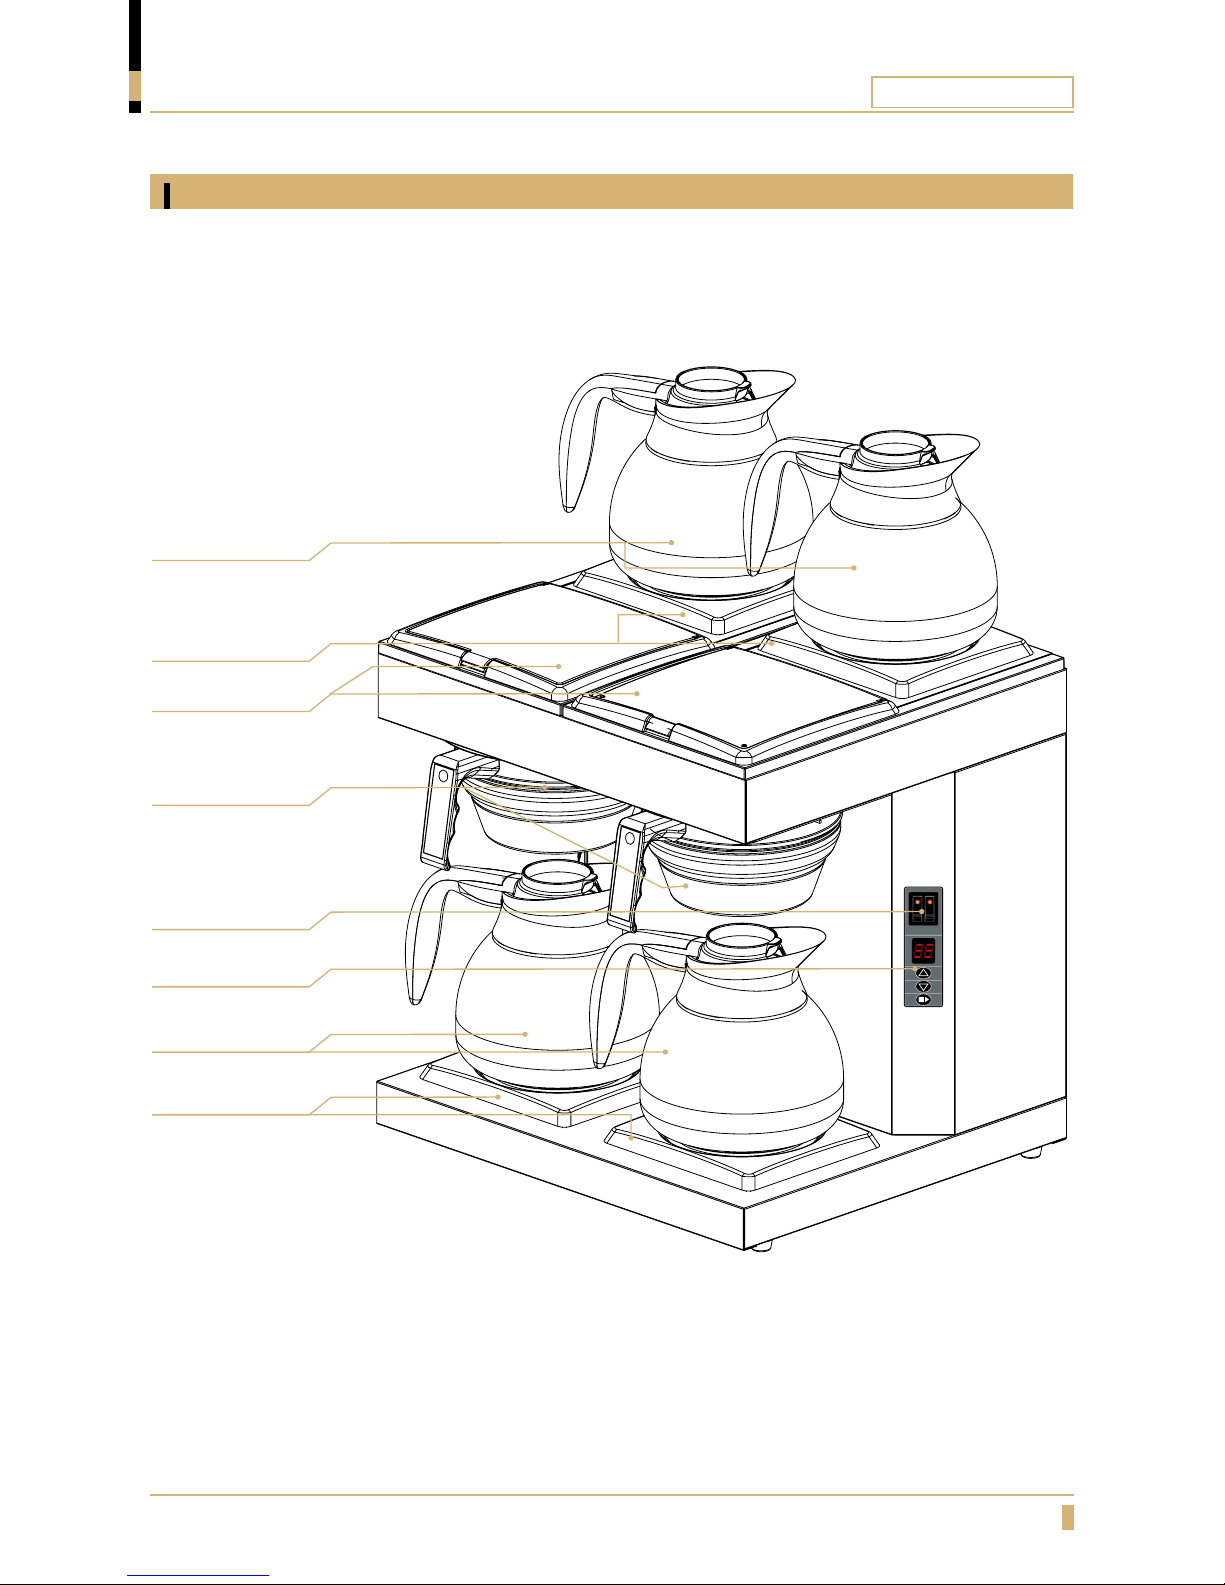
DA-4
Front view
Brewing lamp
Power Switch
Filiter Holder
Tank Lid
Glass decanters
Glass decanters
Lower hot plates
Upper hot plates
Page 8
ORIGINAL LINE A
8
OVERVIEW OF COMPONENTS
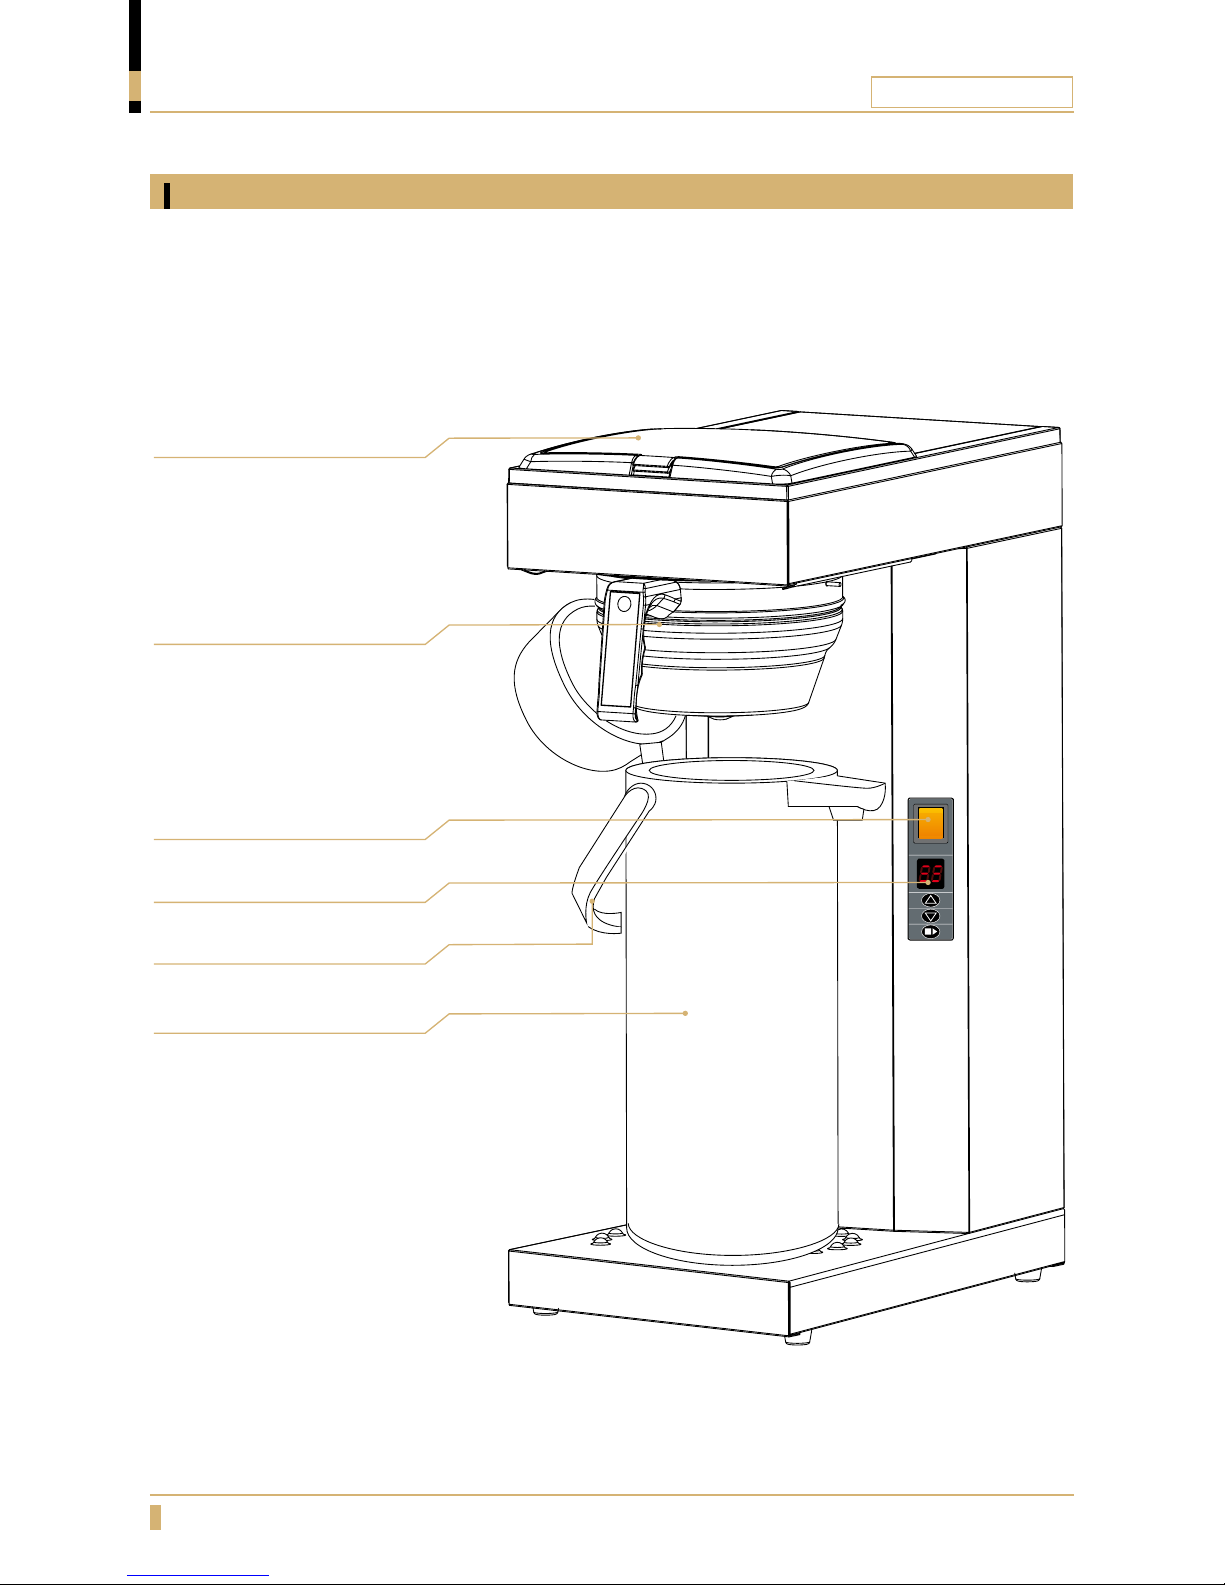
Thermos A
Front view
Display
Power Switch
Filiter Holder
Thermos
Carry Handle
Tank Lid
Page 9
ORIGINAL LINE A
9
OVERVIEW OF COMPONENTS
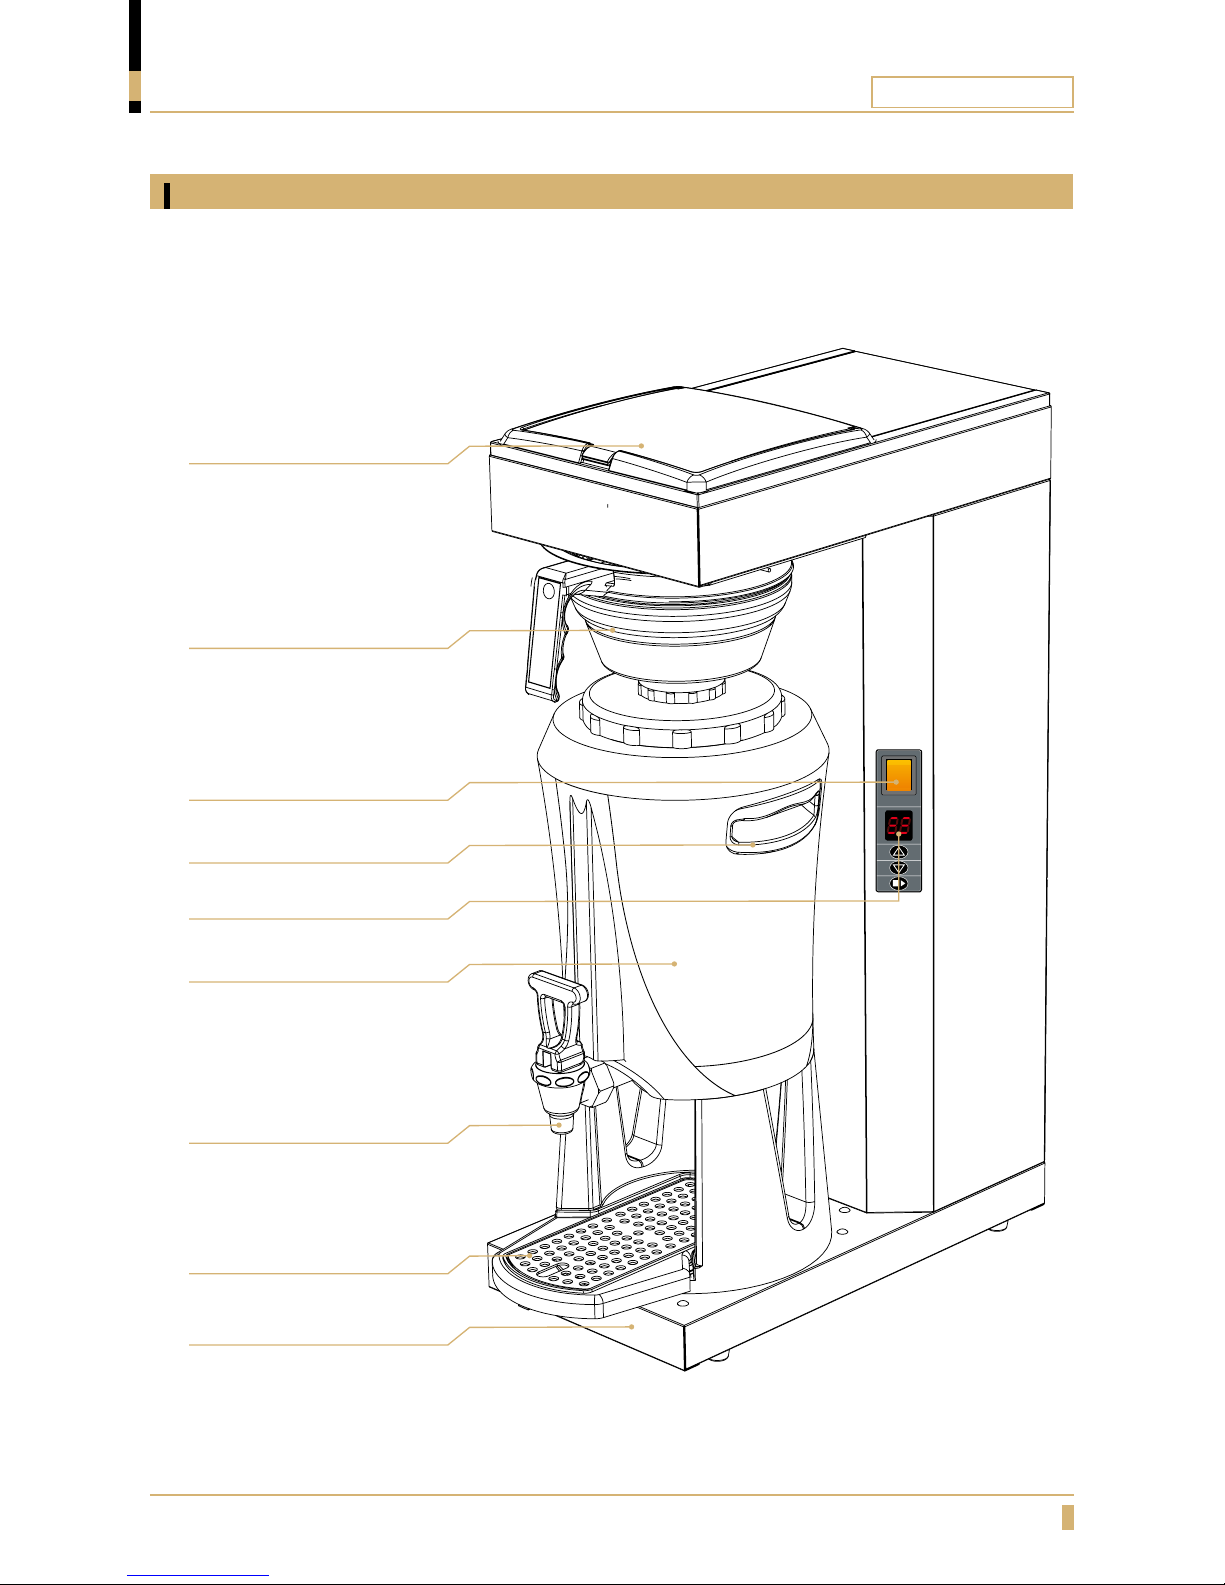
Mega Gold A
Front view
Display
Power Switch
Filiter Holder
Serving Station
Tap for Coffee
Drip Tray Insert
Drip Tray
Carry Handle
Tank Lid
Page 10
ORIGINAL LINE A
10
OVERVIEW OF COMPONENTS
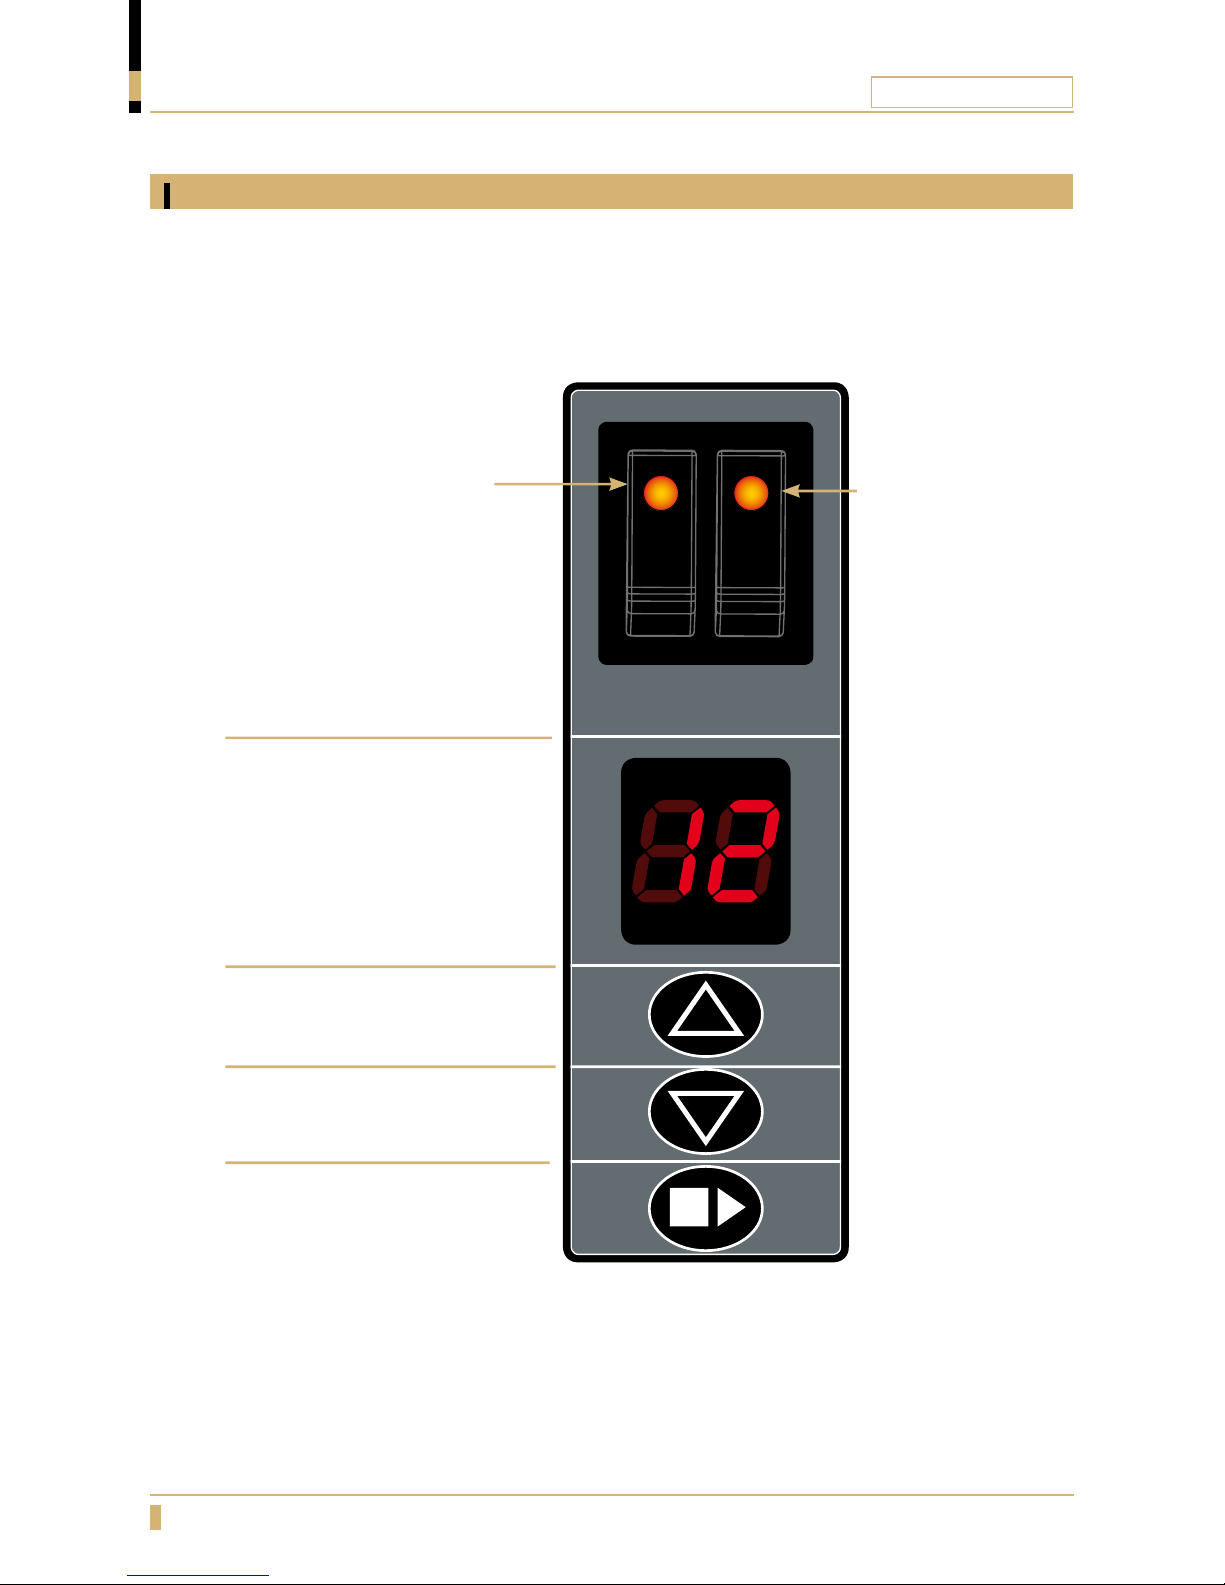
Function
A-2, DA-4
Shows the number of cups.
Display is blinking when brewing.
ON-OFF button for display
and lower hot plate.
Increase the number of cups.
Decrease the number of cups.
ON-OFF button
For upper hot plate.
Starts brewing.
During a brewing you may press
this button to stop the brew
process.
Page 11
ORIGINAL LINE A
11
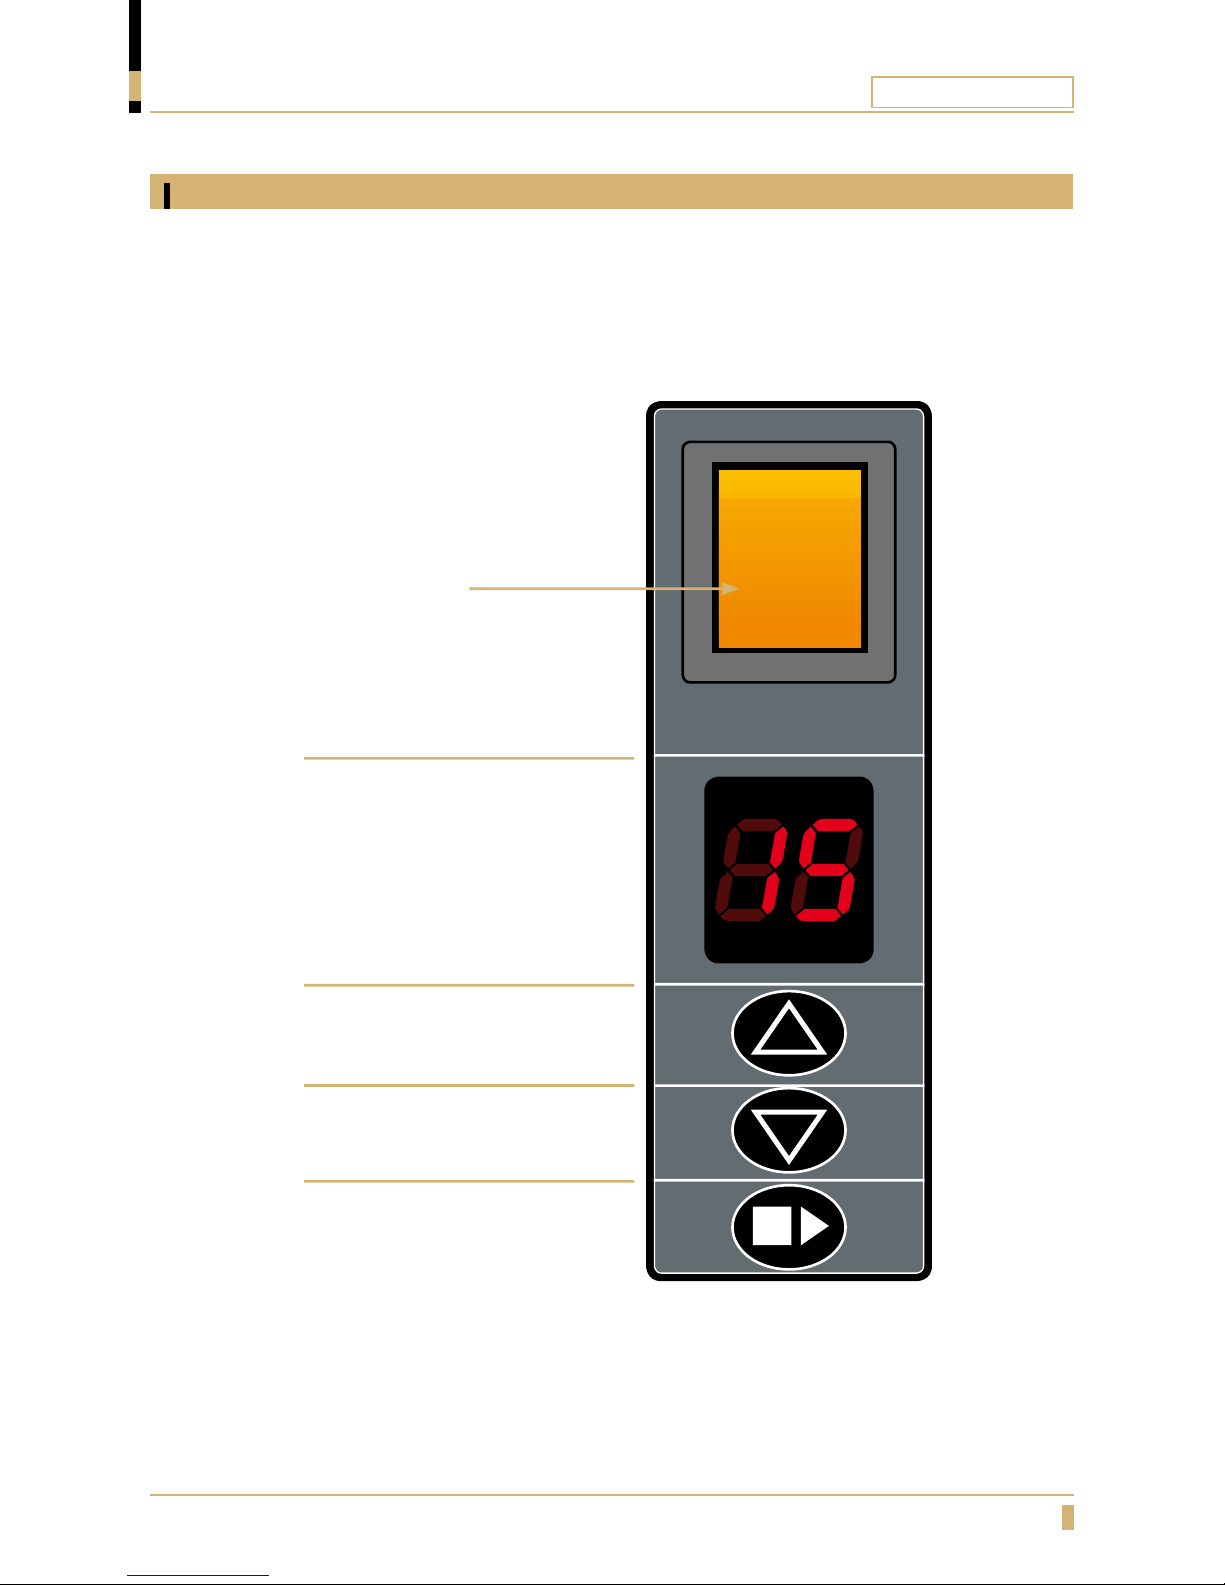
Increase the number of cups.
Decrease the number of cups.
OVERVIEW OF COMPONENTS
Function
Mega Gold A, Thermos A
Starts brewing.
During a brewing you may press
this button to stop the brew
process.
Shows the number of cups.
Display is blinking when brewing.
ON - OFF button.
Page 12
ORIGINAL LINE A
12
INSTALLATION AND START-UP
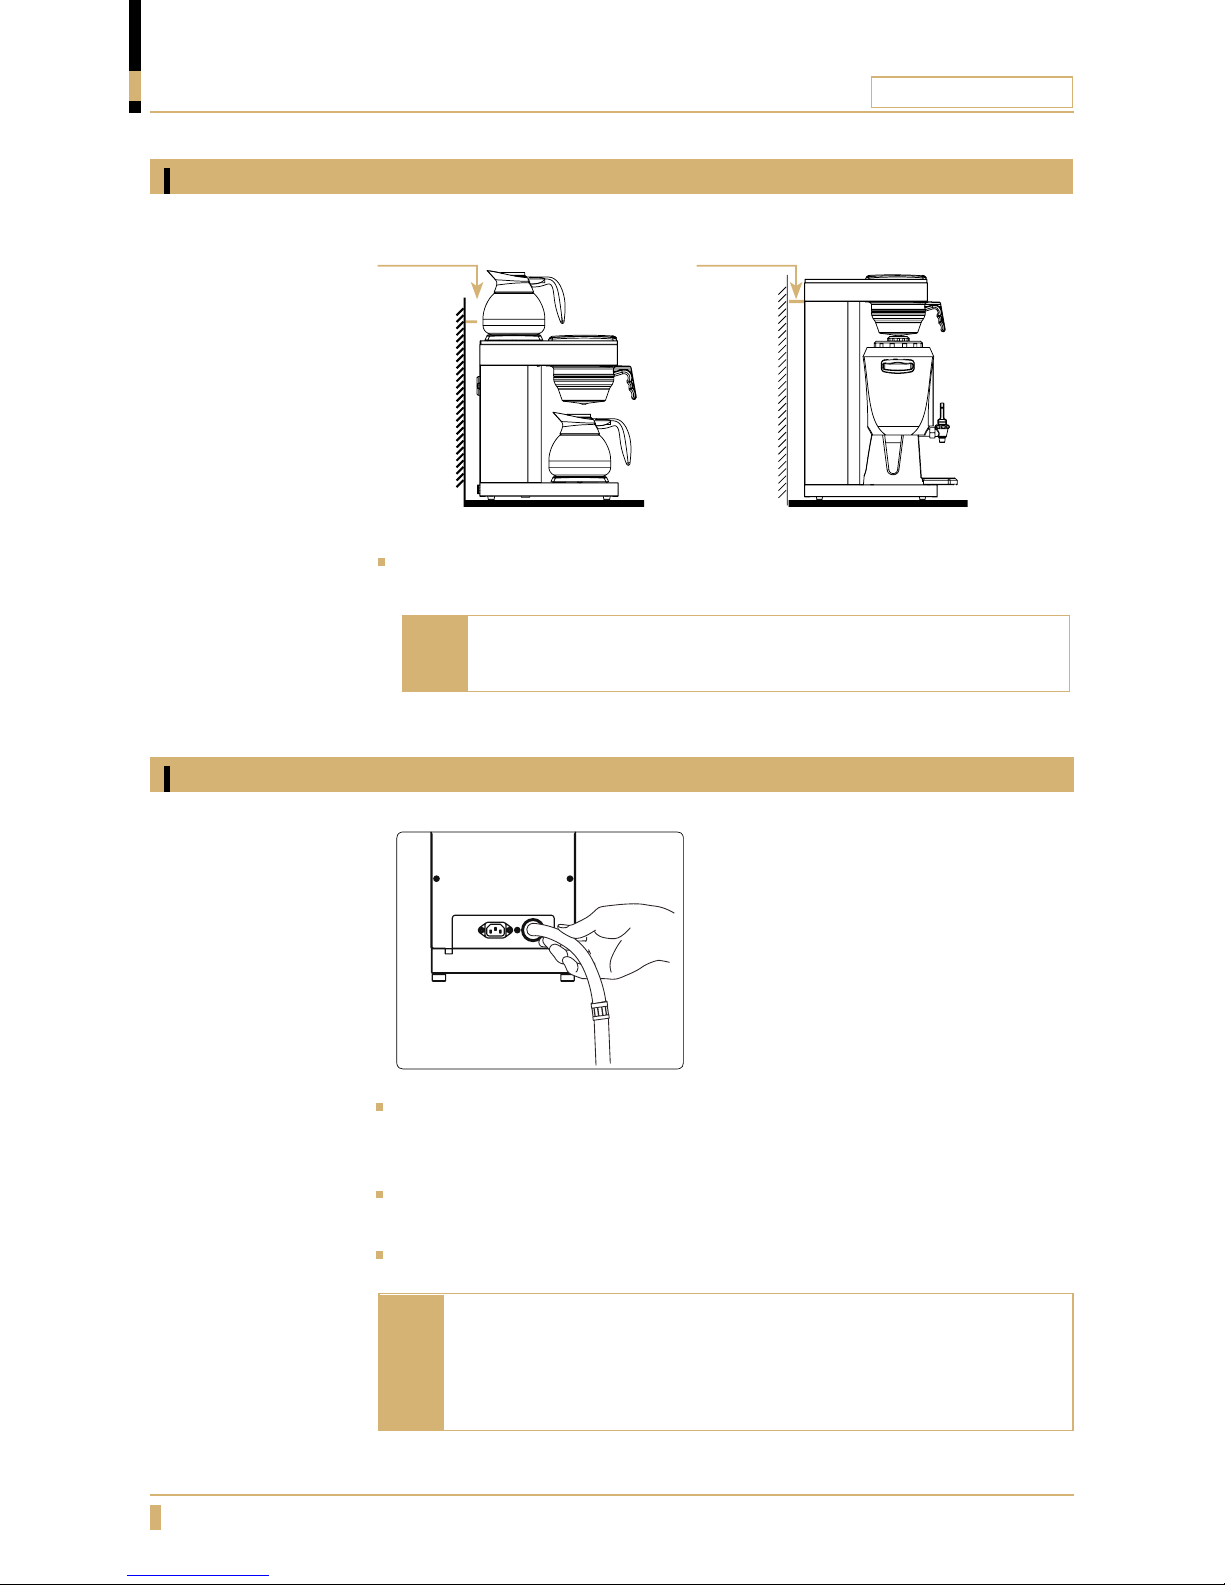
Positioning
Place the machine on a at horizontal surface that will support the weight of
the machine.
Make sure air is able to circulate behind the machine
(minimum 10cm).
Note
Min. 10cmMin. 10cm
Water connection
Connect the supplied water hose to the cold water connection using a ½’’
R-connection(A). When pushing the machine into position make sure there is
no interference to the hose to ensure proper water ow.
Water supply to the machine is the customer’s responsibility according to
instruction and advice from the supplier.
In areas with high level lime problem, a descaling lter should be mounted.
A
The new hose set supplied with the appliance shall be used and
that old hose sets shall not be reused. Connection to a closable
valve is recommended. Min. water pressure; 2bar (200kPa). Max.
waterpressure; 8bar (800kPa).
Note
Page 13
ORIGINAL LINE A
13
INSTALLATION AND START-UP
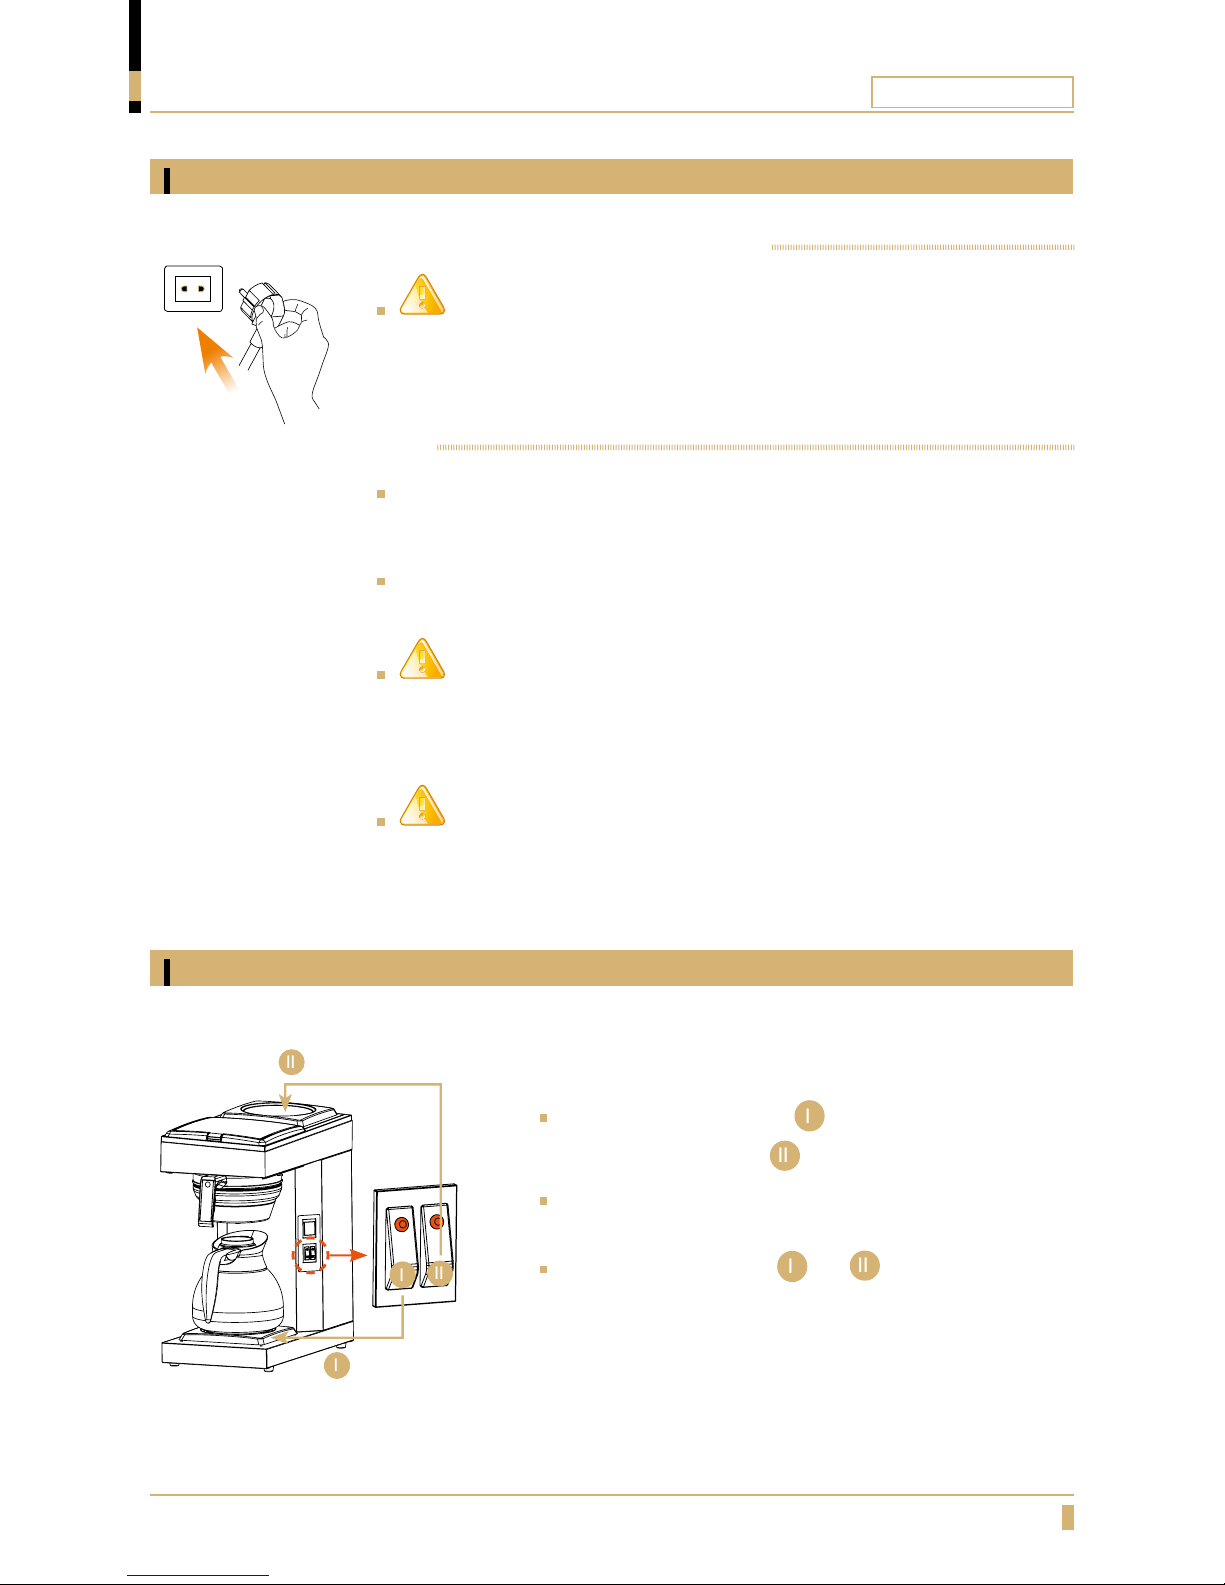
Electrical connection
IMPORTANT!
Connect the plug to a separate earthed wall socket.
110-120V / 220-230V 50-60Hz, 10 Amp.
A-2, THERMOS A, MEGA GOLD A
DA-4
The brewer is not reconnectable and may only be installed to the electric
supply network with a voltage that is stated on the brewer and shall be carried
out by an authorized electrician.
Recommended: install a line circuit breaker and a earth fault breaker to the
machine.
CAUTION!
Connection to a separate 2 phase only
- Brewer should be connected to 110V / 220V with neutral and ground.
- Use 10 Amp fuses.
IMPORTANT!
Electrical installations must be done by a certicated electrician.
Hot plate function
Turn on left power switch: I for lower hot plate,
and right power switch:
II
for upper hot plate.
Ensure that the lamps turn on and that the hot plates get
warm.
Turn off power switches I and II when not in use.
II
Upper hot plate
I
II
I
Lower hot plate
Page 14
ORIGINAL LINE A
14
INSTALLATION AND START-UP
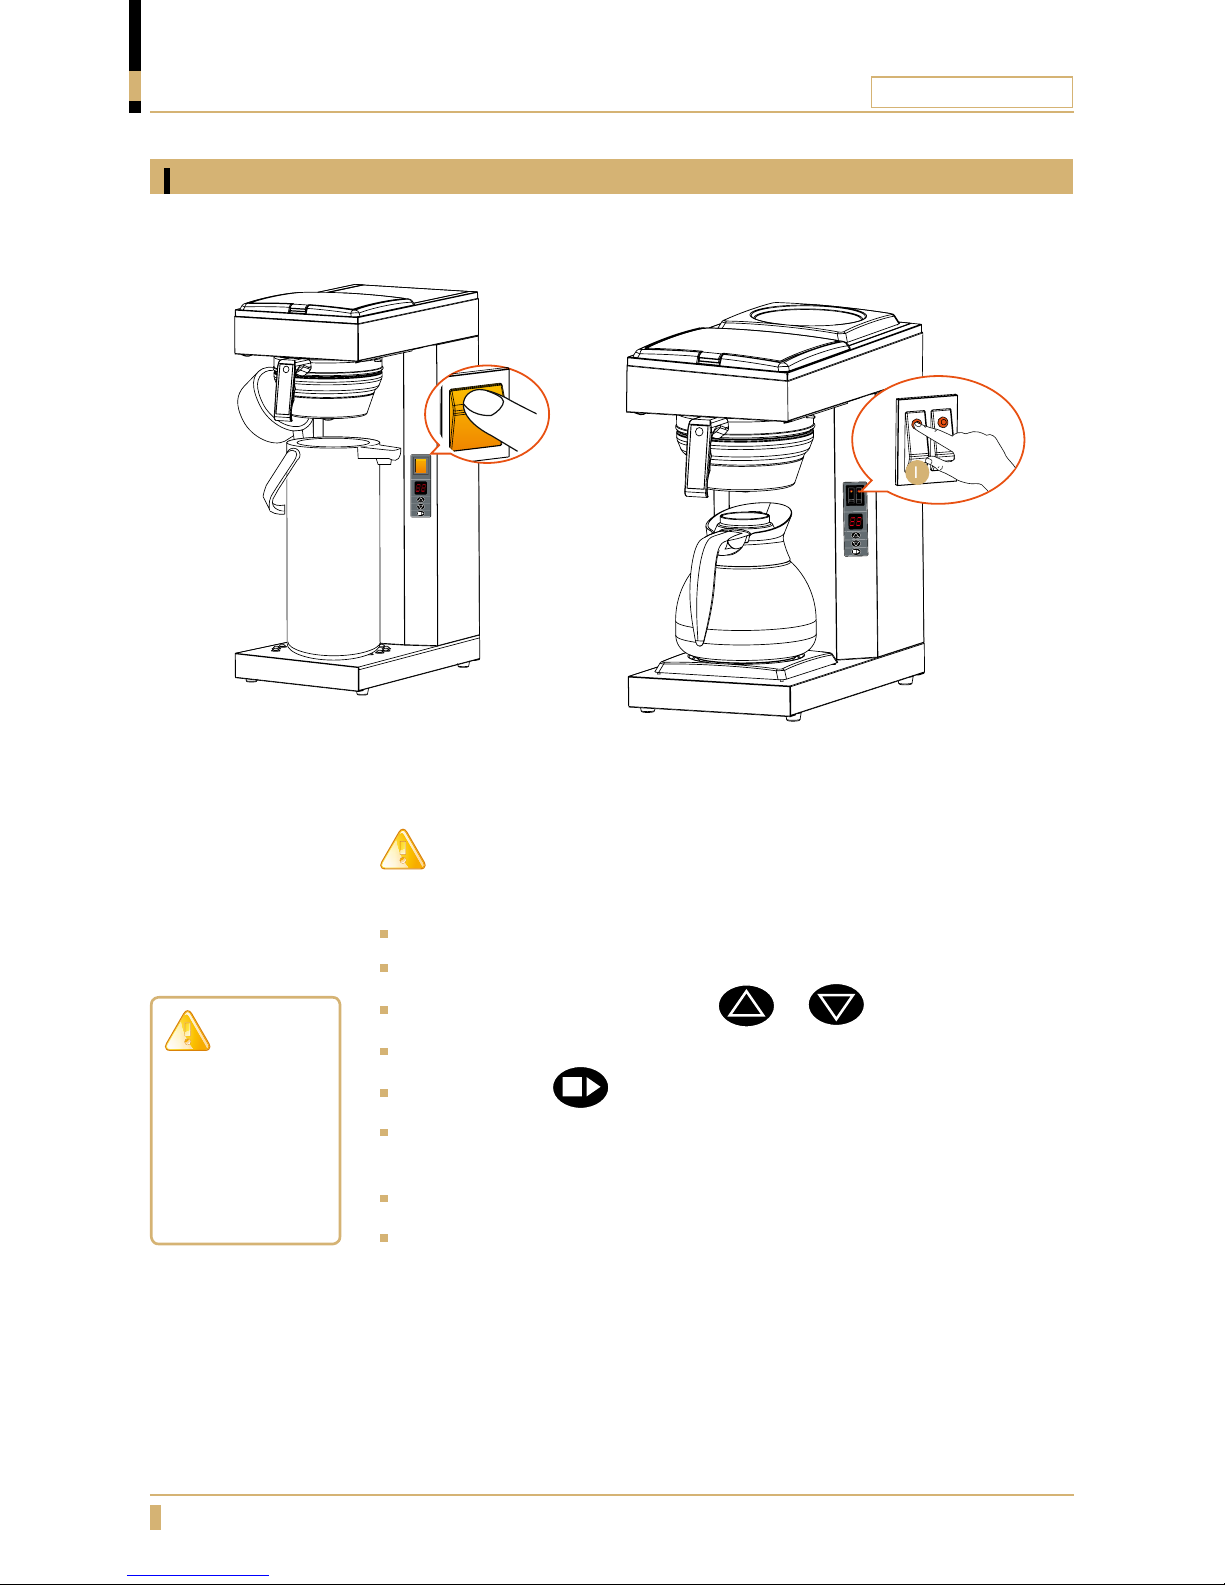
First time start-up
IMPORTANT!
First time you use the machine do the rst brewing with water only.
Slide the lter holder into position without lter and coffee.
Turn on the power switch(A).
Select 12,15 or 17 cups by adjusting or button.
Place the thermos or decanter under the lter holder.
Press the button to start the brew process.
After 20-30 seconds water shall start to pour into the filterholder and down
in the thermos or decanter.
When brewing is completed, empty the thermos or decanter.
A whole brew process takes around 6~8 minutes.
I
A
A
CAUTION!
A thermos or
decanter must
always be in the
machine when
brewing is in
progress.
Page 15
ORIGINAL LINE A
15
A
04
03
0201
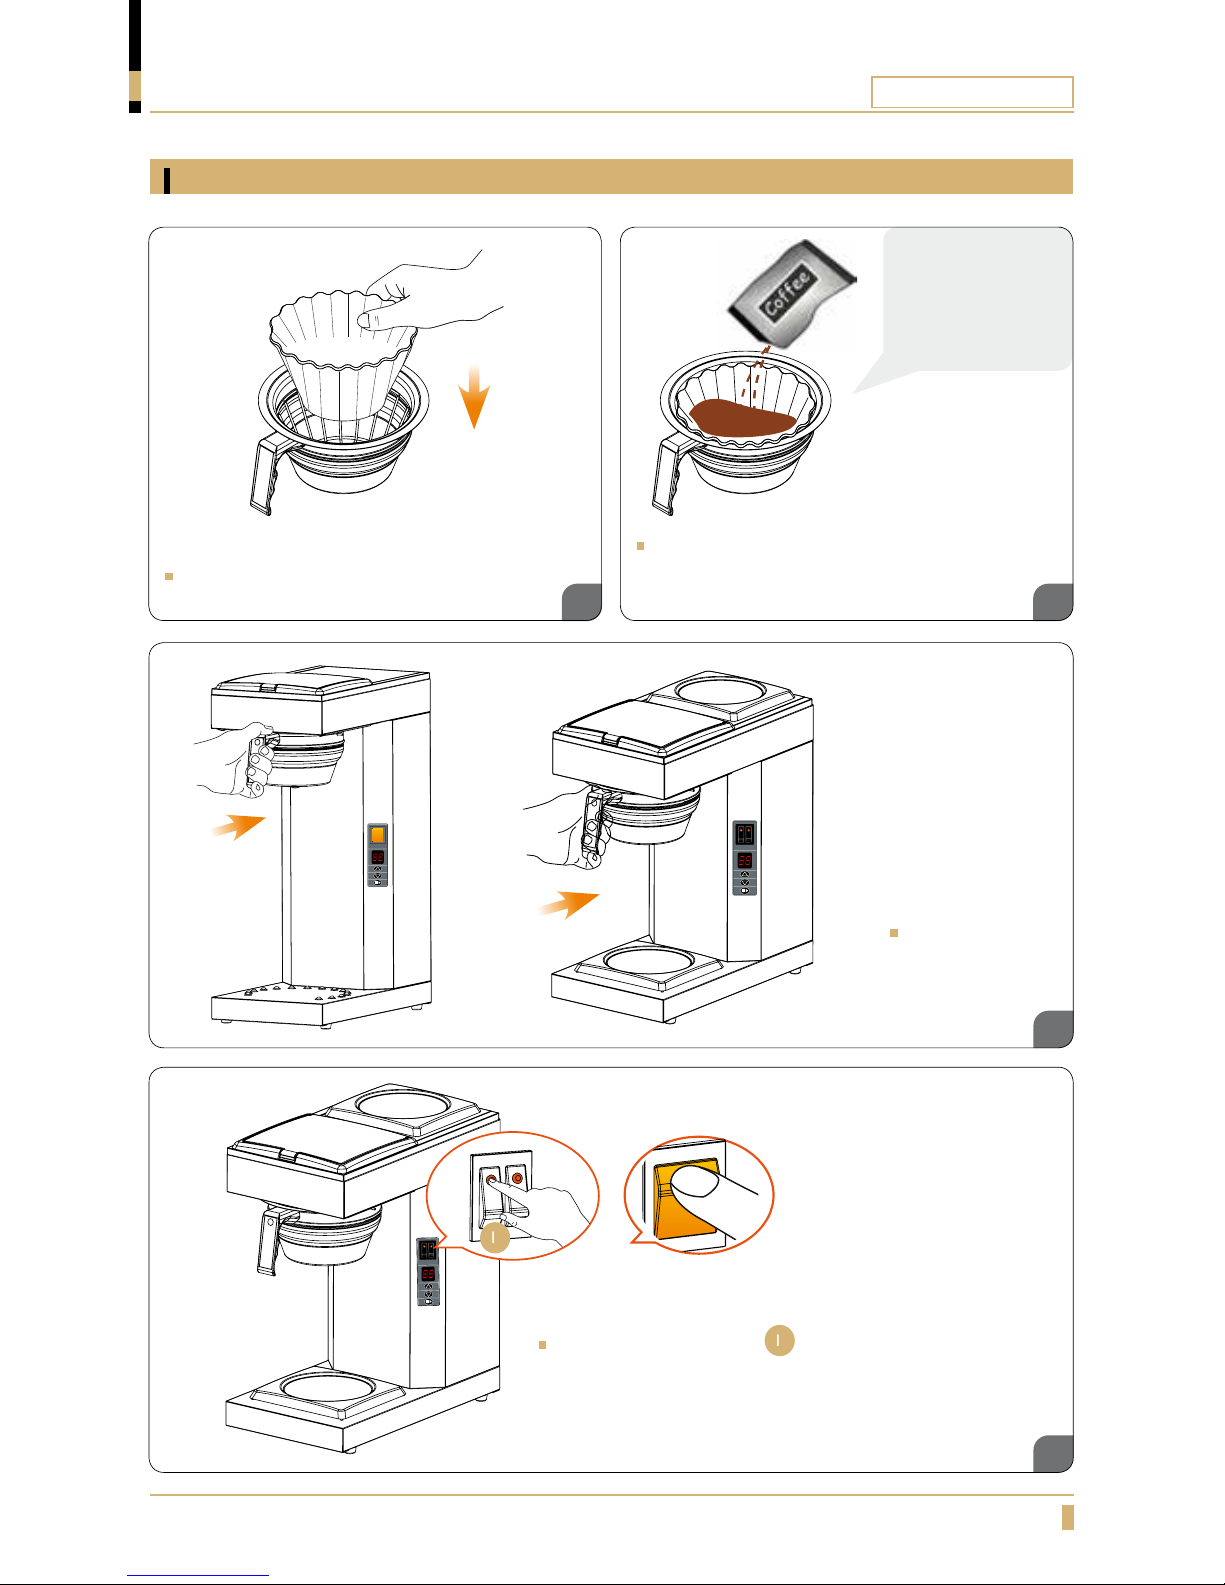
OPERATION
Place a 90mm lter in the lter holder.
Slide the lter
holder into
position.
Add coffee (restaurant / catering
ground coffee). Make sure that the
coffee is evenly spread.
Turn on power switch( I / A) to activate the
dispaly and key pad.
Brewing with coffee
I
Recommended
powder amount is
60g/L
Page 16
ORIGINAL LINE A
16
05
06
OPERATION
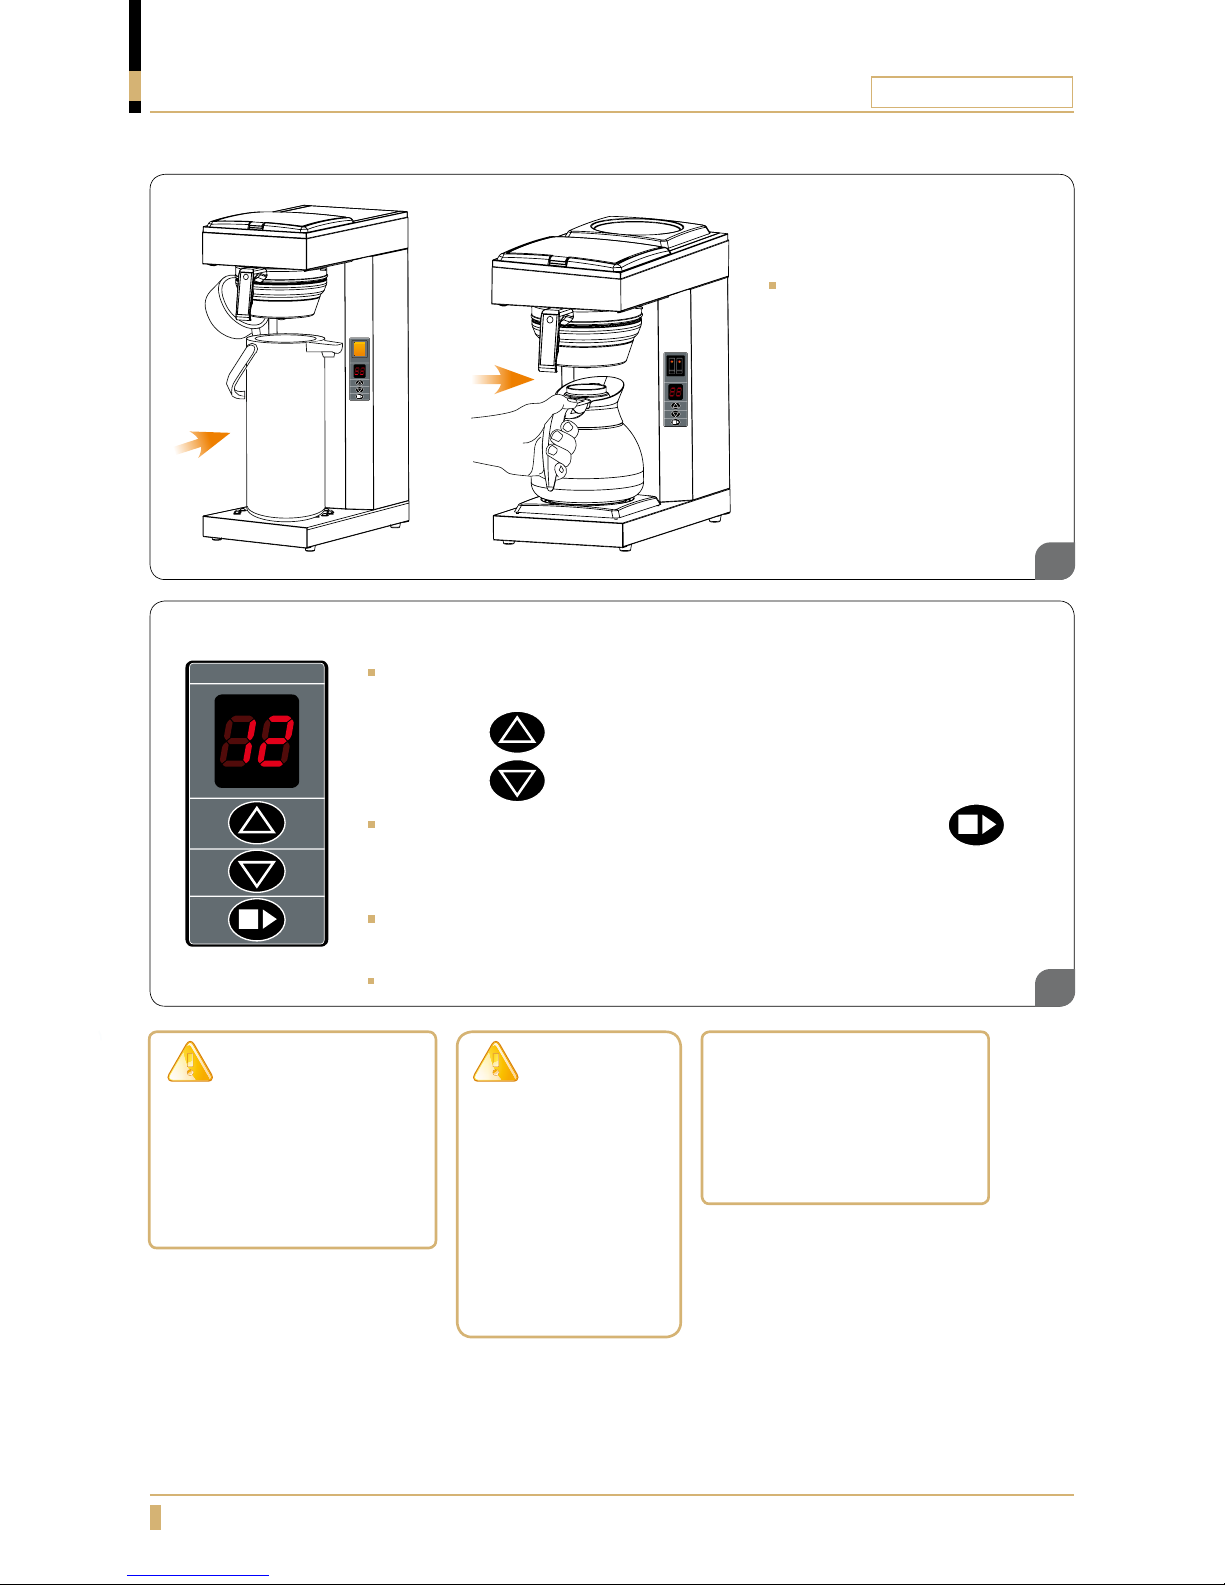
Place the thermos or decanter
under the lterholder.
CAUTION!
Under no circumstances
ll brewed coffee or coffee
powder into the water
tank . It may cause machine
damage.
Tips
Do not mix freshly brewed
coffee with old coffee kept
warm. It will result in poor
coffee quality.
Choose number of cups for your brewing by using the buttons described
below.
- Press the
button to increase number of cups
- Press the
button to decrease number of cups
When you have selected your desired number of cups press the
button to start brewing. During the brew process the number in
the dispaly will blink.
When the brewing is completed the display will stop blinking and a
3 second beep will be heard from the machine.
It is now safe to remove the thermos or decanter.
CAUTION!
Do not remove
decanter or thermos
before display have
stoped blinking and
ready beep has
been heard, it can
cause serious spill
and burns.
Page 17
ORIGINAL LINE A
17
OPERATION
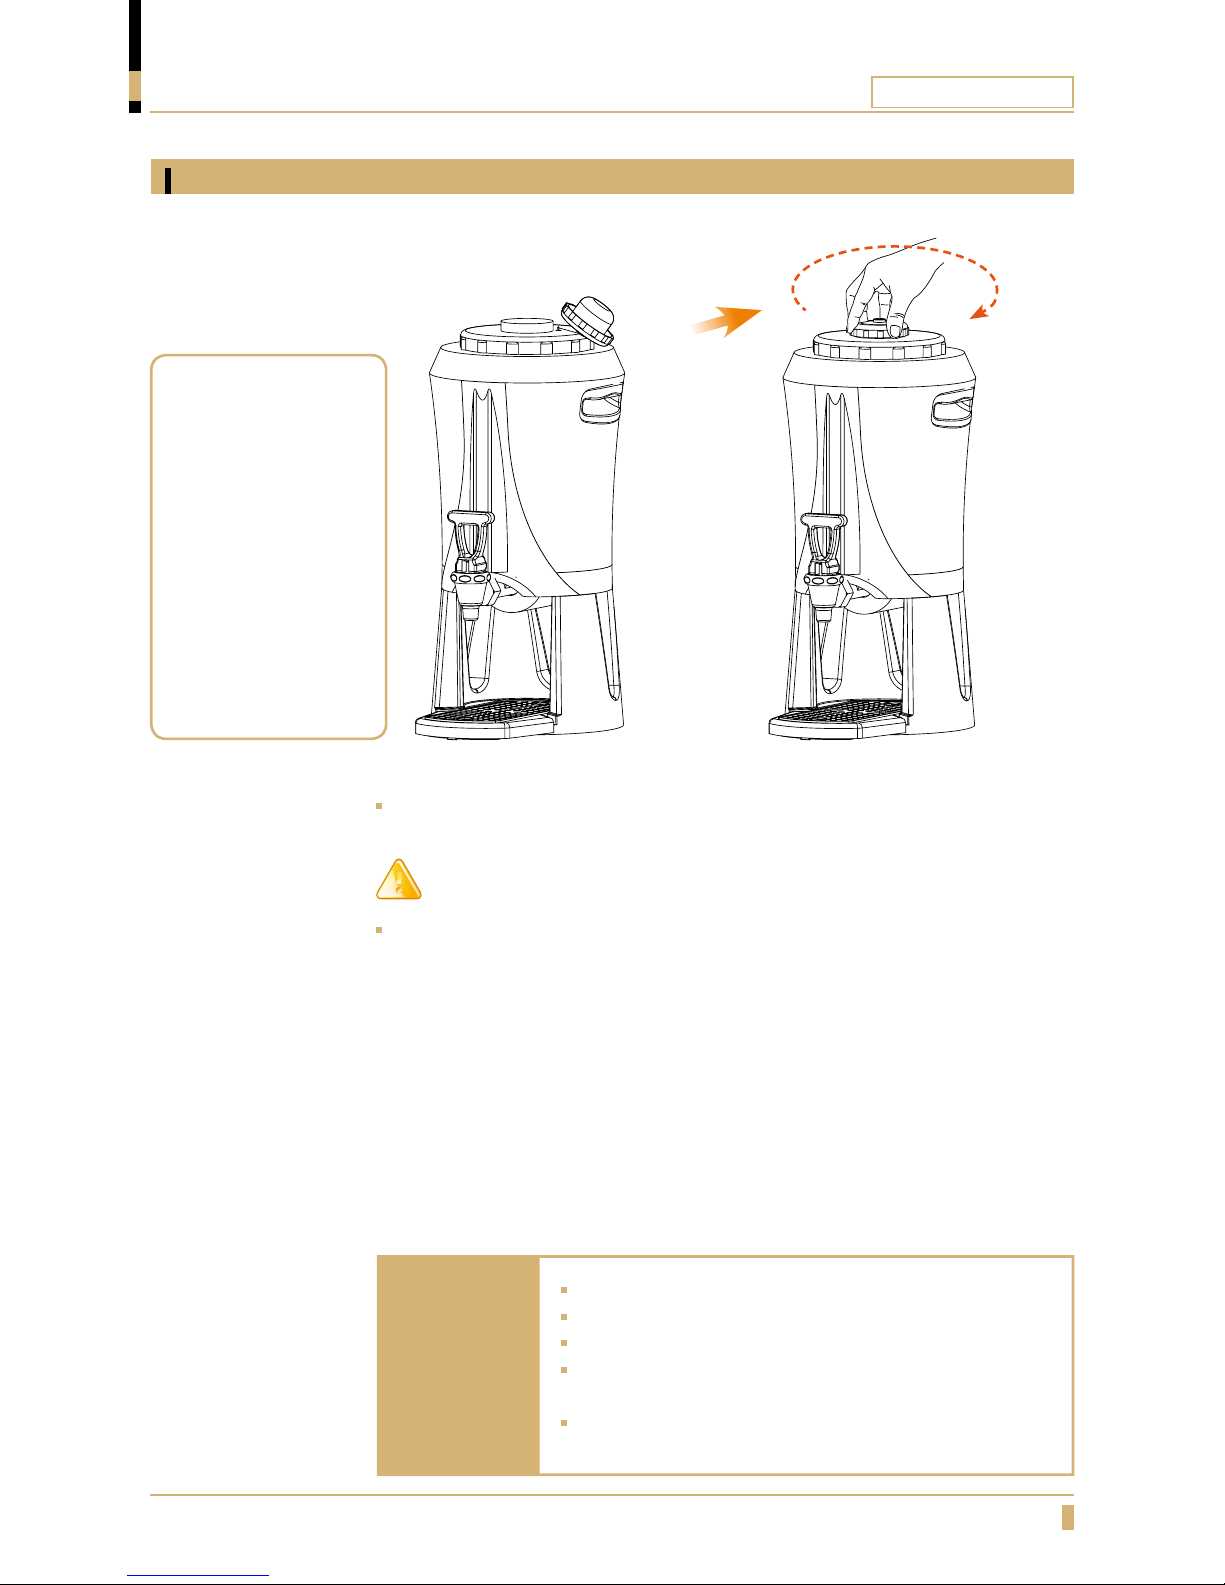
To keep temperature and aroma
A
Do not change the recommended portion of coffee.
Do not mix freshly brewed coffee with old coffee.
Always rinse the serving station before next brew.
Empty the lter holder from lter and coffee grounds
directly after a brew.
Dispense 50ml of coffee every hour to always have
fresh and hot coffee to the faucet.
Tips for keeping
coffee hot
Pre-heat the serving
station, start a brewing
with only water into
the serving station.
When brewing is
complete let it stand
for about 1 hour. Pour
out the water. Then
start a brew with
coffee.
Tips for
achieving the
best quality
To keep temperature and aroma, put the lid (A) back on the serving station
immediately after the brewing.
IMPORTANT!
The temperature in the serving station will decrease with ~1.5°C/h. There is
~30ml of coffee standing in the tubes from the inner container to the coffee
faucet. This part is not insulated and will drop in temperature much faster.
If the serving station haven’t been used in 1h the rst cup can be lower in
temperature. Cups after the rst will not be affected of this.
Page 18
ORIGINAL LINE A
18
CLEANING AND CARE
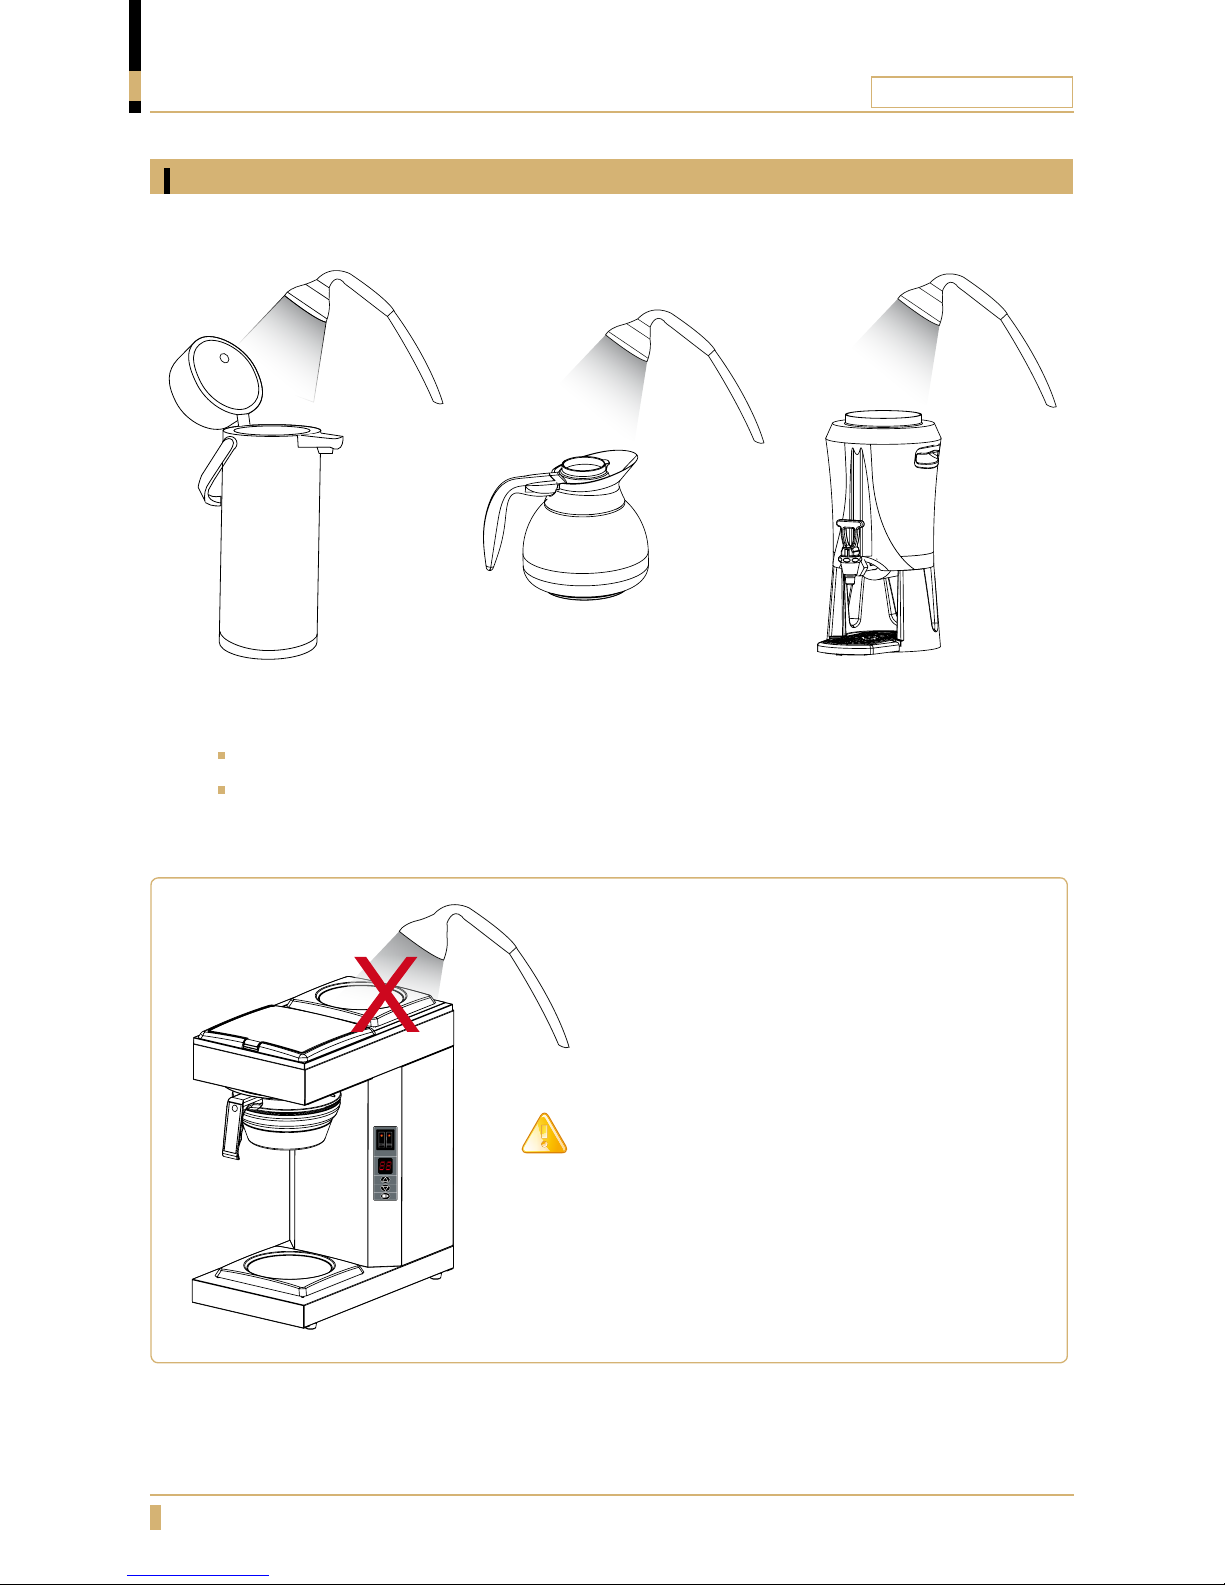
Before each brewing, rinse the thermos, decanter or serving station with fresh tap water.
When cleaning the outside, use a soft rag with liquid cleaning agent to prevent scratches.
Rinse thermos, decanter and serving station
CAUTION!
The machine should not be submerged in water
or washed in a dishwasher. it will result in machine
damage.
Page 19
ORIGINAL LINE A
19
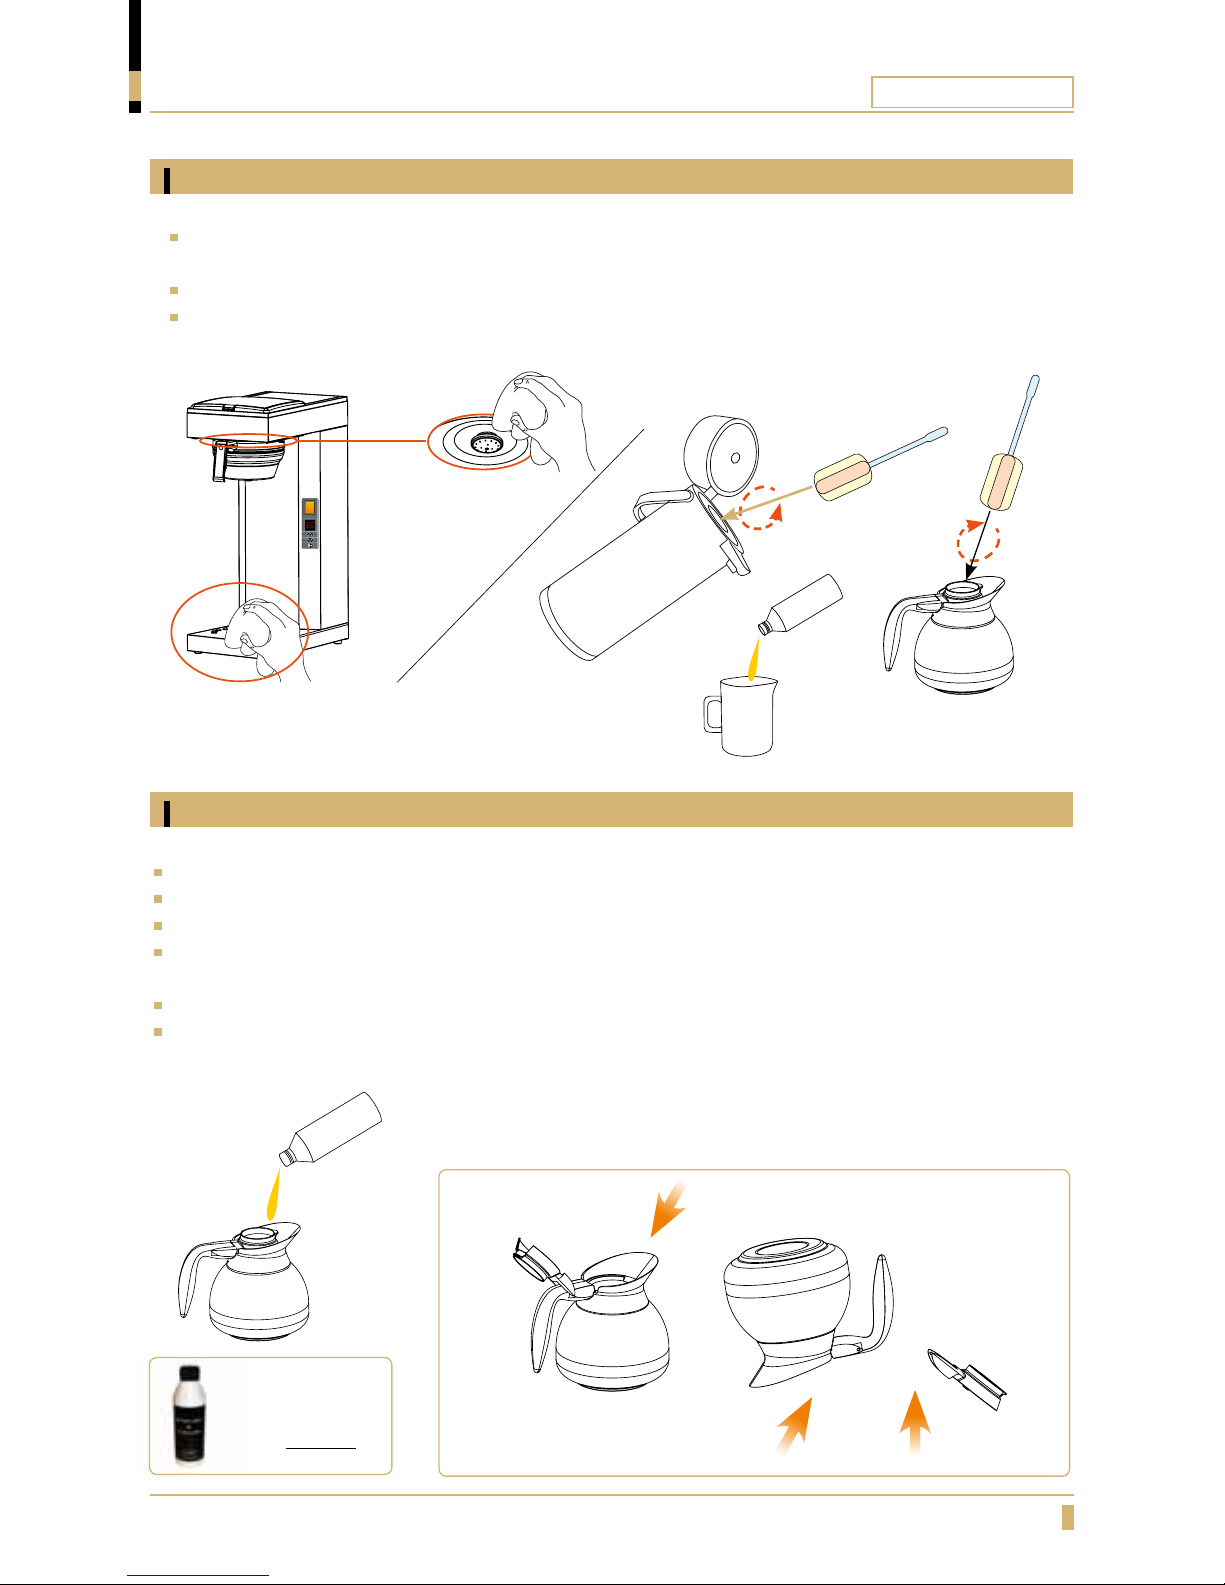
Descaling and cleaning.
Pour 50 ml descaling / cleaning solution in a decanter and ll it up with cold water.
Pour the mixture in the machine and proceed with a brewing without a lterpaper or coffee.
Rinse the machine thoroughly by brewing at least 3 times with clean water so that the particles from
descaling solution disappear.
Regular descaling will ensure optimum brewing performance and a longer life of the machine.
When cleaning the decanter in a dishwasher. Dismantle lid and place decanter upside down in the
dishwasher.(A)
Pitcher
Pt. no.110351
A
B
CLEANING AND CARE
Daily cleaning
Weekly cleaning
Wash the thermos, decanter(B) and the lter holder with liquid solution for coffee machines. Always
remove the lter immediately and clean the lter holder daily, coffee will get moldy.
Clean the spray nozzle(A) and the surrounding area.
Use a soft rag and liquid solution that does not scratch.
Descaling agent
Pt. no. 110412
A
B
Page 20
ORIGINAL LINE A
20
CLEANING AND CARE
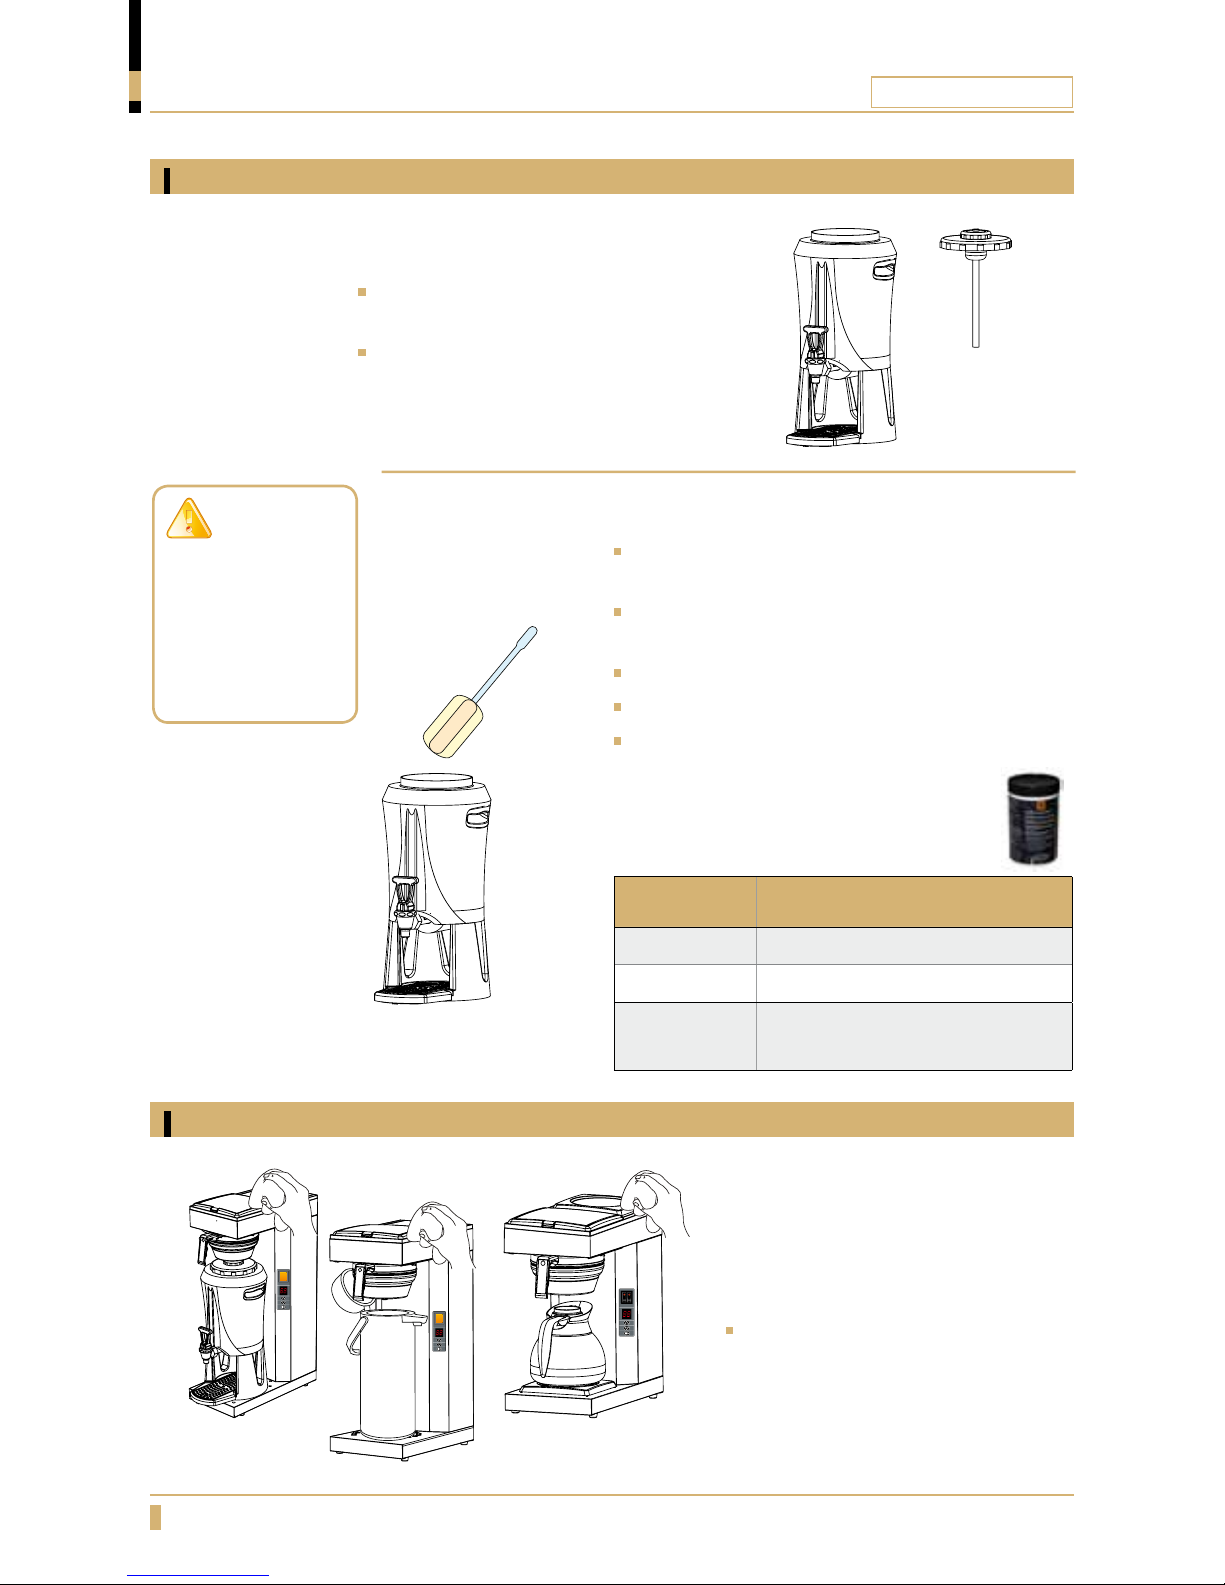
Disassemble the level tube and clean it
every week with the enclosed brush.
Take off the main lid and clean the mixer
tube(A).
Fill the serving station with hot water. ( Full
brewing without coffee and filter ).
Put 1 tablespoon with cleaning powder in the
serving station and wait at least 15 minutes.
Tap out 2/3 of the cleaning solution.
Clean the serving station with the cleaning brush.
Rinse the serving station with fresh tap water
several times before reuse.
Cleaning serving station
Cleaning of serving station 2.5 L
A
IMPORTANT!
Rinse the inside of
the serving station
several times with
fresh tap water.
Exterior cleaning
When cleaning exterior of the
machine, use a soft rag with liquid
cleaning agent to prevent scratches.
OPTIONS
Part No. CLEANING PARTS
110102-02
Cleaning powder
1104231
Cleaning brush
1103360
Cleaning brush for level tube,
mixer tube
Page 21
ORIGINAL LINE A
21
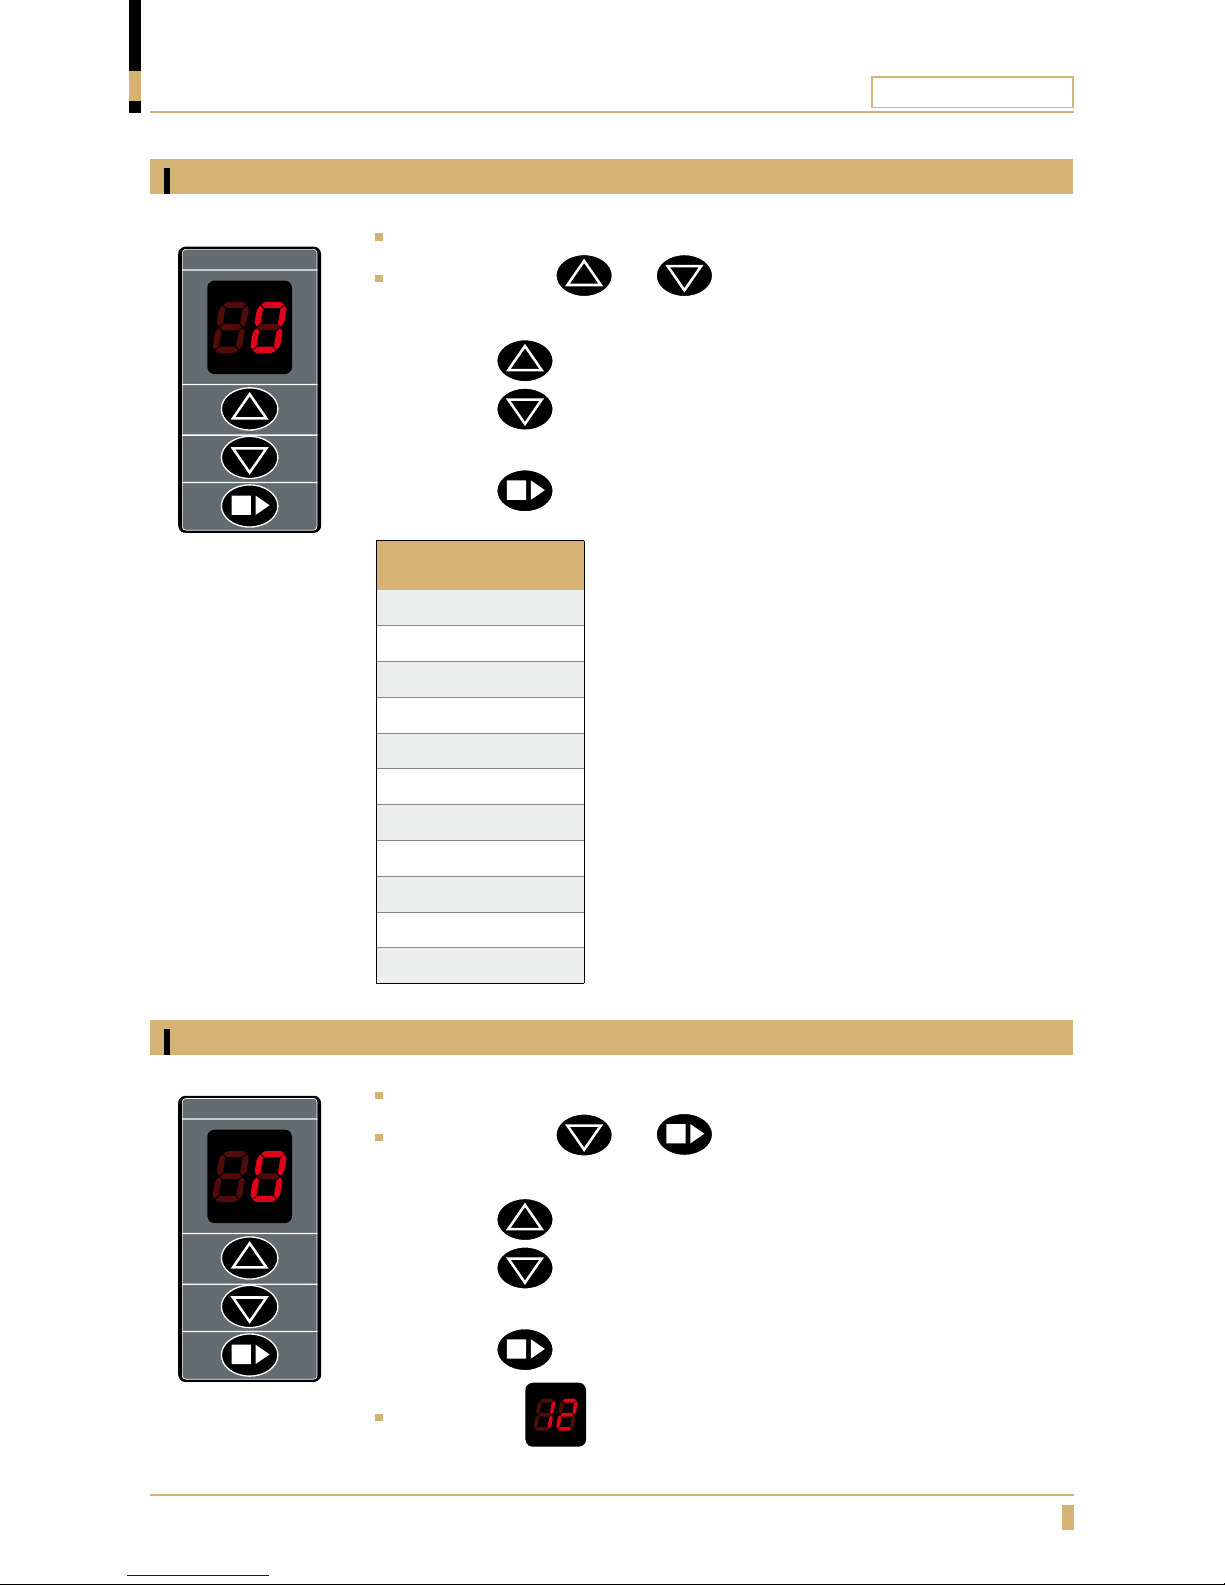
Adjust water amount
PROGRAMMING
Adjust amount of brew water
Press the buttons and at same time in 5 seconds.
The buzzer beeps twice. Display shows 0.
- Press the
button to increase amount of water.
- Press the
button to decrease amount of water.
- 1 step = 5%
- Press the
button to conrm the change.
Adjust the brew time
Press the buttons and at same time in 5 seconds.
The buzzer beeps four times. Display shows 0.
- Press the
button to increase brewing time.
- Press the
button to decrease brewing time.
- 1 step = 5%
- Press the
button to conrm the change.
Display shows and machine is ready to use.
ADJUSTMENTS
5 = 25%
4 = 20%
3 = 15%
2 = 10%
1 = 5%
0
- 1 = - 5%
- 2 = -10%
- 3 = - 15%
- 4 = - 20%
- 5 = - 25%
Adjust brew time
Page 22
ORIGINAL LINE A
22
POSSIBLE SOLUTION
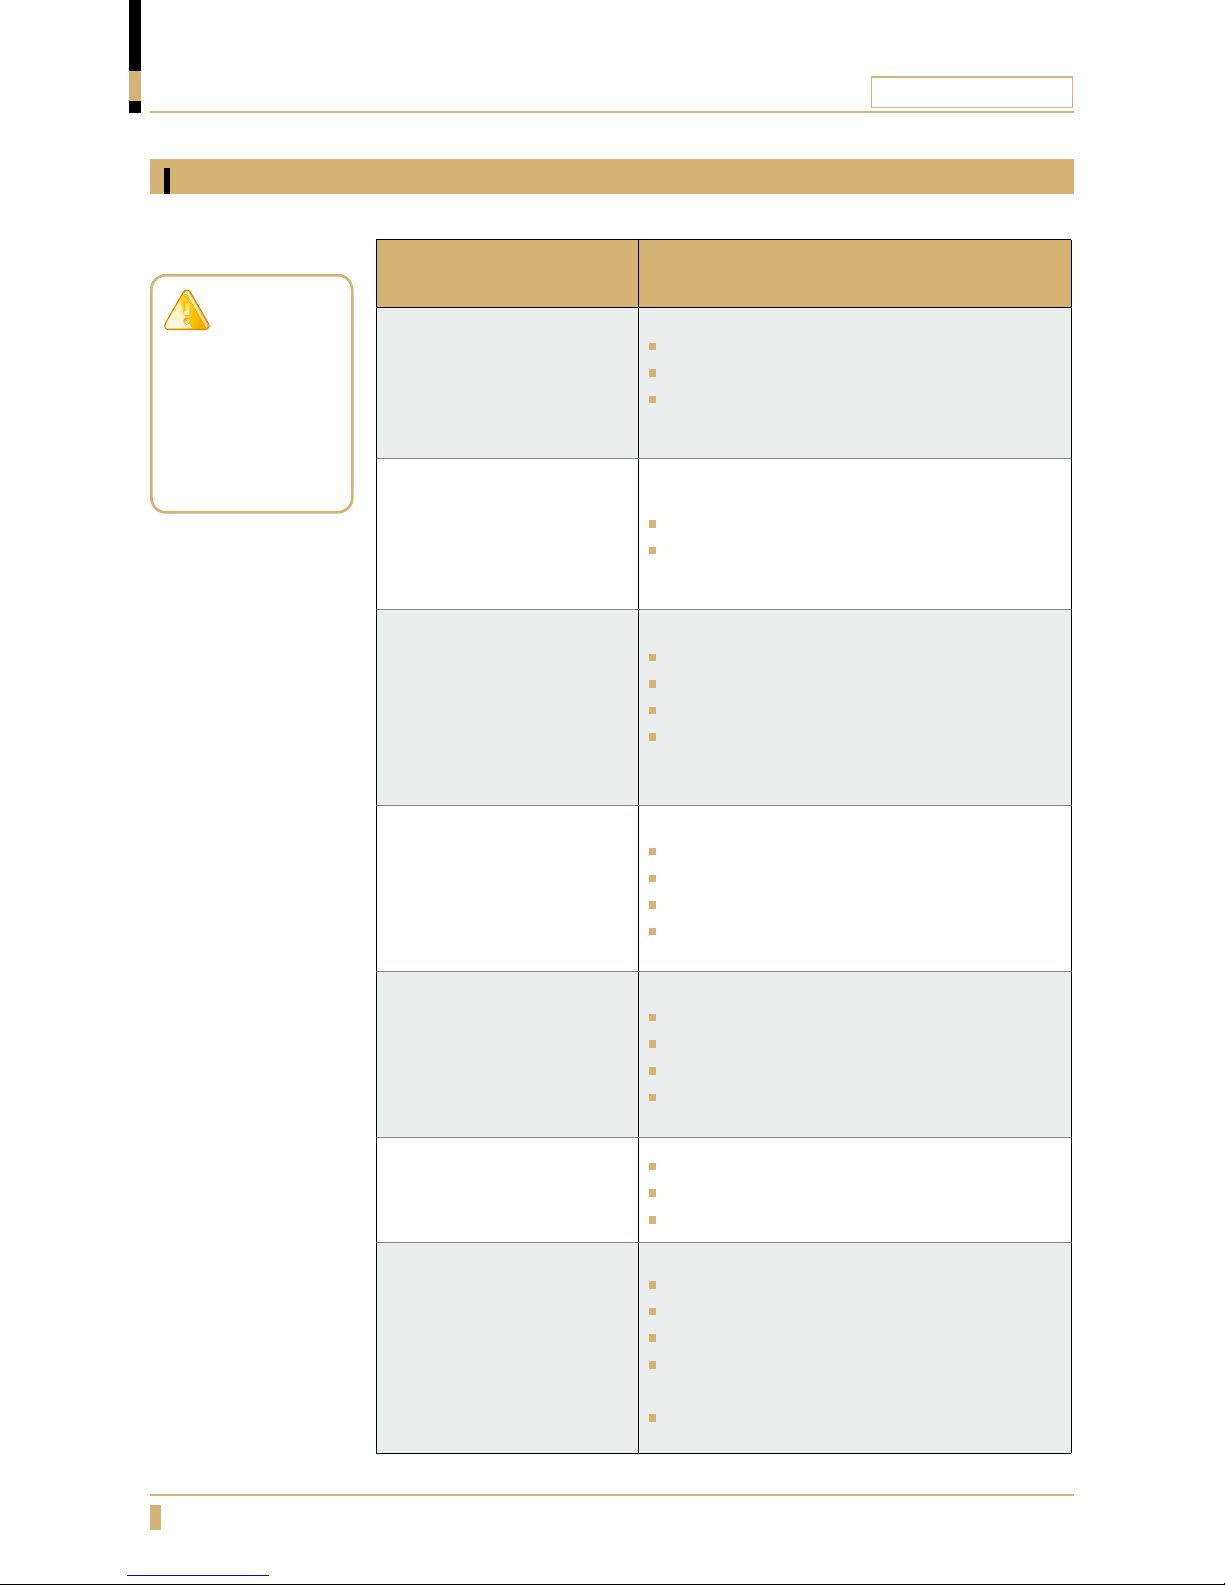
Fault and solution
FAU LT POSSIBLE SOLUTION
Power switch does not lit
Check plug connection to wall socket.
Check fuse in plug.
Check if hot plate becomes warm, if so
replace power switch.
Hot plate does not become
warm although switch is lit.
Check connection to hot plate.
If hot plate is defective, replace.
Brewer excess steam.
Machine may require descaling.
Spray nozzel may need unblocking.
Hose may be bent.
Inlet to boiler may be blocked. Descale
machine - if boiler still defective - replace.
Machine will not brew.
Check overheating protection.
Check microswicth.
Check connection to boiler.
Boiler unit may need replacing.
The machine does not take
in water
Make sure water tap is open.
Make sure the water hose is not bent.
Check inlet valve.
Check that the display is blinking.
The machines does not
stop taking in water.
Dirt in the inlet valve.
inlet valve is defective - replace
PCB is defective - replace
The machine is giving
wrong amount of water.
Check water tap.
Water hose is bent.
Dirt in inlet valve.
Water amount adjustment set in display is
adjusted faulty. Adjust according to page 21.
Defect oatregulator in inlet valve - replace
IMPORTANT!
All maintenance
and installations
must be done
of an authorized
technician.
Page 23
ORIGINAL LINE A
23
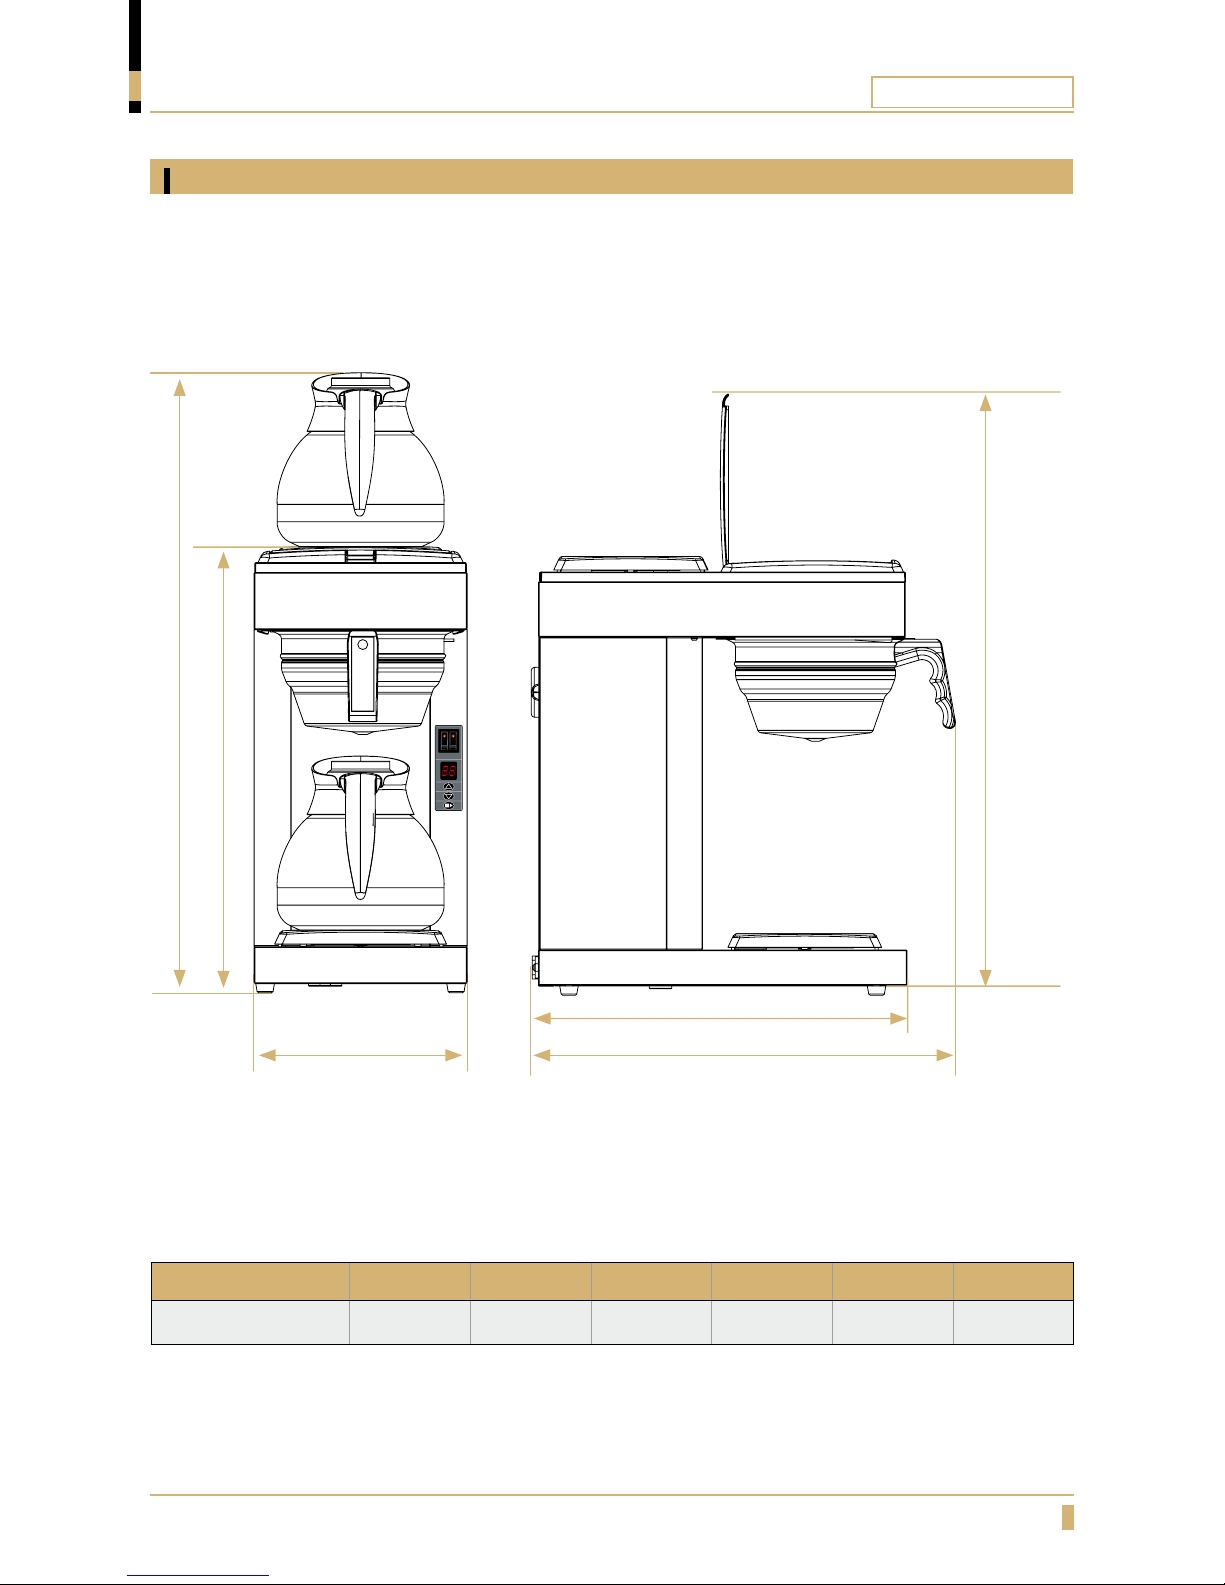
A-2
DIMENSION
A D E
B C
F
Model A B C D E F
A-2 595mm 205mm 410mm 428mm 578mm 360mm
Page 24
ORIGINAL LINE A
24
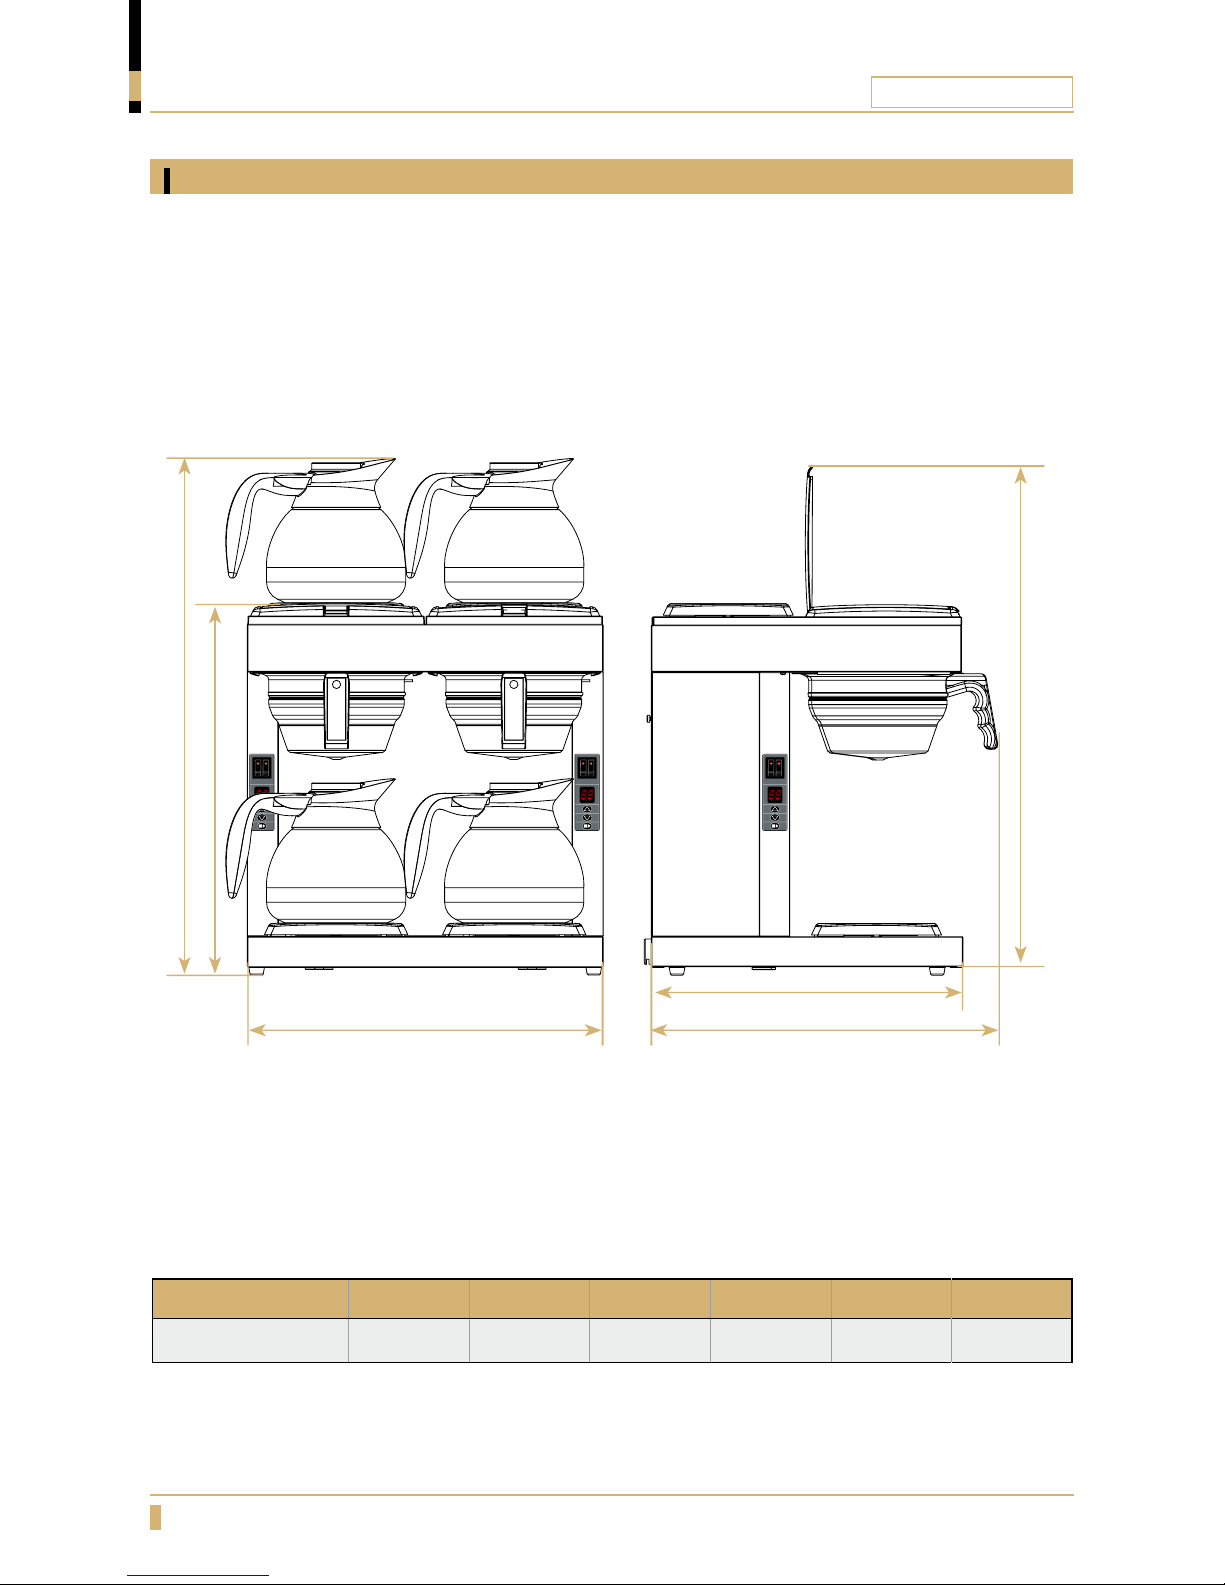
DA-4
DIMENSION
Model
A B C D E F
DA-4 410mm 410mm 428mm 595mm 578mm 360mm
D C
A
E
B
F
Page 25
ORIGINAL LINE A
25
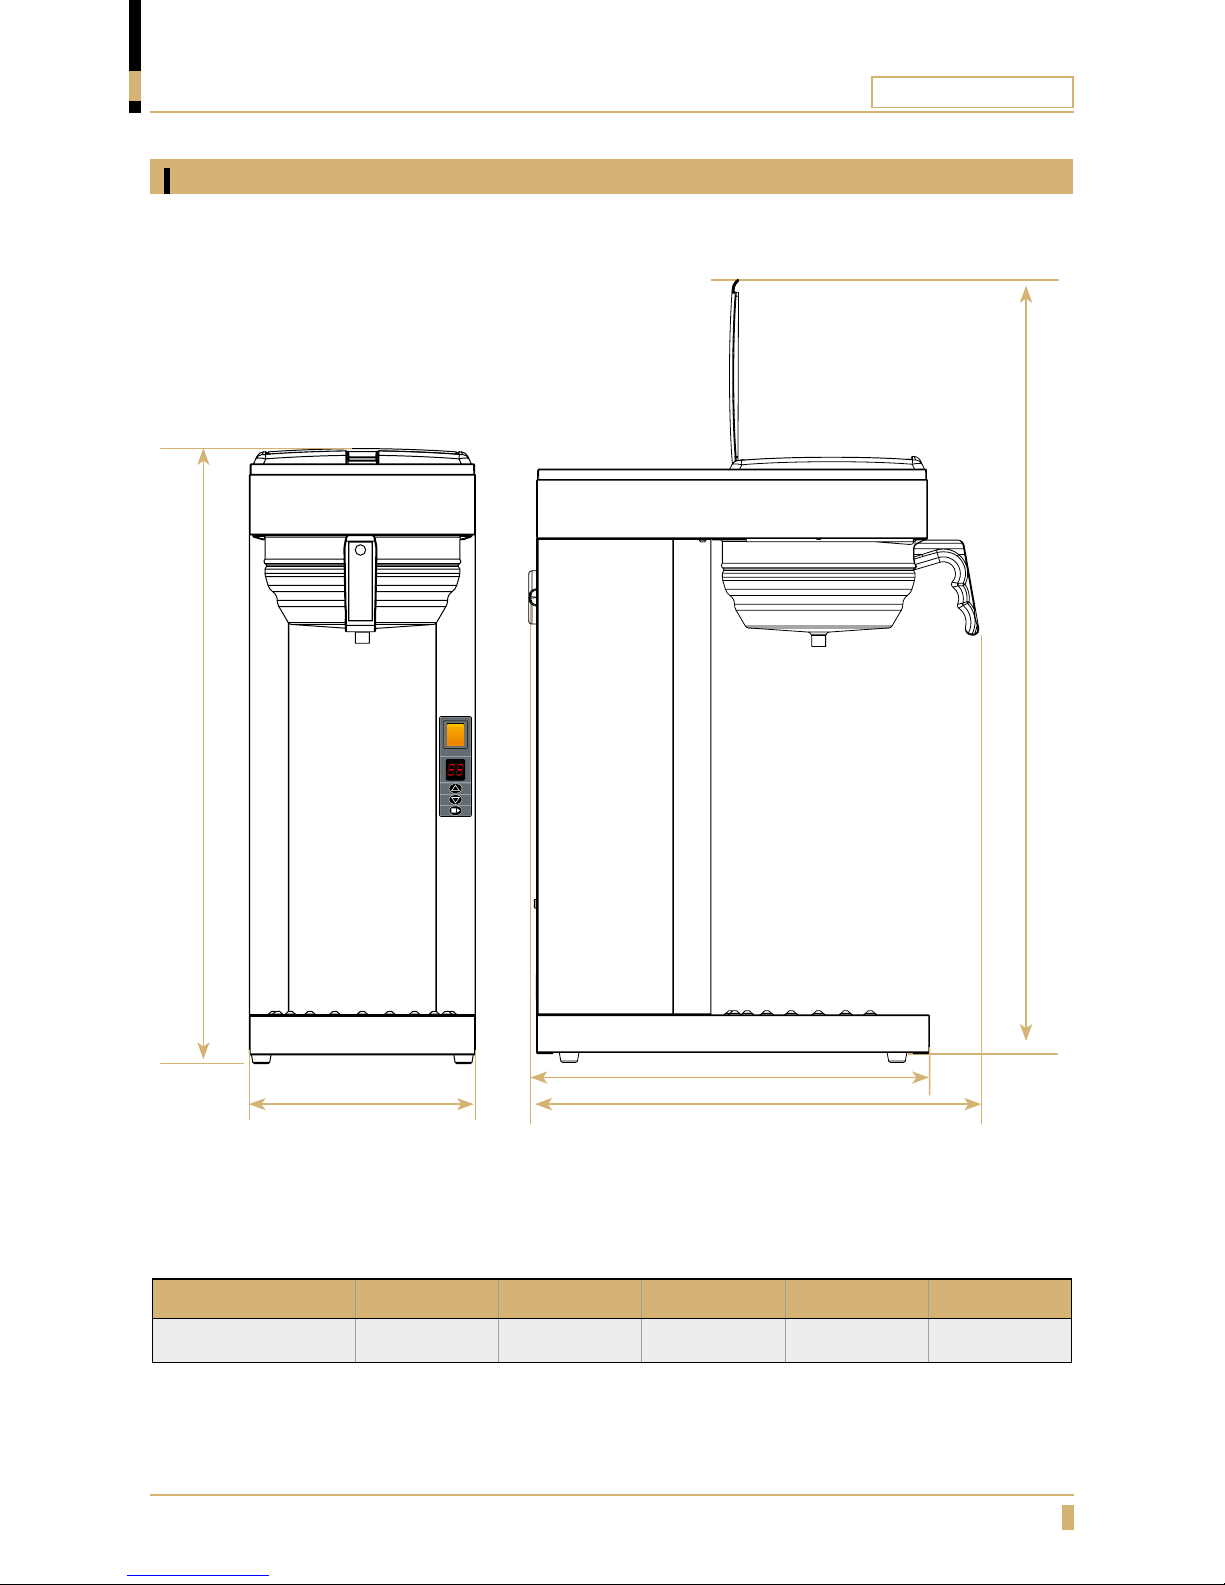
Thermos A
DIMENSION
Model
A B C D F
Thermos A 557mm 205mm 410mm 708mm 360mm
B
A
F
D
C
Page 26
ORIGINAL LINE A
26
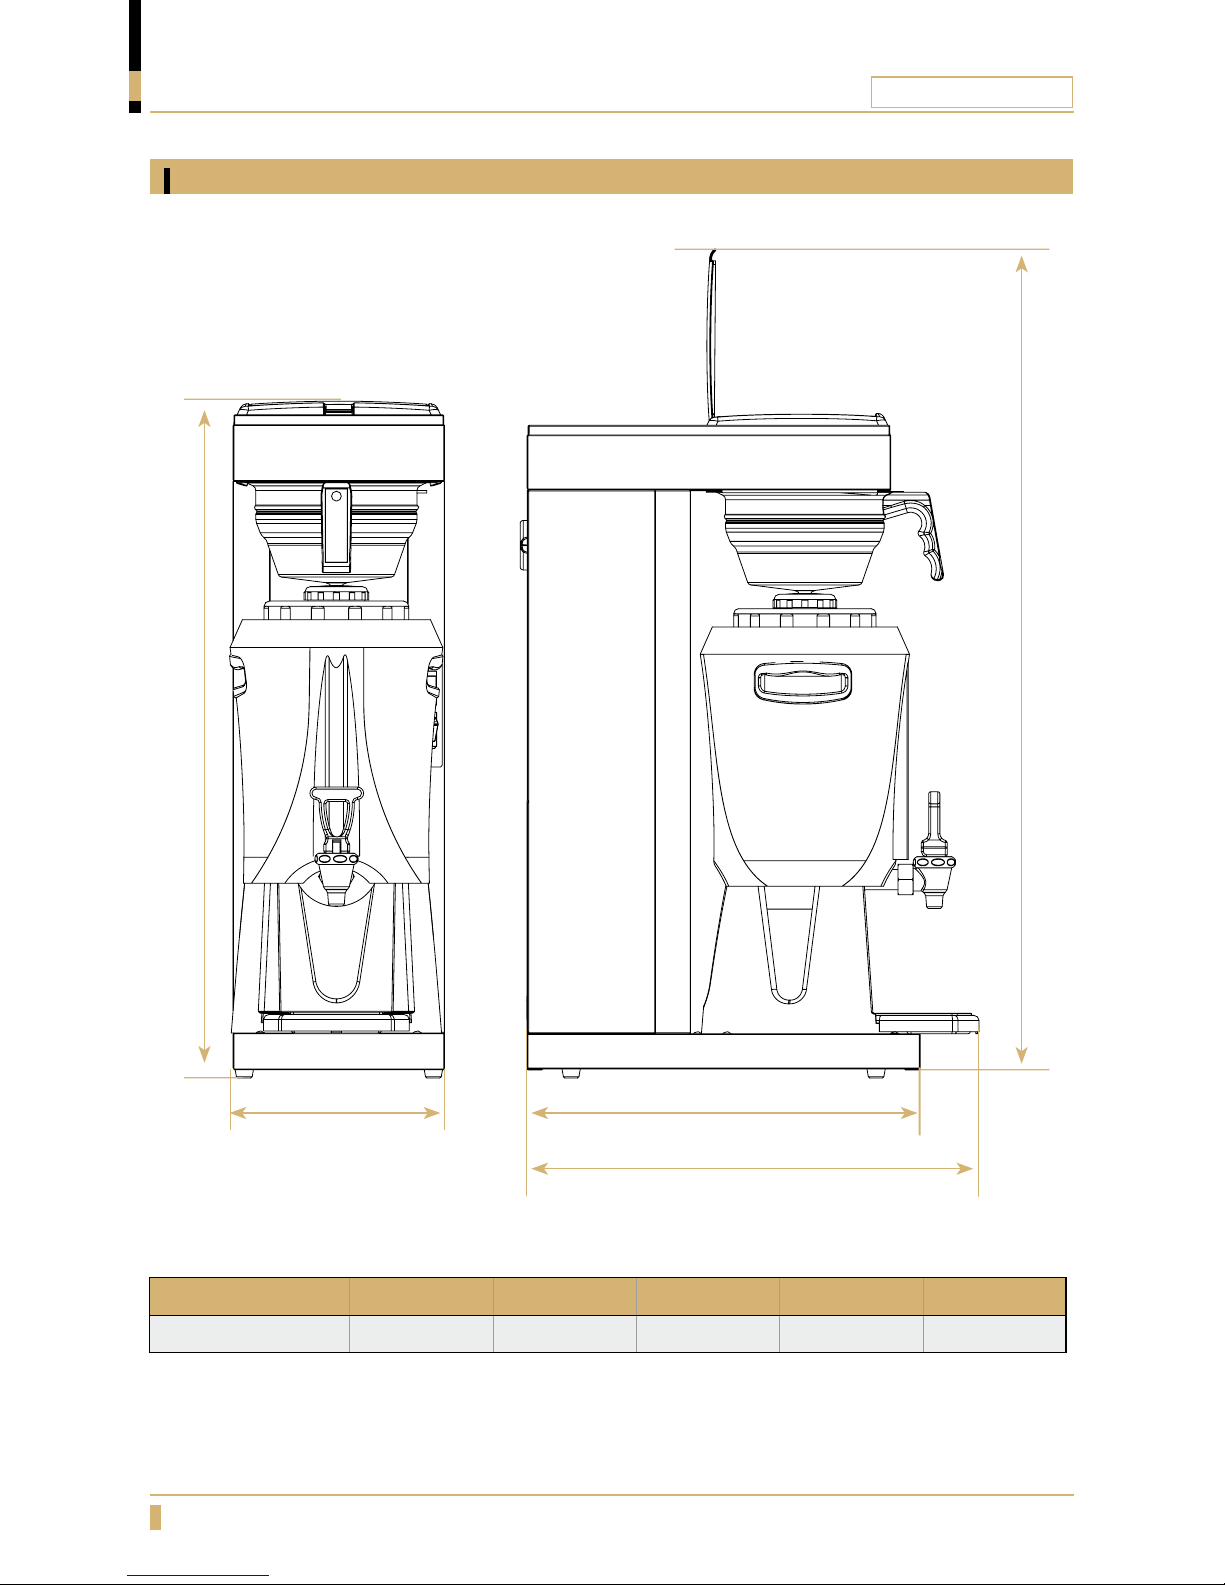
Mega Gold A
DIMENSION
Model A B C D E
Mega Gold A 655mm 205mm 445mm 390mm 806mm
A
E
B D
C
Page 27
ORIGINAL LINE A
27
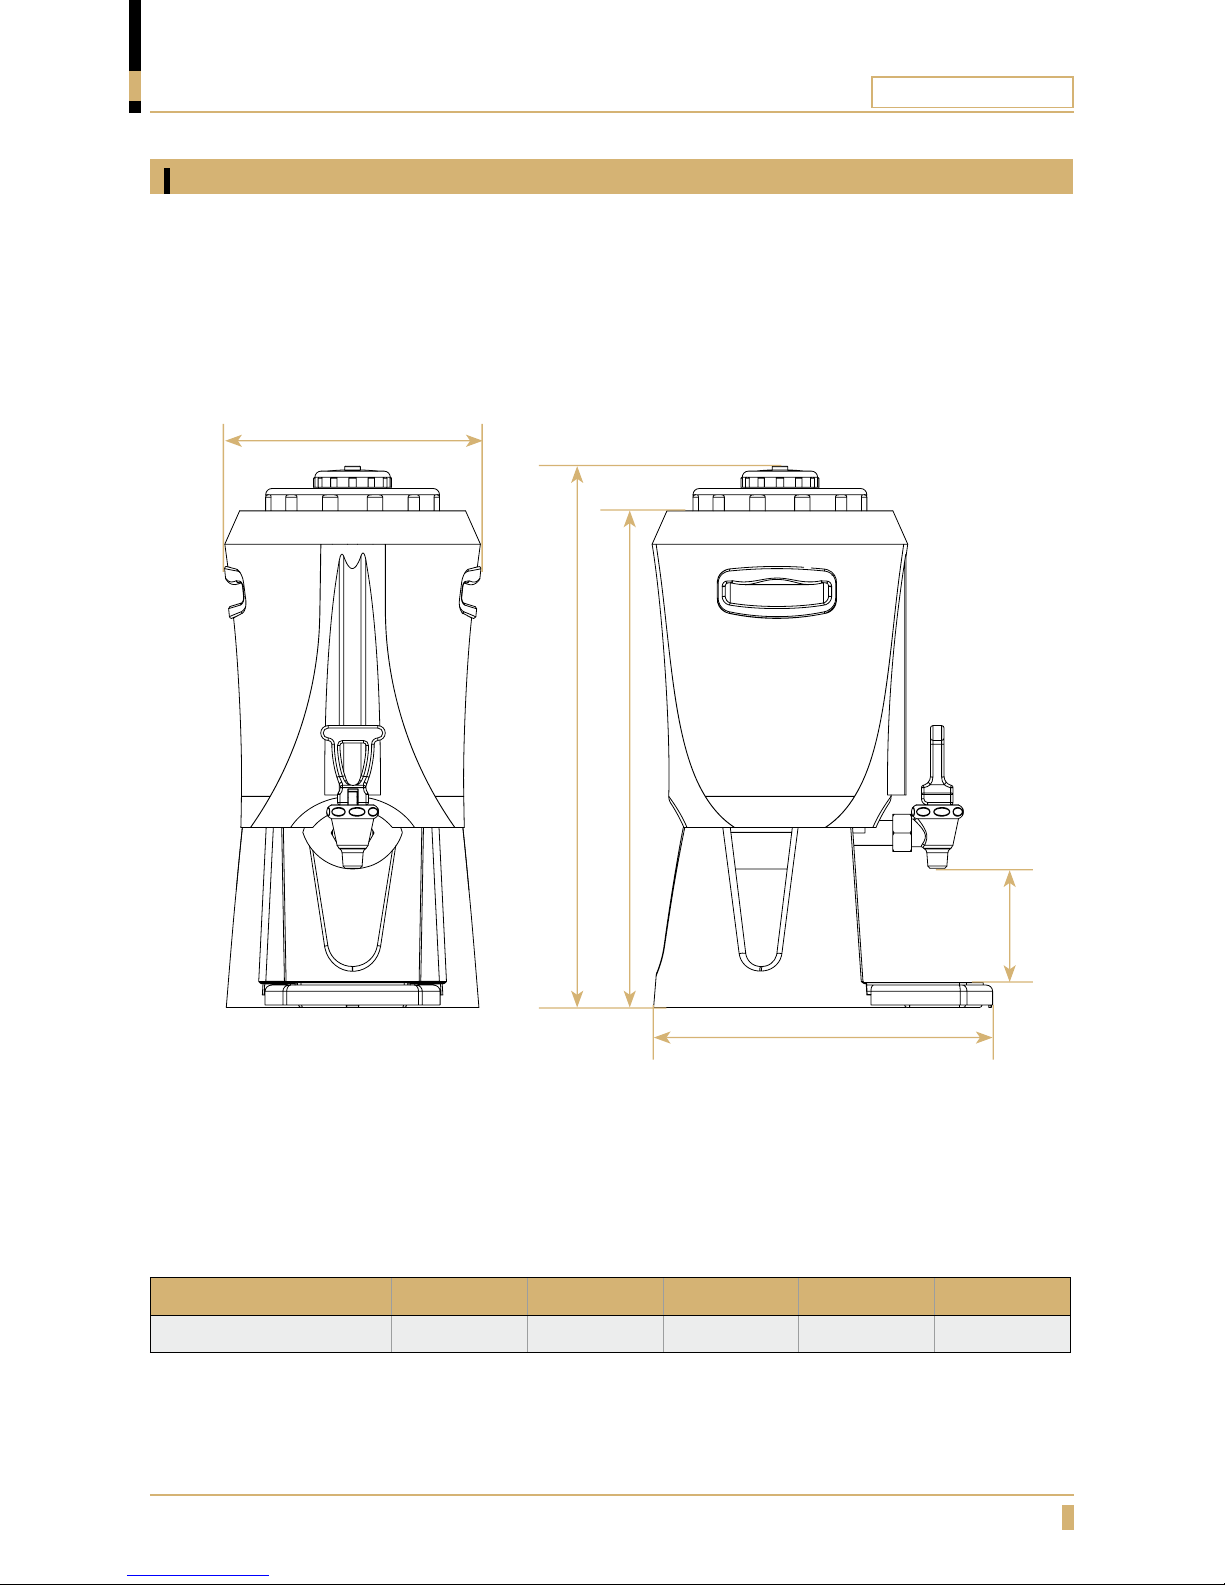
DIMENSION
Serving Station
Model A B C D E
Serving Station 205mm 273mm 436mm 400mm 105mm
B
E
A
C D
Page 28

Your Dealer
FOR SERVICE
Please contact your dealer
www.creminternational.com
For the warranty to be valid the conditions for maintenance must have been
followed according to our instructions, proper precaution has been made and
warranty claim been issued without delay.
The affected equipment may not be used during awaiting service if there is any risk
that the damage or defect would worsen.
The warranty will not cover consumption supplies such as glassware, normal
maintenance such as cleaning of lters, contaminations in water, lime, incorrect
voltages, pressure or adjustment of water amounts.
The warranty will not cover damages of defects caused by incorrect handling and
operation of the appliance.
 Loading...