

Coffee Queen EVENT 5 Litre, EVENT 20 Litre, EVENT 10 Litre, event 5, event 10 Service Manual
...
23456789012345678901234567890121234567890123456789012345678901212345678901234567890123456789012123456789012345678901234567890121234567890123456789012345678901212345678
9
23456789012345678901234567890121234567890123456789012345678901212345678901234567890123456789012123456789012345678901234567890121234567890123456789012345678901212345678
9
23456789012345678901234567890121234567890123456789012345678901212345678901234567890123456789012123456789012345678901234567890121234567890123456789012345678901212345678
9
23456789012345678901234567890121234567890123456789012345678901212345678901234567890123456789012123456789012345678901234567890121234567890123456789012345678901212345678
9
23456789012345678901234567890121234567890123456789012345678901212345678901234567890123456789012123456789012345678901234567890121234567890123456789012345678901212345678
9
23456789012345678901234567890121234567890123456789012345678901212345678901234567890123456789012123456789012345678901234567890121234567890123456789012345678901212345678
9
23456789012345678901234567890121234567890123456789012345678901212345678901234567890123456789012123456789012345678901234567890121234567890123456789012345678901212345678
9
23456789012345678901234567890121234567890123456789012345678901212345678901234567890123456789012123456789012345678901234567890121234567890123456789012345678901212345678
9
23456789012345678901234567890121234567890123456789012345678901212345678901234567890123456789012123456789012345678901234567890121234567890123456789012345678901212345678
9
23456789012345678901234567890121234567890123456789012345678901212345678901234567890123456789012123456789012345678901234567890121234567890123456789012345678901212345678
9
REV. 060612
051124
AA
AA
A
TT
TT
T
ASTE OF ASTE OF
ASTE OF ASTE OF
ASTE OF
THE FUTURETHE FUTURE
THE FUTURETHE FUTURE
THE FUTURE
Service manual
S / GB
Your retail dealer
COFFEE QUEEN
EVENT 5 - 10 - 20 Litre

1. 1.
1. 1.
1.
TT
TT
T
able of contentable of content
able of contentable of content
able of content
s.s.
s.s.
s.
EventEvent
EventEvent
Event
1. Table of contents. sid 2.
2. Orientation. 3.
3. General. 4.
4. Function description - (general). 4.
5. Start up - (general). 4.
6. Operating instructions (Brewing with coffee) 5. - 7.
6.1 Preheating of the machine. 5.
6.2 Place a filter in the filterholder. 5.
6.3 Add coffee. 5.
6.4 Place the filterholder. 6.
6.5 Place brewarm. 6.
6.6 Spray nozzle position. 6.
6.7 Start brewing. 7.
6.8 To keep temp. / aroma. 7.
6.9 Next brew. 7.
SERVICE
7. Starting instructions 8.
7.1 Electrical connection. 8.
7.2 Water supply. 8.
8. Installation and start 8.
8.1 Locate brewer. 8.
8.2 Coldwater feed. 8.
8.3 Connect thermos. 9.
8.4 Safety switch, function 9.
9. Maintenance and cleaning 9. - 11.
10. Servicemanual 12. - 13.
11. Exploded view - Brew Unit 14.
12. Spare part list - Brew Unit 15.
13. Exploded view - Brew arm 16.
14. Spare part list - Brew arm 16.
15. Exploded view - Thermos 17.
16. Exploded view - Wall mounting, rolling table termos 18.
17. Spare part list - Wall mounting, rolling table termos 18.
18. Spare part list - Thermos 19.
19. Electrical diagram 20-22.
20. Instructions for descaling 23.
comment:
21. Adjustable consta flow valve 5 ,10 and 20 litre 24.
22. Safety instructions 25.
22.1 Emptying watertank 25.
22.2 Storage temp (Frostless) 25.
23. Electro coupling - Electrical data 25.
24. Dimension sketch: Event machine complete - 26.-28.
- Water / electrical supply - Wall mounting, brew station
22
22
2.

234567890123456789012345678901212345678901234567890123456789012123456789012345678901234567890121234567890123456789012345678901212345678901234567890
1
234567890123456789012345678901212345678901234567890123456789012123456789012345678901234567890121234567890123456789012345678901212345678901234567890
1
234567890123456789012345678901212345678901234567890123456789012123456789012345678901234567890121234567890123456789012345678901212345678901234567890
1
234567890123456789012345678901212345678901234567890123456789012123456789012345678901234567890121234567890123456789012345678901212345678901234567890
1
234567890123456789012345678901212345678901234567890123456789012123456789012345678901234567890121234567890123456789012345678901212345678901234567890
1
234567890123456789012345678901212345678901234567890123456789012123456789012345678901234567890121234567890123456789012345678901212345678901234567890
1
234567890123456789012345678901212345678901234567890123456789012123456789012345678901234567890121234567890123456789012345678901212345678901234567890
1
33
33
3.
2. Orient2. Orient
2. Orient2. Orient
2. Orient
ation.ation.
ation.ation.
ation.
Event.Event.
Event.Event.
Event.
The manual is intended for this model onlyThe manual is intended for this model only
The manual is intended for this model onlyThe manual is intended for this model only
The manual is intended for this model only
..
..
.
W W
W W
W
arning!arning!
arning!arning!
arning!
The machine must be connected correctly for your safety.
Read the manual before using the machine.Read the manual before using the machine.
Read the manual before using the machine.Read the manual before using the machine.
Read the manual before using the machine.
ON / OFF-switchON / OFF-switch
ON / OFF-switchON / OFF-switch
ON / OFF-switch
Safety switchSafety switch
Safety switchSafety switch
Safety switch
Ready lampReady lamp
Ready lampReady lamp
Ready lamp
Brewing lampBrewing lamp
Brewing lampBrewing lamp
Brewing lamp
Brew unitBrew unit
Brew unitBrew unit
Brew unit
Spray nozzleSpray nozzle
Spray nozzleSpray nozzle
Spray nozzle
Lid for filterLid for filter
Lid for filterLid for filter
Lid for filter
holderholder
holderholder
holder
FilterholderFilterholder
FilterholderFilterholder
Filterholder
WW
WW
W
ater levelater level
ater levelater level
ater level
devicedevice
devicedevice
device
Lid for thermosLid for thermos
Lid for thermosLid for thermos
Lid for thermos
Drip trayDrip tray
Drip trayDrip tray
Drip tray
Thermos/ connecting 220V/2A (max)Thermos/ connecting 220V/2A (max)
Thermos/ connecting 220V/2A (max)Thermos/ connecting 220V/2A (max)
Thermos/ connecting 220V/2A (max)
ON / OFF-switchON / OFF-switch
ON / OFF-switchON / OFF-switch
ON / OFF-switch
Thermos Thermos
Thermos Thermos
Thermos
Handle Handle
Handle Handle
Handle
Coffee outlet Coffee outlet
Coffee outlet Coffee outlet
Coffee outlet
TT
TT
T
eawater outleteawater outlet
eawater outleteawater outlet
eawater outlet
Base plate Base plate
Base plate Base plate
Base plate
1/2 - 1/1 Brewing switch1/2 - 1/1 Brewing switch
1/2 - 1/1 Brewing switch1/2 - 1/1 Brewing switch
1/2 - 1/1 Brewing switch

234567890123456789012345678901212345678901234567890123456789012123456789012345678901234567890121234567890123456789012345678901212345678901234567890
1
234567890123456789012345678901212345678901234567890123456789012123456789012345678901234567890121234567890123456789012345678901212345678901234567890
1
234567890123456789012345678901212345678901234567890123456789012123456789012345678901234567890121234567890123456789012345678901212345678901234567890
1
234567890123456789012345678901212345678901234567890123456789012123456789012345678901234567890121234567890123456789012345678901212345678901234567890
1
234567890123456789012345678901212345678901234567890123456789012123456789012345678901234567890121234567890123456789012345678901212345678901234567890
1
234567890123456789012345678901212345678901234567890123456789012123456789012345678901234567890121234567890123456789012345678901212345678901234567890
1
44
44
4.
3. General.3. General.
3. General.3. General.
3. General.
Event.Event.
Event.Event.
Event.
5. S5. S
5. S5. S
5. S
tt
tt
t
art up - Generalart up - General
art up - Generalart up - General
art up - General
EventEvent
EventEvent
Event
COFFEE QUEEN EVENTCOFFEE QUEEN EVENT
COFFEE QUEEN EVENTCOFFEE QUEEN EVENT
COFFEE QUEEN EVENT
5 - 10 - 20 litre5 - 10 - 20 litre
5 - 10 - 20 litre5 - 10 - 20 litre
5 - 10 - 20 litre
We congratulate to your choice of coffee machine.
The brewer is equiped with full/half brewfunction.
It is also equipped with a tank for separate outlet of hot water.
Coffee Queen EVENT is delivered with a base-plate, driptray,
brew unit, 2st.thermos and filterholder.
CofCof
CofCof
Cof
fee Queen fee Queen
fee Queen fee Queen
fee Queen
AB is certified ISO 9002 and 14001AB is certified ISO 9002 and 14001
AB is certified ISO 9002 and 14001AB is certified ISO 9002 and 14001
AB is certified ISO 9002 and 14001
and therefore a minimal stress of the enviroment.and therefore a minimal stress of the enviroment.
and therefore a minimal stress of the enviroment.and therefore a minimal stress of the enviroment.
and therefore a minimal stress of the enviroment.
4. Function description - General4. Function description - General
4. Function description - General4. Function description - General
4. Function description - General
EventEvent
EventEvent
Event
Event Coffee BrewerEvent Coffee Brewer
Event Coffee BrewerEvent Coffee Brewer
Event Coffee Brewer
Coffee brewer with automatic water supply.
It is also equipped with a tank for separate outlet of hot water.
Brewing takes place in removable thermos pots with maintenance heat.
Brewing is carried out in paper filters.
Brew time for 5 ltrs.Brew time for 5 ltrs.
Brew time for 5 ltrs.Brew time for 5 ltrs.
Brew time for 5 ltrs.
approx.approx.
approx.approx.
approx.
8 min. 8 min.
8 min. 8 min.
8 min.
Brew time for 10 ltrs.Brew time for 10 ltrs.
Brew time for 10 ltrs.Brew time for 10 ltrs.
Brew time for 10 ltrs.
approx.approx.
approx.approx.
approx.
13 min.13 min.
13 min.13 min.
13 min.
Brew time for 20 ltrs.Brew time for 20 ltrs.
Brew time for 20 ltrs.Brew time for 20 ltrs.
Brew time for 20 ltrs.
approx.approx.
approx.approx.
approx.
24 min.24 min.
24 min.24 min.
24 min.
Turn on the separately assembled main switch, push on/off, water rushing will be heard.
The brewer is now filling water and will start heating when the water rushing noise stops.
Ready lamp will light up when the correct temperature has been reached.
(approx 10 minutes).
234567890123456789012345678901212345678901234567890123456789012123456789012345678901234567890121234567890123456789012345678901212345678901234567890
1
234567890123456789012345678901212345678901234567890123456789012123456789012345678901234567890121234567890123456789012345678901212345678901234567890
1
234567890123456789012345678901212345678901234567890123456789012123456789012345678901234567890121234567890123456789012345678901212345678901234567890
1
234567890123456789012345678901212345678901234567890123456789012123456789012345678901234567890121234567890123456789012345678901212345678901234567890
1
234567890123456789012345678901212345678901234567890123456789012123456789012345678901234567890121234567890123456789012345678901212345678901234567890
1
234567890123456789012345678901212345678901234567890123456789012123456789012345678901234567890121234567890123456789012345678901212345678901234567890
1
234567890123456789012345678901212345678901234567890123456789012123456789012345678901234567890121234567890123456789012345678901212345678901234567890
1
234567890123456789012345678901212345678901234567890123456789012123456789012345678901234567890121234567890123456789012345678901212345678901234567890
1
234567890123456789012345678901212345678901234567890123456789012123456789012345678901234567890121234567890123456789012345678901212345678901234567890
1
55
55
5.
6. BRUKSANVISNING6. BRUKSANVISNING
6. BRUKSANVISNING6. BRUKSANVISNING
6. BRUKSANVISNING
BryggningBryggning
BryggningBryggning
Bryggning
EventEvent
EventEvent
Event
22
22
2
11
11
1
6. Operating instructions.6. Operating instructions.
6. Operating instructions.6. Operating instructions.
6. Operating instructions.
(Brewing with coffee)(Brewing with coffee)
(Brewing with coffee)(Brewing with coffee)
(Brewing with coffee)
EventEvent
EventEvent
Event
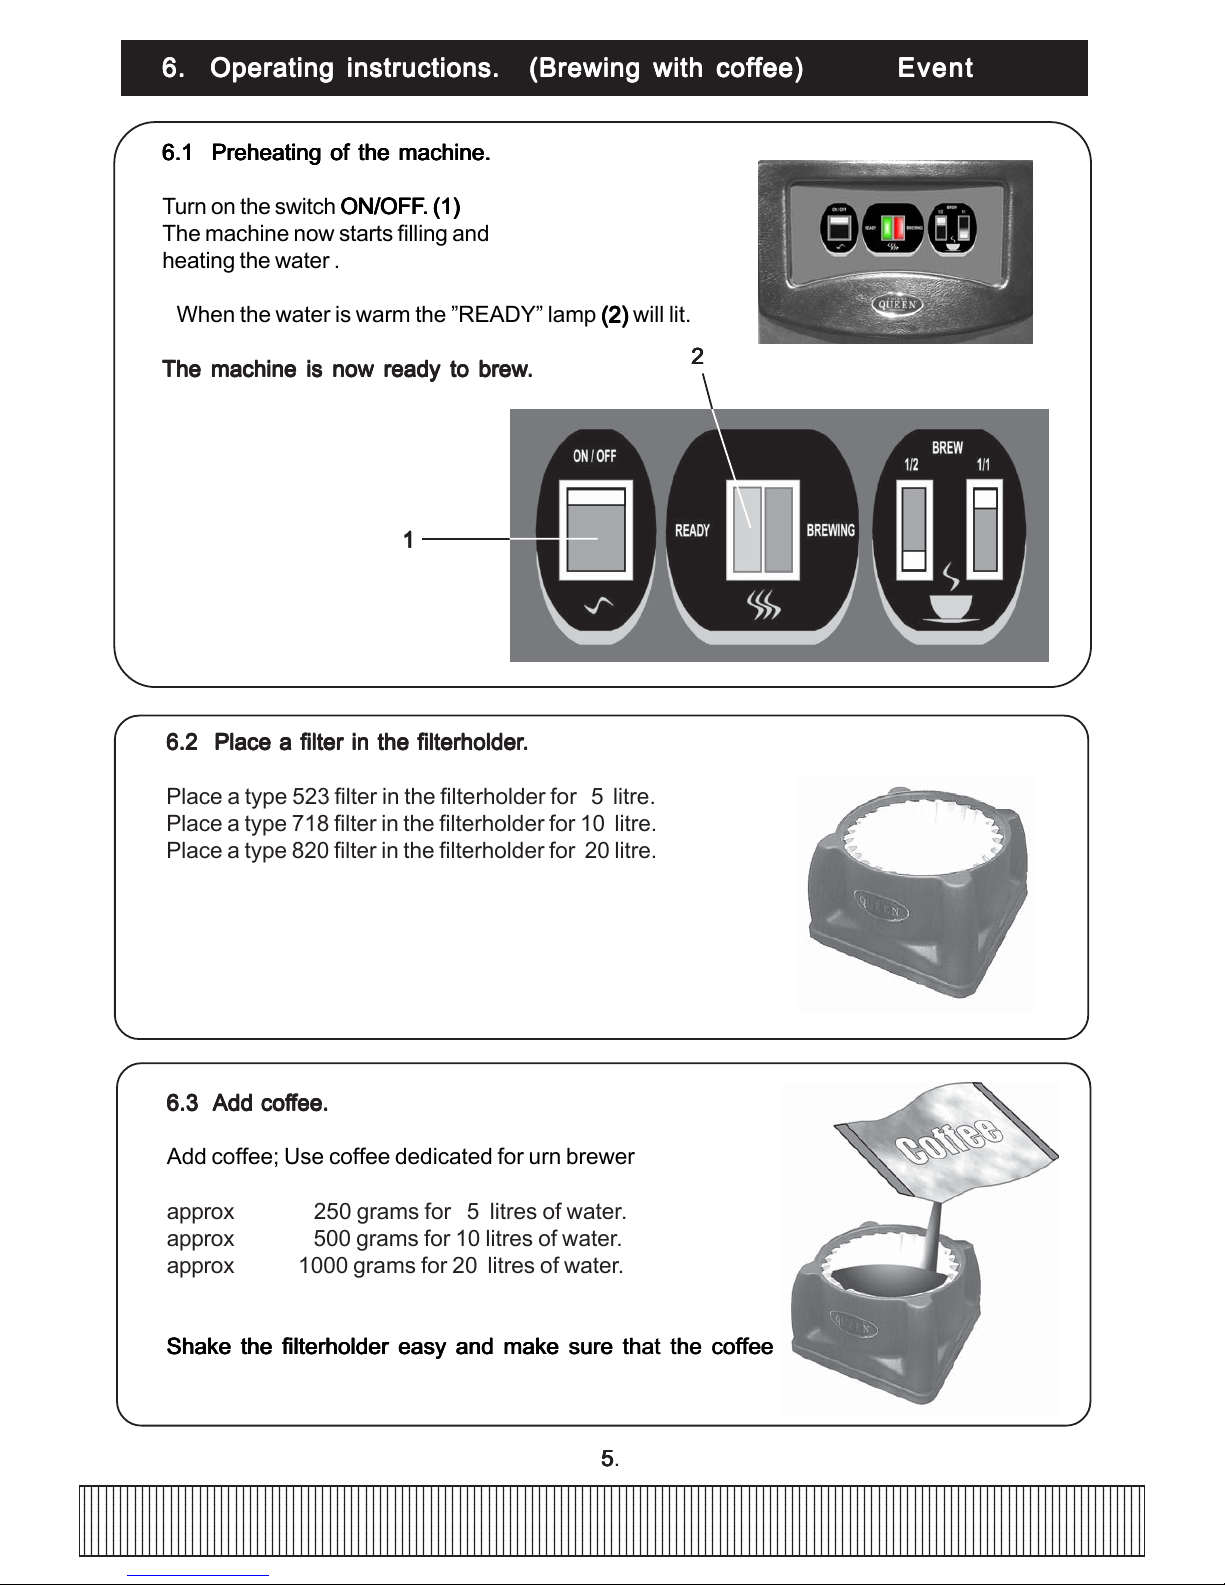
6.1 Preheating of the machine.6.1 Preheating of the machine.
6.1 Preheating of the machine.6.1 Preheating of the machine.
6.1 Preheating of the machine.
Turn on the switch
ON/OFFON/OFF
ON/OFFON/OFF
ON/OFF
. (1). (1)
. (1). (1)
. (1)
The machine now starts filling and
heating the water .
When the water is warm the ”READY” lamp
(2)(2)
(2)(2)
(2) will lit.
The machine is now ready to brewThe machine is now ready to brew
The machine is now ready to brewThe machine is now ready to brew
The machine is now ready to brew
..
..
.
6.2 Place a filter in the filterholder6.2 Place a filter in the filterholder
6.2 Place a filter in the filterholder6.2 Place a filter in the filterholder
6.2 Place a filter in the filterholder
..
..
.
Place a type 523 filter in the filterholder for 5 litre.
Place a type 718 filter in the filterholder for 10 litre.
Place a type 820 filter in the filterholder for 20 litre.
6.3 6.3
6.3 6.3
6.3
Add cofAdd cof
Add cofAdd cof
Add cof
fee.fee.
fee.fee.
fee.
Add coffee; Use coffee dedicated for urn brewer
approx 250 grams for 5 litres of water.
approx 500 grams for 10 litres of water.
approx 1000 grams for 20 litres of water.
Shake the filterholder easy and make sure that the coffeeShake the filterholder easy and make sure that the coffee
Shake the filterholder easy and make sure that the coffeeShake the filterholder easy and make sure that the coffee
Shake the filterholder easy and make sure that the coffee
is evenly spreaded.is evenly spreaded.
is evenly spreaded.is evenly spreaded.
is evenly spreaded.
Use Coffe Queens recommended coffefilterUse Coffe Queens recommended coffefilter
Use Coffe Queens recommended coffefilterUse Coffe Queens recommended coffefilter
Use Coffe Queens recommended coffefilter
Filtertype 523 for 5Litre.Filtertype 523 for 5Litre.
Filtertype 523 for 5Litre.Filtertype 523 for 5Litre.
Filtertype 523 for 5Litre.
Article no.Article no.
Article no.Article no.
Article no.
11
11
1
10102-0210102-02
10102-0210102-02
10102-02
Filtertype 718 for 10Litre.Filtertype 718 for 10Litre.
Filtertype 718 for 10Litre.Filtertype 718 for 10Litre.
Filtertype 718 for 10Litre.
Article no.Article no.
Article no.Article no.
Article no.
11
11
1
10103-0210103-02
10103-0210103-02
10103-02
Filtertype 820 for 20Litre.Filtertype 820 for 20Litre.
Filtertype 820 for 20Litre.Filtertype 820 for 20Litre.
Filtertype 820 for 20Litre.
Article no.Article no.
Article no.Article no.
Article no.
11
11
1
10104-0210104-02
10104-0210104-02
10104-02
234567890123456789012345678901212345678901234567890123456789012123456789012345678901234567890121234567890123456789012345678901212345678901234567890
1
234567890123456789012345678901212345678901234567890123456789012123456789012345678901234567890121234567890123456789012345678901212345678901234567890
1
234567890123456789012345678901212345678901234567890123456789012123456789012345678901234567890121234567890123456789012345678901212345678901234567890
1
234567890123456789012345678901212345678901234567890123456789012123456789012345678901234567890121234567890123456789012345678901212345678901234567890
1
234567890123456789012345678901212345678901234567890123456789012123456789012345678901234567890121234567890123456789012345678901212345678901234567890
1
234567890123456789012345678901212345678901234567890123456789012123456789012345678901234567890121234567890123456789012345678901212345678901234567890
1
234567890123456789012345678901212345678901234567890123456789012123456789012345678901234567890121234567890123456789012345678901212345678901234567890
1
234567890123456789012345678901212345678901234567890123456789012123456789012345678901234567890121234567890123456789012345678901212345678901234567890
1
234567890123456789012345678901212345678901234567890123456789012123456789012345678901234567890121234567890123456789012345678901212345678901234567890
1
66
66
6.
AA
AA
A
6. Operating instructions. (Brewing with coffee)6. Operating instructions. (Brewing with coffee)
6. Operating instructions. (Brewing with coffee)6. Operating instructions. (Brewing with coffee)
6. Operating instructions. (Brewing with coffee)
Event Event
Event Event
Event
6.4 Place the filterholder6.4 Place the filterholder
6.4 Place the filterholder6.4 Place the filterholder
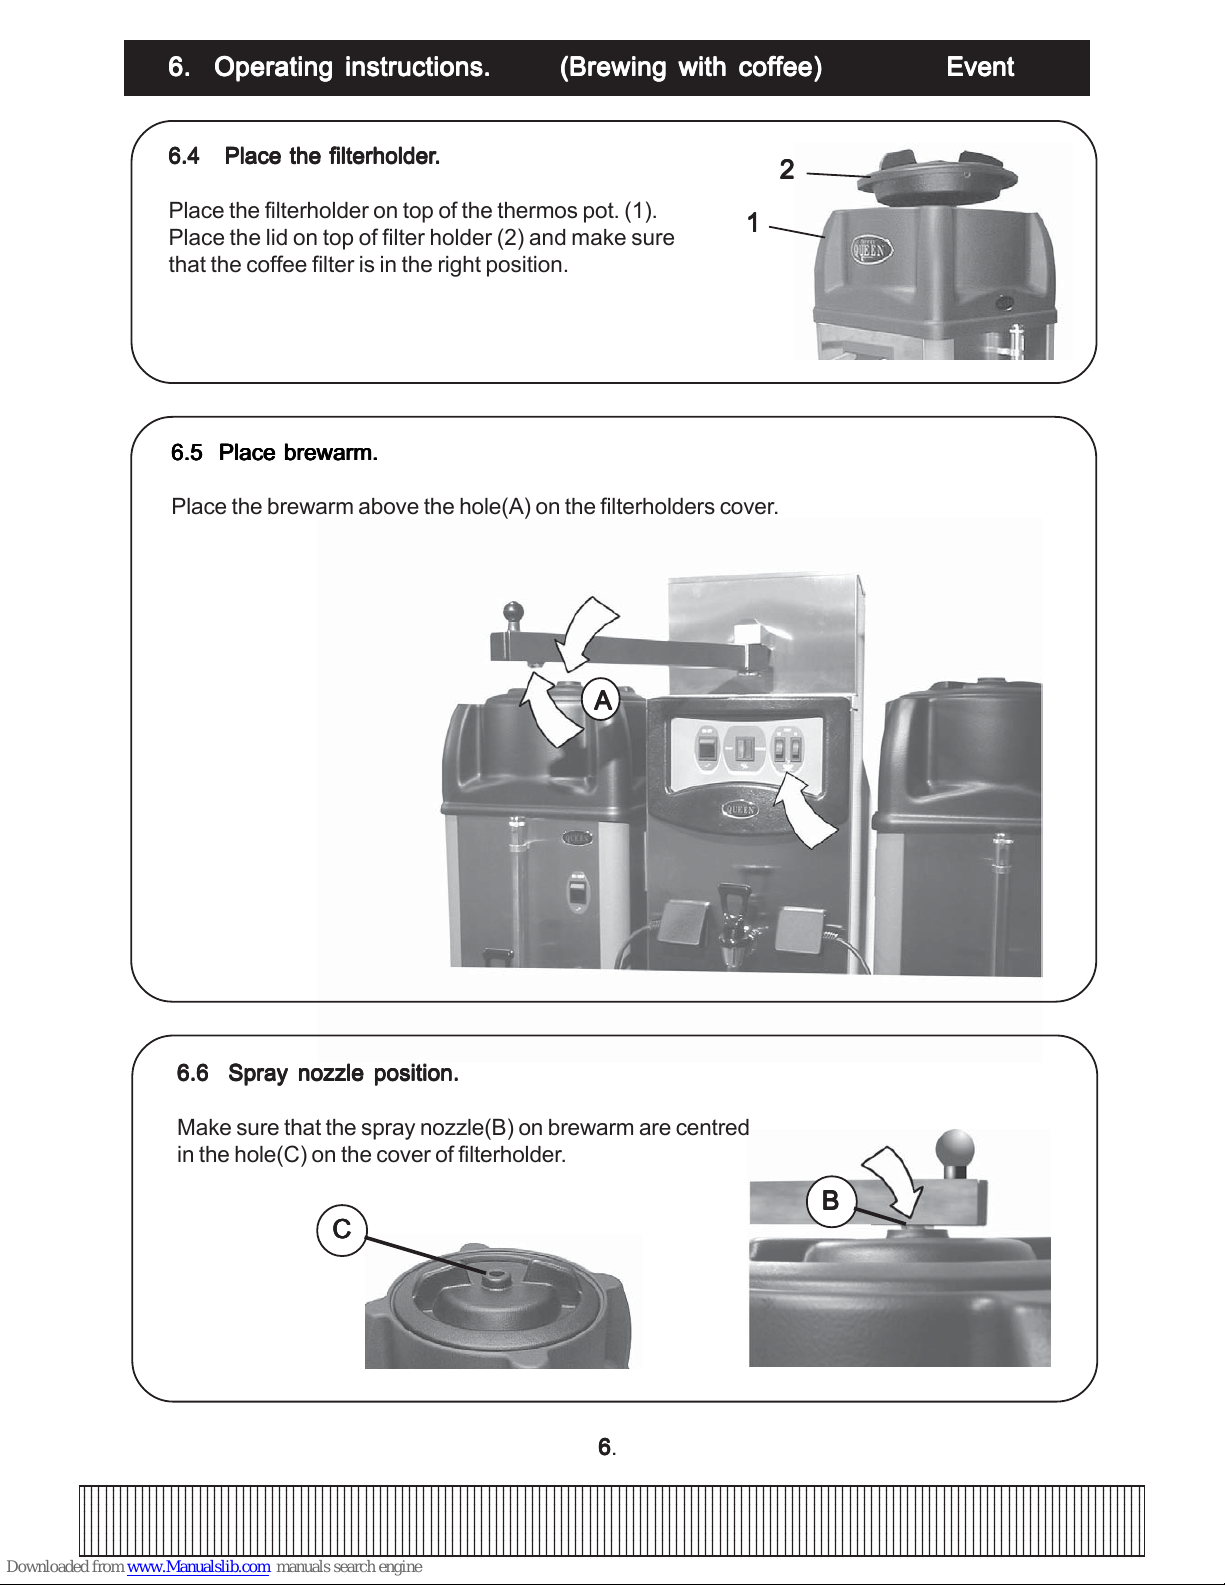
6.4 Place the filterholder
..
..
.
Place the filterholder on top of the thermos pot. (1).
Place the lid on top of filter holder (2) and make sure
that the coffee filter is in the right position.
11
11
1
22
22
2
6.5 Place brewarm.6.5 Place brewarm.
6.5 Place brewarm.6.5 Place brewarm.
6.5 Place brewarm.
Place the brewarm above the hole(A) on the filterholders cover.
CC
CC
C
BB
BB
B
6.6 Spray nozzle position.6.6 Spray nozzle position.
6.6 Spray nozzle position.6.6 Spray nozzle position.
6.6 Spray nozzle position.
Make sure that the spray nozzle(B) on brewarm are centred
in the hole(C) on the cover of filterholder.
234567890123456789012345678901212345678901234567890123456789012123456789012345678901234567890121234567890123456789012345678901212345678901234567890
1
234567890123456789012345678901212345678901234567890123456789012123456789012345678901234567890121234567890123456789012345678901212345678901234567890
1
234567890123456789012345678901212345678901234567890123456789012123456789012345678901234567890121234567890123456789012345678901212345678901234567890
1
234567890123456789012345678901212345678901234567890123456789012123456789012345678901234567890121234567890123456789012345678901212345678901234567890
1
234567890123456789012345678901212345678901234567890123456789012123456789012345678901234567890121234567890123456789012345678901212345678901234567890
1
234567890123456789012345678901212345678901234567890123456789012123456789012345678901234567890121234567890123456789012345678901212345678901234567890
1
234567890123456789012345678901212345678901234567890123456789012123456789012345678901234567890121234567890123456789012345678901212345678901234567890
1
234567890123456789012345678901212345678901234567890123456789012123456789012345678901234567890121234567890123456789012345678901212345678901234567890
1
234567890123456789012345678901212345678901234567890123456789012123456789012345678901234567890121234567890123456789012345678901212345678901234567890
1
77
77
7.
DD
DD
D
6.7 Start brewing6.7 Start brewing
6.7 Start brewing6.7 Start brewing
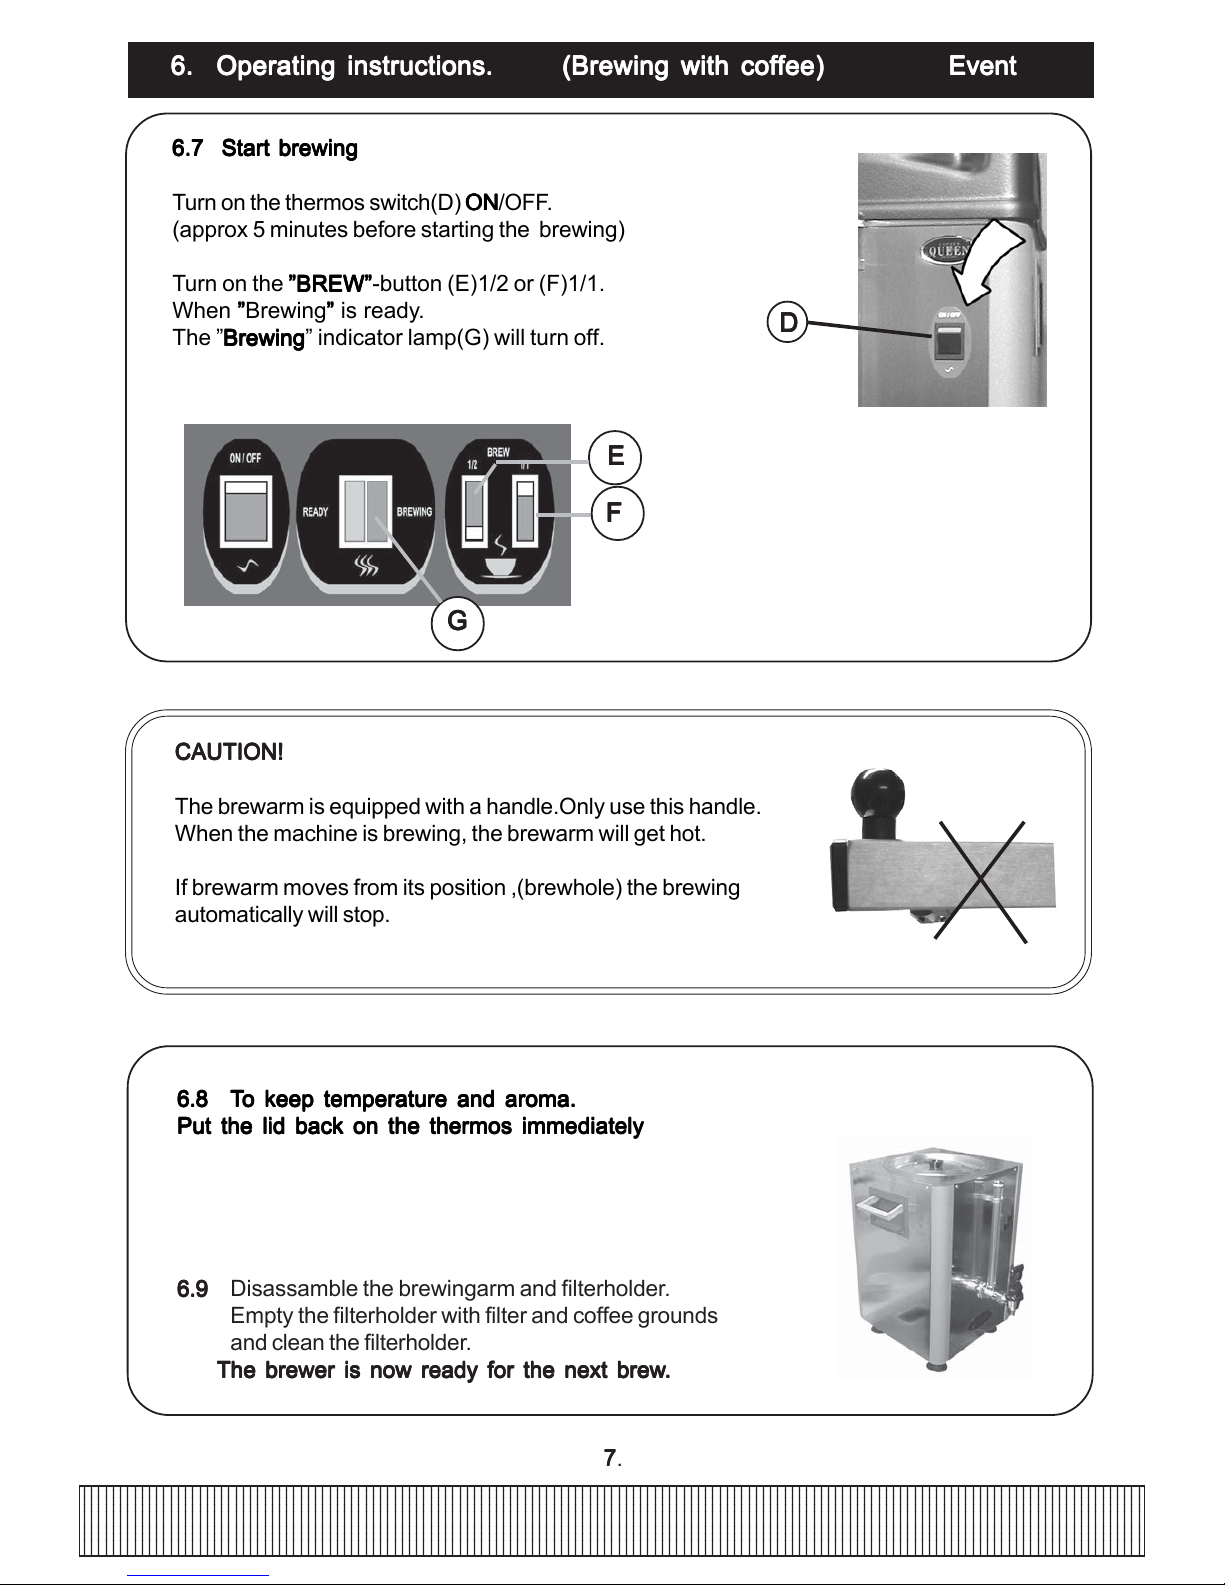
6.7 Start brewing
Turn on the thermos switch(D)
ONON
ONON
ON/OFF.
(approx 5 minutes before starting the brewing)
Turn on the
”BREW””BREW”
”BREW””BREW”
”BREW”-button (E)1/2 or (F)1/1.
When
””
””
”Brewing
””
””
” is ready.
The ”
BrewingBrewing
BrewingBrewing
Brewing” indicator lamp(G) will turn off.
6. Operating instructions. (Brewing with coffee)6. Operating instructions. (Brewing with coffee)
6. Operating instructions. (Brewing with coffee)6. Operating instructions. (Brewing with coffee)
6. Operating instructions. (Brewing with coffee)
Event Event
Event Event
Event
EE
EE
E
FF
FF
F
GG
GG
G
CAUTION!CAUTION!
CAUTION!CAUTION!
CAUTION!
The brewarm is equipped with a handle.Only use this handle.
When the machine is brewing, the brewarm will get hot.
If brewarm moves from its position ,(brewhole) the brewing
automatically will stop.
6.96.9
6.96.9
6.9 Disassamble the brewingarm and filterholder.
Empty the filterholder with filter and coffee grounds
and clean the filterholder.
The brewer is now ready for the next brewThe brewer is now ready for the next brew
The brewer is now ready for the next brewThe brewer is now ready for the next brew
The brewer is now ready for the next brew
..
..
.
6.86.8
6.86.8
6.8
TT
TT
T
o keep temperature and aroma.o keep temperature and aroma.
o keep temperature and aroma.o keep temperature and aroma.
o keep temperature and aroma.
Put the lid back on the thermos immediatelyPut the lid back on the thermos immediately
Put the lid back on the thermos immediatelyPut the lid back on the thermos immediately
Put the lid back on the thermos immediately
after the brewing,after the brewing,
after the brewing,after the brewing,
after the brewing,
234567890123456789012345678901212345678901234567890123456789012123456789012345678901234567890121234567890123456789012345678901212345678901234567890
1
234567890123456789012345678901212345678901234567890123456789012123456789012345678901234567890121234567890123456789012345678901212345678901234567890
1
234567890123456789012345678901212345678901234567890123456789012123456789012345678901234567890121234567890123456789012345678901212345678901234567890
1
234567890123456789012345678901212345678901234567890123456789012123456789012345678901234567890121234567890123456789012345678901212345678901234567890
1
234567890123456789012345678901212345678901234567890123456789012123456789012345678901234567890121234567890123456789012345678901212345678901234567890
1
234567890123456789012345678901212345678901234567890123456789012123456789012345678901234567890121234567890123456789012345678901212345678901234567890
1
234567890123456789012345678901212345678901234567890123456789012123456789012345678901234567890121234567890123456789012345678901212345678901234567890
1
234567890123456789012345678901212345678901234567890123456789012123456789012345678901234567890121234567890123456789012345678901212345678901234567890
1
234567890123456789012345678901212345678901234567890123456789012123456789012345678901234567890121234567890123456789012345678901212345678901234567890
1
88
88
8.
8.28.2
8.28.2
8.2 Connect the brewer unit to a
coldwater feed -1/2"Rcoldwater feed -1/2"R
coldwater feed -1/2"Rcoldwater feed -1/2"R
coldwater feed -1/2"R with connection tube
supplied.
Connect to a water stop valve.
In areas with high level lime problem, a descaling filter should be mounted.
See; description for descaling. (page 22.)
7. S7. S
7. S7. S
7. S
tt
tt
t
arting instructionsarting instructions
arting instructionsarting instructions
arting instructions
SERVICESERVICE
SERVICESERVICE
SERVICE
EventEvent
EventEvent
Event
7.1 Electrical connection;7.1 Electrical connection;
7.1 Electrical connection;7.1 Electrical connection;
7.1 Electrical connection;
The brewer is not reconnectable and may only be installed to the electric supply network with
a voltage that is stated on the brewer and shall be carried out by an Authorized Electrician.
A main switch should be assembled before the machine, with a minimum contact gap of 3mm.
7.2 W7.2 W
7.2 W7.2 W
7.2 W
ater supply;ater supply;
ater supply;ater supply;
ater supply;
The brewer shall be connected to a cold water pipe.
A shut off tap must be assembled.
The brewer shall be mounted on a spilltray connected to a drain.
8.18.1
8.18.1
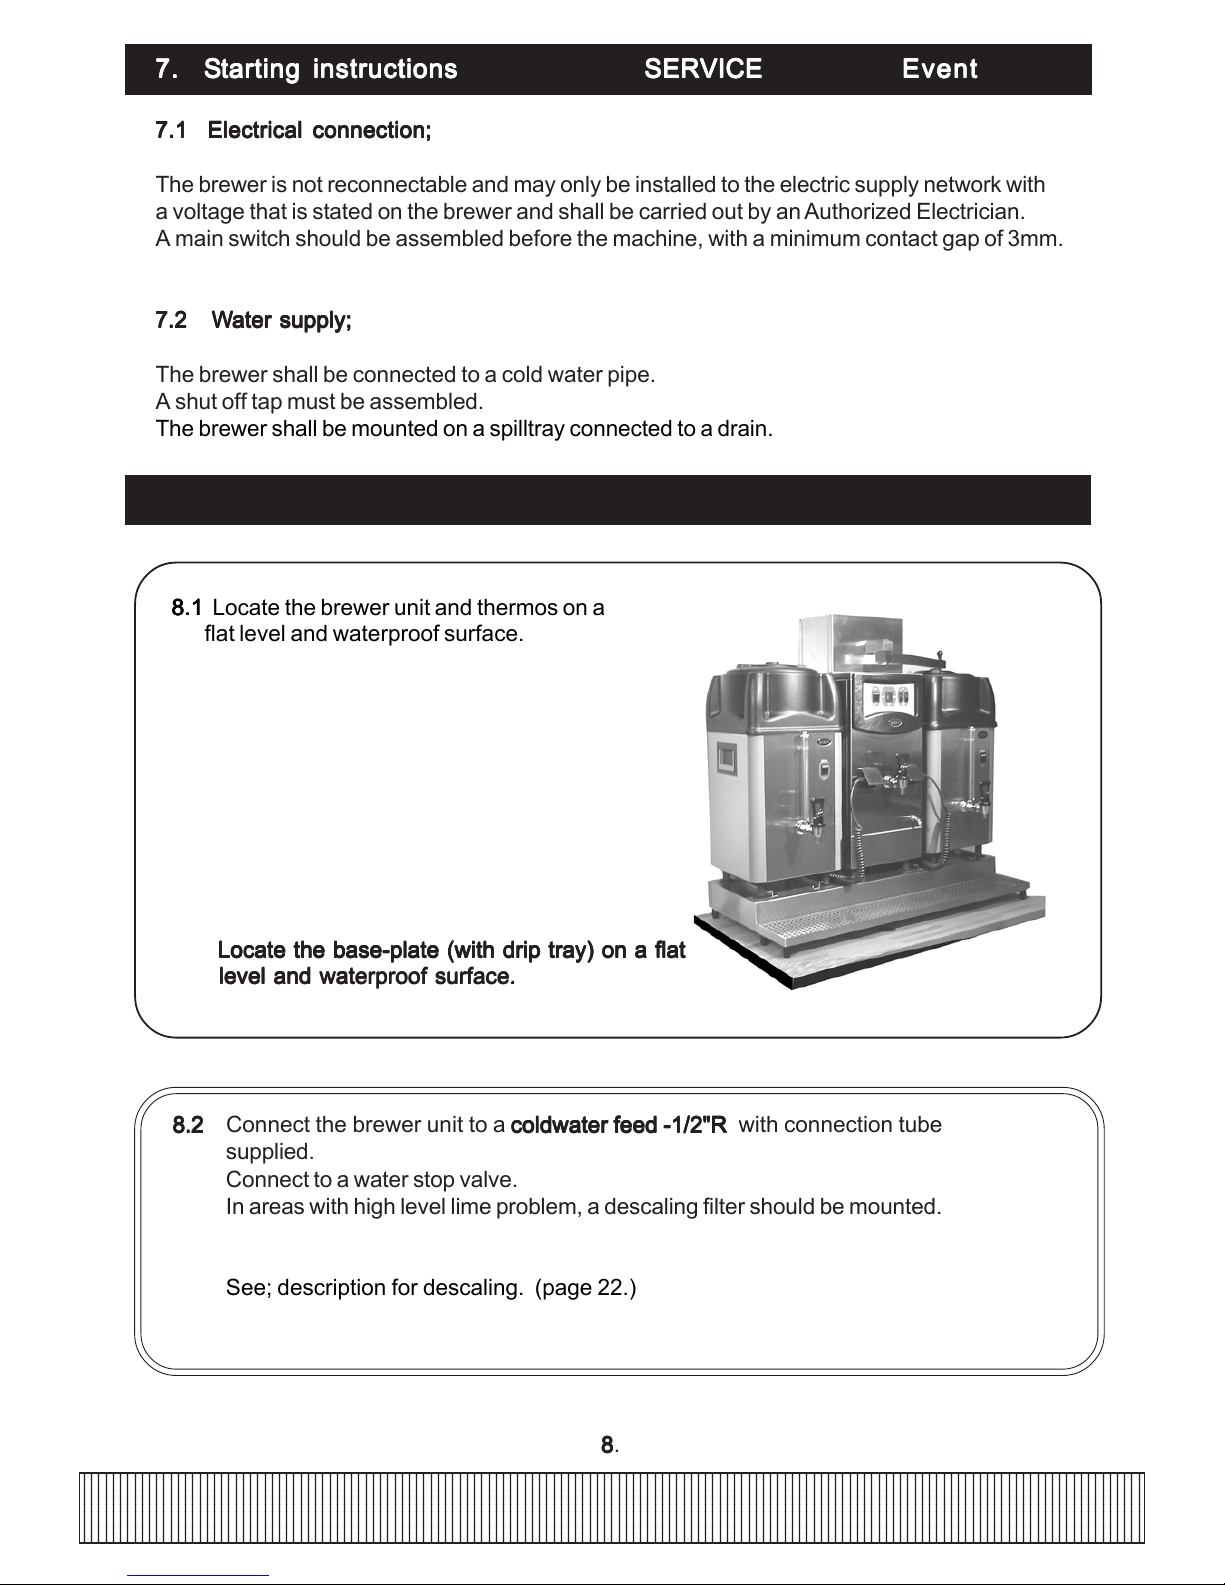
8.1 Locate the brewer unit and thermos on a
flat level and waterproof surface.
Locate the base-plate (with drip tray) on a flatLocate the base-plate (with drip tray) on a flat
Locate the base-plate (with drip tray) on a flatLocate the base-plate (with drip tray) on a flat
Locate the base-plate (with drip tray) on a flat
level and waterproof surface. level and waterproof surface.
level and waterproof surface. level and waterproof surface.
level and waterproof surface.
8. Inst8. Inst
8. Inst8. Inst
8. Inst
allation and stallation and st
allation and stallation and st
allation and st
artart
artart
art
SERVICESERVICE
SERVICESERVICE
SERVICE
EventEvent
EventEvent
Event

figure 1.figure 1.
figure 1.figure 1.
figure 1.
figure 2.figure 2.
figure 2.figure 2.
figure 2.
8. Inst8. Inst
8. Inst8. Inst
8. Inst
allation and stallation and st
allation and stallation and st
allation and st
artart
artart
art
SERVICESERVICE
SERVICESERVICE
SERVICE
EventEvent
EventEvent
Event
8.38.3
8.38.3
8.3 Make sure the thermos pot and the filterholder are clean and in place. (figure 1)
Connect the electric cord from the thermos pot to the outlet on the brewer unit.
220V/2A max.(figure 2). Never connect other electric equipment to the brewer unit.
234567890123456789012345678901212345678901234567890123456789012123456789012345678901234567890121234567890123456789012345678901212345678901234567890
1
234567890123456789012345678901212345678901234567890123456789012123456789012345678901234567890121234567890123456789012345678901212345678901234567890
1
234567890123456789012345678901212345678901234567890123456789012123456789012345678901234567890121234567890123456789012345678901212345678901234567890
1
234567890123456789012345678901212345678901234567890123456789012123456789012345678901234567890121234567890123456789012345678901212345678901234567890
1
234567890123456789012345678901212345678901234567890123456789012123456789012345678901234567890121234567890123456789012345678901212345678901234567890
1
234567890123456789012345678901212345678901234567890123456789012123456789012345678901234567890121234567890123456789012345678901212345678901234567890
1
234567890123456789012345678901212345678901234567890123456789012123456789012345678901234567890121234567890123456789012345678901212345678901234567890
1
234567890123456789012345678901212345678901234567890123456789012123456789012345678901234567890121234567890123456789012345678901212345678901234567890
1
234567890123456789012345678901212345678901234567890123456789012123456789012345678901234567890121234567890123456789012345678901212345678901234567890
1
99
99
9.
8.4.8.4.
8.4.8.4.
8.4.
Before starting up the machine, inspect the safety switch function (A) when brewarm
are in the right position in the hole (B).
Adjust if it is necessary (C).
AA
AA
A
BB
BB
B
C C
C C
C
 Loading...