

Page 1
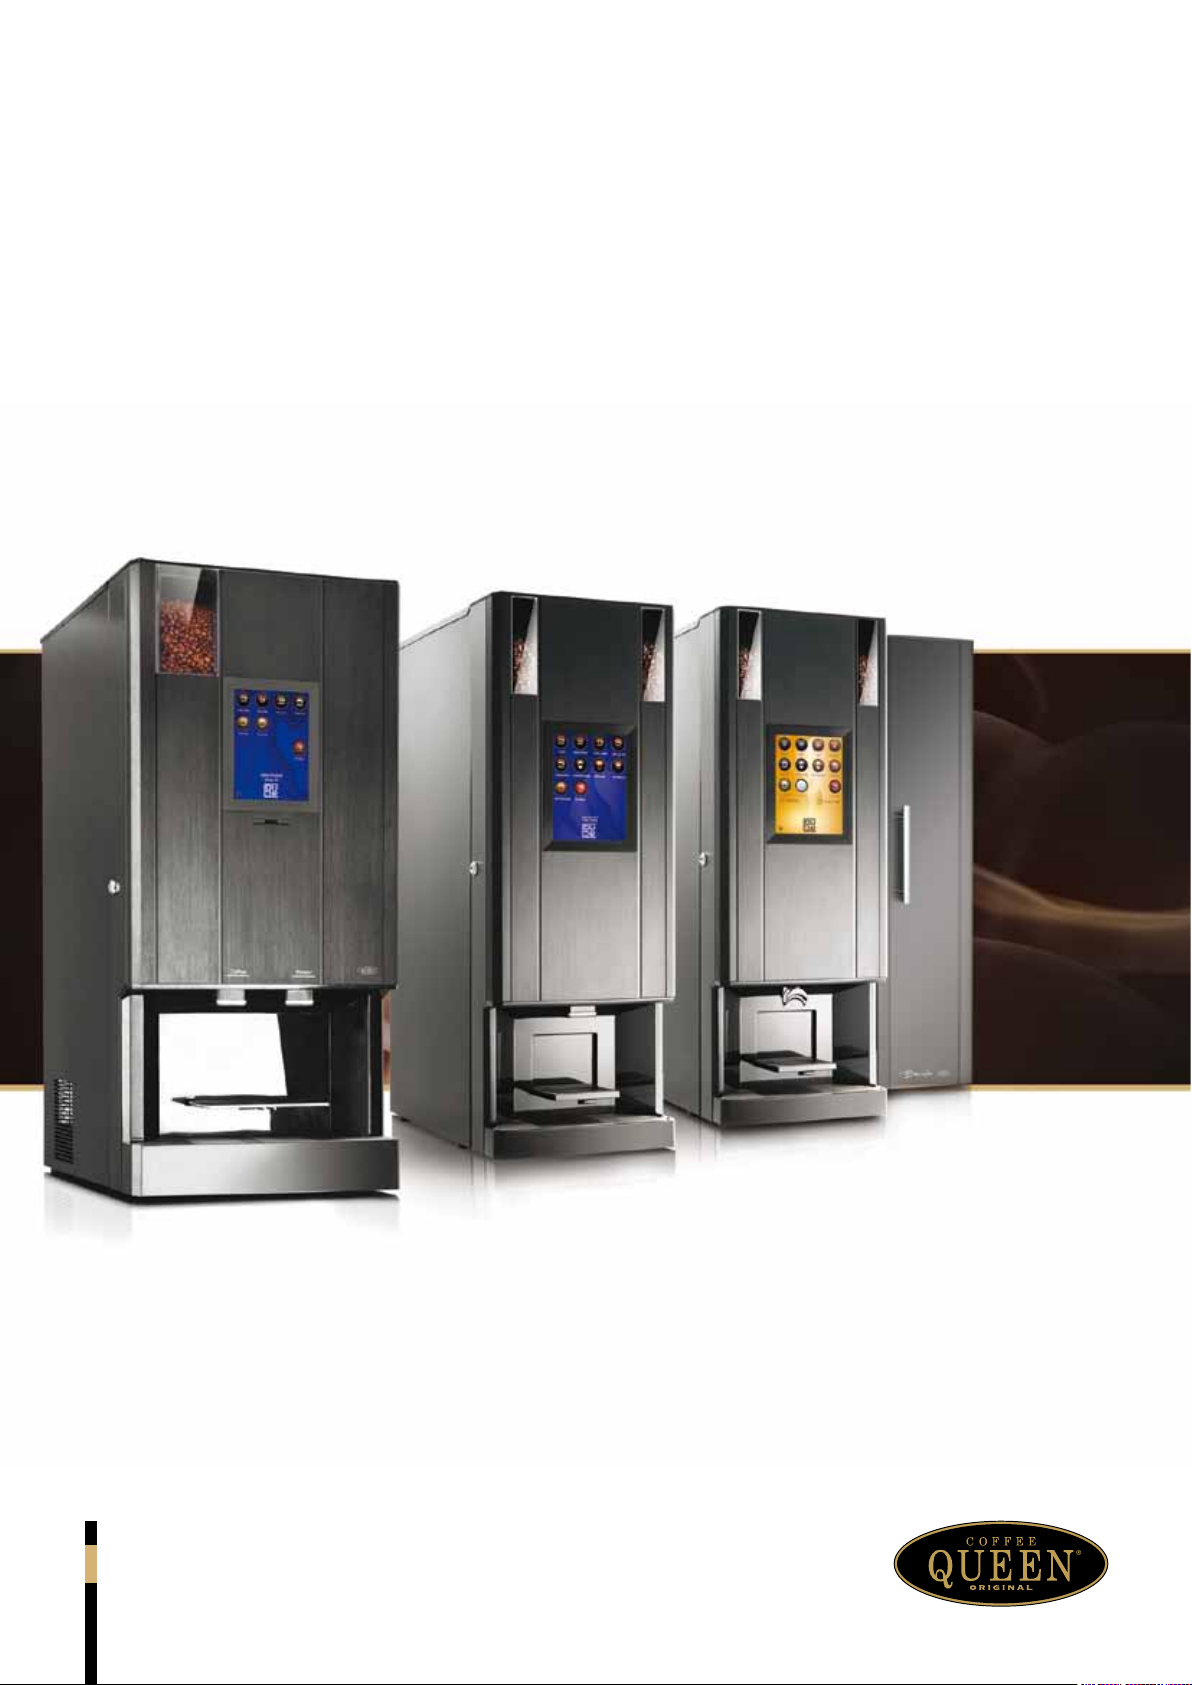
CQUBE SERIES
PROGRAMMING MANUAL
PM_EN
Part No.: 1764073_01
Page 2
CONTENT
CQUBE SERIES
CONTENT ................................................................................................................................................................................2
ACTIVATE WITH CARD ..................................................................................................................................................3
Activate programming with technical service card .......................................................................................................................................... 3
Programming buttons ..............................................................................................................................................................................................4
MAIN MENU ............................................................................................................................................................................5
Pay system menu ...................................................................................................................................................................................................... 5
Jug beverage ............................................................................................................................................................................................................... 5
PROGRAMMING .................................................................................................................................................................6
Clean machine .......................................................................................................................................................................................................... 6
Counters .................................................................................................................................................................................................................... 7
Beverage setup, Strength ........................................................................................................................................................................................ 9
Beverage setup, Volume ......................................................................................................................................................................................... 10
Beverage setup, Drink Settings ............................................................................................................................................................................ 11
Beverage setup, Water/Recipe Bank .................................................................................................................................................................12
Beverage setup, Enable Beverage ........................................................................................................................................................................13
Jug setup ...................................................................................................................................................................................................................14
Calibration ............................................................................................................................................................................................................... 15
Machine settings ..................................................................................................................................................................................................... 17
Language setup and set time/day ........................................................................................................................................................................19
Hardware test .........................................................................................................................................................................................................20
Factory reset ........................................................................................................................................................................................................... 25
Expert settings ........................................................................................................................................................................................................ 26
Time schedule (Energy Mode) ............................................................................................................................................................................ 27
Pay system ...............................................................................................................................................................................................................28
Cashflow ..................................................................................................................................................................................................................29
Some important information may appear in textboxes seen below
IMPORTANT!
INFO.
2
CAUTION!
INFO.
More INFO.
Note
INFO.
Page 3
ACTIVATE WITH CARD
Freshbrew / Espresso
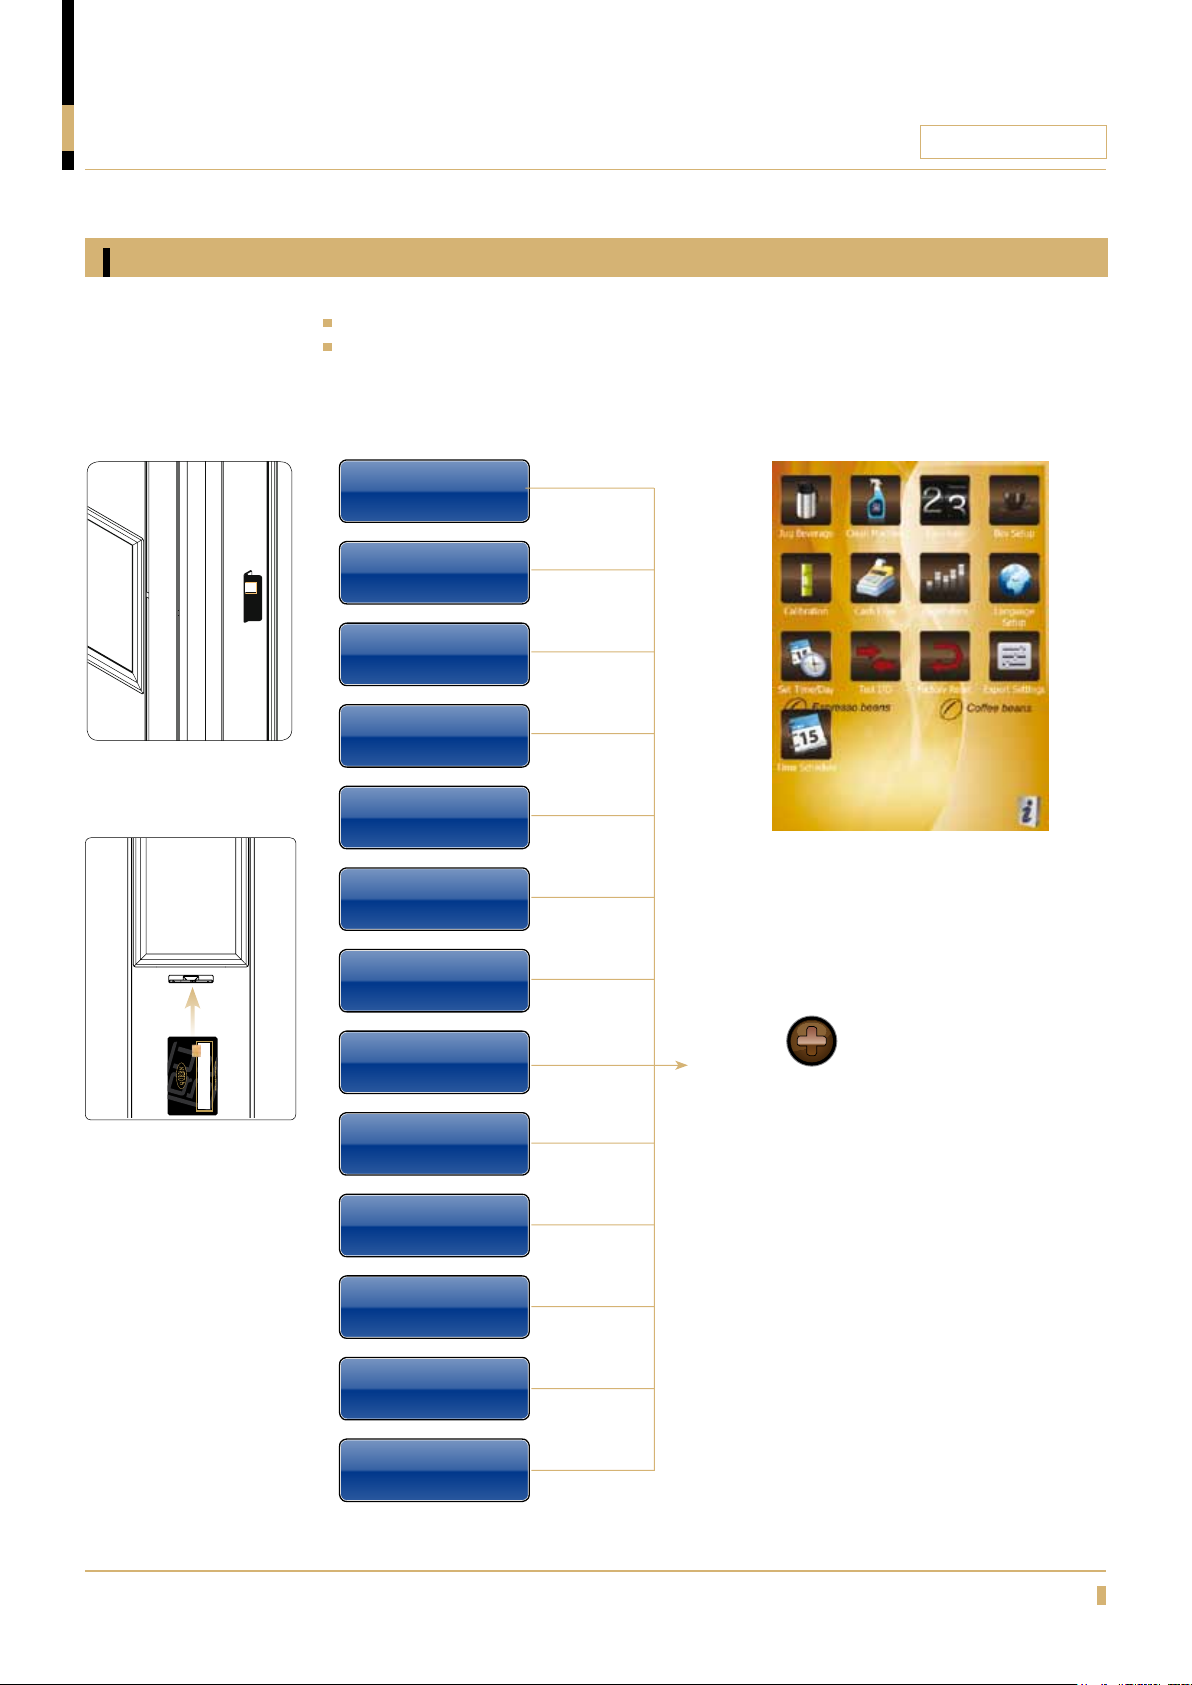
Activate programming with technical service card
Insert technical card in the card reader (A)
The display indicates
CQUBE SERIES
CQube SF
A
A
CQube Series with membrane switch
Service Menu
Jug Beverage
Service Menu
Clean Machine
Service Menu
Counters
Service Menu
Beverage Setup
Service Menu
Jug Setup
Service Menu
Calibration
Service Menu
Machine Settings
CQube Series with touch display
Press any icon to
enter the menu.
CQube MF & LF
Service Menu
Language Setup
Service Menu
Set Time/Day
Service Menu
Hardware Test
Service Menu
Factory Reset
Service Menu
Expert Settings
Service Menu
Time Schedule
Press button to scroll
between the different menus
3
Page 4

ACTIVATE WITH CARD
Freshbrew / Espresso
Programming buttons
CQUBE SERIES
Touch Display
BACK
ENTER
STOP
Membrane
Switch
Description
Press this button if you wish to leave the submenu and return to the main
menu.
Press the ENTER button if you want to enter a menu, alter the value or a
setting. Alter a value by pressing the
Confirm the new setting by pressing the E-button.
Press this button if you wish to increase a value or go forward in the menu.
Press this button if you want to reduce a value or go back in the menu.
Press the STOP button if you wish to return to the service menu.
ENERGY SAVING MODE button. Keep the STOP button pressed down for 5
seconds. The display shows; Energy Saving Mode. To return to normal setting,
keep the Stop button pressed down for 5 sec.
or button.
ENERGY SAVING MODE, the machine switches off the front display and
decreases the temperature in the water tank to 65
4
°C.
Page 5
MAIN MENU
Freshbrew / Espresso
Pay system menu
CQUBE SERIES
These menus will
only be visible if
the machine has
any pay system
installed.
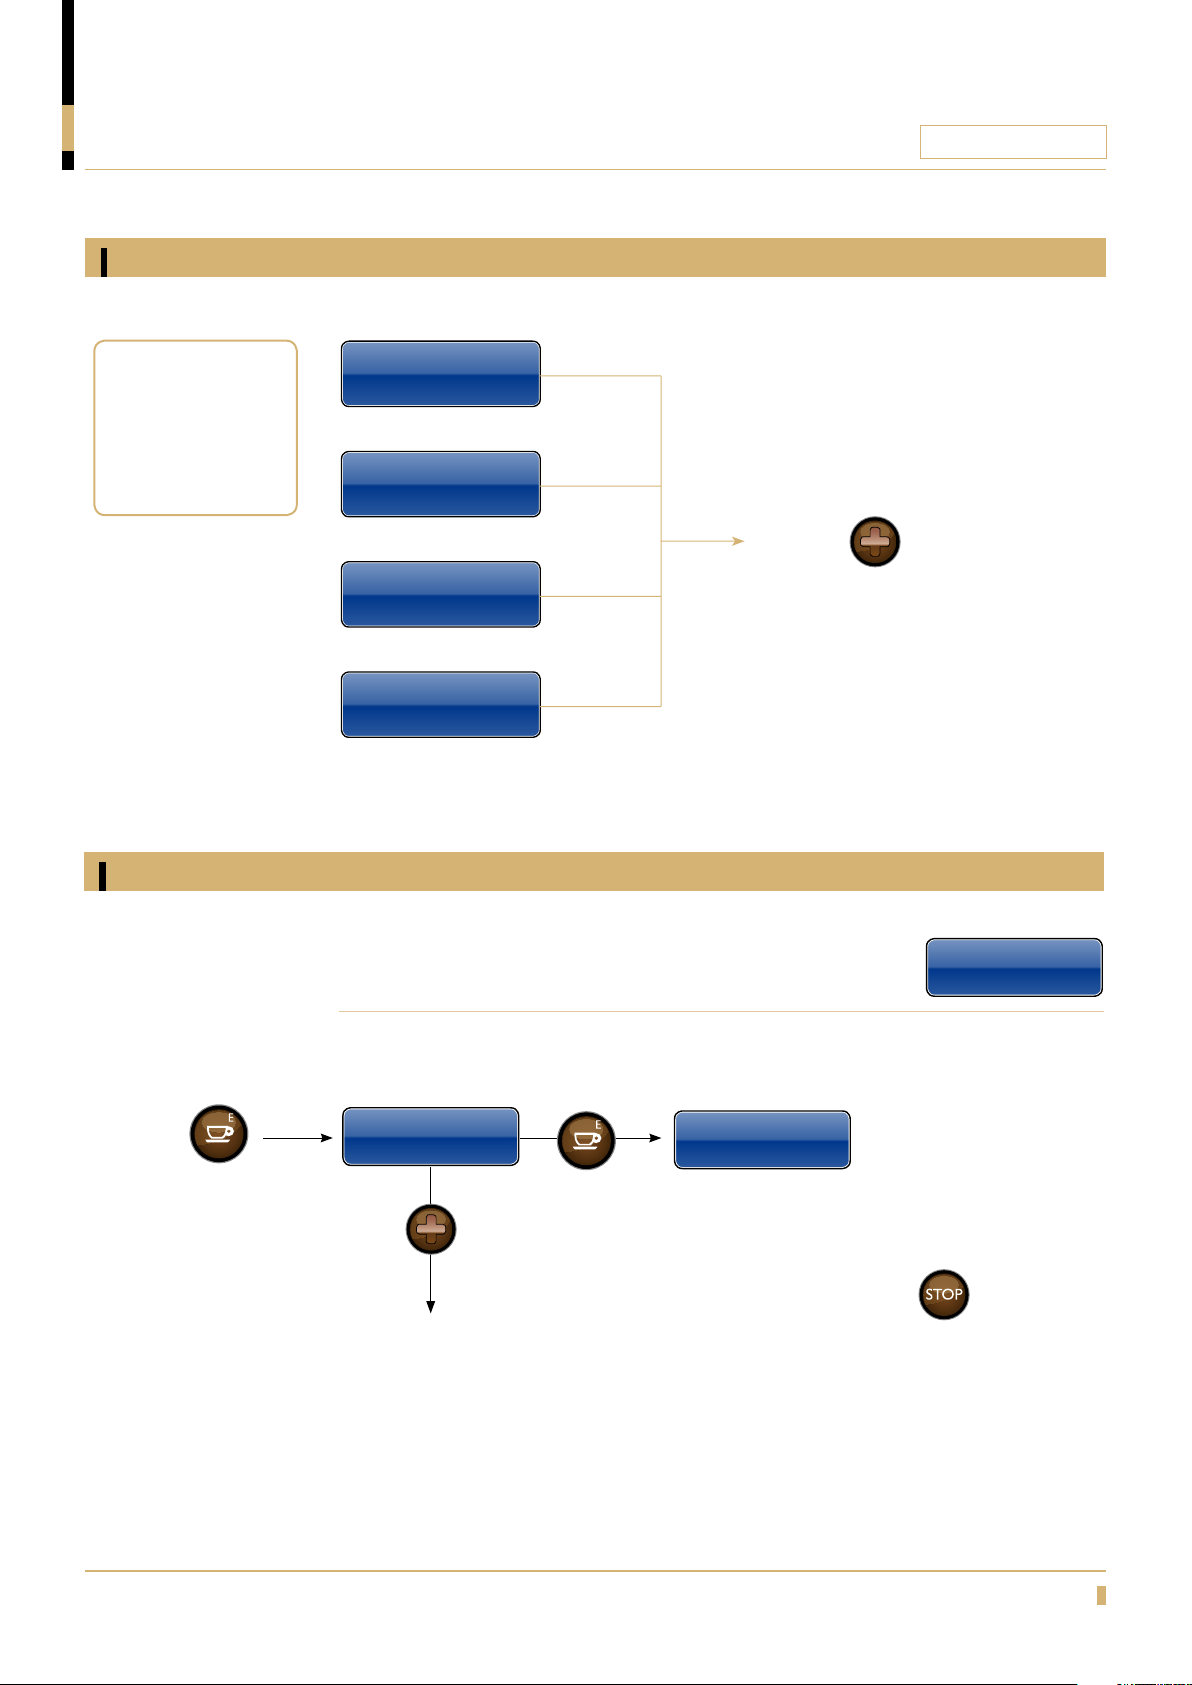
Jug beverage
Service Menu
Free Vending
Service Menu
Free Vend Off
Service Menu
Load Vend Key
Service Menu
Cashow
Press button to scroll
between the different menus
Press
How to dispense a decanter of a drink.
Press
Jug Beverage
Press
Select the number of cups to be brewed in jug
If no selection is made, remove the technical card
to return the default mode.
To stop a jug process press the
machine will finish the drink in progress before it
stops.
Cups
1-12
Service Menu
Jug Beverage
Press desired drink to
start the jug.
button,
5
Page 6
PROGRAMMING
Freshbrew / Espresso
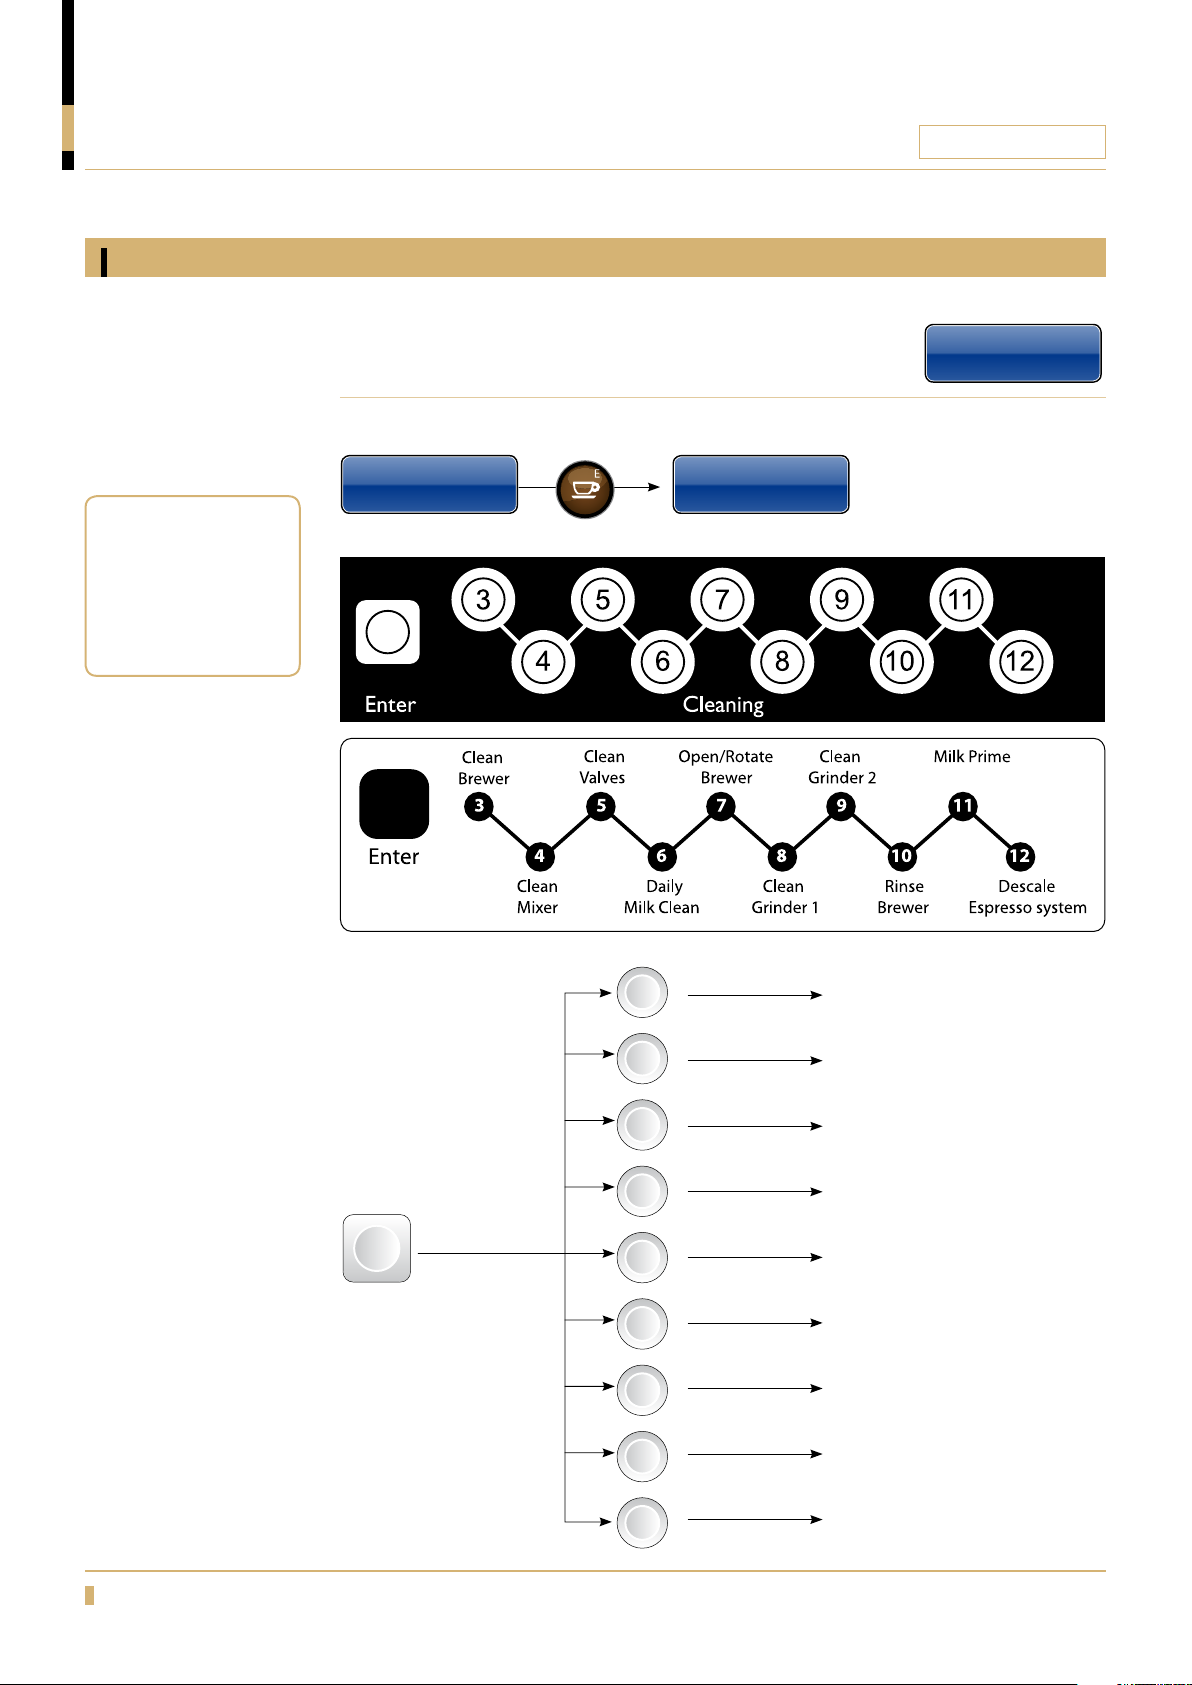
Clean machine
CQUBE SERIES
See maintenance
manual for detailed
information about
the cleaning
programs.
Perform cleaning of the machine.
Press
Clean Machine Cleanning Hot Key
Cleaning hot key
Enter
Press
3
4
5
7
8
9
10
11
12
Press
Clean Brewer
Press
Clean Mixer
Press
Clean Valves
Press
Open\Rotate Brewer
Press
Clean Grinder 1
Press
Clean Grinder 2
Press
Rinse Brewer
Press
Milk Prime
Press
Descale Espresso system
6
Page 7
PROGRAMMING
Freshbrew / Espresso
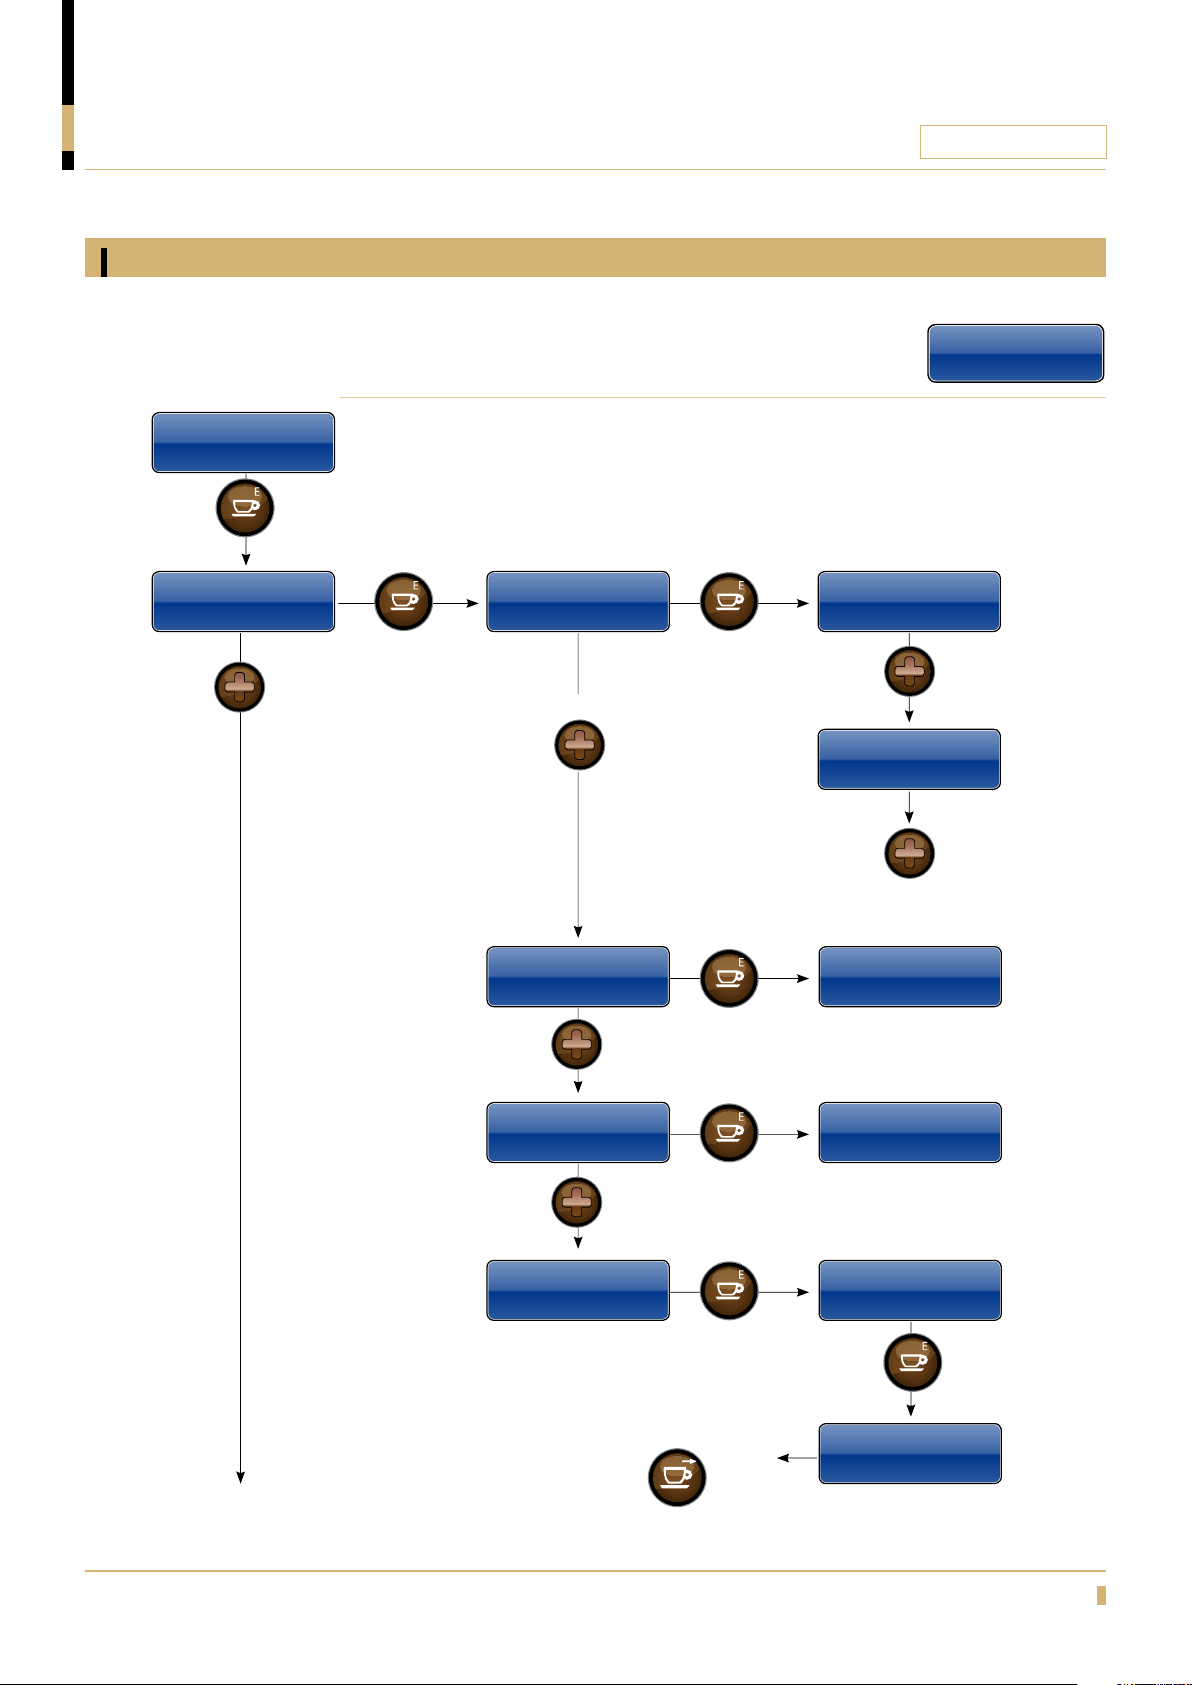
Counters
See the counter of each drink or total counters
for all drinks. It’s also possible to reset the drink
counters.
Service Menu
Counters
Press
CQUBE SERIES
Service Menu
Counters
Press Press
Press
Counters
Beverages
Beverage Counters
Per Beverage
To go forward in the menu.
Press
Beverage Counter
Total Served
Press
Beverage Counter
Master Total
Drink 1
served xxx
Press
Drink 2
served xxx
Press
Press
Total Beverages
Served # #
Press
Master Total
Served xxx
Press
Beverage Counter
Clean Counters
To go back in menu.
Press
Press
Hold Enter to
Clean Counters
Hold ENTER key
for 3 seconds
Counters Cleaned
Press ESCAPE
7
Page 8
PROGRAMMING
Freshbrew / Espresso
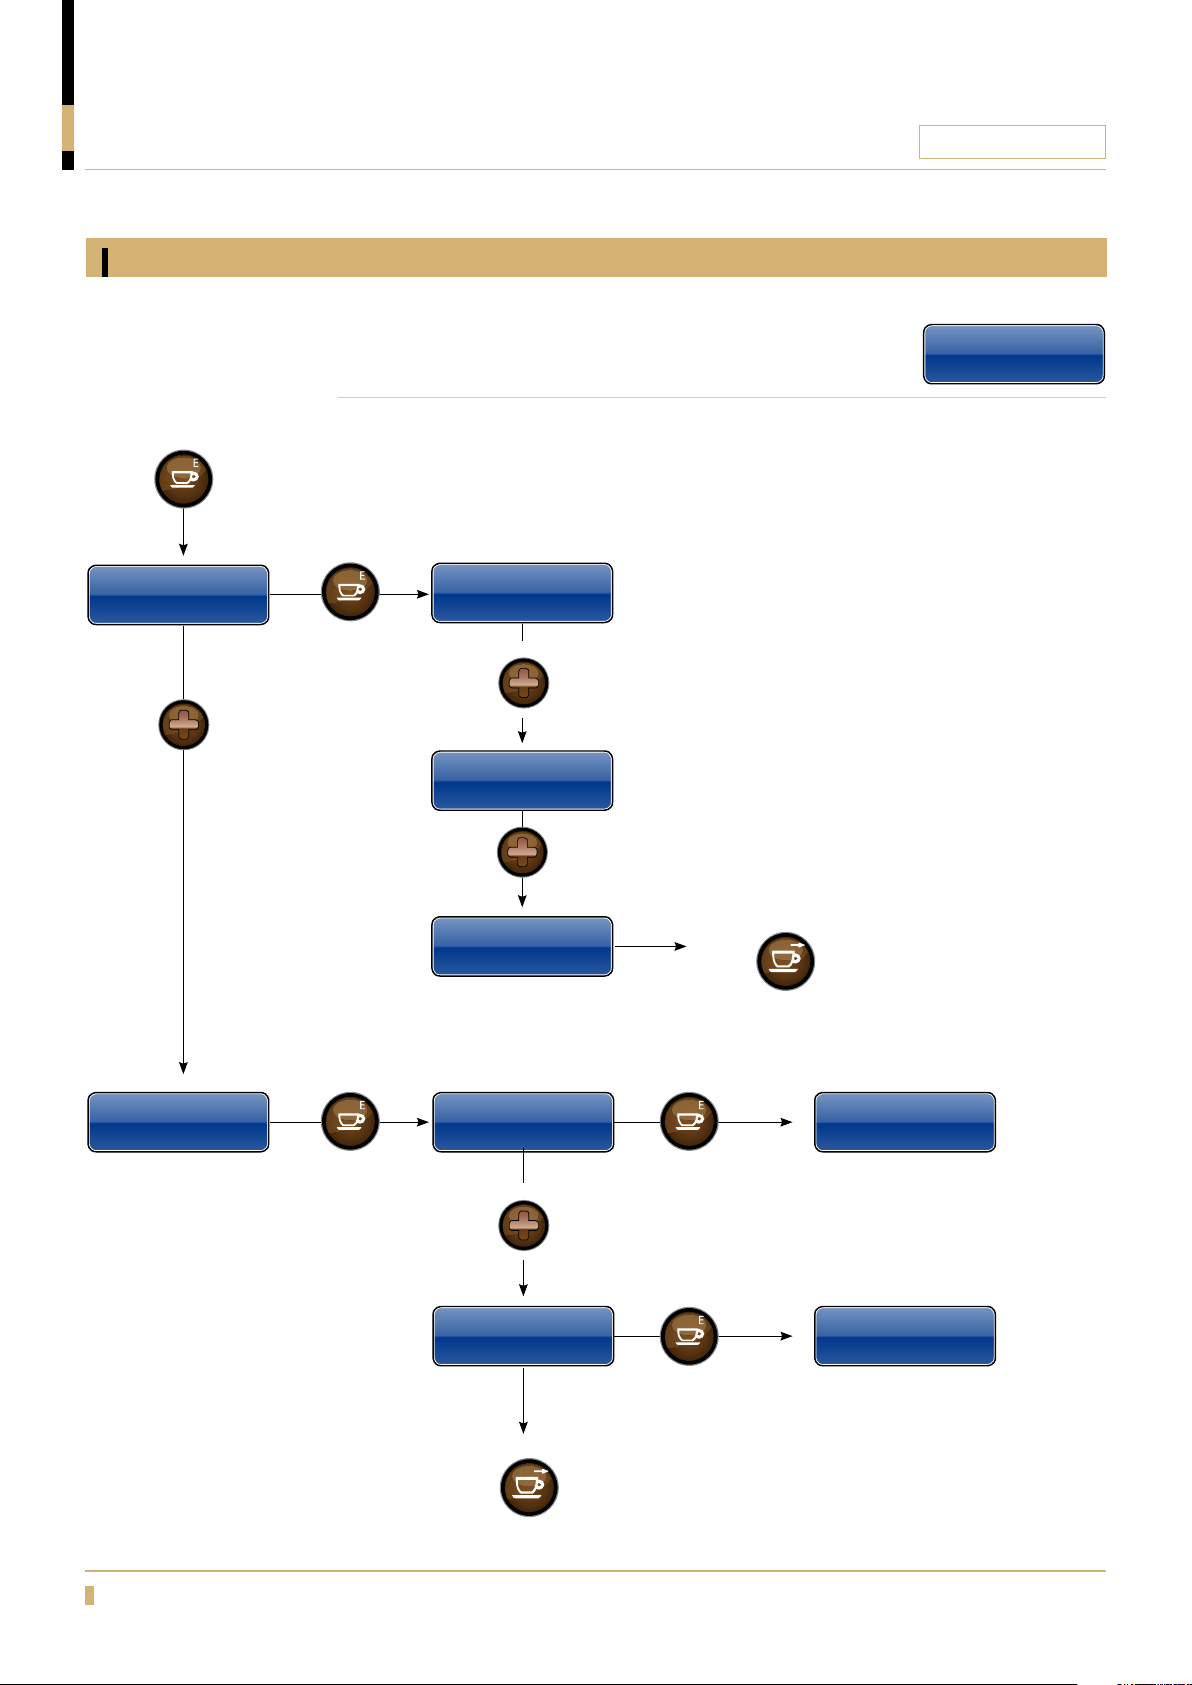
Counters
CQUBE SERIES
Press
Counters
Clean Counter
Press
See the number of times cleaning has been
performed or reset the clean counter.
Press
Clean Counter
Brewer 000
To go forward in menu.
Press
Clean Counter
Milk xx
Press
Service Menu
Counters
Counters
Water Filter
Clean Counter
Total 000
Press Press
Water Filter
Reset Filter
To go forward in menu.
Press
Press
Water Filter
Interval 6
To go back in menu.
Press
To go back in menu.
Press
Reset? No/Yes
Months Left 6
Standard=6 months
Water Filter
Interval 1-12
8
Page 9
PROGRAMMING
Freshbrew / Espresso
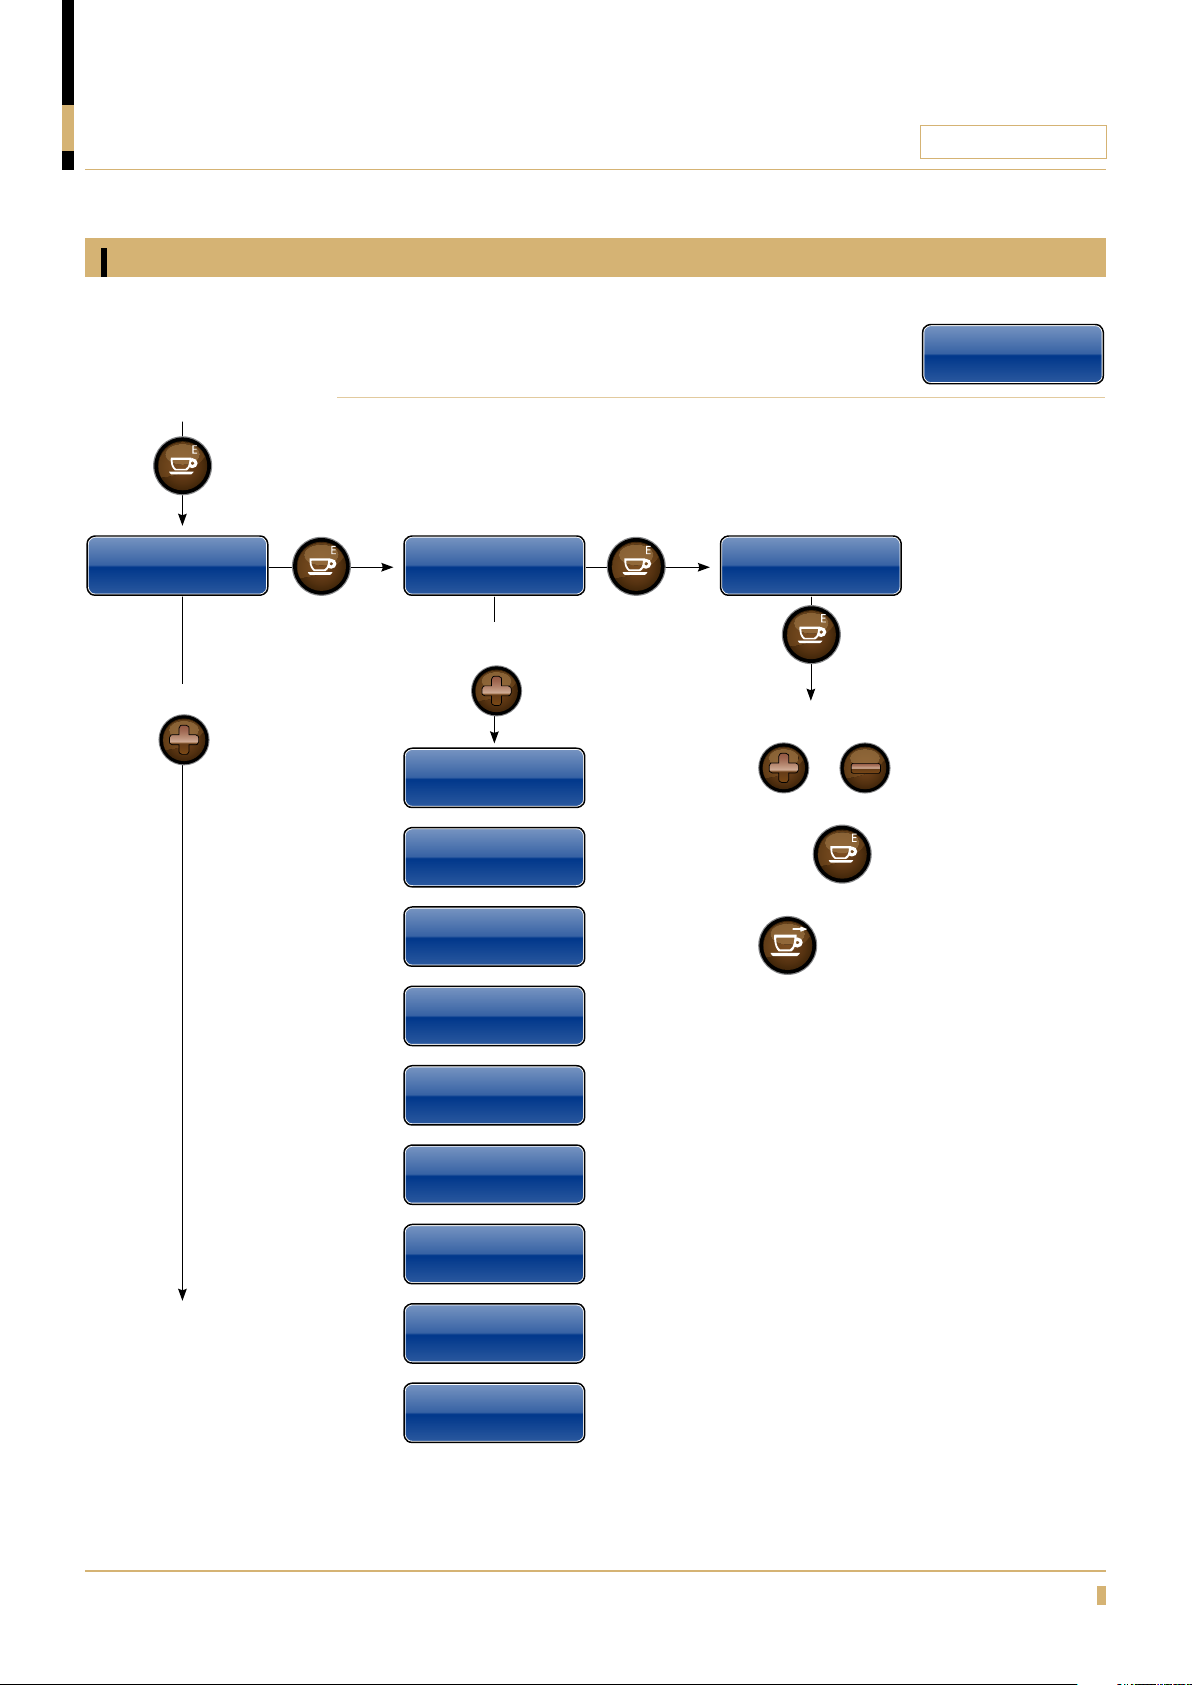
Beverage setup, Strength
CQUBE SERIES
Press
Beverage Setup
Strength
To go forward in menu.
Press
Change strength of the different drinks.
Press Press
STRENGTH
Drink 1
Strength xx%
To go forward in menu.
Choose another drink.
Press
Drink 2
Strength xx%
Drink 3
Strength xx%
Drink 4
Strength xx%
Factory default value
Drink 1
Strength xx%+0
Press
Change the value of a drink,
Press or
Confirm the new setting by
pressing the
To step backwards in the
Menu.
Press
Increase or reduce
value in %
Service Menu
Beverage Setup
Drink 5
Strength xx%
Drink 6
Strength xx%
Drink 7
Strength xx%
Drink 8
Strength xx%
Drink 9
Strength xx%
Drink 10
Strength xx%
9
Page 10
PROGRAMMING
Freshbrew / Espresso
Beverage setup, Volume
CQUBE SERIES
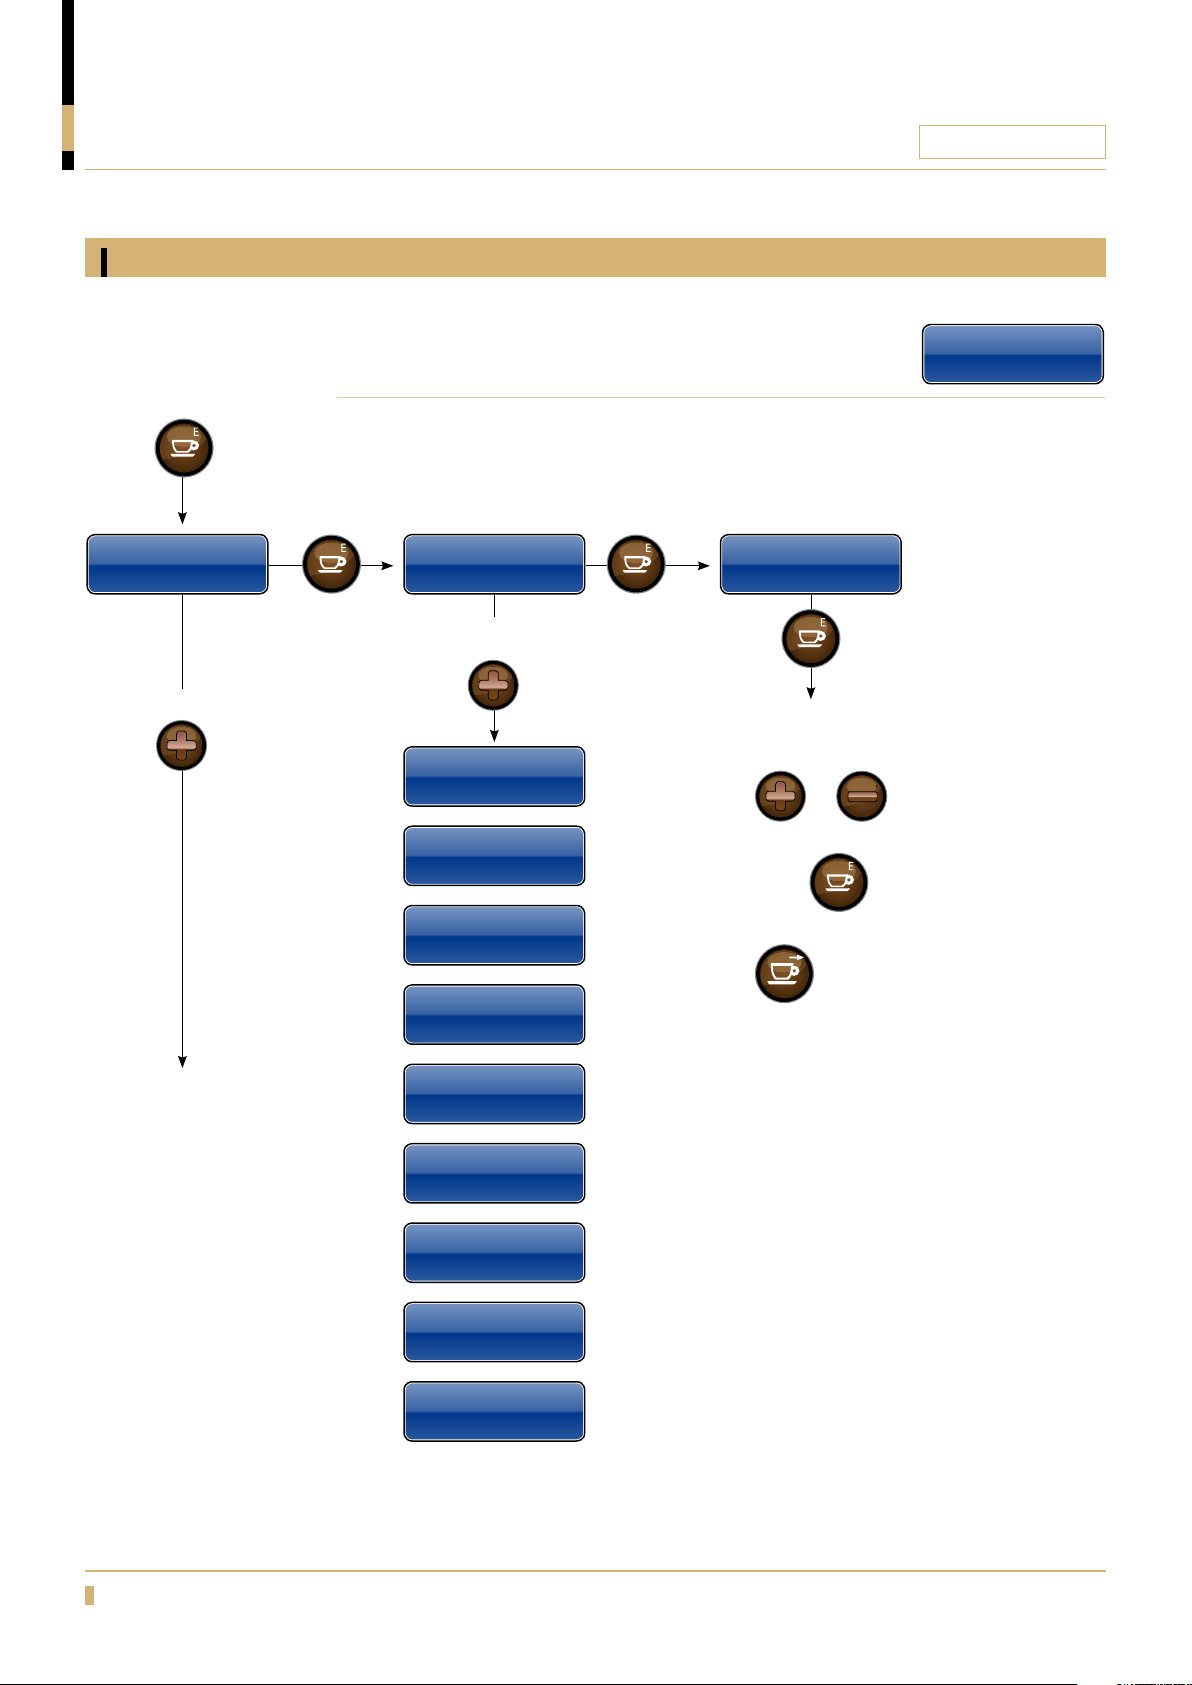
Press
Beverage Setup
Volume
To go forward in menu.
Press
Change strength and volume of the different drinks.
Press Press
To go forward in menu.
Choose another drink.
VOLUME
Drink 1
Volume xx ml
Press
Drink 2
Volume xx ml
Drink 3
Volume xx ml
Factory default value
Drink 1
Volume xx ml
Press
Change the value of a drink,
Press or
Confirm the new setting by
pressing the
Service Menu
Beverage Setup
Increase or reduce
value in %
Drink 4
Volume xx ml
Drink 5
Volume xx ml
Drink 6
Volume xx ml
Drink 7
Volume xx ml
Drink 8
Volume xx ml
Drink 9
Volume xx ml
Drink 10
Volume xx ml
To step backwards in the
Menu.
Press
10
Page 11
PROGRAMMING
Freshbrew / Espresso
Beverage setup, Drink Settings
CQUBE SERIES
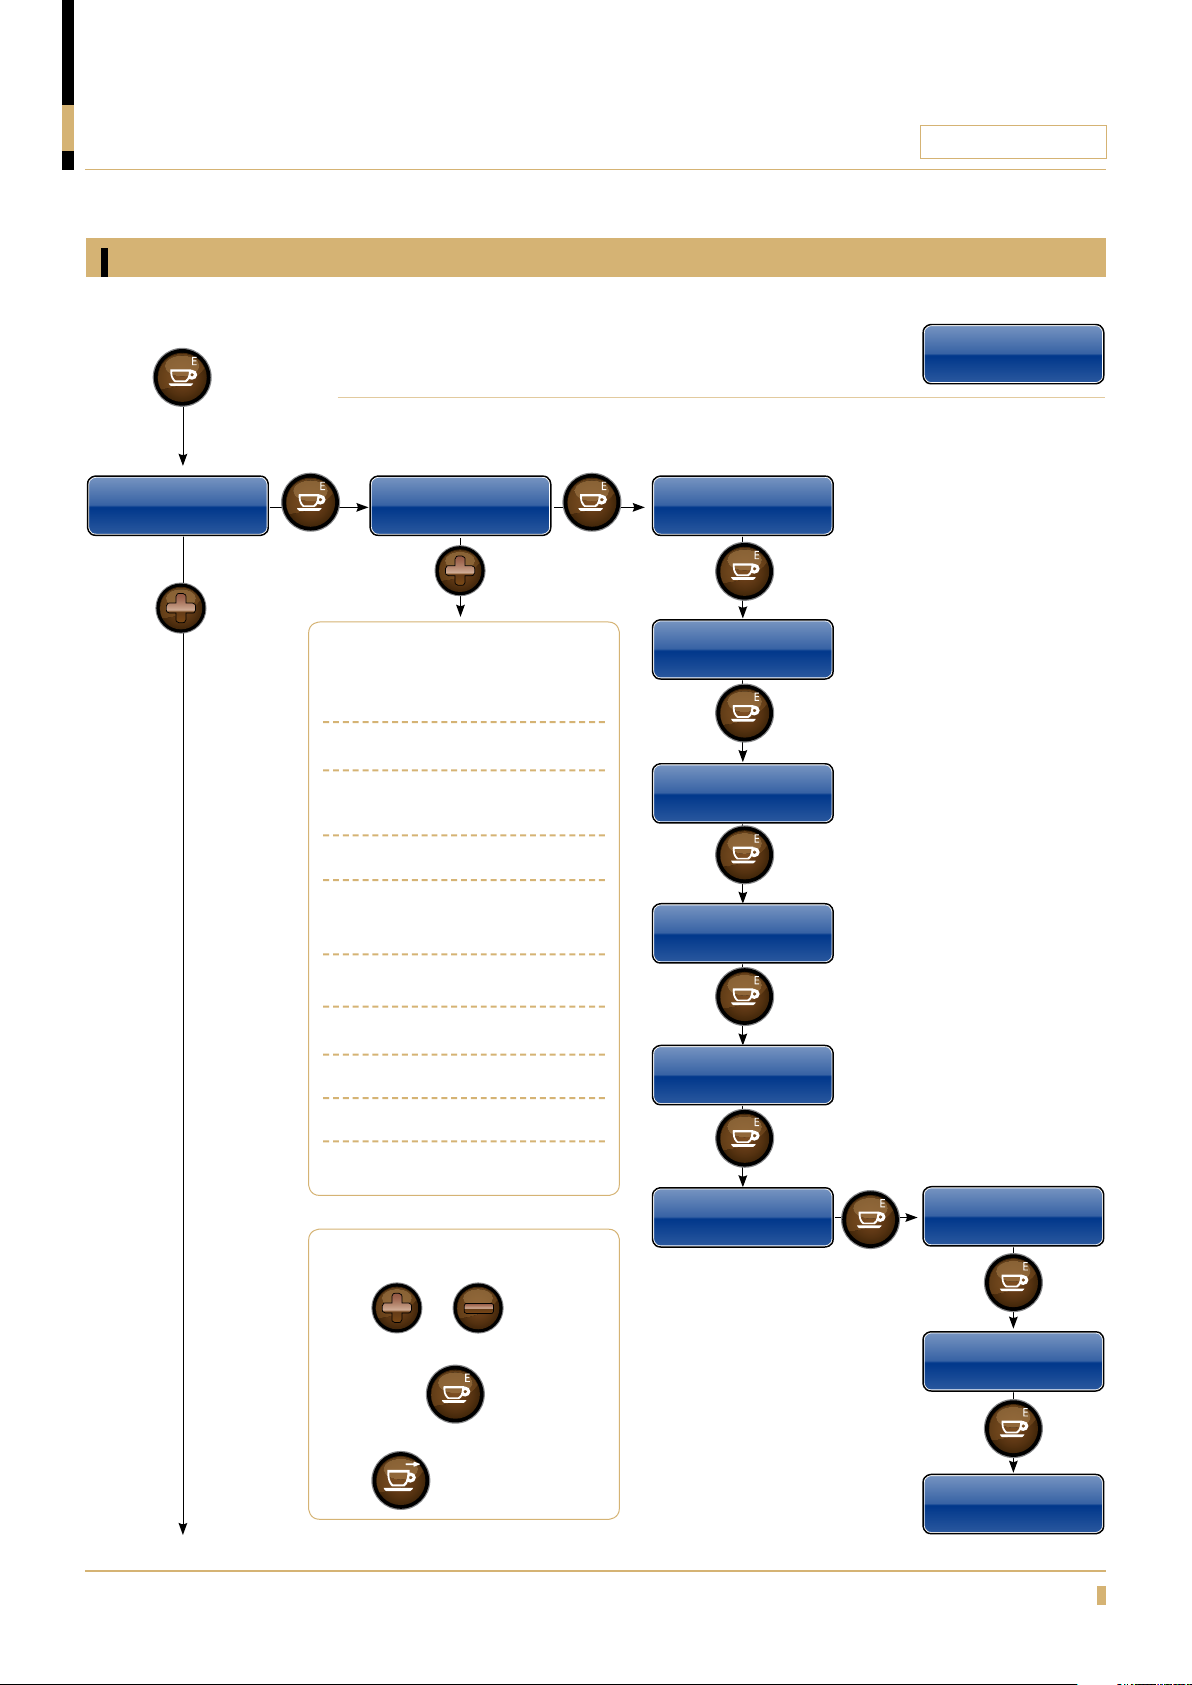
Press
Beverage Setup
Drink Settings
Press
Change drink settings.
Press Press
Aeration = see technical manual
Pre brew = see technical manual
Extraction Time = see technical
manual
Press Time = see technical manual
Decompress Time = see technical
manual
Drink Settings
Drink 1
Press
(Filter mec. adjustments)
(Filter mec. adjustments)
Factory default value
Drink 1
Aeration 50%+0
Press
Pre brew 4.1s
Press
Extraction Time
11.5s
Press
Press Time
50% +0
Increase or reduce
value in %
Service Menu
Beverage Setup
Empty Time = see technical manual
(Espresso mec. adjustments)
Pre Infuse = see technical manual
Paus = see technical manual
Delay Open = see technical manual
Change the value of a drink,
Press or
Confirm the new setting by
pressing the
To step backwards in the Menu.
Press
Press
DecompressTime
2.0s
Press
Empty Time 6.0s
Press
(Espresso mec.
adjustments)
Pre infuse 1.5s
Press
Pause 1.5
Press
Delay Open 4.0
11
Page 12
PROGRAMMING
Freshbrew / Espresso
Beverage setup, Water/Recipe Bank
CQUBE SERIES
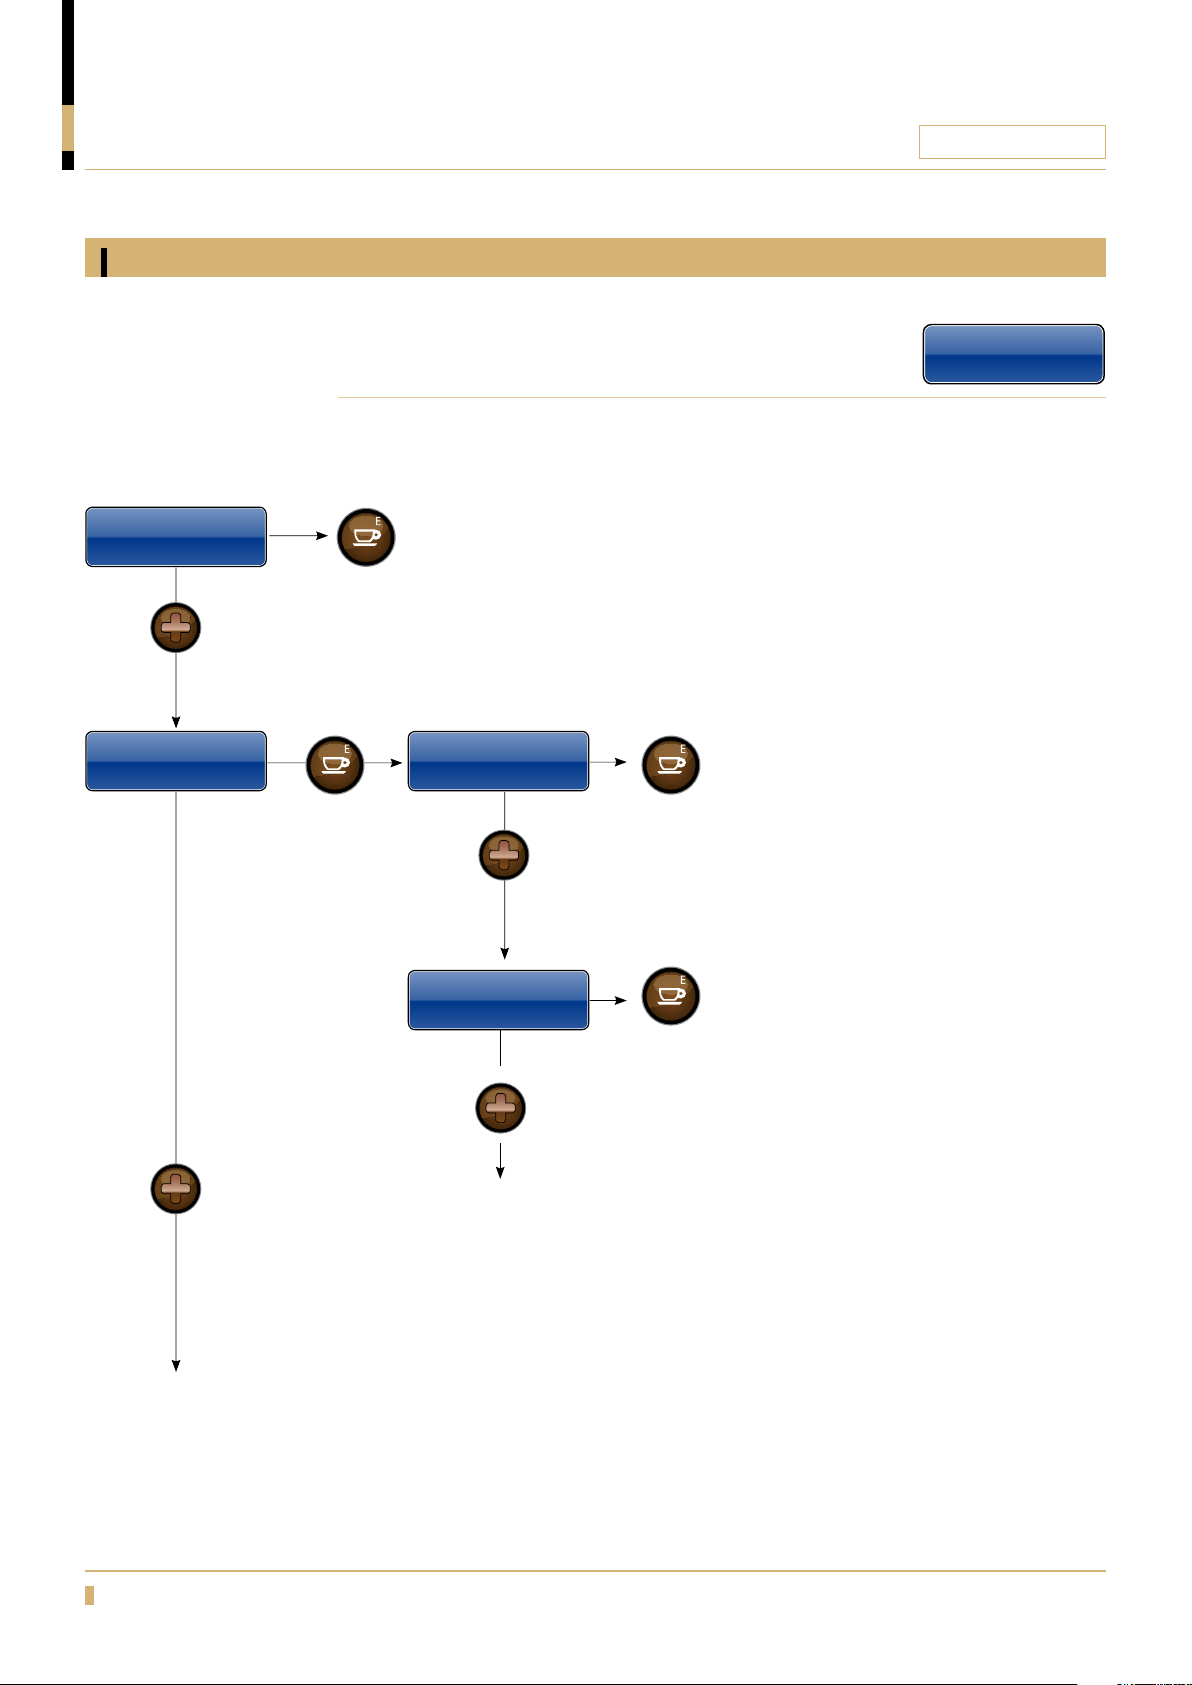
Beverage Setup
Water <On/Off>
Press
Beverage Setup
Recipe Bank
Turn the water ON/OFF and enter recipe bank.
Press
Enable or disable water with ON/OFF settings.
Confirm with ENTER
Press Press
Key#ZZ R#XXX
<Drink 1 name>
Press
Choose which drink key (key #ZZ) that
should be related to which recipe (R#YYY) in
the recipe bank.
Confirm with ENTER
Beverage Setup
Water <On/Off>
Press
Key#ZZ R#XXX
<Drink 2 name>
To go forward in menu.
Press
Press
Choose which drink key (key #ZZ) that
should be related to which recipe (R#YYY) in
the recipe bank.
Confirm with ENTER
12
Page 13
PROGRAMMING
Freshbrew / Espresso
Beverage setup, Enable Beverage
CQUBE SERIES
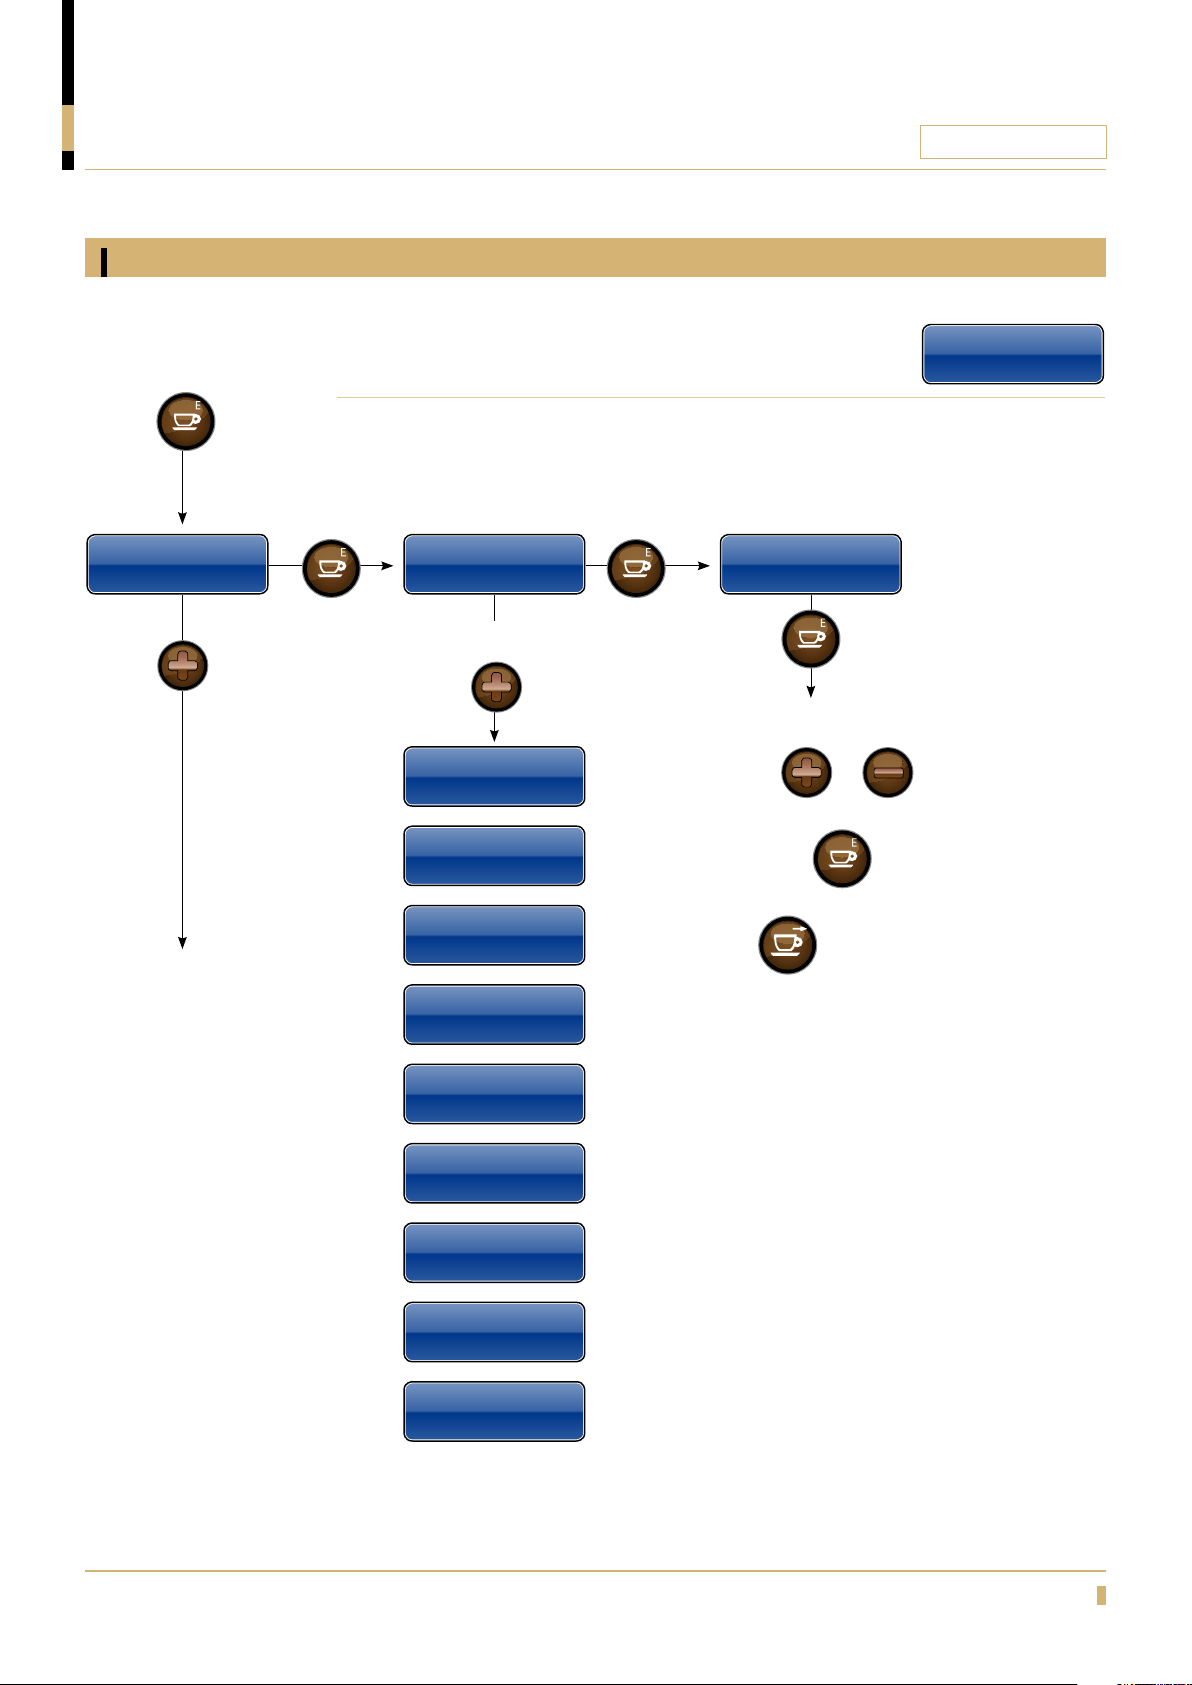
Press
Beverage Setup
Enable Beverage
Press
Enable or disable different drinks.
Press Press
ENABLE BEVERAGE
Drink 1
Enable Bev ON
To go forward in menu.
Choose another drink.
Press
Drink 2
Drink 3
Drink 4
Service Menu
Beverage Setup
Drink 1
Enable Bev On-Off
Press
Change the value by
Pressing or
Confirm the new setting by
pressing the
To step backwards in the Menu.
Press
Drink 5
Drink 6
Drink 7
Drink 8
Drink 9
Drink 10
13
Page 14
PROGRAMMING
Freshbrew / Espresso
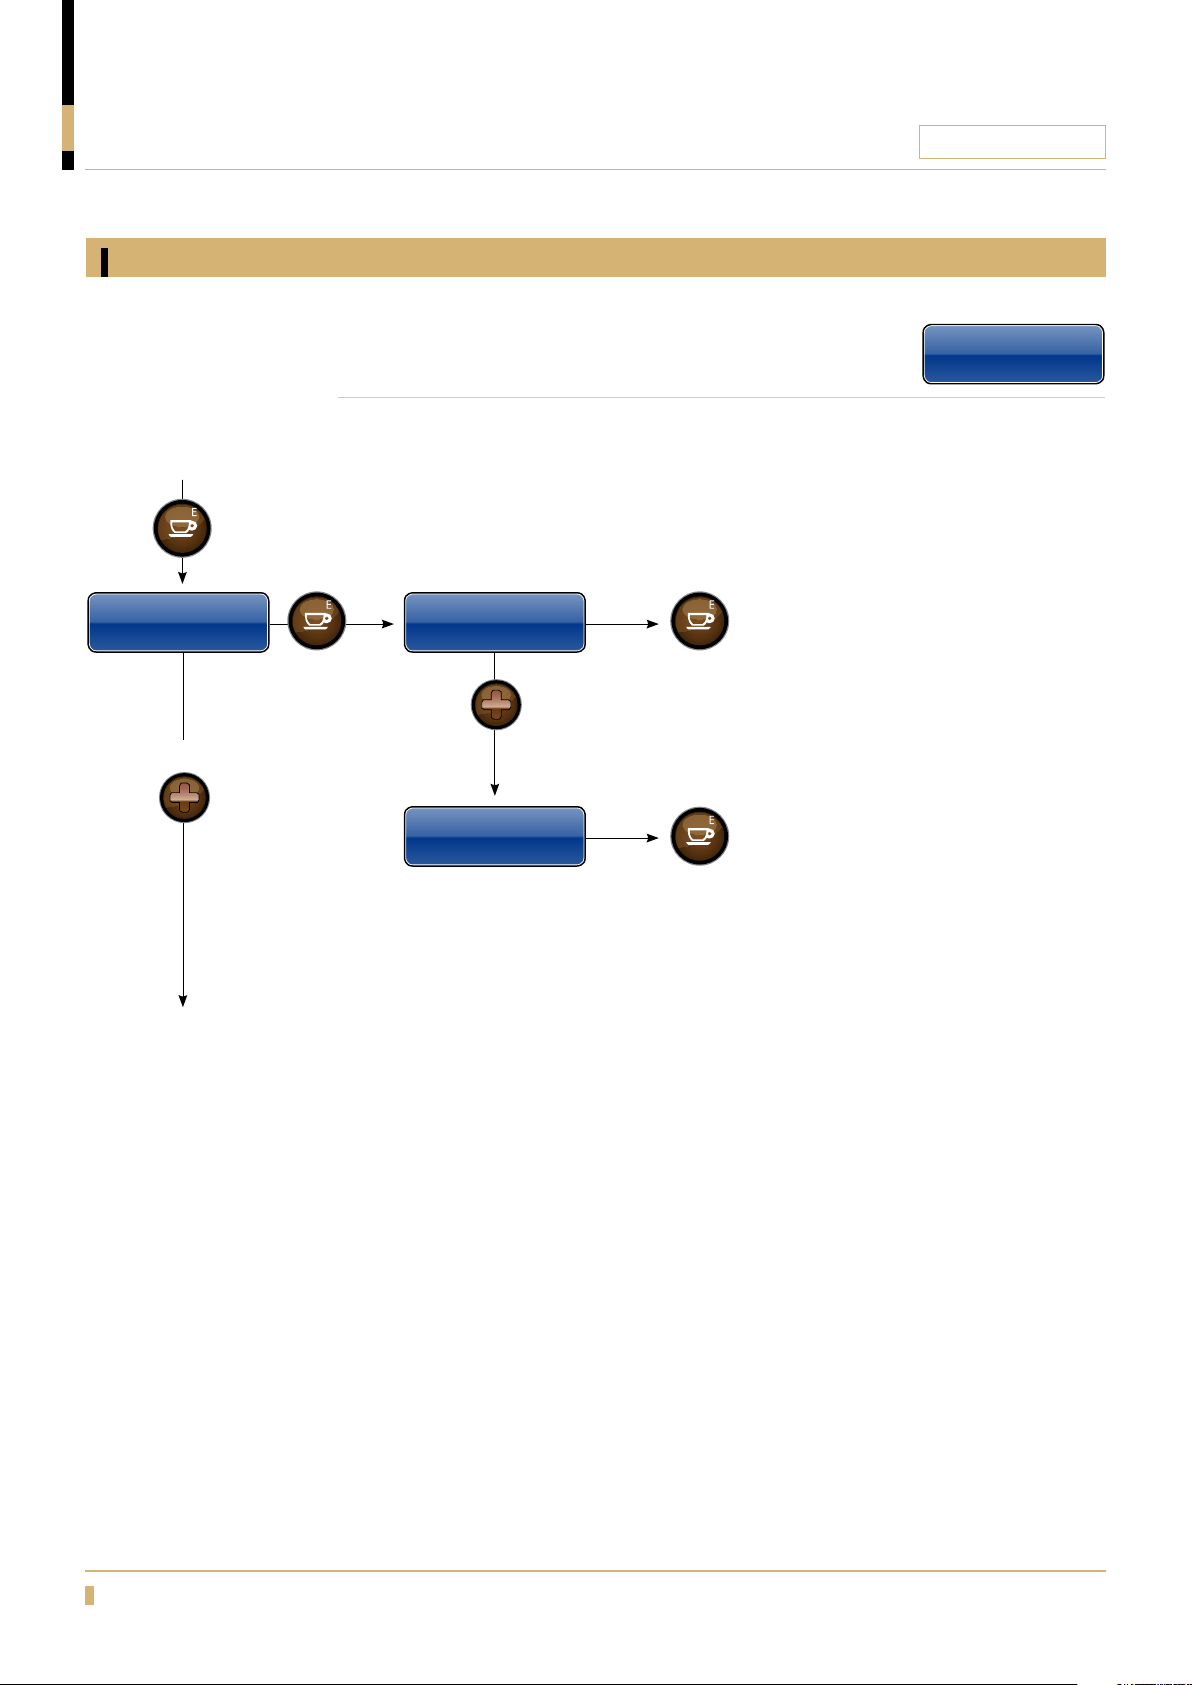
Jug setup
CQUBE SERIES
Press
Sevice Menu
Jug Setup
To go forward in menu.
Press
Change the number of cups for standard jug.
Press
Jug Setup
Jug Setup
Default Cups (x)
Press
Jug Setup
Max Cups
Press
Press
Service Menu
Jug Setup
Choose the amount of cups to be used
as standard when you enter Jug Mode.
Confirm with ENTER
Choose the maximum allowed amount
of cups to be used when brewing into
a jug, Value set here rules the maximum
allowed cups in “Defaut cups“ choice
above.
Confirm with ENTER
14
Page 15
PROGRAMMING
Freshbrew / Espresso
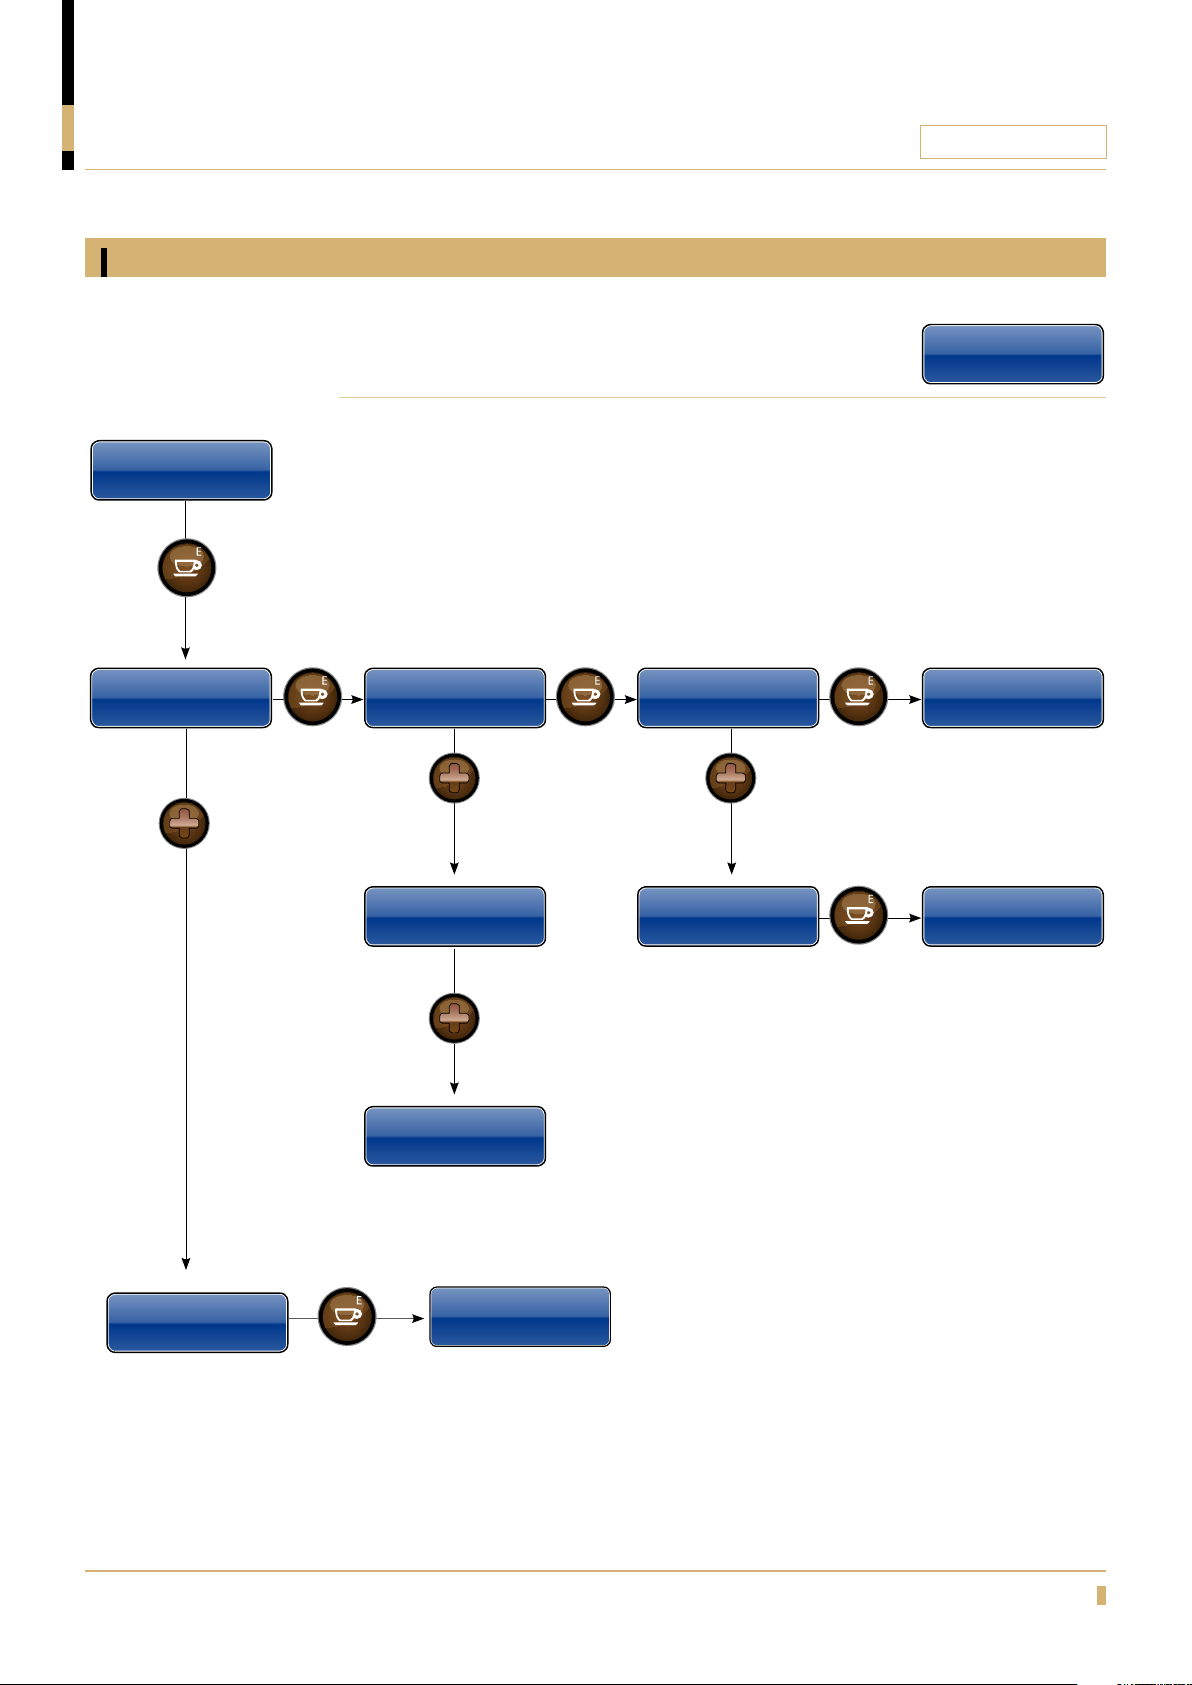
Calibration
CQUBE SERIES
Service Menu
Calibration
Press
Calibration
Valves
Press
Change calibration settings of the machine.
Press
Select Valve
HWater M1
Press
Select Valve
HWater M2
Press Press
HWater-M1 ###ml
Verify Valve
Press
HWater M1 0-xxx
Calibrate Valve
Service Menu
Calibration
HWater-M1
Verify: ###ml
Water will dispense from the
outlet valve nr 1.
Total volume should be 150ml if
the calibration is correct.
Press
HWater-M1
Volume:<xxx>ml
Calibration
Boiler Temp
Press
Press
Select Valve
HWater
Boiler 0C
Temp: ## Cal:<±XX>
set offset temperature for tank
water temperature.
Confirm with ENTER
Water will dispense from the
outlet valve nr 1. Measure the
actual volume in a measurement
cup and enter actual water
volume.
Confirm with ENTER and go
back to “Verify Valve“ to verify
volume.
15
Page 16
PROGRAMMING
Freshbrew / Espresso
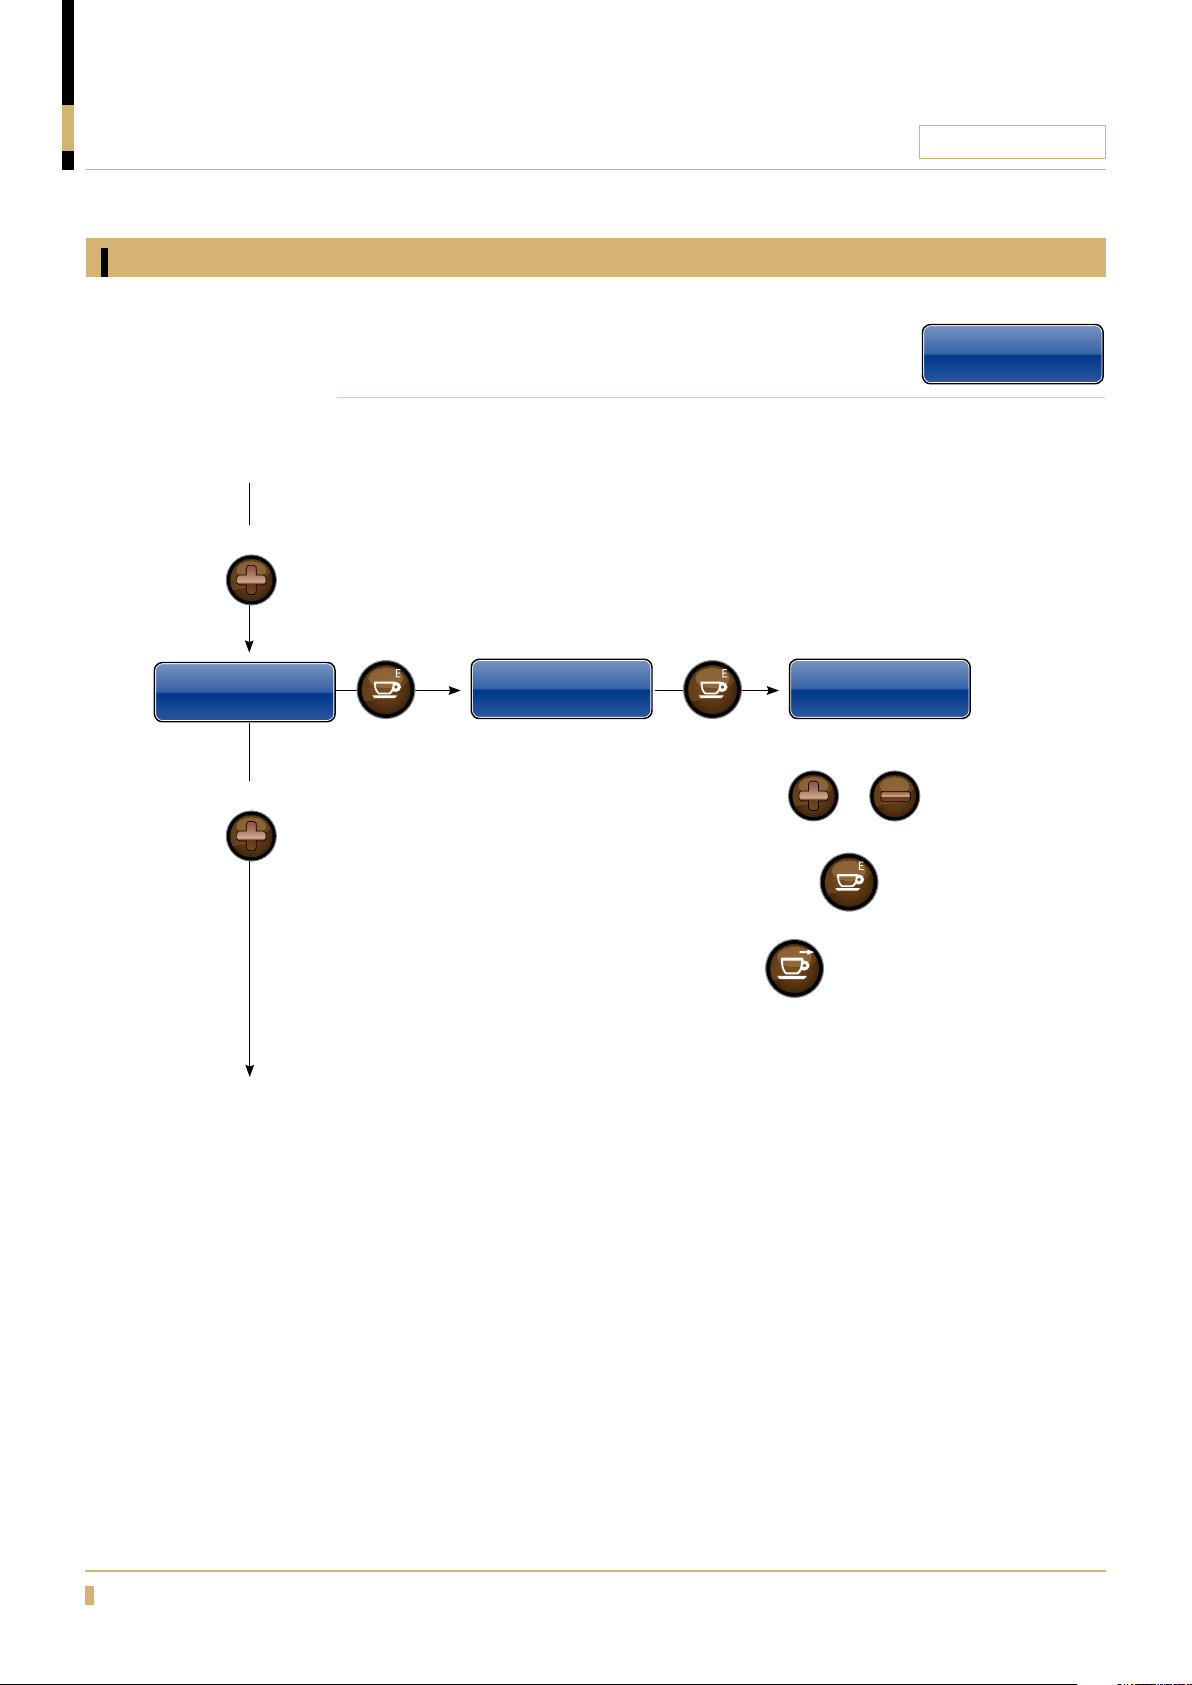
Calibration
CQUBE SERIES
To go forward in menu.
Press
Calibration
Time Open Brewer
To go forward in menu.
Press
Change calibration settings of the machine.
Chnage the time for when
the filter wiper stops in open
brewer function.
Press Press
Time Open Brewer
Brewer 2,8s
Change the value by
Pressing
Confirm the new setting by
pressing the
Service Menu
Calibration
Time Open Brewer
Brewer 0,0s
or
To step backwards in the Menu.
Press
16
Page 17
PROGRAMMING
Freshbrew / Espresso
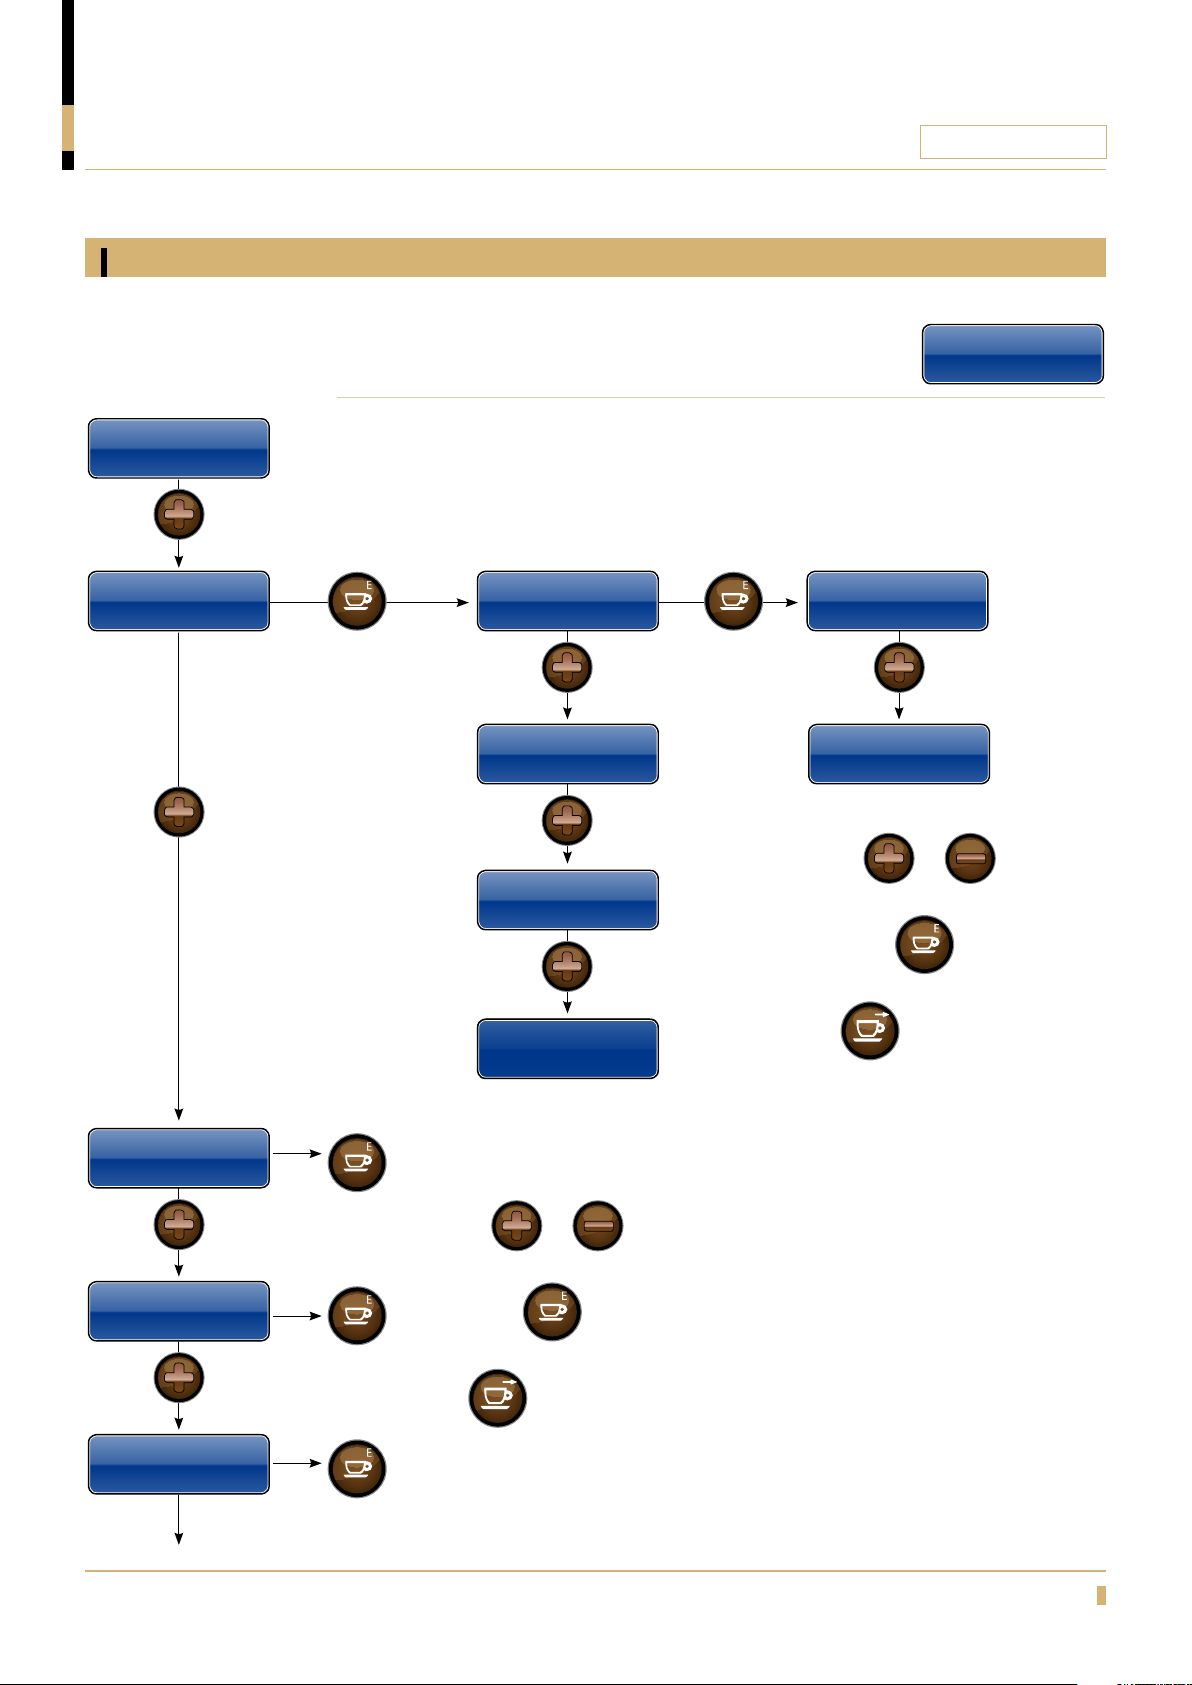
Machine settings
CQUBE SERIES
Service Menu
Machine Settings
Press
Machine Settings
Heater Temp
Press
Change Machine Settings.
Press Press
Set Heater Temp
Heater
Press Press
Heater ESP
Press
Heater BLK
Service Menu
Machine Settings
Heater
Idle Temp <XX>ºC
Heater
Prio Temp <XX>ºC
Change the value by
Pressing
Confirm the new setting by
or
Machine Settings
Warning Temp 85 ºC
Press
Machine Settings
Block Temp 80ºC
Press
Machine Settings
FanldleSpeed <On/Off>
Press
Press
Press
Press
Heater BLK2
Change the value by
Pressing
Confirm the new setting by
pressing the
To step backwards in the Menu.
Press
or
pressing the
To step backwards in the Menu.
Press
17
Page 18
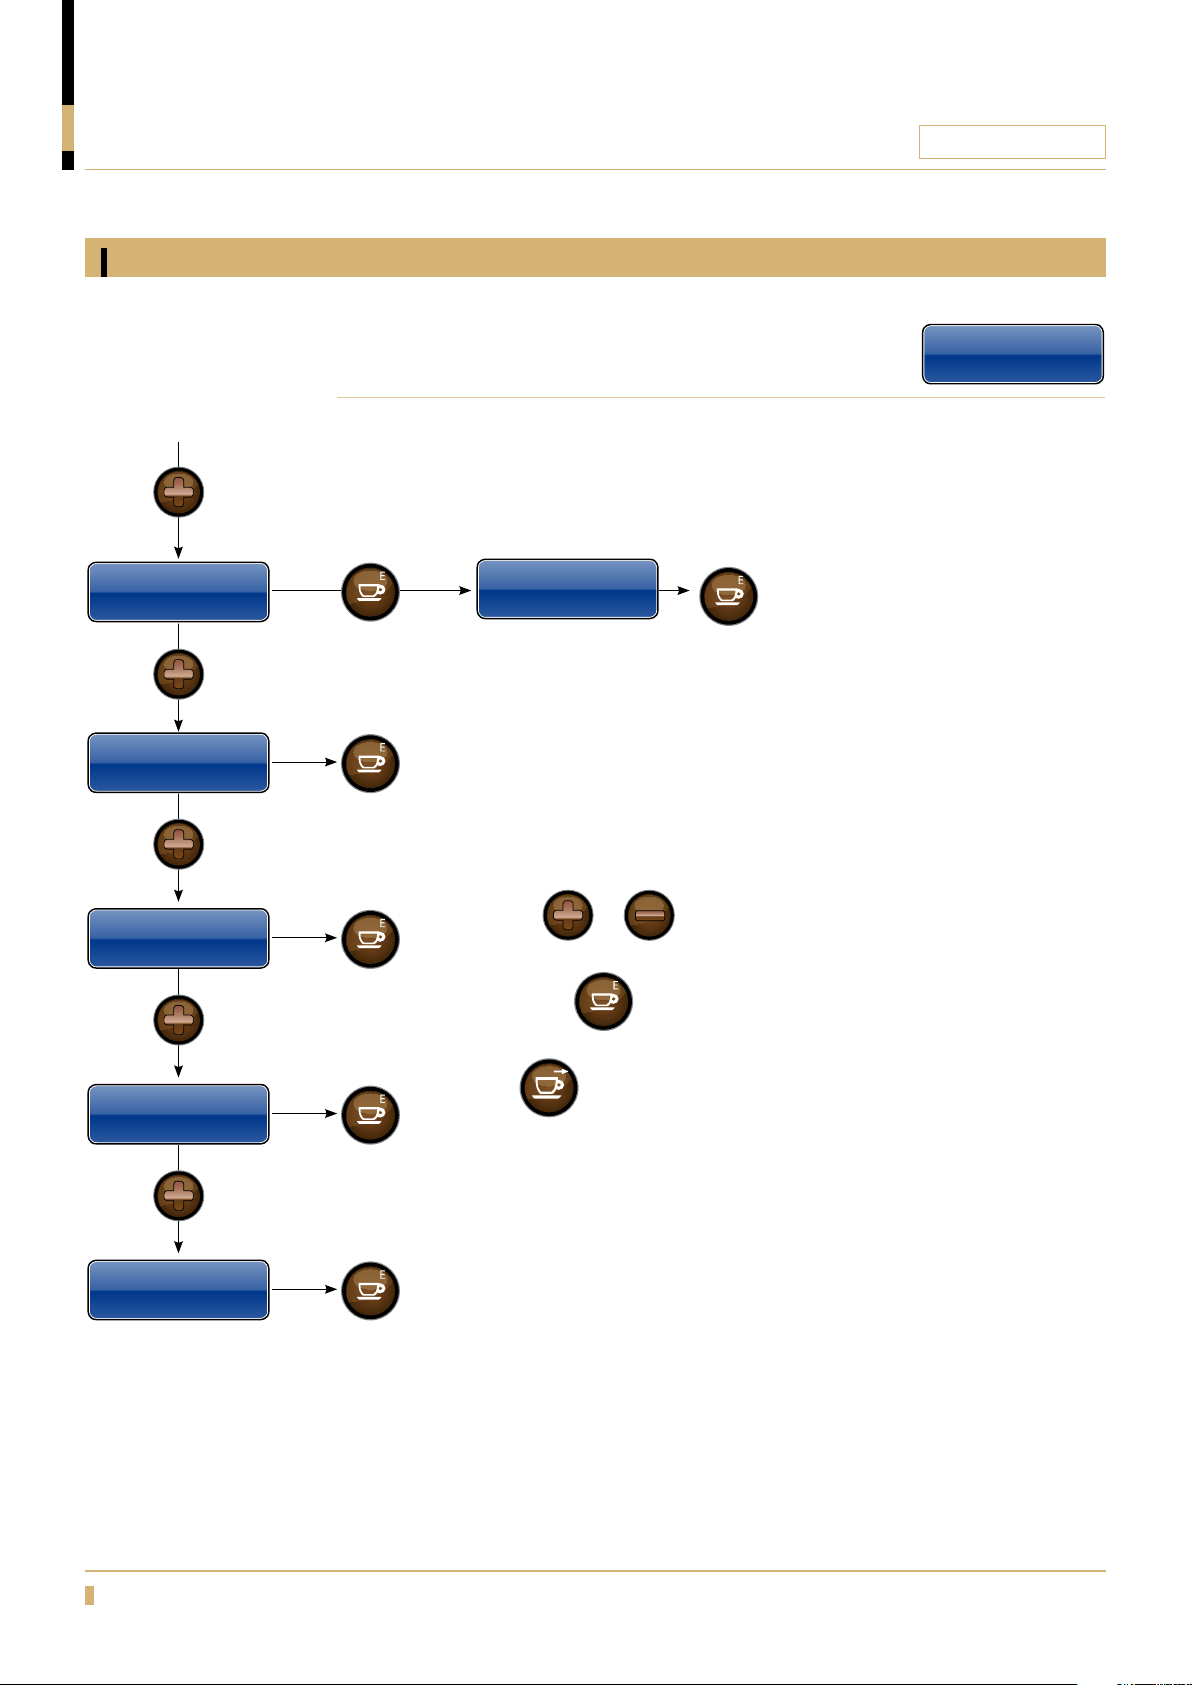
PROGRAMMING
Freshbrew / Espresso
Machine settings
CQUBE SERIES
Press
Machine Settings
Fan Run Time
Press
Machine Settings
Use Driptray<On/Off>
Press
Machine Settings
Waste cups 00
Change Machine Settings.
Press
Fan Run Time
00:30
Press
Press
Change the value by
Pressing
Confirm the new setting by
or
Service Menu
Machine Settings
Press
Set fan run time
Confirm with ENTER
Press
Machine Settings
Standby Mode<A/B>
Press
Machine Settings
Dry Soldout
pressing the
To step backwards in the Menu.
Press
Press
Press
18
Page 19
PROGRAMMING
Freshbrew / Espresso
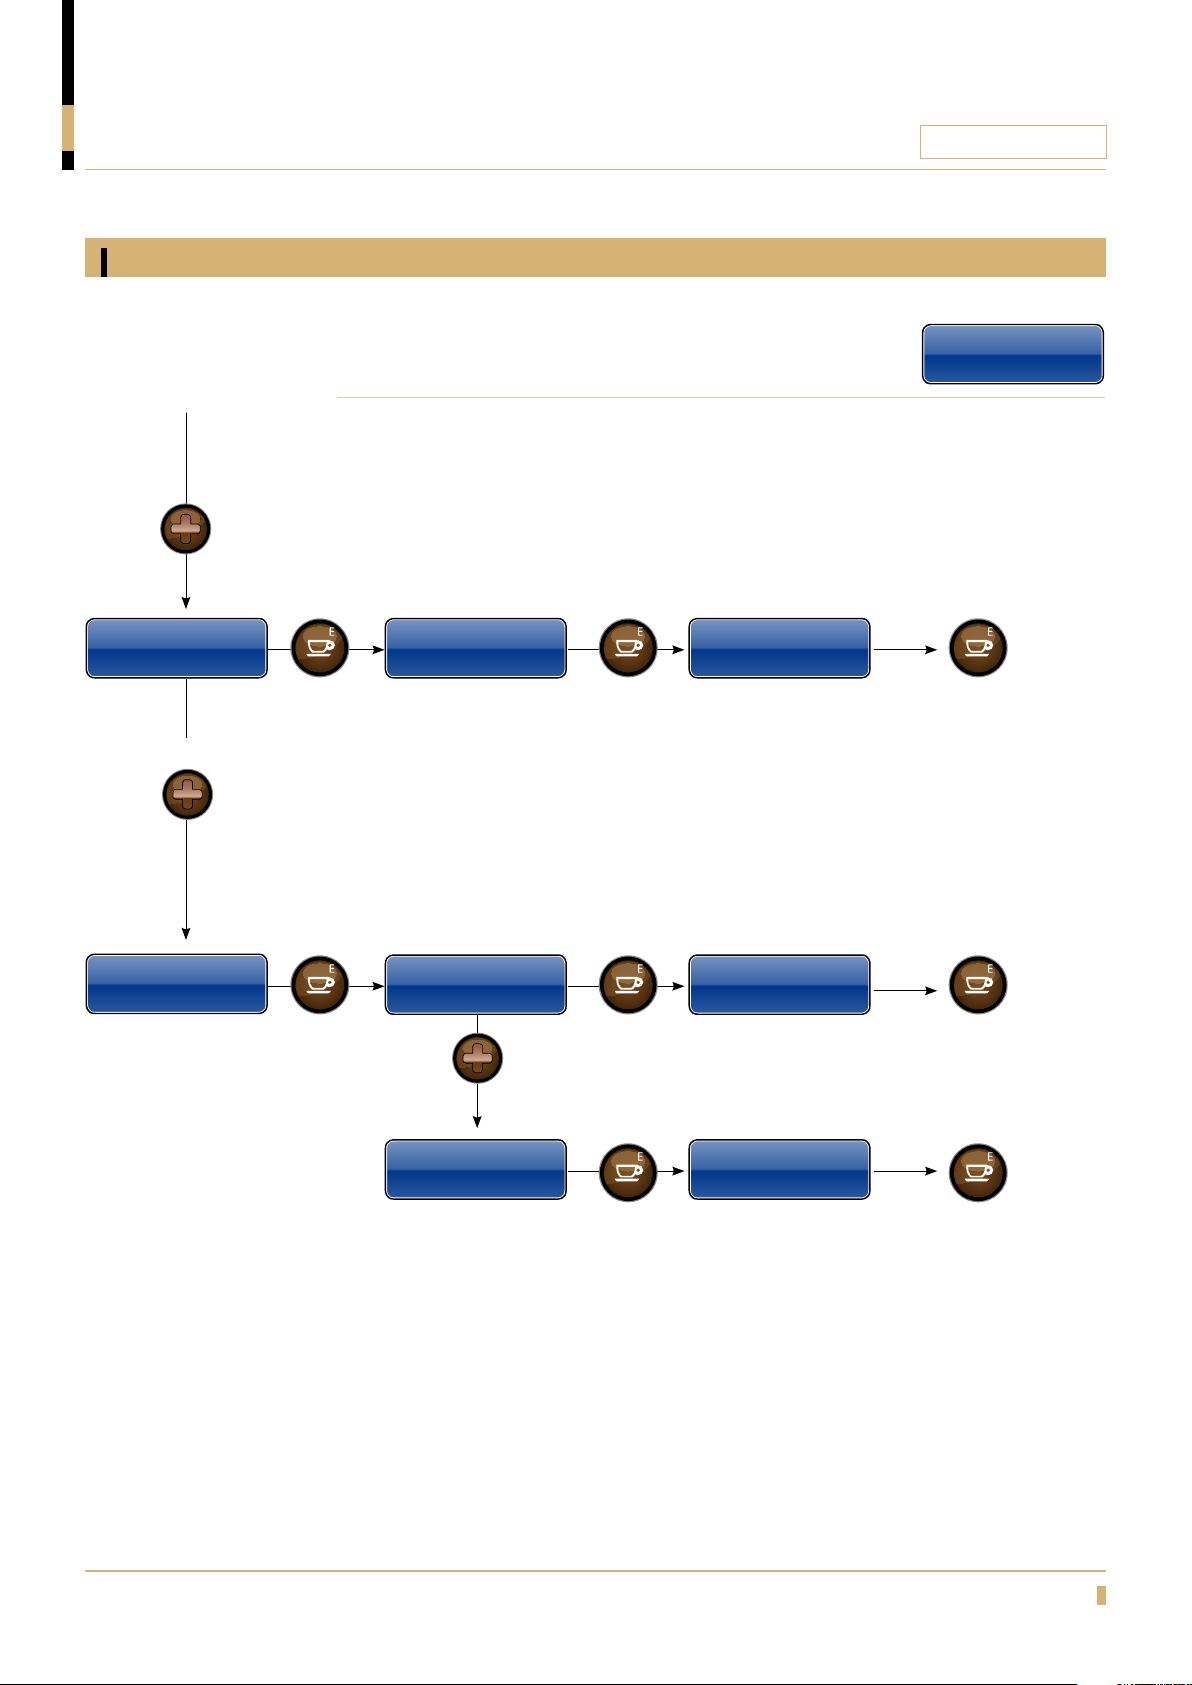
Language setup and set time/day
CQUBE SERIES
Press
Service Menu
Language Setup
To go forward in menu.
Press
Change language or update time/day.
Press
Language Setup
User Language
Press
Service Menu
Language Setup
Press
User Language
English
Service Menu
Set Time/Day
Press
Set Time/Day
Set Time
Press
Set Time/Day
Set Weekday
Press
Press
Press
Set Time
<XX:XX>
Press
Set Weekday
<Active>
19
Page 20
PROGRAMMING
Freshbrew / Espresso
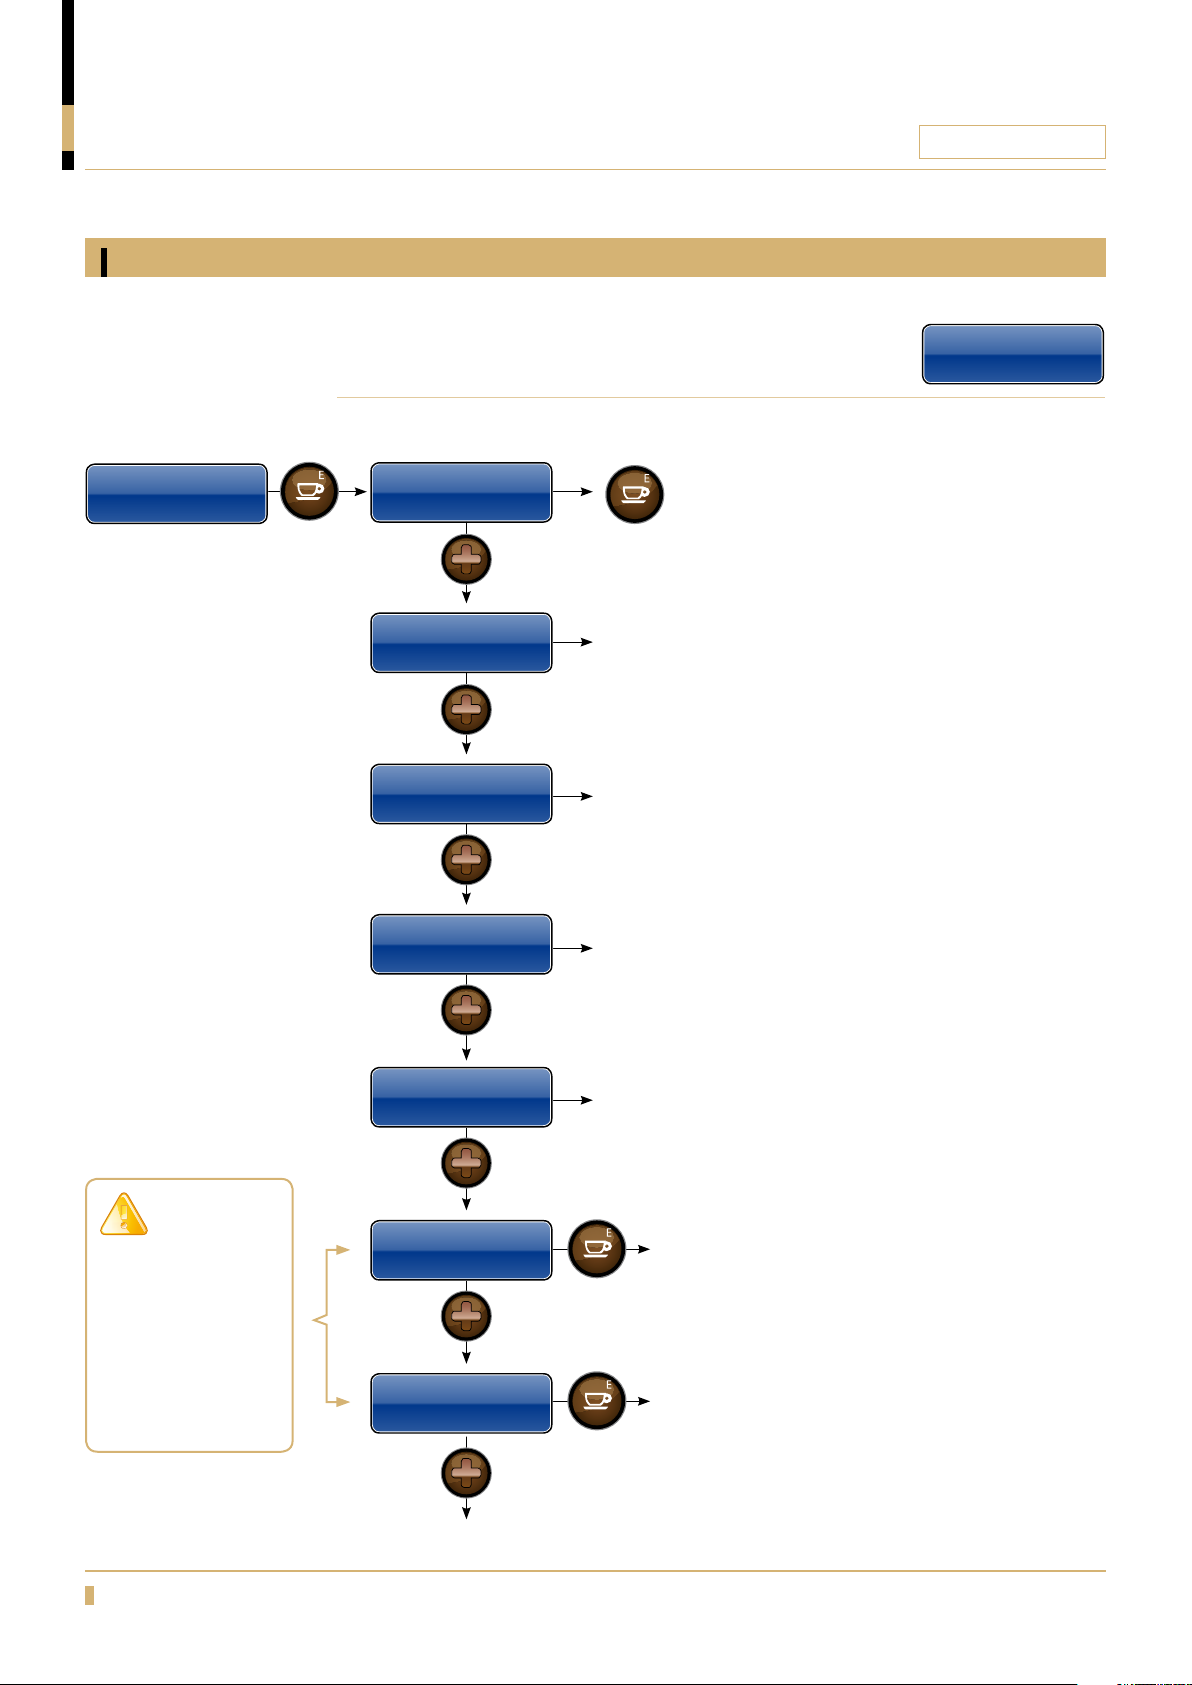
Hardware test
CQUBE SERIES
Service Menu
Hardware Test
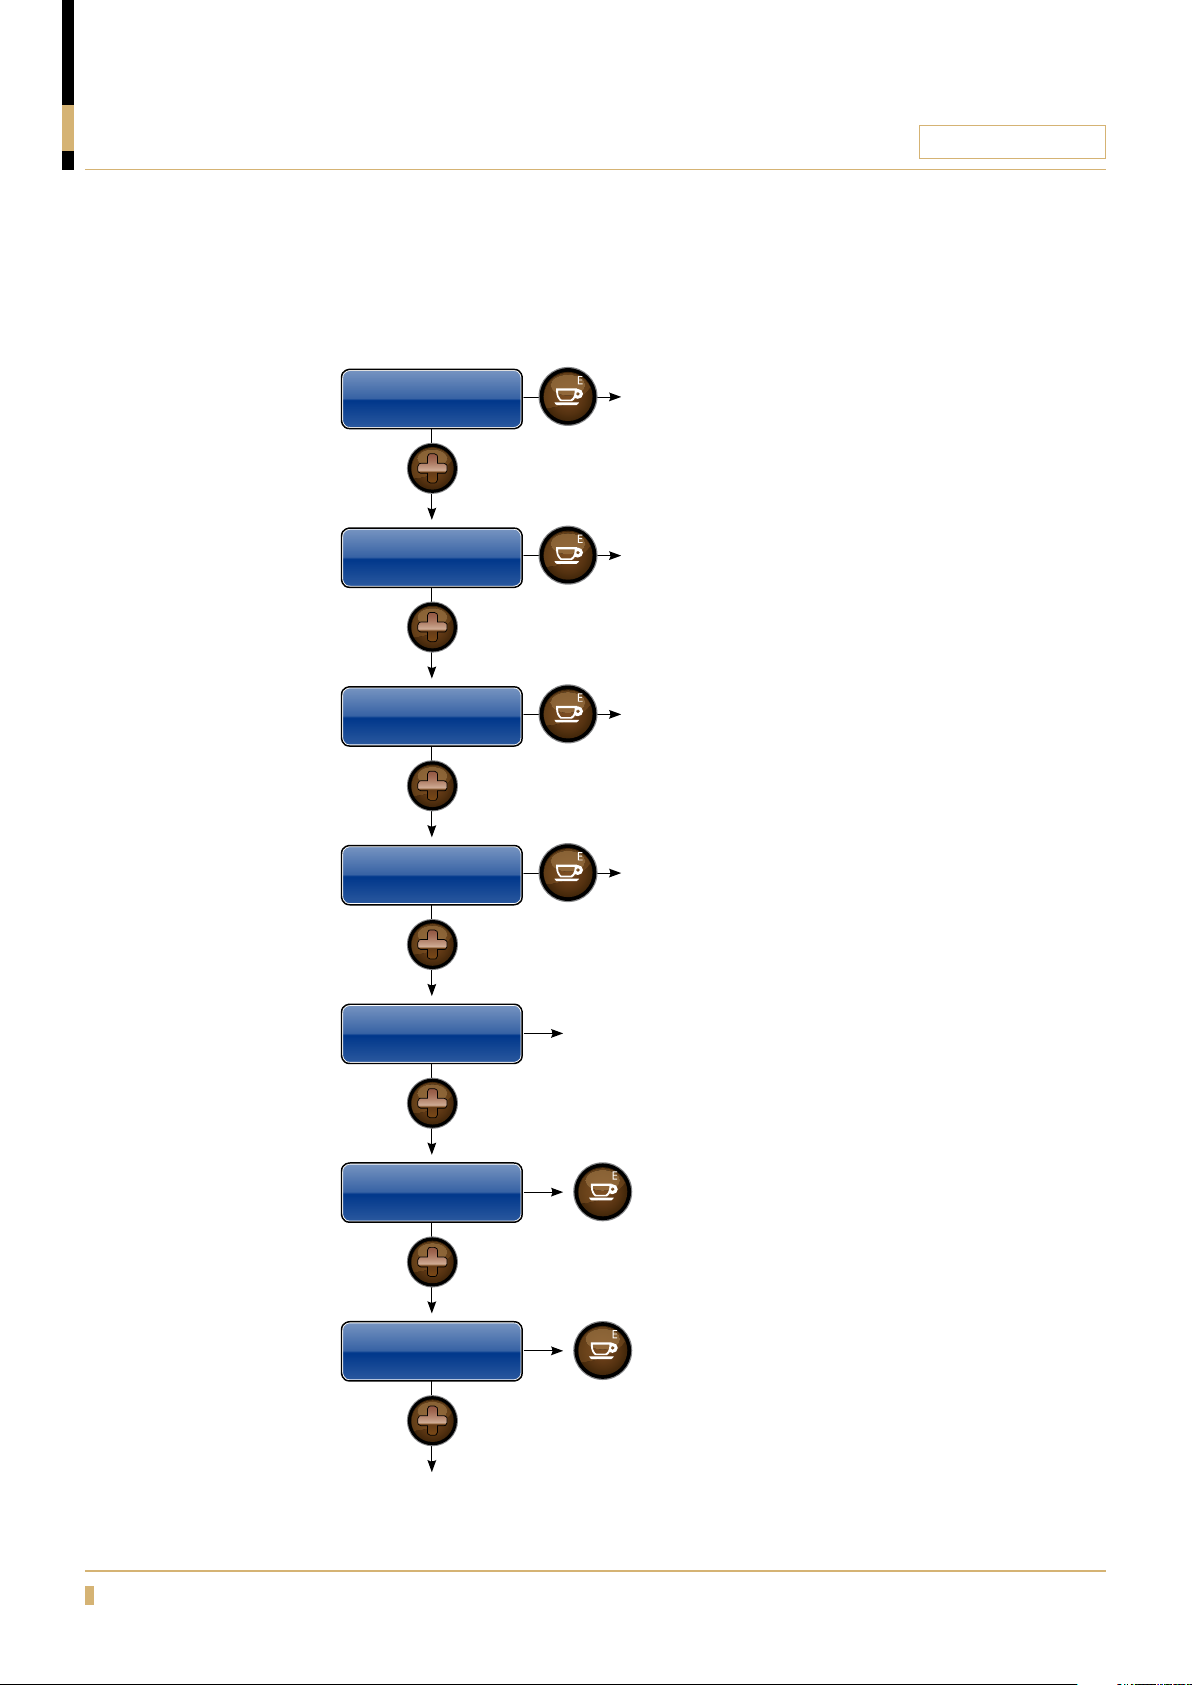
Test different components in the machine.
Press
Hardware Test
ESP-MCC
Press
Hardware Test
Heater xx
Press
Hardware Test
Heater ESP xx
Press
Press
Display current temp in heater
Display current temp in espresso heater
Service Menu
Hardware Test
Run one espresso brewer cycle
Warning!
When opening any
valves the machine
will dispense hot
water, please place
a jug under the
outlets to avoid
spilling of water.
Hardware Test
Heater BLK xx
Press
Hardware Test
Heater BLK2 xx
Press
Hardware Test
HWater-M1 0
Press
Hardware Test
HWater-M2 0
Press
Display current temp in pre heater milk
Display current temp in main heater milk
Press
Pressing ENTER will open/close outlet valve 1
0 = valve closed; 1= valve open
Press
Pressing ENTER will open/close outlet valve 2
0 = valve closed; 1= valve open
20
Page 21
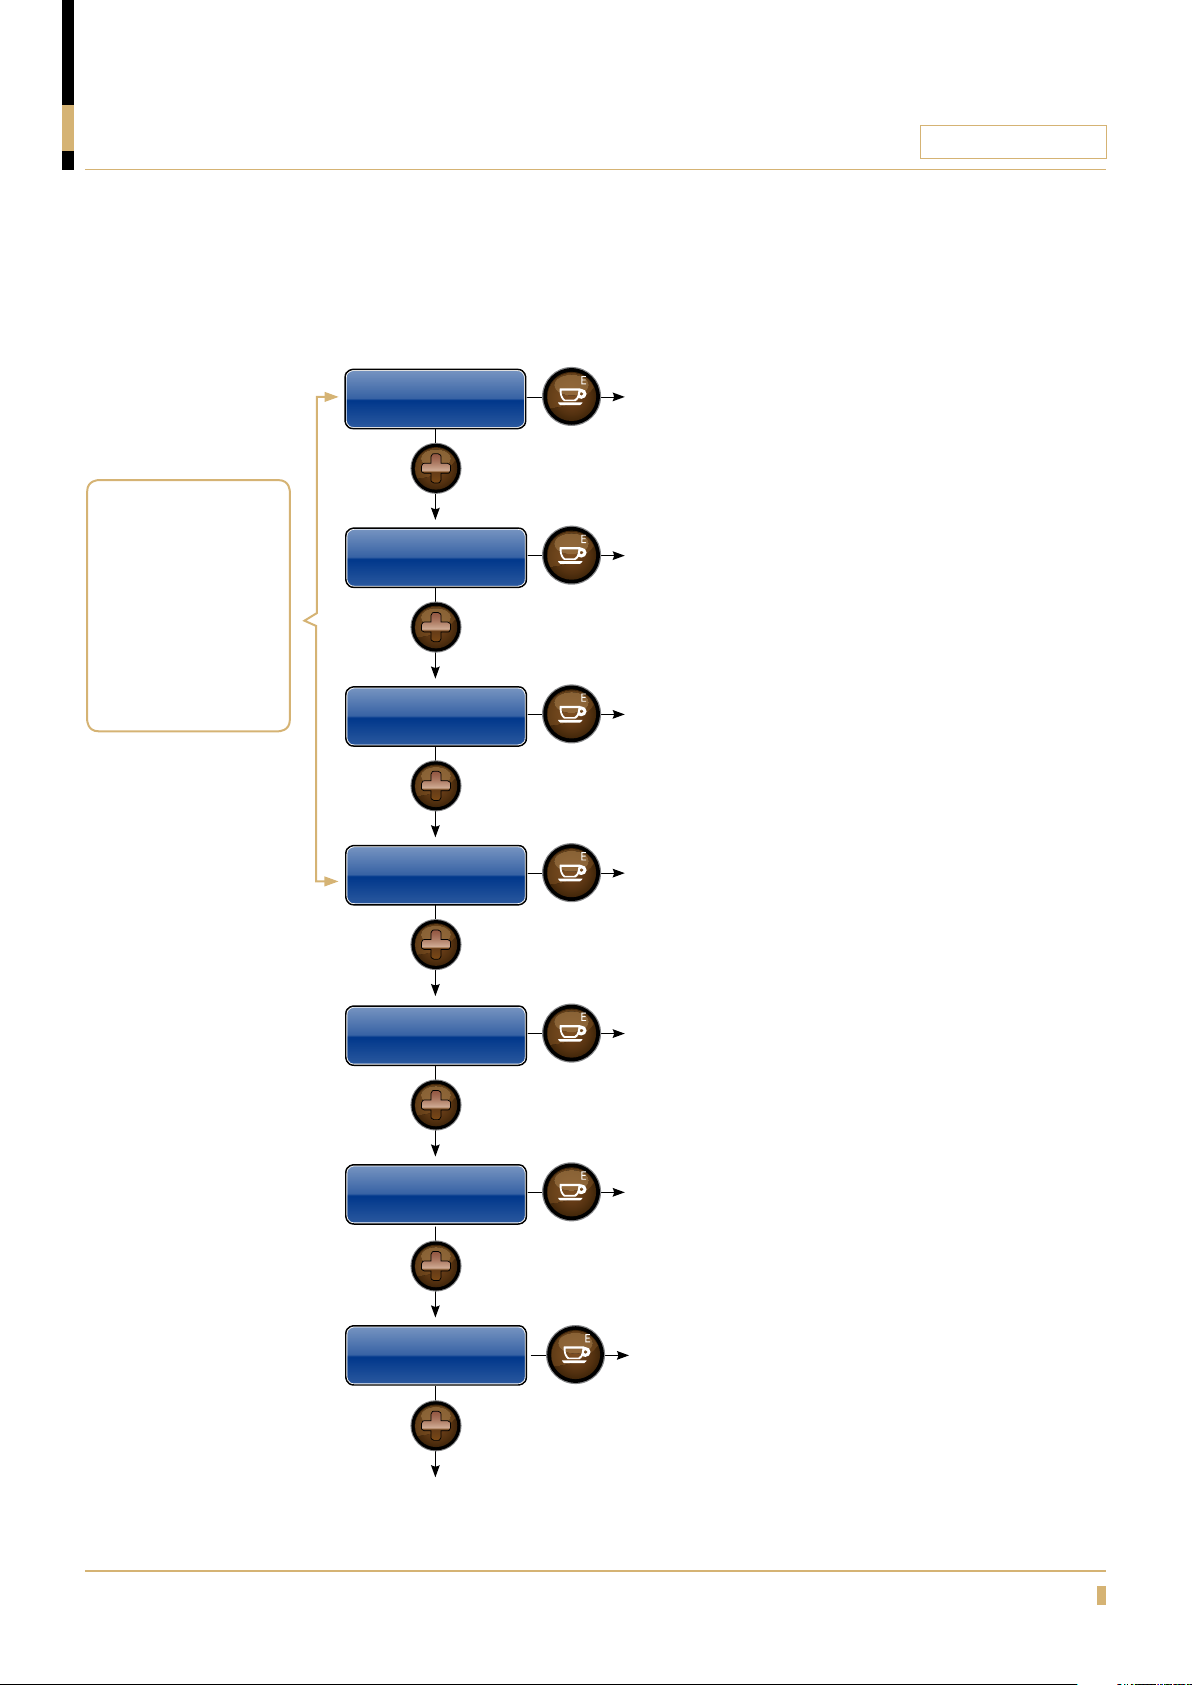
PROGRAMMING
Freshbrew / Espresso
Press
Hardware Test
HWater-M3 0
CQUBE SERIES
Press
Pressing ENTER will open/close outlet valve 3
0 = valve closed; 1= valve open
Warning: when
opening any valves
the machine will
dispense hot water,
please place a jug
under the outlets
to avoid spilling of
water.
Hardware Test
HWater 0
Press
Hardware Test
CWater 0
Press
Hardware Test
CWater-Car 0
Press
Hardware Test
Bev Lamp 1 0
Press
Pressing ENTER will open/close hot water valve
0 = valve closed; 1= valve open
Press
Pressing ENTER will open/close cold water valve
0 = valve closed; 1= valve open
Press
Pressing ENTER will open/close CO2 water valve
0 = valve closed; 1= valve open
Press
Pressing ENTER will turn on/off brew lamp 1
0 = lamp off; 1= lamp on
Press
Hardware Test
Bev Lamp 2 0
Press
Hardware Test
Brewer 0
Press
Press
Pressing ENTER will turn on/off brew lamp 2
0 = lamp off; 1= lamp on
Press
Run one filter brewer cycle
21
Page 22
PROGRAMMING
Freshbrew / Espresso
Press
Press
Hardware Test
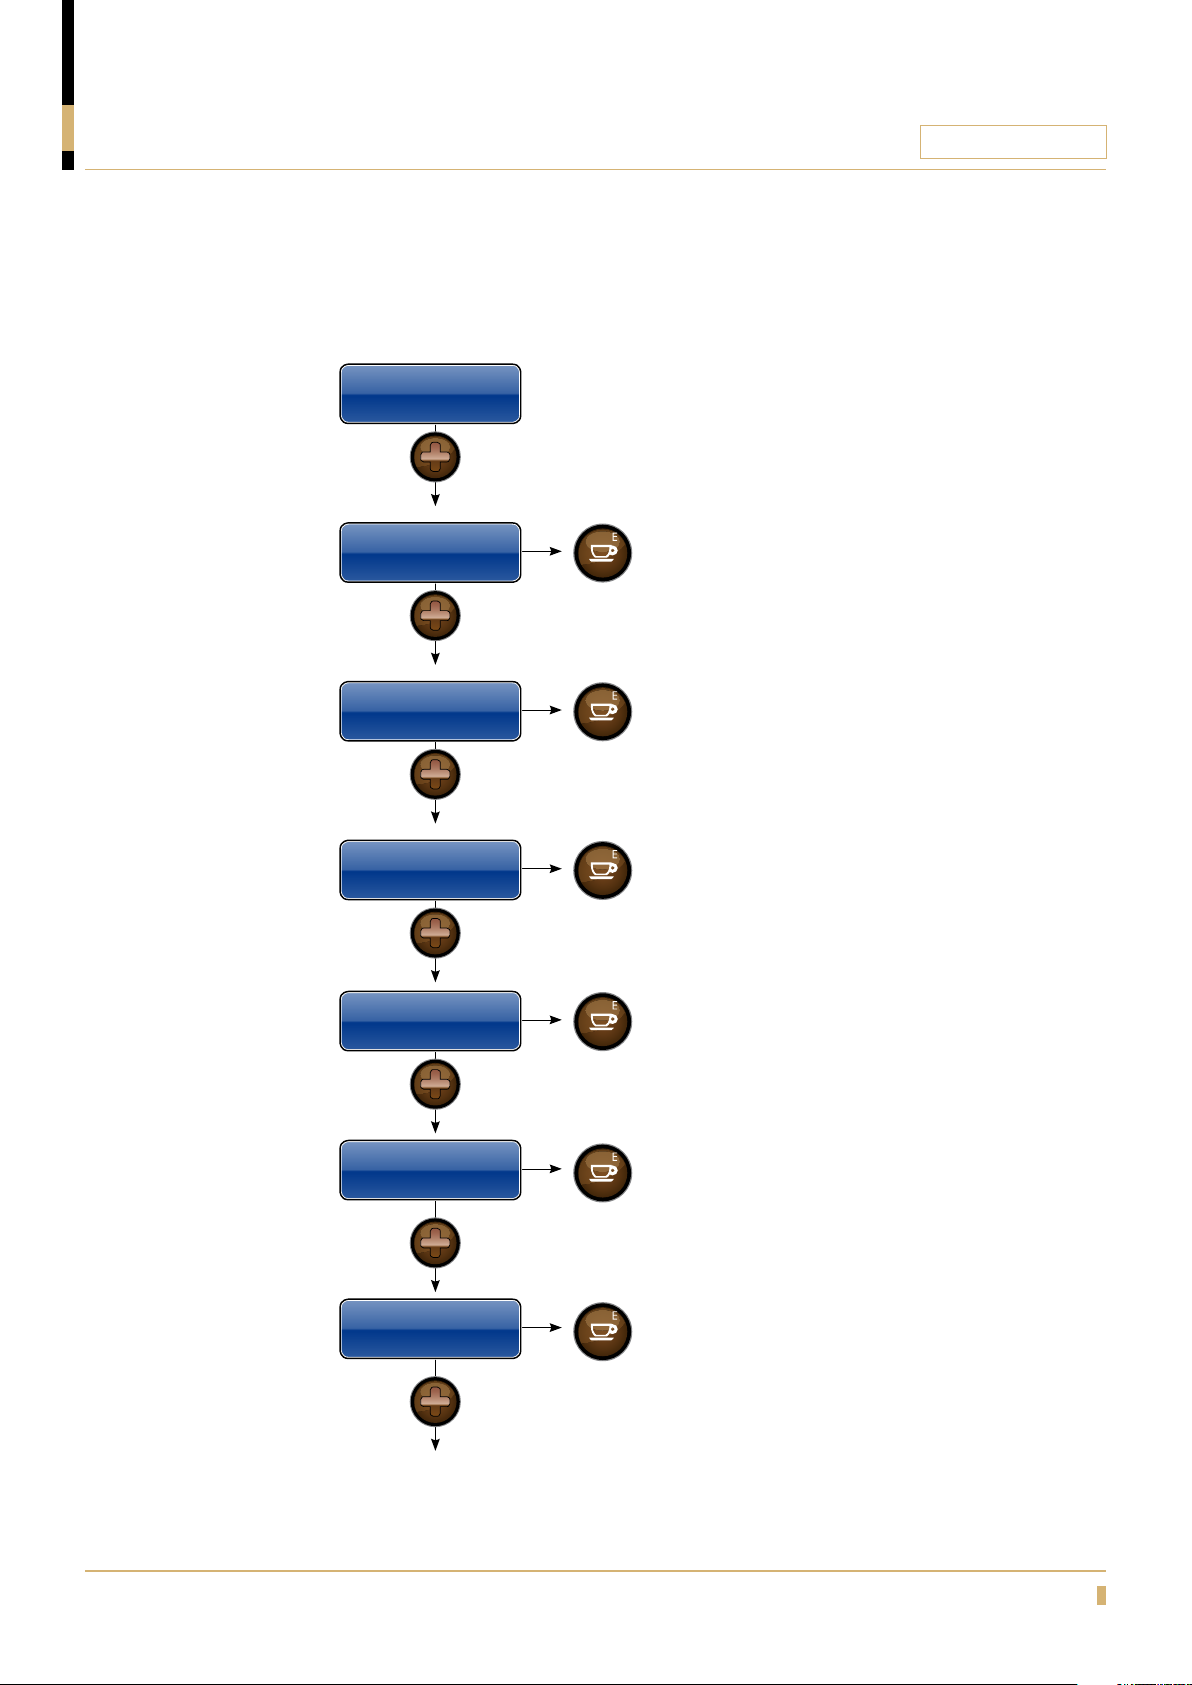
Canister 1 0
Hardware Test
Canister 2 0
CQUBE SERIES
Press
Pressing ENTER will start/stop canister motor 1
0 = motor off; 1= motor on
Press
Pressing ENTER will start/stop canister motor 2
0 = motor off; 1= motor on
Press
Hardware Test
Canister 3 0
Press
Hardware Test
Canister 4 0
Press
Hardware Test
CupSensor 1
Press
Hardware Test
Fan 0
Press
Pressing ENTER will start/stop canister motor 3
0 = motor off; 1= motor on
Press
Pressing ENTER will start/stop canister motor 4
0 = motor off; 1= motor on
Put a cup or your hand in front of the cup
sensor to see if the value toggels between 1
and 0.
Press
Pressing ENTER will start/stop the fan
0 = fan stopped;
200= fan at full speed
22
Press
Hardware Test
Keypad led 1
Press
Page 23
PROGRAMMING
Freshbrew / Espresso
CQUBE SERIES
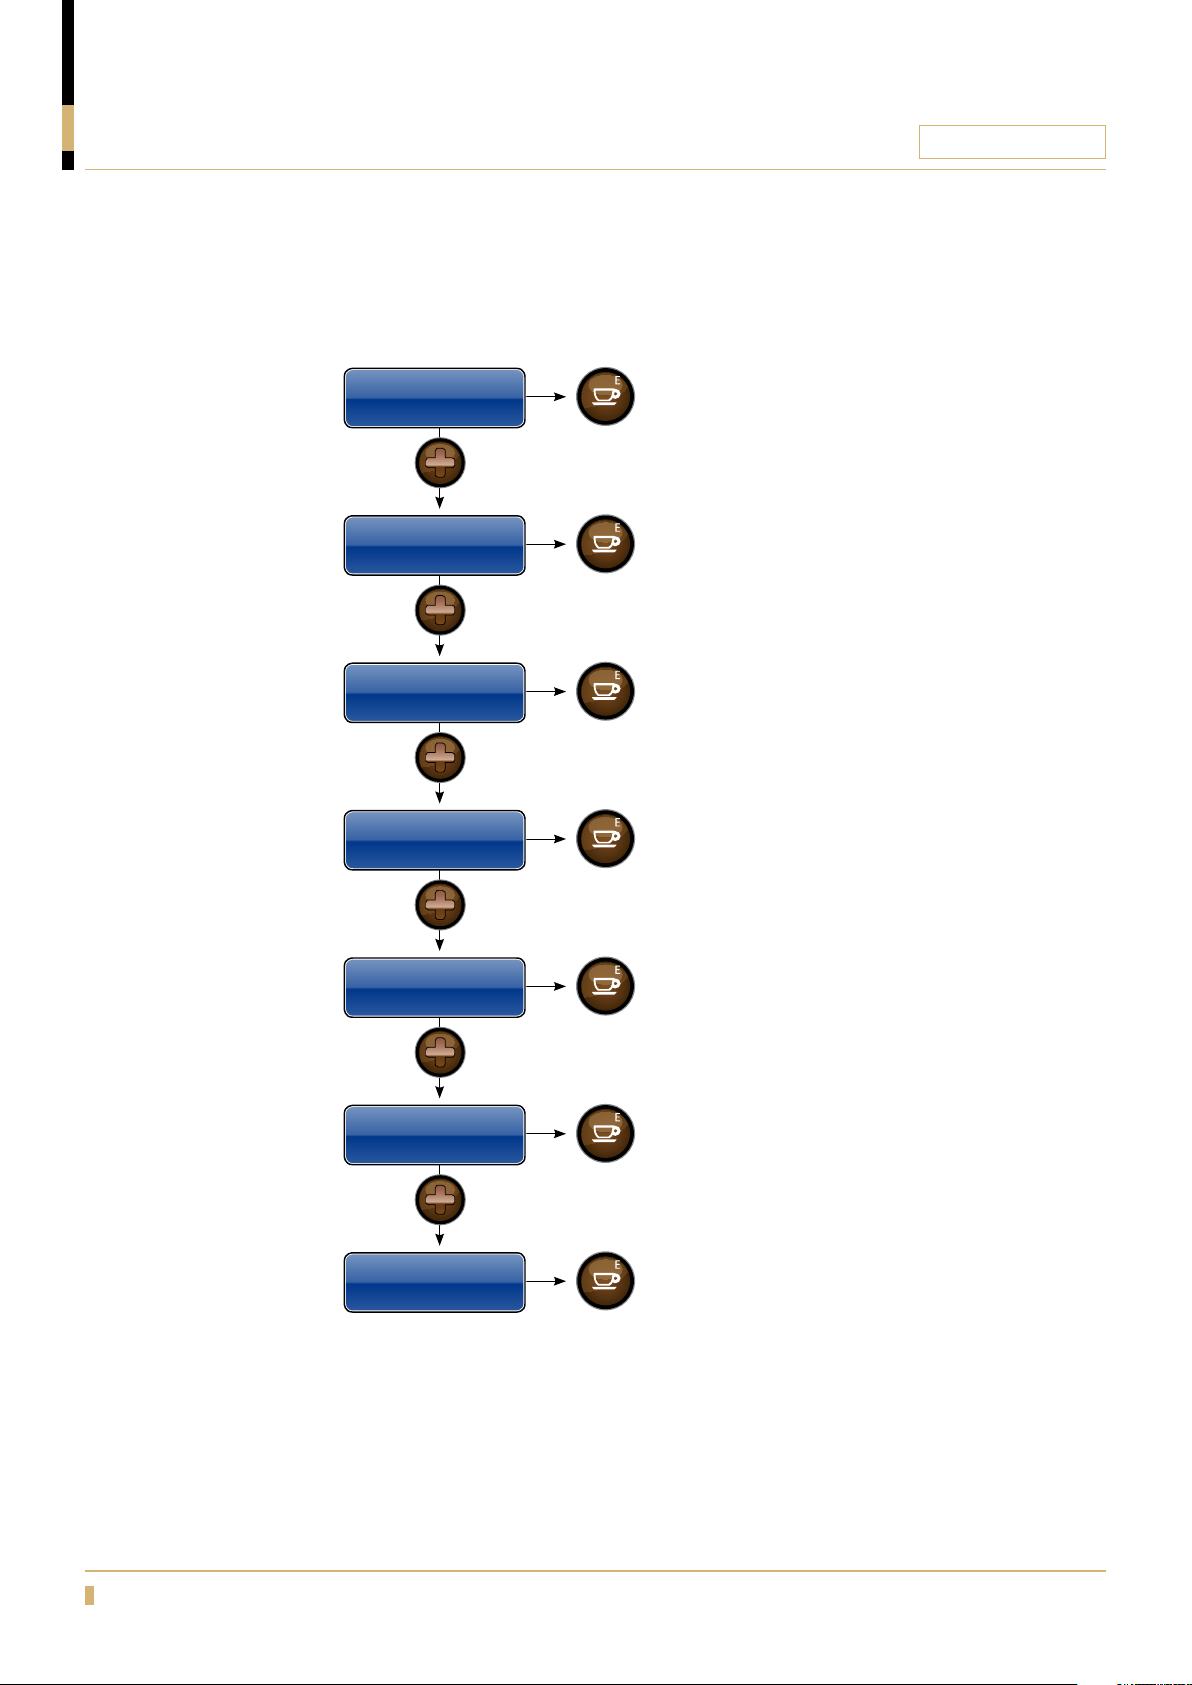
Hardware Test
LevelSens 3
Press
Hardware Test
MixMotor 2 0
Press
Hardware Test
MixMotor 3 0
Press
Hardware Test
TraySensor 1
Press
Show status of level sensors signal
0= Tank empty
1= Level low triggerd
3= Tank full
Press
Press
Press
Pressing ENTER will start/stop the mixer 2
0 = mixer stopped;
200= mixer at full speed
Pressing ENTER will start/stop the mixer 3
0 = mixer stopped;
200= mixer at full speed
Put the two drip tray pins together and see if
the value toggels between 1 and 0
Hardware Test
Brew valve
Press
Hardware Test
Descale valve
Press
Hardware Test
Pump
Press
Press
Press
Press
Pressing ENTER will open/close brew valve
0 = valve closed; 1= valve open
Pressing ENTER will open/close descale valve
0 = valve closed; 1= valve open
Pressing ENTER will start/stop the pump
0 = pump stopped;
200= pump at full speed
23
Page 24
PROGRAMMING
Freshbrew / Espresso
CQUBE SERIES
Press
Hardware Test
M-Clean V
Press
Hardware Test
M-Disp C
Press
Hardware Test
M-Disp Drip
Press
Hardware Test
M-Disp M
Press
Hardware Test
M-Mix
Pressing ENTER will open/close milk clean valve
0 = valve closed; 1= valve open
Press
Pressing ENTER will open/close milk disp C valve
0 = valve closed; 1= valve open
Press
Pressing ENTER will open/close milk direction valve
0 = valve closed; 1= valve open
Press
Pressing ENTER will open/close milk cooler valve
0 = valve closed; 1= valve open
Press
Pressing ENTER will start/stop the mixer
0 = stopped;
200= at full speed
24
Press
Hardware Test
M-Prime
Press
Hardware Test
M-Pump
Press
Press
Pressing ENTER will open/close milk prime valve
0 = valve closed; 1= valve open
Pressing ENTER will start/stop the milk pump
0 = pump stopped;
200= pump at full speed
Page 25
PROGRAMMING
Freshbrew / Espresso
Factory reset
CQUBE SERIES
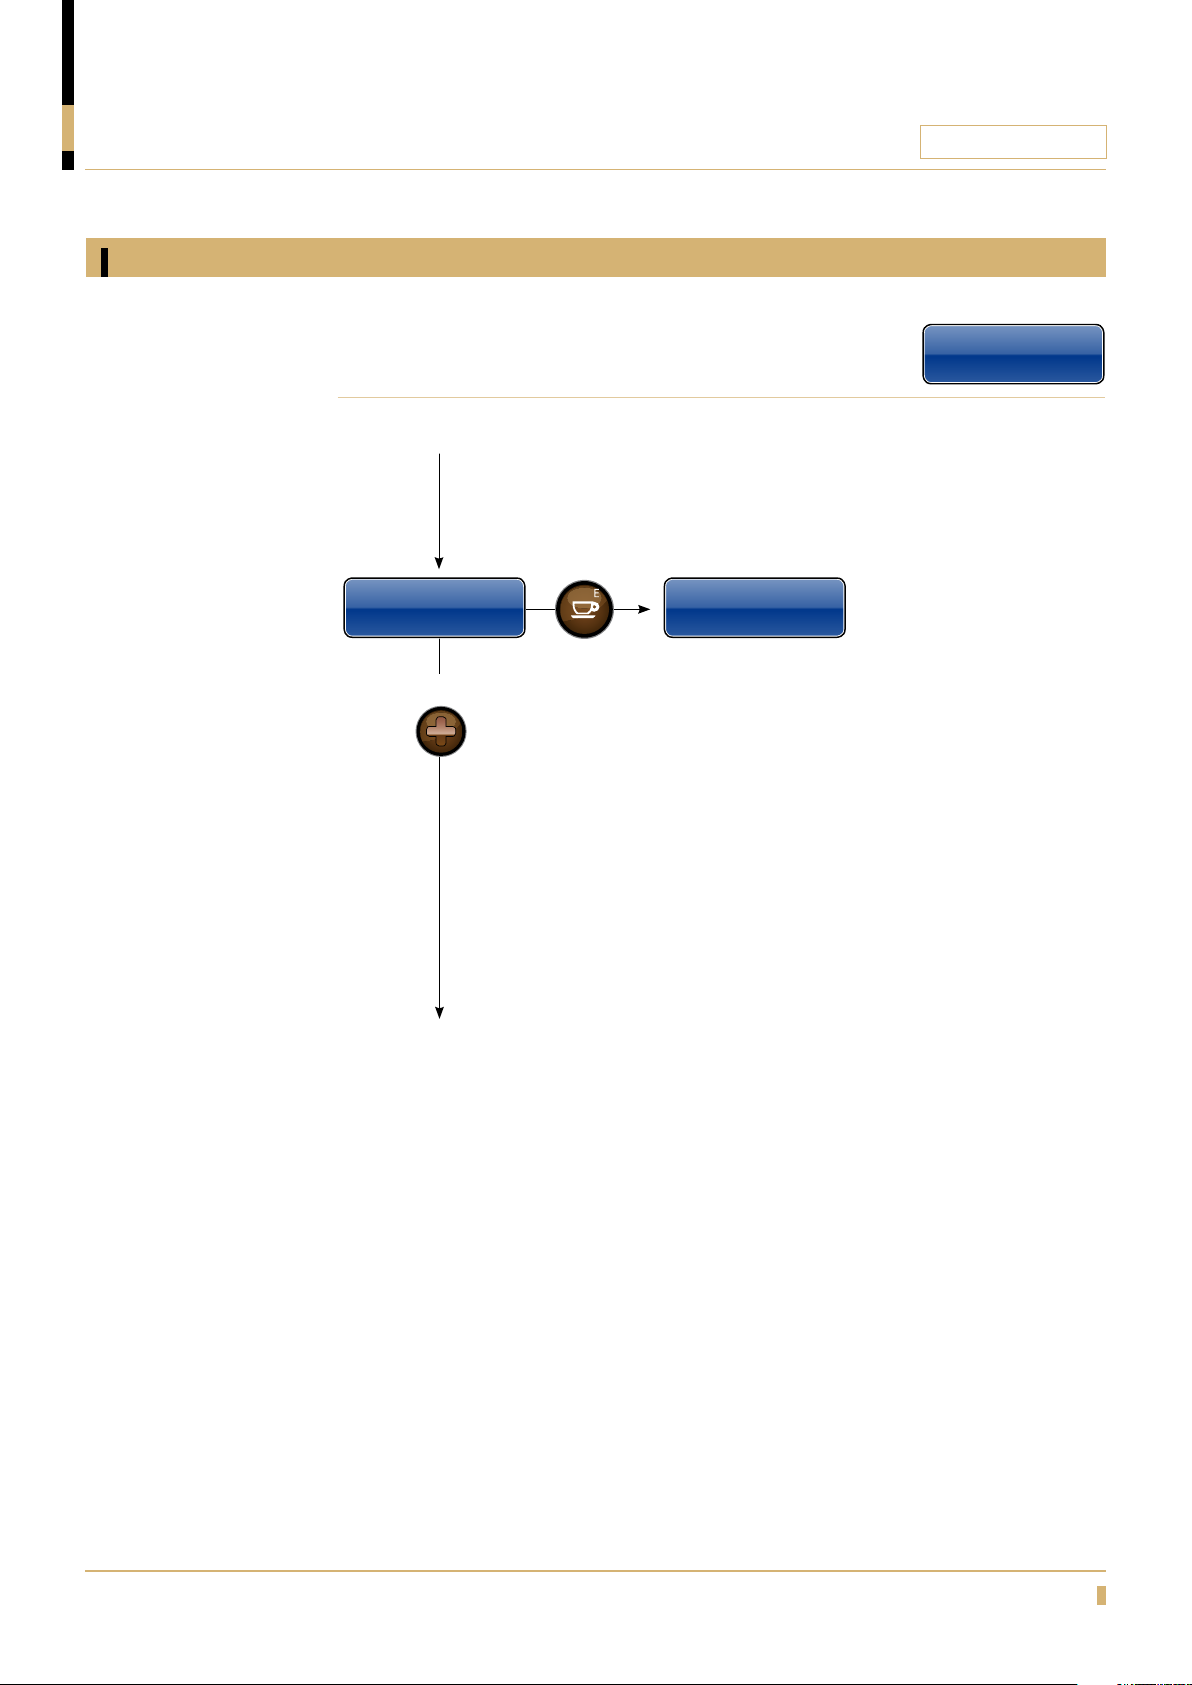
How to perform a factory reset of the machine.
Press
Service Menu
Factory Reset
To go forward in menu.
Press
Press and hold
ENTER to reset
Service Menu
Factory Reset
Press and hold ENTER for 3
seconds. Machine will go back
to factory settings and reboot
25
Page 26
PROGRAMMING
Freshbrew / Espresso
Expert settings
CQUBE SERIES
Press
Service Menu
Expert Settings
Press
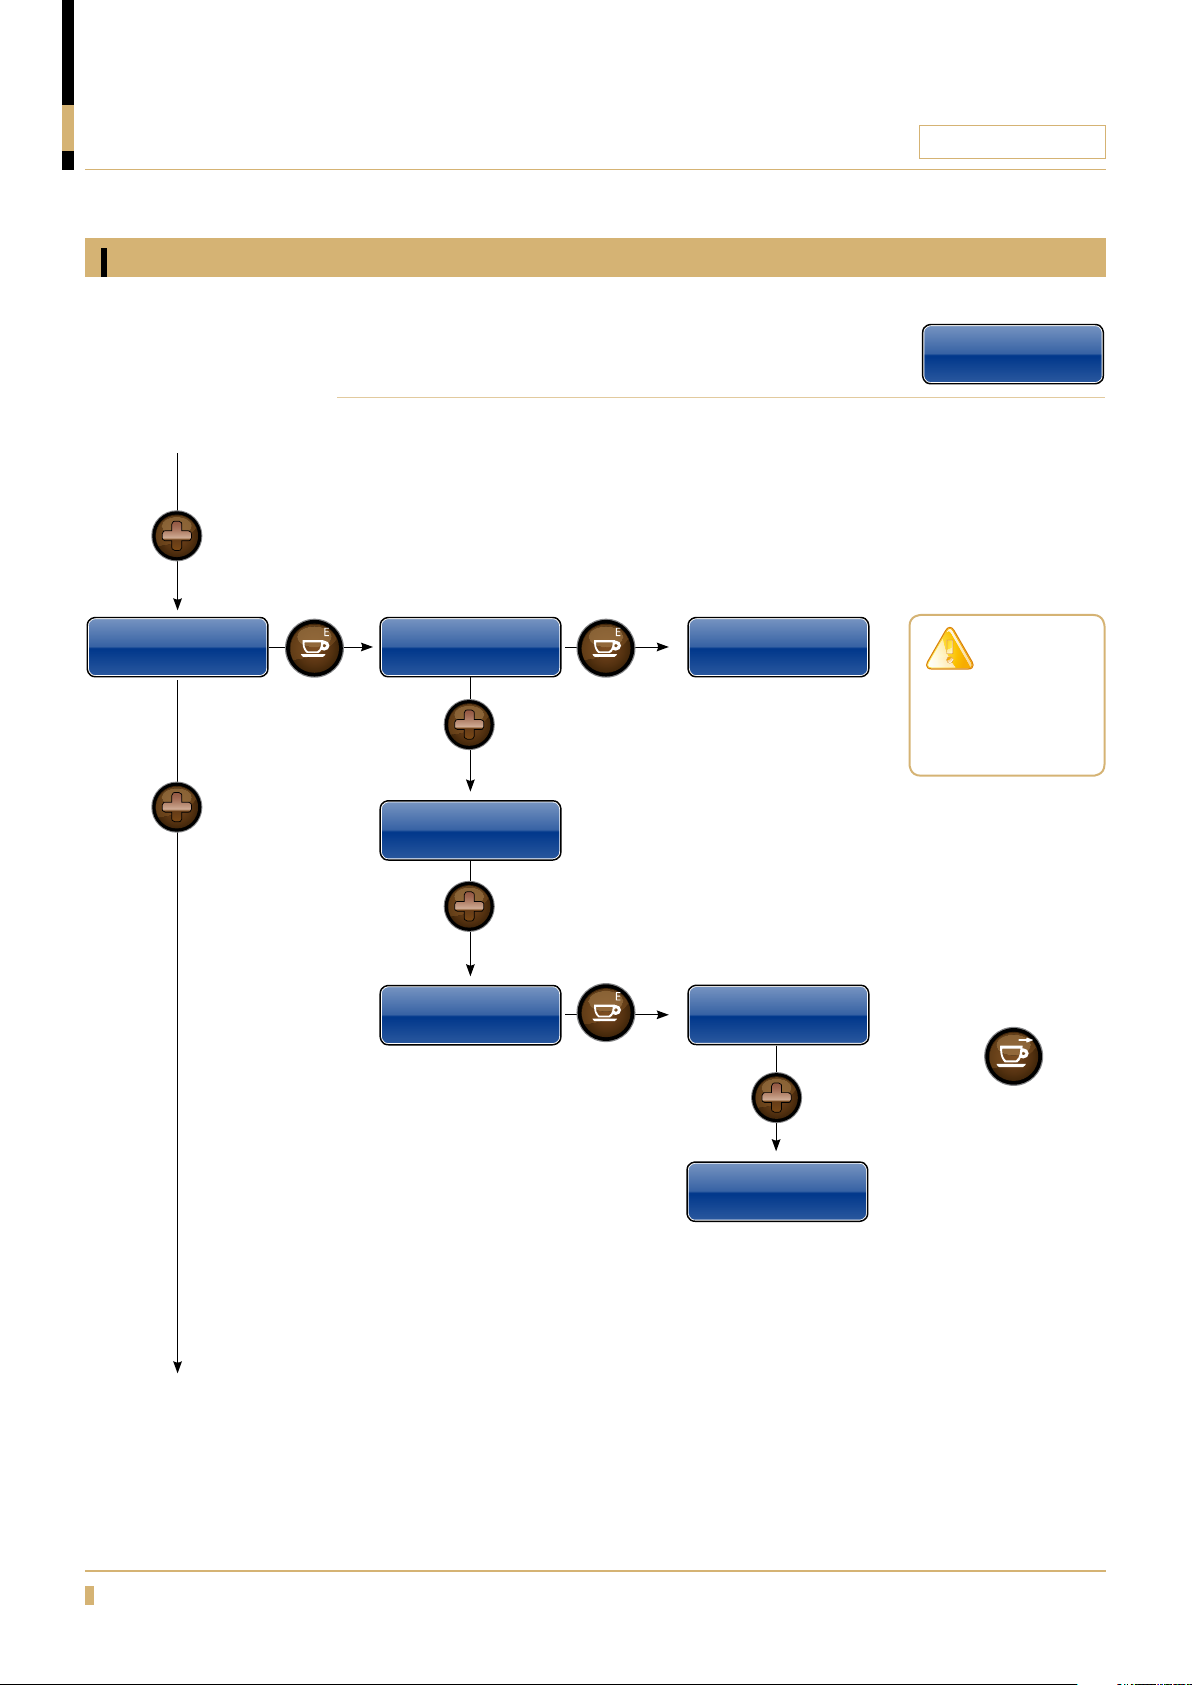
Expert Settings of the machine.
Press
Expert Settings
Open Valves
Press
Expert Settings
Heater<On/Off>
Press
Press
Open Valves
Valves<Closed/Open>
Press ENTER will open/
close all the valves in
the machine
Press ENTER will turn on
the heater for 10 seconds
Service Menu
Expert Settings
Observe!
Place a 1liter pint
under the outlet
coffee and water.
Press
Expert Settings
Open Inlet Valve
Press ENTER will turn on/off
the inlet valve
0= inlet valve off;
1= inlet valve open
Open Inlet Valve
HWater In 0
Press
Open Inlet Valve
CWater In 0
To step backwards
in the Menu.
Press
26
Page 27
PROGRAMMING
Freshbrew / Espresso
Time schedule (Energy Mode)
CQUBE SERIES
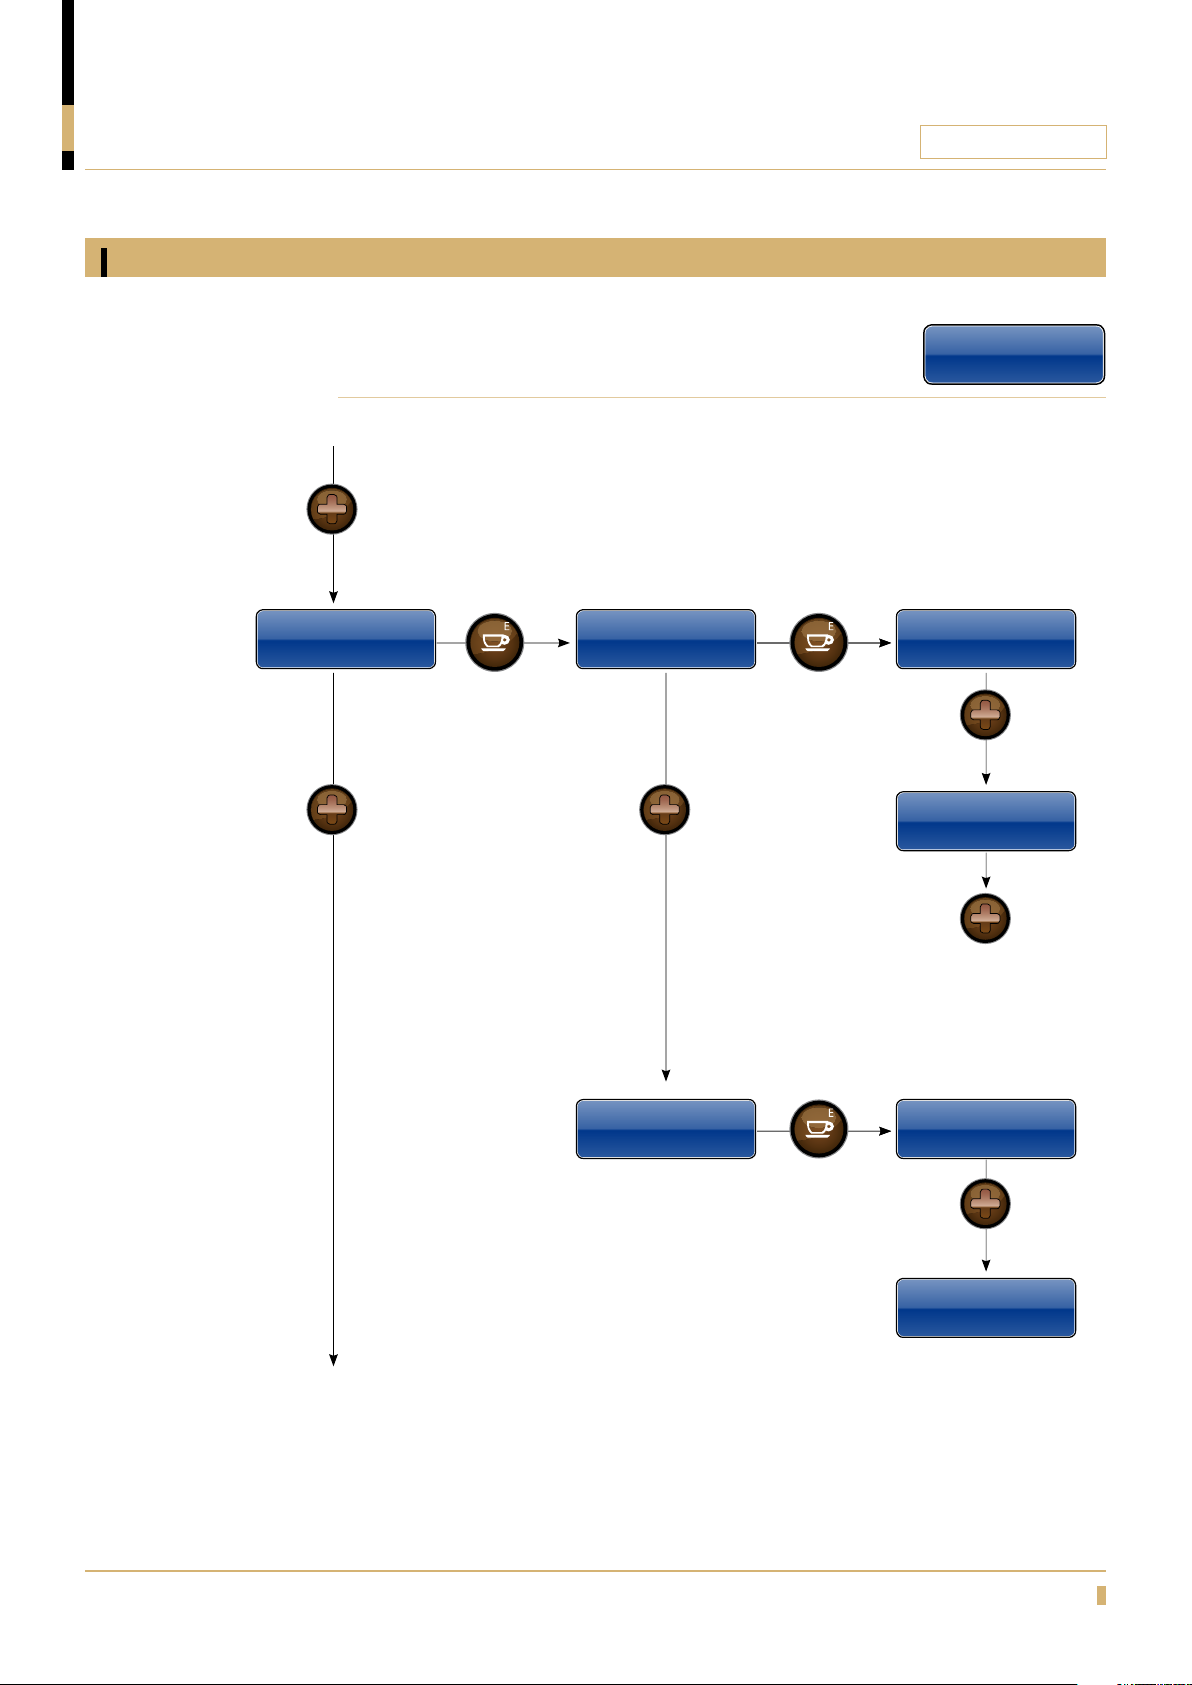
How to setup a schedule for energy mode and
cleaning
Press
Press Press
Service Menu
Time Schedule
Press Press
Scheduled Tasks
Energy Mode
Service Menu
Time Schedule
Energy Mode 0
Mon
<XX:XX XX:XX >
Press
Energy Mode 1
Tu e
<XX:XX XX:XX >
Scheduled Tasks
Clean Mixer
Press
Press
Continue through the menu
to browse through all the
settings for each week day
Clean Mixer0
All
<XX:XX XX:XX >
Press
Clean Mixer 1
All
<XX:XX XX:XX >
27
Page 28
PROGRAMMING
Freshbrew / Espresso
Pay system
CQUBE SERIES
Note! Only for
machines with
pay system.
Free Vending
Press
Free Vend Off
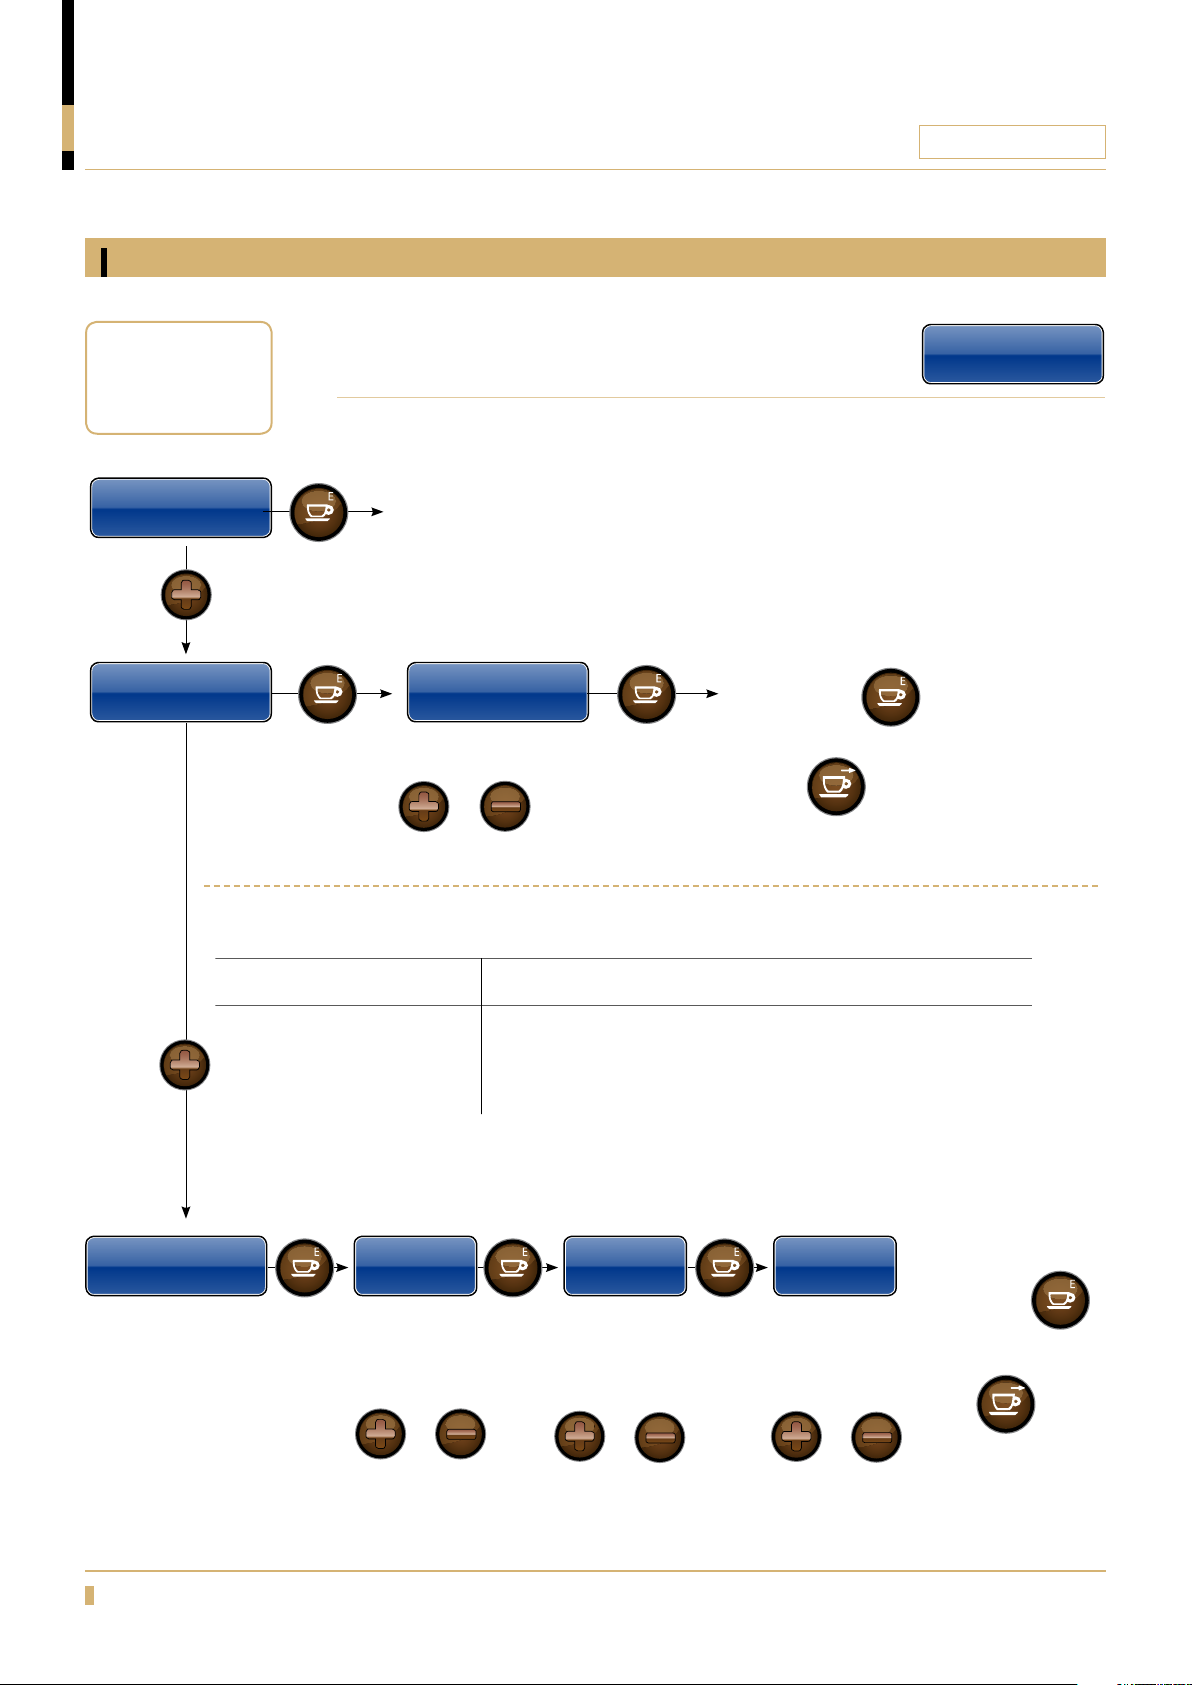
These menus are included if the machine is
equipped with pay system.
Press
The machine will go in normal mode and drinks are free as long as
the service card is in the card reader.
Press
Free Vend
on - off
Change value by Pressing
or
Press
Service Menu
Free Vending
Confirm the new setting by
pressing the
To step backwards in the Menu.
Press
button
button
Press
Scheduled Tasks
Free Vend
Periodic free drinks
When display shows Service Menu Time Schedule
Free Vend 00:00 00:00
Start Stop
time time
Press Press Press
Free Vend 0
Mon
Adjusting the
Weekend day
Change by
pressing
or
Free Vend 0
00:00 00:00
Adjusting the
Hour
Change by
pressing
or
Adjusting the
or
Free Vend 0
00:00 00:00
Minutes
Change by
pressing
Confirm the new
setting by
pressing the
To step backwards in
the Menu.
Press
28
Page 29
PROGRAMMING
Freshbrew / Espresso
Cashflow
CQUBE SERIES
Note! Only for
machines with
pay system.
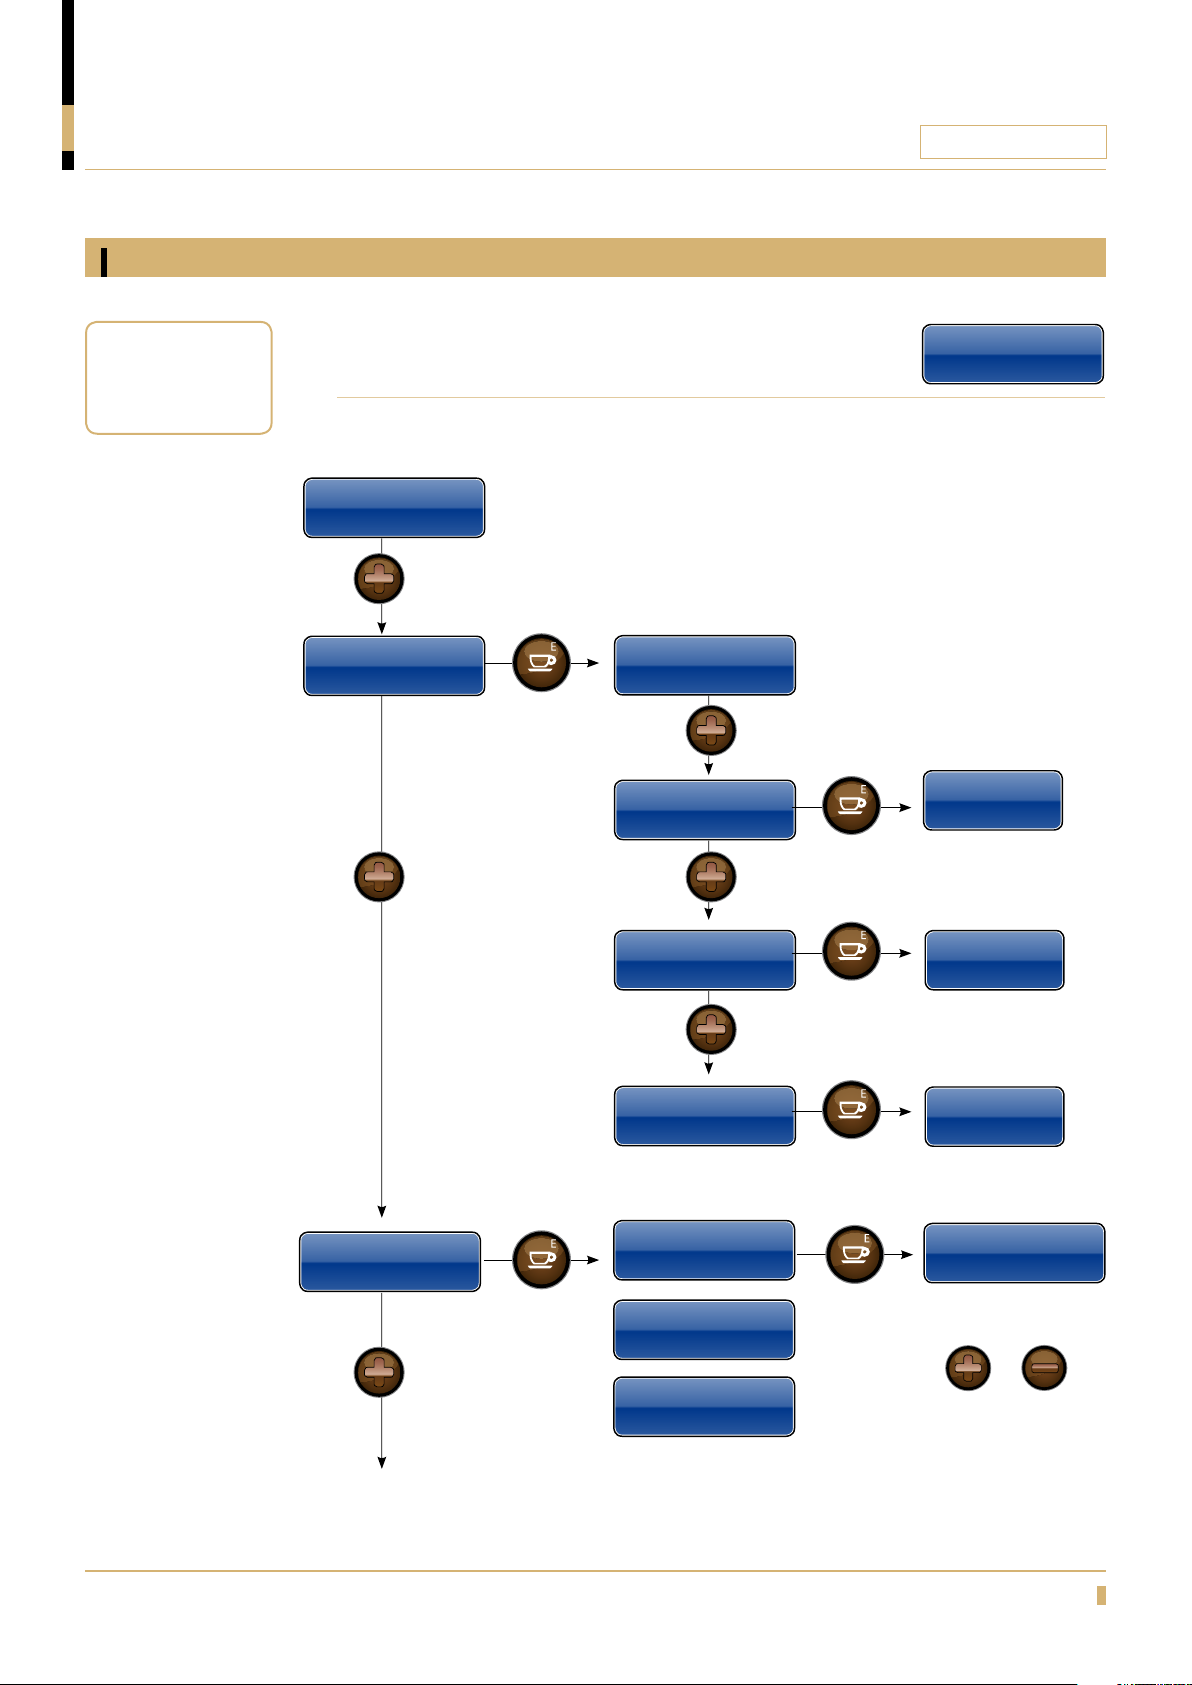
Change Service Menu Cashow
Service Menu
Cashow
Press
Press
Cashow System
Parameters
Press
Cashow System
Sufx: SEK
Press
Cashow System
Lower coin
Press
Service Menu
Cashow
Press
Lowest coin
xx:xx
Press
Cashow System
Coin Channel
Press
Press
Cashow System
Single Sale On/Off
Press
Cashow System
Low coin BLK
Setup channel
Chan A 0.00
Setup channel
Chan B 0.00
Setup channel
Chan C 0.00
On/Off
Press
On/Off
Press
Setup channel
Chan A 0.00
Change value by
Pressing
or
29
Page 30
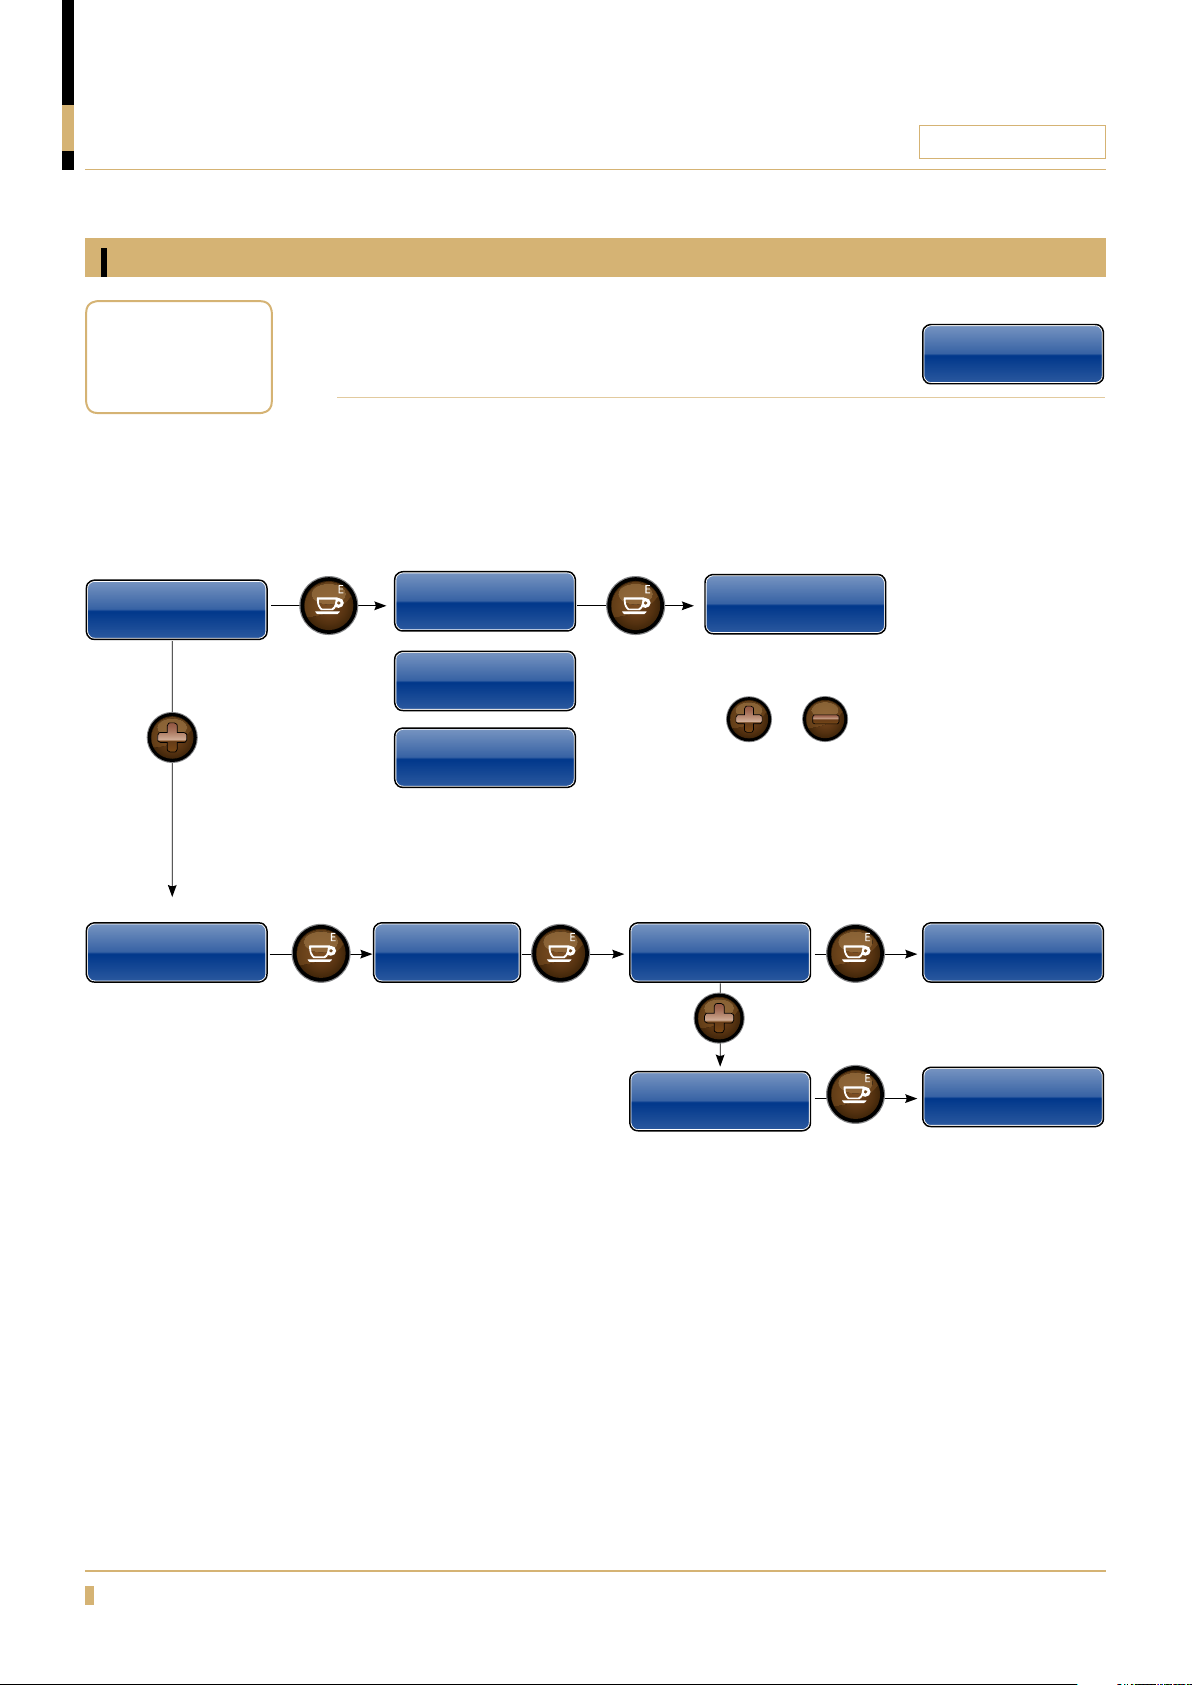
PROGRAMMING
Freshbrew / Espresso
Cashflow
CQUBE SERIES
Note! Only for
machines with
pay system.
Cashow System
Price List
Press
Change Service Menu Cashow
Press Press
Drink 1
Price 0.00
Drink 2
Price 0.00
Drink 3
Price 0.00
Press Press Press
Drink 1
Price 0.00
Change value by
Pressing
or
Service Menu
Cashow
Counters
Beverages
Free Drinks
Press
Paid Drinks
Free Drinks
Served xxx
Press
Paid Drinks
Served xxx
30
Page 31

For the warranty to be valid the conditions for maintenance must have been followed
according to our instructions, proper precaution has been made and warranty claim
been issued without delay.
The affected equipment may not be used during awaiting service if there is any risk
that the damage or defect would worsen.
The warranty will not cover consumption supplies such as glassware, normal
maintenance such as cleaning of filters, contaminations in water, lime, incorrect
voltages, pressure or adjustment of water amounts.
The warranty will not cover damages of defects caused by incorrect handling and
operation of the appliance.
FOR SERVICE
Please contact your dealer
Your Dealer
www.creminternational.com
 Loading...