

Coffee Queen CQube SF12, CQube SF03, CQube SE20+ BARISTA, CQube MF04, CQube MF13 Maintenance Manual
...
CQUBE SERIES
MAINTENANCE MANUAL
MM_EN
Date: 131203

CQUBE SERIES
2
CONTENT
CONTENT ........................................................................................................................................................ 2
Facts & weight .........................................................................................................................................................4
Dimensions ...............................................................................................................................................................6
CQube SF12 SF03 SF20 and CQube SE12 & SE20 ..........................................................................................6
BARISTA ...................................................................................................................................................................7
CQube MF13 & MF04 and CQube ME12 ..........................................................................................................8
CQube LF13 & LF04 ...............................................................................................................................................9
Cabinet for CQube M.......................................................................................................................................... 10
INSTALLATION AND START-UP ..................................................................................................... 11
Positioning............................................................................................................................................................... 11
Machine startup procedure for CQube SF SE ............................................................................................... 11
Start-up procedure for CQube MF LF ............................................................................................................. 12
TECHNICAL SERVICE CARD ............................................................................................................ 14
CLEANING PROGRAM ......................................................................................................................... 15
Detailed cleaning instructions ............................................................................................................................ 15
Clean brewer CQube SF MF LF ........................................................................................................................ 15
Clean brewer CQube SE ME.............................................................................................................................. 16
Clean mixer for CQube series .......................................................................................................................... 17
Clean valves for CQube series .......................................................................................................................... 18
Daily milk clean for CQube SE BARISTA ........................................................................................................ 19
Open/rotate brewer for CQube series ........................................................................................................... 20
Clean grinder 1/2 for CQube series ................................................................................................................ 21
Rinse brewer for CQube series ........................................................................................................................ 22
Milk prime for CQube SE BARISTA ................................................................................................................. 23
Descale espresso for CQube ME SE ................................................................................................................ 24
MAINTENANCE AND CARE .......................................................................................................... 25
Disassemble the brewing chamber ................................................................................................................... 25
Disassemble and cleaning of coffee filter ......................................................................................................... 26
Weekly cleaning ..................................................................................................................................................... 27
Disassemble mixing system ................................................................................................................................ 27
Wash these parts .................................................................................................................................................. 28
Reassemble mixing system ................................................................................................................................ 28
Disassemble the espresso group ....................................................................................................................... 29
Reassemble the espresso group ........................................................................................................................ 30
Cleaning the espresso group .............................................................................................................................. 31
Applying grease to group .................................................................................................................................... 32
Grinder EK-21 ....................................................................................................................................................... 35
Periodic maintenance ........................................................................................................................................... 35
Safety ........................................................................................................................................................................ 35
Monthly maintenance ........................................................................................................................................... 36
Removing the rotating carrier ............................................................................................................................ 36
CQUBE SERIES
3
CONTENT
Basic adjustment of the grinding finess ............................................................................................................ 37
Correction of the adjustment ............................................................................................................................ 38
Grinder EK-7 ......................................................................................................................................................... 39
Periodic maintenance ........................................................................................................................................... 39
Safety ........................................................................................................................................................................ 39
Monthly maintenance ........................................................................................................................................... 40
Basic adjustment of the grinding finess ............................................................................................................ 41
BREW CYCLE SETTING ........................................................................................................................ 42
Filter mechanism ................................................................................................................................................... 42
Brewing cycle settings .......................................................................................................................................... 42
Remember .............................................................................................................................................................. 43
Tips ........................................................................................................................................................................... 43
Symptom - Cause - Solution ............................................................................................................................. 44
Espresso brew process ........................................................................................................................................ 45
Pre infusion ............................................................................................................................................................. 45
Pause ........................................................................................................................................................................ 45
Brew process ......................................................................................................................................................... 45
Dry press ................................................................................................................................................................ 45
Delay open .............................................................................................................................................................. 45
OVERVIEW OF COMPONENTS ..................................................................................................... 46
Cold water unit ..................................................................................................................................................... 46
Cold water + CO2 unit....................................................................................................................................... 47
ERROR CODE DESCRIPTION .......................................................................................................... 48
FLOW CHARTS .......................................................................................................................................... 50
Water system espresso ....................................................................................................................................... 50
Water system CQube series .............................................................................................................................. 51
Milk system ............................................................................................................................................................. 52
SERVICE INTERVALS ................................................................................................................................ 53
CQube SF ............................................................................................................................................................... 53
CQube SE 12 ......................................................................................................................................................... 54
CQube SE20 barista ............................................................................................................................................. 55
CQube MF LF ........................................................................................................................................................ 56
CQube ME .............................................................................................................................................................. 57
IMPORTANT!
INFO.
CAUTION!
INFO.
More INFO.
INFO.
Some important information may appear in textboxes seen below
Note

CQUBE SERIES
4
GENERAL
Facts & weight
FACTS
CQube
SF12 SF03 SF20 SE12 SE20
SE20+
BARISTA
Drink options
1-12 1-12 1-5 1-12 1-5 1-12
Function for selecting jug
Ye s None
Grinder type
EK-7 None 2 x EK-7 EK-7 2 x EK-7 2 x EK-7
Number of bean hoppers
1 None 2 1 2 2
Number of ingredient
canisters
2 3 None 2 None 1
Brewer type
Filter Espresso
Touch screen
Option
Espresso pump type
None Vibration pump
Drip tray size
0.5L
Milk waste size
None 1.1L
Ground container size
0.5 kg (40cups)
Base cabinet
Option
Tank volume
1.8L
Espresso boiler
0.7L
Power supply
220-230VAC/2200W 50-60Hz
Water connection
1/2” external thread
Built-in cold water unit
None
Co
2
water unit
None
Water punictation lter
Option
Model / Name
CQube
SF12 SF03 SF20 SE12 SE20 SE20+BARISTA
Weight
37kg 37kg 37kg 37kg 37kg 74kg
Base cabinet
25 kg 25 kg 25 kg 25 kg 25 kg 25 kg
CQUBE SERIES
5
Facts & weight
GENERAL
FACTS
CQube
ME12 MF13 MF04 LF13 LF04
Drink options
1-12
Function for selecting jug
Ye s
Grinder type
EK-21 EK-21 None EK-21 None
Number of bean hoppers
1 1 None 1 None
Number of ingredient canisters
2 3 4 3 4
Brewer type
Espresso Filter
Touch screen
Espresso pump type
Rotation
Pump
None
Drip tray size
1.8L
Ground container size
2kg (160cups)
Base cabinet
Option
Tank volume
5L
Power supply
220-230VAC/2200W 50-60Hz
Water connection
1/2” external thread
Built-in cold water unit
Option
Co
2
water unit
Option
Water punictation lter
Option
Model / Name
CQube
ME12 MF13 MF04 LF13 LF04
Weight
52kg 48kg 42kg 51kg 45kg
Cold water unit
12kg 12kg 12kg 12kg 12kg
Cold + co
2
water unit
16kg 16kg 16kg 16kg 16kg
Base cabinet
25 kg 25 kg 25 kg 25 kg 25 kg

CQUBE SERIES
6
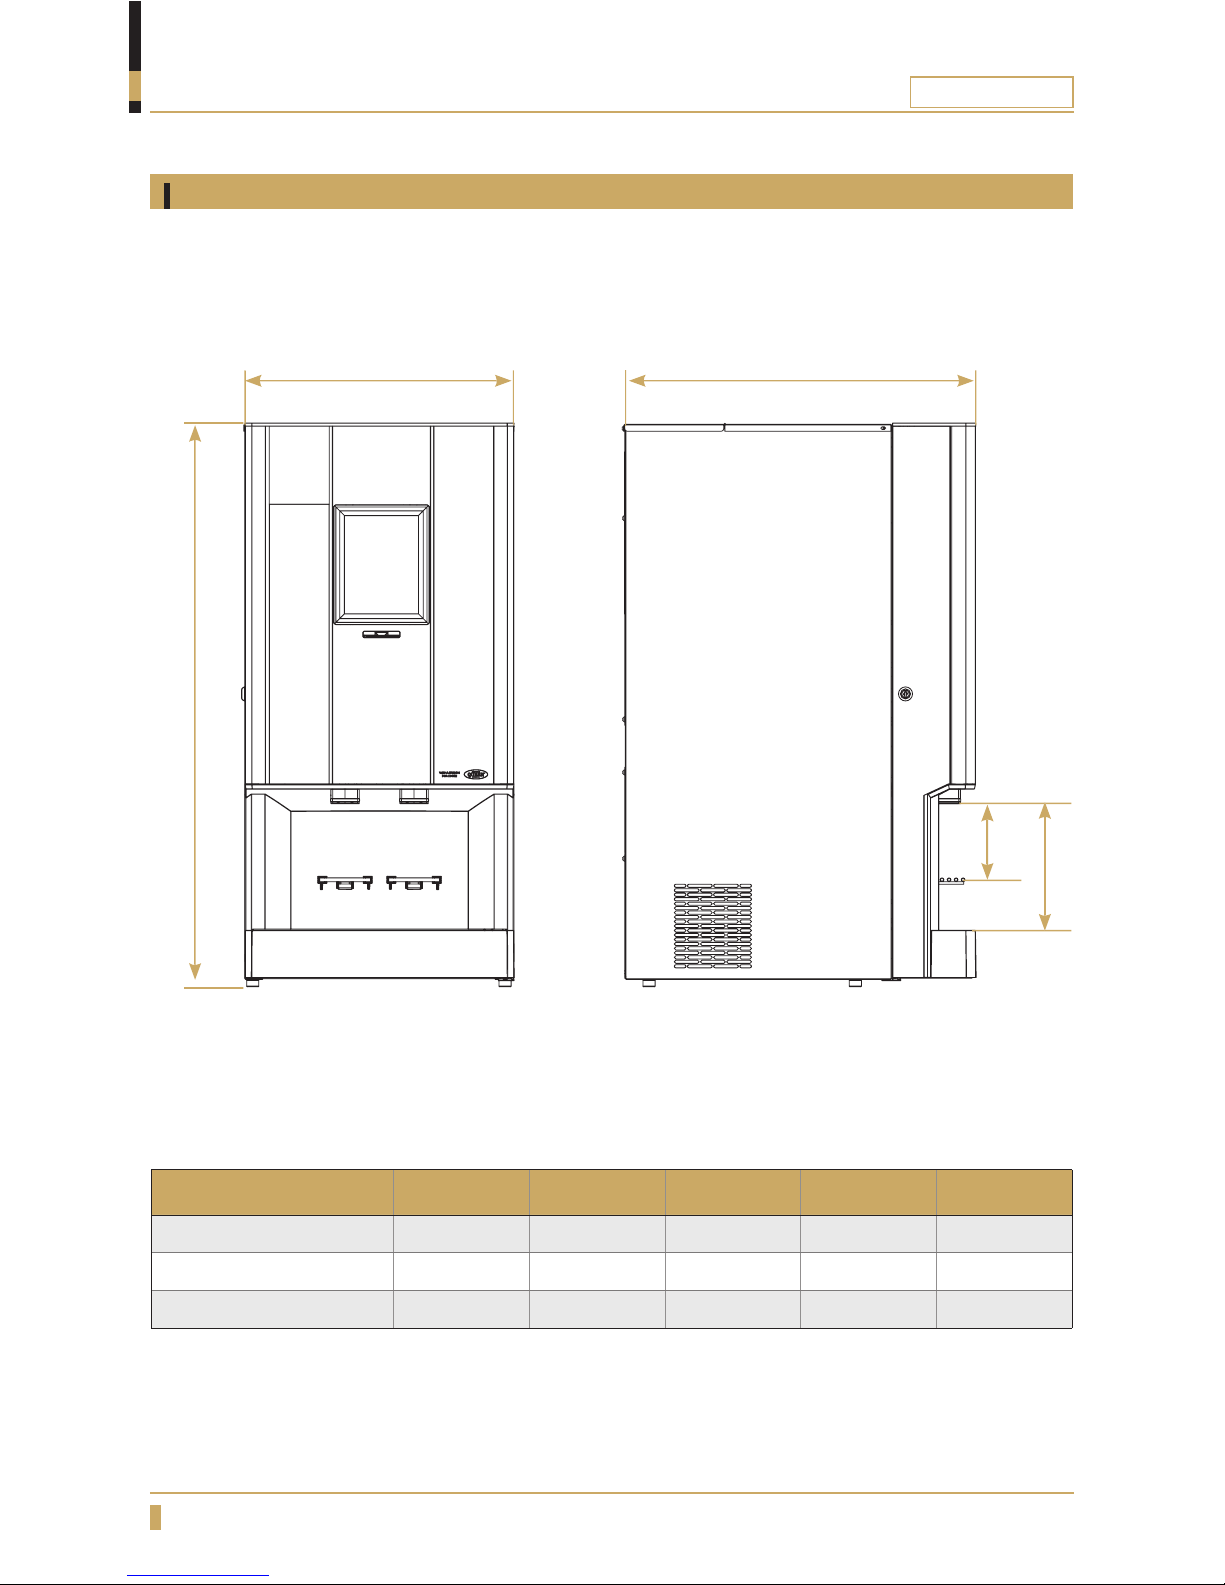
A
Model
A B C D E
CQube SF12
818mm 290mm 532mm 110mm 155mm
CQube SF03
818mm 290mm 532mm 110mm 155mm
CQube SF20
818mm 290mm 532mm 110mm 155mm
CQube SE12
818mm 290mm 532mm 110mm 155mm
CQube SE20
818mm 290mm 532mm 110mm 155mm
B C
Dimensions
CQube SF12 SF03 SF20 and CQube SE12 & SE20
GENERAL
D
E
CQUBE SERIES
7
B C
A
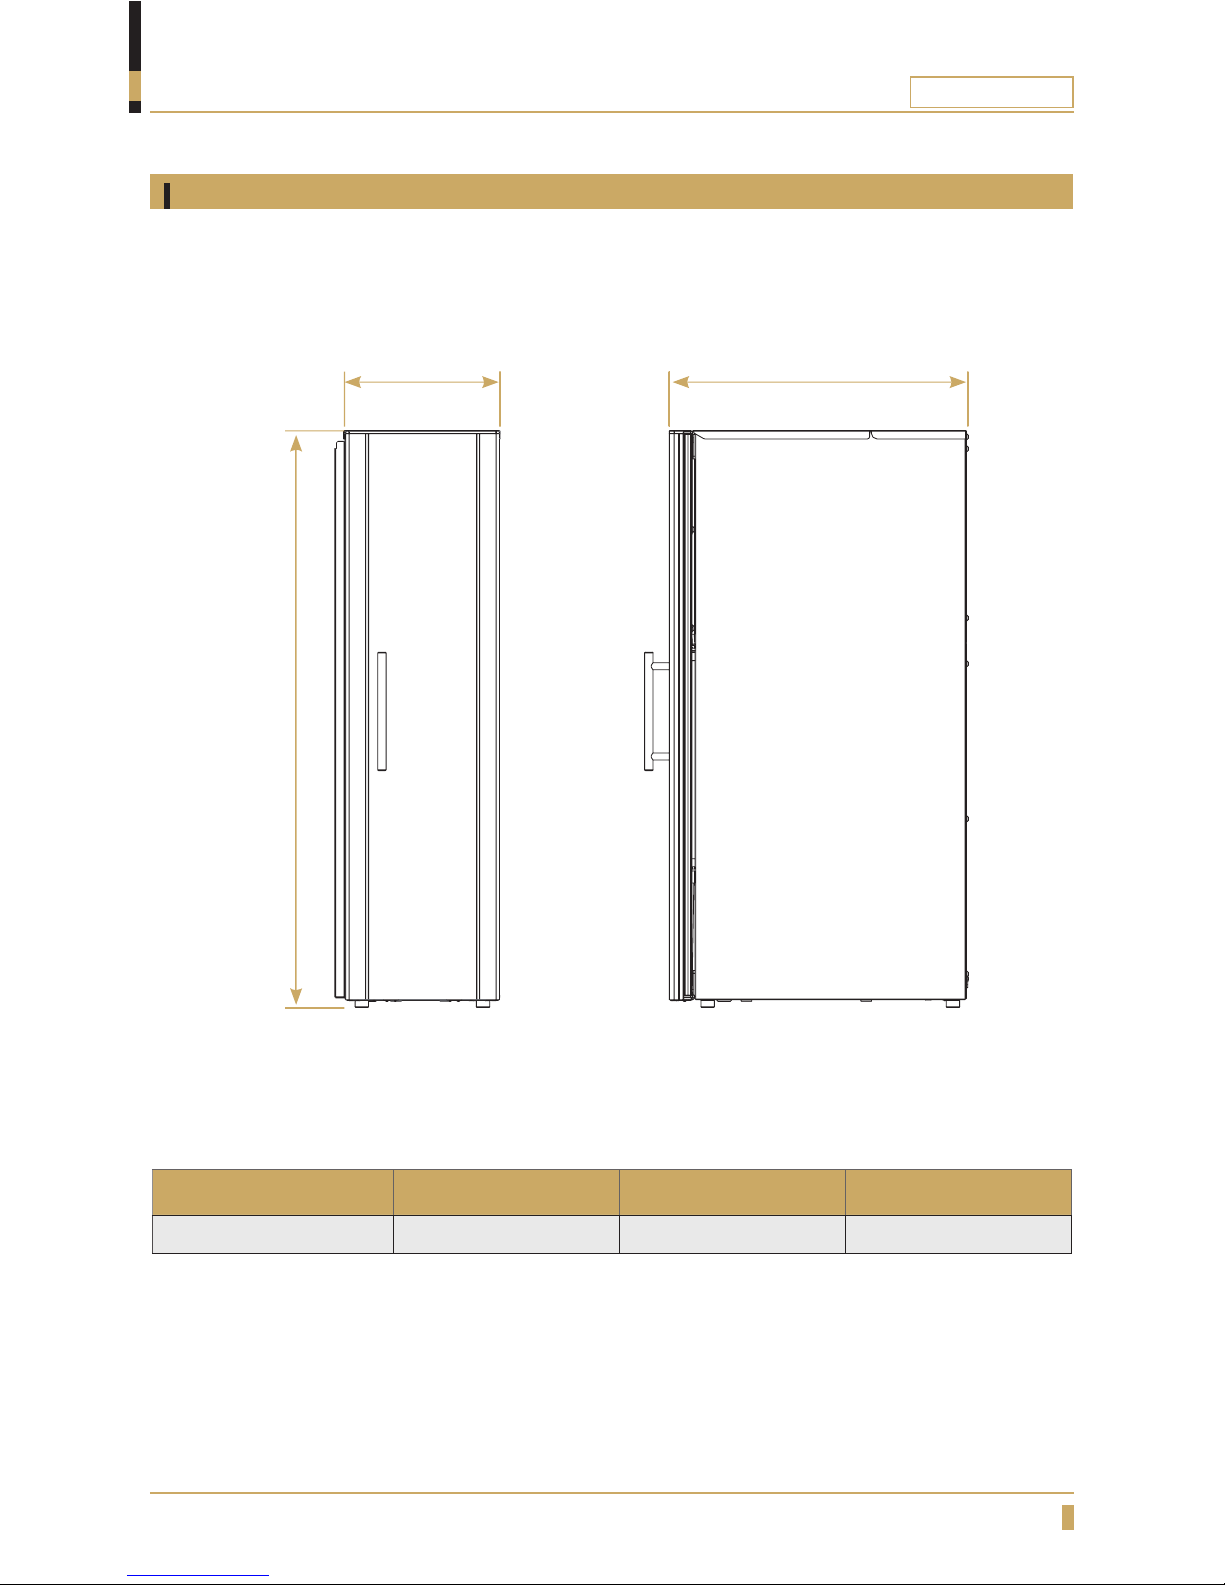
Dimensions
BARISTA
GENERAL
Model
A B C
BARISTA
818mm 235mm 456mm
CQUBE SERIES
8
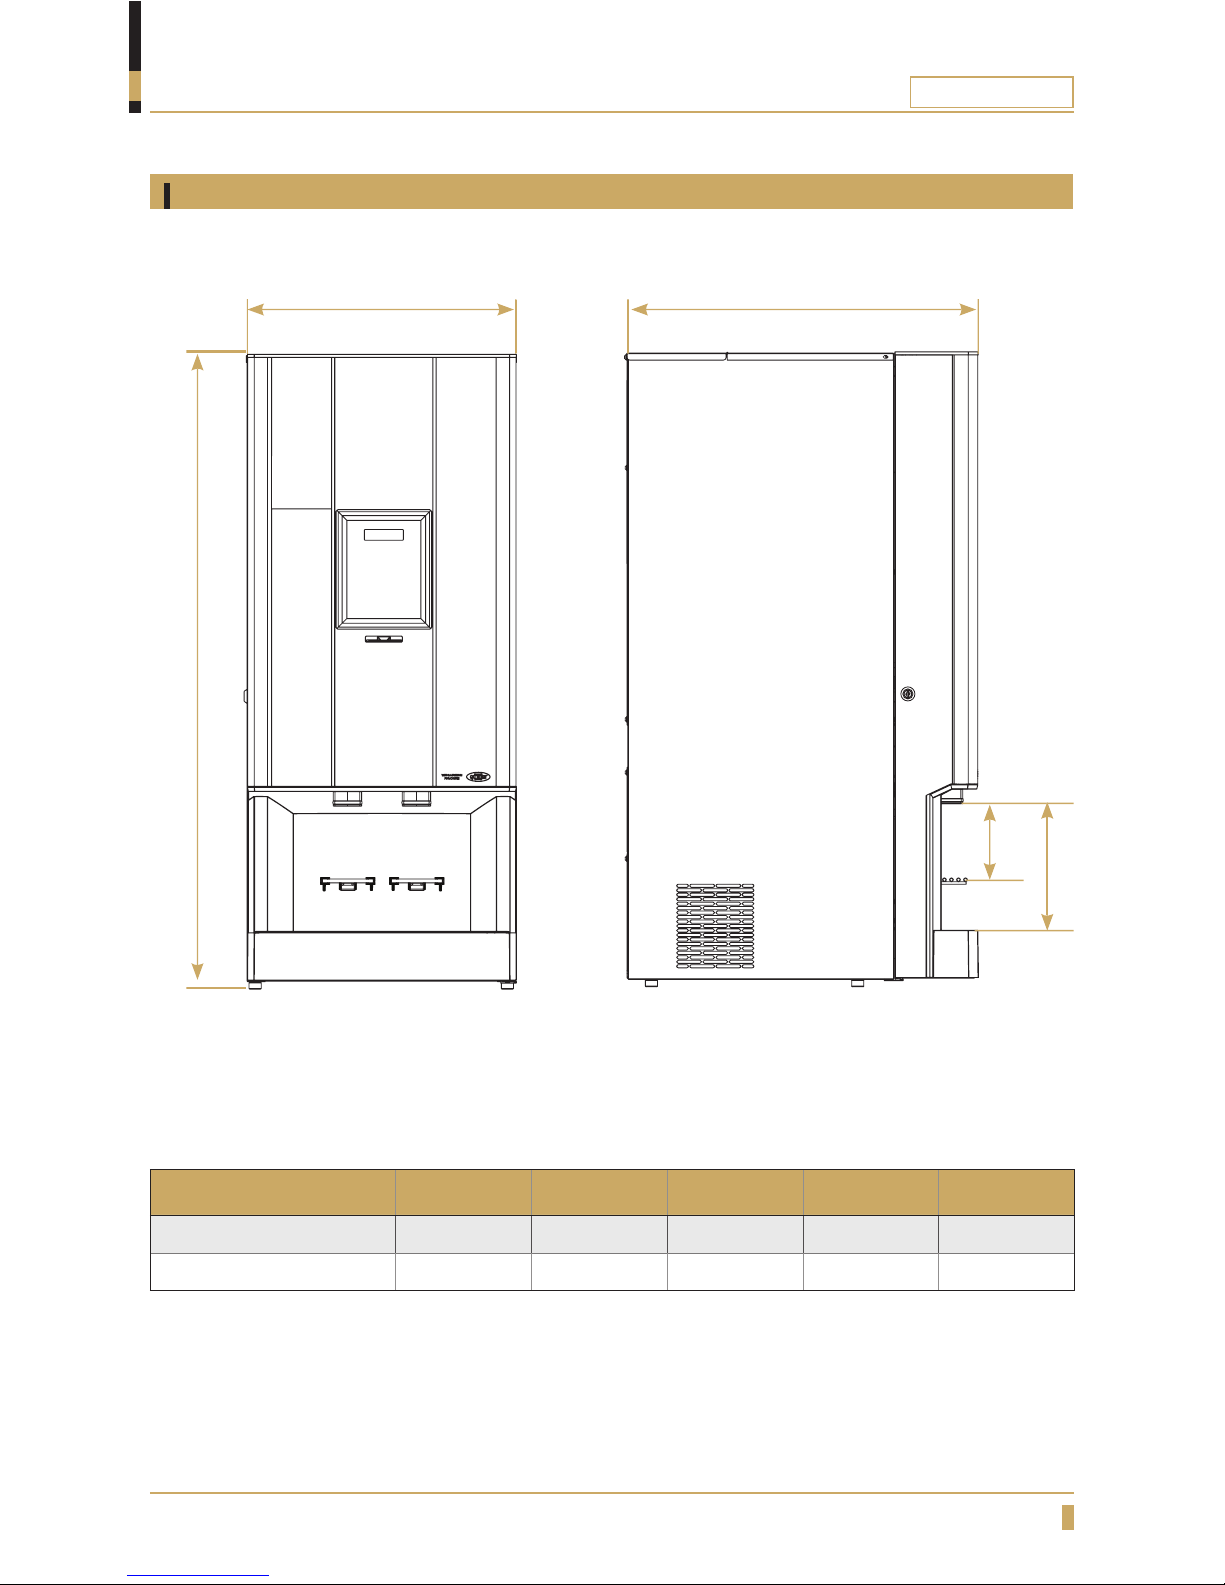
Model
A B C D E
CQube MF13
882mm 427mm 550mm 110mm 155mm
CQube MF04
882mm 427mm 550mm 110mm 155mm
CQube ME12
882mm 427mm 550mm 110mm 155mm
GENERAL
CQube MF13 & MF04 and CQube ME12
Dimensions
A
B
C
D
E
CQUBE SERIES
9
A
B
C
Model
A B C D E
CQube LF13
995mm 420mm 565mm 110mm 155mm
CQube LF04
995mm 420mm 565mm 110mm 155mm
GENERAL
CQube LF13 & LF04
Dimensions
D
E
CQUBE SERIES
10
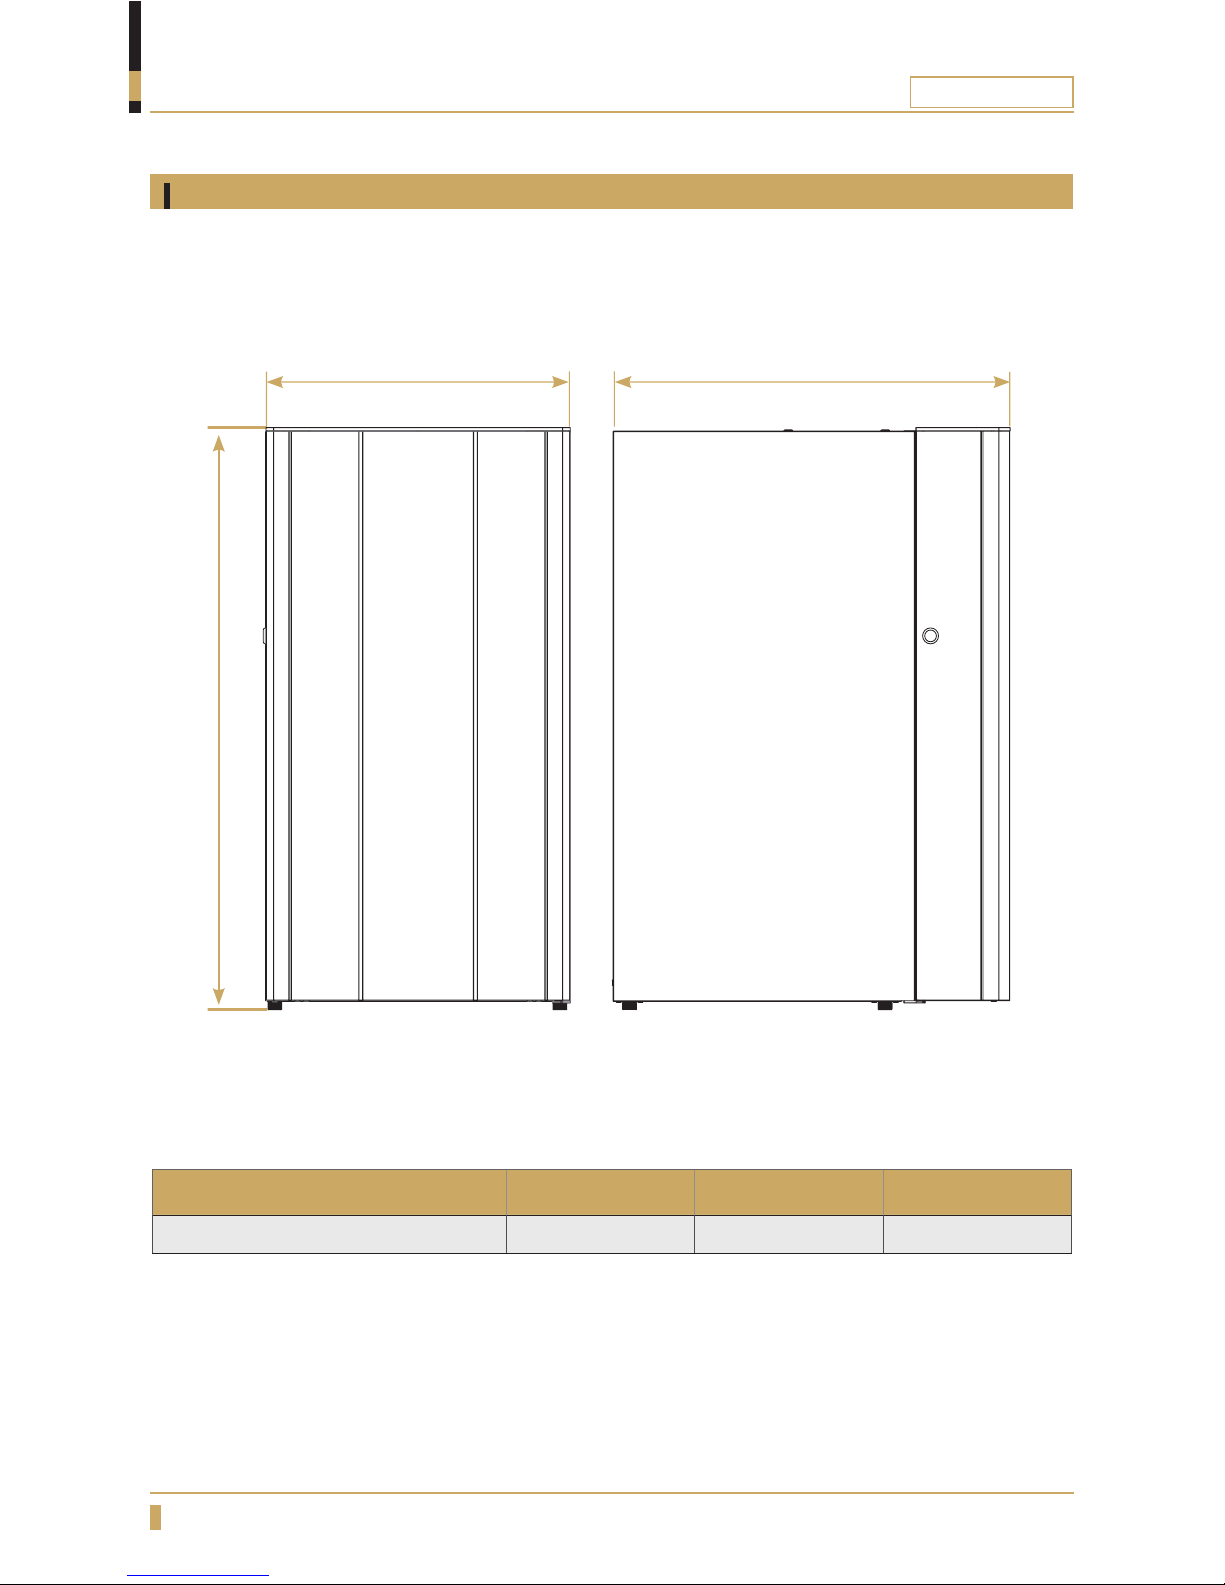
B C
A
Model
A B C
Base cabinet for CQube M
806mm 425mm 550mm
GENERAL
Cabinet for CQube M
Dimensions
CQUBE SERIES
11
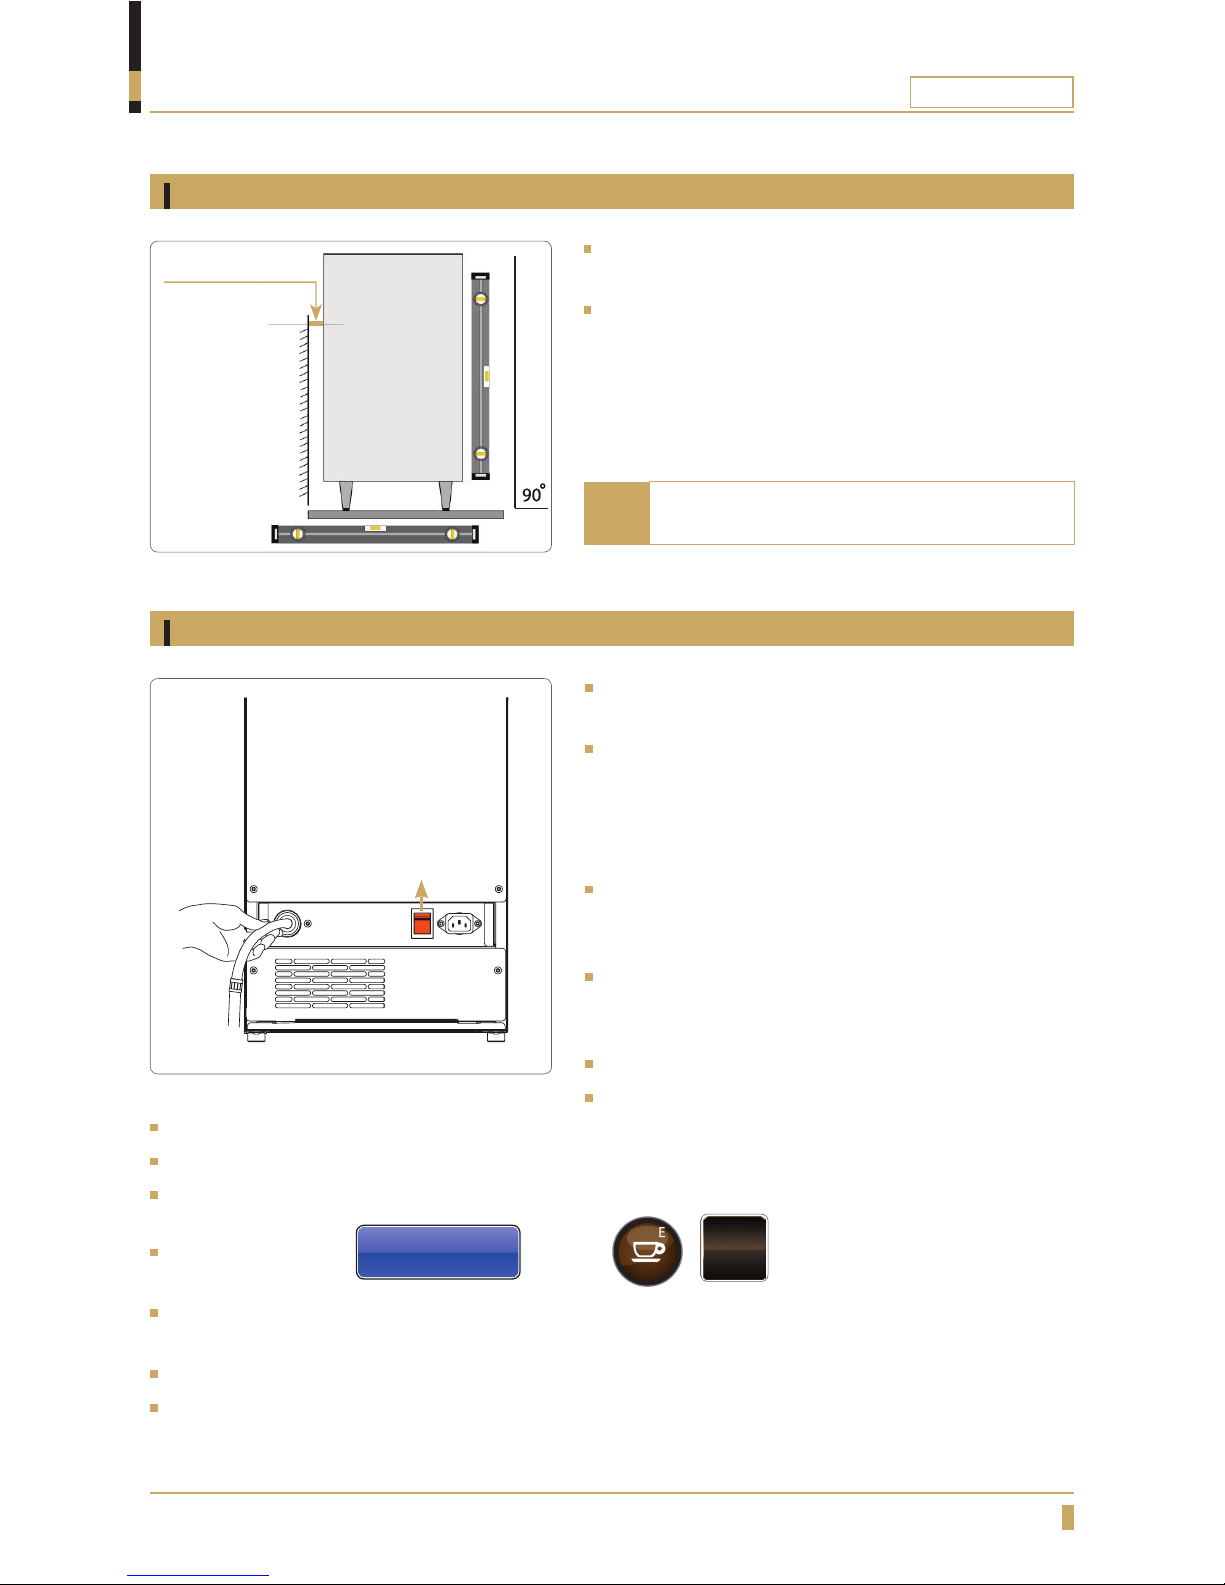
INSTALLATION AND START-UP
Place the machine on a fl at horizontal surface that will
support the weight of the machine.
When assembled with a base cabinet: Fix the CQube
machine together with the base cabinet with supplied
M6 X 35 screws.
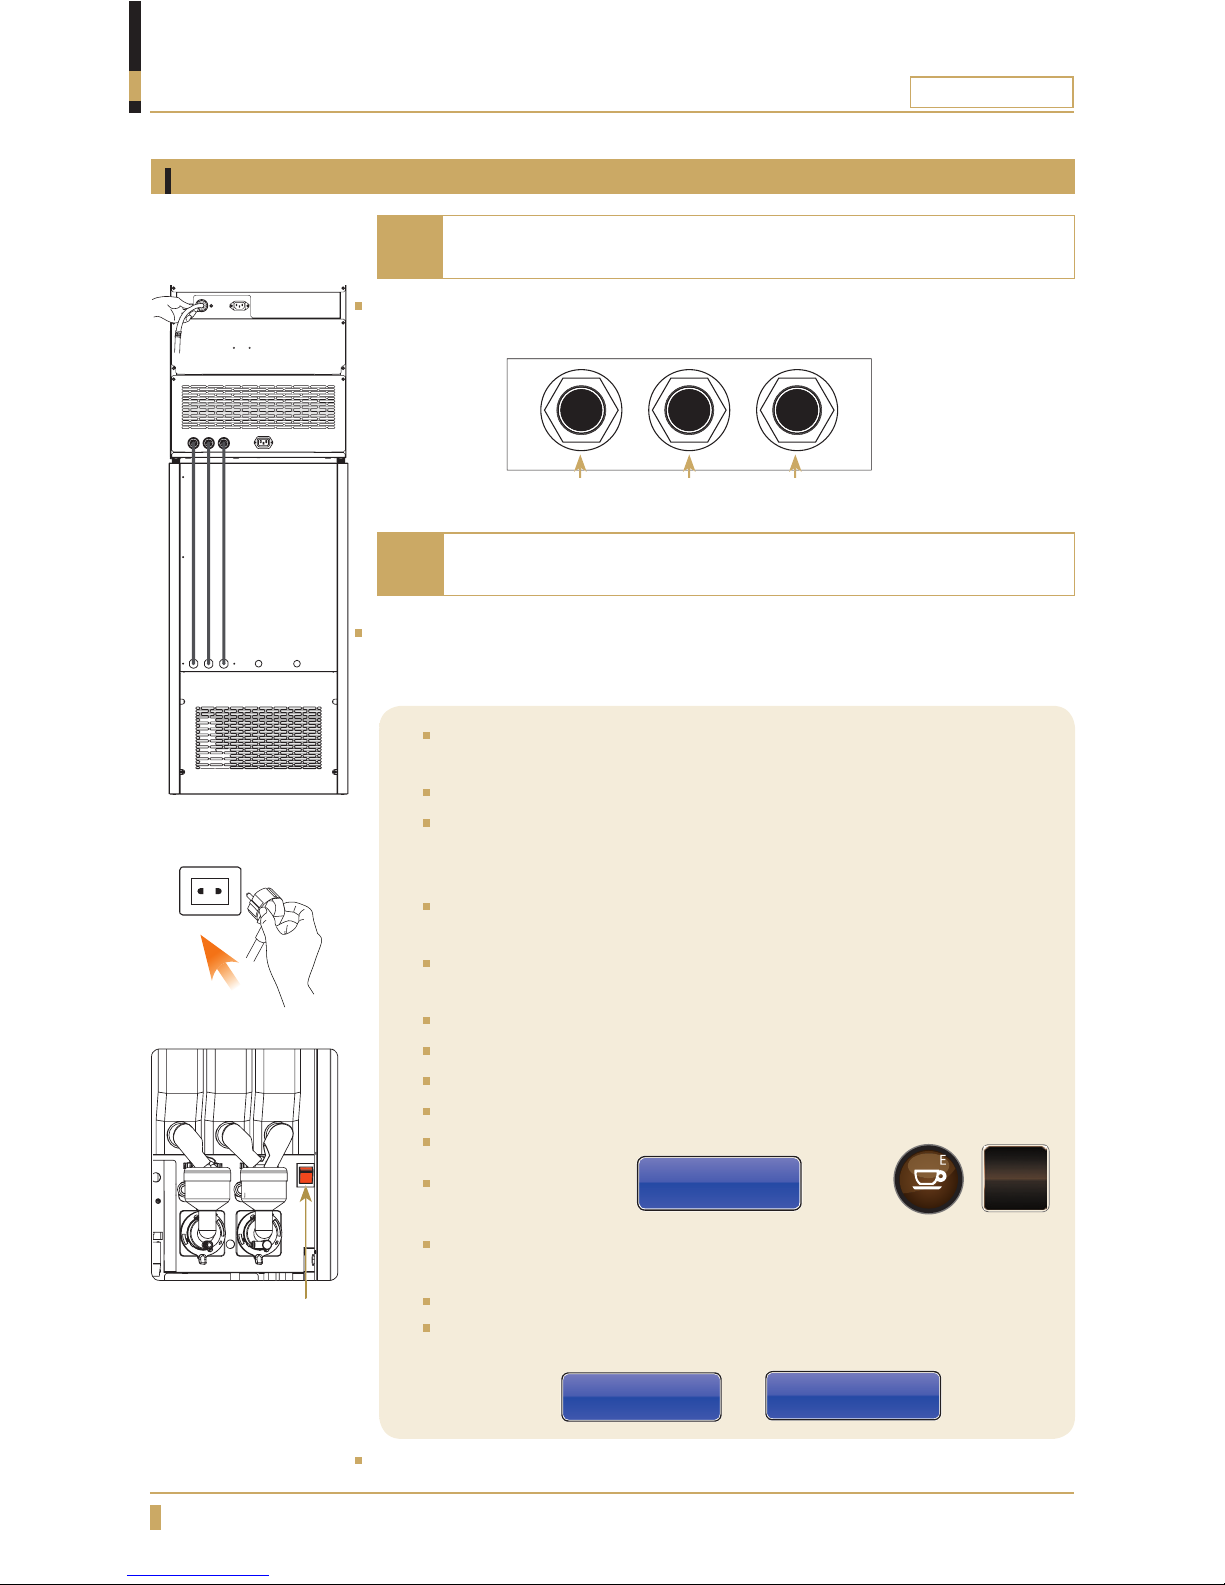
Connect the water to the top cabinet on the
machine.
Connect the supplied water hose to the cold water
connection using a ½’’ R-connection. When pushing
the machine into position make sure there is no
interference to the hose to ensure proper water
fl o w .
If the inlet hose is new, fl ush the system with water
rst to remove copper shavings. These can damage
the inlet valve.
The new tube set supplied with the appliance must be
used. Old tubes may not be re-used. Connection to a
closable valve is recommended.
Min. water pressure; 2 bar (200kPa).
Max. water pressure: 8 bar (800kPa).
Make sure air is able to circulate behind
the machine (minimum 10cm).
Positioning
Machine startup procedure for CQube SF SE
minimum 10cm
Switch
Note
Open the water tap.
Connect the mains cable to the machine (A) and insert the plug to a earthed wall socket.
Switch on the power switch on the rear of the machine. See gure.
The display indicates
Low Water Level
Press Enter Key
Press the /
ENTER
button.
The water tank will now automatically ll with 1.8 litres of water. The element will not be powered until
the water reaches the level sensor.
Set temperature is 96º Celsius.
Once the water heating is complete “Low temp” text will disappear from the display. (The display text
will start to rotate).
A
CQUBE SERIES
12
INSTALLATION AND START-UP
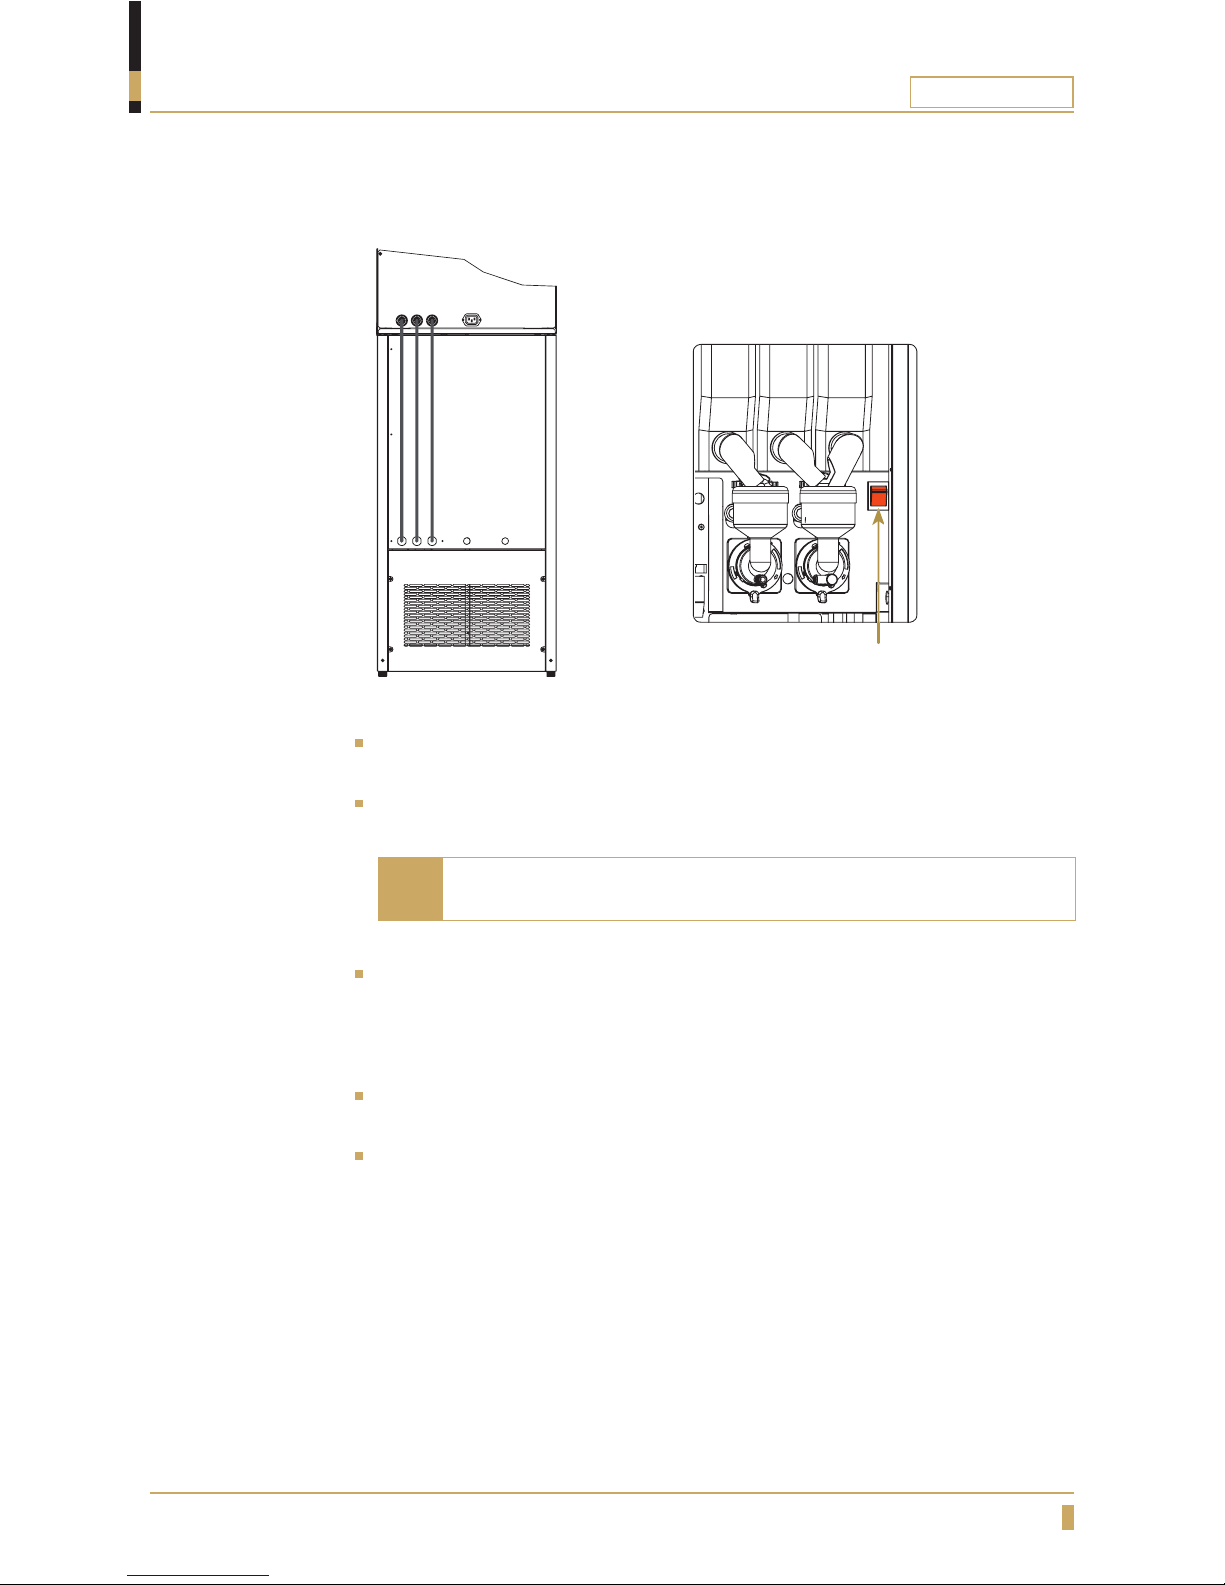
Connect the 8mm hoses 3 units. (A) parallel between the top and base cabinets,
from left to right.
Connect the carbon dioxide tube to the gas canister and open the tap, check
that the factory set pressure is c. 3.5bar. May be adjusted +0.5 -1.0 bar. Put the
gas canister tube in place inside the base cabinet.
Connect the mains cable to the machine (B) and insert the plug to a
earthed wall socket (C).
Connect the water to the top cabinet on the machine.
Connect the supplied water hose to the cold water connection using a
½’’ R-connection. When pushing the machine into position make sure
there is no interference to the hose to ensure proper water fl ow.
If the inlet hose is new, fl ush the system with water rst to remove
copper shavings. These can damage the inlet valve.
The new tube set supplied with the appliance must be used. Old tubes
may not be re-used. Connection to a closable valve is recommended.
Min. water pressure; 2 bar (200kPa).
Max. water pressure: 8 bar (800kPa).
Open the water tap.
Open the door and turn on the power switch. See gure.
Close the door
The display indicates
Low Water Level
Press Enter Key
Press the /
ENTER
button.
The water tank will now automatically ll with 5 litres of water. The
element will not be powered until the water reaches the level sensor.
Set temperature is 96º Celsius.
Once the water heating is complete “Low temp” text will disappear
from the display. (The display text will start to rotate between these
two screens
FRESHBREWED
FILTER COFFEE
and
SELECT PRODUCT
)
Shut off the machine, continue on next page.
Do not connect the electrical cable from the cold water unit
until the machine has heated up.
Start-up procedure for CQube MF LF
Note
WATER IN COLD WATERCARBONATED
WATER
A
B
C
Switch
If the machine doesn’t have any cold water cabinet only follow
the steps in the colored section below.
Note
A
CQUBE SERIES
13
A
Now connect the electricity cable which comes from the base cabinet into the
electric socket at the machine (B).
Switch on the machine again and wait until the text in the display starts to
rotate.
The fresh-brew machine must be warm before any cold water
can be dispensed.
Note
Take a glass and press the button for cold water until water is dispensed in a
even fl ow and the pressure pump that is buzzing gives a different calmer sound
(cold water compressor is relatively quite so it should not usually be heard very
much)
Now press the button for carbonated water so the water can mix with the
carbon dioxide, keep the button pressed until you have a even fl ow of water.
When you release the button the pump will ll up the cooling unit and then turn
off. The machine is now ready for use.
INSTALLATION AND START-UP
B
Switch

CQUBE SERIES
14
TECHNICAL SERVICE CARD
Insert the technical service card with the chip
upwards for MF or LF series as in the gure above.
Press this button to enter
cleaning mode on a touch
display.
Insert the technical service card with the chip
towards for SF or SE series as in the gure above.
For this detailed cleaning section you will encounter these screens and buttons on the displays.
Technical service card Item number: 1602693.
Is used for advanced cleaning and adjust machine settings.
The technical service card is supplied by your dealer.
For complete icons see programming manual.
To use the machine again remove the technical smart card and store it in a safe place.
Touch Display Membrane Switch
Cleaning Hot KeyClean Machine
Clean Machine
CQUBE SERIES
15
IMPORTANT!
CLEANING PROGRAM
Detailed cleaning instructions
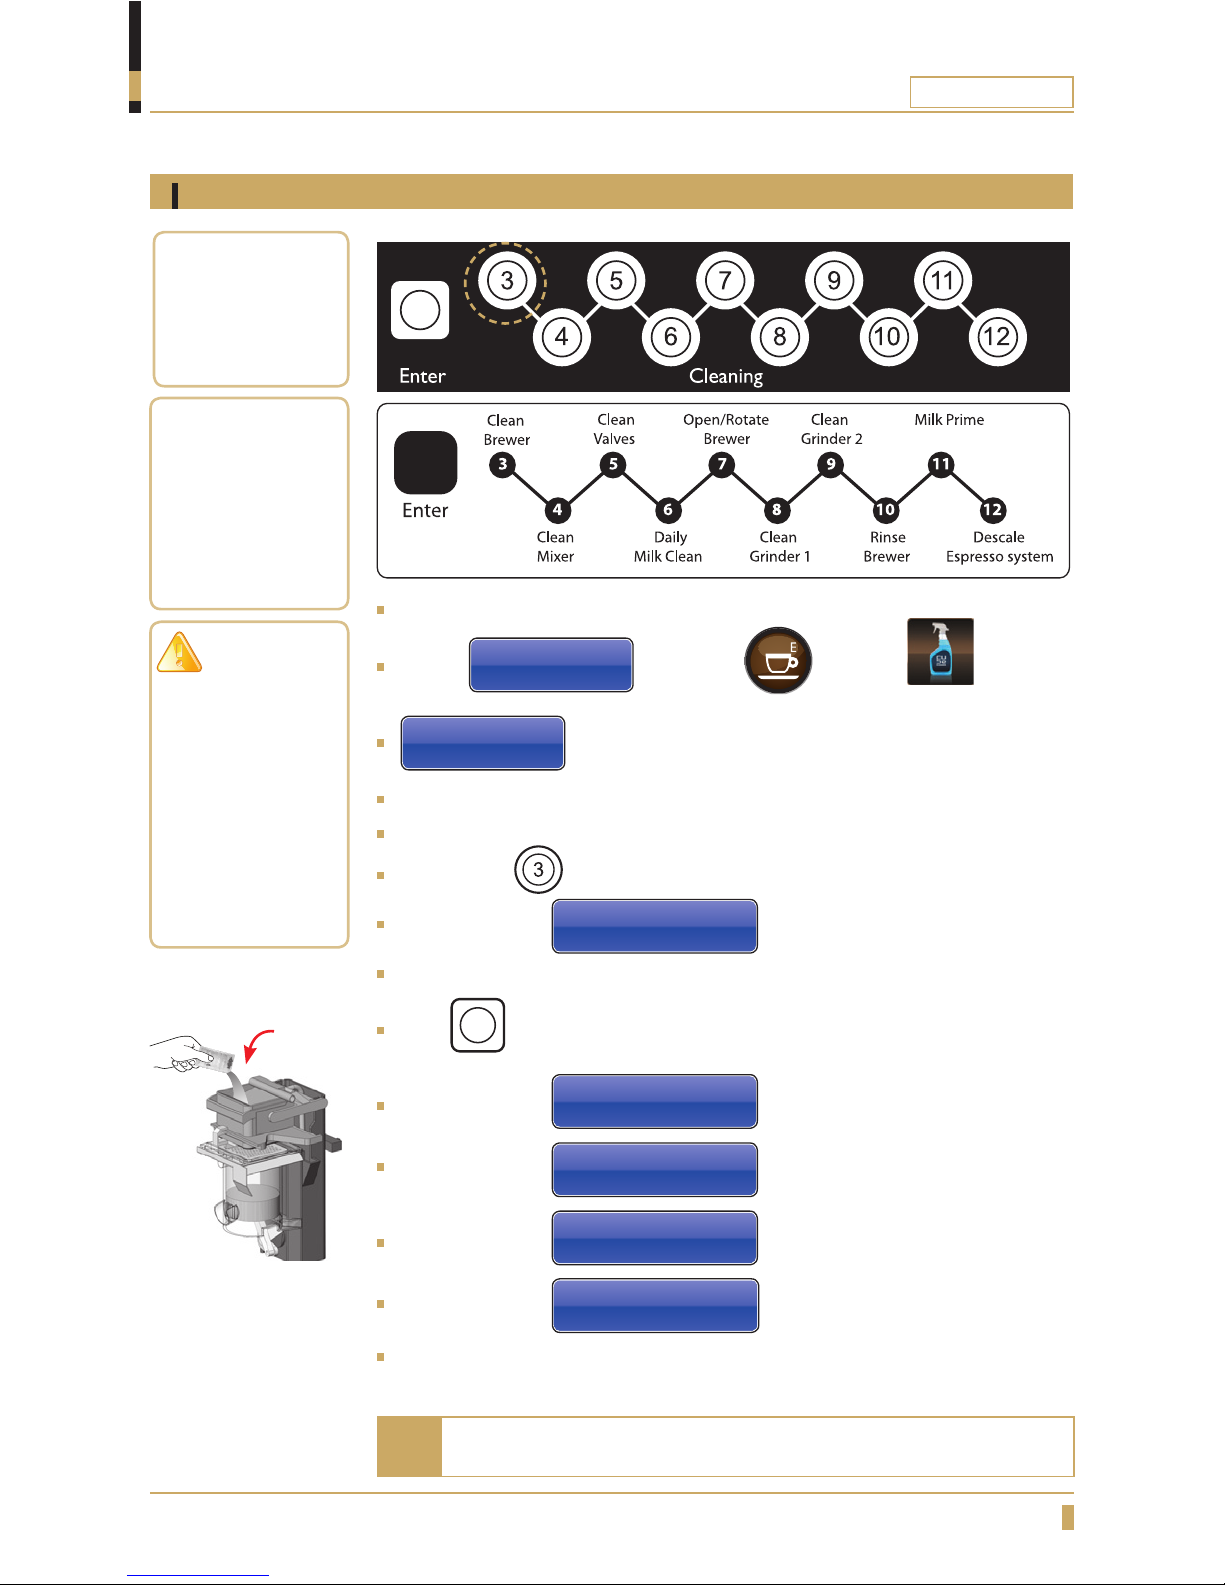
Clean brewer CQube SF MF LF
Cleaning of the
brewing
mechanism should
be performed once
a week.
Insert technical service card
Step to
Clean Machine
Press Enter or press
Clean Machine
Cleaning Hot Key
appears on the display
Open the machine door
Put a container that holds at least 0.5 litres under the outlet for hot drinks.
Press button on the cleaning panel. (See g. A)
Display indicates:
Place jug
Press ENTER to start
Put 25gr (one portion) of cleaning agent (See g.B) in brewing mechanism.
Press
Enter
on the cleaning panel to start the cleaning process.
Display indicates:
Preparing Brewer
Please Wait.
Display indicates:
Cleaning Brewer
Time Left 300s
The machine counts down from
300 seconds.
Display indicates:
Rinsing Brewer
Cycles left 7
Display indicates:
Cleaning hot key
when the cleaning is complete.
Close the door and remove technical service card to return to normal mode.
A
Fig.B
When the cleaning agent has been added, the process must not
be interrupted but be allowed to run its course.
Note
Total cleaning time
about 10 minutes.
Filter cleaning agent
is avalible from your
dealer:
Product no.
1104161
After cleaning of the
brew mechanism is
completed, dispense
a cup of coffee and
discard it to remove
cleaning agent
remains in the
fi lter and brew
chamber.
CQUBE SERIES
16
CLEANING PROGRAM
Detailed cleaning instructions
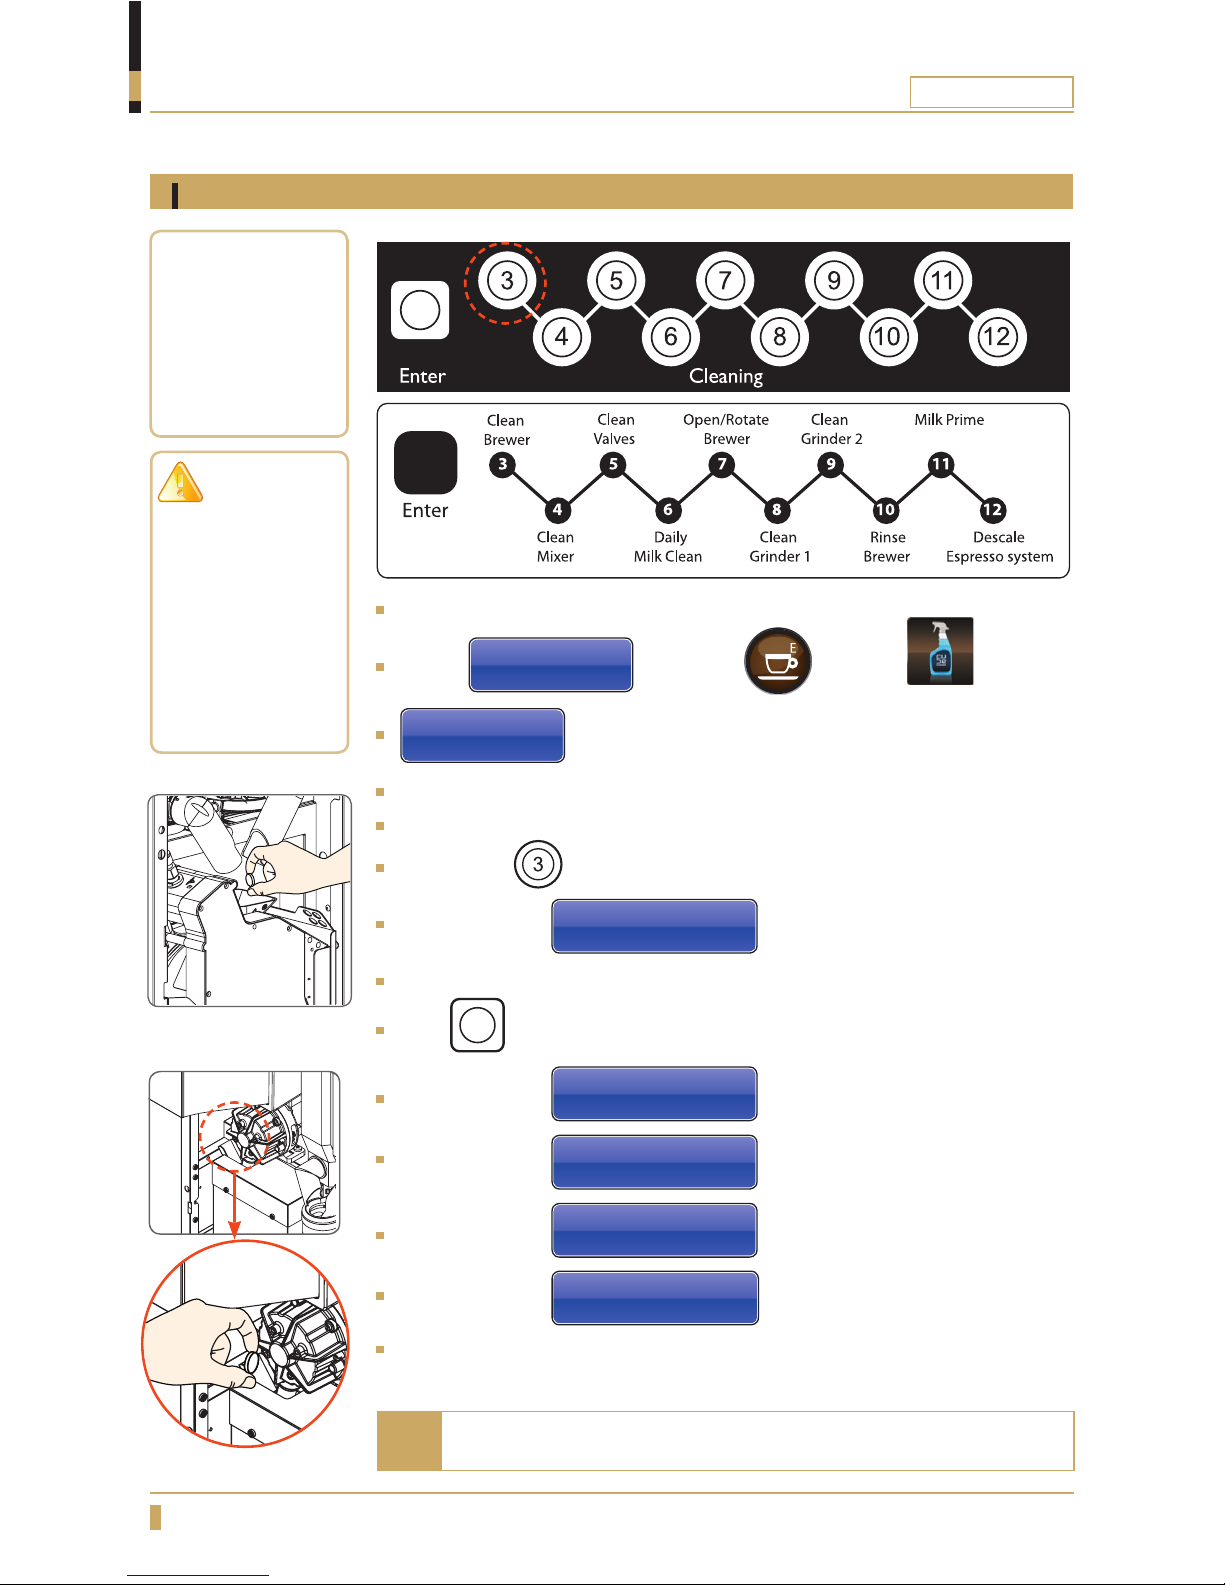
Clean brewer CQube SE ME
Insert technical service card
Step to
Clean Machine
Press Enter or press
Clean Machine
Cleaning Hot Key
appears on the display
Open the machine door
Put a container that holds at least 1 litres under the outlet for hot drinks.
Press button on the cleaning panel. (See g. A)
Display indicates:
Place jug
Press ENTER to start
Put a cleaning tablet in brewmechanism. (See g. C and D)
Press
Enter
on the cleaning panel to start the cleaning process.
Display indicates:
Preparing Brewer
Please Wait.
Display indicates:
Cleaning Unit
Time Left 60 seconds
The machine counts down from 60
seconds.
Display indicates:
Rinsing Brewer
Cycles left 3
Display indicates:
Cleaning hot key
when the cleaning is complete.
Close the door and remove technical service card to return to normal mode.
A
When the cleaning tablet has been added, the process must not
be interrupted but be allowed to run its course.
Note
Brewer for CQube SE
Brewer for CQube ME
Fig.C
Fig.D
Total cleaning time
about 5 minutes.
Espresso cleaning
tablets are avalible
from your dealer:
Product no.
1104171
After cleaning of the
brew mechanism is
completed, dispense
a cup of coffee and
discard it to remove
cleaning agent
remains in the
fi lter and brew
chamber.
IMPORTANT!

CQUBE SERIES
17
Detailed cleaning instructions
Cleaning means
rinsing with water
and rotating the
whipper.
Cleaning of the
mixing bowl should
be performed once
per day.
Repeat the cleaning procedures 2-3 times to get a better
cleaning effect.
Note
Clean mixer for CQube series
Insert technical service card
Step to
Clean Machine
Press Enter or press
Clean Machine
Cleaning Hot Key
appears on the display
Open the machine door.
Put a container that holds at least 0.5 litres under the outlet for hot drinks.
Press button on the cleaning panel. (See g. A)
The machine will now clean the mixing bowl for 5 seconds.
Close the door and remove technical service card to return to normal mode.
A
CLEANING PROGRAM

CQUBE SERIES
18
Repeat the cleaning procedures 2-3 times to get a better
cleaning effect.
Note
Clean valves for CQube series
Insert technical service card
Step to
Clean Machine
Press Enter or press
Clean Machine
Cleaning Hot Key
appears on the display
Open the machine door.
Put a container that holds at least 0.5 litres under the outlet for hot drinks.
Press button on the cleaning panel. (See g. A)
The machine will now clean the dispenser valves for 5 seconds.
Close the door and remove technical service card to return to normal mode.
Cleaning entails that
the valves “knock”
off any lime scale
and other particles
that may get stuck
in the cylinders and
fl ushing them with
water.
A
CLEANING PROGRAM
Detailed cleaning instructions
 Loading...