

Coffee Queen CQUBE EVO Cleaning And Care Manual
CQUBE EVO
CLEANING AND CARE MANUAL
EVO_C&CM_EN
Part No.: 1764256_05

2
CONTENTS
CONTENTS
INTRODUCTION
3 Cleaning and care overview
3 Required equipment
3 Optional equipment
OPERATOR INFORMATION
4 Accessing the Service Menu
4 Dishwasher-safe parts list
MONTHLY CLEANING PROCEDURE
5 Step 1: Run the automatic valve and mixer cleaning functions
6 Step 2: Run the automatic brewer cleaning function
7 Step 3: Clean the drip tray
8 Step 4: Clean the mixing system
9 Step 5: Clean the canister bodies
9 Step 6: Clean the canister outlets
10 Step 7: Cleaning the brewing system - VKI brewer equipped models
12 Step 2: Clean the waste bin
13 Step 8: Clean the grinder, bean hopper and grinder area (MF13 only)
14 Step 9: Clean the machine and base cabinet interiors
REASSEMBLY PROCEDURE
15 Step 10: Reassemble the brewing system
16 Step 11: Reassemble the mixing system
17 Step 12: Reassemble the drink outlet beam bracket
17 Step 13: Fill and replace the canisters
18 Step 14: Fill and replace the bean hopper (MF13 only)
18 Step 15: Replace the waste bin
19 Step 16: Reassemble the drip tray, cup slider grids, and accessories
19 Step 17: Make test drinks
3
INTRODUCTION
Cleaning and care overview
Required equipment
Optional equipment
Responsible Person: Task: Reference Guide:
Operator
Daily cleaning
Operation Manual
Weekly cleaning
Hygiene technician Monthly cleaning Cleaning & Care Manual
Service technician
6 month service
Technical Manual
12 month service
Note:
The cleaning program and maintenance intervals recommended in this manual
and others for the appliance are based on an averaged daily dispensing rate of 180
drinks per day. Variations from this amount will affect required cleaning frequency
and should be calculated and cleaning frequency should be adjusted accordingly.
i
The following cleaning equipment/consumable items are required to perform the
monthly cleaning procedure:
• Door Key
• Mixer Disc Tool (article number: 6162028)
• Brew Mechanism Rotating Tool (article number: 4740132)
• Filter Ejector Tool (VKI models only - article number: 4720090)
• Cleaning container
• Waste bin liners
• GRINDZ grinder cleaning tablets (article number: E1001001)
• Brewer cleaning powder (article number: 1104161)
• Mild cleaning solution or dish soap
• Kitchen cleaning spray
• Glass cleaning spray
• Soft, lint-free cleaning cloth
• Coffee beans (MF13 only)
• Fresh-ground coffee (MF04 only)
• Powdered ingredients
• Paper coffee cups, coffee condiments, etc.
The following cleaning equipment/consumable items are optional to perform the
monthly cleaning procedure. For better time management some used parts (as
indicated with a *) may be exchanged, rather than cleaned on-site:
• Service USB key
• Right mixer assembly with 265mm tube and adaptors: 1 *
• Left mixer assembly with 215mm tube and adaptors: 1 *
• Mixer mounting plate and whipper disc: 2 *
• Mixer hose adaptor lters: 2 *
• Waste guides: 1 pair, left and right
• Coffee spout: 1 *
• Brew chamber and steam trap: 1 *
• Brew lter: 1 *
• Right canister chute: 1 *
• Left canister chute - MF13: 2, MF04: 3 *
• Coffee cups (for cup dispenser-equipped machines)
• Coffee condiments (for condiment shelf-equipped machines)
This manual has been optimized for cleaning and care of the appliance and base cabinet
by a hygiene technician on a monthly (every four weeks) basis. As such, it is expressly
focused on cleaning the machine in the most efcient manner possible while still
guaranteeing a complete and thorough cleaning procedure. Please follow the steps in
the order they are listed to minimize wait times and ensure that no areas are skipped
or overlooked. Pay special attention to information marked Note: or Important!: since
these details may require extra attention, or signal that a part should be replaced during
the cleaning visit. For information other than cleaning, see the accompanying chart for
the appropriate reference guide.
Important:
Monthly cleaning and 6 and 12 month service tasks shall only be performed by
a trained operator or technician using all required safety equipment as outlined
during the training session(s).
4
OPERATOR INFORMATION
Accessing the Service Menu
Dishwasher-safe parts list
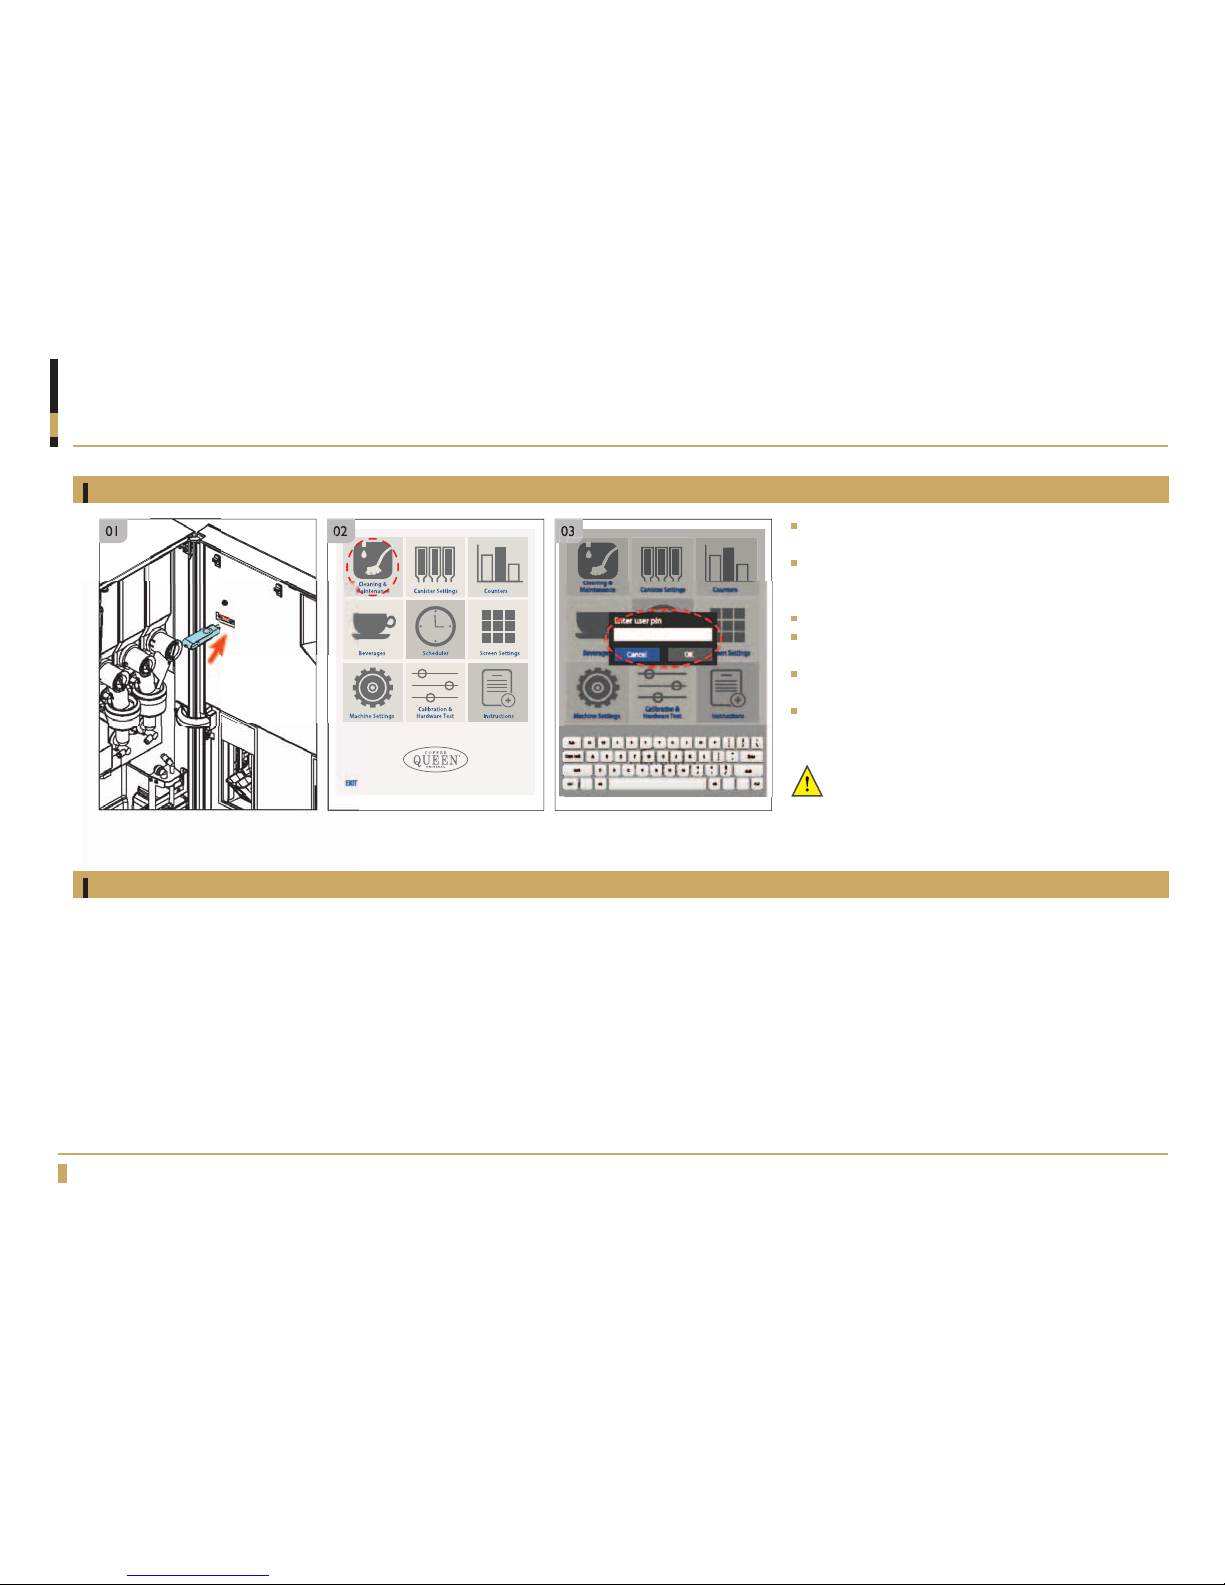
Open the door, remove the rubber cover and insert the
Operator USB stick into the USB port (see Fig. 1).
Within a few seconds the Service Menu will display on the
touchscreen (see Fig. 2), then enter the PIN code if required
(see Fig. 3).
Press the desired button to access the function needed.
Follow the on screen instructions to complete each
function.
To exit the service menu simply remove the USB stick and
replace the rubber cover on the USB port
Close and lock the door, then press EXIT on the
touchscreen to return to the home screen.
These parts can be washed in a residential grade dishwasher (with water temperature note exceeding 70ºC):
• Mixer bodies
• Mixer mounting plates
• Mixing bowls
• Whipper discs
• Coffee and drink outlet funnels
• Brew chamber and steam trap
• Canisters bodies
• Canister chutes
• Cup slider liners
010203
Important:
Never close the door with a USB key still inserted
into the door USB port, it may cause damage to the
USB key, USB port or PCB.
5
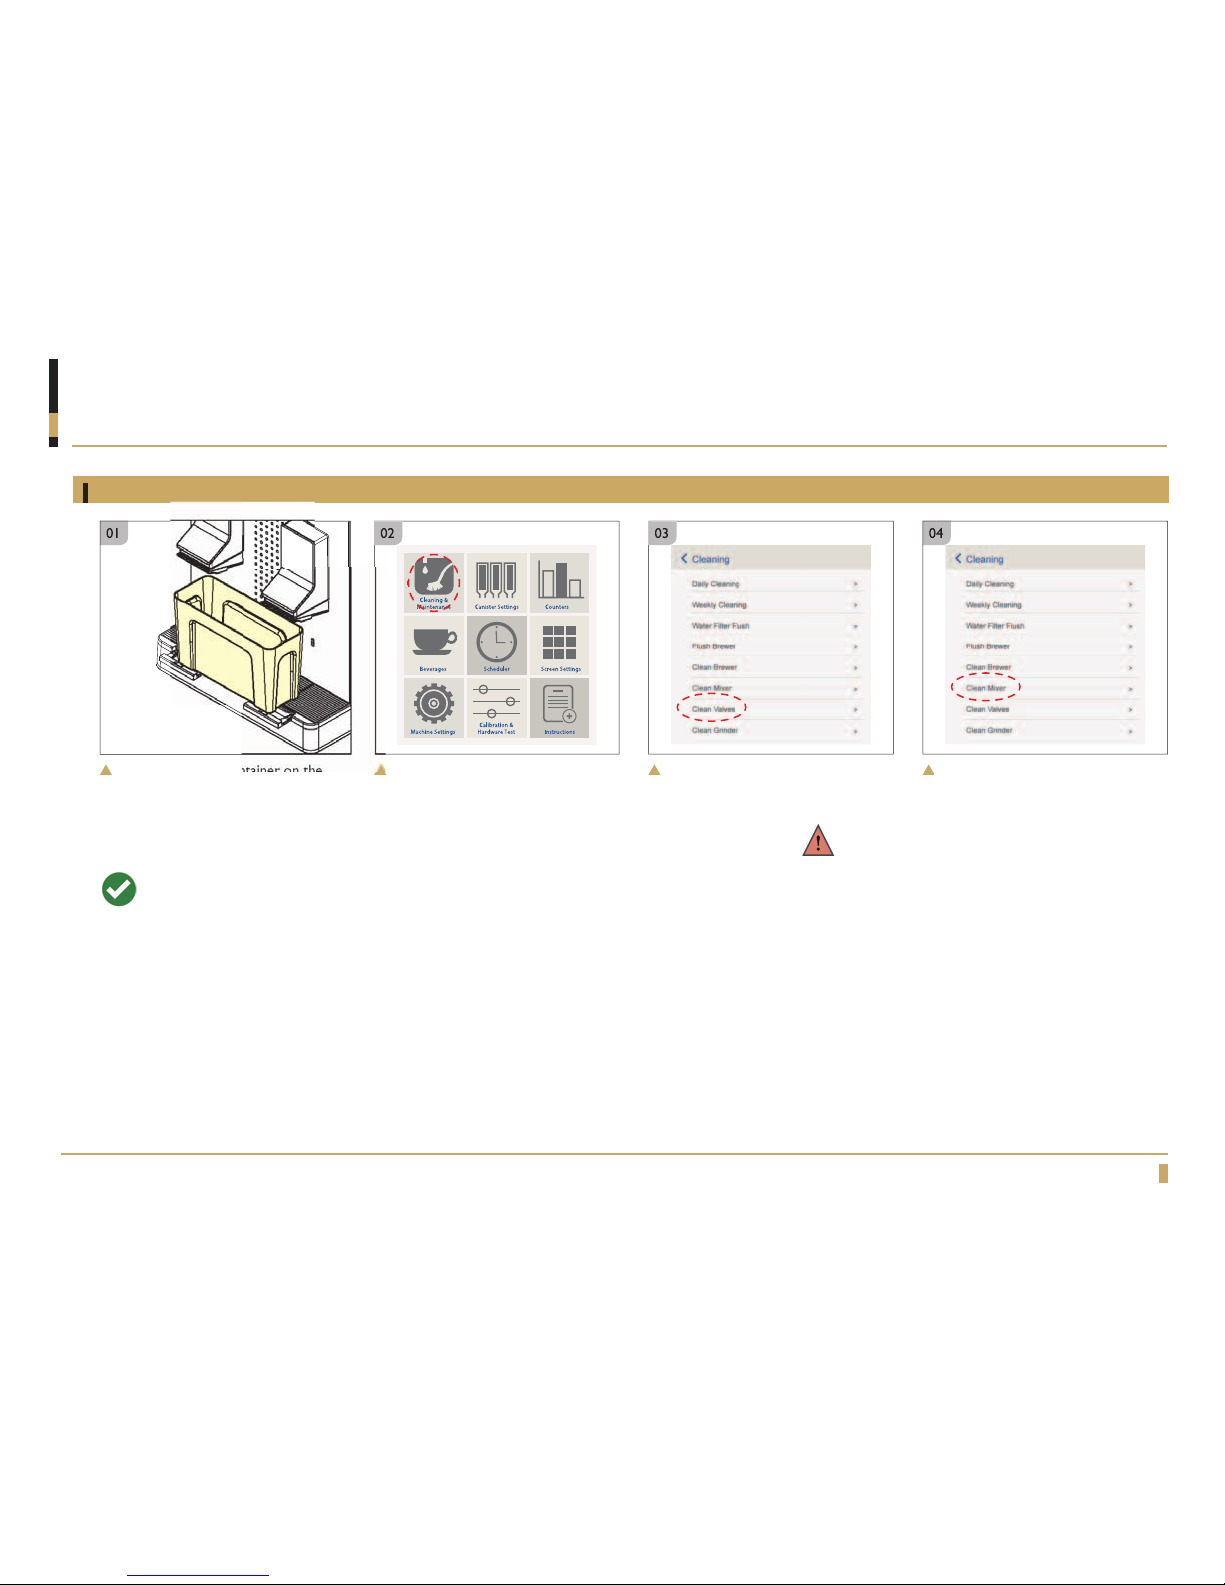
Step 1: Run the automatic valve and mixer cleaning functions
MONTHLY CLEANING PROCEDURE
Select the Clean Mixer function and
follow the on-screen instructions.
04
Place the cleaning container on the
drip tray underneath both outlets.
01
Enter the Service Menu then select
the Cleaning & Maintenance function.
02
Select the Clean Valves function and
follow the on-screen instructions.
03
Pro Tip:
Running the Clean Valves and Clean Mixer functions
precleans the machines internal parts and makes
disassembly of the mixing system much easier.
WARNING:
Cleaning water is very hot!

6
WARNING:
Cleaning water is very hot!
Important!:
For brewer cleaning only use the
cleaning powder (article number:
1104161) which is compatible
with the brewer material.
MONTHLY CLEANING PROCEDURE
Rotate the waste bin (or other large
container) 90 degrees inside the
machine so that it sits underneath both
the brewer and coffee outlet and is able
to catch waste water coming from both
the brewer and coffee outlet during the
cleaning cycle.
Select the Clean Brewer function and
follow the on-screen instructions.
Unlock and open the door.
Step 2: Run the automatic brewer cleaning function
Pro Tip:
The Clean Brewer function is an automated cycle that takes about 8
minutes to complete. During this time the canisters, bean hopper, mixing
system, drip tray and grids, and waste bin and waste funnel should be
disassembled, cleaned and dried.
03
 Loading...