

Page 1
Master Disco 96
®
Programmable Console
• OPERATING INSTRUCTIONS
• MANUALE ISTRUZIONI
Rev. 1
Page 2

®
E-mail: info@coef.it - http://www.coef.it
Tuttiidiritti diriproduzione, diffusionedel presentemanuale
sono riservati a COEF srl.
Le descrizioni ed illustrazioni fornite nella presente pubbli-
cazione non sono impegnative.
COEF srl. si riserva il diritto di apportare in qualsiasi mo-
mento tutte le modifiche che riterrà opportune.
Ilpresentemanuale non puòessere ceduto invisionea terzi
senza specifica autorizzazione scritta da COEF srl.
All rights for reproduction of this catalogueare reserved for
COEF srl.
Descriptions and illustrations are not binding.
COEFsrl.reservestheright to make allnecessarymodifica-
tions at any time.
Thismanualcannotbeinspectedbythird party,withoutwrit-
ten autorization by COEF srl.
Lesdroitsdereproductiondececataloguesontentiérement
réservés à la Société COEF srl.
Lesdescriptions etles illustrations fournies dans ce manuel
n’engagent acunement notre Société.
COEF srl. se réserve le droit d’apporter,à tout moment, les
modifications qu’elle jugera utiles.
Ce manuel ne peut être remis à des tiers sans l’autorisation
préalable de la Société COEF srl.
Pag. 2
Alle Rechte vorbehalten. Nachdruck verboten.
Die in diesem Handbuch enthaltenen Beschreibungen und
Abbildungen sind nicht verbindilich.
Die Firma COEF srl. behält sich das Recht auf Änderungen
zu jedem Zeitpunkt vor.
Diese Bedienungsanleitung darf ohne schriftliche Genehmigung der Firma COEF srl. dritten Personen nicht zugänglich
gemacht werden.
Page 3

INDICE INDEX
CONCETTO GENERALE - GENERAL CONCEPT ....................................................................................
1-DIMENSIONIEPANNELLI - DIMENSIONSandPANELS......................................................................
2-COLLEGAMENTI-CONNECTIONS.........................................................................................................
3-ACCENSIONECONSOLE-SWITCHTOPOWERON..............................................................................
4- SETUP ........................................................................................................................................................
Passo 1 Setup 1......................................................................................................................................................
•
Step 1 Setup 1 .....................................................................................................................................................
•
Passo 2 - JOYSTICK - Settaggio Joystick ........................................................................................................
•
Step 2 - JOYSTICK - Setting Joystick ............................................................................................................
•
Passo 3 - ASSIGN - Assegnazione proiettori ............ ..........................................................................................
•
Step 3 - ASSIGN - Projectors’ assignment ............. .........................................................................................
•
Passo 4 - TYPE - Tipi di proiettore ....................................................................................................................
•
Step 4 - TYPE - Projectors type setting ..........................................................................................................
•
Passo 5 - AUDIO - Configurazione audio IN ....... ...............................................................................................
•
Step 5 - AUDIO - Audio IN setting ...................................................................................................................
•
pag. 4
pag. 5
pag. 6
pag. 7
pag. 8
pag. 8
pag. 8
pag. 8
pag. 8
pag. 9
pag. 10
pag. 11
pag. 12
pag. 13
pag. 13
•
Passo 6 - RS232 - Configurazione porta RS232 ........... ....................................................................................
•
Step 6 - RS232 - RS232 port’s configuration .................................................................................................
•
Passo 7 - BEEPER - Configurazione cicalino .....................................................................................................
•
Step 7 - BEEPER - Beeper configuration .......................................................................................................
•
Passo 8 - PASSWR - Configurazione PASSWORD ...........................................................................................
•
Step 8 - PASSWR - Password setting .............................................................................................................
•
Passo 9 - FORMAT - Formattazione dell’unità .....................................................................................................
•
Step 9 - FORMAT - Resetting unit ......................................................................................................................
5-PROGRAMMAZIONE................................................................................................................................
5 - PROGRAMMING .......................................................................................................................................
6 - PROGRAMMAZIONE SEQUENCER ........................................................................................................
6 - SEQUENCER PROGRAMMING ...............................................................................................................
7 - ESECUZIONE PROGRAMMI ...................................................................................................................
7 - RUNNING PROGRAMS ..........................................................................................................................
8
pag. 13
pag. 13
pag. 14
pag. 14
pag. 14
pag. 14
pag. 15
pag. 15
pag. 16
pag. 18
pag. 17
pag. 19
pag. 20
pag. 21
pag. 22
Pag.3
Page 4

CONCETTO GENERALE GENERAL CONCEPT
Master Disco 96
Il Master Disco 96 è una console programmabile studiata per controllare apparecchiature che dispongono di ingressi
DMX: (scanners, fari cambiacolore, inseguipersone ecc.).
ConilMasterDisco96èpossibilecontrollare fino a 96 canali DMX(es:16proiettorida6canalicadauno oppure 12 proiettorida8canali). nel MasterDisco96sono memorizzati didefaulttuttii proiettori prodotti daCOEF,con assegnazione automatica dei canali.
Tutta la console viene gestita e configurata attraverso un display a matrice retroilluminato che permette una interfaccia
utentechiarae semplicissima dacomprendere.I valori daattribuireai vari canalideiproiettori sono impostabiliconrapiditàattraverso comodi sliders molto sensibili; una migliore precisione si ottiene permezzo di appositi pulsanti che incrementano o
decrementano il valore digitale, con passo di una unità su 255.
Sonomemorizzabili16programmichepossonoimpegnaretuttiiproiettorisupportatidalMasterDisco96,conunnumero
di scene per programmavarabile e non condizionante, grazie alla memoria dinamica che non viene sprecata se unprogramma contiene un numero ridotto di scene.
Iprogrammimemorizzati nel Master Disco 96 possonoessere eseguiti sincronizzandoil cambio scenaconmicrofono interno o audio esterno.
Laprotezione dei datiè salvaguardatadall'obbligodi unaPassword per leoperazioni che porterebberoalla perditatotale
o parziale dei dati memorizzati.
E’possibile, tramite collegamento con PC, il salvataggio dei programmi, della configurazione di lavoro e l’aggiornamento
della versione software.
Master Disco 96 is a programmable console studied to control units provided with DMX inputs: scanners, color-chan-
gers, follow-spots etc.
Bythe MasterDisco 96it’s possible to control up to 96 DMX channels (forex: 16projectors eachof 6channels or12 projectors each of 8 channels). In the Master Disco 96 are stored to default all the COEF projectors of the Performance line and
all the other Coef light effects, with automatic assignment of the channels.
Thewhole console is managed and configurated througha matrixdisplay that permitsan userinterface clearand easy to
understand.
The values to assign to the various projectors channels are rapidly setted by means of useful precise sliders; a greater
precisionof the value, for each channel, can be obtained bymeans of proper push-buttons whichallow the digital value to increase and decrease, at one digit step on 255.
It’spossibleto insert 16programs usingall the projectorscontrolled by theMaster Disco96, with anumber of scenesvariable thanks to the dynamic memory which is not wasted when a program contains a smaller number of scenes.
Master Disco 96 can be synchronized to internal microphone and external audio systems.
Theprotection of the data is guaranteed by PASSWORD,for those operations which can cause the total or partial loss of
data.
Bymeansof the RS232portconnecting to a personalcomputer,youcanbothupgrade the MasterDisco96 softwareand
to save the settings and programs inserted.
Pag. 4
Page 5
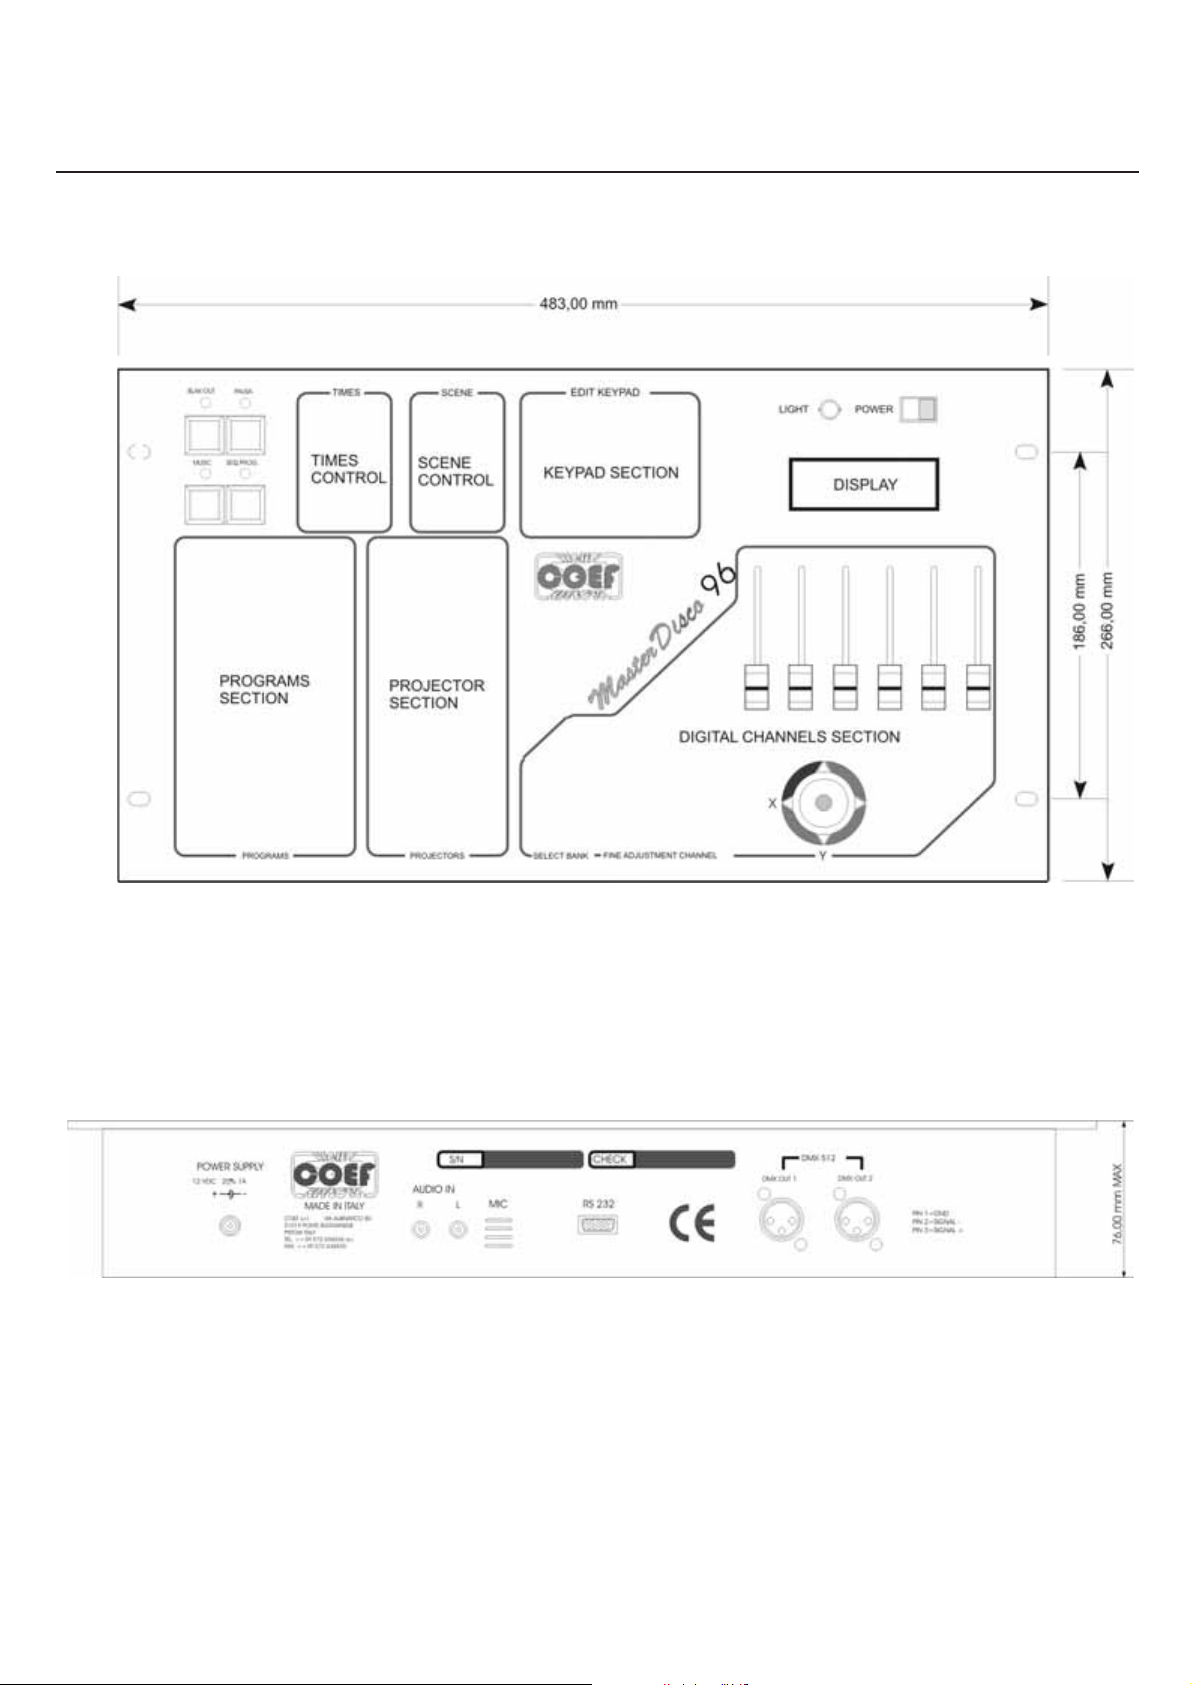
1 - DIMENSIONI E PANNELLI DIMENSIONS and PANELS
Figure 3
Figure 2
Pag.5
Page 6
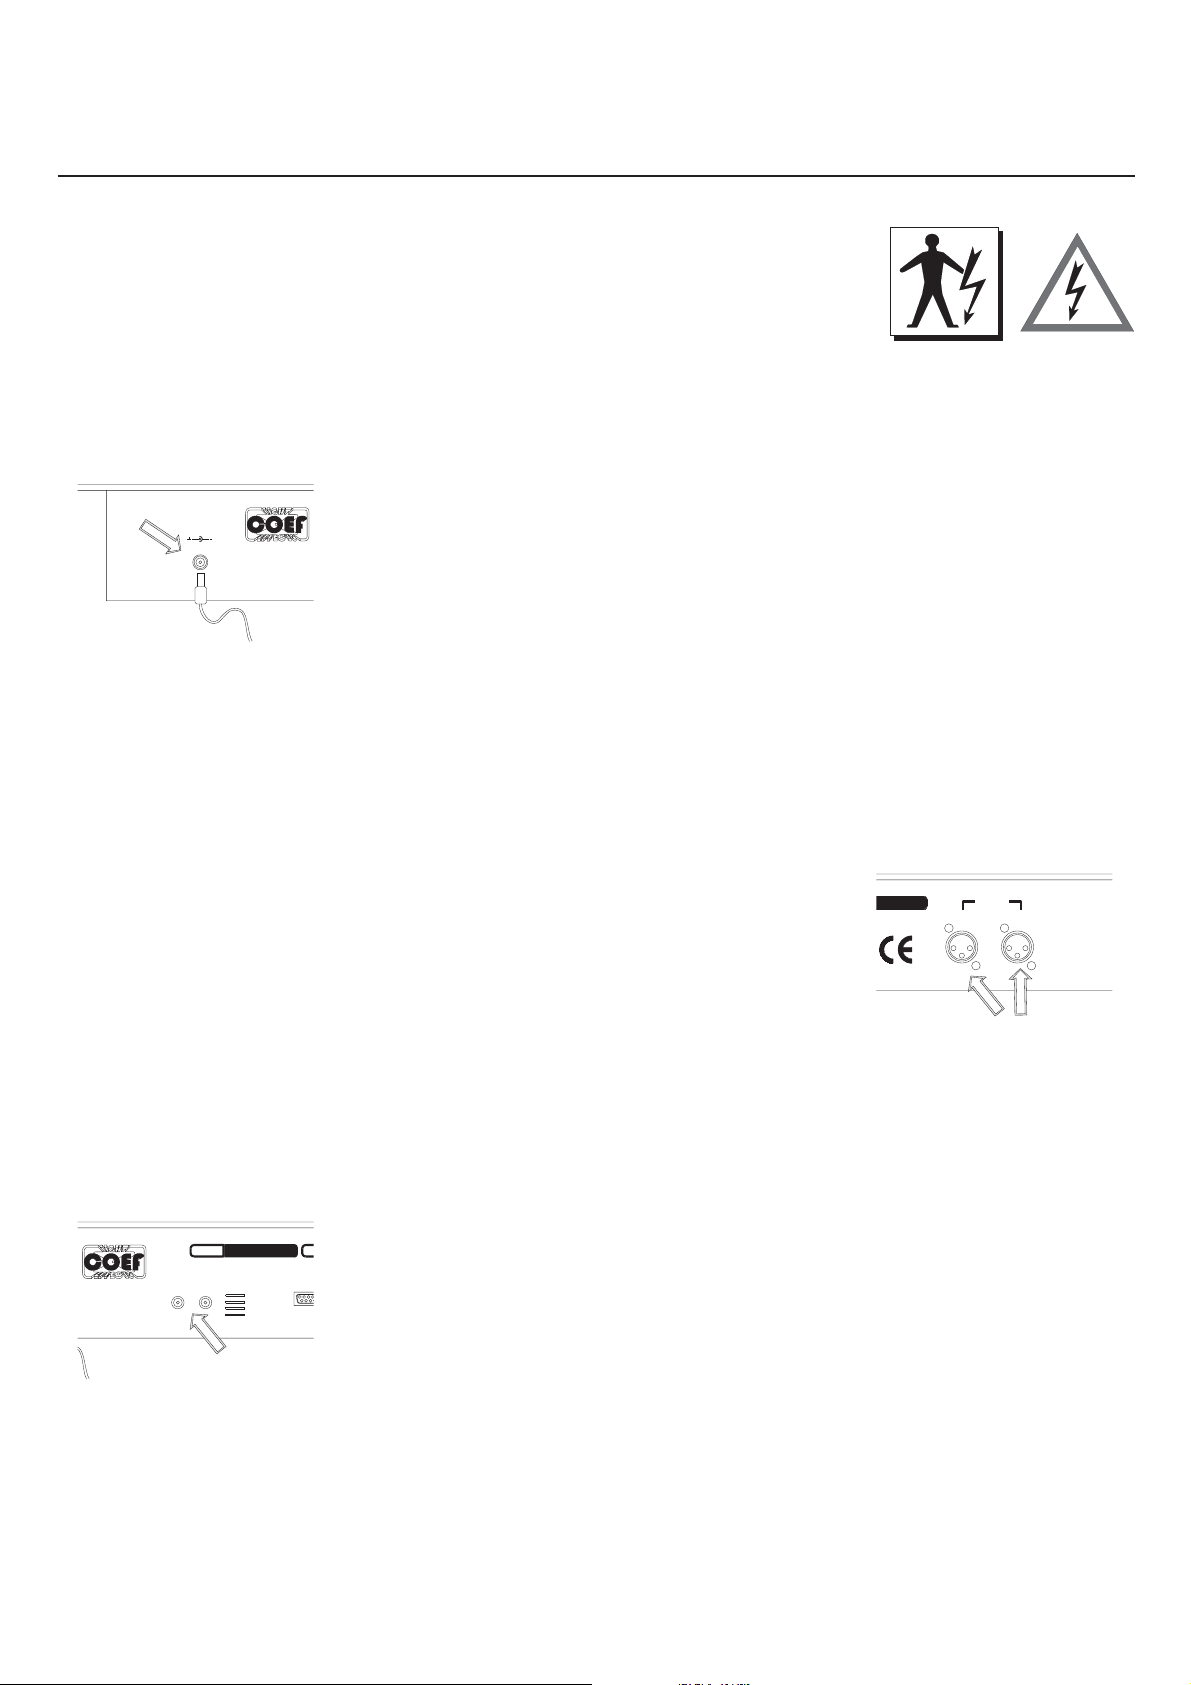
2 - COLLEGAMENTI CONNECTIONS
3
H
InserirenellapresapredispostanelpannelloposterioredelMasterDisco 96 lo
POWER
IN
POWER SUPPLY
+
12 VDC 20% 1A
-
From DC adapter
Figure 4
spinottoprovenientedall’alimentatoreacorredodell’apparecchiatura(vediFig.4).
ATTENZIONE! La tensione fornita deve essere di 12 Volts DC e 1A.
Take out the provided DC adapter and plug it into the relevant socket in the
Master Disco 96 back panel (see fig.4).
ATTENTION! The voltage furnished must be 12 Volts DC and 1A.
Collegarealleprese indicate inFig.5le apparecchiature dacontrollare,facendoattenzione chei cavied iconnettori nonpresentino corto-circuitiche potrebbero danneggiare le uscite DMX del Master Disco 96
Connectthe units tobe checked tothe outletsindicatedin Fig.5.Pay attention
that the cables and the connectors don’t present short-circuits that could damage
the DMX outputs of the Master Disco 96.
Questi ingressi permettono ilcollegamento di segnali audio provenienti da va-
rie sorgenti musicali; cd audio, mixer, registratori a nastro ecc.
S/N C
AUDIO IN
MIC RS 2
RL
These inputs allow the connection to audio signals coming from various music
Audio IN
Figure 6
sources: cd-audio, mixer, tape-player, etc.
DMX OUT 1
Figure 5
DMX 512
DMX OUT 2
DMX Out
PIN 1=GND
PIN 2=SIGNAL PIN 3=SIGNAL +
Pag. 6
Page 7
3 - ACCENSIONE DELLA CONSOLE SWITCH TO POWER ON
InserirenellarelativapresaBNClalampadaflessibile(l’accessorioèunoptional,nonèfondamentaleperilfunzionamento
della console, e deve essere acquistato a parte). Accendere il Master Disco 96 tramite l’interruttore presente sul pannello
frontalesopra il display a matrice. L’apparecchiatura provvederà ad effettuare un check funzionale e sul display sarà indicata
per qualche secondo la versione del software attualmente installato.
Plug the flexiblelamp in the relevant BNCsocket (this lamp is an optional, not essential to theconsole working: it’s
not provided with the console). Switch the Master Disco 96 on by means of the switch on the front panel above the matrix
display. The unit will make a functional check and the actually installed softwareversion will appear for some seconds on the
display.
Ceck...
Revision x.xx
Figure 7
COEF
Master Disco 96
[PROGRAM] SETUP SEQ.
Figure 9
Figure 8
Le indicazioni che il display mostrerà saranno:
[PROGRAM] = Programmazione di uno dei 16 programmi disponibili
SETUP = Settaggio dei parametri di funzionamento della console
SEQ. = Programmazione del SEQUENCER per l’esecuzione automatica dei programmi.
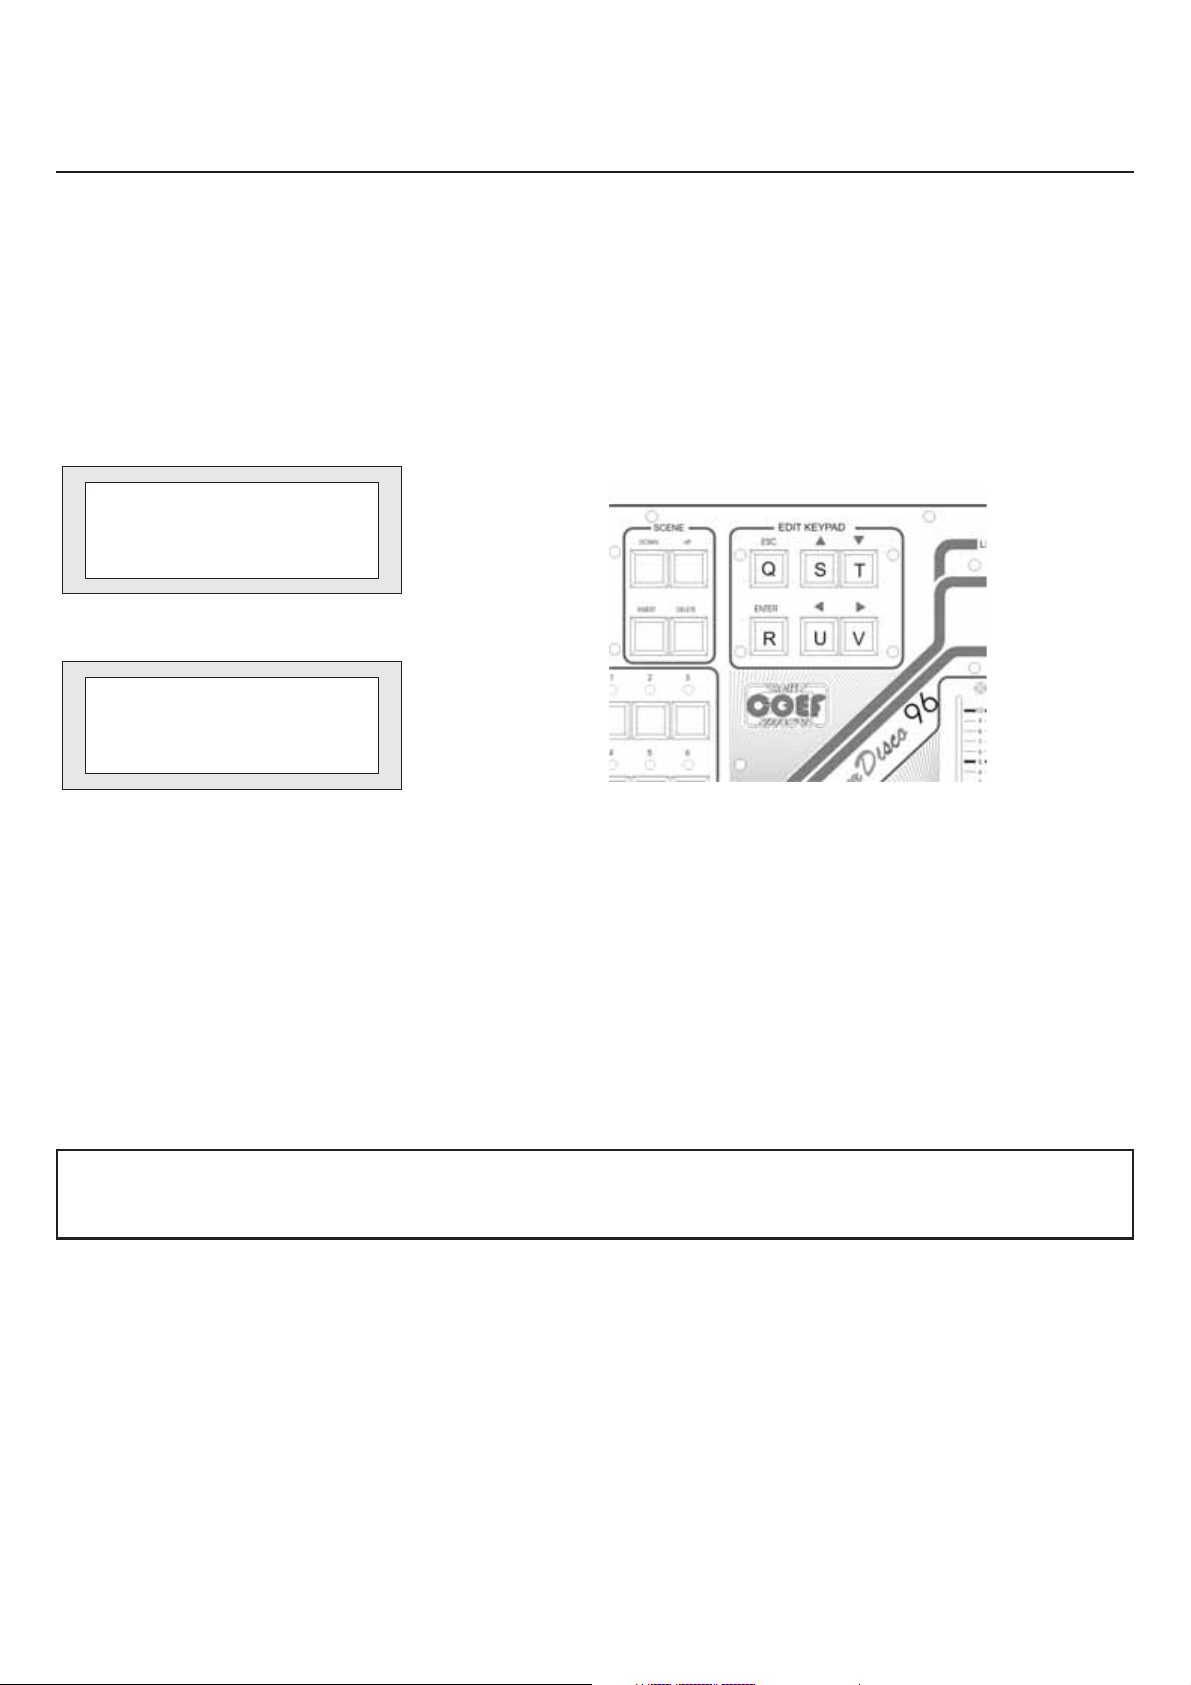
Tutte le impostazioni e le scelte si effettueranno attraverso i pulsanti della sezione EDIT KEYPAD (vedi fig.9).
Il tasto ENTER confermerà la scelta o la selezione, il tasto ESC annullerà ogni selezione e riporterà le indicazioni del Displaynellostatoprecedente.Laprimafaseall’accensionedelMasterDisco96saràquelladelsettaggiodeiproiettoricollegati alla console e della impostazione dei parametri di funzionamento; con il tasto freccia destra (part. V fig.9) porteremo la
selezione(ledueparentesiquadrelampeggianti)sulla parola SETUP; premere ENTER (part.Rfig.9)edentriamonella sezionedi SETUP.Seal Master Disco 96 (dopo laprima accensione) èstataassegnata una PASSWORDdiingresso allefunzioni
di programmazione, inserire la PASSWORD alla richiesta.
LaPASSWORDimpostatain fabbrica è: 1-2-3-4 da digitareconipulsantidellasezionePROGRAMS(fig.13pag.9)
ThedefaultPASSWORDis:1-2-3-4; youcaninsertitusingthePROGRAMSsectionpush-buttons(fig.13pag.9)
The display will show the following indications:
[PROGRAM] = the programming of one of the 16 available programs
SETUP = setting of the operating parameters of the console
SEQ. = the SEQUENCER programming for the automatic execution of programs.
Allthesettingswill be made bymeansofthe EDIT KEYPADsectionpush-buttons(seefig.9). The ENTER push-buttonwill
confirm the selection or the choice, the ESC push-button will cancel each selection and will restore the Display indications as
before. The first stage, after switching on the Master Disco 96, will be the setting of the projectors connected to the console
andthefunctioningparameterssetting; by means oftheright-arrowpush-button (part. V, fig9),youwillselect ( movingthetwo
flashingsquarebrackets)the word SETUP; pressENTER(part.R, fig.9) and entertheSETUPsection.Ifatthe time ofthefirst
switching you have assigned a PASSWORDto the Master Disco 96 to entry the programming functions, you must enter the
PASSWORD as requested.
Pag.7
Page 8

4 - SETUP SETUP
Selezioniamo con il tasto “V” (fig. 9 pag.7) la sezione [SETUP] e confermiamo con ENTER (tasto R).
Questafase è di estremaimportanza, affinchè il funzionamentodel parcoproiettori collegatoalla console,funzioni in maniera corretta, permettendo impostazioni veloci e sicure.
Il display mostrerà un nuovo menu (vedi Fig. 10); analizziamolo in dettaglio:
JOY:
ASSIGN:
TYPE:
SETUP2:
* SETUP/1 *
[JOY] ASSIGN TYPE
SETUP2 ----- -----
Figure 10
JOY:
ASSIGN:
TYPE:
SETUP2:
Assegnazione della modalità di funzionamento del JOYSTICK
Assegnazione del tipo di proiettore ad ogni pulsante della sezione PROJECTORS.
Configurazione di proiettori aggiuntivi.
Passaggio alla sezione [SETUP2]
JOYSTICK setting
Assignment of the type of the projector to each push-button of the PROJECTORS section
Projectors and their channels configuration.
Go to [SETUP2] section
By “V” push-button (fig.9pag.7) select [SETUP] section and confirm by EN-
TER (push-button R).
This stage is extremely important so that the functioning of the projectors
group connected to the console flew correctly, allowing fast and accurate settings. The display will show a new menu (see fig. 10); let’s see it in details:
•
Passo 2 - Settaggio JOYSTICK
•
Step 2 - Setting JOYSTICK
PremendoENTER (part. R fig.9)con la parola[JOY] evidenziata tra icursori
***** JOYSTICK *****
Status:SPEED HIGH
SPEED LOW
Figure 11
PushingENTER (part.R, fig. 9) withthe word[JOY] betweenflashing brackets,the display (see fig. 11)willgive youother
indications and requests.
By means of the S and T buttonsyou will select the type of velocity forthe JOYSTICK (rangedigital value 0-255 fast or
slow).
Pressing ESC you will exit from “JOY” (part. Q, fig.9).
Pag. 8
lampeggianti, il diplay (fig. 11) ci fornirà altre indicazioni.
Selezioniamo per mezzo dei pulsanti S e T la velocità del Joystick (range 0-
255 digitale veloce o lento).
Uscire dalla funzione e memorizzare per mezzo del pulsante ESC.
Page 9

Passo 3 - ASSIGN - Assegnazione proiettori
•
*PROJECTORS ASSIGN.*
Projector DMX:StÈ Len
Empty ---È ---
Channel Used:0
Figure 12
Figure 13
Lafase diassegnazione deiproiettori è assolutamente necessaria
peril funzionamentodel Master Disco 96. Non sarà
possibilecostruirealcunprogramma,senonavremoassociatoaipulsantiPROJECTORS(part.Bfig.13) un tipo di proiettore.
Si accede atale funzione selezionando la parola [ASSIGN] e premendo ENTER (part. R fig.14).
Appena entrati in questa fase, lampeggerà il led luminoso della sezione PROJECTORS (fig.13) riferito al numero 1 dei
proiettori disponibili. Con i pulsanti S e T (vedi fig.14) sceglieremo il tipo di proiettore da abbinare al numero selezionato; la
scelta,senonabbiamocreatoaltritipidi proiettore con lafunzione[TYPE](vediPasso4)
,èlimitataatuttalaseriedeiproiettori
COEF e sarà mostrata sul display che riporterà anche informazioni relative a:
- canale di partenza DMX del proiettore “DMX St”
- numero di canali occupati dal proiettore “DMX Len”
- numero di canali totali usati nel Master Disco 96 “Channels Used:”
Continuare l’assegnazione dei proiettori installati, premendo il pulsante relativo al proiettore stesso (part. B fig.13) e ripetendo ciò che è stato esposto poche righe prima.
Usciamo dalla funzione ASSIGN premendo il tasto ESC (part.Q fig.13).
CH
2
3
5
6
8
Figure 14
PROIETTORICOEFDIVISIPERNUMERODICANALI
CDisco SC
CDisco AL
Color Fr
Col Show
PERF I
PERF II
PERF III
PERF IV
PERF 200
200Disco
250RG
250Show
1k2 Disco
MP 250
MP 250 Fr
= Color Disco Scarica
= Color Disco Alogeno
= Color Fresnel
= Color Show
= Performance 1
= Performance 2
= Performance 3
= Performance 4
= Performance 200
= Performance 200 Disco
= Performance 250 RG
= Performance 250 Show
= Performance 1200 Disco
= MP-250 Optic
= MP-250 Fresnel
Pag.9
Page 10

Step 3 - ASSIGN - Projectors’ assignment
•
*PROJECTORS ASSIGN.*
Projector DMX:StÈ Len
Empty ---È ---
Channel Used:0
Figure 15
Figure 16
After pushing ENTER (part. R, fig. 17) with the word [ASSIGN] between flashing brackets, the display willgive you other
indications and requests.
This stage is absolutely necessary to the Master Disco 96 functioning becauseit will be impossible to ‘edit’any program
till one projectors set will be at disposal.
As soon as you enter this stage, the led of the PROJECTORS section, relevant to the n1 of the available projectors, will
flash (fig. 16).
Bymeansofthe S and Tbuttonsyouwill select the typeofprojectorto link to theselectednumber; ifyou have not yetdone
thestep 4[TYPE] thechoice, is limited to the whole series of COEF projectors, that will appear on the display together with informations about:
- DMX starting channel of the projector “DMX St”
- number of channels occuped by the projector “DMX Len”
- total number of the channels used in Master Disco 96 “Channels Used:”
Continueto assign the installed projectors by pushing the button relevant to each projector (part.B, fig.16) and repeating
the operations explained above.
Pressing ESC you will exit from “ASSIGN” (part. Q, fig. 17).
Pag. 10
Figure 17
CH
2
3
5
6
8
PROJECTORS COEF by NUMBER OF CHANNELS
CDisco SC
CDisco AL
Color Fr
Col Show
PERF I
PERF II
PERF III
PERF IV
PERF 200
200Disco
250RG
250Show
1k2 Disco
MP 250
MP 250 Fr
= Color Disco Scarica
= Color Disco Alogeno
= Color Fresnel
= Color Show
= Performance 1
= Performance 2
= Performance 3
= Performance 4
= Performance 200
= Performance 200 Disco
= Performance 250 RG
= Performance 250 Show
= Performance 1200 Disco
= MP-250 Optic
= MP-250 Fresnel
Page 11

Passo 4 - TYPE - Tipi di proiettore
•
* SETUP/1 *
JOY ASSIGN [TYPE]
SETUP2 ----- -----
Figure 18
[N:1 ]Name:Type 01
ChPrj:1 ChMS96:-Interpolation:--Shutter Value:---
Figure 19
Selezionando[TYPE]unnuovomenu (Fig. 19) ciindicheràiltipodi proiettore che ciapprestiamoaconfigurare.Possiamo
configurare sino a 10 tipi di proiettore differenti; tale scelta si effettua tramite i pulsanti S e T.
Determinato il numero del proiettore da configurare, per mezzo dei pulsanti U e V sceglieremo cosa variare della confi-
gurazione:
[Name:Type xx]
[ChPrj:x]
[ChMS96]
[Interpolation:XX]
[Shutter Value:---]
= Nome da attribuire al proiettore
= Canale fisico del proiettore in edit
= Canale assegnato al Master Disco 96
= Interpolazione o meno del canale
= Valore digitale dell’otturatore chiuso attribuito al canale selezionato
“Name:Typexxx”:8caratteriadisposizioneperattribuireun nome univoco al proiettore. Selezionarelaletteradamodifi-
care tramite i pulsanti S e T e modificarla per mezzo dei pulsanti Y e Z.
”ChPrj: (valore)”: viene impostato il numero delcanale del proiettore selezionato.Sono controllabili proiettori finoa 20
canali. Selezionare tramite i pulsanti S e T il numero del canale.
”ChMS96: (--- / valore)”: viene impostato il numero del canale (cursore / joystick) della consolle con cui controlleremo il
canale X del proiettore selezionato. Selezionare tramite i pulsanti S e T il numero del canale.
“Interpolation:(YES/ NO)”: si riferiscealla possibilità diimpostarequeldeterminato canale inmodo diretto
do dei valori digitali da una scena all’altra) o in modo interpolato
(possibilità di eseguire il range dei valori da una scena ad
(cambiorapi-
un’altra in modo regolato dal tempo di CROSS).
“Shutter Value : (---/valore)”: Valoredigitale0-255 corrispondente all’otturatore chiuso o allo spegnimento della lampa-
da. Selezionare tramite i pulsanti S e T il valore digitale da attribuire.
Proseguire fino alla configurazione totale di tutti i canali di quel tipo di proiettore.
Premereilpulsante(ESC)dopoaverterminatolaconfigurazionedeitipidi proiettori in possesso. Si ritorna almenuprece
dente.
Pag.11
-
Page 12

Step 4 - TYPE - Projectors type setting
•
* SETUP/1 *
JOY ASSIGN [TYPE]
SETUP2 ----- -----
Figure 20
[N:1 ]Name:Type 01
ChPrj:1 ChMS96:-Interpolation:--Shutter Value:---
Figure 21
Selecting [TYPE] a new menu(Fig. 21) willshow you the type of projector to be configurated. Youcan configure up to 10
types of different projectors; this choice is possible by means of S e T button.
Once selected the number of the configutating projector, by means of the U and V push-buttons you choose what is to
change in the configuration:
[Name:Type xx]
[ChPrj:x]
[ChMS96]
[Interpolation:XX]
[ShutterValue:---]
= Name for the projector
= Channel of the projector in edit
= Channel assigned to Master Disco 96
= Channel interpolation or not
= Digital value of the closed shutter for the selected channel
“Name:Typexxx” : you have 8 letters available to name the projector. Select the letter to be modified by means of S e T
buttons and modify it by means of Y e Z (Down & UP digital channels section).
”ChPrj:(value)”: you setthe channelnumber of theselected projector.Youcan control projectors upto 20 channels. Se-
lect the number of the channel by means of the S e T push-buttons.
”ChMS96:(---/ value)”: you setthenumber of thechannel(slider / joystick) oftheconsole controlling theXchannel of the
selected projector.Select the number of the channel by means of the S e T push-buttons.
“Interpolation: (YES/ NO)”: it means that each channel can be setted either Direct
fromone scene tothe other)or Intepolated
(thevalues range betweenone sceneand the otherwill beexecuted regulated by
(quick change of the digital values
the CROSS time).
“Shutter Value : (---/value)”: 0-255 digital value. Corresponding to the closed shutter or to the lamp switching off. Select
the digital value by means of the S e T push-buttons.
Continueupto the totalconfigurationof all channelsforeach type ofprojector.Pressthe push-button ESCwhenthe confi-
guration of all type of projector is done.Then return to the previous menu.
Pag. 12
Page 13

Passo 5 - AUDIO - Configurazione Audio IN
•
Step 5 - AUDIO - Audio IN Setting
•
*SETUP/2*
[AUDIO] RS232 ----BEEPER PASSW FORM.
Figure 22
****** AUDIO ******
Input:MIC
Input:LINEA
Figure 24
Figure 23
Passare alla sezione SETUP2 come precedentemente indicato.
Selezionare con i pulsanti U e V (fig.23) la parola [AUDIO] e premere ENTER .
Inquesto modoavremo la possibilità di determinare il tipo di sorgenteAUDIO chepiloterà il cambio scena automatico del
programmainesecuzione.Sceglieretral’ingressomicrofonicoel’ingressoPINRCAconitastiSeT nellasezione EDIT KEY-
PAD (fig.23).
Premere ESC per uscire dalla funzione.
Go to SETUP2 function.
Select by means of the U and V push-buttons (fig. 23) the word [AUDIO] and press ENTER.
Inthis way you will havethe possibilityto select the kind ofAUDIO sourcethat will pilot the automaticchanging ofthe scene of the program in execution. Choose between the microphone input and the PIN RCAone by means of the S and T pushbuttons in the EDIT KEYPAD section (fig. 23). Push ESC to exit the function.
•
Passo 6 - RS232 - Configurazione porta RS232
•
Step 6 - RS232 - RS232 port configuration
Selezionare con i pulsanti U e V (fig.23) laparola [RS232] e premere EN-
TER .
In questo modo avremo la possibilità di stabilire se rendere attiva o disattivare la porta RS232 con i tasti S e T (fig.23). Il nuovo software permette ora il
salvataggio ed il recupero dei programmi attraverso il collegamento al Perso-
****** RS232 ******
nal Computer per mezzo della porta RS232.
Premere ESC per uscire dalla funzione.
Status:DISABLED
Status:ENABLED
Select by means of the U and V push-buttons (fig. 23) the word [RS232]
Figure 25
andpushENTER. In this wayyouwill have thepossibilityto decide to enableor
disabletheRS232port by means oftheS and T push-buttons (fig.23).Withthe
new software release, you can save and load the MasterDisco96 programs
and configuration by means of the RS232 port and the Personal Computer.
Press ESC to exit from the function.
Pag.13
Page 14

Passo 7 - BEEPER - Configurazione cicalino interno
•
Step 7 - BEEPER - BEEPER setting
•
Selezionare con i pulsanti U e V (fig.23) la parola [BEEPER] e premere EN
****** BEEPER ******
Status:ON
Status:OFF
Figure 26
Passo 8 - PASSWR - Impostazione PASSWORD
•
Step 8 - PASSWR - PASSWORD setting
•
Selezionarecon i pulsantiU e V (fig.18) la parola[PASSW]epremereENTER . Comemostrato dalla fig.27il displaychiederàdi immettere 4numeri con ipulsanti della sezione PROGRAMS (part.Afig.29).Automaticamente il sistemachiederà poi
laripetizionedella PASSWORDinseritaperverificarnela correttezza; undoppioBEEPconfermerà l’avvenuta memorizzazione.ATTENZIONE!
cherete il sistema.
E’importantenongenerare passwordcasualiche nonsarà possibile ricordare, perchè difficilmentesbloc-
TER .
Inquestomodoavremolapossibilità di determinare se rendereattivoodisattivareil BEEPalla pressione di ogni pulsante. Effettuarela sceltacon i tasti S e T
nella sezione EDIT KEYPAD (fig.23).
Premere ESC per uscire dalla funzione.
Select by means of the U and V push-buttons(fig. 23) the word [BEEPER]
andpressENTER.Inthiswayyouwillhavethepossibilitytoenableordisablethe
BEEPpressinganypush-button. Choose bymeansof the Sand T buttonsonthe
EDIT KEYPAD section (fig. 23). Press ESC to exit from the function.
-
Select by means of the U and V push-buttons the word [PASSW]and press ENTER. As shown in fig. 27, the display will
ask you to set 4 numbers by means of the PROGRAMS section push-buttons (part. A, fig. 29). Automatically the system will
askyou to repeattheinserted PASSWORDtoverify its correctness;a double BEEPwillconfirmit’smemorized. ATTENTION!
It’simportant: don’t generate casual passwords because you could forget them, so you could hardly be able to unlock the system!
* PASSWORD MODIFY *
New Password:
Figure 27
* PASSWORD VERIFY *
Repeat Password:
Figure 28
Figure 29
Pag. 14
Page 15

Passo 9 - FORMAT - Formattazione e reset console
•
Step 9 - FORMAT - Format and reset console
•
!!!!!! FORMAT !!!!!!
Attention, all data
will be delete!
Press DEL. to start
Figure 30
ATTENZIONE! Con questa funzione verranno azzerate tutte le impostazioni effettuate sulla console e saranno anche
cancellati tutti programmi memorizzati. E’ dunque una funzione da utilizzare solo in caso di estrema necessità e con estrema
attenzione.
ATTENTION!
used only when strictly necessary and very carefully.
This function will clear all the settings of the console and all thememorized programs. It’s a function to be
Pag.15
Page 16

5 - PROGRAMMAZIONE
COEF
Master Disco 96
[PROGRAM] SETUP SEQ.
Premere ENTER per entrare nella fase di preparazione di un programma.
Immetterela PASSWORDpersonale se questaè stataconfigurata(vedi capi-
tolo SETUP paragrafo relativo).
Come richiede il display (fig.32) selezionare uno dei 16 programmi (pulsanti
part. A fig. 34) ed osserviamo le indicazioni presentate dal display (fig. 33).
Figure 31
PROGRAMMING
Select Program
to Edit
Figure 32
Scene: 1/1 TS:1.0
MemUsed: 0% TC:1.0
[START] END
COPYprg DELETEprg
Figure 33
Scene: 1/1-ilprimonumero indica lascenaincuici troviamo; ilsecondoindi-
ca il totale delle scene già programmate.
TS: 1.0 - Valoreespressoinsecondi relativo altempo di STAND(tempo di
permanenza della scena prima di un cambio scena) Valore minimo 0.1 Valore
MAX 9.9.
TC: 1.0 - Valoreespressoin secondi relativo al tempodi CROSS(tempo di
spostamento degli assi dello specchio; canali X e Y del proiettore).
[START] - Permette di raggiungere rapidamente la prima scena del programma.
[END] - Permettedi raggiungere rapidamentel’ultimascenadel programma.
[COPYprg] - Copiailcontenutodelprogramma in EDITinun’altro programma (Destination?).
[DELETEprg] - Cancella il programma in EDIT
Quando si entra nella programmazione di un programma è indispensabile,
come prima azione, selezionare il o i proiettori che vogliamo inserire nella scena,
permezzo deipulsanti B (fig. 34);il lampeggiodei relativi LEDS ci indicherà quelli
selezionati. Controllare il o i proiettori per mezzo dei cursori J e del Joystick (per
controllareproiettoriconpiù di 6 canalicambiareilbanco dei canaliconiltastoW);
impostare i tempi di STAND ediCROSS con i relativi pulsanti della sezione TI-
MES (part. G-H-I-L fig. 40)e quindipremere INSERT (part.O fig.40)per passare
allascena successiva. E’ possibile ritornare sullascena volutaper mezzo dei pulsanti M ed N per poter correggere il valore dei canali dei proiettori impiegati nella
scena;ilproiettore dovrà essere selezionato(lampeggiodel LED relativo)ecorrezionedeivaloricongli slider ed iljoystick.E’possibilenotarecheogniminimo spostamento dei cursori attiva il canale, evidenziando sul display, il valore digitale
inserito nelle due parentesi quadre []lampeggianti. Per una regolazione fine del
valore, una volta attivato il canale di interesse, usare i pulsanti Y e Z predisposti
perlaregolazione con incrementio decrementi diun digit perpressione. Il pulsante X provvede ad attivare rapidamente icanaliXeYdelJoystick evitandodi toccarlo fisicamente, rischiando lo spostamento di posizione anche se minimo.
Pag. 16
Figure 34
Figure 35
Page 17

Lamemoriadel Master Disco96 è ditipo dinamico esi adatta quindi automa
ticamentead ogninuovo inserimentodi scenanel programmaa secondadel numero di proiettori (e dunque dei canali impiegati) che vengono inseriti in ogni
scena del programma in EDIT.
L’indicatore della percentuale di memoria in uso è sempre presente nel displaymentreviene preparato unprogramma (MemUsed: %fig.33);quando questa percentuale raggiunge il 99%, un nuovo messaggio (fig.36) chiederà di
rimuovere alcuni proiettori dalla scena o la scena stessa affinchè il programma
possa essere memorizzato senza alcun problema.
Quandovogliamoutilizzareunprogrammagiàdefinitoapportandomodifiche
nellescene,possiamocopiarneilcontenutoinun’altroprogrammachesuccessivamente modificheremo a nostropiacimento; selezioniamocon itasti freccia la
parola [COPYprg]e premiamo ENTER; il display (fig.37) ci chiederà di fornire il
numero del programma destinazione;tale sceltadeve essere effettuata tramite i
pulsantiS e T(fig.39) e confermatacon ENTER. PremereESC per annullarel’operazione.
Quando vogliamo azzerare completamente un programma per comodità di
EDIToperrecuperarespazionellamemoria,possiamousarelafunzione[DELETEprg] (fig. 38) che sarà confermata dalla pressione del tasto DELETE (part. P
fig. 40) oppure annullata da ESC.
-
** Out of Memory! **
Remove Projectors or
Scene and try again
ESC to continue
Figure 36
*** COPY PROGRAM ***
Destination?:1
Press ENTER to start
or ESC to abort
Figure 37
* DELETED PROGRAM *
Press DEL. to start
or ESC to abort
Figure 38
Figure 39
6 - PROGRAMMAZIONE SEQUENCER
Entrando nella funzione [SEQ.] potremo inserire fino a 18 programmi che il
[--] -- -- -- -- --
-- -- -- -- -- --
-- -- -- -- -- --
Sequencer Prog.ing
Figure 41
Pag.17
Master Disco 96 eseguirà in modoautomatico e consequenziale.E’ sufficiente
selezionare i programmi dalla sezione PROGRAMS per inserirli oppure premere DELETE per cancellare l’inserimento. Si può inserire ripetitivamente anche il
solito programma. Per correggere eventuali errori di impostazione o di sequenza, usare i tasti freccia S-T-U-V (fig. 34) ed immettere il nuovo numerodel programma oppure premere DELETE per eliminare quello non voluto.
Premere ESC per uscire e memorizzare.
Figure 40
Page 18

5 - PROGRAMMING
COEF
Master Disco 96
[PROGRAM] SETUP SEQ.
Push ENTER in order to enter the stage of program preparation.
Insert the personal PASSWORDin case you have saved your own one (
see chapter SET-UP ).
Thedisplay will ask you to select oneof the 16 programs (see fig. 45 part
A) and after that it will show the following instructions (see fig. 44) :
Figure 42
PROGRAMMING
Select Program
to Edit
Figure 43
Scene: 1/1 TS:1.0
MemUsed: 0% TC:1.0
[START] END
COPYprg DELETEprg
Figure 44
Scene1/1 - the first numberindicates the scene you arein atthe moment
and the second number indicates the total scenes already programmed.
TS : 1.0 - indicates the STANDtime value expressed in seconds (standingtime of a scene before the scene change). Minimumvalue 0.1Maximum
value 9.9.
TC : 1.0 - indicates the CROSS time value expressed in seconds (moving time of the mirror axis; X and Y channels)
[START] - allows you to go immediately to the first scene of the program
[END] -allowsyoutogoimmediatelytothelastsceneoftheprogram
[COPYprg]-copy the program you areediting intoanother program(De-
stination?)
[DELETE prg] - cancel the program you are editing
The first step to takewhen you enter in the programming stage of a program is to select the projector or projectors (push-buttons B fig 45) that you
want to insert inthe scene;the selectedprojectors leds will be flashing. You
can control the selected projectors by means of sliders J and Joystick (to
control the projector which have more channels, press the push-buttonW to
changechannelbank);settheSTANDand CROSStimesbymeansoftherelevantpush-buttons inthe TIMES section (part. G-H-I-L fig 51)than pressIN-
SERT (part. O fig 51) to skip to the next scene. It is possible to go back to the
requested scene by means of push-buttons M and N and to change the projectors channels values; the projector must be selected (the relevant led flashing) and to proceed to the values changing using the sliders and joystick.
Youwillnotice that any small movement of the slider will activate the channel
and you will see on the display the digital value inserted. In order to make a
fineadjustment ofthe value,once youhave activatedthe requestedchannel,
you can use the push-buttons Y and Z that will make adjustments of one digit
by one digit. The X push-button will quicklyactivate the X and Y channels of
the joystick without having to touch it and this will avoid any possible movement from the setted position.
Pag. 18
Figure 45
Figure 46
Page 19

MASTERDISCO 96 memory is dynamicand it isautomatically adapting to
eachnewsceneinsertioninthe program, following the numberofprojectors(therefore following the number of channels used) that are inserted in each scene of
the program you are editing.
On the display you constantly have the indicator of the memory used while
youare preparinga program (MemUsed: % see fig.44); whenthis memoryreaches99%youwillhave a message onthedisplaysayingthat you have toremove
some projectors from the scene or the scene itself in order to properly save the
program.
Whenyou wantto use an already existing program just making some modificationsto the scenes,you canrecall this programand copy itscontent in another
program, to be then modified asyou like. Selectfrom the displaythe word [CO-
PYprg] by means of the arrow-push-buttons andpush ENTER; the display (fig.
32)willaskyoutogivethe destination program number; theprogramnumbercan
beinsertedbymeansofpush-buttonsSandT(fig.50)andconfirmedbypressing
ENTER. Press ESC in order to delete the operation.
Ifyouwishto delete acompleteprogram in order torecovermemory capacity
orforyourownconvenience,youcanusethefunction[DELETEprg] (fig.49)that
has to be confirmed by pressing the push-button DELETE (fig. 51 part. P) or that
can be cancelled with ESC.
** Out of Memory! **
Remove Projectors or
Scene and try again
ESC to continue
Figure 47
*** COPY PROGRAM ***
Destination?:1
Press ENTER to start
or ESC to abort
Figure 48
* DELETED PROGRAM *
Press DEL. to start
or ESC to abort
Figure 49
Figure 50
6 - SEQUENCER PROGRAMMING
[--] -- -- -- -- --
-- -- -- -- -- --
-- -- -- -- -- --
Sequencer Prog.ing
Figure 52
Pag.19
Figure 51
Enteringinfunction [SEQ.]youwillhavethepossibilitytoinsert up to 18 programs number and Master Disco 96 will automaticallyexecute themfollowing
thesequenceyouhavegiven.Theprogramsnumbersareinserted by simply selecting them and they arecancelled by pressing DELETE. You can also insert
the same program repeatedly. In order to modify the sequence settings you can
use the arrow-push-buttons S-T-U-V (fig. 50) and insert the new number or to
press DELETE in order to cancel the undesired ones.
Press ESC to exit.
Page 20

7 - ESECUZIONE PROGRAMMI
Unavolta memorizzati tutti iprogrammi eduscendo dalla fase di programmazione, basterà selezionare uno deiprogram
mi (1-16) per portarlo in esecuzione.
In questa modalità sono disponibili alcune funzioni:
a) - Cambio della scena con tempo di STAND impostato o con impulso musicale (MIC interno o LINE (vedi SETUP)).
b) - Black-OUT temporaneo del programma (chiusura degli otturatori di tutti proiettori).
c) - STOP temporaneo del programma (proiettori fermi nelle funzioni ma con otturatore aperto).
d) - Impiego manuale di alcuni proiettori anche se usati nel programma.
FUNZIONE a)
E’possibileregolareconun coefficiente generaleKTS (tempo diSTAND) oKTC(tempodi CROSS) l’esecuzionedelprogrammaper mezzo dei pulsanti inseriti nella sezione TIMES (part.G-H-I-L fig.53) oppure stabilire ilcambio scena attraverso
impulsimusicali abilitandoil pulsanteMUSIC (part.E fig. 53). La scelta della sorgente musicale (MIC - LINE)deve essereimpostata in fase di SETUP. Ripremere il pulsante per riportare il controllo delle scene alla funzione “tempo”.
FUNZIONE b)
Premereil pulsante BLACK-OUT(part.C fig.53) per bloccarela scena inesecuzione interrompendo ancheil fascio luminoso dei proiettori. Ripremere il solito pulsante per riavviare il programma.
FUNZIONE c)
Premere il pulsante PAUSA (part. D fig. 53) per fermare temporaneamente l’esecuzione del programma mantenendo
aperti gli otturatori dei proiettori.
FUNZIONE d)
Mentre un programma è in esecuzione, è possibile selezionare uno o più proiettori per ottenerne un controllo manuale
completo. I proiettori che risultano inseriti nel programma (veloce lampeggio dei relativi LEDS) saranno sganciati dal programmastesso (lentolampeggio deirelativi LEDS)e potrannoessere controlati manualmente nelle loro funzioni. Ripremendo il pulsante relativo al proiettore, questo ritornerà al controllo assoluto del programma.
-
Progr. 1 KTS:1.0
Sc: 1/1 KTC:1.0
Program Running
Figure 54
Progr. 1 KTS:1.0
Sc: 1/1 KTC:1.0
Figure 53
[087] 105 000 X:000
000 --- --- Y:124
Figure 55
Per mandare in esecuzione i programmi pre-ordinati con la funzione SEQUENCER, premere il pulsante SEQ. PROG.
(part.F fig. 53). I programmi verranno eseguiti nell’ordine stabilito al momento della programmazione del SEQUENCER. Per
interrompere l’esecuzione è sufficiente ripremere lo stesso pulsante.
Pag. 20
Page 21

7 - RUN PROGRAMS
To send one program in execution you have to exit the programming stage and to push the relevant push-button (1-16).
In this stage you also have the following functions available :
a) scene changing by a given STAND time or by musical impulse (internal MIC or on LINE - see SETUP).
b) temporary black-out of the program (shutter closing of all projectors)
c) temporary STOP of the programs (projectors stopped with open shutter)
d) manual use of some projectors even if they are used in the program
Function a)
Itis possibleto seta generaltime coefficientcalled KTS (STANDtime) orKTC (CROSStime) toadjust theprogram execution by means of the push-buttons inserted in the TIMESsection (part. G-H-I-L fig.56). It is also possible to set the scene
changeby musical impulseenabling the MUSIC push-button (part E fig. 56). Thechoice of themusical sourcemust be setted
in the SETUP stage. Press the push-button again to go back to the “time” function.
Function b)
Bypressingthe BLACK-OUT push-button(part.C fig. 56) youwillstop the sceneinexecution and theshutterswill be clo-
sed. Press the button again to restart the program.
Function c)
Bypressingthe PAUSApush-button(part D Fig.56) you willtemporarystop the executionof the programbut keeping the
shutters open.
Function d)
While the program is in execution you can select one or more projectors in order to obtain the complete manual control.
The projectors that are inserted in the program(whose LEDS are quickly flashing)will be released (the LEDSwill than flash
moreslowly)andavailabletomanualcontrol.Bypressingtheprojectorpush-buttonagainitwillbereinsertedintheprogram.
Progr. 1 KTS:1.0
Sc: 1/1 KTC:1.0
Program Running
Figure 57
Progr. 1 KTS:1.0
Sc: 1/1 KTC:1.0
Figure 56
[087] 105 000 X:000
000 --- --- Y:124
Figure 58
In order to send in execution the programs following the setting given in the function SEQUENCER you have to press the
push-buttonSEQ.PROGR. (part.F fig.56) . Theprogramswillbeexecutedfollowingtheordergivenandtostopthe execution
you simply have to push the same button again.
Pag.21
Page 22

®
Realization:
PC CAD & VIDEO
 Loading...