

Page 1

en
Virtua
®
Reference Guide
Page 2

Page 3

Table of Contents
Components.......................................................................................................................................... 1
Assembly............................................................................................................................................... 6
Startup ................................................................................................................................................. 14
Shutdown ............................................................................................................................................ 16
Initial Media Loading .......................................................................................................................... 17
Configuration ...................................................................................................................................... 22
DICOM Host Setup.............................................................................................................................. 33
Replace an Ink Cartridge ................................................................................................................... 34
Software Installation .......................................................................................................................... 38
Troubleshooting ................................................................................................................................. 40
iii
Page 4

Page 5

Components
1
5
6
4
3
2
1. Display
2. Display arm
3. Front cover
4. Recorder
5. Controller
6. Output bin
1
Page 6

10
9
11
12
13
14
7
8
7. Ink cartridges
8. Print head
9. CD/DVD recorders
10. Eject Ramp
11. Ink Cartridge Load button
12. Robotic disc transporter
13. Printer tray
14. Input bins
2 Virtua Reference Guide
Page 7

16
17
18
19
15
SELECT
MENU
22
23
20
21
15. Controller Soft Power button
16. USB-2 port
17. Status indicators
18. SmartDrive USB port
19. SmartDrive
20. Display/exit on-screen menus
21. Select adjustment item
22. Contrast and Brightness settings
23. Power switch
3
Page 8

CEpartner4U BV, Esdoornlaan 13
3951 DB Maarn, The Netherlands
Phone: +31.6.516.536.26
Codonics Inc.,17991 Englewood Dr.
Middleburg Heights OH, 44130 USA
This device complies with part 15 of the FCC R ules. Operation is subject to the
following two conditions: 1) This device may not cause harmful interference, and 2)
this device must accept any interference received, including interference that may
cause undesired operation.
This Class B digital apparatus complies with Can adian ICES-003. Cet appareil
numerique de la Classe B est c onform a la norme NMB-003 du Canada.
This product is in conformity with the requirements of EC Council direc tive
93/42/EEC on the approximation of the laws of the Member States relating to
medical devices.
0601-1 and
CISPR 11.
Virtua Medical Disc Pub lisher
Made in the U.S.A.
Patents Pending
All Rights Reser ved
MODEL / MODLE
VIRTUA-2
ETL CLASSIFIED
CONFORMS TO
UL STD 60601-1
CERTIFIED TO
CAN/CSA STD C22.2 NO. 601.1
xxxxxxx
XXX-XXXXX
-1
-2
25
24
24. Power input ports 25. Hard power switches
4 Virtua Reference Guide
Page 9

26 28
313029
27
-1 -2
CEpartner4U BV, Esdoornlaan 13
3951 DB Maarn, The Netherlands
Phone: +31.6.516.536.26
Codonics Inc.,17991 Englewood Dr.
Middleburg Heights OH, 44130 USA
This device complies with part 15 of the FCC Rule s. Operation is subject to the
following two conditions: 1) This device may not cause harmful interference, and 2)
this device must accept any interference received, including interference that may
cause undesired operation.
This Class B digital apparatus complies with Canadian ICES-003 . Cet appareil
numerique de la Classe B est conf orm a la norme NMB-003 du Canada.
This product is in conformity with the requirements of EC Council directiv e
93/42/EEC on the approximation of the laws of the Member States relating to
medical devices.
CISPR 11.
VirtuaTM Medical Disc Publisher
Made in the U.S.A.
Patents Pending
All Rights Reser ved
MODEL / MODLE
VIRTUA-2
ETL CLASSIFIED
CONFORMS TO
UL STD 60601-1
CERTIFIED TO
CAN/CSA STD C22.2 NO. 601.1
xxxxxxx
Windows® XP Embedded
XXXXX-XXX-XXX-XXX
XXX-XXXXX
32
26. eSATA connectors
27. Display power connector
28. Display fuse
32. Recorder USB 2.0 connector.
29. VGA connector
30. USB 2.0 connectors
31. Ethernet connector
5
Page 10

Assembly
1. Place the Controller on a solid level surface.
2. Remove the cardboard insert containing the print head.
6 Virtua Reference Guide
Page 11

CEpartner4UBV,Esdoornlaan 13
3951 DBMaarn,The Netherlands
Phone: +31.6.516.536.26
Codonics Inc.,17991 Englewood Dr.
Middleburg Heights OH, 44130 USA
This device complies with part 15 of the FCC Rules. Operation is subject to the
following two conditions: 1)This device may not cause harmful interference, and 2)
this device must accept any interference received, including interference that may
cause undesired operation.
This Class B digital apparatus complies with Canadian ICES-003. Cet appareil
numerique de la Classe B est conform a la norme NMB-003 du Canada.
This product is in conformity with the requirements of EC Council directive
93/42/EEC on the approximation of the laws of the Member States relating to
medical devices.This product satisfies the Class B limits of EN 60601-1 and
CISPR 11.
VirtuaTM Medical Disc Publisher
Made in the U.S.A.
Patents Pending
All Rights Reserved
MODEL / MODLE
VIRTUA-2
ETL CLASSIFIED
CONFORMSTO
UL STD 60601-1
CERTIFIEDTO
CAN/CSA STD C22.2 NO.601.1
xxxxxxx
Windows® XP Embedded
XXXXX-XXX-XXX-XXX
XXX-XXXXX
-1
-2
3. Place the Recorder on the Controller.
-1
-2
CEpartner4UBV,Esdoornlaan 13
3951 DBMaarn,The Netherlands
Phone: +31.6.516.536.26
Codonics Inc.,17991 Englewood Dr.
Middleburg Heights OH, 44130 USA
This device complies with part 15 of the FCC Rules. Operation is subject to the
following two conditions: 1)This device may not cause harmful interference, and 2)
this device must accept any interference received, including interference that may
cause undesired operation.
This Class B digital apparatus complies with Canadian ICES-003. Cet appareil
numerique de la Classe B est conform a la norme NMB-003 du Canada.
This product is in conformity with the requirements of EC Council directive
93/42/EEC on the approximation of the laws of the Member States relating to
medical devices.This product satisfies the Class B limits of EN 60601-1 and
CISPR 11.
Virtua Medical Disc Publisher
Made in the U.S.A.
Patents Pending
All Rights Reserved
MODEL / MODLE
VIRTUA-2
CONFORMSTO
UL STD 60601-1
CERTIFIEDTO
CAN/CSA STD C22.2 NO.601.1
xxxxxxx
-1
-2
(Note: Offset the components to avoid pinching finger.)
4. Center the Recorder on the Controller.
7
Page 12

5. Assemble the Display by attaching the Display Arm
to the Display using the four thumbscrews provided.
6. Attach the Display Arm with the four thumbscrews provided to the Controller.
8 Virtua Reference Guide
Page 13

CEpartner4U BV, Esdoornlaan 13
3951 DB Maarn,The Netherlands
Phone: +31.6.516.536.26
Codonics Inc.,17991 Englewood Dr.
Middleburg Heights OH, 44130 USA
This device complies with part 15 of the FCC Ru les. Operation is subject to the
following two conditions: 1)This device may not cause harmful interference, and 2)
this device must accept any interference received, including interference that may
cause undesired operation.
This Class B digital apparatus complies with Canadian ICES-003. Cet appareil
numerique de la Classe B est conform a la norme NMB-003 du Canada.
This product is in conformity with the requirements of EC Council directive
93/42/EEC on the approximation of the laws of the Member States relating to
medical devices.This product satis es the Class B limits of EN 60601-1 and
CISPR 11.
VirtuaTM Medical Disc Publi sher
Made in the U.S.A.
Patents Pending
All Rights Reser ved
MODEL / MODLE
VIRTUA-2
ETL CLASSIFIED
CONFORMSTO
UL STD 60601-1
CERTIFIEDTO
CAN/CSA STD C22.2 NO.601.1
xxxxxxx
Windows® XP Embedded
XXXXX-XXX-XXX-XXX
XXX-XXXXX
-1
-2
DC Power USB VGA
-1
-2
7. Finger-tighten the thumbscrews.
8. Attach Display cables (VGA, USB, Power).
9. Connect the DC power, USB, and VGA cables from the Display Arm to the Display ports.
9
Page 14

CEpartner4U BV, Esdoornlaan 13
3951 DB Maarn,The Netherlands
Phone: +31.6.516.536.26
Codonics Inc.,17991 Englewood Dr.
Middleburg Heights OH, 44130 USA
This device complies with part 15 of the FCC Rules. Operation is subject to the
following two conditions: 1)This device may not cause harmful interference, and 2)
this device must accept any interference received, including interference that may
cause undesired operation.
This Class B digital apparatus complies with Canadian ICES-003. Cet appareil
numerique de la Classe B est conform a la norme NMB-003 du Canada.
This product is in conformity with the requirements of EC Council directive
93/42/EEC on the approximation of the laws of the Member States relating to
medical devices.This product satises the Class B limits of EN 60601-1 and
CISPR 11.
Virtua Medical Disc Publisher
Made in the U.S.A.
Patents Pending
All Rights Reser ved
MODEL / MODLE
VIRTUA-2
ETL CLASSIFIED
CONFORMSTO
UL STD 60601-1
CERTIFIEDTO
CAN/CSA STD C22.2 NO.601.1
xxxxxxx
XXX-XXXXX
-1
-2
eSATA-1
eSATA-2
10. Attach the Recorder USB cable, eSATA-1 cable to the eSATA-1 connector
and eSATA-2 cable to the eSATA-2 connector.
10 Virtua Reference Guide
Page 15

CEpartner4U BV, Esdoornlaan 13
3951 DB Maarn, The Netherlands
Phone: +31.6.516.536.26
Codonics Inc.,17991 Englewood Dr.
Middleburg Heights OH, 44130 USA
This device complies with part 15 of the FCC Rule s. Operation is subject to the
following two conditions: 1) This device may not cause harmful interference, and 2)
this device must accept any interference received, including interference that may
cause undesired operation.
This Class B digital apparatus complies with Canadian ICES-003 . Cet appareil
numerique de la Classe B est conf orm a la norme NMB-003 du Canada.
This product is in conformity with the requirements of EC Council directiv e
93/42/EEC on the approximation of the laws of the Member States relating to
medical devices. This product satises the Class B limits of EN 60601-1 and
CISPR 11.
VirtuaTM Medical Disc Publisher
Made in the U.S.A.
Patents Pending
All Rights Reserved
MODEL / MODLE
VIRTUA-2
ETL CLASSIFIED
CONFORMS TO
UL STD 60601-1
CERTIFIED TO
CAN/CSA STD C22.2 NO. 601.1
xxxxxxx
Windows® XP Embedded
XXXXX-XXX-XXX-XXX
XXX-XXXXX
11. Connect the power cables.
11
Page 16

CEpartner4U BV, Esdoornlaan 13
3951 DB Maarn,The Netherlands
Phone: +31.6.516.536.26
Codonics Inc.,17991 Englewood Dr.
Middleburg Heights OH, 44130 USA
This device complies with part 15 of the FCC Ru les. Operation is subject to the
following two conditions: 1)This device may not cause harmful interference, and 2)
this device must accept any interference received, including interference that may
cause undesired operation.
This Class B digital apparatus complies with Canadian ICES-003. Cet appareil
numerique de la Classe B est conform a la norme NMB-003 du Canada.
This product is in conformity with the requirements of EC Council directive
93/42/EEC on the approximation of the laws of the Member States relating to
medical devices.This product satis es the Class B limits of EN 60601-1 and
CISPR 11.
VirtuaTM Medical Disc Publi sher
Made in the U.S.A.
Patents Pending
All Rights Reser ved
MODEL / MODLE
VIRTUA-2
ETL CLASSIFIED
CONFORMSTO
UL STD 60601-1
CERTIFIEDTO
CAN/CSA STD C22.2 NO.601.1
xxxxxxx
Windows® XP Embedded
XXXXX-XXX-XXX-XXX
XXX-XXXXX
12. Connect the Ethernet cable.
13. Install the SmartDrive.
12 Virtua Reference Guide
Page 17

14. Install the output bin.
15. Install the input bins.
13
Page 18

Startup
CEpartner4U BV, Esdoornlaan 13
3951 DB Maarn,The Netherlands
Phone: +31.6.516.536.26
Codonics Inc.,17991 Englewood Dr.
Middleburg Heights OH, 44130 USA
This device complies with part 15 of the FCC Ru les. Operation is subject to the
following two conditions: 1)This device may not cause harmful interference, and 2)
this device must accept any interference received, including interference that may
cause undesired operation.
This Class B digital apparatus complies with Canadian ICES-003. Cet appareil
numerique de la Classe B est conform a la norme NMB-003 du Canada.
This product is in conformity with the requirements of EC Council directive
93/42/EEC on the approximation of the laws of the Member States relating to
medical devices.This product satis es the Class B limits of EN 60601-1 and
CISPR 11.
VirtuaTM Medical Disc Publi sher
Made in the U.S.A.
Patents Pending
All Rights Reser ved
MODEL / MODLE
VIRTUA-2
ETL CLASSIFIED
CONFORMSTO
UL STD 60601-1
CERTIFIEDTO
CAN/CSA STD C22.2 NO.601.1
xxxxxxx
Windows® XP Embedded
XXXXX-XXX-XXX-XXX
XXX-XXXXX
1
1. Set the hard power switches ON (top power switch first).
14 Virtua Reference Guide
Page 19

2
2. Press the Controller soft power button.
3
3. Wait three minutes for startup to complete.
15
Page 20

Shutdown
4
1. Touch the Log Out button.
2. Touch the Shutdown button.
3. Touch the Shutdown button.
4. Wait 1 minute for shutdown to complete.
16 Virtua Reference Guide
Page 21

Initial Media Loading
2
3
1. Open the front cover.
CAUTION: Do not touch a patient while also accessing Virtua
internal components that are under the front cover.
2. Press the Ink Cartridge Load button.
3. Press in the latch tab at the front of the print head carriage and then lift the latch.
17
Page 22

FR AG IL E
4.1
4.2
4. Remove the print head from its packaging.
5
18 Virtua Reference Guide
5. Install the print head.
Page 23

6
7
6. Close the print head latch until you hear a click.
7. Remove the ink cartridge from its packaging.
19
Page 24

8.1
8.2
9
8. Remove the ink cartridge protective cap.
NOTE: Install the ink cartridge immediately after removing the protective cap
to prevent the ink from drying out.
9. Place the ink cartridge into its corresponding colored slot.
20 Virtua Reference Guide
Page 25

10
12
10. Press down the back of the ink cartridge until you hear a click.
11. Install the other three ink cartridges.
NOTE: For the printer to operate, all four ink cartridges must be installed.
12. Load the discs (white side up).
13. Close the front cover.
21
Page 26

14
14. Wait approximately two minutes while the system performs a maintenance cycle
on the ink system.
NOTE: Do not shut down the device while the system is performing
the ink system maintenance cycle.
NOTE: After installing a new print head and closing the front cover, the system will automatically
clean the ink system. However, for best results you should manually clean the ink system a
second time. Refer to “Clean the Ink System” on p. 27.
Configuration
On Screen Keyboard
On Screen Keyboard allows character input from Display.
1. Touch characters.
2. Displays typed characters.
3. Press OK when done.
22 Virtua Reference Guide
Page 27

Log In
1. Touch the Username field. Type “admin”.
2. Touch the Password field. Type “codonics”.
3. Touch the Log In button.
23
Page 28

Set Network
1. Touch the Setup button.
2. Touch the Network tab.
3. Touch the Static button.
4. Enter the IP Address.
5. Enter the Subnet Mask.
6. Enter the Gateway.
7. Touch the Save button.
24 Virtua Reference Guide
Page 29

Set Date and Time
1. Touch the Setup button.
2. Touch the Date & Time tab.
3. Enter the Date.
4. Enter the Time.
5. Touch the Save button.
25
Page 30

Clean the Ink System
5
1. Touch the Utilities button.
2. Touch the Ink Cartridges tab.
3. Touch the Clean button.
A confirmation dialog box displays.
4. Touch the OK button.
5. Wait approximately two minutes for the cleaning operation to complete.
NOTE: The print head and ink cartridges should remain installed to avoid having the ink in them
dry out.
NOTE: The system should remain powered on so that periodic ink maintenance cycles can be
completed. These ink maintenance cycles are run automatically by the system. If the system is
powered off for extended periods, the ink in the ink system can dry out.
26 Virtua Reference Guide
Page 31

View Site Information
1. Touch the Setup button.
2. Touch the Site tab.
27
Page 32

Set Site Information
1. Power-off the Controller.
2. Remove the SmartDrive from the Controller.
3. Insert the SmartDrive in Windows PC.
4. Edit the file: \profiles\site\site.default.txt.
5. Insert the SmartDrive in the Controller.
6. Power-on the Controller.
p~ãéäÉ=ÑáäÉW=ëáíÉKÇÉÑ~ìäíKíñí=
[ SiteProfile ]
siteProfileName = default
address0 = Codonics Imaging Center
address1 = 17991 Englewood Drive
address2 = Suite D
address3 = Middleburg Heights, OH 44130
customLabelFileLocation =
defaultImagerProfile =
defaultJobProfile =
demoSiteBurnDirectory = c:\data\cc\spd
inactivityTimeout = 60
isDemoSite = false
logoFileLocation =
siteDisclaimer = This disc contains confidential medical information. If you
are not the intended recipient or an authorized user, please contact the site
shown on this label.
siteName = Codonics
phoneNumber = 1-800-444-1198
url = www.codonics.com
28 Virtua Reference Guide
Page 33
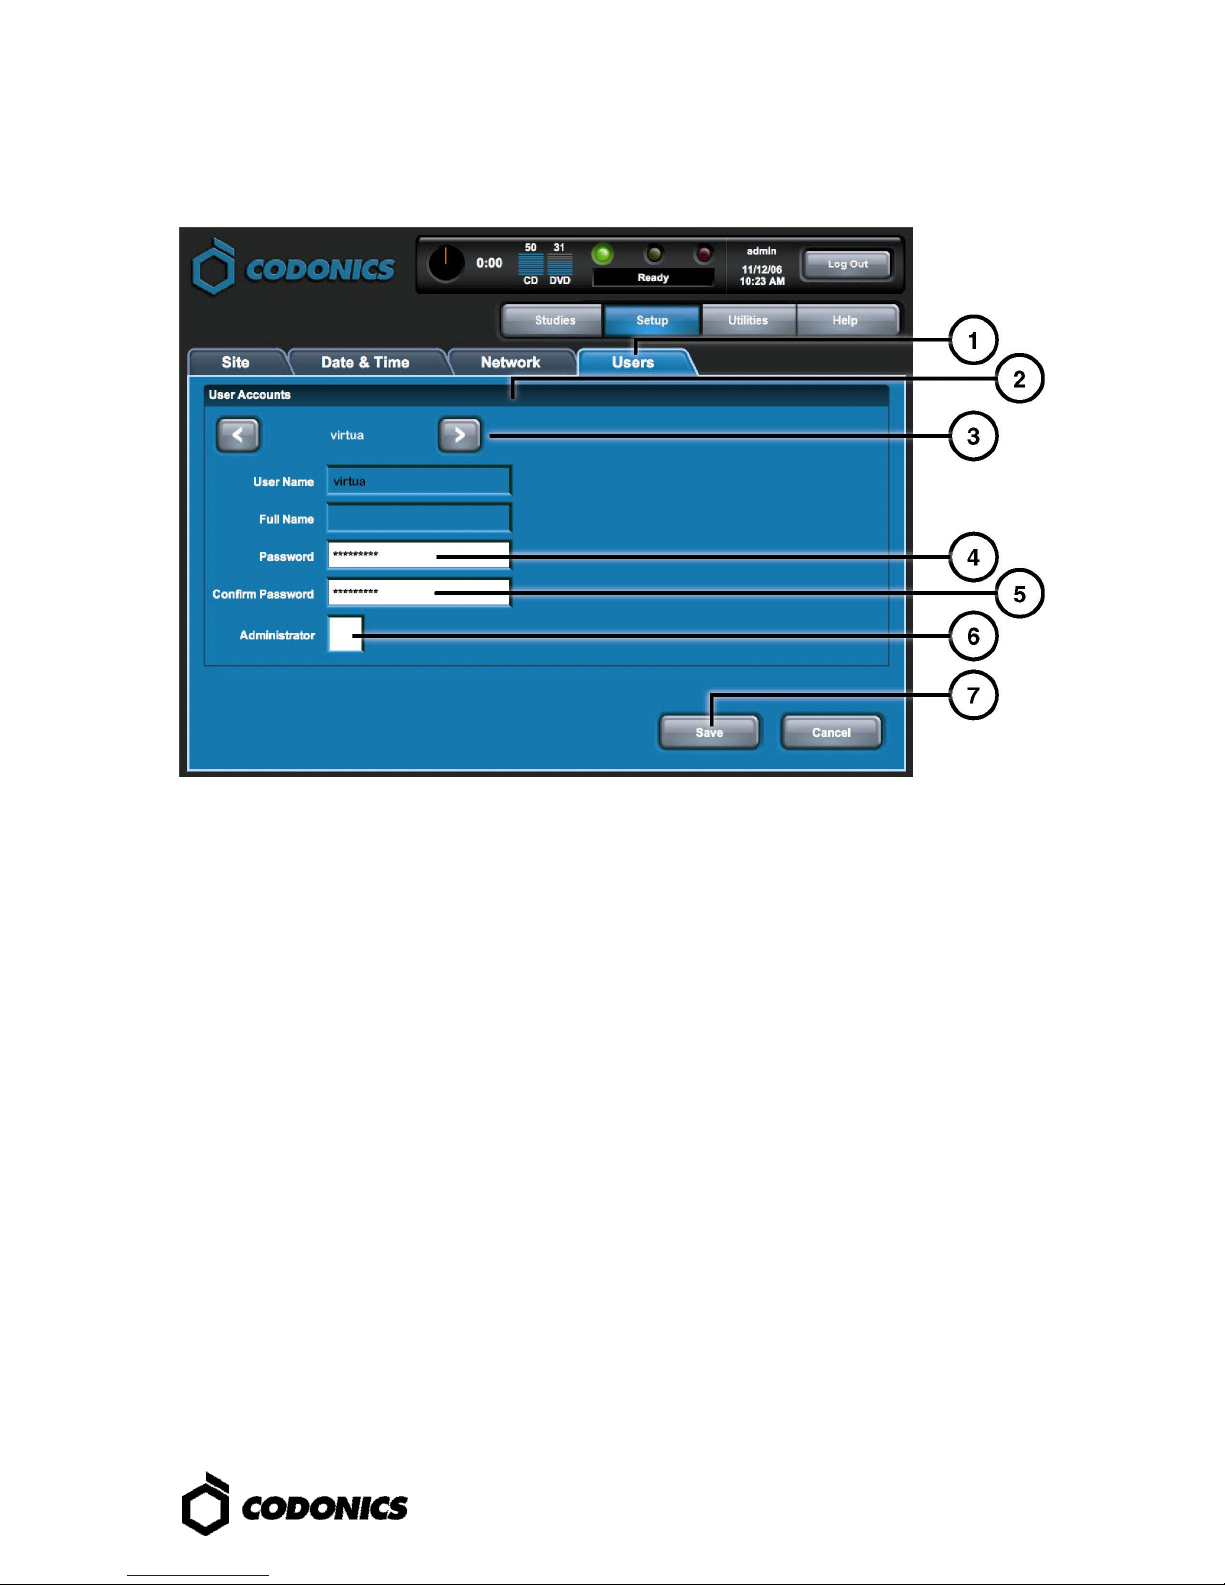
Set User Password
1. Touch the Setup button.
2. Touch the User tab.
3. Select the User Name.
4. Enter the Password.
5. Confirm the Password.
6. Set the Administrator mode (optional).
7. Touch the Save button.
29
Page 34

Record Studies
1. Touch the Studies button.
2. Touch the Studies tab.
3. Select the Filter.
4. Select the Studies.
5. Touch the Record button.
30 Virtua Reference Guide
Page 35

6. Touch the Edit Options button.
31
Page 36

7. Select Label.
8. Select Viewer.
9. Set Make Auto-Run (optional).
10. Select the number of copies.
11. Touch the OK button.
32 Virtua Reference Guide
Page 37

12. Touch the OK button to record the disc.
DICOM Host Setup
eзлн=pЙннбеЦл=Сзк=pнзкбеЦ=af`lj=pнмЗбЙл=нз=sбкн м~=
AE Title TCP Port Description
AUTO 104 Automatically record studies.
MANUAL 104 Place studies in Study List for manual recording.
33
Page 38

Replace an Ink Cartridge
2
3
1. Open the front cover.
CAUTION: Do not touch a patient while also accessing Virtua
internal components that are under the front cover.
2. Press the Ink Cartridge Load button.
NOTE: Do not open the print head latch when replacing an ink cartridge.
3. Press the colored tab on the back of the print head that corresponds to the used ink cartridge.
The ink cartridge pops up slightly.
34 Virtua Reference Guide
Page 39

5
4. Remove the used ink cartridge.
5. Remove the new ink cartridge from its packaging.
35
Page 40

6.1
6.2
7
6. Remove the ink cartridge protective cap.
NOTE: Install the ink cartridge immediately after removing the protective cap
to prevent the ink from drying out.
7. Place the ink cartridge into its corresponding colored slot.
36 Virtua Reference Guide
Page 41

8
10
8. Press down the back of the ink cartridge until you hear a click.
NOTE: For the printer to operate, all four ink cartridges must be installed.
9. Close the front cover.
10. Wait approximately two minutes while the system performs a maintenance cycle
on the ink system.
NOTE: Do not shut down the device while the system is performing
the ink system maintenance cycle.
37
Page 42

Software Installation
1
1. Power-off the Controller.
2
2. Open the bottom drive tray.
38 Virtua Reference Guide
Page 43

6
3. Place the “Operating Software” disc in the bottom drive tray.
4. Close the bottom drive tray.
5
5. Power-on the Controller.
6. Wait 45 minutes for the software to install.
7. Remove the “Operating Software” disc from bottom drive tray.
8. Close the bottom drive tray.
39
Page 44

Troubleshooting
Problem Solution
System start up fails. Check “Y” power cable.
Verify power selector switches are set properly.
Verify controller power switch is ON.
Verify recorder power switch is ON.
Verify display power switch is ON.
Check display cables (VGA, USB, Power).
Check recorder USB cable.
Verify SmartDrive is connected.
Software will not install Make sure that the eSATA cables are connected to the right connectors.
Drives not found Make sure the Recorder is powered on before the Controller.
Display is blank. Check display power switch.
Check display cables (VGA, USB, Power).
Display does not respond
properly.
Login fails. Verify username and password.
Network not responding. Check network settings.
Recorder is not responding. Check recorder USB cable.
Label prints light, has lines
or is blank.
Display shows missing or
invalid cartridge.
Check display USB cable.
Align display by touching Align Touch Screen button.
Verify password case (upper-case and lower-case).
Delete file \profiles\user\user.admin.txt on SmartDrive to restore default
password: codonics.
Verify network cable is connected.
Verify SmartDrive is connected.
Verify recorder power switch in ON.
Cycle power on recorder using recorder power switch.
Verify that the ink cartridges are fully seated.
Clean the ink system. Refer to “Clean the Ink System” on p. 27.
Clean the print head copper contacts. Refer to the Virtua Print Head
Replacement Technical Brief (Codonics part number 901-558-001).
Replace the ink cartridge or cartridges. Refer to “Replace an Ink Cartridge” on
p. 35.
Replace the print head. Refer to the Virtua Print Head Replacement Technical
Brief (Codonics part number 901-558-001)
Verify that the correct ink cartridges are loaded and fully seated.
Clean the print head copper contacts.
40 Virtua Reference Guide
Page 45

Problem Solution
Display shows disc error. Verify that the correct media type is loaded in each input bin.
Use recommended quality discs.
Handle discs properly when loading.
System responses are slow. Multiple jobs are being processed at the same time.
Large jobs with many images are being processed.
Multiple remote web connections are active.
All registered and unregistered trademarks are the property of their respective owners.
Specifications subject to change without notice. Copyright © 2005-2014 Codonics, Inc.
Printed in U.S.A. Part Number 900-567-002.01.
41
 Loading...