

Page 1

USER GUIDE
VAULT 2
ADMINISTRATOR GUIDE
REVISION 06.08.2013
CODEX VAULT 2 - ADMINISTRATOR GUIDE REV 06.08.13
PAGE 1
Page 2

Safety Warnings
Please observe any warnings and follow all instructions.
Do not use this equipment near water and clean only with a dry cloth.
Do not block any ventilation openings. Install in accordance with the manufacturer’s instructions.
Do not install near any heat sources such as radiators, heat registers, stoves, or other equipment (including ampliers)
that produce heat.
Do not expose to excessive vibration, or drop this product.
Do not defeat the safety purpose of the polarised or grounding-type plug. A polarised plug has two blades with one wider
than the other. A grounding-type plug has two blades and a third grounding prong. The wide blade, or the third prong, is
provided for your safety.
If the provided plug does not t into your outlet, consult an electrician for replacement of the obsolete outlet.
Protect the power cord from being walked on or pinched, particularly at plug ends, convenience receptacles, and the point
where they exit from the equipment.
Only use attachments/accessories specied by the manufacturer.
Use only with the cart, stand, tripod, bracket, or table specied by the manufacturer, or sold with the equipment.
Unplug this equipment during lightning storms or when not in operation for long periods of time.
Refer all servicing to qualied service personnel. Servicing is required when the equipment has been damaged in any way,
such as power-supply cord or plug is damaged, liquid has been spilled or objects have fallen into the equipment,
has been exposed to rain or moisture, does not operate normally, or has been dropped.
To reduce the risk of re or electric shock, do not expose equipment to rain or moisture.
To avoid electrical shock, do not attempt to open this equipment. Refer servicing to qualied personnel only.
Caution: Media may become hot during normal use.
Disclaimer
Codex products are continually developed to remain at the forefront of the industry, and as such the information in this guide
is subject to change without notice. Whilst Codex endeavour to ensure that all documentation provided is correct at the time of
writing, this document is not guaranteed to be error-free.
Codex does not assume responsibility for issues or losses due to misinterpretation of the information in this document, errors in
this document, or incorrect conguration or installation of the equipment described herein.
Please report any errors found in this document to [email protected]
Support and Servicing
For assistance with your Codex Vault 2 please contact [email protected]
For servicing please contact [email protected]
CODEX VAULT 2 - ADMINISTRATOR GUIDE REV 06.08.13
PAGE 2
Page 3

Contents
Safety Warnings .........................................................................................................................................................................................2
Disclaimer ....................................................................................................................................................................................................2
1. Introduction ........................................................................................................................................................................................ 4
2. Glossary ..............................................................................................................................................................................................4
3. Product Elevations ............................................................................................................................................................................ 5
4. Modules ..............................................................................................................................................................................................7
5. Power ...................................................................................................................................................................................................7
6. Starting Up .........................................................................................................................................................................................8
7. Logging In ..........................................................................................................................................................................................8
8. Loading and unloading media .......................................................................................................................................................9
9. The Main Menu .............................................................................................................................................................................. 12
10. Preparing the Vault for a new project ...................................................................................................................................... 13
11. During a project - Clearing space on the Internal Storage ..................................................................................................16
12. Work Templates ..............................................................................................................................................................................18
13. From and To Expressions............................................................................................................................................................. 22
14. Task Types ........................................................................................................................................................................................27
15. Task Scheduler ............................................................................................................................................................................... 48
16. Library .............................................................................................................................................................................................. 51
17. Audio Sync and on-screen proxy playback .............................................................................................................................57
18. Filter in the Library ....................................................................................................................................................................... 63
20. Storage ..............................................................................................................................................................................................67
21. Settings ............................................................................................................................................................................................ 68
22. Info ..................................................................................................................................................................................................... 74
23. Using media with a clashing name ...........................................................................................................................................75
24. Using a keyboard and mouse with the Vault software .........................................................................................................75
25. Supported media types and file formats ..................................................................................................................................76
26. Cleaning the Process Module Air Filter .....................................................................................................................................77
27. Setting up the Vault for a single tape Archive ........................................................................................................................79
CODEX VAULT 2 - ADMINISTRATOR GUIDE REV 06.08.13
PAGE 3
Page 4

1. Introduction
Welcome to this guide for the Codex Vault, a next-generation modular solution for backup, archive, and dailies production that supports a
range of digital camera systems.
Software version - this guide assumes the Vault is running software version 2013.r1.3204 or higher.
An Administrator will set up the Vault and create User accounts for a specic project. The Administrator could be a data workow specialist,
and the Users could be members of the camera team.
The workow for the project may involve several Tasks (e.g. copying, backing up, making reports) and the Administrator can design “Work
Templates” which run the Tasks in a given order – when these Tasks are running they are grouped together as a Job. The User(s) operate the
Vault and complete the Tasks guided by a series of on-screen prompts.
Depending on the size of the production, the Administrator may also be a User who interacts with the system on a daily basis. On larger
productions the Administrator may congure the Vault initially, and then other Users will operate the system.
This guide will detail how to congure and operate the Vault as an Administrator.
2. Glossary
AXSM Memory card - a type of solid state media, used in the AXS-R5 recorder for the Sony F55 camera
Capture Drive – a type of Codex Storage device, used with a Codex Onboard S Recorder and then brought to the Vault for checking, backup,
and archive.
Clip – a clip represents a take, normally from “Roll Camera!” to “Cut!”. The term Shot rather than Clip is used in Codex software, but they are
essentially interchangeable. A Shot/Clip will contain image data, metadata, and possibly audio.
Clone (Task) – this process makes an exact copy of all the data from one media to another.
Codex Intermediate Format - les are recorded to a Capture Drive (or Datapack) in this format and can then be transcoded to other le
formats using the Vault. (ProRes les recorded on the Alexa XT are in their native format)
CRC32 – this is a type of checksum used in the software to verify the integrity of les as they are copied from one media to another
Datapack – a type of Codex storage device, used with a Codex Onboard M Recorder and then brought to the Vault for checking, backup, and
archive.
Ethernet – a type of network connection between computers
Generate (Task) – this process copies les from the source media, containing as much metadata as possible.
Job – an active set of Tasks, as congured by the Administrator
LTFS – Linear Tape File System, a type of formatting for LTO digital archive tape
LTO – a digital tape media used for data backup
Media – any type of removable data storage, disk or tape
Media Clear (Task) – this process deletes data from a specied media
Media Check (Task) – this process checks media for number and length of clips, and also valid timecode and roll information. It produces a
report for the user, including a summary of any issues that have occurred.
Media Sign Off (Task) – this process should be run on media once all other required tasks are complete, and marks that all required tasks are
completed with media so it can be cleared.
Media Verify (Task) – this process checks that disks in media are readable, and that CRC32 checksums are correct.
Metadata – information that relates to the image data such as timecode, roll, Exposure Index, White Balance, Comments, etc. Metadata is
always carried through the system where possible into different le formats.
MUL – when media is formatted it is given a MUL (Media User Label). Shots recorded to the media then belong to this MUL, which can be
though of as a group of shots. The Vault then processes shots in these groups, for operations such as cloning and archiving.
Network – a connection between computer systems, the most common type of which is Ethernet.
Reel – a metadata property of shots, with multiple shots being recorded to the same reel.
Roll – equivalent to Reel.
Shot – equivalent to Clip.
SR Memory card - a type of solid state media, used in the Sony F65 camera.
SxS card – a type of solid state media, used in the ARRI Alexa camera.
Task – one of several possible processes that can be performed on media, such as a Clone or Archive.
Transfer Drive – a type of Codex Storage device, generally used on the Vault to clone from a Datapack or Capture Drive
Work Template – a set of Tasks that form (part of) the workow
CODEX VAULT 2 - ADMINISTRATOR GUIDE REV 06.08.13
PAGE 4
Page 5
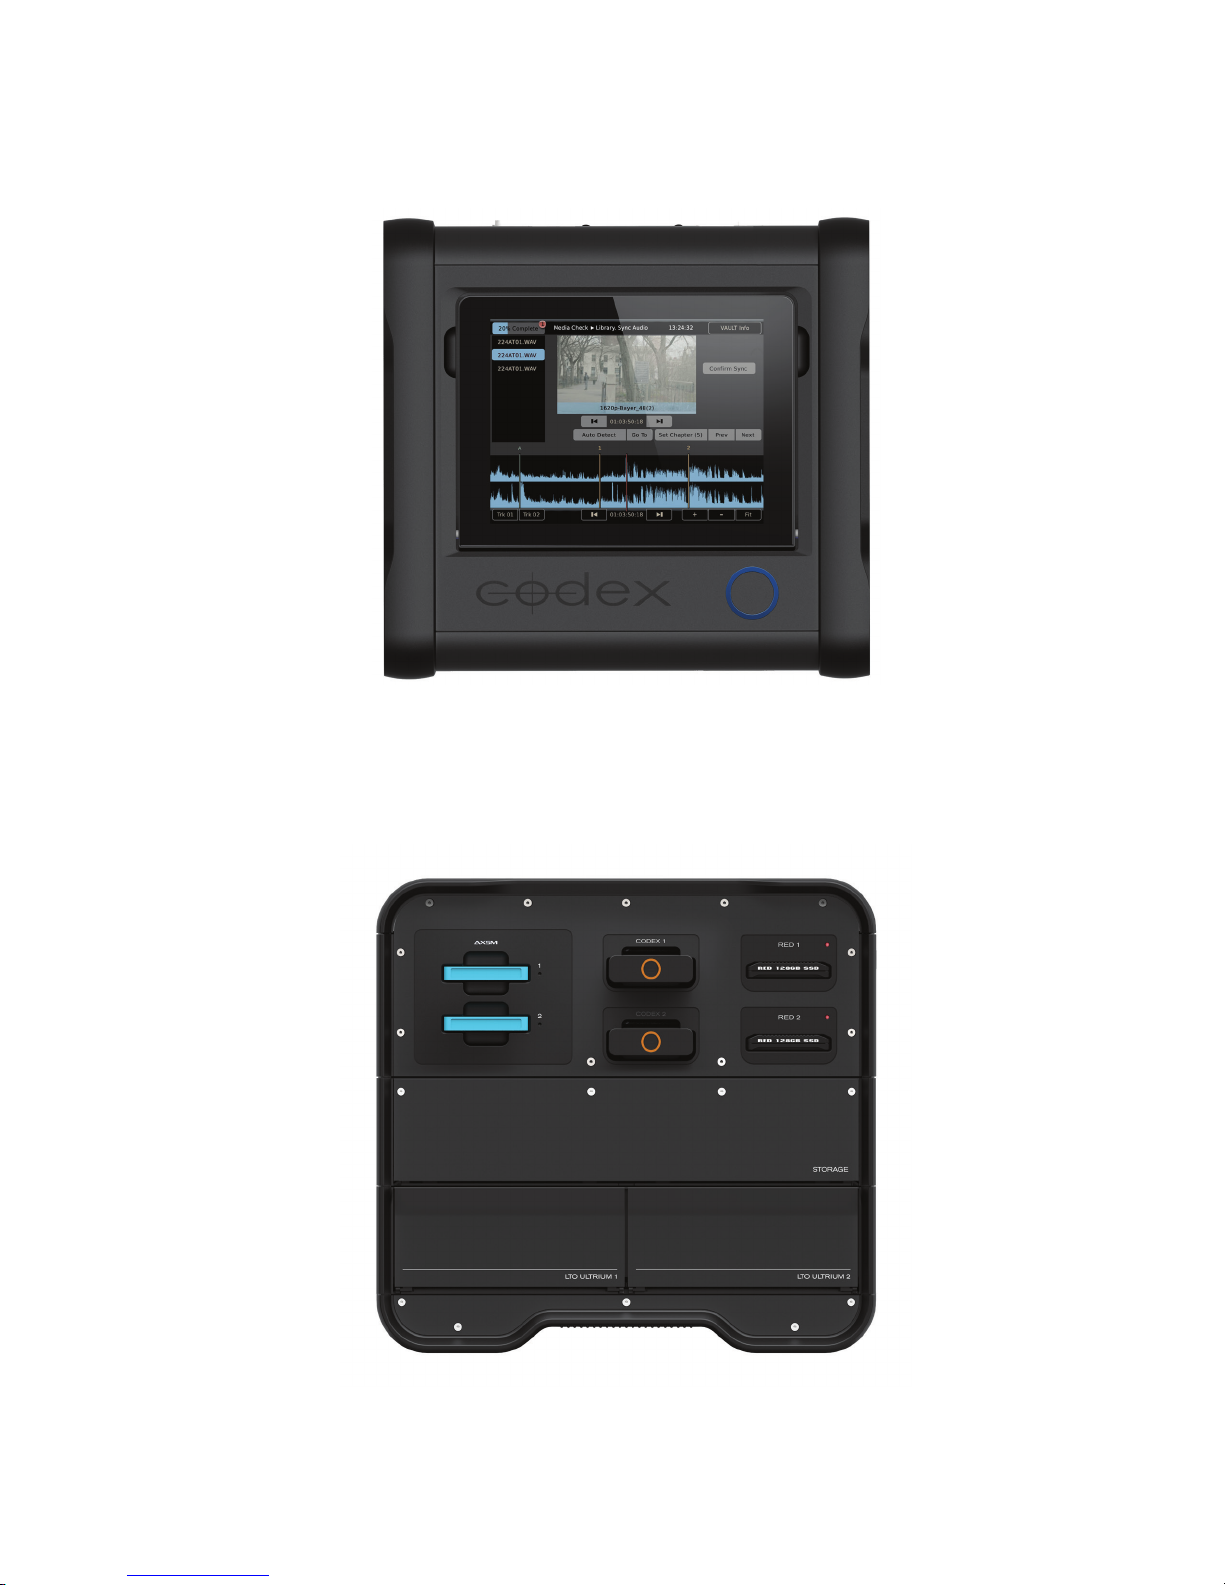
3. Product Elevations
Top Elevation Showing touchscreen interface and LED Status ring.
Right Elevation
Process Module
Storage Module ____
Archive Module ____
Sony AXSM Capture/Transfer Drive REDMAG
____
Base ____
CODEX VAULT 2 - ADMINISTRATOR GUIDE REV 06.08.13
PAGE 5
Page 6
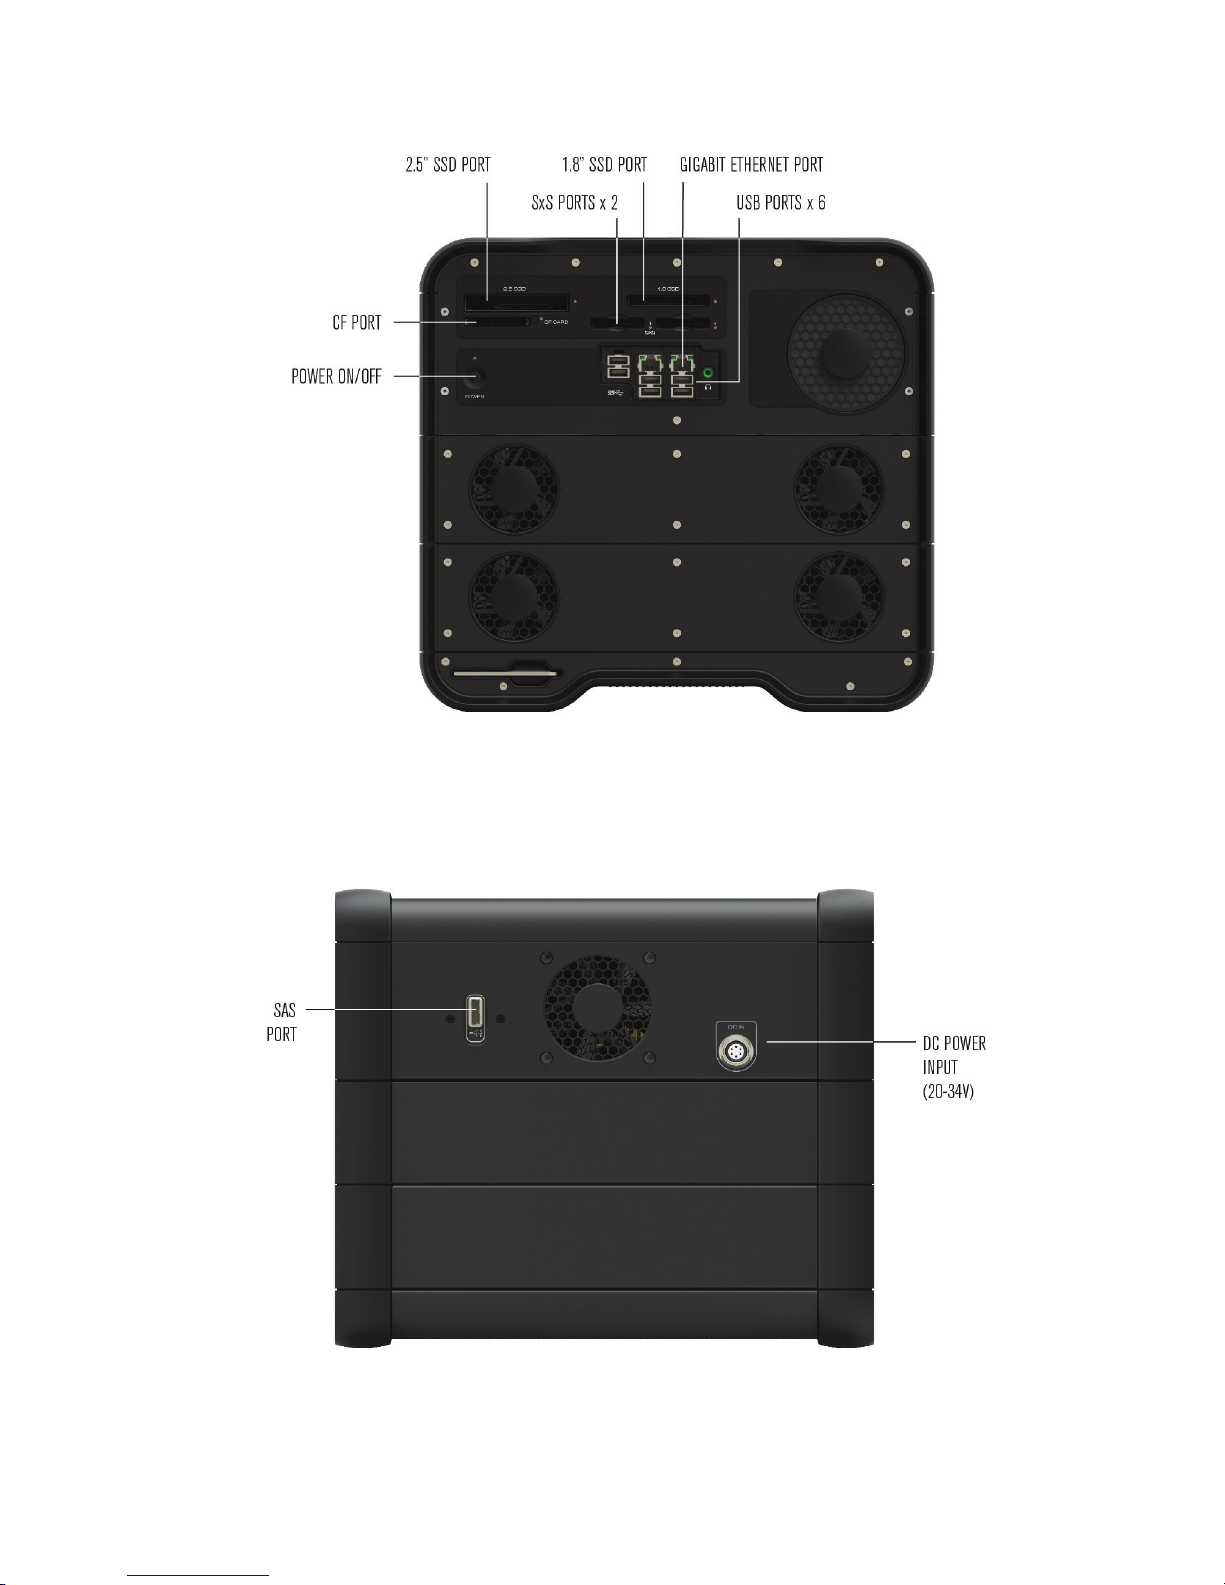
Left Elevation
Rear Elevation
CODEX VAULT 2 - ADMINISTRATOR GUIDE REV 06.08.13
PAGE 6
Page 7
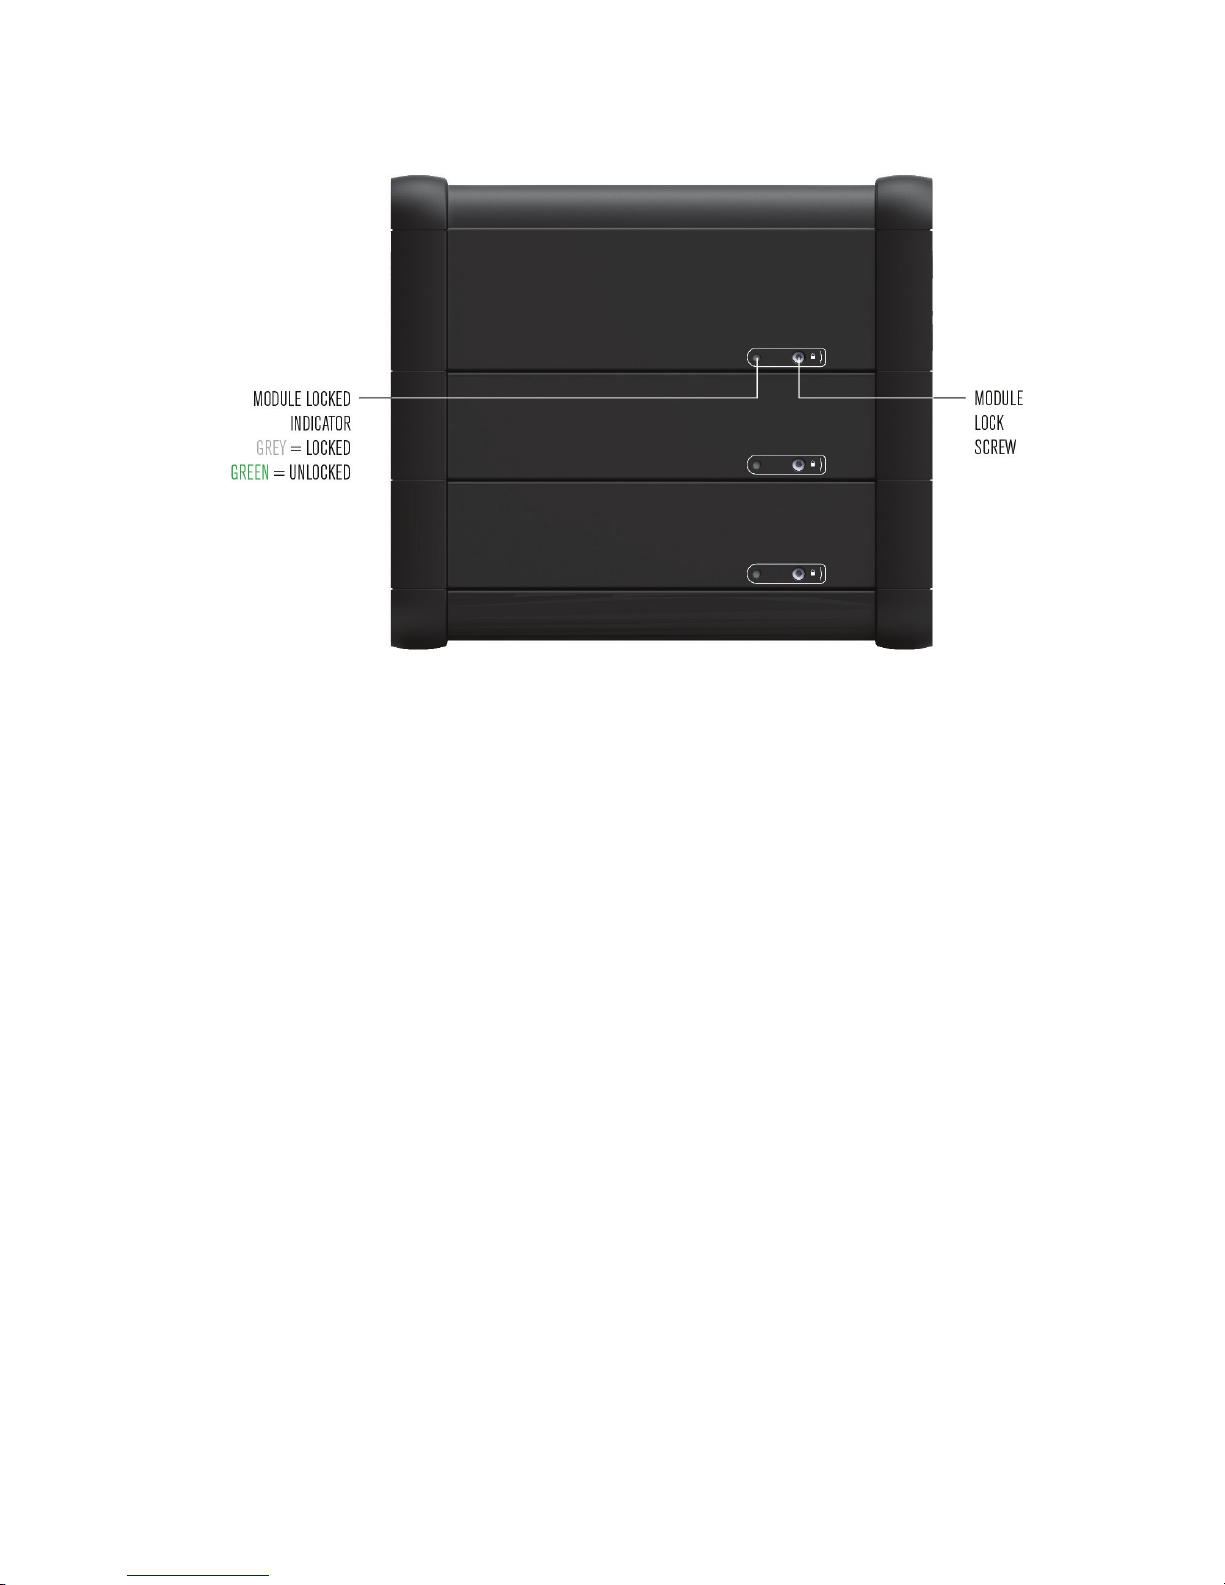
Front Elevation
4. Modules
There are several modules that can be used to build a Vault system. These are:
• Process module – depending on the conguration this allows loading of various media such as Codex Datapacks, Capture/Transfer
Drives, SxS cards, AXSM cards, RED mags and SSDs.
• Storage module – this contains 8TB of xed RAID storage that is used as intermediate storage for data prior to archiving
and/or le generation.
• SR module - this allows loading of two SR Memory cards from the Sony F65 camera.
• Archive module – this contains two LTO5 drives that can be used to make backups.
The Process module can function alone, but other modules can only be used with the Process module.
IMPORTANT – only disconnect and reconnect the modules of the Vault when the system is not powered on.
5. Power
The Vault requires an input voltage of between 20V and 34V. The power required will vary depending on the modules being used.
The maximum required is 500W.
Only the included Codex power supply should be used for the Vault when running off mains electricity.
Anton VCLX batteries are suitable for powering the Vault when mains electricity is not available.
CODEX VAULT 2 - ADMINISTRATOR GUIDE REV 06.08.13
PAGE 7
Page 8
6. Starting Up
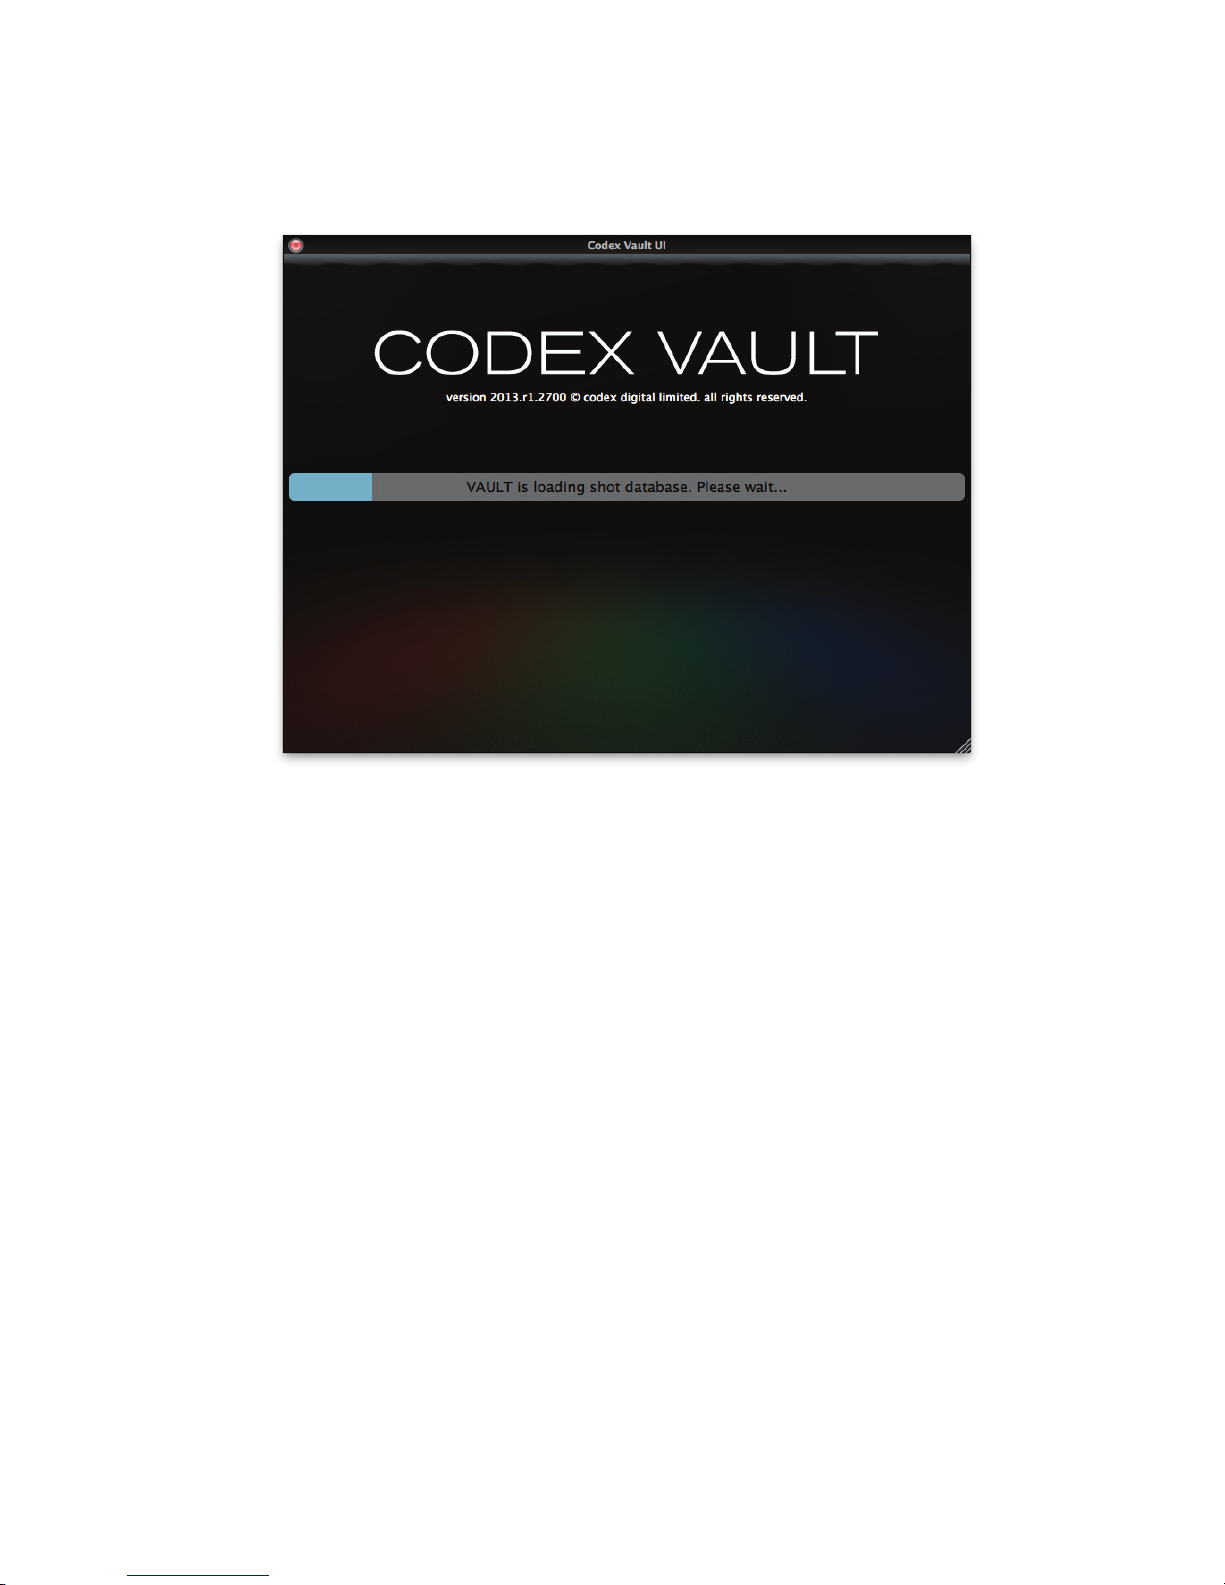
With a power source connected press the Power Button on the side of the Vault. The Vault takes around 1 minute to start up during which time
you will see the Initialising screen:
When it has nished initialising you will be presented with the Logon screen.
7. Logging In
When the Vault is started you will need to log in, with details provided by the owner of the Vault. Once logged in with an Administrator account
you can set up accounts for other Users as detailed in the later section ‘Settings’ in this guide.
CODEX VAULT 2 - ADMINISTRATOR GUIDE REV 06.08.13
PAGE 8
Page 9
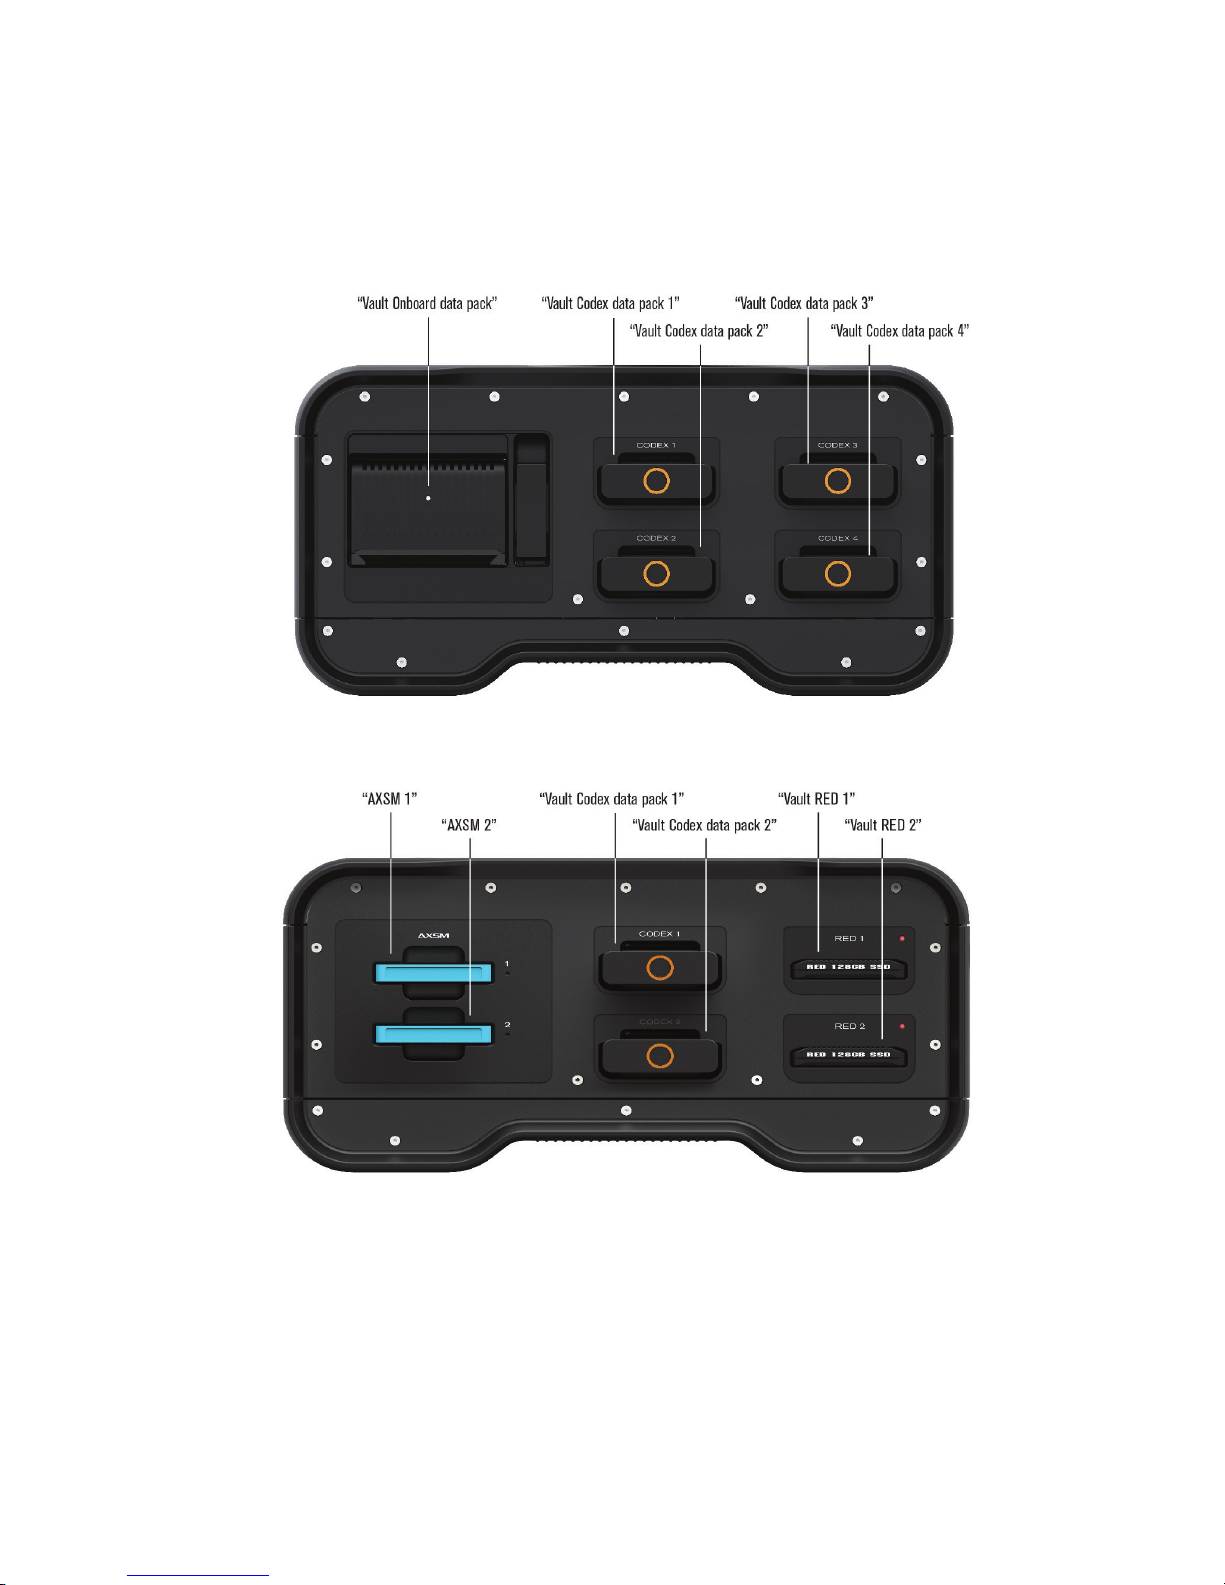
8. Loading and unloading media
Following the correct procedures for loading and unloading media is very important. Failure to do so may result in damage to the media and/or
compromise data integrity.
WARNING: Do not unload media when it is reading or writing.
CODEX VAULT 2 - ADMINISTRATOR GUIDE REV 06.08.13
PAGE 9
Page 10
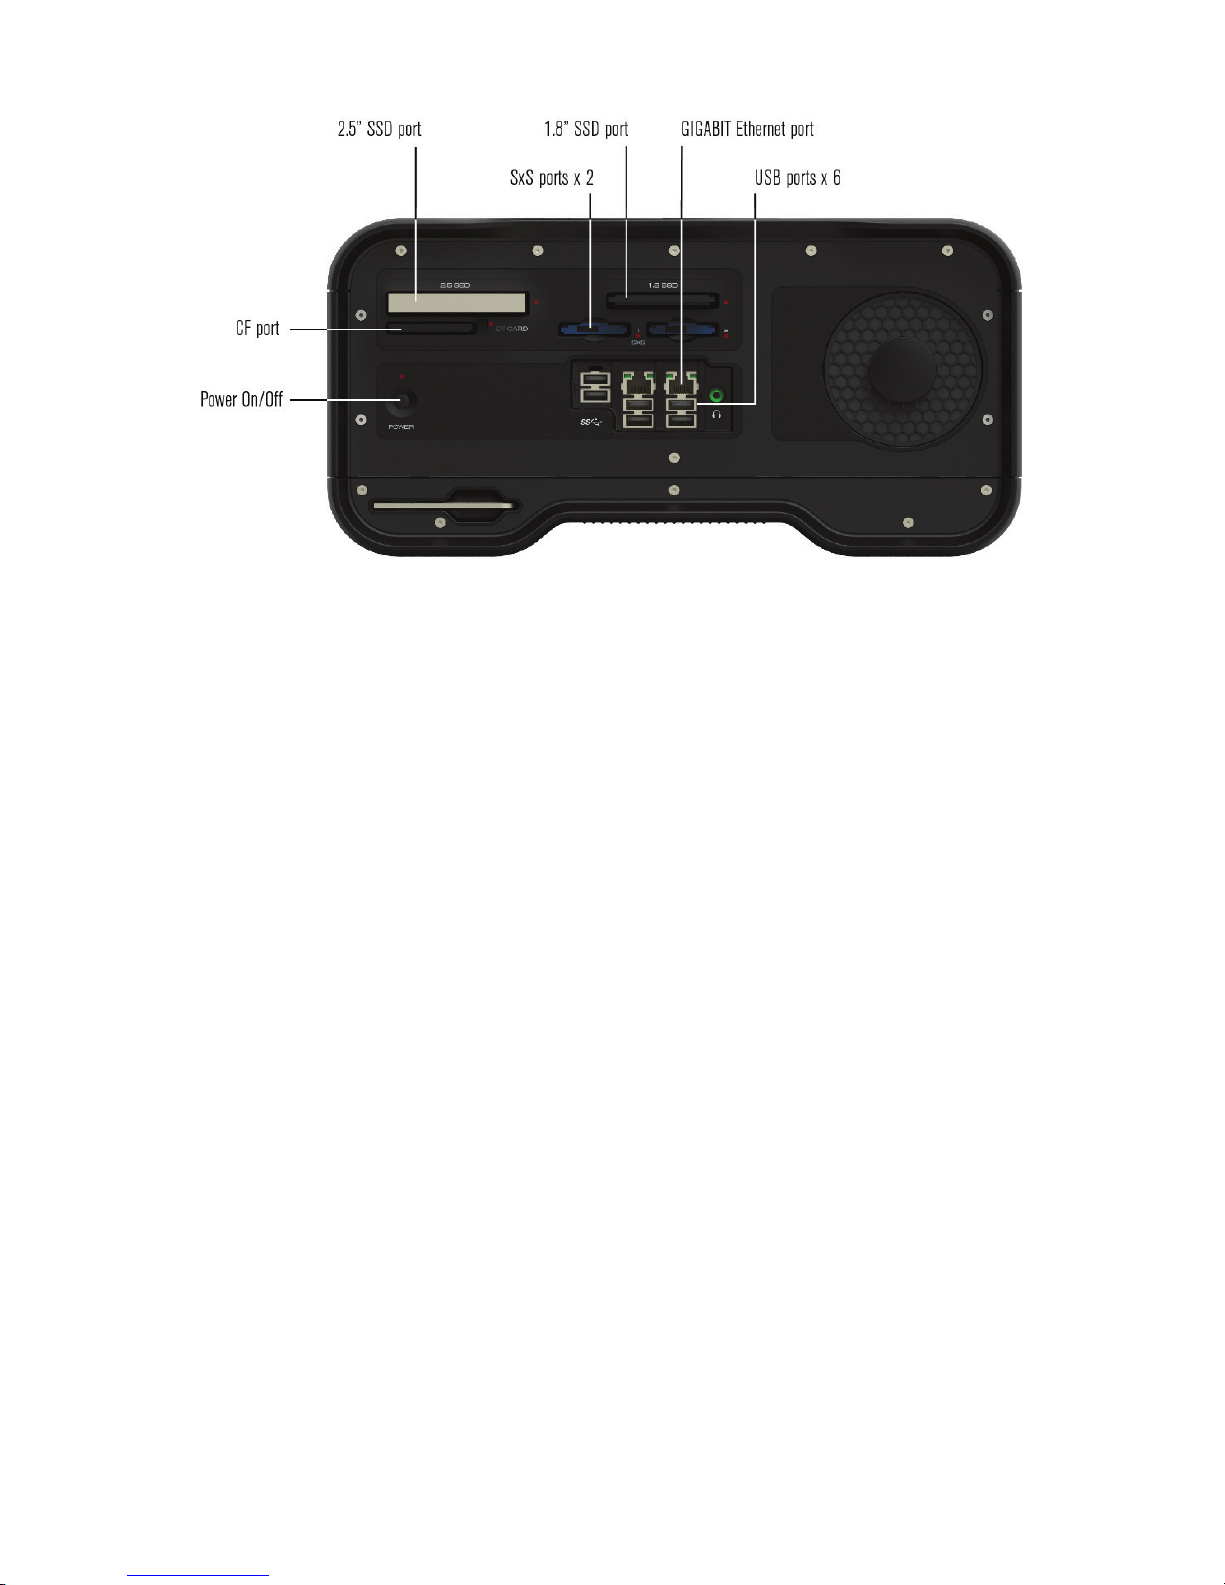
8.1 Onboard Datapack
Loading – gently insert the Datapack fully into the port. The loading process will begin, and during this time the LED on the Datapack will ash
orange. When the Datapack has loaded the LED will ash green.
Reading/Writing – the LED will be solid green when reading/writing.
Unloading – go to the Storage screen of the Vault User Interface, select the Onboard Datapack, and press Eject. While the Datapack is
unloading the LED on it will ash red. When it becomes constantly red the unloading process has completed. Now pull the lever next to the
Datapack fully to eject it from the port.
8.2 Capture Drive / Transfer Drive
Loading – gently insert the Capture Drive fully into one of the Codex ports. The loading process will begin, and during this time the LED on the
Capture Drive will ash blue. When the Capture Drive has loaded the LED will ash green.
Reading/Writing – the LED will be solid green when reading/writing.
Unloading – go to the Storage screen of the Vault User Interface, select the Capture Drive, and press Eject. While the Capture Drive is
unloading the LED on it will ash blue. When it becomes constantly blue the unloading process has completed. Now pull the Capture Drive to
remove it from the port.
8.3 REDMAG 1.8”
Loading – gently insert the REDMAG fully into one of the RED ports. The loading process will begin, and during this time the LED next to the
port will ash blue. When the REDMAG has loaded the LED will ash green.
Reading/Writing – the LED will be solid green when reading/writing.
Unloading – go to the Storage screen of the Vault User Interface, select the REDMAG, and press Eject. While the REDMAG is unloading the
LED next to the port will ash blue. When it becomes constantly blue the unloading process has completed. Now pull the REDMAGto remove it
from the port.
8.4 SxS cards
Loading – push the SxS card into one of the two SxS card slots until there is a small click. It will load automatically and a green light will be
shown next to the slot to indicate it is loaded.
CODEX VAULT 2 - ADMINISTRATOR GUIDE REV 06.08.13
PAGE 10
Page 11

Unloading - push the SxS card into the slot to trigger the spring release.
8.5 SR Memory cards
Loading – open one of the doors on the SR module and push the SR Memory card into the drive. The loading process will begin, and during
this time the lights next to the card slot will ash blue. When the SR Memory card has loaded the lights will be constant blue.
Reading/Writing – the lights next to the SR Memory card will ash green when reading/writing.
Unloading - press the Unlock button next to the card slot, then pull the SR Memory card to remove it from the drive. Do not push the Unlock
button while the card is reading/writing.
8.6 AXSM Memory cards
Loading – gently insert the AXSM memory card fully into one of the AXSM ports. The loading process will begin, and when the AXSM memory
card has loaded the LED will become solid green.
Reading/Writing – the LED will be solid red when reading/writing.
Unloading – go to the Storage screen of the Vault User Interface, select the AXSM memory card, and press Eject. Now pull the AXSM memory
card to remove it from the port.
8.7 External drives and SSDs
The Vault allows general purpose hard drives and SSDs to be loaded via a range of connections: SAS/eSATA. USB3.0, and the 2.5 SSD and 1.8
SSD ports. The drives must be formatted with one of the following lesystems before it can be used with the Vault:
• FAT
• Ext3
• HFS
• HFS+
• NTFS
• XFS
• ExFAT
• UDF
Loading – connect the external drive or gently insert the SSD fully into one of the SSD ports. The loading process will begin, and when the
drive has loaded it will be shown on the Storage screen.
Unloading – go to the Storage screen of the Vault User Interface, select the drive, and press Eject. Now disconnect the drive or pull to remove
it from the SSD port.
CODEX VAULT 2 - ADMINISTRATOR GUIDE REV 06.08.13
PAGE 11
Page 12
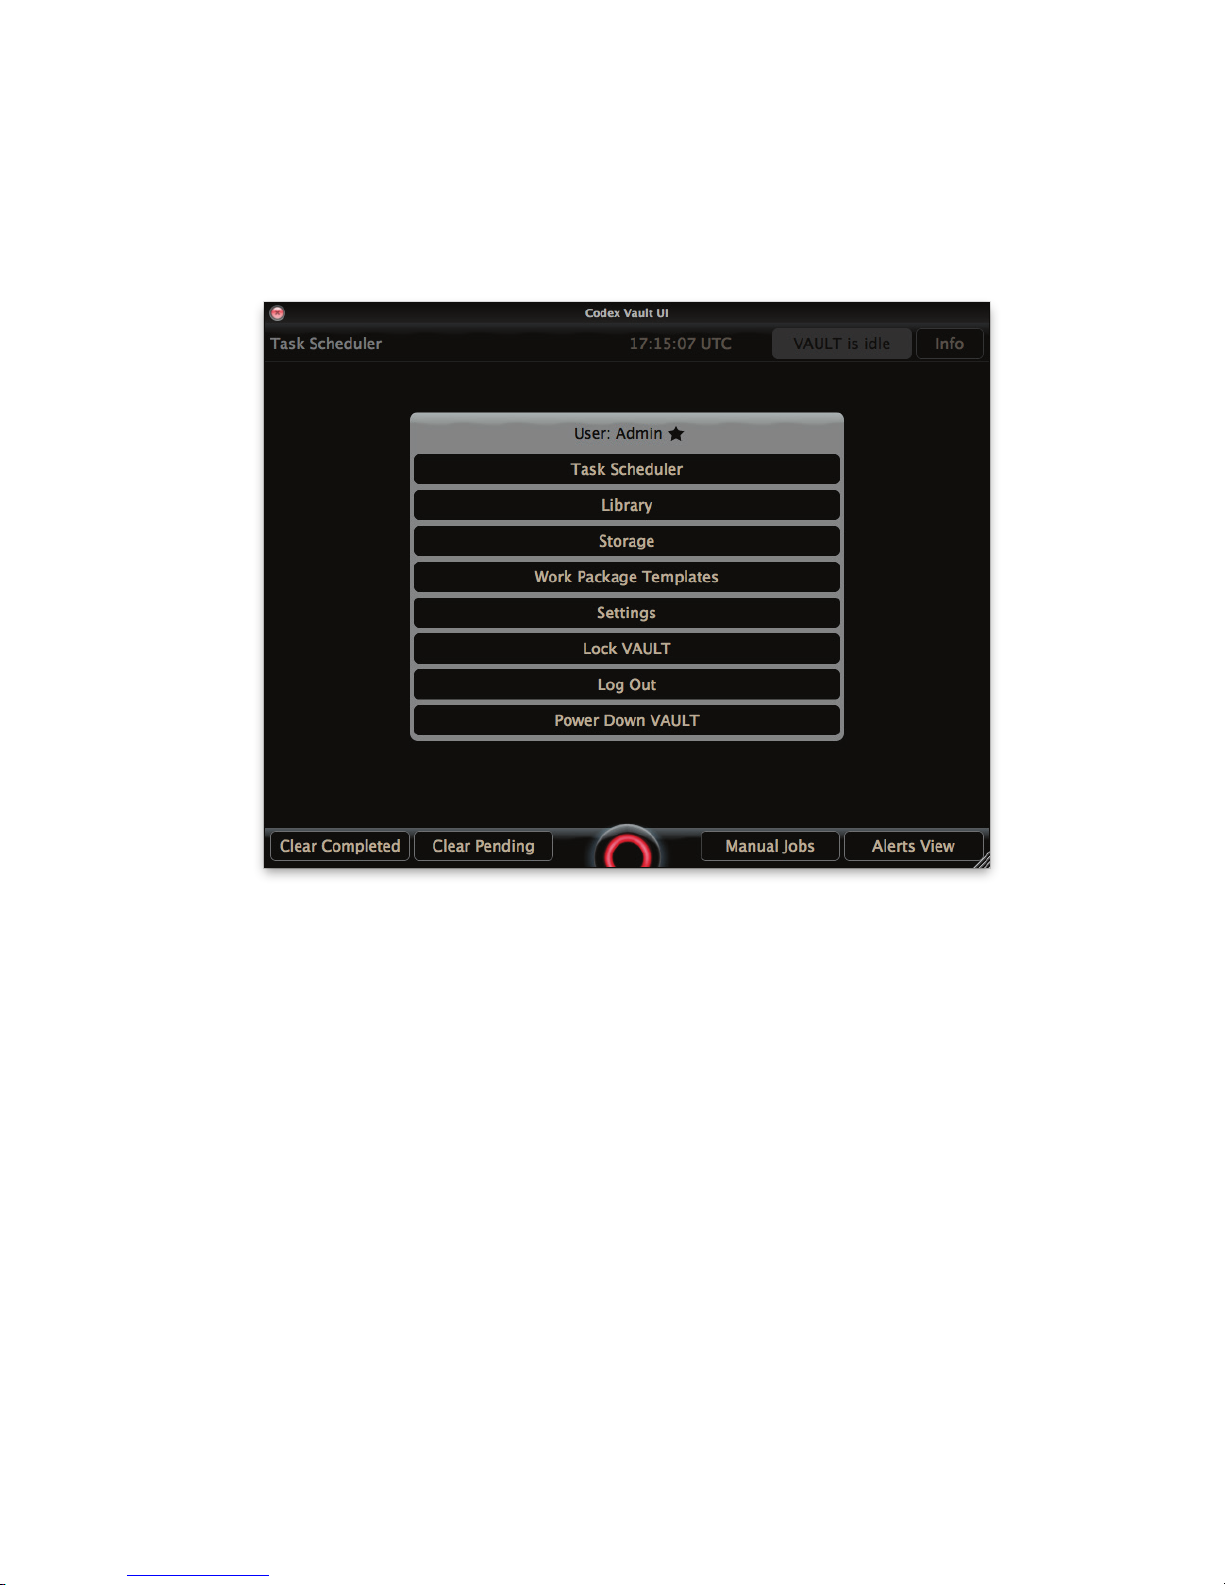
9. The Main Menu
After logging in you will be shown the Task Scheduler screen. This is where you can monitor the progress of any Tasks that are running, so the
screen is initially empty.
Select the blue Codex ring at the bottom of the screen to bring up the Main Menu (the blue Codex ring is available from any of the main
screens of the user interface):
The Main Menu provides access to the following:
Task Scheduler – to monitor the status of Tasks
Library – to edit metadata, play a preview of loaded shots and sync audio
Storage – to view details of the loaded media
Work Package Templates – for setting up the project “Work Templates”
Settings – for creating/deleting user accounts and other system settings (only accessible to Administrator accounts)
Lock Vault – to prevent unauthorised people from using the Vault
Log Out – as above, but also to allow a different user to log in
Power Down Vault – to initiate the shutdown process. Alternatively, press the Power Button on the side of the Vault which will bring up the
option to power down the system. The system cannot be powered down if there are active Tasks.
CODEX VAULT 2 - ADMINISTRATOR GUIDE REV 06.08.13
PAGE 12
Page 13
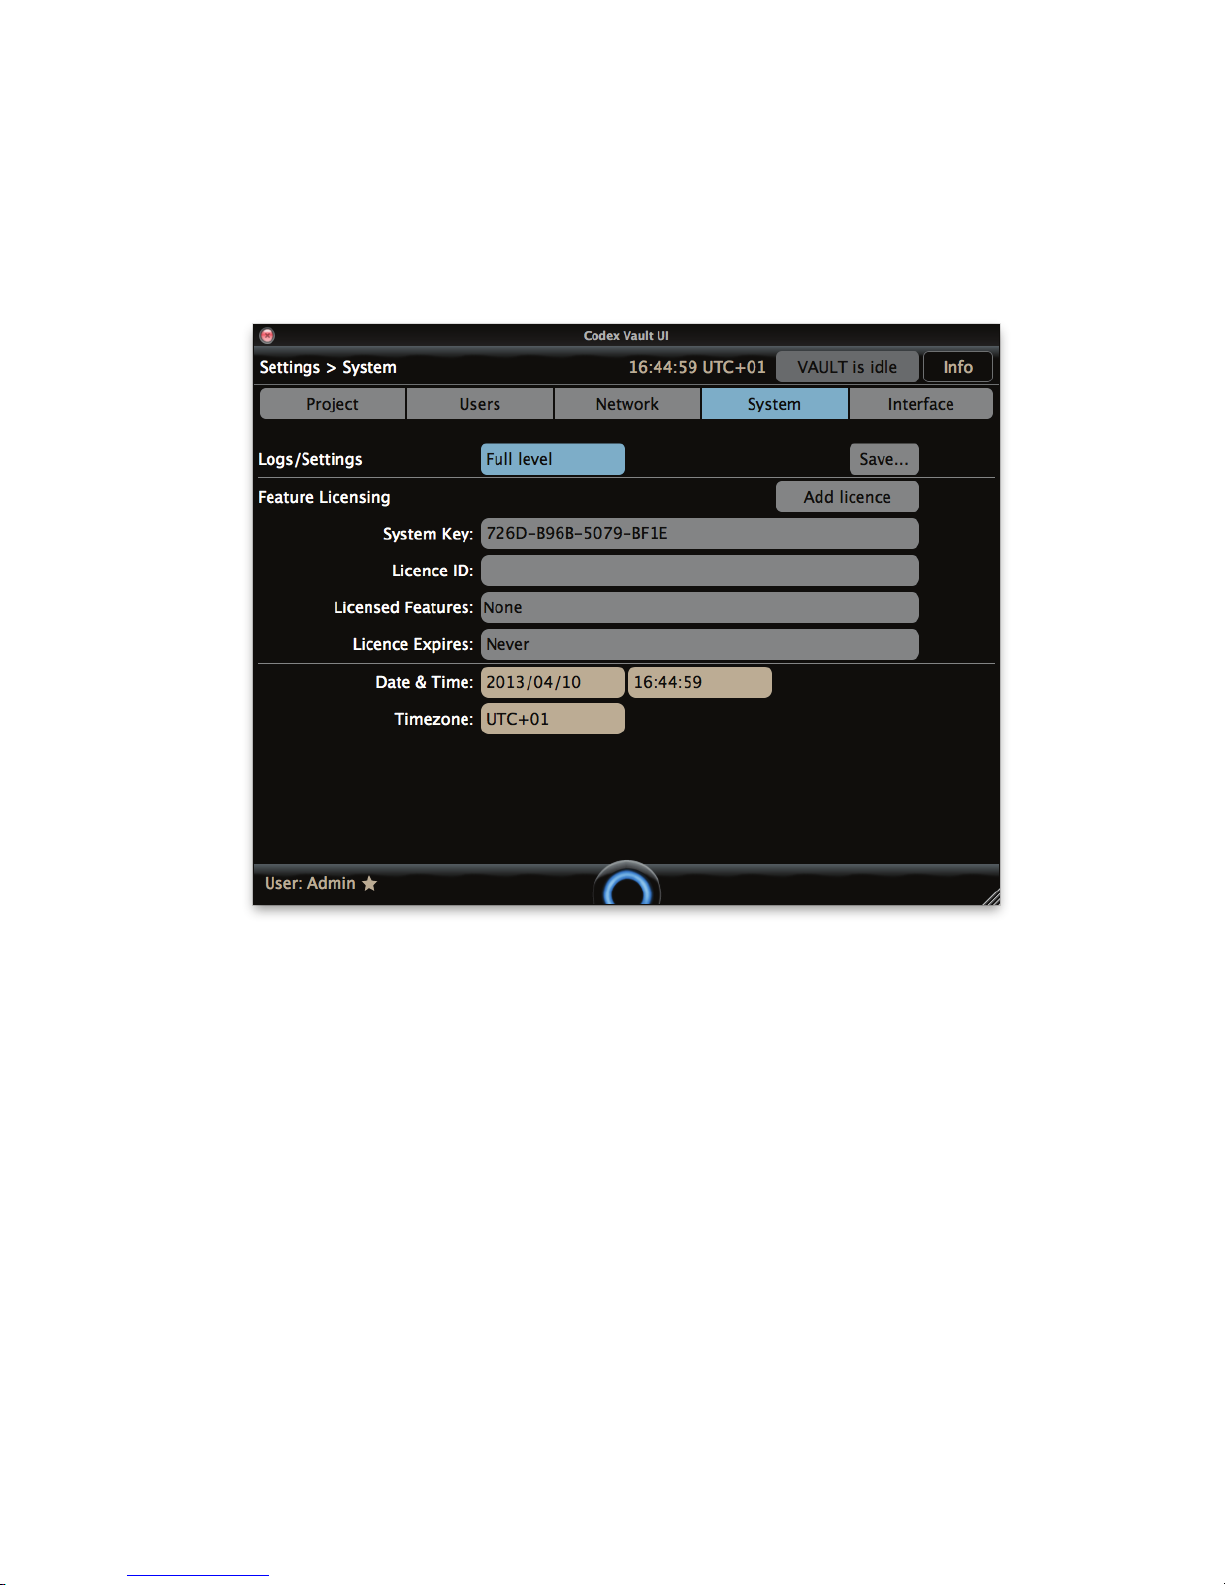
10. Preparing the Vault for a new project
There are some important steps that should normally be done before the start of a new project:
10.1 Saving Logs
The rst step is to save the system log les, which includes the media history - a record of all the media from a project. Log in with an
Administrator account, open the Main Menu and go to the Settings screen. Select the System tab.
The logs can either be saved onto the Vault itself, or onto a USB stick. If you are saving the logs to a USB stick connect it now.
There is a toggle button for either ‘Default level’ or ‘Full level’. Set this to ‘Full level’, then press Save...
The le browser screen will be shown. If you are saving the logs to the Vault system drive, choose the /tmp directory. Alternatively select your
USB stick.
There will be two les saved, e.g.
vaults1048_20130308_142631_logs.tgz
vaults1048_20130308_142631_settings.tgz
The naming of these les uses this information:
vaults<SerialNumber>_<Date>_<Time>_logs.tgz
The _logs.tgz includes a le called localdb that contains the history of all media that has been processed on the Vault in the most recent project
(i.e. since it was last cleared). It is therefore important to keep a copy of this le for future reference.
The _settings.tgz contains the Work Package Templates and other more general settings les.
CODEX VAULT 2 - ADMINISTRATOR GUIDE REV 06.08.13
PAGE 13
Page 14
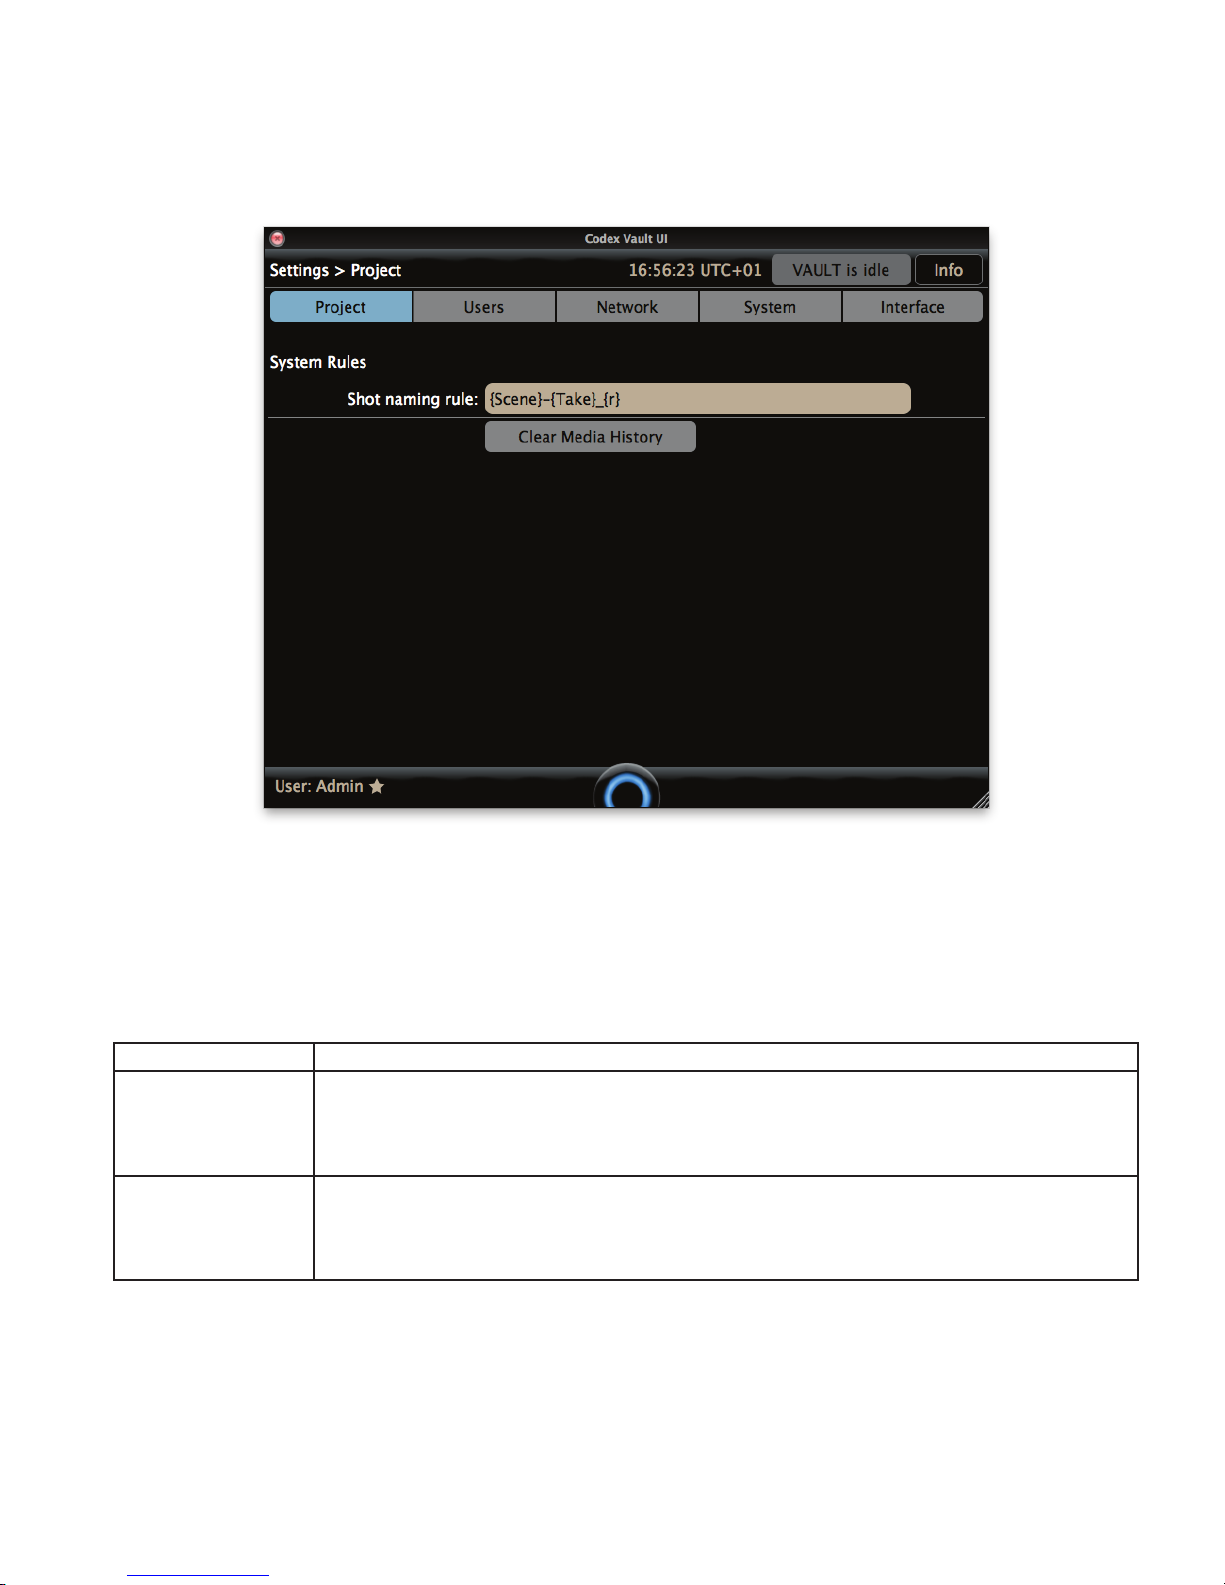
10.2 Clear Media History
Now you have a backup of the history and settings from the last project, these can be cleared from the Vault. From the Settings screen select
the Project tab.
Press the Clear Media History button, which will delete the localdb le. Doing this will prevent the Vault from reporting clashing media names
during the new project if a name matches media from the previous project.
10.3 Setting up the Storage module
The Storage module can be formatted in two ways, and this determines what type of material can be stored:
Type Supported material
Codex (RAID-3 Internal) When formatted in this way, the Internal storage can contain material recorded in the Codex Intermediate Format
XFS (RAID-5 XFS) When formatted in this way, the Internal storage can contain material recorded to other types of recording system
Open the Main Menu and go to the Storage screen.
using a Codex Onboard M, Onboard S, or ALEXA XT camera (ARRIRAW).
It cannot contain material from other types of recording system, such as ARRI ALEXA XT or SxS (ProRes), Sony
SR Memory, AXSM, RED drives, etc.
such as ARRI ALEXA XT or SxS (ProRes), Sony SR Memory, AXSM, RED drives, etc.
It cannot contain material recorded in the Codex Intermediate Format using a Codex Onboard M, Onboard S, or
ALEXA XT camera (ARRIRAW).
CODEX VAULT 2 - ADMINISTRATOR GUIDE REV 06.08.13
PAGE 14
Page 15
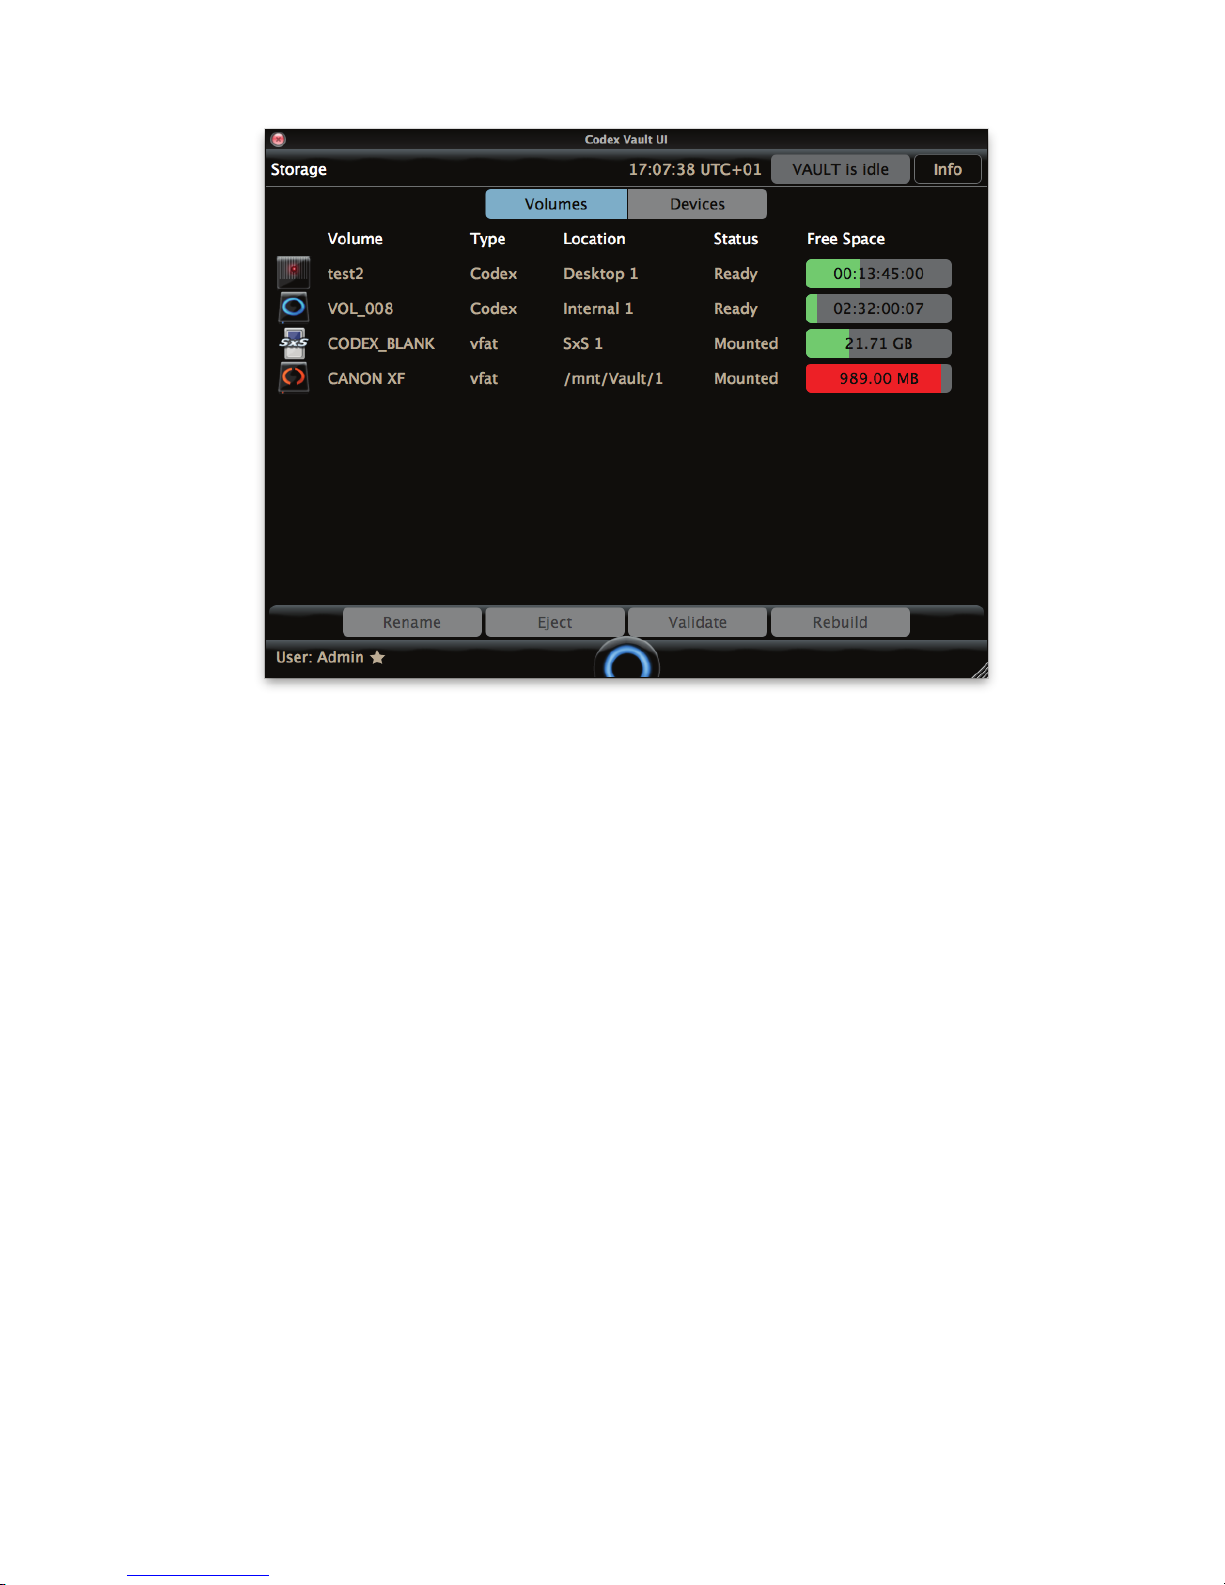
10.4 Reformatting the Storage module
The Storage module may contain shots from the previous project, which will be indicated in the Free Space area by the coloured bar and the
remaining capacity. You will probably want to reformat the storage to delete these shots, which should only be done if there is conrmation that
the data has been securely backed up to another storage location.
This can be done by reformatting the Storage module with the following steps:
1. Open the Main Menu and go to the Storage screen. Press the Devices button
2. Press to highlight the Internal storage, and then press the Create button.
3. Set the Name of the Internal storage (this is limited to 8 characters).
4. Set the Type as either ‘RAID-3 Codex Internal’ or ‘RAID-5 XFS Internal’ depending on the requirement for your workow.
5. Press OK and a progress bar will be shown as the drives are formatted as the selected type. Once complete the message “Volume created
successfully” will be shown.
CODEX VAULT 2 - ADMINISTRATOR GUIDE REV 06.08.13
PAGE 15
Page 16
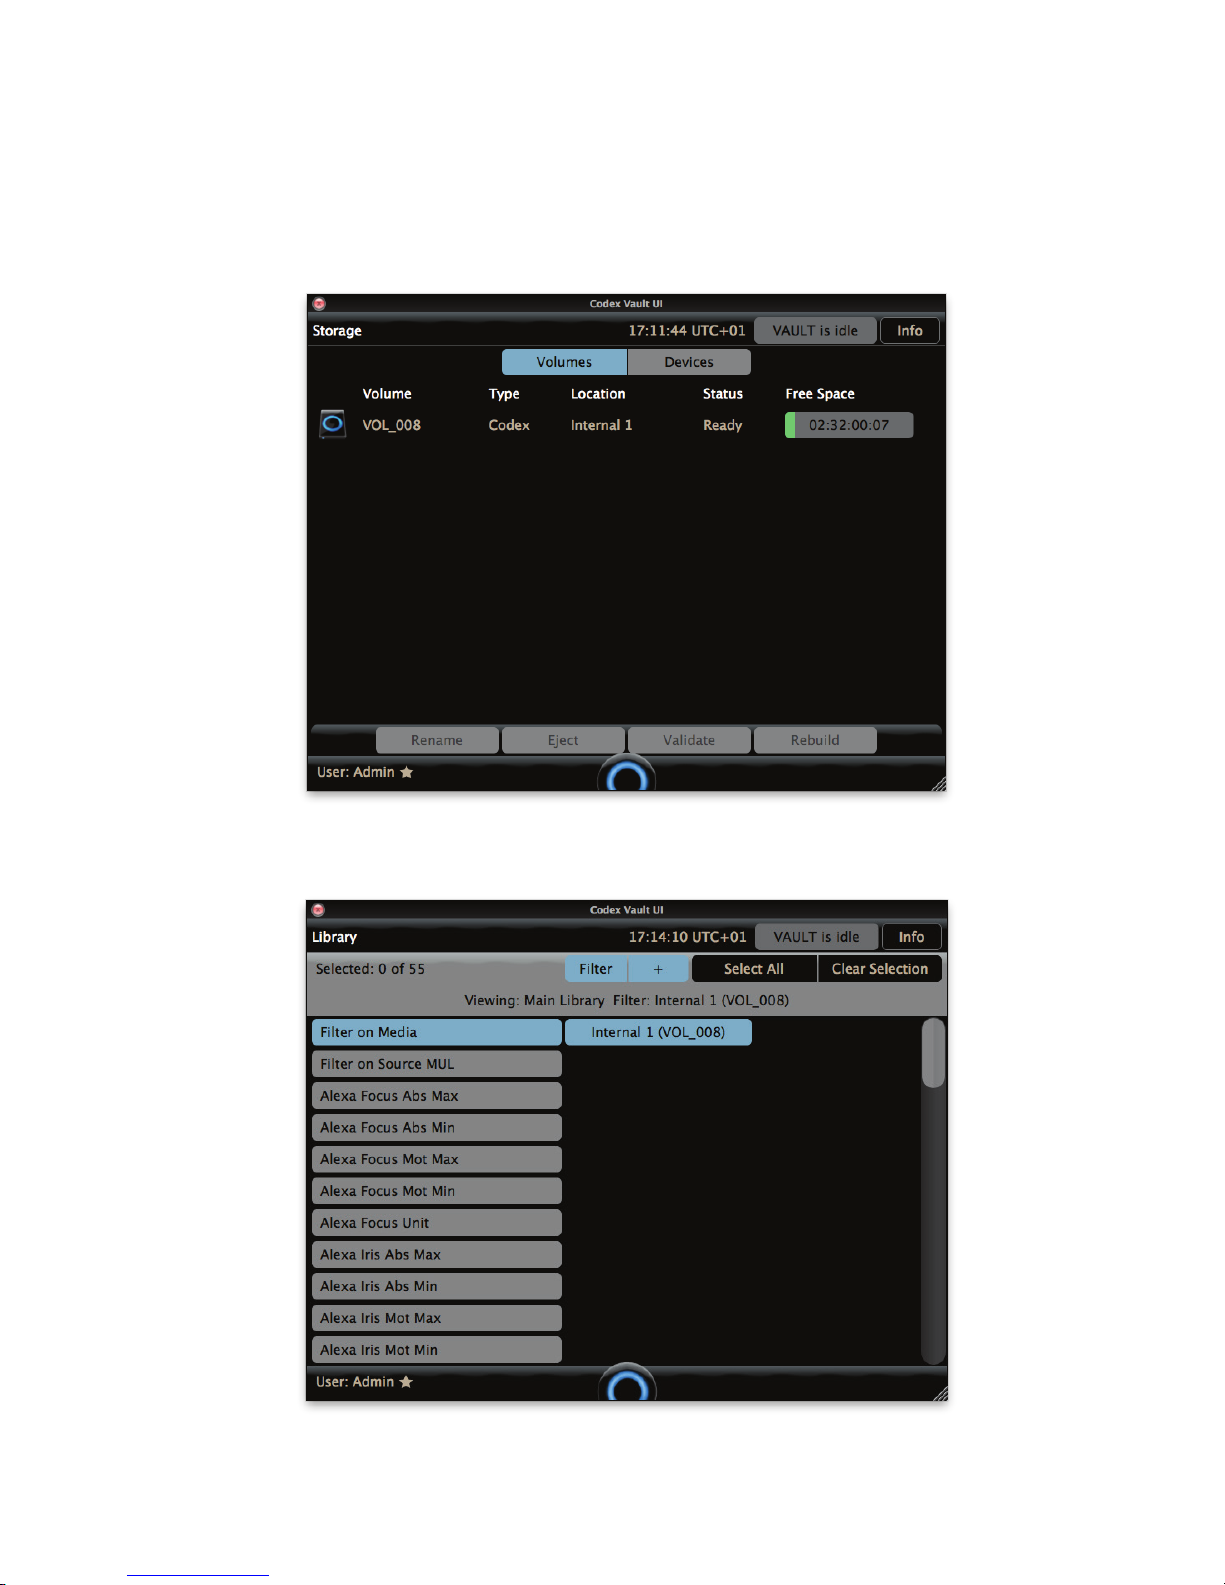
11. During a project - Clearing space on the Internal Storage
The Storage Module has a capacity of 8TB, and during a project it can become full and you will need to clear off older material (that you know
has been backed up securely, of course!).
1. For safety, go to the Storage screen and eject all other media from the Vault, so that only the Internal storage is loaded:
2. Open the Main Menu and go to the Library. Press the + icon and then set Filter on Media to the Internal storage:
CODEX VAULT 2 - ADMINISTRATOR GUIDE REV 06.08.13
PAGE 16
Page 17
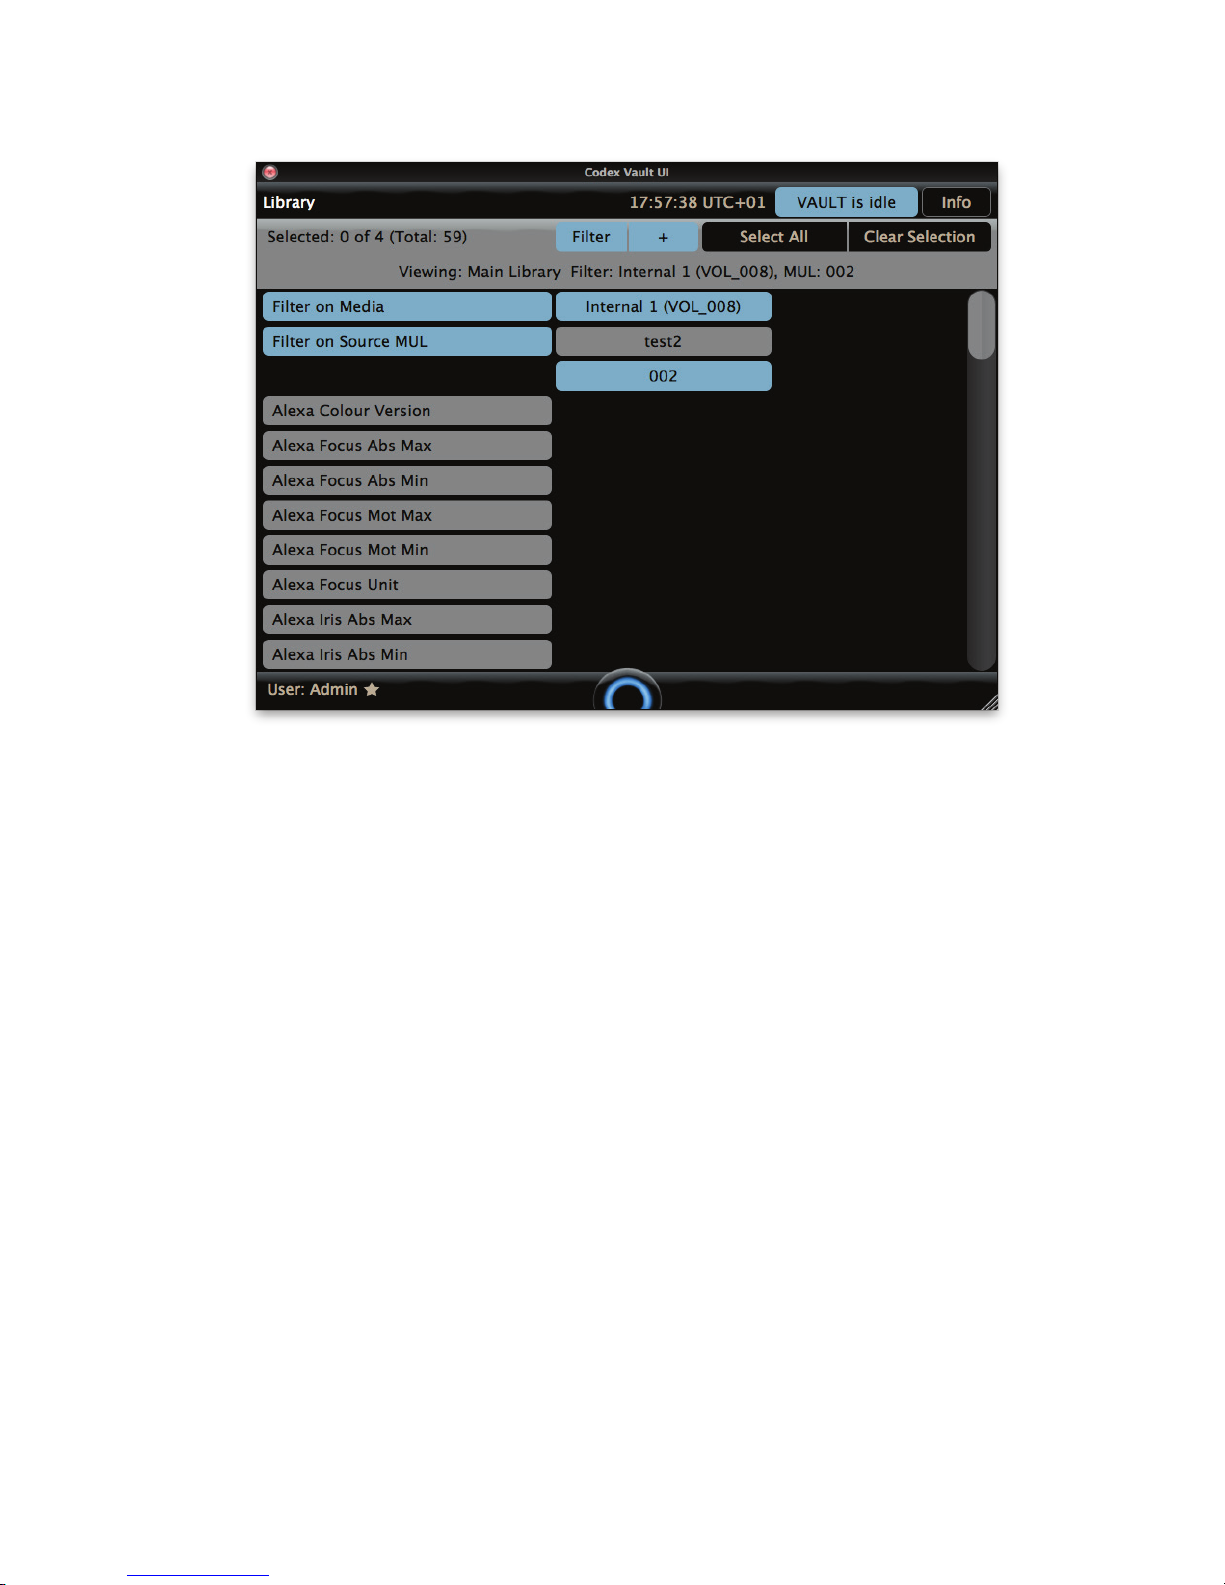
3. Press Filter on Source MUL and then highlight the groups that you want to delete.
4. Press the Filter button to apply this lter, and then press + to return to the main Library view.
5. Press Select All and then press Manage.
6. Press Delete Selected. You will be shown a list of the shots that will be deleted. Press the Delete button to proceed, or if you are not sure
press Cancel.
Note: the Delete Selected function in the Library is only available to Administrator accounts.
CODEX VAULT 2 - ADMINISTRATOR GUIDE REV 06.08.13
PA GE 17
Page 18
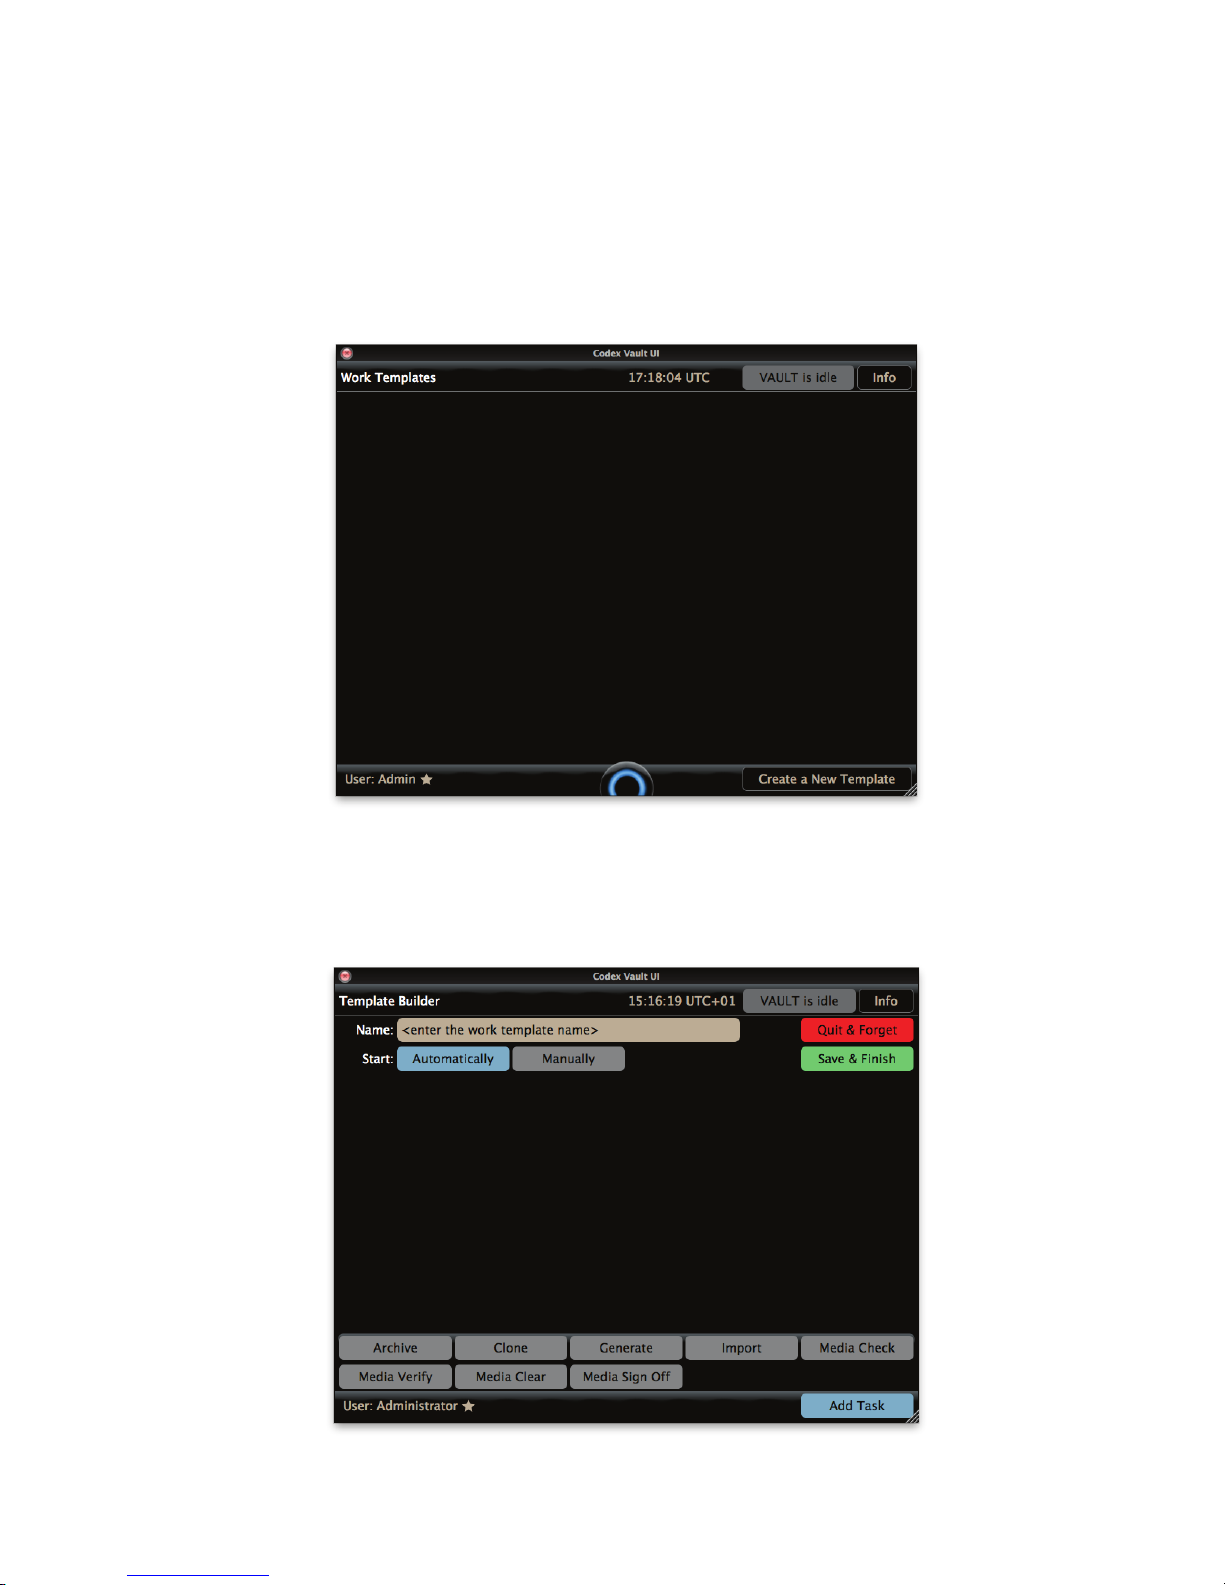
12. Work Templates
Select ‘Work Package Templates’. This is where the Administrator can create and view the different Work Templates on the Vault system. The
Work Templates dene the workow for the Vault on a project, and therefore setting up the Work Template(s) is an important responsibility of the
Administrator.
Note: only Administrator accounts can edit the Work Templates.
The Work Templates screen may initially be empty:
12.1 Creating a Work Template
Select ‘Create a New Template’ and the Template Builder screen is shown:
CODEX VAULT 2 - ADMINISTRATOR GUIDE REV 06.08.13
PAGE 18
Page 19
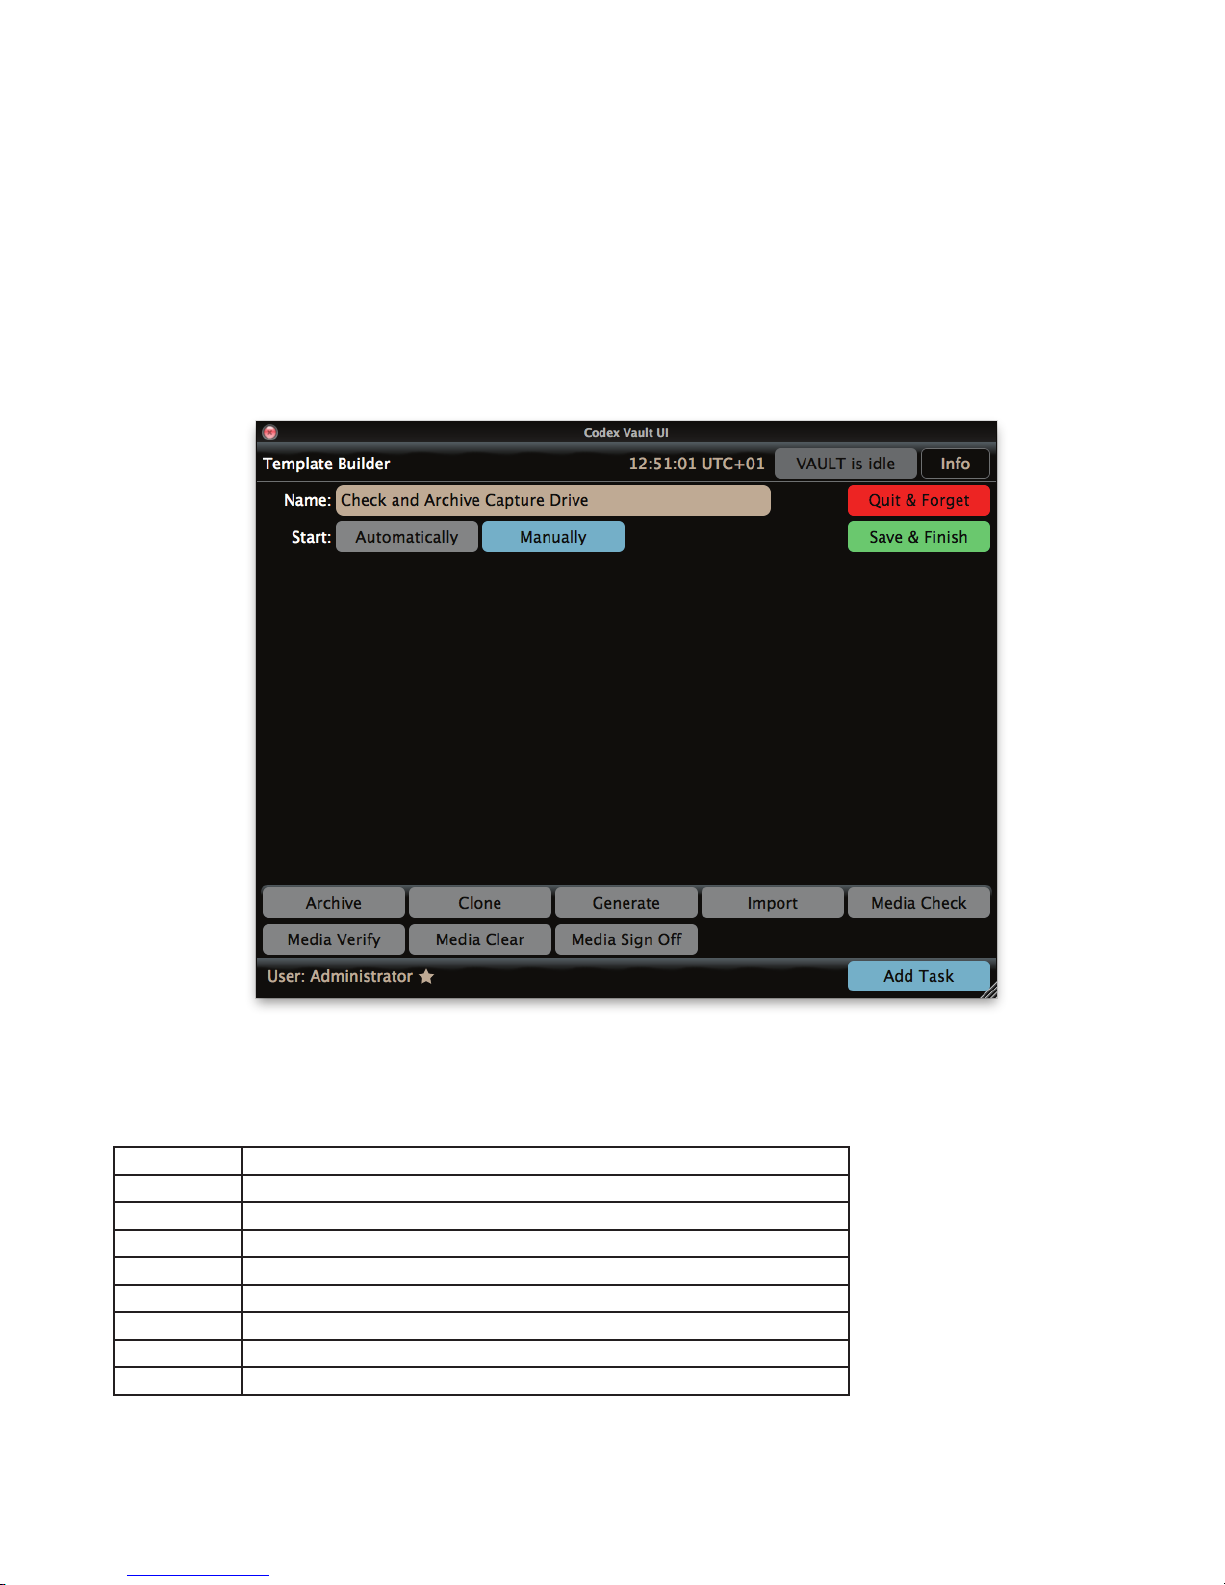
At the top of the screen you can edit the name of the Work Template, normally to something self explanatory, e.g. Check and Archive Capture
Drive.
The Work Template can be set to start Automatically, Manually, or both. Simply highlight the setting in blue that is required.
When set to start Automatically the Work Template will begin when media is loaded in the specied port - this could be any port or a specic
port depending on how the Work Template is set up. When set to start Manually the Work Template will be accessible from the Manual Jobs
screen (available from the Task Scheduler screen).
12.2 Adding a Task to the Work Template
A range of possible tasks are shown at the bottom of the screen:
Click a task type to add it. After adding a task, click Add Task again to add further tasks to the Work Template.
The table below gives a brief description of these Tasks:
Task Name Description
Archive Copies data to LTO5 tape and then performs verication.
Clone Makes an identical copy of data from one media to another.
Generate Generates les for post-production to an external drive.
Media Check Provides an overview on the contents of media and reports any issues found.
Media Verify Performs a checksum-based verication of media.
Media Clear Deletes the data from specied media.
Media Sign Off Marks that all required tasks are completed with media so it can be cleared.
Import Imports les from an external disk or LTFS tape
The next image shows the Template builder screen with Media Check and Archive Tasks that have been added:
CODEX VAULT 2 - ADMINISTRATOR GUIDE REV 06.08.13
PAGE 19
Page 20
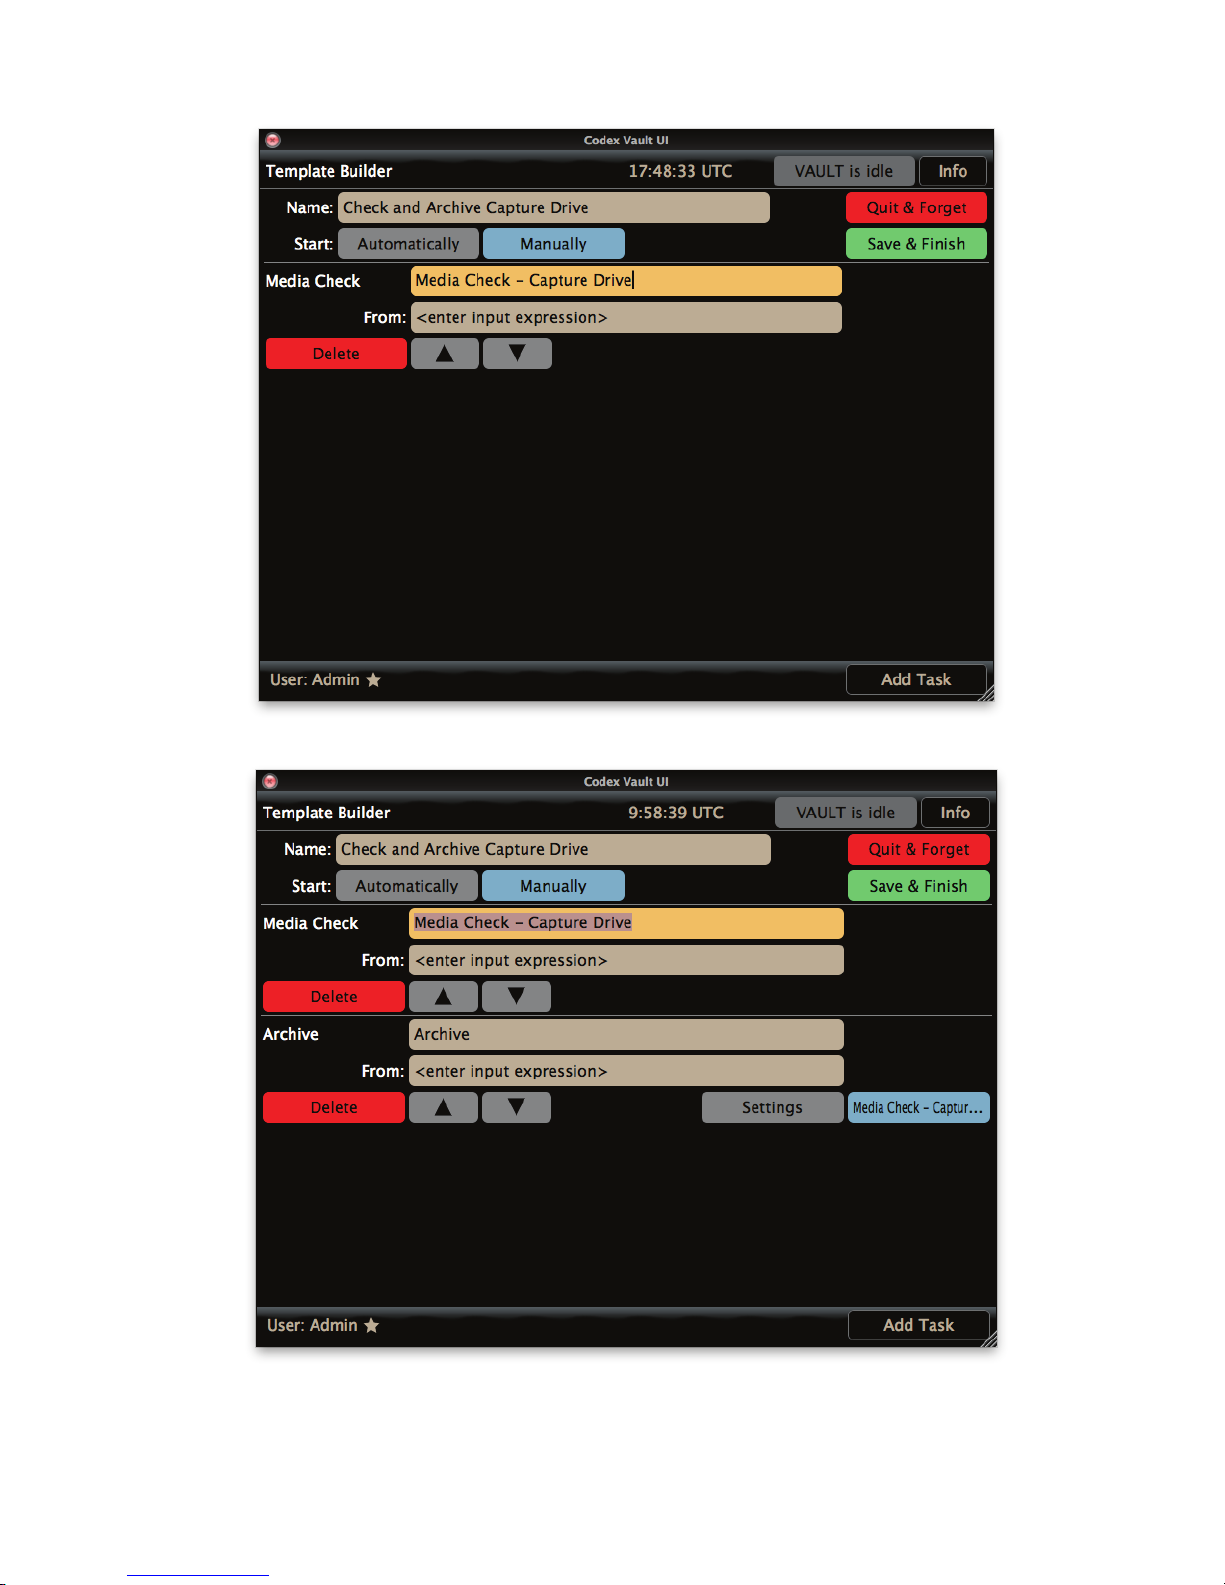
Important Note: a Task is considered complete when it nishes - for any reason. For example rather than completing as expected, a Generate
task could stop due to an error with the external disk (e.g. power loss). If this happened the Vault would still proceed with subsequent tasks in
the template (because you may still want an Archive to LTFS despite the disk issue). It is therefore important to conrm on the Task Scheduler
that tasks have completed as expected
CODEX VAULT 2 - ADMINISTRATOR GUIDE REV 06.08.13
PAGE 20
Page 21
For each Task you can specify a more descriptive name, e.g. ‘Clone from Capture Drive to Internal’. By default each Task is simply called by its
type, e.g. ‘Clone’, ‘Archive’, etc. If there is more than one of the same task type they must be given unique names.
Any Task can be removed from the Template using the Delete button, and the order of the Tasks in the Template can be changed using
For most Tasks there is a ‘From:’ eld for which you select the media that is used as the input for the Task (where the data is coming from).
Some Tasks also have a ‘To:’ eld for which you select the media that is used as the output for the Task (where the data is going to). Setting up
the expressions for the ‘From:’ and ‘To:’ elds is described in the section ‘From and To Expressions’.
Some Tasks have an option to ‘Eject Output’. This means that when the Task has completed the media used as the output for the Task will be
ejected from the Vault and it can be safely removed.
For most Tasks there are ‘Settings’ that can be chosen. Full options for each task type will be described later in this guide.
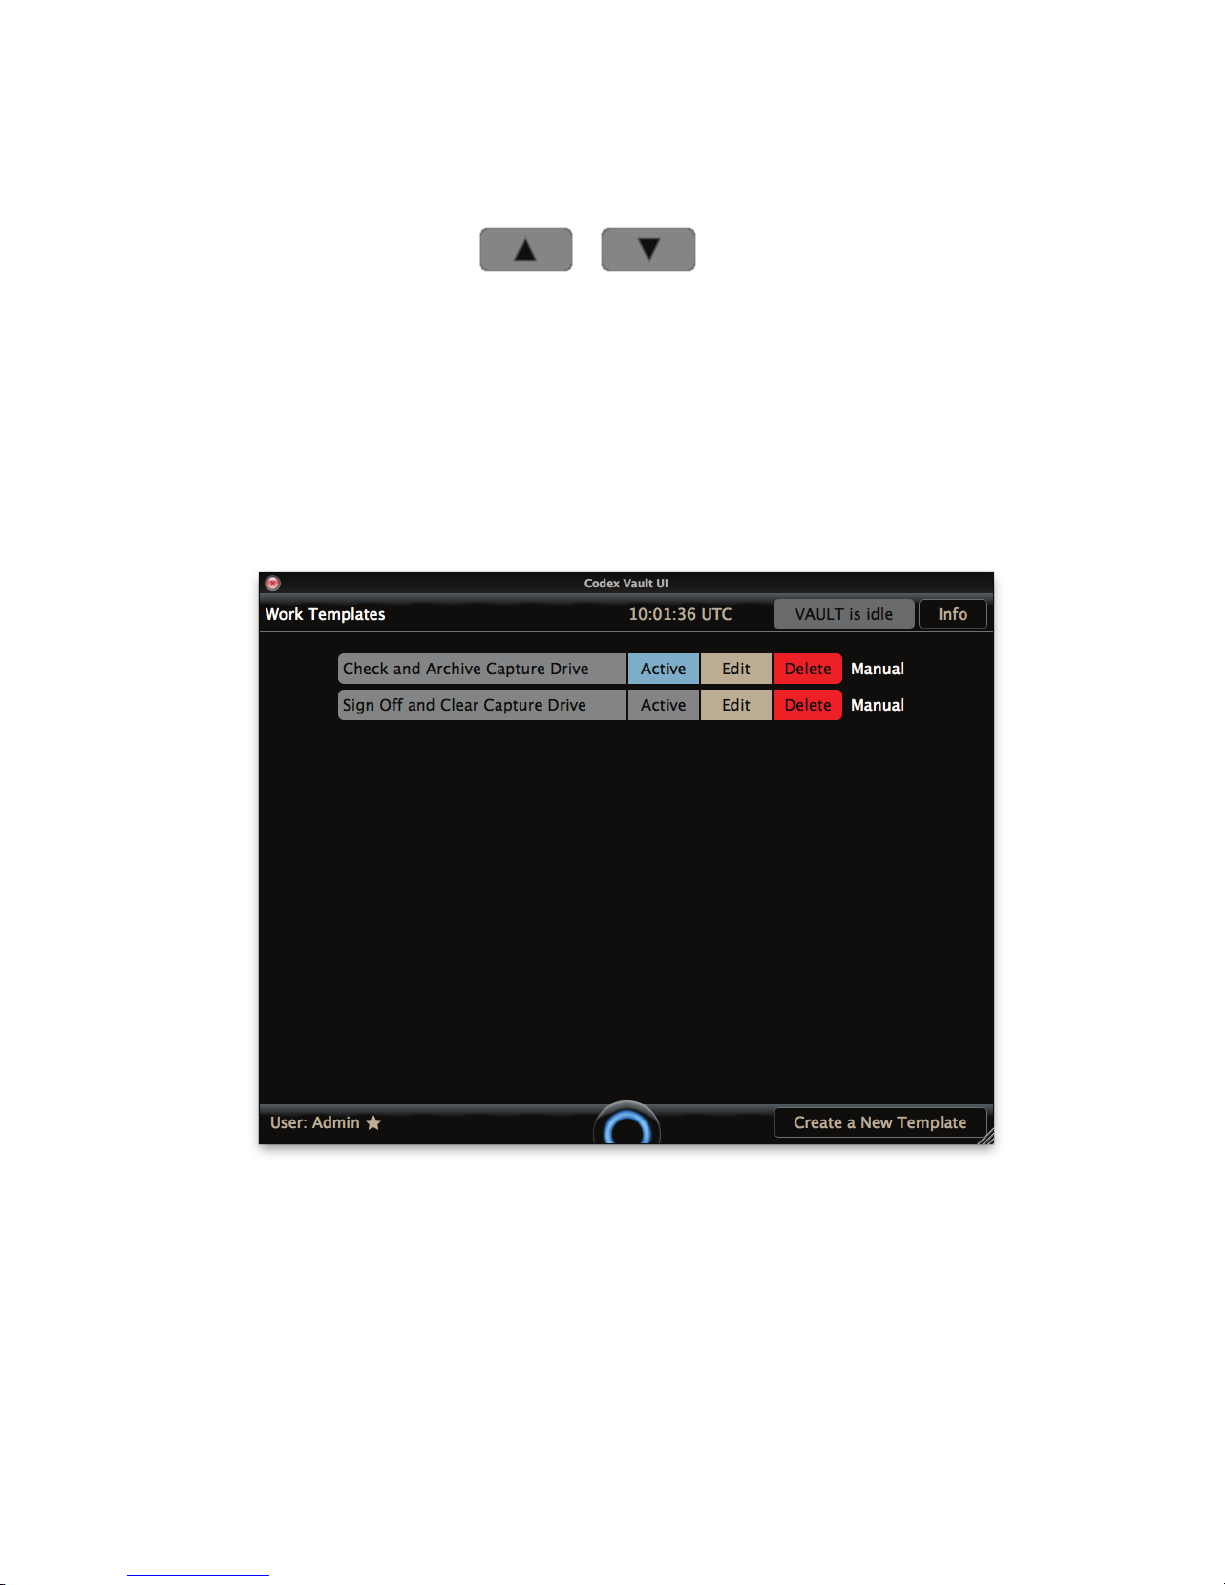
Once you have nished dening a Work Template select Save & Finish. (If you don’t want to save the Work Template, select Quit & Forget.) It
will be added to the list of Work Templates on the system:
From this screen you can select if a Work Template is Active. If a Work Template is set to start Automatically then it will only be able to start
when it is Active. If a Work Template is set to start Manually then it will only be shown on the Manual Jobs screen when it is Active.
You can also choose to Edit or Delete any Work Template from this screen.
CODEX VAULT 2 - ADMINISTRATOR GUIDE REV 06.08.13
PAGE 21
Page 22
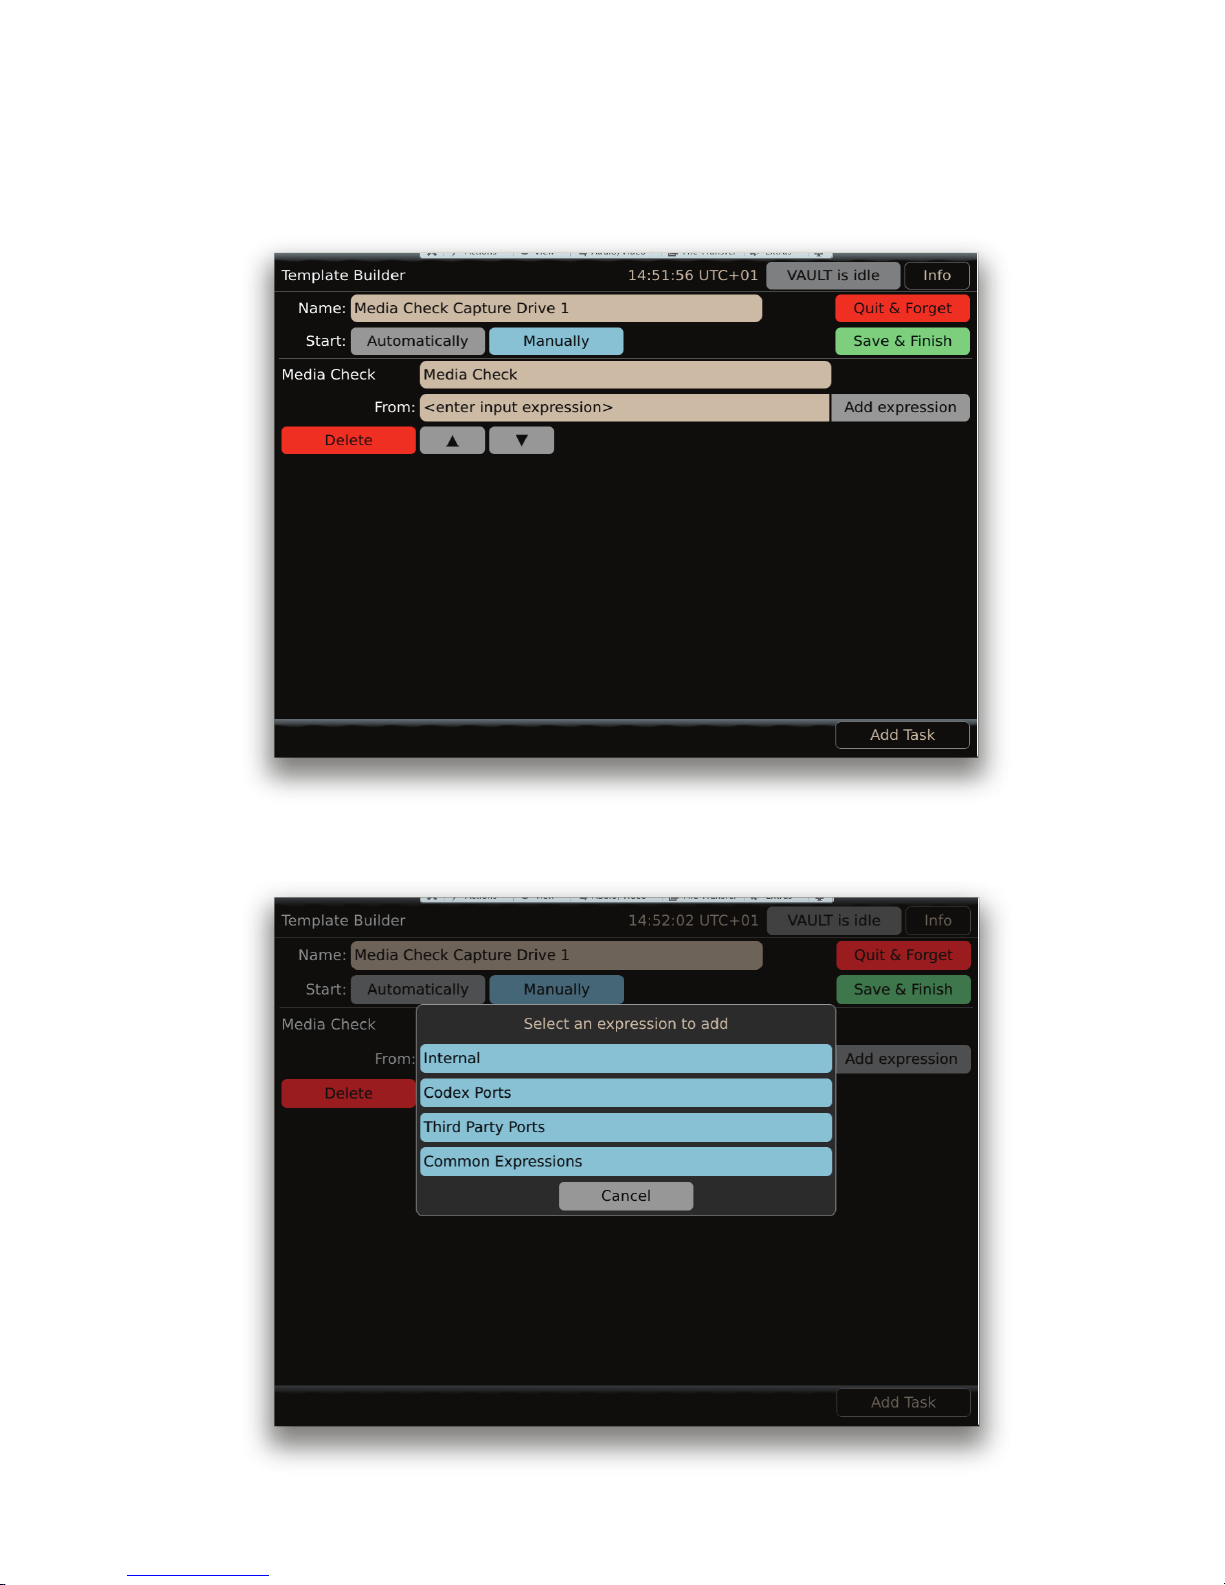
13. From and To Expressions
In the ‘From:’ and ‘To:’ elds for a Task we can set expressions, which are used to dene where the source and destination media are loaded.
Next to the ‘From:’ or ‘To:’ elds there is an ‘Add expression’ button:
Select the Add expression button to open a list of categories for different media ports on the Vault:
CODEX VAULT 2 - ADMINISTRATOR GUIDE REV 06.08.13
PAGE 22
Page 23
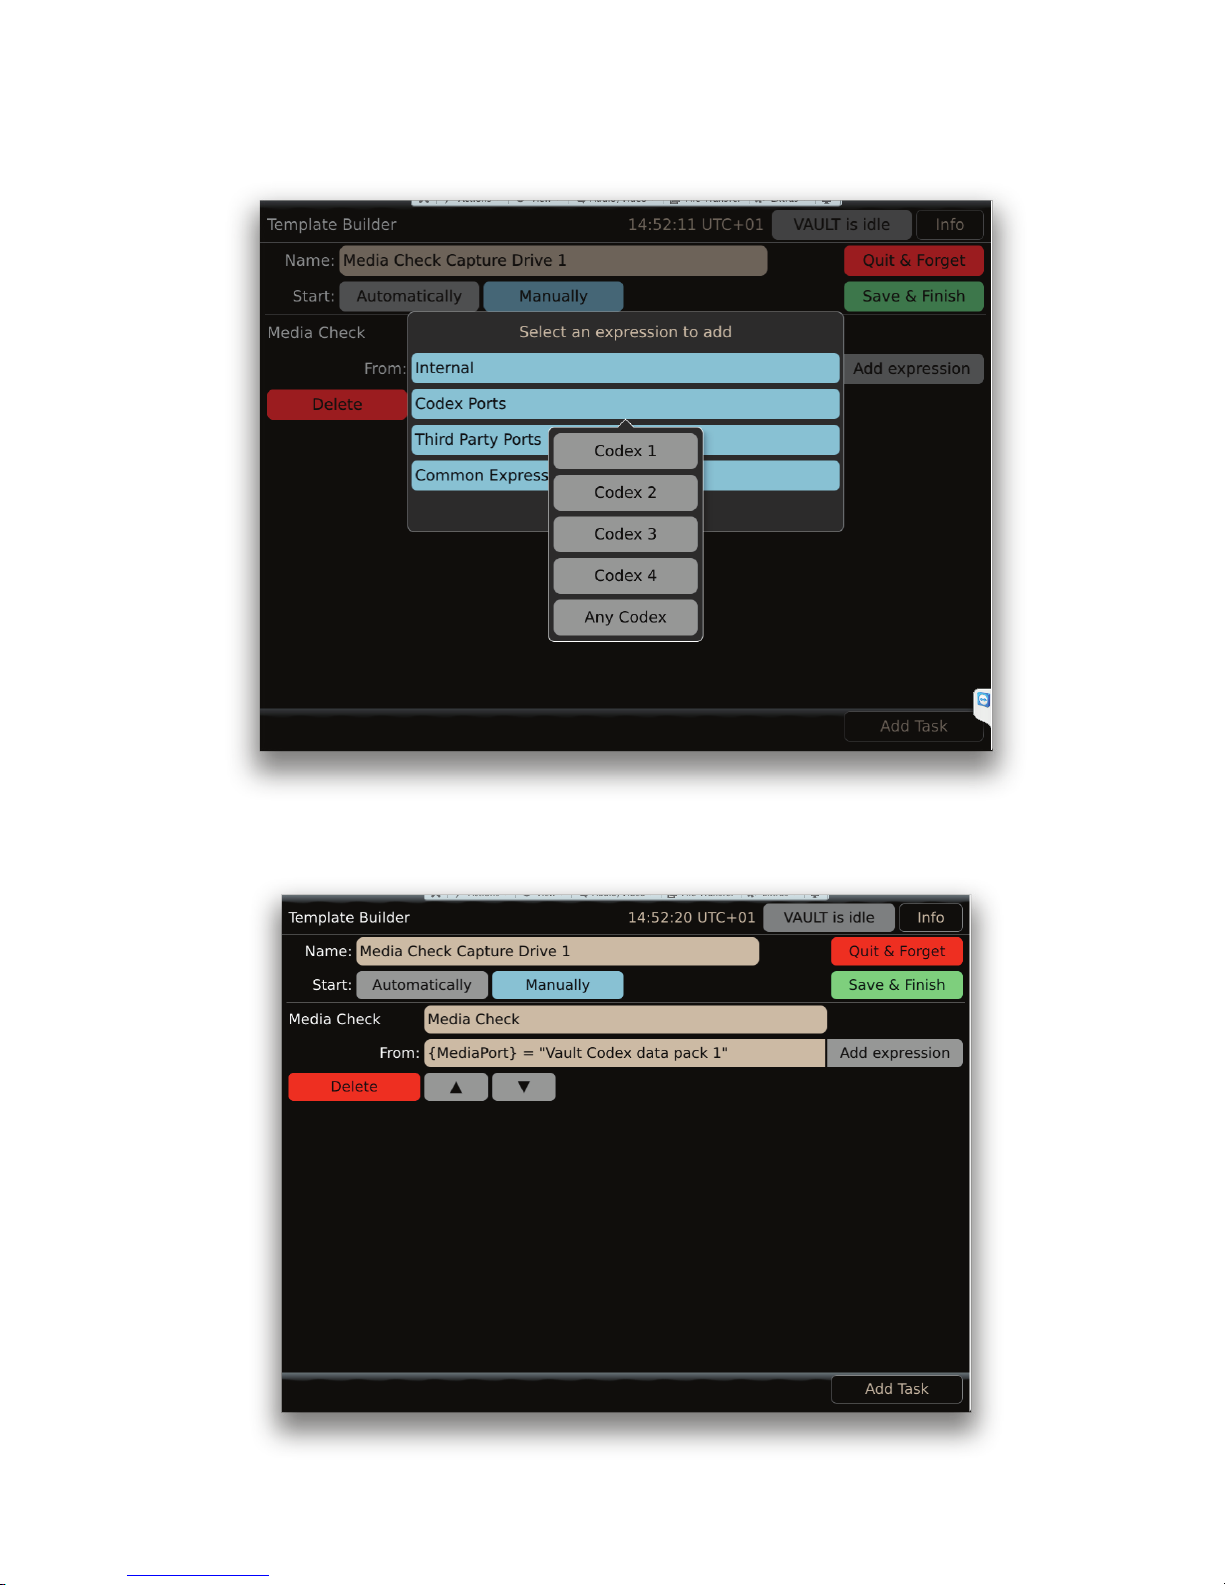
Choose the relevant category and then select the media port you would like to use. You can select a specic media port or in some cases
select to use any of a particular type of media port:
In the From: eld the full expression will then be automatically inserted.
CODEX VAULT 2 - ADMINISTRATOR GUIDE REV 06.08.13
PAGE 23
Page 24
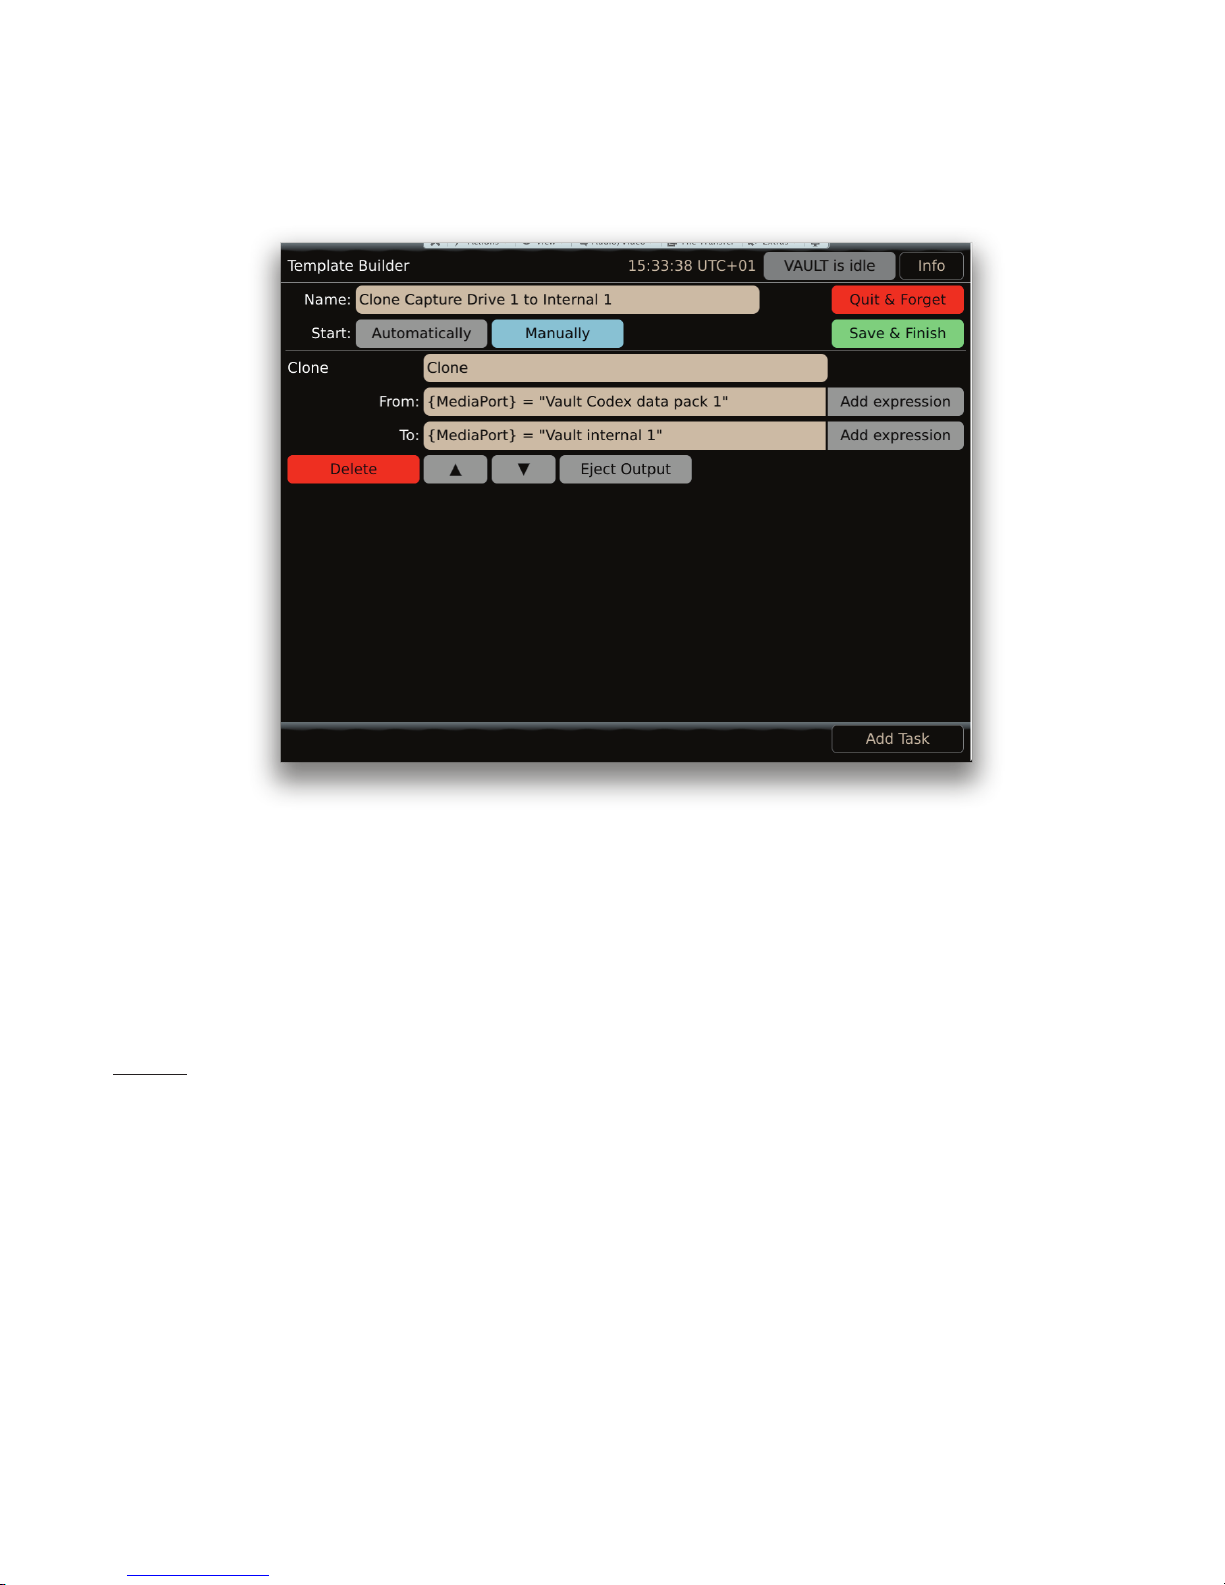
Most Tasks require a ‘‘From:’ expression that species the {MediaPort} - physical location of the media - for the Task. So in this case the Media
Check will run on the media that is loaded in the CODEX 1 port.
In addition to an input expression the Media Clone Task also requires an output expression in the ‘To:’ eld, as shown here:
This Task will clone material from the media loaded in the CODEX 1 port to the Internal 1 (Storage Module).
The Add expression button allows the most common expressions to be entered very easily. More advanced users can enter expressions
manually if required, using the information in the next section.
13.1 Full options for From and To Expressions
The options for these expressions are:
MediaPort
{MediaPort} can be:
Vault Onboard data pack
Vault Codex data pack 1
Vault Codex data pack 2
Vault Codex data pack 3
Vault Codex data pack 4
AXSM 1
AXSM 2
Vault RED 1
Vault RED 2
Vault internal 1
Vault internal 2
Vault removable 1
Vault removable 2
SxS 1
SxS 2
SR Memory 1
SR Memory 2
CODEX VAULT 2 - ADMINISTRATOR GUIDE REV 06.08.13
PAGE 24
Page 25
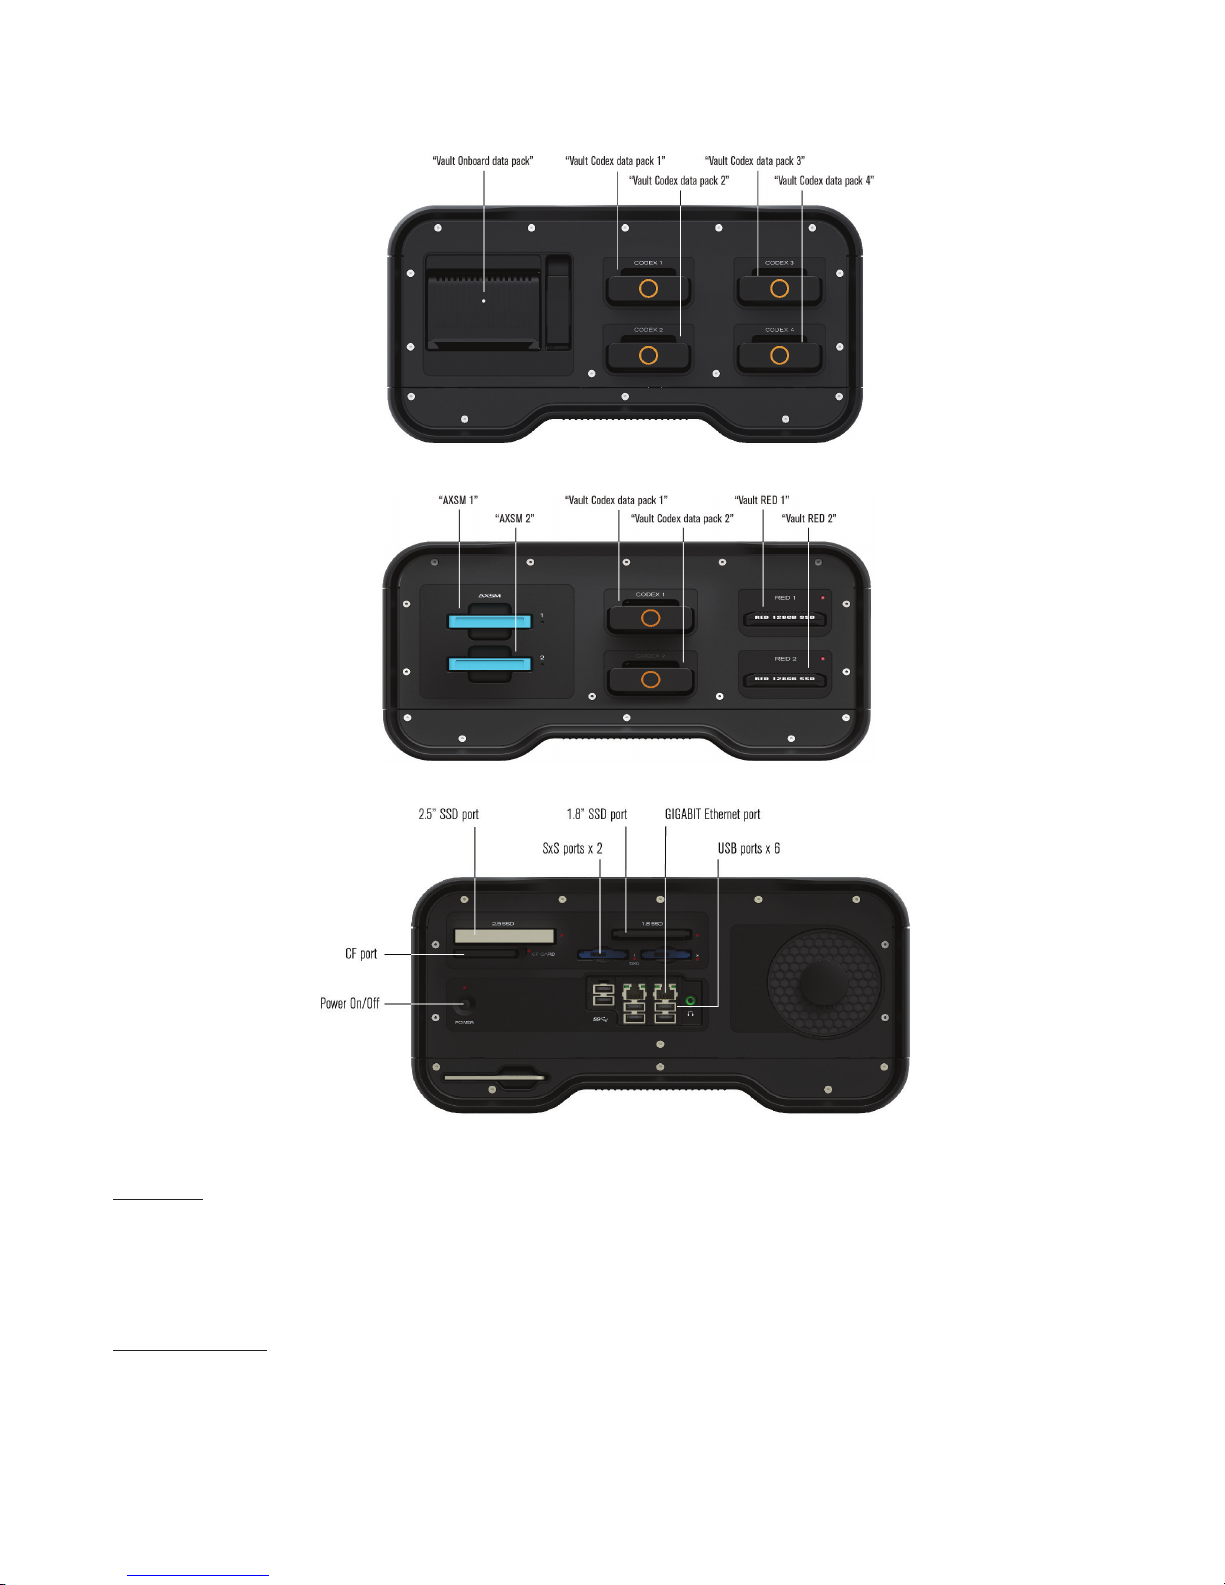
This diagram shows how the MediaPort names correlate to the physical ports on the Vault
Note: Only the SxS ports on this side of the Vault can be used in expressions.
MediaEmpty
{MediaEmpty} can be:
[0|1]
This is used with the output expression to only copy to empty media. A value of 1 means the destination is required to be empty before
copying. A shortcut to this is available through Add expression->Common Expressions, titled ‘Only If Media Is Empty’.
PreviousTaskMULList
A shortcut to this is available through Add expression->Common Expressions->‘Source clips: Same as previous task’.
{PreviousTaskMULList} can be used when there are several tasks grouped together in a Work Template. A task will process a group of
shots and the use of {PreviousTaskMULList} in the From expression for the next task means this will also process the same shots. Use of
{PreviousTaskMULList} in expressions is detailed in the next section.
CODEX VAULT 2 - ADMINISTRATOR GUIDE REV 06.08.13
PAGE 25
Page 26

InitialTaskMULList
A shortcut to this is available through Add expression->Common Expressions->‘Source clips: Same as initial task’.
{InitialTaskMULList} can be used when there are several tasks grouped together in a Work Template. The rst task will process a group of shots
and the use of {InitialTaskMULList} in the From expression for any subsequent tasks means they will also process the same shots.
PreviousTaskInputMUL
A shortcut to this is available through Add expression->Common Expressions->‘Media: Same as previous task input’.
{PreviousTaskInputMUL} can be used when there are several tasks grouped together in a Work Template. A task will process a given media
and the use of {PreviousTaskInputMUL} in the From expression for the next task means this will use that same physical media. Use of
{PreviousTaskInputMUL} in expressions is detailed in the next section.
PreviousTaskOutputMUL
A shortcut to this is available through Add expression->Common Expressions->‘Media: Same as previous task output’.
{PreviousTaskOutputMUL} can be used when there are several tasks grouped together in a Work Template. A task will utilize a specied media
to output to and the use of {PreviousTaskOutputMUL} in the From expression for the next task means this will use that same physical media.
Use of {PreviousTaskOuputMUL} in expressions is detailed in the next section.
13.2 Syntax for From and To Expressions
When specifying the From or To expression manually it must be written with the correct syntax. If spelling, case, or spacing is incorrect then it
will not work. The software will not warn you if the syntax of the expression is wrong.
Here are some basic rules:
1. You must at minimum specify {MediaPort} followed by an equals symbol (=) and the name of the port in “quotes”. Examples are:
{MediaPort} = “Vault Onboard data pack”
{MediaPort} = “Vault Codex data pack 1”
2. There are no spaces between the words in {MediaPort}, and the M and P must be capitalized with other letters lower case. For example,
entering {Media port} will not work.
3. When specifying the name of the {MediaPort} there are spaces between the words. For example, “Vault Onboard data pack” is correct, whilst
“VaultOnboarddatapack” is not correct.
4. The asterisk * symbol can be used to mean ‘any’. For example:
{MediaPort} = “*”
This can be useful if, for example, you want to set up a Work Template to run automatically when media is loaded in any port and the user will
then be asked to choose the port. Or you could be more specic:
{MediaPort} = “Vault Codex *”
This could be used to run a task on media loaded into any of the Capture Drive ports.
Here are some more advanced rules:
5. After specifying the {Mediaport} name you can combine other parameters with the following operators: and, or, not. For example:
{MediaPort} = “Vault Codex *” and {MediaEmpty} = “1”
6. You can use (brackets) in the expression too. For example:
({MediaPort} = “Vault Onboard data pack” or {MediaPort} = “Vault Codex data pack 1”) and {MediaEmpty} = “1”
This could be used, for example, to run a Media Clone on an Onboard Datapack or Capture Drive in port 1, only if it was empty.
CODEX VAULT 2 - ADMINISTRATOR GUIDE REV 06.08.13
PAGE 26
Page 27
7. The {MULList} option operates a bit differently. In order for a task to process the same group of shots as the previous task, use
{PreviousTaskMULList} in a syntax like this:
{MediaPort} = “Vault internal 1” and {MULList} = {PreviousTaskMULList}
8. In order for a task to process the same group of shots as the intial task, use {InitialTaskMULList} in a syntax like this:
{MediaPort} = “Vault internal 1” and {MULList} = {InitialTaskMULList}
9. In order to process the same MUL (physical media) as was used in the previous task, in the input expression for a task use either:
{MUL} = {PreviousTaskInputMUL}
Or, alternatively:
{MUL} = {PreviousTaskOutputMUL}
14. Task Types
14.1 Selecting a MUL for a Task
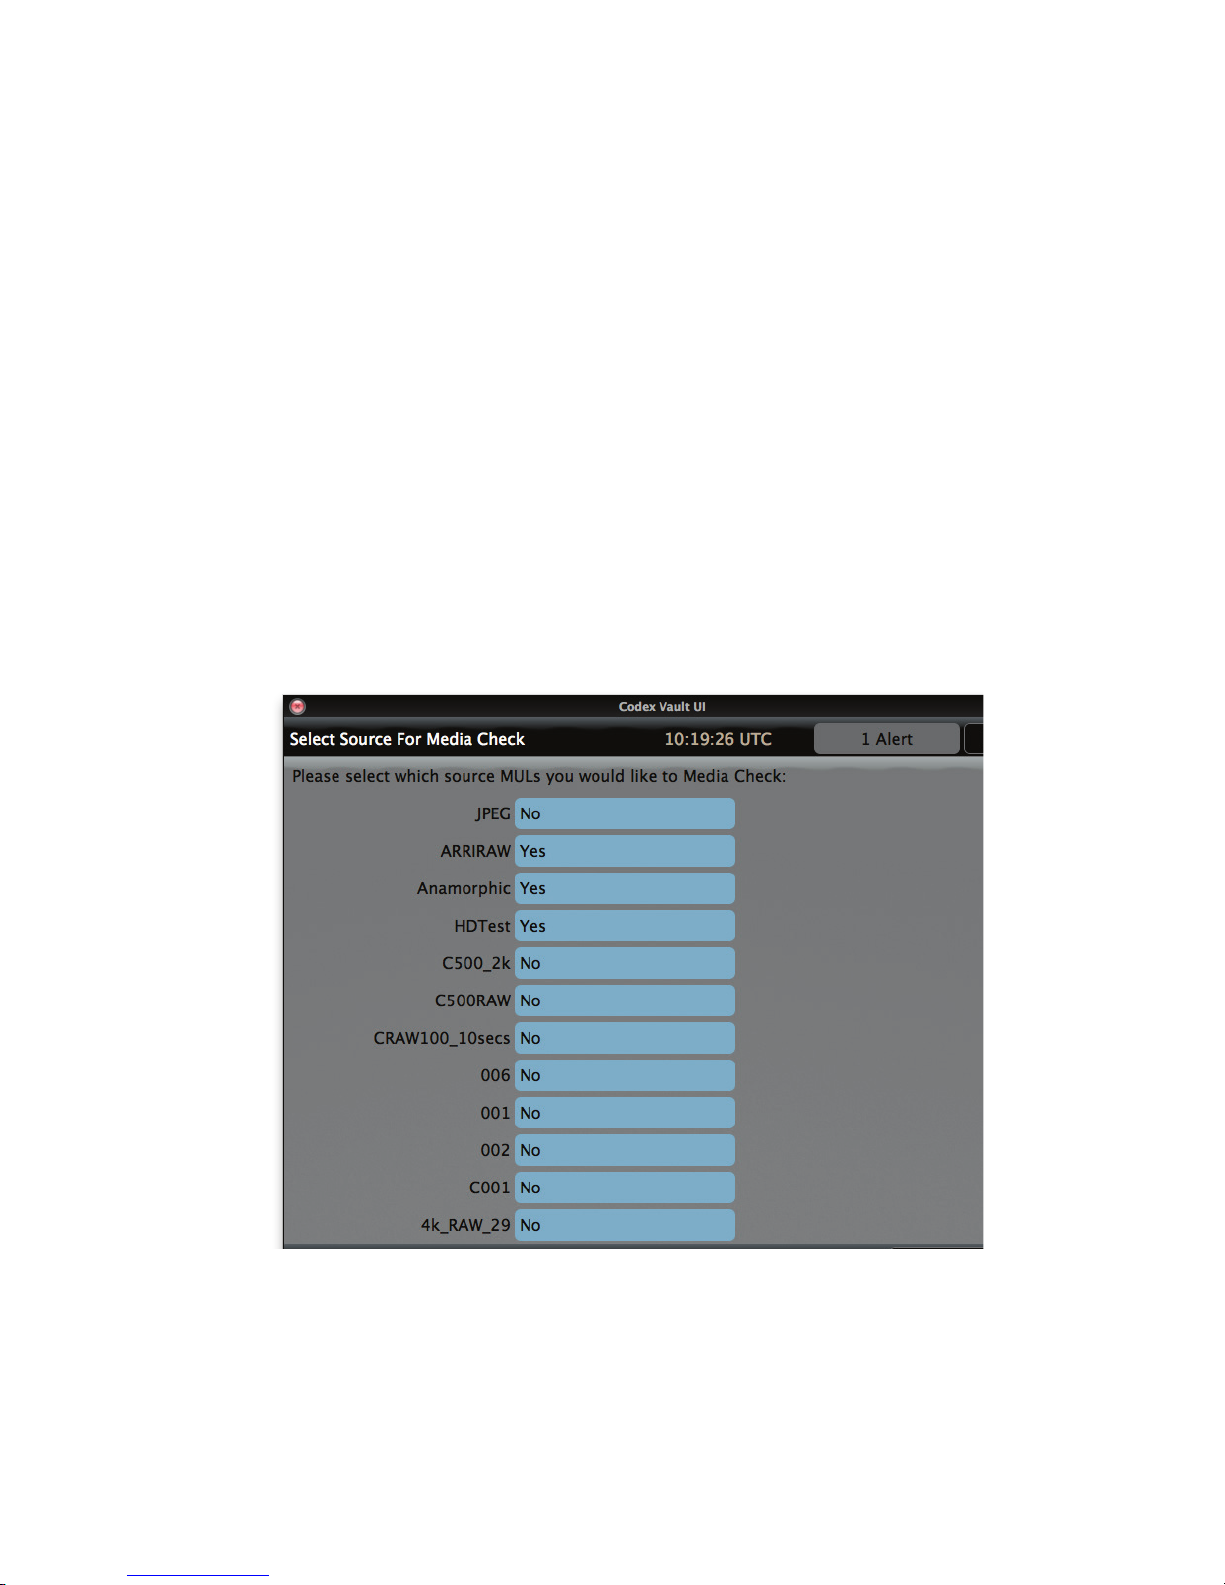
As a general note for all tasks, if the source media contains more than one group of shots (MUL), the User is given the option to select which
groups/MULs are involved in the task. When this is the case a list of available MULs are shown but none are initially selected. The User must
manually set which MULs will be involved in the task:
An example is where the Vault internal storage is used as the source media for a task. The internal storage is normally used as a destination
for cloning data to, and after several Datapacks/Capture Drives have been cloned to the Vault internal storage it will contain shots from several
MULs.
Then, for example, if an Archive task is run using the Vault internal storage as the source the User can select which MULs to include in the
Archive.
The Tasks will now be discussed in more detail. They are presented on the Vault screen in alphabetical order, but they will be discussed in the
order they are more likely to be used.
CODEX VAULT 2 - ADMINISTRATOR GUIDE REV 06.08.13
PAGE 27
Page 28
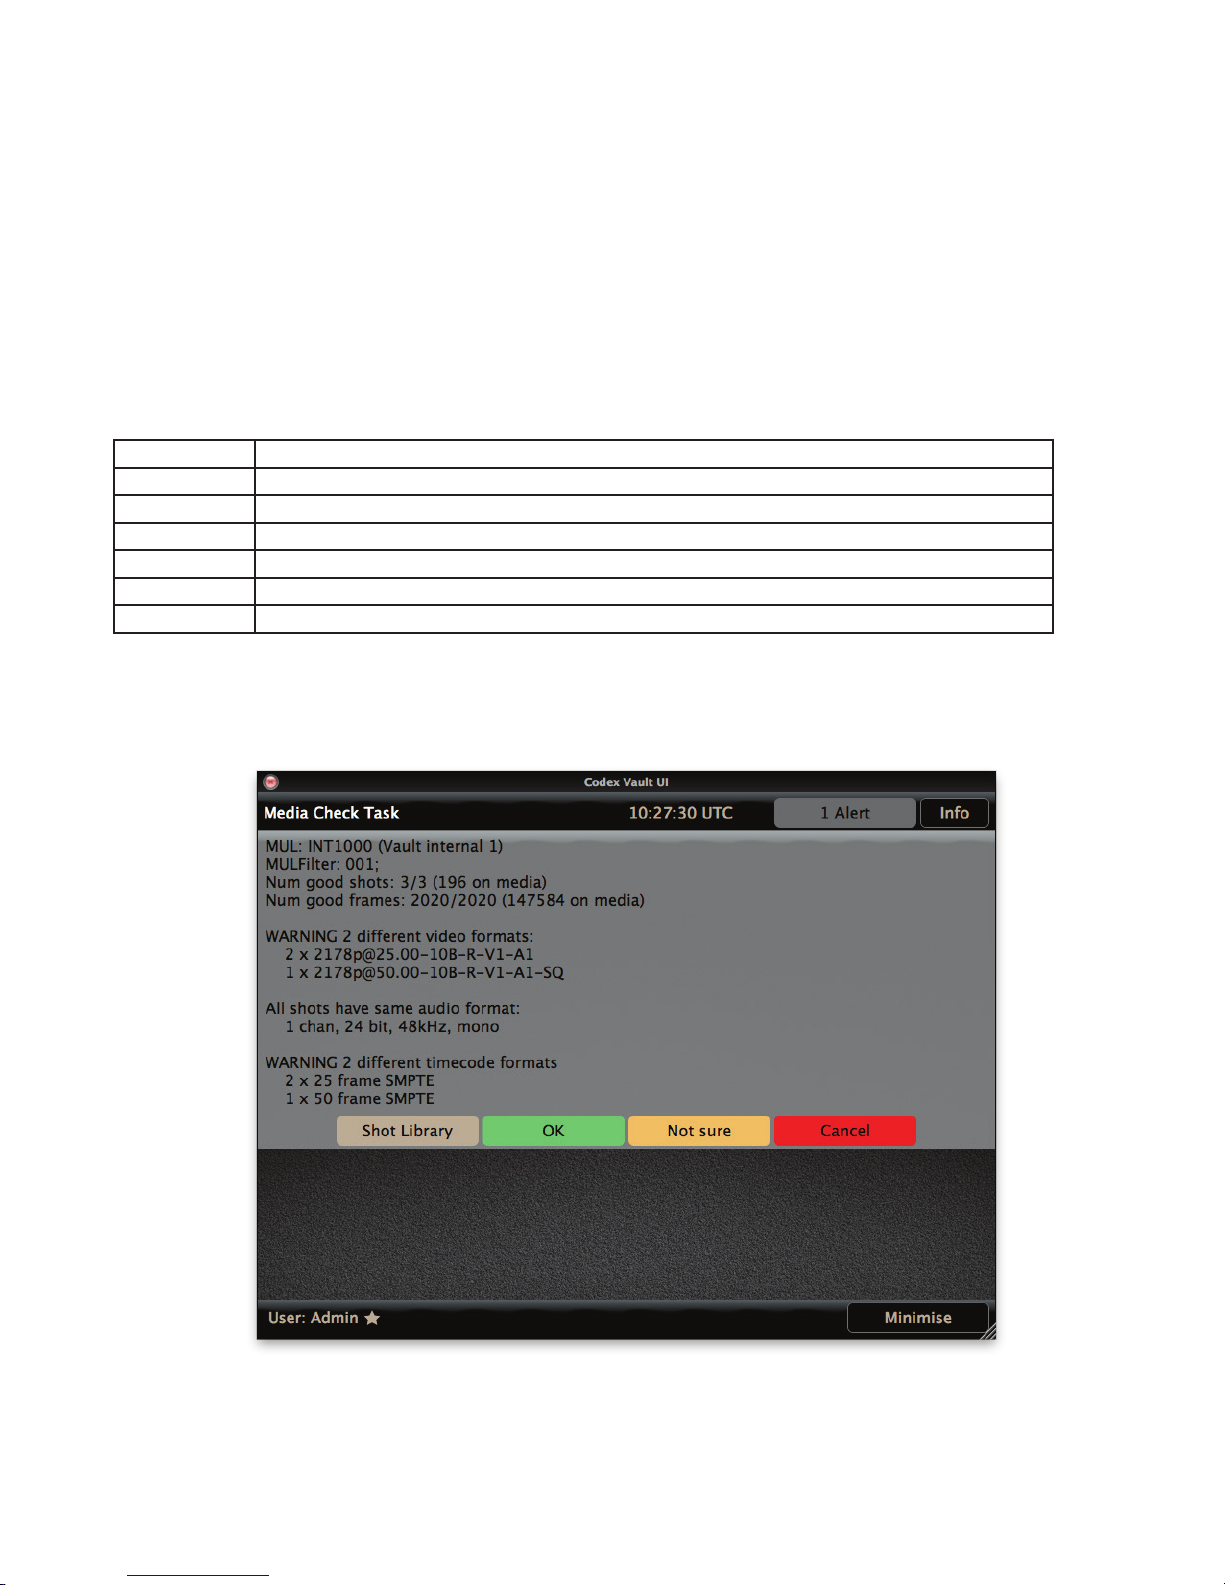
14.2 Media Check Task
Note: Media Check cannot be run on third party media (SxS, SR Memory, AXSM, REDMAG). The contents of this media should rst be Cloned
to XFS formatted Internal storage and then the Media Check can be done on this.
The Media Check Task provides the following features:
• Reports the number of shots and frames on the media.
• Provides a summary of the video/audio/timecode formats on the media.
• Checks for duplicate timecodes.
• Checks for duplicate shot names.
• Reports any issues found during these checks.
In the example shown below, the video format information displayed means:
Format attribute Description
2178p Image height and scan format.
25.00 Frames per second.
10B Image sample bit depth, e.g. 10-bit.
R Colourspace, i.e. RGB Bayer. The other possibility is Y meaning YCbCr.
V1 Number of video channels.
A2 Number of audio channels.
If the media being checked contains shots from multiple Rolls the user will be asked to select which of these Rolls to include in the media
check.
Here is an example of the results from a Media Check task:
This shows a Media Check where no issues have been found.
The User could optionally press to view the Library (as described in the later section), where they can check metadata, view on screen
playback, and sync audio.
CODEX VAULT 2 - ADMINISTRATOR GUIDE REV 06.08.13
PAGE 28
Page 29

They can then proceed by selecting from the given options:
OK – this should be selected if the user agrees with the results of the Media Check. The Vault then proceeds with any subsequent tasks that
have been congured.
Not Sure – this should be selected if the user is not sure that the results of the Media Check match their expectations. The Vault then proceeds
with subsequent tasks, but any PDF reports produced later will show that the user did not mark the Media Check as ‘OK’.
Cancel – this should be selected if the user does not agree with the results of the Media Check. The Vault will not proceed with subsequent
tasks in that Work Template.
14.2.1 Media Check Information
The Media Check always provides the following information:
MUL: - this is the Media User Label for the media that is being checked (followed by the media location in brackets)
MULFilter: - if a selection of shots are included based on their MUL, this is shown here
Num good shots: - shows how many shots from the total have no issues detected
Num good frames: - show how many frames from the total have no issues detected
Depending on what is found during the Media Check some of the following information may also be displayed.
These messages are for information and no action is required:
All shots have same video format
All shots have same audio format
All shots have same timecode format
No audio
These messages may or may not be expected depending on the project:
WARNING X different video formats
WARNING X different audio formats
WARNING X different timecode formats
These messages provide warnings that are important to prevent issues in post-production:
WARNING X/Y shots have timecodes which clash with other shots
WARNING X/Y shots have timecode clashes if normalised to 24fps SMPTE
WARNING X/Y shots have timecode breaks/repeats
WARNING X/Y shots names are not unique
The image below shows a Media Check where issues have been found:
CODEX VAULT 2 - ADMINISTRATOR GUIDE REV 06.08.13
PAGE 29
Page 30
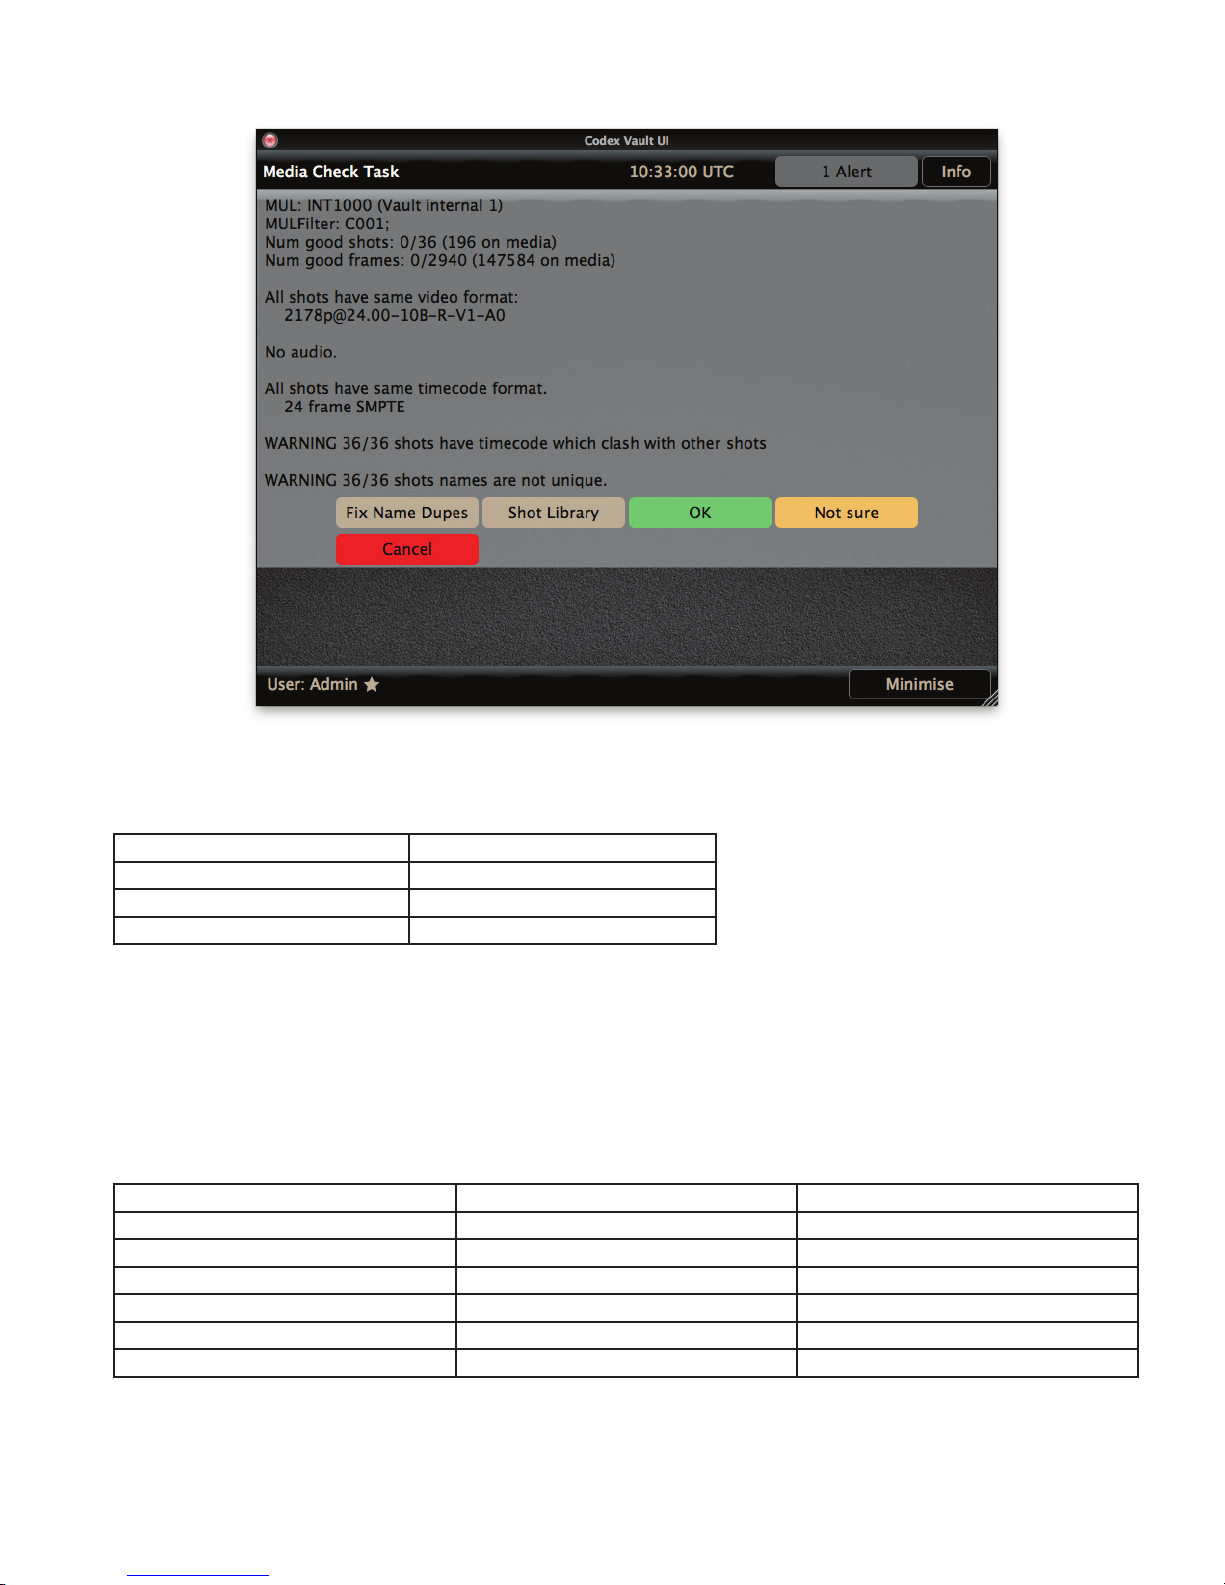
If there is more than one shot with the same name, there will be a Fix Name Dupes button shown. Pressing this will add a number in brackets to
the end of any duplicate shot names. For example:
Original Shot Names Shot Names After “Fix Name Dupes”
1-1_A001 1-1_A001
1-1_A001 1-1_A001(2)
1-1_A001 1-1_A001(3)
14.3 Clone Task
Note: the Clone Task must be used to copy from third party media (SxS, SR Memory, AXSM, REDMAG) onto XFS formatted Internal storage
before any other task can be performed with these les.
The Clone Task makes an identical copy of data from one media to another. This includes all data – image, audio, and metadata.
The Source and Destination media need to be compatible:
Source Media Clone to Storage Module RAID-5 XFS Clone to Storage Module RAID-3 Codex
Capture Drive (Codex Intermediate Format) No Yes
Capture Drive (ProRes from Alexa XT) Yes No
AXSM Memory Card Yes No
SxS Memory Card Yes No
SR Memory Card Yes No
REDMAG Yes No
There is an Eject Output option for a Clone Task – if this is highlighted then the target media will be automatically ejected from the system once
the Clone task has nished.
For Capture Drives in the Codex Intermediate Format the Clone Task will read the source data and create CRC32 samples that are compared to
CODEX VAULT 2 - ADMINISTRATOR GUIDE REV 06.08.13
PAGE 30
Page 31
the copy, ensuring data integrity. If the source data already has CRC32 samples then the system will compare these to the copied data also.
For les from third party media an md5 verication is performed during the Clone process.
14.3.1 Dual Clone
The Clone Task can be used to clone data to two targets at the same time. This can only be set up for cloning between media formatted as
Codex Intermediate Format. It cannot be used when cloning from third party media (SxS, SR Memory, AXSM, REDMAG).
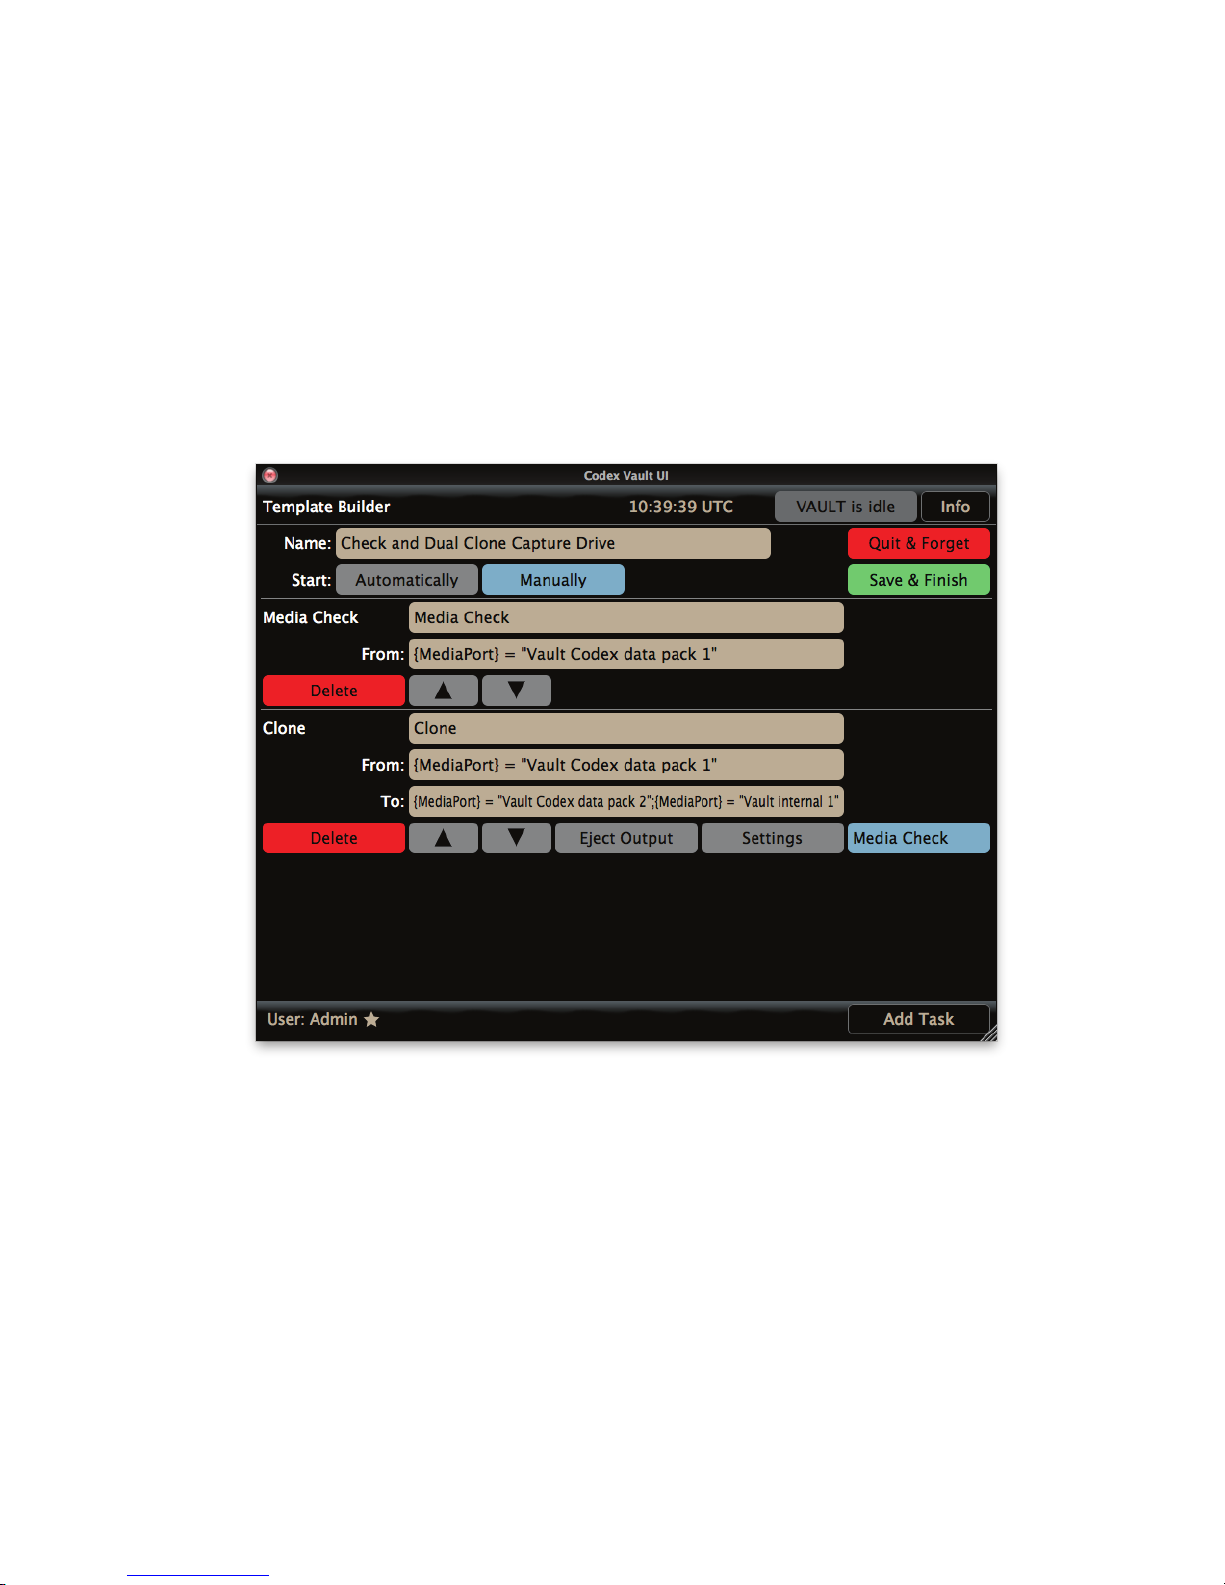
When setting up the template dual clone is achieved by including details of each target in the To: expression for the task separated by a semi-
colon (;) symbol. For example:
{MediaPort} = “Vault Codex data pack 1”;{MediaPort} = “Vault Codex data pack 2”
Setting this up as a Work Template is shown below:
14.4 Archive Task
14.4.1 Tape and Disk Archive options
The Archive Task performs a Backup (and Verify) operation of data to Tape using the LTO5 drives in the Vault or external Disk.
An external disk can be formatted with any of the following supported lesystems:
• FAT
• Ext3
• HFS
• HFS+
• NTFS
• XFS
• ExFAT
• UDF
CODEX VAULT 2 - ADMINISTRATOR GUIDE REV 06.08.13
PAGE 31
Page 32
The LTO tapes for an Archive task are formatted by the Vault as LTFS (Linear Tape File System), which is an open standard.
By default the system will do either a single disk archive or a dual tape archive. This can be changed to a single tape archive by editing a
system conguration le. For more information on changing this system conguration contact Codex support.
When using large disks (e.g. >4TB) it is good practice to format with multiple smaller partitions to assist with data management.
After adding an Archive Task to the Template, select Settings. Set the Target as Disk or LTFS and set the Operation as Backup, Backup And
Verify, or Verify.
The Backup And Verify option copies the les and then does a byte-for-byte verication by comparing what is on the disk/tape to the original
data. This is the recommended setting.
If Backup is used then the Verify option can be used later, and this compares what is on the tape/disk with md5 checksum les that were
created from the original data. These md5 les are stored on the Vault – therefore the Verify must be done on the same machine as the Archive
task.
Set the Frame Rate to be correct for the project. This is very important to allow successful conforming from the archive later in post-production.
There is also an option to Add Other Files. This can be used to include any other les in the Archive. An example might be Sound Files or Lens
Data les brought to the Vault on a USB stick. Set this option to Yes and then use the browser to set the path for the Other Files Location.
14.4.2 File types and structure of Archives
For material stored on XFS formatted Vault Internal storage the le types and directory structure are copied directly onto the disk/tape when the
Archive task is done.
For material stored on Codex Intermediate Format drives the le types and directory structure for the Archive Task is as follows:
File Type Description
ari Per frame les for ARRIRAW material, containing extensive metadata
dpx Per frame les for all other material, containing essential metadata. These are Uncompressed dpx les in the same
colourspace as the source data.
bwf Per shot Broadcast WAV audio les, containing timecode and roll metadata.
xml Per shot Codex metadata les, containing all metadata (with the exception of per frame metadata)
rmf Per frame les for Canon Cinema RAW material, containing extensive metadata
Directory Structures In Archive:
ari - <Roll>/<Extension>/<Roll>.<Shot>.<UniqueID>/<Shot>.<TC Frames>.<Extension>
dpx - <Roll>/<Extension>/<Roll>.<Shot>.<UniqueID>/<Shot>.<TC Frames>.<Extension>
bwf - <Roll>/<Extension>/<Roll>.<Shot>.<UniqueID>/<Shot>.<Channel>.<Extension>
xml - <Roll>/<Extension>/<Roll>.<Shot>.<UniqueID>/<Shot>.<Extension>
rmf - <Roll>/<Shot>/<Shot>_<Frame Number>.<Extension>
bwf - <Roll>/<Shot>/<Shot>_00000001.<Extension>
xml - <Roll>/<Shot>/CLIPINFO.XML
ari - <Roll>/<Extension>/<Roll>.<Shot>.<UniqueID>/<ChannelID>/<Shot>.<TC Frames>.<Extension>
dpx - <Roll>/<Extension>/<Roll>.<Shot>.<UniqueID>/<ChannelID>/<Shot>.<TC Frames>.<Extension>
Note: the .rmf and second .bwf and .xml structures will only be used for Canon Cinema RAW recordings. The structure allows these les to be
loaded into third party software such as Canon Cinema RAW Development. The second .ari and .dpx structures will only be used for 2-channel
(generally Stereo 3D) shots. The les for each eye are contained in a separate folder, and the Roll metadata includes the Channel ID, e.g. left
eye Roll A001L, right eye Roll A001R.
CODEX VAULT 2 - ADMINISTRATOR GUIDE REV 06.08.13
PAGE 32
Page 33
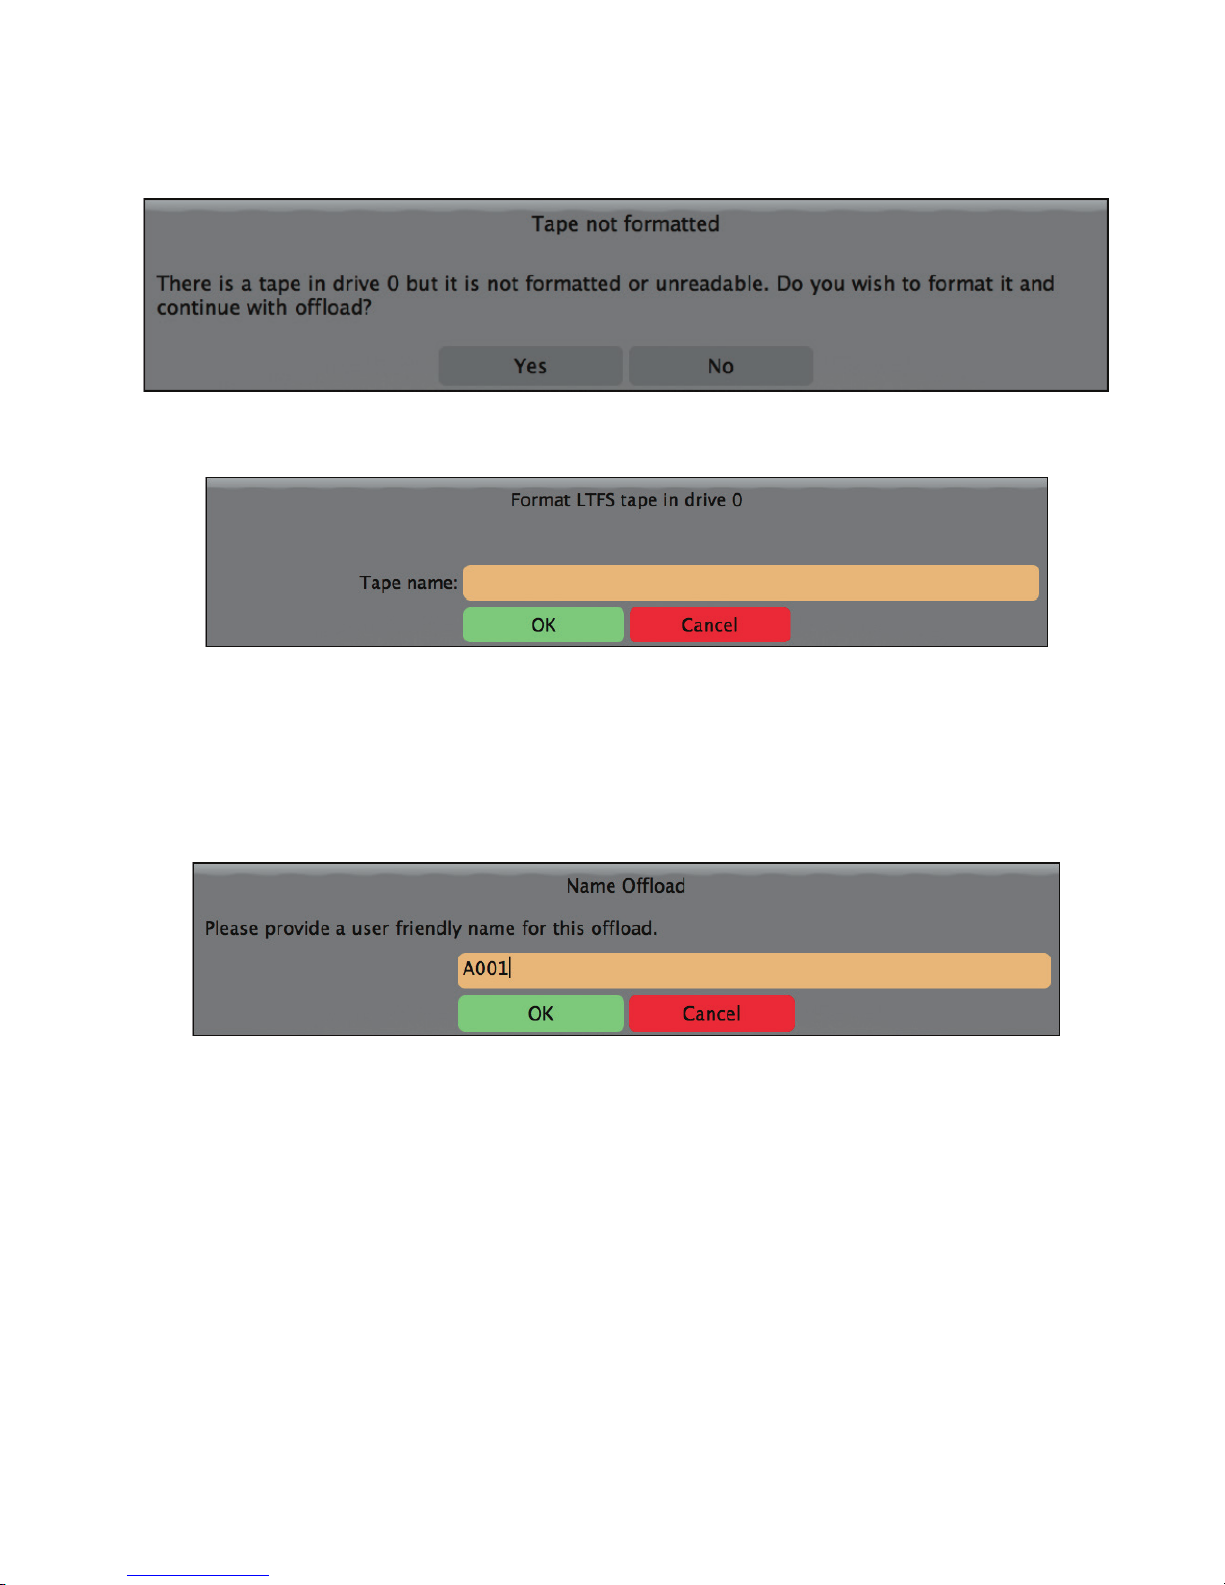
14.4.3 Prompts during the Archive Task
New tapes have to be formatted when an Archive Task starts, which takes a couple of minutes. In this case the following prompt will appear:
During the formatting process the system will prompt for a tape name:
Typically this would match the barcode label. There should be no spaces in tape names.
When the Archive process starts a message will be displayed that says ‘Status: Applying shot lter…’ – this may be shown for several minutes
whilst the system prepares to run the archive.
The disk/tapes will then be mounted, which may take a minute or two. Then a prompt will appear asking for a user-friendly name for the ofoad
for logging purposes:
Typically this would match the Roll metadata for the material that is being archived, but anything can be entered.
In the case of a disk Archive you will also be prompted to enter a name for the disk for tracking purposes.
14.5 Generate Task
The Generate Task can be used to output a range of le types to external disk to be used for post-production.
Note: the Generate Task is not compatible with SONY RAW MXF or RED RAW R3D les.
When preparing the Generate Task, select Settings to dene the File type and any other options for it. Each Generate Task is congured for a
single le type, but you can set up multiple Generate Tasks to run in a sequence as part of your Work Template.
14.5.1 Settings for different le types
The table below shows the different image/audio le types and options available for them:
CODEX VAULT 2 - ADMINISTRATOR GUIDE REV 06.08.13
PAGE 33
Page 34

Option ↓ - File Type → dpx bmp jpg ari rmf avi mov mxf 3D DNxHD mxf
Specify the Lut(s) to apply to files here. The software supports a range of LUT file formats, detailed in the 'LUTs Guide'.
Convert to 16-bit RGB ✔ ✘ ✘ ✘ ✘ ✘ ✘ ✘ ✘
Audio file type
For still image files this setting determines if associated audio is also generated. 'wav' files contain only audio - 'BWF' files also contain timecode and roll metadata.
None ✔ ✔ ✔ ✔ ✔ ✔ ✔ ✔ ✔
wav ✔ ✔ ✔ ✔ ✔ ✔ ✔ ✔ ✔
BWF ✔ ✔ ✔ ✔ ✔ ✔ ✔ ✔ ✔
Directory
First frame
Set the directory that the files will be exported to here. This is typically to an external drive connected to the Vault. Leave this blank to choose from mounted volumes when the Generate task begins.
Leave this field blank to generate files for entire shots. If required a value can be entered here to start generating files from a specified frame number in the shots.
<User Input Value> ✔ ✔ ✔ ✔ ✔ ✔ ✔ ✔ ✔
Num frames
Leave this field blank to generate files for entire shots. If required a value can be entered here to only generate files for a specified number of frames in the shots.
<User Input Value> ✔ ✔ ✔ ✔ ✔ ✔ ✔ ✔ ✔
Lut
<User Specified Lut> ✔ ✔ ✔ ✘ ✘ ✔ ✔ ✔ ✔
Scaling
Images can be scaled for some file types if required. Scaling can be done either to a factor of the original image size, or to a specified width and height.
None ✔ ✔ ✔ ✘ ✘ ✔ ✔ ✘ ✘
Scaling factor specified ✔ ✔ ✔ ✘ ✘ ✔ ✔ ✘ ✘
Fixed size specified ✔ ✔ ✔ ✘ ✘ ✔ ✔ ✘ ✘
Scale factor
Choose the required Scale Factor here.
1/2 ✔ ✔ ✔ ✘ ✘ ✔ ✔ ✘ ✘
1/4 ✔ ✔ ✔ ✘ ✘ ✔ ✔ ✘ ✘
1/8 ✔ ✔ ✔ ✘ ✘ ✔ ✔ ✘ ✘
1/16 ✔ ✔ ✔ ✘ ✘ ✔ ✔ ✘ ✘
Scale width
Specify the required image Width here.
<User Input Value> ✔ ✔ ✔ ✘ ✘ ✔ ✔ ✘ ✘
Scale height
Specify the required image Height here.
<User Input Value> ✔ ✔ ✔ ✘ ✘ ✔ ✔ ✘ ✘
FPS
This should generally be set to the project rate. (Otherwise files will be generated at the Natural [shooting] frame rate, which may vary, causing issues in post production).
23.98 ✔ ✘ ✘ ✔ ✔ ✔ ✔ ✔ ✔
24.00 ✔ ✘ ✘ ✔ ✔ ✔ ✔ ✔ ✔
25.00 ✔ ✘ ✘ ✔ ✔ ✔ ✔ ✔ ✔
29.97 ✔ ✘ ✘ ✔ ✔ ✔ ✔ ✔ ✔
30.00 ✔ ✘ ✘ ✔ ✔ ✔ ✔ ✔ ✔
47. 95 ✔ ✘ ✘ ✔ ✔ ✔ ✔ ✔ ✔
48.00 ✔ ✘ ✘ ✔ ✔ ✔ ✔ ✔ ✔
50.00 ✔ ✘ ✘ ✔ ✔ ✔ ✔ ✔ ✔
59.94 ✔ ✘ ✘ ✔ ✔ ✔ ✔ ✘ ✔
60.00 ✔ ✘ ✘ ✔ ✔ ✔ ✔ ✘ ✔
Natural ✔ ✘ ✘ ✔ ✔ ✔ ✔ ✔ ✔
Interlace
This option can be used to create Interlaced mxf files.
No ✘ ✘ ✘ ✘ ✘ ✘ ✘ ✔ ✔
Yes ✘ ✘ ✘ ✘ ✘ ✘ ✘ ✔ ✔
Burn-in
Specify the Burn-in to apply to files here. There are preset Burn-ins for Masking, Timecode, Shot/Roll etc. Users can also refer to the 'Burn-Ins Guide' to create custom burn-ins.
<User Specified Burn-In> ✔ ✔ ✔ ✘ ✘ ✔ ✔ ✔ ✔
Roll transform
This option can be used for multi-channel shots (Stereo rig, or A/B cameras, to a Codex recorder), so that files for each camera have unique Roll metadata in the file header.
Append Channel ID ✔ ✔ ✔ ✔ ✔ ✔ ✔ ✔ ✔
Prepend Channel ID ✔ ✔ ✔ ✔ ✔ ✔ ✔ ✔ ✔
File numbering
This option sets if file sequences are numbered based on the Frame Number in the shot starting from 00001, or from the timecode converted to a 7-digit Frames Since Midnight value (at the recorded speed)
Frame number ✔ ✔ ✔ ✔ ✔ ✘ ✘ ✘ ✘
Frames since midnight ✔ ✔ ✔ ✔ ✔ ✘ ✘ ✘ ✘
Compression
Select the compression codec used for editorial/dailies files here. See the section 'Compression Quality settings' for details.
DNxHD 422 ✘ ✘ ✘ ✘ ✘ ✘ ✔ ✔ ✔
DNxHD 444 ✘ ✘ ✘ ✘ ✘ ✘ ✔ ✔ ✔
ProRes 422 ✘ ✘ ✘ ✘ ✘ ✘ ✔ ✘ ✘
ProRes 4444 ✘ ✘ ✘ ✘ ✘ ✘ ✔ ✘ ✘
jpeg ✘ ✘ ✔ ✘ ✘ ✔ ✔ ✔ ✘
Compression Quality
This setting relates to the selected Compression option. See the section 'Compression Quality settings' for details.
High ✘ ✘ ✔ ✘ ✘ ✔ ✔ ✔ ✔
Medium ✘ ✘ ✔ ✘ ✘ ✔ ✔ ✔ ✔
Low ✘ ✘ ✔ ✘ ✘ ✔ ✔ ✔ ✔
Conversion Quality
This option determines the quality of: De-Bayering, Colourspace conversion, and Scaling operations. High will give the best results, but take longer than Medium or Low.
High ✔ ✔ ✔ ✘ ✘ ✔ ✔ ✔ ✔
Medium ✔ ✔ ✔ ✘ ✘
✔ ✔ ✔ ✔
Low ✔ ✔ ✔ ✘ ✘ ✔ ✔ ✔ ✔
Audio
For editorial/dailies files this determines the embedded audio. For image sequences this setting determines whether 'wav' or 'BWF' files are generated as Mono or Stereo.
Mono ✔ ✔ ✔ ✔ ✔ ✔ ✔ ✔ ✔
Stereo ✔ ✔ ✔ ✔ ✔ ✔ ✔ ✔ ✔
DPX
This option determines the format of dpx files that are generated.
Keep Existing Format ✔ ✘ ✘ ✘ ✘ ✘ ✘ ✘ ✘
Convert to 10-bit RGB ✔ ✘ ✘ ✘ ✘ ✘ ✘ ✘ ✘
Uncompress ✔ ✘ ✘ ✘ ✘ ✘ ✘ ✘ ✘
Convert to 12-bit RGB ✔ ✘ ✘ ✘ ✘ ✘ ✘ ✘ ✘
CODEX VAULT 2 - ADMINISTRATOR GUIDE REV 06.08.13
PAGE 34
Page 35
14.5.2 Setting the destination for a Generate Task
The Vault will auto-mount external drives that are formatted with the following lesystems:
• FAT
• Ext3
• HFS
• HFS+
• NTFS
• XFS
• ExFAT
• UDF
When using large disks (e.g. >4TB) it is good practice to format with multiple smaller partitions to assist with data management.
Drives can be connected to the following ports on the Vault:
• SAS (a cable is available to connect up to 4 eSATA devices to the SAS port)
• USB 2.0
• USB 3.0
• 2.5” SSD
• 1.8” SSD
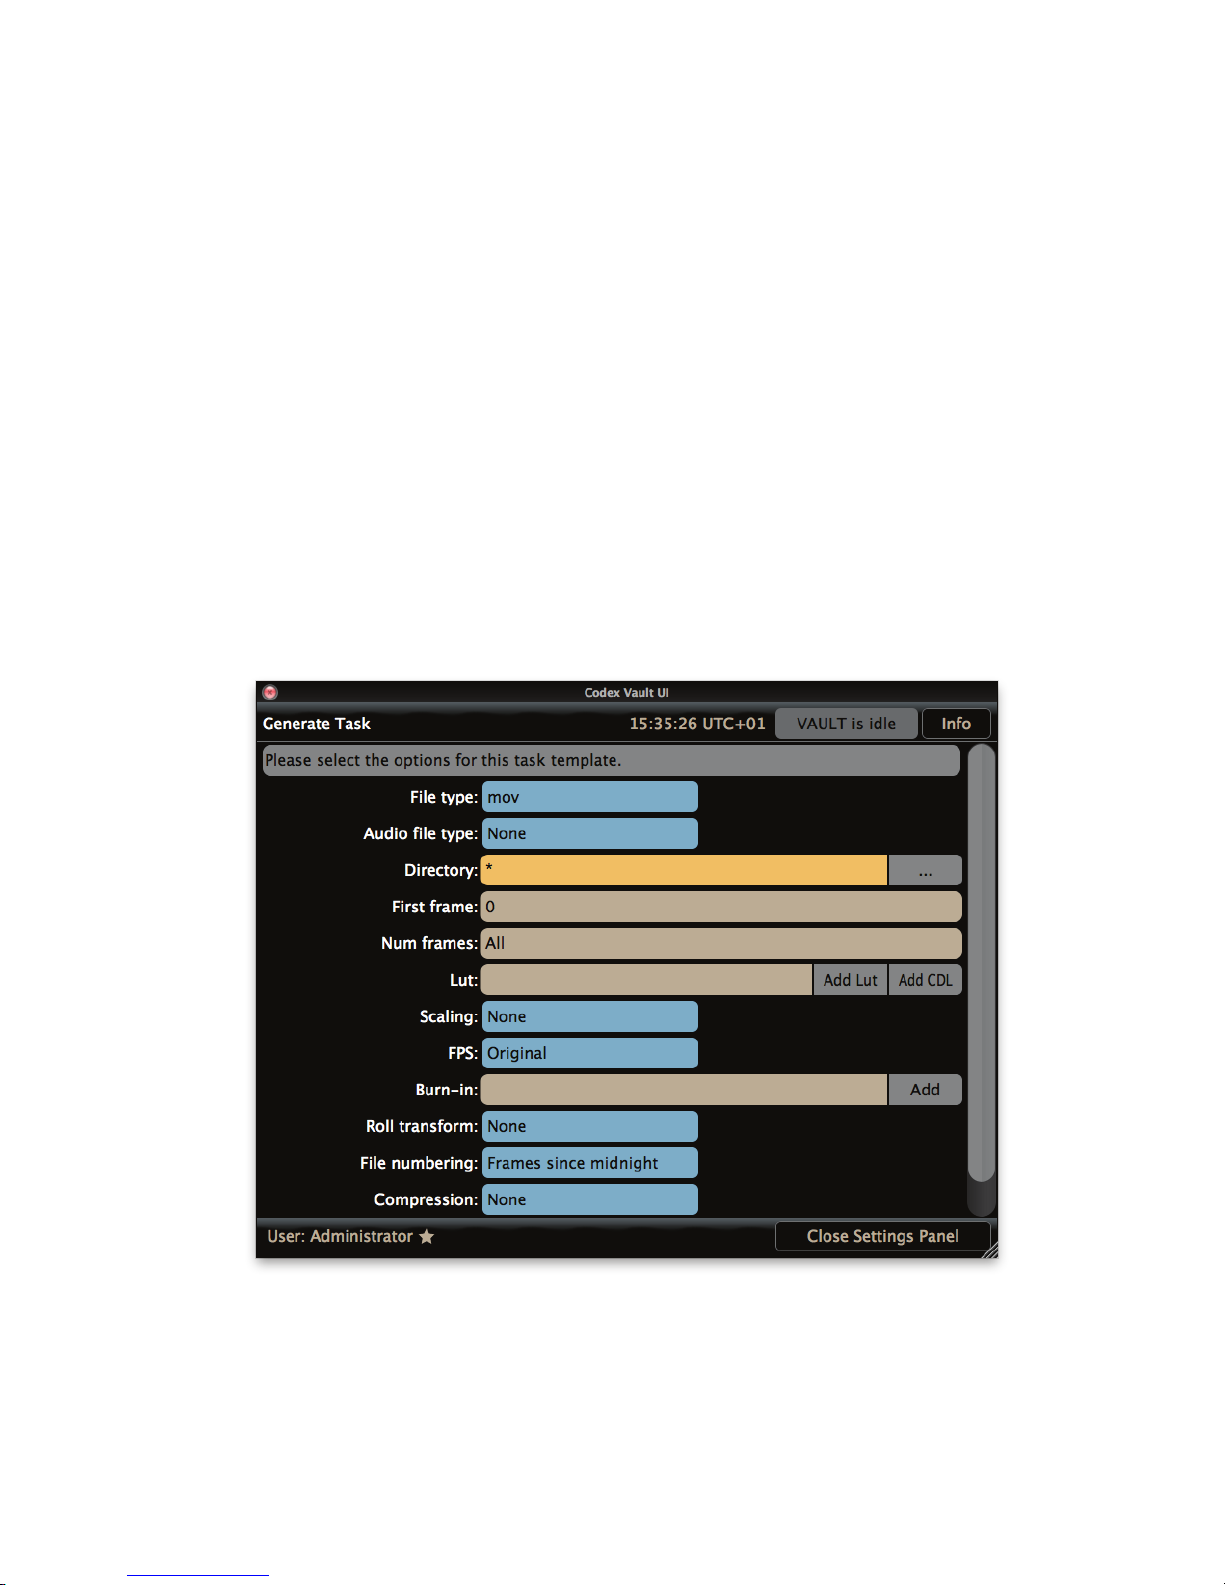
In the settings for the Generate Task leave the Directory eld blank or containing a * if you want to choose the location of the external drive
when the task starts:
If the mounted device/directory is always the same then the exact path can be specied in the Directory eld when setting up the Generate
Task. Click the ... symbol to choose a directory:
CODEX VAULT 2 - ADMINISTRATOR GUIDE REV 06.08.13
PAGE 35
Page 36
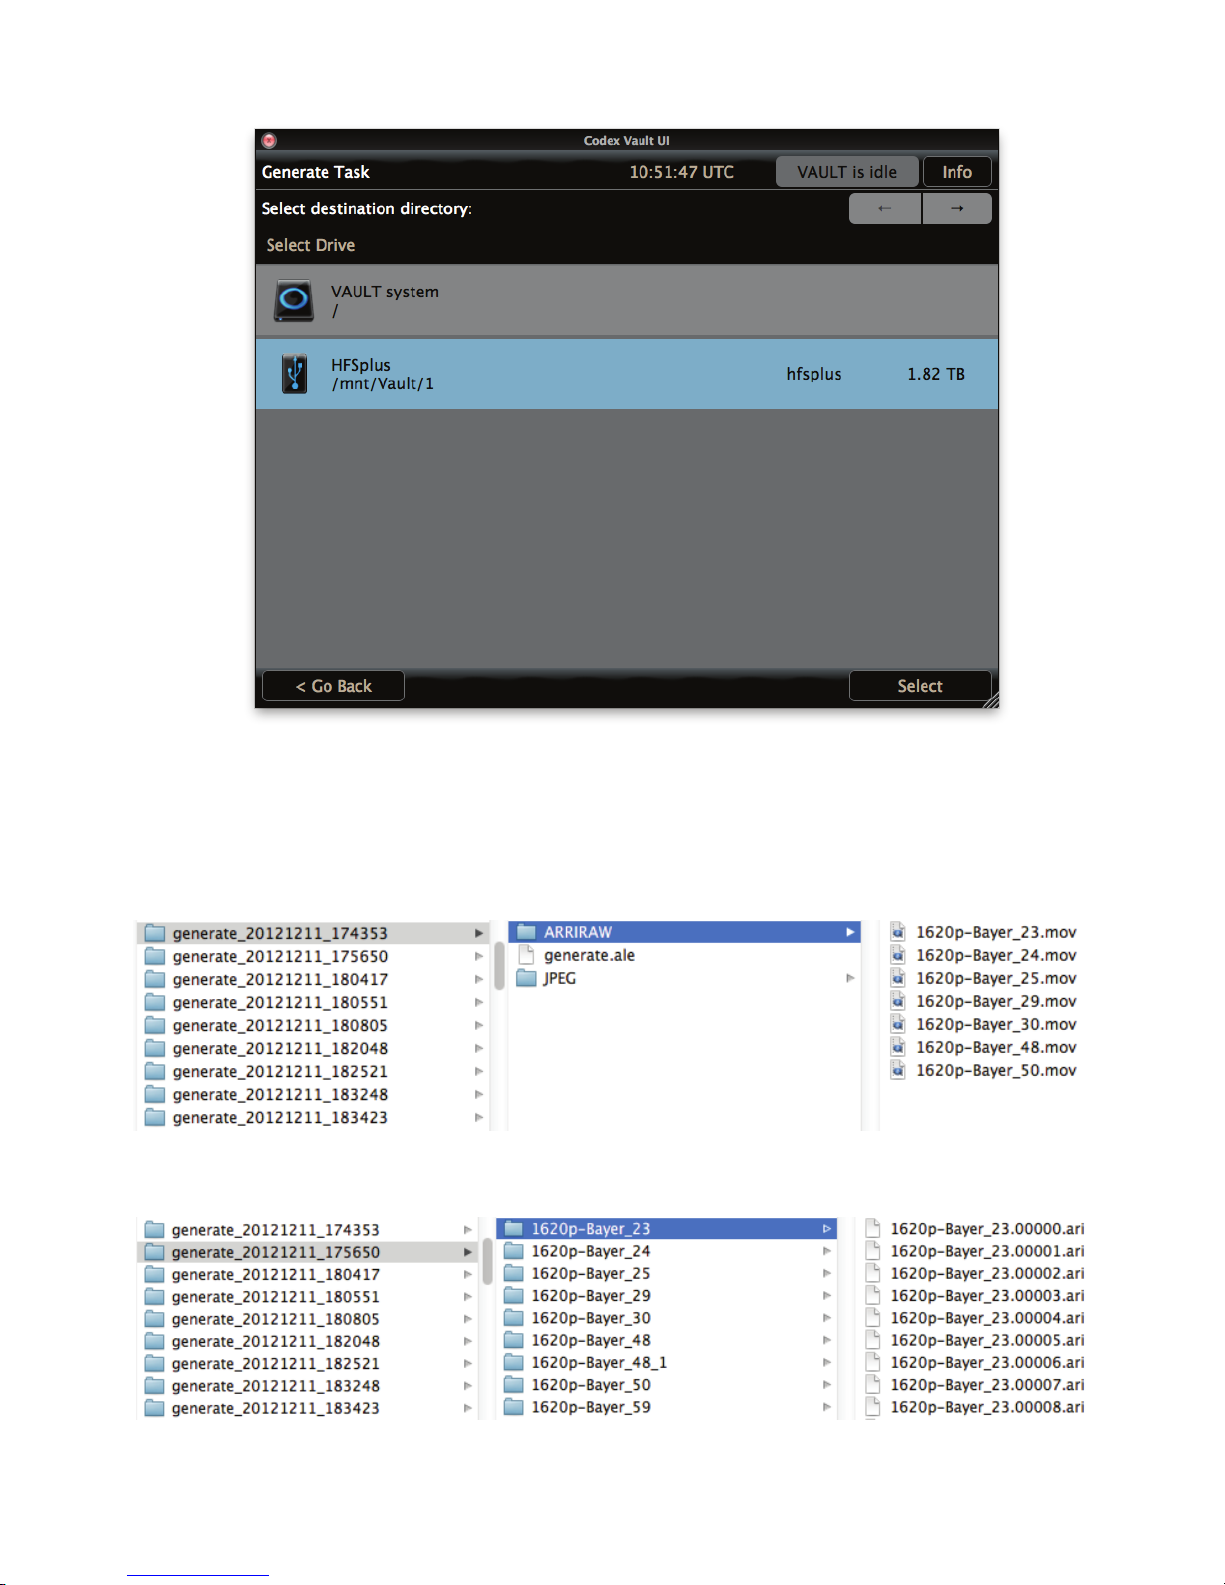
A top level directory will always be created on the drive used for the Generate Task, which is given a unique name based on the date and time
the task was started in the following format:
generate_DDMMYY_HHMMSS
Per shot les such as .mxf or .mov will be copied into a Roll folder within the main generate folder:
For per frame les such as .ari or .dpx, the generate folder will contain a folder for each shot, and the individual les will be in these folders.
Each Generate Task automatically creates an ALE (Avid Log Exchange) le called generate.ale in the main generate folder. The ALE can be
used to bring all the original shot metadata into Avid.
CODEX VAULT 2 - ADMINISTRATOR GUIDE REV 06.08.13
PAGE 36
Page 37
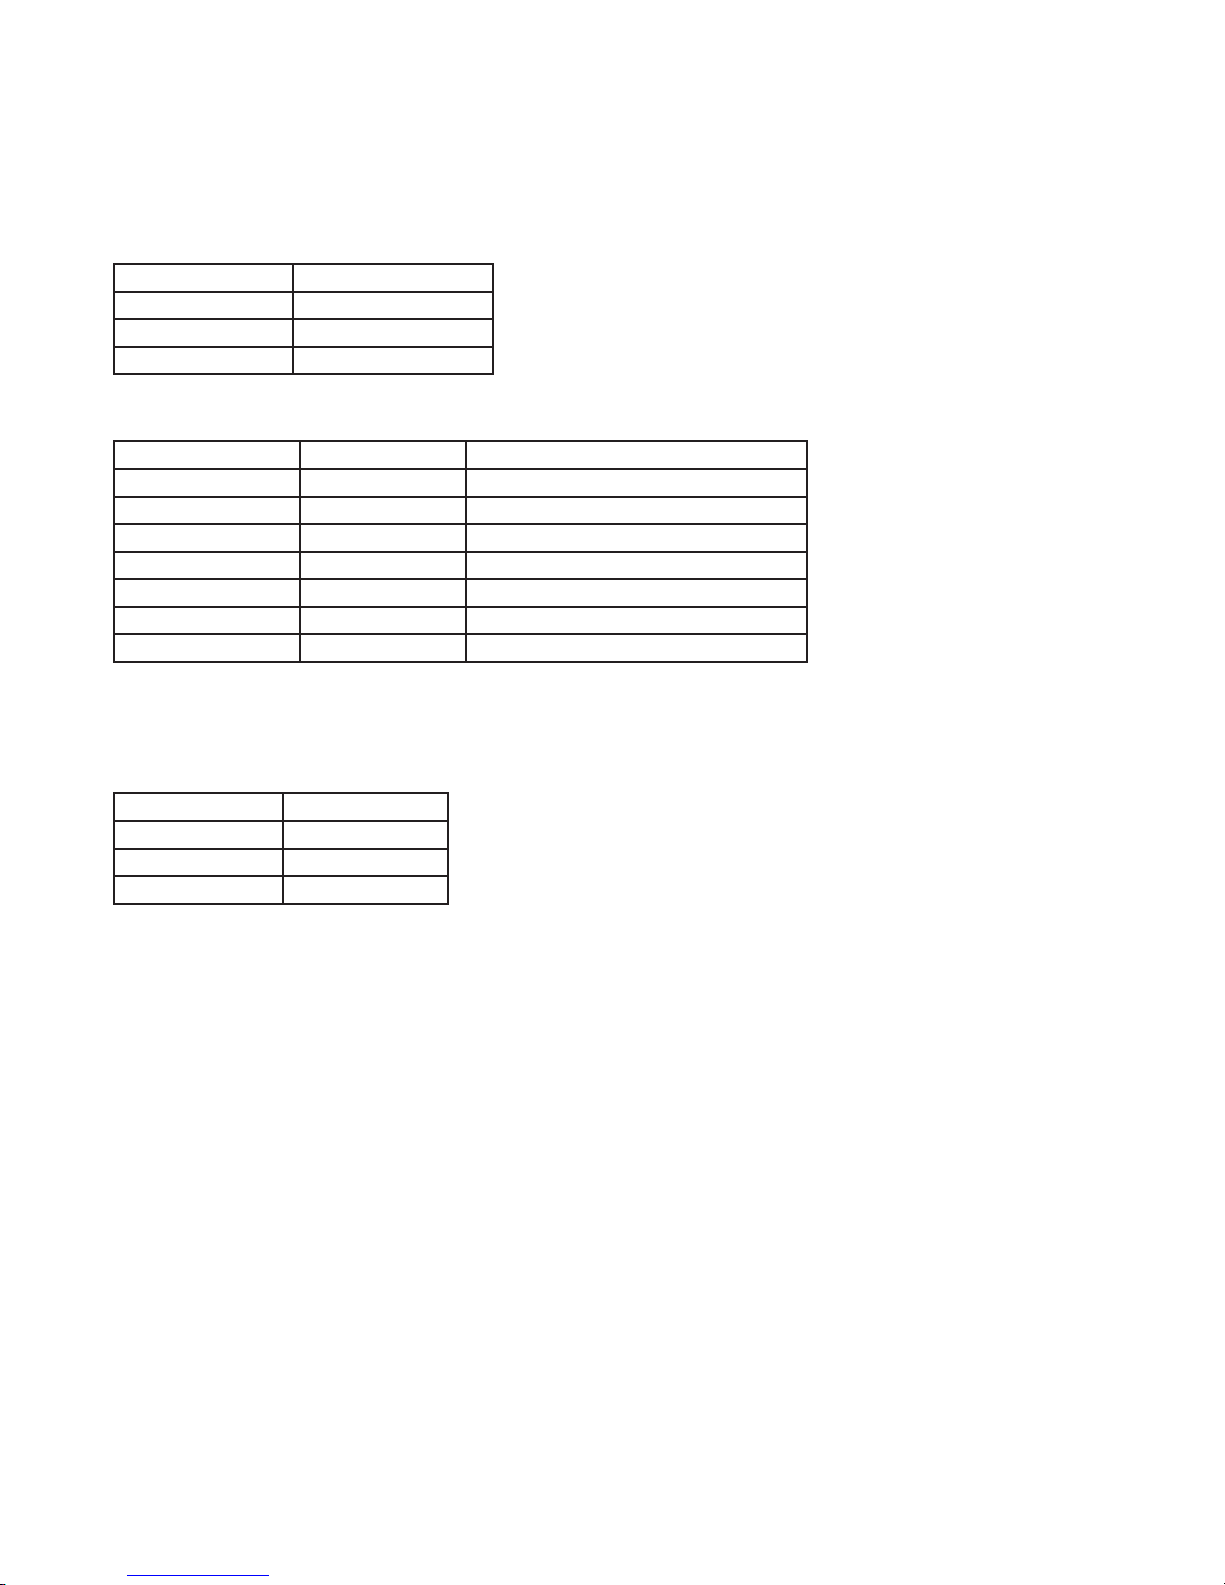
14.5.3 Compression Quality Settings
When using ProRes 422 or DNxHD compression there is a Compression Quality setting available. Below are details on how this setting relates
to the compression codec that is used.
ProRes 422:
Compression Quality ProRes 422 codec
High ProRes 422 HQ
Medium ProRes 422 LT
Low ProRes 422 Proxy
DNxHD 422:
Compression Quality Frames per second DNxHD 422 codec
High* 23.98/24 DNx175/DNx175x
25 DNx185/DNx185x
29.97/30 DNx220/DNx220x
Medium 23.98/24 DNx115
25 DNx120
29.97/30 DNx145
Low DNx36
* Using High Compression Quality the DNx codec will be 8-bit for source material that is captured as 8-bit.The DNx codec will be 10-bit for
source material that is captured as 10-bit or higher. Medium and Low Quality will use an 8-bit DNx codec.
DNxHD 444:
Frames per second DNxHD 444 codec
23.98/24 DNx360x
25 DNx370x
29.97/30 DNx440x
When mxf les are generated, for any shots with audio there will be a video mxf as well as audio mxf les. For example, if shot 1-1_A001 has
two audio channels then generating an mxf will result in three les:
1-1_A001V1.mxf
1-1_A001A1.mxf
1-1_A001A2.mxf
These video and audio mxf les contain metadata so that when they are loaded into an Avid edit system they will be linked automatically.
As well as image/audio les the Vault can also generate some metadata le types:
CodexShot xml – these les are generated per-shot and contain a wide range of metadata that can be used in post-production with custom
tools.
FinalCut xml – this le is designed to allow easy organisation of mov les in FCP. There is one le generated for all shots that can be loaded into
FCP along with the media, and the software then automatically creates bins for the media.
ASC CDL xml – these les are generated per-shot for any shots with CDL Data (captured from Truelight TL Onset software, Pomfort LiveGrade,
or Framewright LinkColor). They can be used later in post-production software to apply the same LUT that was used on set.
Metadata txt – this le is for proprietary metadata and should not be used under normal circumstances
14.5.4 Applying LUTs and Burn-Ins
The Vault can apply 1D LUTs, 3D LUTs, and burn-ins to deliverable les. The most common use of this feature is for editorial and dailies les to
have a colour corrected image, optionally with production information and a watermark.
CODEX VAULT 2 - ADMINISTRATOR GUIDE REV 06.08.13
PAGE 37
Page 38
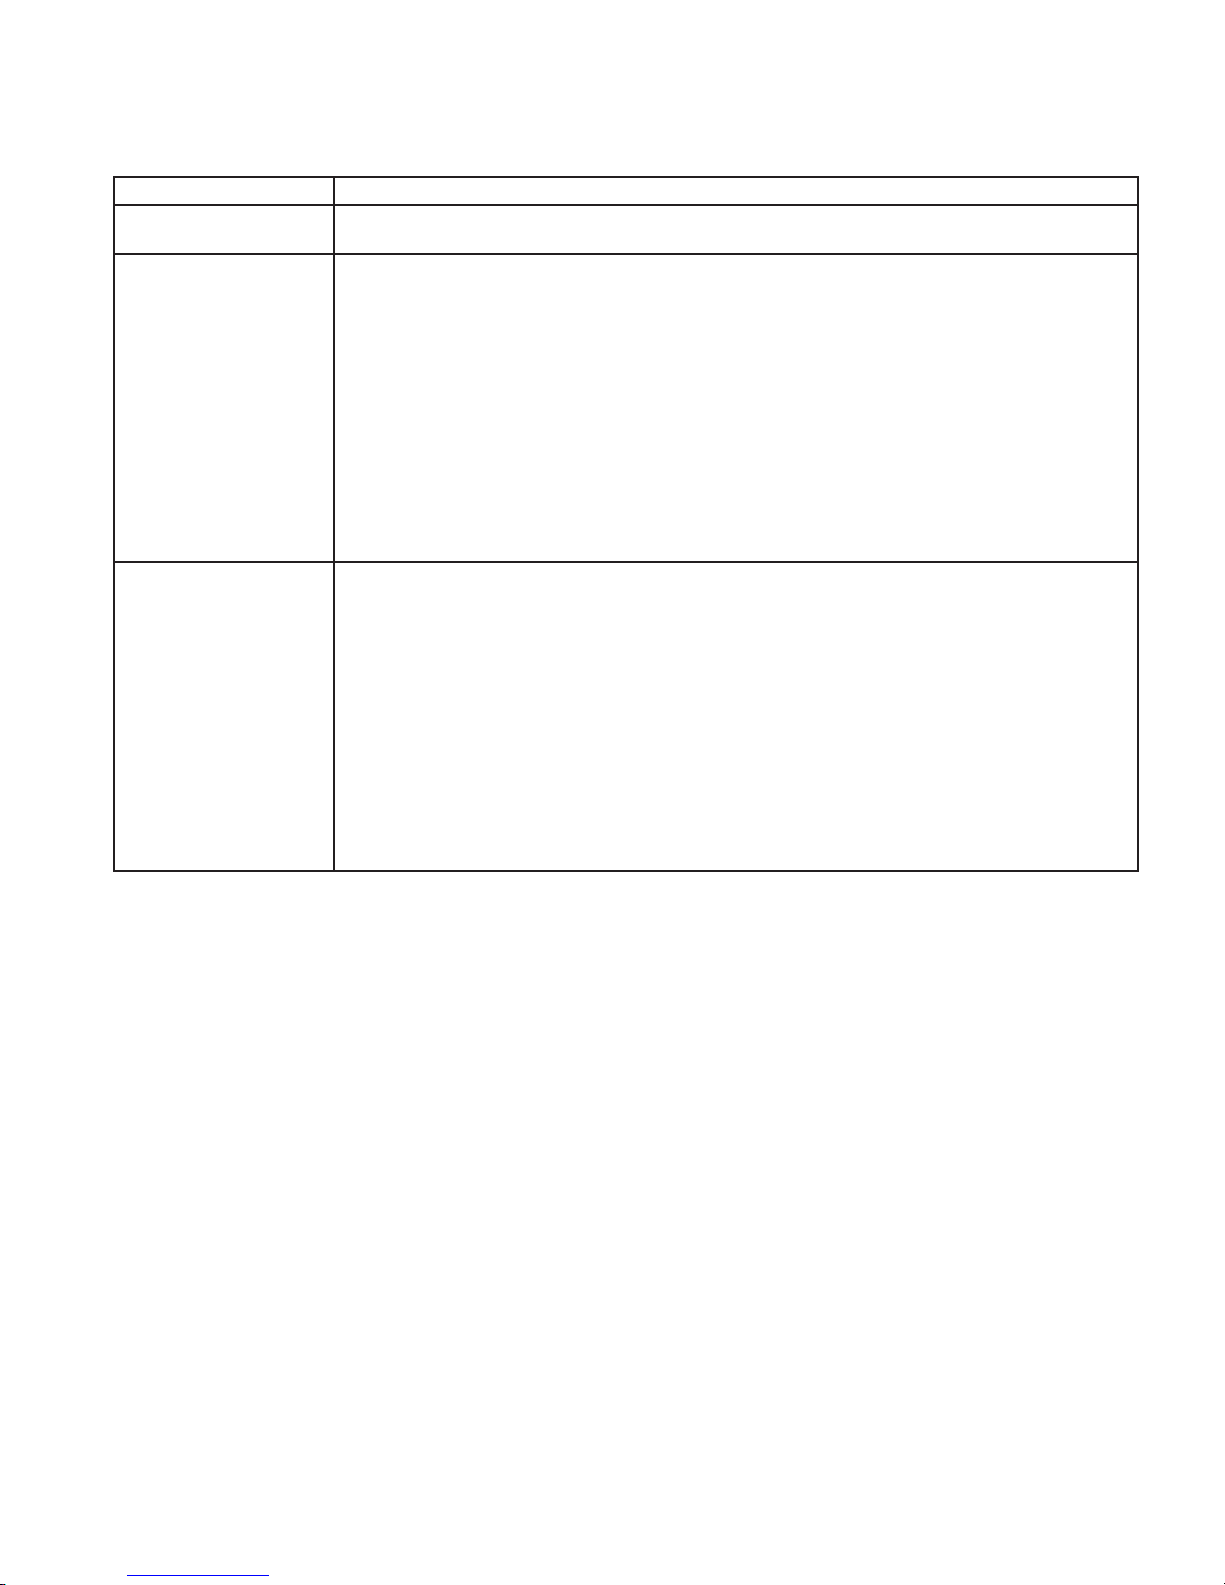
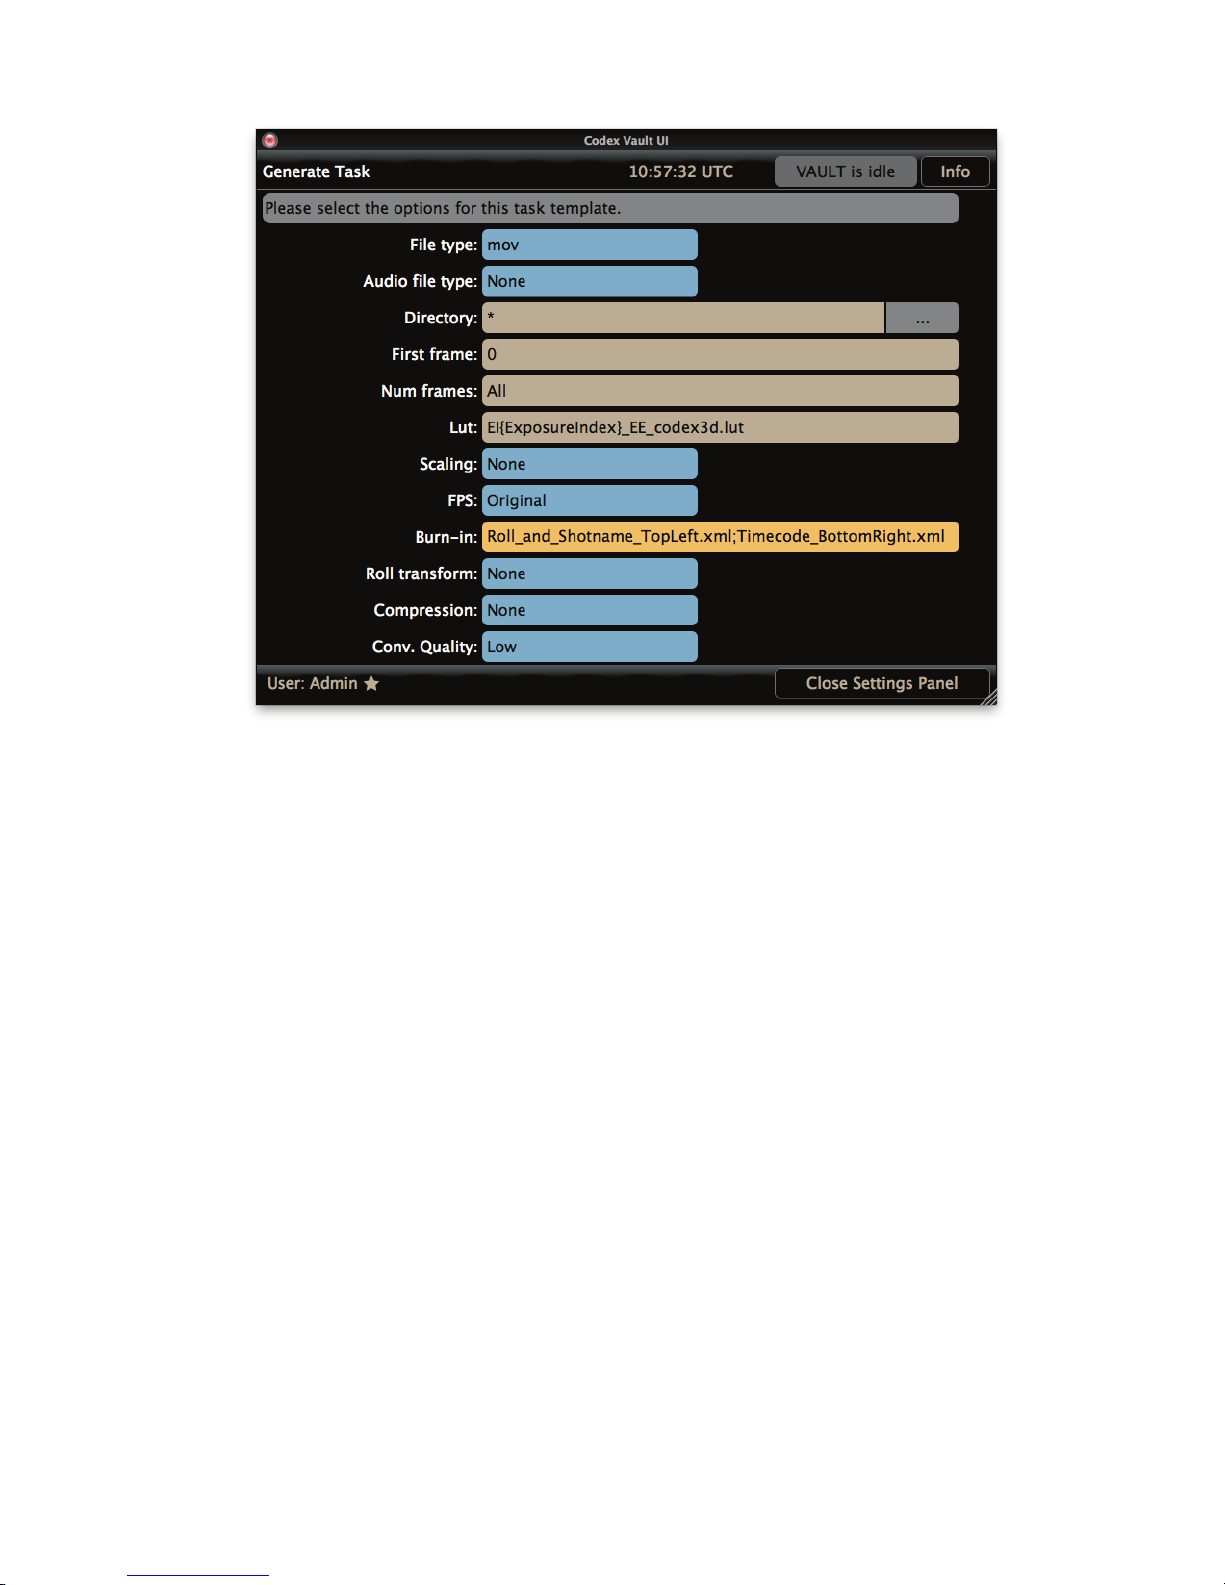
When in the Settings for a Generate Task there are separate boxes to specify LUT and Burn-In les. There are a range of pre-loaded LUT and
Burn-In les available to choose from on the Vault:
LUT Name Description
C3vid_F.lut
C3vid_L.lut
EI160_EE_codex3d.lut
EI200_EE_codex3d.lut
EI250_EE_codex3d.lut
EI320_EE_codex3d.lut
EI400_EE_codex3d.lut
EI500_EE_codex3d.lut
EI640_EE_codex3d.lut
EI800_EE_codex3d.lut
EI1000_EE_codex3d.lut
EI1280_EE_codex3d.lut
EI1600_EE_codex3d.lut
EI2000_EE_codex3d.lut
EI2560_EE_codex3d.lut
EI3200_EE_codex3d.lut
EI160_EL_codex3d.lut
EI200_EL_codex3d.lut
EI250_EL_codex3d.lut
EI400_EL_codex3d.lut
EI320_EL_codex3d.lut
EI500_EL_codex3d.lut
EI640_EL_codex3d.lut
EI800_EL_codex3d.lut
EI1000_EL_codex3d.lut
EI1280_EL_codex3d.lut
EI1600_EL_codex3d.lut
EI2000_EL_codex3d.lut
EI2560_EL_codex3d.lut
EI3200_EL_codex3d.lut
Canon LUTs for C500 recordings. These are 1D LUTs to scale the image values to either Full range or Legal
range, giving more contrast than the native Canon Log image.
ARRI LUTs for Alexa LogC recordings. These 3D LUTs convert from LogC to Rec709. They resulting values
are Extended range, so these LUTs are suitable for creating ProRes .mov les.
If you have material with a range of Exposure Index values, use this as the LUT setting to apply the correct
LUT based on Exposure Index metadata:
EI{ExposureIndex}_EE_codex3d.lut
ARRI LUTs for Alexa LogC recordings. These 3D LUTs convert from LogC to Rec709. They resulting values
are Legal range, so these LUTs are suitable for creating DNxHD .mxf les.
If you have material with a range of Exposure Index values, use this as the LUT setting to apply the correct
LUT based on Exposure Index metadata:
EI{ExposureIndex}_EL_codex3d.lut
Click the Add Lut button to open a browser and highlight/Select a LUT le from those loaded on the Vault. Repeat this process to add multiple
LUTs to a le type:
CODEX VAULT 2 - ADMINISTRATOR GUIDE REV 06.08.13
PAGE 38
Page 39
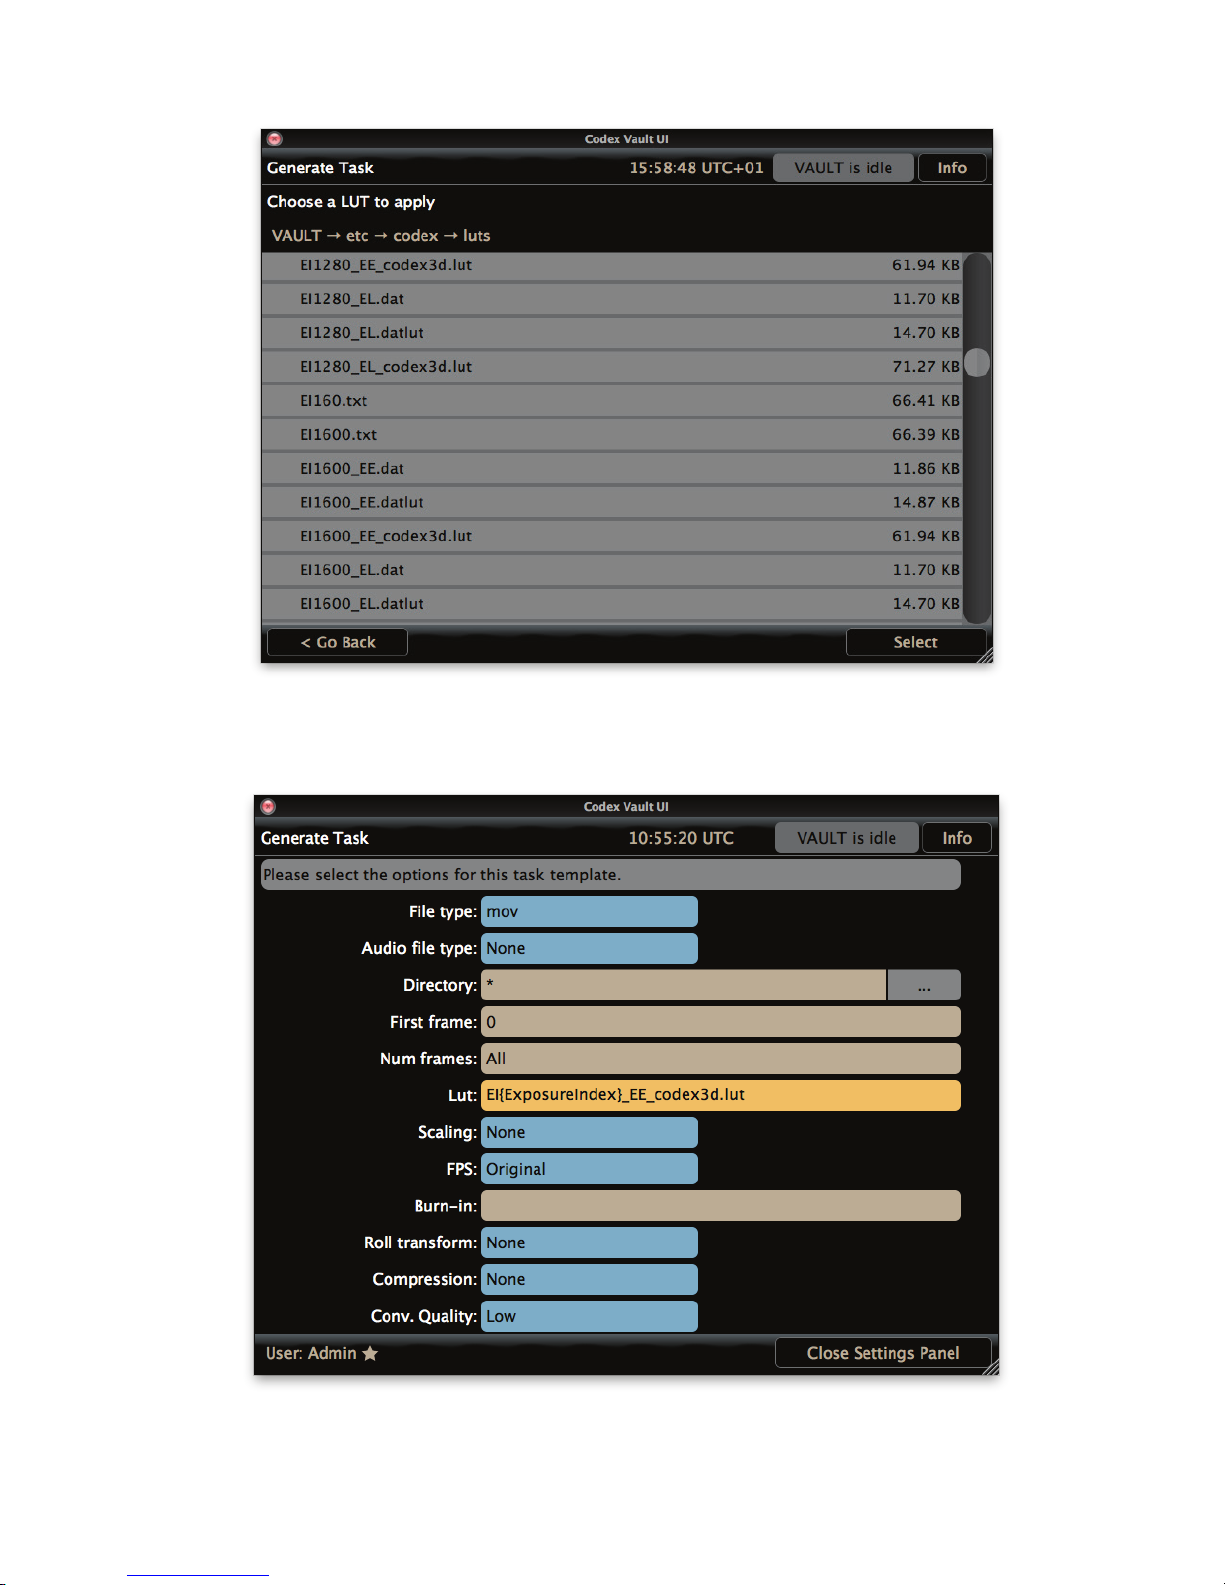
To apply one of the pre-installed LUTs based on the Exposure Index metadata of the clip, change the value in the lename to be
{ExposureIndex} as shown below:
If the clips were recorded with CDL Data, click the Add CDL button to burn this look into the les:
CODEX VAULT 2 - ADMINISTRATOR GUIDE REV 06.08.13
PAGE 39
Page 40
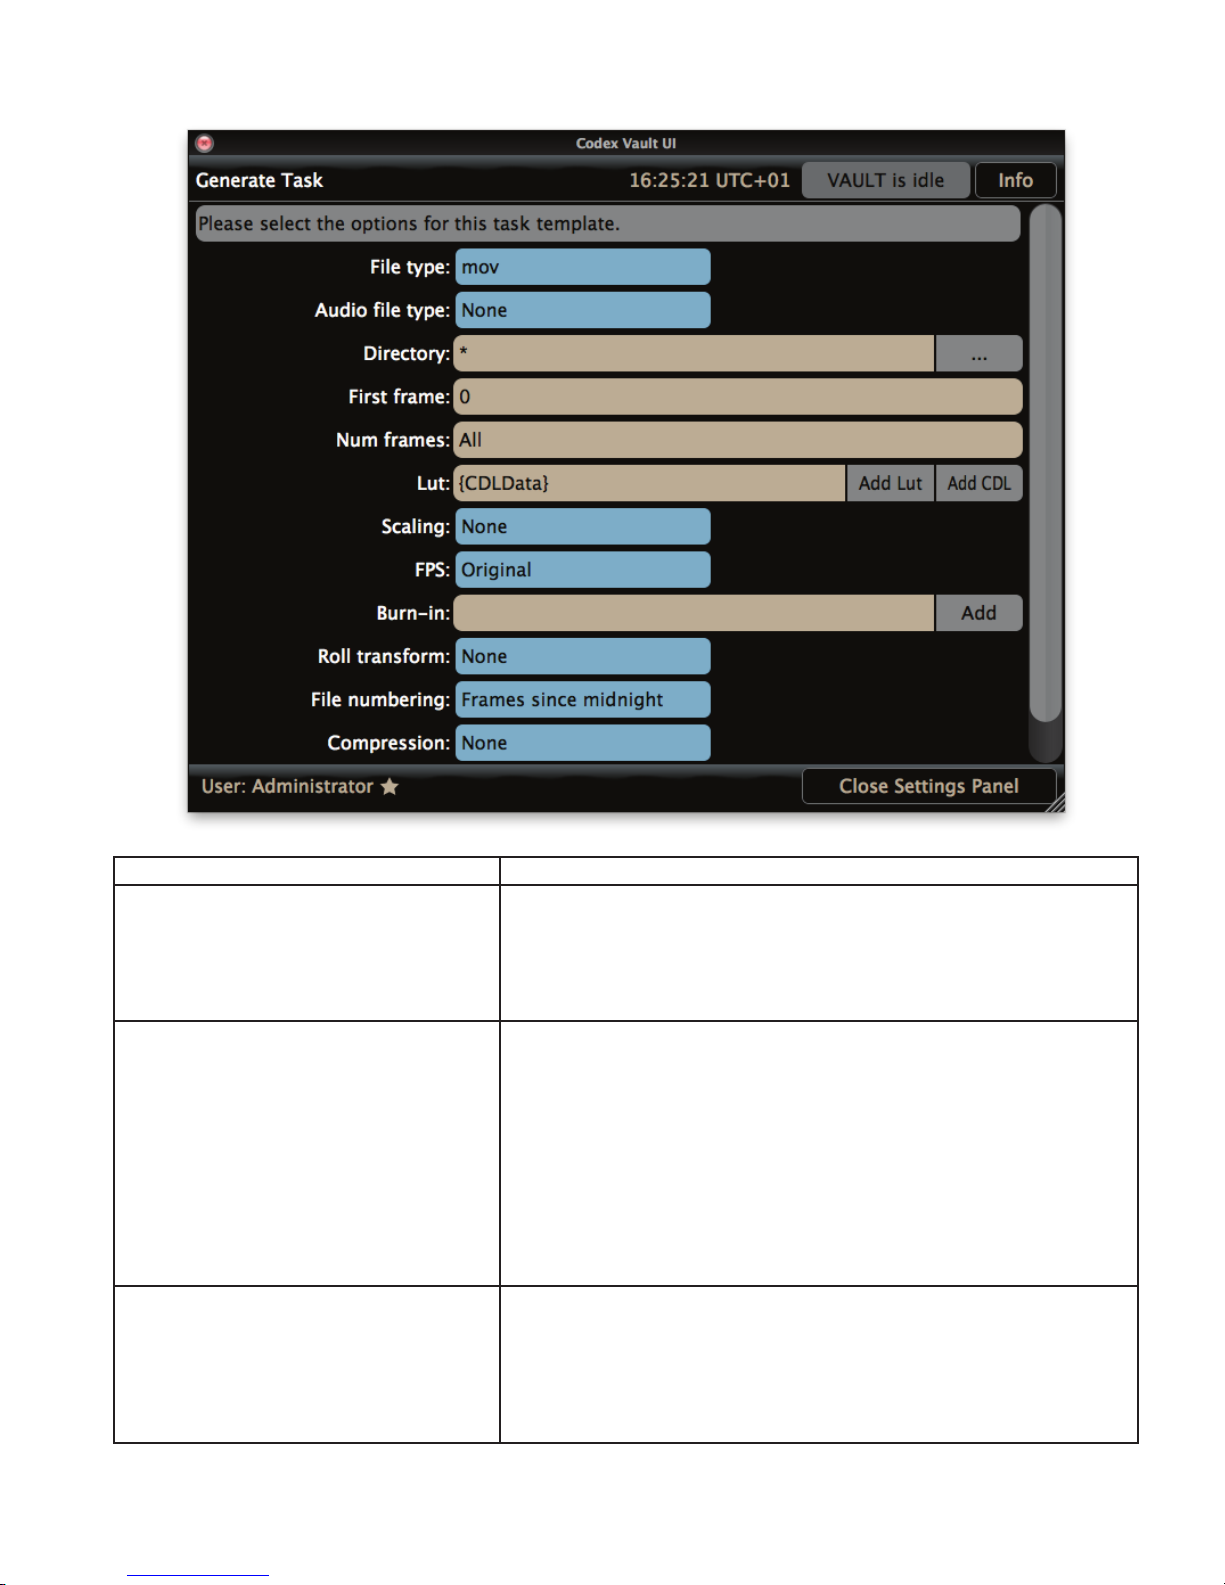
Burn In Name Description
Framecount_BottomCentre.xml
Framecount_BottomLeft.xml
Framecount_BottomRight.xml
Framecount_TopCentre.xml
Framecount_TopLeft.xml
Framecount_TopRight.xml
Framelines_185_Full_Width_1920.xml
Framelines_185_Full_Width_2880.xml
Framelines_185_With_5_Percent_Safe_1920.xml
Framelines_185_With_5_Percent_Safe_2880.xml
Framelines_239_Full_Width_1920.xml
Framelines_239_Full_Width_2880.xml
Framelines_239_With_5_Percent_Safe_1920.xml
Framelines_239_With_5_Percent_Safe_2880.xml
Framelines_240_Full_Width_1920.xml
Framelines_240_Full_Width_2880.xml
Framelines_240_With_5_Percent_Safe_1920.xml
Framelines_240_With_5_Percent_Safe_2880.xml
Logo_Large_Transparent_Centre.xml
Logo_Medium_Transparent_Centre.xml
Logo_Small_Opaque_BottomLeft.xml
Logo_Small_Opaque_BottomRight.xml
Logo_Small_Opaque_TopLeft.xml
Logo_Small_Opaque_TopRight.xml
logo.png
Overlays a frame count, starting from 00000, at the indicated position on the image.
Text is white.
Overlays 1 pixel thick lines showing the dened aspect ratio over the image. There are
also 5_Percent_Safe options that move the framelines a further 5% towards the middle
of the image in all directions. The framelines are white.
Overlays the logo.png le (see next section for how to load a new logo.png le).
Large_Tranparent = 50% of image width, 10% opaque
Medium_Transparent = 25% of image width, 10% opaque
Small = 10% of image width, 100% opaque
CODEX VAULT 2 - ADMINISTRATOR GUIDE REV 06.08.13
PAGE 40
Page 41
Mask_185_Full_Width.xml
Mask_185_With_5_Percent_Safe.xml
Mask_239_Full_Width.xml
Mask_239_With_5_Percent_Safe.xml
Mask_240_Full_Width.xml
Mask_240_With_5_Percent_Safe.xml
Roll_and_Shotname_BottomCentre.xml
Roll_and_Shotname_BottomLeft.xml
Roll_and_Shotname_BottomRight.xml
Roll_and_Shotname_TopCentre.xml
Roll_and_Shotname_TopLeft.xml
Roll_and_Shotname_TopRight.xml
Roll_BottomCentre.xml
Roll_BottomLeft.xml
Roll_BottomRight.xml
Roll_TopCentre.xml
Roll_TopLeft.xml
Roll_TopRight.xml
Shotname_BottomCentre.xml
Shotname_BottomLeft.xml
Shotname_BottomRight.xml
Shotname_TopCentre.xml
Shotname_TopLeft.xml
Shotname_TopRight.xml
Timecode_and_Framecount_BottomCentre.xml
Timecode_and_Framecount_BottomLeft.xml
Timecode_and_Framecount_BottomRight.xml
Timecode_and_Framecount_TopCentre.xml
Timecode_and_Framecount_TopLeft.xml
Timecode_and_Framecount_TopRight.xml
Timecode_BottomCentre.xml
Timecode_BottomLeft.xml
Timecode_BottomRight.xml
Timecode_TopCentre.xml
Timecode_TopLeft.xml
Timecode_TopRight.xml
Overlays a 50% opaque mask to provide the dened aspect ratio. There are also
5_Percent_Safe options that move the mask a further 5% towards the middle of the
image in all directions.
Overlays the Roll name and Shot name at the indicated position on the image. Text is
white.
Overlays the Roll name at the indicated position. Text is white.
Overlays the Shotname name at the indicated position. Text is white.
Overlays the Timecode and Framecount at the indicated position. Text is white.
Overlays the Timecode at the indicated position. Text is white.
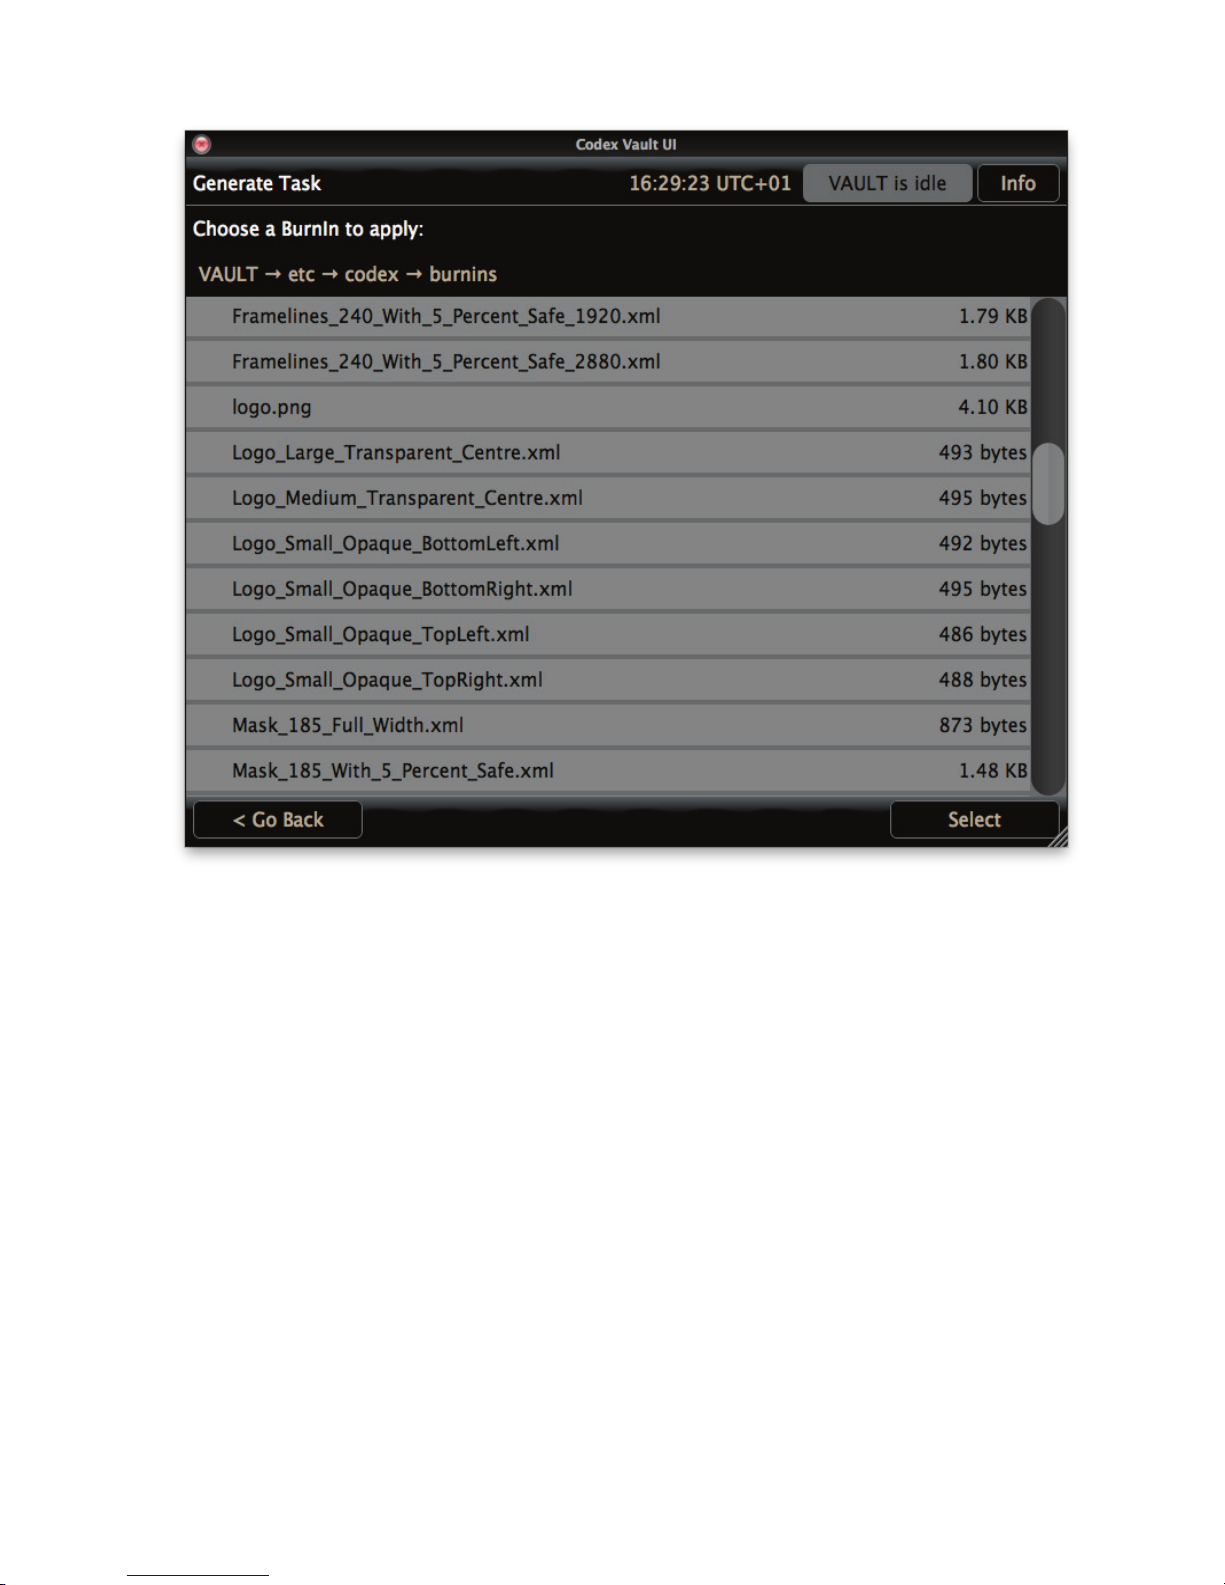
Click the Add box next to the Burn-In eld to open a browser and highlight/Select from the les available on the Vault. Repeat this process to
add multiple Burn-Ins to a le type:
CODEX VAULT 2 - ADMINISTRATOR GUIDE REV 06.08.13
PAGE 41
Page 42
v
CODEX VAULT 2 - ADMINISTRATOR GUIDE REV 06.08.13
PAGE 42
Page 43
14.6 Import Task
The Import Task can be used to import les from an external disk (e.g. attached USB or eSATA hard drive) or LTFS tape to one of the following
media types:
• Vault Storage module (formatted as either RAID-3 Codex or RAID-5 XFS)
• Capture Drive
• Transfer Drive
If the les were archived from Codex formatted storage they should be imported to Codex formatted storage. Similarly, if they were archived
from XFS formatted storage they should be imported to XFS formatted storage.
Once the les have been imported then they can be processed using other types of task, such as a Generate.
In the Settings for the Import Task you can select if the Source for the import is File (disk) or Tape (LTFS).
For le sequences the Num Frames setting allows you to set how many frames will be imported, which can be useful if you are checking an
archive and want to check a sample of frames rather than whole shots.
If the les for import will always be in the same directory set Predene Filepath to Yes and specify the correct location. If Predene Filepath is
set to No then when a le Import task runs the user selects the location of the les to import using a the le browser.
When importing from an LTFS tape the left hand tape drive is used.
CODEX VAULT 2 - ADMINISTRATOR GUIDE REV 06.08.13
PAGE 43
Page 44
14.7 Media Sign Off Task
The Media Sign Off task should be congured to run when all required tasks have completed with a given media. It provides PDF reports for the
media, and also means a Media Clear task can be run without prominient warnings.
Note: the Media Sign Off Task cannot be run directly on third party media (i.e. SxS, AXSM, SR Memory, REDMAG). Instead use the Media Sign
Off Task on the copy of les made from this media to XFS Internal formatted storage.
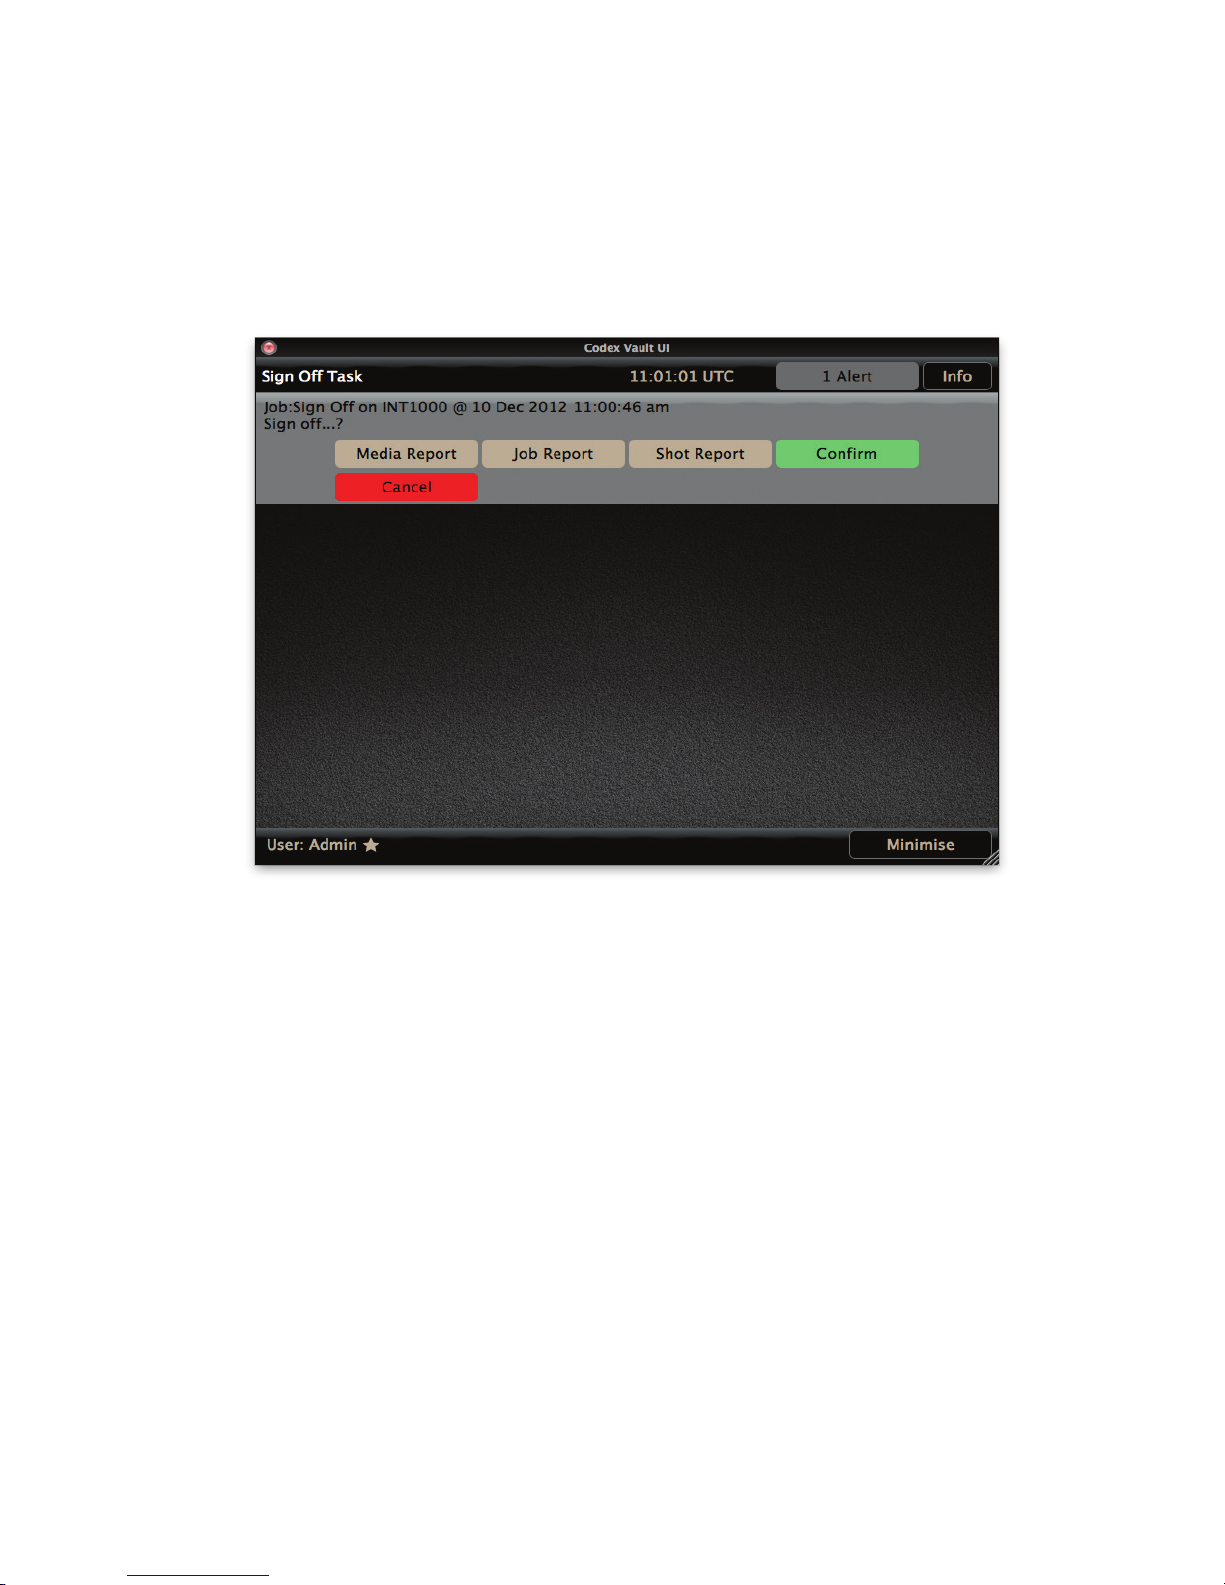
The Media Sign Off task provides the following prompt:
The Media Sign Off task can produce a range of reports:
Media Report – provides a PDF report with a summary on the contents of the media and the history of jobs/tasks that have been carried out
with the media.
Job Report – provides a PDF report on the current running job that the media is involved in.
Shot Report – provides a PDF report of the shots on the media, with key metadata such as Roll, Timecode, Duration, File size, and Format.
Here is an example of a Shot Report:
CODEX VAULT 2 - ADMINISTRATOR GUIDE REV 06.08.13
PAGE 44
Page 45
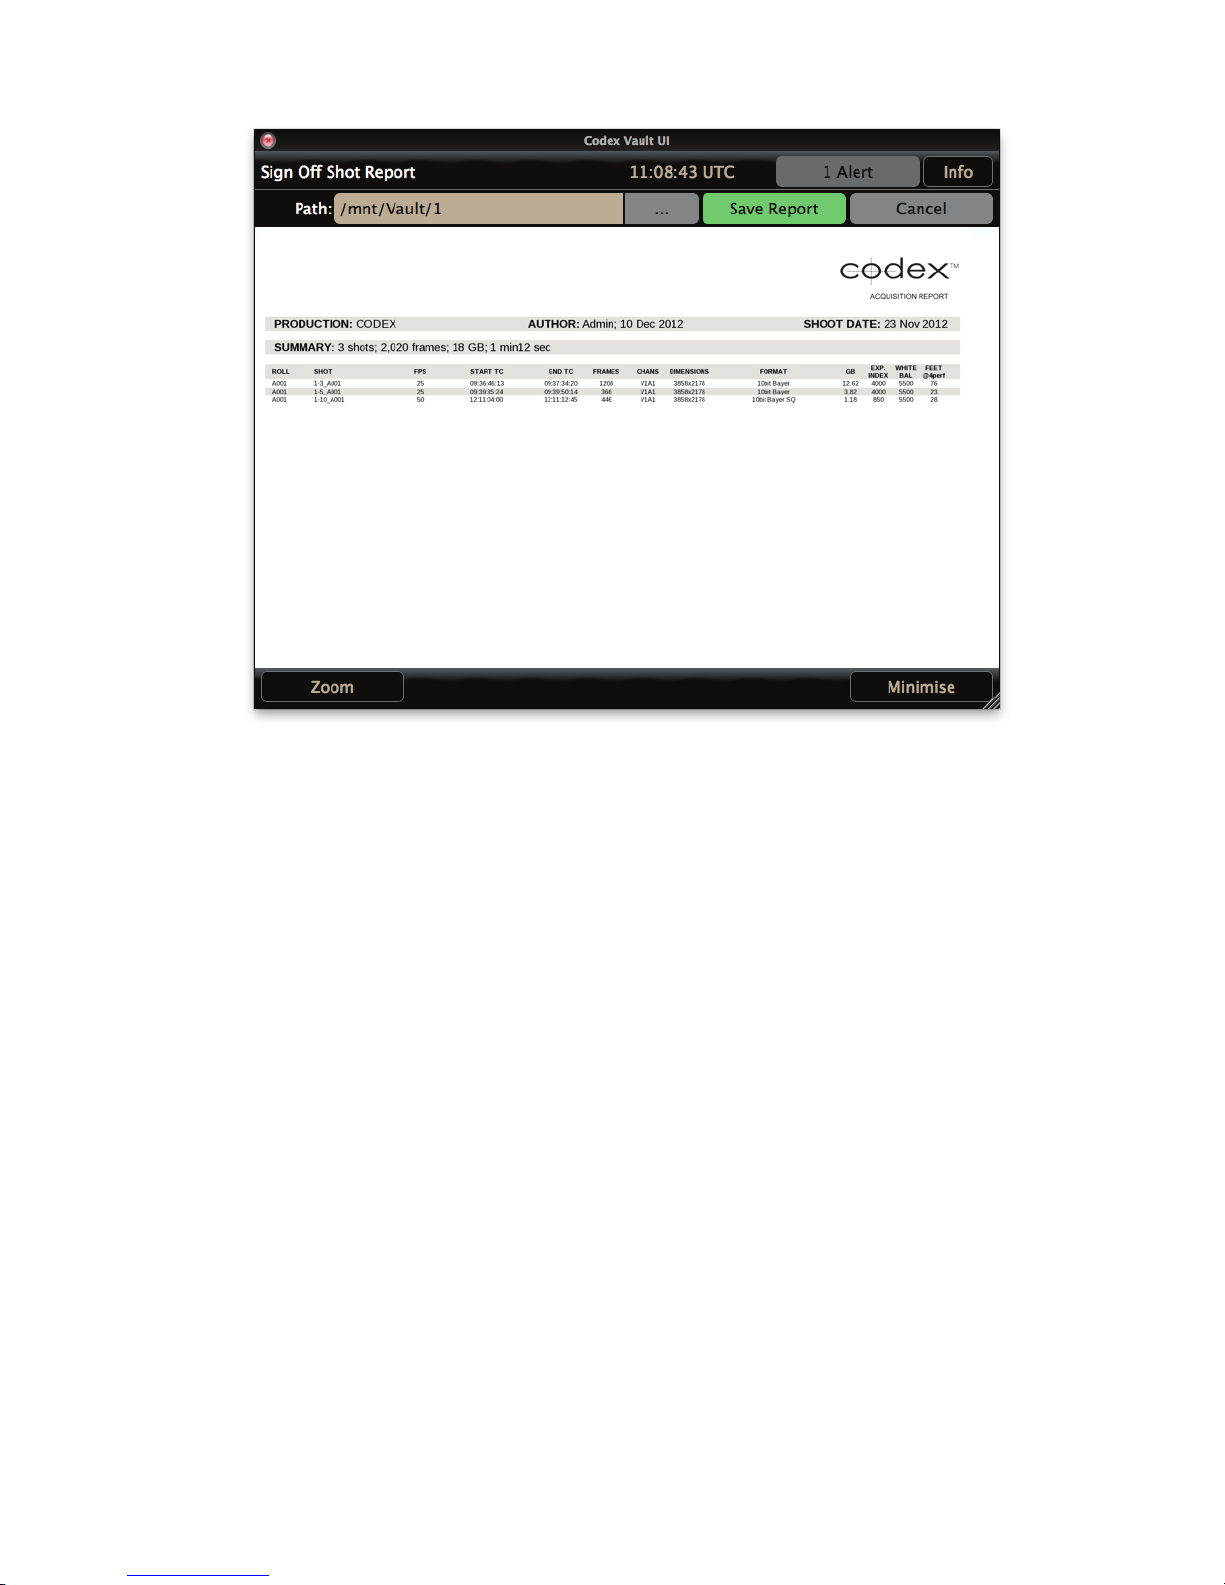
Note: all shots must have matching ShootDate metadata in the format YYYYMMDD for this to appear on the Shot report.
Conrm – when the Conrm button is pressed the Vault marks the media as signed off (i.e. all required tasks have been completed) and a
Media Clear can be carried out without any warnings
Cancel – cancels the Media Sign Off, meaning effectively that the media is not nished with.
When viewing a report, click the ... button next to the Path eld. From here the User can select an external device or a directory on the Vault to
save the report to. A good directory on the local le system for saving reports is /tmp.
To access reports saved locally on the Vault, the root samba share can be used. It is recommended to only allow more advanced users to do
this, as deleting or moving les when connected to the Vault in this way can stop the system from working.
For further details on connecting to samba shares refer to the Codex guide “Getting Logs and Loading LUTs, Burn-Ins, and syscongs”.
14.8 Media Verify Task
The Media Verify Task can be used to check the integrity of cloned data after it has been copied.
Note: the Clone Task performs checksum verication by default on any les that are cloned in the system.
Note: the Media Verify Task cannot be run directly on third party media (i.e. SxS, AXSM, SR Memory, REDMAG). Instead use the Media Verify
Task on the copy of les made from this media to XFS Internal formatted storage.
14.9 Media Clear Task
The Media Clear Task formats the media so that it can be used again.
When setting up a Media Clear task in Settings you can specify:
CODEX VAULT 2 - ADMINISTRATOR GUIDE REV 06.08.13
PAGE 45
Page 46
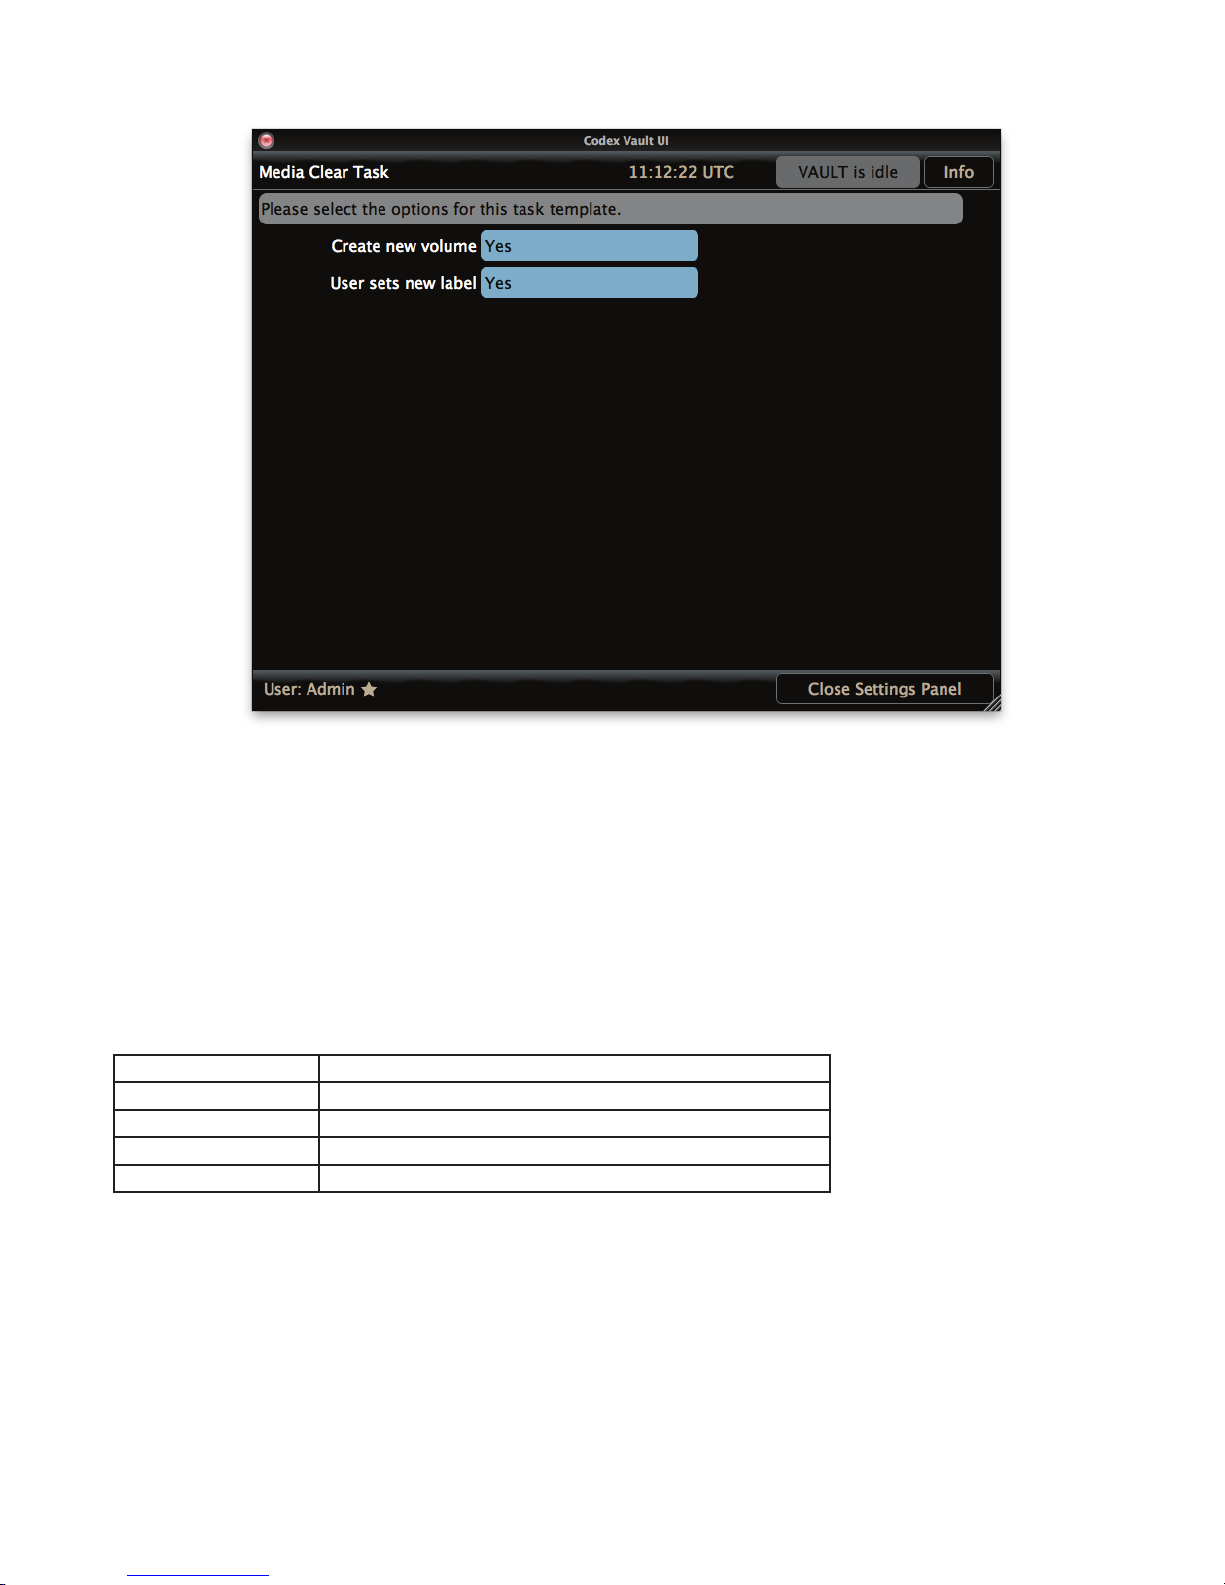
Create new volume: Yes or No.
If this is set to No, the media will need to be reformatted with a new Roll number before it can be used. This is normally done in the camera or
recorder on set.
If this is set to Yes the media will be reformatted with a new Roll number, and the additional option will be available:
User sets new label: Yes or No.
If this is set to Yes the user will be asked to input a new Roll number for the media.
If this is set to No the Vault will automatically create a new Roll with a length of 8 characters on Codex media, incremented from the previous
Roll number. Here are some examples of Roll numbers created automatically by the Vault:
Previous volume name New volume name created automatically by Vault
001 00100002
00100002 00100003
204 20400002
A263 A2630002
SxS and SR Memory cards will be cleared and given the name CODEX_BLANKED. These should be reformatted in the camera before use.
AXSM Memory cards cannot be cleared on the Vault, and should therefore always be reformatted on camera.
CODEX VAULT 2 - ADMINISTRATOR GUIDE REV 06.08.13
PAGE 46
Page 47
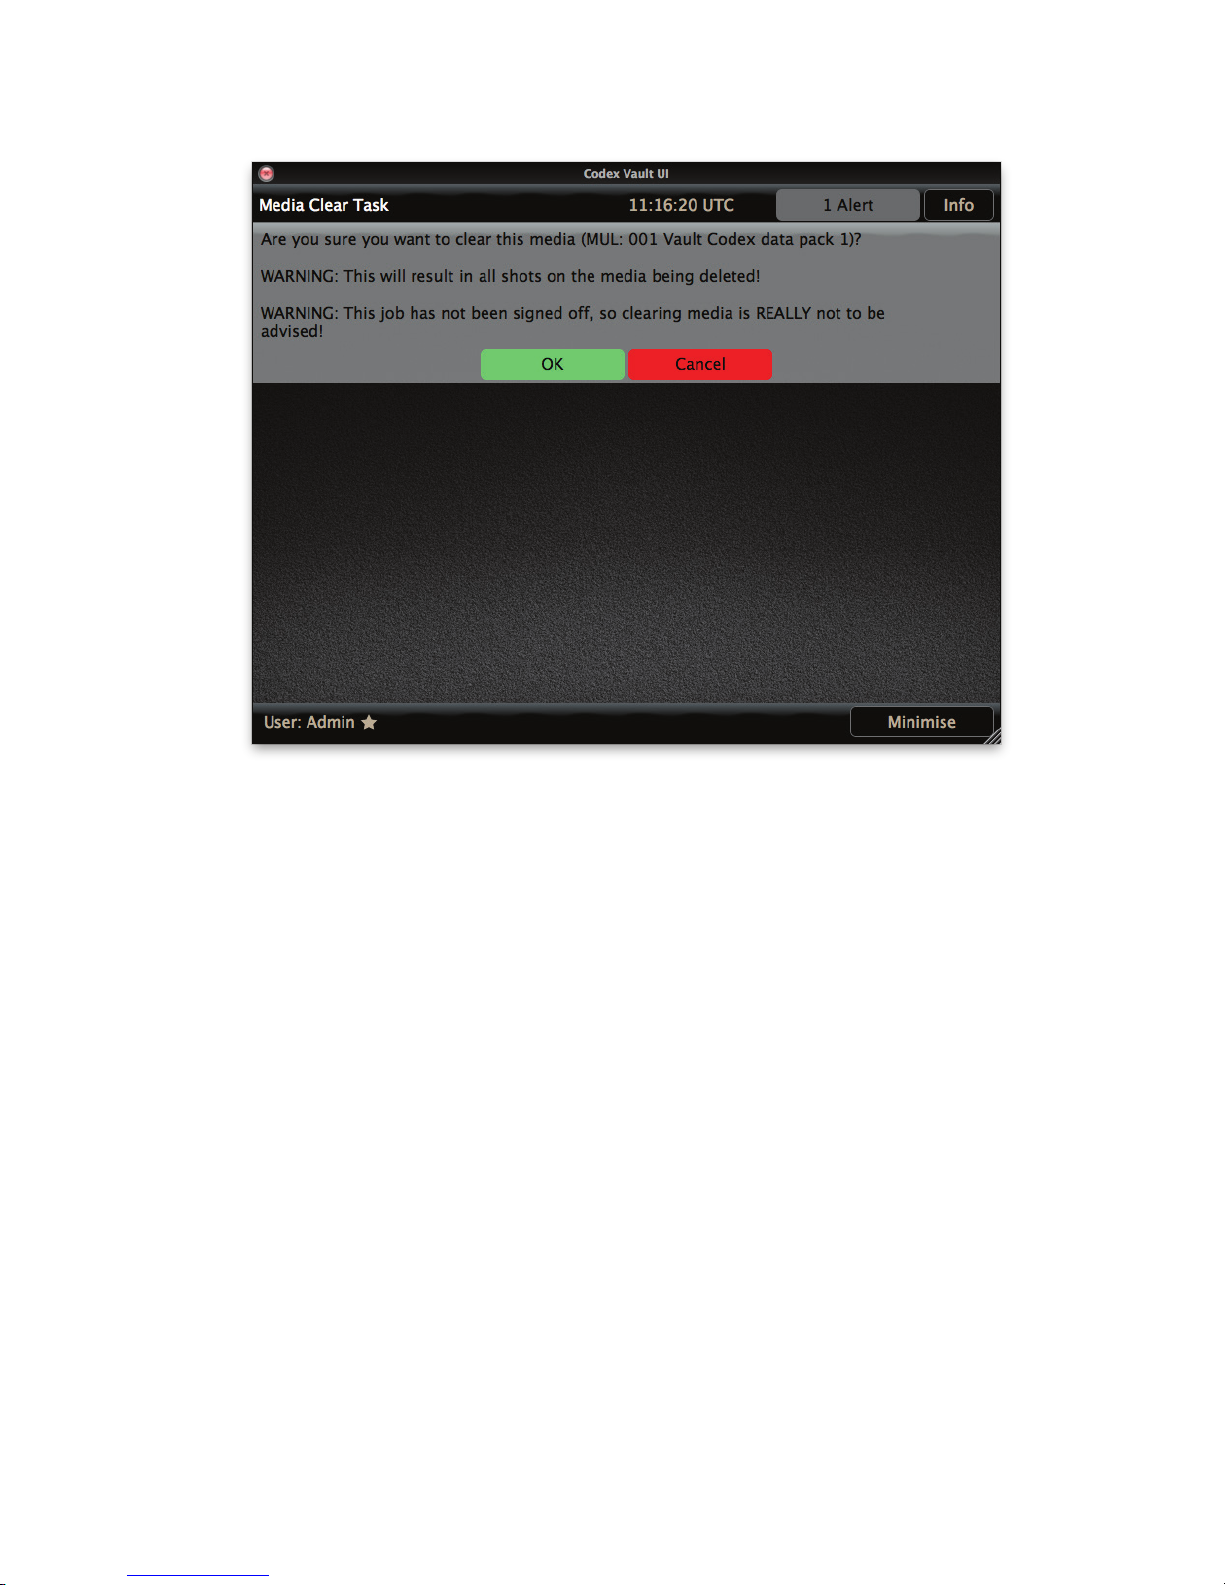
If a Media Sign Off has not been completed before the Media Clear then a prominent warning will be displayed as shown below:
CODEX VAULT 2 - ADMINISTRATOR GUIDE REV 06.08.13
PAGE 47
Page 48
15. Task Scheduler
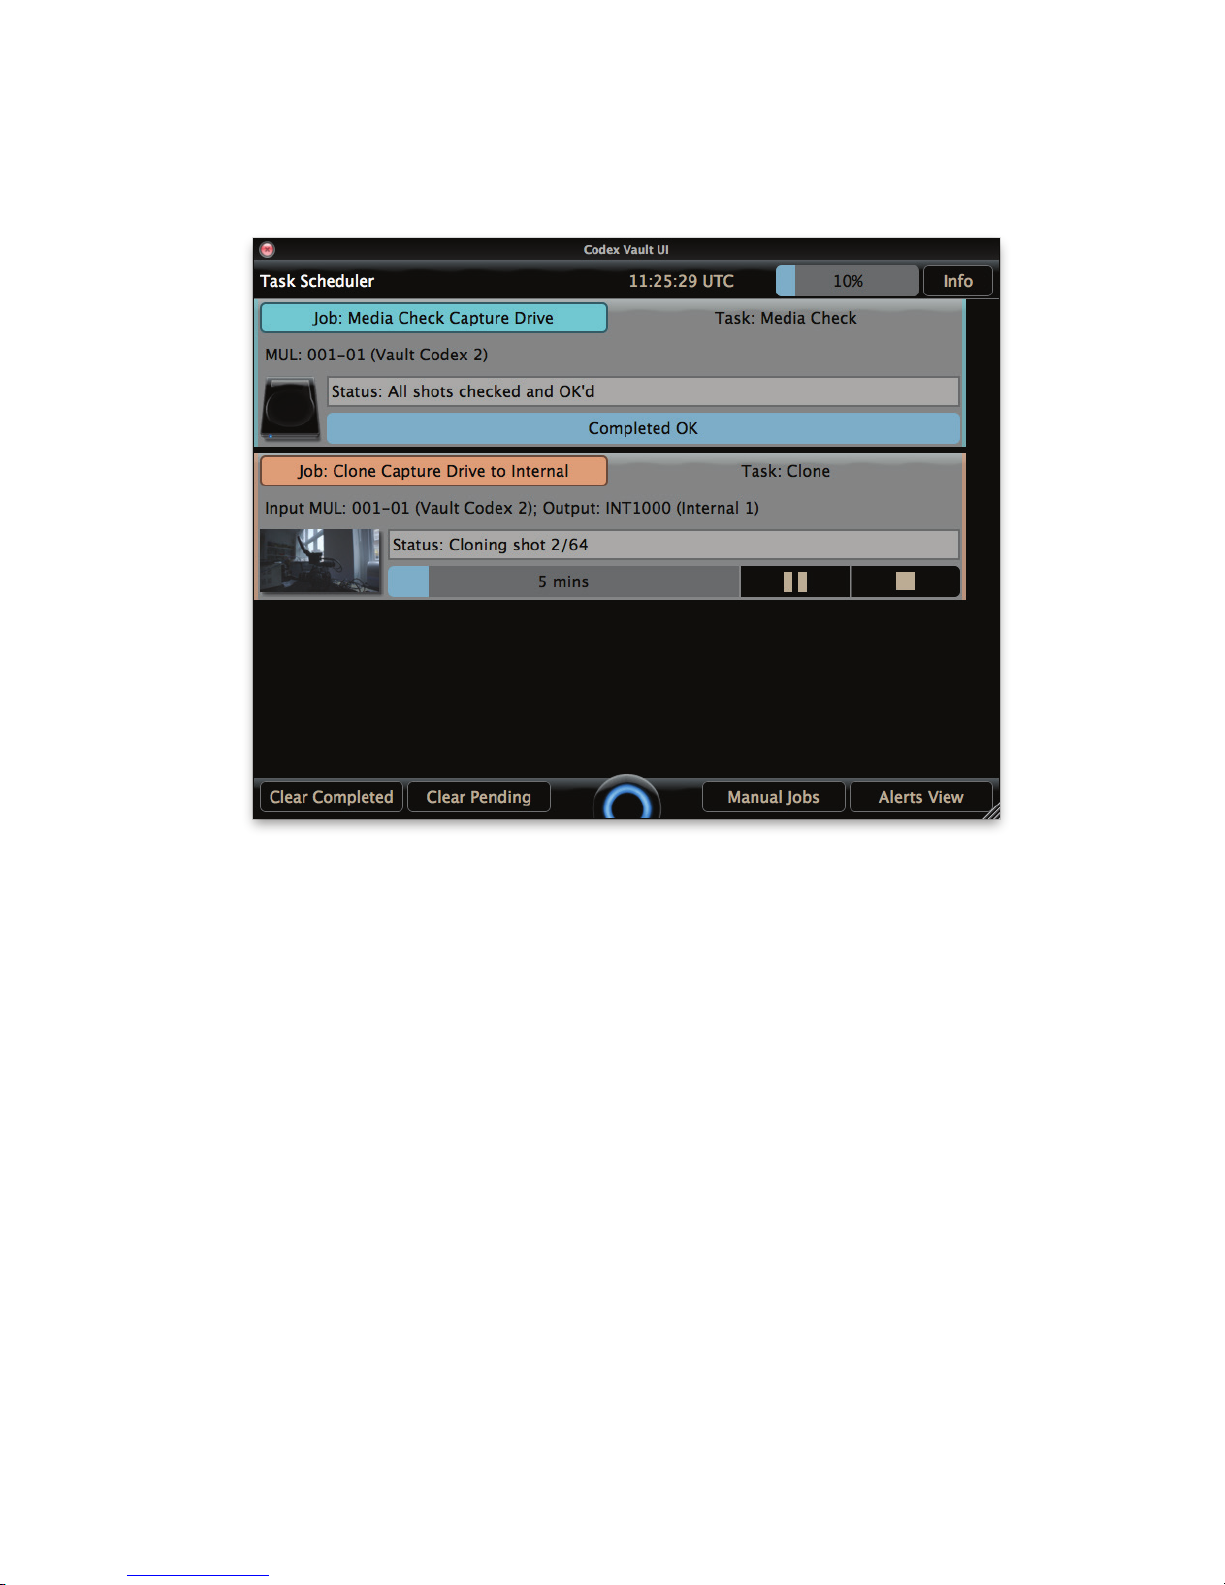
The Task Scheduler is the main screen that the User will interact with on a daily basis. It displays progress information about active Jobs (Work
Templates that are running) and information about previous Jobs, as shown below:
Jobs can be paused or stopped if required using the buttons next to the progress bar for an individual job.
The list of Jobs on the Task Scheduler screen is cleared when the Vault is restarted.
Tasks that belong to the same Job are colour coded for clarity.
The Clear Completed and Clear Pending buttons can be used to remove jobs from the Task Scheduler that have a status of completed or
pending. This can be useful to simplify the screen if lots of tasks have been running.
The Vault cannot be powered off when there are tasks running. Wait for the tasks to nish, or cancel them before powering off.
Ensure a reliable power source because if power is lost during the middle of a Job it will have to be started again.
CODEX VAULT 2 - ADMINISTRATOR GUIDE REV 06.08.13
PAGE 48
Page 49
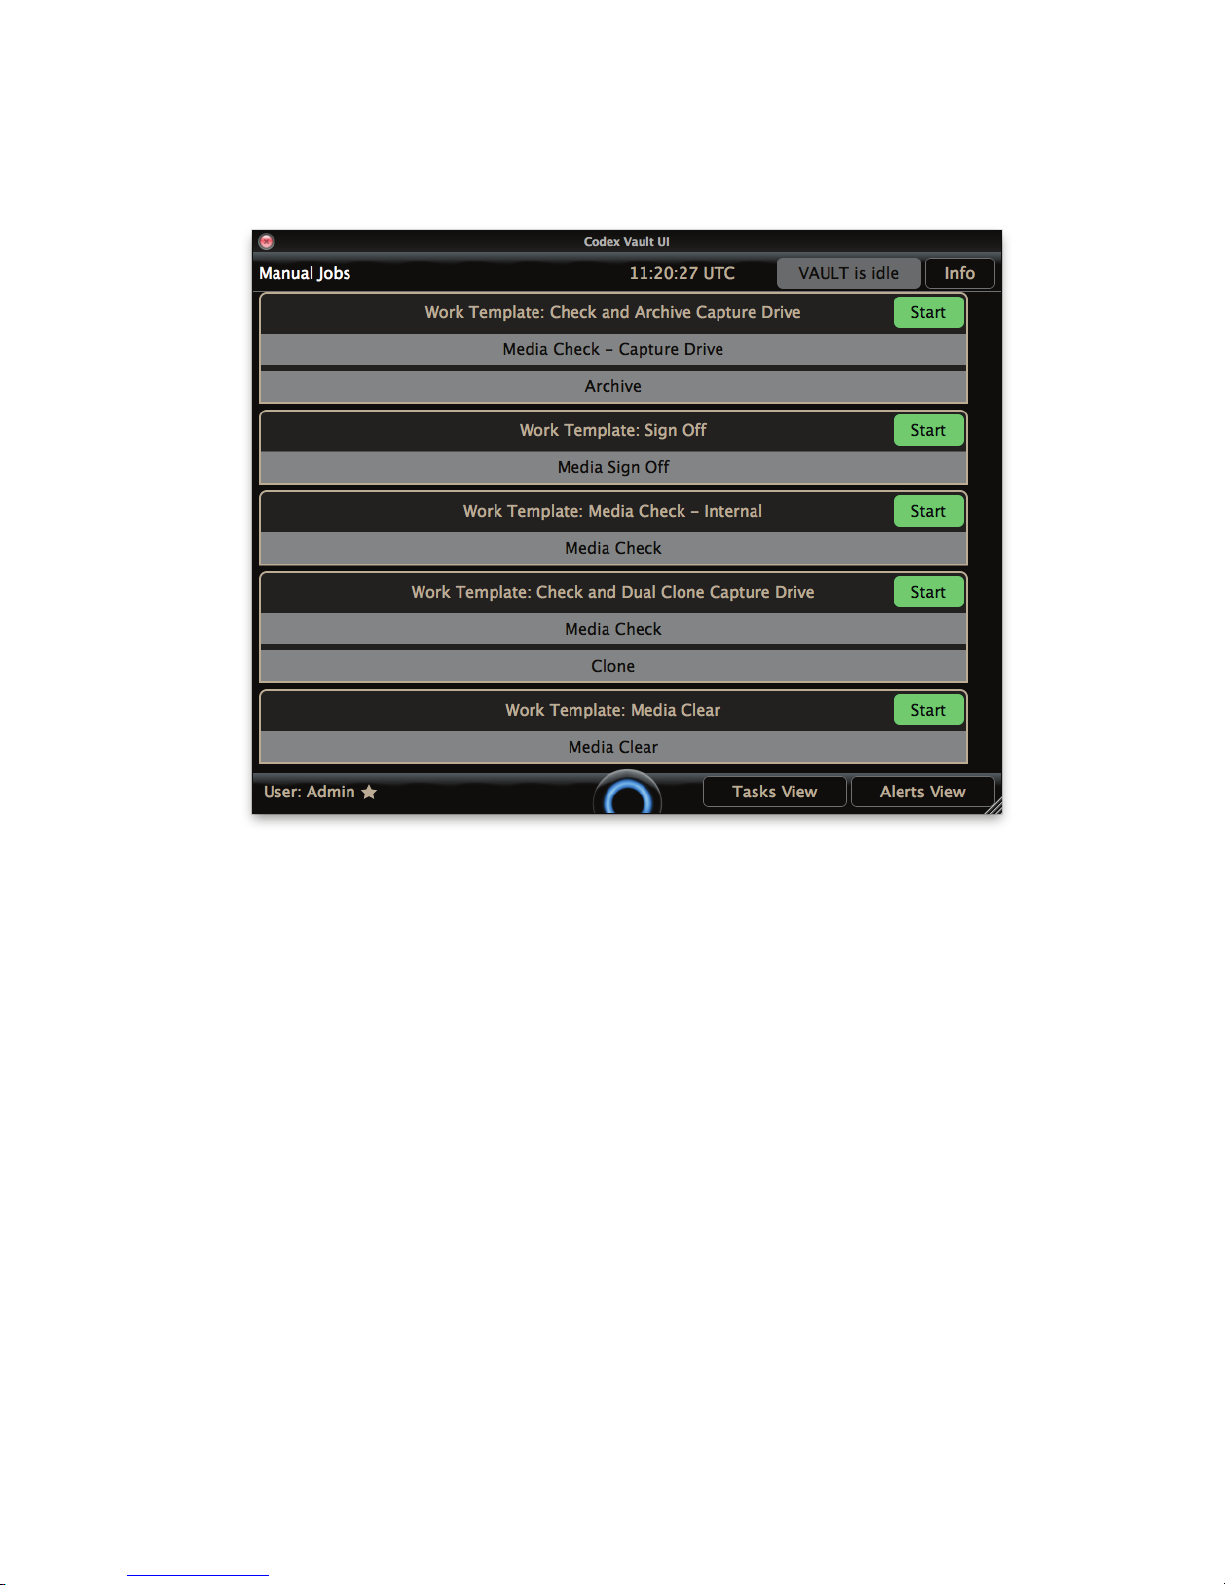
15.1 Manual Jobs
When a Work Template is set up to be triggered manually, it is available on the Manual Jobs screen, and the User can press Start to begin any
job:
If the required media is not available to start a manual job then an error message will be displayed.
CODEX VAULT 2 - ADMINISTRATOR GUIDE REV 06.08.13
PAGE 49
Page 50
15.2 Alerts View
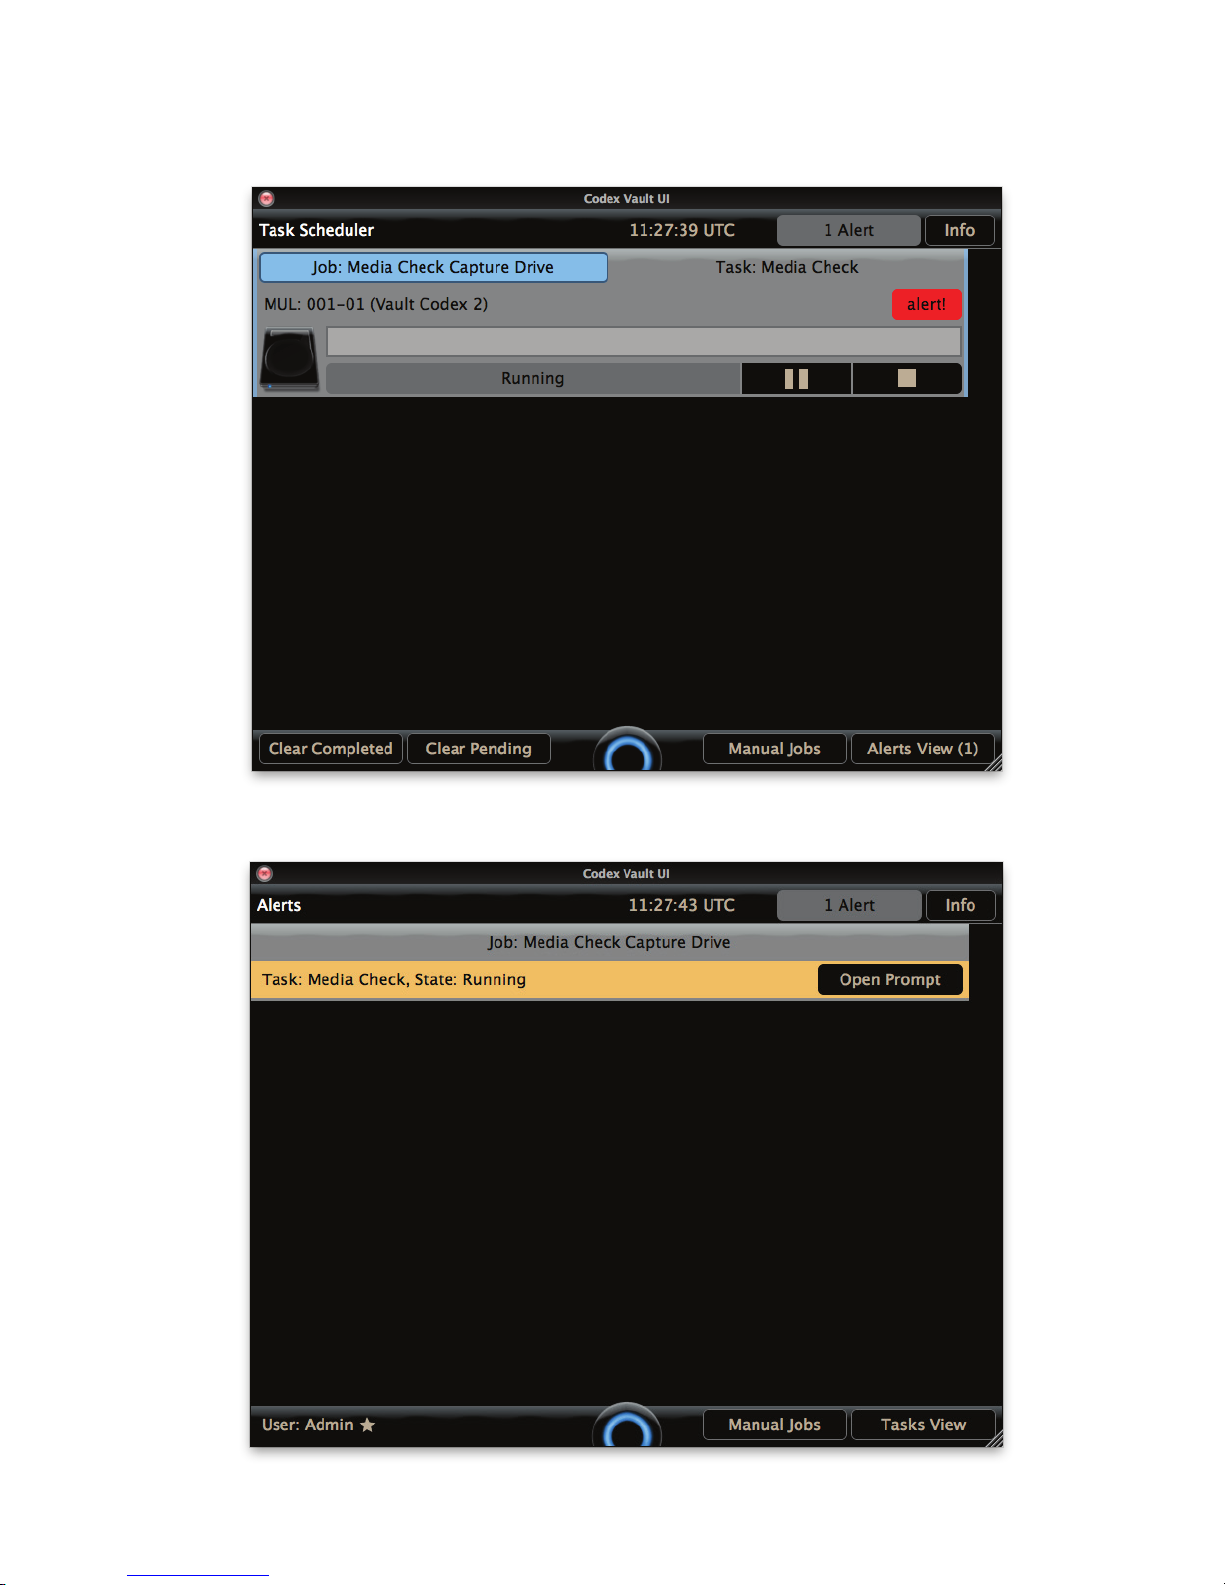
If there are Alerts that require a response from the User than an ‘alert!’ button is shown on the Task Scheduler screen:
To view a full list of alerts press the Alerts View button:
Press ‘Open Prompt’ for a to view details and make a decision on the specic alert.
CODEX VAULT 2 - ADMINISTRATOR GUIDE REV 06.08.13
PAGE 50
Page 51
16. Library
16.1 General Library Info
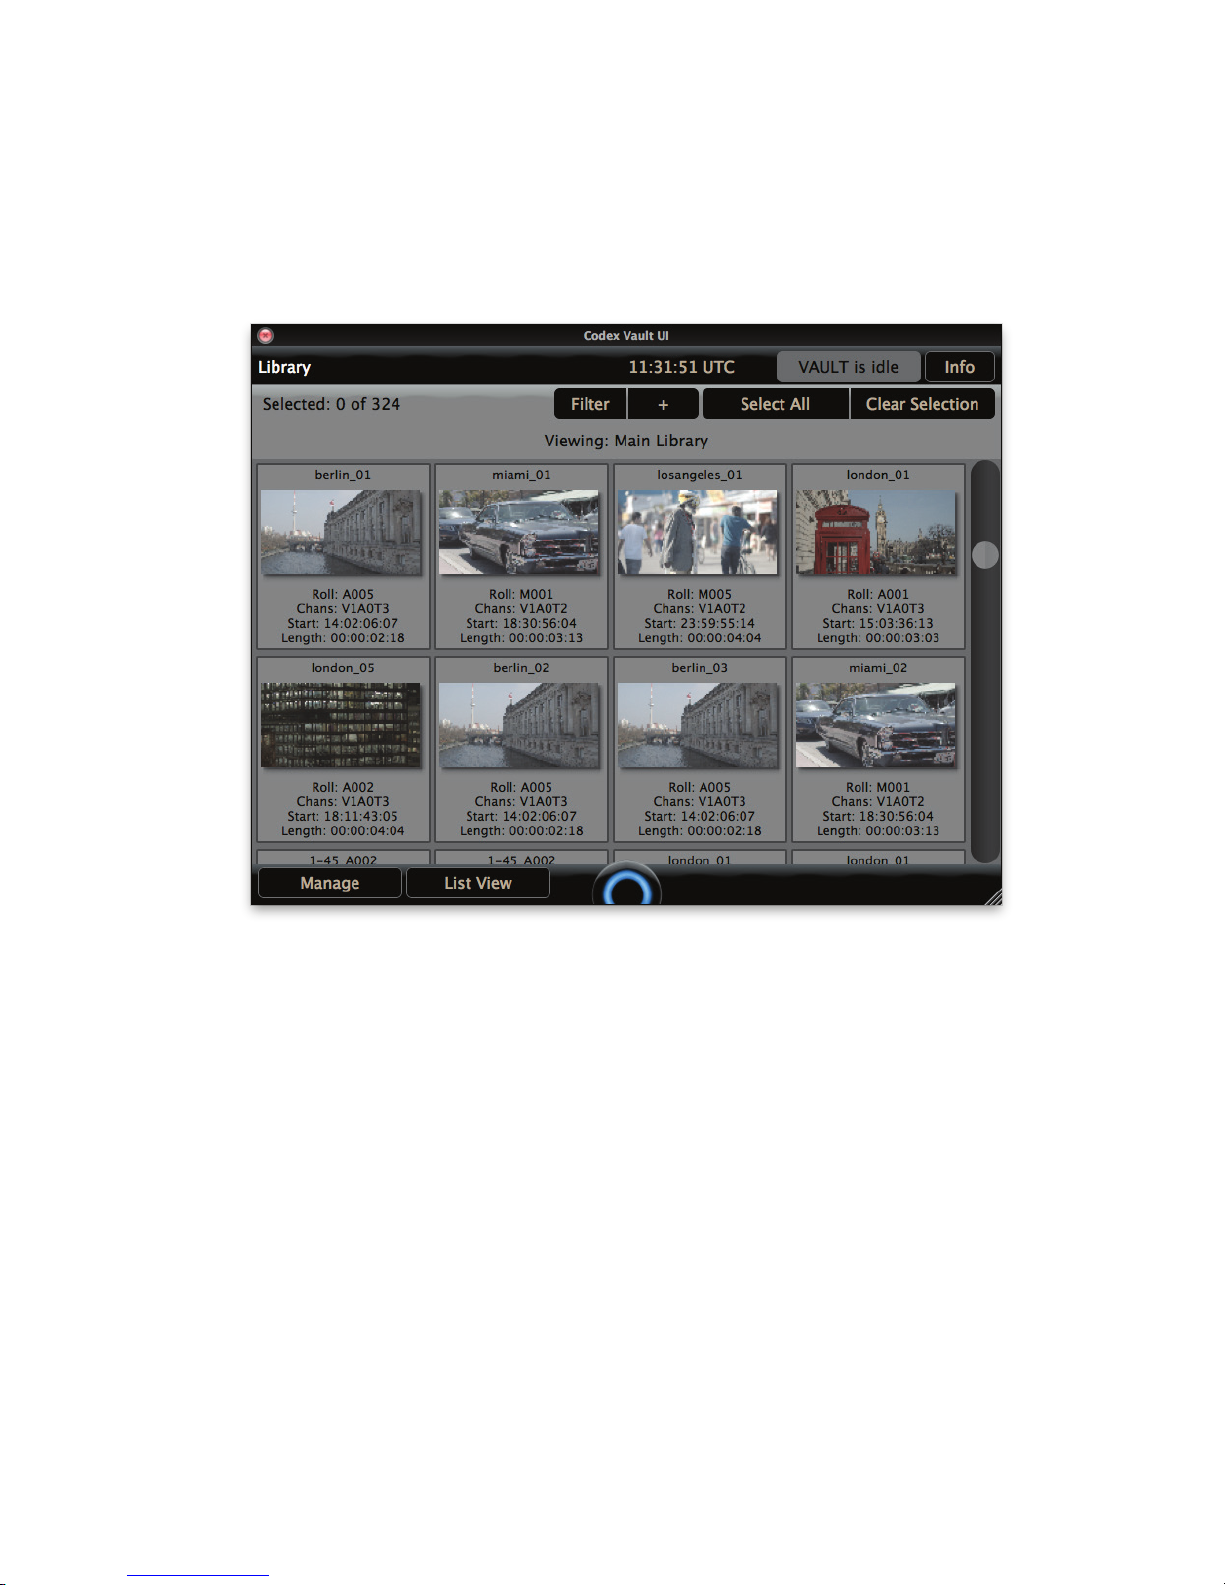
The general Library is the same as Media Check Library except it applies to all media loaded in the Vault rather than just the media currently
involved in a Media Check.
The Library allows the User to view thumbnails or a list of shotnames and key metadata:
If accessing the Library during a Media Check this can be useful to assist the User in conrming the results of the Media Check. To activate List
View, click the List View button at the bottom of the screen.
The information shown with each shot thumbnail is:
Roll – Roll name metadata
Chans – Number of channels of video, audio and timecode.
Start – Start timecode of shot.
Length – Length of shot expressed as HH:MM:SS:FF (Hours: Minutes: Seconds: Frames)
16.2 Editing Metadata
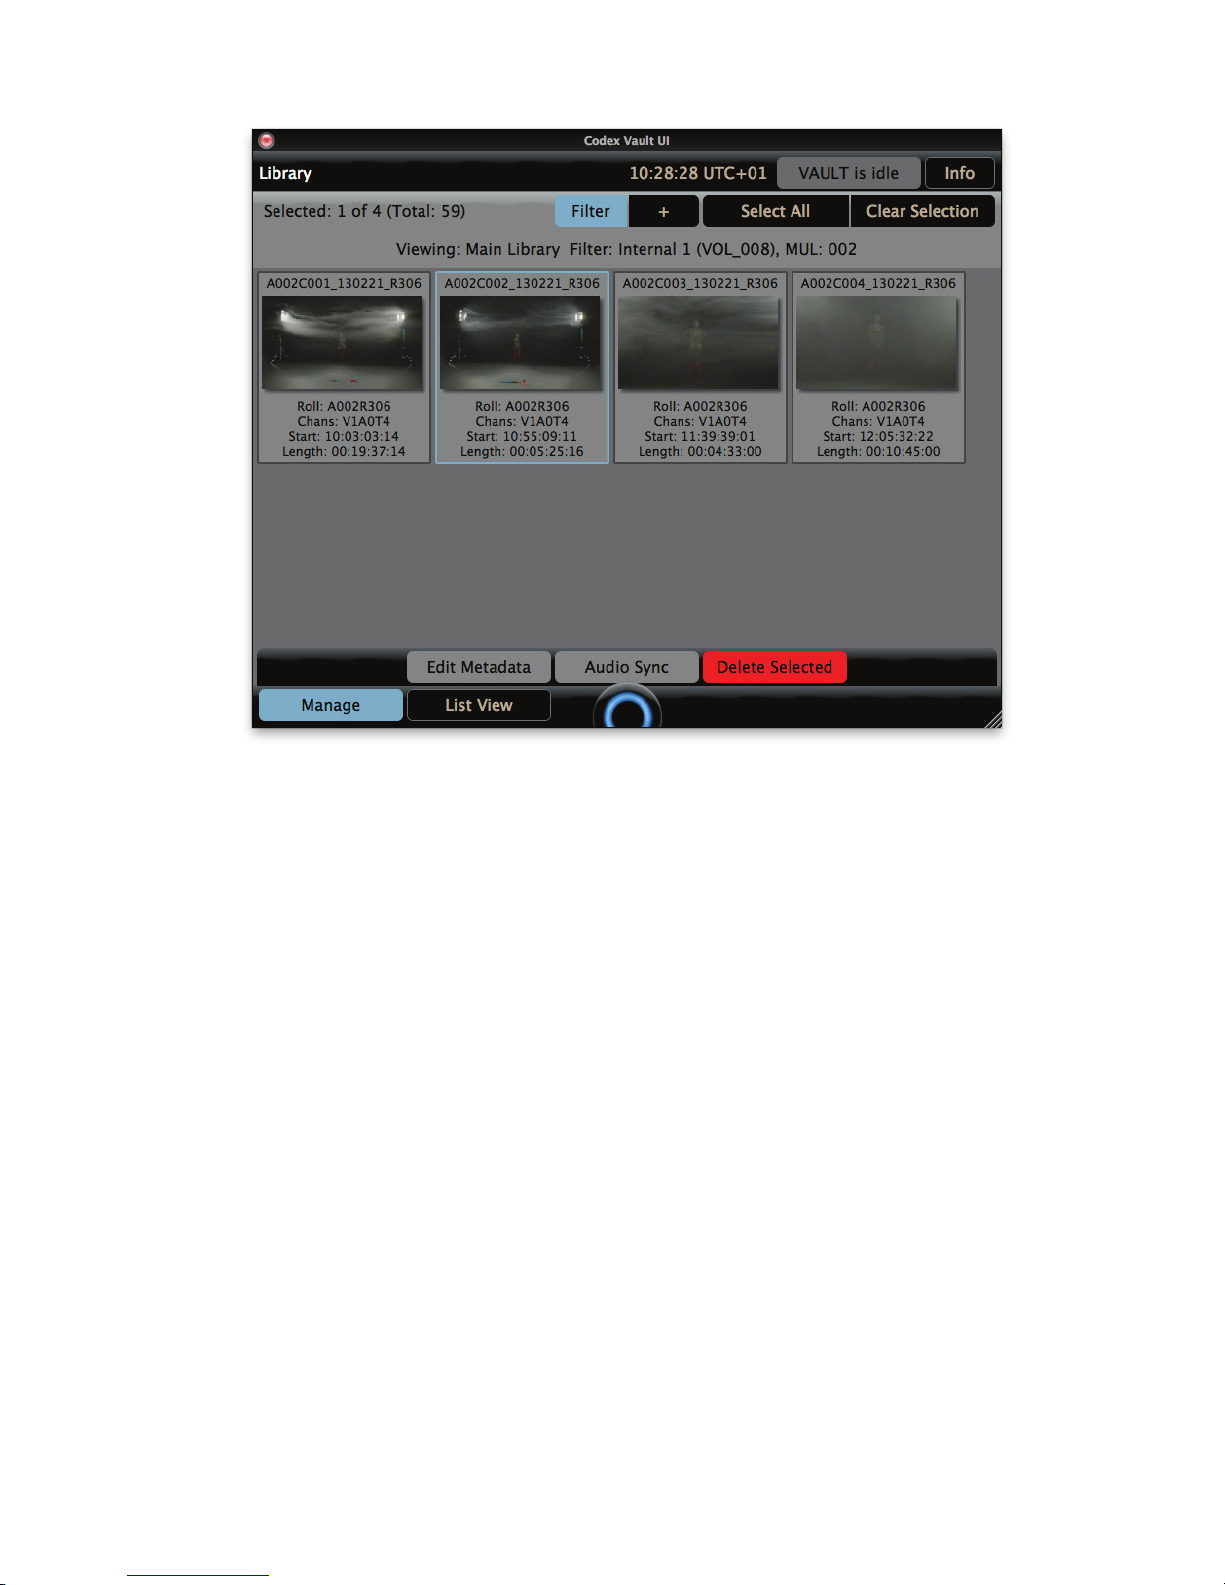
To view/edit metadata for a shot click on the thumbnail so the shot is highlighted in blue. Alternatively to work on multiple clips, select and
highlight several thumbnails.
Then click the Manage button and click Edit Metadata:
CODEX VAULT 2 - ADMINISTRATOR GUIDE REV 06.08.13
PAGE 51
Page 52
The Edit Metadata screen shows the full range of clip metadata, divided into these headings:
• Filecard: a selection of metadata most likely to be edited
• Project: a selection of metadata that is the same for all clips on a Roll, and less likely to be edited
• All: every metadata item stored with the shot(s)
• Shot Info: general metadata information that is not editable (except in the case of Pixel Aspect)
CODEX VAULT 2 - ADMINISTRATOR GUIDE REV 06.08.13
PAGE 52
Page 53
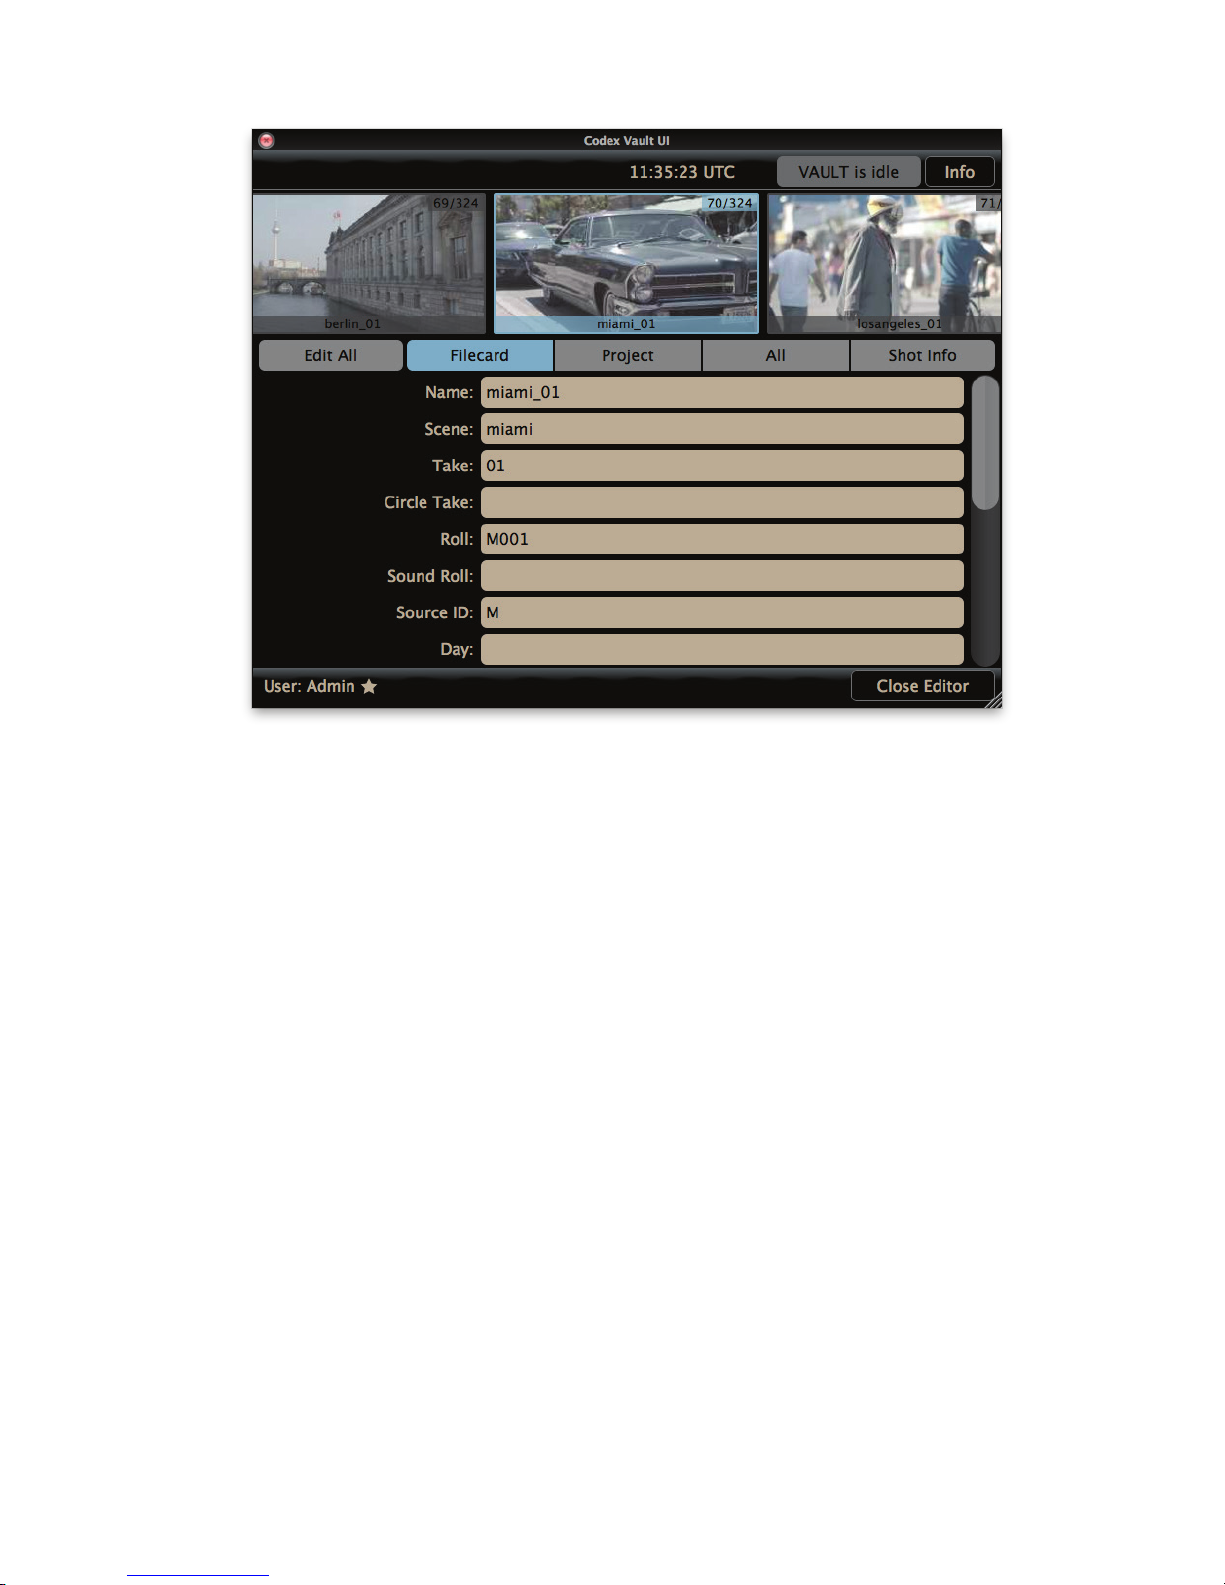
Click in a eld to make changes to metadata, then either Save & Finish or Quit & Forget to return to the Library.
Fields that are grey in colour cannot be edited.
The top-centre thumbnail that is highlighted blue is the shot selected for editing. Click the thumbnail to the left or right to select that shot for
editing.
Click the Edit All button to select all shots for editing. When this is done any metadata that is common to all selected shots will be shown as
normal. Any metadata that varies between the selected shots will be shown as <mixed>.
16.3 Setting the correct Aspect for shots
All shots have a Pixel Aspect setting, and this metadata can determine how they are processed on the Vault and in some cases also how the
les are handled by other software. An example is ARRIRAW les which have this metadata setting in the le header. Viewing applications such
as Da Vinci Resolve read this metadata and apply the appropriate desqueeze when playing back the les.
When shooting with the ALEXA XT it is important to ensure that this setting is applied correctly to shots when they are loaded into the Vault (in
SUP8.0 it is not possible to set this in the camera).
For material recorded on the Codex Onboard S there is an Aspect setting that can be set prior to recording. However, if this setting was not
correct at the time of recording it can be changed on the Vault.
To set the Pixel Aspect for shots rst select the shots in the Library so they are highlighted blue, then select Manage->Edit Metadata. Once in
the Edit Metadata view, select Edit All and then select the Shot Info tab:
CODEX VAULT 2 - ADMINISTRATOR GUIDE REV 06.08.13
PAGE 53
Page 54
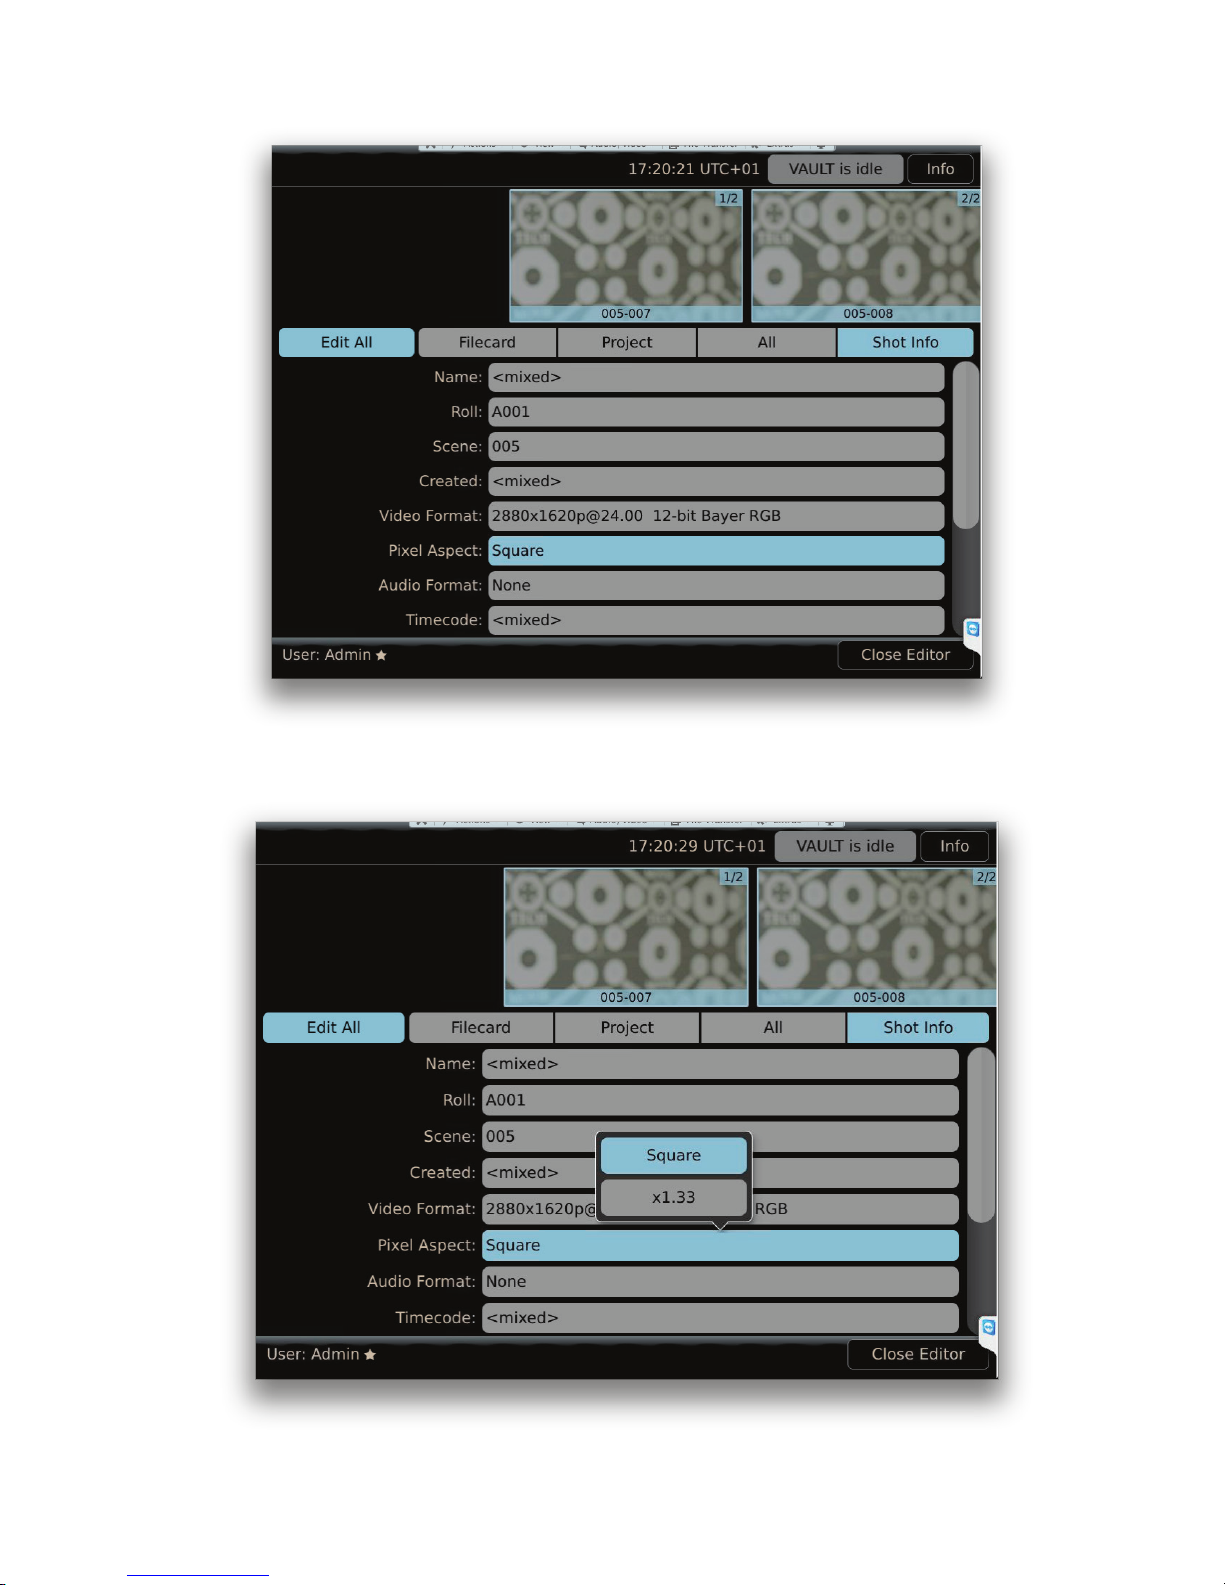
Select the Pixel Aspect eld and a pop-up box will show the settings that can be applied to one or more of the selected shots:
CODEX VAULT 2 - ADMINISTRATOR GUIDE REV 06.08.13
PAGE 54
Page 55
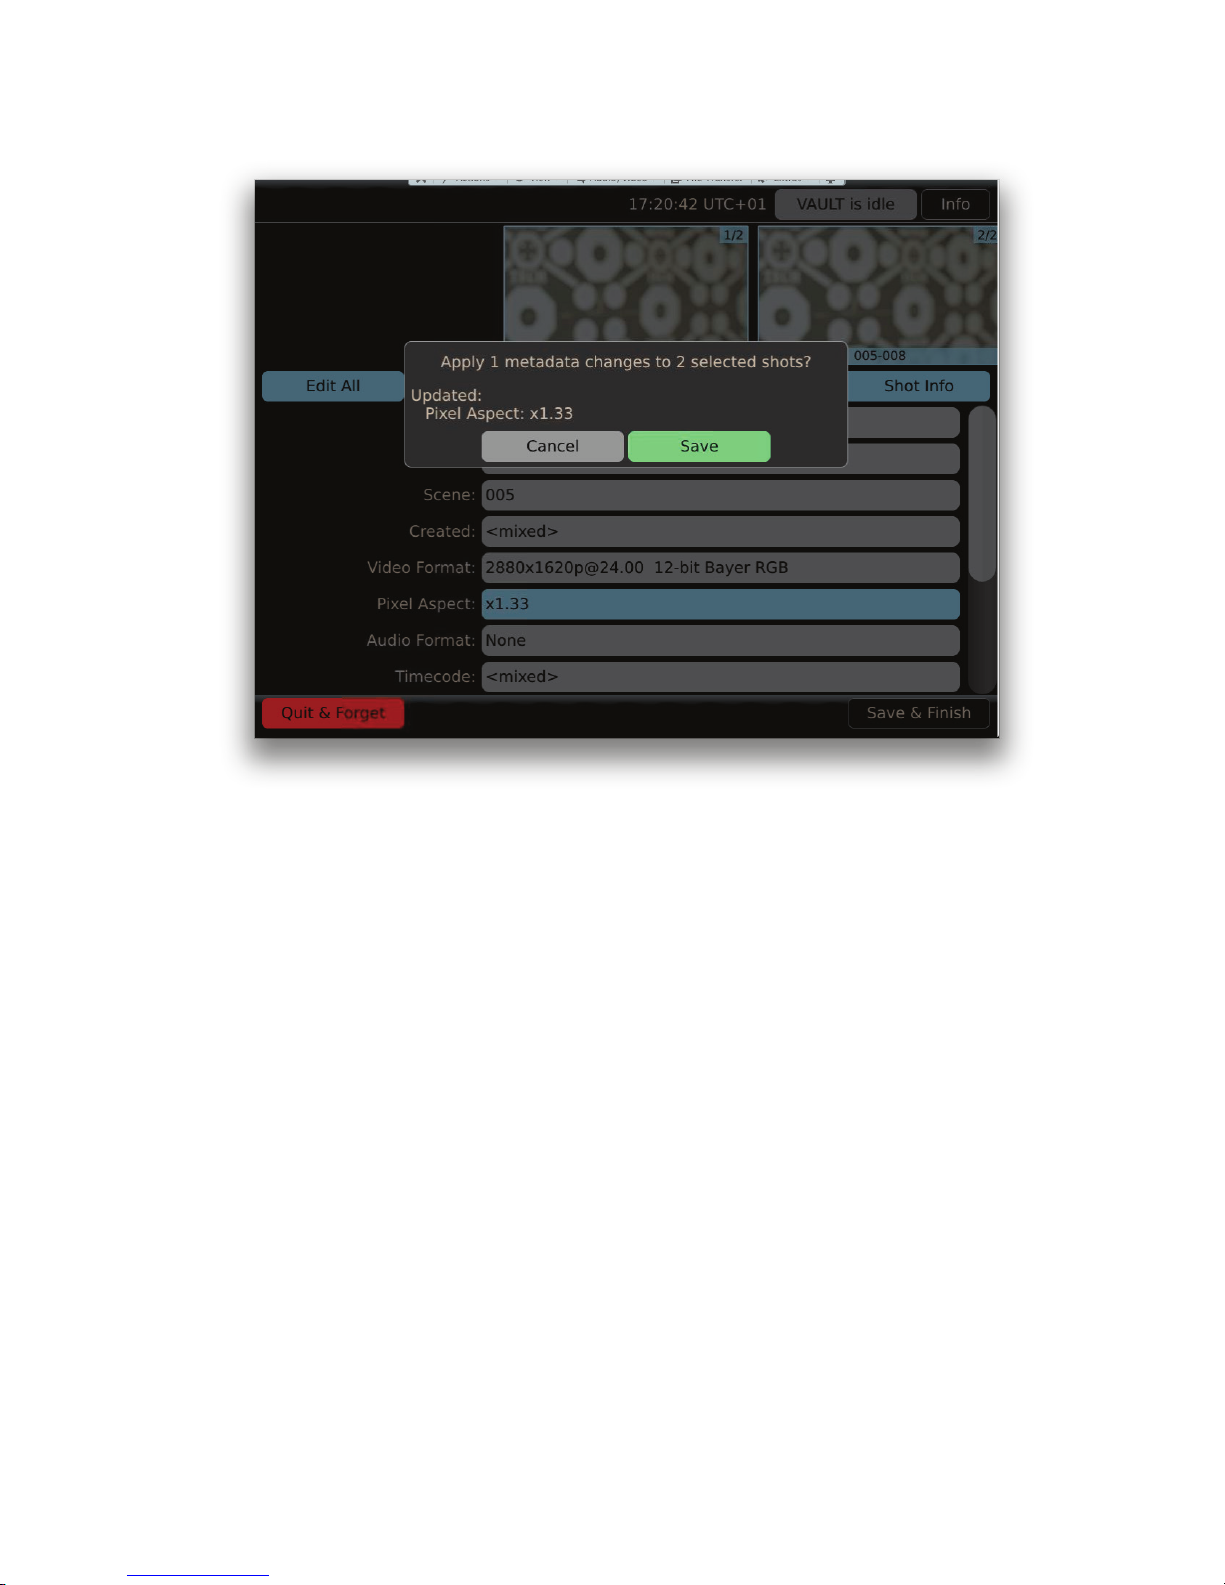
Choose the required setting and a summary box will show how many shots the selected changes will apply to:
Select Save, and then Save & Finish to apply the changes. Back in the Library the shot thumbnails will change to indicate the new aspect.
CODEX VAULT 2 - ADMINISTRATOR GUIDE REV 06.08.13
PAGE 55
Page 56
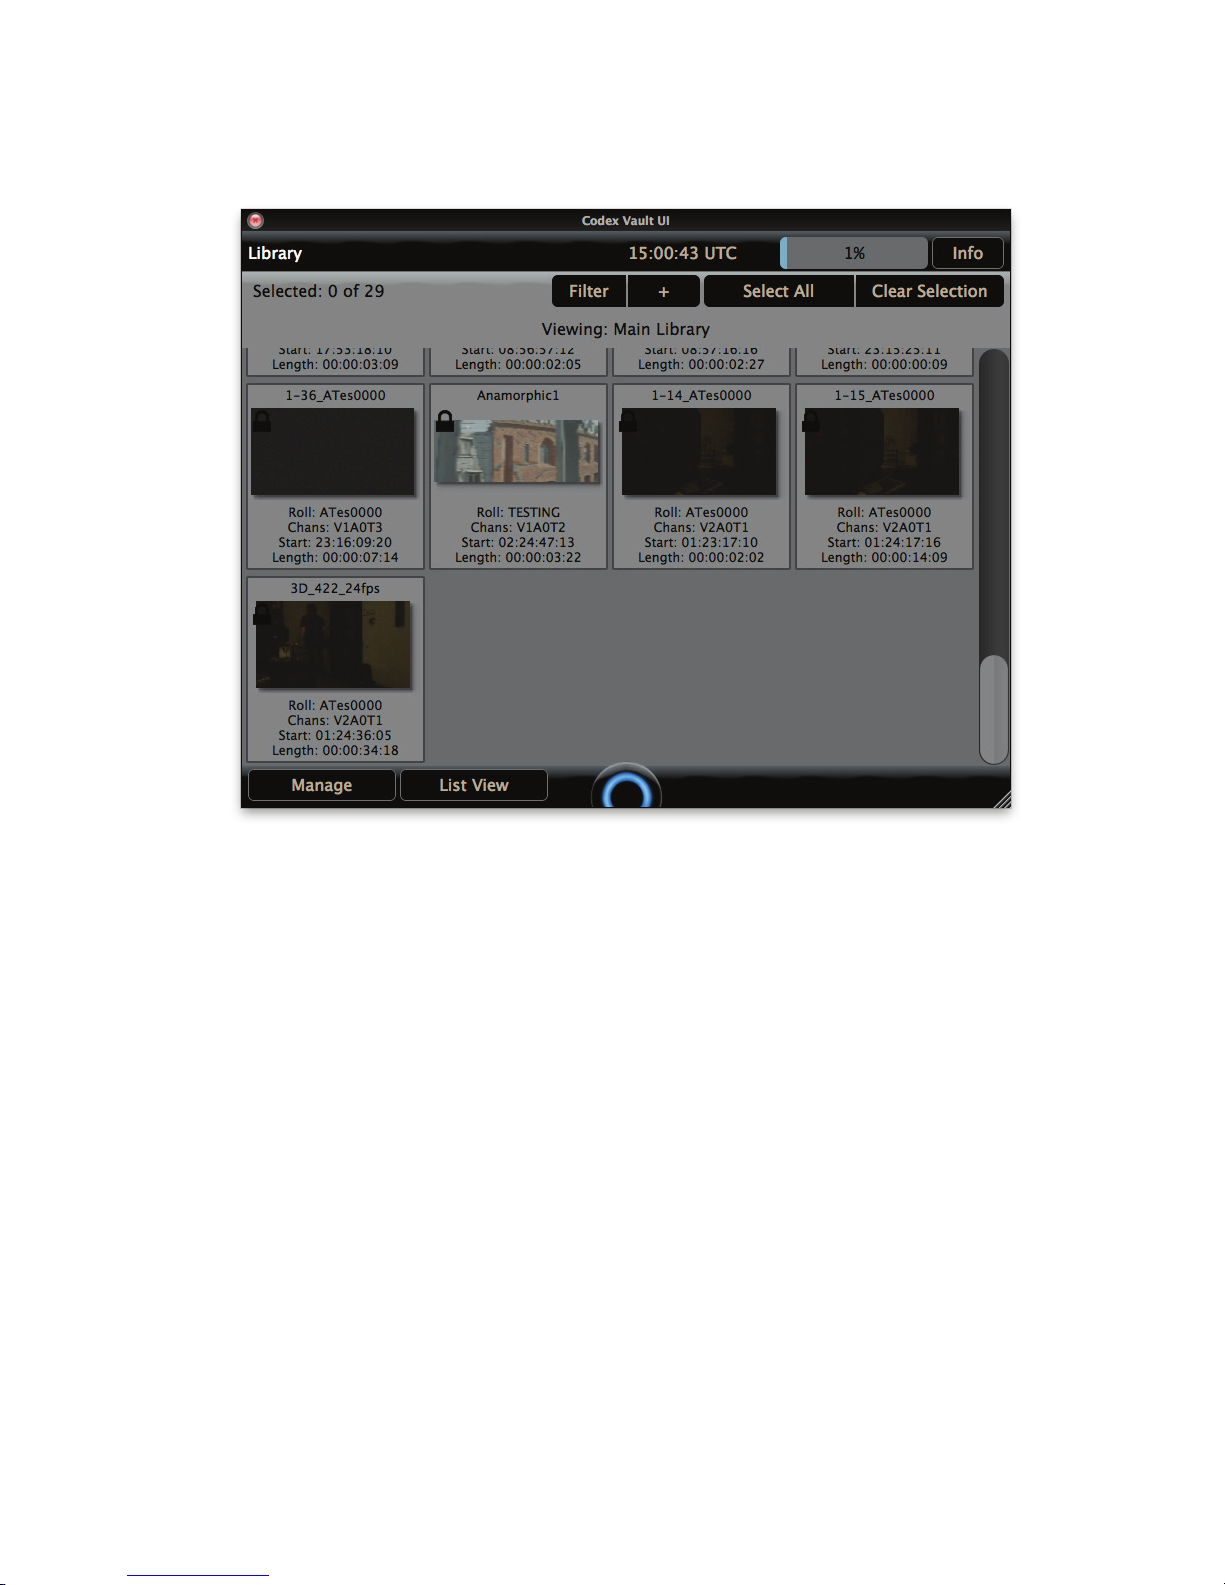
16.4 Shots locked against editing
Shots will be locked against editing during an Archive. When shots are locked in the Library a padlock icon is shown over the shot thumbnail:
16.5 Deleting individual shots
When the Manage options are opened there is also the option to Delete Selected, which deletes any selected shots. This option is only
available to Administrator accounts.
WARNING: Deleting a shot is an irreversible process so be very sure you want to delete a shot when selecting this option!
CODEX VAULT 2 - ADMINISTRATOR GUIDE REV 06.08.13
PAGE 56
Page 57
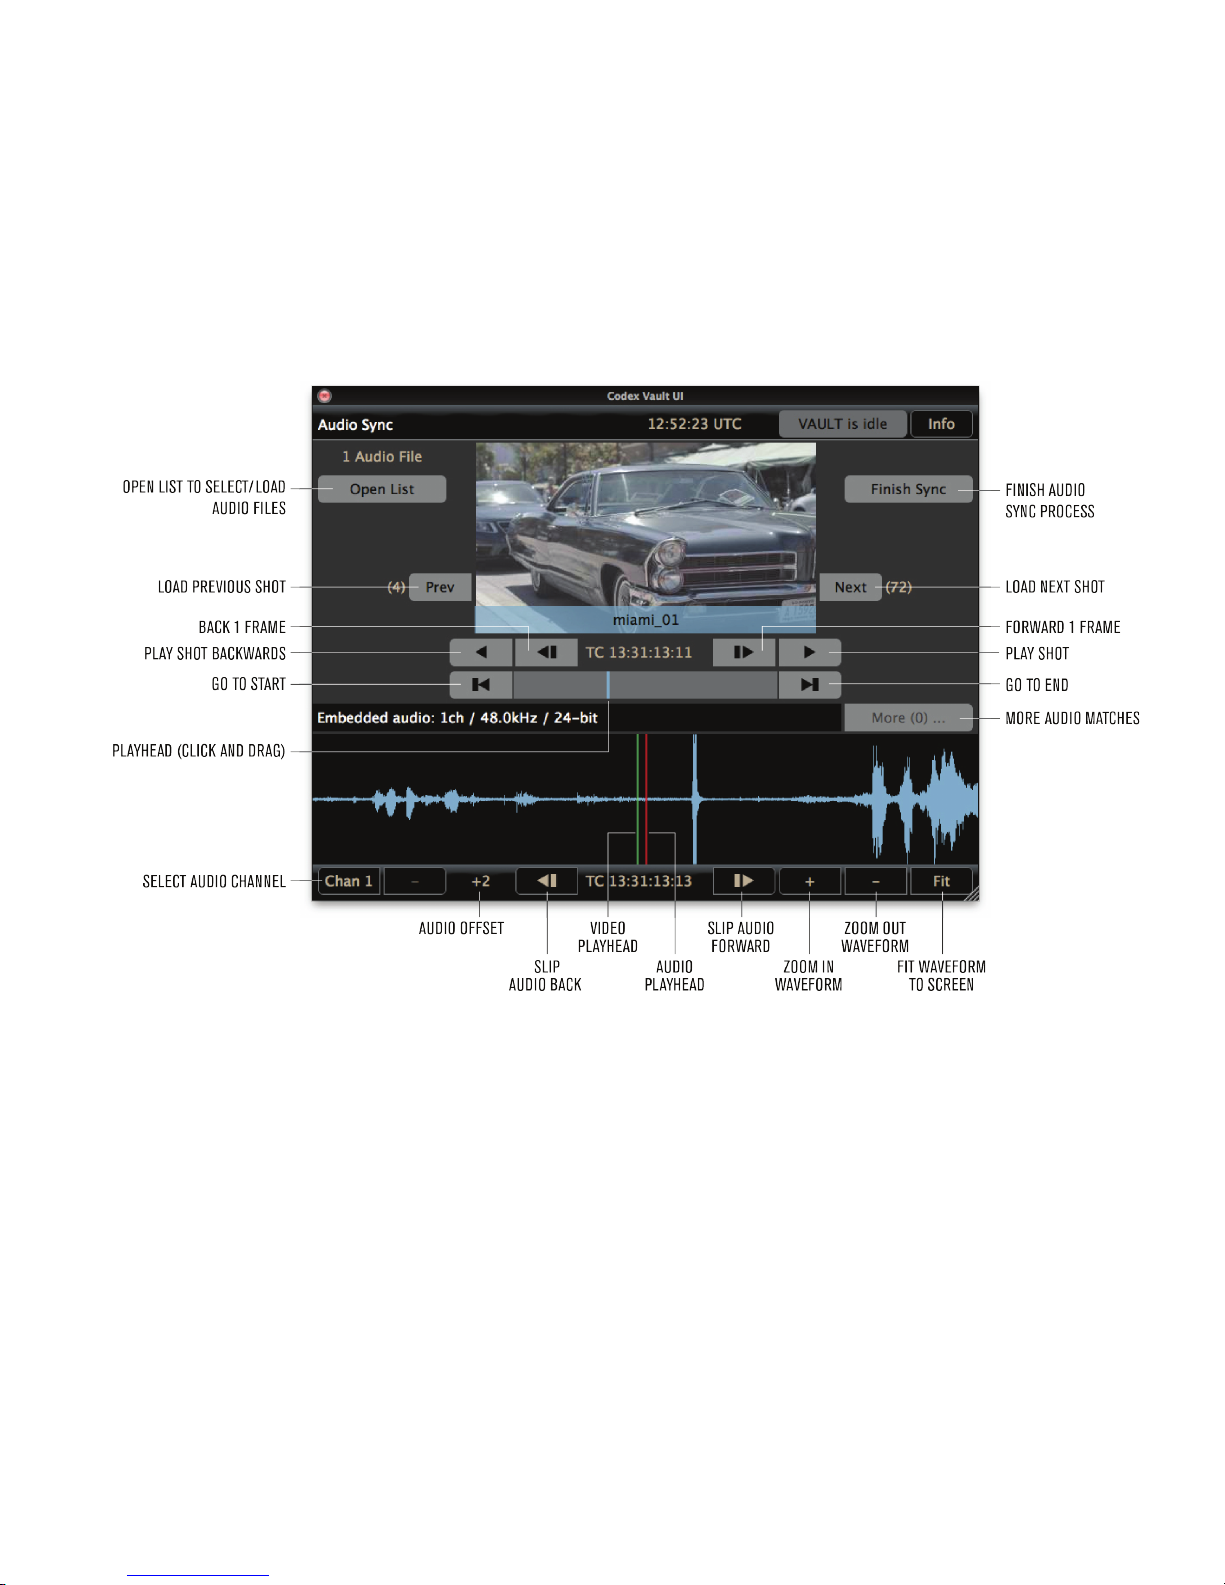
17. Audio Sync and on-screen proxy playback
The Audio Sync option allows you to playback shots on the Vault and synchronize audio les from an external recorder to shots based on
timecode.
Note: the Audio Sync feature is not compatible with RED RAW les. For other le types it is recommended to wait for the audio waveform to
nish building before starting playback.
When in the Library, select the shots you want to work with so they are highlighted blue, then click the Manage button and then Audio Sync.
If your shots were not recorded with audio the waveform area at the bottom of the screen will be empty:
CODEX VAULT 2 - ADMINISTRATOR GUIDE REV 06.08.13
PAGE 57
Page 58
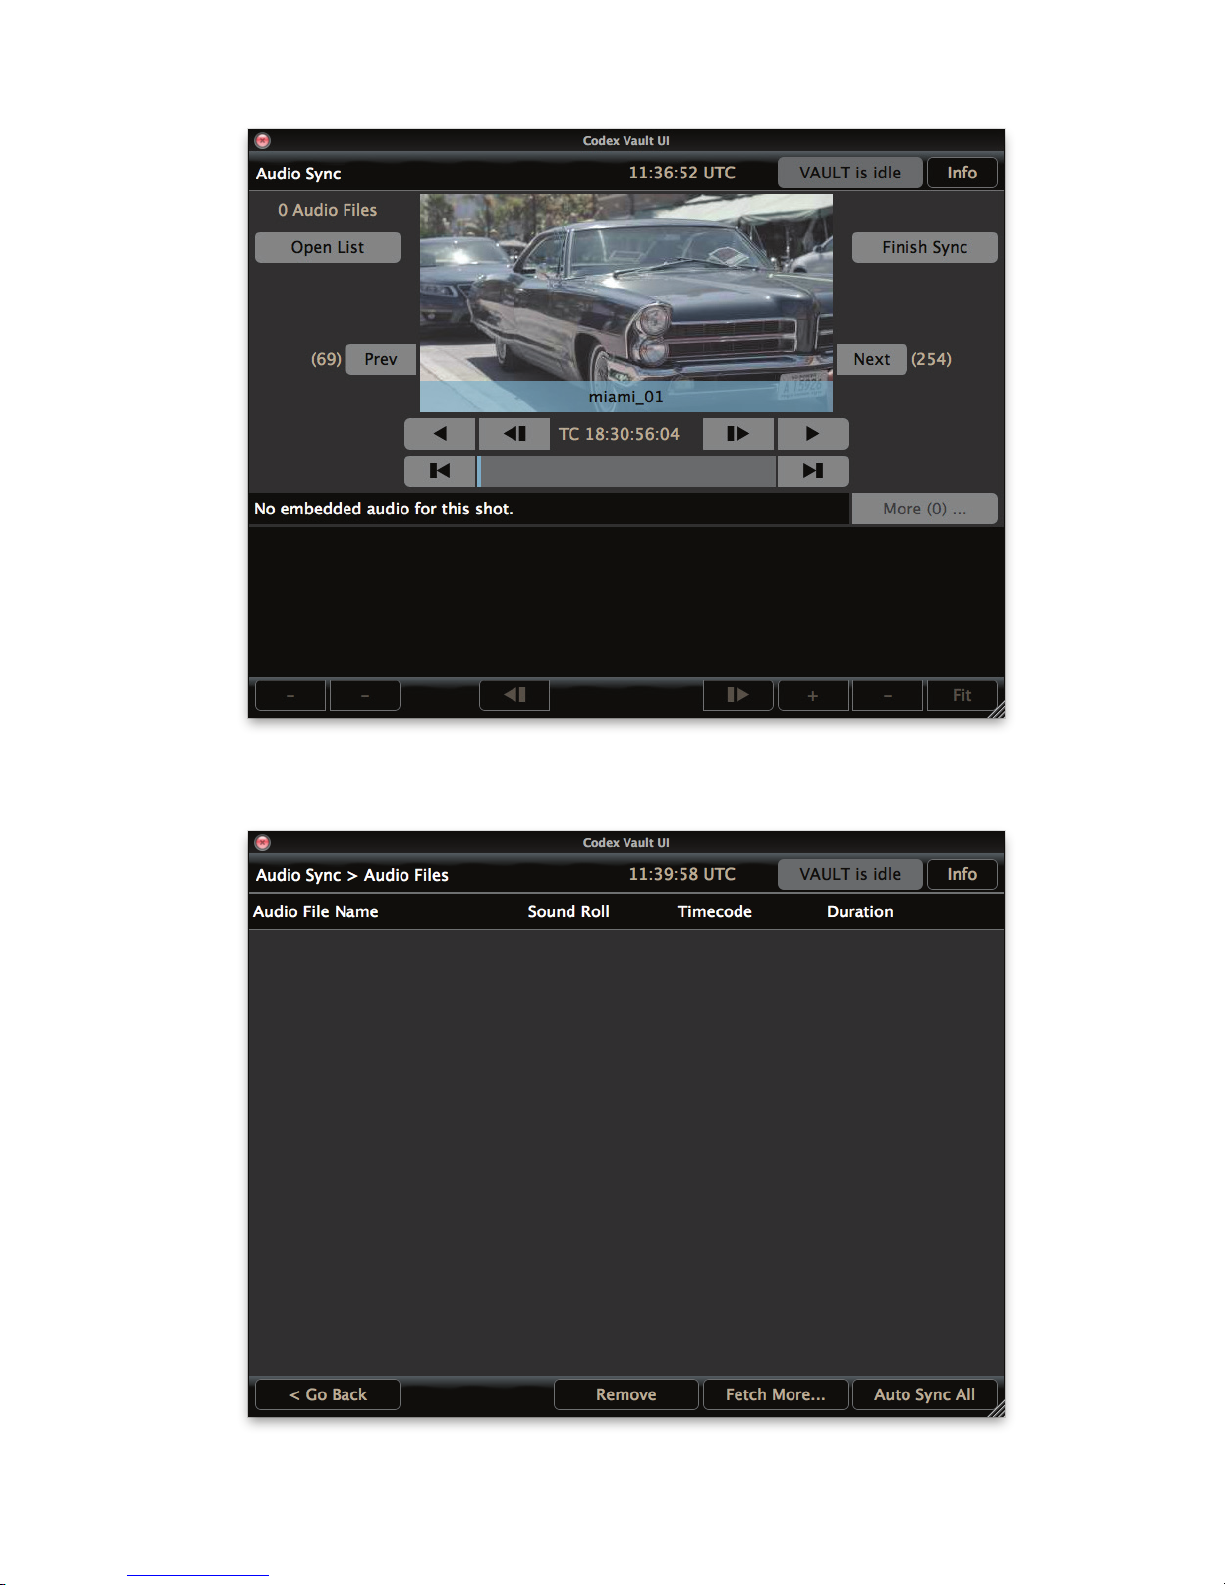
Click the Open List button and this will show a view of the available audio les. This will initially be empty:
Click the Fetch More... button to load les from an attached device, e.g. USB drive.
CODEX VAULT 2 - ADMINISTRATOR GUIDE REV 06.08.13
PAGE 58
Page 59
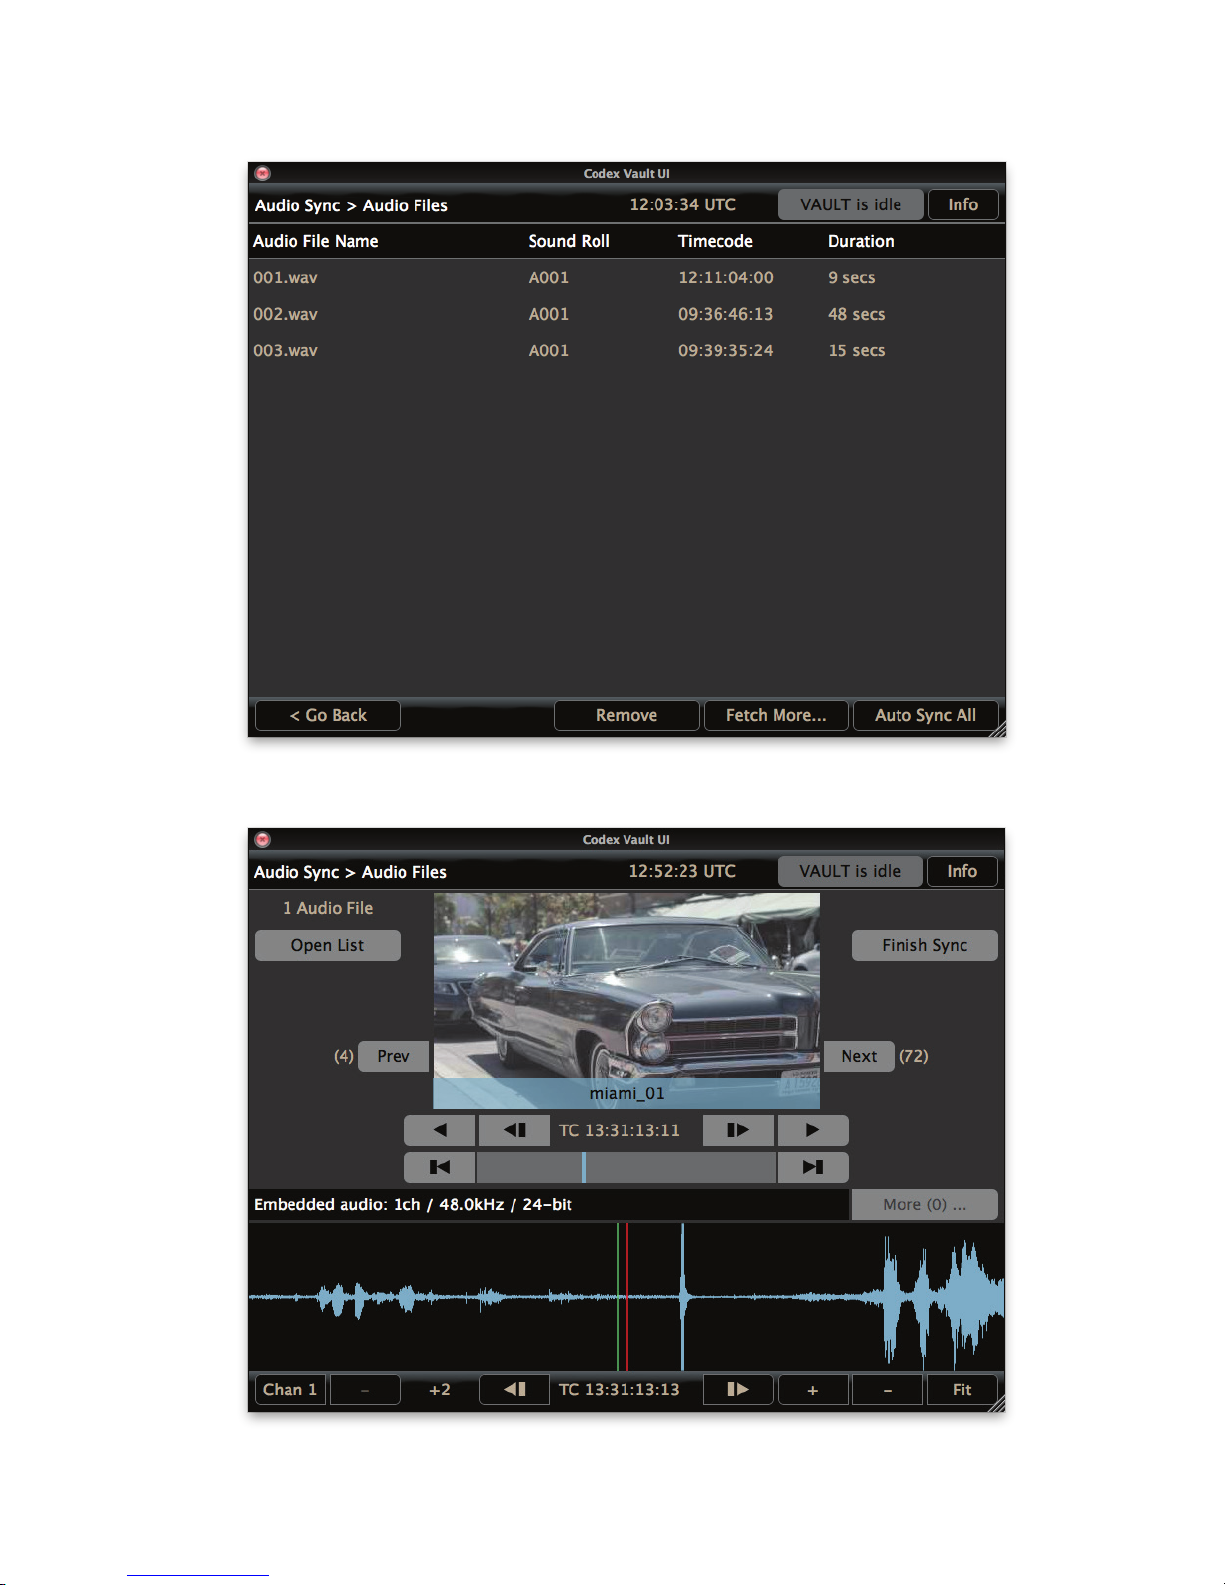
Locate les, select them and click Continue.
Click the Auto Sync All button and the audio les will be sync’ed to your shots based on timecode.
Press the Play shot button to check the sync has been successful. You can step through using the Forward 1 frame and Back 1 frame
buttons to conrm this with accuracy and monitor via the headphone output of the Vault.
CODEX VAULT 2 - ADMINISTRATOR GUIDE REV 06.08.13
PAGE 59
Page 60
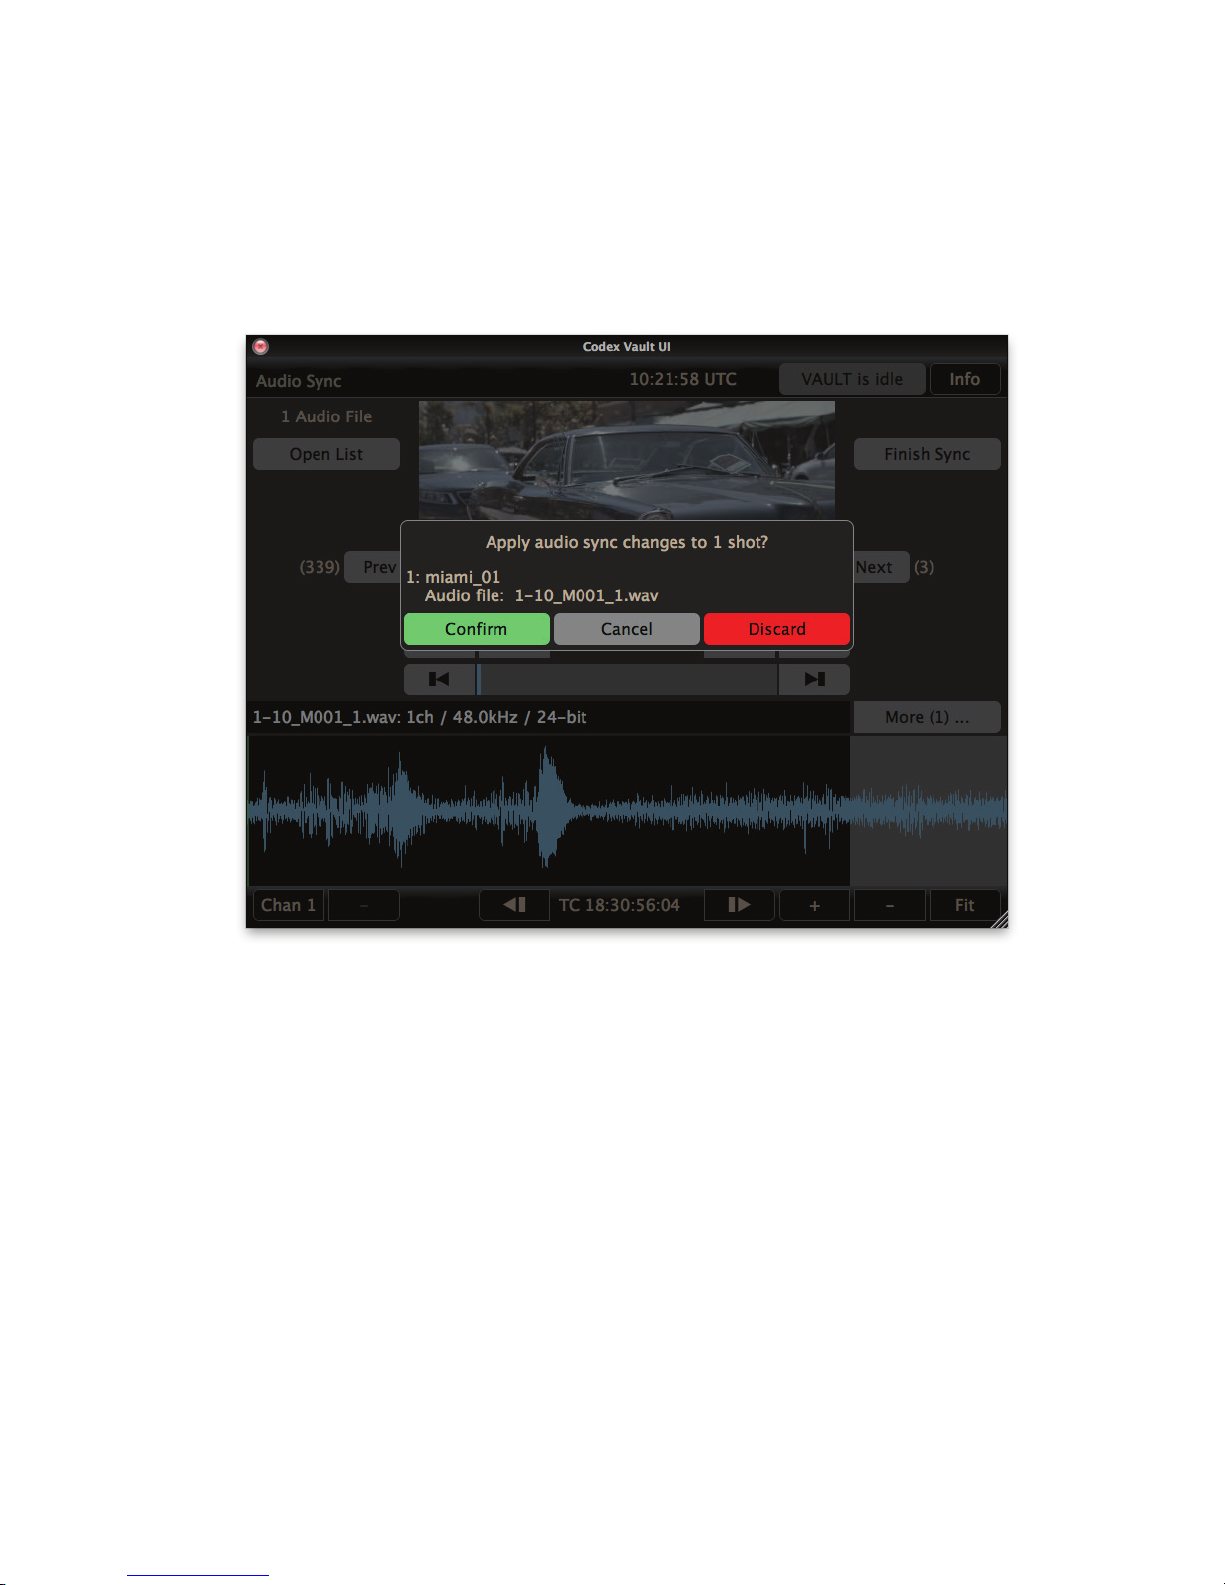
If the sync is not accurate, look at the image and line up the Playhead with the clapper frame. Then use the Slip audio forward or Slip audio
back buttons to slip the audio in 0.25 frame increments to line up the Audio playhead with the clapper peak on the waveform. Now when you
play the shot the audio and video should be sync’d.
If required you can use the Zoom in waveform and Zoom out waveform controls for greater accuracy.
If there is more than one audio le matching to a particular shot, click the More button to choose which audio le to sync.
Once the sync on all shots has been checked press the Finish Sync button and then Conrm to nalise the changes:
This screen will then be shown:
CODEX VAULT 2 - ADMINISTRATOR GUIDE REV 06.08.13
PAGE 6 0
Page 61
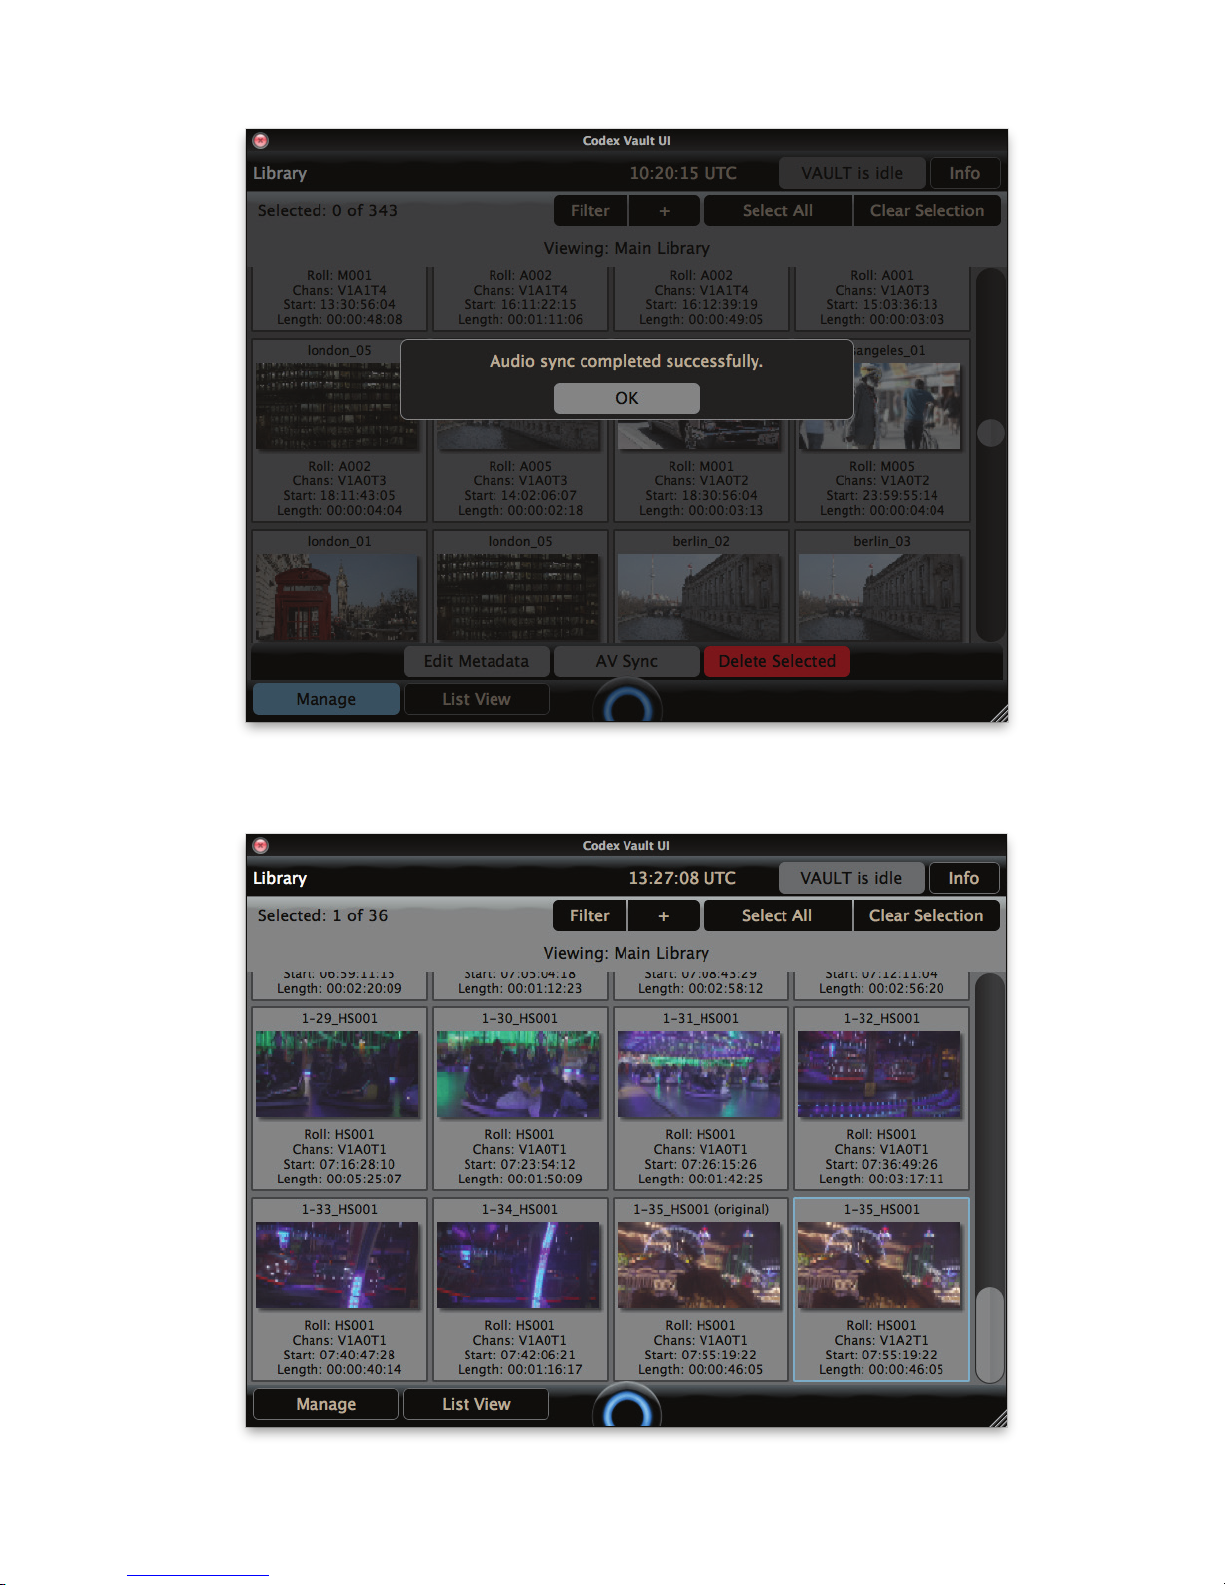
When an audio sync is done a new version of the shot is created with the sync’d audio. The original shot remains and will have ‘(original)’
added to the end of the shot name, as shown at the bottom right of this image:
To continue working with just the audio sync’d versions of the shots for subsequent tasks (e.g. Archive or Generate) select the copy of the shots
CODEX VAULT 2 - ADMINISTRATOR GUIDE REV 06.08.13
PAGE 61
Page 62
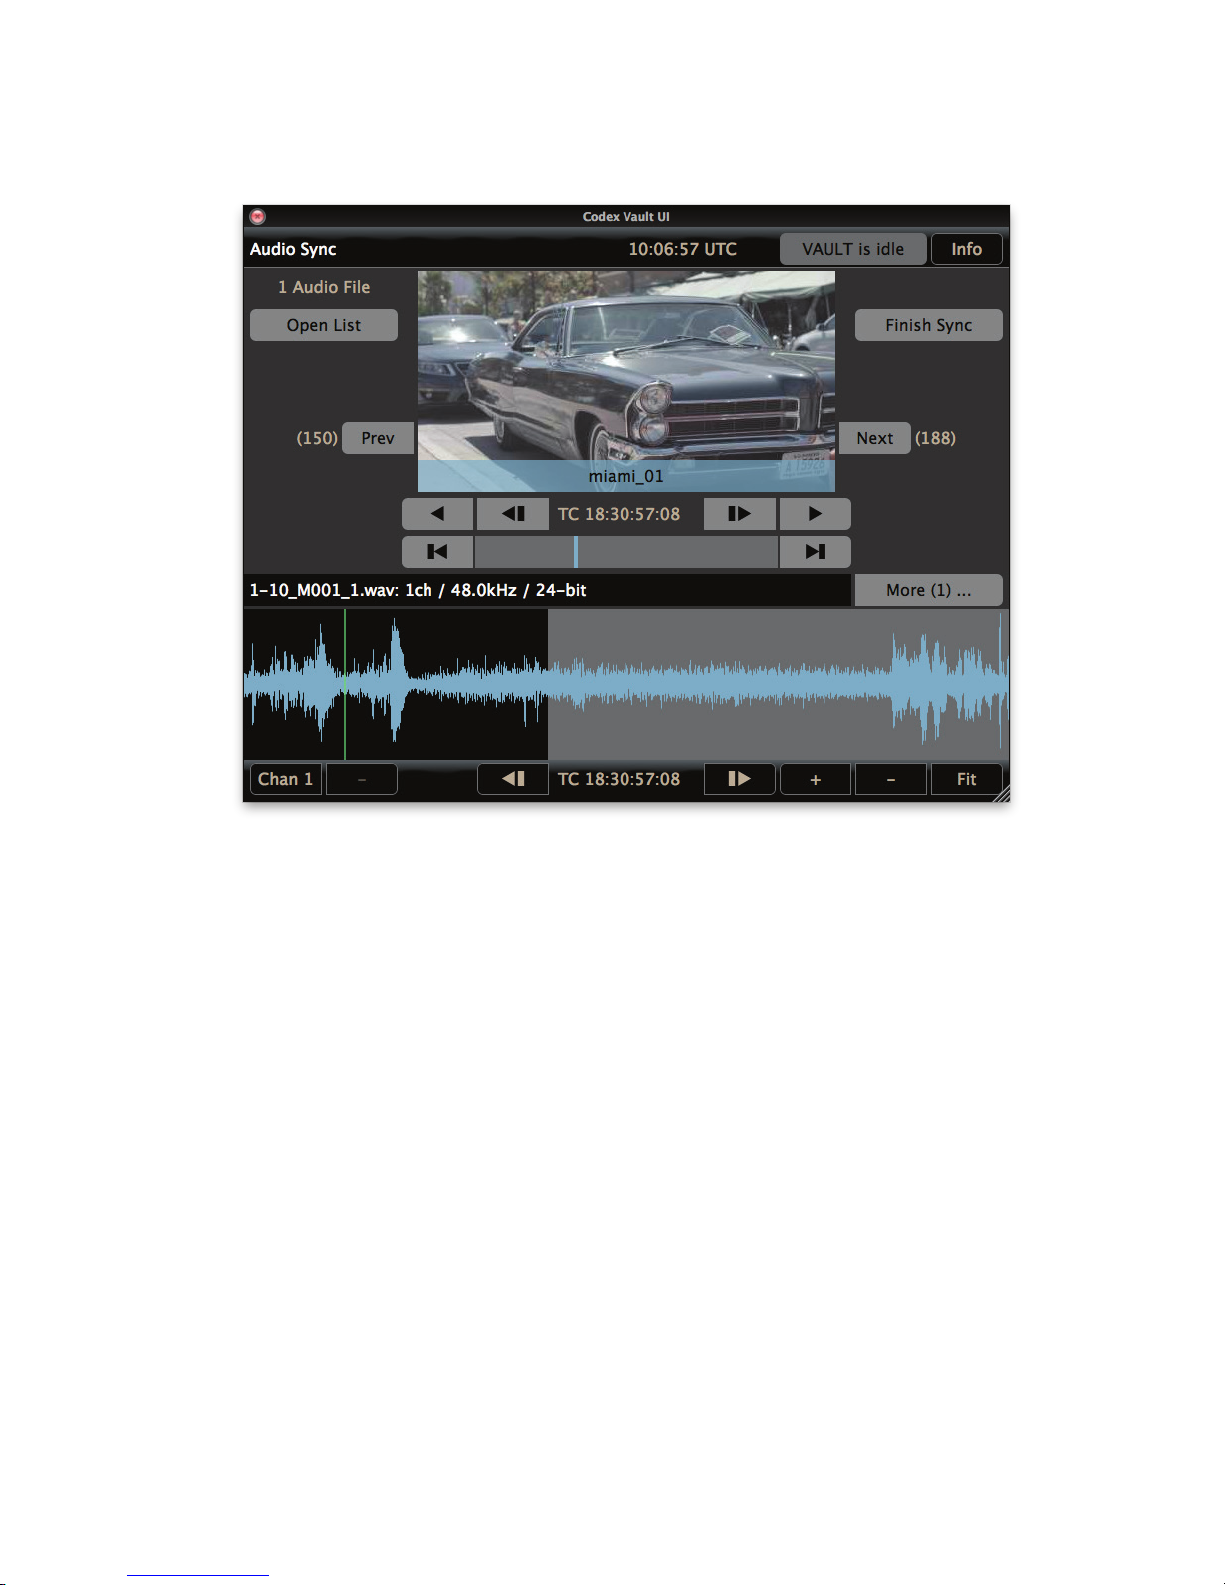
that have had (original) added to the name and delete them from the Library.
Note: if the audio le is longer than the video le the later part of the audio waveform will be shown in grey:
CODEX VAULT 2 - ADMINISTRATOR GUIDE REV 06.08.13
PAGE 62
Page 63
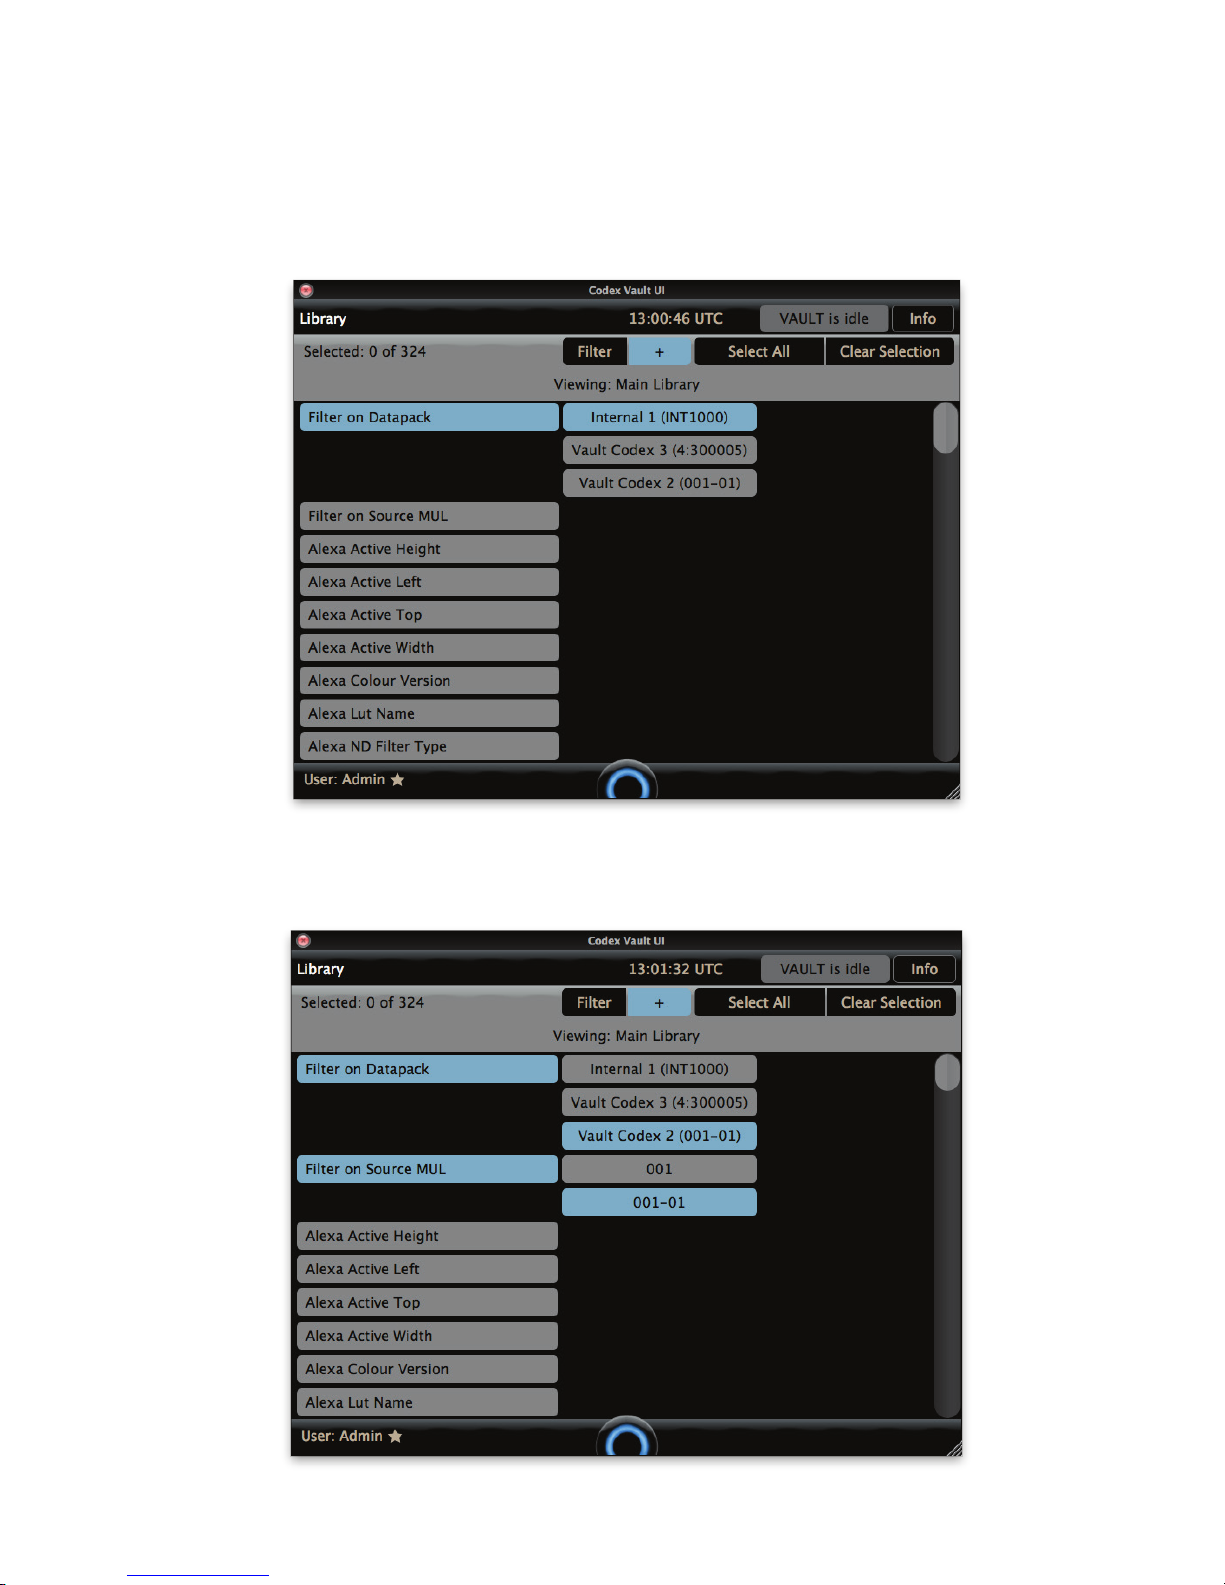
18. Filter in the Library
The Filter option in the Library allows you to limit the shots that are visible. This is done by applying a lter based on metadata. This can be
useful if you want to view or edit metadata on multiple shots that share common metadata, e.g. all the shots from a Roll.
Click the + button to choose a metadata item to lter on:
At the top of the list are the options to Filter on Datapack (physical media) and Filter on Source MUL (if there is material from multiple MULs
on a single media – this is most likely with the Internal Storage):
CODEX VAULT 2 - ADMINISTRATOR GUIDE REV 06.08.13
PAGE 63
Page 64
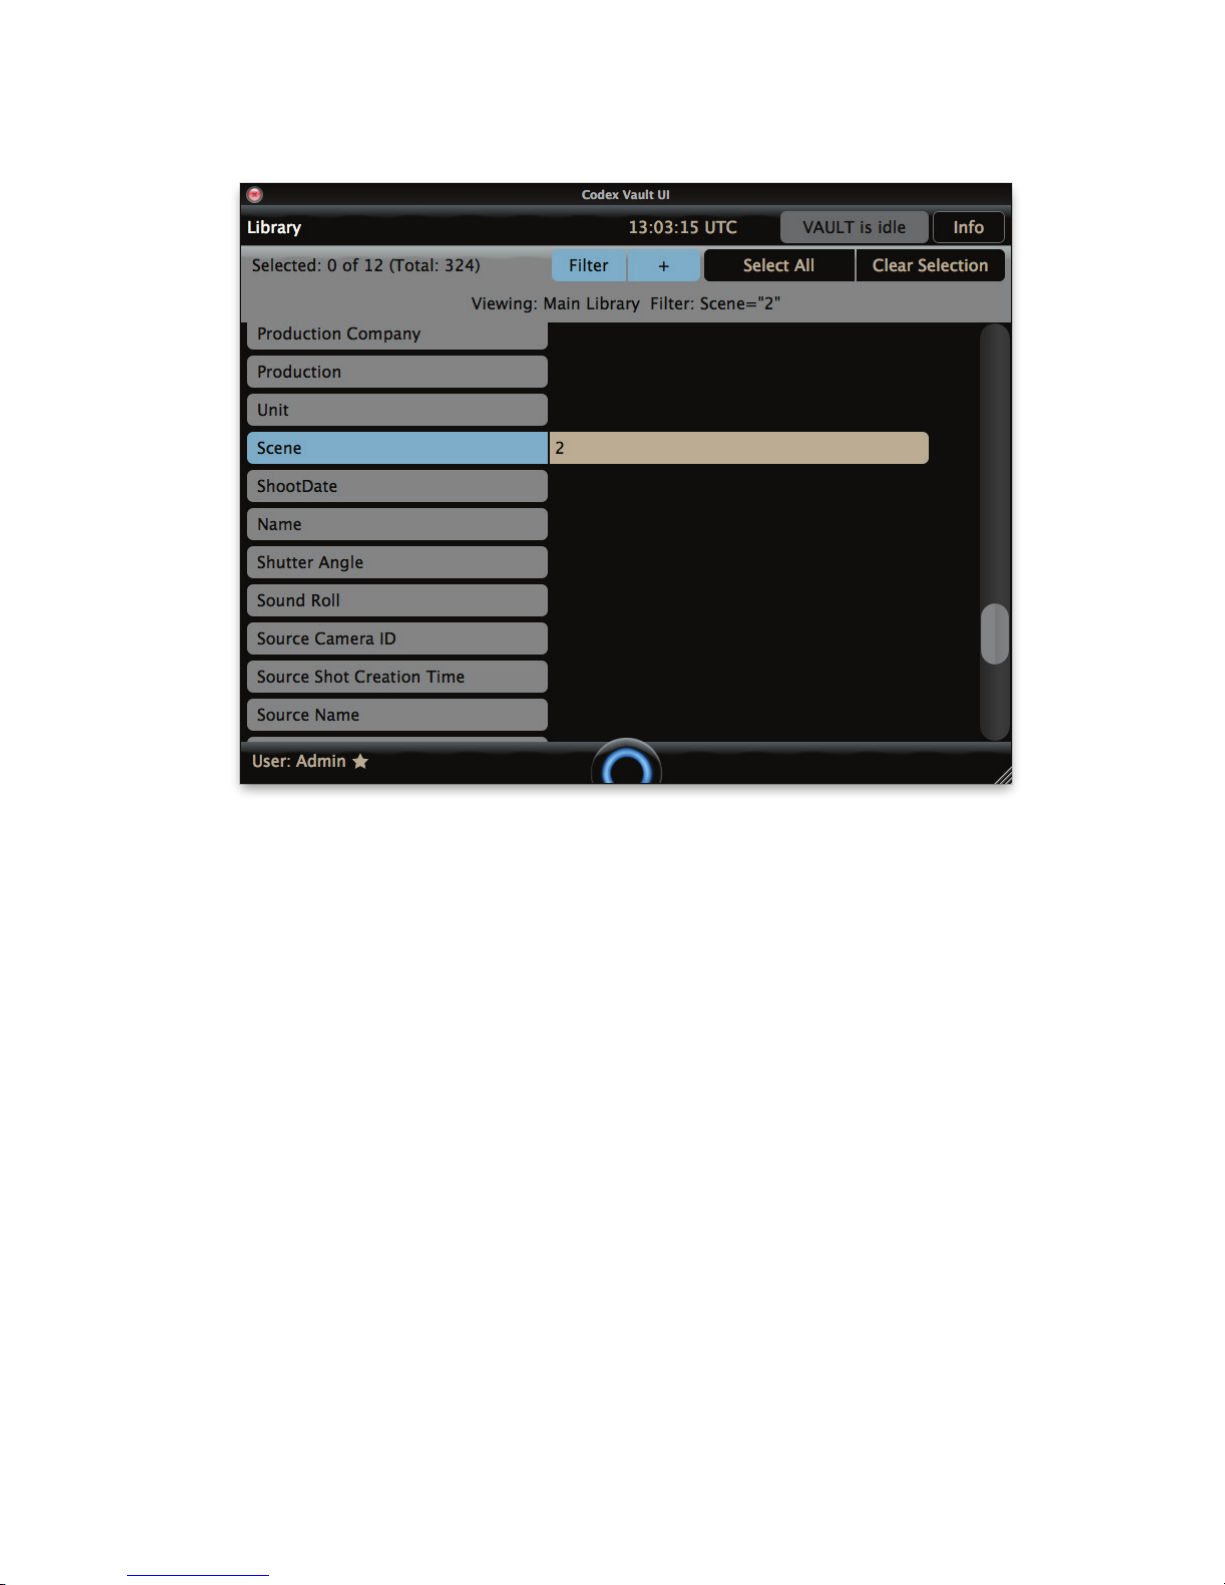
The rest of the column on the left shows all metadata that is stored with the shots. Click on one of these to enter a value. For example, if we just
want to see the shots from scene 2 we would scroll down and enter this value next to the Scene metadata item:
Then click the + button to return to the Library View and click the Filter button to only show shots that match the lter.
Click the Filter button to turn the lter on and off.
Values can be entered for multiple metadata items and shots will only be shown that match the values entered for all items.
CODEX VAULT 2 - ADMINISTRATOR GUIDE REV 06.08.13
PAGE 64
Page 65
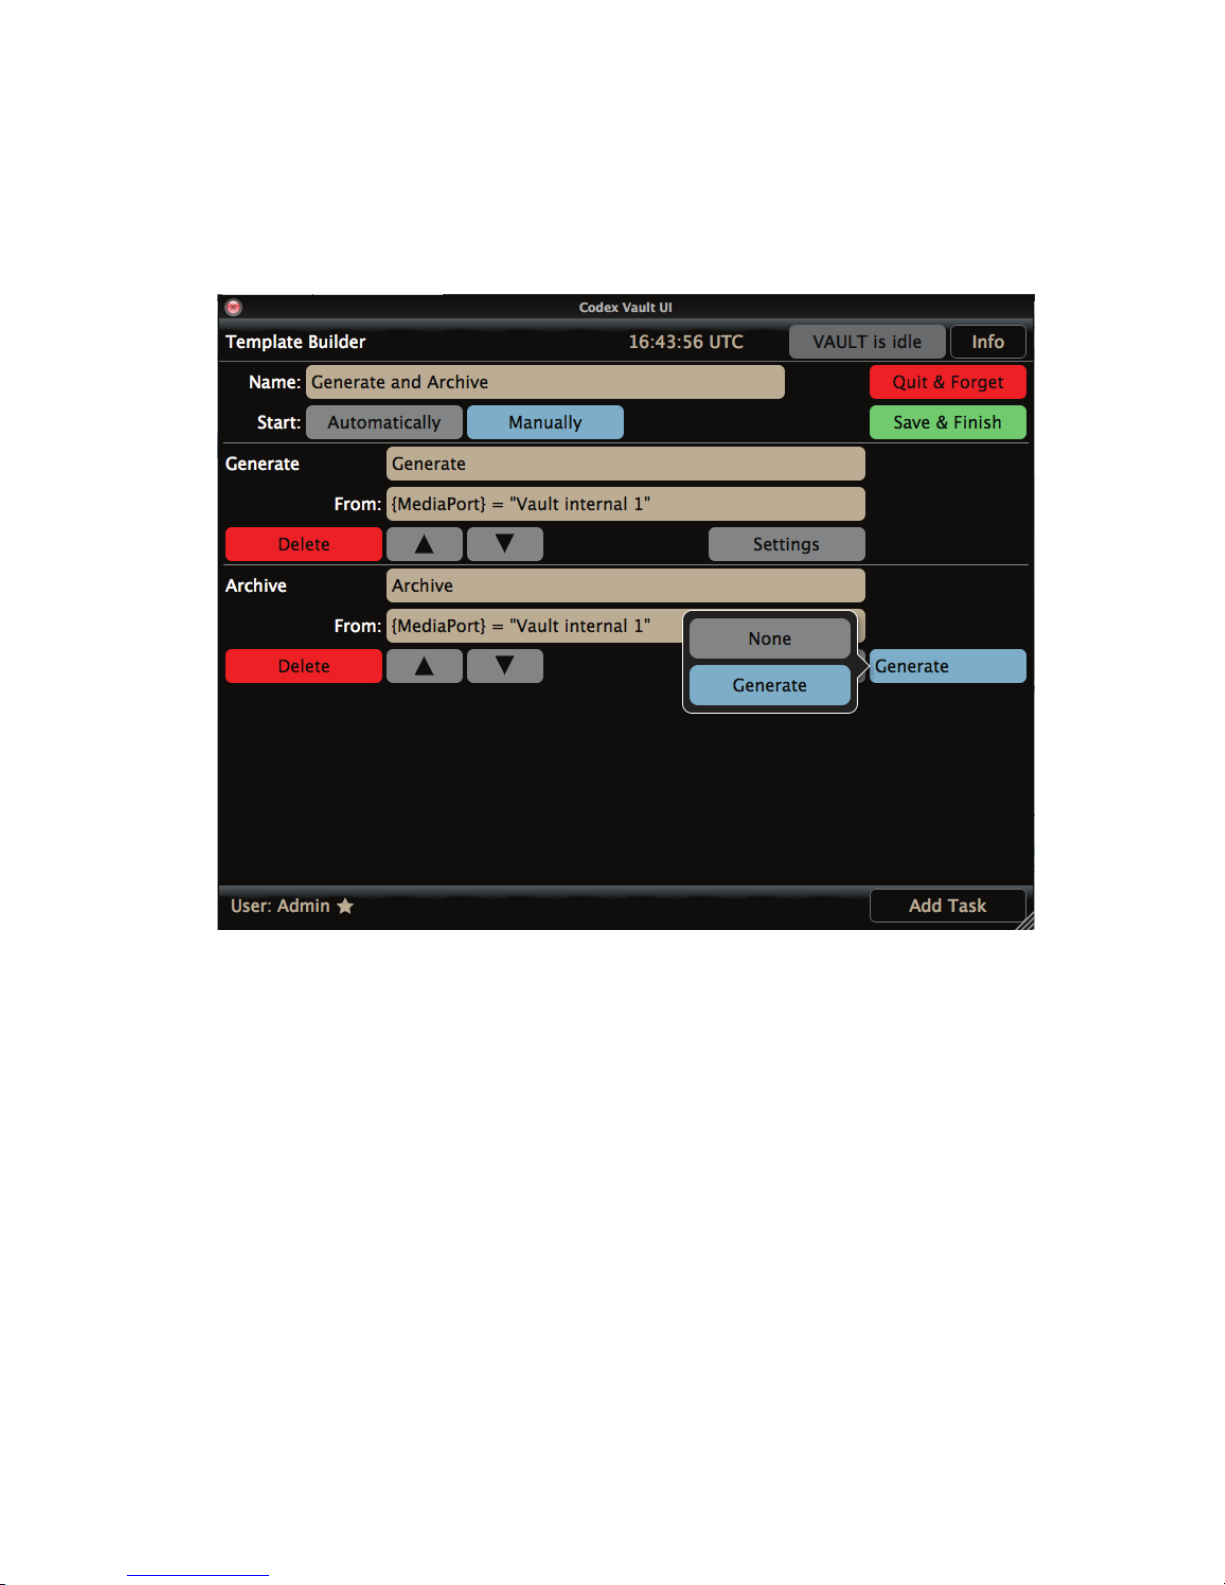
19. Parallel Tasks
The Vault can use media for more than one task at the same time. For example the Internal Storage could be used for both a Generate and an
Archive task at the same time.
We will look at an example of how to set this up. When making a Work Template there is a setting to the right of each Task (apart from the rst
task):
By default the rst Task must nish before the second Task begins, and the second Task must nish before the third Task begins, and so on.
Important Note: a Task is considered nished when it ends for any reason. For example rather than nishing as expected, a Generate task
could stop due to an error with the external disk (corruption, power loss, etc). If this happened the Vault would still proceed with subsequent
tasks in the template (because you may still want an LTFS backup despite the disk issue for example). It is therefore important to conrm on the
Task Scheduler that tasks have completed as expected and that no errors have occurred.
The setting on the right of the screen shows which previous Task must nish before that particular Task can begin. In the above image, by
changing this setting to None, it means the Archive Task does not need to wait for the Generate Task to complete:
CODEX VAULT 2 - ADMINISTRATOR GUIDE REV 06.08.13
PAGE 65
Page 66
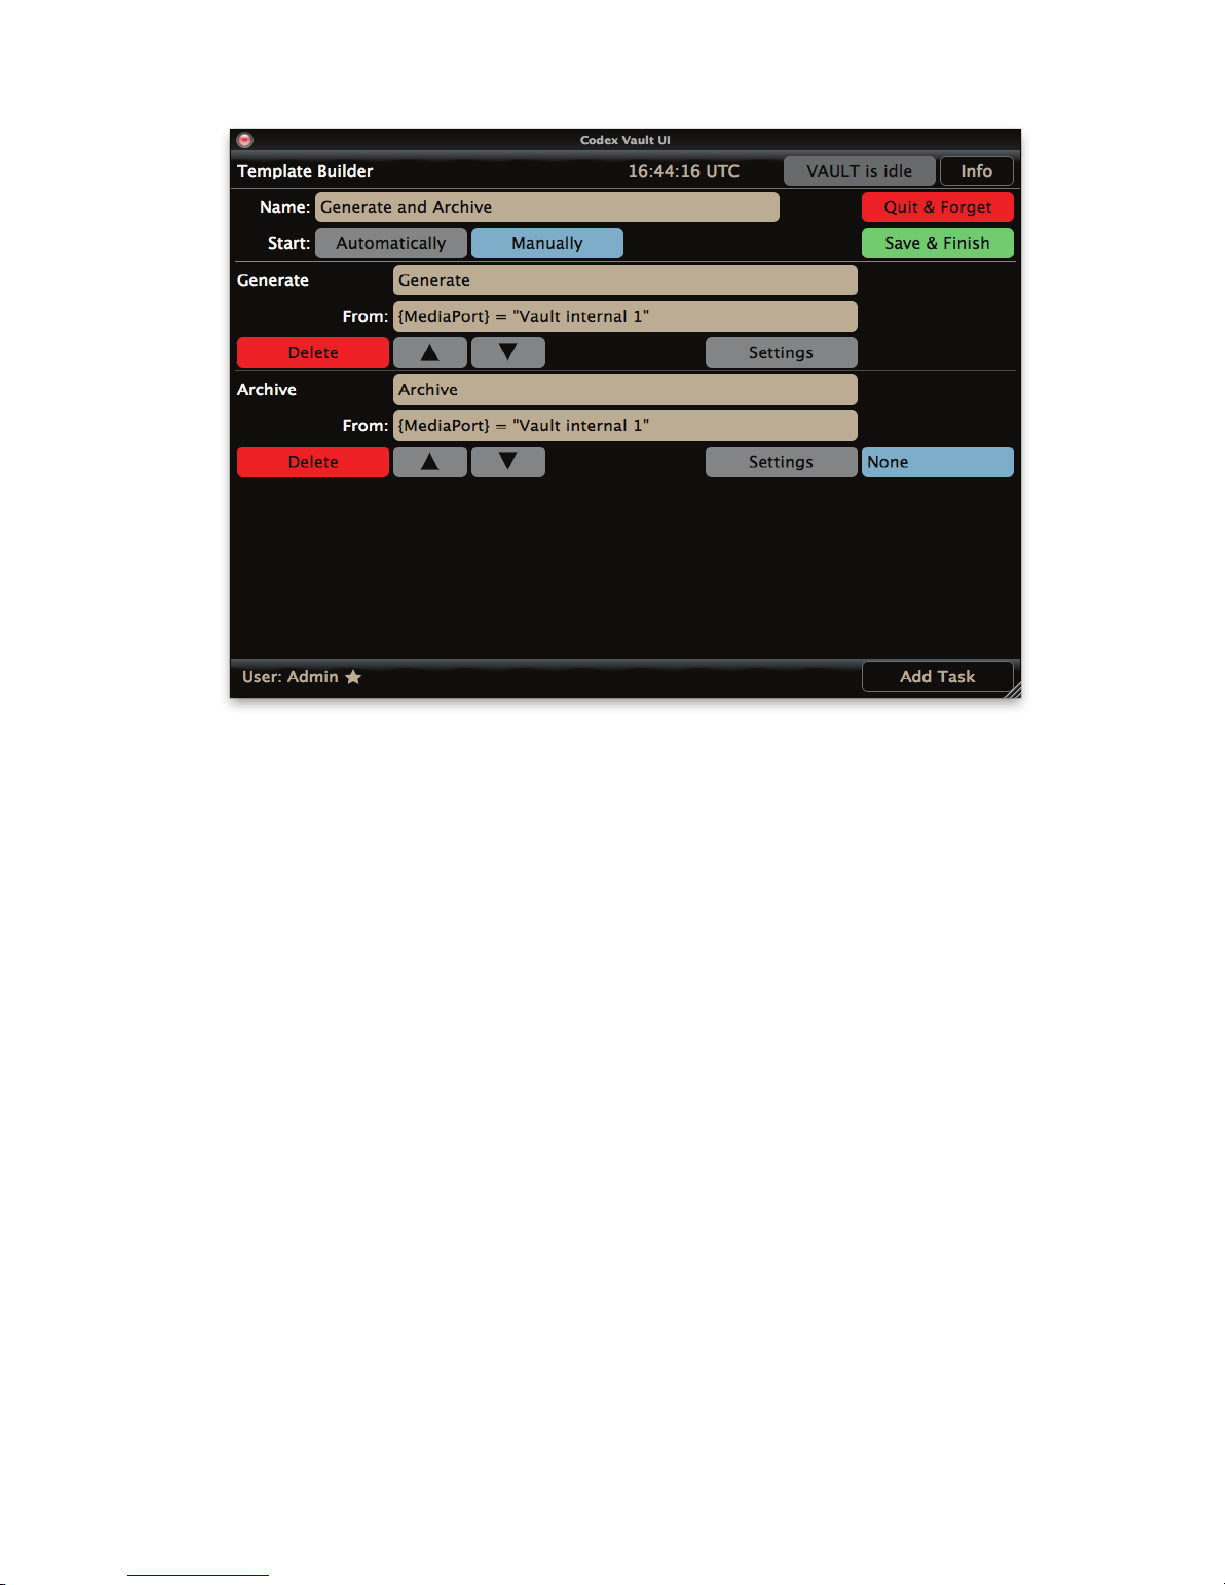
Now the Generate and Archive Tasks can run from the Internal Storage in parallel.
CODEX VAULT 2 - ADMINISTRATOR GUIDE REV 06.08.13
PAGE 66
Page 67
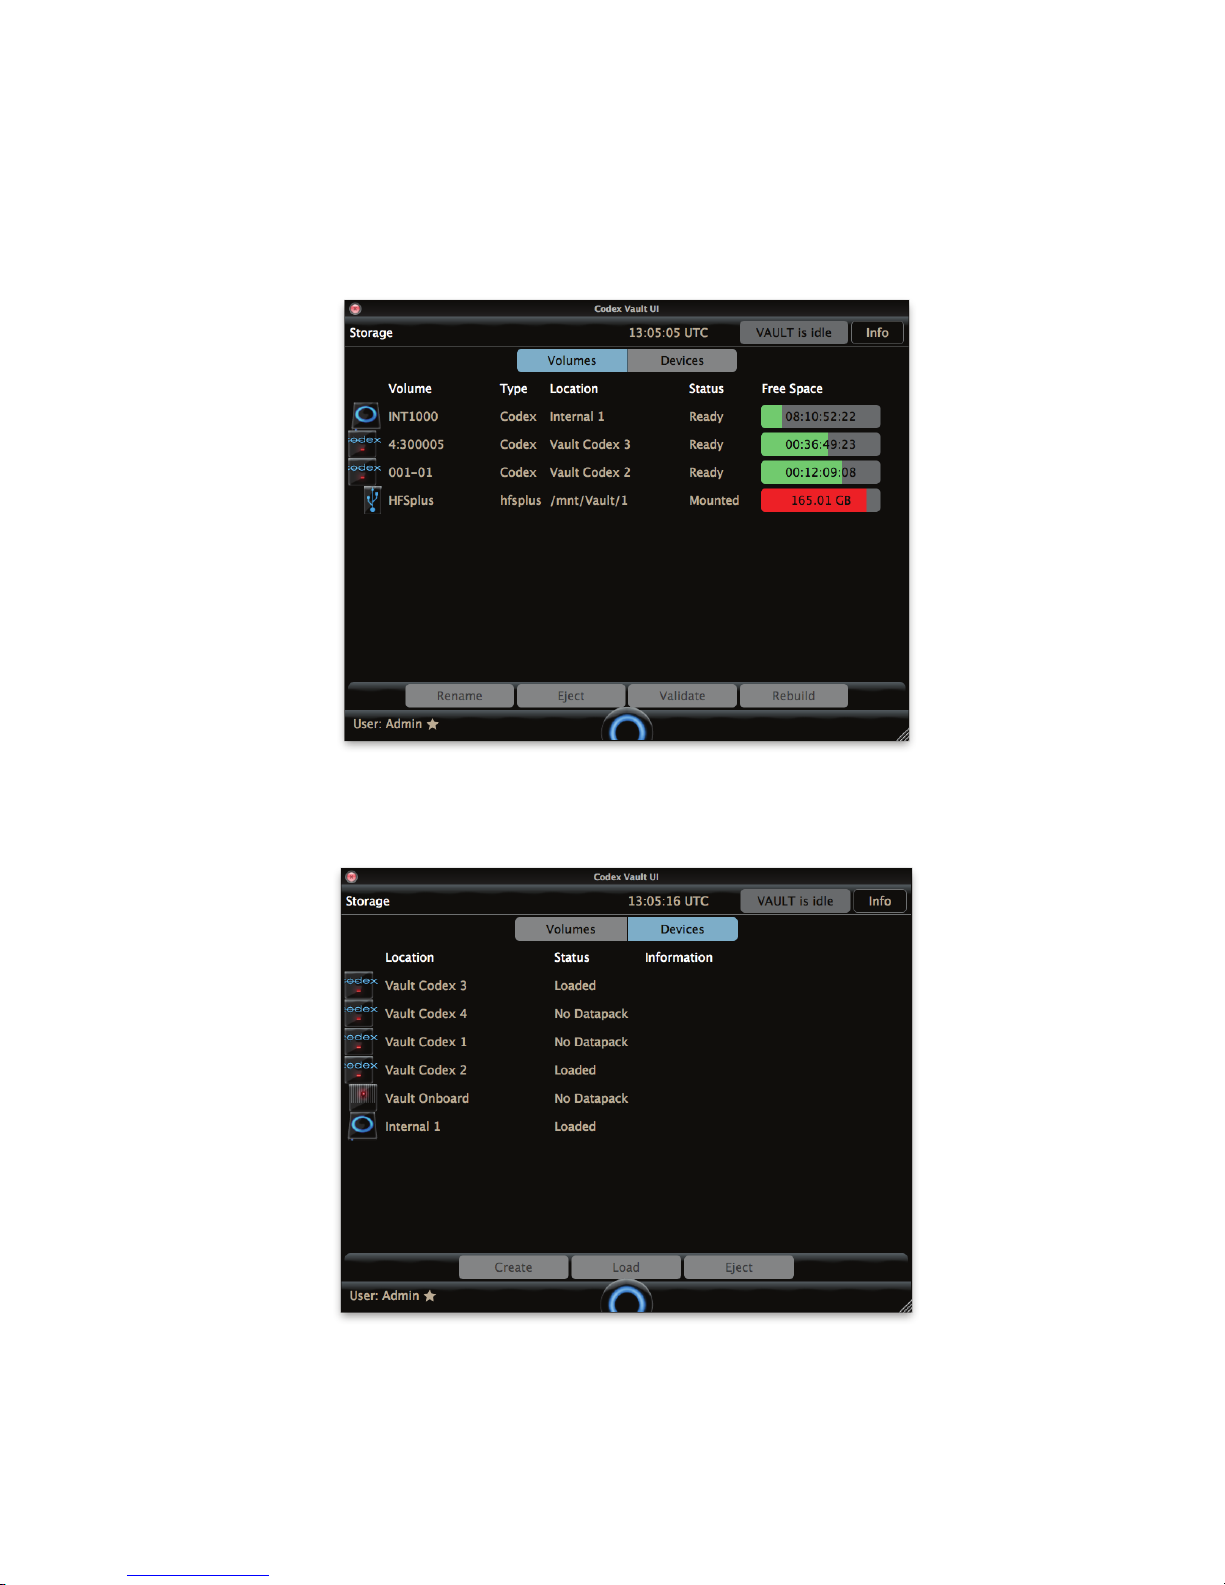
20. Storage
The Storage screen allows the User to view general information about media that is loaded in the Vault. The Volumes section shows details of
the volumes that are loaded including their name, formatting type, location, status and the free space.
Before physically removing a storage device (Capture Drive or external hard disk) it should be ejected from this screen by selecting it and then
pressing the Eject button:
The Devices section shows details of the devices including all media ports and their status.
There are also options to Create, Load, and Eject:
The Create option can be used on unformatted Codex media to apply a name and specify the RAID type in order that it can be used by the
Vault, Onboard S recorder or Alexa XT.
If an unformatted Capture Drive or Datapack is inserted into the Vault an error message like this will be displayed:
“Error – Vault Codex data pack 3 contains an unformatted Datapack. This cannot be used.”
CODEX VAULT 2 - ADMINISTRATOR GUIDE REV 06.08.13
PAGE 67
Page 68
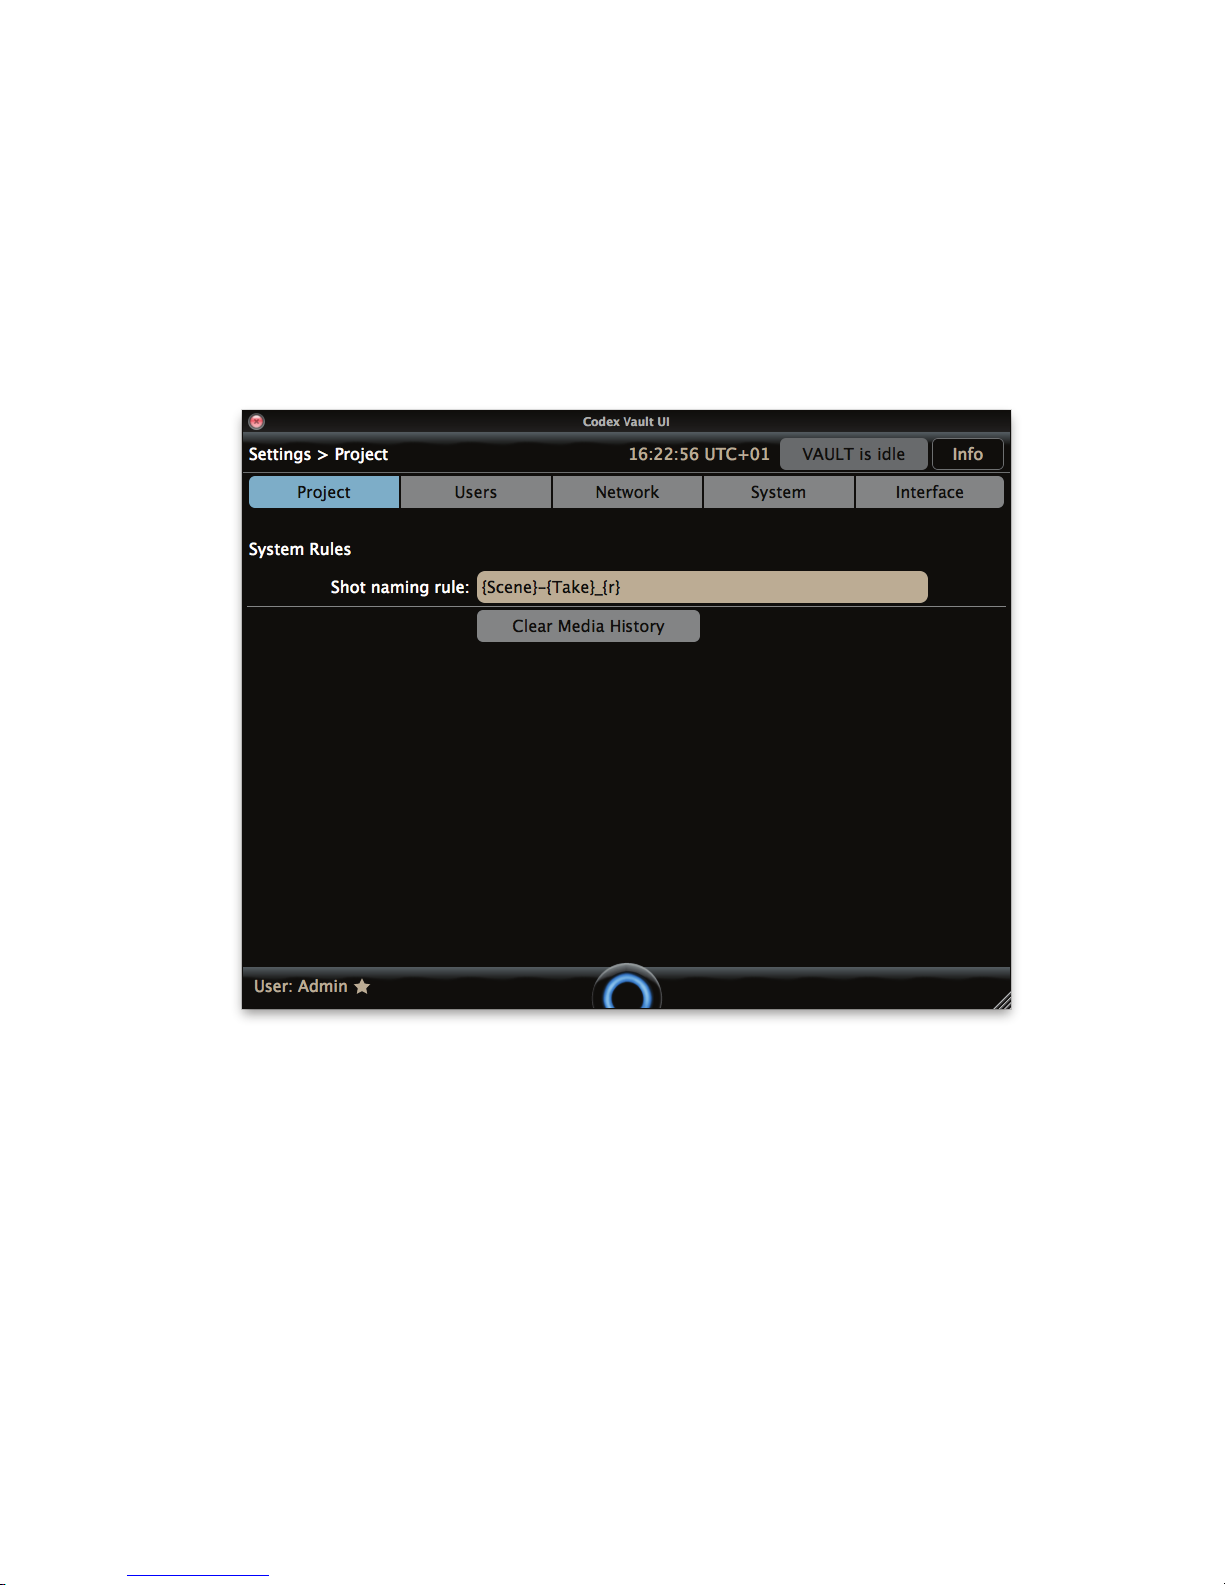
21. Settings
From the Vault Main Menu select ‘Settings’. This option is only available to accounts with Administrator privileges. This screen provides the
following menus:
21.1 Project
Here the Administrator can set the ‘Shot naming rule’ for the project. When using Codex Onboard S or M recorders, this setting on the Vault
should be set to match the Setup->Slate->Shot naming rule on the recorder(s).
This can be useful for batch renaming - when shot names are manually deleted on the Vault the ‘Shot naming rule’ is used to apply new shot
names based on the individual metadata items (e.g. Scene, Take) that are stored with the shots.
The Clear Media History button should only be used before a new project begins, as detailed in the earlier section ‘Preparing the Vault for a new
project’.
CODEX VAULT 2 - ADMINISTRATOR GUIDE REV 06.08.13
PAGE 68
Page 69
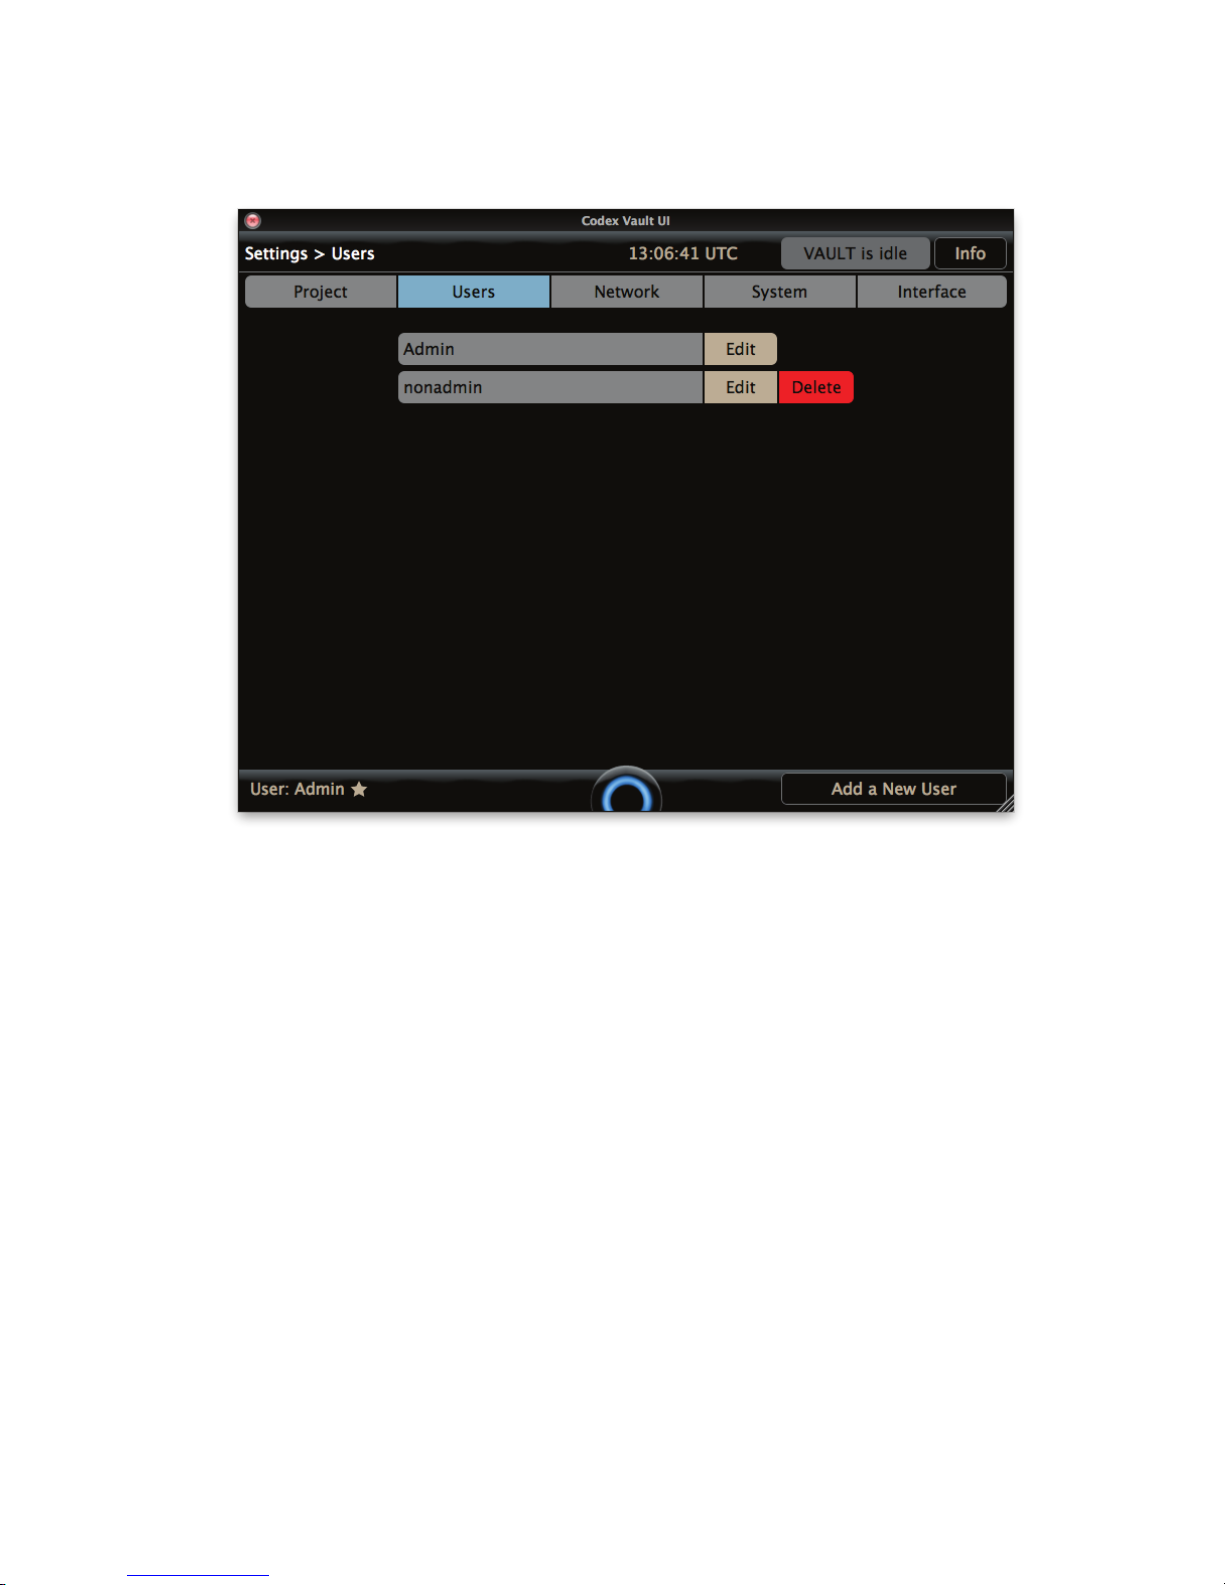
21.2 Users
This screen is used for managing user accounts.
When logged in you can delete other accounts, but not your own account. To create additional user accounts select ‘Add a New User’.
Complete all possible elds and then highlight the Administrator button if the user should have administrative privileges. Then select Save &
Finish.
21.3 Network
The Vault has two Gigibit Ethernet ports, and optionally the capability to set up a Wireless Access Point for controlling it remotely if the correct
hardware is tted.
On the side of the Vault, Network Port 1 is on the left and Network Port 2 is on the right.
Click to choose if a Network port is Static or DHCP. When set to static you must manually enter the rest of the settings. When set to DHCP the
Vault should be connected to a DHCP server and it will be assigned network settings automatically.
CODEX VAULT 2 - ADMINISTRATOR GUIDE REV 06.08.13
PAGE 69
Page 70
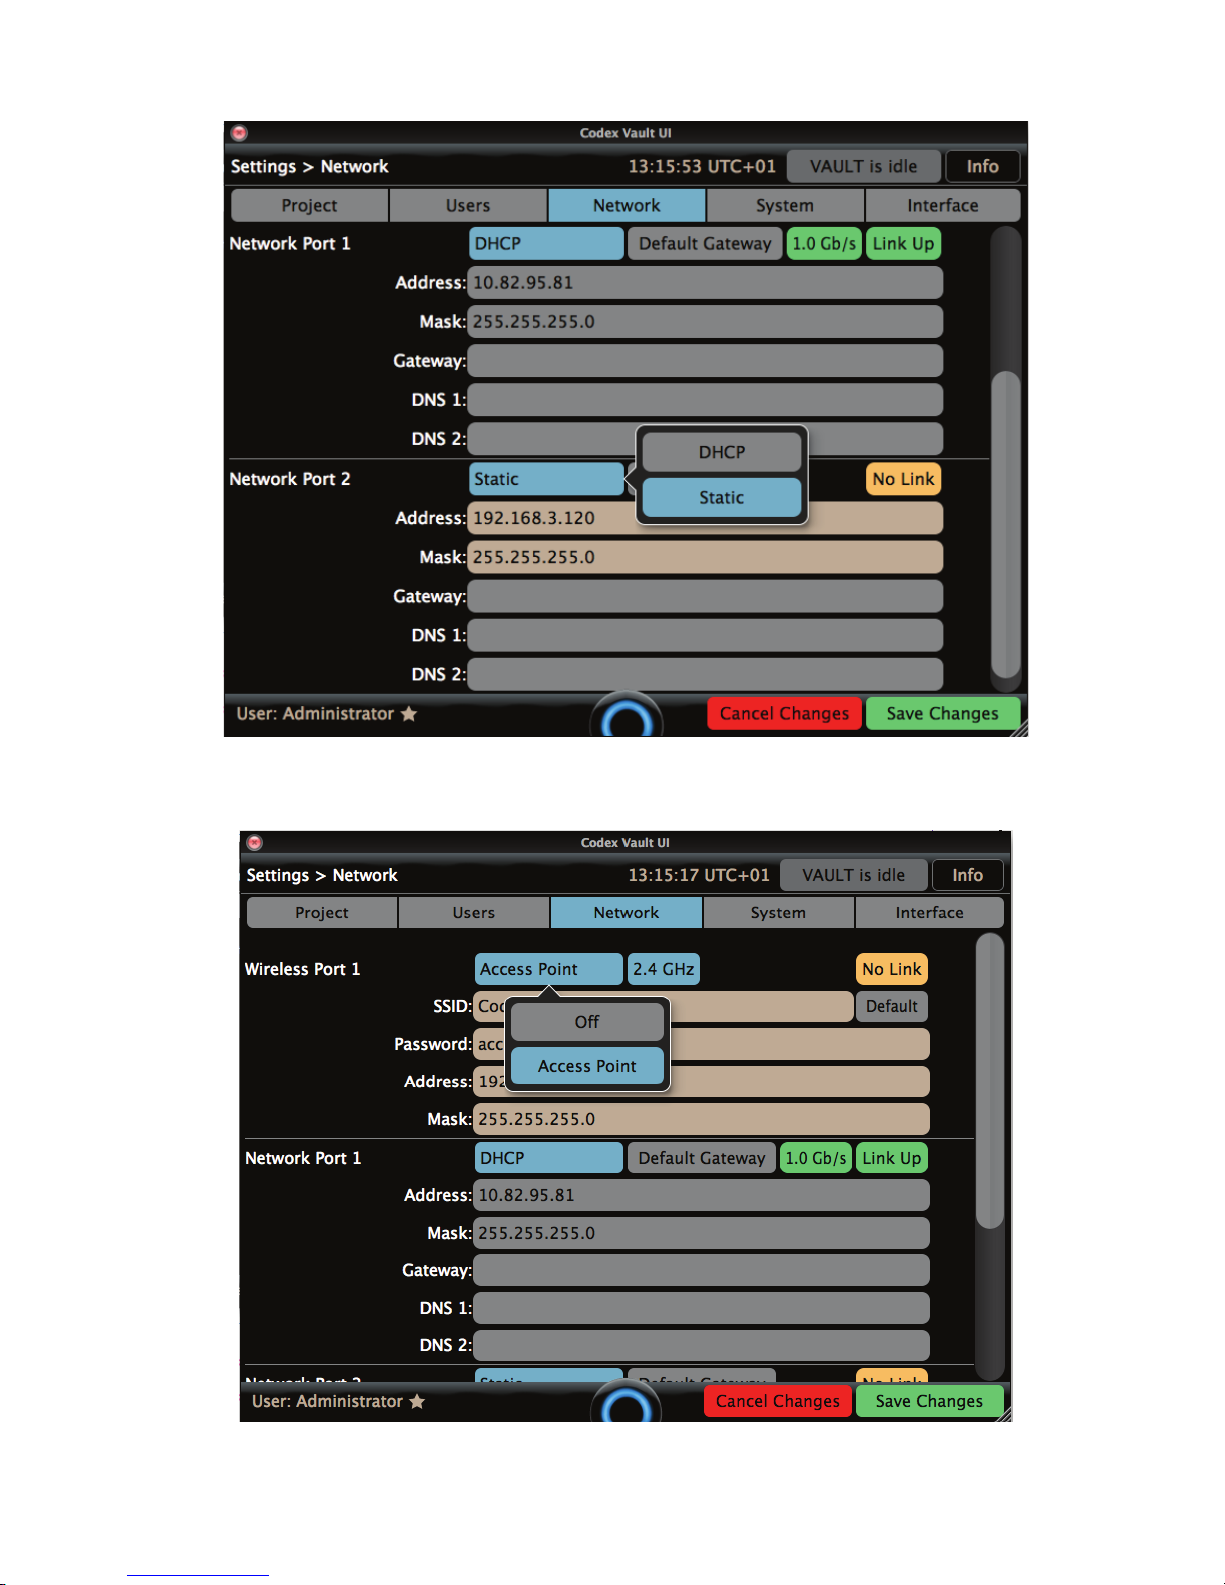
To set up a Wireless Access Point click the Off button and set this to Access Point.
Set the details for the Access Point to make it secure, and only provide these details to authorised users of the Vault. The password must be
between 8 and 63 alphanumberic charaters, with no spaces.
CODEX VAULT 2 - ADMINISTRATOR GUIDE REV 06.08.13
PAGE 70
Page 71
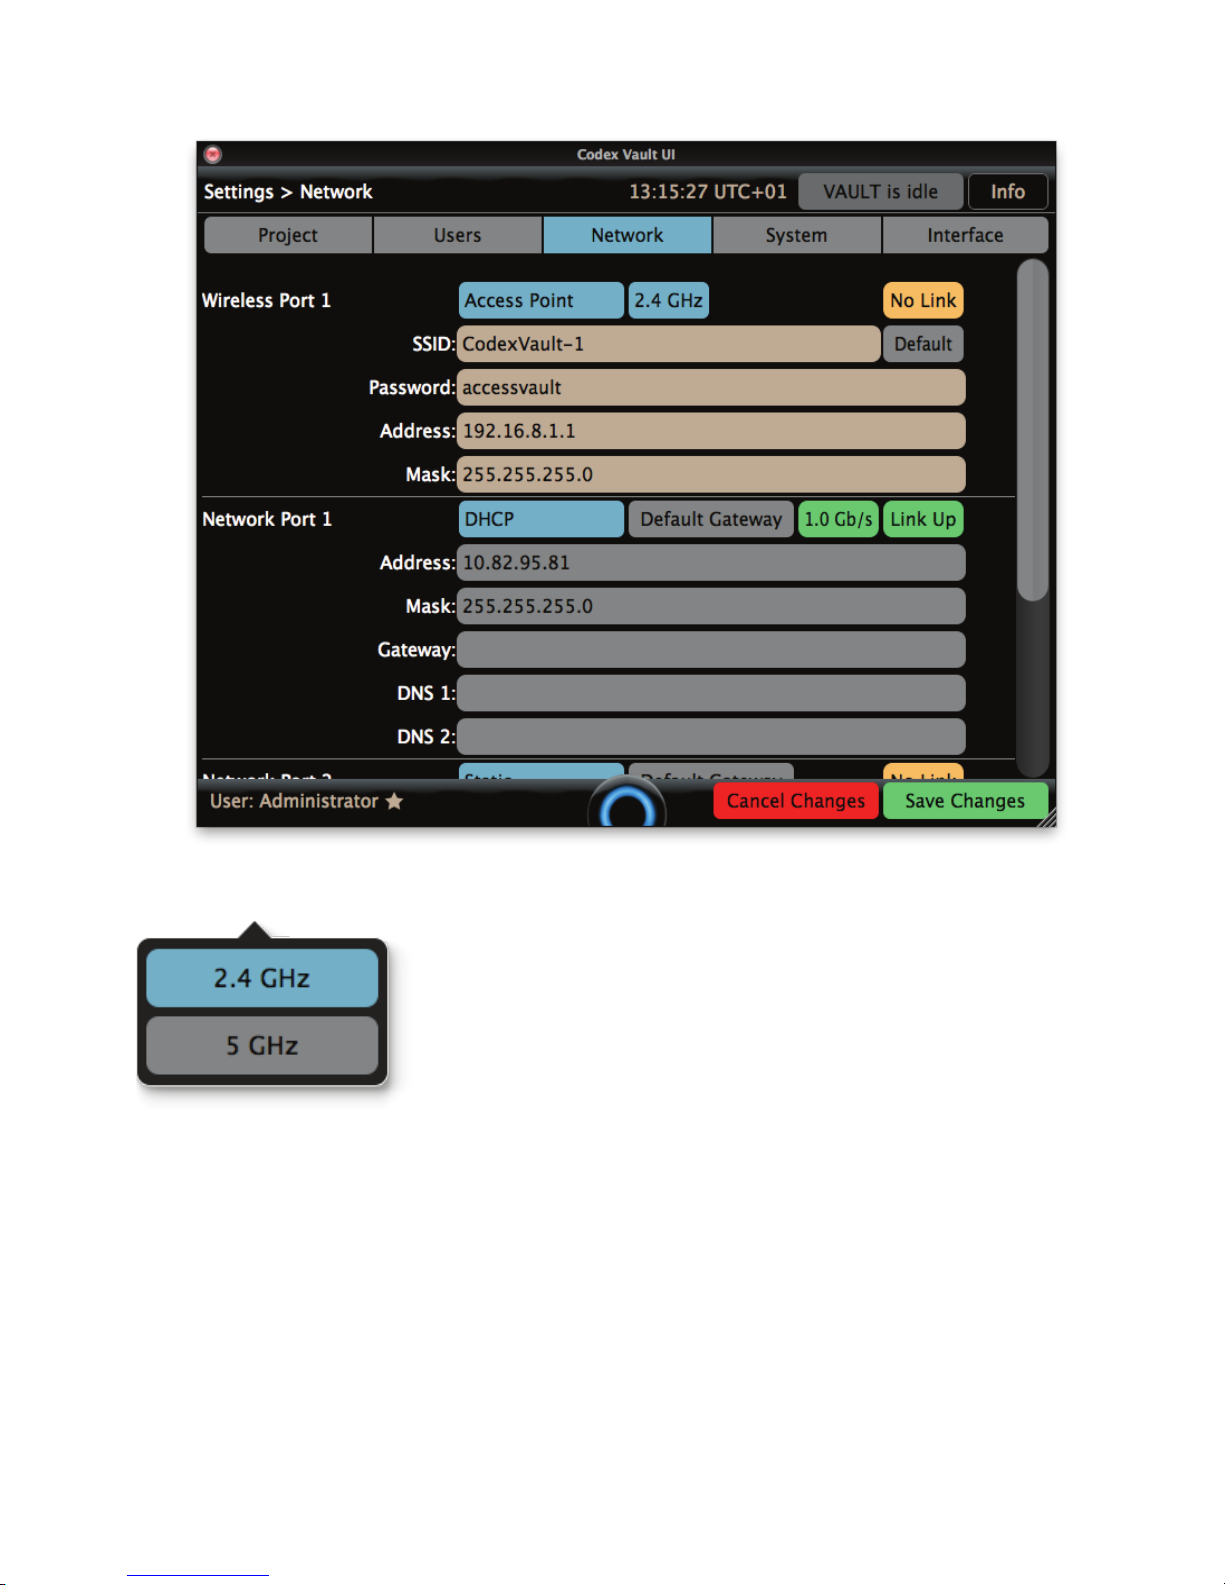
The Access Point can operate at 2.4GHz or 5GHz. Click the 2.4GHz button to change this setting:
Note: when the Access Point is set to 5GHz, equipment that can only operate up to 2.4GHz will not be able to connect.
CODEX VAULT 2 - ADMINISTRATOR GUIDE REV 06.08.13
PAGE 71
Page 72
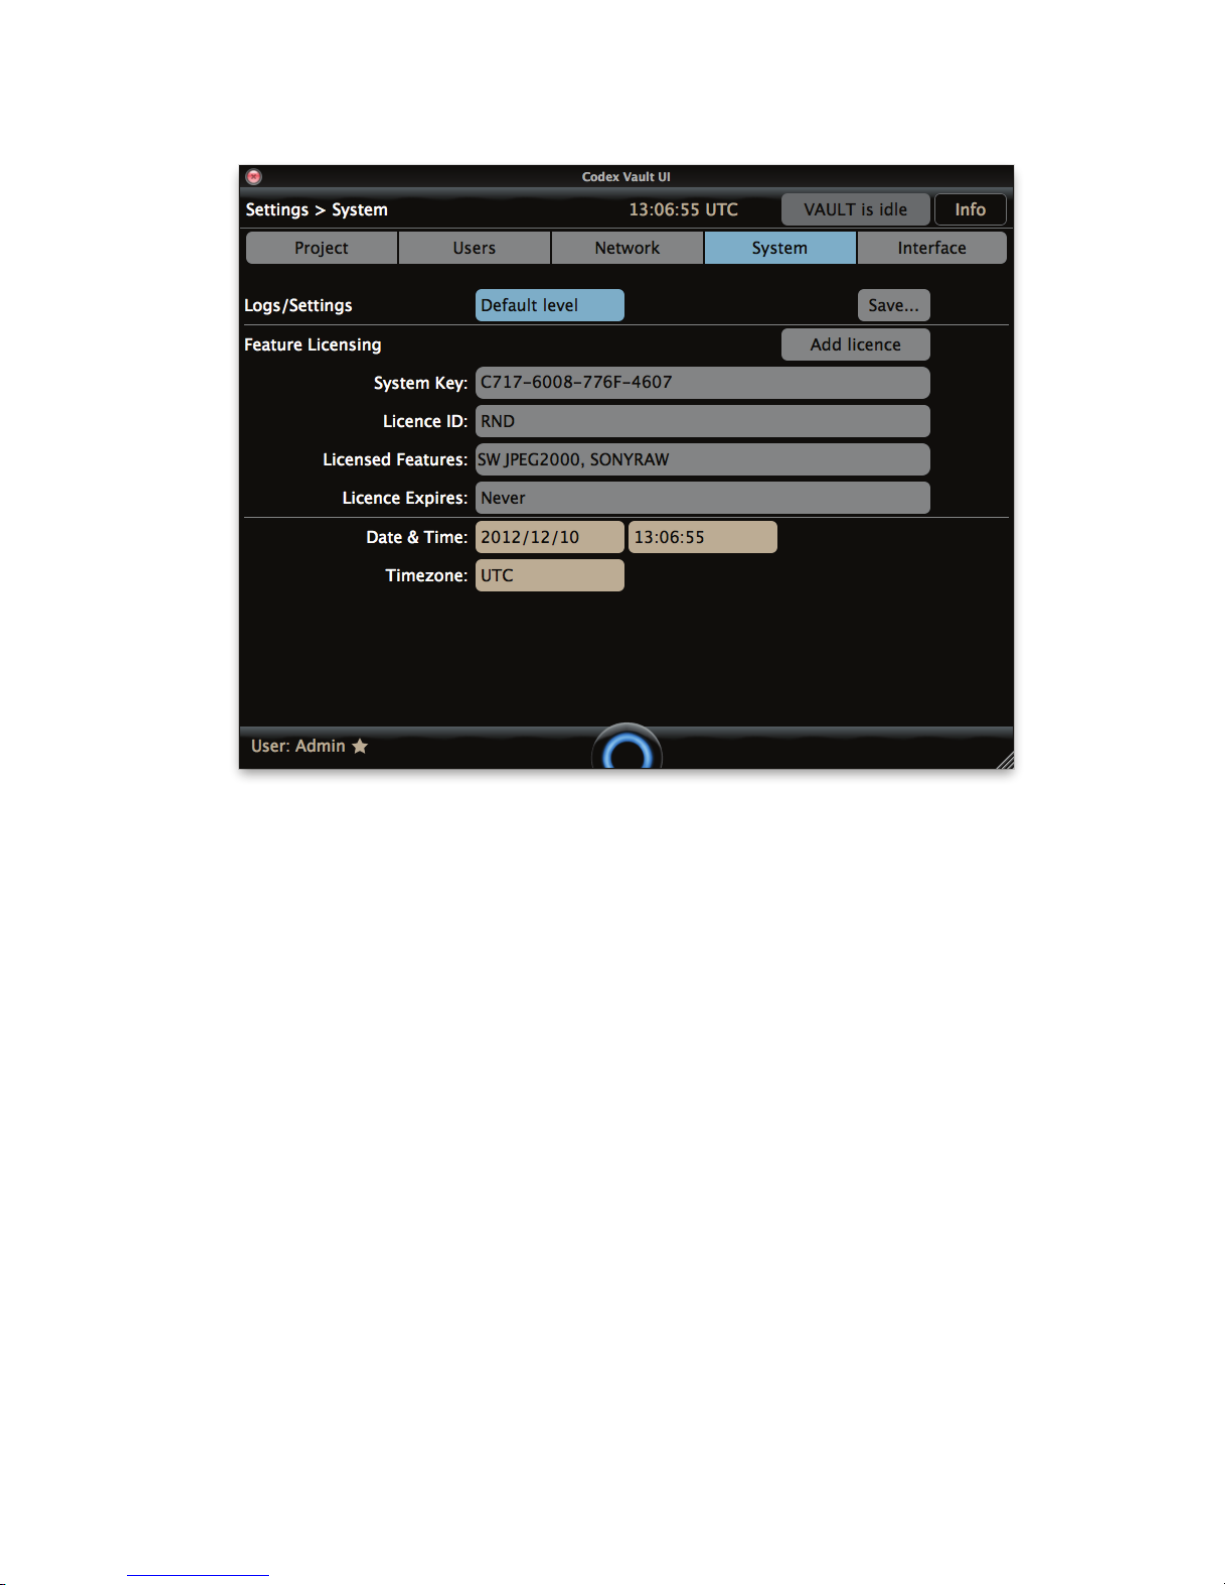
21.4 System
This screen is used for saving system log les, adding feature licences, and adjusting the system date/time.
If logs are requested by Codex support they will specify if they require Default level or Full level logs. To save the logs to a USB stick plug it in
and then click the Save... button and a le browser will appear. Choose the USB stick and then click Select to save the logs.
If you don’t have a USB stick available choose use the /tmp directory on the Vault system disk to save the logs to. To access logs saved locally
on the Vault the root samba share can be used. It is recommended to only allow more advanced users to do this, as deleting or moving les
when connected to the Vault in this way can stop the system from working.
For further details on connecting to samba shares refer to the Codex guide “Getting Logs and Loading LUTs, Burn-Ins, and syscongs”.
If you have been issued a licence key by Codex for a specic software feature use the Add Licence button and copy/paste the licence key into
the box and click OK.
The timezone setting by default is UTC, which is equivalent to GMT. To adjust the timezone you can add an offset of between -12 and +14
hours. For example UTC-08 or UTC+10.
If necessary the Date and Time can be entered manually. After a change is made click the Save Changes button.
CODEX VAULT 2 - ADMINISTRATOR GUIDE REV 06.08.13
PAGE 72
Page 73
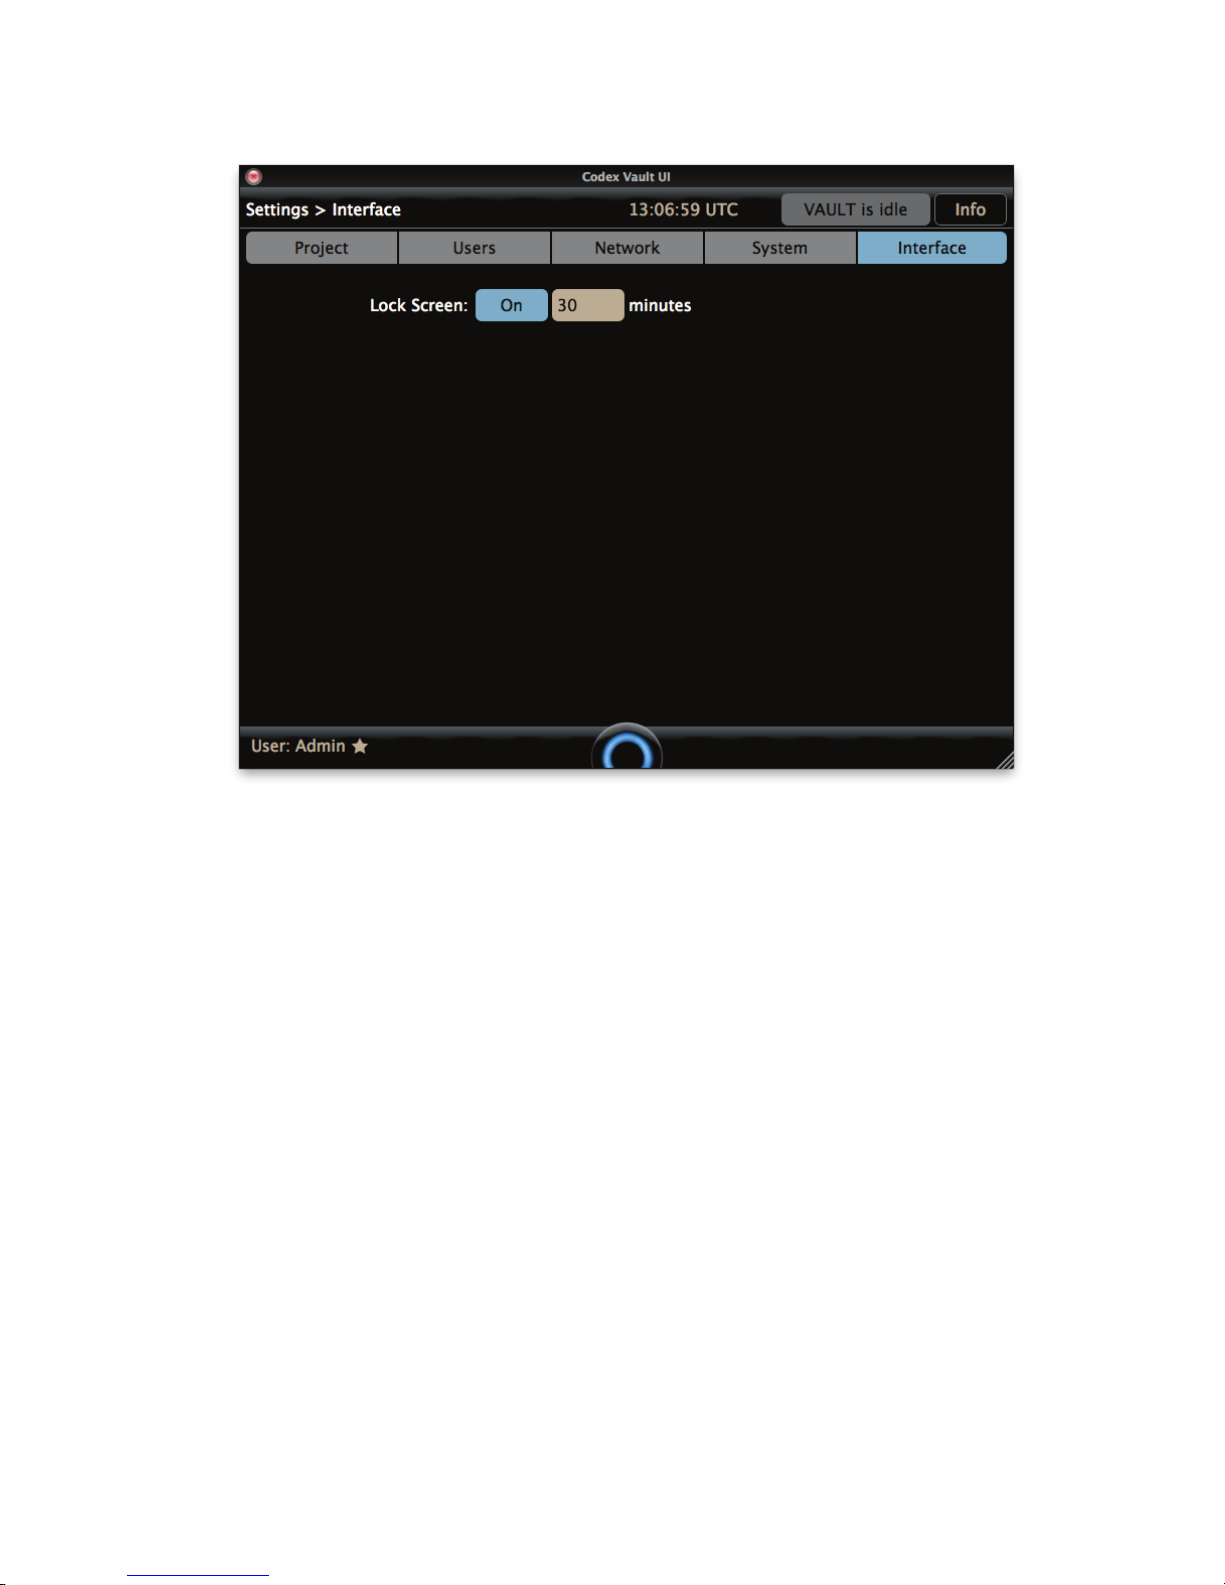
21.5 Interface
On this screen the Vault can be set to automatically lock after a specied amount of time. Once the Vault is locked then a user account and
password is required to log back in.
CODEX VAULT 2 - ADMINISTRATOR GUIDE REV 06.08.13
PAGE 73
Page 74
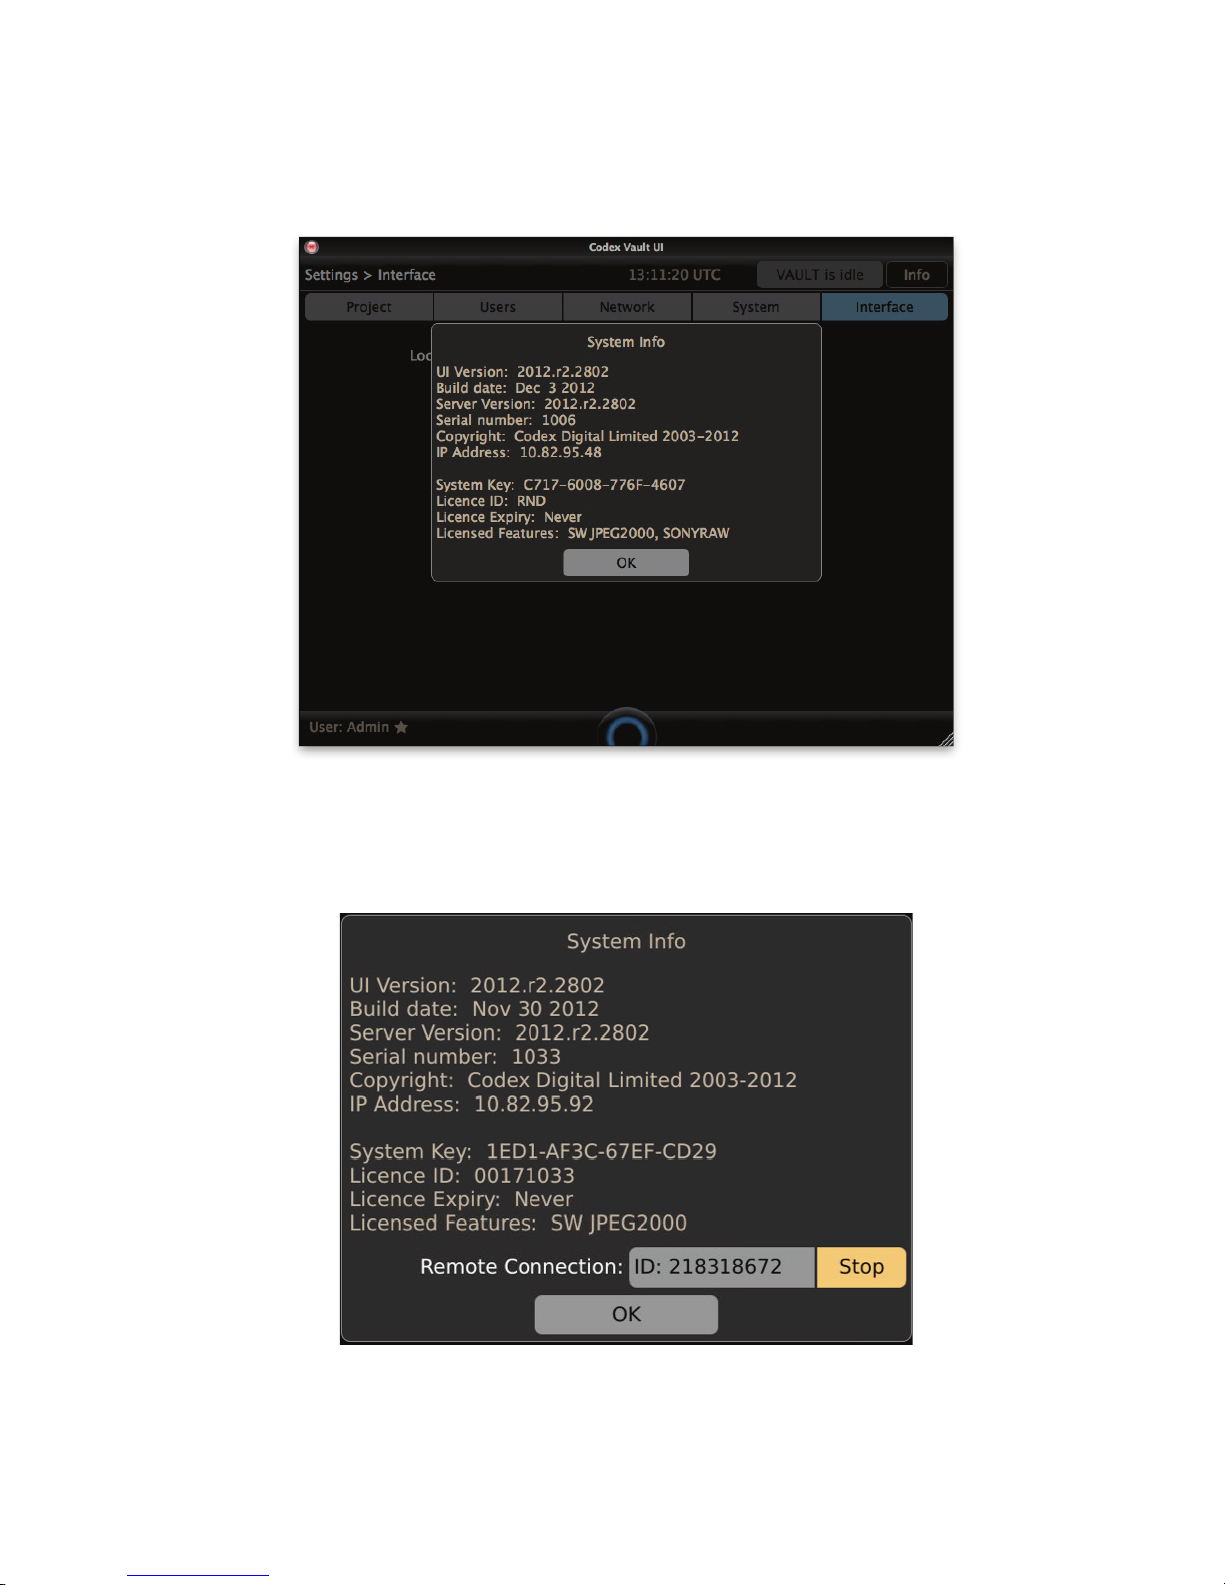
22. Info
At the top of the Vault screen is an overall progress bar for tasks, and to the right of this is the Info button. The image below shows the
information displayed in the Info box:
22.1 Remote Connection (TeamViewer)
In the Info box there is a Remote Connection option. This allows you to connect to the Vault from another computer using TeamViewer to
observe and control the Vault. TeamViewer is a free application that can be downloaded from www.teamviewer.com:
With the Vault connected to a network with internet access click Start and a 9 digit ID should be displayed in the Remote Connection box. From
another computer you can then run the TeamViewer software and enter this ID and the password codex to connect to the Vault.
Press CTRL-T on your keyboard to disable the touchscreen on the Vault so you can use your keyboard and mouse via TeamViewer. Remember
to press CTRL-T again to reenable the touchscreen before disconnecting from TeamViewer.
CODEX VAULT 2 - ADMINISTRATOR GUIDE REV 06.08.13
PAGE 74
Page 75
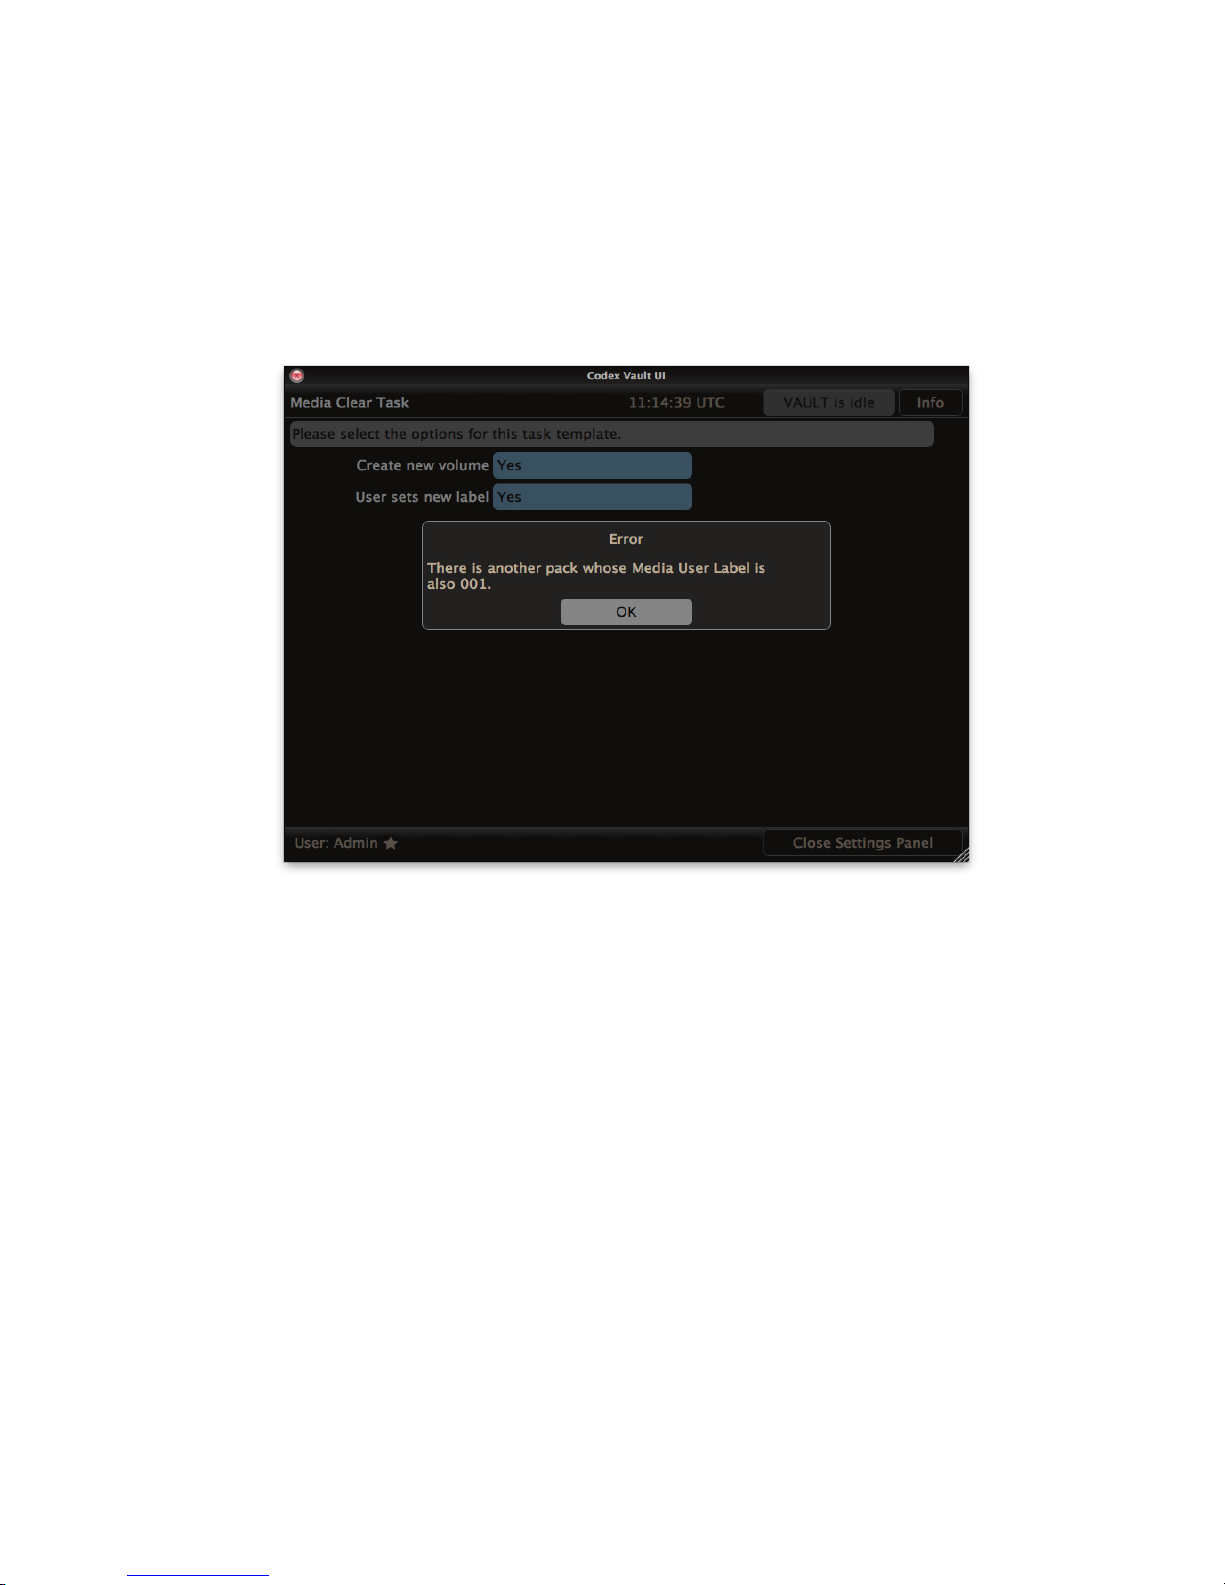
23. Using media with a clashing name
The Vault keeps a database of all the Capture Drives and Datapacks (media) that get loaded. When a Task is started the Vault will check that
the name of the media being used does not clash with any media that has been loaded previously. If a clash is detected you will be given the
opportunity to rename the media before proceeding.
It is strongly recommended to rename the media at this stage. If this is not done there is the possibility of les with clashing Roll and Timecode
information being delivered to post production which will cause a great deal of confusion.
24. Using a keyboard and mouse with the Vault software
If you want to use a USB keyboard and mouse with the Vault, connect them and then press ctrl-T on the keyboard. This disables the
touchscreen allowing a keyboard and mouse to be used.
CODEX VAULT 2 - ADMINISTRATOR GUIDE REV 06.08.13
PAGE 75
Page 76
25. Supported media types and file formats
The Vault supports the following media, le formats and compression codecs:
Company Camera Memory Card File Type Codec Resolution Bit Depth Colourspace
ARRI Alexa SxS PRO Quicktime ProRes 4444 1920x1080 12-bit 4:4:4
ARRI Alexa SxS PRO Quicktime ProRes 4444 2048x1152 12-bit 4:4:4
ARRI Alexa SxS PRO Quicktime ProRes 4444 2048x1536 12-bit 4:4:4
ARRI Alexa SxS PRO Quicktime ProRes 422HQ / 422 / 422LT /
Proxy
ARRI Alexa SxS PRO Quicktime ProRes 422HQ / 422 / 422LT /
Proxy
ARRI Alexa SxS PRO Quicktime ProRes 422HQ / 422 / 422LT /
Proxy
ARRI Alexa Capture Drive ARI Uncompressed 2880 x 1620 12-bit RAW
ARRI Alexa Capture Drive ARI Uncompressed 2880 x 2160 12-bit RAW
Canon C500 Capture Drive RMF Uncompressed 4096 x 2160 10-bit RAW
Canon C500 Capture Drive RMF JPEG2000 4096 x 2160 10-bit RAW
Sony F5 AXSM MXF 16-bit linear RAW 2K 16-bit linear RAW
1920x1080 10-bit 4:2:2
2048x1152 10-bit 4:2:2
2048x1536 10-bit 4:2:2
Sony F55 AXSM MXF 16-bit linear RAW 4K 16-bit linear RAW
Sony F55 AXSM MXF 16-bit linear RAW 2K 16-bit linear RAW
Sony F65 SR Memory MXF F65RAW-SQ 16-bit linear RAW 4096x2160 16-bit linear RAW
Sony F65 SR Memory MXF F65RAW-Lite 16-bit linear RAW 4096x1080 16-bit linear RAW
RED EPIC REDMAG R3D REDCODE (RAW) 5K 12-bit and 16-bit RAW
RED EPIC REDMAG R3D REDCODE (RAW) 4.5K 12-bit and 16-bit RAW
RED EPIC REDMAG R3D REDCODE (RAW) 4K 12-bit and 16-bit RAW
RED EPIC REDMAG R3D REDCODE (RAW) 3K 12-bit and 16-bit RAW
RED EPIC REDMAG R3D REDCODE (RAW) 2K 12-bit and 16-bit RAW
Support audio les for Audio Sync are Broadcast Wave Files with timecode at 48KHz, 16/20/24/32 bit, from 1 to 8 channels.
CODEX VAULT 2 - ADMINISTRATOR GUIDE REV 06.08.13
PAGE 76
Page 77
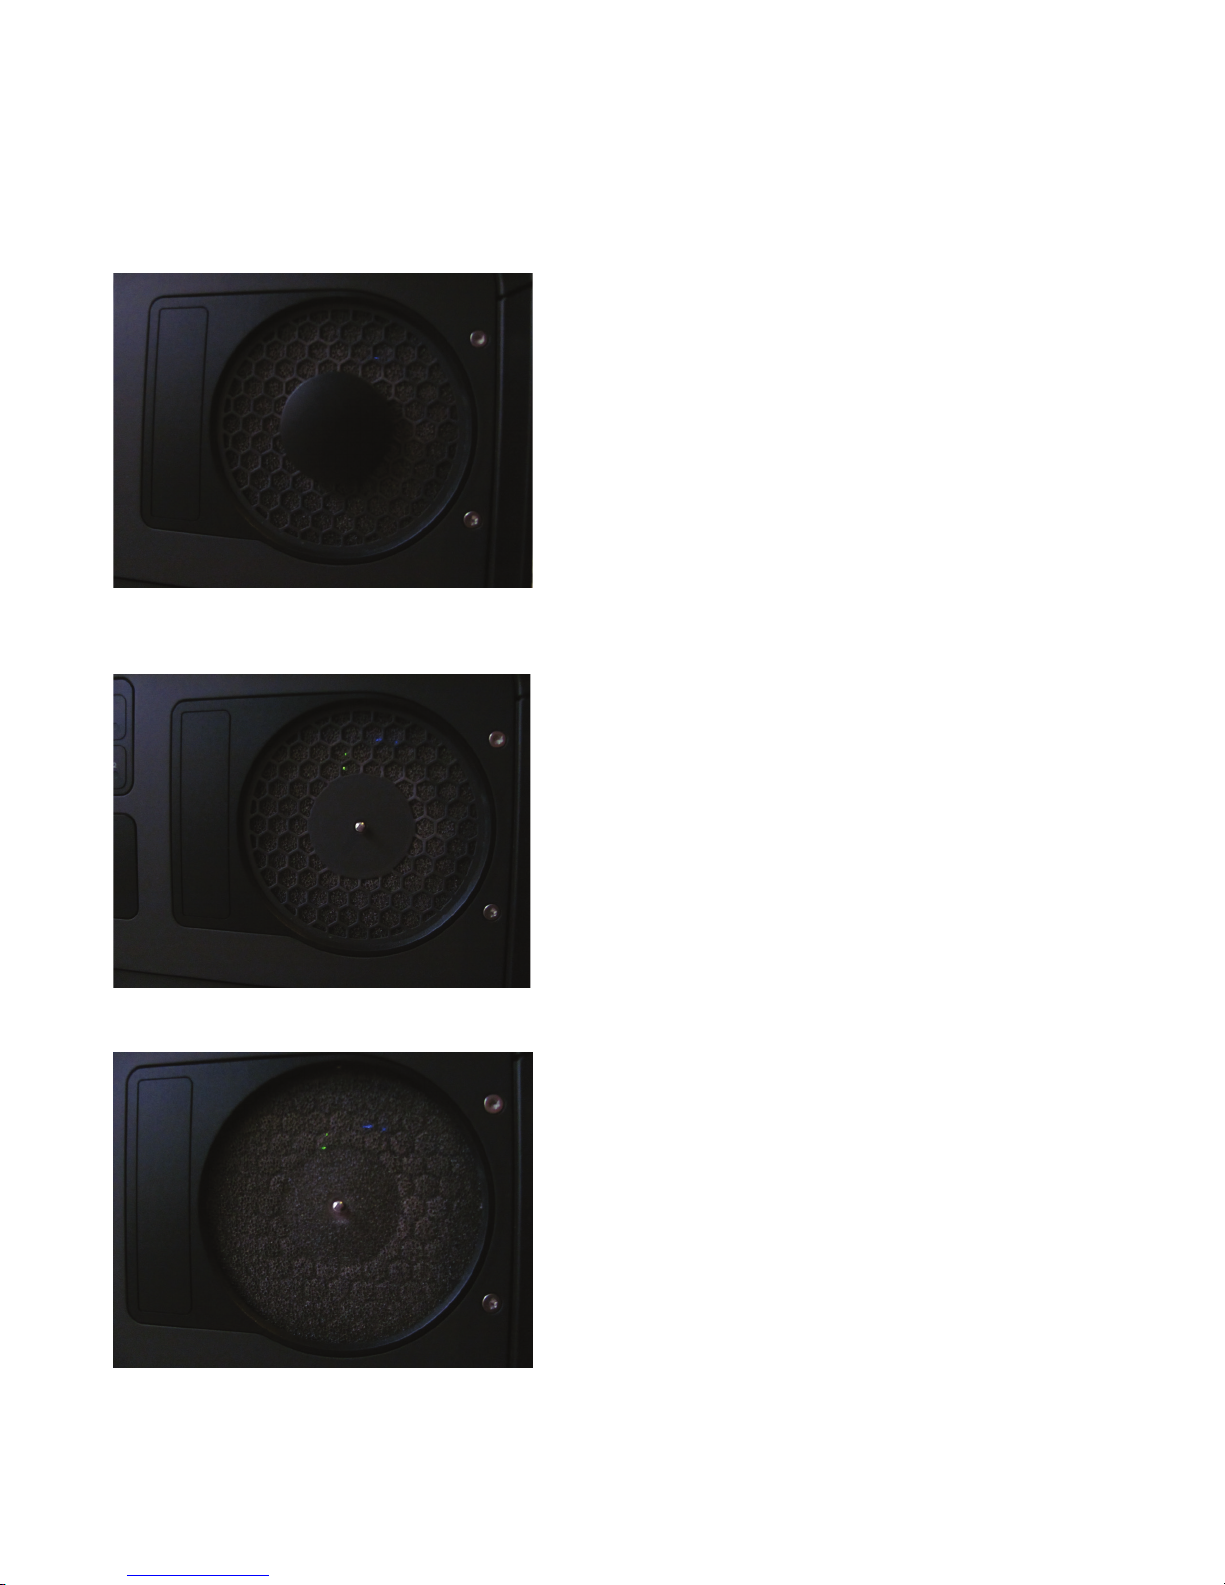
26. Cleaning the Process Module Air Filter
It is advised to periodically clean the lter on the air intake for the Process Module. This is particularly important if the Vault has been exposed
to dusty environments. Follow these steps to remove the lter for cleaning:
Turn the central plastic disk of the air intake anti-clockwise to remove it:
Remove the air intake grill. It is clipped in place but can be freed with a small amount of wiggling. A pair of needlenose pliers can be used for
this, holding the grill near to the central disk:
With the air intake grill removed the lter material is visible. Carefully remove the lter material:
CODEX VAULT 2 - ADMINISTRATOR GUIDE REV 06.08.13
PAGE 77
Page 78
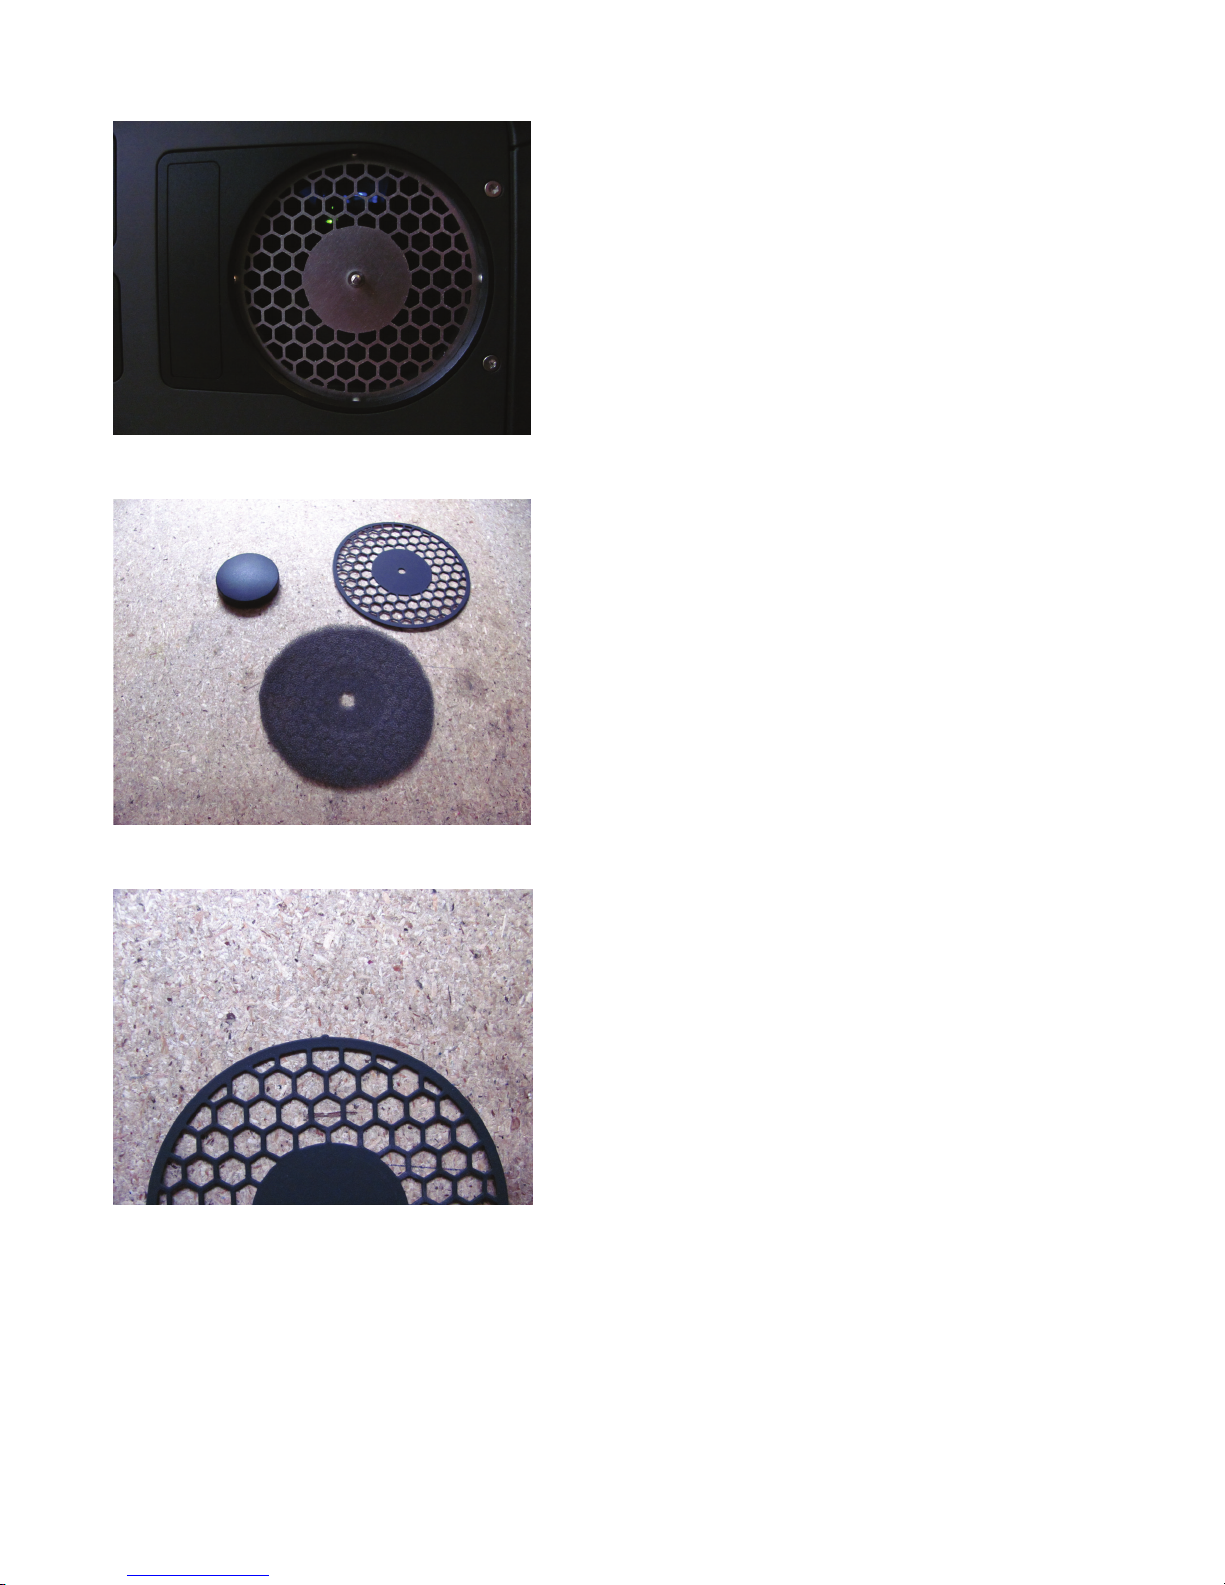
Clean the lter material using a vacuum, can of air duster from the inner side, or similar:
Then ret the lter material. When retting the air intake grill, note the locating pin. This should be at the top of the grill when retted:
CODEX VAULT 2 - ADMINISTRATOR GUIDE REV 06.08.13
PAGE 78
Page 79

27. Setting up the Vault for a single tape Archive
To set the Vault to use only one LTO drive for archiving, follow the instructions below:
1. Connect a USB keyboard to the Vault
2. Open a terminal window by pressing CTRL+ALT+F2 and
3. Login as user=root, password=codex
4. Type the following command and press enter:
vi /etc/codex/ltfs_ofoader.conf
5. Use the cursor keys to move down to the line:
num_mount_points 2
6. Press the “i” key to enter test insert mode.
7. Change the line to be:
num_mount_points 1
8. Press ESC to exit insert mode and then SHIFT+Z+Z (i.e. hold SHIFT and press Z twice)
9. Type the following command and press enter:
reboot
CODEX VAULT 2 - ADMINISTRATOR GUIDE REV 06.08.13
PAGE 79
Page 80

Notes
24 hour support line +44 7985 467 665
CODE X DIGITAL LI MITED 6 0 POL AND STR EET LOND ON ENGL AND W1F 7NT UK TE L +44 207 292 6 918 CODEXDI GITAL.CO M INFO@ CODE XDIG ITAL.COM
Codex Digital Limited reserve the right to alter the specification at any time and without prior notice. © Copyright Codex Digitial Limited January 2013.
CODEX VAULT 2 - ADMINISTRATOR GUIDE REV 06.08.13
PAGE 80
 Loading...