

Page 1
Version 1.1 June 2011
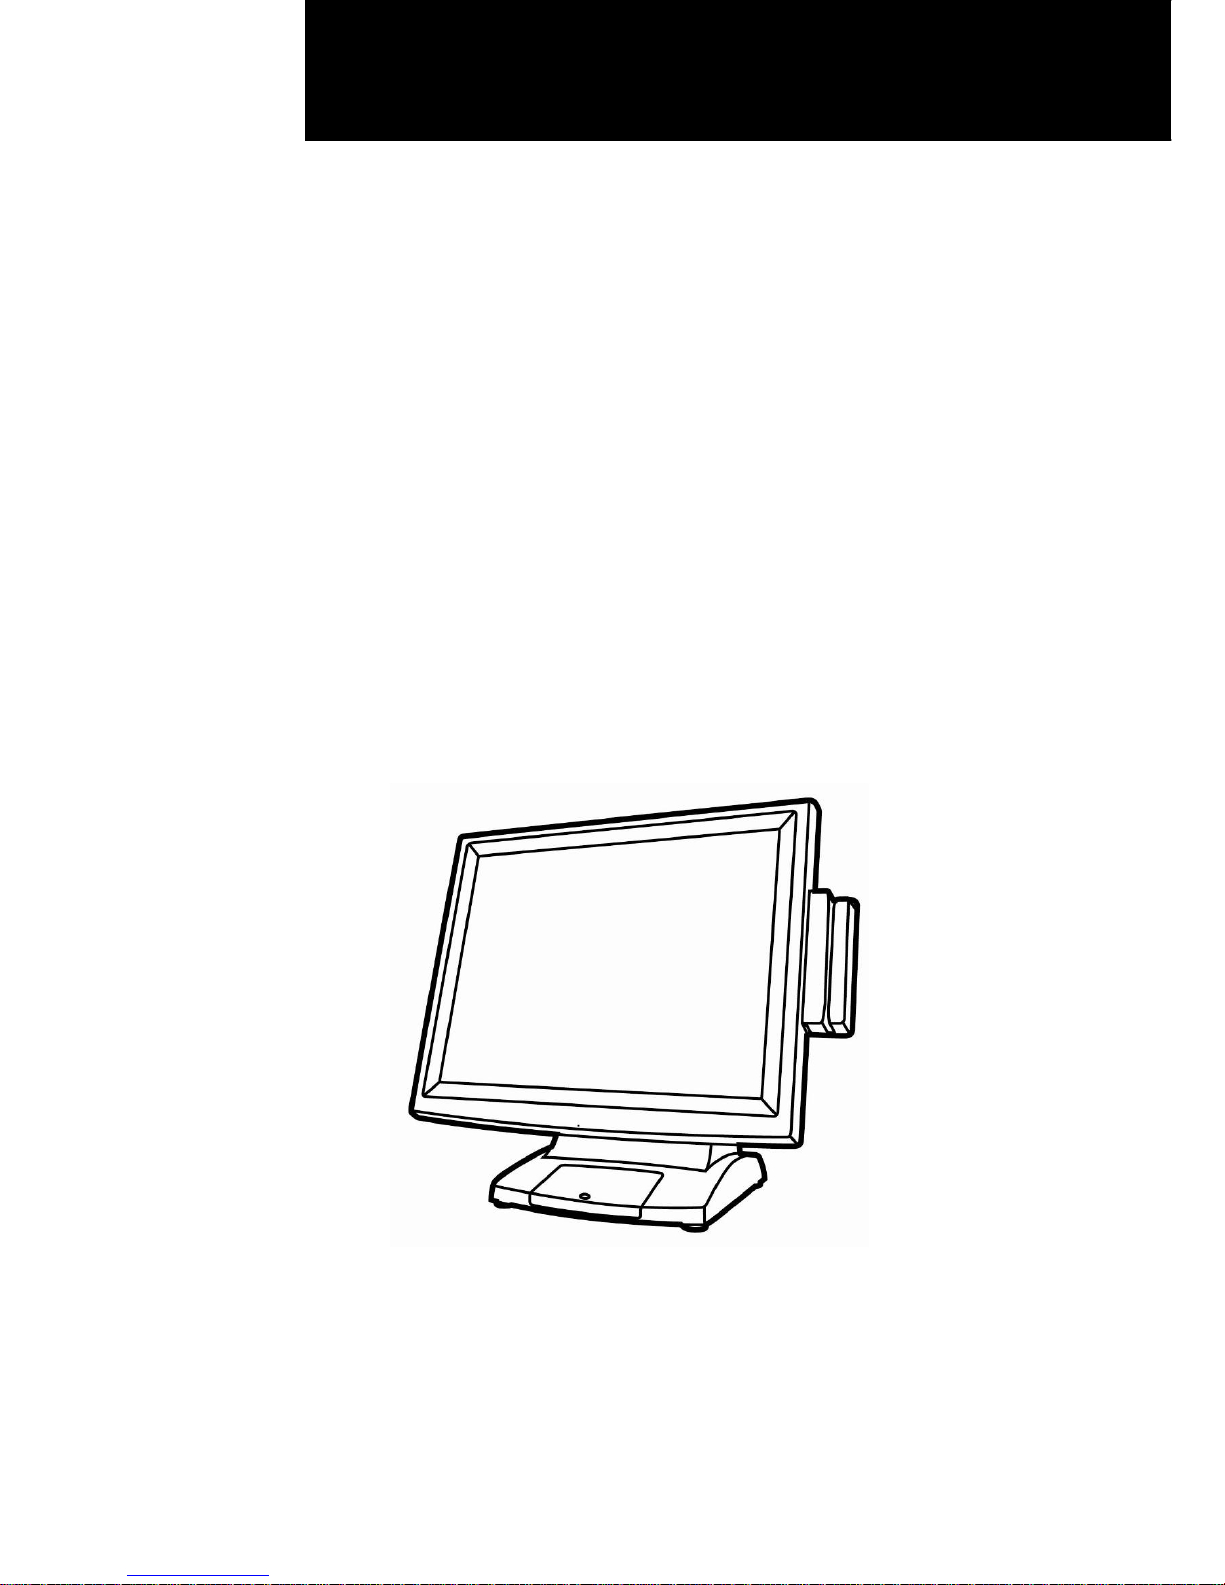
Point-of-Sale
Hardware System
User Manual
Page 2

i
Copyright 2011
All Rights Reserved
Manual Version 1.1
Part Number: 3LMPP3350311
The information contained in this document is subject to change
without notice.
We make no warranty of any kind with regard to this material,
including, but not limited to, the implied warranties of merchantability
and fitness for a particular purpose. We shall not be liable for errors
contained herein or for incidental or consequential damages in
connection with the furnishing, performance, or use of this material.
This document contains proprietary information that is protected by
copyright. All rights are reserved. No part of this document may be
photocopied, reproduced or translated to another language without
the prior written consent of the manufacturer.
TRADEMARK
Intel®, Pentium® and MMX are registered trademarks of Intel®
Corporation. Microsoft® and Windows® are registered trademarks of
Microsoft Corporation.
Other trademarks mentioned herein are the property of their
respective owners.
Page 3
ii
Safety
IMPORTANT SAFETY INSTRUCTIONS
1. To disconnect the machine from the electrical Power Supply, turn
off the power switch and remove the power cord plug from the wall
socket. The wall socket must be easily accessible and in close
proximity to the machine.
2. Read these instructions carefully. Save these instructions for future
reference.
3. Follow all warnings and instructions marked on the product.
4. Do not use this product near water.
5. Do not place this product on an unstable cart, stand, or table. The
product may fall, causing serious damage to the product.
6. Slots and openings in the cabinet and the back or bottom are
provided for ventilation; to ensure reliable operation of the product
and to protect it from overheating. These openings must not be
blocked or covered. The openings should never be blocked by
placing the product on a bed, sofa, rug, or other similar surface.
This product should never be placed near or over a radiator or heat
register, or in a built-in installation unless proper ventilation is
provided.
7. This product should be operated from the type of power indicated
on the marking label. If you are not sure of the type of power
available, consult your dealer or local power company.
8. Do not allow anything to rest on the power cord. Do not locate this
product where persons will walk on the cord.
9. Never push objects of any kind into this product through cabinet
slots as they may touch dangerous voltage points or short out parts
that could result in a fire or electric shock. Never spill liquid of any
kind on the product.
CE MARK
This device complies with the requirements of the EEC directive
2004/108/EC with regard to “Electromagnetic compatibility” and
2006/95/EC “Low Voltage Directive”
FCC
This device complies with part 15 of the FCC rules. Operation is subject
to the following two conditions:
(1) This device may not cause harmful interference.
(2) This device must accept any interference received, including
interference that may cause undesired operation
Page 4
iii
CAUTION ON LITHIUM BATTERIES
There is a danger of explosion if the battery is replaced incorrectly.
Replace only with the same or equivalent type recommended by the
manufacturer. Discard used batteries according to the manufacturer’s
instructions.
Battery Caution
Risk of explosion if battery is replaced by an incorrectly type.
Dispose of used battery according to the local disposal instructions.
Safety Caution
Note: To comply with IEC60950-1 Clause 2.5 (limited power sources,
L.P.S) related legislation, peripherals shall be 4.7.3.2 "Materials for fire
enclosure" compliant.
4.7.3.2 Materials for fire enclosures
For MOVABLE EQUIPMENT having a total mass not exceeding
18kg.the material of a FIRE ENCLOSURE, in the thinnest significant
wall thickness used, shall be of V-1 CLASS MATERIAL or shall pass
the test of Clause A.2.
For MOVABLE EQUIPMENT having a total mass exceeding 18kg
and for all STATIONARY EQUIPMENT, the material of a FIRE
ENCLOSURE, in the thinnest significant wall thickness used, shall
be of 5VB CLASS MATERIAL or shall pass the test of Clause A.1
LEGISLATION AND WEEE SYMBOL
2002/96/EC Waste Electrical and Electronic Equipment Directive on the
treatment, collection, recycling and disposal of electric and electronic
devices and their components.
Page 5

iv
The crossed dustbin symbol on the device means that it should not be
disposed of with other household wastes at the end of its working life.
Instead, the device should be taken to the waste collection centers for
activation of the treatment, collection, recycling and disposal
procedure.
To prevent possible harm to the environment or human health from
uncontrolled waste disposal, please separate this from other types of
wastes and recycle it responsibly to promote the sustainable reuse of
material resources.
Household users should contact either the retailer where they
purchased this product, or their local government office, for details of
where and how they can take this item for environmentally safe
recycling.
Business users should contact their supplier and check the terms and
conditions of the purchase contract.
This product should not be mixed with other commercial wastes for
disposal.
Page 6

v
Revision History
Changes to the original user manual are listed below:
Revision Date Description
V1.0 Sep, 2009 Release
V1.1 June, 2011 C46 MB added
Page 7

vi
Table Contents
1 Item Checklist................................................1
1-1 Standard Items ..................................................................... 1
1-2 Optional Items ...................................................................... 2
2 System View...................................................3
2-1 Front View ............................................................................ 3
2-2 Rear View............................................................................. 4
2-3 Bottom View ......................................................................... 5
2-4 I/O View................................................................................ 6
3 Peripheral Installation...................................7
3-1 MSR & Fingerprint................................................................ 7
3-2 VFD ...................................................................................... 8
3-3 Second Display .................................................................. 10
3-4 Cash Drawer ...................................................................... 12
3-5 Wall Mount Kit .................................................................... 14
4 System Assembly & Disassembly.............. 15
4-1 Replace the HDD ............................................................... 15
4-2 Replace the Power Adapter................................................ 16
4-3 Remove the System Stand................................................. 16
4-4 Remove the LCD Rear Cover & the System Box ............... 17
4-5 Replace the Motherboard................................................... 18
4-6 Replace the Inverter Board ................................................ 18
4-7 Replace the ELO Touch Control Board .............................. 19
4-8 Replace the LCD Panel...................................................... 20
5 Specification ............................................... 21
Page 8

vii
6 Jumper Settings.......................................... 23
6-1 C36A Motherboard............................................................. 23
6-2 C46 Motherboard ............................................................... 28
Appendix..........................................................37
Page 9
1
1 Item Checklist
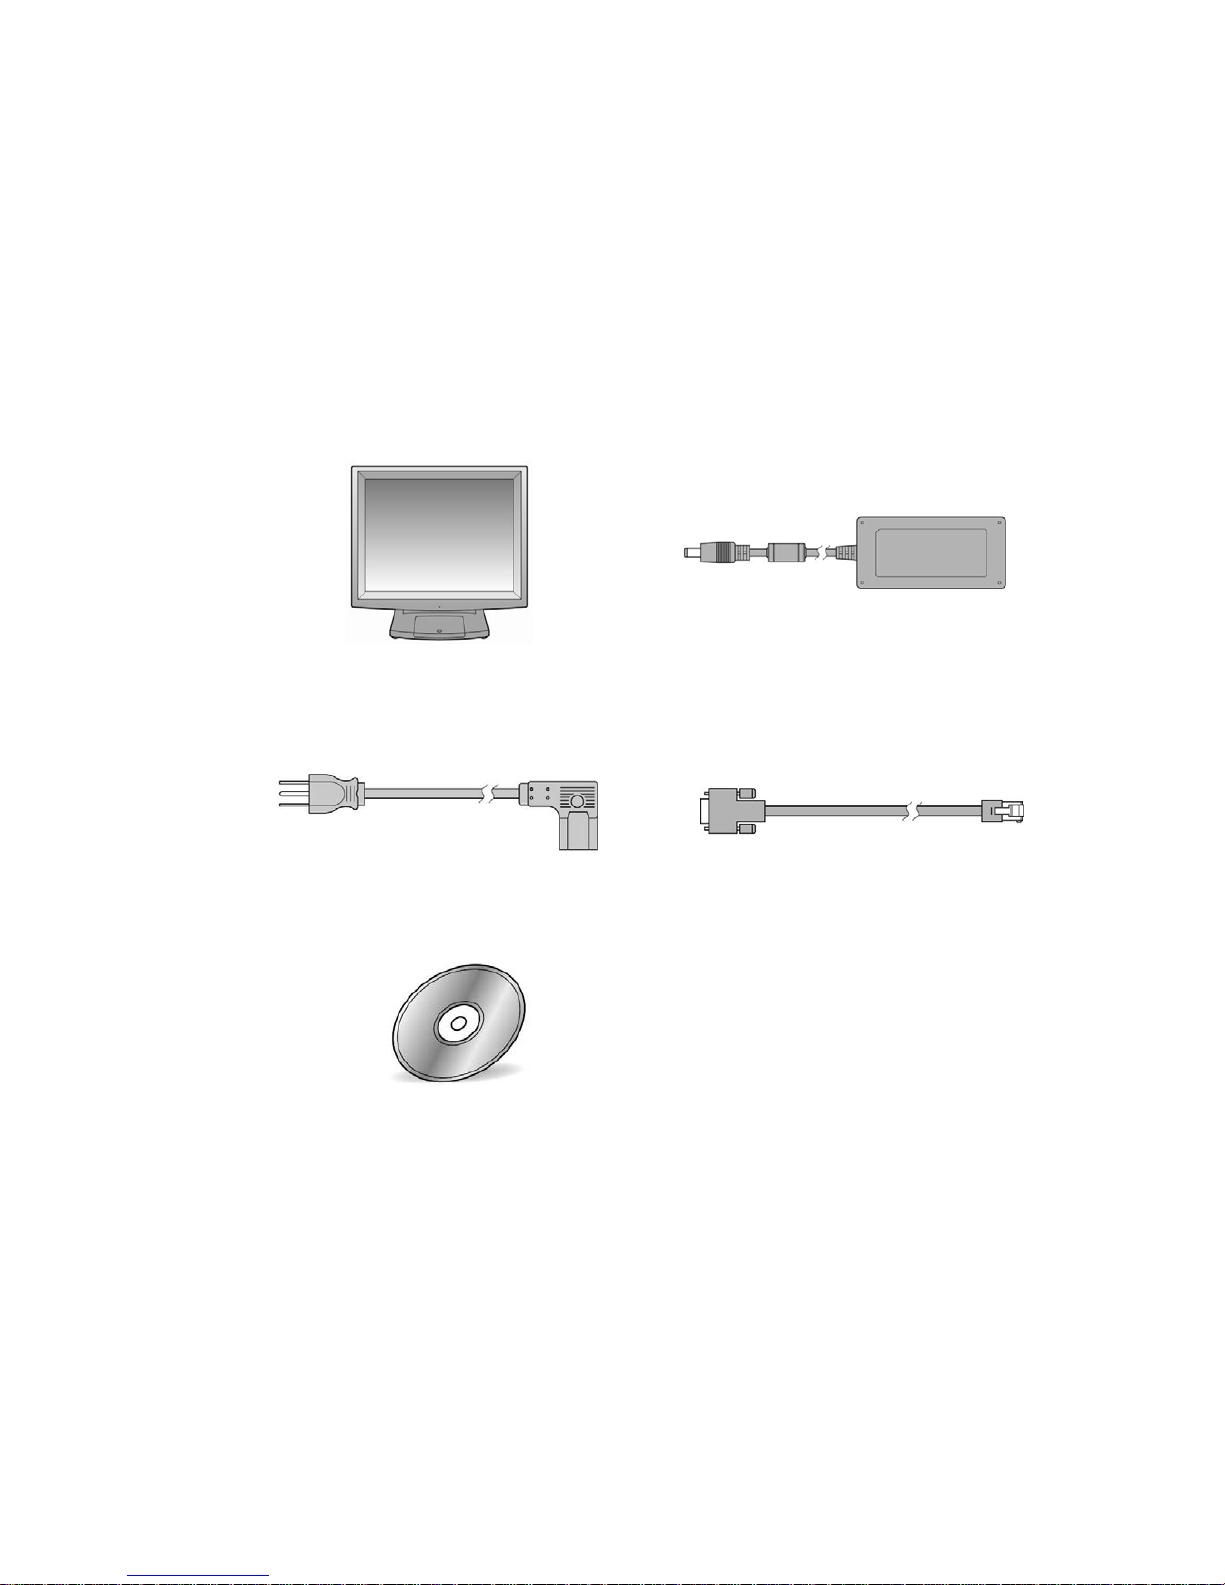
Take the system unit out of the carton. Remove the unit from the carton by holding
it by the foam inserts. The following contents should be found in the carton:
1-1 Standard Items
a.
b.
c.
d.
e.
a. System
b. Power adapter (65W)
c. Power cable
d. COM-RJ45 cable (x2)
e. Driver CD
Page 10
2
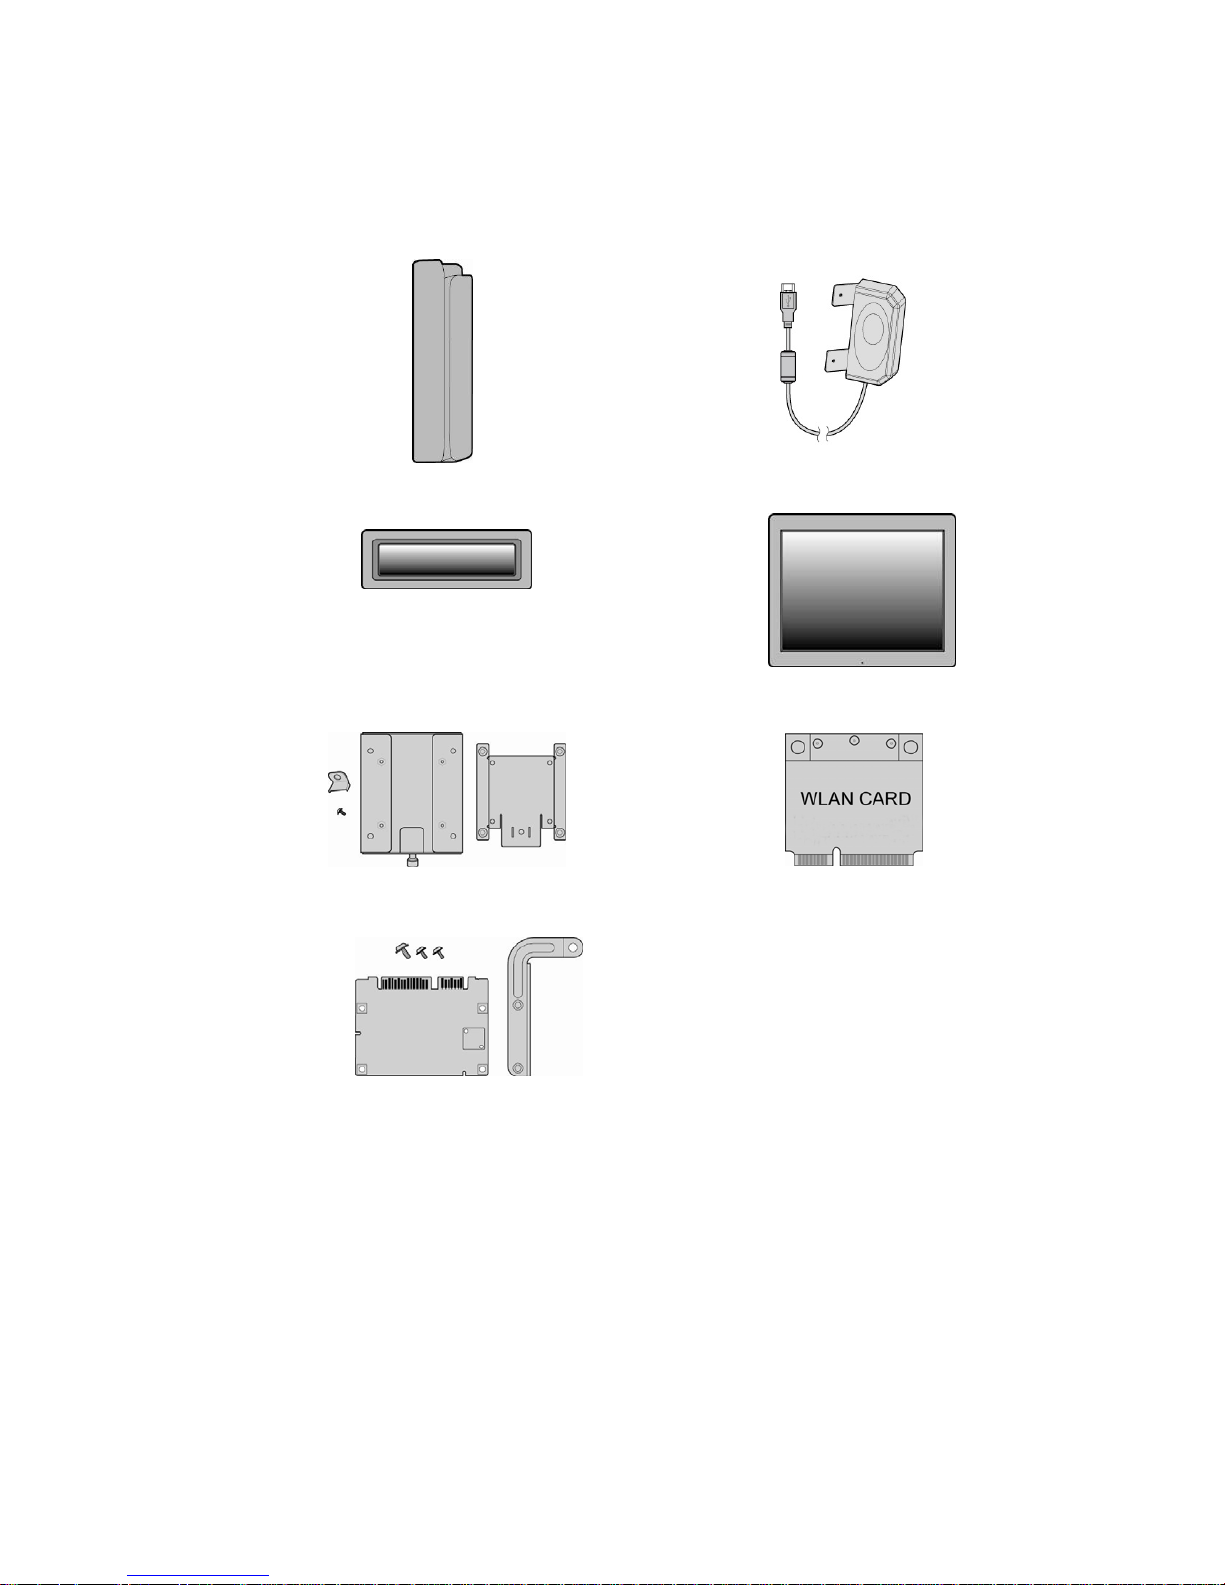
1-2 Optional Items
a.
b.
c.
d.
e.
f.
g.
a. MSR module
b. Fingerprint
c. VFD module
d. Second display
e. Wall mount kit
f. Wireless LAN card
g. pSSD card module
Page 11
3
2 System View
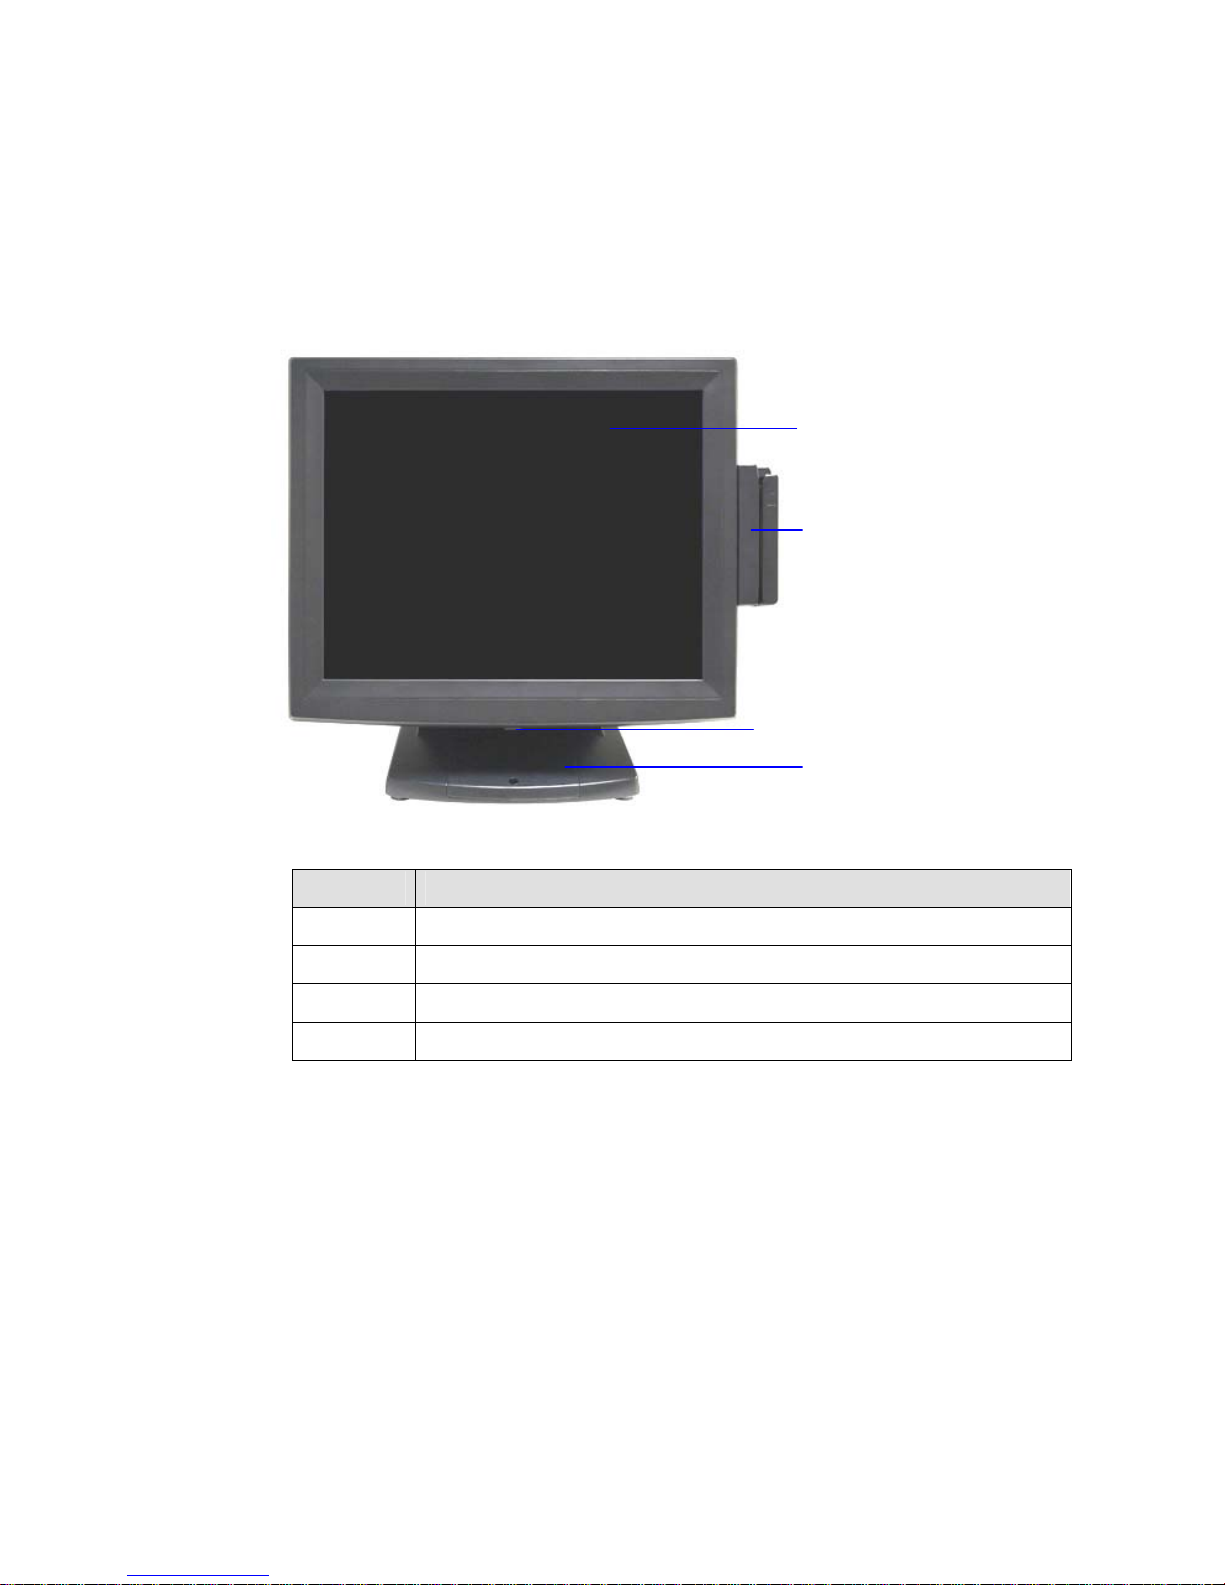
2-1 Front View
Number Description
1 Touch Screen
2 MSR Module (Option)
3 Power Button
4 Hard Disk Drive Cover
②
①
③
④
Page 12
4
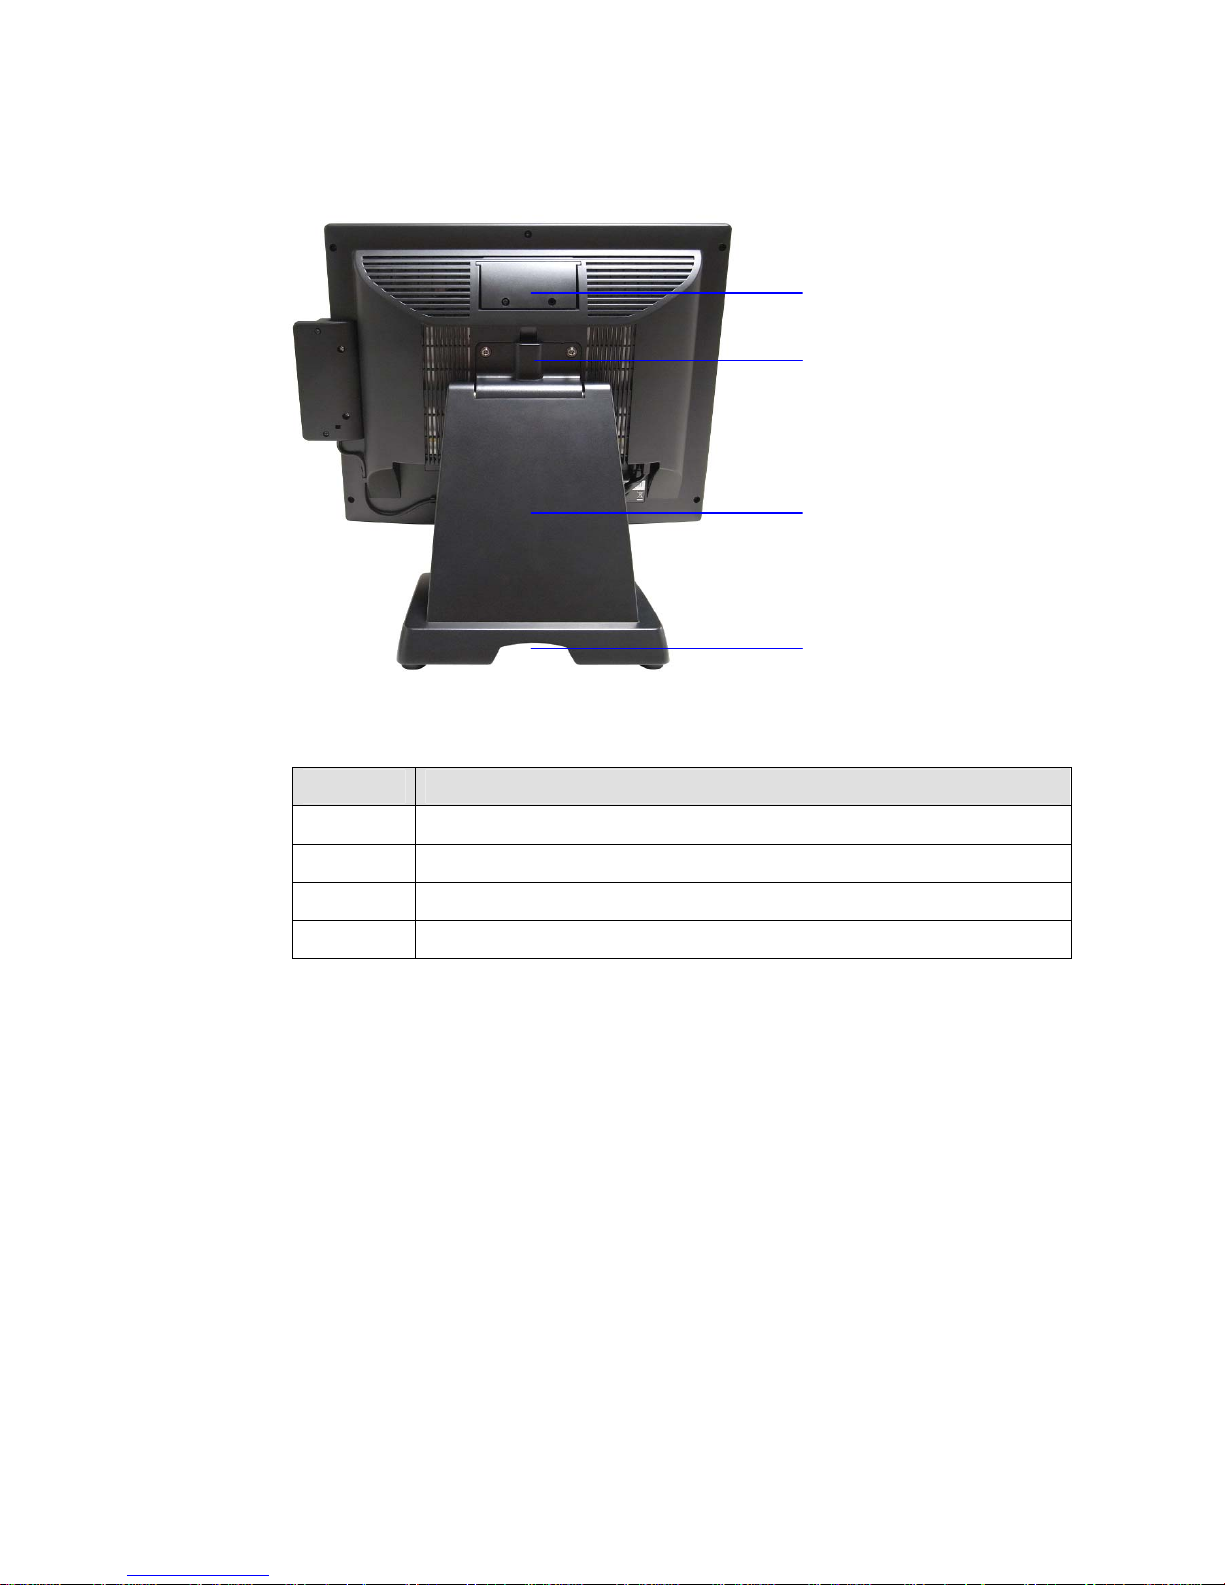
2-2 Rear View
Number Description
5 VFD cover (for VFD & Second display installation)
6 Stand/Wall mount kit installing place
7 Stand
8 Cable management outlet
⑤
⑦
⑥
⑧
Page 13
5
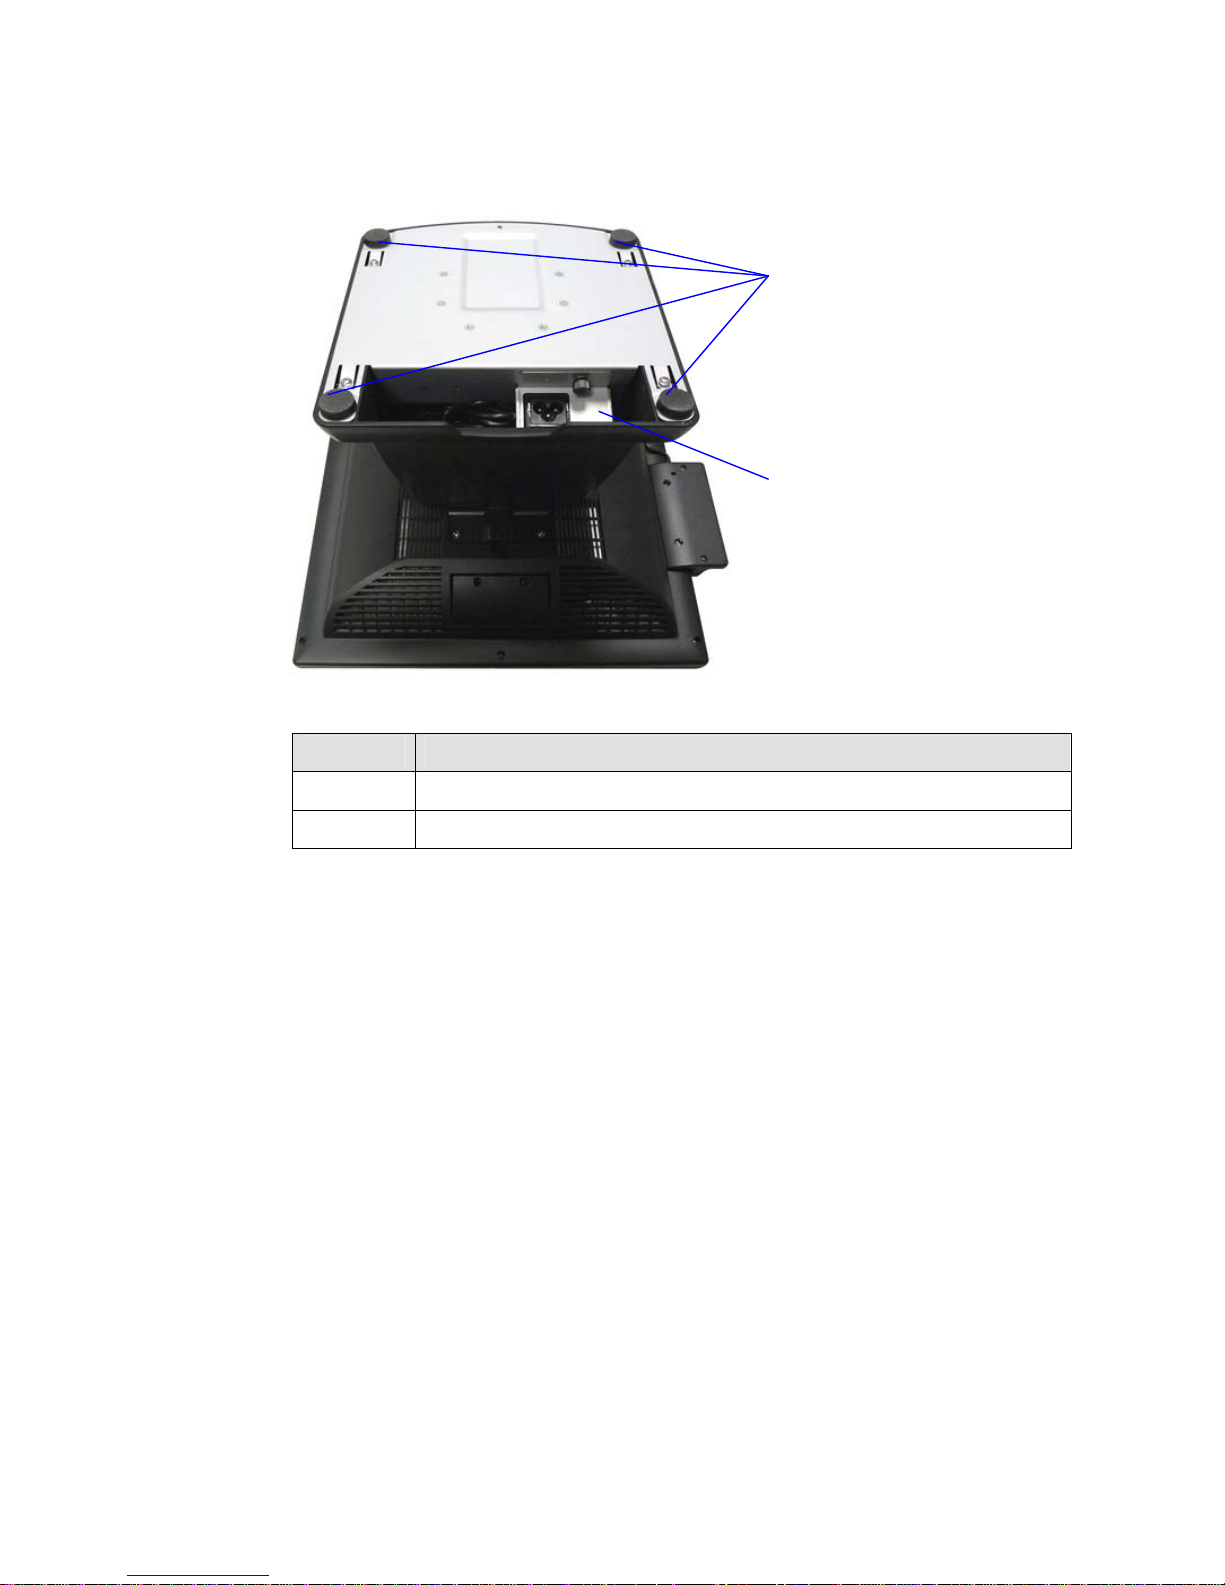
2-3 Bottom View
Number Description
9 Stand Pad
10 Easy-Service Retaining Bracket for Power Adapter
⑨
⑩
Page 14
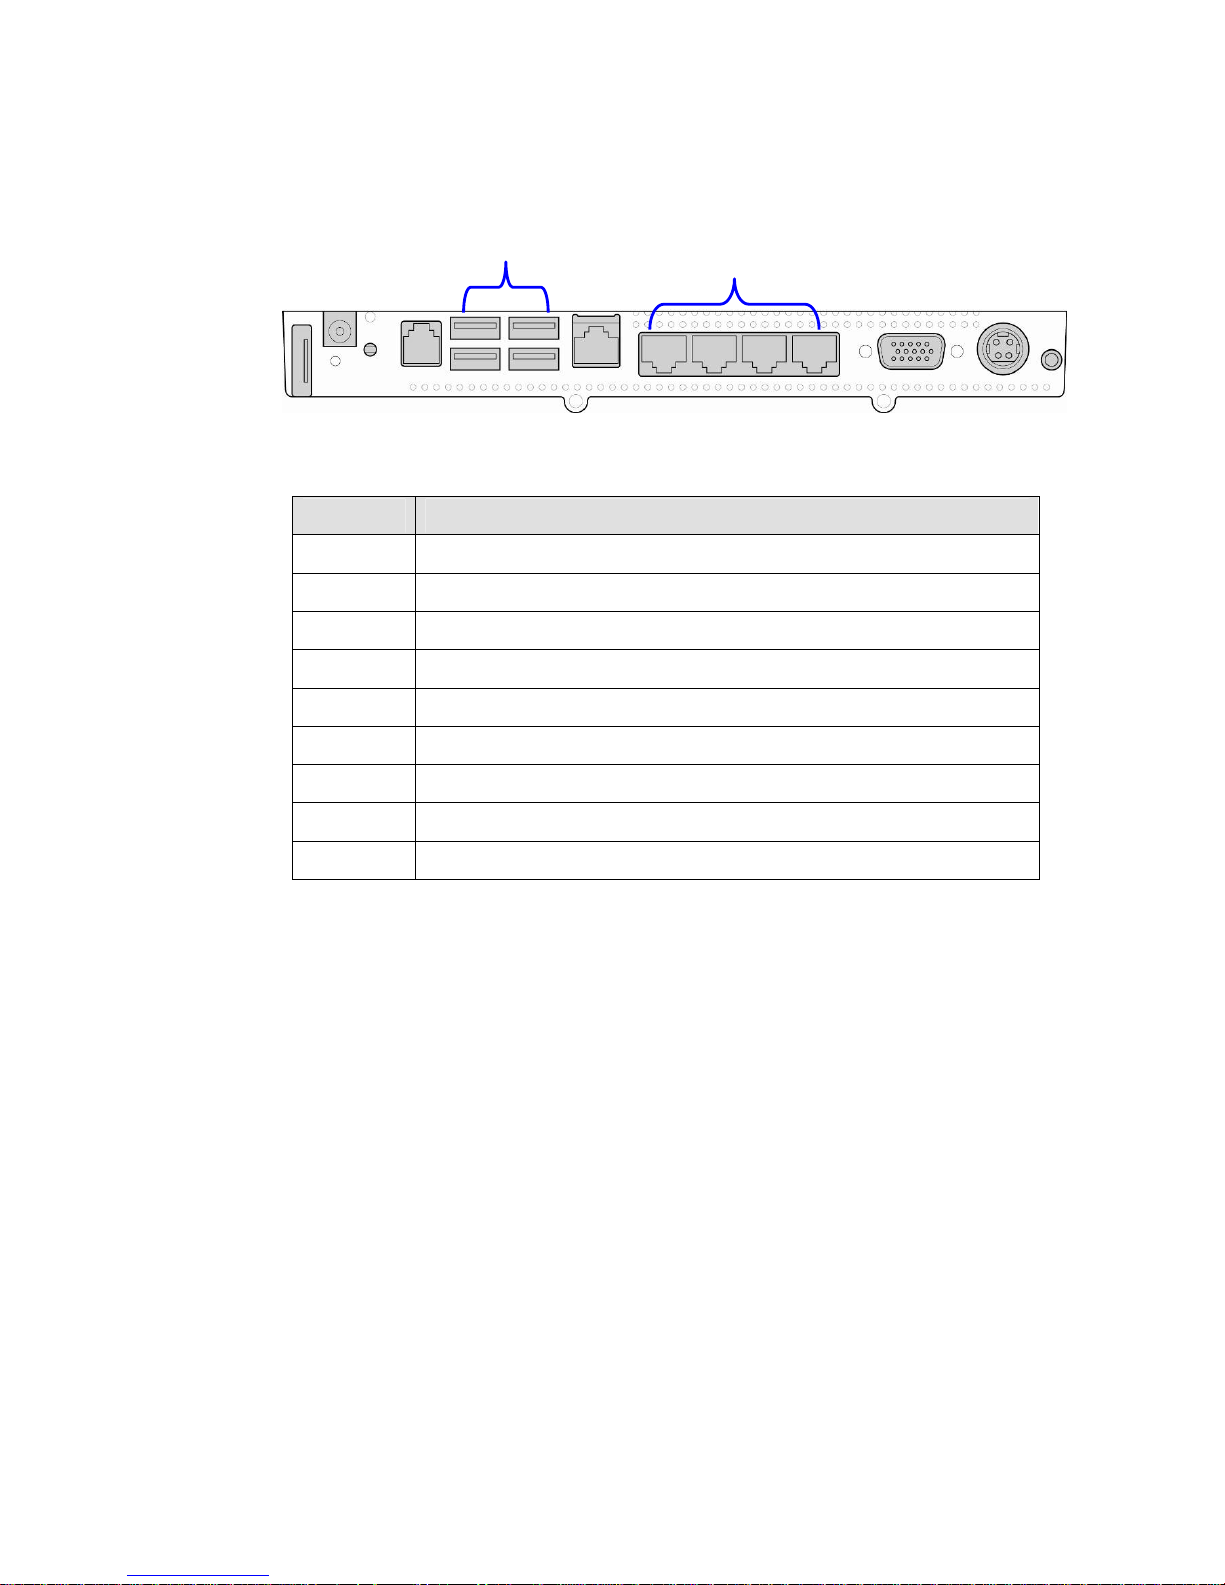
6
2-4 I/O View
Number Description
1 E-SATA connector
2 Power Jack for HDD
3 Cash Drawer
4 USB x 4
5 LAN
6 COM1~4 (from left to right)
7 VGA
8 Power Jack for System
9 Power Button
Note: The maximum current that can be drawn from each COM port is 500 mA.
③
④
⑤
⑥
⑦ ⑧ ①
②
⑨
Page 15
7
3 Peripheral Installation
The peripheral and modules units provided are tested and can be supplied at your
request.
3-1 MSR & Fingerprint
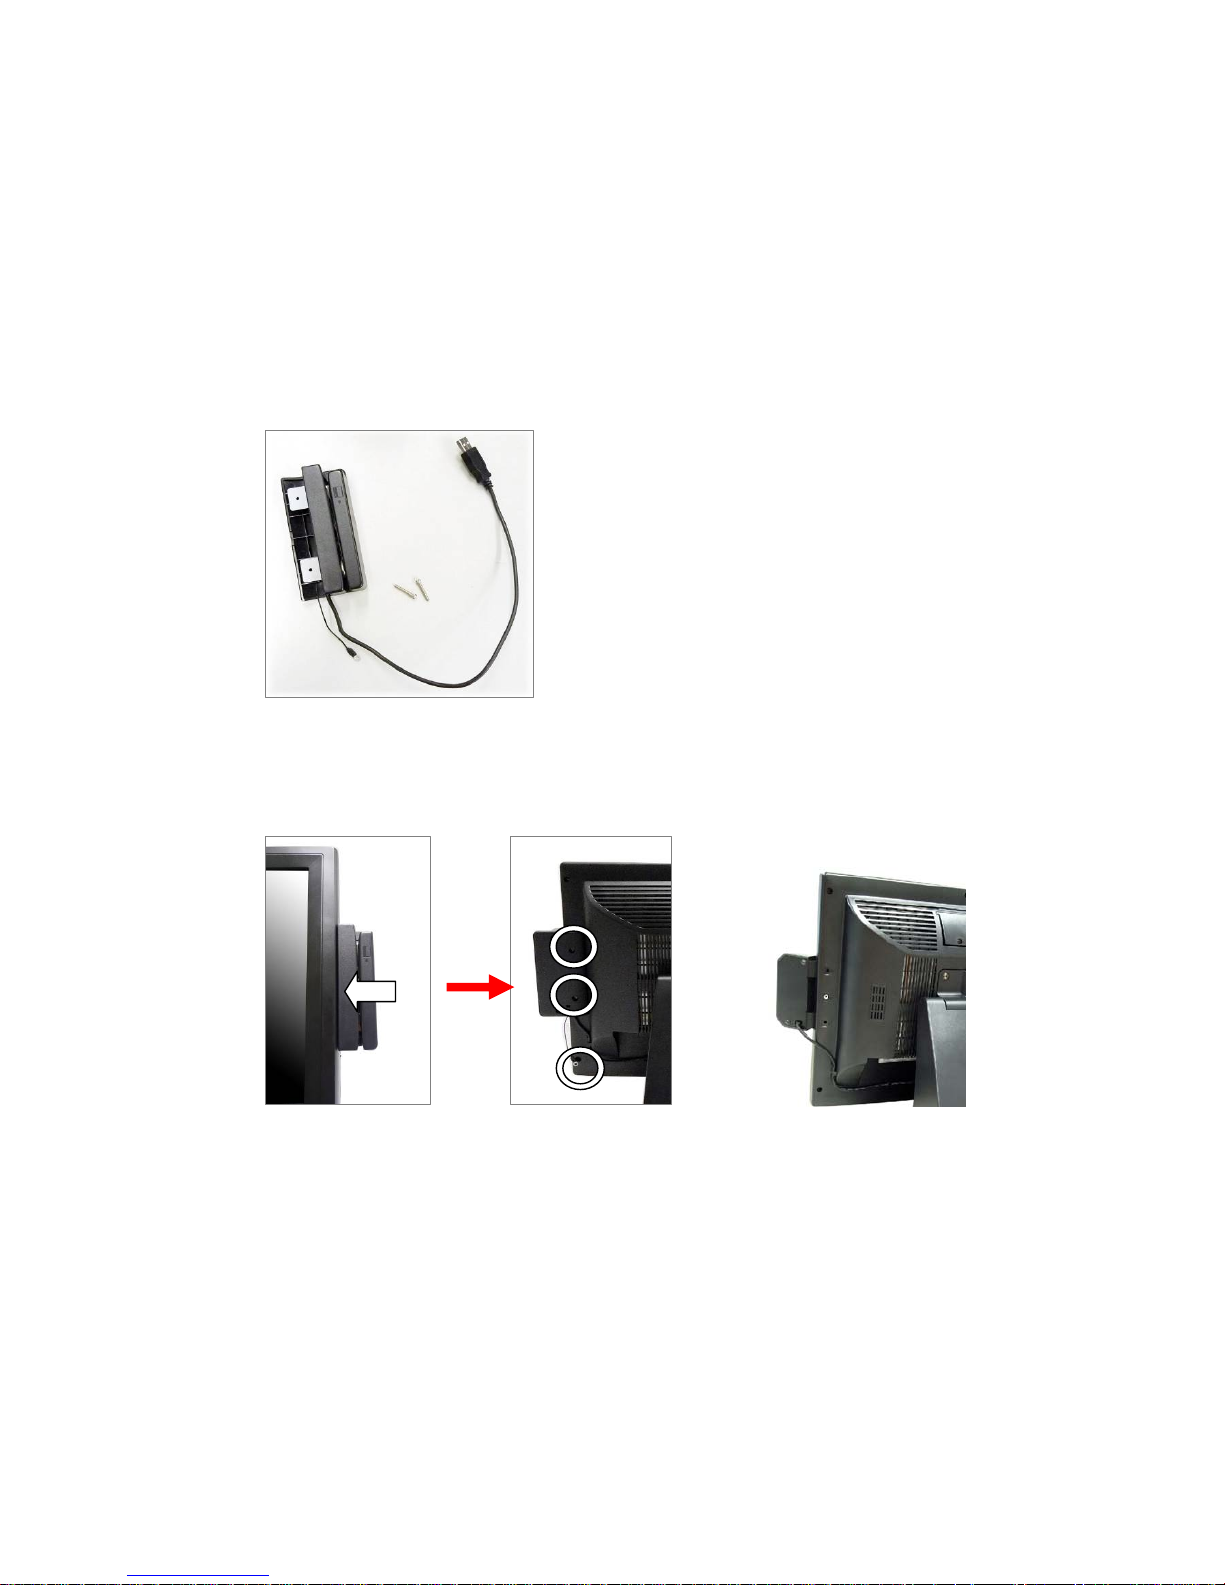
Components of MSR Kit:
1. Slide the MSR into the right position of the System.
2. Fasten the screws (x2) and grounding cable (x1).
* The fingerprint scanner can be installed in the same way.
USB
Groundin
g
MSR
Screws
Page 16
8
3-2 VFD
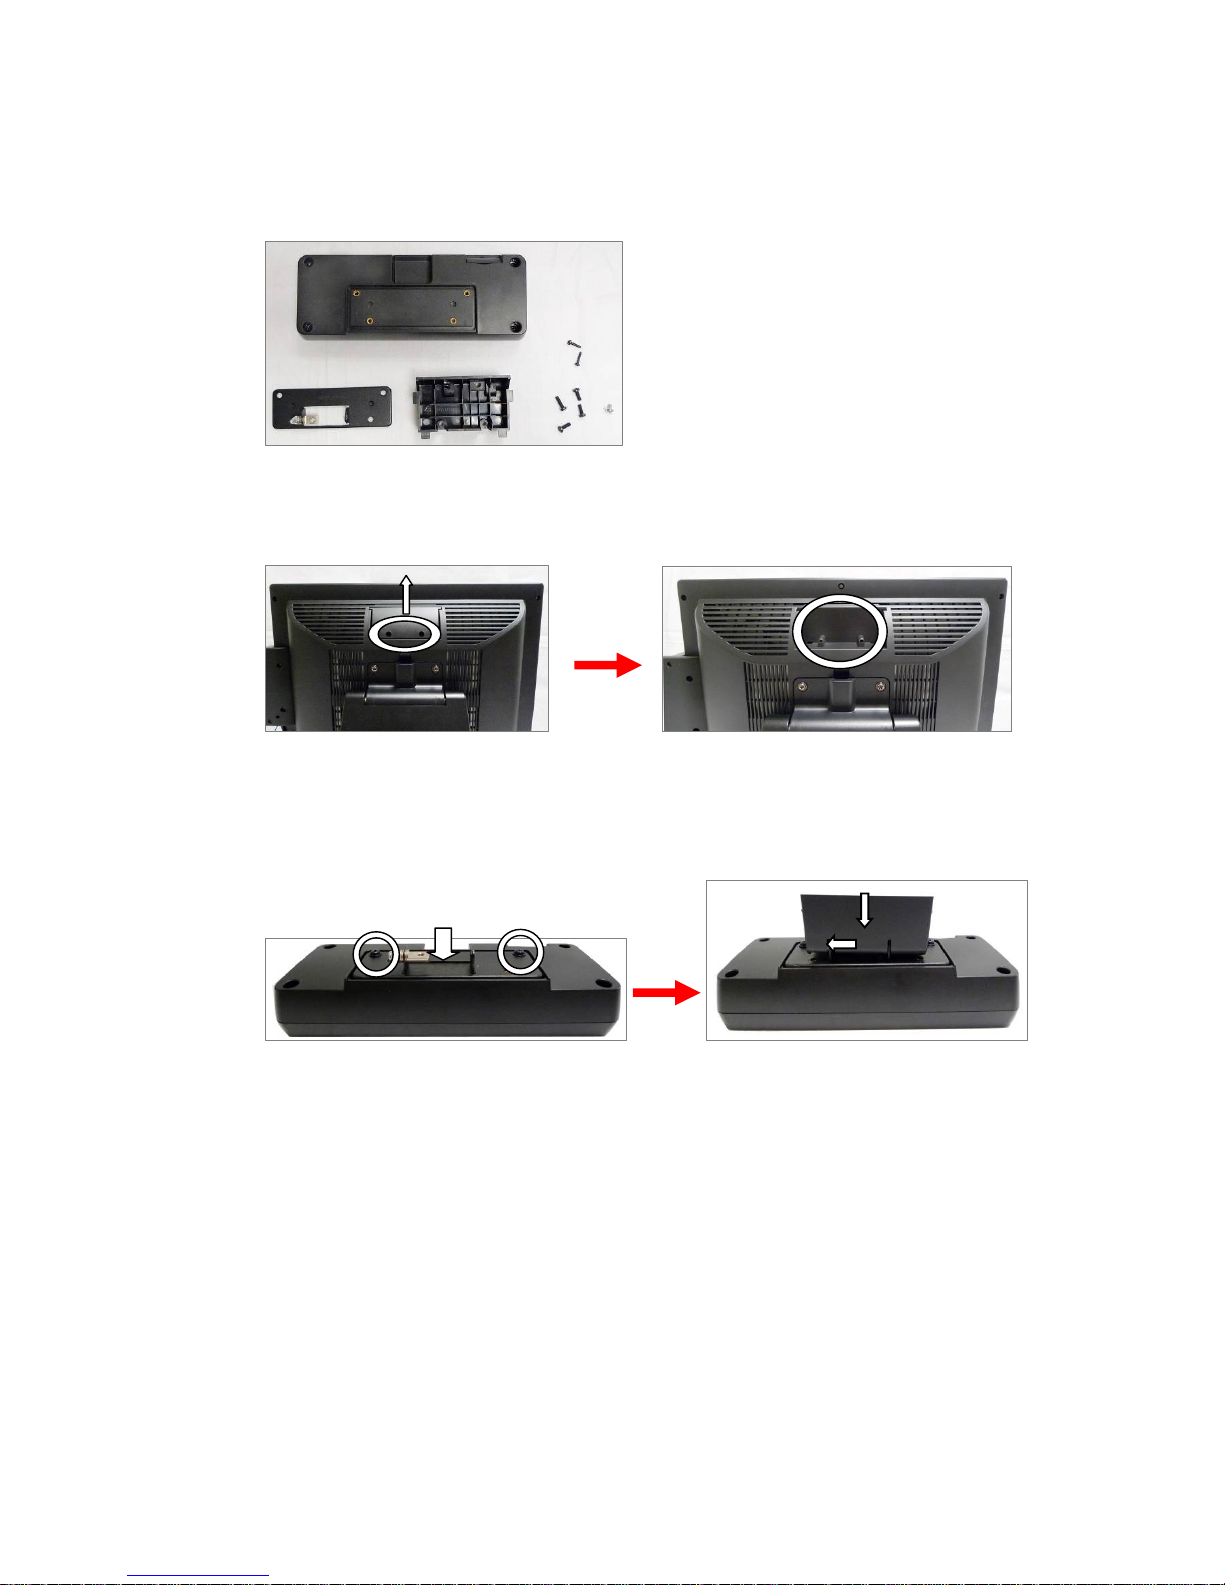
Components of VFD Kit:
1. Remove the screws (x2) and slide the VFD Cover outward.
2. Positioning the VFD metal bracket onto the rear side of the VFD module and
fasten the screws (x2).
3. Positioning the plastic bracket onto the metal bracket as the direction and
steps of arrows show.
❷
❶
VFD
Metal Bracket
Plastic bracket
Screws
Page 17
9
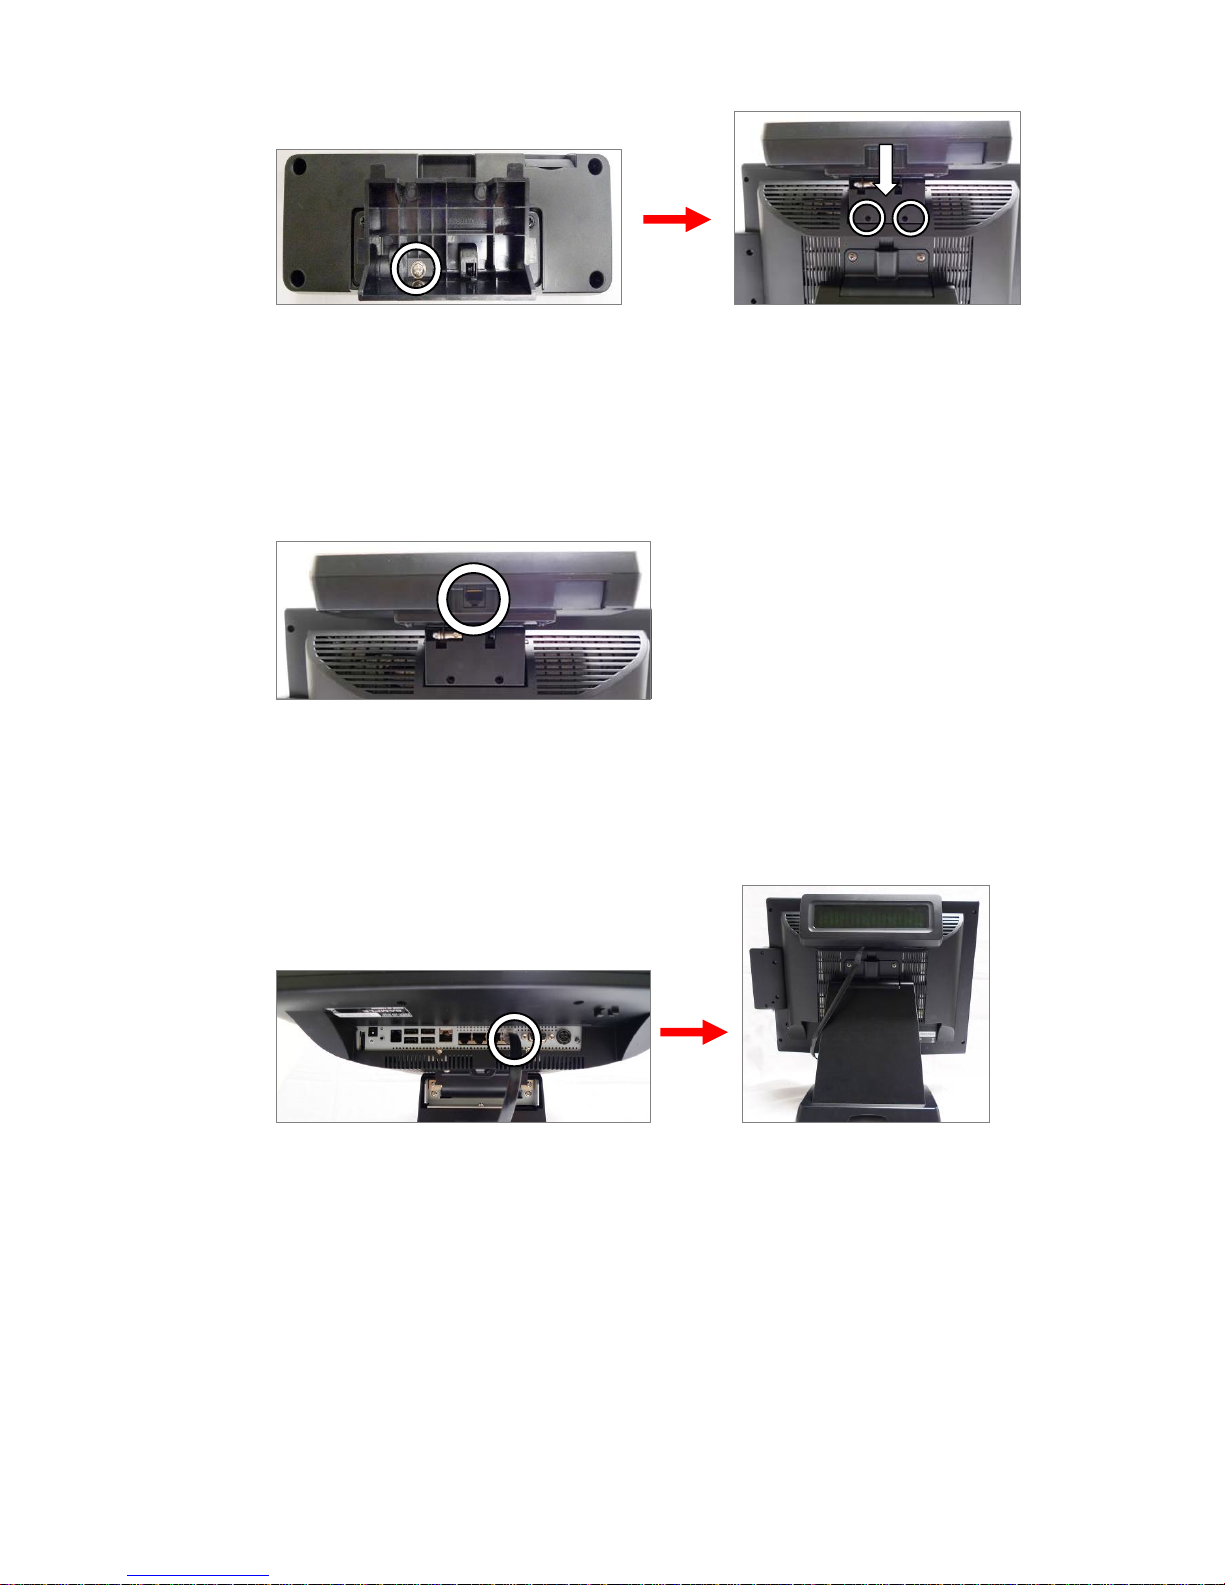
4. Fasten the screw (x1) to fix the plastic bracket to the metal bracket and VFD
module.
5. Slide the MSR module with bracket into the VFD socket.
6. Fix the MSR module by fasten the screws (x2) as circles show.
7. Connect the VFD cable to the VFD Module.
8. Connect to the COM4 port of the System.
Page 18
10
3-3 Second Display
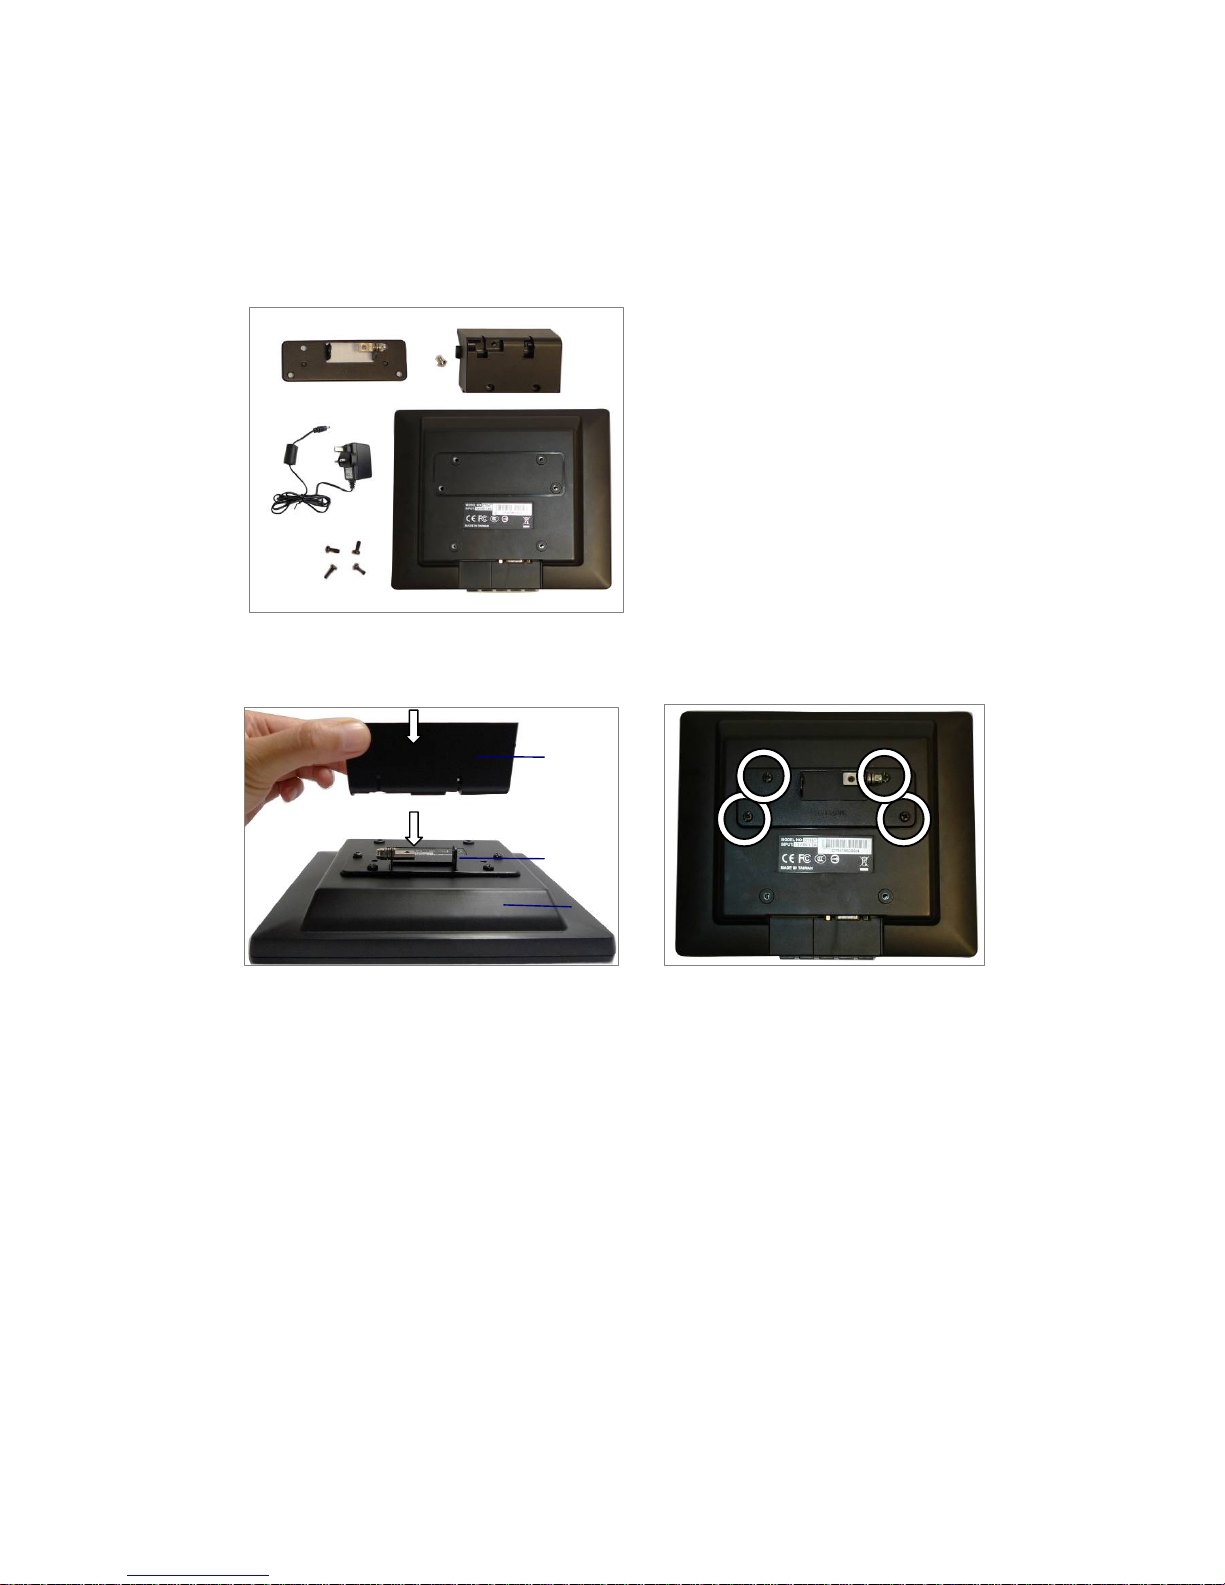
To install the Second Display, please open the VFD cover first (Chapter 3-2-1).
Components of Second Display Kit with power adapter:
Fix the parts of Second Display modules as steps ❶ ❷ ❸
1. as above left picture shows. (detail steps as below)
❶ Put the second display upside down.
❷ Place the metal bracket onto the rear side of the second display
and fasten the screws (x4) to fix metal bracket with the system.
❸ Align the plastic bracket into the right position of metal bracket.
(a) Align the plastic bracket onto the metal bracket.
(b) Push to left until the click sound appears.
❶❷❸
Plastic Bracket
Metal Bracket
Power Adapter
Second Display
Screws
Screw
Page 19
11
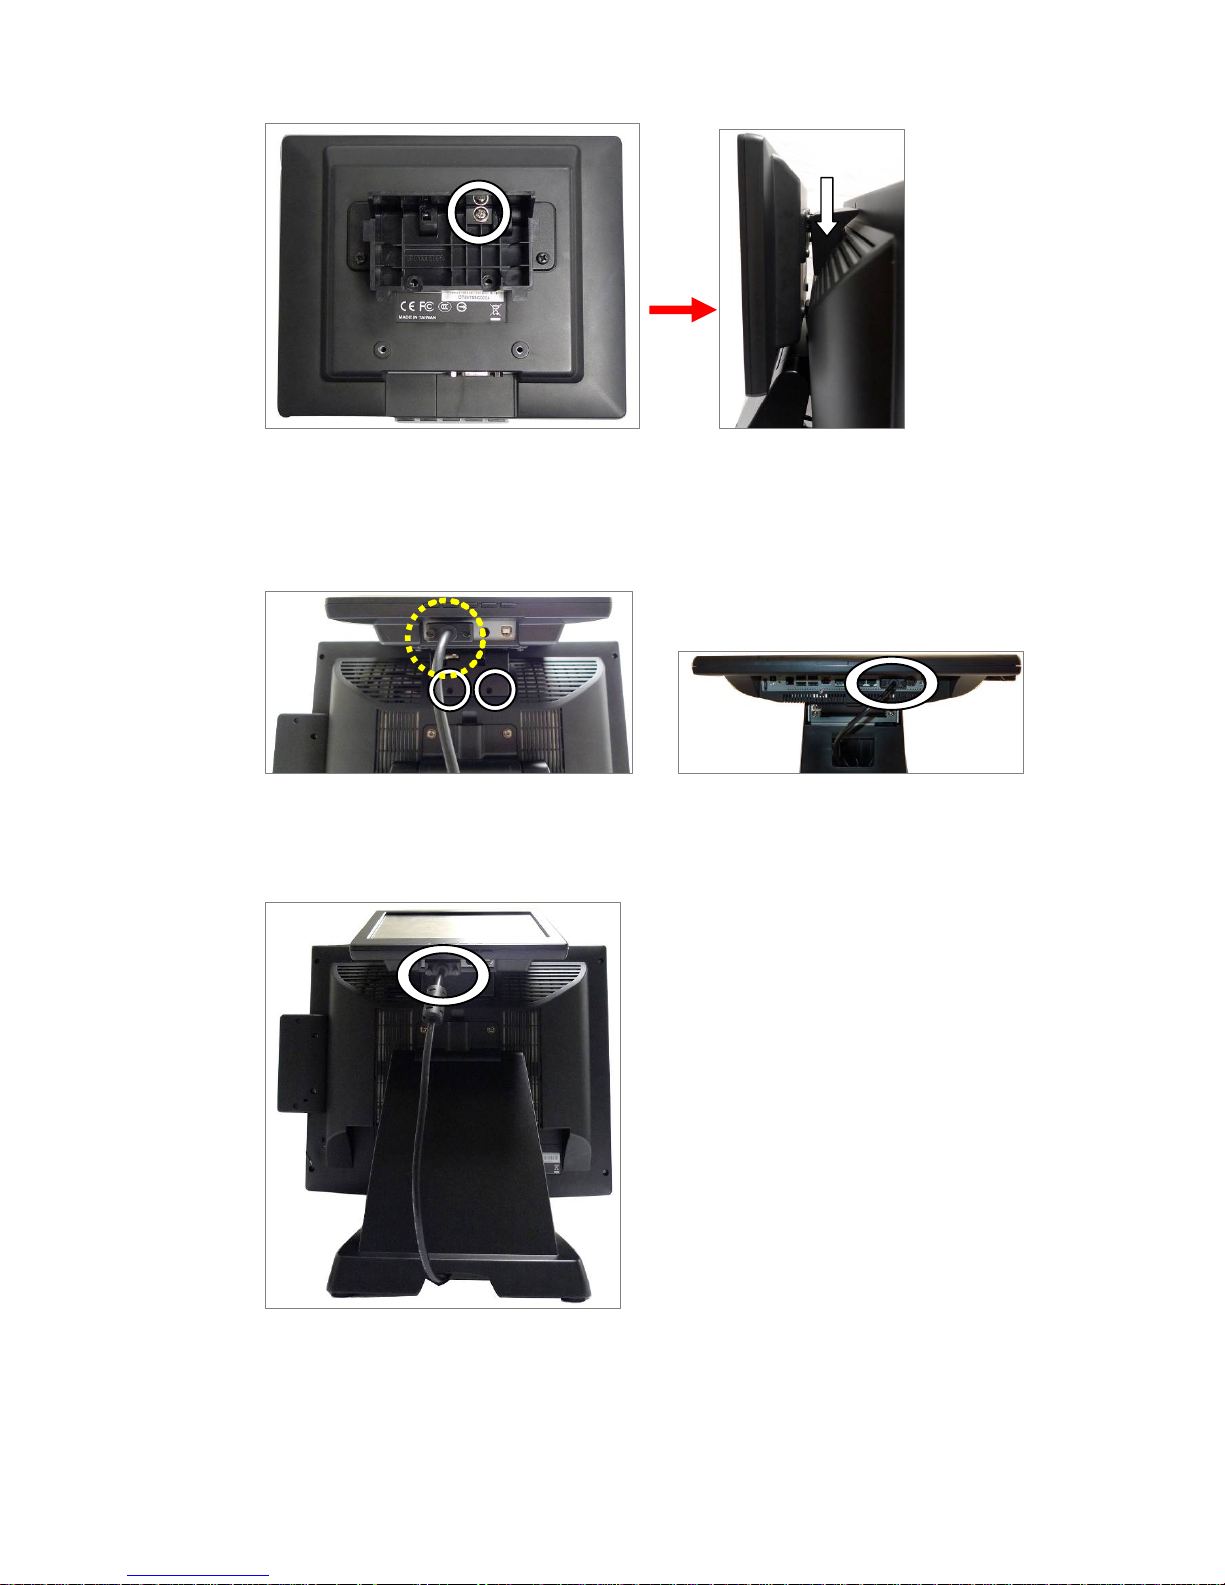
2. Fasten the screw (x1) to fix the platic bracket and Second Display module with
metal bracket.
3. Slide the Second Display Module into the slot.
4. Fasten the scrws (x2) to fix the Second Display moudle with the System.
5. Connect the VGA cable to the Second Display Module and the System.
6. Finish.
Page 20
12
3-4 Cash Drawer
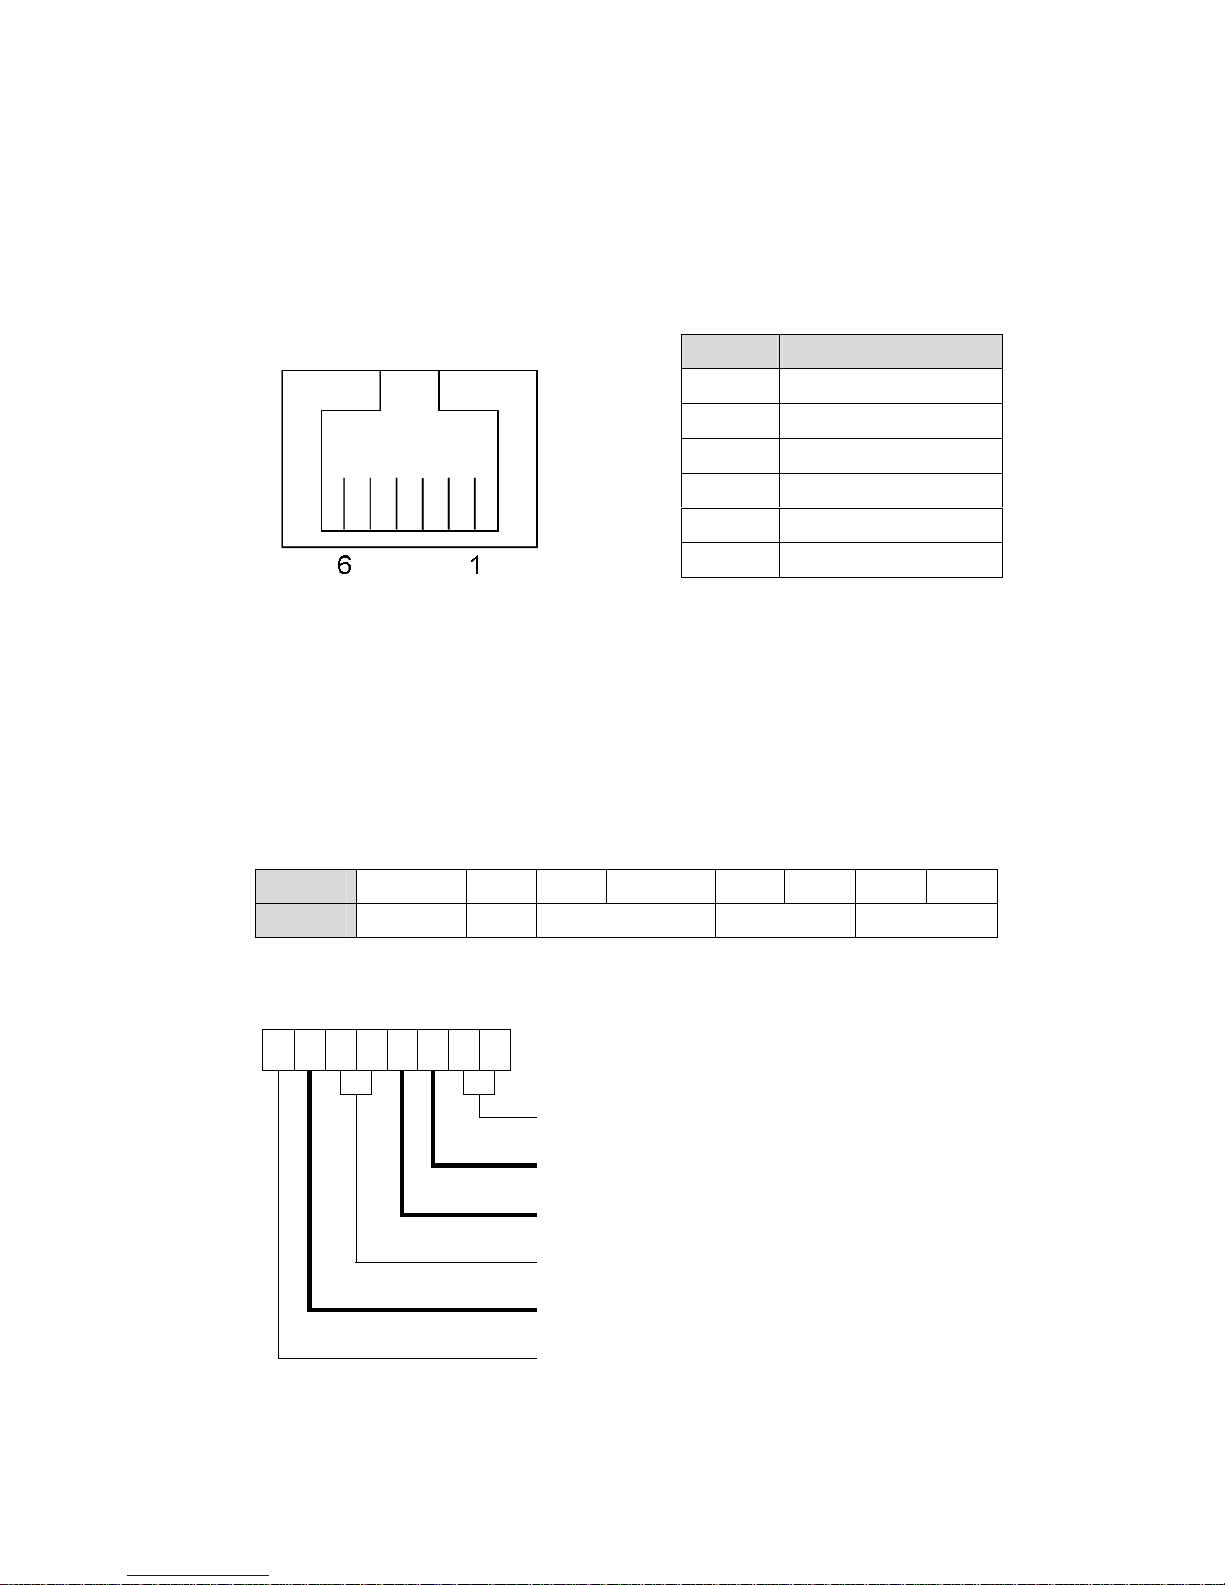
You can install a cash drawer through the cash drawer port. Please verify the pin
assignment before installation.
Cash Drawer Pin Assignment
Cash Drawer Controller Register
The Cash Drawer Controller use one I/O addresses to control the Cash Drawer.
Register Location: 48Ch
Attribute: Read / Write
Size: 8bit
BIT BIT7 BIT6 BIT5
BIT4 BIT3 BIT2 BIT1 BIT0
Attribute Reserved Read
Reserved Write Reserved
7 6 5 4 3 2 1 0
X X X X X
Reserved
Cash Drawer “DOUT bit0” pin output control
Cash Drawer “DOUT bit1” pin output control
Reserved
Cash Drawer “DIN bit0” pin input status
Reserved
Pin Signal
1 GND
2 DOUT bit0
3 DIN bit0
4 12V / 19V
5 DOUT bit1
6 GND
Page 21
13
Bit 7: Reserved
Bit 6: Cash Drawer “DIN bit0” pin input status.
= 1: the Cash Drawer closed or no Cash Drawer
= 0: the Cash Drawer opened
Bit 5: Reserved
Bit 4: Reserved
Bit 3: Cash Drawer “DOUT bit1” pin output control.
= 1: Opening the Cash Drawer
= 0: Allow close the Cash Drawer
Bit 2: Cash Drawer “DOUT bit0” pin output control.
= 1: Opening the Cash Drawer
= 0: Allow close the Cash Drawer
Bit 1: Reserved
Bit 0: Reserved
Note: Please follow the Cash Drawer control signal design to control the Cash
Drawer.
Cash Drawer Control Command Example
Use Debug.EXE program under DOS or Windows98
Command Cash Drawer
O 48C 04 Opening
O 48C 00 Allow to close
Set the I/O address 48Ch bit2 =1 for opening Cash Drawer by “DOUT
bit0” pin control.
Set the I/O address 48Ch bit2 = 0 for allow close Cash Drawer.
Command Cash Drawer
I 48C Check status
The I/O address 48Ch bit6 =1 mean the Cash Drawer is opened or not
exist.
The I/O address 48Ch bit6 =0 mean the Cash Drawer is closed.
Page 22
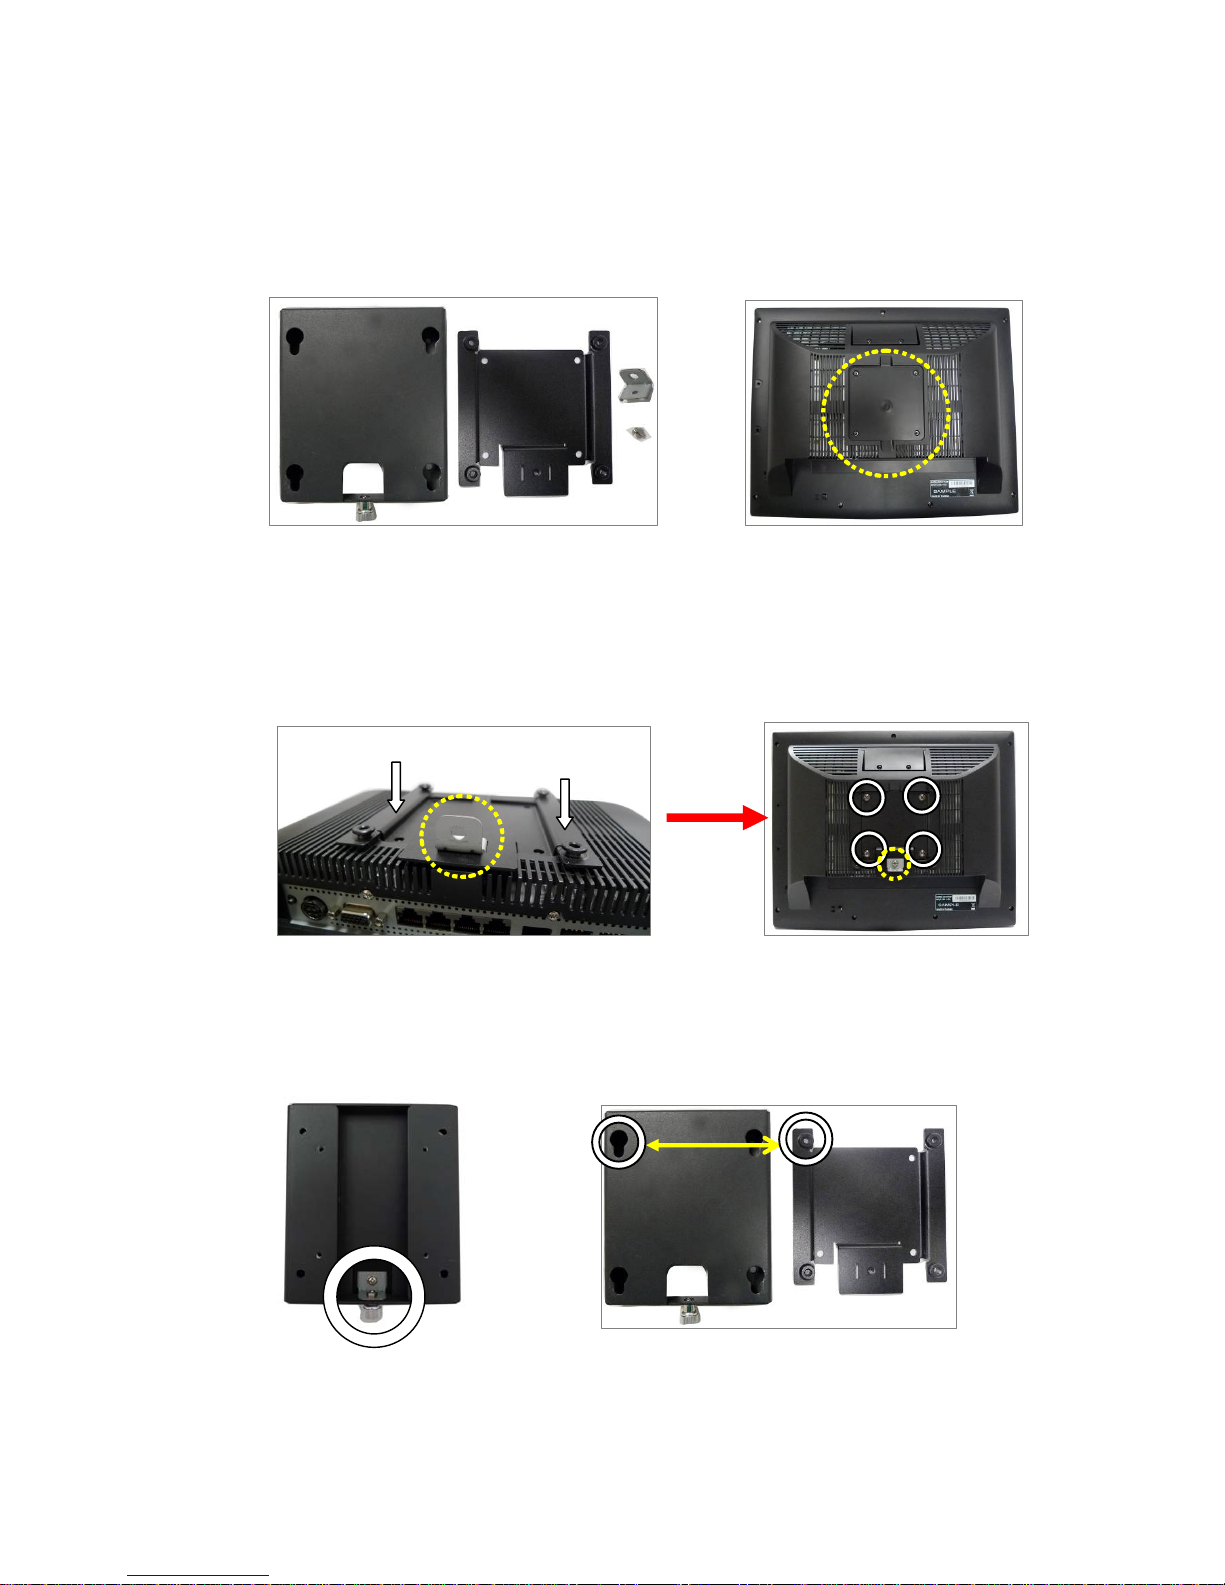
14
3-5 Wall Mount Kit
Before installing the Wall Mount Kit, please remove the stand first if needed. (See
Chapter 4-3 for removing the stand)
(Parts of Wall Mount Kit) (Place to install)
1. Components of VESA-standard wall mount kit includes follows.
a. Wall-mounting plate
b. Monitor-mounting plate & screws
c. Screw metal bracket
2. The wall mount Kit installing place is at the rear side of the system.
3. Place “b” which has 4 fixed hooks onto the rear side of the LCD rear cover.
4. Place “c” onto the hole of the monitor plate as the position as picture shows
and fasten the screw (x1).
5. Fasten the screws (x4) to fix the monitor plate.
6. Fix “a” on the wall at your request.
7. Fasten the thumb screw (x1).
8. Align the hooks of “monitor plate” into the keyholes of the “wall plate”.
c
a. Wall Plate
b. Monitor
plate
c
Page 23
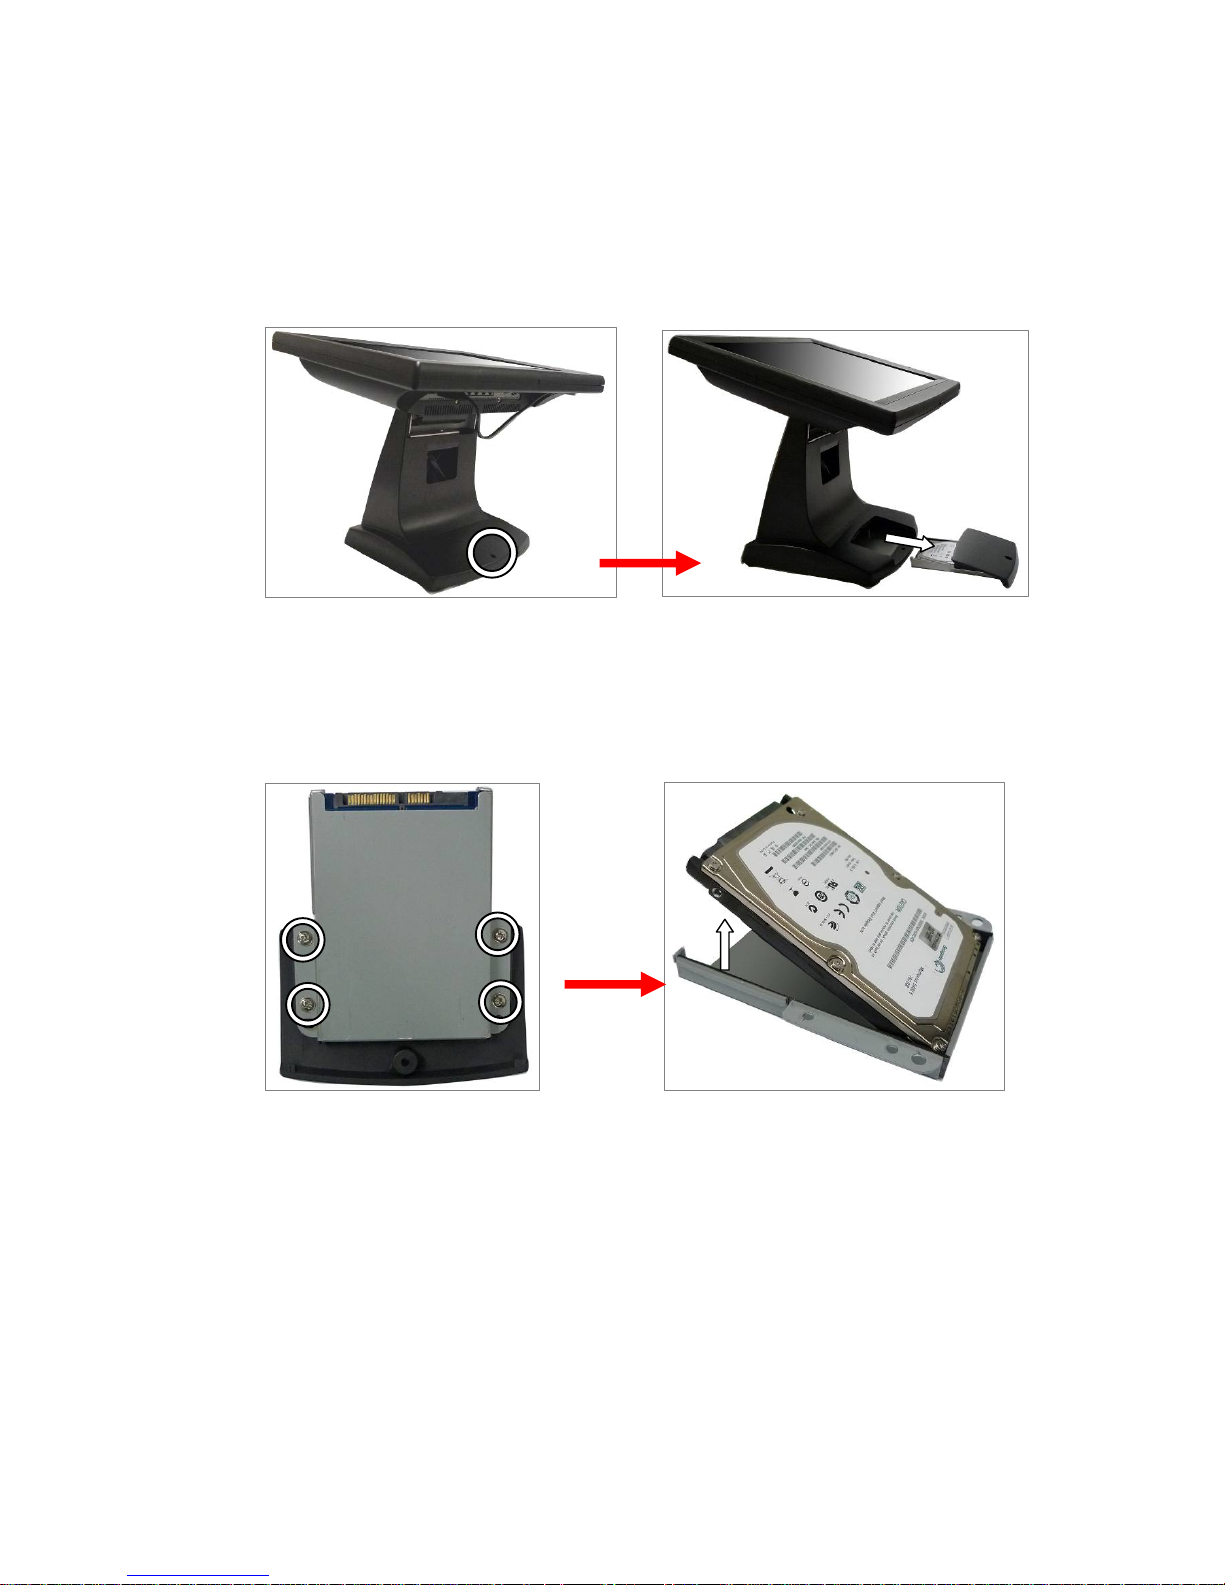
15
4 System Assembly & Disassembly
4-1 Replace the HDD
1. Unfasten the screw (x1).
2. Slide out the HDD Cover.
3. Unfasten the screws (x4)
4. Separate the HDD from the metal bracket.
Page 24
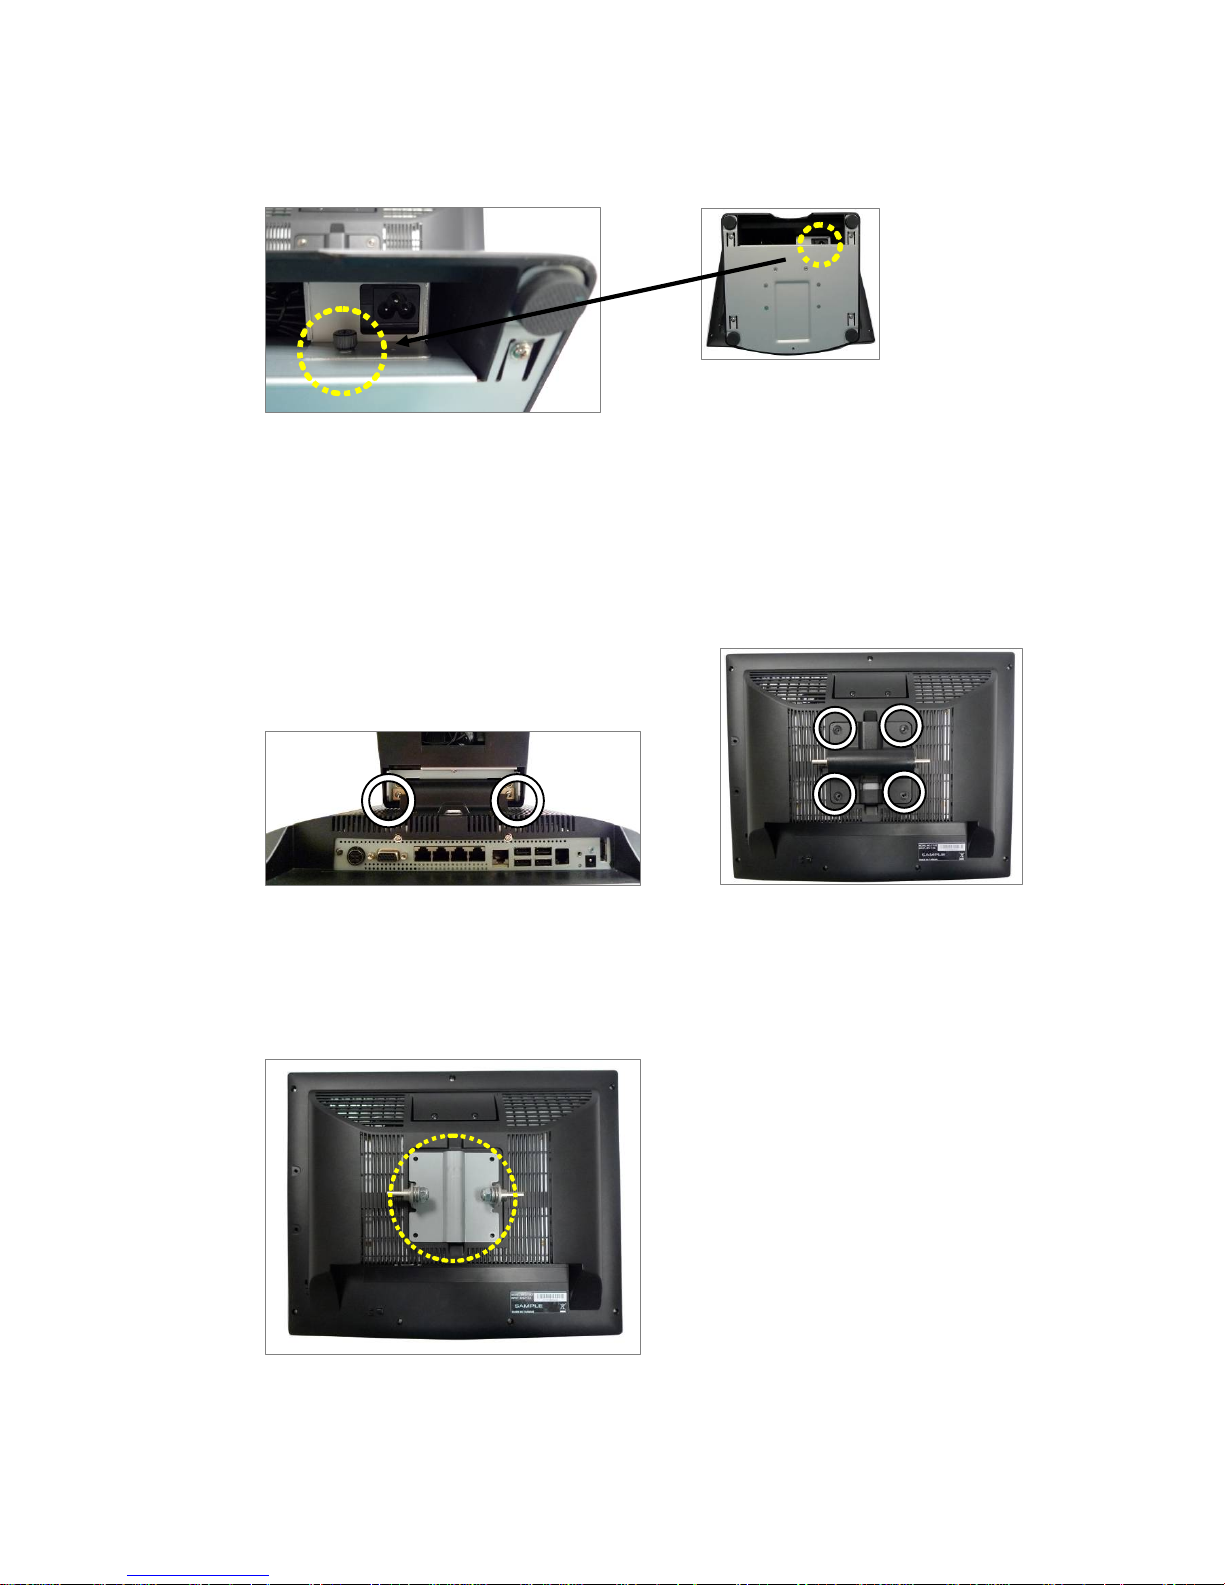
16
4-2 Replace the Power Adapter
1. Release the thumb screw to seperate the retaining metal bracket from the
stand and take out the power adapter.
4-3 Remove the System Stand
1. Release the screws (x2) that fasten the stand and the system.
2. Release the screws (x4) that fasten the plastic VESA mounting plate and the
LCD rear cover.
3. Remove the VESA metal bracket,.
Page 25
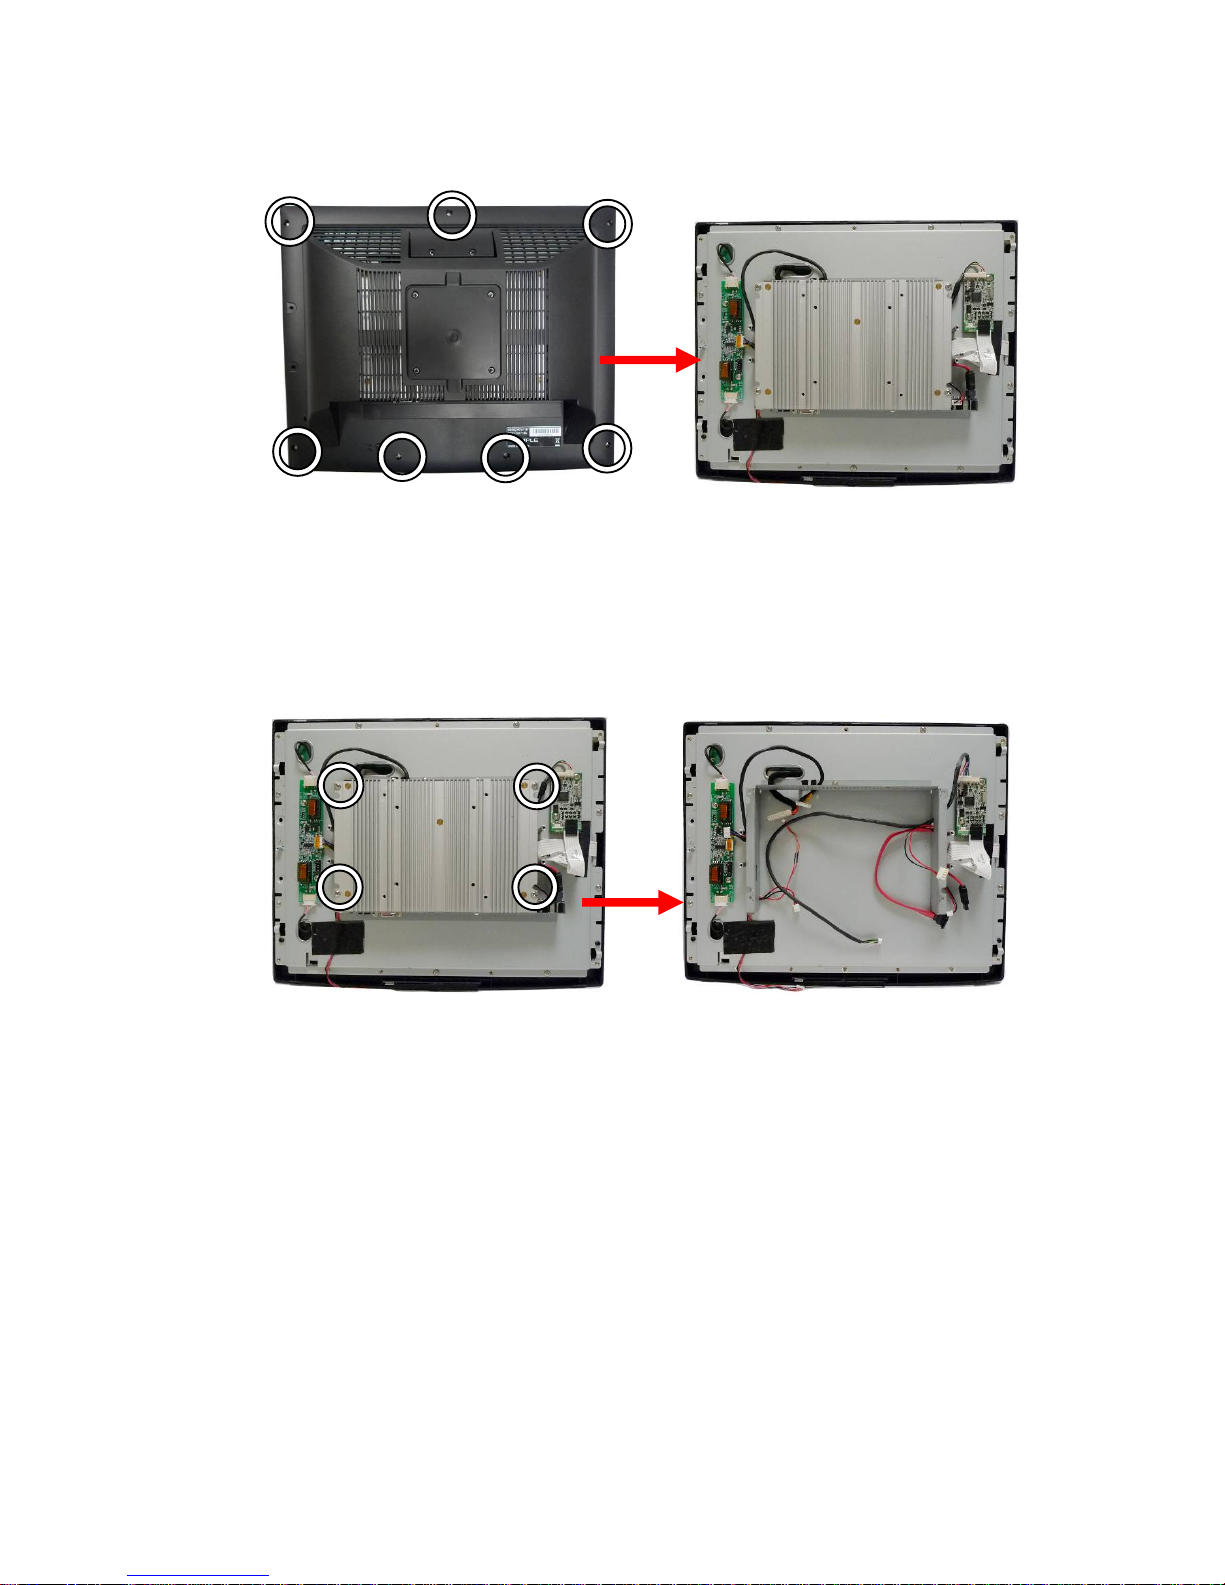
17
4-4 Remove the LCD Rear Cover & the System Box
1. Remove the system stand (Chapter 4-3).
2. Unfasten the screws (x7) to separate the LCD Rear Cover.
3. After remove the LCD Rear Cover, you will see the “system box” inside.
Inside of the system box is the motherboard place.
4. Unfasten the scrws (x4) at both sides of the system box to uncover the
Motherboard.
5. Gently flip up the system box.
Note: Please release all the connectors on the Motherboard before you
completely open the system box.
Page 26
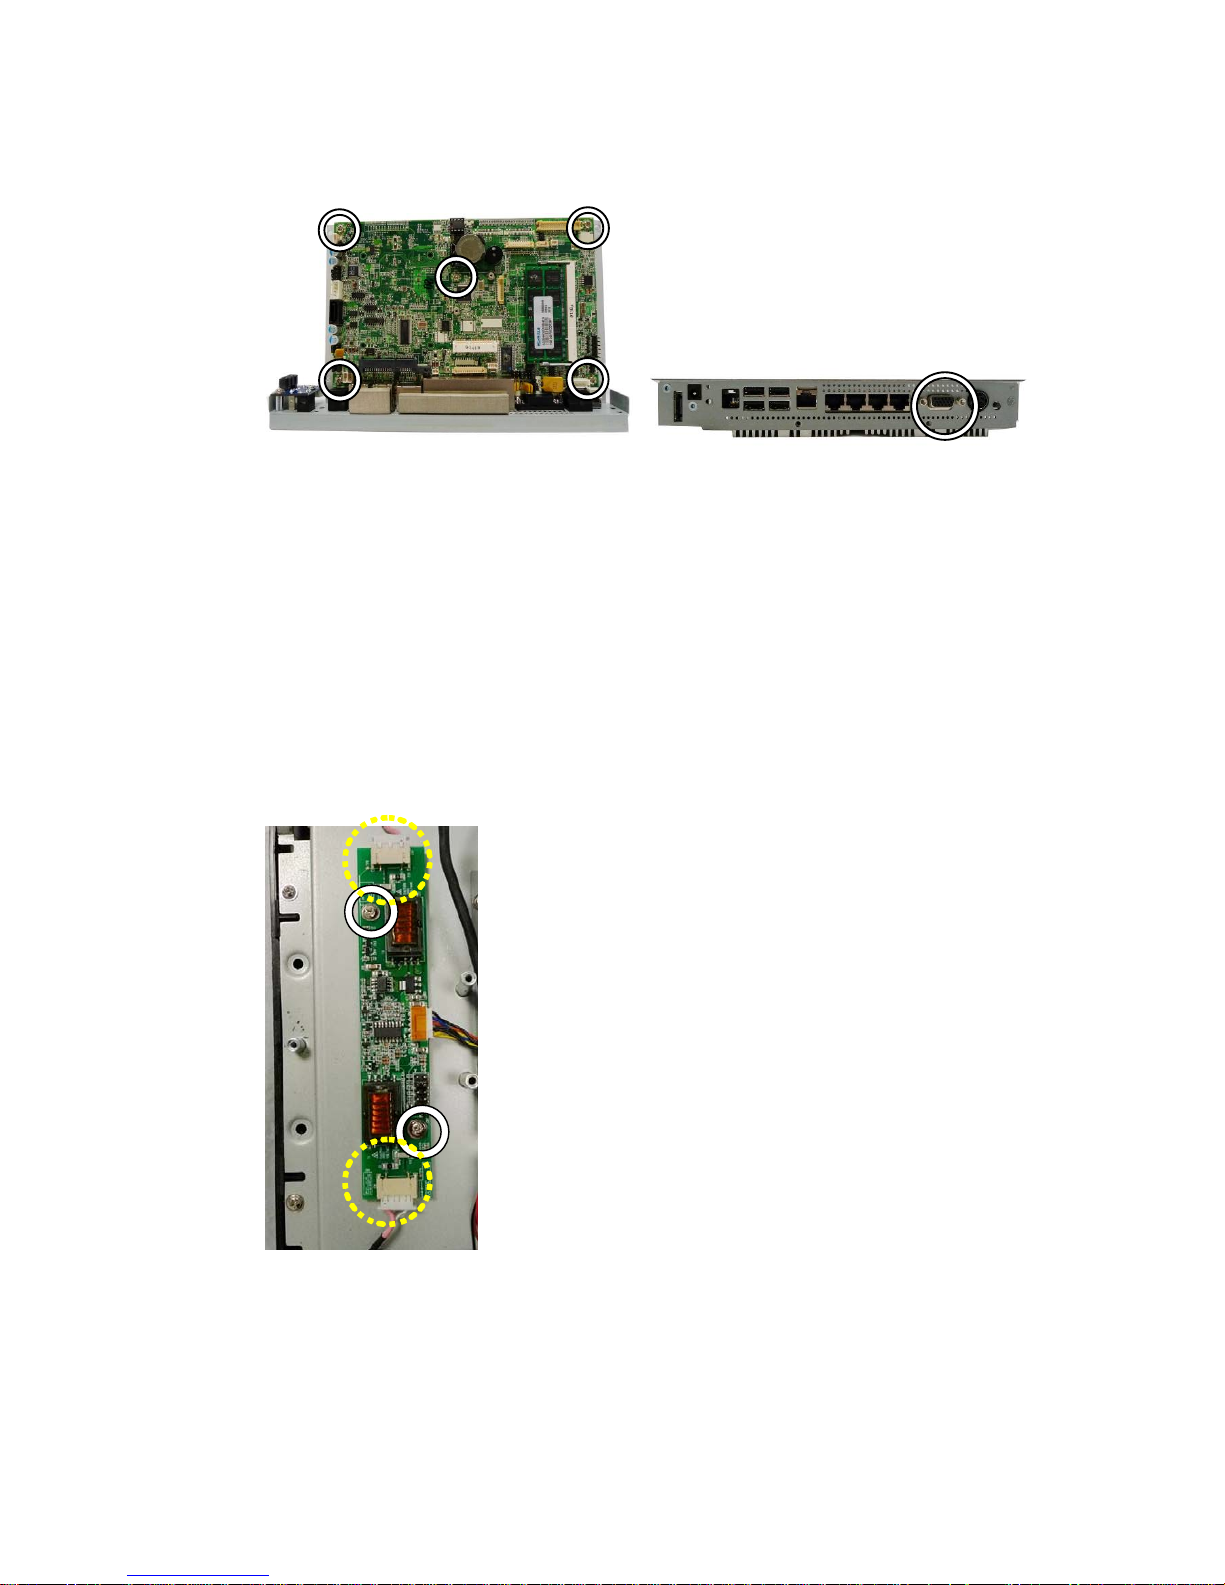
18
4-5 Replace the Motherboard
1. To open the LCD rear cover & system box first as steps in Chapter 4-4.
2. Unfasten the screws (x5) on the Motherboard.
3. Unfasten the hex screws (x2) to release the I/O metal panel from the
Motherboard.
4-6 Replace the Inverter Board
1. To open the LCD rear cover first (see Chapter 4-4).
2. Unfasten the screws (x2).
3. Release the backlight connectors (x2).
Page 27
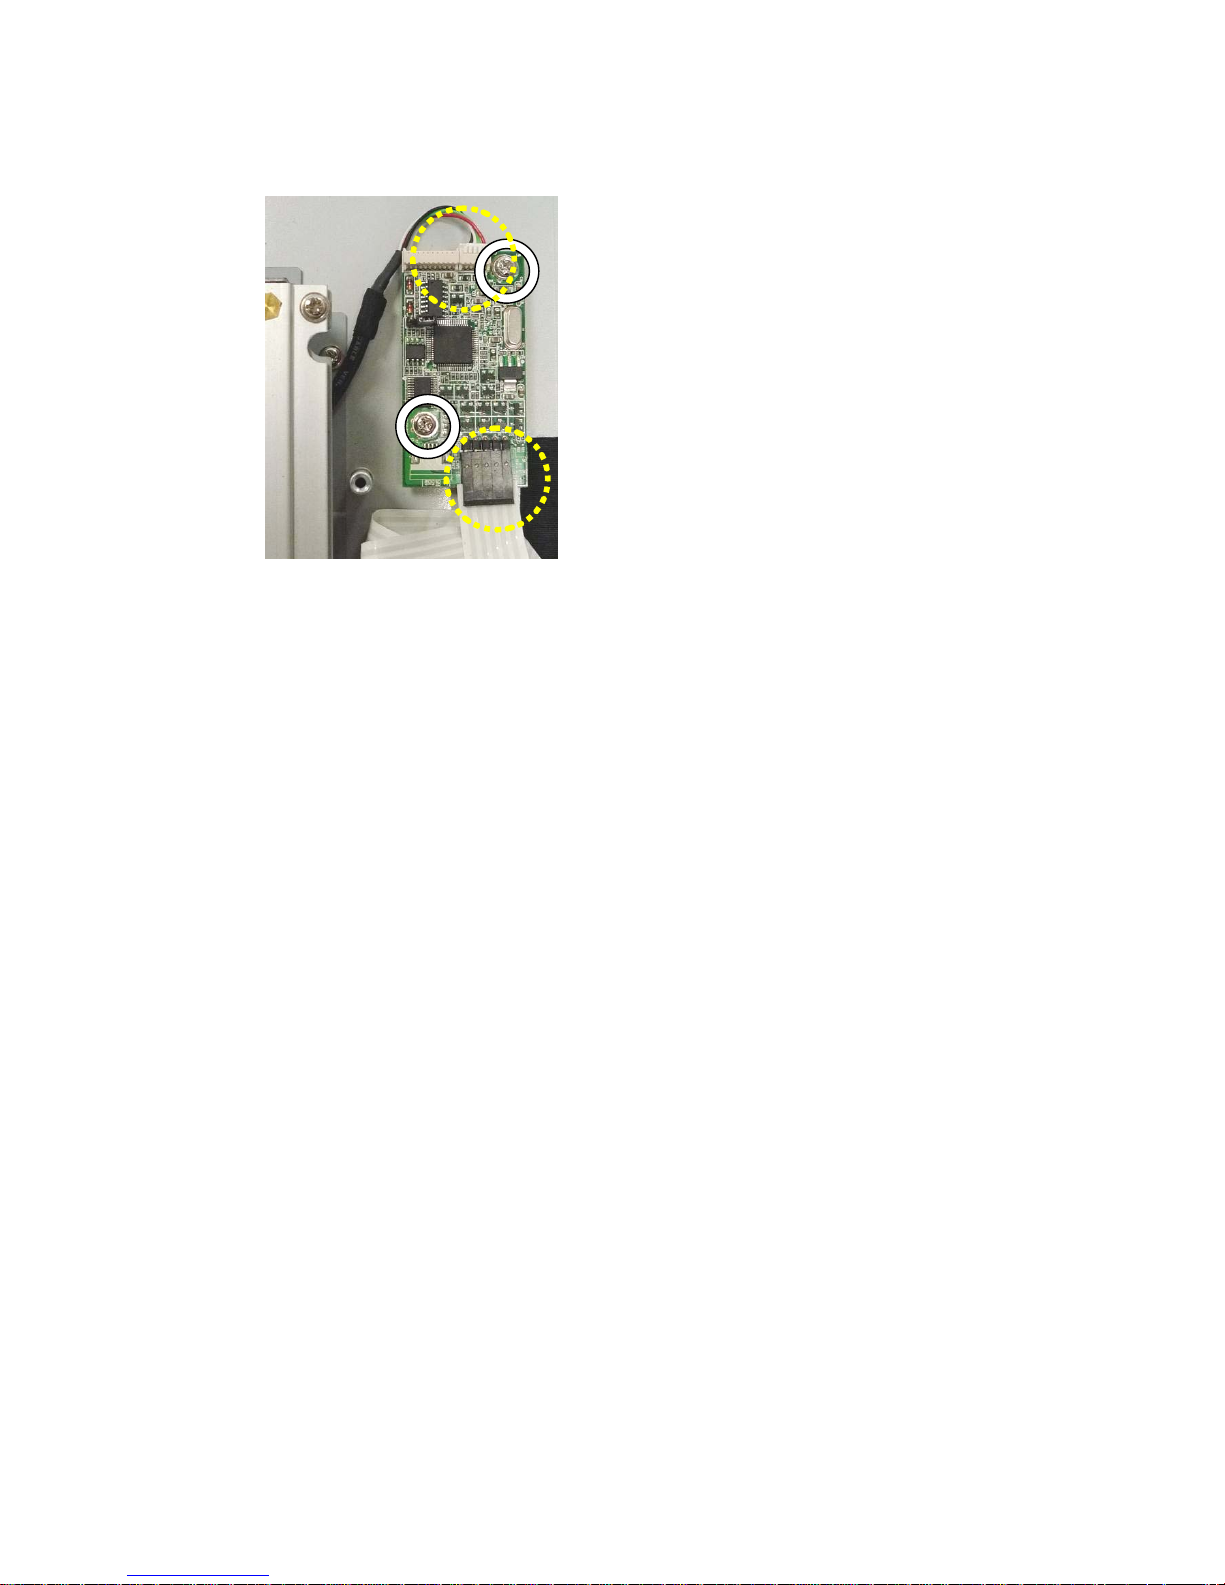
19
4-7 Replace the ELO Touch Control Board
1. Open the LCD rear cover first (see Chapter 4-4).
2. Unfasten the screws (x2).
3. Release the connectors (x2).
Page 28
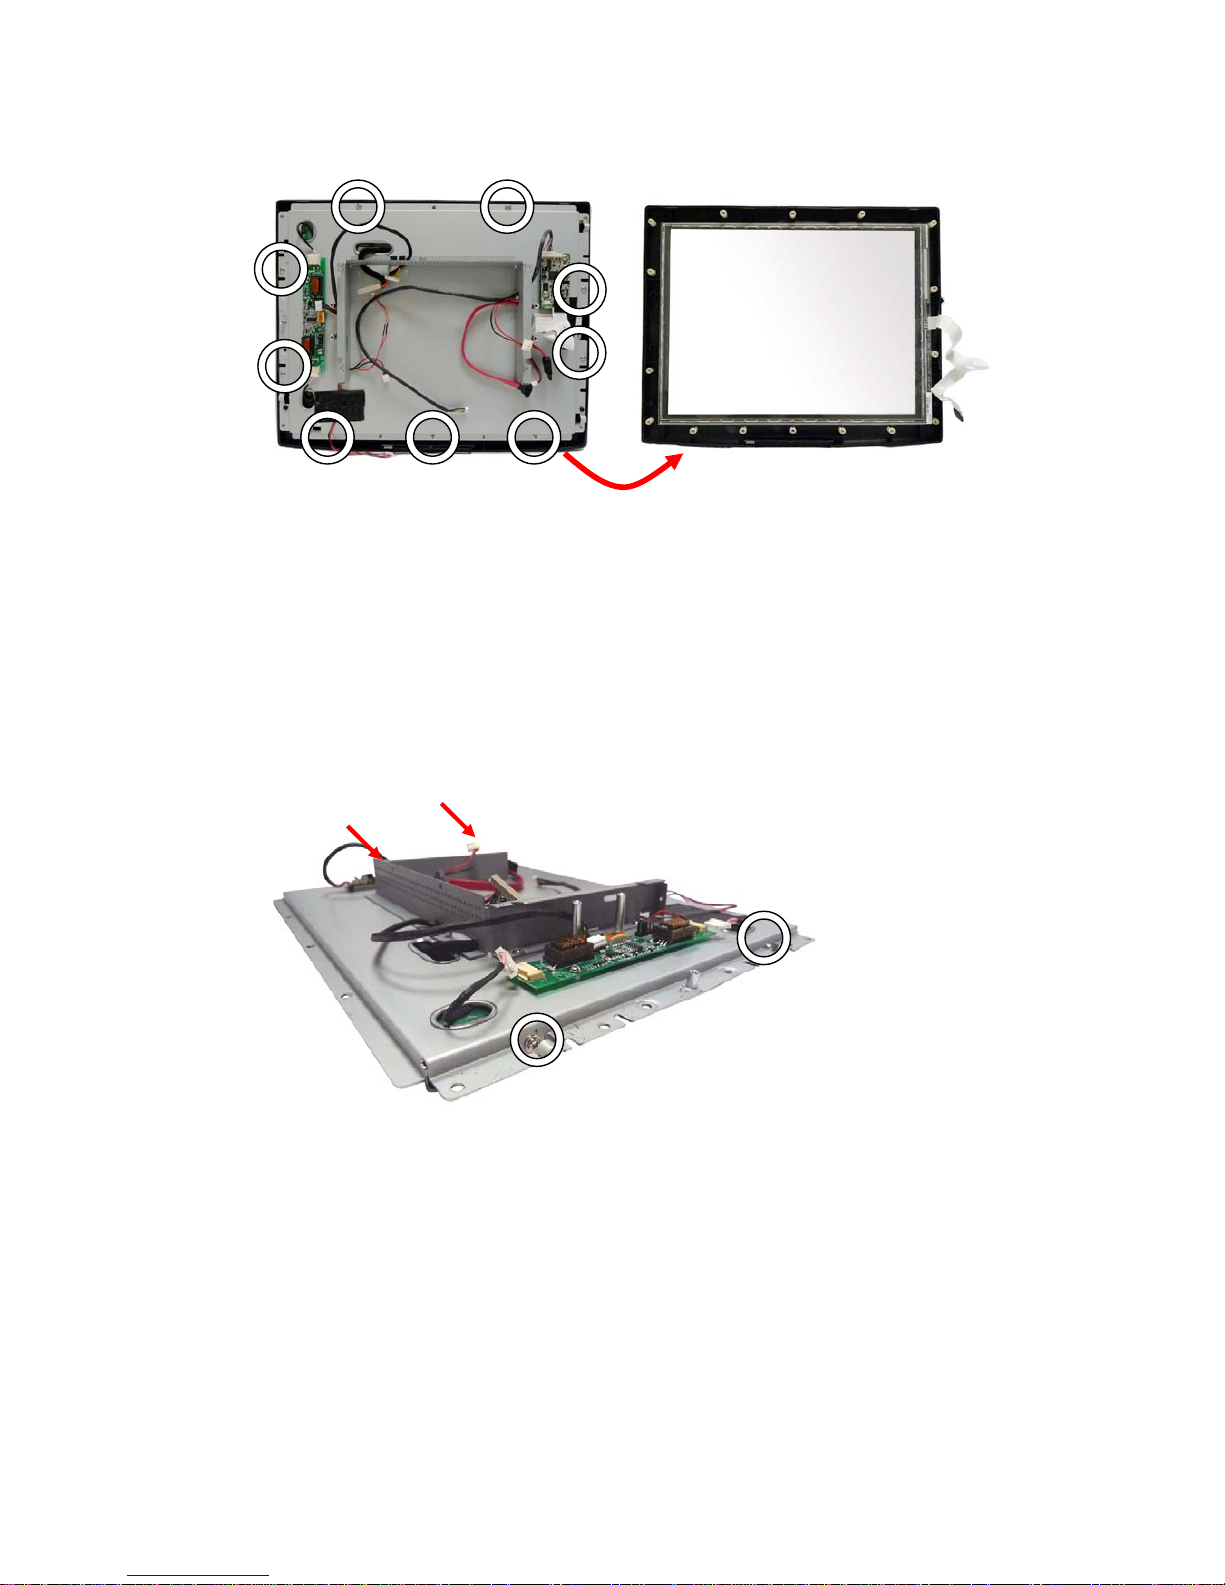
20
4-8 Replace the LCD Panel
1. Remove the LCD rear Cover (Chapter 4-4)
2. Remove the system box and release all the connectors on the Motherboard
(Chapter 4-4)
3. Release inverter cables & touch cables (Chapter 4-6 and 4-7)
4. Remove the screws (x9) to separate the Touch LCD bezel from the LCD
Panel Module.
5. Release the screws (x4) that fix the sheet metal bracket to separate it from
the LCD Panel.
T ouch LCD Bezel
Page 29
21
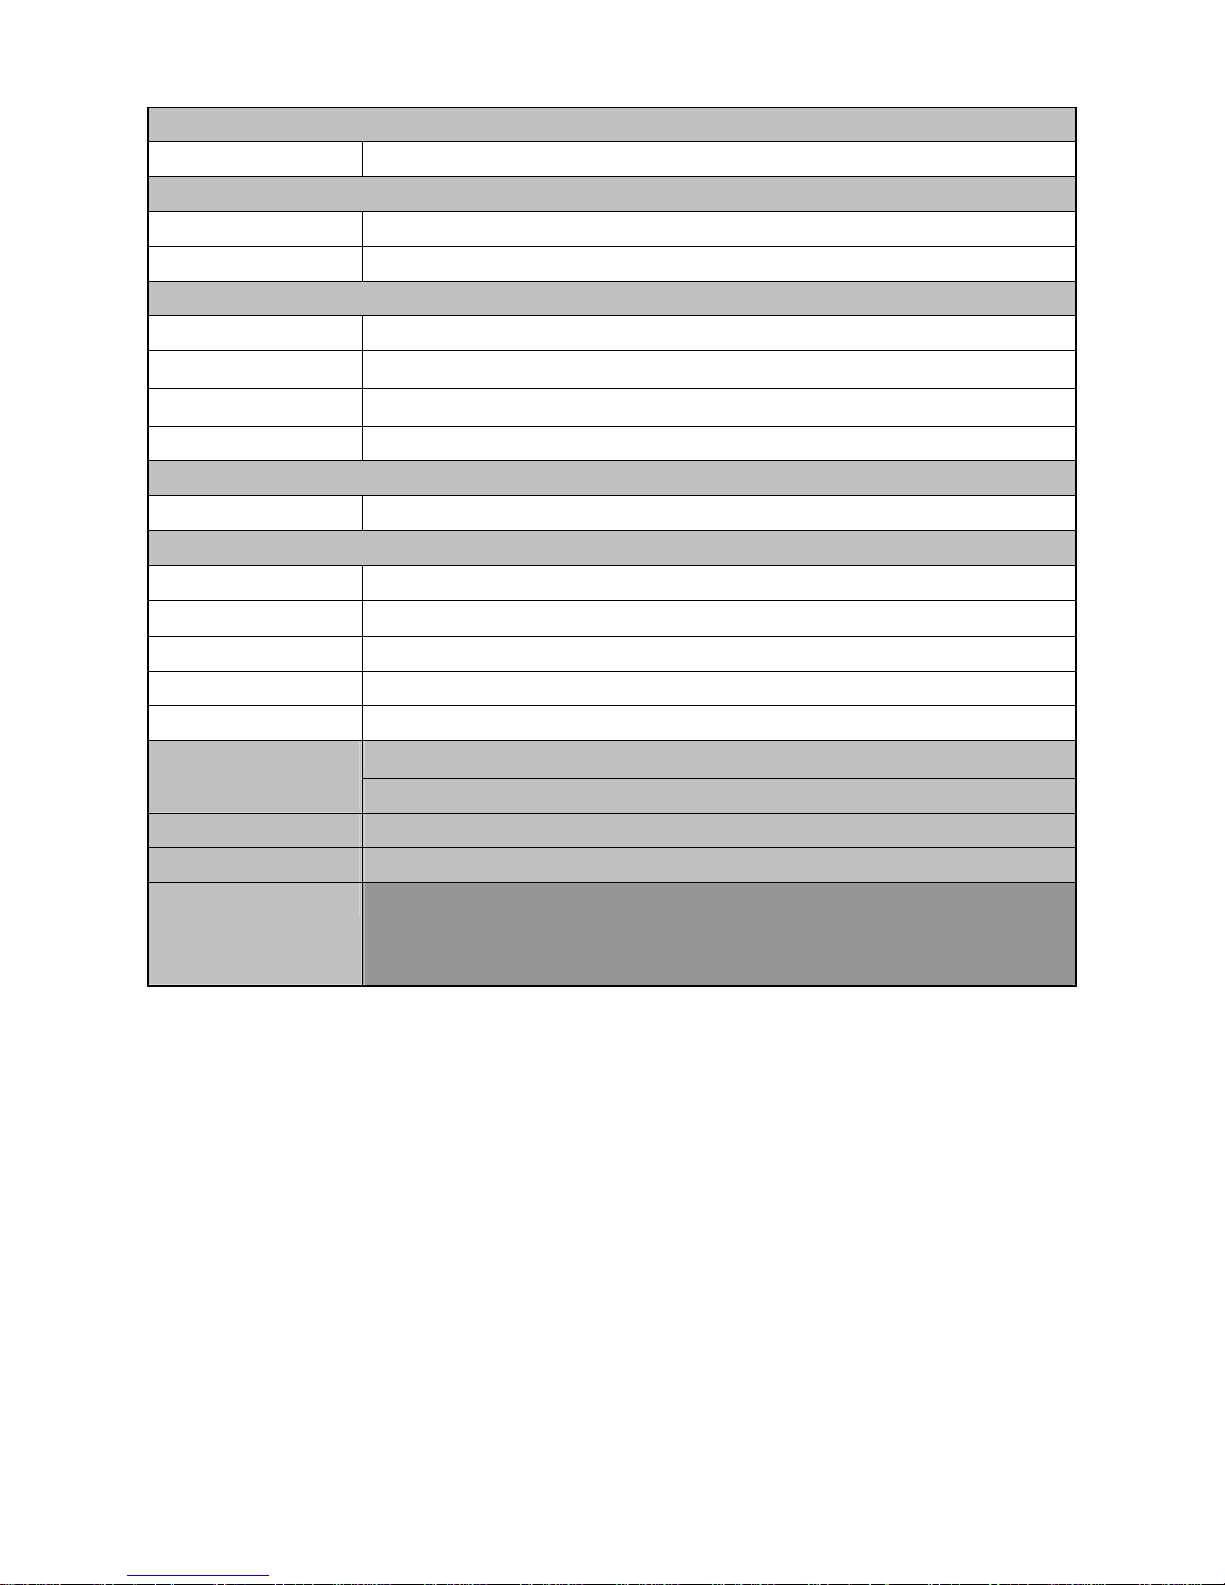
5 Specification
Model Name POS335
Motherboard C36 C46
CPU Support
Intel Atom N270 processors 1.6G, L2
512K FSB 533MHz
Intel PineTrial D525 Duo Core 1.8G,
L2 1M, FSB667 / 800MHz
Chipset Intel 945GSE Express chipset + ICH7M
CPU integrated graphic + ICH8M
System Memory 1 x DDR2 SO-DIMM socket up to 2GB 1 x DDR3 SO-DIMM socket up to 2GB
Graphic Memory
Intel GMA 950 share system memory
up to 224MB
Intel GMA 3150 share system memory
up to 256MB
LCD Touch Panel
LCD Size 15” TFT LCD
Brightness 250nits
Maximal Resolution 1024 x 768
Touch Screen Type Resistive
Tilt Angle 4° ~ 84°
Storage
HDD One 2.5" SATA HDD bay
Flash Memory SATA pSSD flash card (Option)
Expansion
PCI-E Socket 1
External I/O Ports
USB 4 ports (V2.0)
Serial / COM 4 x RJ-45 COM connectors ( COM1 &
COM2 standard RS-232; COM3 &
COM4 pin10 with 5V /12V power by
jumper )
4 x RJ-45 COM connectors ( COM1 &
COM2 standard RS-232; COM3 & COM4
pin10 with 5V /12V power by BIOS )
LAN (10 /100 / 1000) 1 x RJ45
DC Jack
1
E-SATA interface DC-OUT, E-SATA
2nd VGA 1
1 (DB-15/F, power by BIOS
configuration)
Cash Drawer Port 1 (19V)
1 (12V/24V cash drawer power by BIOS
configuration)
Audio
Speaker 2 x 2W speakers (Option)
Page 30
22
Power
Power Adapter 65W, 19V/3.4A
Control / Indicator
Power Button 1
Indicator LED 1
Peripheral
MSR module MSR (USB)
Fingerprint Fingerprint (USB)
Customer display 2 x 20 VFD customer display (COM)
Second display 8.4” 2nd display without touch
Communication
Wireless LAN 802.11 b/g/n wireless LAN card & antenna (Option)
Environment
EMC & Safety FCC/CE Class A, LVD
Operating Temperature
5℃ ~ 35℃ (41℉ ~ 104℉)
Storage Temperature
-20℃ ~ 55℃ (-4℉ ~ 131℉)
Operating Humidity 20% ~ 80% RH non condensing
Storage Humidity 20% ~ 85% RH non condensing
LCD 4 degree : 365.2 x 296.2 x 282.2 mm
Dimension
(W x D x H)
LCD 84 degree : 365.2 x 217.76 x 343.1 mm
Weight (N.W./G.W.)
5.8kgs / 6.8kgs
Mounting
100mm x100mm VESA Standard holes
OS Support
Windows® XP Professional, Windows Embedded, POSReady 2009,
Windows XP Embedded, Windows XP Professional for Embedded,
WinCE, Windows 7, Linux
* This specification is subject to change without prior notice.
Page 31
23
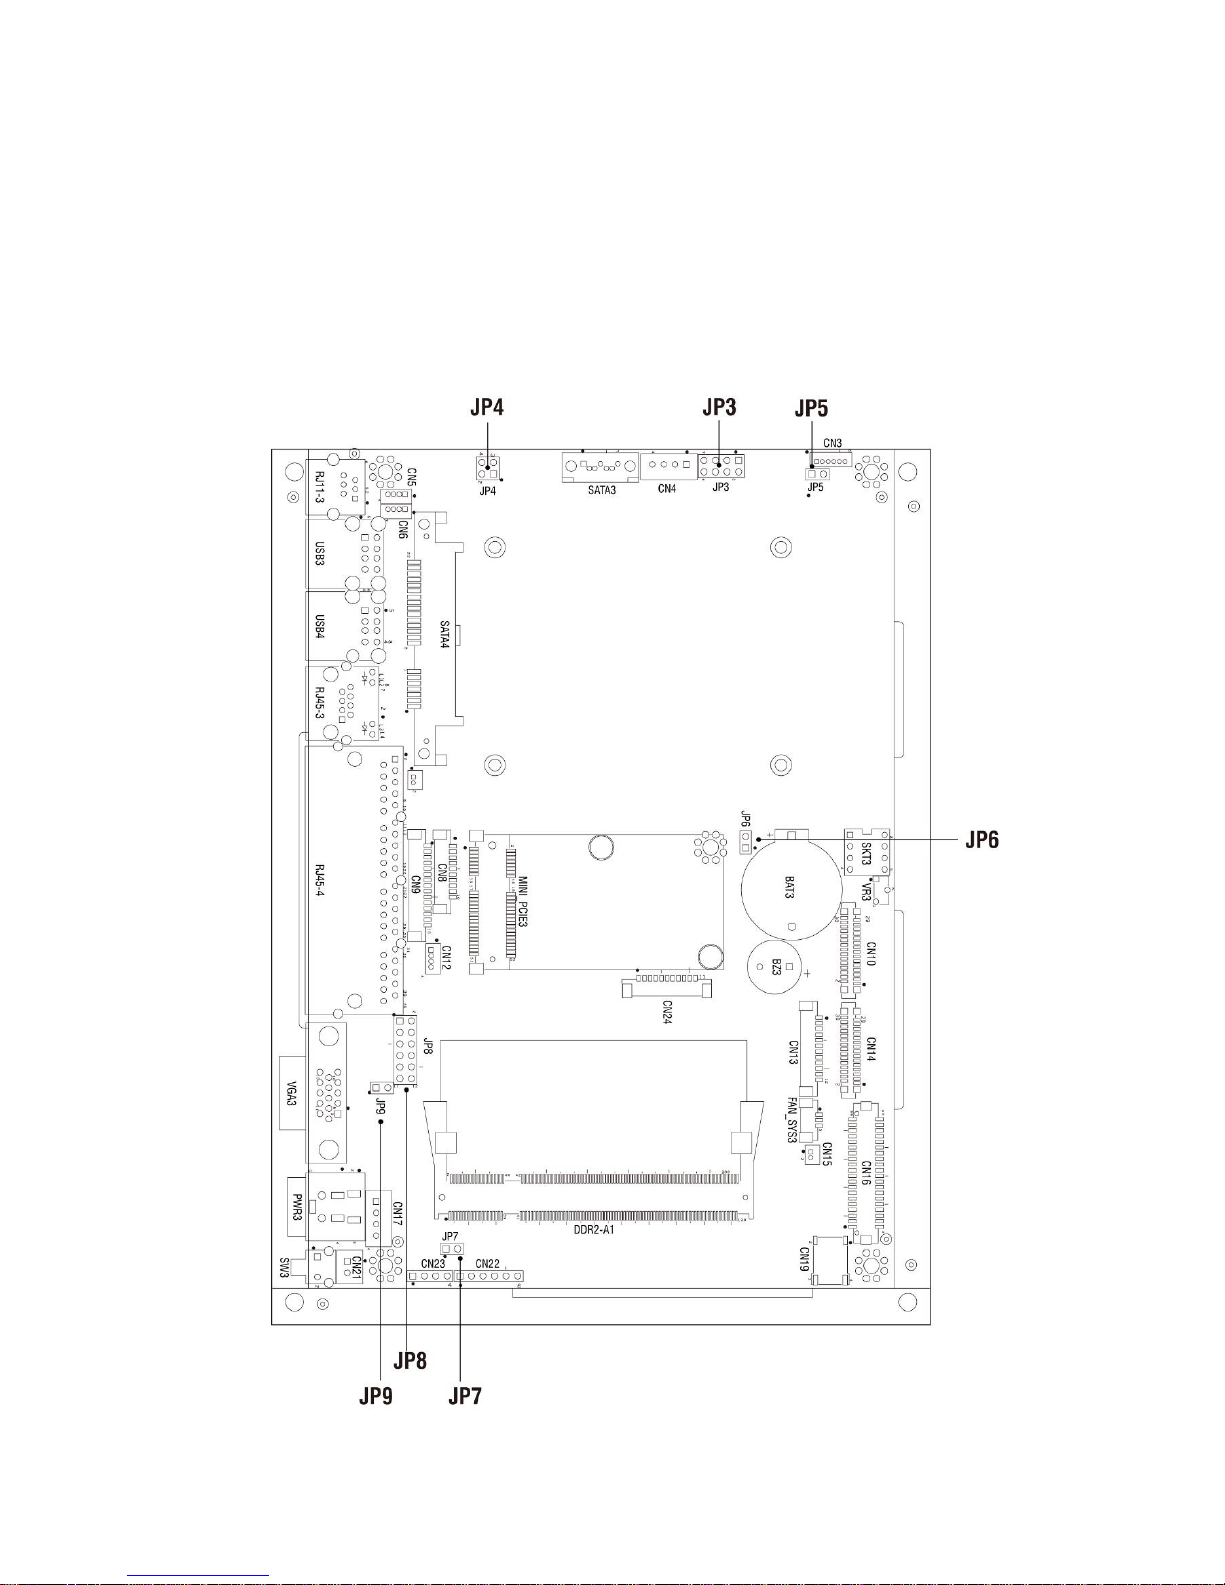
6 Jumper Settings
6-1 C36A Motherboard
6-1-1 Motherboard Layout
Page 32
24
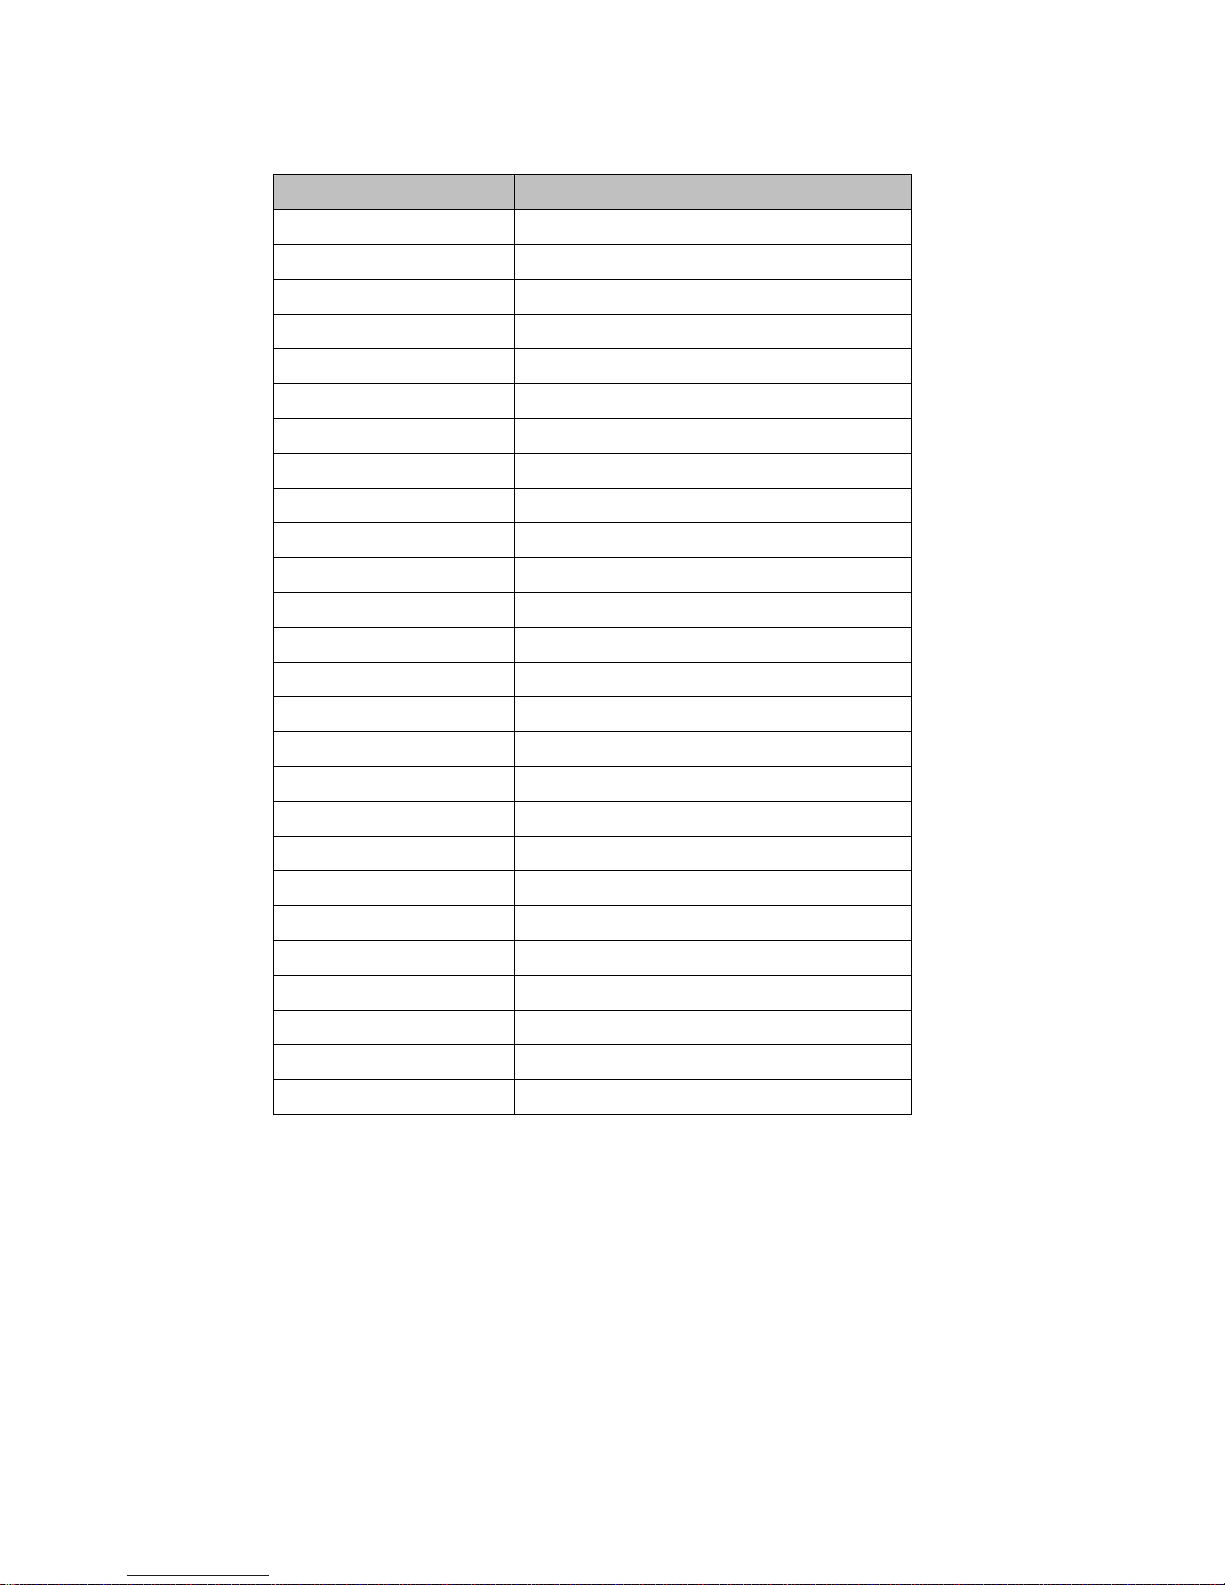
6-1-2 Connectors & Functions
Connector Purpose
BAT3 CMOS Battery Base ( Use CR2023)
CN3 Speaker & MIC Connector
CN4 Power Connector For HDD
CN5 USB5
CN6 USB7
CN9 Card Reader Connector
CN12 IrDA Connector
CN13 Inverter Connector
CN15 Power LED
CN16 LCD Interface Connector
CN21 Internal Power On Switch Connector
CN22 5 Wire Touch
CN24 FT Status Interface
DDR2_A1 DDR2 SO-DIMM
PWR3 +19V Power Adaptor
RJ11_3 Cash Drawer Connector
RJ45_3 LAN (On Board)
RJ45_4 COM1, COM2, COM3, COM4
FAN_SYS3 System FAN Connector
MINI_PCIE3 Mini PCI-E Socket
SATA3 SATA Connector
SKT3 SPI ROM
SW3 Power On Button
USB3 USB1, USB2
USB4 USB3, USB4
VGA3 VGA Port
Page 33
25
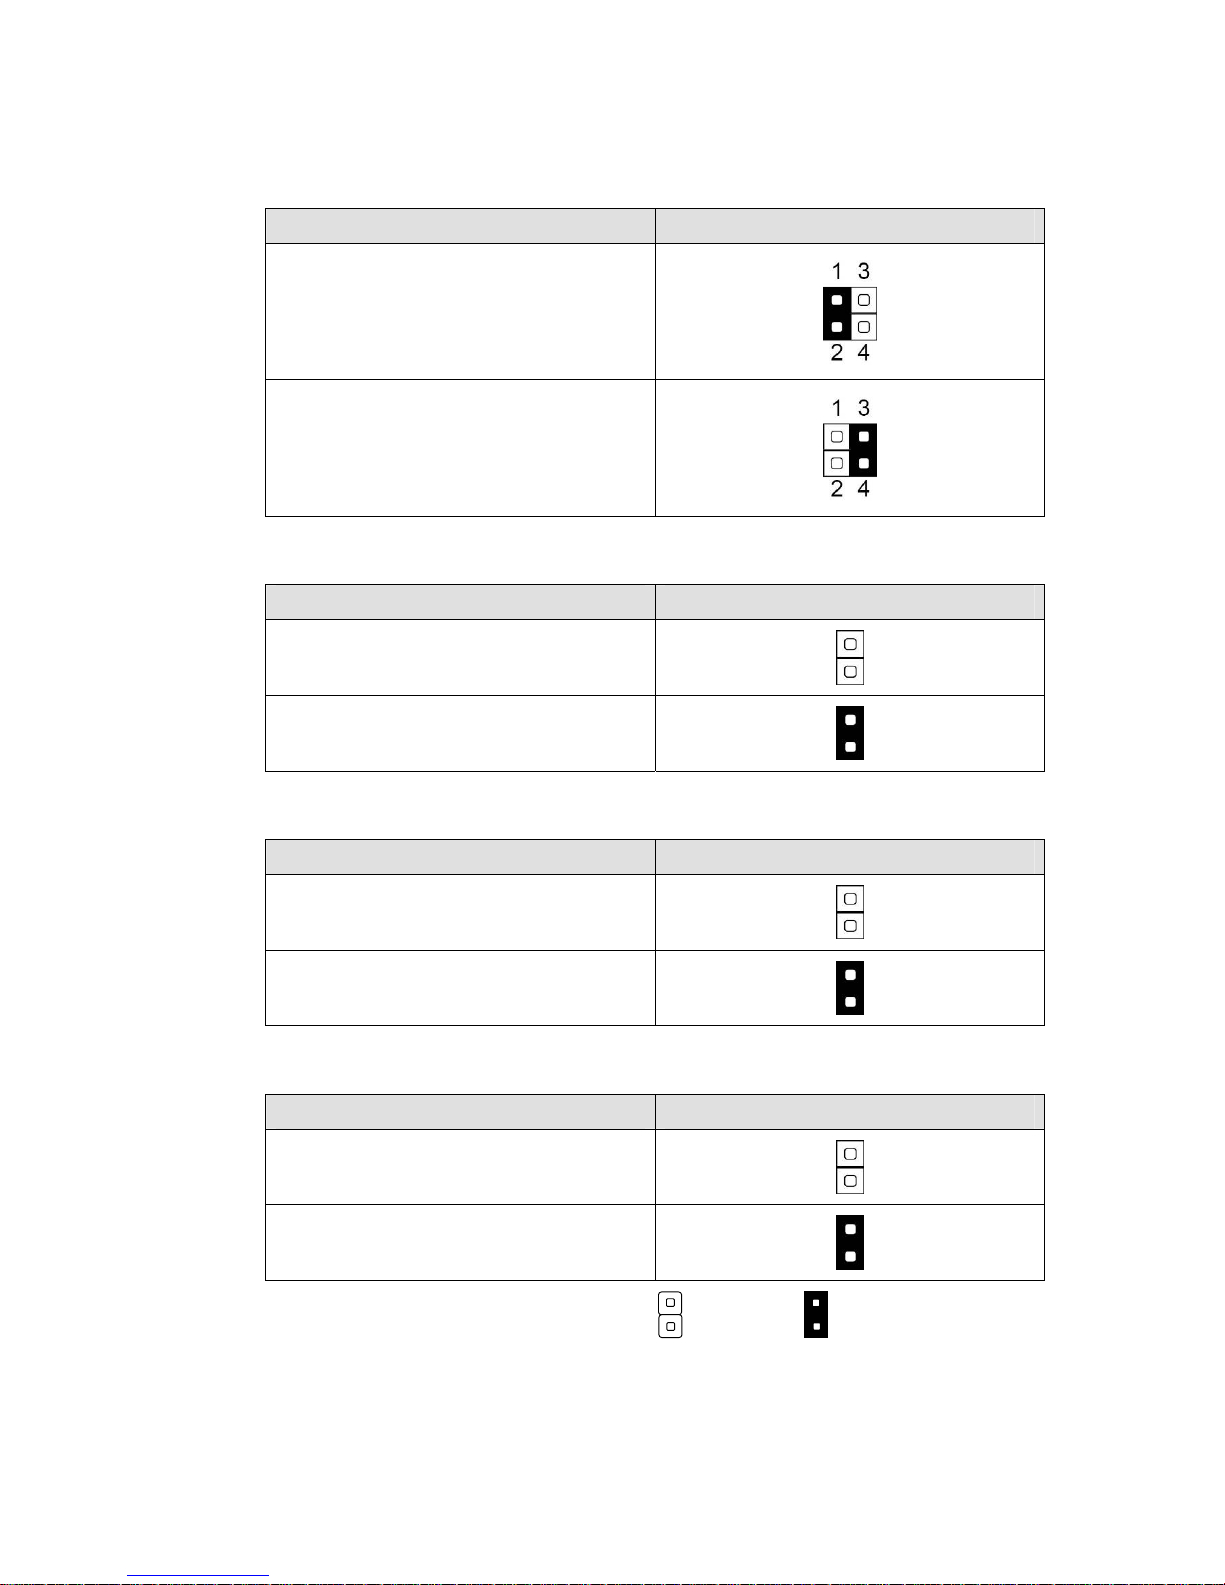
6-1-3 Jumper Settings
Cash Drawer Power Settings
Function JP4 (1-2) (3-4)
+12V
▲+19V
Power Mode Settings
Function JP5 (1-2)
▲ATX Power
AT Power
CMOS Operation Mode
Function JP6 (1-2)
▲CMOS Normal
CMOS Reset
System Reset Settings:
Function JP7 (1-2)
▲Normal
Reset
▲ = Manufacturer Default Setting OPEN SHORT
Page 34
26
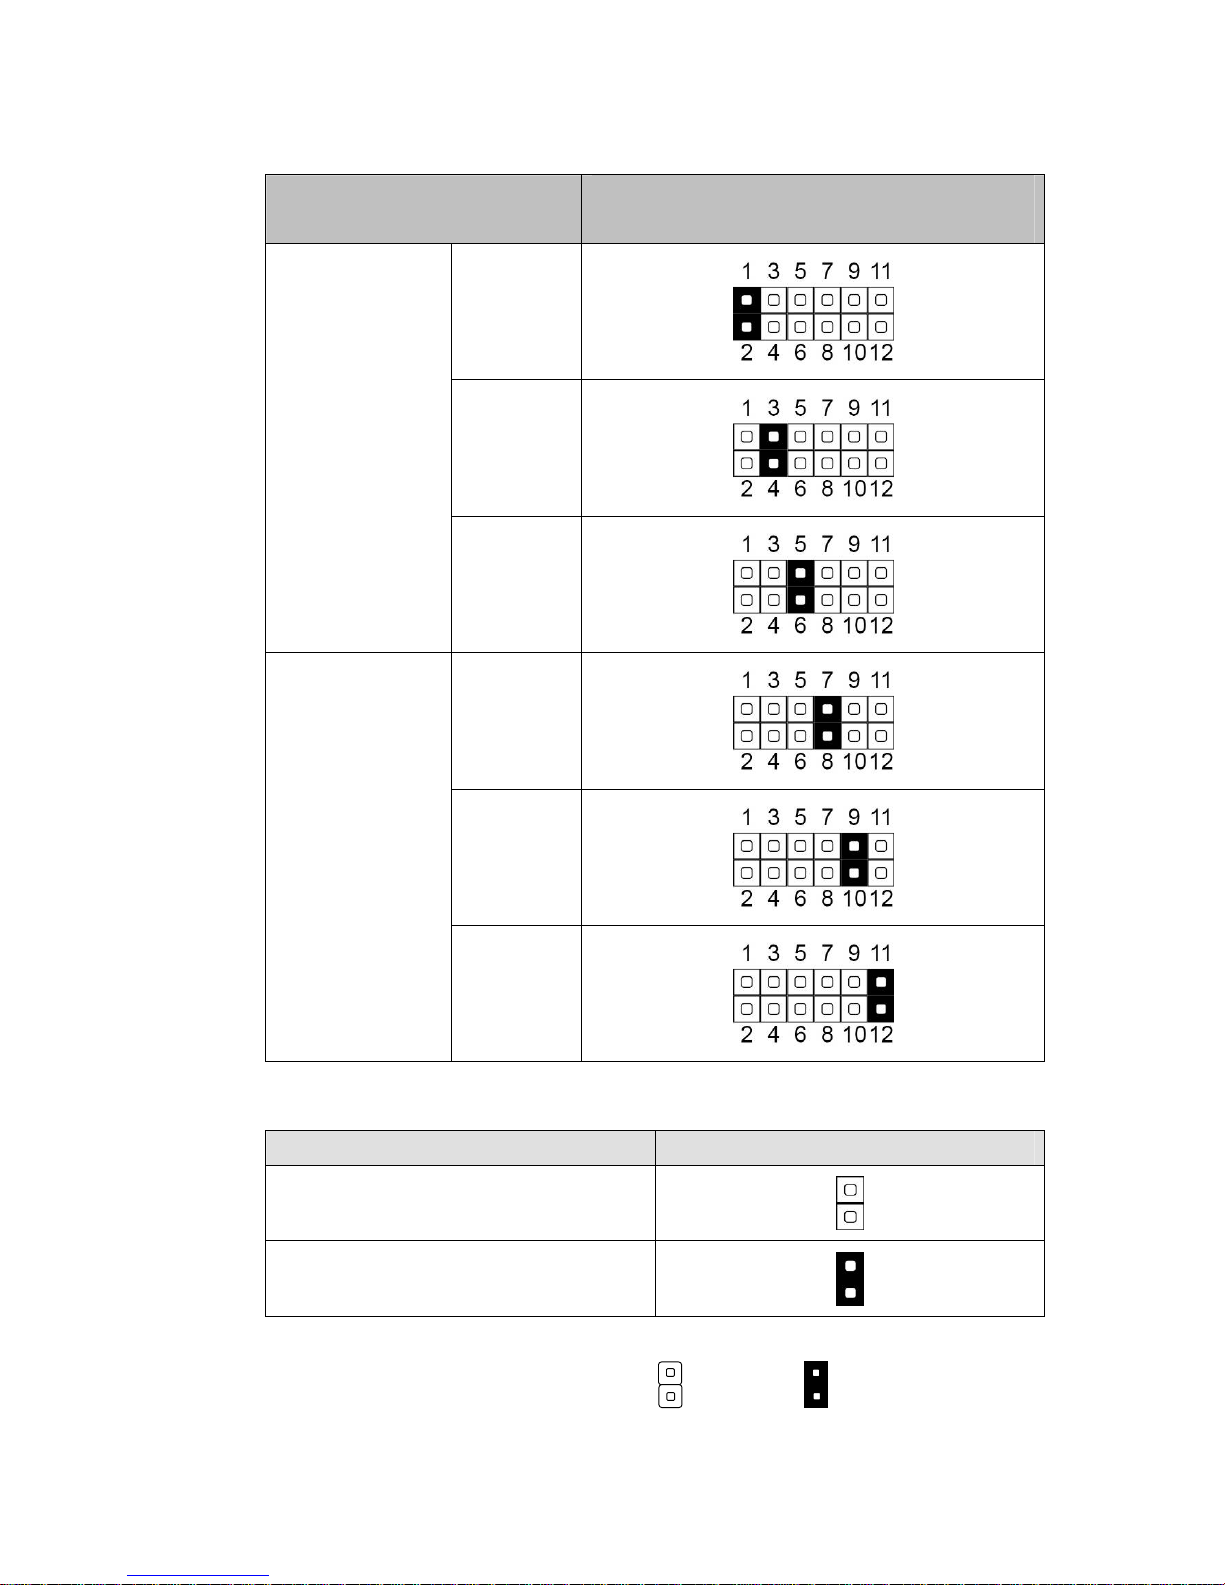
COM3 & COM4 Power Settings
Function
JP8
(1-2) (3-4) (5-6) (7-8) (9-10) (11-12)
RI
▲+5V
COM3 Pin10
+12V
RI
+5V
COM4 Pin10
▲+12V
VGA Power Settings
Function JP9 (1-2)
▲No Power
+12V
▲ = Manufacturer Default Setting OPEN SHORT
Page 35
27
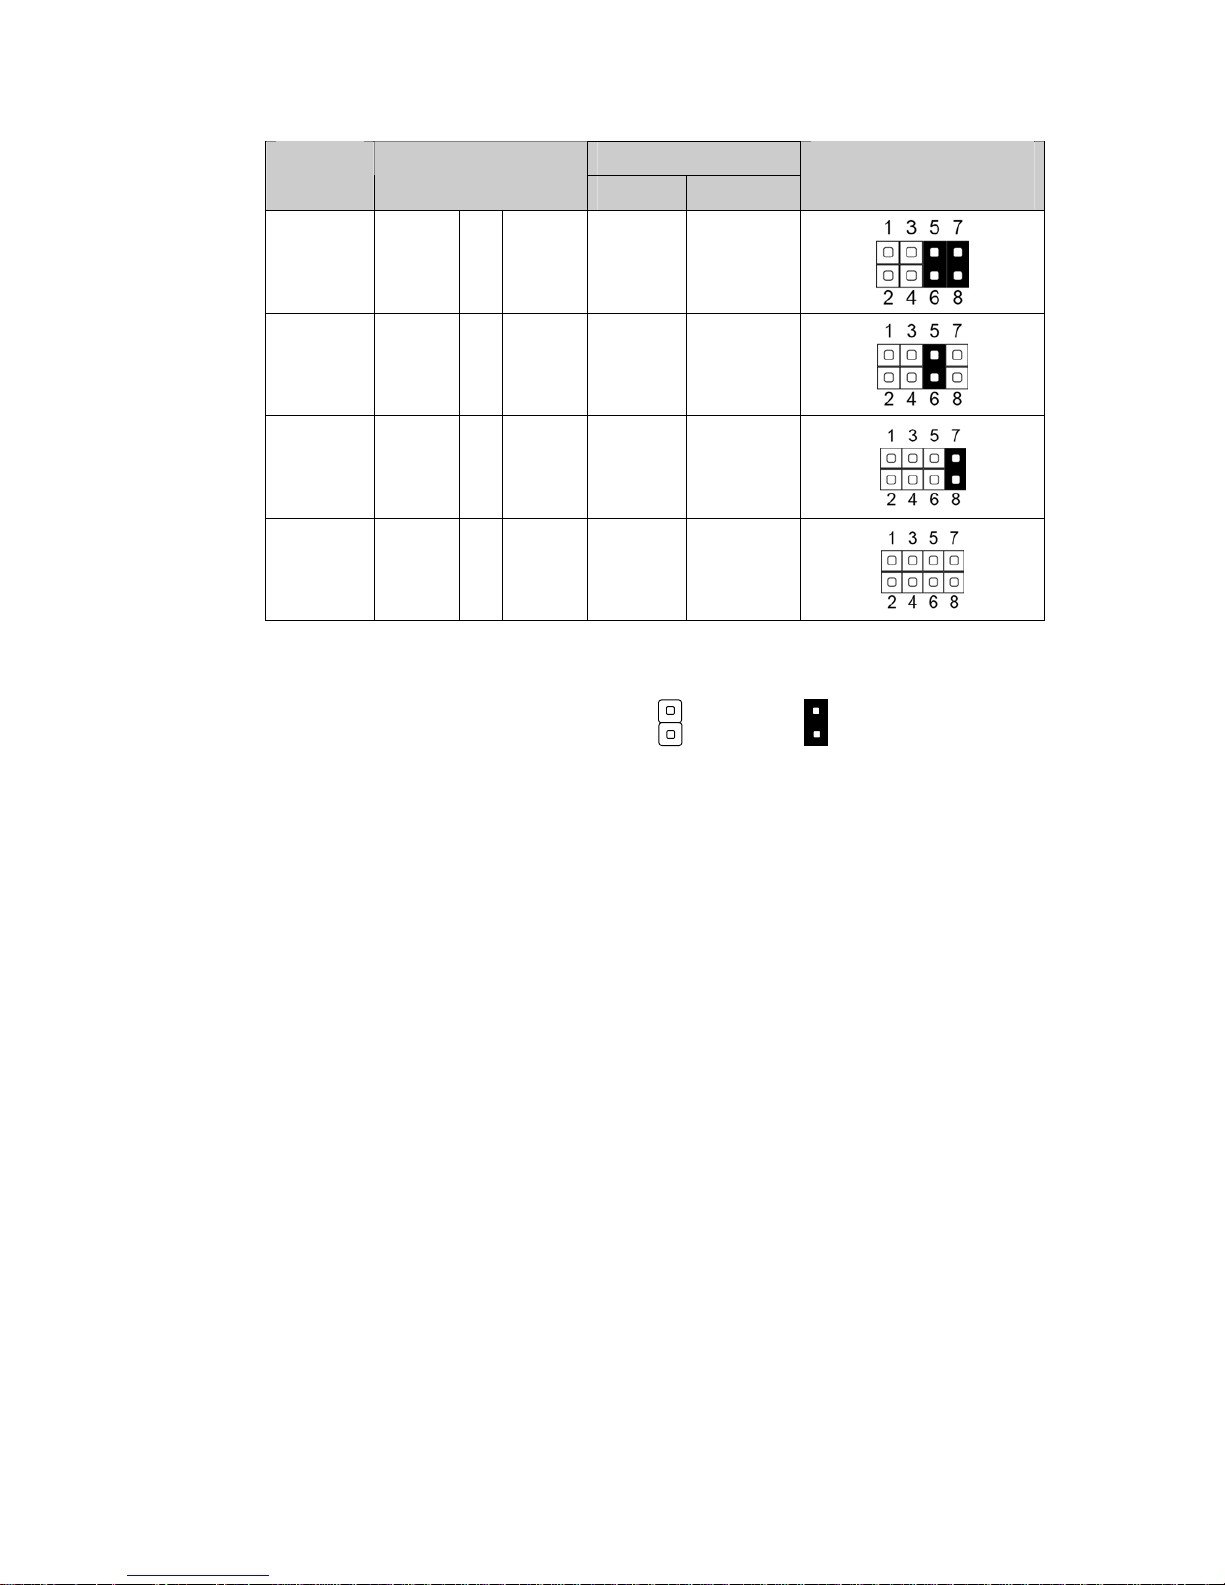
LCD ID Settings
LVDS Panel
Number
Resolution
Bits Channel
JP3
(1-2) (3-4) (5-6) (7-8)
1 1024 x 768 24 Single
2 1280 x 1024
24 Dual
3 800 x 600 18 Single
4 1024 x 768 18 Single
▲ = Manufacturer Default Setting OPEN SHORT
Page 36
28
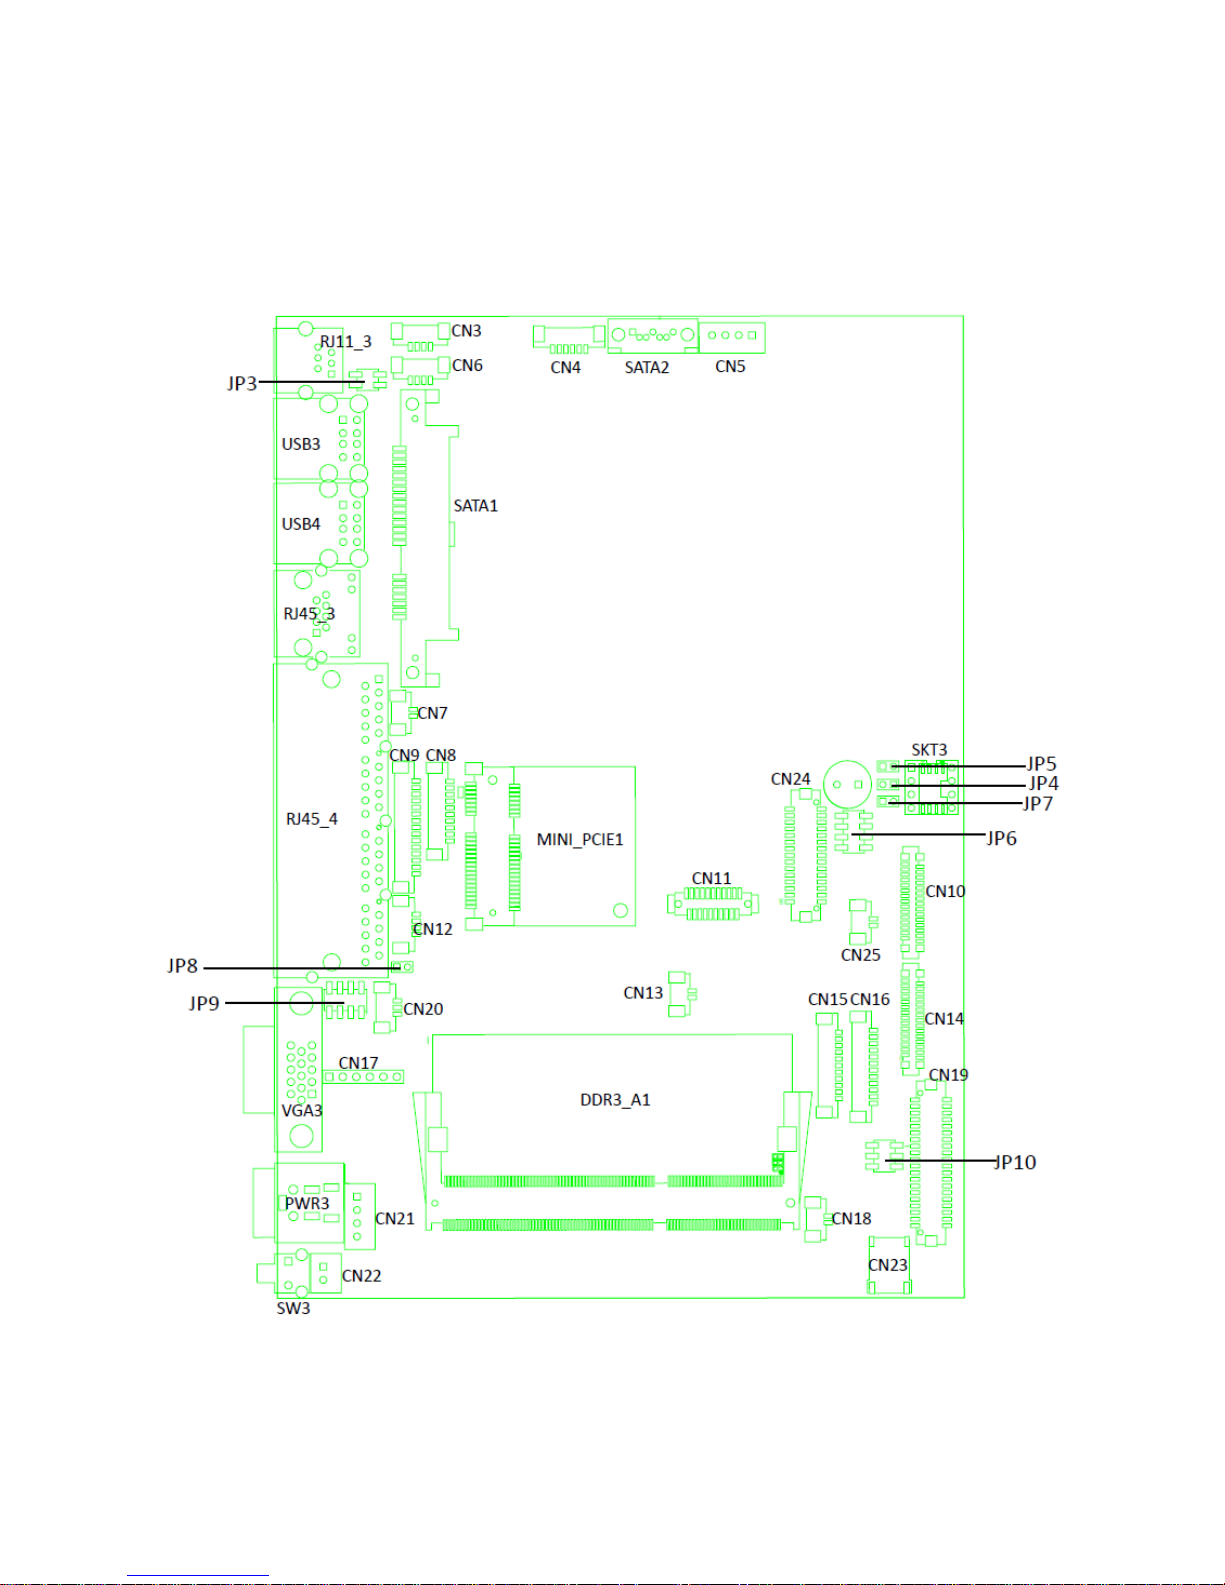
6-2 C46 Motherboard
6-2-1 Motherboard Layout
Page 37
29
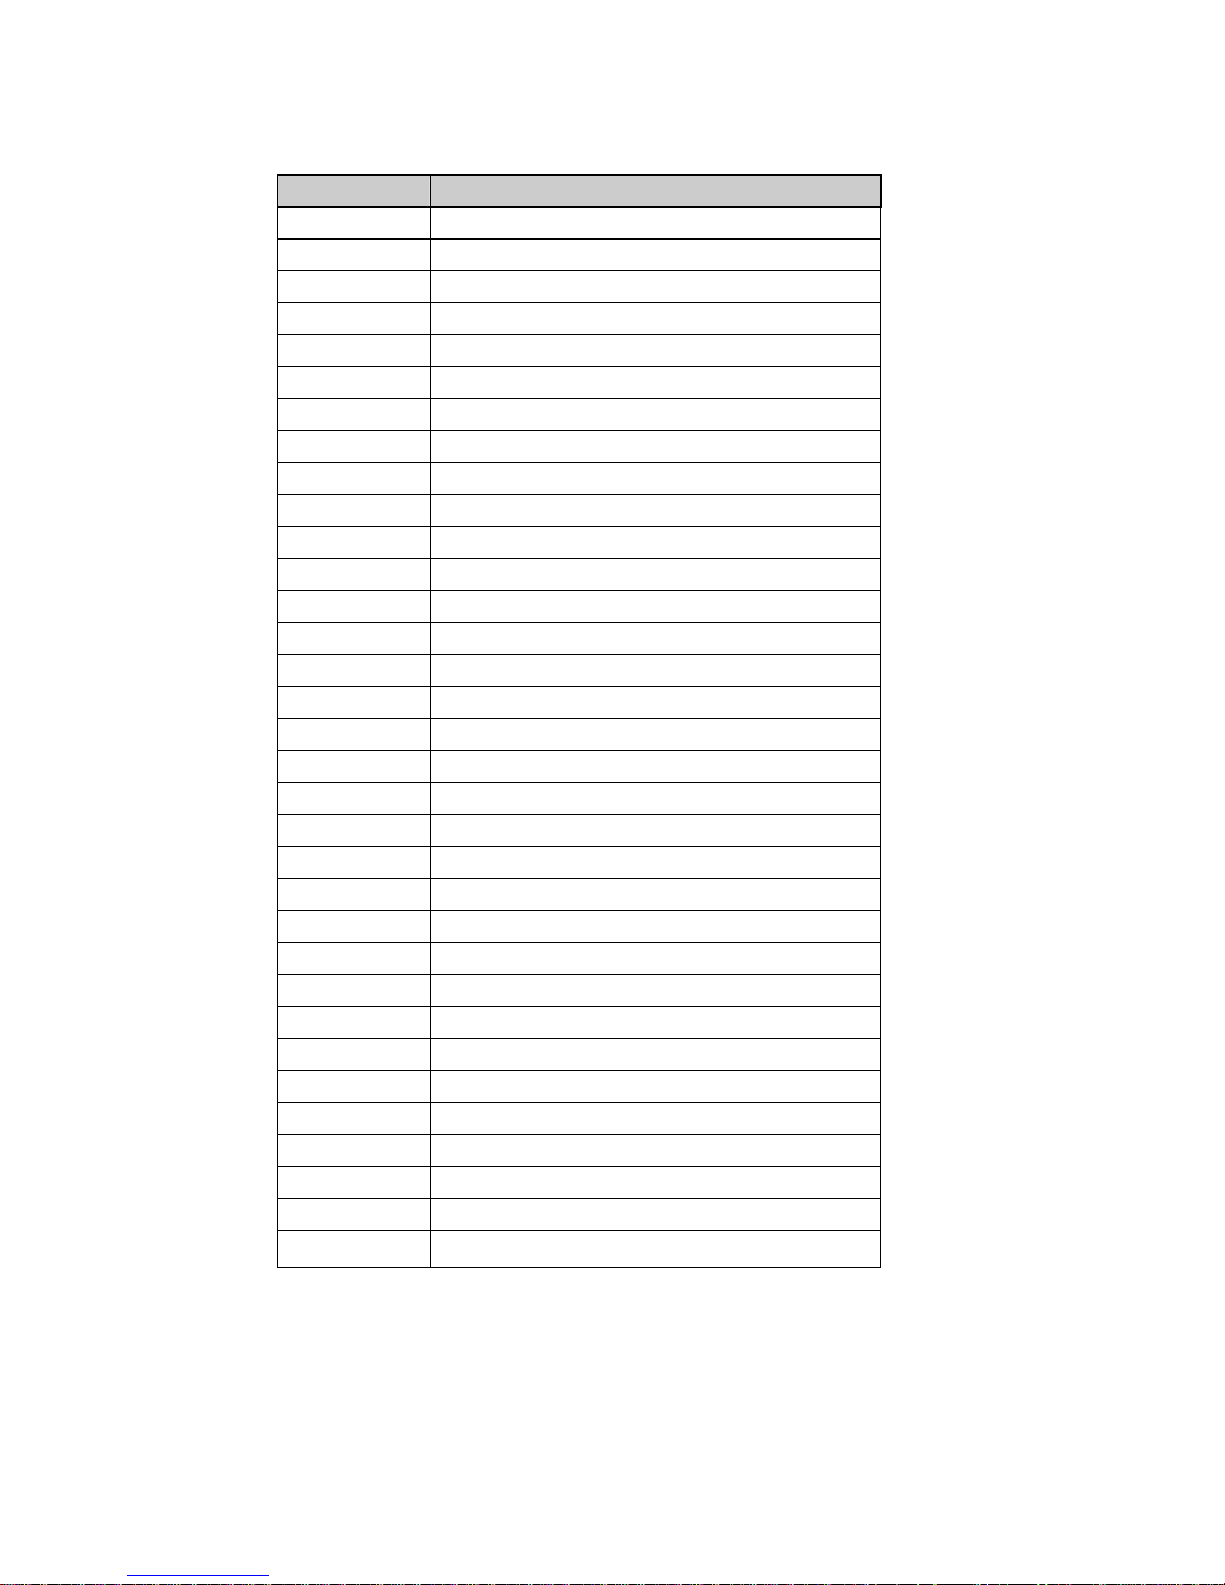
6-2-2 Connectors & Functions
Connector Function
CN3 USB
CN4 Speaker & MIC CONN
CN5 SATA Power
CN6 USB
CN8 For external Touch
CN9 Card reader
CN12 PS2 Keyboard
CN13 HDD LED CONN
CN16 Inverter
CN17 TUOCH
CN18 Power LED CONN
CN19 LVDS (24bit)
CN20 SYSTEM FAN
CN21 DC-JACK
CN22 POWER BOTTOM CONN
CN25 Battery CONN
PWR3 DDR3 SO-DIMM1
RJ11_3 SATA Connector
RJ45_3 SATA Connector
RJ45_4 Power Button
SATA2 CMOS Operation Mode
SKT3 VGA Port
USB3 COM2 RS232/485/422 Settin
g
USB4 LCD ID Settin
g
VGA3 Power Mode Settin
g
JP3 Cash Drawer power selection
JP4 AT/ATX
JP5 CMOS Operation Mode
JP6 LCD ID Settin
g
JP7 H/W RESET
JP8 CRT Power Settin
g
JP9 COM Power Settin
g
JP10 Inverter Selection
Page 38
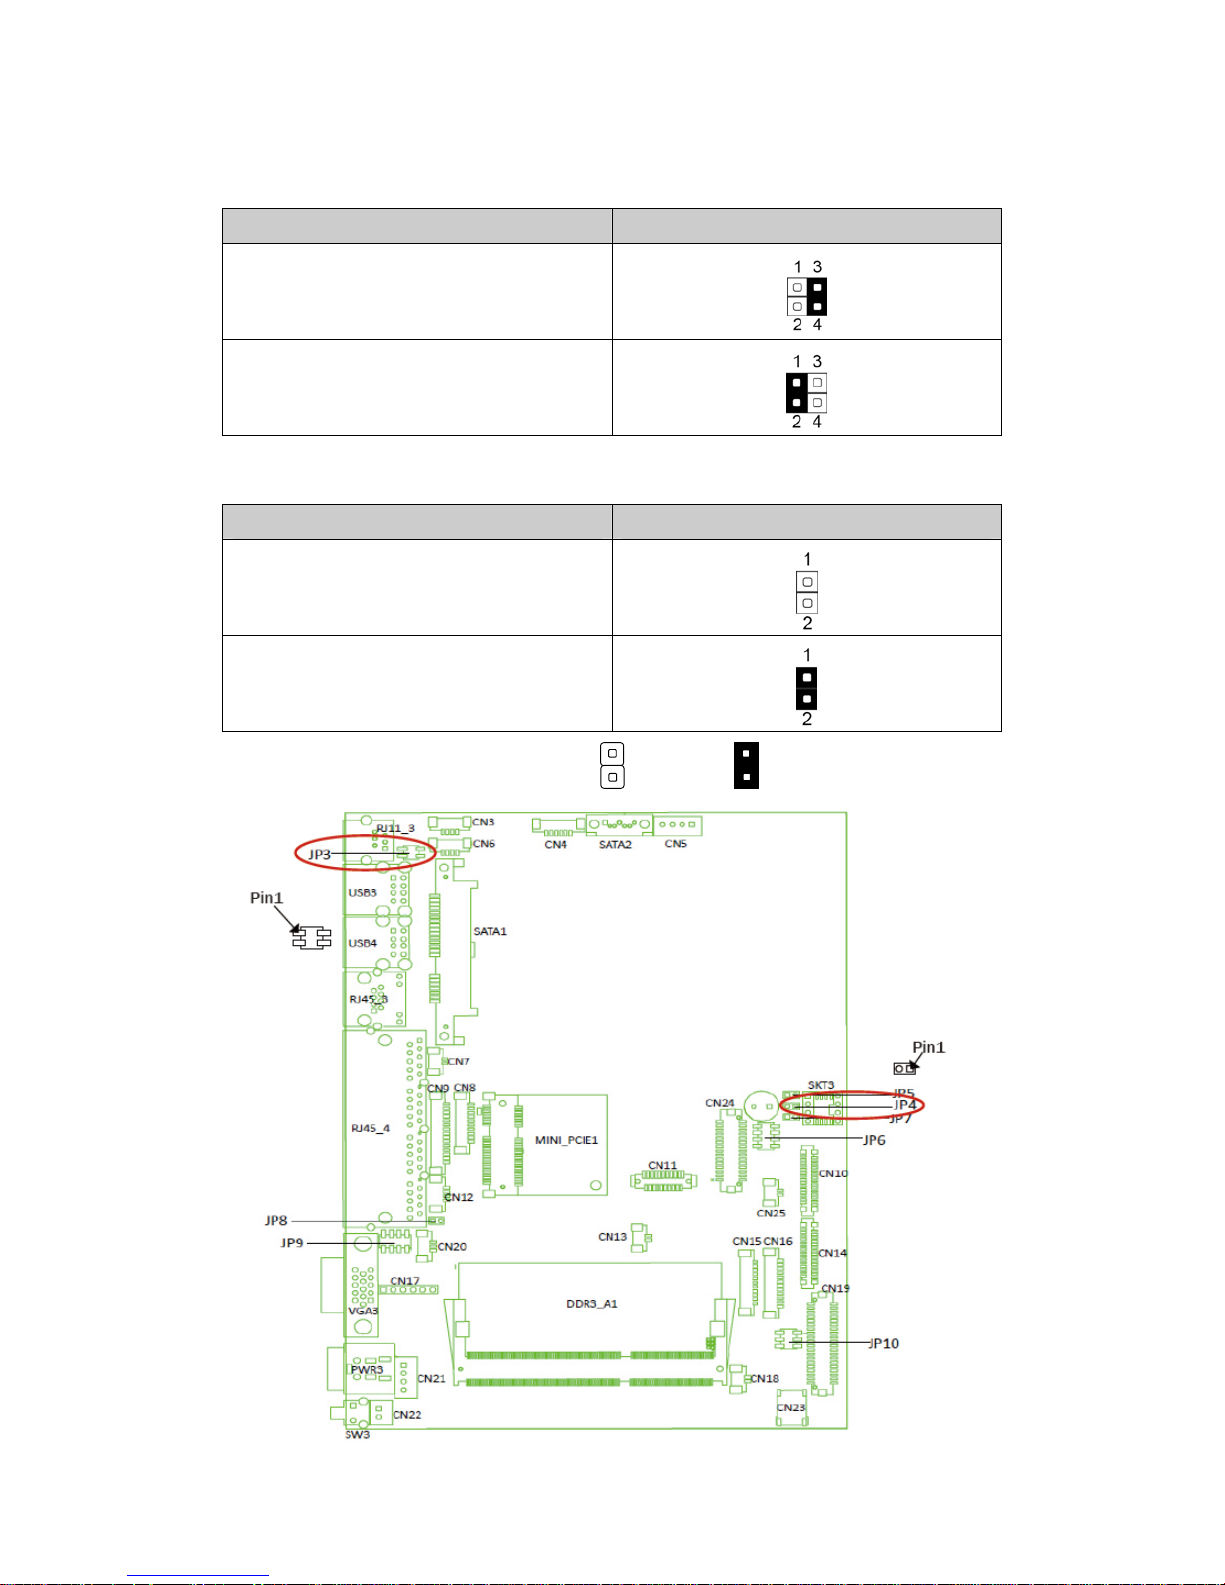
30
6-2-3 Jumper Settings
Cash Drawer Power Setting
Function JP3 (1-2) (3-4)
▲19V
12V
Power Mode Setting
Function JP4 (1-2)
▲ATX Power
AT Power
▲ = Manufacturer Default Setting OPEN SHORT
Page 39
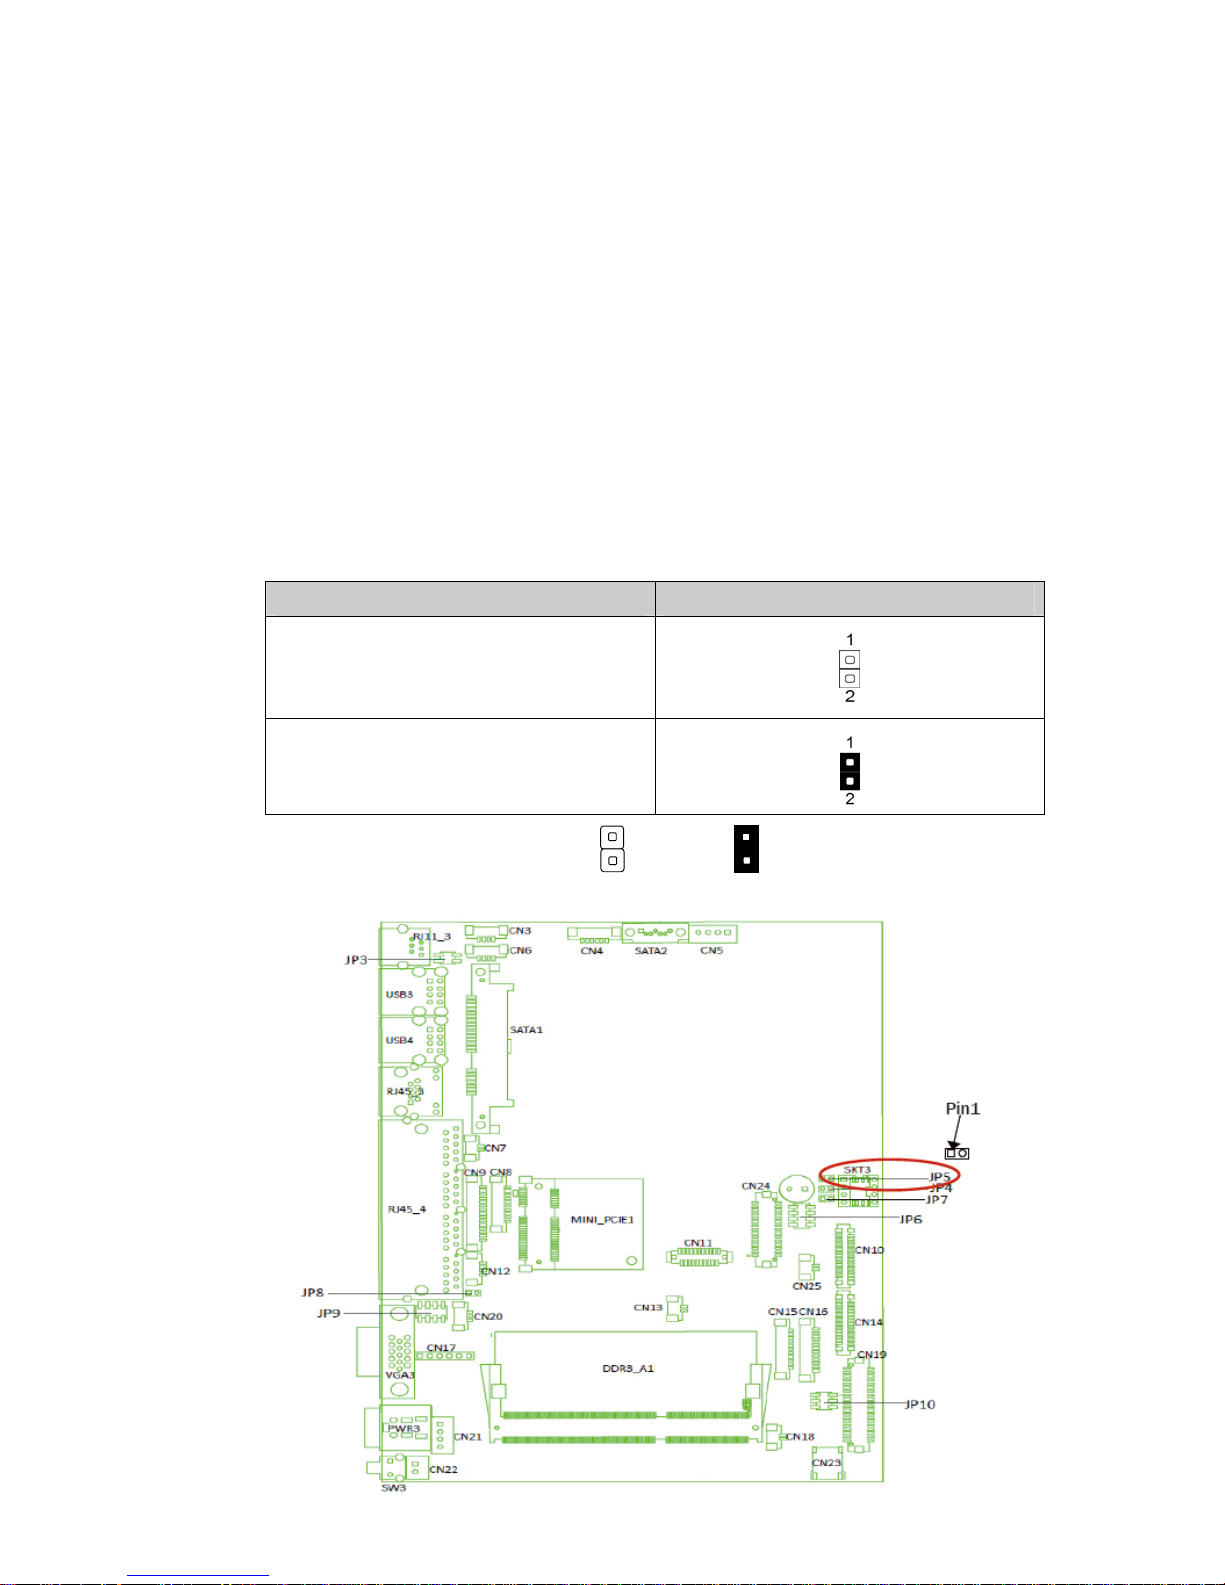
31
CMOS Operation Mode
CMOS Reset
To clear the CMOS,
1. Remove the power cable from the system.
2. Open the system, and set the ‘CMOS Operation jumper’ from ‘CMOS Normal’
to ‘CMOS Reset’. (refer to the jumper shown below)
3. Connect the power cable to the system, and power on the system:
in ATX mode: press the power button and it will fail power on
in AT mode: turn on system power
4. Remove the power cable from the system.
5. Return the "CMOS Operation mode" jumper setting from "CMOS Reset" to
"CMOS normal".
6. Connect the power cable and power on the system.
CMOS Operation Mode
Function JP5 (1-2)
▲CMOS Normal
CMOS Reset
▲ = Manufacturer Default Setting OPEN SHORT
Page 40
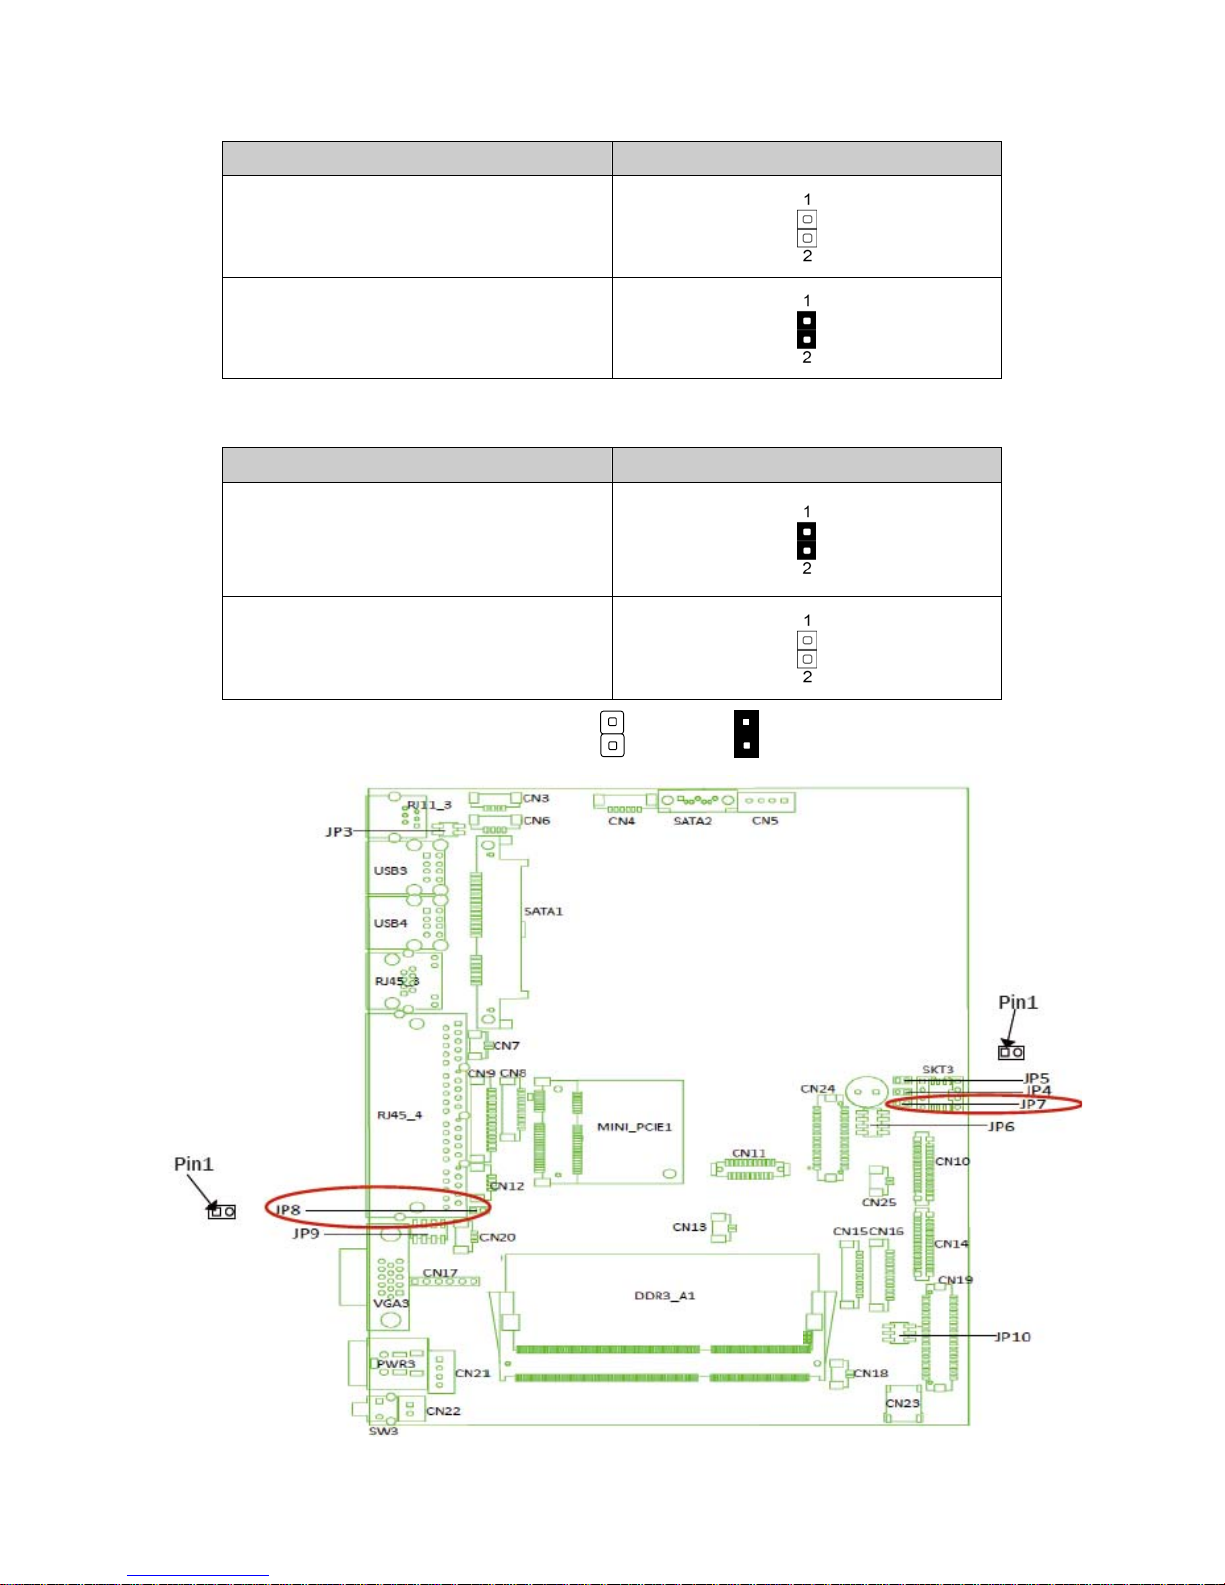
32
System Reset
Function JP7 (1-2)
▲System Normal
System Reset
CRT Power Ctrl
Function JP8 (1-2)
▲HW
BIOS
▲ = Manufacturer Default Setting OPEN SHORT
Page 41
33
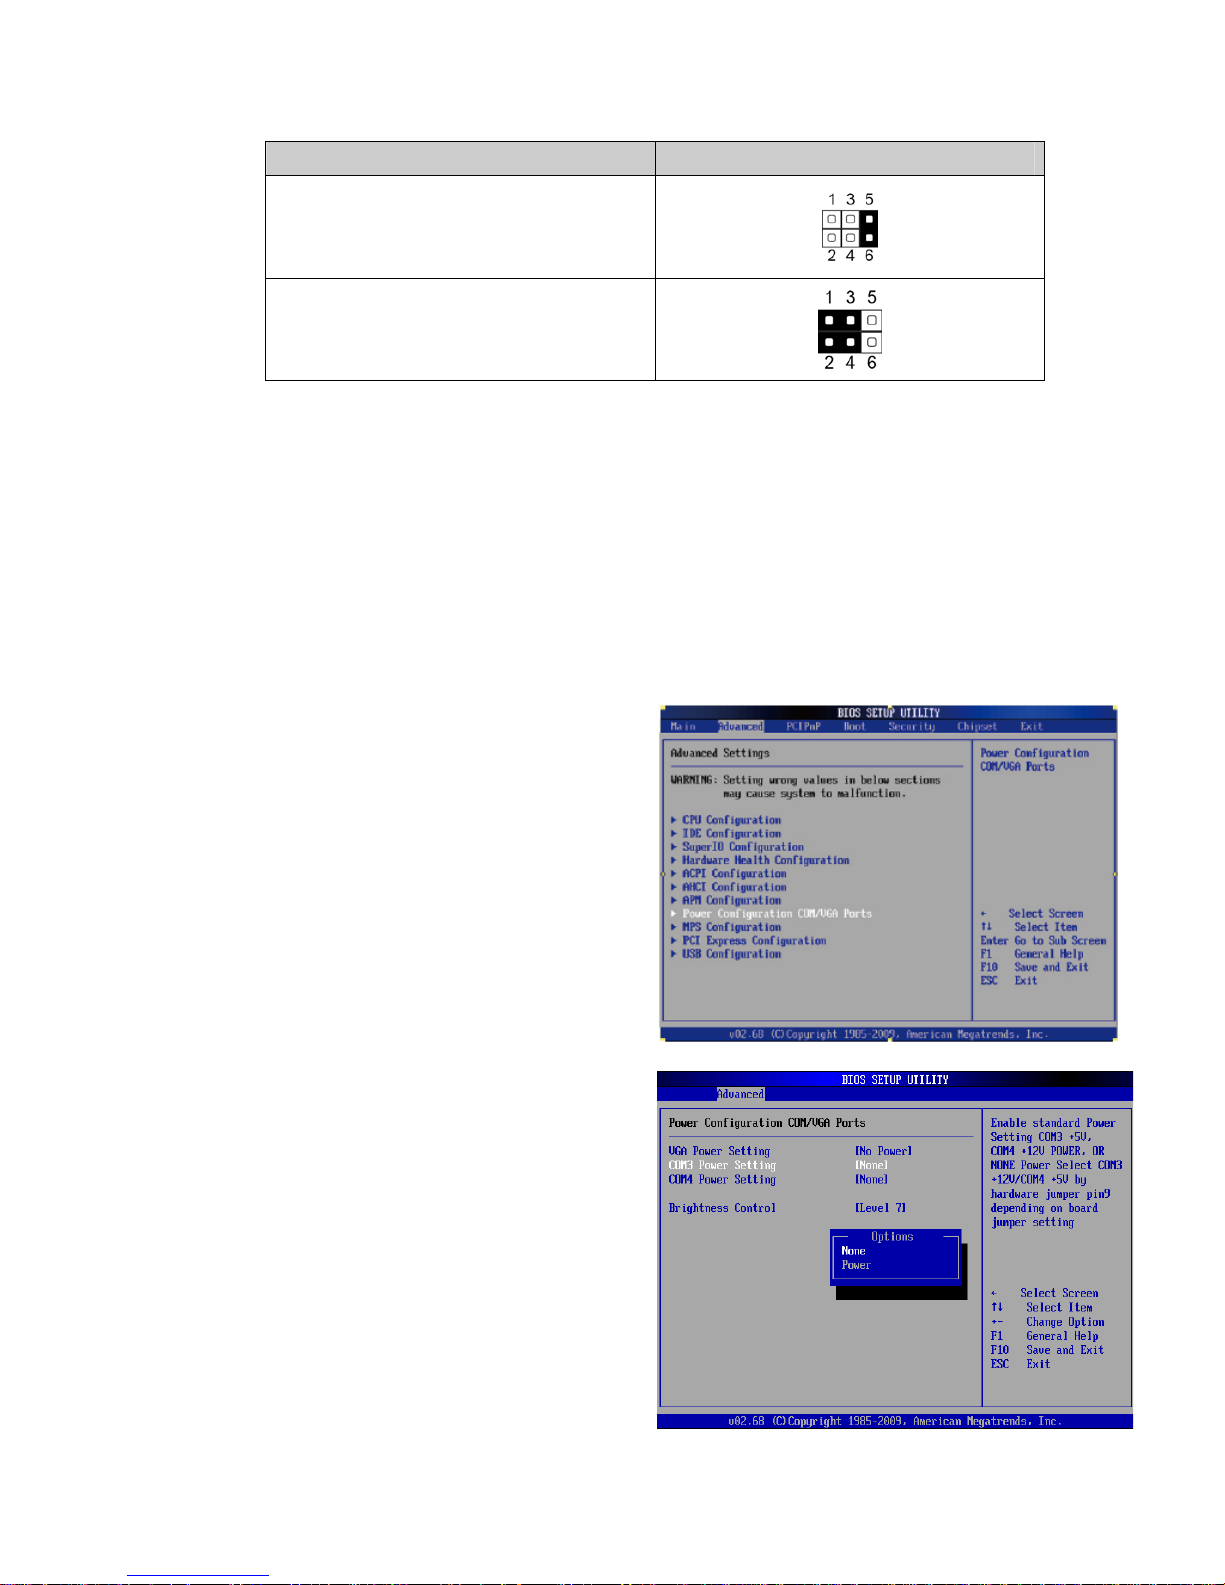
Inverter Selection
Function JP10 (1-2) (3-4) (5-6)
▲CCFL
LED
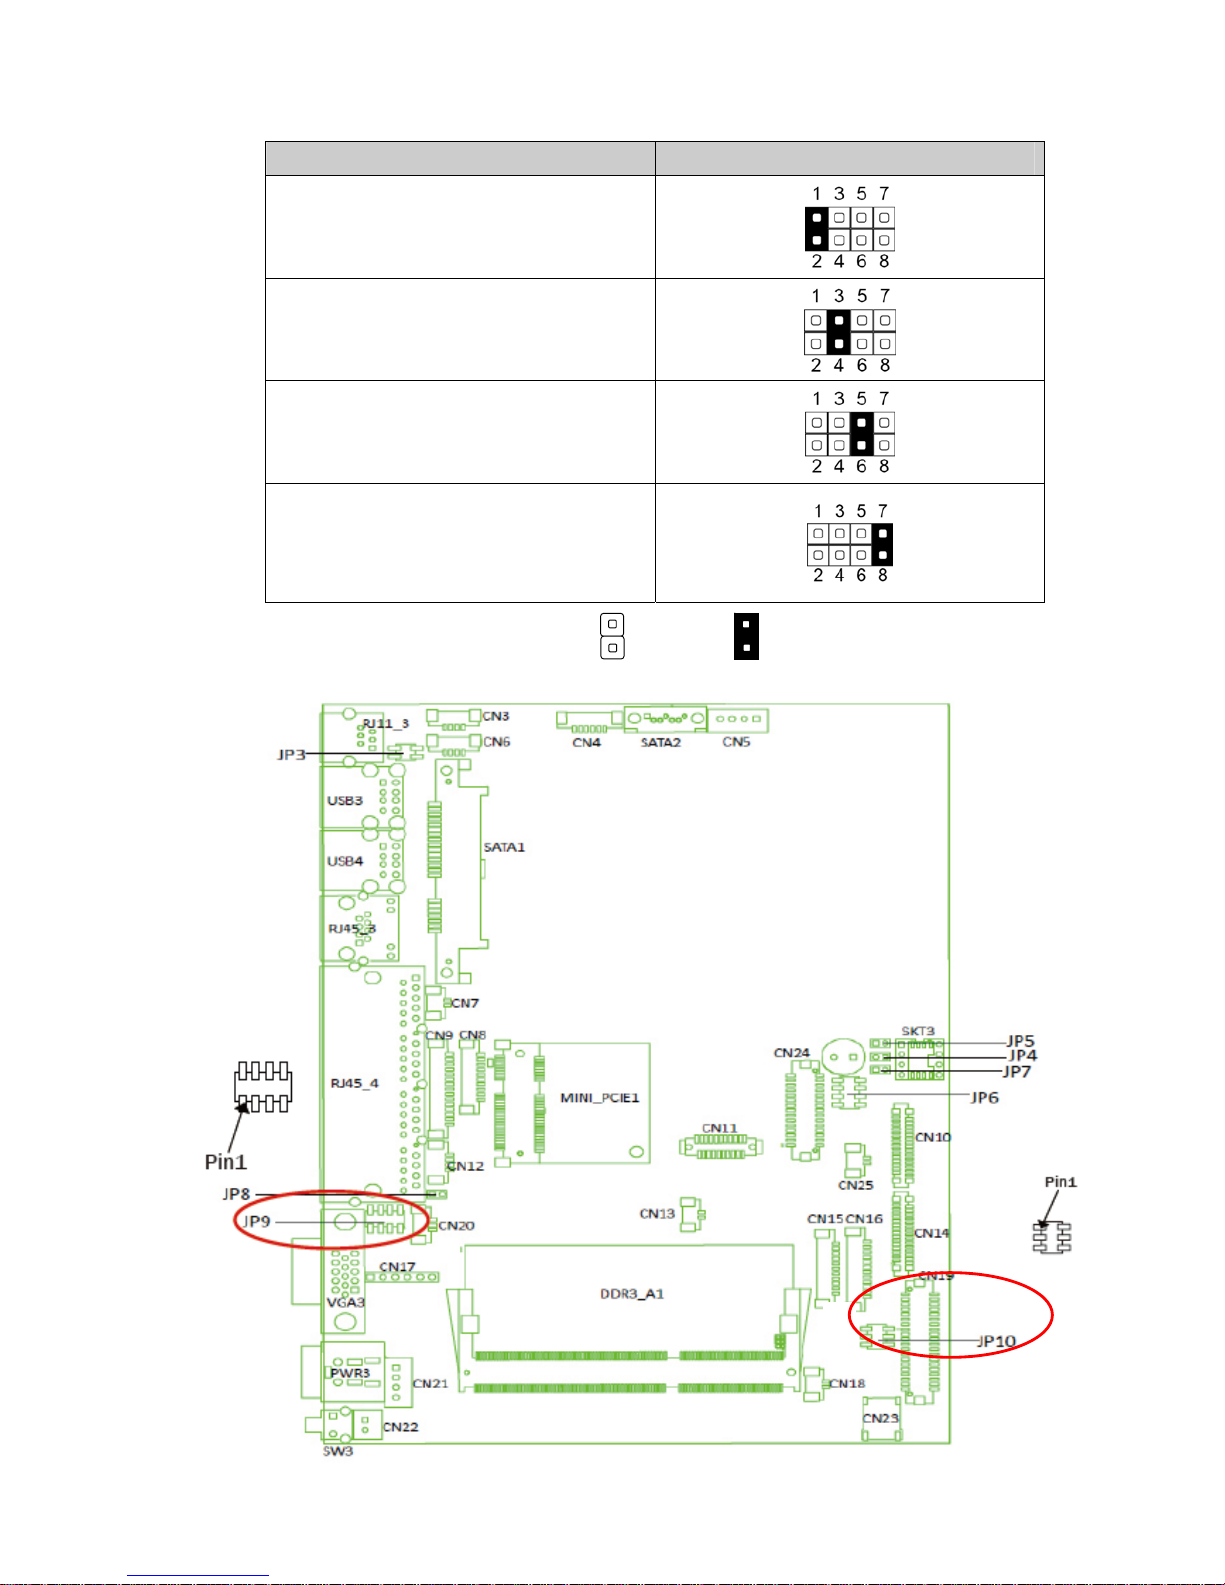
COM3 & COM4 Power Setting
COM3 and COM4 can be set to provide power to your serial device.
The voltage can be set to +5V or 12V by setting jumper JP9 on the motherboard.
When enabled, the power is available on pin 10 of the RJ45 serial connector.
If you use the serial RJ45 to DB9 adapter cable, the power is on pin 9 of the DB9
connector. By default, the power option is disabled in the BIOS.
Enable COM3/COM4 power in BIOS
1. Power on the system, and press
the <DEL> key when the system
is booting up to enter the BIOS
Setup utility.
2. Select the Advanced tab
3. Select Power Configuration
COM/VGA Ports and press
<Enter> to go to display the
available options.
4. To enable the power, select
COM3 Power Setting or COM4
Power setting and press
<Enter>. Select Power and
press <Enter>.
Save the change by pressing
F10.
Page 42
34
COM Power Setting
Function JP9 (1-2) (3-4) (5-6) (7-8)
▲COM3 5V
COM3 12V
COM4 5V
▲COM4 12V
▲ = Manufacturer Default Setting OPEN SHORT
Page 43
35
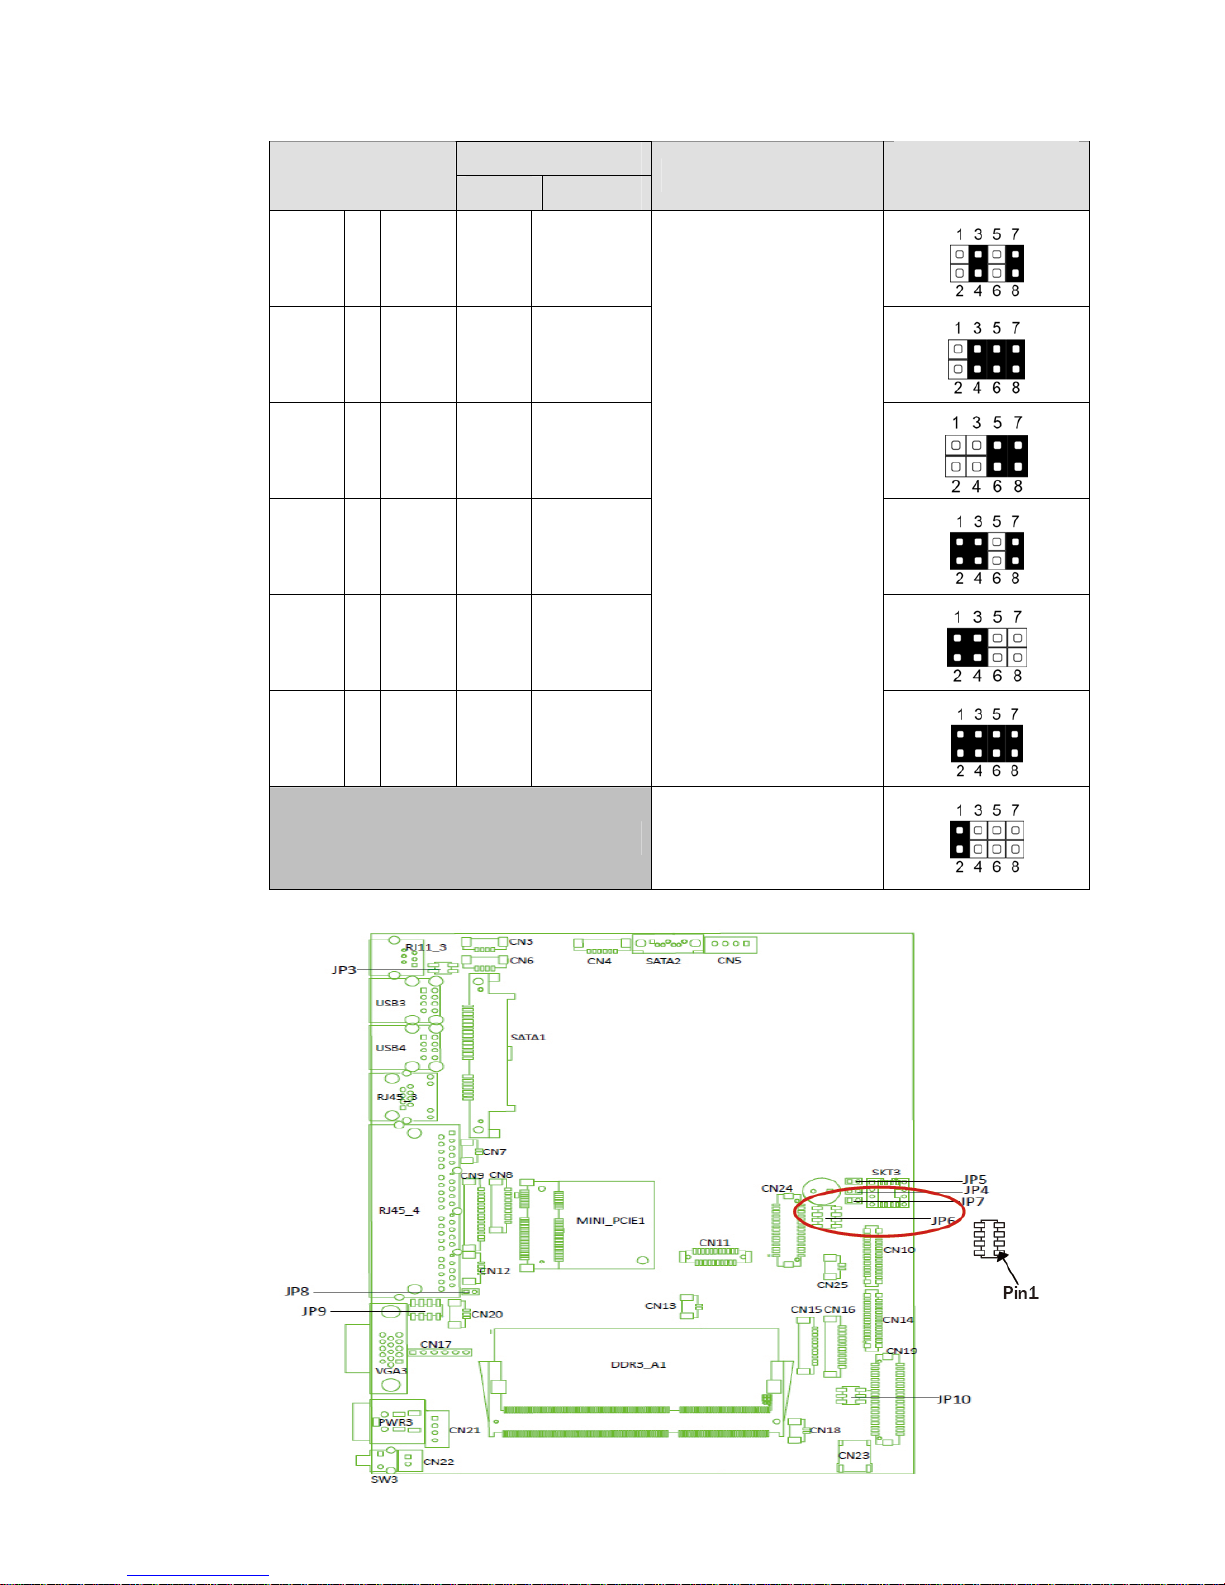
LCD ID Setting
LVDS/TTL
Resolution
Bits Channel
Output Interface
JP6
(1-2) (3-4) (5-6) (7-8)
800 X 600 24 Single
1024 x 768 24 Single
1366 x 768 24 Single
800 x 600 18 Single
*800 x 600 18 Single
1024 x 768 18 Single
1st: LCD Panel
2nd: VGA Port
CRT only
(Pineview CRT only)
*Note: specialized for Sharp 12.1” LQ121S1LG41/LQ121S1LG42 panel.
Page 44
36
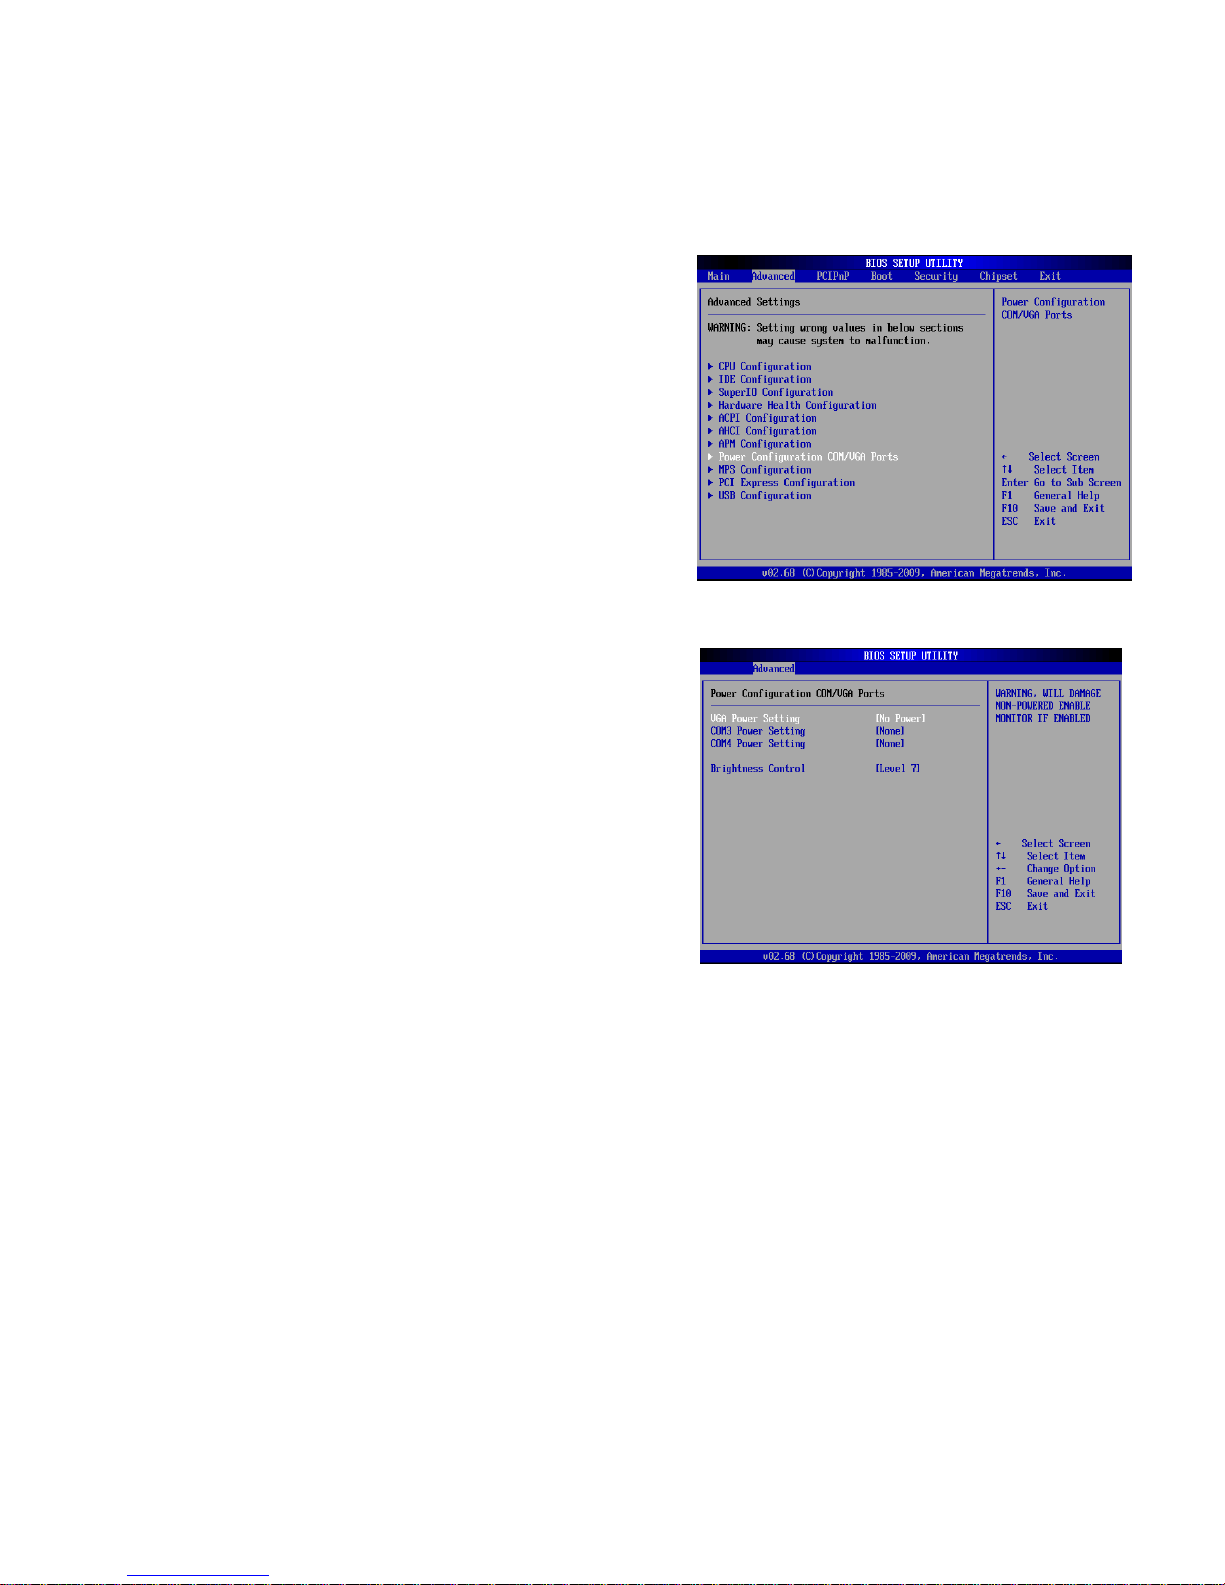
2nd VGA Power Setting
VGA port power must be on through BIOS/Utility for default is “No Power“
1. Power on the system, and press the
<DEL> key when the system is booting
up to enter the BIOS Setup utility.
2. Select the Advanced tab
3. Select "Power Configuration COM/VGA
Ports" and press <Enter> to go to
display the available options.
4. To switch on the power, select
"+12V" press <Enter>. Please Save
the change by pressing F10
Page 45

37
Appendix
Drivers Installation:
The shipping package includes a Driver CD. You can find every individual driver and
utility that enables you to install the drivers in the Driver CD.
Please insert the Driver CD into the drive and double click on the “index.htm” to
pick up the models. You can refer to the drivers installation guide for each driver in
the “Driver/Manual List”.
 Loading...