

Page 1

CODELOCKS LTD UK
Tel: +4 4 (0 ) 16 35 2 39 64 5
Fax: +44 (0) 1635 239644
sales@codelocks.co. uk
Helpline, se rvice & spares
FREEPHONE 0800 393 405
CODELOCKS CHINA
Tel: +8 6 75 7 86 60 1 98 1- 3
Fax: +86 757 8660 1980
CODELOCKS US
Tel: +1 7 14 9 79 2 90 0
Fax: +1 714 979 2902
sales@codelocks.us
Help: 1.877.CODELOCK
www.codelock s. co m
Step 9 Select th e ca m wh ic h su it s your door and frame
and attac h it t o th e sq ua re shaft at t he e nd o f
the spind le .
Step 10 Now check t he o pe ra ti on o f the lock using the
factory U se r Co de 0 0 99 .
Step 11 If the lo ck i s fu nc ti on in g correct ly, C HA NG E
TH E DE FAULT MA ST ER C OD E 55 4 4 33 2 2 and
DE FAULT US ER C OD E 00 9 9 and pro gr am t he
lock usin g th e programming and ope ra ti ng
instructi on s en cl os ed .
B) N ew in stallat ion
Step 1 Place tem pl at e on d oo r an d mark upper 6mm (1/4”)
hole and lo we r 16 mm (5/8”) hole.
IMPORTANT N OT E: B ef ore drill in g fi xi ng h ol es , please
ensure th at t he position of the ca bi ne t lo ck w he n fi tted will
allow eno ug h cl ea ra nc e fo r selected cam to work.
Step 2 Drill bot h fi xi ng h ol es .
Step 3 Continue in st al la ti on f rom step 4 to 1 1, a bo ve .
CL1000
Right Hand
Horizontal Lock
Installation
Instructions
II- 10 00 -V RH01
tp2CLInstallInstructionsRIGHTH.i1-2 1-2 18/04/2008 01:42:07
Page 2
SPECIAL NOTES
• Before in st al ling the lock, load t he b at te ri es a nd f amiliarise yourself
with the op er at io n an d programming .
• The handl e wi ll n ot t ur n un ti l yo u en te r the factory default
Ma st er Co de 5 5 44 3 3 22 O R th e Us er C od e 00 9 9.
• Please se e pr ogramming guide to se t yo ur o wn c od es .
INSTALLATION GUIDE
A) Repl acing e xisti ng cam lock with
the Cabinet Lock
Step 1 Remove ex is ti ng c am l oc k.
Step 2 Place tem pl at e ov er h ol e le ft by cam lock and ma rk
upper fix in g ho le .
Step 3 Drill the 6 mm (1/4”) upper fi xi ng h ol e.
Step 4 Fit the C ab in et L oc k to t he door by passing the sp in dl e
throu gh t he 1 6mm (5/8”) hole.
Step 5 If re qu ired, fro m th e in side of the door, pass either o f th e
packing p ie ce s ov er t he s pi ndle to centralise th e lo ck .
Step 6 Now secur e th e lock by threa di ng t he l arg e nu t on to
the spind le .
Step 7 Fit one o f th e up pe r fi xi ng bolts to suit your
door thic kn es s.
Step 8 Tighten the lower fi xi ng n ut a nd u pp er bolt.
FITTING INSTRUCTIONS
The Cabin et L oc k ca n be f it ted to:
A) Cupboa rd s, cabinets and lockers e tc a s a di rect re pl ac em en t for
existing ca m lo ck s.
B) It can also be ea si ly f it te d to c upboard s an d ca bi ne ts t ha t do not
have an e xi st in g lo ck in g de vice.
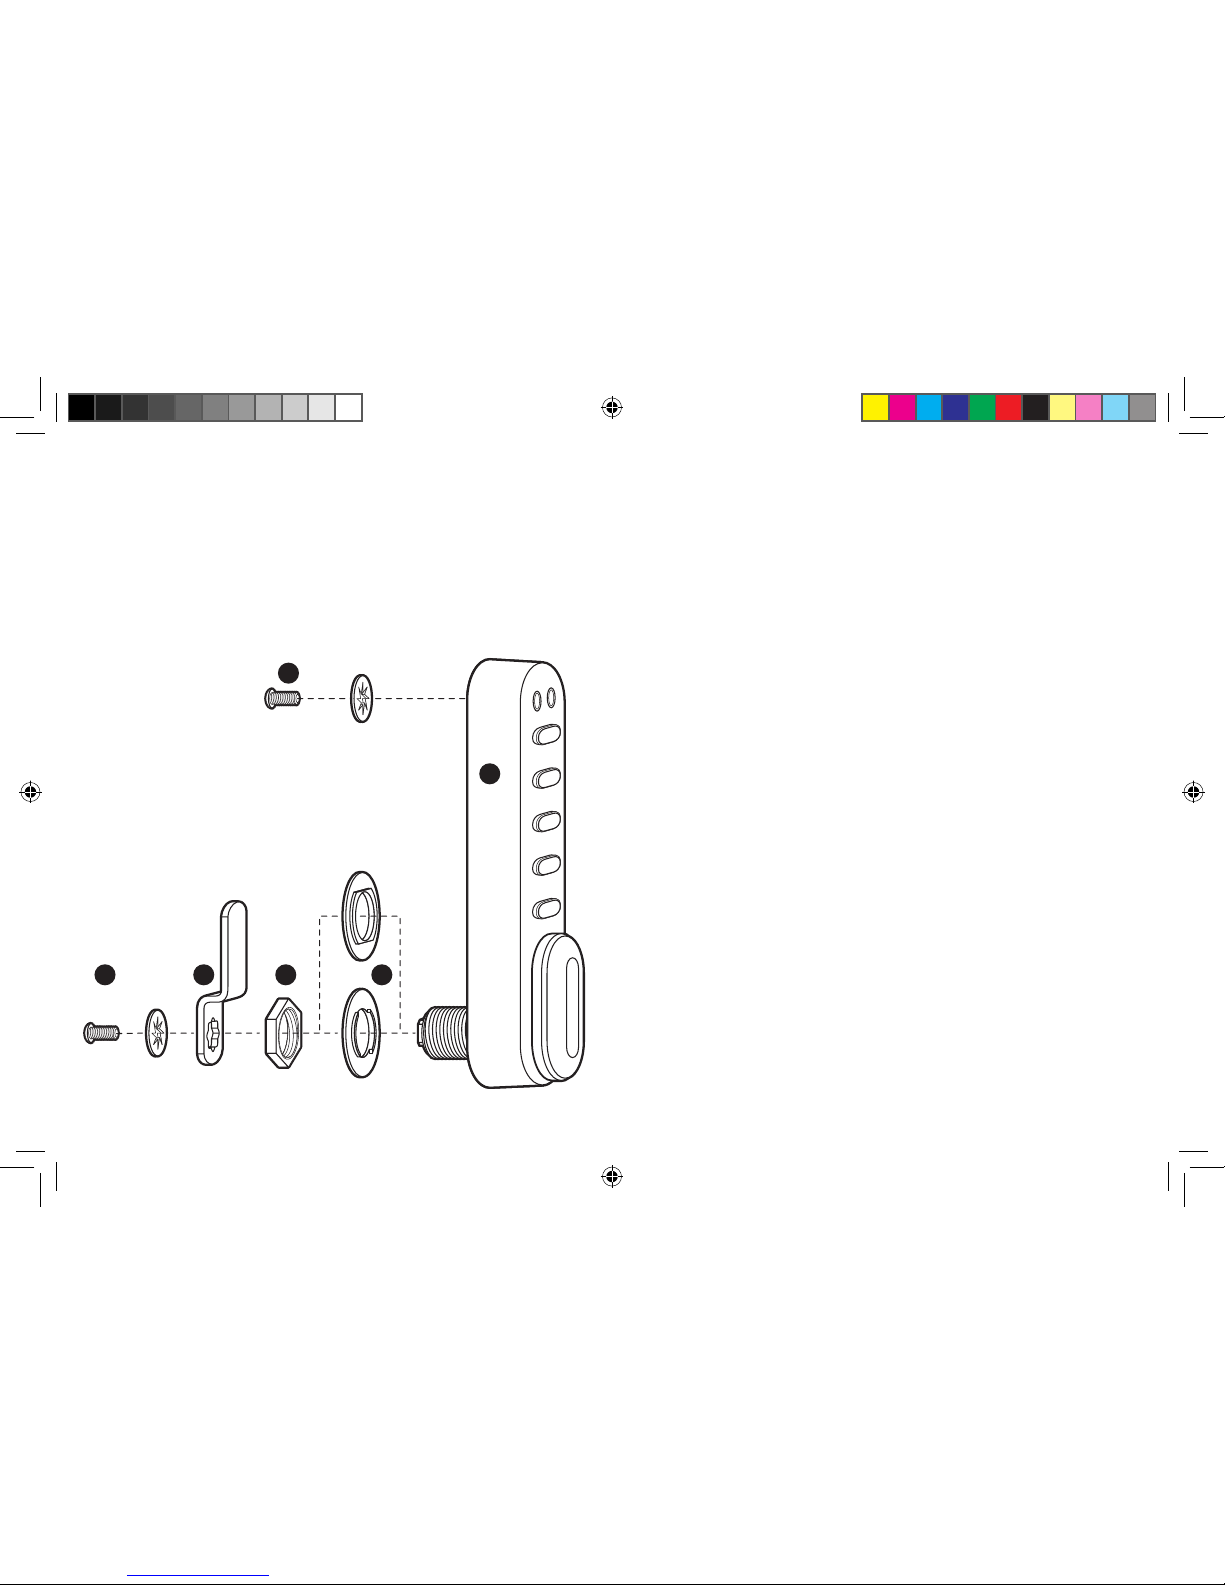
1 Cabinet L oc k
2 Upper fix in g bo lt x 2
3 Packer pi ec es x 2
4 Locking n ut
5 Cams x 2
6 Cam fixin g bo lt
• B at te ri es – 2 x 1.5V AAA
• Template x 1
1
2
3456
tp2CLInstallInstructionsRIGHTH.i3-4 3-4 18/04/2008 01:42:07
 Loading...