

Page 1
Print Page
You ar e curr ently in: Codelocks UK > CL5000 Locks Programming Operating Instructio ns
CL5000 Programming & Operating Instructions
CODES
The factory set Master Code is #1234. This should be changed immediately after installation (see program 10).
The Master Code and optional Sub-Master Code always start with the # prefix. This puts the lock into Programming Mode.
When t he Mast er o r Su b-Ma ste r C ode is enter ed 3 times cons ecu tively w ithout per forming a prog ramming f unction, a pena lty
time of 10 seconds is ac tivated. This feature is to disc ourage the casual use of Mas ter Codes as U ser Codes.
The length of the Master Code determines the length of the User Code and the Sub-Master Code.
If the Master Codes is changed to another of the same length then the Sub-Master and all User Codes will be retained.
If the Master Code is c hange to one of a different length then the Sub-Master and User Codes will be deleted.
Codes may be 4, 5 or 6 digits long.
The lock memory will store 80 different User Codes, each identified by a User Code ID – 01 to 80.
The lock memory can store 10 different One Time User Codes. Each One Time User Code is identified by a One Time User
Code ID – 81 to 90.
When in Prog ramming Mode a Program Code mus t be ent ered within 5 s econds , other wise the Re d light will flash and beep
and the lock w ill revert to normal.
If a programming mistake is made wait 5 seconds , the Red light will flash and beep and the lock will revert to normal.
A new code will be rejec ted if it is already in the memory.
OPERATING INSTRUCTIONS
The CL5000 lock has a 12 button keypad including * and # buttons.
UNLOCK TIME
The factory pre-set UNLOCK time is 4 seconds. This may be changed – (see Program 06).
PENAL TY T IME
Enter ing 3 inc orrec t User codes will caus e the loc k t o su spen d ac tivity for a penalty time of 10 se cond s.
KEY OVER-RIDE
The Key-in-Lever allows the lock to be opened for Security and Housekeeping Functions. Turn the key clockwise 90° and
operate the lever handle to open the door.
CODE FREE MODE
Using the Master or the Sub-Master Code, programs 08 and 09 will put the lock into, and out of, Code Free Mode. In Code Free
Mode battery power is not being us ed.
If the Master and Sub-Master C odes cannot be issued for this purpose it is poss ible to use the Key-in-Lever to put the lock into
Code Free Mode. This requires that the cylinder tailpiece be changed according to the instruction. (SEE LATER)
REVERTING TO FACTORY SETTING
If the Master Code is not known the lock memory c an be cleared and made to revert to the factor y Master Code as follows:
1. Remove one battery.
2. Pres s and ho ld the ‘0’ button, replace the b atter y, the Blu e LED will flas h twic e, beep w ill soun d twic e, then r elease th e ‘0’
button.
3. Within 3 secon ds pres s the ‘*’ button 3 times. The Blue LED w ill light continuous ly for 7 sec onds and t hen 2 beeps will so und.
The lock will have reverted to the factory set Master Code, #1234, and all other settings will be erased.
REMOTE RELEASE OPTION
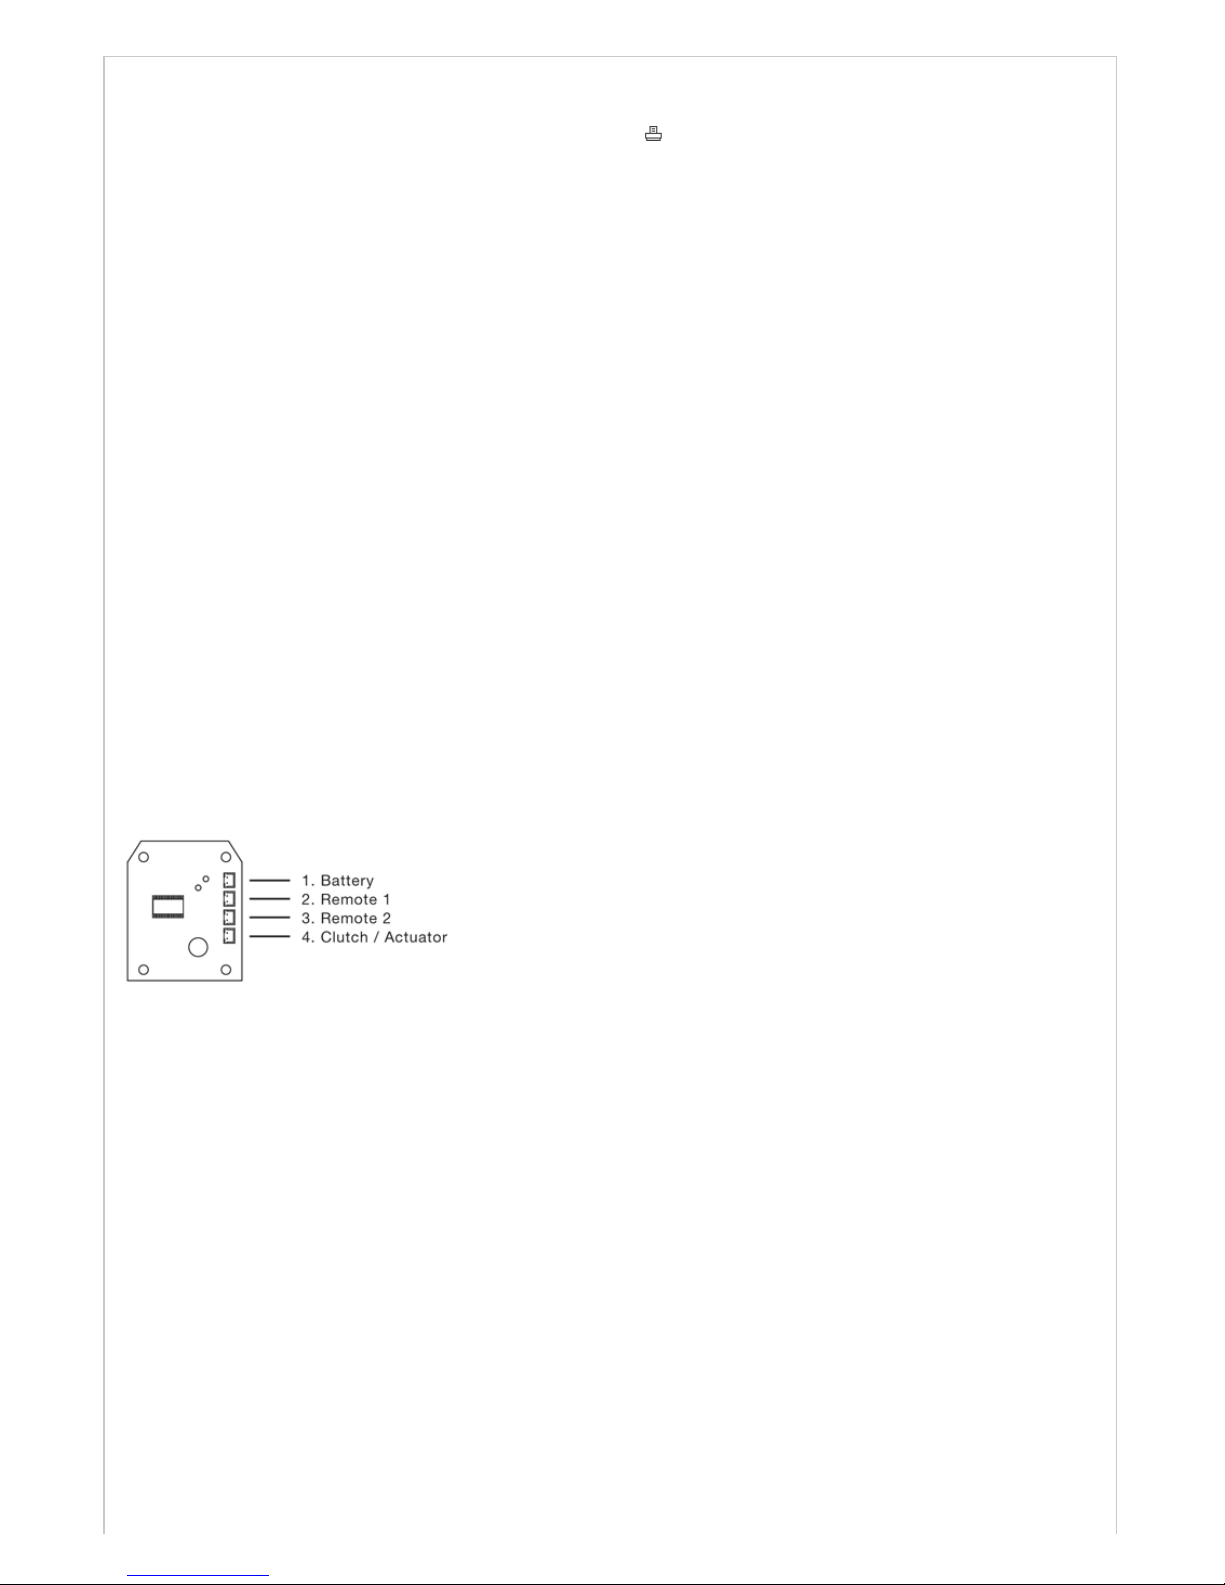
The lock has 2 sets of terminals for remote release, labelled REM 1 and REM 2 on the printed circuit board in the front housing.
Cables are provided with the lock for these connections
REM 1 is intended for use when there is a need to allow a visitor to open the door after having been identified by intercom or by
sight from within. REM 1 would be connected to a pushbutton on a reception desk, or to the appropriate button on an intercom.
Pushing the button would caus e the Blue LED to light and would release t he loc k for the no rmal s et time.
REM 2 is intended for use when there is a need for the door to be release by an alarm system, such as a fire alarm. This enables
emergency personnel to rapidly chec k that no one is tr apped / over looked in class rooms, w ards, gues t rooms , etc during a fire
drill. When activated by an alarm REM 2 will maintain the unlocked c ondition for 30 minutes. During this time the red LED will flash
once every s econd and beep to indicate the unloc ked condition. The lock will automatically rev ert to normal after 30 minutes. If
required Program 11 can be used to revert the lock to normal before the 30 minute period has finished.
LOCKED / UNLOCKED STATUS INDICATION
Using Program 15 the Blue and Red LED’s can be programmed to indicate locked and unlocked status.
BATTERY POWER
These Electronic Codelocks should provide well in excess of 200,000 openings from 4 x AA cells rated at 2,900 mAh.
LOW BATTERY
When t he batter y pow er is low the Red LED will flash 5 times befor e the Blue LED will flas h 5 times befor e the Blue LED f lashes to
signal acceptance of the code. Batteries should be changed as soon as this happens.
REMOVAL OF FRONT-LOAD CYLINDERS TO CHANGE KEY BY PASS FUNCTION, TO REPIN CYLINDERS, OR *TO
REPLACE WITH CYLINDERS BY A DIFFERENT MANUFACTURER.
1. Remove handle and c ylinder
Page 2
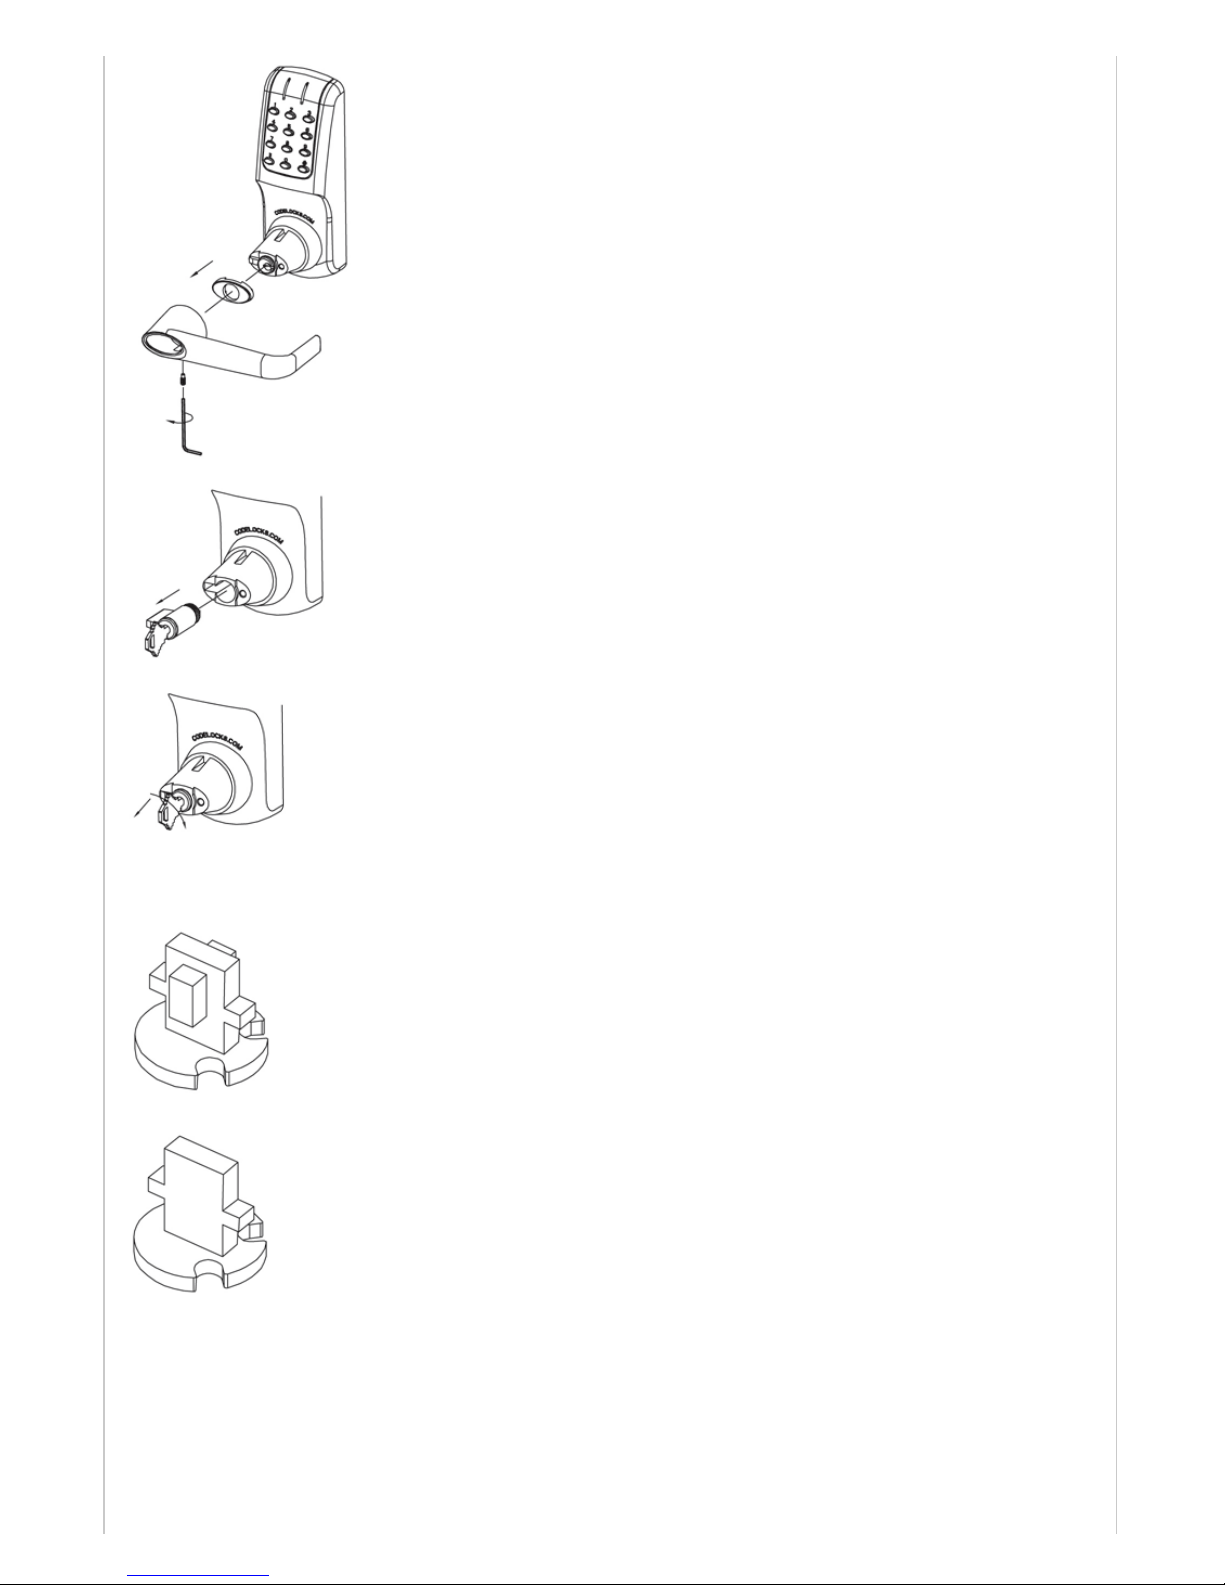
2. Turn the k ey 90° clockwise and remove c ylinder from bos s.
3. With key tur ned 90° clockwise replace the c ylinder, cylinder cov er and handle.
* If intending to use a cy linder by a different manufactur er it is adv isable to c onfirm befor ehand that th e new c ylinder will fit the
boss. The CL5000 uses a 6 pin scrw-c ap cylinder.
CHANGING KEY BY PASS FUNCTIONS
4. Storeroom func tion tailpiece allows key to tur n 90° clock wise to enable handle to retrac t the latch – this is the factor y fitted
function.
5. Classr oom function tailpiece allows key to turn 90° clockwis e and be removed leav ing the handle engaged in Code Free Mode.
Code Free Mode is cancelled by turning key 90° anti-clockwise.
These tailpieces will fit most screw-cap cylinders from other manufacturers.
6. Hold down the contr ol pin in the end of the cylinder and uns crew the cap.
Page 3
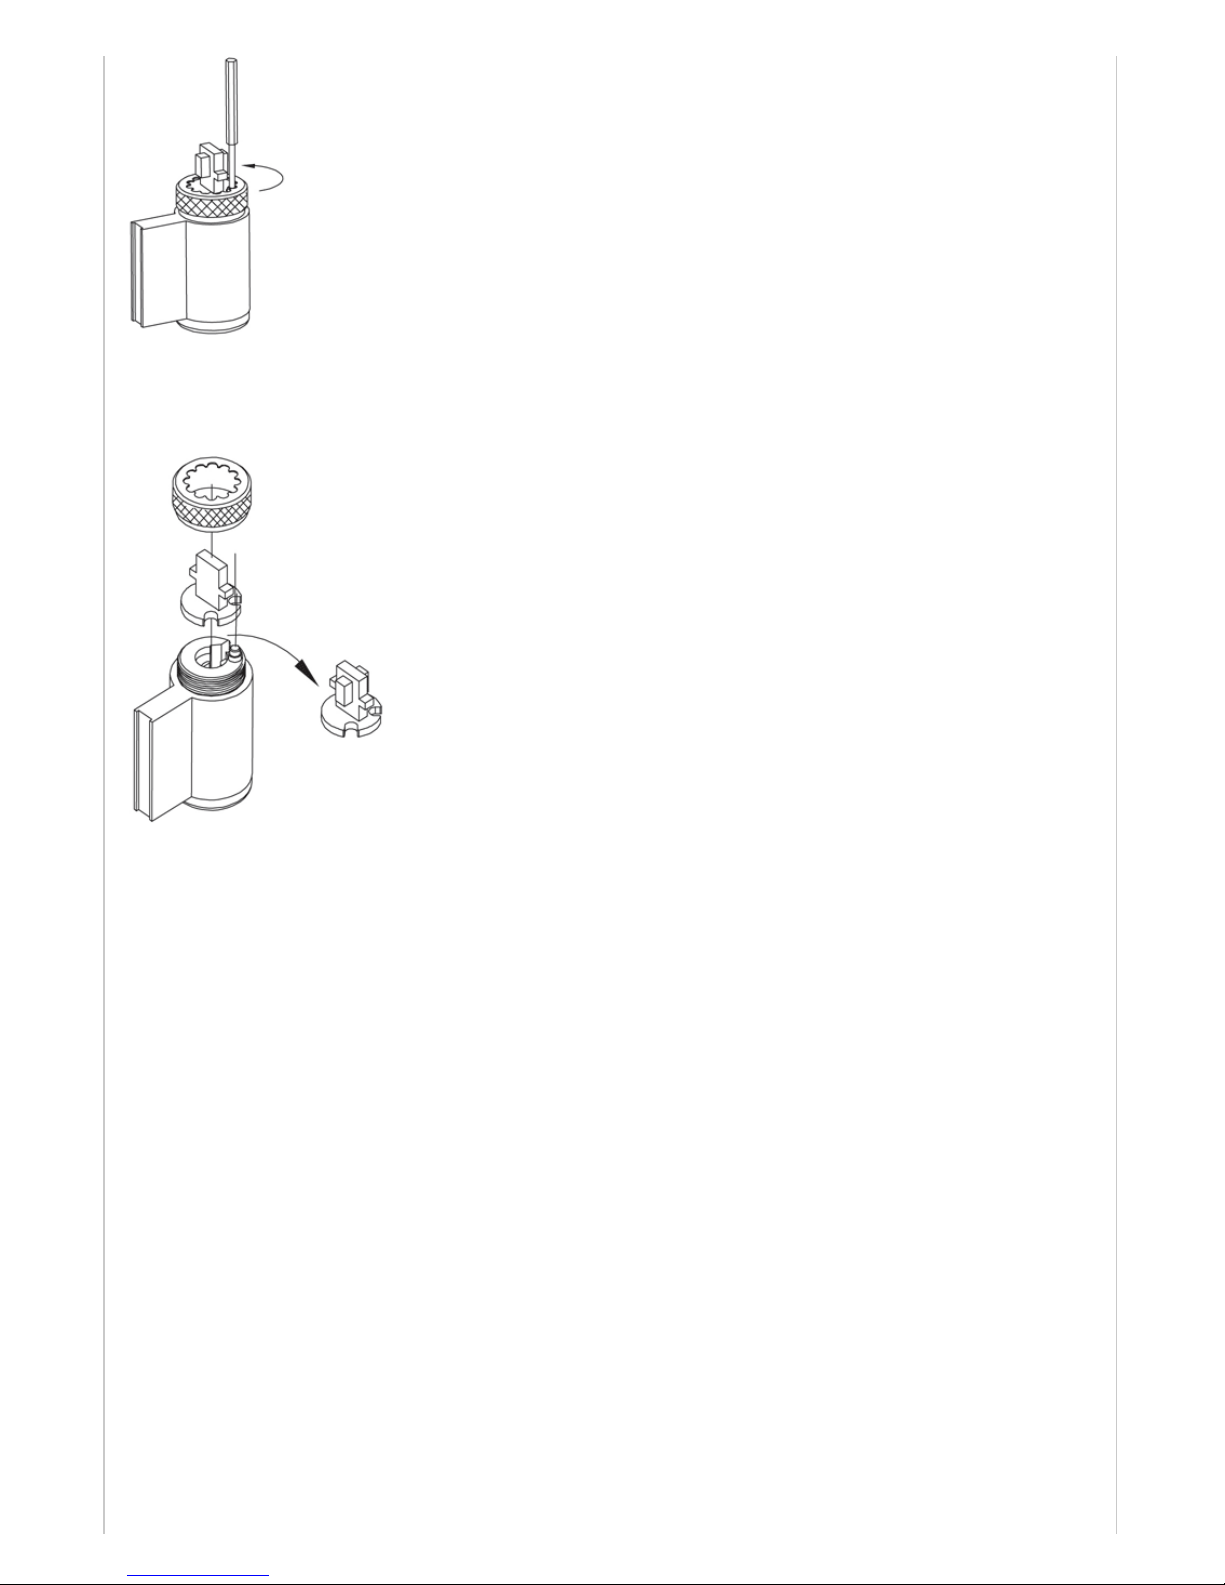
7. Replace the tailpiece, hold down the control pin and scr ew the cap fully on without tightening. Ensure control pin projec ts to lock
the cap.
Test the key operation
If the key is difficult to insert or tight when turning, then the cap maybe too tight. Loosen the cap one notch at a time and try the
key again. If the key inserts and turns OK, but is difficult to remove, then the cap may be too loose. Tighten the cap one notch at a
time. Adjust the cap until the key inser ts, turns and removes eas ily.
Caution! Do not insert the key in the cylinder once you have removed the screw-cap
PROG RAMMING
* First change th e fact ory Master Cod e – see prog ram 10. If the Maste r or Su b-Master C ode is en tered 3 ti mes
consecut ively wit hout perform ing a programmin g fun ction , a penalt y time of 10 second s is activated .
Note: The Master Code and Sub-Master Code MUST always start with #.
Codes can only be the same length as the Master Code.
A • or • in the Key Sequence below indicates LED illumination.
If entered, a Sub -Master Code can be used inst ead of th e Master Code fo r all programs except program 10 and 12.
ENTER NEW USER CODE Prog ram 01
Key Sequence
#Master C ode • 01 • User Code ID ( eg 05), New Code (eg 4321) ••
Result
New Code 4321 entered at User Code ID 05
(• when user enters code)
SUPEND USER C ODE Prog ram 02
Key Sequence
#Master C ode • 02 • User Code ID ( EG 05) ••
Result
User Code at ID 05 suspended
(•• when user 05 enters c ode)
RESTORE USER CODE Program 03
Key Sequence
#Master C ode • 03 • User Code ID ( eg 05) ••
Result
User Code at ID 05 restored
(• when user 05 enters code)
SUSPEND ALL USER CO DES Pro gram 04
Key Sequence
#Master C ode • 04 ••
Result
All User C odes suspended
(•• when all users enter code)
RESTORE ALL USER CODES Program 05
Key Sequence
#Master C ode • 05 ••
RESULT
All User C ode r estored
(• when all users enter code)
CHANGE UNLOCK TIME Program 06
Key Sequence
#Master C ode • 06 • enter open time
(range 2 – 9 secs) ••
RESULT
After co de entry the loc k will unlo ck for the set time
(Factory pre-set time is 4 seconds)
Page 4

ONE TIME USER CODES Program 07
Key Sequence
#Master C ode • 07 • One time code ID
(eg 81) • One time Code (eg 4321) ••
RESULT
Code 4321 in position 81 will work once and then be removed from memory
Note: ID Positions 81 to 90 are reserved for this program functions, allowing up to 10 One-Time User Codes to be
entered.
SET CODE FREE MODE Program 08
Key Sequence
#Master C ode • 08 ••
RESULT
Lock will be continuously unlock ed
CANCEL CODE FREE MODE Program 09
Key Sequence
#Master C ode • 09 ••
RESULT
Lock will revert to normal operation
CHANGE MASTER CODE Program 10
Key Sequence
#Master C ode • 10 • enter length of Master Code
Followed by new Master Code (eg 6, 123456) •
Confirm length of Master Code followed by new Master Code (eg 6, 123456) ••
RESULT
Master Code now c hanged to #123456. Note: If the length of the Master Code is changed then all previous User Codes
will be deleted
CANCEL EMERGENCY OPEN MODE Program 11
Key Sequence
#Master C ode • 11 ••
RESULT
The emergency unlocked condition via REN 2 will be cancelled and the lock will revert to normal operation
DELETE ALL USER CODES Program 12
Key Sequence
#Master C ode • 12 • 12 •• (7 sec s)
RESULT
All User C odes will be clear ed from t he memory
ADD/CHANGE SUB-MASTER CODE Program 13
Key Sequence
#Master C ode • 13 • Sub-Master Code (eg 2468) ••
RESULT
A Sub- Mast er C ode #2468 has been entered
DELETE SUB-MASTER CODE Program 14
Key Sequence
#Master C ode • 14 • 14 ••
RESULT
Sub-Maste r Co de has been delet ed
LOCKED/UNLOCKED STATUS Program 15
Key Sequence
1. #Master Code • 15 • 1 •• = Locked, No LED flashing (this is the default setting)
2. #Master Code • 15 • 2 •• = Locked – Red • LED flashing
3. #Master Code • 15 • 3 •• = Unlocked – Blue • LED flashing
RESULT
If activated LED’s will flash continuously every 5 seconds
Note: LED’s will not indicate unlocked mode by key
 Loading...