

Page 1
User’s Manual
Ver 1.04
CODE ELECTRONIC CO., LTD.
Page 2

Page 3
CODE Flame 384 User’s Manual
http://www.codelight.com
1
Summary
CODE Flame 384 scanner console is specially designed to control the various scanners. To adopt double CPU
work in coordination, high speed MCU proceed the precise control to achieve 16Bit X/Y movement. Up to 16
scanners may be connected with a maximum of 24 channels each. Multi scenes and multi Chase programs can be
operated at the same time, and 16 scanners can be selected simultaneously. It is equipped with two groups of
DMX 512 signals and is adapted for wide range of power voltage. The edit mode and running mode of the console
are convenient and flexible. So it is easy to edit and to handle. Flame 384 is the best suit for art show, theater,
dancing and acting.
Features
DMX512/1990 standard, 384 DMX control channels.
2 output with optical isolated,withstand 2000Vrms. Independent slot structure, which is easy to change.
Up to 16 scanners may be connected with a maximum of 24 channels each.
A large backlight LCD to display operation parameters.
24 sliders for channel, 1 slider for speed control.
1600 Chase steps, 48 Chases, up to 100 steps each. Each step contains its speed and cross time, can
be set respectively. Trigger mode selectable: Music synchronously and manual speed.
Cooperating with the Chase speed slider, the time of the program step can be changed from 0.03s to
180s.
48 scanner scenes can be used directly.
8 Chases, 48 scenes operated at the same time. At most 16 scanners can be selected simultaneously.
The X/Y channels of different scanners can be controlled by modulation wheel.
16Bit control for absolutely precise movement.
The music trigger source can be selected between audio line input or inside microphone.
Easy to edit and handle.
USB Flash Drive enable user to backup the show in a file
The Data auto-saves.
High performance switching power supply, with extremely low power harmonious distortion and wide
range of voltage, suit for the requirement of different country.
Explanation for Reading
For reading convenience, some signs and usual displays are specially defined as following:
xxx expresses a key,like HOLD .
When the parameter is inside [ ] on display,like [012],the parameter is the current choice.
Press xx + yy ,expresses press xx key first and hold,then press yy key.
X/Y control is named Pan/Tilt also. In the Manual, it is X/y, the control of X axis/Y axis.
When the key indicating light is on, it indicates that the key has been pressed, chosen or the function is
effective.
When the indicating light is blink:
BLACKOUT, EDIT function key--emphasizes the function.
Scanner number key-- expresses that the computer is in a hold state.
Scene section key and Chase section key - indicate that when multi scenes and multi Chases are
running, there are scene or Chase running on the section.
Page 4
CODE Flame 384 User’s Manual
http://www.codelight.com
2
Cautions
Danger: there is high voltage inside the equipment, avoid getting an electric shock.
Caution: please don’t open the equipment. There is no part that can be repaired by the user.
Using the equipment, the power supply must be connected to the earth line to ensure the safety.
When console and scanner are working, don’t plug or pull out DMX512 data cable with the power on.
This will destroy the port electric components of the console.
Don’t splash any liquid to the scanner console. This will shatter the inside components of the console
and make functions failure.
Scanner console is precision electric equipment. Please pay attention to moistureproof protection and
dustproof protection. And please clean the control panel in schedule with non-chemical cleanser.
Contents
Contents in the package:
CODE Flame 384 scanner console 1
User’s Manual 1
QC card 1
Power supply line 1
Connect to scanner
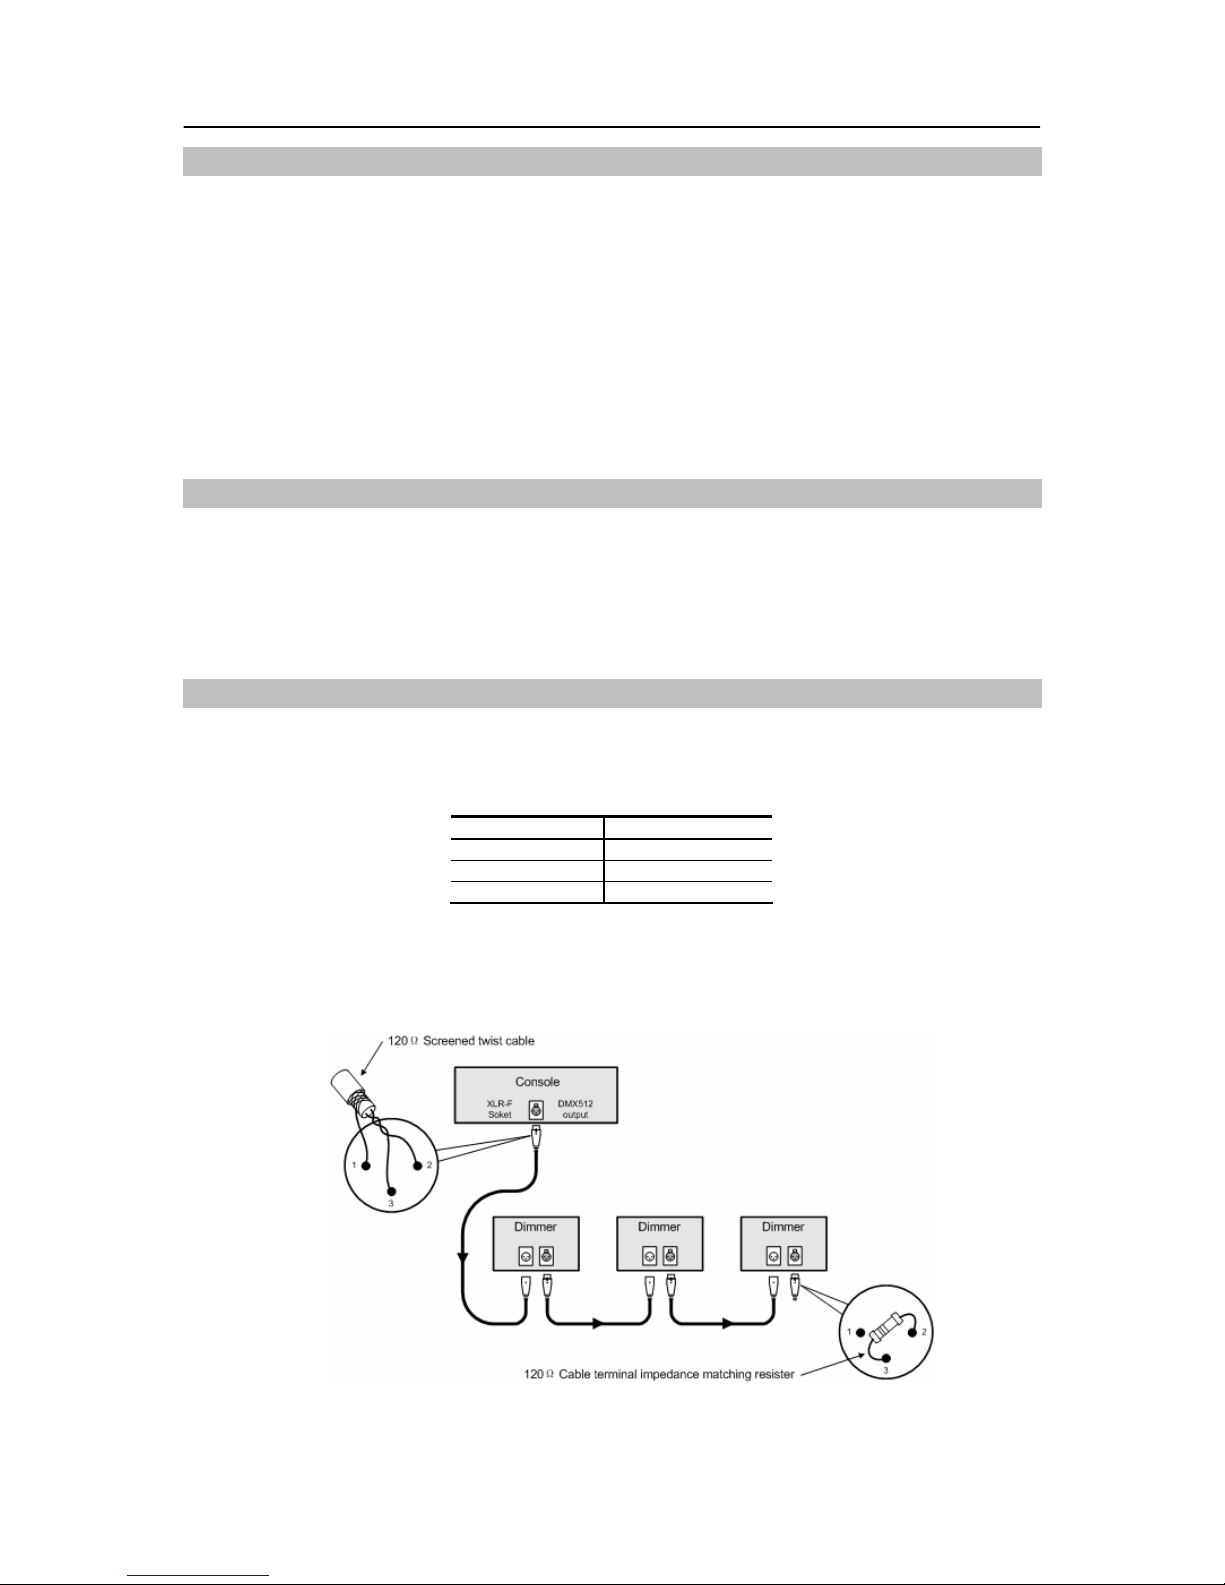
Flame 384 console has 2 optical isolated DMX512 signal independent drive device. So there are 2 DMX512
XLR-D3F. The connection of the output socket and the data cable as following:
Foot No. Data cable
1 Screen net
2 Signal 3 Signal +
In the end of DMX512 data cable, a 120Ω matching resister must be connected to the +, - end of the cable to
improve the signal transmission quality.
Page 5

CODE Flame 384 User’s Manual
http://www.codelight.com
3
The set of the scanner address
Flame 384 console distributes the DMX512 address of various scanners with the fixed space of 24 channels. The
reference is as following:
Scanner No.
Decimal
code
Binary Code Switch
Scanner No
Decimal
code
Binary Code Switch
Scanner No
Decimal
code
Binary Code Switch
1 001
123456789
ON DIP
001
002
004
008
016
032
064
128
256
2 025
123456789
ON DIP
001
002
004
008
016
032
064
128
256
3 049
123456789
ON DIP
001
002
004
008
016
032
064
128
256
4 073
123456789
ON DIP
001
002
004
008
016
032
064
128
256
5 097
123456789
ON DIP
001
002
004
008
016
032
064
128
256
6 121
123456789
ON DIP
001
002
004
008
016
032
064
128
256
7 145
123456789
ON DIP
001
002
004
008
016
032
064
128
256
8 169
123456789
ON DIP
001
002
004
008
016
032
064
128
256
9 193
123456789
ON DIP
001
002
004
008
016
032
064
128
256
10 217
123456789
ON DIP
001
002
004
008
016
032
064
128
256
11 241
123456789
ON DIP
001
002
004
008
016
032
064
128
256
12 265
123456789
ON DIP
001
002
004
008
016
032
064
128
256
13 289
123456789
ON DIP
001
002
004
008
016
032
064
128
256
14 313
123456789
ON DIP
001
002
004
008
016
032
064
128
256
15 337
123456789
ON DIP
001
002
004
008
016
032
064
128
256
16 361
123456789
ON DIP
001
002
004
008
016
032
064
128
256
Since the first address set is different for various scanner manufacturer. There are two ways to express 512
channels: the first is 000~511, the second is 001~512. The above table is suitable for the product of the second
way. For the product of the first way, we should subtract one from the above address, and the first bit of the binary
code switch should be changed from 1 to 0.
Page 6
CODE Flame 384 User’s Manual
http://www.codelight.com
4
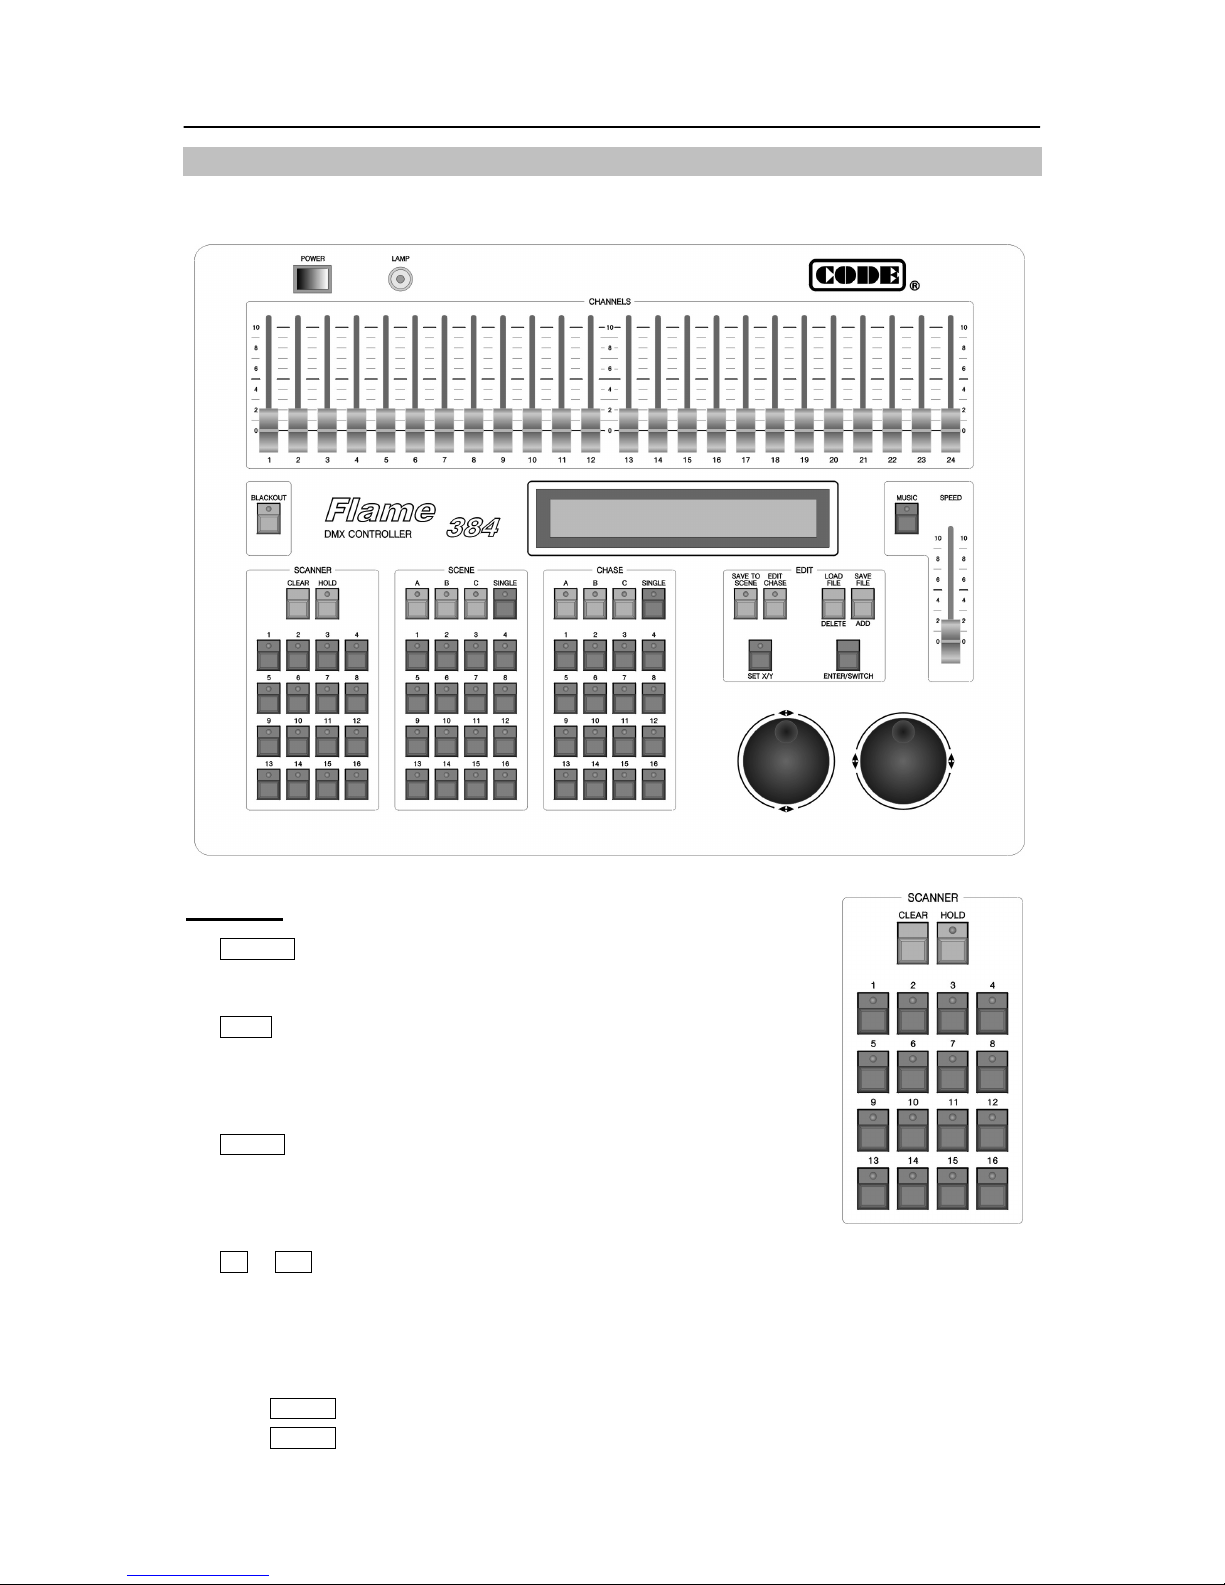
Introduction of the panel
The panel is as following:
SCANNER
CLEAR Clear key
Clear all states chosen by scanner keys and quit manual operation.
1-16 Section keys
When the indicating light is on, 1-16 scanner can be chosen from number
keyboard.
HOLD Scanner hold key
When the indicating light is on, it is a scanner hold state. Multi scanner can be
manual operated.
1 ~ 16 Scanner number keys:
Press these keys, the corresponding indicating lights are on and indicate the scanners are in manual
operating states.
Press again, there are two states:
HOLD light is off:the scanner can’t be operated manually.
HOLD light is on:the scanner is in a hold state.
Page 7
CODE Flame 384 User’s Manual
http://www.codelight.com
5
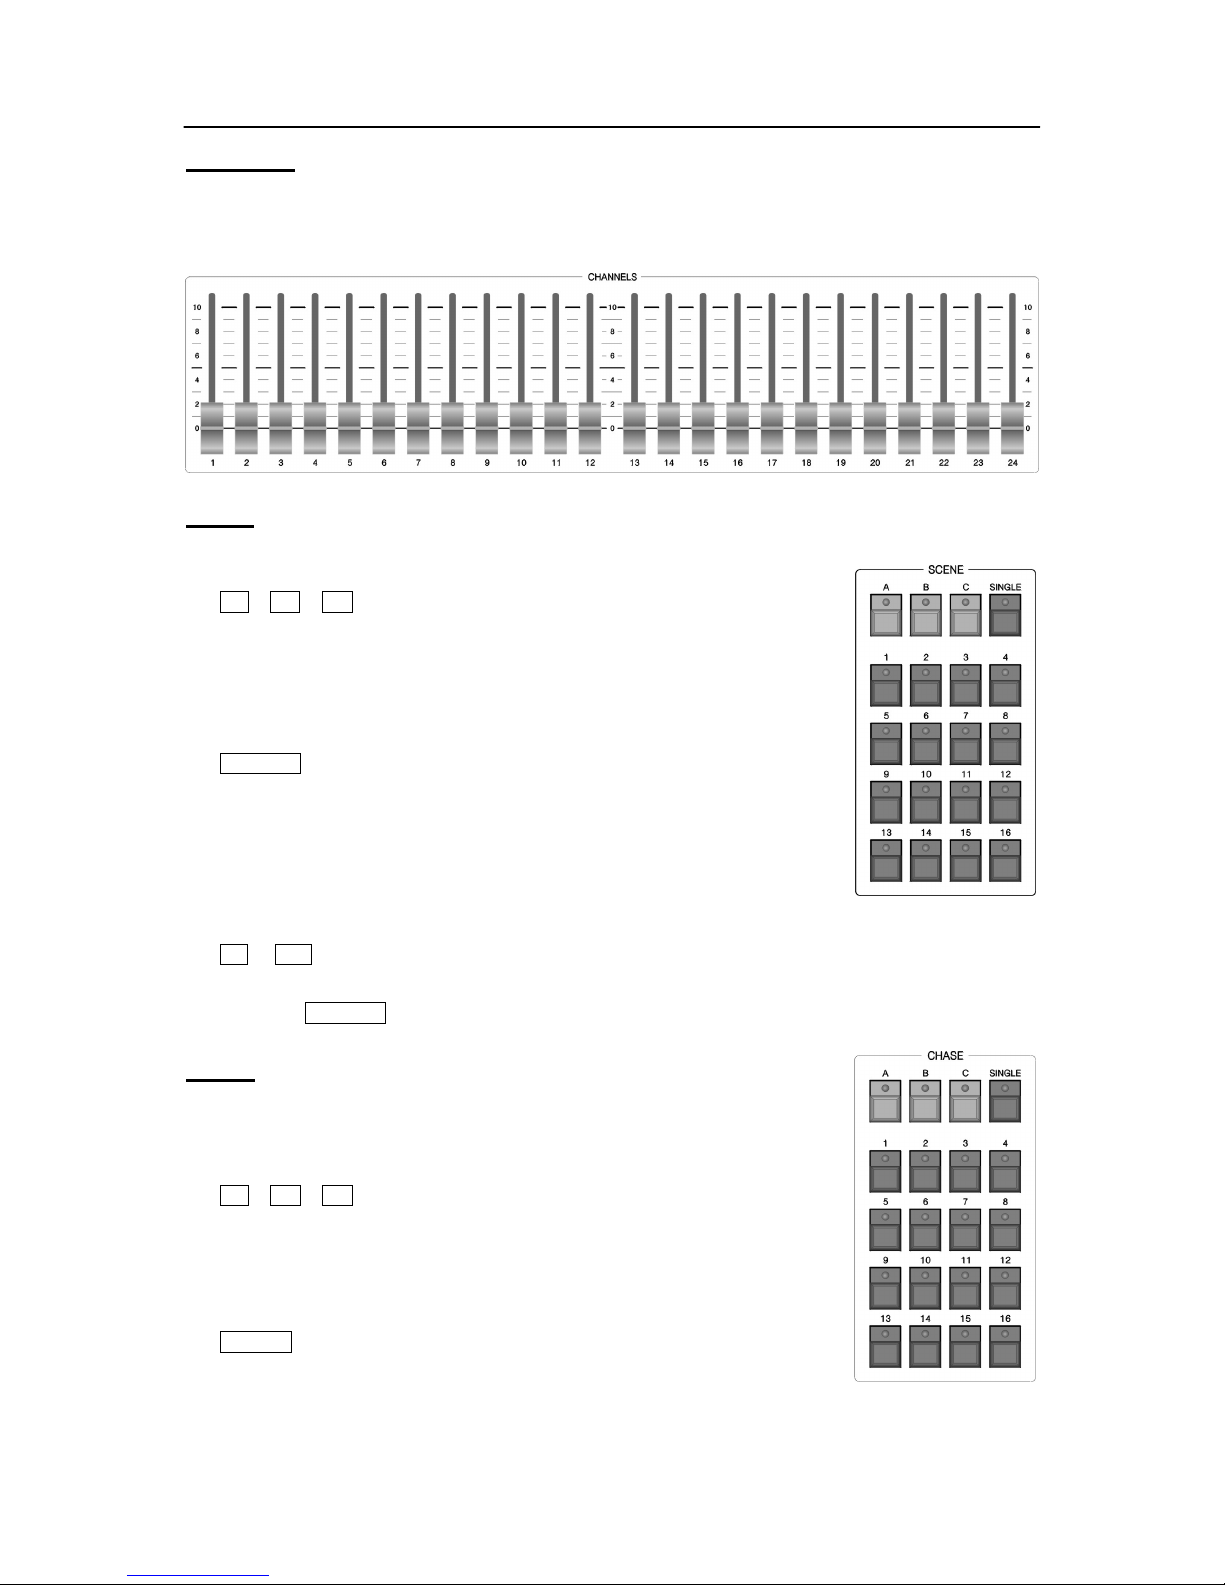
CHANNELS
In manual state, 24 channel slides can set the channel value of the chosen scanner.
CHANNELS must cooperate with SCANNER.
SCENE
Flame 384 console can save 48 scenes in 3 saving section with 16 scenes each.
A / B / C Scene section keys
When the key is pressed, the corresponding indicating light is on and indicates
that the section is current section. If current section is A, press scene number
key and A01-A16 scene can be operated. If the indicating light of not current
section is on, it indicates that there are scenes are running in that section.
SINGLE Single scene key
Set for each section respectively. The key is used to switch the following
states:
When SINGLE light is on, the current section only can run a scenes.
When SINGLE light is off, the current section can run multi scenes at
the same time.
1 ~ 16 Scene number key
Cooperating with scene section key, 16 scene keys can operate A01-A16, B01-B16, C01-C16, 48 scenes.
Using SINGLE key, single scene or multi scenes can be operated.
CHASE
Flame 384 console can save 48 Chases in 3 saving section with 16 Chases each
And can run up to the last 8 chases at the same time.
A / B / C Keys
When the key is pressed, the corresponding indicating light is on and indicates
that the section is current section. If current section is A, press scene number
key and A01-A16 Chase can be operated. If the indicating light of not current
section is on, it indicates that there are Chases are running in that section
SINGLE Single Chase key
The key is used to switch the following states:
When SINGLE light is on, the current section only can run a Chase.
When SINGLE light is off, the current section can run up to 8 Chases at the same time.
The key is effective for 3 Chase sections.
Page 8

CODE Flame 384 User’s Manual
http://www.codelight.com
6
1 ~ 16 Chase number keys
Cooperating with Chase section key, 16 Chase keys can operate A01-A16, B01-B16, C01-C16, 48
Chases. Using SINGLE key, single Chase or multi Chases can be operated.
Edit
SAVE TO SCENE Scene save key
Save the current channel values of the scanners to a scene with some
number.
Set the channel values of various scanners with manual operation, or add
some scenes, then press the key first, and press scene section key and scene
number key. The current channel values of the scanners are saved to the number of that section.
EDIT CHASE Chase edit key
Press the key, the indicating light blink. It is in the Chase edit state.
Press the key again, the indicating light is off. The edit result is saved and the edit state is quitted.
SET X/Y X/Y set key
Write the X/Y control channel number of various scanners to the console, then use modulation wheels to
control the position of the various scanners.
LOAD FILE / DELETE Import Files / Delete key
Press the key and hold 2 seconds, to import files from USB Drive or when the Chase is edited, press the
key to delete the current Chase step.
SAVE FILE / ADD Backup files / Add key
Press the key and hold 2 seconds, to backup files to USB Drive or when the Chase is edited, press the
key to add a new Chase step after the current one.
If the current Chase step is the last one of the Chase, the parameters of the current Chase step are
copied automatically to the new added Chase step.
ENTER / SWITCH Enter/Switch key
In scene edit and environment edit, it is ENTER key.
In Chase edit, it is SWITCH key.
WX、ST MODULATION WHEELS
In edit Chase, WX is used to change edit item, ST is used to set the value of
the item.
In manual operation mode, WX is used to set the X position of a scanner, ST
is used to set the Y position.
Page 9
CODE Flame 384 User’s Manual
http://www.codelight.com
7
Edit
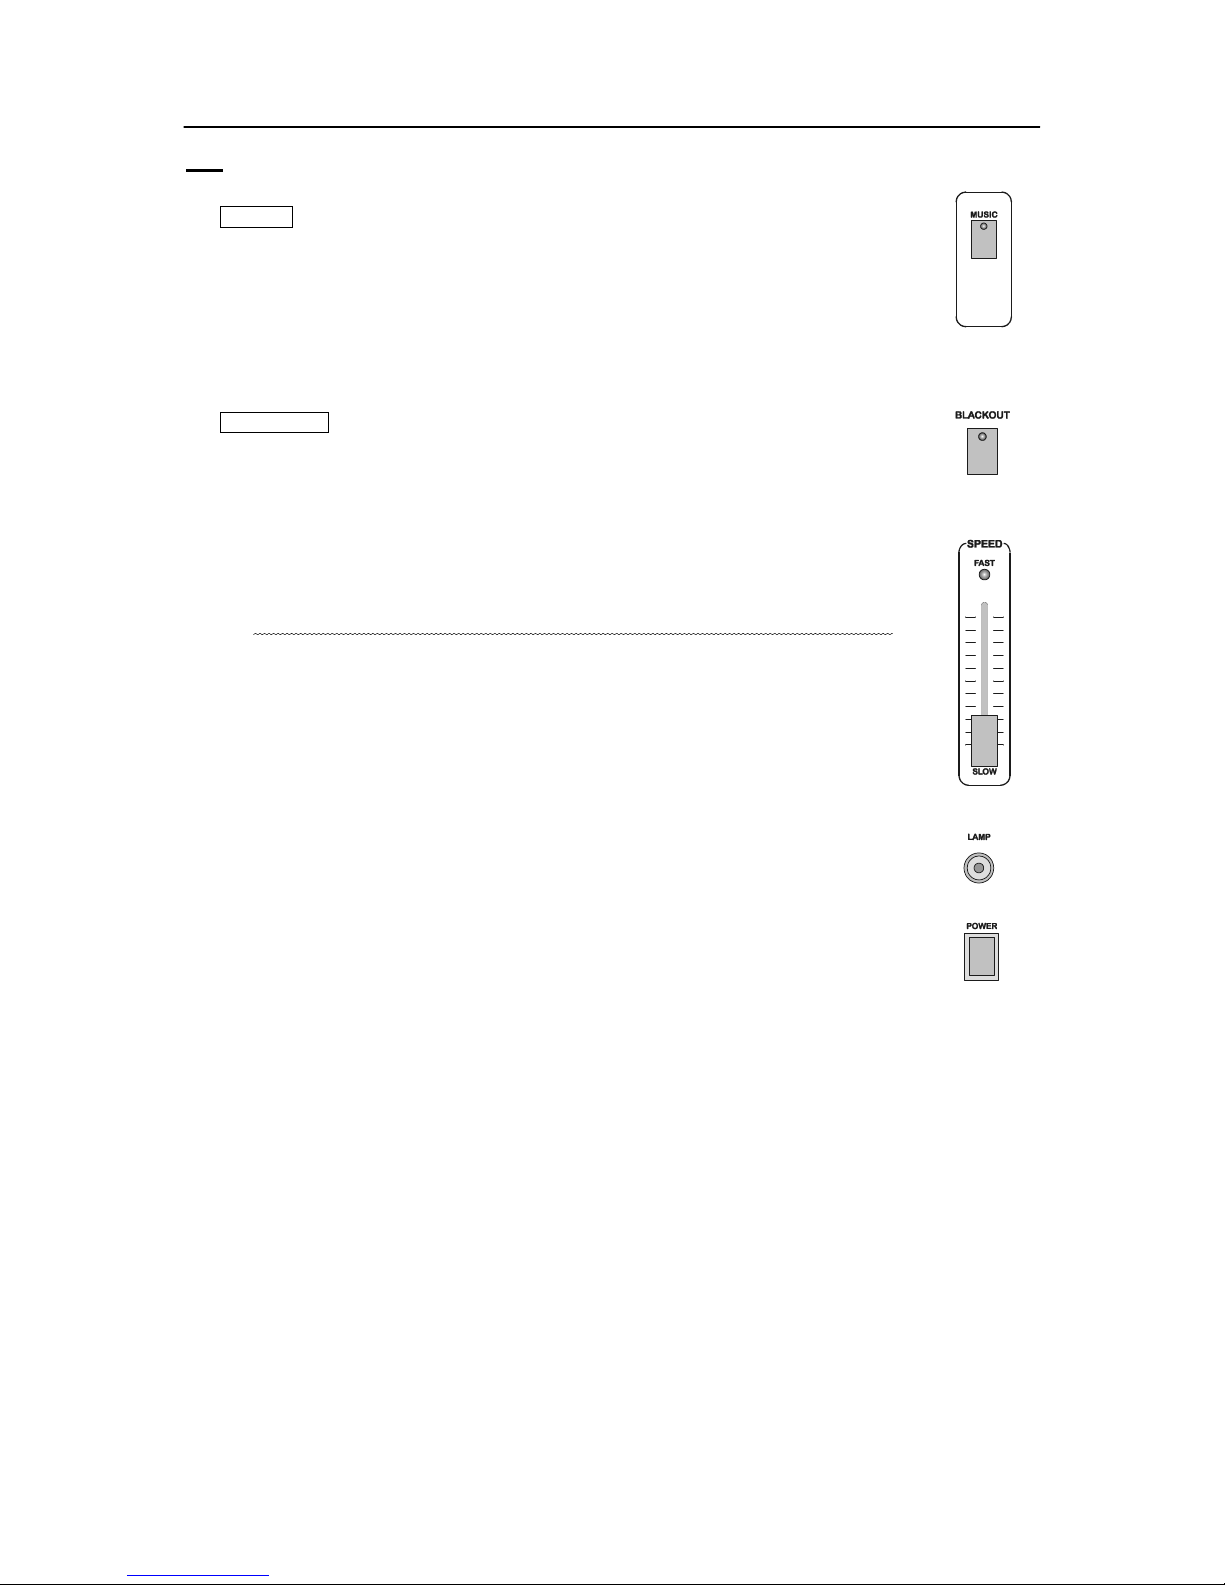
MUSIC Music trigger key
When the indicating light is on, Chase follows the music rhythm.
When the indicating light is off, Chase follows the set time multiplying the speed
percentage set by SPEED slider.
BLACKOUT Blackout key
When the indicating light is blink, console run an inside black scene automatically.
When the indicating light is off, console is in the normal state.
SPEED Chase speed slider
Push the slider to FAST, Chase runs faster. Push the slider to SLOW, Chase runs slower.
Chase step Time x SPEED percentage = the actual running time of the current Chase step
The changeable range is 300%-30%. When SPEED is 100%, Chase step runs on the set
time and the set cross time. When the higher speed is needed, SPEED should be adjusted
to smaller than 100%. The fast is 1/3 of the standard speed when SPEED is 30%. When
the slower speed is needed, SPEED should be adjusted to larger than 100%. The slowest
is one third of the standard speed when the SPEED is 300%.
LAMP:12V work lamp socket. The power of the lamp is smaller than 6W.
POWER:Power switch of the whole equipment.
Page 10

CODE Flame 384 User’s Manual
http://www.codelight.com
8
Introduction to the rear
Explanation:
There are 2 optical isolated DMX512 output sockets, which have the same signals.
The USB interface is compatible to the USB Drives which meet FAT format, such as USB1.0, USB2.0
and so on
Audio signal input socket is a 1/4” mono socket with –10 ~ 0dB input level. When the plug is connected,
music trigger signal comes from audio input signal. When the plug is pull out, music trigger signal comes
from the environment sound picked by the inside microphone.
Please use the standard fuse. The standard is printed on the backboard.
The power supply must be connected to the earth line to ensure the safety.
Set X/Y channels for scanners
Flame 384 scanner console can control the scanners with 8Bit or 16Bit X/Y resolution.
Before Flame 384 scanner console uses modulation wheel to control the X/Y position of any DMX512 standard
scanner, the address of every scanner must be set and the set control channel number of each scanner must be
written to the console one by one.
X axis of 16Bit resolution scanner is controlled by two data channels. Y axis is controlled by two data channels, too.
So X/Y is controlled by 4 data channels: X axis coarse channel (high 8Bit), X axis fine channel (low 8Bit), y axis
coarse channel (high 8Bit), and Y axis fine channel (low 8Bit). For 8Bit resolution scanner, X/Y is controlled by 2
data channels: X axis coarse channel and y axis coarse channel,
The explanations of the display can be seen in append table 1.
Setting operation of X/Y:
From the User’s Manual of the scanner, whether the scanner is 8Bit X/Y or 16Bit X/Y and the attribute of the
corresponding channel can be known.
1. Press SET X/Y key, the indicating light is on. It is in setting scanner’s X/Y state.
2. Use scanner keyboard to choose scanner.
3. Use modulation wheel WX to choose edit item.
4. Use modulation wheel ST to choose the value of the corresponding channel, range: 1-16, no.
5. Repeat step 2-4 to set X/Y of the other scanners.
6. Press SET X/Y key to quit the edit state.
For example:
Some 8Bit
scanner
X=5, Y=7.
Item Value
X-H 5
X-L no
Y-H 7
Y-L no
Some 16Bit
scanner
X coarse
channel=5,
X fine channel =6,
Y coarse
channel=7,
Y fine channel=8.
Item Value
X-H 5
X-L 6
Y-H 7
Y-L 8
Page 11
CODE Flame 384 User’s Manual
http://www.codelight.com
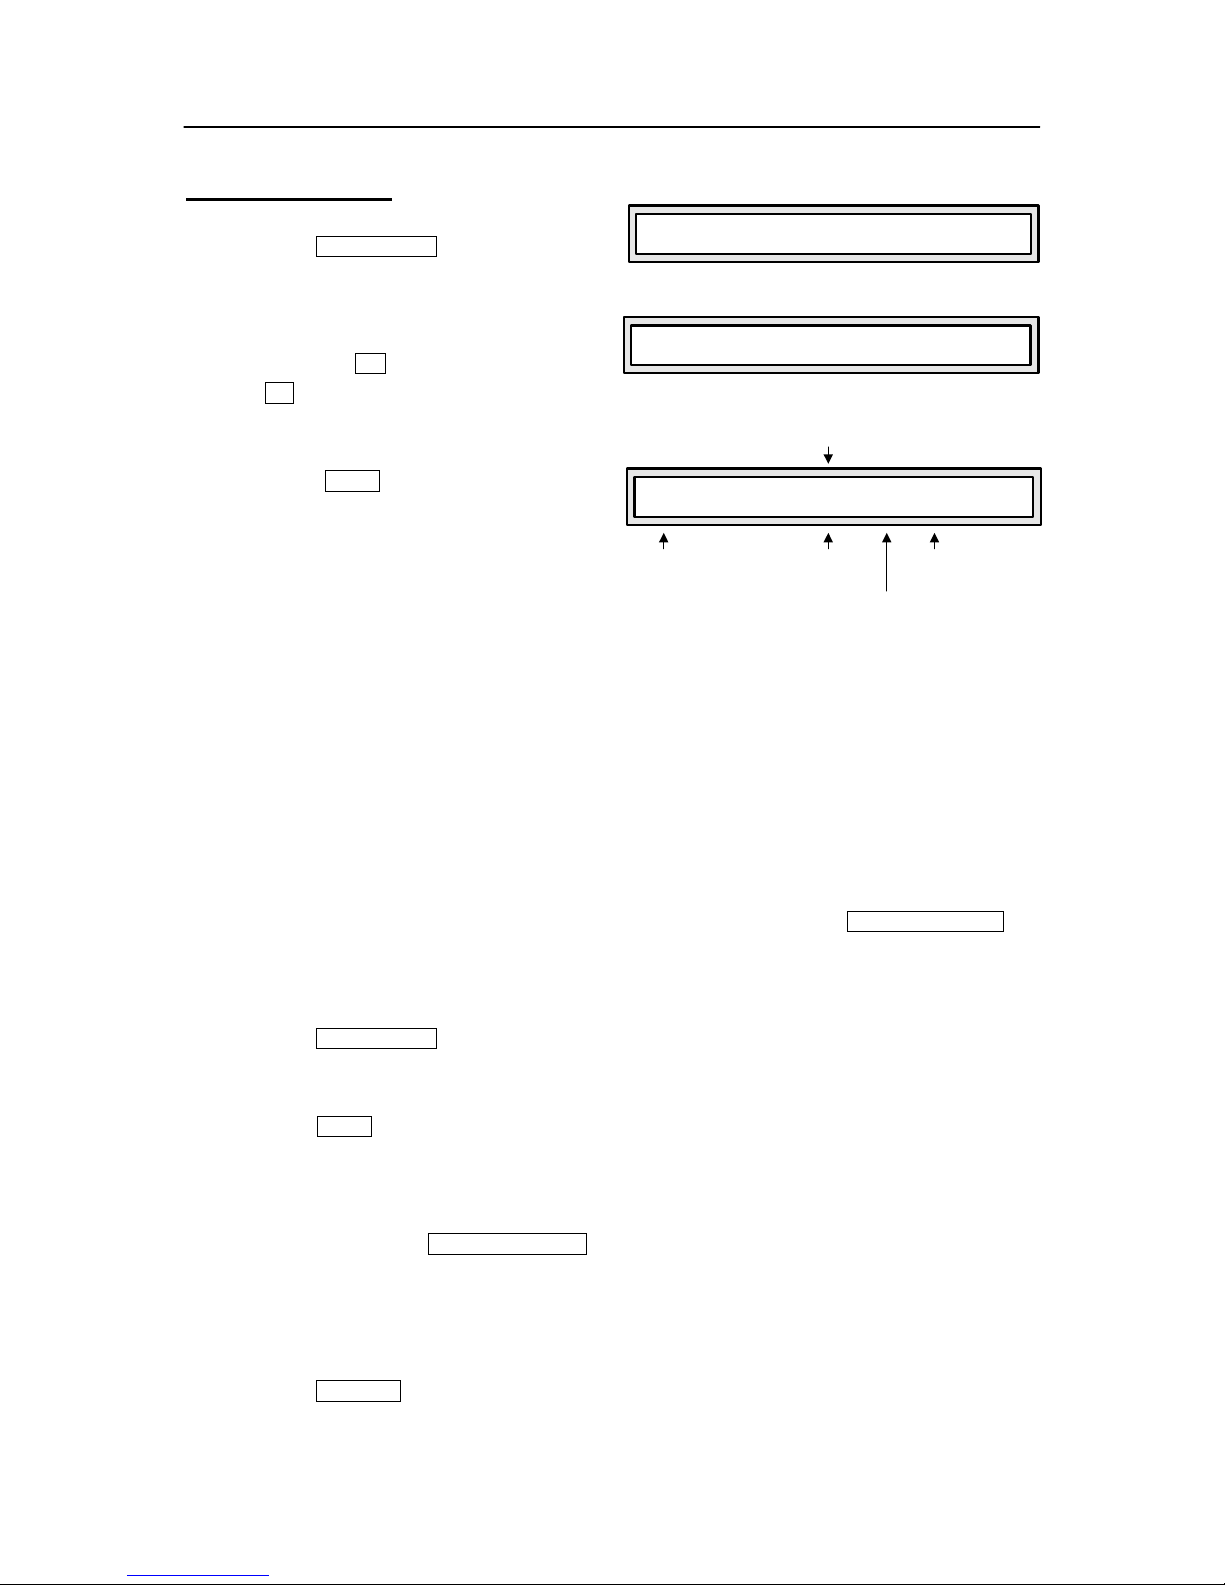
9
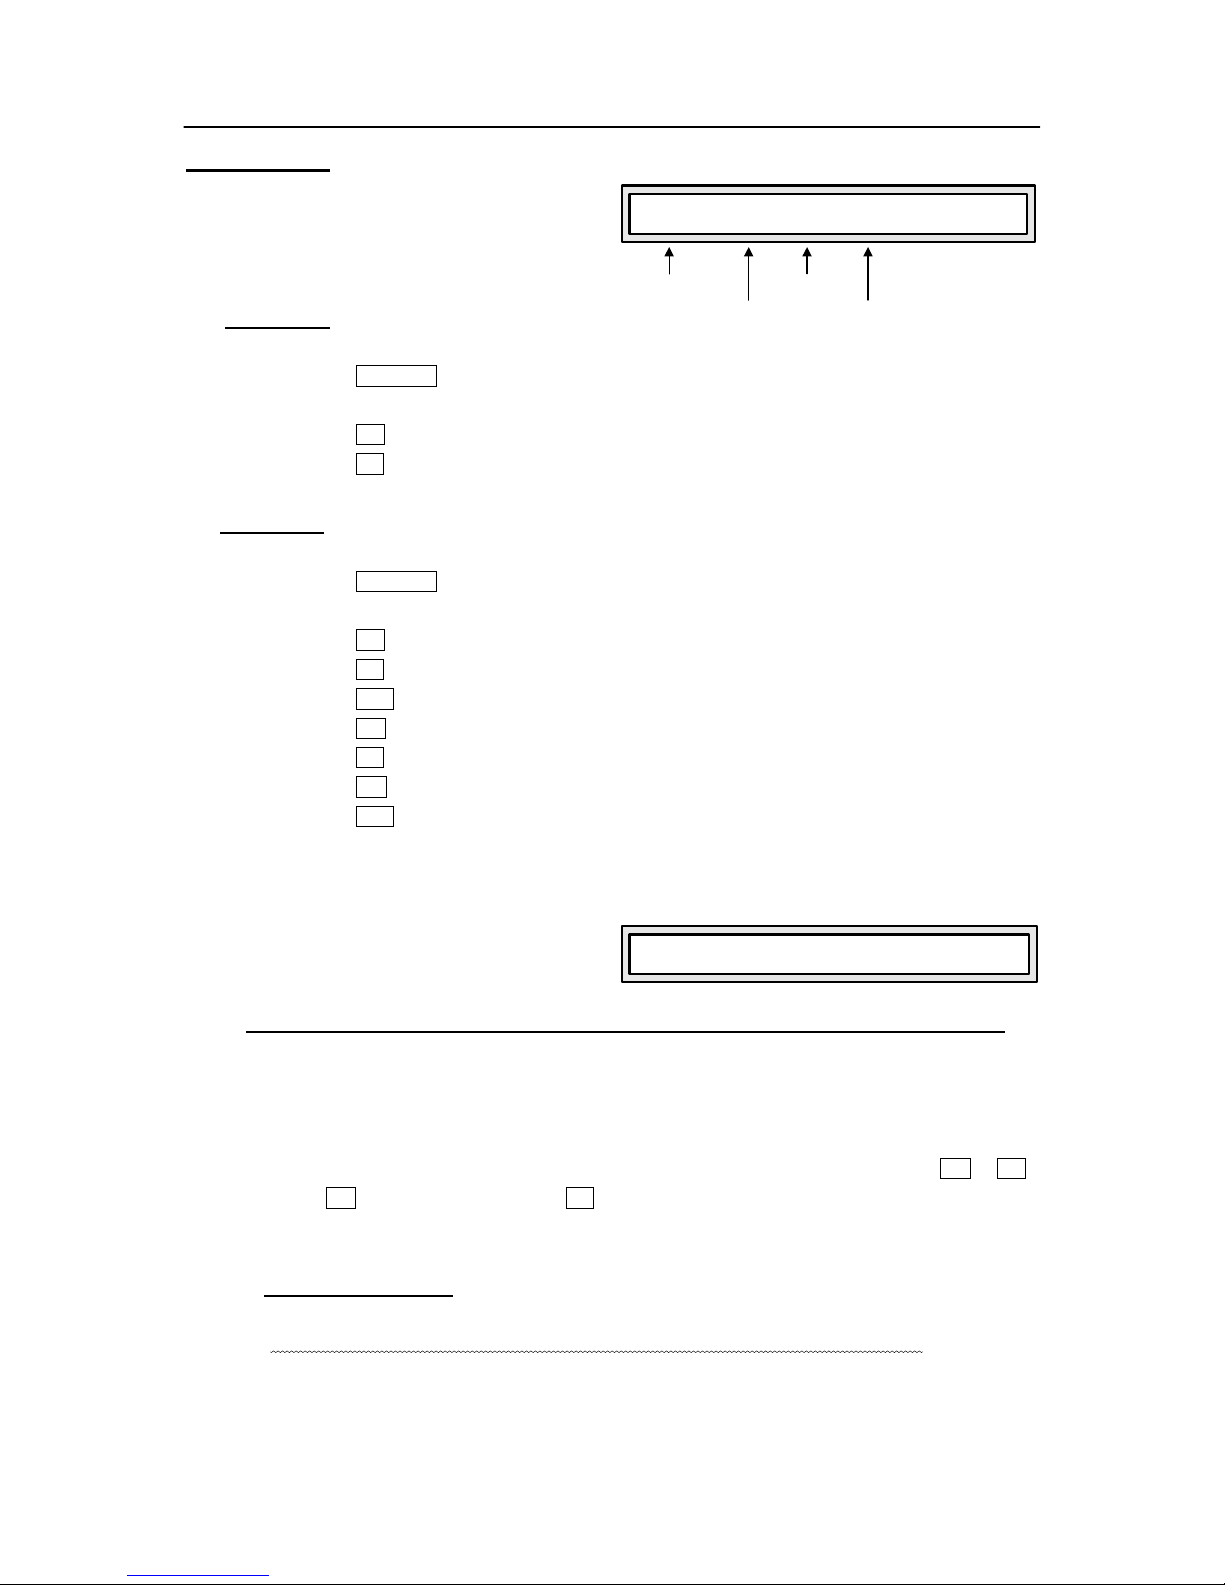
SET XY CHANNEL: X-H X-L Y-H Y-L
Scanner: 1 [ 5] no 7 no
Scanner's number
X
c
o
a
rse
ch
a
n
n
e
l
X
t
i
n
y
c
hann
e
l
Y
coars
e channel
Y
tiny
c
h
a
n
nel
Setting the corresponding channel
number. [ ] is current item
The setting of 16Bit scanner:
The setting of 8Bit scanner:
For 16Bit scanner, if the values of X-H,Y-H are set and the values of X-L,Y-L are set to [no], the 16Bit scanner
will be running in 8Bit X/Y resolution. This will lost some characteristics of 16Bit scanner, such as high
precision of X/Y orientation and the smoothness of the moving trace.
Auto correction to the wrong setting:
X-L=no, Y-L=no must be set at the same time. That just one is ‘no’ is a mistake. Flame 384 checks and
corrects X-L, Y-L to be ‘no’ at the same time automatically.
Check the X/Y setting of the scanners:
Use following ways to check:
1. Press SET X/Y key, the indicating light is on. It is in setting scanner’s X/Y state.
2. Use scanner keyboard to choose scanner. Check the X/Y setting.
3. Repeat step 2 to check X/Y setting of all scanners.
4. Press SET X/Y key to quit the edit state.
SET XY CHANNEL: X-H X-L Y-H Y-L
Scanner: 1 [ 5] 6 7 8
Scanner's number
X
co
a
r
se
ch
a
n
n
e
l
X
t
i
n
y
ch
an
nel
Y
coa
rse
ch
a
nn
e
l
Y
tiny channel
Setting the corresponding channel
number.
[]
is current item
Page 12

CODE Flame 384 User’s Manual
http://www.codelight.com
10
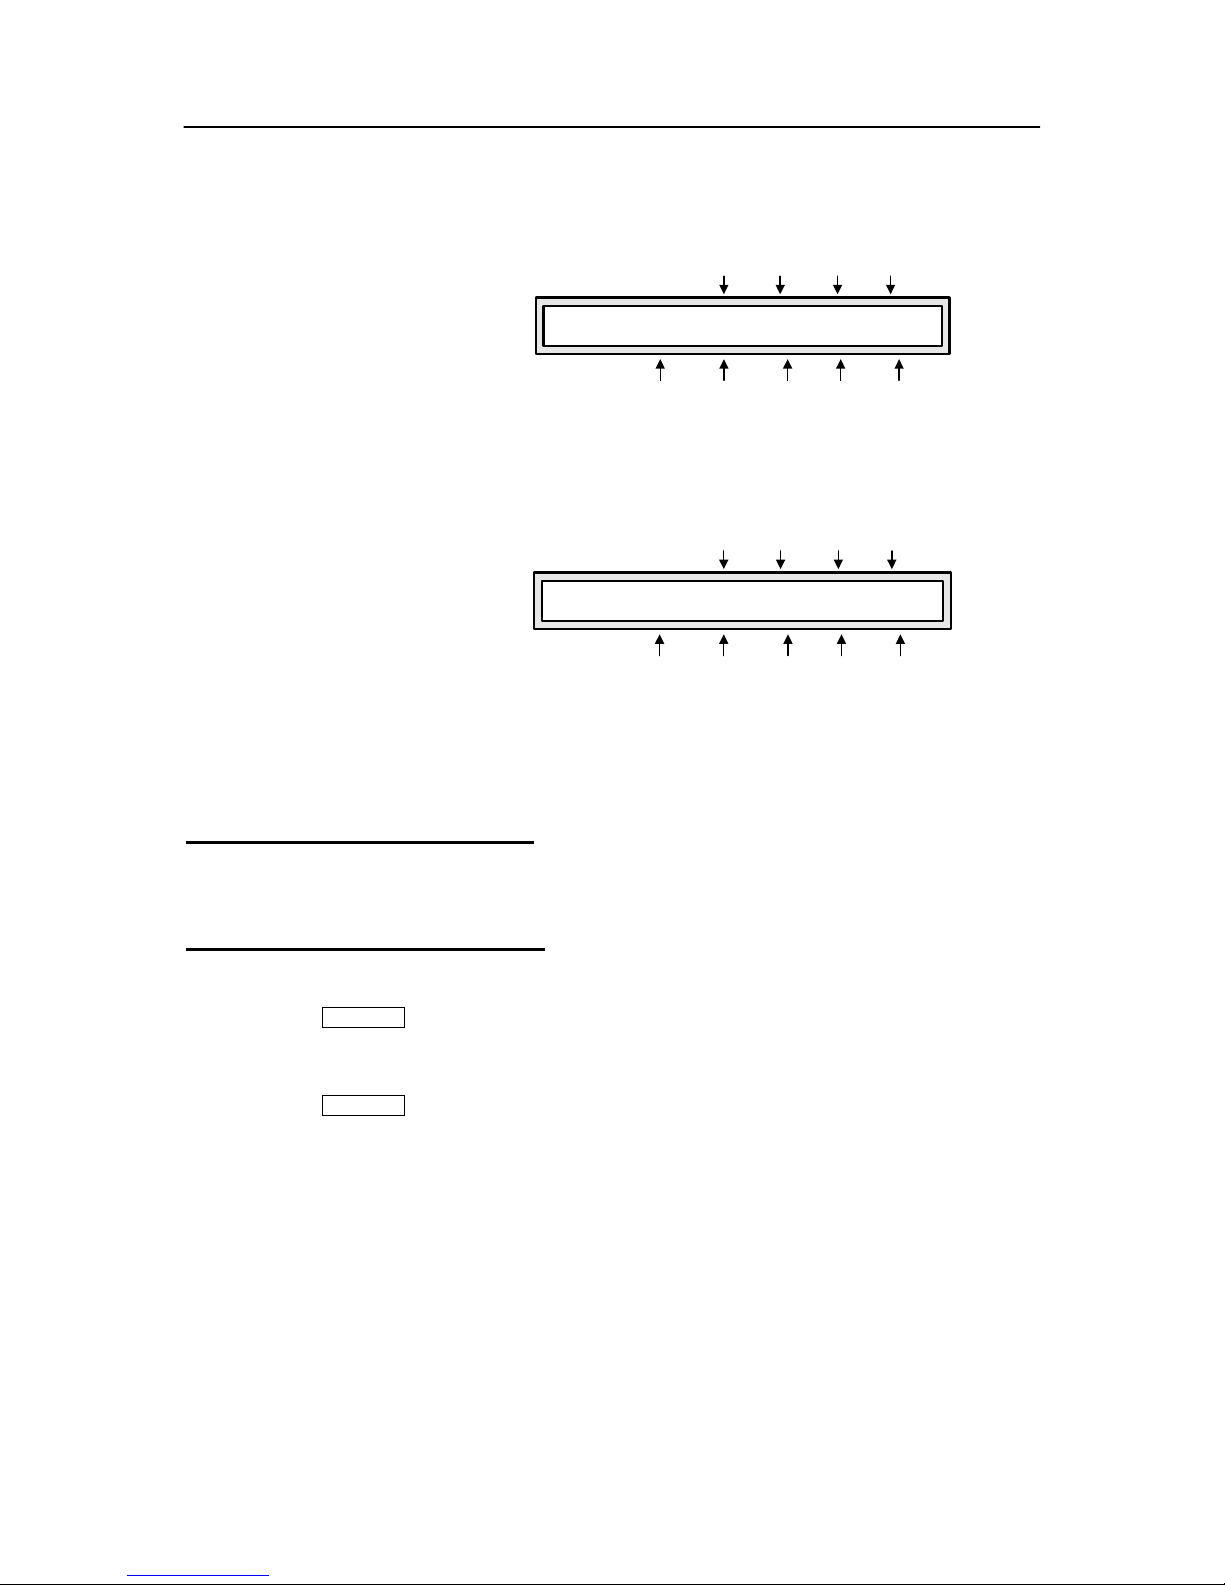
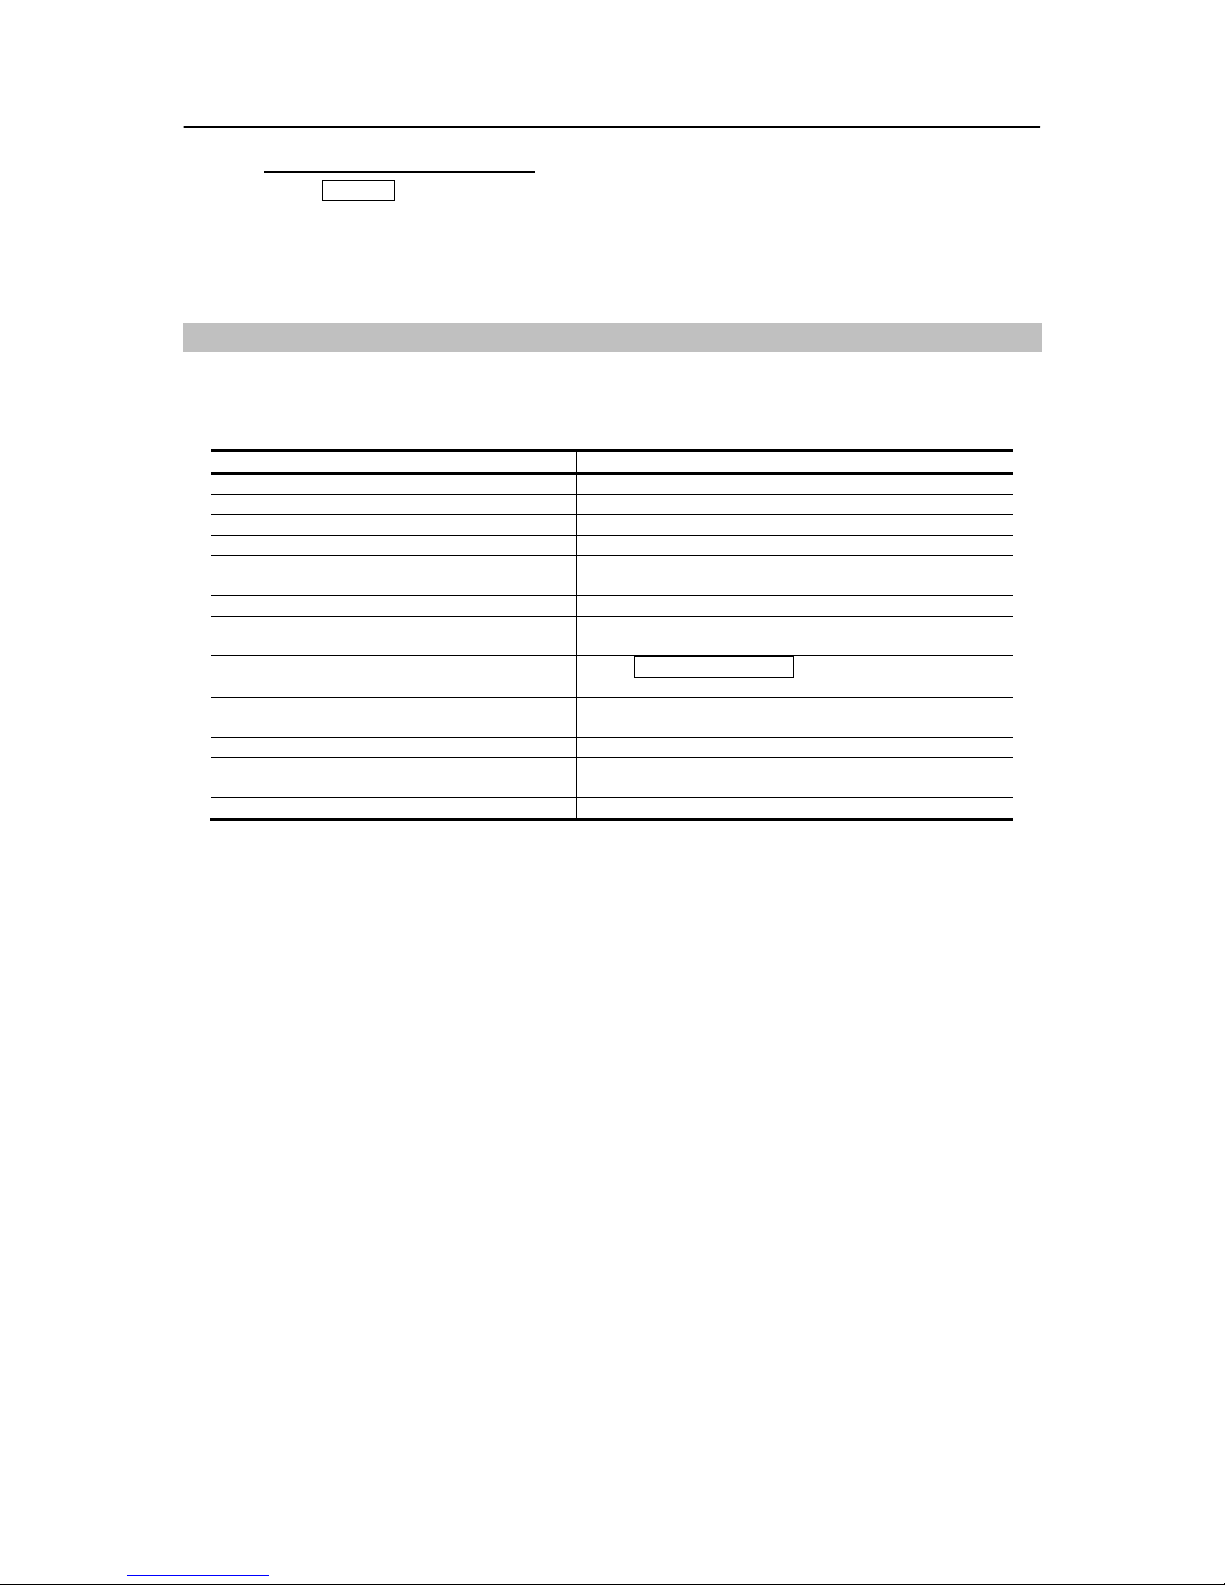
CH 1 2 3 4 5 6 7 8 | X:120
123 58 204 32 12 0 0 0 | Y:891
The manual mode
The scanner’s channel values, such as intensity, gobo, X/Y, pattern, and color, can be set manually.
Usually, the control contents of each channel of various scanners are different. With the particular comprehension
to the control contents of each channel of various scanners, the scanner connected to the control net can be
controlled with facility. The control contents of each channel of ordinary scanners can be seen in the append
tables.
In the edit state or running state, it can be operated manually.
Manual operation is the highest priority operation. The chosen scanner will be divorced from the running scene,
Chase and environment automatically. Manual operation is the basic operation. Manual operation, especially multi
scanner manual operation, can be saved as scene, which is the basic operation of edit Chase step.
When the number indicating light is on, that scanner is in the chosen state. It can be set by CHANNELS sliders and
modulation wheels.
CHANNELS 1-24 channel sliders and modulation wheesl
The values of each channel of scanners can be set by 1-16 channel sliders. X channel of a scanner is set by
modulation wheel WX. Y channel is set by modulation wheel ST. The set range of a slider is 0-255. Whether
8bit or 16Bit X/Y scanner, the set range of a modulation wheel is 0-999. It represents the moving range of X
axis or Y axis. For 16Bit scanner, modulation wheel WX controls X-H and X-L at the same time. Modulation
wheel ST controls Y-H and Y-L at the same time. For 8Bit scanner, modulation wheel WX controls X-H only.
Modulation wheel ST controls Y-H only.
When the X/Y channel is controlled by modulation wheels, the corresponding X/Y slider is locked. The X/Y
position of a scanner must be set by modulation wheels.
In the manual mode of a scanner, slider and modulation wheel can change the value of the corresponding
channel. The screen displays the value of these channels.
When the scanner key is pressed, the X/Y current appears at the right part of the screen. Turn the modulation
wheels, the values of X/Y can be changed.
Move 1-8 channel slider, the screen displays:
Move 9-16 channel slider, the screen displays:
Note: the values of channel and X/Y depend on the slider position and the X/Y modulation wheel value. In a
moment of slider moving, the value display will disappear until the next moving.
Manual operation of single scanner
1. Press HOLD key to make the indicating light off.
2. Choose scanner: press scanner number key, the indicating light is on.
3. Use CHANNELS sliders to set the channel values, use modulation wheel WX and ST to adjust X/Y
position.
CH 9 10 11 12 13 14 15 16 | X:120
0 0 14 128 0 0 0 0 | Y:891
Page 13

CODE Flame 384 User’s Manual
http://www.codelight.com
11
Manual operation of the same kind multi scanners
1. Press HOLD key to make the indicating light off.
2. Choose scanner: according to the 2 step of Manual operation of single scanner, multi scanners can be
chosen. (Note: only the scanners with the same X/Y channel can be chosen at the same time.)
3. Use CHANNELS sliders to set the channel values. Use modulation wheel WX to adjust X position. Use
modulation wheel ST to adjust Y position. And the adjusted channel values are set to all chosen
scanners at the same time.
Manual operation of the different kind of multi scanners
For the manual operation of the different kind of scanners, set one kind of the scanners and make these
scanners in the hold state first. Then choose another kind of the scanners to set. This is also the usual
operation method to set 1 scene. The hold state of the scanner can be change to the choosing state by
pressing its key to make the indicating light on.
1. Press HOLD key to make the indicating light on.
2. Choose scanner: use the way of choosing single scanner or multi scanners to choose scanners. (Note:
only the scanners with the same X/Y channel can be chosen at the same time.)
3. Use CHANNELS sliders to set the channel values. Use modulation wheel WX and ST to adjust X/Y
position.
4. Press the corresponding number key of the chosen scanner to make the indicating light blink. The set
values of these scanners are in the hold state. And the adjusted channel values are set to all chosen
scanners at the same time.
5. Repeat 2-4 steps to set other scanners manually.
Cancel the manual operation of scanner
Press CLEAR key, the manual operation is canceled and the set values of the scanners can not be saved.
Scene Edit
The appropriate values of channels (such as color, intensity, pattern, X/Y, and so on) of various scanners can make
a needed light art pattern in the space-scene. Each scene is an aggregate of the set channels of the various
scanners. Flame 384 console can save 48 scanner scenes. The saved scenes can be run at any moment.
Important tips
For the simultaneous running of the multi scenes and multi Chases, the different values of the same channel
which are produced at the same time are treated by HTP Technique. So following setting is proposed:
1. For all scenes which just include pattern effect controls, such as color, pattern, and so on, the values of
X/Y, intensity, and so on are set to 0.
2. If Chase just include the controls like X/Y, intensity, and so on, the values of the other channels are set
to 0.
Page 14

CODE Flame 384 User’s Manual
http://www.codelight.com
12
Process of scene edit:
1. According to the ways of manual operation, choose scanner and set the various channel values and
X/Y position.
2. Press SAVE TO SCENE key, then press scene district key and scene number key. In the end, press
ENTER / SWITCH key to confirm the save.
Example:
If you want to save the current scanner running states to A13 scene, press SAVE TO SCENE key,
then press A key in SCENE, and press 13 key, in the end, press ENTER / SWITCH key.
Tips:
Scene edit can be done at any time. After the various setting to multi scanners, if the art pattern is
what you want, just perform the above step 2. The running states of all scanners can be saved to a scene
number. For instance, using simultaneously running scene B02 and C07 as basic, choose 3 scanners
manually and set the light beam to some position, then save the combination to scene C01. So, run C01
can recur this light art pattern combination.
Copy of Scene
Example: Copy scene A01 to scene C10.
1. Press A key in SCENE, then press 1 key. Then the console run A01 scene.
2. Press SAVE TO SCENE key, press C key in SCENE, then press 10 key and
ENTER / SWITCH key.
Chase Edit
Flame 384 console can save 48 Chases.
A Chase is a buildup of some Chase steps. The concept of Chase step is very similar to the scene.
A Chase step is made up of the aggregation of each channel value of various scanners, the step time and the
graduate change parameter Cross.
The total capability of the Chase step is 1600. Each Chase can have up to 100 step. In each step of a Chase, the
step time and the gradual change parameter Cross can be set independently. The standard operating speed of a
Chase is decided by the step time and the gradual change parameter Cross of a step. The speed can be adjusted
from 1/3 to 3 times as the standard speed by SPEED slider.
Step time value
The value defines the interval time between the current to the next step. The unit is 0.1s. The changeable
range of Time is 1-600. It means that the minimum time of a step is 0.1s and the maximum is 60s.
Cross value
The value defines the time ratio of the gradual change treatment between two Chase steps. The range of the
value is 0-100%. For instance, in the current step, Time=10, Cross=60% express that the current step will use
1 second and use 40% of this 1 second as stay time, 60% as gradual change treatment time for moving to the
next step.
Page 15
CODE Flame 384 User’s Manual
http://www.codelight.com
13
Pchase Total-Step Step Time Cross% ->
C15 1 [* 1] 5 0
Current step
Current edit
number
Current edit step
* is last step
Default=5
Unit: 0.1s
Default=0
Process of Chase edit
1. Press EDIT CHASE Key;
2. Choose the Chase number which will be
edited. For instance, if want to edit Chase
C15, press C key in CHASE, then press
15 key. if the Chase is empty, the screen
will display:
3. Press ADD key to add a step;
4. Use modulation wheel WX to change
the items, such as STEP, TIME and
CROSS. Use modulation wheel ST
to set the value of the current item.
- If current STEP xx is the last one of CHASE, the relevant character will be display as *xx.
For example: The last step of current chase is 20, the relevant character be displayed as *20.
- The scale of TIME: 1 - 600, unit is 0.1 second.
The value of TIME defines the interval between current step and next step.
- The scale of CROSS: 0 – 100%. The value of CROSS defines the proportion of TIME for fulfilling
Cross process.
For example: TIME=100, CROSS=70%, the hold time at last step=10s×(1-70%)=3s;
Residual time for transferring from last step to next step.
Total time for processing is 10s×70%=7s.
5. Set the channel values of various scanners in the current step manually. Use ENTER / SWITCH key
to change the setting state of Chase step, the various channel values of manual operating scanners,
and the setting state of X/Y.
6. Repeat step 3-5 to edit next Chase step.
7. Press EDIT CHASE key to end edit.
Tips:
When ADD key is pressed to add a Chase step, the values, such as the channel values of all
scanners, the values of TIME and CROSS are copied to the new added Chase step automatically. So
just change some items to make a new Chase step.
If the current Chase is empty, all channel values are set to 0.
In the edit state, use ENTER / SWITCH key to switch between the Chase setting state and manual
setting state, which set the various channel values and X/Y values of scanner. In different state, the
control object of the modulation wheel is different. In Chase setting state, use modulation wheel ST to
change the current step. This can check the space pattern effect of every Chase step and can change
the channel values of some scanners in the current Chase step immediately.
Press DELETE key to cancel the current Chase step.
PROGRAM CHASE...
Please select a chase:
PROGRAM CHASE...
CHASE:C15 Step is empty
Page 16
CODE Flame 384 User’s Manual
http://www.codelight.com
14
Data Backup & Restore With USB Flash Drive
Flame 384 can backup 48 files into a USB Flash Drive, and can upload one of the files from USB Flash Drive.
Process:
1. Backup the files with USB:
a) Insert the USB Flash Drive into the USB jack at the back of the console;
b) Press SAVE FILE key;
c) Select 1 ~ 16 key(s) of SCNNER, SCENE and CHASE to export the data to USB;
d) Press ENTER / SWICTH key to validate.
2. Upload one file with USB:
a) Insert the USB Flash Drive into the USB jack at the back of the console;
b) Press LOAD FILE key;
c) Select 1 ~ 16 key(s) of SCNNER, SCENE and CHASE to import the data from USB;
d) Press ENTER / SWICTH key to validate.
Running
Running scene
Example 1:
Single running scene A01.
1. Close running scene B and C one by one.
2. Press A key to choose A as the current district.
3. Press SINGLE key to make SINGLE indicating light on. A district is in the single scene running
mode.
4. Press 1 key to run scene A01.
Example 2:
Run A02, A10, B15, C07 scenes at the same time.
1. Press A key to choose A as the current district.
2. Press SINGLE key to make SINGLE indicating light off. It is in the multi scene running mode.
3. Press 2 key to run scene A02.
4. Press 10 key to run scene A10.
5. Press B key, 15 key to run scene B15.
6. Press C key, 7 key to run scene C07.
Now, the above scenes are running simultaneously.
Tips
In the step 3 of example 2, if press SINGLE key to make SINGLE indicating light on, perform step 4 to
run scene A10 and scene A02 will close automatically.
Page 17
CODE Flame 384 User’s Manual
http://www.codelight.com
15
CHASE: Step is empty!
CHASE TRIGGER STEP SPEED%
A08 AUTO 1 100
Chase number
Trigger mode
Current
chase step
Speed ratio
Running Chase
Running Chase, the screen will display:
Example 3:
Running Chase A08.
1. Press SINGLE key of CHASE to make SINGLE indicating light on. it is in the single Chase
running mode.
2. Press A key to choose A as the current district.
3. Press 8 key to run Chase A08.
Example 4:
Run A04, A13, B07, C10 Chases at the same time.
1. Press SINGLE key of CHASE to make SINGLE indicating light off. It is in the multi Chase
running mode.
2. Press A key to choose A as the current district.
3. Press 4 key to run Chase A04.
4. Press 13 key to run Chase A13.
5. Press B key to choose B as the current district.
6. Press 7 key to run Chase B07.
7. Press C key to choose C as the current district.
8. Press 10 key to run Chase C10.
Now, the above 4 Chases are running simultaneously.
Tips
If the chosen Chase is empty (without
Chase step), the screen will display:
Check the various operating parameters of multi Chases running simultaneously
When multi Chases are running, the last parameters are displayed in the screen. In example 4, the
parameters of last Chase C10 are displayed in the screen.
If the parameters of some Chases are want to be change, the Chase must be set as current Chase and
the Chase is display in the screen. For instance, in example 4,here the parameters of last Chase c10
are displayed in the screen. If the parameters of B07 are wanted to be seen, just press B + 7 .
(press B key and hold, then press 7 key)
This method does not affect the current Chase running.
Adjust Chase speed
The operating speed of the current Chase can be change by moving SPEED slider.
Chase step time value x speed ratio = real running time of the current Chase step
Using the method of checking operating parameters of multi Chases running simultaneously, make a
Chase to be current Chase one by one. Then set its Chase speed.
Page 18
CODE Flame 384 User’s Manual
http://www.codelight.com
16
The music trigger of a Chase
Press MUSIC key to make MUSIC indicating light on. It indicates that the current Chase is in the
music in-phase trigger state. In this state, the Chase step time and the gradual change ratio Cross don’t
work.
Addenda
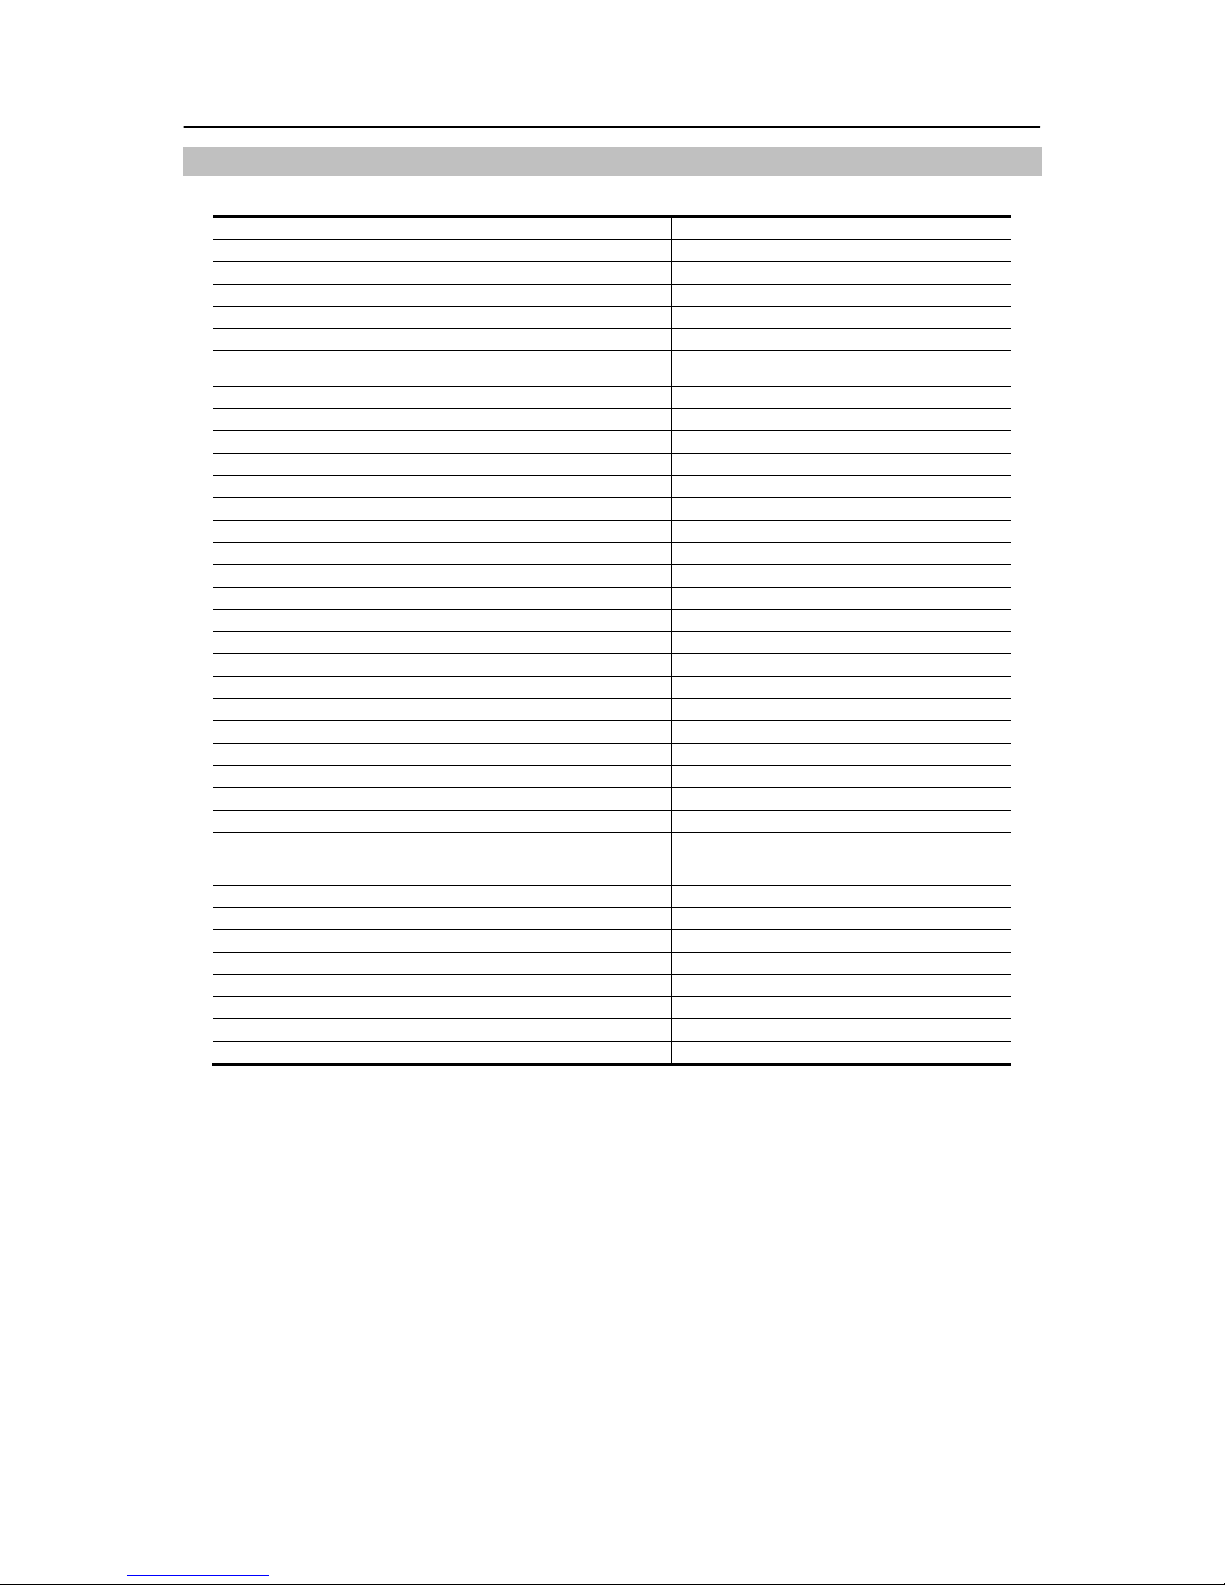
Table 1:
Explanations to display contents
Display contents Explanations
X-H X axis coarse channel (high 8Bit channel)
X-L X axis fine channel (low 8Bit channel)
Y-H Y axis coarse channel (high 8Bit channel)
Y-L Y axis fine channel (low 8Bit channel)
No For 8Bit scanner, only X/Y coarse channel can be used.
So the X/Y fine channel must be set to [no].
CH Abbreviation of CHANNEL
* The Chase step with * is the last step of the current
Chase.
->
Use ENTER / SWITCH key can switch the display
contents.
[ ] The parameter in the [ ] is the current adjustable item.
Its value can be change by modulation wheel.
PROGRAN CHASE… Chase edit state
CHASE: xxx Step is empty! The Chase with this number is empty! (the Chase
number is replaced by xxx )
MEMORY IS OVERFLOW!! There is no space in memory.
Page 19

CODE Flame 384 User’s Manual
http://www.codelight.com
17
Table 2:
Control channel data of the ordinary scanner
Scanner model Channel Control type
1 IRIS
2 Color Disc1
3 Color Disc2
4 Dimmer / Strobe
5 PAN
6 TILT
7 Frost and Effect
8 Prism Rotation
9 FOCUS
10 Fixed Gobo Select
11 Rotation Gobo Select
CLAY PAKY GOLDEN SCAN HPE
(Golden scanner)
12 Gobo Rotation
1 IRIS
2 Color Select
3 Gobo Select disk1 / disk2
4 Shutter Strobe
5 PAN
6 TILT
7 Gobo Rotation
SGM GALILEO II
8 DIMMER
1 IRIS
2 Color Select
3 Gobo Select disk1 / disk2
4 Shutter Strobe
5 PAN
SGM GALILEO
6 TILT
1 PAN
2 TILT
3 Color
4 Gobo
5 Shutter
6 Dimmer
Trackspot
(Bond scanner)
7 Motor Speed
1 Strobe, Fan Speed, Lamp on / off, Reset Fixture
2 Intensity
3 Color
4 Gobo 1 / Fixed Gobos
5 Rotating Gobo selection
6 Rotating Gobo Index/Continuous Rotation
7 Focus
8 Iris
9 Prism
10 Pan
Martin Roboscan Pro 1200 XR
(Protocol 1)
(Martin scanner 1200XR)
11 Tilt
1 Strobe, Fan Speed, Lamp on/off, Reset fixture
2 Dimmer
3 Color
4 Rotating Gobo
5 Effect Wheel
6 Pan
Martin Roboscan Pro 518
(Mode 3)
(Martin Scanner 518)
8 Tilt
1 Shutter / Strobe / SA /Reset fixture
2 Dimmer
3 Color
4 Gobo
5 Pan
Martin Roboscan Pro 218
(Mode 3)
(Martin scanner 218)
7 Tilt
1 -
2 Color
3 Gobo
4 Strobe
5 Pan
FAL ITALSCAN HMI 1200
(Fly eagle scanner)
6 Tilt
Page 20
CODE Flame 384 User’s Manual
http://www.codelight.com
18
Technical specification
Digital control mode DMX512/1990
DMX control channel amount 384
Control scanner amount 16
Control channel distribution of a scanner 24
control resolution of a scanner 16bit
optical isolated independent digital output drive module 2
Electrical isolation of optical isolated independent digital output
drive module
2000VDC
LCD backlight screen 40 character x 2 row
BLACKOUT function
3
Manual operation function
3
Simultaneous manual operation ability 16
Scanner scene 48
Scene amount of simultaneous running scanners 48
Scanner Chase 48
Maximum Chase steps in a Chase 100
Chase step time 0.1s – 60s
Chase gradual change ratio Cross 0-100%
Total capability of Chase steps 1600
Chase amount of simultaneous running scanners 8
Music in-phase Chase -10 ~ 0dB audio line input/inbuilt microphone
Channel sliders 24
Speed slider 1
The ratio range of Chase speed 30%-300%
MODULATION WHEEL 2
Copy of scanner scene
3
All scanner X/Y channels can be controlled by modulation wheel
3
Data auto save
3
Backup or restore with USB Flash drive
The USB interface is compatible to the USB
Drives which meet FAT format, such as USB1.0,
USB2.0 and so on
DMX signal output connector XLR-D3F x 2
Audio signal input connector 1/4” mono socket
Power supply range AC 100V-240V, 50-60Hz
Consume power 18VA max.
Work temperature range 0-40 C°
Work environment Waterproof, dustproof
Size 483mm x 400mm x 105mm
Weight 8kg
Page 21

CODE Flame 384 User’s Manual
http://www.codelight.com
19
MEMO
CODE Electronic Co., Ltd.
 Loading...