

Page 1

D032263_01 CR2700 User Manual
Page 2

1
Legal Disclaimer
Copyright © 2019 Code Corporation.
All Rights Reserved.
No part of this publication may be reproduced in any form or by any means without written permission
from Code Corporation. This includes electronic or mechanical means such as photocopying or recording
in information storage and retrieval systems.
NO WARRANTY. This technical documentation is provided AS-IS. Further, the documentation does not
represent a commitment on the part of Code Corporation. Code Corporation does not warrant that it is
accurate, complete or error free. Code Corporation reserves the right to make changes in specifications
and other information contained in this document without prior notice. Code Corporation shall not be
liable for errors or omissions contained herein; nor for incidental or consequential damages resulting
from the furnishing, performance, or use of this material. Code Corporation does not assume any
product liability arising out of or in connection with the application or use of any product or application
described herein.
NO LICENSE. No license is granted, either by implication, estoppel, or otherwise under any intellectual
property rights of Code Corporation. Any use of hardware, software and/or technology of Code
Corporation is governed by its applicable agreement.
The following are trademarks or registered trademarks of Code Corporation:
GoCode®, QuickConnect Codes, Cortex®, Code, Code Reader, and CortexTools.
The software and/or products of Code Corporation include inventions that are patented or that are the
subject of patents pending. Relevant patent information is available at
https://www.codecorp.com/patent-marking/
The Code Reader software uses the Mozilla SpiderMonkey JavaScript engine, which is distributed under
the terms of the Mozilla Public License.
The Bluetooth® word mark and logos are registered trademarks owned by Bluetooth SIG, Inc. and any
use of such marks by the Code Corporation is under license. Other trademarks and trade names are
those of their respective owners.
The Code Reader software is based in part on the work of the Independent JPEG Group.
The Code Corporation, 12393 S. Gateway Park Place, Ste. 600, Draper, Utah 84020
www.codecorp.com
Page 3

2
Statement of Agency Compliance
NOTE: This equipment has been tested and found to comply with the limits for a Class A digital
device, pursuant to part 15 of the FCC Rules. These limits are designed to provide reasonable
protection against harmful interference in a residential installation. This equipment generates,
uses and can radiate radio frequency energy and, if not installed and used in accordance with
the instructions, may cause harmful interference to radio communications. However, there is
no guarantee that interference will not occur in a particular installation. If this equipment does
cause harmful interference to radio or television reception, which can be determined by
turning the equipment off and on, the user is encouraged to try to correct the interference by
one or more of the following measures:
• Reorient or relocate the receiving antenna.
• Increase the separation between the equipment and receiver.
• Connect the equipment into an outlet on a circuit different from that to which the receiver is
connected.
• Consult the dealer or an experienced radio/TV technician for help.
Industry Canada (IC)
This device complies with Industry Canada license-exempt RSS standard(s). Operation is subject
to the following two conditions: (1) this device may not cause interference, and (2) this device
must accept any interference, including interference that may cause undesired operation of the
device.
Industrie Canada (IC)
Le présent appareil est conforme aux CNR d’Industrie Canada applicables aux appareils radio
exempts de licence. L’exploitation est autorisée aux deux conditions suivantes : (1) l’appareil ne
doit pas produire de brouillage, et (2) l’utilisateur de l’appareil doit accepter tout brouillage
radioélectrique subi, même si le brouillage est susceptible d’en compromettre le
fonctionnement.
Page 4

3
Table of Contents
1. Introduction ...................................................................................................................................... 5
2. Useful Configuration Codes ............................................................................................................. 5
3. CR2700 Readers and Accessories ..................................................................................................... 7
3.1. Readers ......................................................................................................................................... 7
3.2. Charging Stations .......................................................................................................................... 7
3.3. Cables ............................................................................................................................................ 7
3.4. Accessories .................................................................................................................................... 7
4. Supporting Documents and Resources ............................................................................................ 8
5. Unpacking and Installation .............................................................................................................. 9
5.1. CR2700 Features ........................................................................................................................... 9
5.2. Charging Station Features ........................................................................................................... 10
5.3. Desktop Base Features ................................................................................................................ 10
5.4. Quad-bay Charger Feature .......................................................................................................... 11
5.5. Unpacking ................................................................................................................................... 12
5.6. Insert and Remove Battery ......................................................................................................... 12
5.7. Connecting Charging Station ....................................................................................................... 13
5.8. Mounting Charging Station ......................................................................................................... 14
5.9. Charging CRA-B27 Battery .......................................................................................................... 17
5.10. Pairing CR2700 with a Bluetooth Device ................................................................................ 19
6. CR2700 Operations ......................................................................................................................... 21
6.1. Handheld Scanning ..................................................................................................................... 21
6.2. Targeting ..................................................................................................................................... 22
6.3. Presentation Scanning ................................................................................................................ 22
6.4. Battery Use .................................................................................................................................. 23
7. User Feedback Indicators ............................................................................................................... 25
7.1. CR2700 Readers .......................................................................................................................... 25
7.2. CRA-B27 Battery .......................................................................................................................... 26
7.3. CRA-A271 Bluetooth Charging Station ........................................................................................ 26
8. Configuring the CR2700 .................................................................................................................. 27
8.1. Use Configuration Guide Generator on Code Website ............................................................... 27
8.2. Use CortexTools2 ........................................................................................................................ 27
8.3. Use JavaScript ............................................................................................................................. 27
9. Bluetooth Radio Communications ................................................................................................. 29
Page 5

4
9.1. Bluetooth Radio Power ............................................................................................................... 29
9.2. Bluetooth Auto-Reconnect ......................................................................................................... 29
9.3. Bluetooth Security ...................................................................................................................... 29
10. Interface Parameters ...................................................................................................................... 30
10.1. Bluetooth Charging Station Interface ......................................................................................... 30
10.2. Reader Bluetooth Interface .................................................................................................... 30
11. Programming Reader Buttons ....................................................................................................... 31
12. CR2700 Specifications .................................................................................................................... 32
12.1. Typical Reading Ranges ........................................................................................................... 32
12.2. Supported Symbologies .......................................................................................................... 32
12.3. Product Dimensions ................................................................................................................ 34
13. CR2700 Device Information ........................................................................................................... 38
13.1. Reader Information ..................................................................................................................... 38
13.2. Bluetooth Charger Information .................................................................................................. 39
13.3. Battery Information .................................................................................................................... 40
14. Maintenance and Troubleshooting ............................................................................................... 41
14.1. Approved disinfectants for the CR2700 readers: .................................................................... 41
14.2. Routine cleaning and disinfection ........................................................................................... 42
14.3. Troubleshooting Guide ........................................................................................................... 42
15. Contact Code for support ............................................................................................................... 44
16. Limited Warranty ........................................................................................................................... 45
Page 6
5
1. Introduction
Code’s CR2700 is an advanced wireless 2D barcode reader purpose-built for medical and
healthcare applications. It features inductive charging, the latest Bluetooth Low Energy
standards, and a lightweight and ergonomic design in combination with superior barcode
scanning performance.
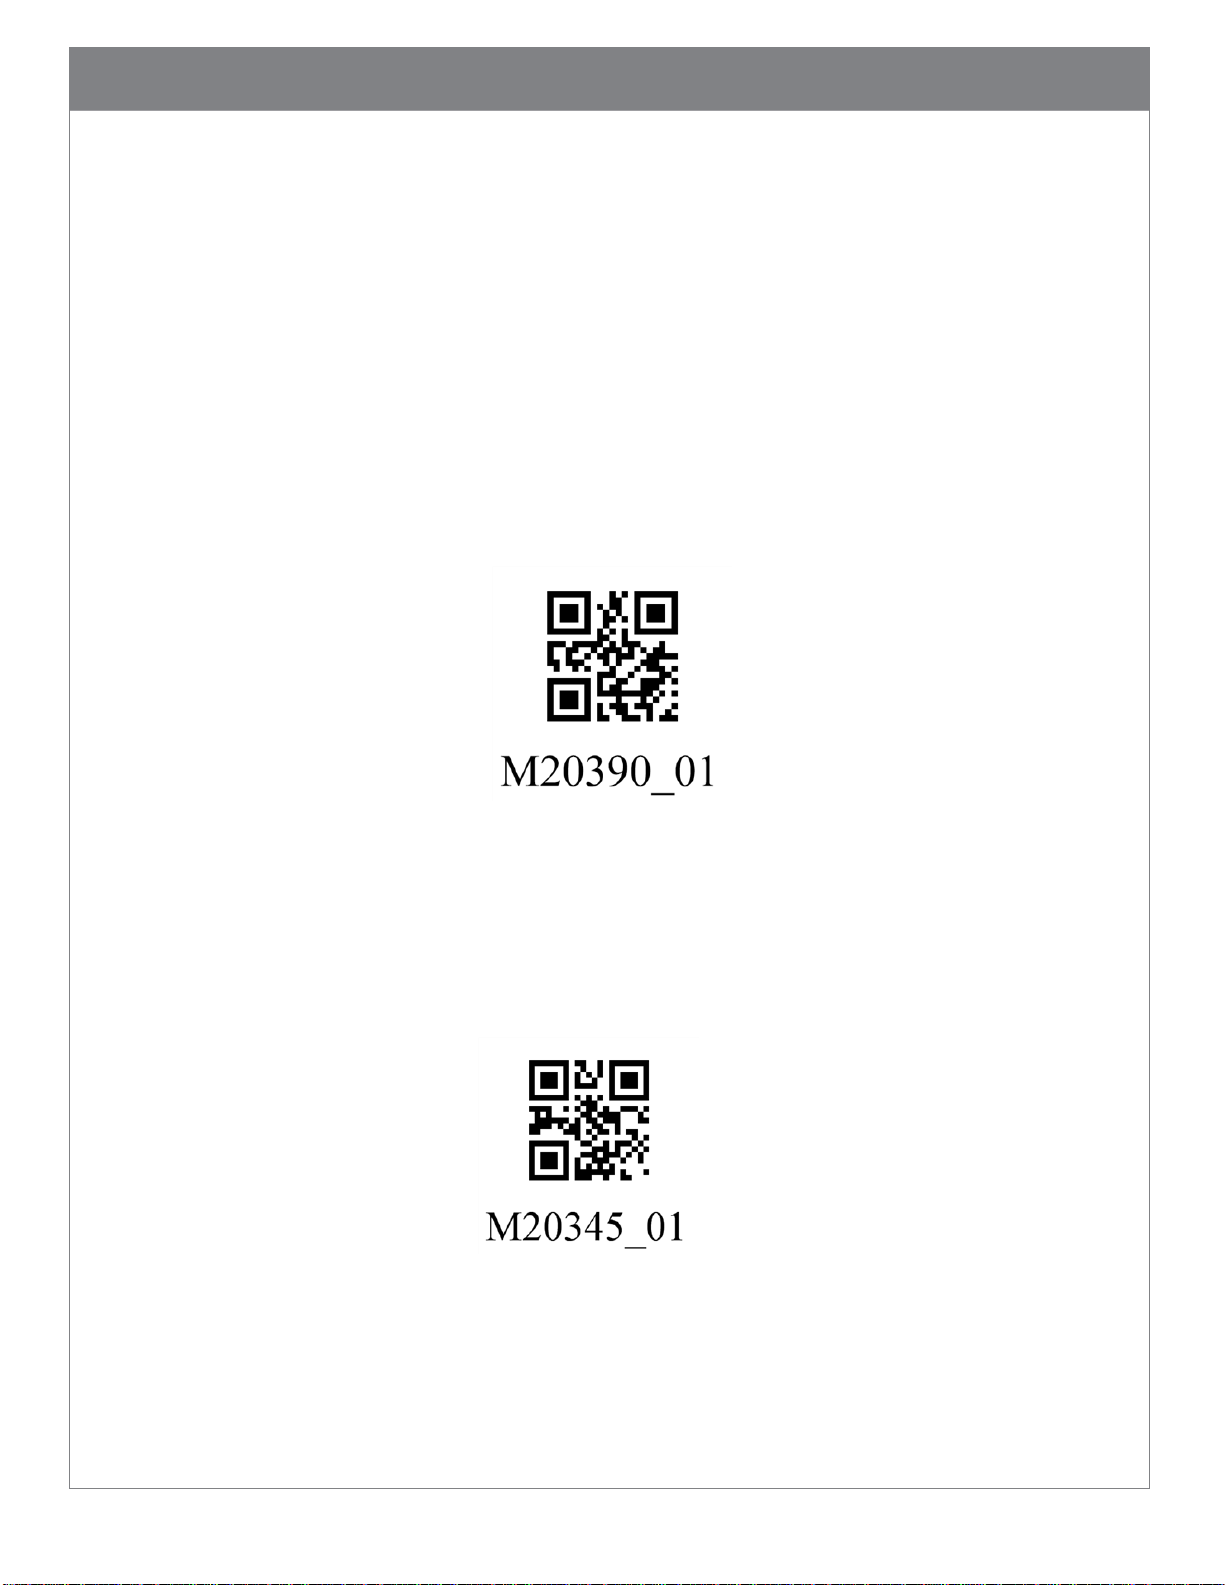
2. Useful Configuration Codes
2.1. Scanning the Reset Bluetooth Reader to Factory Defaults barcode below (M20390) will
erase all custom configurations and reset the device to default settings. This will also
erase any pairing information. This, however, will not erase any user settings
preprogrammed at factory or any JavaScript files loaded at factory or by the user.
2.2. Scanning the Reboot Reader barcode below (M20345) will power cycle the device.
Note: any settings that are not saved will be erased.
2.3. The CR2700 supports direct connection as a Bluetooth Keyboard device with third party
hosts that support Bluetooth Low Energy (such as PCs, mobile phones and tablets).
Scan the Bluetooth HID Keyboard barcode below (M20381) to set the reader as a
Page 7

6
Bluetooth Keyboard device, then connect using host’s device manager (on PC) or
Bluetooth settings (on mobile devices). Note: this mode is not applicable when using a
Code charger with embedded Bluetooth radio (CRA-A271).
Page 8
7
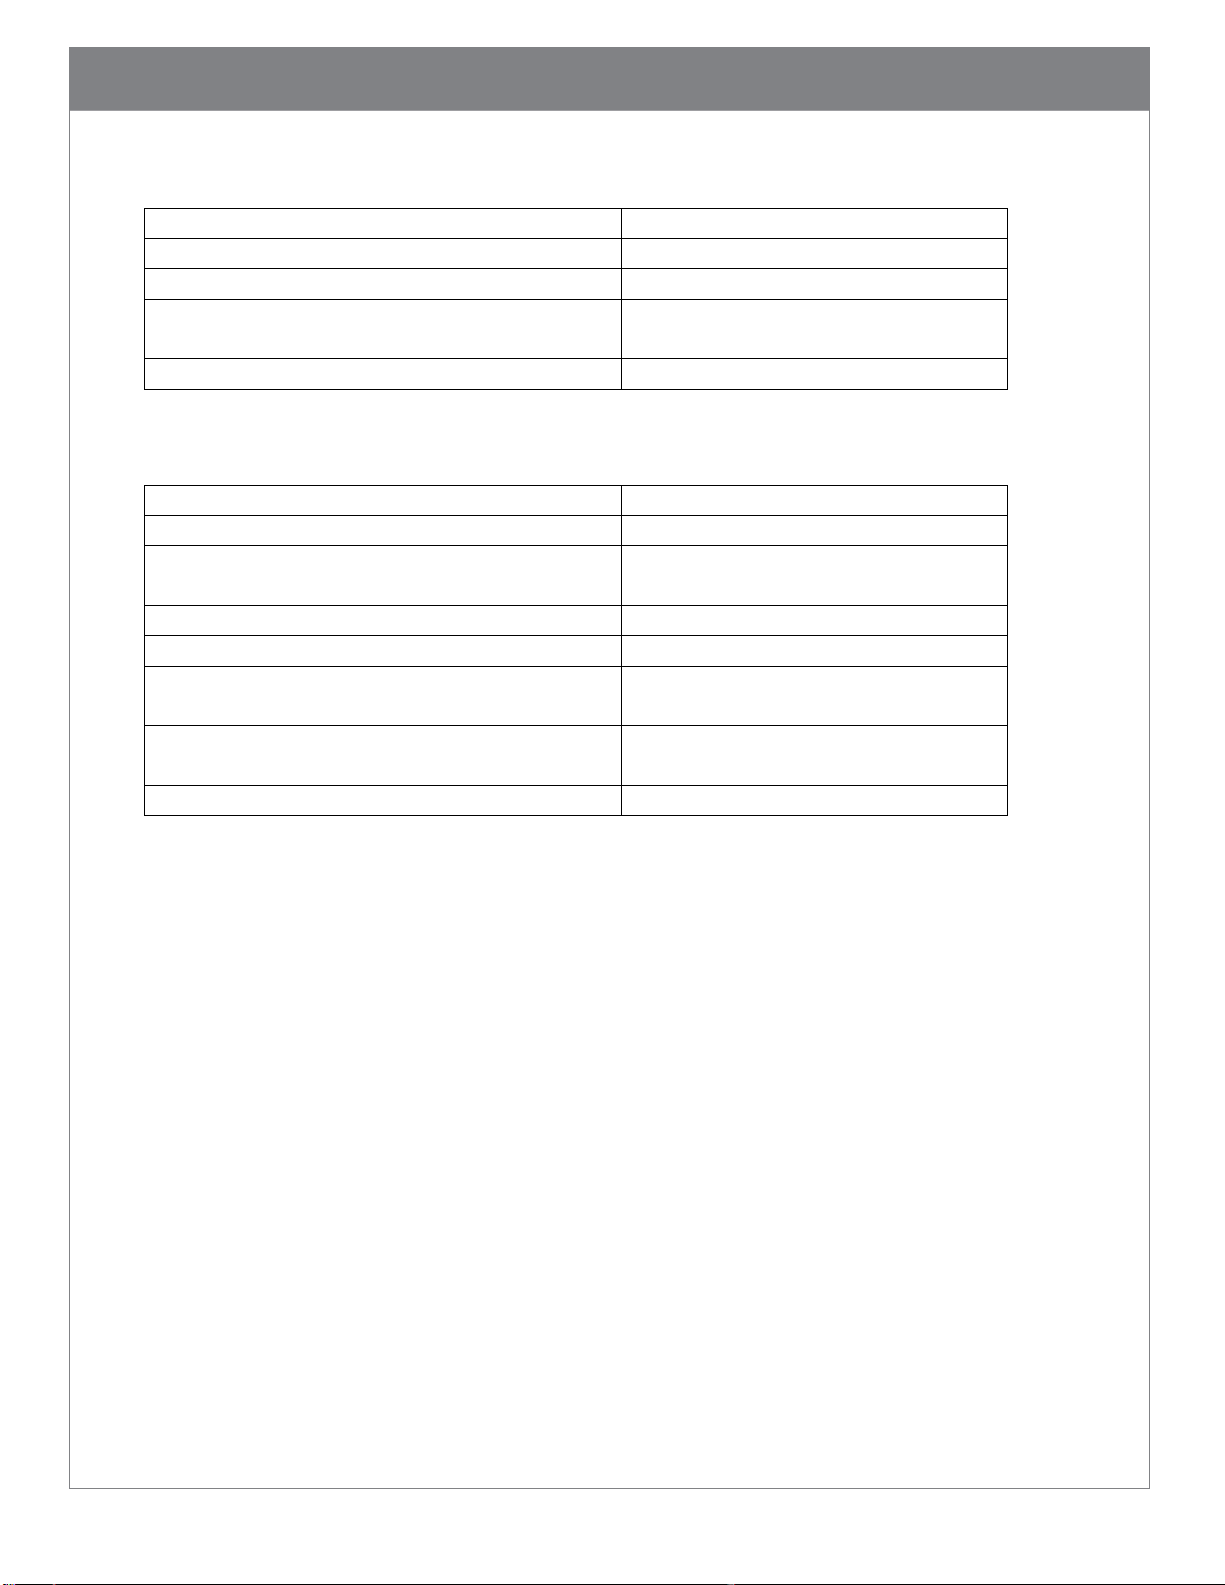
Part Number
Description
CR2701-100
CR2700 Reader, Palm, Wireless, Light Gray, CodeShield Plastic
CR2702-100
CR2700 Reader, Handled, Wireless, Light Gray, CodeShield Plastic
Part Number
Description
CRA-A271
CR2700 Reader Bluetooth Inductive Charging Station, Light Gray
CRA-A274
Quad-Bay Charging Station for B27 Battery, Light Gray
Part Number
Description
CRA-C34
Straight USB Cable, USB to Micro USB, 3 ft (1 m)
CRA-C36
Straight USB Cable, USB to Micro USB, 6 ft (2 m)
Part Number
Description
CRA-MB6
Desktop Base for Inductive Charging Station
CRA-WMB4
Wall Mount Bracket for Inductive Charging Station
CRA-MB7
Medical Cart VESA Mount Bracket for Inductive Charging Station
CRA-B27
Spare Battery for CR2701/CR2702
CR2AG-P1
US Power Supply for Quad-Bay Charging Station CRA-A274
CR2AG-P2
Europe/South American Power Supply for Quad-bay Charging Station
CRA-A274
CR2AG-P3
UK Power Supply for Quad-bay Charging Station CRA-A274
CRA-CR27-01
Optional Metal Thumb Screws for Mounting Inductive Charging Station,
set of ten; for mounting up to five charging stations
CRA-CR27-02
Precut Adhesive Tapes, set of two, for mounting one CRA-MB6
CRA-CR27-10
Precut Adhesive Tapes, set of ten, for mounting up to five CRA-MB6s
3. CR2700 Readers and Accessories
3.1. Readers
3.2. Charging Stations
3.3. Cables
3.4. Accessories
Page 9

8
4. Supporting Documents and Resources
The following documents available from the Documentation section of the product page on
Code website https://www.codecorp.com/
4.1. Quick Start Guide, C011784, includes general instructions on setting up and operating
CR2700 readers and charging stations.
4.2. Interface Control Document, D026166, specifies the communication protocol between
Code Reader hardware and application software that runs on the host computer,
specific Reader commands, and examples of a variety of ways to communicate and
send data to the Reader and command/communication types.
4.3. Configuration Control Document, D027153, specifies the Reader configuration
commands.
Note: D026166 and D027153 are for application developers that want to integrate scan
data directly into their application and control configuration of the barcode reader.
Customers using a keyboard interface won’t need these documents, and should reference
the Configuration Guide Generator for configuration changes.
The following tools and resources are also available:
4.4. CortexTools2, is a PC software tool to configure, update, customize and manage Code
Readers. It is available to download from the CR2700 product page on the Code
website.
4.5. Configuration Guide Generator is an online tool to quickly generate a configuration
guide using configuration manual codes for every application. It is available at the
CR2700 product page on the Code website.
4.6. JavaScript Programming Guide, D028868, describes the JavaScript application
programming interface for the Code Readers. It is available from Code Support upon
request (see section 15).
Page 10
9
5. Unpacking and Installation
Please note: CR2700 readers can only be charged by the CRA-A271 charging station from
Code. The CR2700 is not compatible with any other chargers.
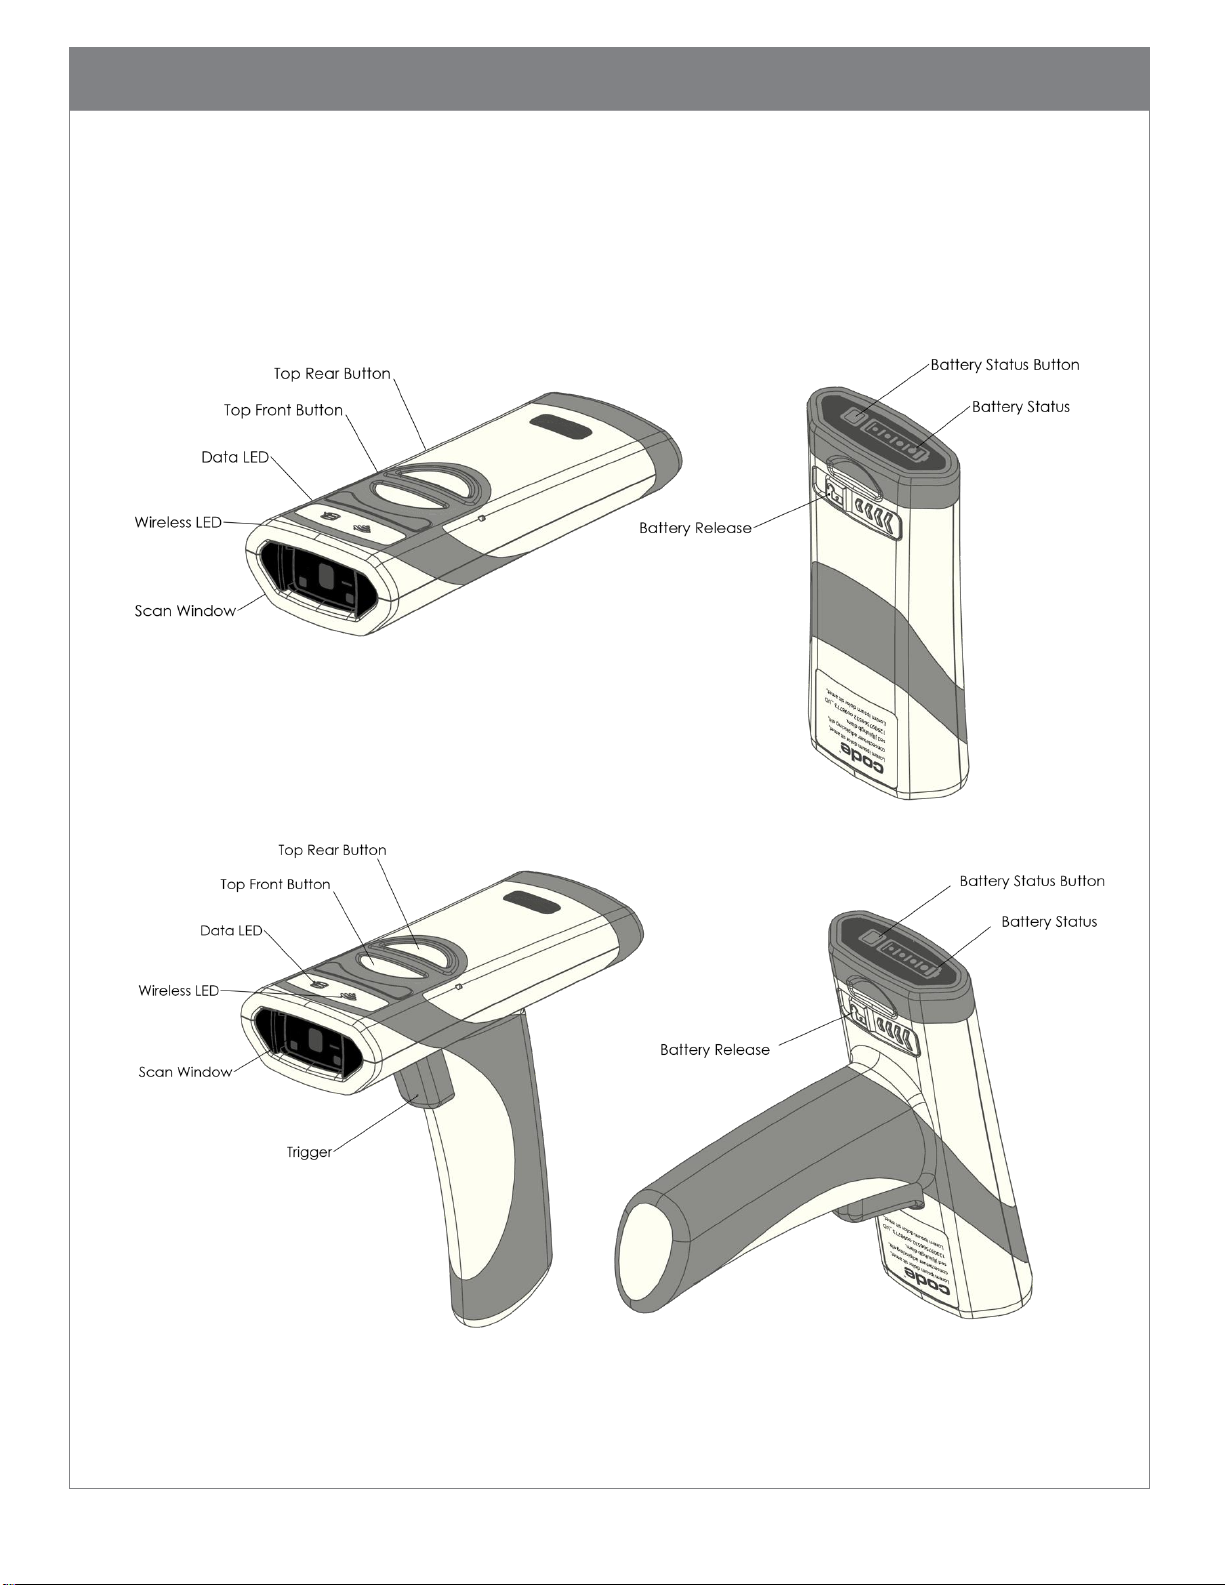
5.1. CR2700 Features
Figure 1 CR2701 Reader Features
Figure 2 CR2702 Reader Features
Page 11

10
5.2. Charging Station Features
Figure 3 CRA-A271 Bluetooth Charging Station Feature
5.3. Desktop Base Features
Figure 4 CRA-MB6 Desktop Base Features
Page 12
11
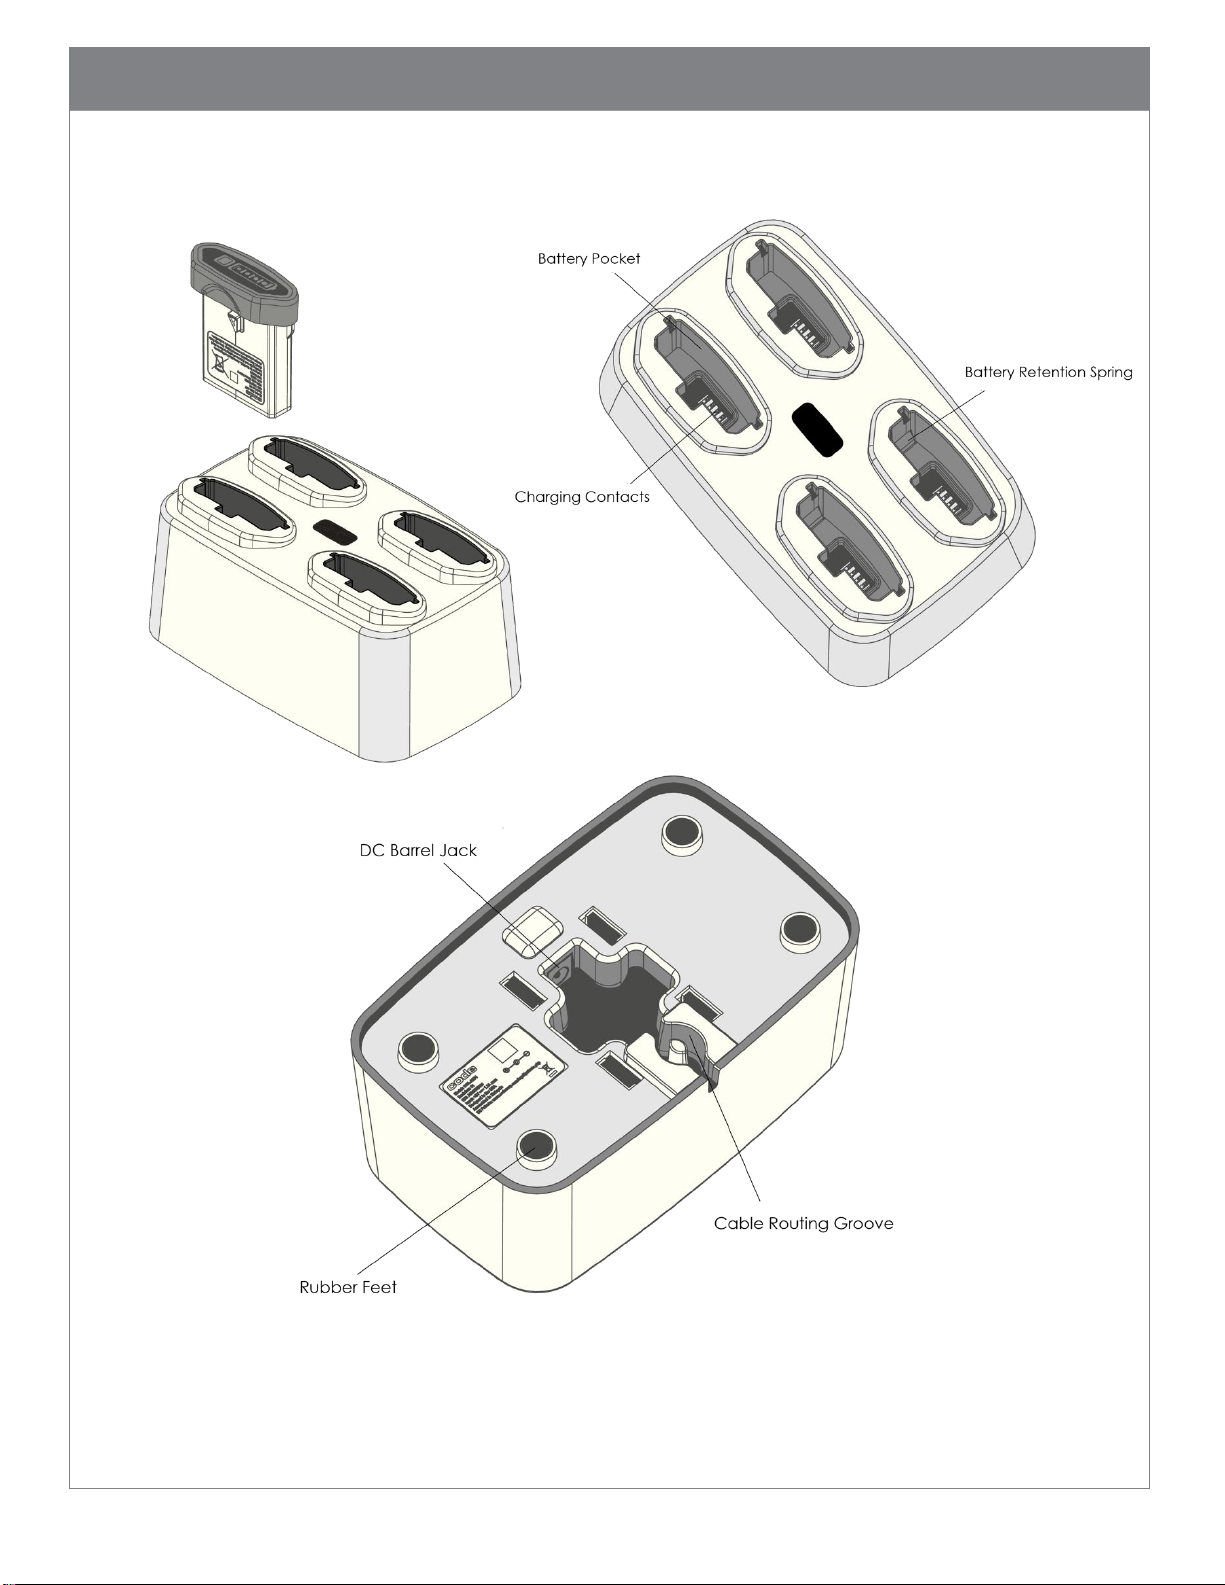
5.4. Quad-bay Charger Feature
Figure 5 CRA-A274 Quad-Bay Battery Charger Features
Page 13
12
5.5. Unpacking
Open the box that contains the product, remove the reader and included accessories.
Inspect for damage. If the product is damaged, please do not proceed to installation.
Contact Code Support (see section 15 for information). Retain the original packaging
material for potential return shipment.
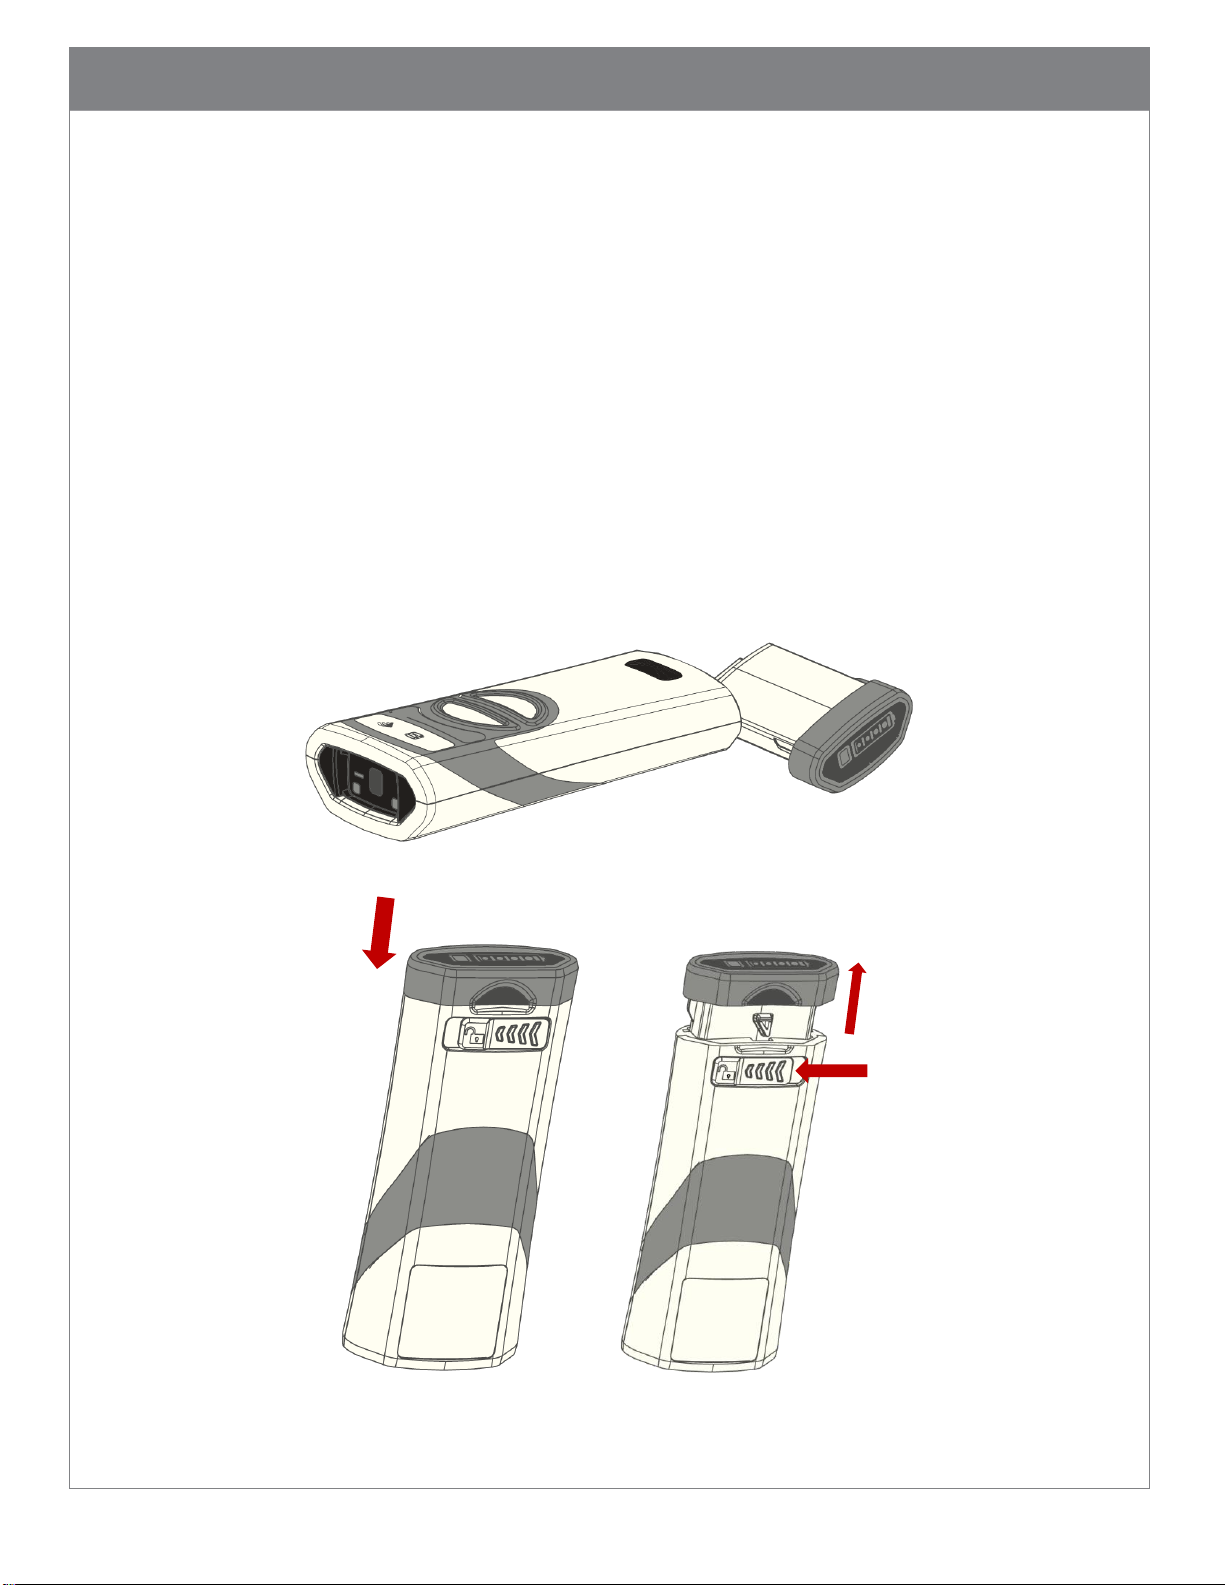
5.6. Insert and Remove Battery
Only the CRA-B27 battery is compatible with the CR2700 readers. The battery is keyed so it
can only be inserted one way. Insert a B27 battery into the cavity of the reader (Figure 6)
until it clicks. Hold any button on the reader (except the Power Gauge button on the
battery) for half a second and the reader will start its booting sequence. When the reader
successfully completes its booting sequence (in about 2 seconds), the LEDs will flash, and
the reader will beep and vibrate once.
Figure 6 Insert and Remove Battery
Page 14
13
To remove the battery, push the battery compartment latch in the direction indicated by
the arrow (Figure 6) until the battery pops up slightly. Pull the battery out of the reader
cavity.
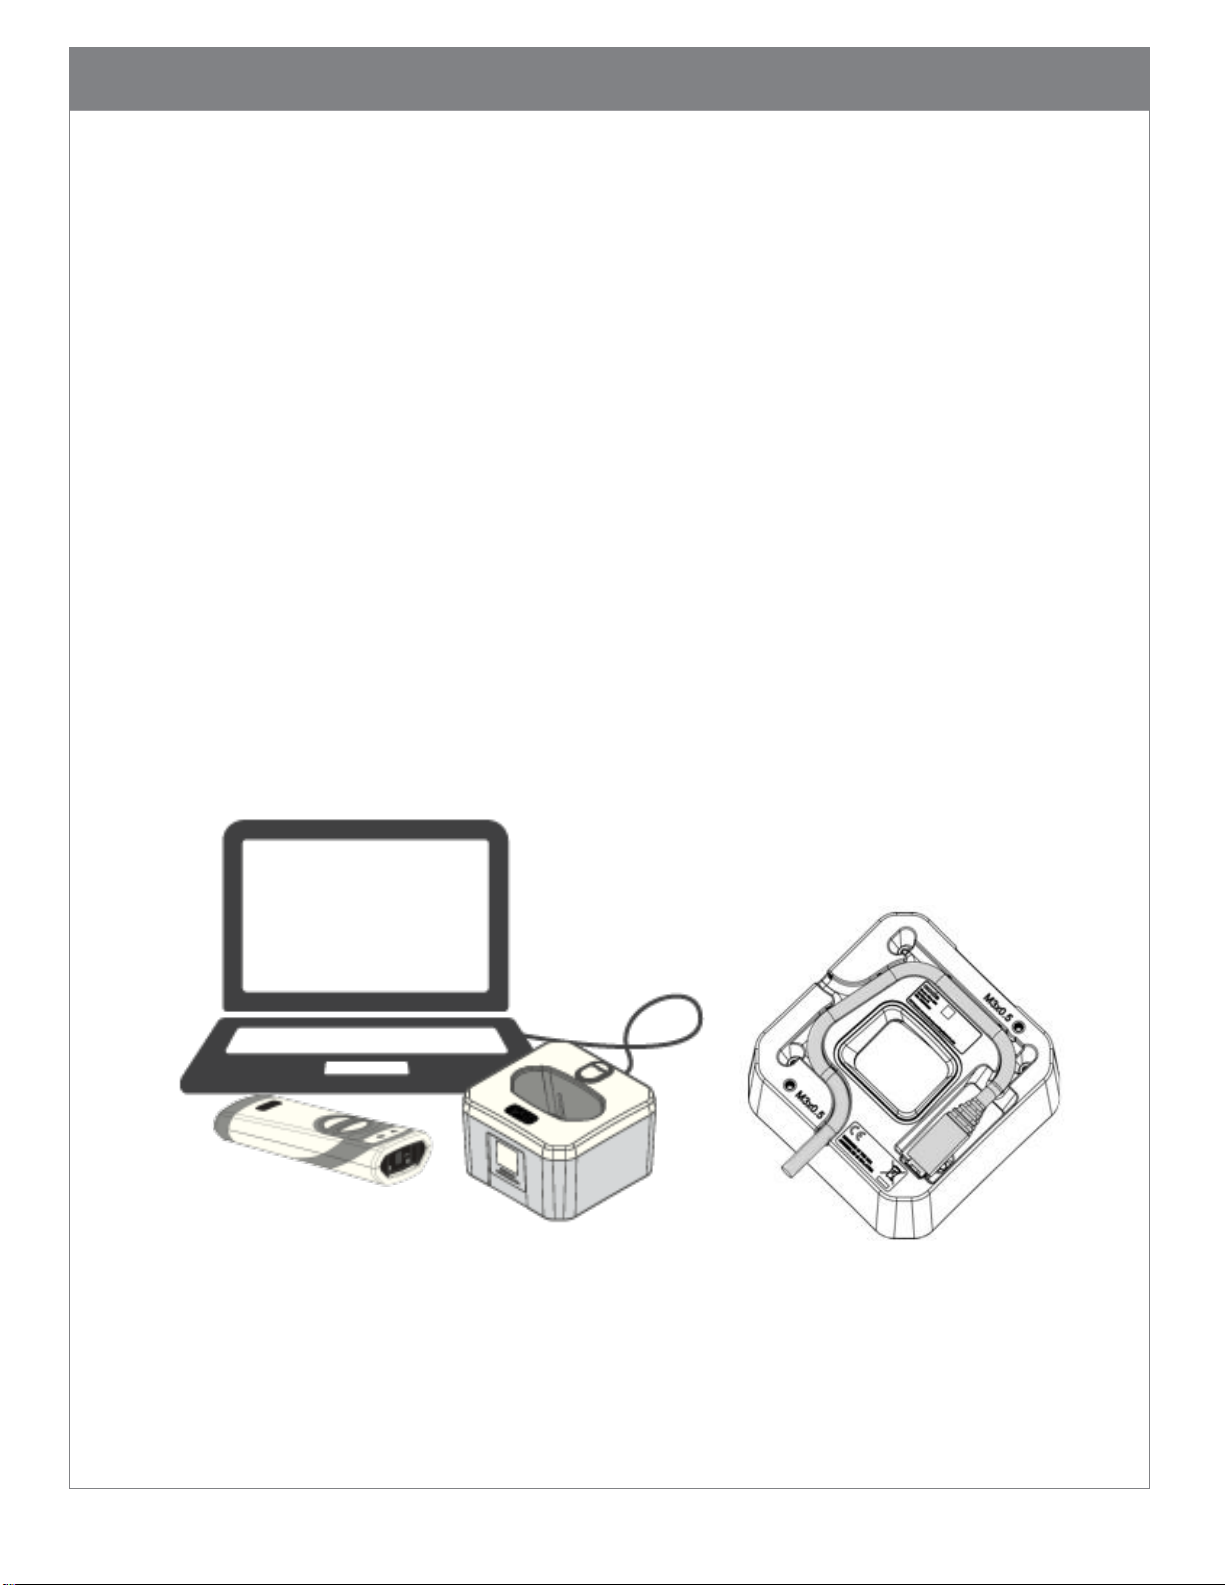
5.7. Connecting Charging Station
Use only cables or power supply provided by Code to ensure proper communication with
the host and to provide adequate voltage to charge the reader.
5.7.1. Insert the micro USB connector of the cable to the micro USB port on the bottom
of the charging station (Figure 7)
5.7.2. Run the cable along the cable routing guides on the bottom of the charging
station. If the charging station will be placed into a desktop base (CRA-MB6), the
cable should exit through the opening in the back of the charging station (see
Figure 8). If the charging station will be mounted on a wall mount bracket (CRAWMB4) or a VESA mount bracket (CRA-MB7), thread the cable through one of the
two cable exit holes on the bracket (see Figure 9 or 10)
Please note, the CRA-A271 may not charge consistently or at all when connected to
a USB hub, even if the hub is powered.
Figure 7 Connect Charging Station
Page 15
14
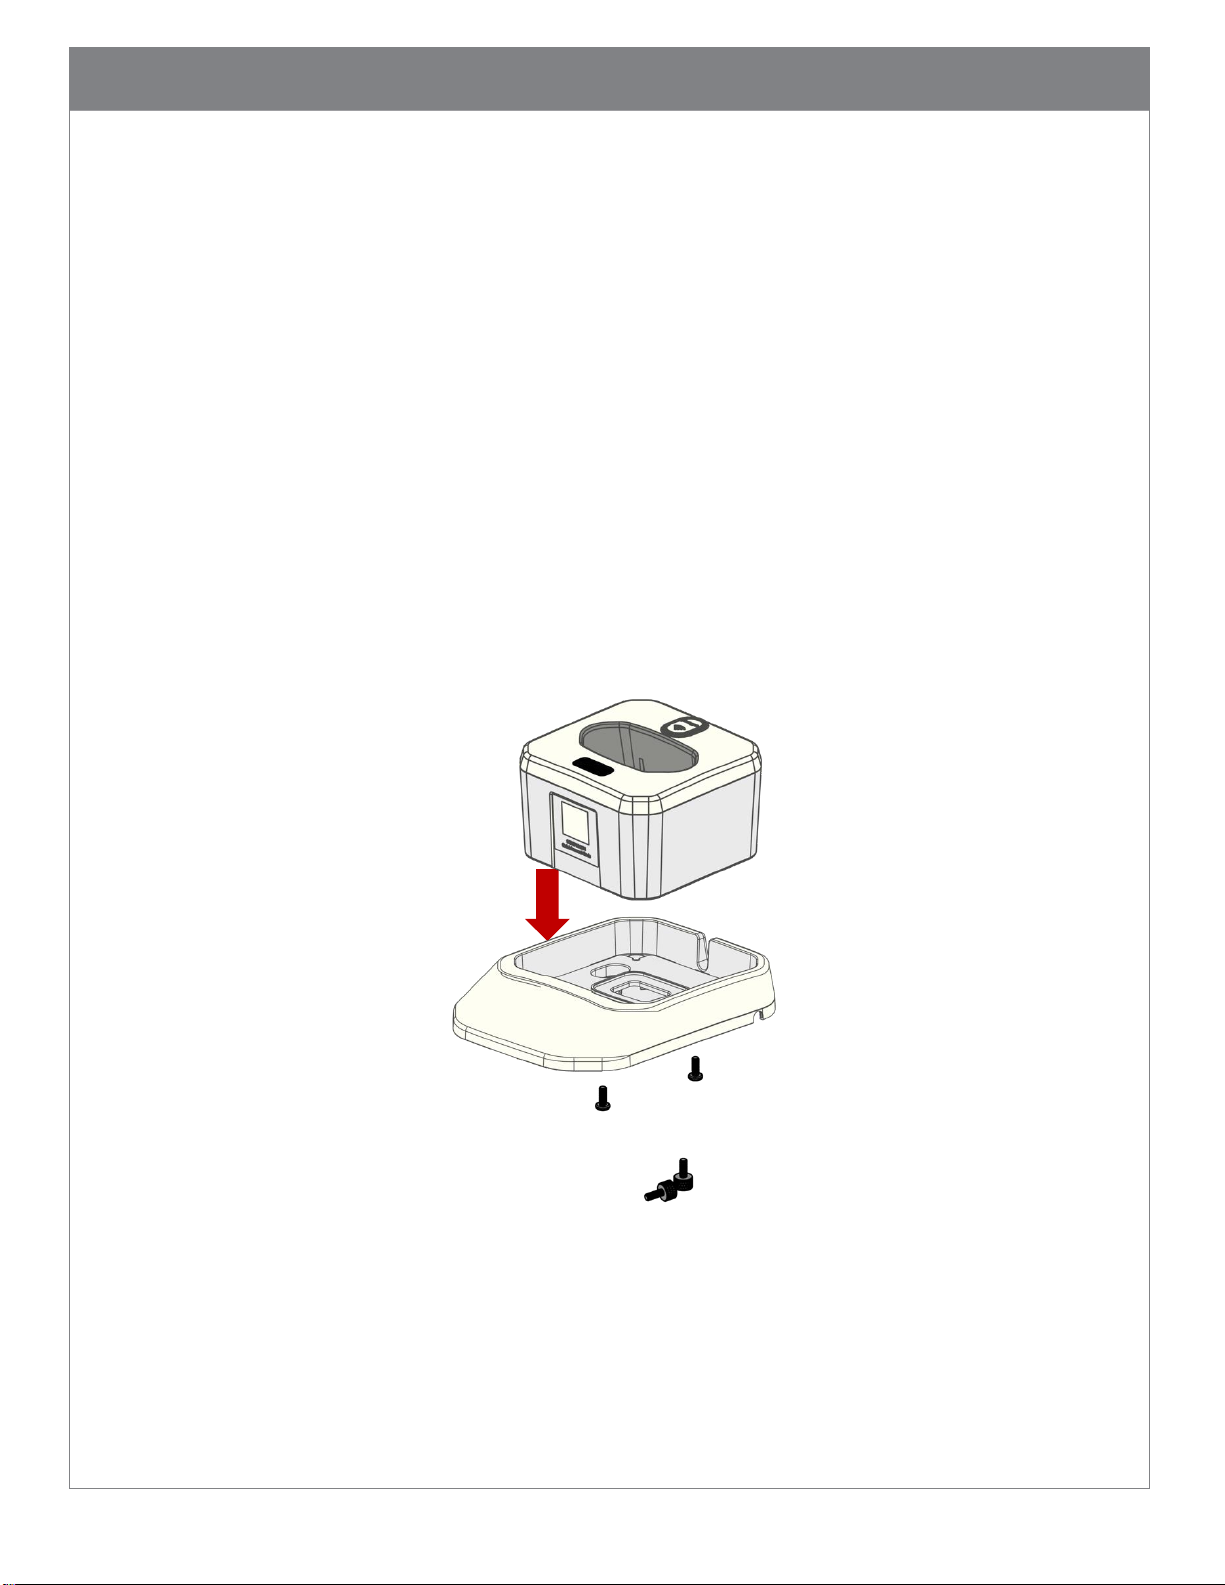
(Thumb screws are optional
5.8. Mounting Charging Station
There are several mounting configurations to meet different application requirements. Choose
the one suitable for your workflow.
5.8.1. Desktop Mount
The Desktop Mount provides extra charger stability when the charger is free standing on
a counter or desk. Place the charging station into a desktop base (CRA-MB6) (Figure 8).
The charging station can be secured onto the base using two pan head screws supplied
with the desktop base. The desktop base can be fastened onto a flat surface using
included multi-use adhesive tape, if desired (see Figure 4 for locations to attach the
tape). Additional adhesive tape (CRA-CR27-02 or CRA-CR27-10) is available as an
accessory.
Optional thumb screws (CRA-CR27-01) can also be used to fasten the charging station to
the base.
and sold separately)
Figure 8 Install and Secure Desktop Base CRA-MB6
Page 16
15
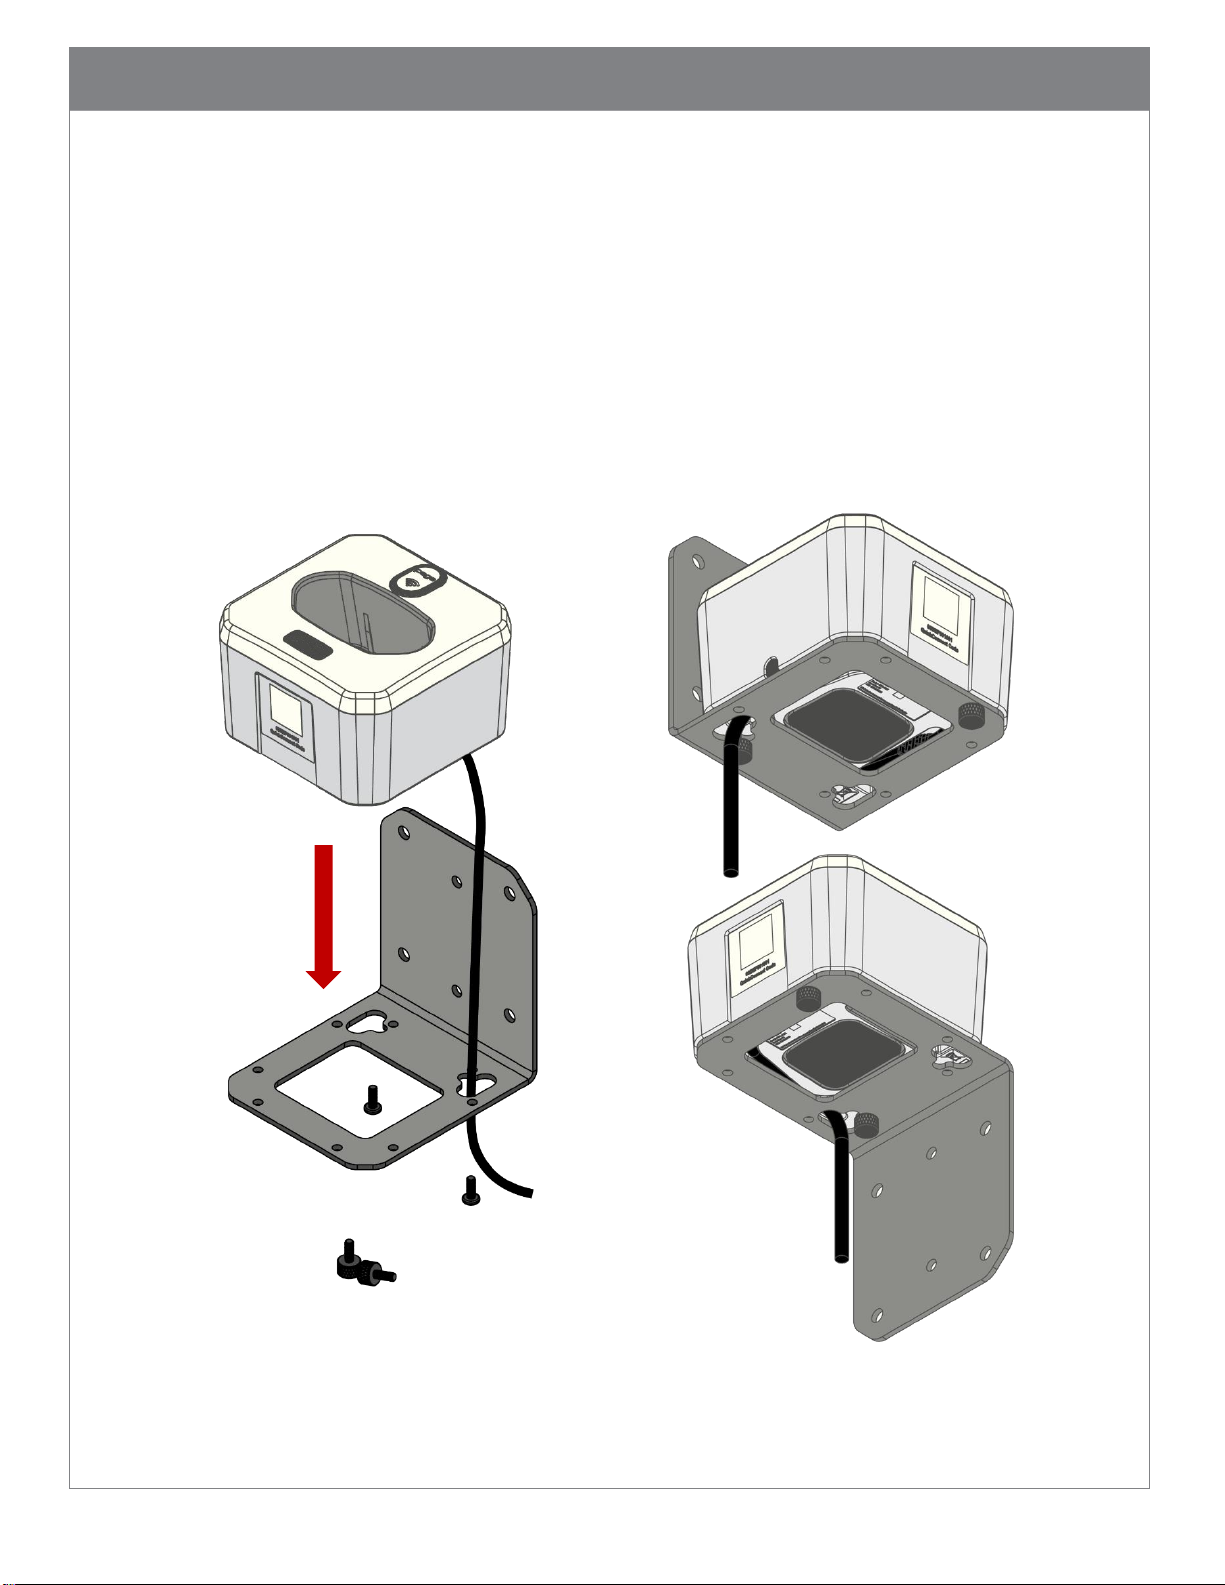
(Thumb screws are optional and
sold separately)
5.8.2. Wall Mount
The charging station can be mounted onto a wall using the wall mount bracket (CRA-
WMB4). Mount the bracket to a wall using four #10 (M4 or M5) size screws (not
provided). The wall mount bracket can be mounted in upward or downward position
depending on application (Figure 9). There are three positions that the charging station
can be affixed onto the bracket. Choose a position suitable for your workflow, thread
the USB cable through one of the two cable exit holes on the bracket and attach the
charging station onto the bracket using two screws supplied with the wall mount
bracket. Optional thumb screws (CRA-CR27-01) are available to mount the charging
station without using a screwdriver.
Figure 9 Install Charging Station with Wall Mount Bracket CRA-WMB4
Page 17
16
(Thumb screws are optional and
sold separately)
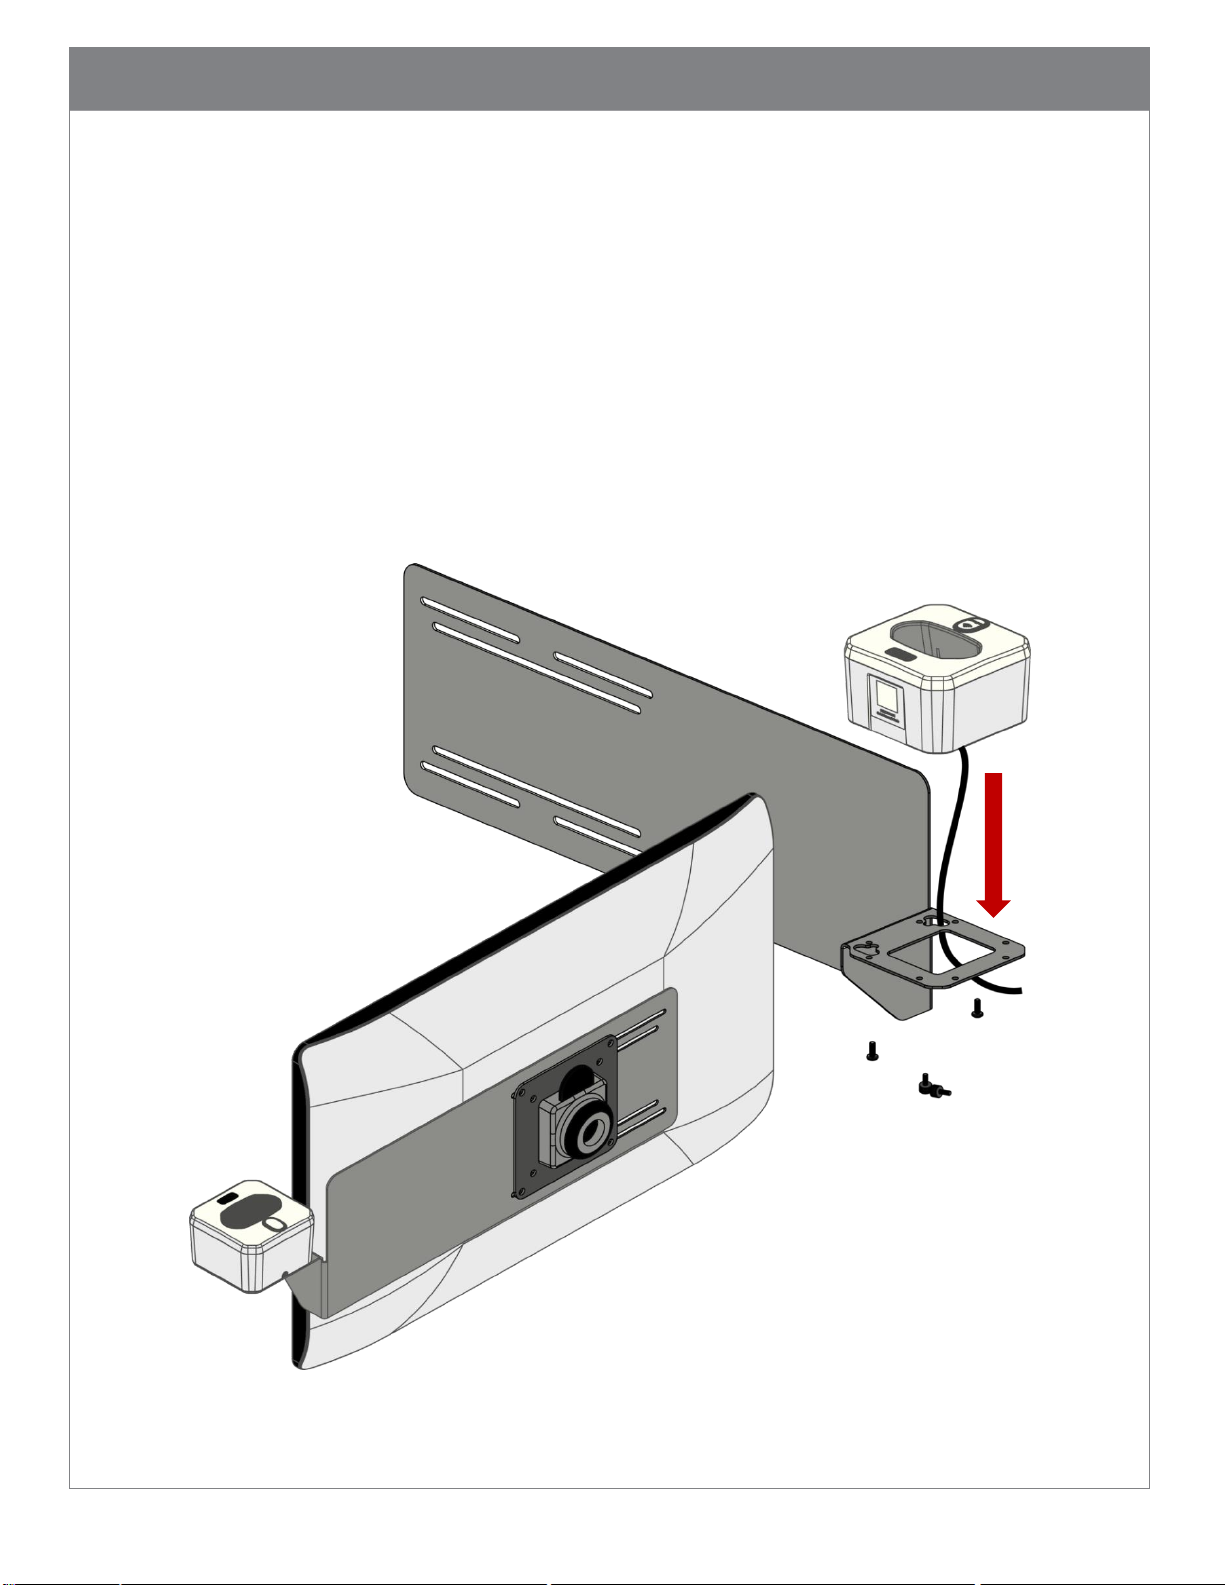
5.8.3. VESA Mount
To mount the charging station next to a monitor on a medical cart, secure the cart VESA
mount bracket (CRA-MB7) to the monitor support beam on the cart first. The CRA-MB7
is compatible with monitor sizes up to 27” (69 cm). It can be mounted with the bracket
on either the left or right side of the monitor. Thread the USB cable through one of the
two cable exit holes on the bracket, and attach the charging station onto the bracket
using two screws supplied with the mounting bracket (Figure 10). Optional thumb
screws (CRA-CR27-01) are available to attach the charging station without using a
screwdriver.
Please note, screws holding monitor in place may loosen over time and monitor may tilt
to one side. If that occurs, adjust the monitor position and tighten those screws.
Figure 10 Install Charging Station with a VESA Mount CRA-MB7
Page 18
17
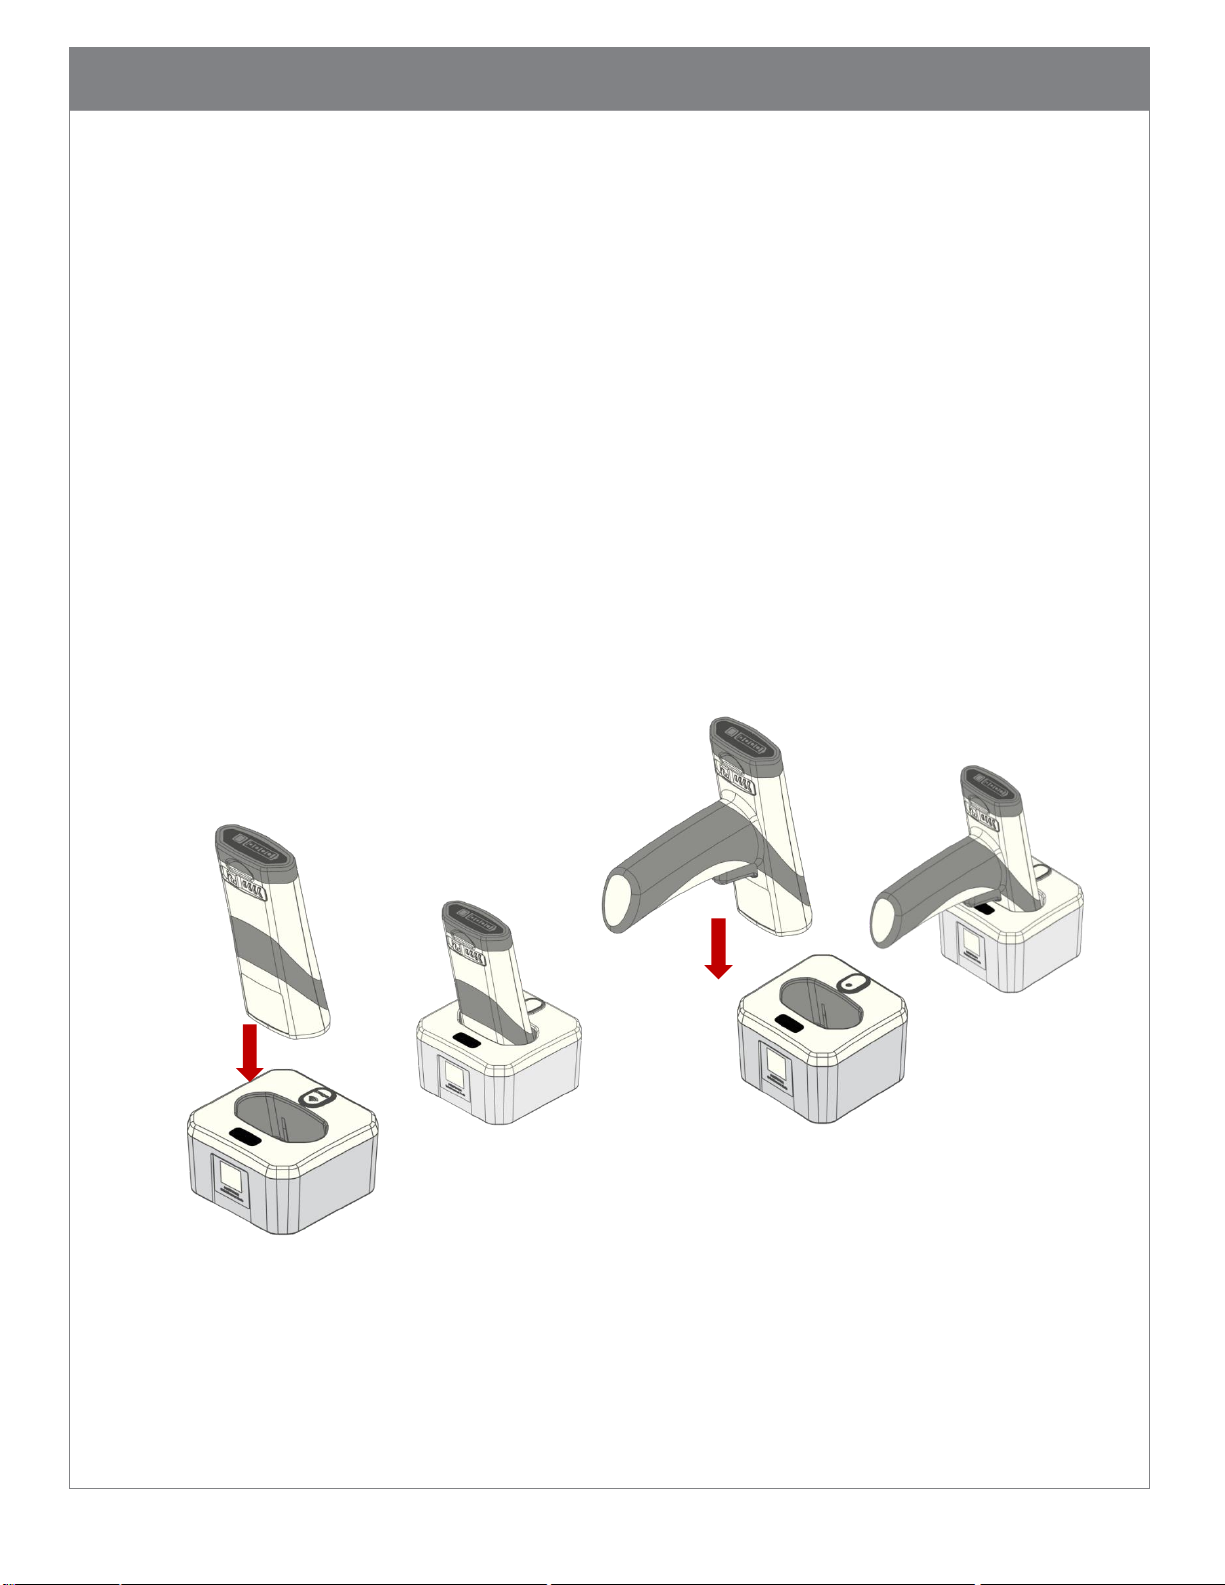
5.9. Charging CRA-B27 Battery
It is recommended to fully charge the battery before deploying the reader for the first time,
even though a new battery has a residual amount of battery power. To ensure adequate
battery power to last through a shift, always place the reader back into a charger between
activities. Constant charging will not shorten the life of the battery.
5.9.1. To charge the battery installed in the reader, place the reader in the charging
station with the scan window facing down (Figure 11). The reader will beep once if the
reader is powered off and wakes up, another beep if the reader has been paired with
the charger and reconnects. The Power Gauge LEDs on the battery will start flashing 4
second on and 1 second off alternately. Once the battery is fully charged, the Power
Gauge LEDs will stay on solid. The battery will be fully charged in approximately 3.5 hrs
when using the charging station with an external power supply (CRA-P4). Charging time
may vary if the inductive charger is connected to a PC USB port.
Figure 11 Charging Reader in Charging Station
Page 19
18
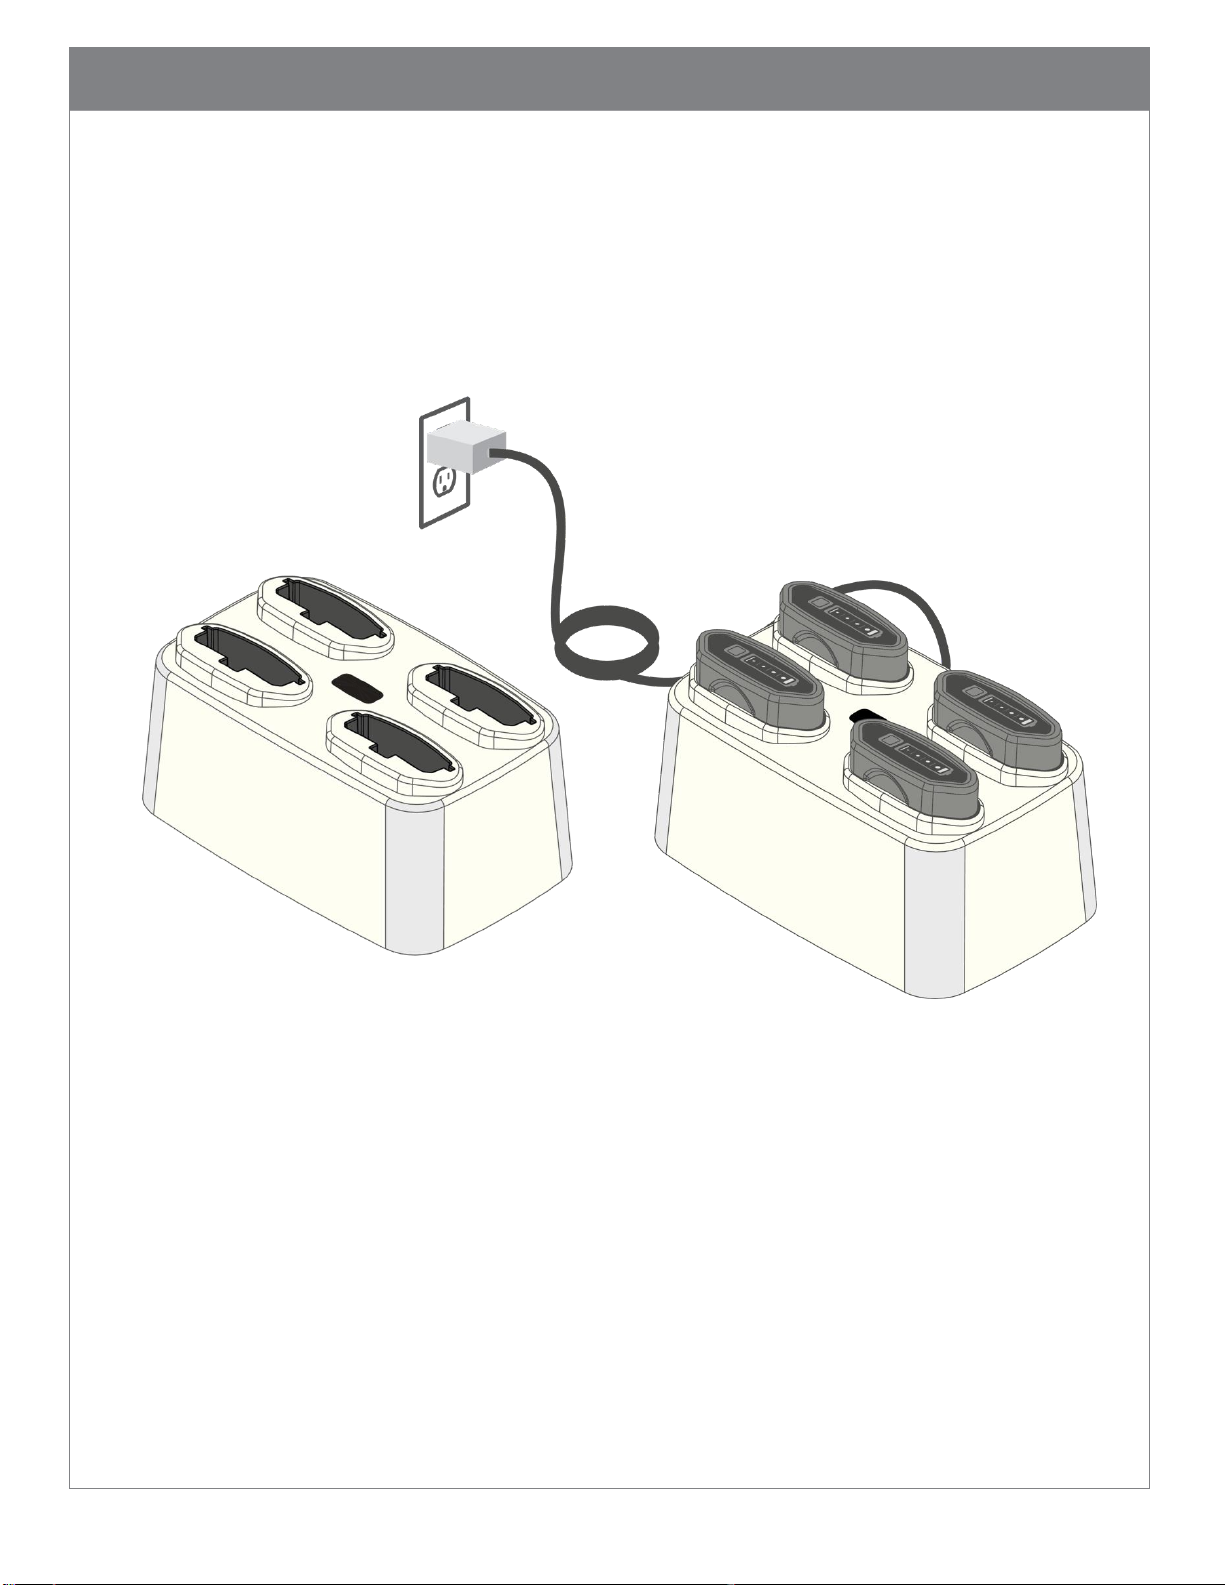
5.9.2. The batteries can also be charged using the Quad-Bay battery charger (CRAA274). Connect the Quad-Bay charger to the power supply provided for the charger and
plug the power supply to an AC power source. Insert batteries into the charger (Figure
12). The batteries will start charging as the Power Gauge LEDs start flashing 4 second on
and 1 second off. The LEDs will stay solid on when a battery is fully charged. The
battery will be fully charged in approximately 4 hrs when using the quad-bay battery
charger.
Figure 12 Charging B27 Batteries in a Quad-Bay Charger
Please note: the temperature range to charge the battery is 0°C – 40°C (32°F – 104°F).
Although the reader will operate beyond this range, the battery may not charge
properly. To avoid temperature related battery issues, always charge the battery and
operate the reader between 0°C – 40°C (32°F – 104°F).
Please note: It is normal that the area around the serial label on the reader becomes
warm during charging.
For long-term storage or shipping, please remove the battery from the reader or the
quad-bay charger.
Page 20
19
5.10. Pairing CR2700 with a Bluetooth Device
The CR2700 reader operates in Bluetooth Low Energy mode. It must be paired with another
Bluetooth device that supports Bluetooth Low Energy for wireless data communication.
5.10.1. Pairing with a Bluetooth Inductive Charging Station
The CR2700 reader can pair with a CRA-A271 Bluetooth Inductive Charging Station. The
charging station will receive data wirelessly from the paired reader and send to the host
PC via USB. It can receive commands, configurations, files, etc. from the host and send
wirelessly to the paired reader. To pair a CR2700 reader with a CRA-A271 Bluetooth
Charging Station, simply scan the unique QuickConnect Code displayed on the charging
station. A successful pairing is indicated by two short beeps followed by one normal
beep and one vibration. Also, the wireless indicators on both the reader and A271 will
turn solid green.
Alternatively, the Quick Connect Code can be generated and displayed on a host PC.
Download CortexTools2 from the CR2700 product page of the Code website, install then
run on the host PC. Connect a CRA-A271 Bluetooth Charging Station to a USB port on
the PC. The software can generate and display the QuickConnect Code to be scanned by
a CR2700 reader. A Quick Connect Code can also be generated at
https://ww2.codecorp.com/bdaddr.php by entering the Bluetooth address of the CRA-
A271 Bluetooth Charging Station.
5.10.2. Pairing with a Host
The CR2700 reader can be paired with a third party host such as a mobile phone, tablet
or a PC that supports Bluetooth Low Energy as a Bluetooth HID keyboard device. Scan
the barcode below (M20381) to set the reader to Bluetooth HID keyboard mode. Open
Bluetooth settings menu on the mobile device or Device Manager on the PC, find “Code
CR2700” in available Bluetooth devices and connect. Successful connection is indicated
by a beep sound and flashing of the Bluetooth indicator on the reader. Automatic
reconnection can be set on the host.
Page 21

20
5.10.3. Locking Device Links
The CR2700 reader supports locking the link between a reader and the CRA-A271
charger. Once locked, the charger can only connect with the paired reader. After
pairing a reader with the CRA-A271 charger, scan the barcode M20409 below to enable
Link Lock. To unlock the link, scan the barcode M20410.
(Enable Link Lock) (Disable Link Lock)
Page 22
21
6. CR2700 Operations
The CR2700 provides red illumination and a blue targeting bar to facilitate barcode
scanning.
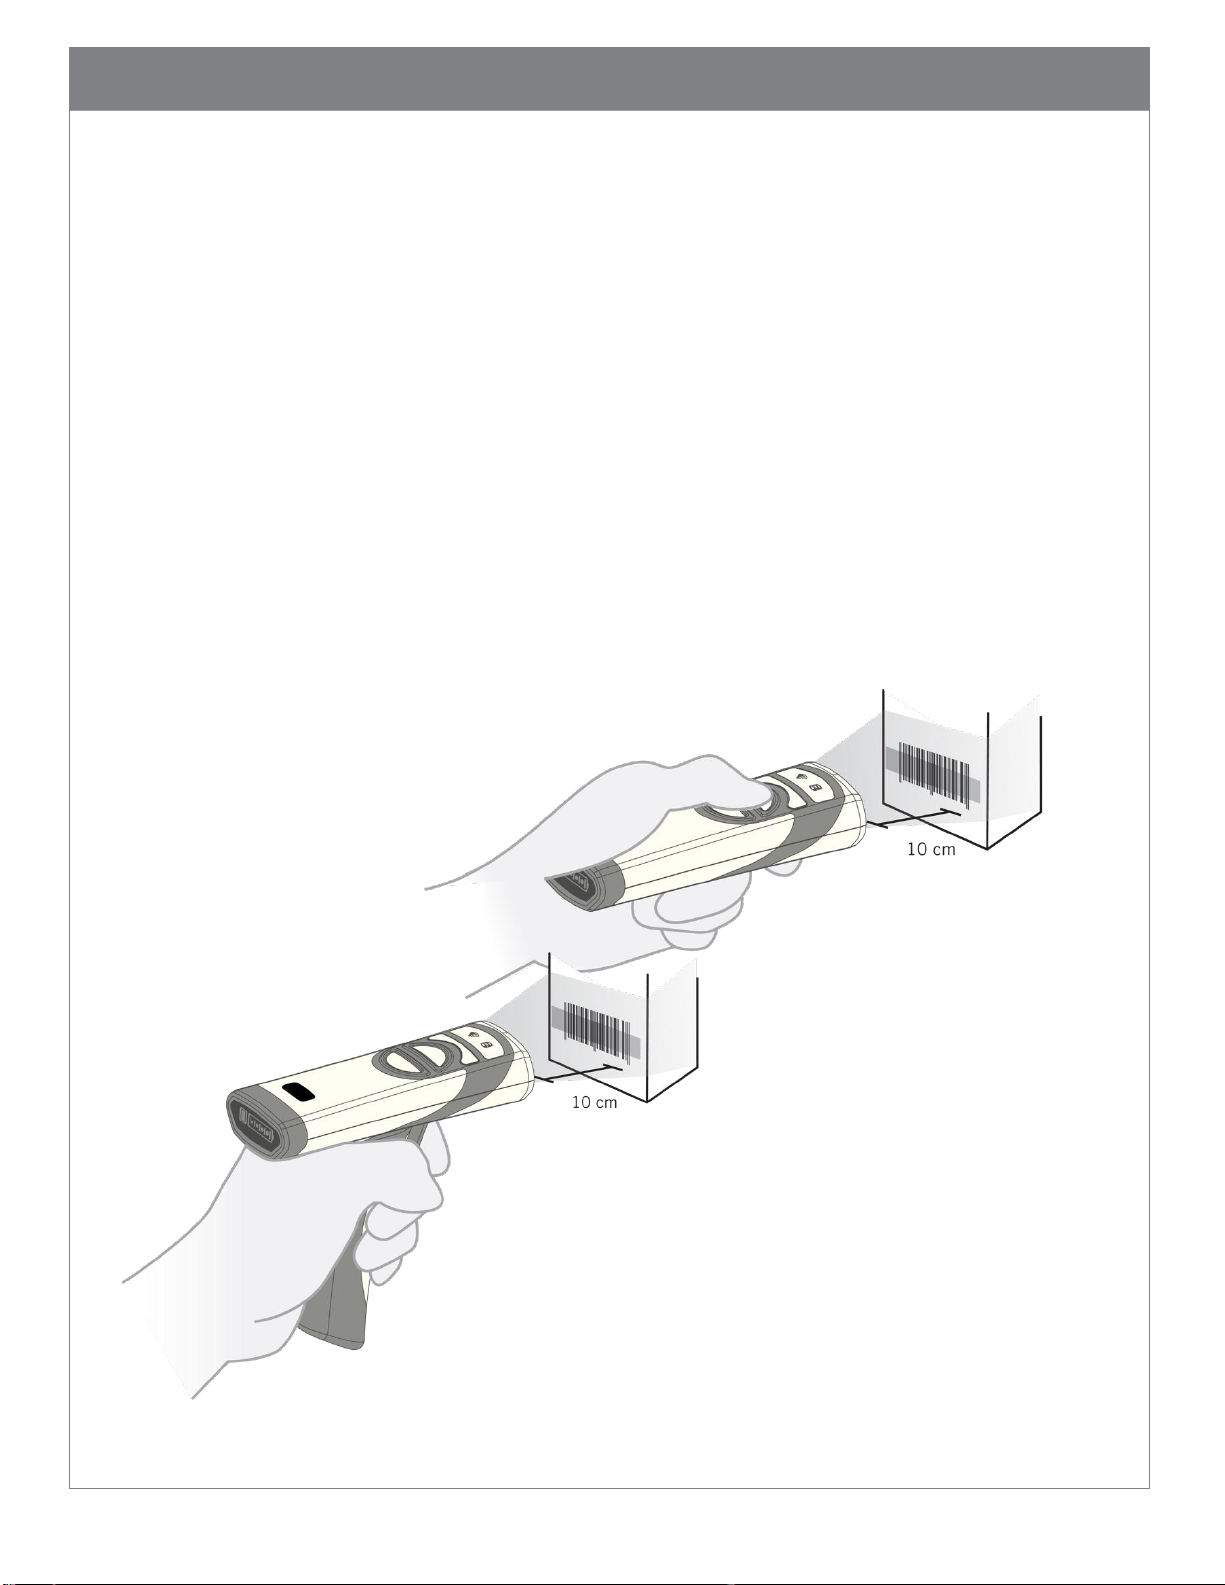
6.1. Handheld Scanning
Target the CR2700 reader at a barcode at a distance about 10 cm (4”) (Figure 13). If you
have a CR2701 (palm unit), press either of the two buttons to read the barcode (Please
note: one of the buttons may be programmed to perform other functions. In this case,
press the other button to scan). If you have a CR2702 (handle unit), pull the trigger to read
the barcode until the barcode is successfully read; alternatively, press one of the buttons on
the top of the device. Press the scan button or trigger until the reader emits a beep, flashes
green in the indicator window and vibrates, which indicate a successful read. Depending on
the size of the barcode, the user may need to vary the distance between the reader and the
barcode. In general, high density codes read better at shorter distances (close up) and large
or wide barcodes read better at larger distances (farther away).
Figure 13 Manual Scanning
Page 23
22
Reader’s field of
6.2. Targeting
The CR2700 reader emits a blue targeting bar to help capture the barcode within its field of
view (Figure 13). For best performance, aim at the barcode with the targeting bar.
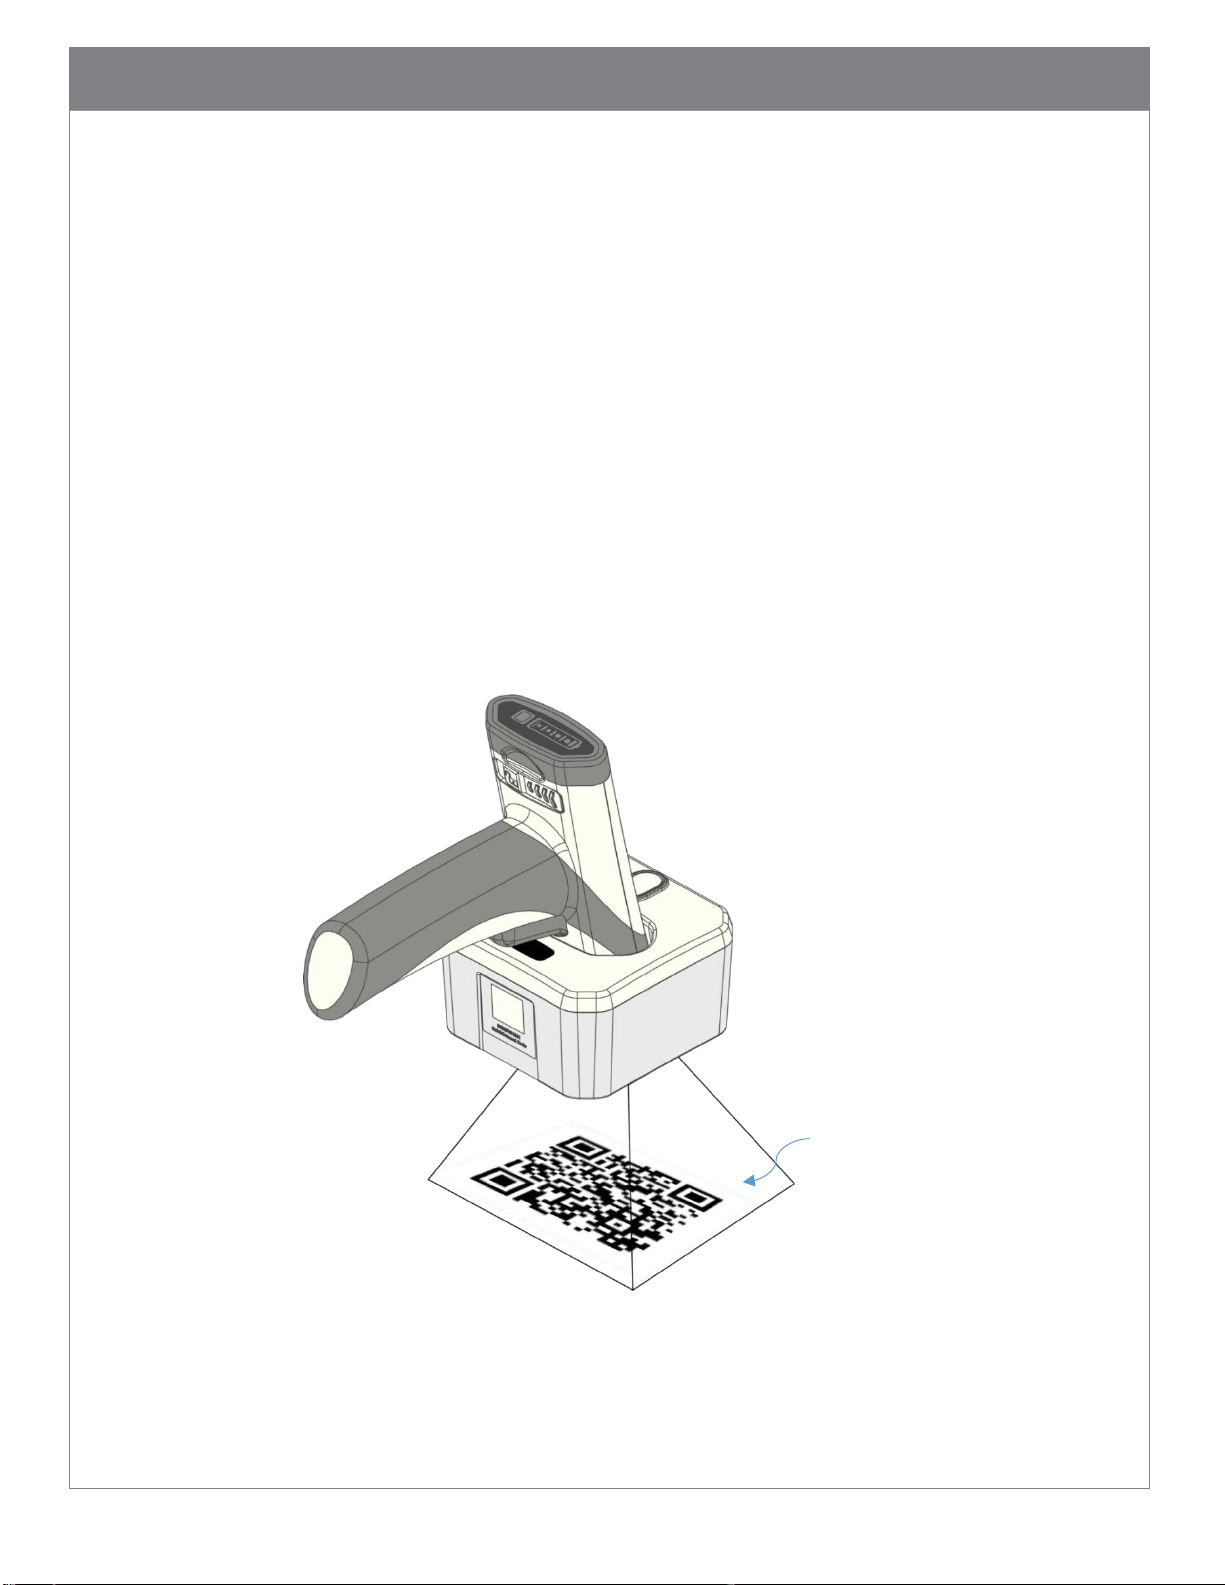
6.3. Presentation Scanning
The CR2700 supports presentation scanning in the charging station. This enables scanning
without pressing a scan button or pulling the trigger. This feature is off by default but can
be enabled using an M-Code from the Configuration Code Generator on Code’s website or a
command sent via the software tool CortexTools2 (see section 8.2). If this feature is
enabled and the reader is placed into a wall mounted or cart mounted charging station, the
reader enters presentation scanning mode. When an object is presented in its field of view,
the reader will automatically emit red illumination, turn on the targeting bar, and attempt
to scan barcodes (Figure 14). A successful read will be indicated by a beep and flashing
green in the indicator window. Normal reading distance is about 10 cm (4”) from the
window of the reader or 9 cm (3.5”) from the bottom of the base but the user may need to
move the barcode closer or farther away for best results depending on barcode size.
Figure 14 Presentation Scanning
Page 24
23
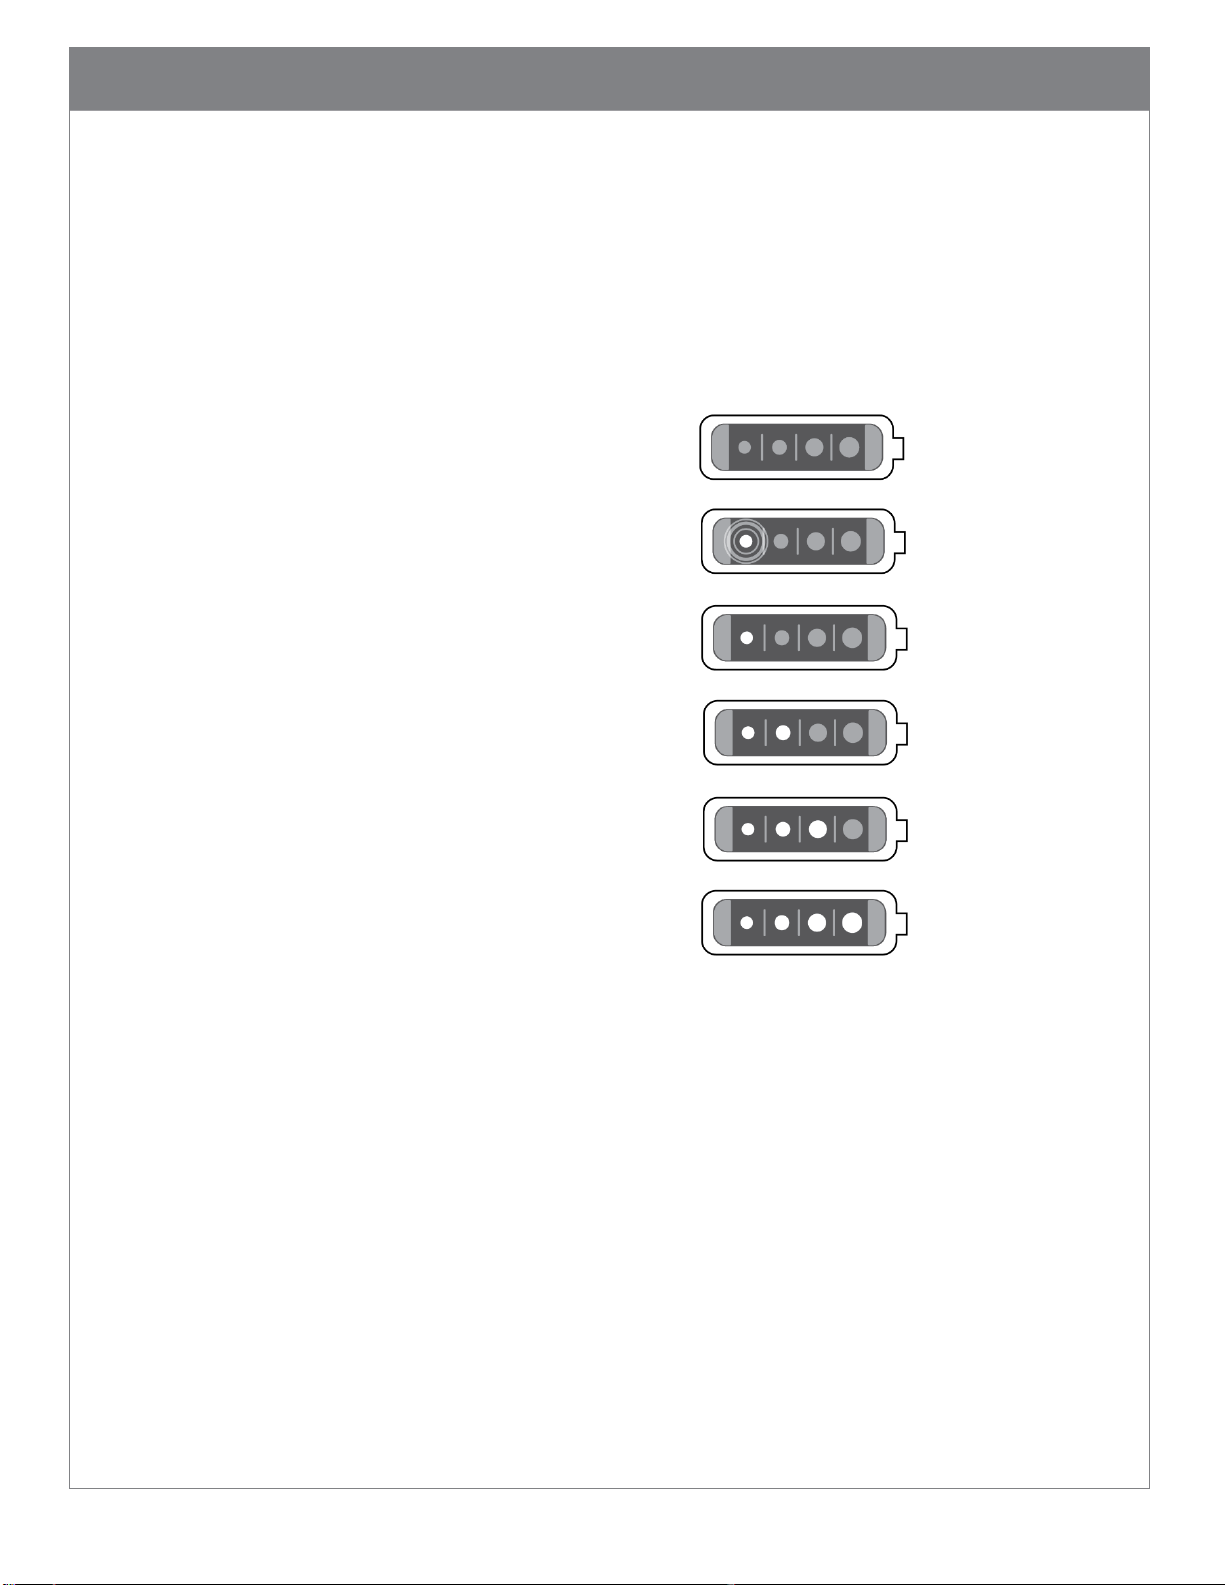
6.4. Battery Use
The CRA-B27 battery has a Li-ion cell with advanced features to allow effective use and
management of its life. Usually, a new battery is only charged partially and should be fully
charged before initial use. The battery has a built-in power gauge status indicator that turns
on when the power gauge button on the battery is pressed, when the trigger is pulled or
when one of the scan buttons is pressed.
No LED turns on Power exhausted
One LED flashing <10% Power left
One LED on <25% Power left
Two LEDs on 25-50% Power
Three LEDs on 50-75% Power
Four LEDs on 75-100% Power
When a battery is being charged either in a reader or in a quad-bay battery charger, the
battery LEDs will flash. As power level increases, more LEDs will flash. Once it is fully
charged, four LEDs will stay on solid.
The CRA-B27 battery has a built-in health check that tracks residual power capacity
against a new cell. See section 13.3 for the M-Code to output battery health information as
a percentage of a new cell. Depending on use intensity and workflow, replace the battery
when the residual capacity drops below a predetermined level to ensure that the battery
will always last through a full shift. Code recommends replacing the battery when residual
capacity drops below 80%, which equates to about 500 charging cycles.
Page 25

24
6.5. Paging Reader
The paging button on the CRA-A271 Bluetooth Charging Station assists with locating a
connected reader. When touched for more than 1 second, the connected reader will beep
until any button on the reader is pushed, the paging button is touched again for more than
1 second, or the page function times out, which is set to 30 seconds by default, but can be
configured for any length between 1 and 60 seconds. Please note that the reader will beep
when paged even if the reader is configured to turn off the beeper. If no reader is
connected, the Paging LED on the charging station will flash 3 times quickly.
6.6. Reader Power Modes
The CR2700 readers support 3 power modes.
Operating Mode – The reader attempts to decode barcodes either by a trigger pull (or
button press) or in presentation mode if enabled. In this mode, illumination and
targeting are flashing.
Idle Mode – The reader is on but not attempting to decode barcodes. In this mode,
illumination and targeting are not on.
Power Off Mode – If the reader is out of its charger, it will power off after 2 hours by
default. Pushing any button on a powered off reader or placing it in a powered charging
station will wake it up within 2 seconds.
Page 26
25
Status
Visual
Audio
Haptic*
Successfully powers up
Reader LEDs flash once in
sequence
One beep
One
vibration
Attempts to connect to
a host
Wireless LED flashes fast
until time out
-
-
Successfully connects
to a host
Wireless LED turns on solid
Two short beeps and
one normal beep
One
vibration
Connected to a host
Wireless LED stays on solid
-
-
Reconnect to a charger
successfully
One beep
Fails to connect
-
Three beeps
Successfully decodes
and transfers data to
the host
Read indicator flashes green
once and wireless LED
flashes until data
transmission is completed
One beep
One
vibration
Decodes but fails to
transfer data
Three beeps
Successfully decodes
and processes
configuration code
Read indicator flashes green
once
Two beeps
Two
vibrations
Successfully decodes
but fails to process
configuration code
Read indicator flashes green
once
Four beeps
Four
vibrations
Scanner is paged
Beeps until a scanner
button is pushed or
paging times out
Downloading
File/Firmware
Read indicator flashes amber
-
-
Installing file/firmware
Read indicator turns on red
Three slow beeps
upon completion
Three slow
vibrations
upon
completion
7. User Feedback Indicators
The CR2700 readers have built-in audio, visual and haptic indicators to provide status
information to the user. Default indicator patterns are described below. These patterns can be
customized for different use environments. For example, when used in a room where the
patient is resting, it is desirable to turn off the beeper.
7.1. CR2700 Readers
*Haptic feedback is turned off when the reader is in a charger.
Page 27
26
Status
Visual
Power gauge button pushed
LEDs turn on for 4 seconds
Scanner trigger is pulled or button is pushed
LEDs turn on for 4 seconds
Charging
LEDs alternate on for 4 seconds and
off for 1 second
Fully charged while remaining in charger
LEDs stay solid on
Status
Visual
Not powered
LED off
Powered but not connected to a reader
LED alternates 1 second on and 1
second off
Attempts to connect to a reader
LED flashes fast 7 times
Connected to a reader
LED stays solid on
Transmitting data
LED alternates 2 seconds on and 2
seconds off
Page issued to a connected reader
LED flashes until the connected
reader starts beeping
Page issued but no reader is connected
LED flashes 3 times
7.2. CRA-B27 Battery
7.3. CRA-A271 Bluetooth Charging Station
Page 28

27
8. Configuring the CR2700
There are several ways to configure the reader to meet specific application requirements: for
example, enabling and disabling certain symbologies, embedding a date code such as
deployment date or warranty expiration date, adding a prefix or suffix to data output or even
complex data manipulations.
8.1. Use Configuration Guide Generator on Code Website
The online Configuration Guide Generator contains all manual configuration codes for the
device. It can display an individual code to be scanned by a reader directly off the screen. It
can easily generate a PDF file containing one or multiple codes.
8.2. Use CortexTools2
CortexTools2 is a software tool to manage Code devices. It is available from the CR2700
product page of Code’s website. Users can use it to:
Download firmware, JavaScript and other files to Code devices
Retrieve files or images from the devices
Retrieve and make changes to device settings including data parsing and
formatting
Retrieve device information including model number, serial number, Bluetooth
MAC address, license numbers if loaded, custom date if programmed and battery
health information
Send commands (refer to device Interface Control Document and Configuration
Control Document) directly to the devices
Save all settings into configuration files or generate configuration barcodes to
replicate the settings in other devices
Generate QuickConnect Code for a Bluetooth charging station
Please note, to ensure successful firmware updates, firmware download will not initiate if
battery power level is low. If this occurs, charge the battery or swap with a charged spare
battery.
8.3. Use JavaScript
Selected Code devices, including the CR2700 readers, support JavaScript programming. This
provides tremendous capabilities and flexibility for customization in order to meet various
application requirements. From simply turning on or off features, to complex data
Page 29

28
manipulation, or even adding custom features, JavaScript gives you the capability. Code
devices will retain JavaScript even after restoring factory settings.
Please contact Code Support (see section 15) for information on JavaScript application
development for Code devices and to request the JavaScript Programmers Guide
(D028868).
Page 30

29
9. Bluetooth Radio Communications
9.1. Bluetooth Radio Power
The CR2700 readers use Class 2 Bluetooth Radio. Its power output level in the reader is set
to 0 dBm by default but can be configured to lower or higher maximum levels. The default
power output level of the Bluetooth radio on the CRA-A271 charger is -8 dBm and also can
be adjusted. Reducing radio power output will restrict data transmission range. Refer to
CCD for commands to change radio power level or contact Code Support.
9.2. Bluetooth Auto-Reconnect
The CR2700 attempts to reconnect automatically when a connection is lost (for example,
when the reader is moved out of range, loss of battery power, rebooting, or Bluetooth
charging station or host powering down). This auto-reconnect feature is enabled by default
but can be disabled. Default time out for auto-reconnect attempt is 5 minutes but can be
configured for different durations.
9.3. Bluetooth Security
By default, Bluetooth Low Energy communication in the CR2700 is AES-128 encrypted. For
enhanced security requirements, please contact Code Support.
Page 31

30
10. Interface Parameters
10.1. Bluetooth Charging Station Interface
The CRA-A271 connects to a host via a USB cable. It automatically detects the USB hosts
and connects as a HID keyboard device by default. To change to another interface type,
scan the desired interface configuration code or use CortexTools2.
10.2. Reader Bluetooth Interface
If a CR2700 reader is connected directly to a host via Bluetooth Low Energy, it
communicates as a Bluetooth HID keyboard device.
Page 32

31
11. Programming Reader Buttons
The buttons on the readers can be programmed to change reader settings. For example,
switch between “Day” and “Night” modes, or between “Regular” and “Continuous”
scanning modes. Contact Code Support for details.
Page 33
32
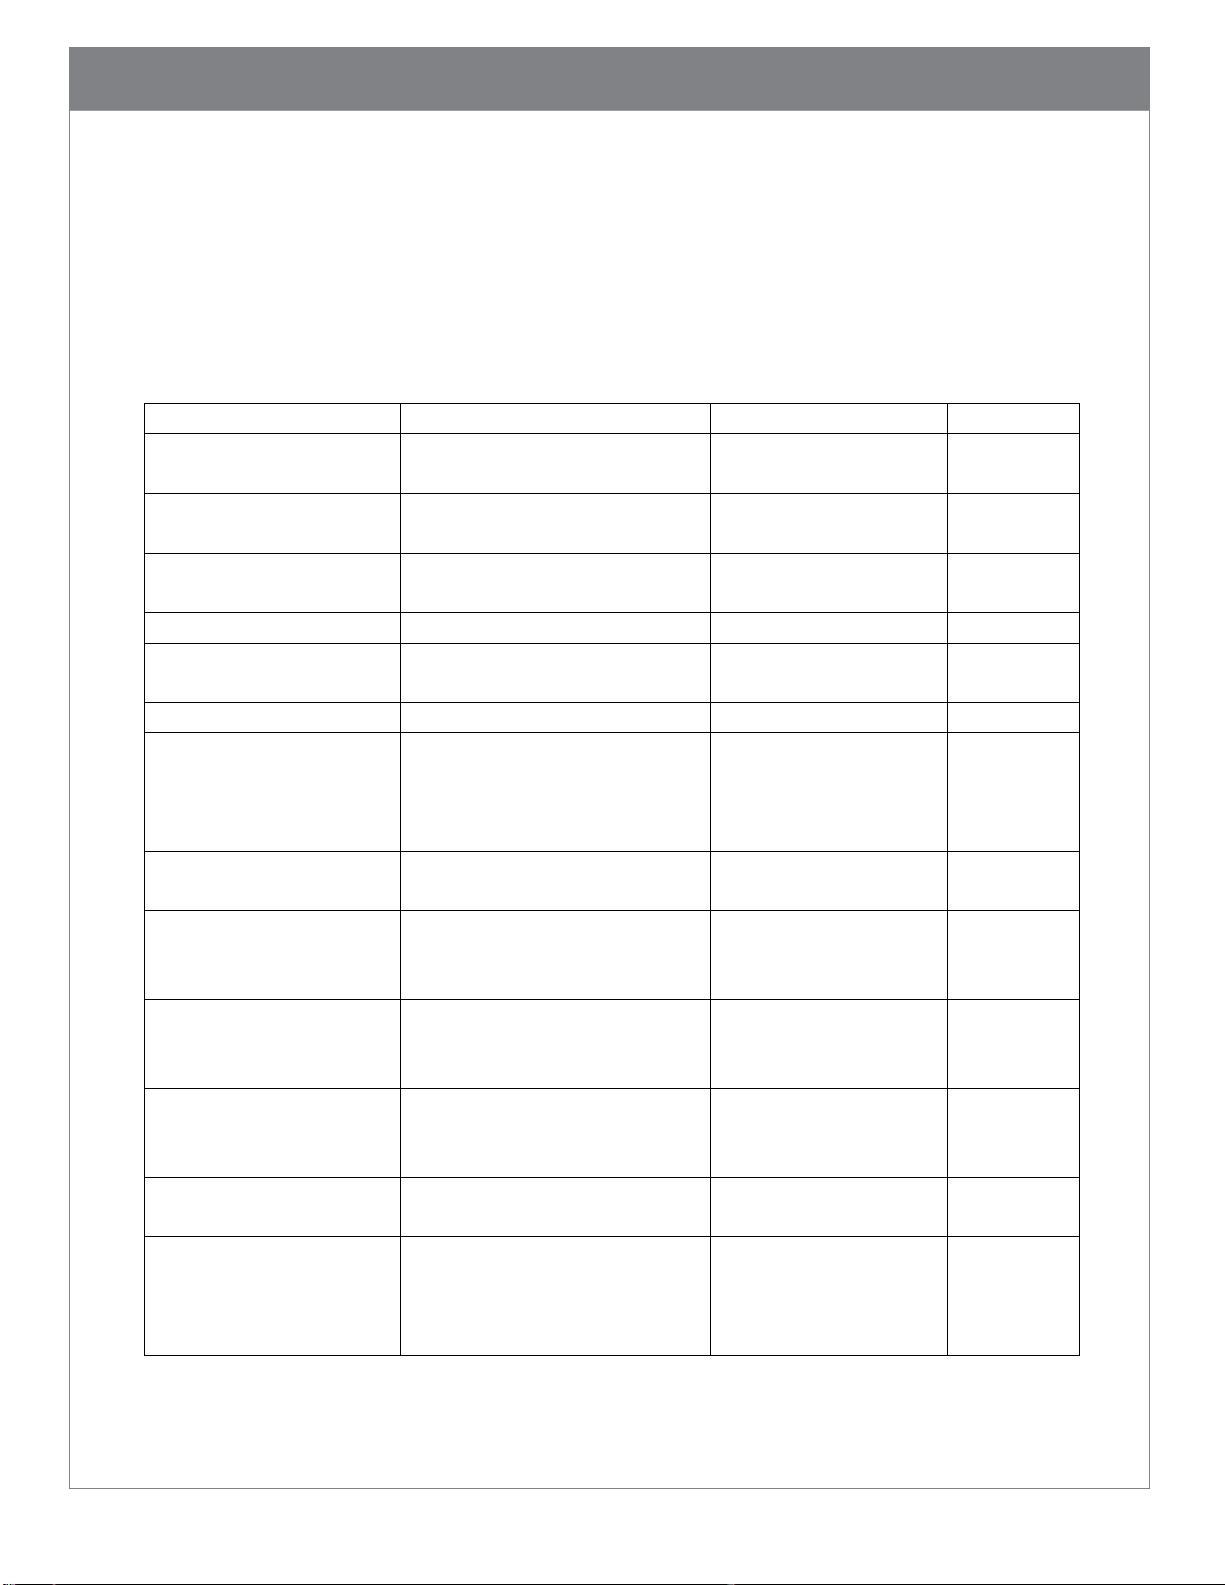
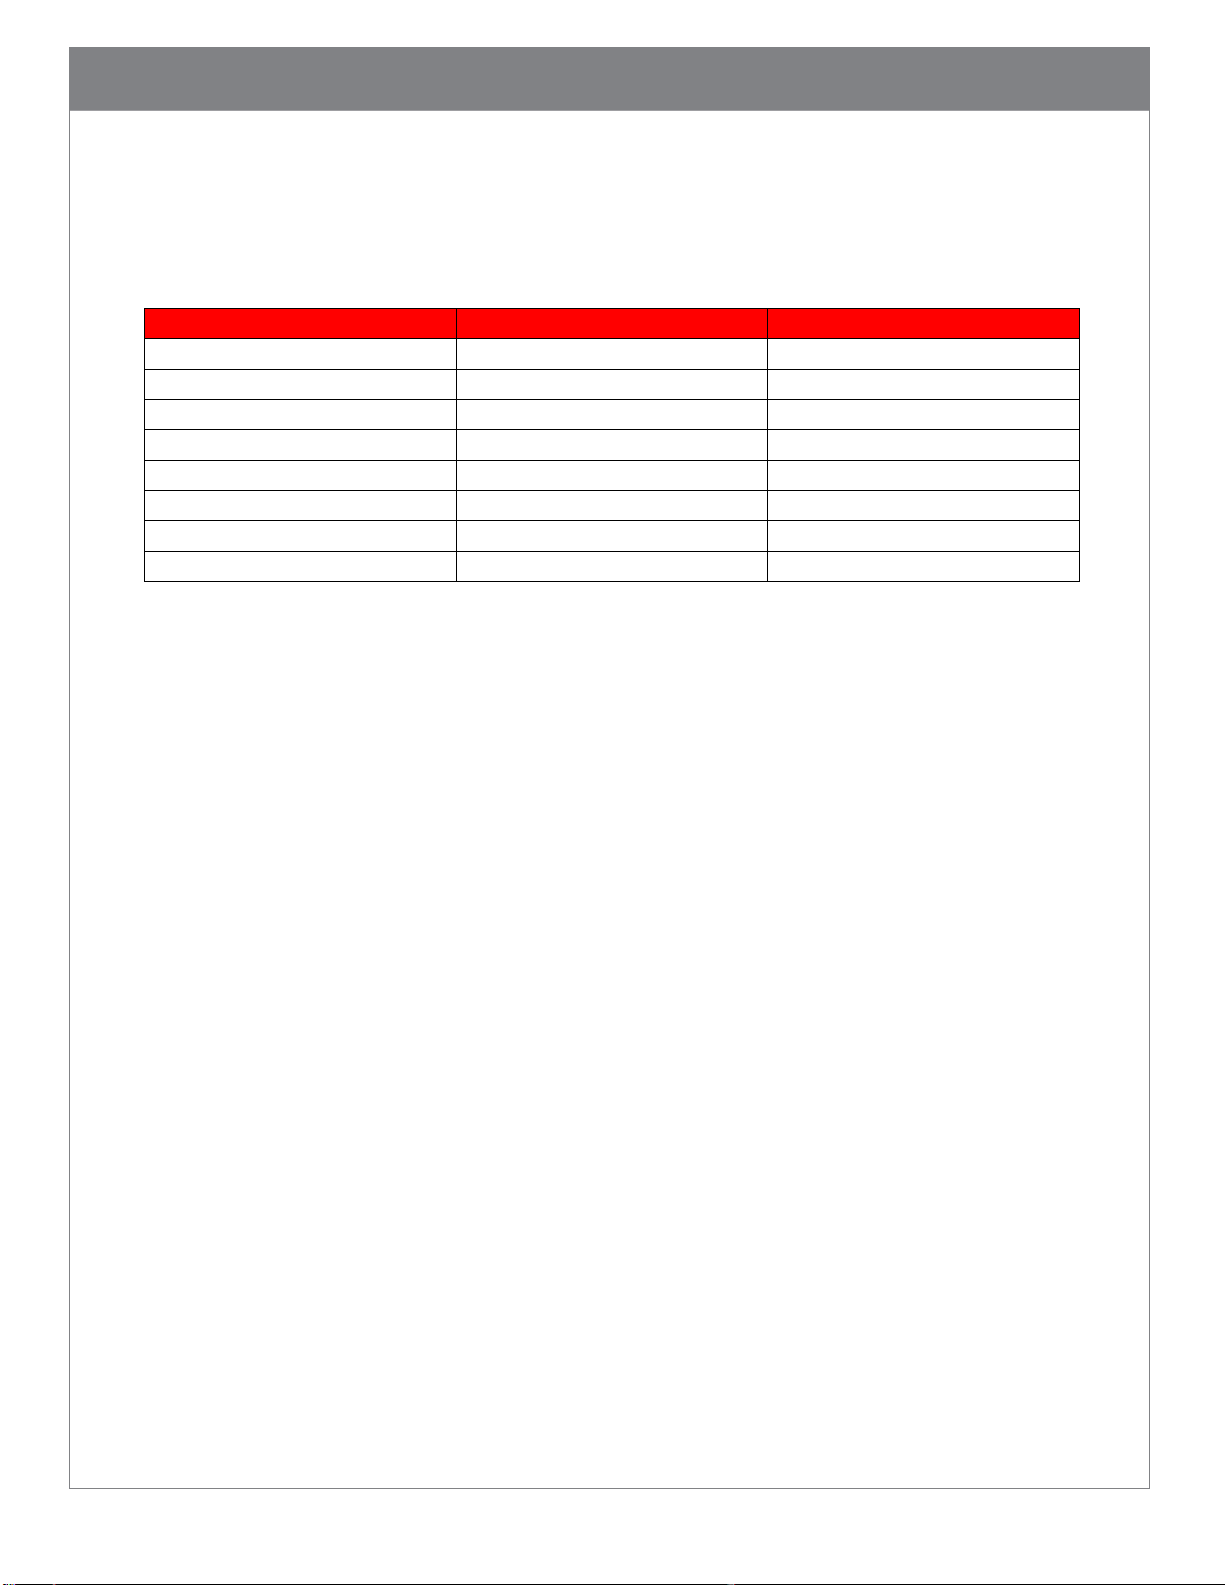
Test Barcode
Minimum Distance
Maximum Distance
3 mil Code 39
3.5” (90 mm)
4.4” (112 mm)
7.5 mil Code 39
0.9” (23 mm)
6.8” (172 mm)
10.5 mil GS1 DataBar
0.4” (10 mm)
8.3” (210 mm)
13 mil UPC
0.7” (18 mm)
10.6” (270 mm)
5 mil Data Matrix
1.3” (33 mm)
4.1” (105 mm)
6.3 mil Data Matrix
0.9” (23 mm)
5.5” (140 mm)
10 mil Data Matrix
0.4” (10 mm)
6.7” (170 mm)
20.8 mil Data Matrix
0.7” (18 mm)
13.1” (333 mm)
12. CR2700 Specifications
12.1. Typical Reading Ranges
Note: Reading ranges are a combination of both the wide and high density fields. All test
barcodes were of high quality and read along a physical center line at a 10° angle. Default
reader settings were used. Distance measured from the front of the reader in Metric units
then converted to Imperial units. Testing conditions may impact working ranges.
12.2. Supported Symbologies
Symbologies that can be decoded by the CR2700 are listed below. Common ones are turned on
by default, but all can be turned on or off. To turn symbologies on or off, scan the symbology
barcodes in the CR2700 Configuration Guide located on Code website at or use CortexTools2
software.
12.2.1. Symbologies default on
Aztec
Codabar
Code 39
Code 93
Code 128
Data Matrix
Data Matrix Rectangle
Page 34

33
GS1 DataBar, All
Interleaved 2 of 5
PDF417/Macro PDF417
QR Code
UPC-A/EAN/UPC-E
12.2.2. Symbologies default off
Codablock F
Code 11
Code 32
Composite
Data Matrix Inverse
Han Xin Code
Hong Kong 2 of 5
IATA 2 of 5
Maxicode
Matrix 2 of 5
Micro PDF417
MSI Plessey
NEC 2 of 5
Pharmacode
Plessey
Straight 2 of 5
Telepen
Trioptic
Postal Codes
Page 35
34
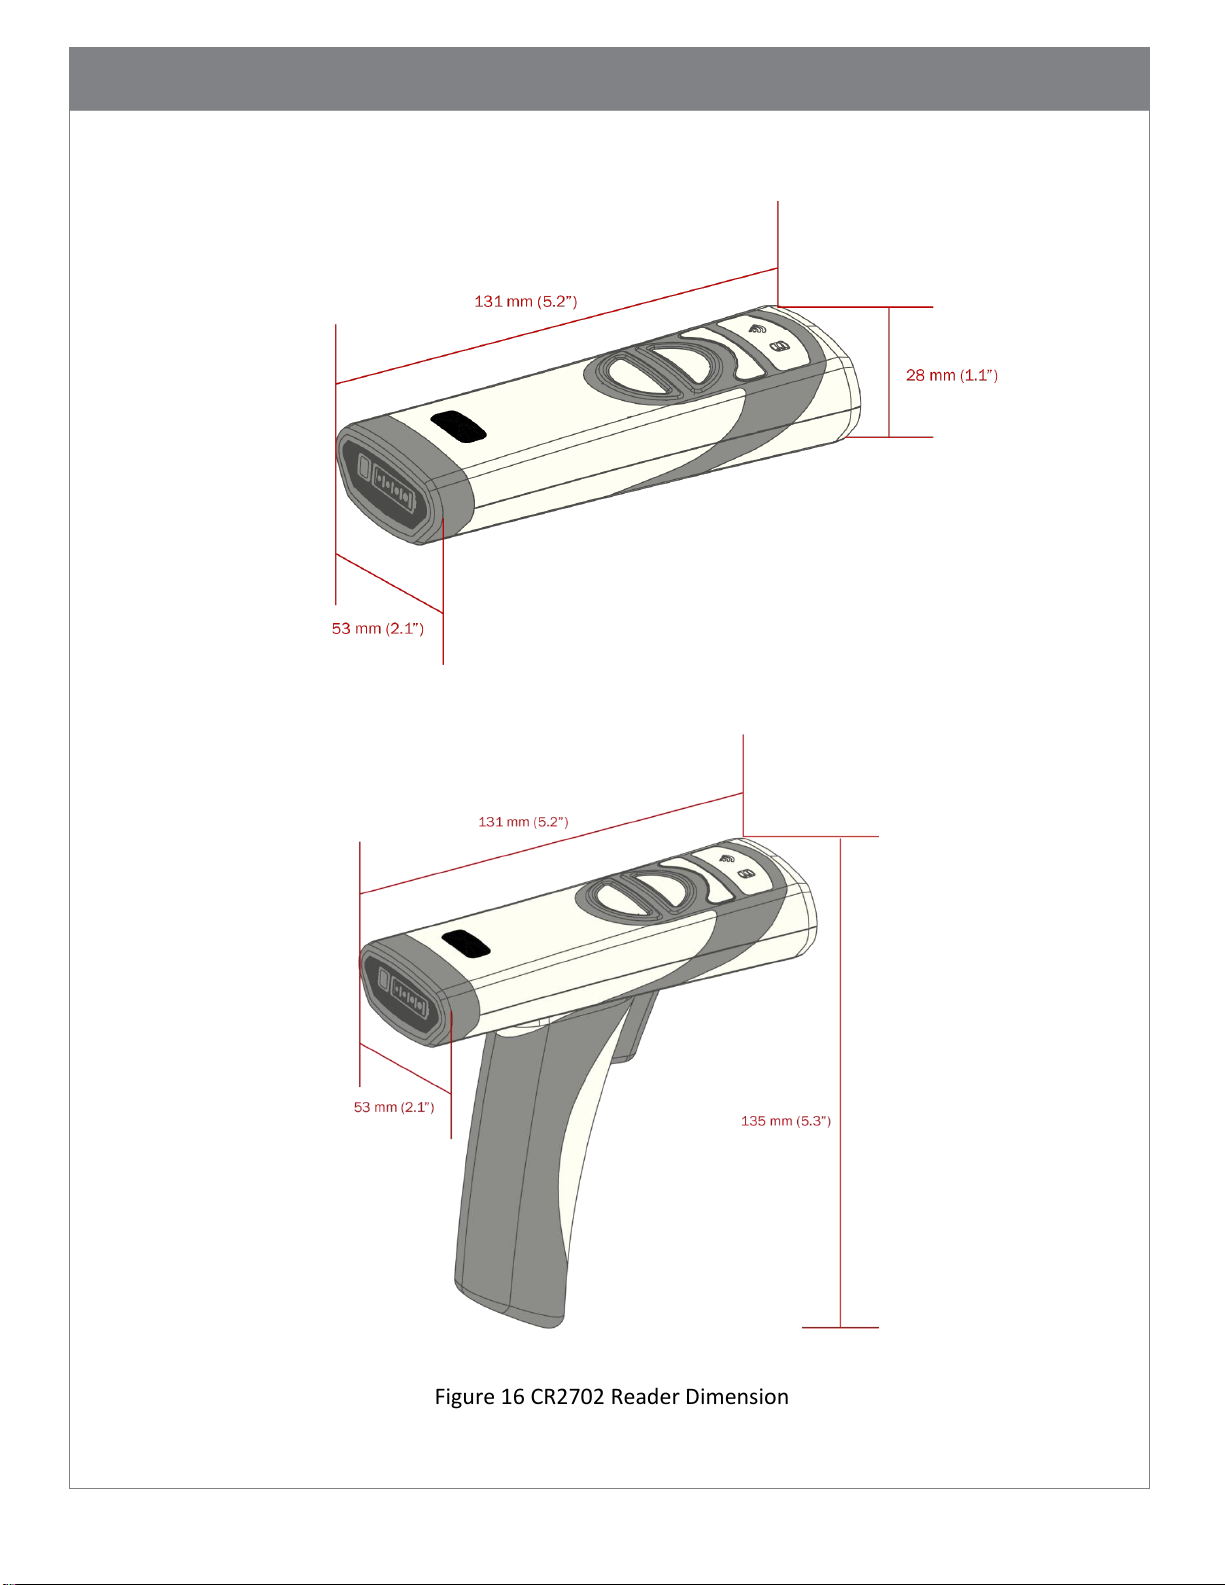
12.3. Product Dimensions
Figure 15 CR2701 Reader Dimensions
Figure 16 CR2702 Reader Dimension
Page 36

35
Figure 17 CRA-A271 Charging Station Dimensions
Figure 18 CRA-A274 Quad-Bay Battery Charger Dimensions
Page 37

36
Figure 19 CRA-MB6 Desktop Base Dimensions
Figure 20 CRA-WMB4 Wall Mount Bracket Dimensions
Page 38

37
Figure 21 CRA-MB7 Cart Mount Bracket Dimensions
Page 39
38
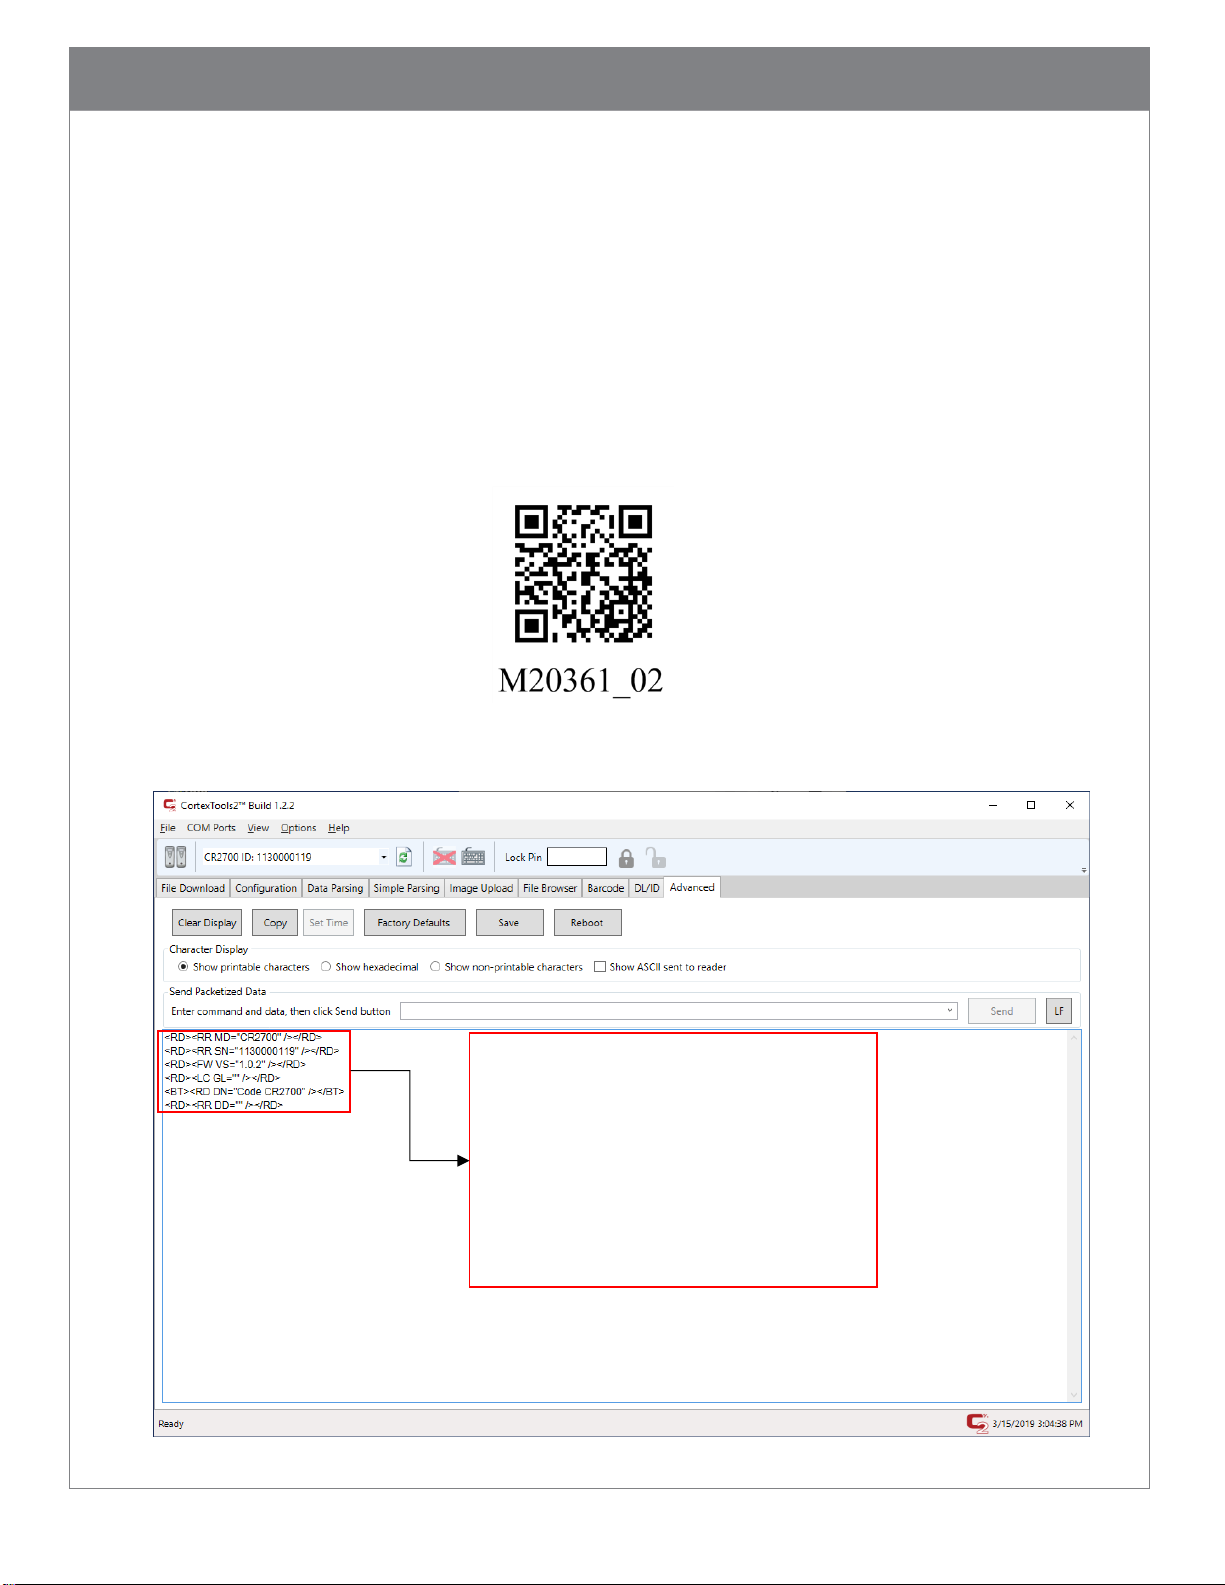
Device Model Number
13. CR2700 Device Information
13.1. Reader Information
For device management and obtaining support from Code, reader information will be
needed. To find out the reader model number, serial number, firmware version and
optional licenses, run CortexTools2 software, connect the reader to the PC via the Bluetooth
charger A271. Once CortexTools2 indicates the reader is connected, go to the Advanced
tab. Scan the barcode below (M20361).
Following data will be displayed:
Serial Number
Firmware Version Number
License Information (if installed)
Bluetooth Device Name (may be changed by user)
Custom Date (if embedded by user)
Page 40
39
Charger Model Number
Charger Custom Date (if embedded by user)
Above information can also be output to a text application such as Notepad.
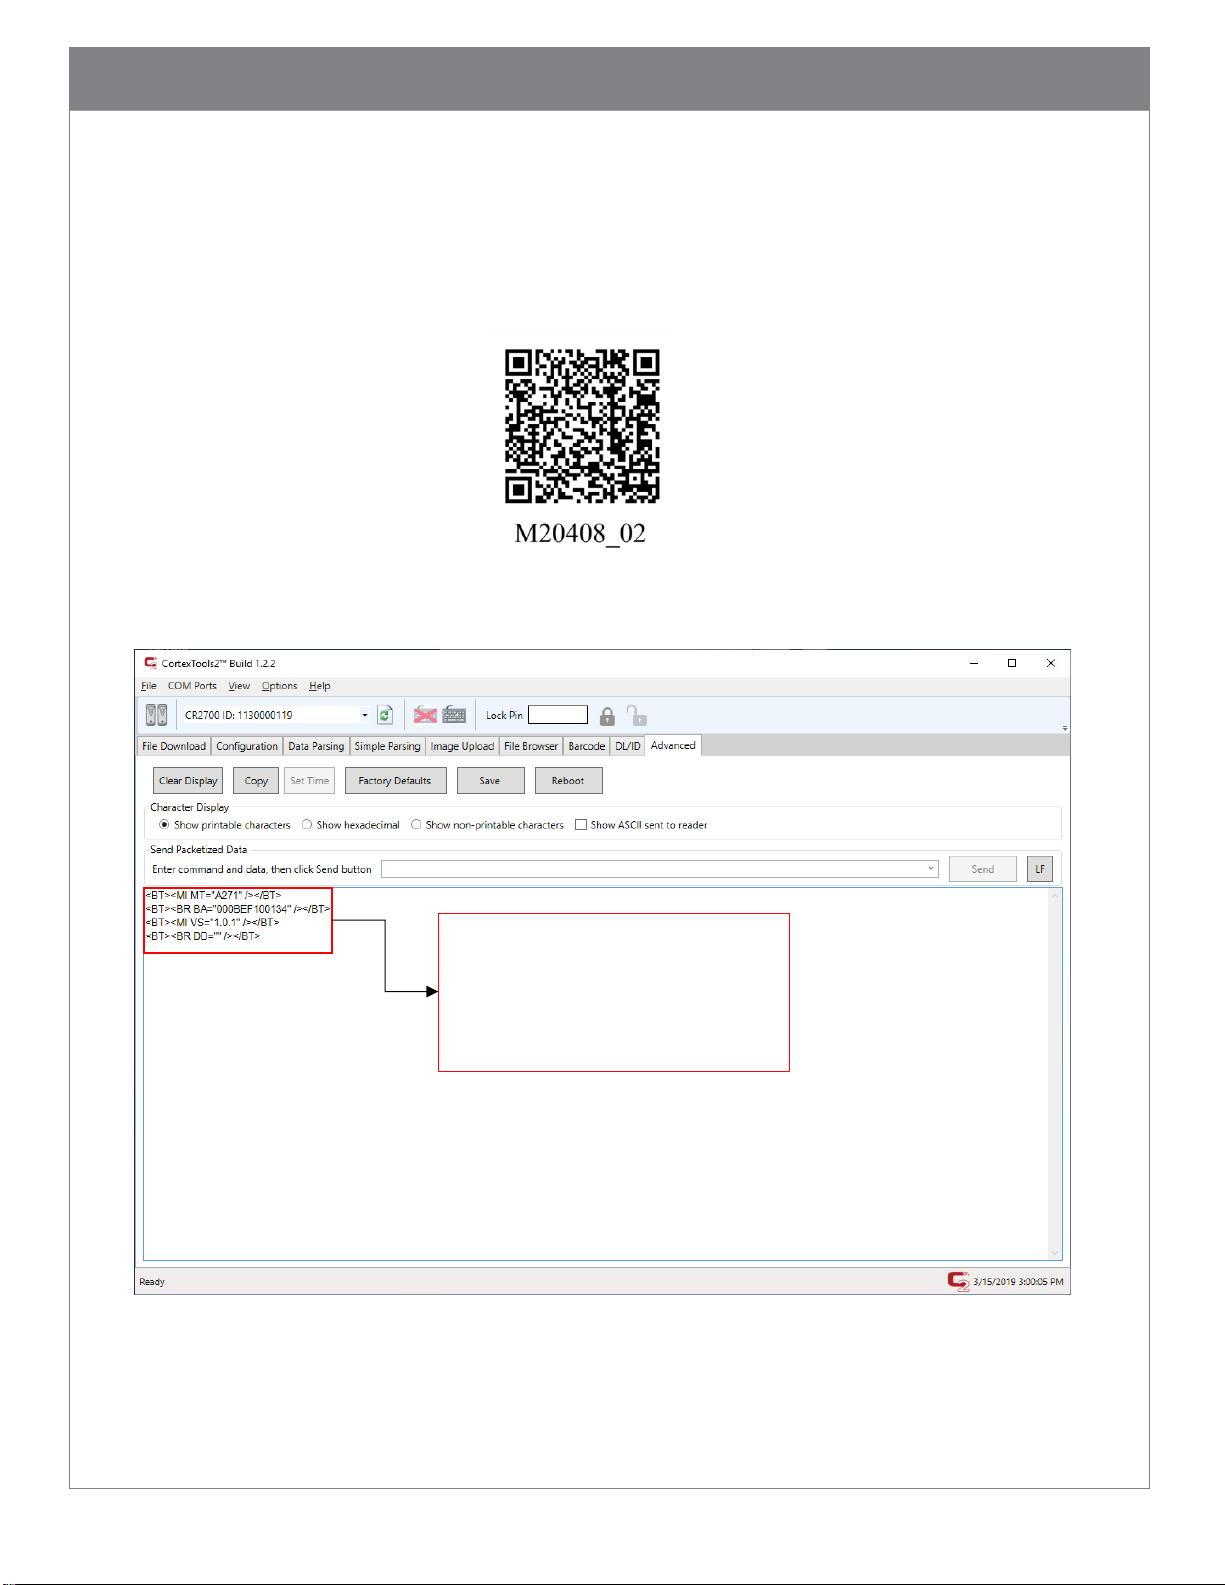
13.2. Bluetooth Charger Information
Scan the barcode below (M20408) to obtain Bluetooth charger information.
Following data will be displayed:
Charger Bluetooth MAC address
Charger Firmware Version Number
Above information can also be output to a text application such as Notepad.
Page 41
40
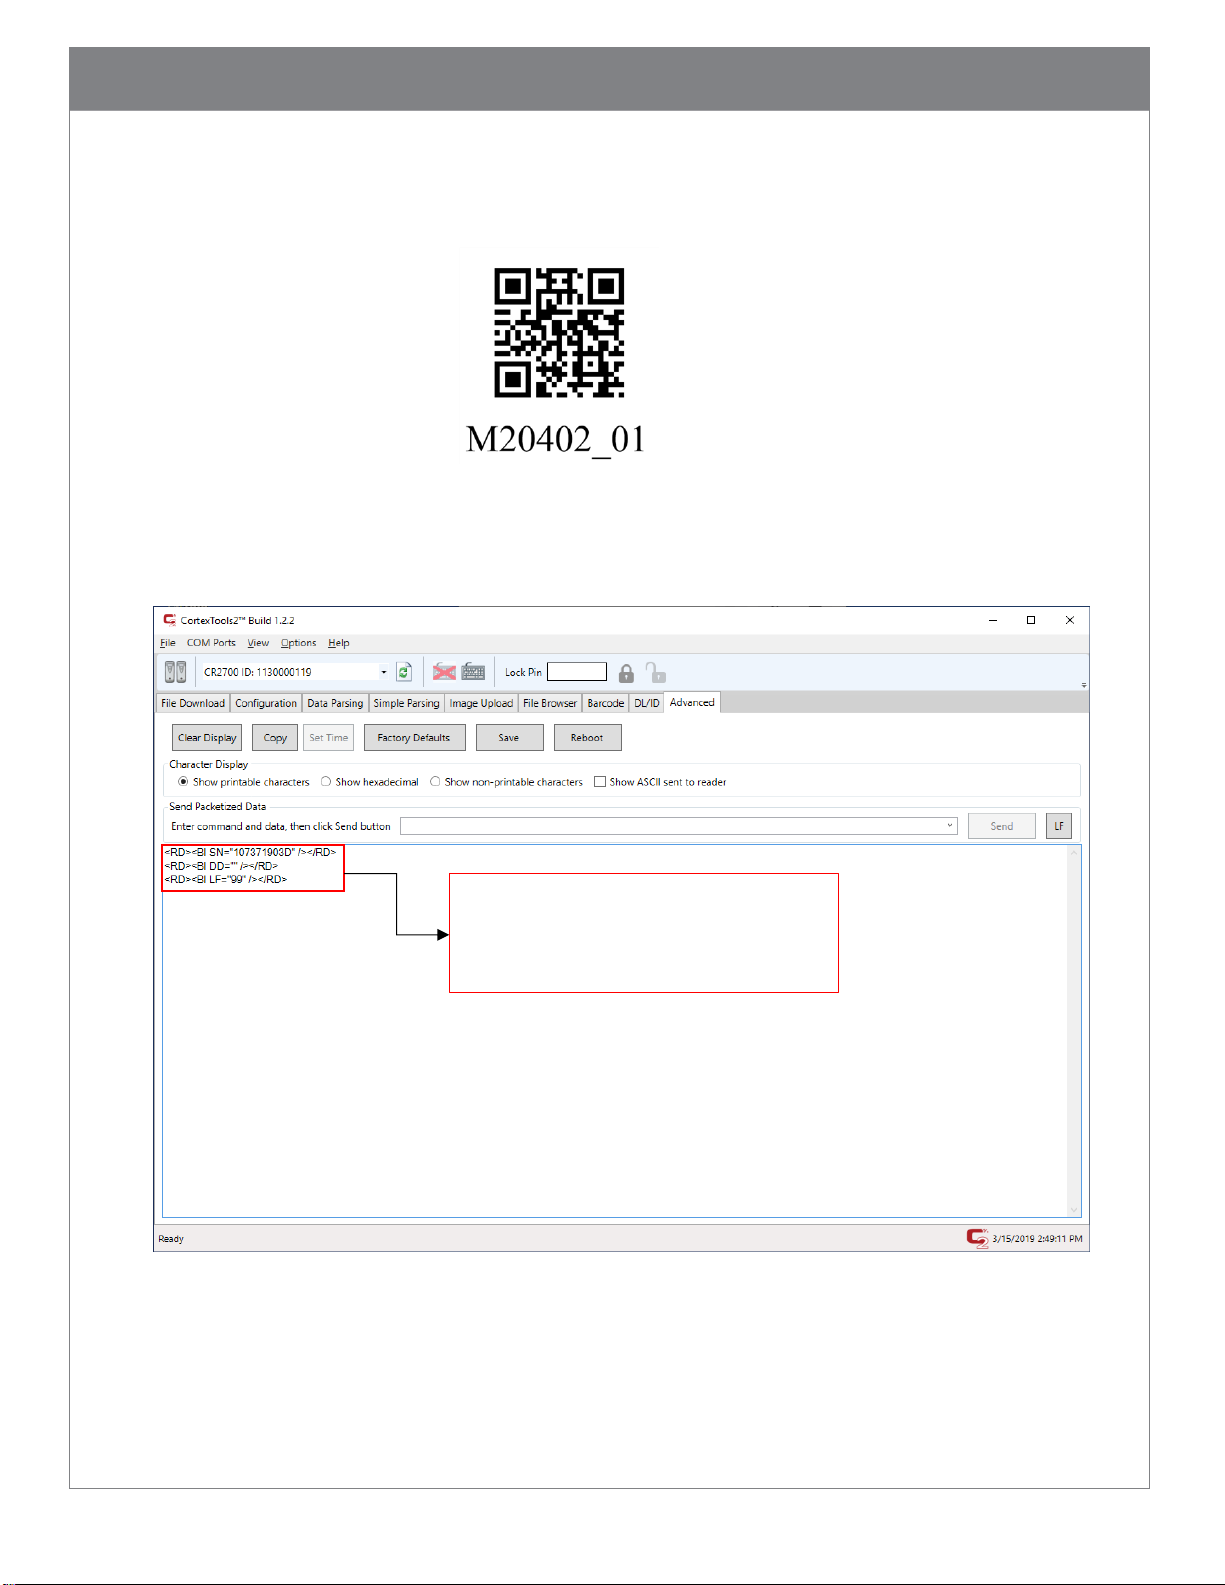
Battery Serial Number
Battery Health (%residual capacity vs. a new cell)
13.3. Battery Information
Scan the barcode below to obtain battery information.
Following data will be displayed:
Custom Date (if embedded by user)
Above information can also be output to a text application such as Notepad.
Note: Code will periodically release new firmware for readers. For information on latest
firmware visit our website at www.codecorp.com/codesupport.php.
Page 42

41
14. Maintenance and Troubleshooting
14.1. Approved disinfectants for the CR2700 readers:
• Clorox® Non-Bleach Disinfecting Wipes
• Oxivir® Tb Wipes
• 3% Hydrogen Peroxide Solution
• Sani-Cloth® Plus Germicidal Wipes
• 91 % lsopropyl Alcohol Solution
• MetriCide® 28 Day Solution (2.5% Glutaraldehyde)
• CaviWipes® Disinfecting Towlettes
• Virex® II 256 Disinfectant Cleaner
• Cidex® OPA
• Sani-Cloth® HB Germicidal Wipes
• Sani-Cloth® PDI AF3 Wipes
• Super Sani-Cloth® Wipes
• Windex® Original
• Windex® Multi-Surface Anti-Bacterial Spray
• Formula 409® Glass and Surface
• Hepacide Quat® II
• Dispatch® Wipes
Please note: mixed disinfectants have not been tested or approved to use with any Code
devices and may result in damage and void the warranty. Please avoid using mixed
disinfectants or alternating use of different disinfectants, even of approved disinfectants.
Please note: Hand sanitizers are not approved disinfectants or cleaners and should not be
used on the devices. Follow the instructions of hand sanitizer use and always rub hands dry
or put on gloves before using Code devices.
Page 43
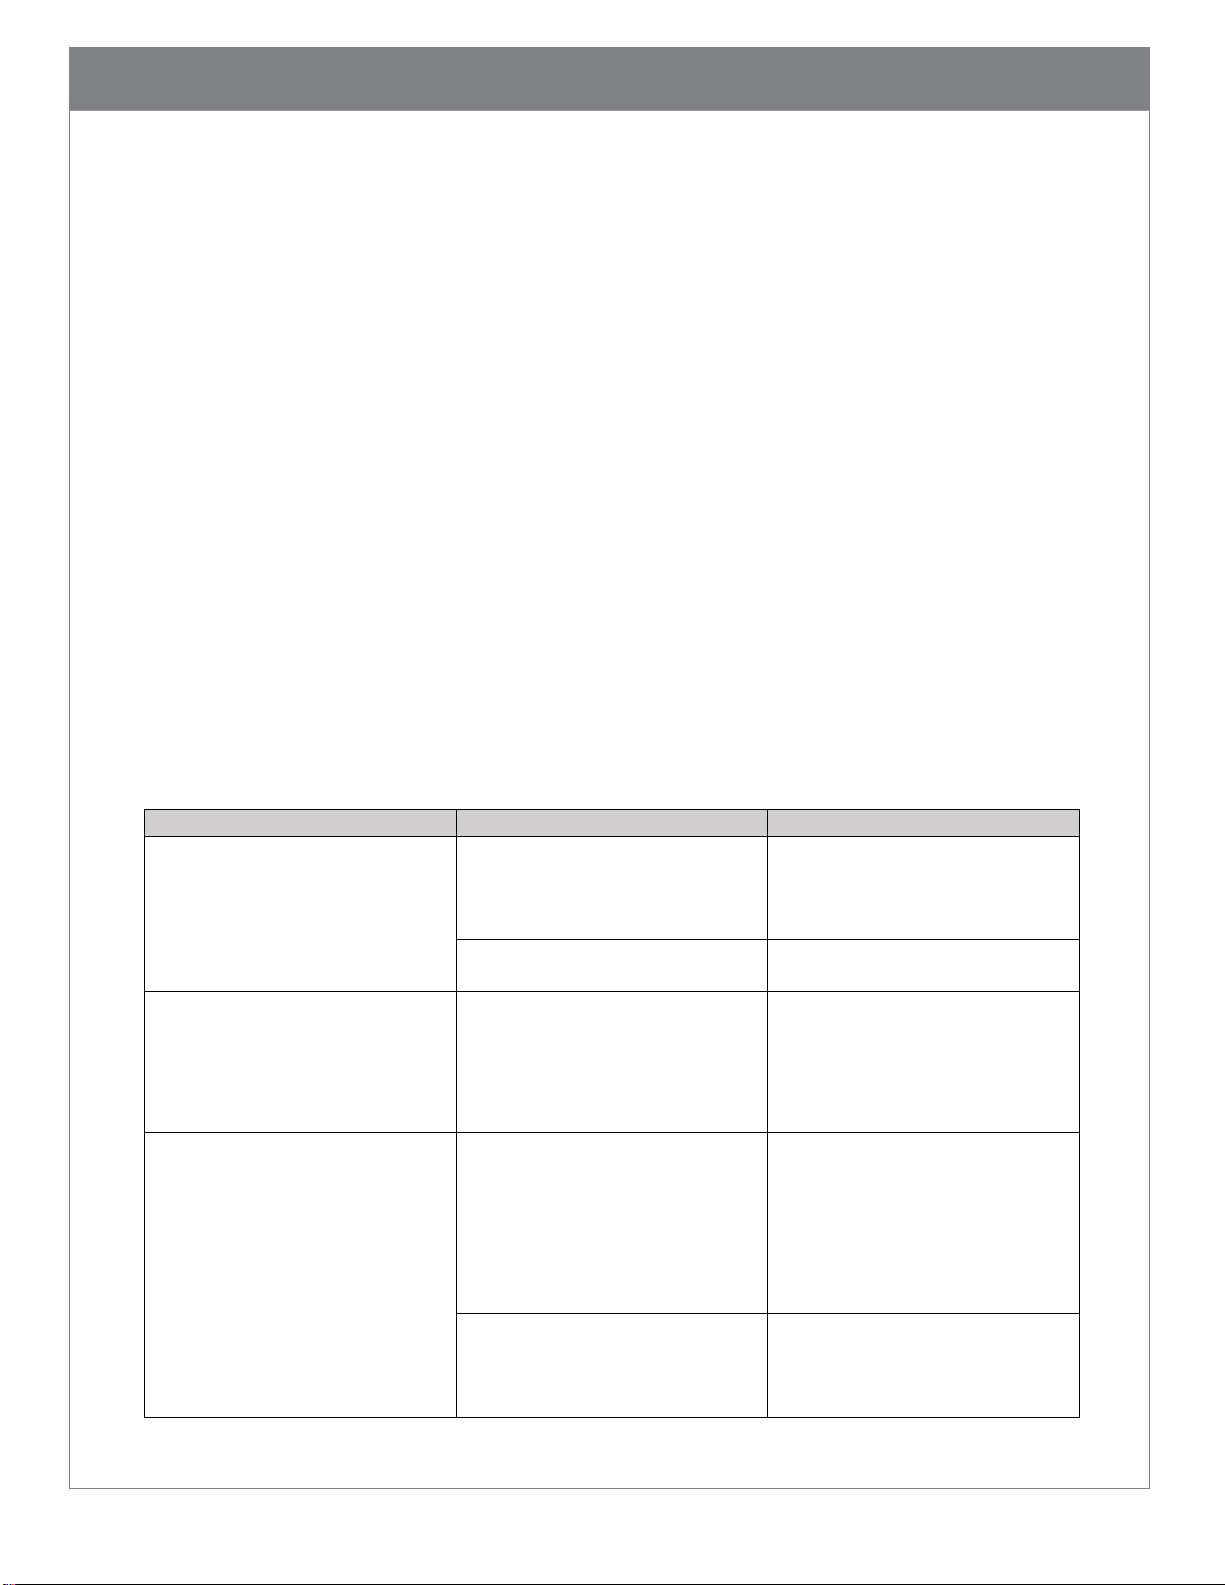
42
Problem
Possible Causes
Potential Solutions
Illumination and/or targeting
does not appear when a scan
button or the trigger is pressed
Battery is out of power
Charge the battery or replace it
with a freshly charged one. When
charging, make sure LEDs on the
battery are blinking.
Hardware failure with the top
LED on the scanner blinking red
Contact support
Illumination is on but the reader
does not scan the barcode
Some symbologies are enabled by
default, but some are not
Make sure the symbology you are
scanning is enabled. Symbologies
can be enabled or disabled using
configuration codes (M-Codes) on
Code’s website
The reader scans the barcode but
fails to transmit the data to the
host
Incorrect communication mode
Set the scanner to the correct
communication mode using
appropriate M-code available on
Code's website (Note: USB
Keyboard is the most common
mode)
CortexTools2 is Open
CortexTools2 takes ownership of
the scanner, and data will be sent
only to CortexTools2. Close
CortexTools2.
14.2. Routine cleaning and disinfection
To maintain the highest performance of Code products, please follow the steps described
below for routine maintenance and cleaning. Failure to follow proper cleaning procedures
or using unapproved cleaners may result in the product warranty being voided.
Use only approved disinfectants and follow the instructions provided by the disinfectant
manufacturers to clean and disinfect the devices. To prevent electric shock, always
disconnect the charger from its power source before cleaning. Gently wipe plastic cases of
the reader with battery installed and charging station with approved disinfectants. Never
pour or spread liquid directly on the device. Do not remove the battery to clean the metal
contacts on the battery or inside the battery compartment.
A dirty scan window will impact scanning performance. Never use any abrasive material to
clean the window. Should the window become dirty, use a damp lint/dust free (or
microfiber) cloth to wipe the window clean and allow air dry before use. Never spray any
liquid directly on to the window. Never allow any liquid to pool around the window. Avoid
using any liquid which may leave a residue or streaks on the window as it may impact scan
performance.
14.3. Troubleshooting Guide
Page 44

43
The host receives incorrect data
or misses characters
Incorrect Keyboard language
Use M-code to set the keyboard
language to correspond to your
system settings.
Incorrect Communication
Protocol
Find and scan the M-Code to set
raw data or package data.
When power gauge on battery is
pressed, no LEDs on the battery
turn on
Battery may be out of power
Charge the battery or replace
with a freshly charged one. When
charging, make sure battery LEDs
are blinking.
Battery is malfunctioning
Replace the battery with a
functioning one.
The reader beeps three times
Reader failed to connect to a
Bluetooth charger
Make sure the charger is
powered up (Wireless logo on the
charger is lit or blinking) and scan
the QuickConnect Code again.
Decodes but fails to transfer data
Make sure scanner is connected
to charger base by scanning the
Quickconnect code.
Cannot connect with my
Bluetooth device
Device does not support
Bluetooth Low Energy connection
Use a compatible device that
supports Bluetooth Low Energy
The reader beeps and vibrates
four times after scanning
configuration code
Reader successfully decodes but
fails to process configuration
code
Make sure to use the correct
configuration codes for the
reader
Wireless LED on reader flashing
one time per second
Reader is not connected to a
charger or host (PC, tablet,
mobile phone that supports
Bluetooth Low Energy)
Move the reader into the
Bluetooth range of a
charger/host.
Scan the QuickConnect Code on
the charger to pair and connect.
Use Device Manager on the host
to pair and connect with the
reader
Wireless LED flashes once every
10 seconds
Reader is in sleep mode and out
of charger
Place reader in charger or press
any button to wake the reader up
Scanner beeps until a button is
pressed
Paging has been turn on
Beeps until a reader button is
pushed, paging button the
charger is touched for more than
1 second, or paging times out (30
seconds by default)
Page button does not work
No reader is connected or reader
is out of range. Paging LED
flashes 3 times when touched for
more than 1 second
Scan QuickConnect code to
paired the scanner with the
charger or bring the reader in
range of the charger.
Wireless LED Flashes fast 7 times,
no data can be sent
Base is attempting to connect to
a reader
Make sure scanner is on and in
range
Reader scans PDF code on
driver’s license but does not
parse the data
Reader may require a parsing
license
Contact sales rep. to purchase a
DL parsing license, which can be
installed by scanning a barcode
provided by Code.
Reader is not correctly configured
for driver’s license parsing
Make sure the correct parsing
file/JavaScript has been loaded to
the reader.
Page 45

44
15. Contact Code for support
If any problem is encountered when using a Code device, contact your facility’s technical
support first. If they determine the problem lies with the Code device, they should contact the
Code Support department at https://www.codecorp.com/code-support/
To obtain support, please provide following information:
Device model number
Device serial number
Firmware version
Code Support will respond by telephone, or email.
If it is deemed necessary to return the device to Code for repair, Code Support will provide a
Return Authorization (RMA) Number and shipping instructions. Packaging or shipping
improperly may result in damage to the device and void the warranty.
Page 46

45
16. Limited Warranty
16.1. Limited Warranty. Code warrants each Code product against defects in materials and
workmanship under normal use for three (3) years from the date of End User
purchase (the “Warranty Coverage Term”). If a hardware defect arises and a valid
warranty claim is received by Code during the Warranty Coverage Term, Code will
either: i) repair the defective product using new parts or parts equivalent to new in
performance and reliability; ii) replace the product with a new or refurbished product
with equivalent functionality and performance, which may include replacing a
product that is no longer available with a newer model product; or ii) in the case of
failure with any software, including embedded software included in the product,
provide a patch, update, or other work around. All replaced products become the
property of Code. All warranty claims must be made using Code’s then current RMA
process.
16.2. Exclusions. This warranty does not apply to: i) cosmetic damage, including but not
limited to scratches, dents, and broken plastic; ii) damage resulting from use of the
product with non-Code products or peripherals, including batteries, power supplies,
cables, and docking station/cradles; iii) damage resulting from accident, abuse,
misuse, flood, fire or other external causes, including damage caused by unusual
physical or electrical stress, immersion in fluids or exposure to cleaning products not
approved by Code, puncture, crushing, and incorrect voltage or polarity; iv) damage
resulting from services performed by anyone other than Code or a Code authorized
repair facility; v) any product that has been modified or altered; vi) any product on
which the Code serial number has been removed or defaced. If a Code Product is
returned under a warranty claim and Code determines, in Code’s sole discretion, that
the warranty remedies do not apply, Code will contact Customer to arrange either: i)
repair or replace the Product; or ii) return the Product to Customer, in each case at
Customer’s expense.
16.3. Non Warranty Repairs. Code warrants its repair/replacement services for ninety (90)
days from the date of shipment of the repaired/replacement product to the
Customer. This warranty applies to repairs and replacements for: i) damage excluded
from the limited warranty described above; and ii) Code products on which the
limited warranty described above has expired (or will expire within such ninety (90)
day warranty period). For repaired product this warranty covers only the parts that
were replaced during the repair and the labor associated with such parts.
16.4. No Extension of Term of Coverage. Product that is repaired or replaced, or for which
a software patch, update, or other work around is provided, assumes the remaining
warranty of the original Code Product and does not extend the duration of the
original warranty period.
Page 47

46
16.5. Software and Data. Code is not responsible for backing up or restoring any of
software, data, or configuration settings, or reinstalling any of the foregoing on
products repaired or replaced under this limited warranty.
16.6. Shipping and Turn Around Time. The estimated RMA turn-around time from receipt
at Code’s facility to shipment of the repaired or replaced product to Customer is ten
(10) business days. An expedited turn-around time may apply to products covered
under certain Code Complete Product Service Plans. Customer is responsible for
shipping and insurance charges for shipping Code Product to Code’s designated RMA
facility and repaired or replaced product is returned with shipping and insurance paid
by Code. Customer is responsible for all applicable taxes, duties, and similar charges.
16.7. Transfer. If a customer sells a covered Code product during the Warranty Coverage
Term, then that coverage may be transferred to the new owner by written
notification from the original owner to The Code Corporation at:
Code Service Center
12393 South Gateway Park Place, Suite 600
Draper, UT 84020, USA
16.8. Limitation on Liability. Code’s performance as described herein shall be Code’s entire
liability, and the Customer's sole remedy, resulting from any defective Code product.
Any claim that Code has failed to perform its warranty obligations as described herein
must be made within six (6) months of the alleged failure. Code’s maximum liability
related to its performance, or failure to perform, as described herein shall be limited
to the amount paid by Customer for the Code product that is subject to the claim. In
no event will either party be liable for any lost profits, lost savings, incidental
damage, or other economic consequential damages. This is true even if the other
party is advised of the possibility of such damages.
EXCEPT AS MAY BE OTHERWISE PROVIDED BY APPLICABLE LAW, THE LIMITED
WARRANTIES DESCRIBE HEREIN REPRESENT THE ONLY WARRANTIES CODE MAKES
WITH RESPECT TO ANY PRODUCT. CODE DISCLAIMS ALL OTHER WARRANTIES,
WHETHER EXPRESSED OR IMPLIED, ORAL OR WRITTEN, INCLUDING WITHOUT
LIMITATION IMPLIED WARRANTIES OF MERCHANTABILITY, FITNESS FOR A
PARTICULAR PURPOSE AND NON-INFRINGEMENT. THE REMEDIES DESCRIBED
HEREIN REPRESENT CUSTOMER’S EXCLUSIVE REMEDY, AND CODE’S ENTIRE
RESPONSIBILITY, RESULTING FROM ANY DEFECTIVE CODE PRODUCT. CODE SHALL
NOT BE LIABLE TO CUSTOMER (OR TO ANY PERSON OR ENTITY CLAIMING
THROUGH CUSTOMER) FOR LOST PROFITS, LOSS OF DATA, DAMAGE TO ANY
EQUIPMENT WITH WHICH THE CODE PRODUCT INTERFACES (INCLUDING ANY
MOBILE TELEPHONE, PDA, OR OTHER COMPUTING DEVICES), OR FOR ANY SPECIAL,
INCIDENTAL, INDIRECT, CONSEQUENTIAL OR EXEMPLARY DAMAGES ARISING OUT
OF OR IN ANY MANNER CONNECTED WITH THE PRODUCT, REGARDLESS OF THE
FORM OF ACTION AND WHETHER OR NOT CODE HAS BEEN INFORMED OF, OR
OTHERWISE MIGHT HAVE ANTICIPATED, THE POSSIBILITY OF SUCH DAMAGES.
 Loading...