

Page 1

Part number 15-04073 Issue 1 i
HF SSB transceiver 9323
This guide contains descriptions of features for the full range of HF SSB series
transceivers. The table of contents below only refers to the sections in the guide that
describe standard or optional features for your transceiver.
1 About this user guide
2 Overview
Your Codan HF SSB transceiver............................................2-2
Transceiver options................................................................2-6
Transceiver controls...............................................................2-7
The display layout................................................................2-12
Transceiver rear panel..........................................................2-14
3 Using the transceiver
Types of calls .........................................................................3-2
Switching on the transceiver...................................................3-4
Adjusting the volume..............................................................3-6
Selecting channels..................................................................3-7
Selecting the sideband or AM (USB/LSB/AM)...................3-12
Tuning the antenna...............................................................3-14
Using the microphone...........................................................3-17
Muting the transceiver..........................................................3-18
Selecting the operating mode ...............................................3-20
Scanning for incoming calls .................................................3-23
Changing transmitter power .................................................3-27
Adjusting the display brightness...........................................3-28
Adjusting the display contrast ..............................................3-29
Using Clarifier mode............................................................3-30
Using View Channel Options mode .....................................3-31
Using Free-Tune Receiver mode..........................................3-33
Using View All Settings mode .............................................3-37
Customising your transceiver ...............................................3-39
4 Sending calls
ALE call .................................................................................4-3
Emergency selcall...................................................................4-7
GPS beacon call ...................................................................4-12
GPS position call..................................................................4-16
Page call...............................................................................4-20
Selcall...................................................................................4-26
Page 2

HF SSB transceiver—9323
ii Part number 15-04073 Issue 1
Selective beacon call............................................................4-29
Status call .............................................................................4-32
Telcall...................................................................................4-39
Tone call...............................................................................4-46
Voice call .............................................................................4-48
5 Receiving calls
Receiving calls .......................................................................5-2
Reviewing calls held in memory.............................................5-7
Setting up to receive emergency selcalls..............................5-10
Receiving beacon calls.........................................................5-11
6 Advanced features
RFDS and Telstra services .....................................................6-2
Selcall lockout......................................................................6-12
Using more than one control panel.......................................6-13
Operating the transceiver from a computer ..........................6-16
Index
Figures
Figure 2.1 Front panel of the transceiver...............................2-7
Figure 2.2 Control panel of the control head.........................2-7
Figure 2.3 The microphone ...................................................2-8
Figure 2.4 The display.........................................................2-12
Figure 2.5 Rear panel of the transceiver..............................2-14
Figure 4.1 Private network for sending telephone calls.......4-40
Specifications specific to transceiver type 9323
Channel capacity Up to 400 channels
Frequency range Transmit: 2 to 26.5MHz
Receive: 250kHz to 30MHz
Operating mode Single sideband (J3E; USB)
Transmitted power 100 watts (PEP)
Page 3

HF SSB transceiver—9323
Part number 15-04073 Issue 1 iii
Options factory fitted in your transceiver
Code Description
C CICS—access to Computer Interface Command Set through transceiver’s
I
2
C adapter (accessory) or RS-232 port.
D Data—support for 9001/9002 fax/data modems.
I IPC-500—support for IPC-500.
LD Local Diagnostics—local diagnostics such as dB volts display and SWR.
RC Remote Control—support for control of transceiver by 8570/8571 remote
control system.
RDD RDD Telcall—telcall format for use with RDD bases (needs SEL or T).
RFDS RFDS—send RFDS emergency call (Australia only).
SEL Selcall: Full—send and receive selcall, group call, page call, selective
beacon call, status call and telcall.
TP Tx Power Select—selectable transmit power level.
TxD TxD—sets channel programming capability.
U Upper Sideband—upper sideband on transmit frequencies.
Page 4

HF SSB transceiver—9323
iv Part number 15-04073 Issue 1
The following plastic envelopes are provided for holding your notes.
HF SSB transceiver—9323
iv Part number 15-04073 Issue 1
The following plastic envelopes are provided for holding your notes.
Page 5

Part number 15-04073 Issue 1 i
HF SSB transceiver 9360
This guide contains descriptions of features for the full range of HF SSB series
transceivers. The table of contents below only refers to the sections in the guide that
describe standard or optional features for your transceiver.
1 About this user guide
2 Overview
Your Codan HF SSB transceiver............................................2-2
Transceiver options................................................................2-6
Transceiver controls...............................................................2-7
The display layout................................................................2-12
Transceiver rear panel..........................................................2-14
3 Using the transceiver
Types of calls .........................................................................3-2
Switching on the transceiver...................................................3-4
Adjusting the volume..............................................................3-6
Selecting channels..................................................................3-7
Selecting the sideband or AM (USB/LSB/AM)...................3-12
Tuning the antenna...............................................................3-14
Using the microphone...........................................................3-17
Muting the transceiver..........................................................3-18
Selecting the operating mode ...............................................3-20
Scanning for incoming calls .................................................3-23
Changing transmitter power .................................................3-27
Adjusting the display brightness...........................................3-28
Adjusting the display contrast ..............................................3-29
Using Clarifier mode............................................................3-30
Using View Channel Options mode .....................................3-31
Using Free-Tune Receiver mode..........................................3-33
Using View All Settings mode .............................................3-37
Customising your transceiver ...............................................3-39
4 Sending calls
ALE call .................................................................................4-3
Emergency selcall...................................................................4-7
GPS beacon call ...................................................................4-12
GPS position call..................................................................4-16
Page call...............................................................................4-20
Selcall...................................................................................4-26
Page 6

HF SSB transceiver—9360
ii Part number 15-04073 Issue 1
Selective beacon call............................................................4-29
Status call .............................................................................4-32
Telcall...................................................................................4-39
Tone call...............................................................................4-46
Voice call .............................................................................4-48
5 Receiving calls
Receiving calls .......................................................................5-2
Reviewing calls held in memory.............................................5-7
Setting up to receive emergency selcalls..............................5-10
Receiving beacon calls.........................................................5-11
6 Advanced features
Selcall lockout......................................................................6-12
Using more than one control panel.......................................6-13
Operating the transceiver from a computer ..........................6-16
Index
Figures
Figure 2.1 Front panel of the transceiver...............................2-7
Figure 2.2 Control panel of the control head.........................2-7
Figure 2.3 The microphone ...................................................2-8
Figure 2.4 The display.........................................................2-12
Figure 2.5 Rear panel of the transceiver..............................2-14
Figure 4.1 Private network for sending telephone calls.......4-40
Specifications specific to transceiver type 9360
Channel capacity Up to 400 channels
Frequency range Transmit: 2.25 to 30MHz
Receive: 250kHz to 30MHz
Operating mode Single sideband (J3E; USB-LSB)
Transmitted power 125 watts (PEP)
Page 7

HF SSB transceiver—9360
Part number 15-04073 Issue 1 iii
Options factory fitted in your transceiver
Code Description
ALE Automatic Link Establishment—support for 9300 ALE controller.
C CICS—access to Computer Interface Command Set through transceiver’s
I
2
C adapter (accessory) or RS-232 port.
D Data—support for 9001/9002 fax/data modems.
ES Emergency Selcall—send and receive emergency selcall.
I IPC-500—support for IPC-500.
LD Local Diagnostics—local diagnostics such as dB volts display and SWR.
LU Lower/Upper Sideband—lower or upper sideband selectable for channel.
RC Remote Control—support for control of transceiver by 8570/8571 remote
control system.
RDD RDD Telcall—telcall format for use with RDD bases (needs SEL or T).
SEL Selcall: Full—send and receive selcall, group call, page call, selective
beacon call, status call and telcall.
SLO Selcall Lock Out—prevents sending selective call if channel busy (needs
S or St).
TP Tx Power Select—selectable transmit power level.
TxE TxE—sets channel programming capability.
Page 8

HF SSB transceiver—9360
iv Part number 15-04073 Issue 1
The following plastic envelopes are provided for holding your notes.
HF SSB transceiver—9360
iv Part number 15-04073 Issue 1
The following plastic envelopes are provided for holding your notes.
Page 9

No part of this handbook may be reproduced,
transcribed, translated into any language or transmitted
in any form whatsoever without the prior written
consent of Codan Pty Ltd.
© Copyright 1997 Codan Pty Ltd.
No part of this handbook may be reproduced,
transcribed, translated into any language or transmitted
in any form whatsoever without the prior written
consent of Codan Pty Ltd.
© Copyright 1997 Codan Pty Ltd.
Page 10

HF SSB transceiver user guide 1-1
1 About this user guide
This guide describes how you use the Codan HF SSB
transceiver to make and receive calls.
The user guide contains six chapters.
Chapter 1 explains how to use this user guide.
Chapter 2 gives you an overview and describes the equipment
and controls.
Chapter 3 explains the basic steps necessary to operate your
transceiver.
Chapter 4 explains how to send calls.
Chapter 5 explains how to respond to received calls.
Chapter 6 describes advanced features of the transceiver.
Page 11

About this user guide
1-2 HF SSB transceiver user guide
Standards and icons
In this guide, Arial typeface is used for text shown on the
transceiver display. For example:
If
no response
was displayed, send the call again.
Arial typeface in bold is used for the names of buttons, knobs
and connectors. For example:
Press the
On/Off
button.
This icon... Means...
the end of a subject.
a warning.
On/Off
the transceiver button or knob that
you need to operate (the
On/Off
button in this example). The solid area
in the picture of the transceiver
control panel on the left shows you
where to find the button or knob.
Call
the microphone button that you need
to operate (the
Call
button in this
example). The solid area in the
picture of the microphone on the left
shows you where to find the button.
Page 12

About this user guide
HF SSB transceiver user guide 1-3
Glossary
This term... Means...
µV Microvolt.
BER Bit Error Rate.
A Ampere.
AC Alternating Current.
ALE Automatic Link Establishment.
AM Amplitude Modulation.
Baud Binary transfer rate.
Call memory a list containing details of the last ten calls
you have received.
CICS Computer Interface Command Set.
D Depth.
dB Decibel.
DC Direct Current.
EPROM
EEPROM
BBPROM
SEEPROM
types of Programmable Read-Only
Memory.
GPS Global Positioning System.
H Height.
HF High Frequency.
kg Kilogram.
kHz Kilohertz.
L/S Loudspeaker.
LCD Liquid Crystal Display.
LSB Lower Sideband.
LU Lower/Upper sideband selectable.
MHz Megahertz.
Page 13

About this user guide
1-4 HF SSB transceiver user guide
This term... Means...
mm Millimetre.
PA Power Amplifier.
PCB Printed Circuit Board.
PIN Personal Identification Number.
PSTN Public Switched Telephone Network.
PTT button
Press-To-Talk button.
RAM Random Access Memory.
RDD Radphone Direct Dial.
Receive-only
channel
a channel that allows you to receive calls
but not send calls.
Revertive signal an acknowledgment signal automatically
transmitted from a station receiving a call.
RF Radio Frequency.
RFDS Royal Flying Doctor Service.
Rx Receive.
Scan table a list of channels used when scanning for
incoming calls.
Selcall the simplest type of selective call.
Selective call a call to a specific station using the
station’s address. Selective calls include
beacon calls, selcalls, group calls, telcalls,
GPS calls, page calls, ALE calls and
status calls.
SSB Single Sideband transmission format.
SWR Standing Wave Ratio.
Transceiver ID a factory set 16-character alphanumeric
code that uniquely identifies your
transceiver.
Transmit channel a channel that allows you to receive and
send calls.
Page 14

About this user guide
HF SSB transceiver user guide 1-5
This term... Means...
Two-frequency
simplex
a channel that has different transmit and
receive frequencies but does not allow
simultaneous transmit and receive.
Tx Transmit.
TXE Transmit Enabled—allows you to set up
new transmit frequencies.
USB Upper Sideband.
V Volt.
W Width.
Other documents
For information on how you set up the transceiver, refer to the
HF SSB transceiver reference manual (Codan part number
15-04076).
For information on ALE calling, refer to the 9300 ALE
controller user guide (Codan part number 15-04046).
For information on Telstra radiophone services within
Australia, refer to the Radphone Direct Dial User Guide and
Radphone User Guide produced by Telstra.
Page 15

About this user guide
1-6 HF SSB transceiver user guide
About this user guide
1-6 HF SSB transceiver user guide
Page 16

HF SSB transceiver user guide 2-1
2 Overview
This chapter describes:
• the main features of the transceiver (2-2)
• the buttons and knobs that control the transceiver (2-7)
• the display layout (2-12)
• the connectors on the rear panel of the transceiver
(2-14).
Continual research and development has produced different
versions of the HF SSB transceiver. Newer versions mean
later issues of EPROM which provide different operating
features. To check the version of your transceiver, see
Chapter 3, Using View All Settings mode—transceiver
software issue.
This issue of the handbook incorporates operating
information for software versions from:
• transceiver (main) 4.00
• head (control) panel 4.00.
Page 17

Overview
2-2 HF SSB transceiver user guide
Your Codan HF SSB transceiver
The innovative HF SSB series transceiver incorporates the
most recent circuit technology and manufacturing techniques
to give unbeatable operating performance and reliability. The
transceiver is designed for fixed base and mobile installations.
The transceiver is available with either front panel control or
with an extended control head using a separate loudspeaker. It
can also operate in a multi-control system consisting of a
front control panel and up to three control heads.
The special purpose microphone provides key-pad control of
most of the transceiver operations and is an extension of the
control panel functions.
The control panel features 10 buttons (sealed membrane
switches), two knobs and a Liquid Crystal Display (LCD).
The display shows the operating status of the transceiver,
including channel number, frequency, channel option settings
and channel comment. There is a bar graph indication of the
transmit and receive signal strengths.
The main features of the transceiver are:
• channels
• scanning
• free-tuning receiver
• selective calling*
• paging*
• GPS*
• telephone interconnect calling*
• fax and data (additional equipment required)*
• cloning.
* These features may require transceiver options to be added
to your transceiver.
Page 18

Overview
HF SSB transceiver user guide 2-3
Channels
The total number of channels that can be stored depends on
the transceiver type and the amount of channel comments
used.
Channels cover:
• the transmit frequency range specified at the front of this
guide
• the receive frequency range 250kHz to 30MHz.
Channels can be single or two-frequency simplex. They can
be programmed at the factory or by an authorised Codan
dealer through the transceiver microphone socket using
Codan XP programming software and an IBM compatible
computer.
You can copy existing channel frequencies in the transceiver
to other channel locations. You can also create receive-only
channel frequencies.
Scanning
This feature allows you to monitor up to 10 selected channels
for incoming calls. Scanning can be programmed to stop on
receipt of a voice call or a selcall (if option selcall is fitted).
Free-tuning receiver
Your transceiver can be used as a free-tuning receiver
covering the receiver world broadcast bands over the
frequency range of 250kHz to 30MHz.
Page 19

Overview
2-4 HF SSB transceiver user guide
Selective call (where fitted)
Selective calling simplifies calling stations. Each transceiver
has its own address rather like a telephone number. You call a
station by specifying its address. If the station is unattended,
your call details are automatically recorded. Selective calling
saves you from having to listen to noise when waiting for a
call.
Selective calls consist of ALE calls, beacon calls, GPS calls,
page calls, selcalls, status calls and telcalls. Selcall is the
basic type of selective call for voice communication.
GPS position calls, page calls and selcalls allow you to call a
range of stations simultaneously by group calling. This is
useful for base stations wanting to contact all mobile stations
or for starting a conference discussion between several
stations.
To change the call to a group call, you end the address with
00. All stations with matching addresses, excluding the last
two digits, will receive your call. For example, a call to
123400 will be received by all stations with addresses in the
range 123401–123498.
Your transceiver can store information from 10 stations that
have called you while your station was unattended.
Paging (where fitted)
The transceiver has a paging feature that allows you to send
and receive text messages up to 64 characters long.
You can either send messages directly from the control panel
or from an attached computer terminal. Received messages
are displayed and recorded in the call memory of the
transceiver.
Page 20

Overview
HF SSB transceiver user guide 2-5
GPS (where fitted)
You can attach a GPS receiver to the transceiver. The
transceiver automatically transmits GPS information in
response to a request from another station. You can also send
your GPS location to another transceiver.
Telephone (where fitted)
A base station can be connected to an IPC-500 telephone
interconnect unit. This allows you to use your transceiver to
make telephone calls through the public telephone system.
Fax and data (where fitted)
By connecting ancillary equipment you can use your
transceiver for fax and data transmission and reception.
Cloning
For network users, you can copy frequencies and settings
from one transceiver to another by the simple process of
cloning. A special cable joins the two transceivers together at
their microphone sockets.
Installing your transceiver
To install your transceiver and connect the components that
make up your station, refer to the HF SSB transceiver
reference manual, Chapter 2, Installation.
Page 21

Overview
2-6 HF SSB transceiver user guide
Transceiver options
See the front of this guide for the list of transceiver options
fitted in your transceiver.
You can also check which options are fitted in your
transceiver by using View All Settings mode (see Using View
All Settings mode, Chapter 3). This mode provides a list of
codes for most fitted options.
To check options such as RDD, which are not displayed in
View All Settings mode, refer to the HF SSB transceiver
reference manual, Chapter 8, Selcall address setup.
Page 22

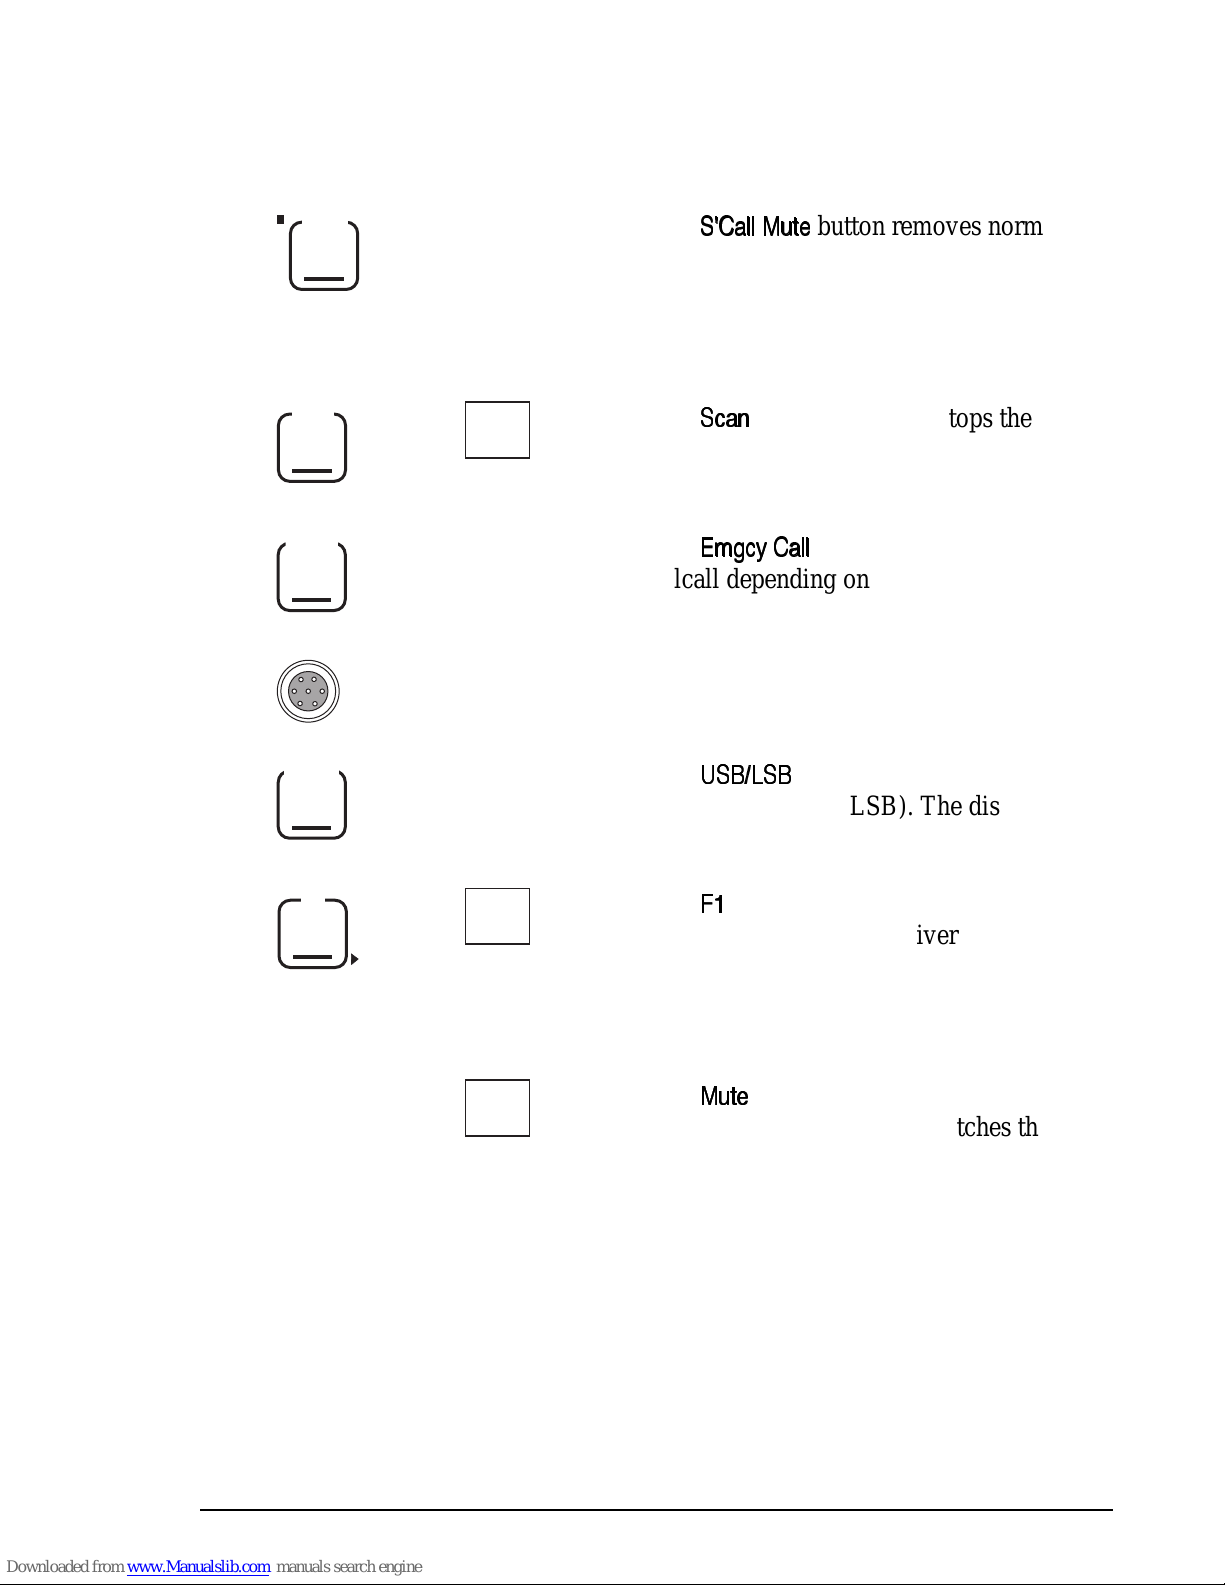
Overview
HF SSB transceiver user guide 2-7
Transceiver controls
13 11 10 9 8 7 6
21 14 1 2 3 5 4
12
On/Off
Select
Mode
Scan
Emgcy
Call
S'Call
Mute
Voice
Mute
On/Off Mode
Tune
USB/LSB
F2F1
Volume
93XX SSB Transceiver
CODAN
Figure 2.1
Front panel of the transceiver
2
On/Off
CODAN
4
6
3
5
12
1
98
7
11
13
14
10
Select
Mode
Scan
Emgcy
Call
S'Call
Mute
Voice
Mute
On/Off Mode
Tune
USB/LSB
F2F1
Volume
HF SSB Transceiver
Figure 2.2
Control panel of the control head
Page 23
Overview
2-8 HF SSB transceiver user guide
Scan
8
CODAN
10
7
14
5
4 6
18
10
17
15
16
19
To control head
or transceiver
20
Mute
9
Enter
R'call
B'con
0
Call
Chan
1
4
Chan
Chan1 Chan
1
Tune
7
Vol
3
6
Vol
F1
2
5
F2
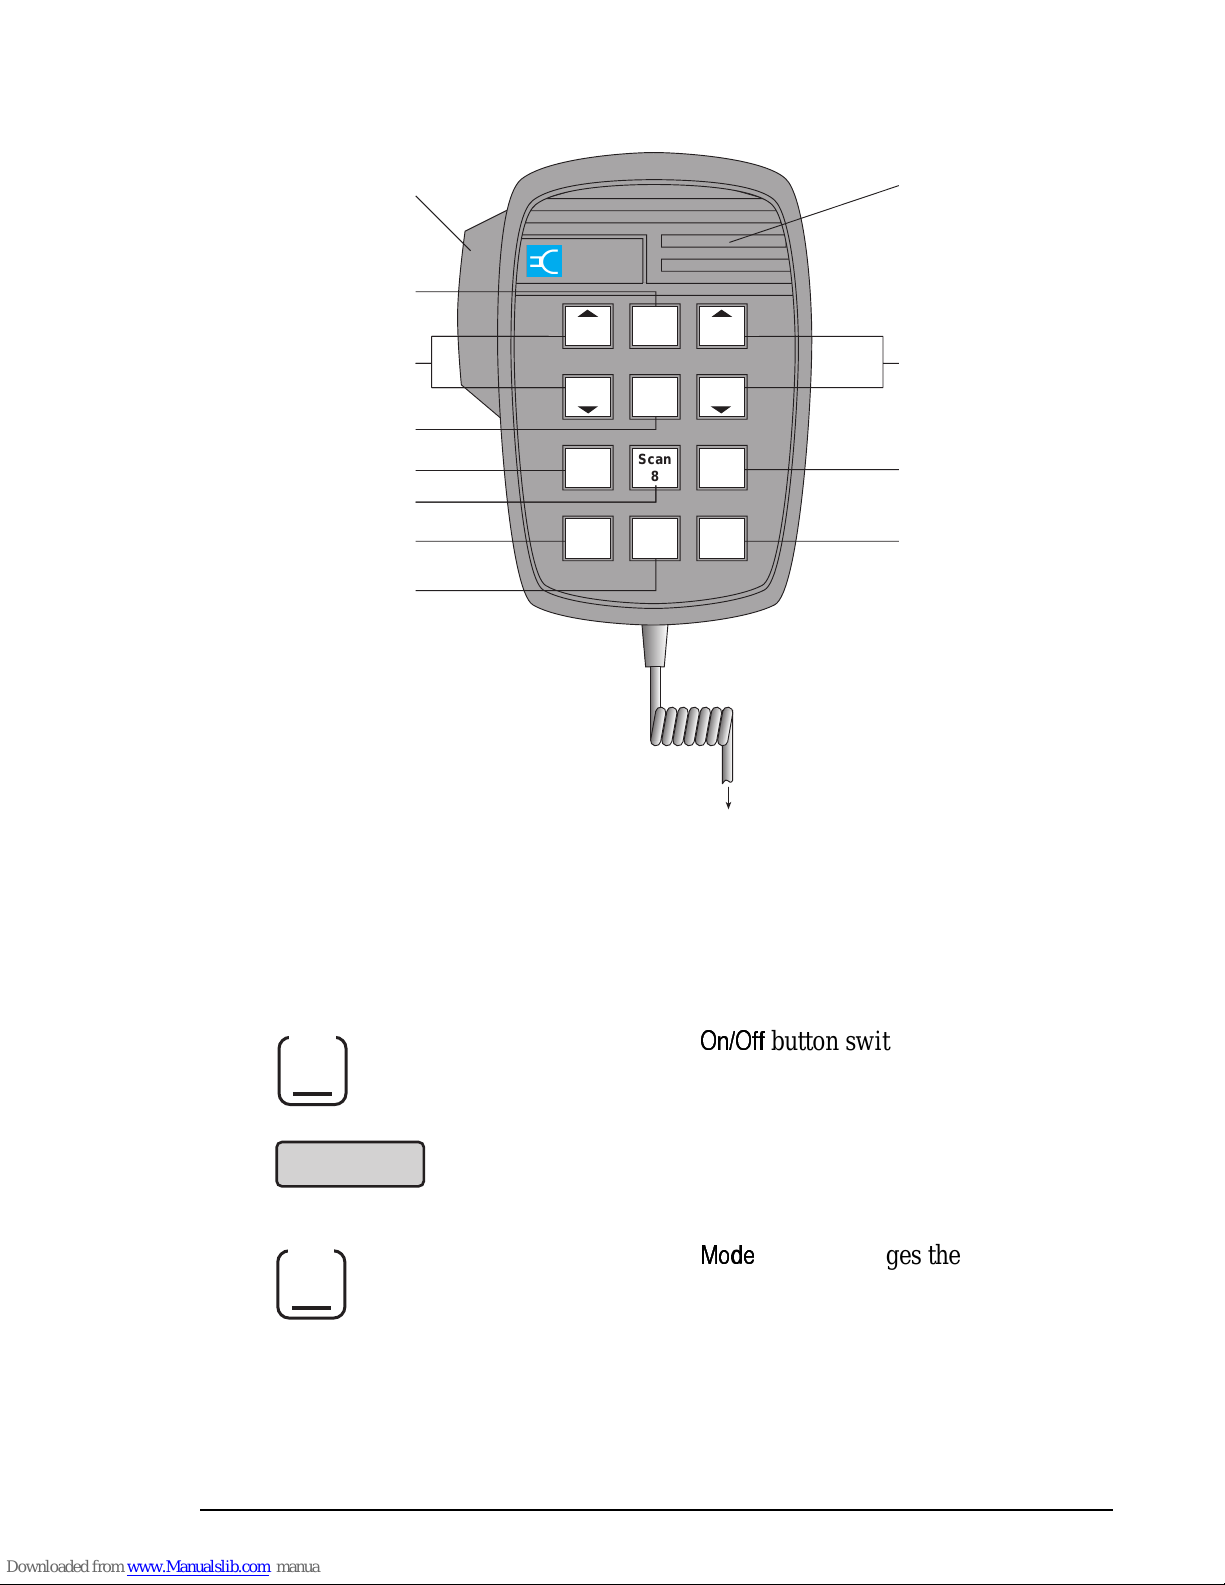
Figure 2.3
The microphone
Control panel Microphone Function
1.
On/Off
The
button switches the transceiver
on or off.
2.
The display shows information about the
current operation of the transceiver.
3.
Mode
The
button changes the operating
mode of the transceiver.
Overview
2-8 HF SSB transceiver user guide
Scan
8
CODAN
10
7
14
5
4 6
18
10
17
15
16
19
To control head
or transceiver
20
Mute
9
Enter
R'call
B'con
0
Call
Chan
1
4
Chan
Chan1 Chan
1
Tune
7
Vol
3
6
Vol
F1
2
5
F2
Figure 2.3
The microphone
Control panel Microphone Function
1.
On/Off
The
button switches the transceiver
on or off.
2.
The display shows information about the
current operation of the transceiver.
3.
Mode
The
button changes the operating
mode of the transceiver.
Page 24
Overview
HF SSB transceiver user guide 2-9
Control panel Microphone Function
4.
Select
Chan
1
4
Chan
The
knob on the control panel and
the channel buttons on the microphone
change the channel when you are in
Channel mode (the normal operating
mode).
The
knob is also used with the
knob to enter message or channel
comment. You rotate the
knob to
select each character. To input numbers
you can also use the buttons on the
microphone.
5.
F2
5
F2
The
button performs different functions
depending on the transceiver’s operating
mode. The bottom right position of the
transceiver display shows the current
function.
6.
Volume
Vol
3
6
Vol
The
knob on the control panel and
the volume buttons on the microphone
change the loudspeaker volume when you
are in Channel mode.
The
knob is also used with the
knob to enter message or channel
comment. You rotate the
knob to
move the cursor to where you want to enter
the next character.
7.
Tune
Tune
7
The
button tunes the antenna for auto
tuners and antenna systems.
8.
Voice
Mute
The
button removes normal
background noise when there is no audio
signal. When voice mute is selected, the
indicator at the top left of the button is on.
Page 25
Overview
2-10 HF SSB transceiver user guide
Control panel Microphone Function
9.
S'Call
Mute
The
button removes normal
background noise until a selcall is
received. When selcall mute is selected,
the indicator at the top left of the button is
on.
10.
Scan
Scan
8
The
button starts and stops the
transceiver scanning selected channels for
incoming calls.
11.
Emgcy
Call
The
button sends an emergency
selcall depending on how you set up the
transceiver.
12.
The microphone socket.
13.
USB/LSB
The
button selects upper or lower
sideband (USB or LSB). The display
indicates the selected sideband.
14.
F1
F1
2
The
button performs different functions
depending on the transceiver’s operating
mode. The bottom left position of the
transceiver display shows the current
function.
15.
Mute
9
The
button silences the transceiver
until a call is received. It switches the mute
on in whichever mute setting (selcall or
voice mute) was last selected on the
control panel.
Page 26
Overview
HF SSB transceiver user guide 2-11
Control panel Microphone Function
16.
Enter
R'call
The
button on the microphone
is used for such functions as:
• recalling an existing channel number in
Channel mode
• viewing the call memory for details of
received calls
• entering information.
17.
B'con
0
Pressing the
button followed by the
button sends a selective beacon call to
establish if communication is possible with
another station.
18.
Call
The
button starts a call on the current
channel.
19.
PTT
The Press-To-Talk (PTT) button.
20.
Microphone grille. You speak into this part
of the microphone.
21.
The loudspeaker.
Page 27
Overview
2-12 HF SSB transceiver user guide
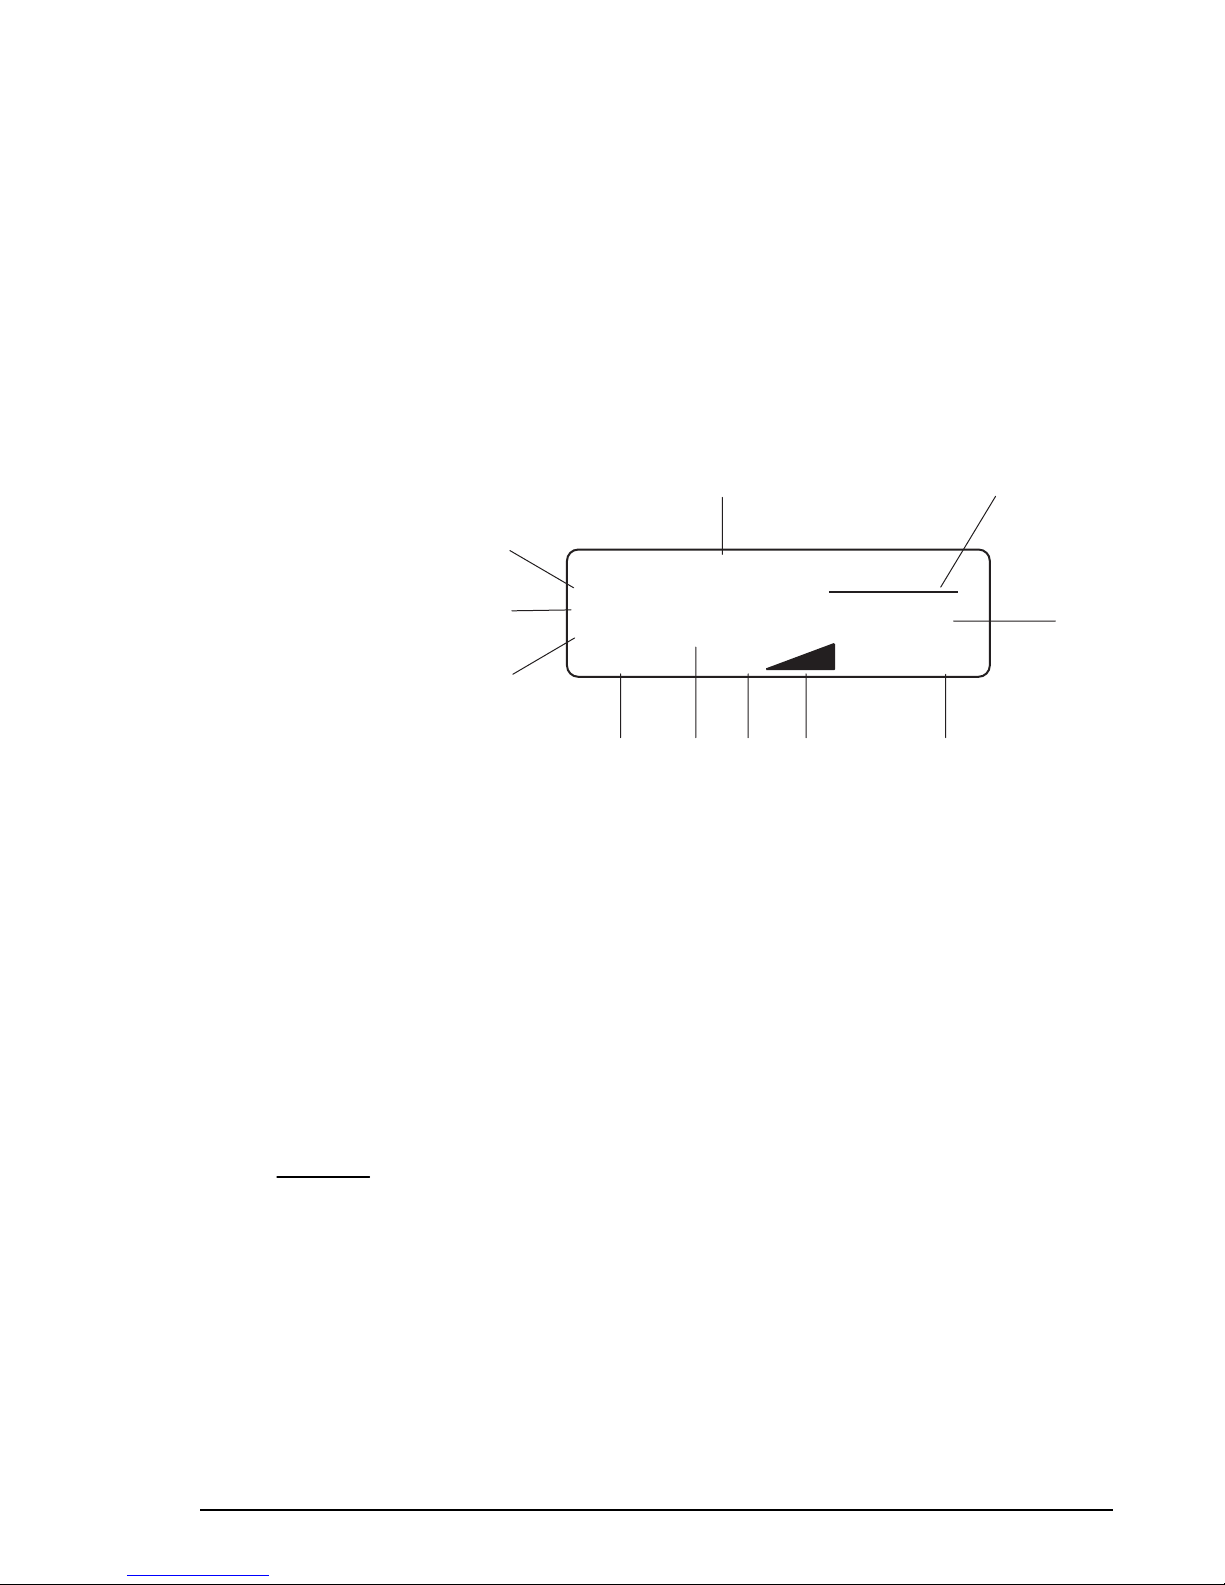
The display layout
The 4-line display on the control panel tells you what the
transceiver is doing.
For a list of display messages, refer to the HF SSB transceiver
reference manual, Chapter 10, Display messages.
10
23
USB
HI
CALL
Tx
422
2100
.
4
6795
Pwr
Base station
8
1
11
Figure 2.4
The display
Part of Display Function
1.
Indicates whether USB, LSB or AM is selected for
the displayed channel.
2.
Base station
Shows the channel comment that describes what the
channel is used for.
3.
Indicates that the channel is a receive-only channel
(does not allow you to transmit). If this bar is not
displayed, the channel is a transmit channel that
allows you to send and receive.
Overview
2-12 HF SSB transceiver user guide
The display layout
The 4-line display on the control panel tells you what the
transceiver is doing.
For a list of display messages, refer to the HF SSB transceiver
reference manual, Chapter 10, Display messages.
10
23
USB
HI
CALL
Tx
422
2100
.
4
6795
Pwr
Base station
8
1
11
Figure 2.4
The display
Part of Display Function
1.
Indicates whether USB, LSB or AM is selected for
the displayed channel.
2.
Base station
Shows the channel comment that describes what the
channel is used for.
3.
Indicates that the channel is a receive-only channel
(does not allow you to transmit). If this bar is not
displayed, the channel is a transmit channel that
allows you to send and receive.
Page 28
Overview
HF SSB transceiver user guide 2-13
Part of Display Function
4.
2100
Shows the kHz transmit/receive frequency of the
channel. For 2-frequency simplex channels the
receive frequency is normally displayed—the
transmit frequency is displayed during transmission.
You can display both frequencies at the same time
(refer to the HF SSB transceiver reference manual,
Chapter 6, Display frequency).
5.
Indicates the current function of the
button on
the front panel.
6.
Indicates the signal strength of the signal being
transmitted or received.
7.
Tx/Rx
Indicates whether the transceiver is currently
transmitting (Tx) or receiving (Rx).
8.
422
Shows the channel number.
9.
Indicates the current function of the
button on
the front panel. For example, if the current channel
is a transmit channel,
is displayed to show that
pressing the
button will send a call.
10.
.
Indicates that the channel is unprotected. If this
marker is not displayed, the channel is protected
from deletion and all changes (except for the
channel comment).
11.
Indicates whether HI (high) or LO (low) power is
selected.
Page 29
Overview
2-14 HF SSB transceiver user guide
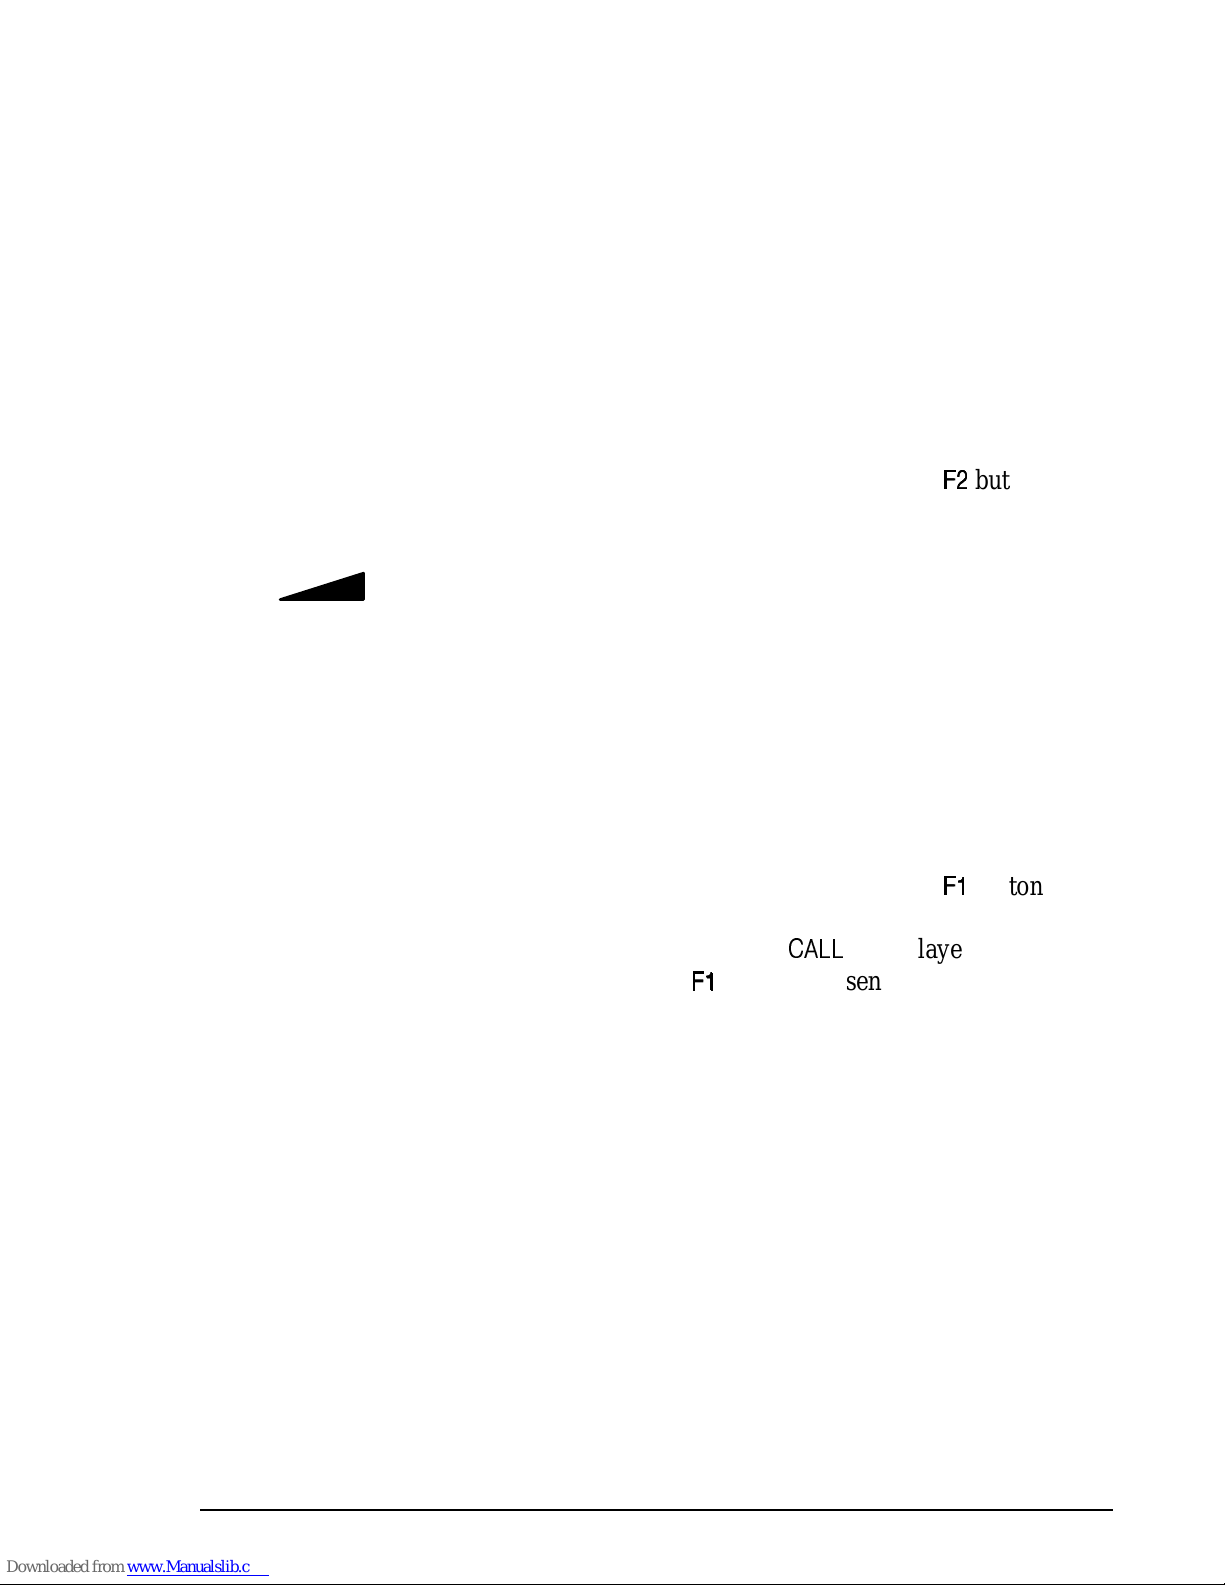
Transceiver rear panel
Antenna Control
12V
Remote Control
L/S
GP
Australia
CODAN
Type 93xx
Serial No.
2 813 76459
RS232
Ext
Alarm
Figure 2.5
Rear panel of the transceiver
Item Description
1.
Antenna socket.
2.
Earth (ground) screw.
3.
connector for automatic antennas
and antenna tuners.
4.
External 8 ohm loudspeaker (
socket.
5.
serial input socket for ancillary equipment
such as a computer or GPS receiver.
Overview
2-14 HF SSB transceiver user guide
Transceiver rear panel
Antenna Control
12V
Remote Control
L/S
GP
Australia
CODAN
Type 93xx
Serial No.
2 813 76459
RS232
Ext
Alarm
Figure 2.5
Rear panel of the transceiver
Item Description
1.
Antenna socket.
2.
Earth (ground) screw.
3.
connector for automatic antennas
and antenna tuners.
4.
External 8 ohm loudspeaker (
socket.
5.
serial input socket for ancillary equipment
such as a computer or GPS receiver.
Page 30
Overview
HF SSB transceiver user guide 2-15
Item Description
6.
12V DC power lead.
7.
connector for the control head or a
remote control unit.
8.
socket for an external alarm (for use
with selcall if fitted).
9.
10-pin general purpose
connector for ALE
controllers, modems and fax interfaces.
Overview
HF SSB transceiver user guide 2-15
Item Description
6.
12V DC power lead.
7.
connector for the control head or a
remote control unit.
8.
socket for an external alarm (for use
with selcall if fitted).
9.
10-pin general purpose
connector for ALE
controllers, modems and fax interfaces.
Page 31

Overview
2-16 HF SSB transceiver user guide
Overview
2-16 HF SSB transceiver user guide
Page 32

HF SSB transceiver user guide 3-1
3 Using the transceiver
This chapter explains the basic steps necessary to operate
your transceiver. It covers:
• Types of call (3-2)
• Switching on the transceiver (3-4)
• Adjusting the volume (3-6)
• Selecting channels (3-7)
• Selecting the sideband or AM (USB/LSB/AM, 3-12)
• Tuning the antenna (3-14)
• Using the microphone (3-17)
• Muting the transceiver (3-18)
• Selecting the operating mode (3-20)
• Scanning for incoming calls (3-23)
• Changing transmitter power (3-27)
• Adjusting the display brightness (3-27)
• Adjusting the display contrast (3-29)
• Using Clarifier mode (3-30)
• Using View Channel Options mode (3-31)
• Using Free-Tune Receiver mode (3-33)
• Using View All Settings mode (3-37)
• Customising your transceiver (3-39).
You should have already installed your transceiver by
referring to the HF SSB transceiver reference manual,
Chapter 2, Installation. The displays in this chapter show
examples of channel and frequency numbers. You must use
numbers appropriate for your own transceiver.
Page 33

Using the transceiver
3-2 HF SSB transceiver user guide
Types of calls
The table below lists the full range of call types for the HF
SSB series transceivers. For specific call details, see
Chapter 4, Sending calls.
Tone calls and voice calls are factory fitted for all HF SSB
series transceivers. To find out what other call types are fitted
for your transceiver version, see the front of this guide for the
list of fitted transceiver options.
Call types that are not factory fitted are available as
transceiver options that you fit yourself. To fit a call type,
contact Codan for a password that will enable the call type in
your transceiver (refer to the HF SSB transceiver reference
manual, Chapter 7, Password entry to enable transceiver
options).
Call type Description
ALE call An ALE call automatically selects the best
channel to use for sending a call. This removes
the need to send selective beacon calls on
different channels to find the best channel on
which to communicate.
Emergency
selcall
An emergency selcall is a simple and
automatic way of selectively calling any
station in an emergency.
GPS
beacon call
A GPS beacon call obtains the Global
Positioning System (GPS) location of another
station.
GPS
position
call
A GPS position call sends your Global
Positioning System (GPS) location to another
station.
Page 34

Using the transceiver
HF SSB transceiver user guide 3-3
Call type Description
Group call A group call simultaneously calls a range of
stations. Group calls can be GPS position
calls, page calls or selcalls.
Page call A page call sends a text message. It allows you
to leave a message at another station.
Status call A status call enables you to obtain information
about a remote transceiver and control
equipment connected to it without assistance
from the operator at the remote station.
Selcall A selcall is the basic type of selective call. It
allows you to call a specific station by
specifying its address. ALE calls, emergency
selcalls, beacon calls, GPS calls, page calls,
status calls and telcalls are all types of
selective call.
Selective
beacon call
A selective beacon call is used to determine
manually the best channel to use before calling
a station to talk or send information.
Telcall A telcall allows you to use your transceiver to
send a telephone call.
Tone call
(fitted as
standard)
A tone call allows you to call a station that is
capable of recognising your two-tone calling
signal.
Voice call
(fitted as
standard)
A voice call is the simplest type of call to
send. Your call can be heard by any station
tuned to or scanning your current channel.
Page 35

Using the transceiver
3-4 HF SSB transceiver user guide
Switching on the transceiver
If you have set up the transceiver with a Personal
Identification Number (PIN), you will need to enter this PIN
before you can use the transceiver.
For details on setting and cancelling the use of a PIN, refer to
the HF SSB transceiver reference manual, Chapter 9, PIN
setup.
If you forget your PIN, you will have to obtain a special
password from Codan to delete the PIN before you can
use the transceiver.
To switch on the transceiver:
Action Notes
1.
Press
On/Off
The power up messages are
shown briefly.
If no PIN needs to be entered,
the display shows the currently
selected channel:
149
2040
CALL
Rx.
USB
HI
Geneva Switzerland
Pwr
Is the transceiver asking
you for a PIN?
Yes
Step 2.
No
Step 4.
If a PIN needs to be entered,
the display shows:
ENTER
Enter Pin
– – – – – –
Page 36

Using the transceiver
HF SSB transceiver user guide 3-5
Action Notes
2.
Enter your PIN
numeral
button
You can enter your PIN using
the
Select
and
Volume
knobs.
3.
Press
Enter
R'call
Example of the display:
149
2040
CALL
Rx.
USB
HI
Geneva Switzerland
Pwr
If the PIN is incorrect, the
transceiver automatically
switches off. Start the
procedure again.
4.
You are now ready to
use the transceiver.
You are in Channel mode, the
normal operating mode of the
transceiver.
When you have finished using
the transceiver, switch it off by
pressing
On/Off
Page 37

Using the transceiver
3-6 HF SSB transceiver user guide
Adjusting the volume
To adjust the volume of the loudspeaker:
Action Notes
1.
Rotate
Volume
As you adjust the volume, any
muting selected momentarily
switches off.
The transceiver beeps at the
minimum and maximum
volume settings.
Using the transceiver
3-6 HF SSB transceiver user guide
Adjusting the volume
To adjust the volume of the loudspeaker:
Action Notes
1.
Rotate
Volume
As you adjust the volume, any
muting selected momentarily
switches off.
The transceiver beeps at the
minimum and maximum
volume settings.
Page 38

Using the transceiver
HF SSB transceiver user guide 3-7
Selecting channels
Before you can send a call, you need to select which channel
to use.
You can change the channel by:
• viewing the list of channels
• recalling a channel number
• recalling a channel receive frequency
• answering a call from the call memory (see Chapter 5,
Reviewing calls held in memory).
There are two types of channels:
• transmit channels that allow you to send and receive calls
• receive-only channels that only allow you to receive
calls.
A bar over the displayed frequency indicates that a channel is
receive-only (see Chapter 2, The display layout).
Page 39

Using the transceiver
3-8 HF SSB transceiver user guide
Selecting a channel by viewing the list of channels
The easiest way to select a channel is by viewing the list of
channels set up in the transceiver.
To select a channel by viewing the list of channels:
Action Notes
1.
In Channel mode, rotate
Select
until you see the
channel you want.
The transceiver always starts up
in Channel mode.
For example, if you want
channel 149, scroll through the
list until the display looks like
this:
149
2040
CALL
Rx.
USB
HI
Geneva Switzerland
Pwr
Page 40
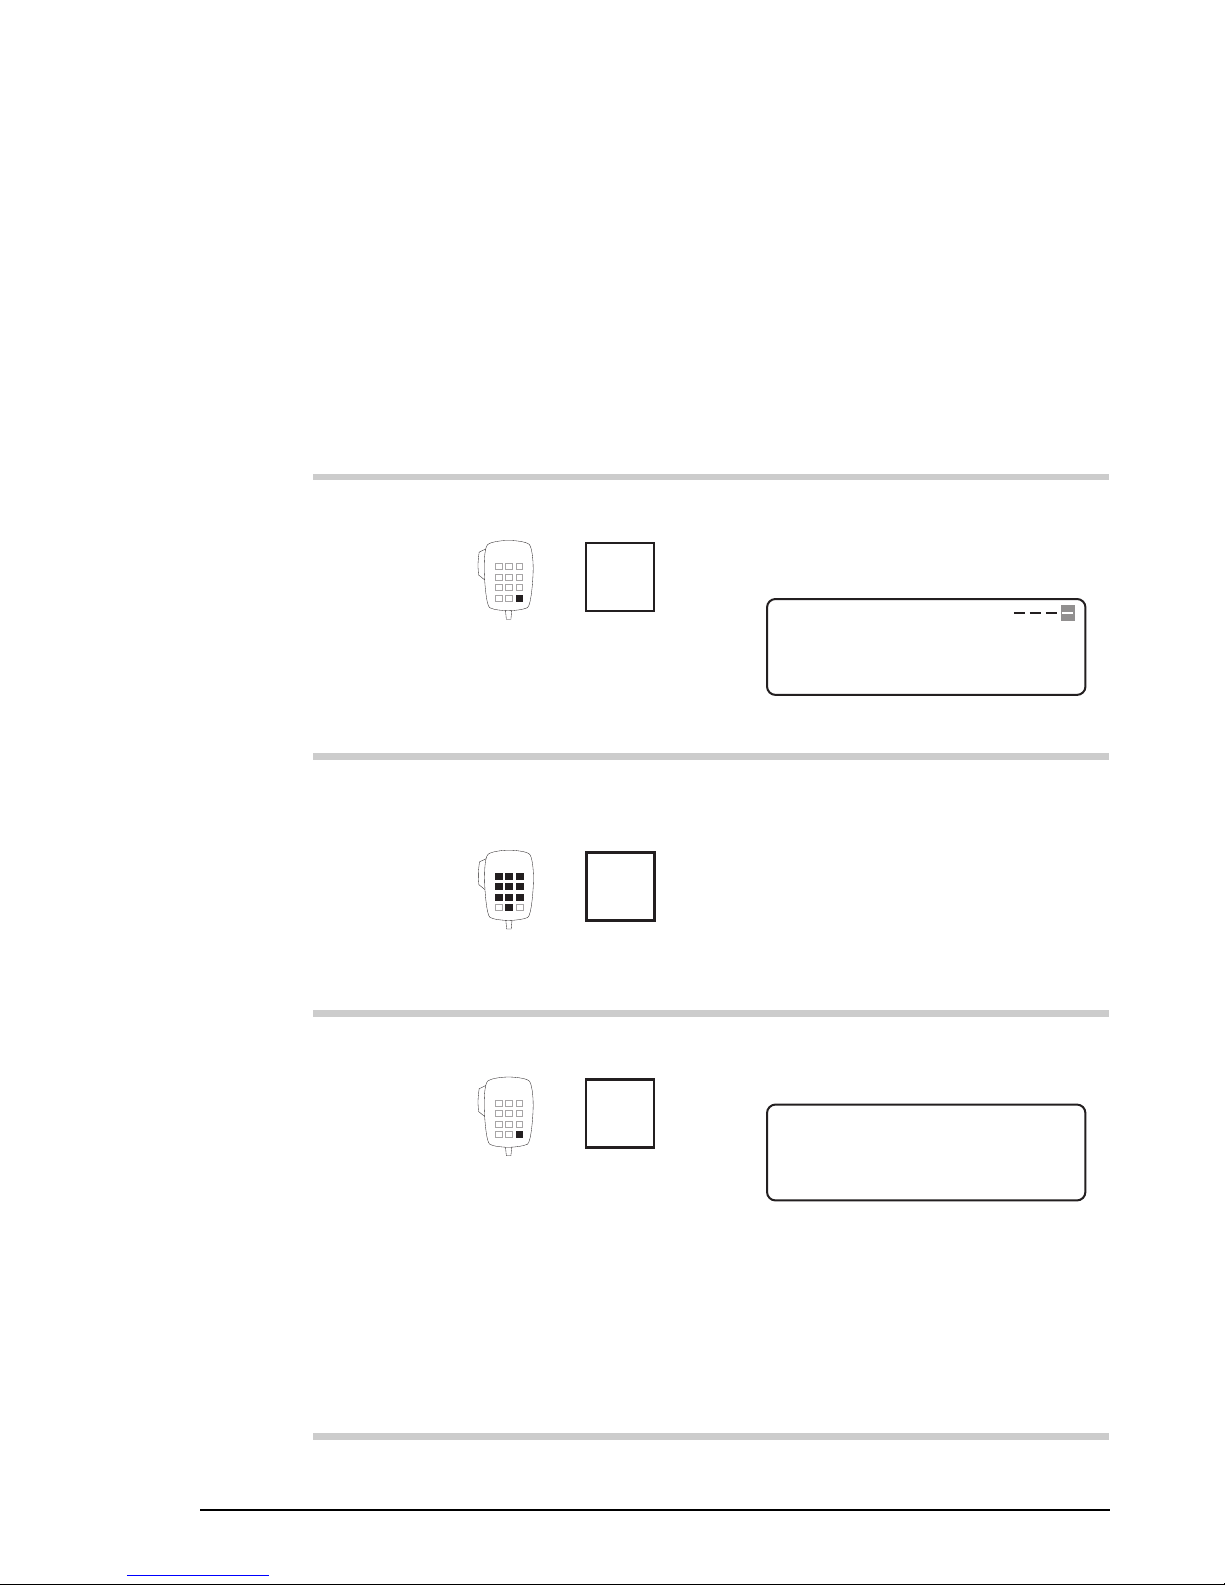
Using the transceiver
HF SSB transceiver user guide 3-9
Selecting a channel by recalling its channel number
You can select a channel by directly entering its channel
number. This method saves you from having to scroll through
a long list of channels.
To select a channel by recalling its channel number:
Action Notes
1.
In Channel mode, press
Enter
R'call
The transceiver always starts up
in Channel mode. Example of
the display:
USB
HI
PROG
Rx.
158
4010
ENTER
Recall Chan:
2.
Enter the number of the
channel you want
numeral
button
Enter up to four digits.
3.
Press
Enter
R'call
Example of the display for
channel number 149:
149
2040
CALL
Rx.
USB
HI
Geneva Switzerland
Pwr
If you enter the number of a
channel that does not exist, the
transceiver beeps and selects
the channel with the next higher
channel number.
Page 41

Using the transceiver
3-10 HF SSB transceiver user guide
Selecting a channel by recalling its channel frequency
If the feature for recalling channels by frequency is switched
on (refer to the HF SSB transceiver reference manual,
Chapter 7, Recall channels by frequency on/off), you can
select a channel by recalling its frequency instead of its
channel number.
To select a channel by recalling its channel frequency:
Action Notes
1.
In Channel mode, press
Enter
R'call
The transceiver always starts up
in Channel mode. Example of
the display:
USB
HI
PROG
Rx.
158
4010
ENTER
Recall Chan:
2.
Enter the kHz
frequency to one
decimal place
numeral
button
Enter a 5-digit or 6-digit
number. For example, to select
the channel on 2040kHz, enter
the number 20400.
158
EXIT
Rx.
USB
HI
Recall Freq:
ENTER
–2,040.0
4010
When you enter the fifth digit,
the display changes from
Recall Chan
to
Recall Freq
.
Page 42

Using the transceiver
HF SSB transceiver user guide 3-11
Action Notes
3.
Press
Enter
R'call
For 2040kHz, the display looks
like this:
149
2040
CALL
Rx.
USB
HI
Geneva Switzerland
Pwr
If you enter the frequency of a
channel that does not exist, the
transceiver beeps and selects
the channel with the next higher
frequency.
Page 43

Using the transceiver
3-12 HF SSB transceiver user guide
Selecting the sideband or AM (USB/LSB/AM)
The
USB/LSB
button on the control panel switches between
upper sideband (USB), lower sideband (LSB) and AM (if
fitted) depending on the current channel settings.
You can select USB or LSB for:
• channels set up with the LU sideband option (lower or
upper sideband selectable, see Using View Channel
Options mode on page 3-31)
• all receive-only channels
• free-tuning in Free-Tune Receiver mode.
You can select AM for any channel if the AM option is
enabled (refer to the HF SSB transceiver reference manual,
Chapter 7, Password entry to enable transceiver options).
The AM setting allows you to transmit on AM to AM stations
that are incapable of sideband communication. The AM
setting automatically operates as USB on receive.
You can receive AM transmissions on any AM, USB and
LSB setting. For an AM broadcast you may find that
switching between USB and LSB improves reception.
Page 44

Using the transceiver
HF SSB transceiver user guide 3-13
To change the USB/LSB/AM setting:
Action Notes
1.
In Channel mode, make
sure that the transceiver
is not scanning.
See Scanning for incoming
calls on page 3-23.
2.
To switch between the
available
USB/LSB/AM settings
for the current channel,
press
USB/LSB
The left of the display indicates
the selected setting:
USB, LSB
or
AM
.
Page 45

Using the transceiver
3-14 HF SSB transceiver user guide
Tuning the antenna
If you have a manual or automatic antenna tuner, you need to
tune the antenna after selecting a channel if you are about to
send a call.
Although the transceiver will tune automatic tuners and
antennas, it is always a good idea to press the
Tune
button
whenever you change channel. Tuning the antenna makes it
easier to hear when the channel is free from voice and data
traffic before starting a call.
Manual tuner
To tune the antenna when you have a manual antenna tuner:
Action Notes
1.
In Channel mode, select
the channel you want to
use.
Example of the display:
149
2040
CALL
Rx.
USB
HI
Geneva Switzerland
Pwr
2.
Press and hold down
Tune
while you manually
adjust the antenna
tuner.
Page 46

Using the transceiver
HF SSB transceiver user guide 3-15
Automatic antenna tuner
This procedure tunes the antenna if you have an automatic
antenna tuner.
The transceiver tells you the status of tuning by a message on
the display and by a series of beeps.
Message Beeps Meaning
Not Tuned
(displayed for
two seconds)
Two loud low
beeps
Antenna not yet tuned.
Tune Fail
Two loud low
beeps
Unable to tune
antenna.
Tune Pass
Two soft high
beeps
Antenna tuned OK.
Tuner Fault
(displayed for
10 seconds)
Two loud low
beeps
Failed to tune the
antenna after two
minutes.
Tuning
Two soft high
beeps every
second
Tuning the antenna
now.
Page 47

Using the transceiver
3-16 HF SSB transceiver user guide
To tune the antenna if you have an automatic antenna tuner:
Action Notes
1.
In Channel mode, select
the channel you want to
use and wait until the
channel is clear of all
voice and data traffic.
Example of the display:
149
2040
CALL
Rx.
USB
HI
Geneva Switzerland
Pwr
2.
Press
Tune
During tuning, the transceiver
beeps every second. Tuning
takes a few seconds to
complete.
3.
Check the result of
tuning from the table
above.
Read the message on the top
line of the display and listen to
the type of beep.
Page 48

Using the transceiver
HF SSB transceiver user guide 3-17
Using the microphone
When talking into the microphone:
• hold the microphone side-on and close to your mouth
• press and hold down the
PTT
button
• speak clearly at normal volume and rate
• use the word ‘over’ to indicate when you have finished
speaking and release the
PTT
button
• remember that your conversation can be monitored by
anyone tuned to your transmit frequency.
The transceiver incorporates a Sleep mode feature designed
to prevent you from operating the transceiver accidentally by
pressing the microphone buttons. In Sleep mode, these
buttons are inoperative.
Sleep mode does not affect the
PTT
button or the front panel
controls.
Sleep mode starts when no microphone button has been
pressed for one minute. To cancel Sleep mode, you hold
down the microphone button you want to operate for two
seconds until you hear a two-tone beep. Immediately after
this the button operates.
To save you from having to say ‘over’, you can use the
transceiver’s PTT release beep feature. If you switch this
feature on, the transceiver automatically indicates that you
have finished talking by sending a beep every time you
release the
PTT
button. Refer to the HF SSB transceiver
reference manual, Chapter 7, PTT release beep on/off.
The transceiver prevents you from transmitting for an
excessive period. If you want to change this time limit, refer
to the HF SSB transceiver reference manual, Chapter 7, PTT
transmit cutout.
Page 49

Using the transceiver
3-18 HF SSB transceiver user guide
Muting the transceiver
Muting allows you to silence the transceiver so that you do
not hear unwanted background noise on the channel until you
receive a call.
Three buttons control the mute setting of the transceiver:
• the
Voice Mute
button on the control panel
• the
S'Call Mute
button on the control panel (selects
selcall mute)
• the
Mute
button on the microphone.
The Voice Mute button on the control panel
Select voice mute if you expect to receive voice calls. Voice
mute silences the transceiver until a voice call is detected.
When the transceiver is not scanning for incoming calls, the
Voice Mute
button switches voice mute on and off. The red
indicator at the top left of the button is on when voice mute is
selected.
When the transceiver is scanning, the
Voice Mute
button is
used to switch between:
•
Pause Scan
to stop scanning and switch off the mute
for five seconds when a voice call is detected
•
Hold Scan
to stop scanning and switch off the mute for
as long as the voice call is detected
•
Scanning
to continue scanning with mute switched off.
Changing the volume, clarifier setting or channel
momentarily switches off mute.
Page 50

Using the transceiver
HF SSB transceiver user guide 3-19
The S’Call Mute button on the control panel
Select selcall mute if selective calling is enabled and you
expect to receive selcalls. Selcall mute silences the
transceiver until a selcall sent to your transceiver is detected.
The
S'Call Mute
button switches selcall mute on and off.
The red indicator at the top left of the button is on when
selcall mute is selected.
Pressing the
PTT
on the microphone also switches off selcall
mute.
The Mute button on the microphone
The
Mute
button on the microphone switches on or off
whichever type of mute was last selected on the control panel
(voice or selcall mute).
You can only select between voice and selcall mute from the
control panel.
Page 51

Using the transceiver
3-20 HF SSB transceiver user guide
Selecting the operating mode
The transceiver has six operating modes:
• Channel mode (the normal operating mode)
• Clarifier mode
• View Channel Options mode
• Free-Tune Receiver mode
• Setup mode
• View All Settings mode.
Channel mode allows you to perform most of the operating
procedures described in this user guide.
Clarifier mode allows you to adjust the quality of the audio
signal by varying the pitch of the received signal. See Using
Clarifier mode on page 3-30.
View Channel Options mode allows you to see the option
settings set up for each channel. See Using View Channel
Options mode on page 3-31.
In Free-Tune Receiver mode, you can set the transceiver to
receive signals on any one frequency within its operating
range. See Using Free-Tune Receiver mode on page 3-33.
Setup mode allows you to view and change settings that
control transceiver operation. Refer to the HF SSB
transceiver reference manual, Chapter 4, Using Setup mode
procedures.
View All Settings mode allows you to view all transceiver
settings without allowing you to change any. See Using View
All Settings mode on page 3-37.
Page 52

Using the transceiver
HF SSB transceiver user guide 3-21
Changing the operating mode
The transceiver starts in Channel mode when you switch it
on.
To change the operating mode:
Action Notes
1.
Repeatedly press
Mode
until you see the display
for the mode you want.
If you have used the transceiver
in a mode other than Channel
mode, the first press takes you
back to Channel mode.
Example of Channel mode
display:
158
4010
CALL
Rx.
USB
HI
Fleet channel
Pwr
Example of Clarifier mode
display:
USB
HI
CALL
158
4010
+--
CLARIFIER
Pwr
Example of Channel Options
mode display:
S2 Id: 185074 T–
Ch:158
U P
CHANNEL OPTIONS
Tx 4,010
Rx 4,010
Page 53

Using the transceiver
3-22 HF SSB transceiver user guide
Action Notes
1. (cont.)
Example of Free-Tune
Receiver mode display:
USB
HI
Rx.
4,010.00
Free Tune Receiver
Example of Setup mode
display:
EXIT
SETUP MENU
1- Scan-
2–Call
ENTER
3–Config
4–More
1/2
Example of View All Settings
mode display:
EXIT
Option TxE
No of Channels: 121
NEXT
Sel
Page 54

Using the transceiver
HF SSB transceiver user guide 3-23
Scanning for incoming calls
Scanning allows the transceiver to detect incoming calls on
more than one channel frequency. This is useful if you expect
to receive calls from several stations or from stations that
transmit on more than one frequency.
The transceiver scans the list of channels set up in a scan
table. It repeatedly scans each channel in the scan table until
an incoming call is detected on any of the channel
frequencies.
You can create up to three scan tables, each containing up to
ten channels. You select which scan table to use when you
start the transceiver scanning. For details on types of
scanning and how to set up a scan table, refer to the HF SSB
transceiver reference manual, Chapter 3, Scan table
creation.
If automatic scan table scanning is switched on, the
transceiver automatically starts scanning after a set time
(refer to the HF SSB transceiver reference manual, Chapter
8, Scan table automatic scanning start).
If you have set up any of the three scan tables for ALE
scanning, automatic scanning resumes with the last scan table
used. If there is no ALE scan table, automatic scanning
resumes with scan table 1.
During scanning, you can:
• change the mute setting (see Muting the transceiver on
page 3-18)
• temporarily pause the scan.
You pause scanning by rotating the
Select
knob on the
control panel. You can then use this knob to view information
about the channels in the scan table and listen on any of these
channels. You resume scanning immediately by pressing the
Scan
button. If you do not touch any button or knob for 30
seconds, scanning automatically starts.
Page 55

Using the transceiver
3-24 HF SSB transceiver user guide
Scanning requires a suitable antenna system. For mobile
installations, we recommend a Codan automatic tuning whip
antenna.
Selecting a scan table and starting the scan
To select a scan table and start the scan:
Action Notes
1.
Press
Scan
Example of the display:
EXIT
PROGRAM
Press SCAN to Scan
Scan Table: 1
2.
To select one of the
three scan tables, rotate
Select
Select scan table 1, 2 or 3.
3.
To start the transceiver
scanning using this scan
table, press
Scan
After tuning, the display cycles
through the channels.
Page 56

Using the transceiver
HF SSB transceiver user guide 3-25
Action Notes
4.
To stop the transceiver
scanning, press
Scan
You can also stop scanning by
pressing
PTT
or
Scan
8
Using the transceiver
HF SSB transceiver user guide 3-25
Action Notes
4.
To stop the transceiver
scanning, press
Scan
You can also stop scanning by
pressing
PTT
or
Scan
8
Page 57

Using the transceiver
3-26 HF SSB transceiver user guide
Starting the scan using the last scan table used
To start scanning the last scan table used:
Action Notes
1.
Press
Scan
8
The display cycles through the
channels.
2.
To stop the transceiver
scanning, press
Scan
You can also stop scanning by
pressing
PTT
or
Scan
8
Page 58

Using the transceiver
HF SSB transceiver user guide 3-27
Changing transmitter power
You can set the transceiver to transmit at high or low power.
The usual setting is high power. For short range
communication this may be too powerful. For example,
excessive signal strength may cause distortion if you transmit
to a transceiver sited close to you.
To change transmitter power:
Action Notes
1.
In Channel mode, make
sure that the transceiver is
not scanning.
See Scanning for incoming
calls on page 3-23.
2.
To switch between high
and low transmitter power,
press
F2
The left of the display indicates
the selected power setting:
HI
(high, as in this example) or
LO
(low):
158
4010
CALL
Rx.
USB
HI
Fleet channel
Pwr
Page 59

Using the transceiver
3-28 HF SSB transceiver user guide
Adjusting the display brightness
You can adjust the display brightness at any time.
To adjust the brightness of the display:
Action Notes
1.
Press and hold down
On/Off
then rotate
Volume
Rotate the knob clockwise to
increase brightness or
anticlockwise to decrease
brightness.
2.
When the brightness is
correct, release
On/Off
The transceiver does not switch
off if you have adjusted the
brightness.
Setup mode also has a
procedure for adjusting
brightness (refer to the HF SSB
transceiver reference manual,
Chapter 6, Display brightness).
Page 60

Using the transceiver
HF SSB transceiver user guide 3-29
Adjusting the display contrast
You can adjust the display contrast at any time.
To adjust the contrast of the display:
Action Notes
1.
Press and hold down
On/Off
then rotate
Select
Rotate the knob clockwise to
increase contrast or
anticlockwise to decrease
contrast.
2.
When the contrast is
correct, release
On/Off
The transceiver does not switch
off if you have adjusted the
contrast.
Setup mode also has a
procedure for adjusting contrast
(refer to the HF SSB
transceiver reference manual,
Chapter 6, Display contrast).
Page 61

Using the transceiver
3-30 HF SSB transceiver user guide
Using Clarifier mode
Clarifier mode allows you to improve the clarity of the voice
you can hear by adjusting the frequency of your transceiver
channel to match that of the received signal.
All controls operate the same way in Clarifier mode as they
do in Channel mode, except for the
Select
knob. This knob
is used to operate the clarifier and adjust signal clarity.
When you use the
Mode
button to return to Channel mode,
the clarifier adjustment for the current channel remains in
force. If you then change to another channel, the adjustment
is reset to the centre value.
To use the clarifier:
Action Notes
1.
In Channel mode, press
Mode
Example of the display (for five
seconds):
USB
HI
CALL
158
4010
+--
CLARIFIER
Pwr
which will then change to:
USB
HI
CALL
158
4010
+--
Fleet channel
Pwr
2.
To make the voice
sound clearer, rotate
Select
The transceiver beeps at the
minimum and maximum
settings.
Page 62

Using the transceiver
HF SSB transceiver user guide 3-31
Using View Channel Options mode
View Channel Options mode allows you to view the channel
settings of any channel. To change channel settings, refer to
the HF SSB transceiver reference manual, Chapter 3,
Channel creation and editing.
If you do not touch any button or knob for 30 seconds while
in this mode, the transceiver automatically returns to Channel
mode.
The table below describes the channel settings.
This setting... Means...
U Upper sideband.
L Lower sideband.
LU Lower or upper sideband selectable.
NP Not Protected. You can edit or delete this
channel.
P Protected. Apart from changing the
channel comment, you cannot edit or
delete this channel.
S– You cannot send selcalls on this channel.
S1 Channel uses selcall group 1 settings.
S2 Channel uses selcall group 2 settings.
S3 Channel uses selcall group 3 settings.
S4 Channel uses selcall group 4 settings.
S5 Channel uses selcall group 5 settings.
T– You cannot send tone calls on this
channel.
T1 Channel uses tone group 1 frequencies.
T2 Channel uses tone group 2 frequencies.
T3 Channel uses tone group 3 frequencies.
T4 Channel uses tone group 4 frequencies.
Page 63

Using the transceiver
3-32 HF SSB transceiver user guide
To view channel settings:
Action Notes
1.
Repeatedly press
Mode
until you see the display
for View Channel
Options mode.
Example of the display:
S2 Id: 185074 T–
Ch:158
U P
CHANNEL OPTIONS
Tx 4,010
Rx 4,010
The settings for the current
channel are displayed.
2.
To view the settings for
a different channel,
rotate
Select
If you do not touch any button
or knob for 30 seconds, the
transceiver automatically
returns to Channel mode.
3.
To return to Channel
mode, repeatedly press
Mode
until you see the display
for Channel mode.
Example of the display:
158
4010
CALL
Rx.
USB
HI
Fleet channel
Pwr
Page 64

Using the transceiver
HF SSB transceiver user guide 3-33
Using Free-Tune Receiver mode
Free-Tune Receiver mode allows you to tune the receiver to
any frequency within the transceiver’s operating range
(250kHz–30MHz).
You can temporarily change the frequency of the current
channel or you can directly enter a new frequency. When you
return to Channel mode, the frequency is reset to the original
value.
If you want to save the frequency you set in Free-Tune
Receiver mode, you must create a channel that has this
frequency (refer to the HF SSB transceiver reference manual,
Chapter 3, Channel creation in Free-Tune Receiver mode).
Setting a receive frequency
To set a receive frequency using the control panel:
Action Notes
1.
Repeatedly press
Mode
until you see the display
for Free-Tune Receiver
mode.
Example of the display:
USB
HI
Rx.
4,010.00
Free Tune Receiver
The display shows the
frequency of the current
channel.
Page 65
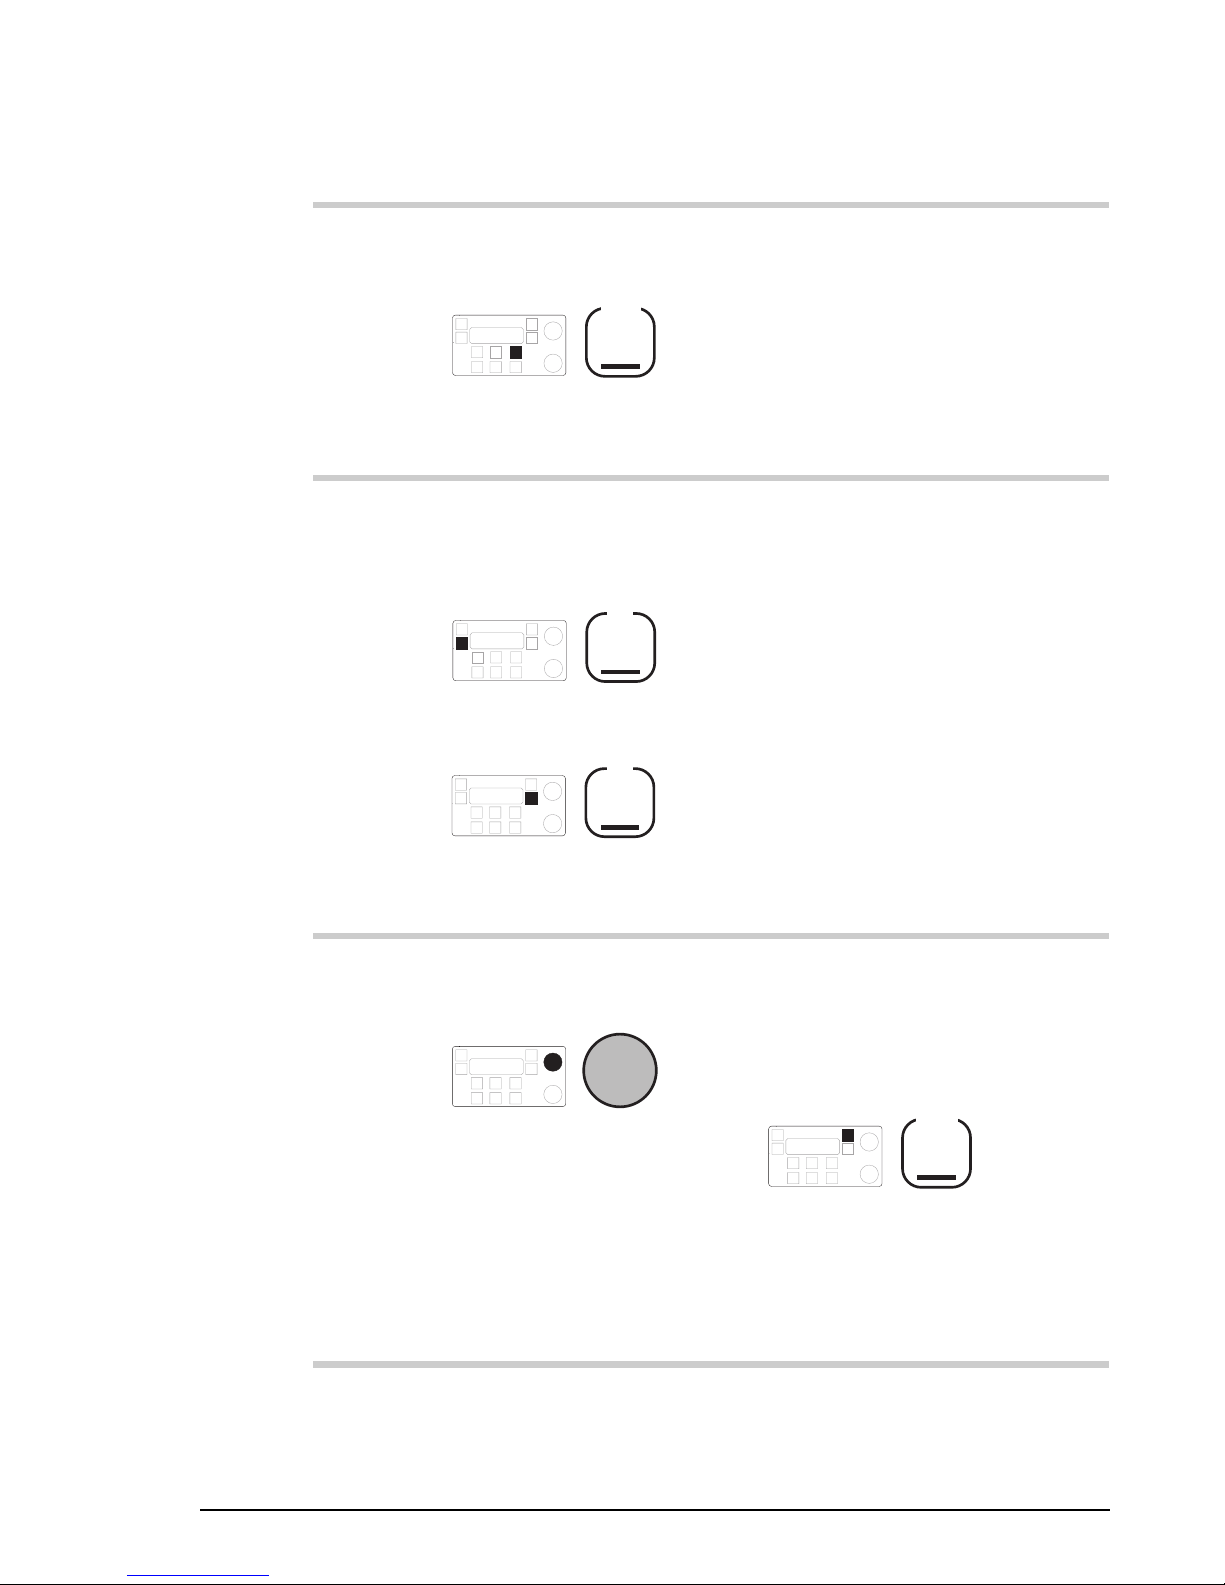
Using the transceiver
3-34 HF SSB transceiver user guide
Action Notes
2.
To tune the antenna,
press
Tune
See Tuning the antenna on
page 3-14 for details on
antenna tuning.
While you remain in Free-Tune
Receiver mode, you do not
need to tune the antenna.
3.
To move the cursor to a
digit you want to
change, press
F1
to move left, or
F2
to move right.
The cursor is the small line
under one of the digits of the
frequency.
4.
To change a digit,
rotate
Select
Repeat steps 3–4 to complete
the setting.
To return to Channel mode,
repeatedly press
Mode
until you see the display for
Channel mode. The frequency
is reset to the original value.
Page 66

Using the transceiver
HF SSB transceiver user guide 3-35
Entering a receive frequency
To directly enter a receive frequency using the microphone:
Action Notes
1.
Repeatedly press
Mode
until you see the display
for Free-Tune Receiver
mode.
Example of the display:
USB
HI
Rx.
4,010.00
Free Tune Receiver
The display shows the
frequency of the current
channel.
2.
Press
Enter
R'call
Example of the display:
USB
HI
Rx.
Free Tune Receiver
PROG
ENTER
4,010.00
3.
Enter the kHz
frequency to two
decimal places
numeral
button
For example, to enter 3920kHz,
enter 392000.
Page 67

Using the transceiver
3-36 HF SSB transceiver user guide
Action Notes
4.
To return to Free-Tune
Receiver mode
Enter
R'call
To return to Channel mode,
repeatedly press
Mode
until you see the display for
Channel mode. The frequency
is reset to the original value.
Using the transceiver
3-36 HF SSB transceiver user guide
Action Notes
4.
To return to Free-Tune
Receiver mode
Enter
R'call
To return to Channel mode,
repeatedly press
Mode
until you see the display for
Channel mode. The frequency
is reset to the original value.
Page 68

Using the transceiver
HF SSB transceiver user guide 3-37
Using View All Settings mode
View All Settings mode allows you to view the settings that
control transceiver operation.
You can view the following information (the items displayed
depend on which transceiver options are fitted in your
transceiver):
• number of channels set up in the transceiver and enabled
options
• time and date
• transceiver software issue
• control panel (front panel) software issue
• your transceiver ID (identification code)
• automatic scanning, selcall mute, 4-digit address
compatible
• selcall groups S1–S5 holding your address
• address of station to call in an emergency selcall
• emergency selcall transmit channels
• emergency selcall receive
• 99-beacon, telcall, selcall lockout
• tone call groups T1–T4
• recall by frequency, beep loudness
• PTT timeout, PTT beeps
• RS-232 mode, RS-232 baud, GPS timeout
• antenna band/channel, RF gain
• PA frequency range (your transceiver’s transmitting
frequency range).
Page 69

Using the transceiver
3-38 HF SSB transceiver user guide
If you want to change some of these settings, refer to the
HF SSB transceiver reference manual, Chapter 4, Using
Setup mode procedures.
If you do not touch any button or knob for 30 seconds while
in this mode, the transceiver automatically returns to Channel
mode.
To view transceiver operational settings:
Action Notes
1.
Repeatedly press
Mode
until you see the display
for View All Settings
mode.
Example of the display:
EXIT
Option TxE
No of Channels: 121
NEXT
Sel
2.
To view more
transceiver settings,
rotate
Select
If you do not touch any button
or knob for 30 seconds, the
transceiver automatically
returns to Channel mode.
3.
To return to Channel
mode, press
Mode
Example of the display:
158
4010
CALL
Rx.
USB
HI
Fleet channel
Pwr
Page 70

Using the transceiver
HF SSB transceiver user guide 3-39
Customising your transceiver
Now you are ready to customise your transceiver so that it
can operate efficiently within your network. This section will
help to get you started.
Once your station is up and running, you may want to change
other settings and further customise your station.
To get an idea of the general operational settings you can
change, refer to the HF SSB transceiver reference manual,
Chapter 3, Channel and scan table setup, and Chapter 4,
Using Setup mode procedures. Many of these settings you
will never need to change since they have already been set up
to suit the most common user.
To find out what settings you need to make to be able to send
and receive each type of call, read the descriptions for each
call type in Chapter 4, Sending calls.
General transceiver operation
You will probably want to:
• set the clock (refer to the HF SSB transceiver reference
manual, Chapter 5, Clock setting)
• reset the clock calibration to its middle position (refer to
the HF SSB transceiver reference manual, Chapter 5,
Clock calibration)
• set up a scan table so that you can scan for incoming calls
on more than one frequency (refer to the HF SSB
transceiver reference manual, Chapter 3, Scan table
creation).
Page 71

Using the transceiver
3-40 HF SSB transceiver user guide
You may want to:
• set up a customised message that appears briefly every
time you switch the transceiver on (refer to the HF SSB
transceiver reference manual, Chapter 7, Power up
message on/off)
• change the initial mute setting used when the transceiver
is switched on (refer to the HF SSB transceiver reference
manual, Chapter 7, Power up mute setting)
• set up the transceiver to start scanning automatically if
you do not touch any button or knob for a certain period
(refer to the HF SSB transceiver reference manual,
Chapter 8, Scan table automatic scanning start)
• change the RF gain setting to suit the level of electrical
interference in the area where your station is located
(refer to the HF SSB transceiver reference manual,
Chapter 7, RF gain on/off).
Handling selcalls
If your transceiver is fitted for sending selcalls, you should:
• set up your address in a selcall group so that other
stations can call you (refer to the HF SSB transceiver
reference manual, Chapter 8, Selcall address setup)
• assign the selcall group to the channels you are going to
use for sending calls (refer to the HF SSB transceiver
reference manual, Chapter 3, Channel creation and
editing)
• consider how the transceiver communicates with stations
incapable of using addresses longer than four digits (refer
to the HF SSB transceiver reference manual, Chapter 8,
Selcall address size compatibility).
Page 72

Using the transceiver
HF SSB transceiver user guide 3-41
Handling telcalls
If your transceiver is fitted for sending telcalls, you should:
• set up a selcall group for use in telcalling (refer to the
HF SSB transceiver reference manual, Chapter 8, Selcall
address setup)
• assign the selcall group set up for telcalling to the
channels you are going to use for sending telcalls (refer
to the HF SSB transceiver reference manual, Chapter 3,
Channel creation and editing)
• set up the telephone directory with the telephone
numbers of the people you most commonly telcall (refer
to the HF SSB transceiver reference manual, Chapter 3,
Telephone directory creation).
Page 73

Using the transceiver
3-42 HF SSB transceiver user guide
Using the transceiver
3-42 HF SSB transceiver user guide
Page 74

HF SSB transceiver user guide 4-1
4 Sending calls
This chapter shows you how to send:
• ALE calls (4-3)
• Emergency selcalls (4-7)
• GPS beacon calls (4-12)
• GPS position calls (4-16)
• Page calls (4-20)
• Selcalls (4-26)
• Selective beacon calls (4-29)
• Status calls (4-32)
• Telcalls (4-39)
• Tone calls (4-46)
• Voice calls (4-48).
This chapter covers the full range of call types for HF SSB
series transceivers. To find out what types of call your
transceiver can send, see the front of this guide for the list of
fitted transceiver options. All HF SSB series transceivers can
send tone and voice calls.
When making a call, the station you are calling needs to be
set to the channel frequency you are using.
In any call procedure up to the point transmission starts, the
transceiver automatically switches back to Channel mode if
you do not touch any button or knob for 30 seconds. If this
happens, start the procedure again.
Page 75

Sending calls
4-2 HF SSB transceiver user guide
Messages like
No calls available
are displayed if the type of
call you are trying to send is not enabled. If this happens,
check the conditions listed at the start of the call procedure
under the heading Before you can send this call, you need
to...
The displays in this chapter show examples of channel and
frequency numbers. You must use numbers appropriate for
your own transceiver.
Page 76

Sending calls
HF SSB transceiver user guide 4-3
ALE call
An Automatic Link Establishment call (ALE) automatically
selects the best channel to use for sending a call. This removes
the need to send selective beacon calls on different channels to
find the best channel to communicate on.
When you send an ALE call, the ALE controller selects the
best frequency from a preset list of channels and attempts to
establish a link with the other station on that channel. If it
fails, it selects the next best channel and tries again. This
process repeats until a link is established or there are no more
channels to try.
ALE calls allow you to use both numeric and alphanumeric
station addresses. A numeric address is a 6-digit number or
less. An alphanumeric address is either a number greater than
six digits or an address containing one or more of the
characters ‘A–Z’, ‘@’ and ‘?’. Maximum length is 15
characters.
To set up your transceiver’s alphanumeric address, refer to
the HF SSB transceiver reference manual, Chapter 5, ALE
alphanumeric address setup.
When you call an alphanumeric address, your alphanumeric
address is used in the call to identify your station.
When you call a numeric address, your numeric address is
used in the call to identify your station (set up in the selcall
group assigned to the current channel).
For further details, refer to the 9300 ALE controller user
guide (Codan part number 15-04046).
Page 77

Sending calls
4-4 HF SSB transceiver user guide
Before you can send an ALE call, you need to:
• connect an ALE controller and set the correct RS-232
and baud rate settings (refer to the HF SSB transceiver
reference manual, Chapter 11, Connecting ancillary
equipment)
• make sure that the station you are calling is also set up
for ALE calling
• set up your address (refer to the HF SSB transceiver
reference manual, Chapter 8, Selcall address setup)
• set up your alphanumeric address if you intend to call an
alphanumeric address (refer to the HF SSB transceiver
reference manual, Chapter 5, ALE alphanumeric
address setup)
• set up a channel for selcalling (refer to the HF SSB
transceiver reference manual, Chapter 3, Channel
creation and editing)
• set up a scan table for ALE call scanning (refer to the
HF SSB transceiver reference manual, Chapter 3, Scan
table creation).
To send an ALE call:
Action Notes
1.
Normally the
transceiver will be in
ALE Scan mode.
Example of the display when in
ALE Scan mode:
208
5820
CALL
Rx.
USB
HI
ALE Scan
TYPE
Page 78

Sending calls
HF SSB transceiver user guide 4-5
Action Notes
2.
To exit ALE scan
mode, press
Call
Example of the display:
208
5820
CALL
Rx.
USB
HI
ALE :
TYPE
185074_ _ _ _ _ _ _ _ _
The top right position of the
display shows the address of
the last station called.
3.
Enter the address you
want to call (if different
to the one displayed)
numeral
button
Enter up to 15 characters or
digits, from left to right.
If the transceiver beeps when
you try to enter the address, the
channel has been set up with a
fixed numeric address. Refer to
the HF SSB transceiver
reference manual, Chapter 8,
Selcall address setup.
4.
To send the call, press
Call
or
F1
You hear your transceiver’s
calling tones. Example of the
display:
208
5820
CALL
Tx
USB
HI
185074
ALE calling:
When the ALE controller has
established the best channel to
use, the display looks like this:
208
5820
CALL
Rx.
USB
HI
185074
Link Established:
Page 79

Sending calls
4-6 HF SSB transceiver user guide
Action Notes
5.
Wait for the operator of
the other station to
return your call.
The operator is notified of your
call by an alarm that sounds
like a telephone.
If the station is unattended, wait
to be called back.
6.
To restart ALE
scanning, press
Scan
8
Now that you have finished the
call, you want the transceiver to
be ready to detect the next call
sent to you.
Page 80

Sending calls
HF SSB transceiver user guide 4-7
Emergency selcall
An emergency selcall is a simple and automatic way of
selectively calling any station in an emergency.
An emergency selcall:
• saves you from having to select channels and addresses
when sending the call since this information is preset
• alerts the operator of the other station by a special
emergency alarm
• automatically sends your GPS position if your station is
set up for GPS (see GPS position call on page 4-16).
If you do not set up any emergency channels, you will need to
select the channel at the time of sending the call.
If you set up more than one emergency channel, the
transceiver will send calls on successive emergency channels
until a call has been sent once on each channel or you stop
the calling process by pressing the
PTT
button.
Before you can send an emergency selcall, you need to:
• set up your address (refer to the HF SSB transceiver
reference manual, Chapter 8, Selcall address setup)
• set up the address to call and up to four emergency
channels to be used (refer to the HF SSB transceiver
reference manual, Chapter 6, Emergency Selcall
transmit setup)
• make sure that the station you are calling is set up for
receiving emergency selcalls.
Page 81

Sending calls
4-8 HF SSB transceiver user guide
Emergency selcall on preset channels
This procedure sends an emergency selcall using the preset
emergency channels. If no emergency channels have been set
up, the call is sent on the current channel.
Action Notes
1.
Press and hold down
for two seconds
Emgcy
Call
You hear beeping. The channel
changes to the first emergency
channel (if emergency channels
have been set up):
211
4920
Rx.
USB
HI
Select Emgcy channel
After the two seconds, antenna
tuning starts followed by the
transceiver’s calling tones:
211
4920
Tx
USB
HI
Emgcy calling:
155054
The transceiver waits 10
seconds and repeats the call on
the next preset emergency
channel:
215
2470
USB
HI
Next call in 10 sec.
Rx.
Page 82

Sending calls
HF SSB transceiver user guide 4-9
Action Notes
2.
To start talking after
hearing the revertive
signal, press
PTT
The other station responds by
sending a siren-like revertive
signal. You may hear a tuning
tone first if the other station has
an automatic tuning antenna.
Pressing the
PTT
button stops
the calling process and further
channel changing.
Page 83

Sending calls
4-10 HF SSB transceiver user guide
Emergency selcall with manual channel selection
This procedure allows you to select the channel at the time of
sending an emergency selcall.
Action Notes
1.
In Channel mode, press
and release
Emgcy
Call
The speed of beeping slows.
You have 30 seconds to select a
channel before the transceiver
reverts to Channel mode.
Example of the display:
211
4920
Rx.
USB
HI
Select Emgcy channel
RECALL
If you want to stop the call,
press
PTT
2.
If you want to select a
channel, rotate
Select
Continue
Step 5.
Example of the display:
211
4920
Rx.
USB
HI
Select Emgcy channel
RECALL
If you want to recall a
channel, press
Enter
R'call
Example of the display:
USB
HI
EXIT
Rx.
211
4920
Recall Chan:
RECALL
Page 84

Sending calls
HF SSB transceiver user guide 4-11
Action Notes
3.
Enter the channel
number
numeral
button
4.
Press
Enter
R'call
Example of the display for
channel 145:
145
6780
Rx.
USB
HI
Select Emgcy channel
RECALL
5.
Press and hold down
for two seconds
Emgcy
Call
You hear your transceiver’s
calling tones. Example of the
display:
145
6780
Tx
USB
HI
Emgcy calling:
155054
6.
To start talking after
hearing the revertive
signal, press
PTT
The other station responds by
sending a siren-like revertive
signal. You may hear a tuning
tone first if the other station has
an automatic tuning antenna.
Page 85

Sending calls
4-12 HF SSB transceiver user guide
GPS beacon call
GPS (Global Positioning System) is a system for displaying
the geographical location of a station. GPS receivers pick up
latitude and longitude coordinates from passing satellites.
A GPS beacon call obtains the global position of another
station.
When a station receives a GPS beacon call, it automatically
transmits the GPS information. The operator is not alerted
that a call has been received. For example, a transportation
manager might send a GPS beacon call to locate a mobile
station such as a delivery vehicle.
If the station you are calling has set up a privacy key, you
will need to set up the same privacy key in your transceiver to
be able to receive GPS information from this station.
Before you can send a GPS beacon call, you need to:
• enable GPS calling (refer to the HF SSB transceiver
reference manual, Chapter 7, Password entry to enable
transceiver options)
• make sure that the station you are calling is also set up
for using GPS
• check if you need to match the other station’s use of a
privacy key (refer to the HF SSB transceiver reference
manual, Chapter 5, Call privacy on/off)
• set up your address (refer to the HF SSB transceiver
reference manual, Chapter 8, Selcall address setup)
• set up a channel for selcalling (refer to the HF SSB
transceiver reference manual, Chapter 3, Channel
creation and editing).
Page 86

Sending calls
HF SSB transceiver user guide 4-13
To send a GPS beacon call:
Action Notes
1.
In Channel mode, select
one of the frequencies
scanned by the other
station.
2.
Wait until the channel
is clear of all voice and
data traffic.
Temporarily switch off any
muting so that you can hear
activity on the channel.
3.
Press
F1
The display shows the last type
of call made:
208
5820
CALL
Rx.
USB
HI
Selcall:
TYPE
185074
The top right position of the
display shows the address of
the last station called.
4.
Repeatedly press
F2
until you see
GPS
beacon
displayed on
the top line.
Example of the display:
208
5820
CALL
Rx.
USB
HI
GPS beacon:
TYPE
185074
Page 87

Sending calls
4-14 HF SSB transceiver user guide
Action Notes
5.
Enter the address you
want to call (if different
to the one displayed)
numeral
button
If the transceiver beeps when
you try to enter the address, the
channel has been set up with a
fixed address. Refer to the
HF SSB transceiver reference
manual, Chapter 8, Selcall
address setup.
6.
To send the call, press
Call
or
F1
You hear your transceiver’s
calling tones. Example of the
display:
208
5820
CALL
Tx
USB
HI
185074
GPS beacon:
While your transceiver waits
for call acknowledgment, the
display looks like this:
208
5820
CALL
Rx.
USB
HI
Awaiting response
If the call was successful, GPS
information is displayed on the
top line for 30 seconds.
If the call was unsuccessful, the
display looks like this for three
seconds:
208
5820
CALL
Rx.
USB
HI
No response
Page 88

Sending calls
HF SSB transceiver user guide 4-15
Action Notes
7.
Was the call
successful?
Yes
Step 8.
No
Step 1.
If
No response
was displayed,
try sending the call again. If the
call repeatedly fails, try another
channel.
If
No remote GPS
was
displayed, the call failed
because the other station has no
GPS receiver connected or no
GPS information.
8.
To restart scanning,
press
Scan
Now that you have finished the
call, you want the transceiver to
be ready to detect the next call
sent to you.
The GPS information is stored
in call memory. To view it, see
Chapter 5, Reviewing calls
held in memory.
Page 89

Sending calls
4-16 HF SSB transceiver user guide
GPS position call
GPS (Global Positioning System) is a system for displaying
the geographical location of a station. The GPS receiver
picks up latitude and longitude coordinates from passing
satellites.
A GPS position call sends your global position to another
station.
If you want to make sure that only the station you are calling
receives your GPS position, use the transceiver’s call privacy
feature. By setting up a privacy key, you limit the stations
that can read your GPS position to those stations using the
same privacy key. Refer to the HF SSB transceiver reference
manual, Chapter 5, Call privacy on/off.
You can send GPS position calls simultaneously to a range of
stations by group calling.
Before you can send a GPS position call, you need to:
• connect a GPS receiver and set the correct RS-232 and
baud rate settings (refer to the HF SSB transceiver
reference manual, Chapter 11, Connecting ancillary
equipment)
• enable GPS calling (refer to the HF SSB transceiver
reference manual, Chapter 7, Password entry to enable
transceiver options)
• make sure that the station you are calling is also set up
for using GPS
• decide whether you want to use a privacy key (refer to
the HF SSB transceiver reference manual, Chapter 5,
Call privacy on/off)
• set up your address (refer to the HF SSB transceiver
reference manual, Chapter 8, Selcall address setup)
• set up a channel for selcalling (refer to the HF SSB
transceiver reference manual, Chapter 3, Channel
creation and editing).
Page 90

Sending calls
HF SSB transceiver user guide 4-17
To send a GPS position call:
Action Notes
1.
To find a good channel
to use, send selective
beacon calls on the
frequencies scanned by
the other station.
See Selective beacon call on
page 4-29.
2.
In Channel mode, select
the best channel and
wait until the channel is
clear of all voice and
data traffic.
3.
Press
F1
The display shows the last type
of call made:
208
5820
CALL
Rx.
USB
HI
Selcall:
TYPE
185074
The top right position of the
display shows the address of
the last station called.
4.
Repeatedly press
F2
until you see
Send
GPS info
displayed on
the top line.
Example of the display:
208
5820
CALL
Rx.
USB
HI
Send GPS info:
TYPE
185074
Page 91

Sending calls
4-18 HF SSB transceiver user guide
Action Notes
5.
Enter the address you
want to call (if different
to the one displayed)
numeral
button
To send a group call, change
the last two digits to 00.
If the transceiver beeps when
you try to enter the address, the
channel has been set up with a
fixed address. Refer to the
HF SSB transceiver reference
manual, Chapter 8, Selcall
address setup.
6.
To send the call, press
Call
or
F1
You hear your transceiver’s
calling tones. Example of the
display:
208
5820
CALL
Tx
USB
HI
185074
Send GPS info:
Within 20 seconds, the other
station automatically
acknowledges your call by
sending a 4-beep tone revertive
signal (unless you sent a group
call). You may hear a tuning
tone first if this station has an
automatic tuning antenna.
7.
Was the call
successful?
Yes
Step 8.
No
Step 2.
If the call failed, try sending it
again. If the call repeatedly
fails, try another channel.
Page 92

Sending calls
HF SSB transceiver user guide 4-19
Action Notes
8.
To restart scanning,
press
Scan
Now that you have finished the
call, you want the transceiver to
be ready to detect the next call
sent to you.
Sending calls
HF SSB transceiver user guide 4-19
Action Notes
8.
To restart scanning,
press
Scan
Now that you have finished the
call, you want the transceiver to
be ready to detect the next call
sent to you.
Page 93

Sending calls
4-20 HF SSB transceiver user guide
Page call
A page call sends a text message. It allows you to leave a
message at another station.
The message can be up to 64 characters.
You can:
• enter the message when you send the call
• prepare and store up to three canned messages ready for
sending (refer to the HF SSB transceiver reference
manual, Chapter 7, Page call canned message setup).
If you want to make sure that only the station you are calling
receives your message, use the transceiver’s call privacy
feature. By setting up a privacy key, you limit the stations
that can read your message to those stations using the same
privacy key.
You can send page calls simultaneously to a range of stations
by group calling.
Before you can send a page call, you need to:
• decide whether you want to use a privacy key (refer to
the HF SSB transceiver reference manual, Chapter 5,
Call privacy on/off)
• decide whether you want to prepare the message in
advance. Refer to the HF SSB transceiver reference
manual, Chapter 7, Page call canned message setup, for
information about preparing and storing canned messages
• set up your address (refer to the HF SSB transceiver
reference manual, Chapter 8, Selcall address setup)
• set up a channel for selcalling (refer to the HF SSB
transceiver reference manual, Chapter 3, Channel
creation and editing).
Page 94

Sending calls
HF SSB transceiver user guide 4-21
To send a page call:
Action Notes
1.
To find a good channel
to use, send selective
beacon calls on the
frequencies scanned by
the other station.
See Selective beacon call on
page 4-29.
2.
In Channel mode, select
the best channel and
wait until the channel is
clear of all voice and
data traffic.
3.
Press
F1
Example of the display:
208
5820
CALL
Rx.
USB
HI
Selcall:
TYPE
185074
The top right position of the
display shows the address of
the last station called.
4.
Repeatedly press
F2
until you see
Page call
displayed on the top
line.
Example of the display:
208
5820
CALL
Rx.
USB
HI
Page call:
TYPE
185074
Page 95

Sending calls
4-22 HF SSB transceiver user guide
Action Notes
5.
Enter the address you
want to call (if different
to the one displayed)
numeral
button
To send a group call, change
the last two digits to 00.
If the transceiver beeps when
you try to enter the address, the
channel has been set up with a
fixed address. Refer to the
HF SSB transceiver reference
manual, Chapter 8, Selcall
address setup.
6.
Press
Call
or
F1
The display shows the last
message you sent, for example,
canned message 2:
CALL
EDIT
185074
Enter page message
Please call me
Page call: 2
Rx.
7.
To select a different
canned message, rotate
Select
Example of canned message 3:
CALL
EDIT
185074
Enter page message
Leaving base 4PM
Page call: 3
Rx.
Page 96

Sending calls
HF SSB transceiver user guide 4-23
Action Notes
8.
If you want to edit the
displayed message or
enter a new message,
press
F2
then select each
character using
Select
and move between
characters using
Volume
Example of the display:
CALL
Page call: 3
185074
Enter page message
L eaving base 4PM
CLEAR
Rx.
To clear existing text, press
F2
Enter up to 64 characters.
To scroll any hidden part of the
message into view, rotate
Volume
Changes to a canned message
are only valid for this call.
9.
To send the call, press
Call
or
F1
You hear your transceiver’s
calling tones. Example of the
display:
208
5820
CALL
USB
HI
Paging:
185074
Tx
Page 97

Sending calls
4-24 HF SSB transceiver user guide
Action Notes
9. (cont.)
While your transceiver waits 20
seconds for call
acknowledgment, the display
looks like this:
208
5820
CALL
Rx.
USB
HI
Awaiting response
If the call was successful, the
display looks like this for three
seconds:
208
5820
CALL
Rx.
USB
HI
Page Call succeeded
If the call was unsuccessful, the
display looks like this for three
seconds:
208
5820
CALL
Rx.
USB
HI
No response
10.
Was the call
successful?
Yes
Step 11.
No
Step 2.
If the call failed, try sending it
again. If the call repeatedly
fails, try another channel.
Page 98

Sending calls
HF SSB transceiver user guide 4-25
Action Notes
11.
To restart scanning,
press
Scan
8
Now that you have finished the
call, you want the transceiver to
be ready to detect the next call
sent to you.
Sending calls
HF SSB transceiver user guide 4-25
Action Notes
11.
To restart scanning,
press
Scan
8
Now that you have finished the
call, you want the transceiver to
be ready to detect the next call
sent to you.
Page 99

Sending calls
4-26 HF SSB transceiver user guide
Selcall
A selcall is the basic type of selective call.
You can send selcalls simultaneously to a range of stations by
group calling.
Before you can send a selcall, you need to set up:
• your address (refer to the HF SSB transceiver reference
manual, Chapter 8, Selcall address setup)
• a channel for selcalling (refer to the HF SSB transceiver
reference manual, Chapter 3, Channel creation and
editing)
To send a selcall:
Action Notes
1.
To find a good channel
to use, send selective
beacon calls on the
frequencies scanned by
the other station.
See Selective beacon call on
page 4-29.
2.
In Channel mode, select
the best channel and
wait until the channel is
clear of all voice and
data traffic.
Page 100
Sending calls
HF SSB transceiver user guide 4-27
Action Notes
3.
Press
Call
Example of the display:
208
5820
CALL
Rx.
USB
HI
Selcall:
TYPE
185074
The top right of the display
shows the address of the last
station called.
4.
Enter the address you
want to call (if different
to the one displayed)
numeral
button
To send a group call, change
the last two digits to 00.
If the transceiver beeps when
you try to enter the address, the
channel has been set up with a
fixed address. Refer to the
HF SSB transceiver reference
manual, Chapter 8, Selcall
address setup.
5.
To send the call, press
Call
or
F1
You hear your transceiver’s
calling tones. Example of the
display:
208
5820
CALL
Tx
USB
HI
Calling:
185074
 Loading...