

Page 1
Sentry-H 6110-MP
OPERATOR GUIDE
Page 2

No part of this manual may be reproduced, transcribed, translated into any language or transmitted in any
form whatsoever without the prior written consent of Codan Communications.
© Copyright 2019 Codan Communications.
Codan part number 15-04200-EN Issue 1, December, 2019.
CODAN®, Sentry®, and CALM® are trademarks of Codan Limited. Other brand, product, and company
names mentioned in this document are trademarks or registered trademarks of their respective holders.
The English version takes precedence over any translated versions.
Page 3

TABLE OF CONTENTS
Table of Contents
Preparing your radio
Charging and installing batteries................................................................................................ 3
Attaching a ground wire to the radio.......................................................................................... 5
Inserting a 6110-MP into a backpack ........................................................................................7
Selecting and connecting your antenna..................................................................................... 8
Testing your radio before deployment .....................................................................................10
Operating the radio
Front panel and screen overview ............................................................................................. 15
Handsets ..................................................................................................................................23
Speaker and mute .................................................................................................................... 25
Discreet mode and zeroise....................................................................................................... 27
Secure communications........................................................................................................... 29
Entering and editing text ..........................................................................................................32
Operational screen modes
Scanning, channel and scratch modes....................................................................................34
Calling
HF Networks............................................................................................................................. 37
Call types.................................................................................................................................. 39
Answering and ending a call ....................................................................................................42
Making a 2G or 3G ALE call ..................................................................................................... 43
Making a Selcall call................................................................................................................. 49
Stations
Adding a Station....................................................................................................................... 50
GPS
Viewing GPS Information ......................................................................................................... 52
Appendix
Update the radio profile with a USB thumb drive ....................................................................54
i
Page 4

TABLE OF CONTENTS
Troubleshooting ....................................................................................................................... 56
Definitions................................................................................................................................. 62
Menu Navigation ......................................................................................................................65
ii
Page 5

Charging and installing batteries
Charging and installing batteries
Check batteries
Before any deployment, it is vital to ensure that your batteries are fully charged and that you have
a sufficient number of batteries for your mission.
Compatible batteries
The 6110-MP is recommended for use with the following batteries available from Codan.
Codan Part Number Battery Battery Chemistry Rechargeable Capacity
65-72015 BB-390B/U Nickel Metal Hydride Yes 9.8 amp hours
65-72013 BB2590 Lithium-ion Yes 17.4 amp hours
65-72014 BB2590 Lithium-ion Yes 20 amp hours
65-71005 BA-3590/U Alkaline No 15 amp hours
Field charging batteries
The Codan supplied BB-390B/U and BB2590 batteries are compatible with the MIL-STD Battery
Charger Kit (Codan Part Number: 15-00585-00X). The MIL-STD Battery Charger Kit can be
powered by several different AC or DC power sources, including a Solar Panel Power Supply
(Codan Part Number: 15-00537-00X).
Sentry-H 6110-MP Operator Guide Page 3
Page 6
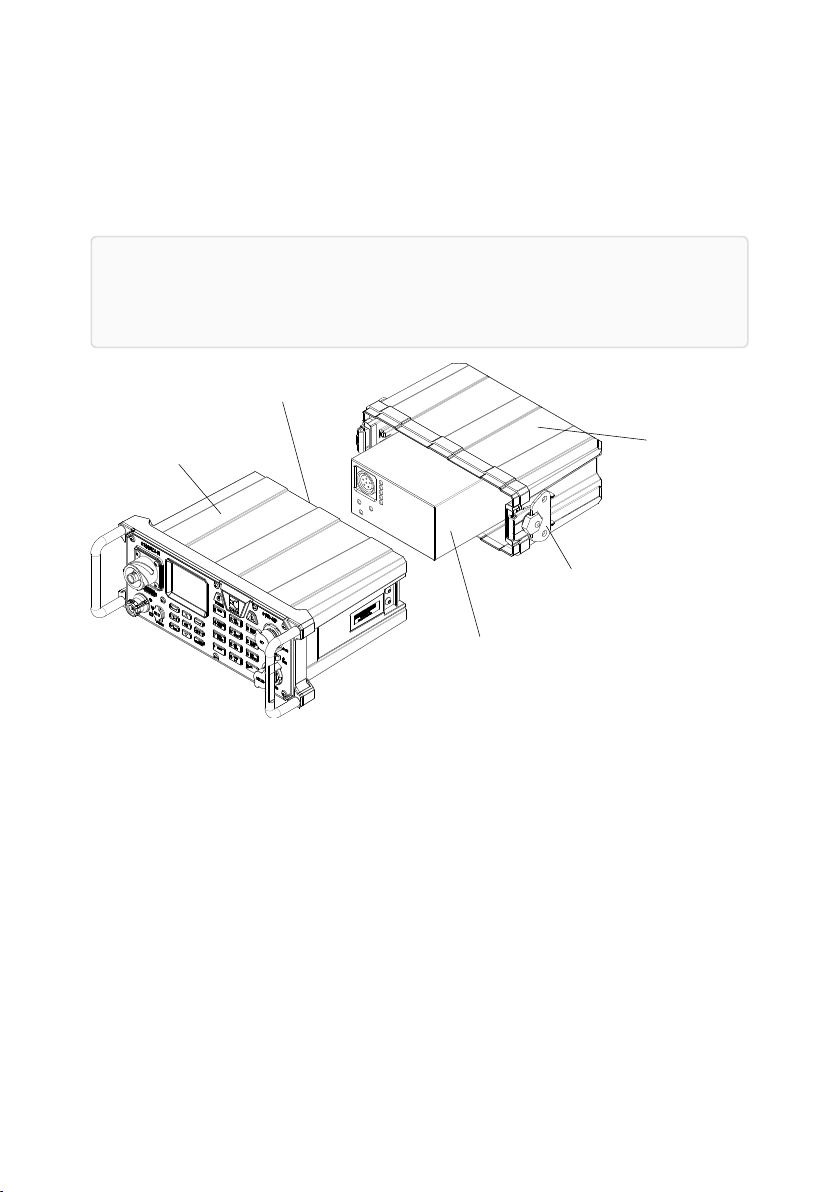
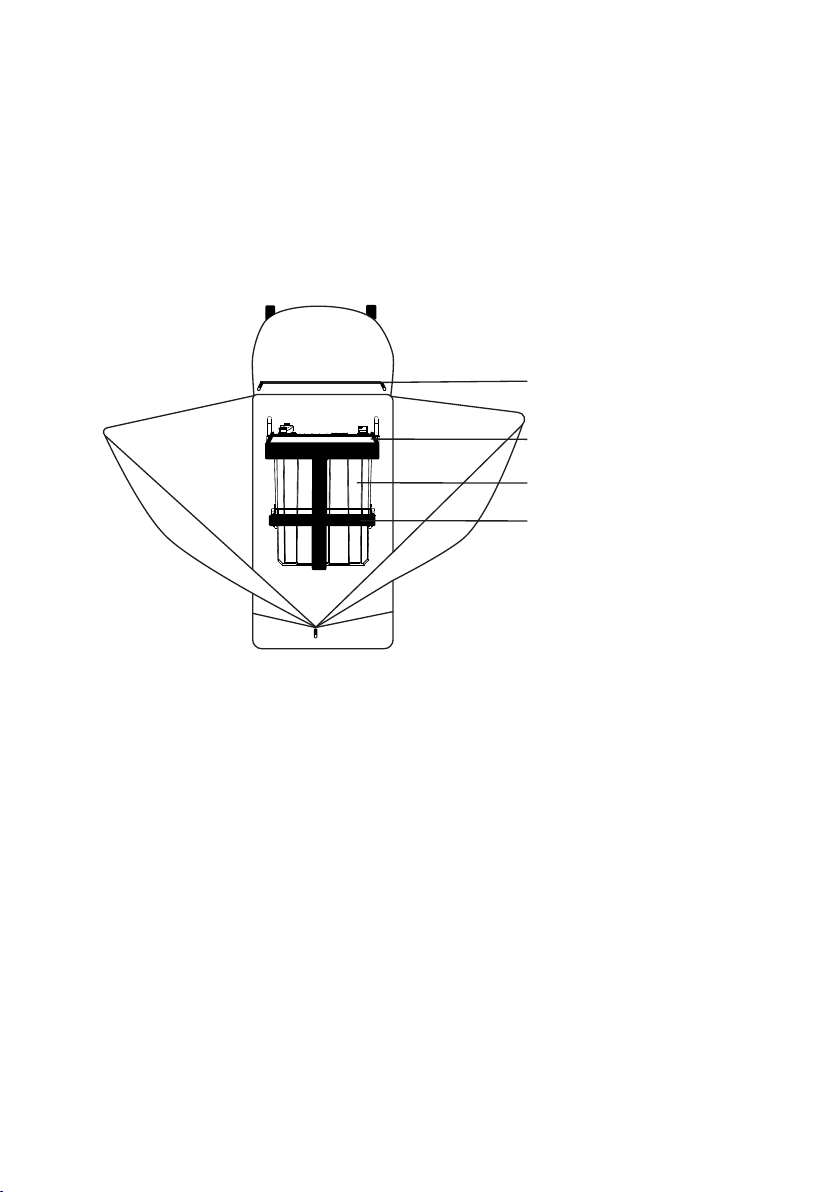
CAUTION: To prevent damaging the 6110-MP and the battery, you must ensure that
the battery is correctly aligned to the battery connector (J7) on the 6110-MP before
attaching the latching battery compartment to the radio.
latch
battery
Sentry®-H
6110-MP
latching battery
compartment
battery connector (J7)
Charging and installing batteries
Inserting your battery into the radio
The battery is connected to the (J7) Connector located on the bottom of the radio and housed in a
latching battery compartment. The image below shows the placement and alignment of the
battery, battery compartment and radio.
Page 4 Sentry-H 6110-MP Operator Guide
Page 7
Attaching a ground wire to the radio
Attaching a ground wire to the
radio
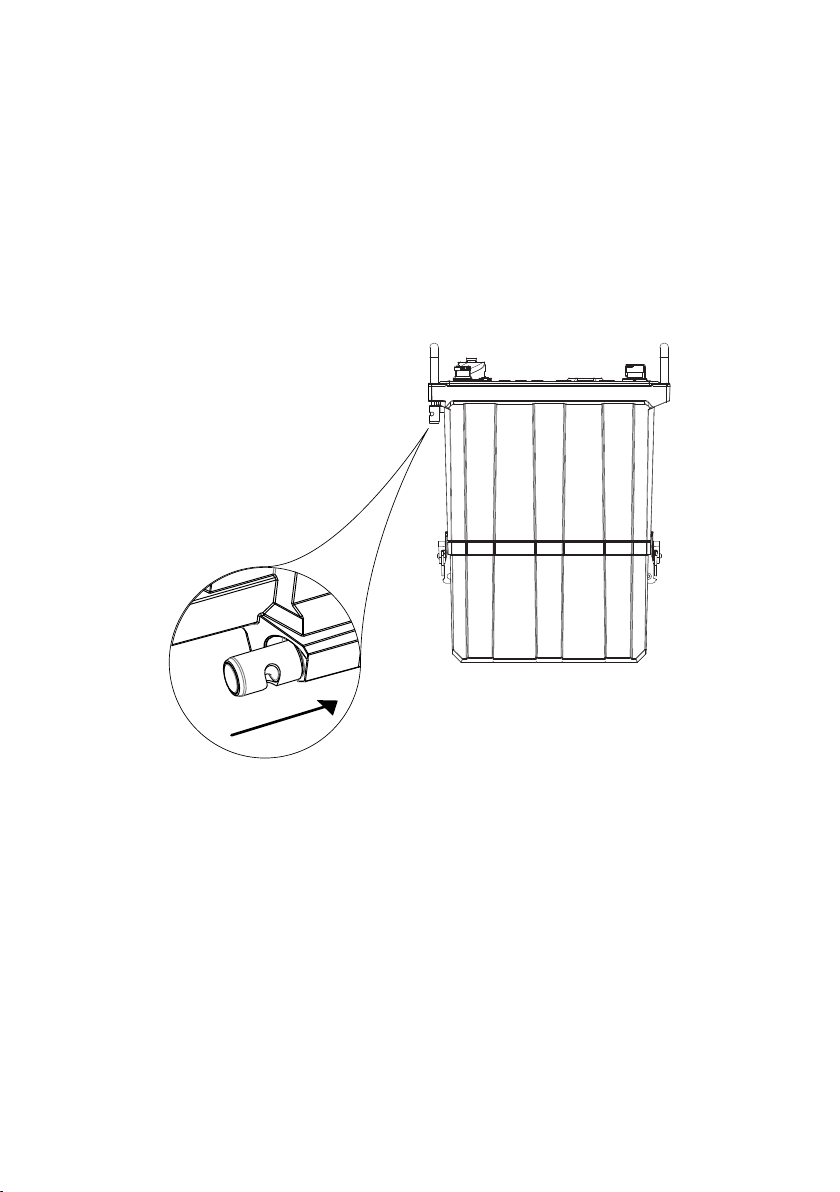
To ensure optimal radio performance, the radio will need to be suitably grounded by fixing the
antenna to an adequate ground point or by connecting a counterpoise. The 6110-MP radio has a
ground lug located underneath the left handle of the radio, connect the grounding kit (Codan Part
Number: 15-60083) to the ground lug by pressing down on the lug to reveal the ground clip
insertion slot.
Connect the grounding wire or counterpoise lead to the grounding lug and deploy as suggested
on the tactical antenna quick reference card.
Sentry-H 6110-MP Operator Guide Page 5
Page 8
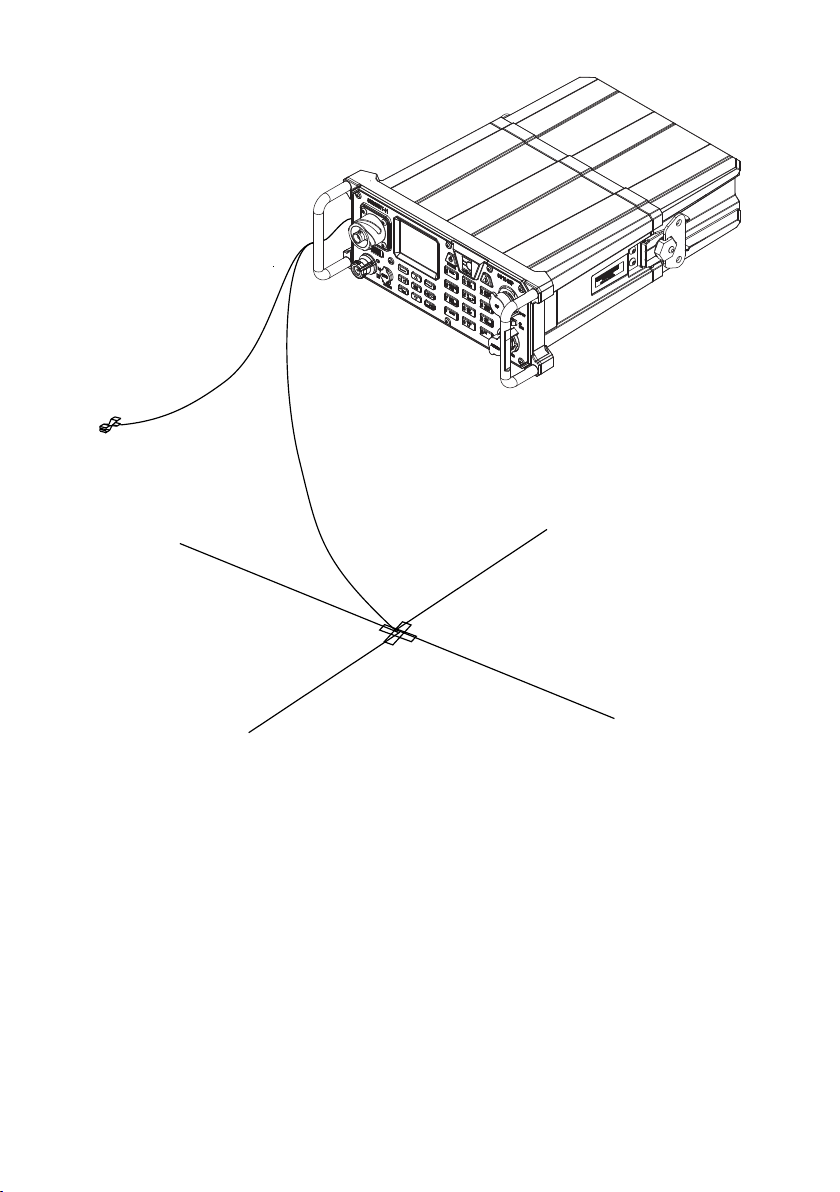
EA
R
TH LEAD
AND CLIP
OR
COUNTERPOISE
Attaching a ground wire to the radio
Page 6 Sentry-H 6110-MP Operator Guide
Page 9
accessory passthrough
elastic loops
radio harness
6110-MP radio
Inserting a 6110-MP into a backpack
Inserting a 6110-MP into a
backpack
All Codan supplied backpacks come with an adjustable harness that holds the radio firmly in
position. The radio can be oriented so that the antenna port (J1) is located on either the right or
left side of the backpack.
To insert the radio into the soft backpack:
1. Open the backpack to expose the harness.
2. Slide the radio into the harness with the front panel oriented to the top of the
backpack.
3. Secure the radio with the adjustable harness.
4. Position the elastic loops over the handles.
Sentry-H 6110-MP Operator Guide Page 7
Page 10

WARNING: This table provides an overview that is general in nature. Many factors can
and will affect the capabilities of your antenna, including location, obstructions, time-ofday, weather and localised interference.
Selecting and connecting your antenna
Selecting and connecting your
antenna
Selecting an antenna
It is crucial that you choose an antenna that meets your requirements. The table below provides
an overview of Codan tactical antennas and the capabilities of each antenna over distance.
Correct installation and positioning of your antenna is essential for quality HF communication.
Tactical antenna Codan
Part
Number
Tape Whip 15-00472 ★ ★
3 m (10 ft) Collapsible
Whip
Long Wire 15-00476 ★★★★ ★★★ ★★
End-fed Broadband 15-00475 ★★★★★ ★★★★ ★★★
Broadband Dipole 15-00474 ★★★★★ ★★★★★ ★★★★ ★★★
15-00473 ★★ ★ ★
Communications distance
0 to 100 km 100 to 500kmup to 2000kmup to 5000
km
Page 8 Sentry-H 6110-MP Operator Guide
Page 11

Note: If the Menu > User Data > Peripherals > Antenna Type is not set to Auto
Detect, the antenna adaptor will not automatically activate the internal tuner.
Note: The accessory pass-through located at the top of the Codan backpack allows the
antenna cable or antenna whip to remain connected while the backpack is closed.
Selecting and connecting your antenna
Connecting your antenna
Your antenna is connected to the 6110-MP using the Antenna port (J1) on the front of the radio.
Tunable antennas like the Tactical Whip antenna (Codan Part Number: 15-00473) and Tactical
Long Wire (Codan Part Number: 15-00476) have a quick connect/release adaptor that connects to
the antenna port (J1), the quick connect/release adaptor activates the internal tuner on the radio.
Once you have connected your antenna, it is recommended that you run a Channel Tune Test
(page 12) to ensure that standing wave ratio (SWR) values are acceptable. This test is
recommended for any antenna used, including supported broadband antennas.
Sentry-H 6110-MP Operator Guide Page 9
Page 12
Note: The self test will only test the control point that it was run from. If you have a 2320
handset connected to your radio, you should run the self test on both the front panel as
well as the 2320 handset.
Note: You can press PTT at any time to abort the self-test.
Testing your radio before deployment
Testing your radio before
deployment
Once assembled, the radio should be tested to ensure that everything is working correctly. The
following tests should be run before the radio is deployed. Testing involves:
• running a diagnostic self-test; and
• measuring the standing wave ratio (SWR) of your channels; and
• carrying out station-to-station on-air testing.
Running a Self Test
The Self Test allows the radio to run through a series of checks to ensure that the radio is
operating. The CP LCD and CP Keys tests require your input in order to complete.
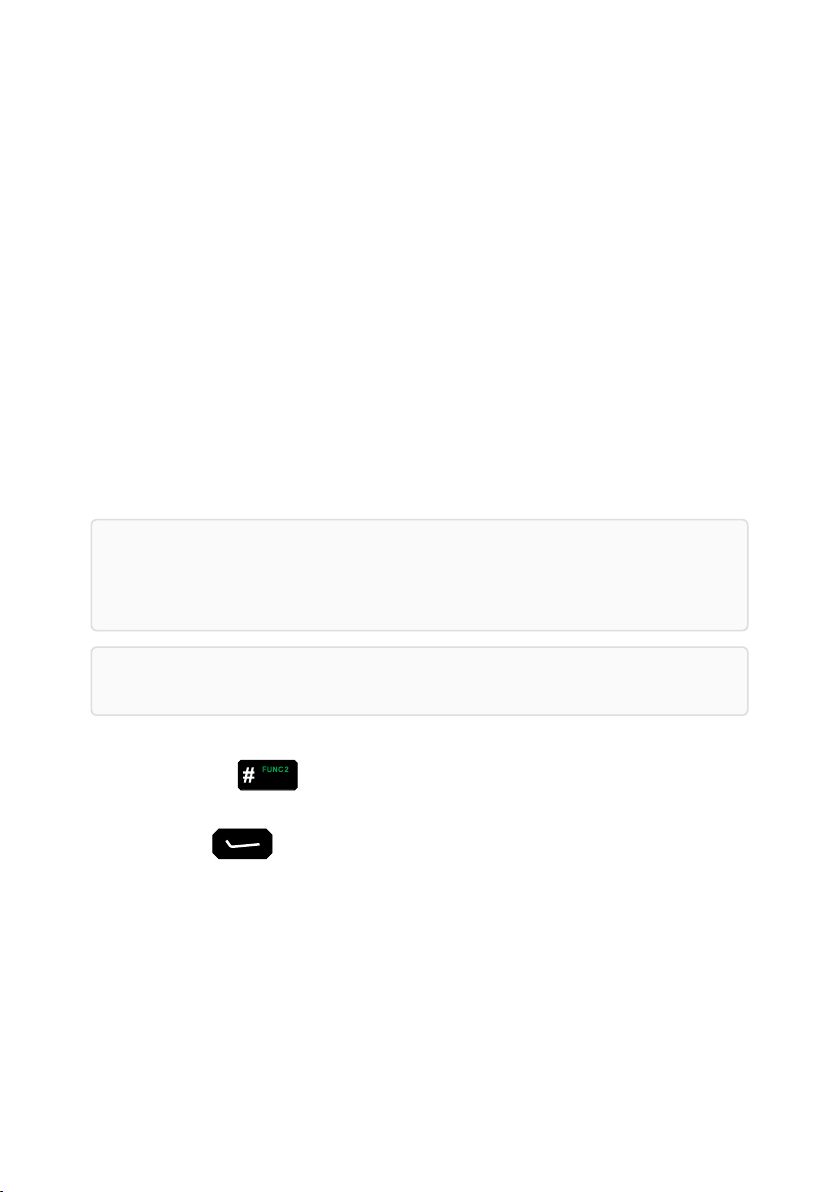
1. Switch on the Radio (page 15).
2. Press the key.
3. Select Self Test Screen from the Function Select screen.
4. Press (Start).
Page 10 Sentry-H 6110-MP Operator Guide
Page 13
Note: The key will not display on the screen when pressed during
this test.
Note: The PTT button is not included in this test, pressing PTT will abort all
tests.
Testing your radio before deployment
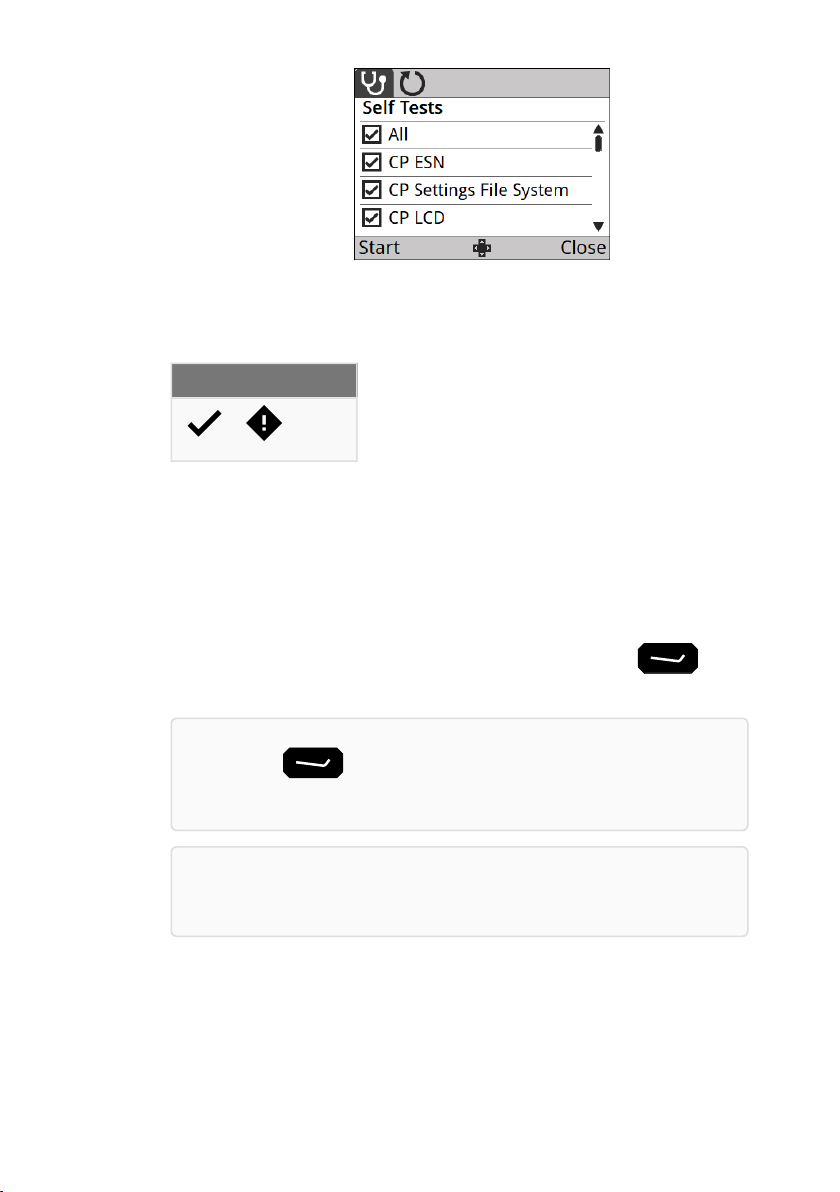
The radio will now run through all of the self tests listed on the Self Tests screen. As
each test is completed, the test result will appear on the screen.
Passed Failed Manual
(blank)
Manual tests are tests that require you to run the test manually.
5. The CP LCD test checks for any screen errors by displaying the colour and tone
states of the screen, the screen displays White, Black, Red, Green and Blue in order.
Press any key on the keypad to progress through this test.
6. The CP Keys test checks that key presses are being registered and that keys pressed
to match the correct input received by the radio. Test each key on the keypad and
confirm that the corresponding key displays on the screen. Leave the key
last as it will end the test.
7. Once the tests have completed, a summary report will display the results. Review any
failed test results and address them before deployment.
Sentry-H 6110-MP Operator Guide Page 11
Page 14
Testing your radio before deployment
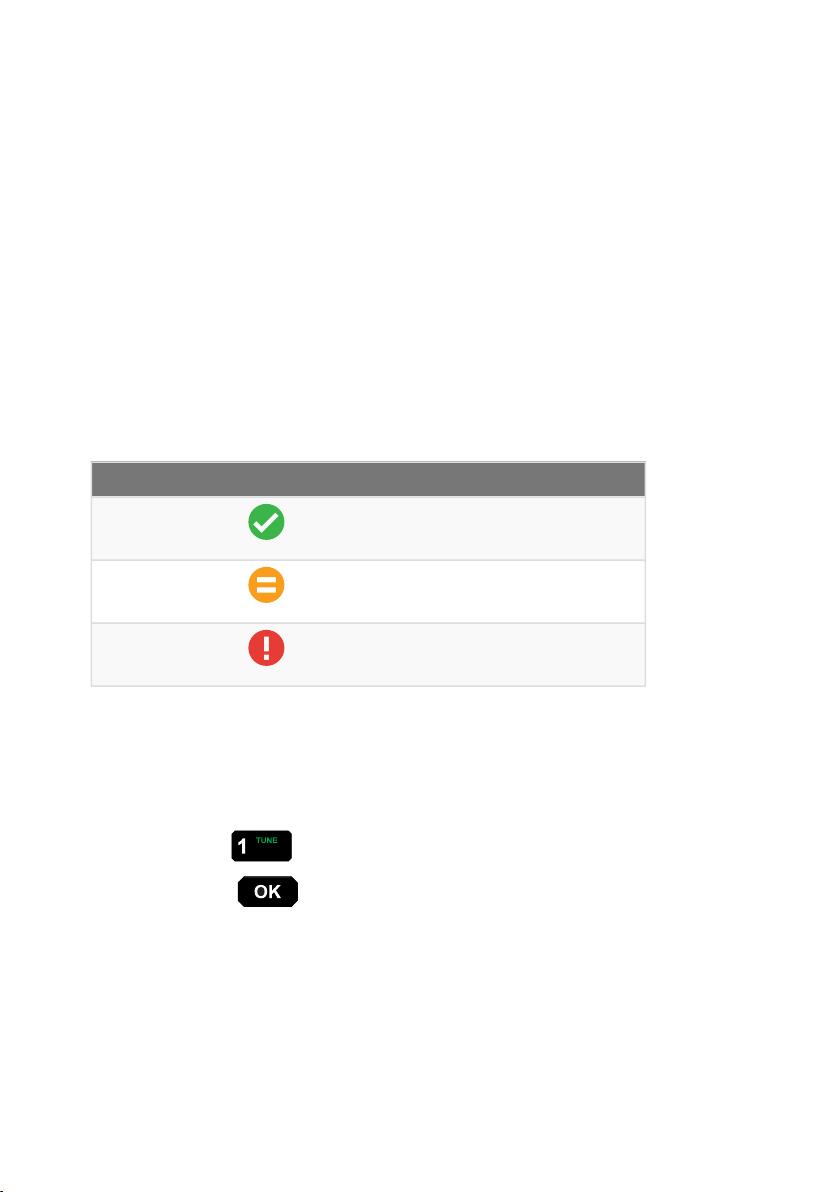
Measuring the Standing Wave Ratio (SWR) of your channels
The 6110-MP radio measures the forward and reflected power between the radio and the
antenna. The measured power ratio is called the Standing Wave Ratio or SWR. To ensure correct
installation, the power and SWR assessment should be performed with the radio with any antenna
you intend on using when deployed.
SWR Results can vary based on several circumstances, including the characteristics of the
antenna, the quality of the connection to ground, the frequency used, and the proximity of the
antenna to other objects. The table below shows the communication quality you are likely to
achieve with a given SWR value.
SWR Measurement Icon Description
Less than 3.0 Good
Between 3.0 and 5.0 Poor
Greater than 5.0 Unlikely to be able to communicate on this channel
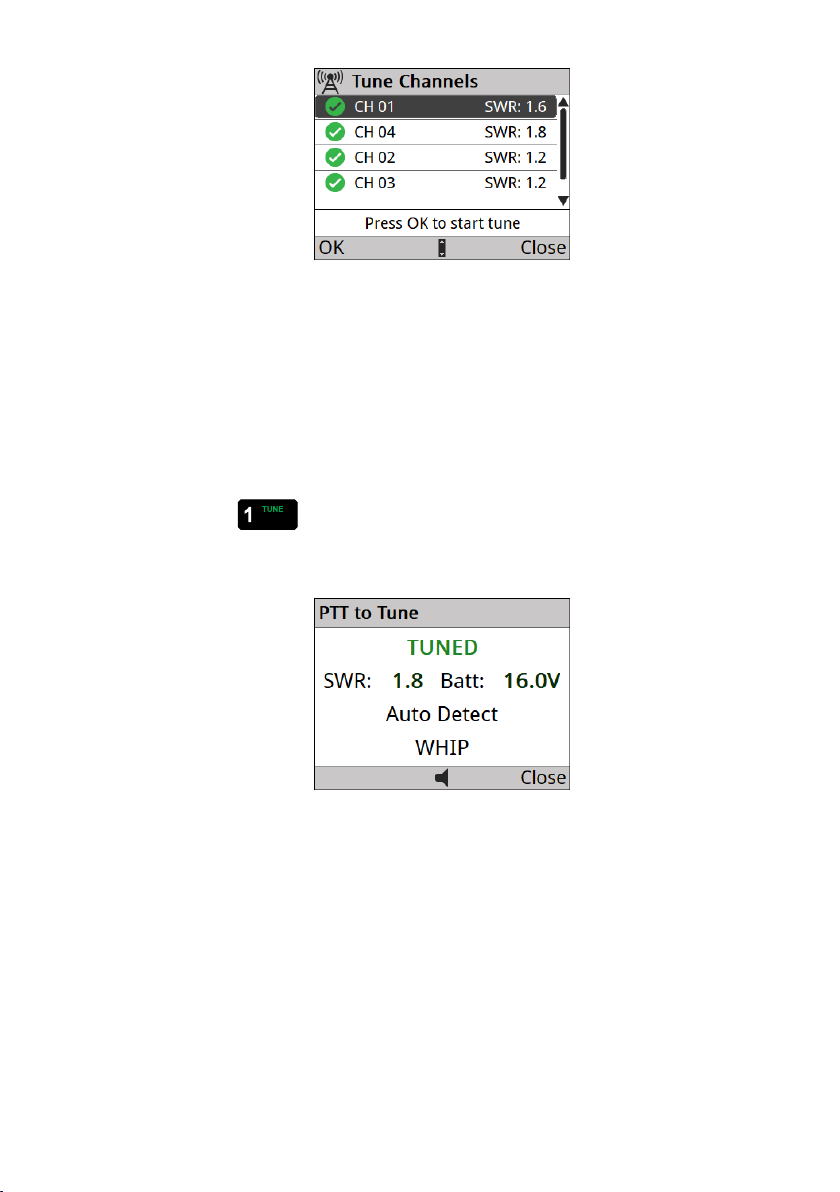
Tuning Scanned Channels
To tune your currently scanned channels:
1. Hold the key for 2 seconds.
2. Press the key to start tuning.
As each channel is tested, it will display an SWR value for each channel. An icon will
appear that indicates if SWR value is at an acceptable level for transmission on the
channel.
3. Review each channel for a good SWR reading, address any poor SWR readings
before deployment.
Page 12 Sentry-H 6110-MP Operator Guide
Page 15
Testing your radio before deployment
Tuning a channel or frequency
Individual channels and frequencies can also be tested for their SWR value.
To tune a single channel or frequency:
1. Select the channel or frequency you want to test from the Channel or Scratch Mode
on the Operational screen (page 19).
2. Press the key.
3. Press the Push-To-Talk (PTT) button on the H-250 or 2320 handset (page 23).
4. Check the SWR value and address any problems before deployment.
Sentry-H 6110-MP Operator Guide Page 13
Page 16

Testing your radio before deployment
On-air testing
On-air testing gives a better indication of antenna operation, particularly if the operator is familiar
with the signal strengths usually received within a network. The Channel Test call (page 39) can be
used to identify the best channel between two stations. A test call between two closely positioned
stations should return call quality results close to 100%. The Channel Test call type can be made
as a 2G or 3G ALE Point-to-Point Call (page 43) or as a Selcall call (page 49)
As well as testing signal quality, making a Selective call (page 39) to other stations in your network
will allow you to test other features of your radio like Digital Voice, Encryption and Frequency
Hopping. All of which should be tested before deploying your radio into the field. Speak to your
HF Network Administrator to resolve any critical issues you are experiencing before deploying
your radio into the field.
Page 14 Sentry-H 6110-MP Operator Guide
Page 17
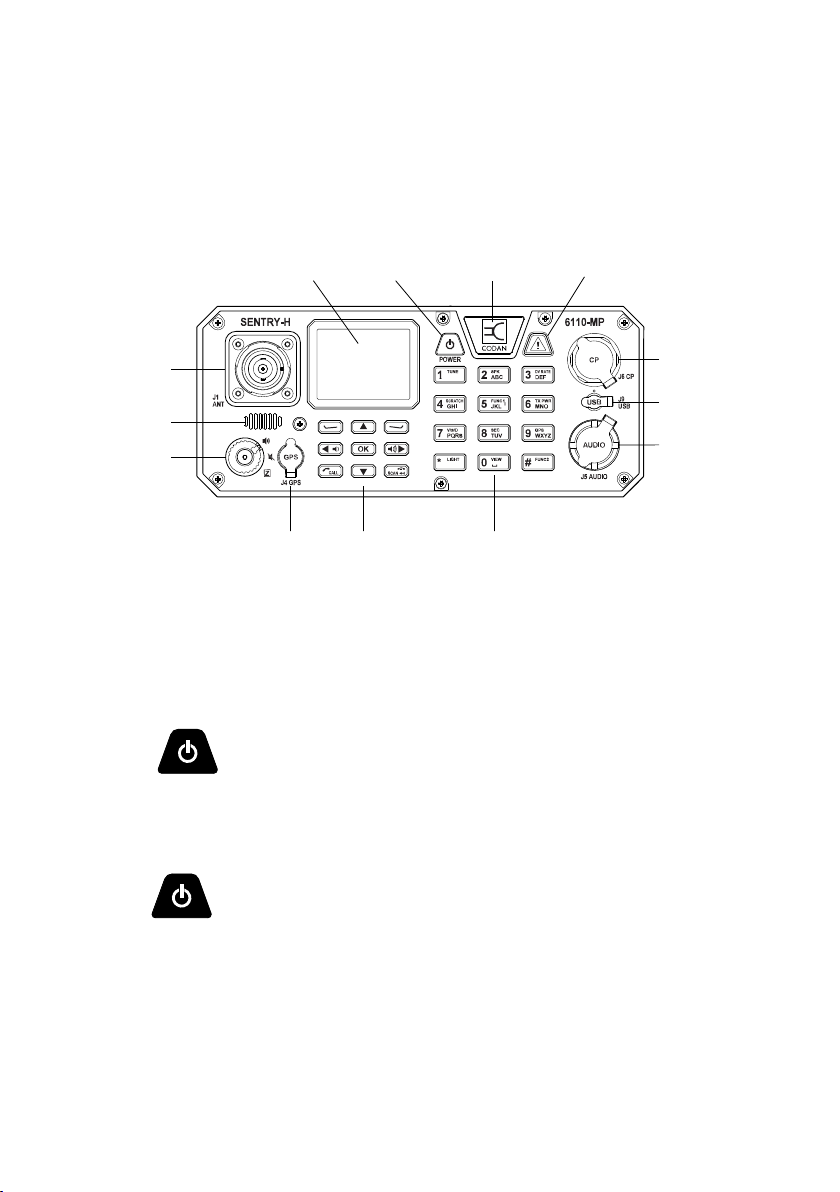
screen
antenna
port (J1)
discreet
mode switch
GPS antenna
port (J4)
navigation
keys
keypad
H-250
port (J5)
usb port (J9)
control point
port (J6)
alert key
internal gps
antennapower key
front panel
speaker
Front panel and screen overview
Front panel and screen overview
The Sentry-H 6110-MP front panel
Switching the radio on and off
Switching on
Press the key.
Switching off
Hold the key for 2 seconds.
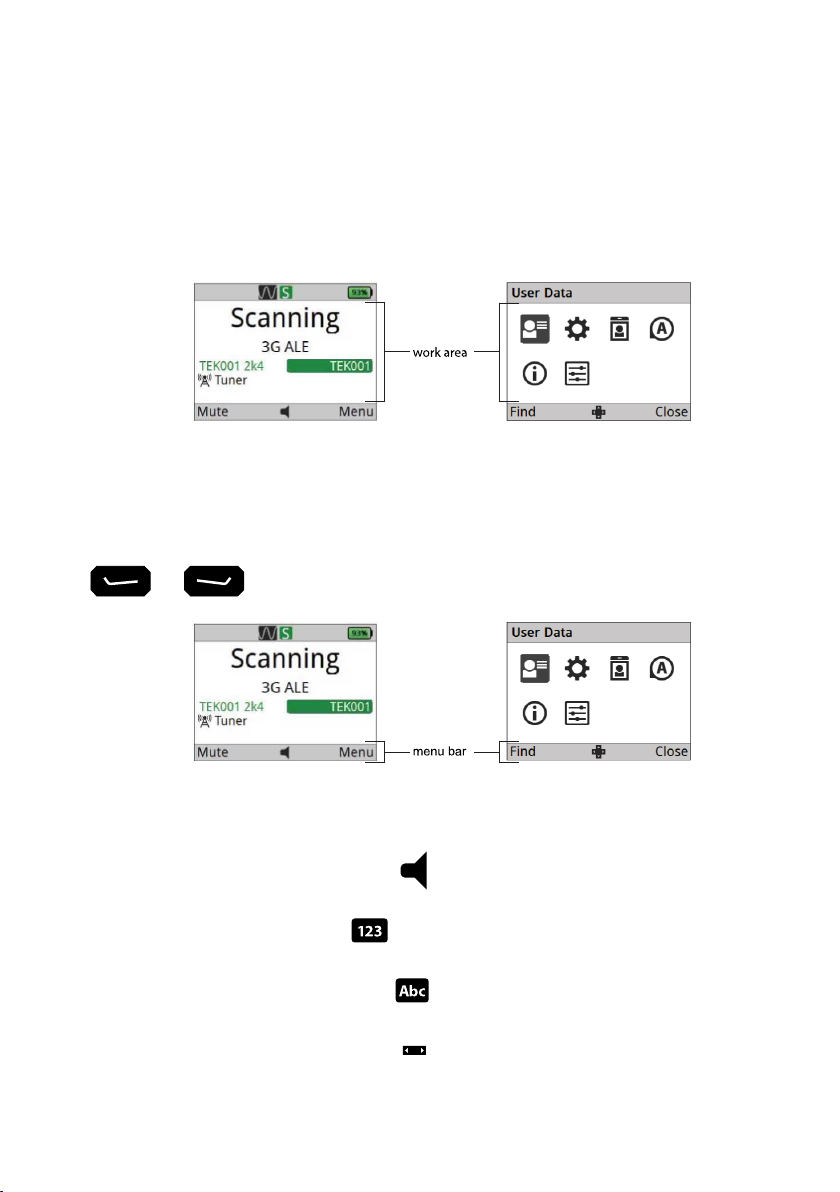
Screen layout overview
The 6110-MP display enables you to view information about your radio as well as allowing you to
perform most of the radio’s functions efficiently. Each screen is split into three main sections, a
notification bar, a menu bar and a work area.
Sentry-H 6110-MP Operator Guide Page 15
Page 18
Front panel and screen overview
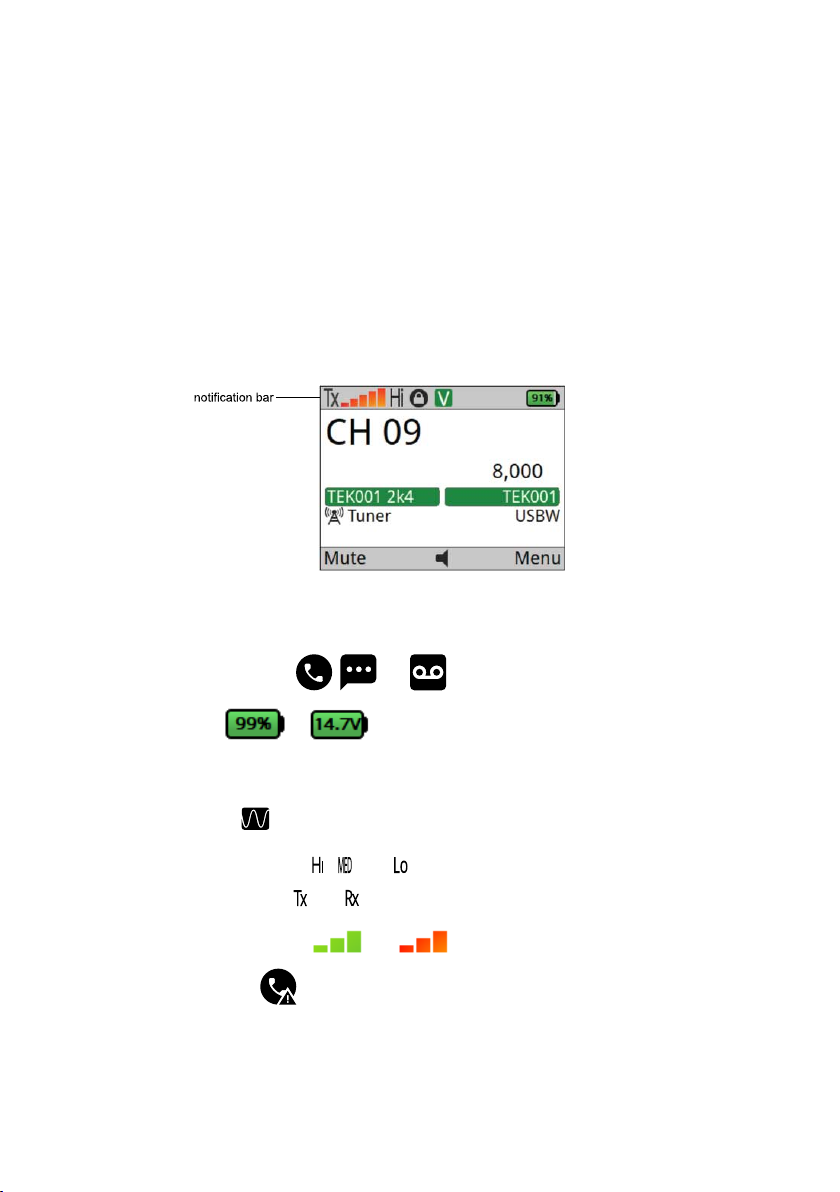
The notification/title/tab bar
The notification, title or tab bar is located at the top of the screen and is used to display useful
information based on the current screen being displayed.
Notification bar
The notification bar is shown on the Operational screen (page 19), it displays the state of several
of the radios key functions.
Some common notification bar icons include:
• Call type indicator , and for example.
• Battery or .
• Mute type indicator, refer to the Select mute type (page 26) table for details of the
various mute states.
• Scanning .
• Transmission power , , and .
• Receive/Transmit and indicator.
• Rx/Tx level indicator and .
• Missed Calls .
Page 16 Sentry-H 6110-MP Operator Guide
Page 19
active menu inactive menu
tab menu bar
not selected
tab menu bar
selected
Front panel and screen overview
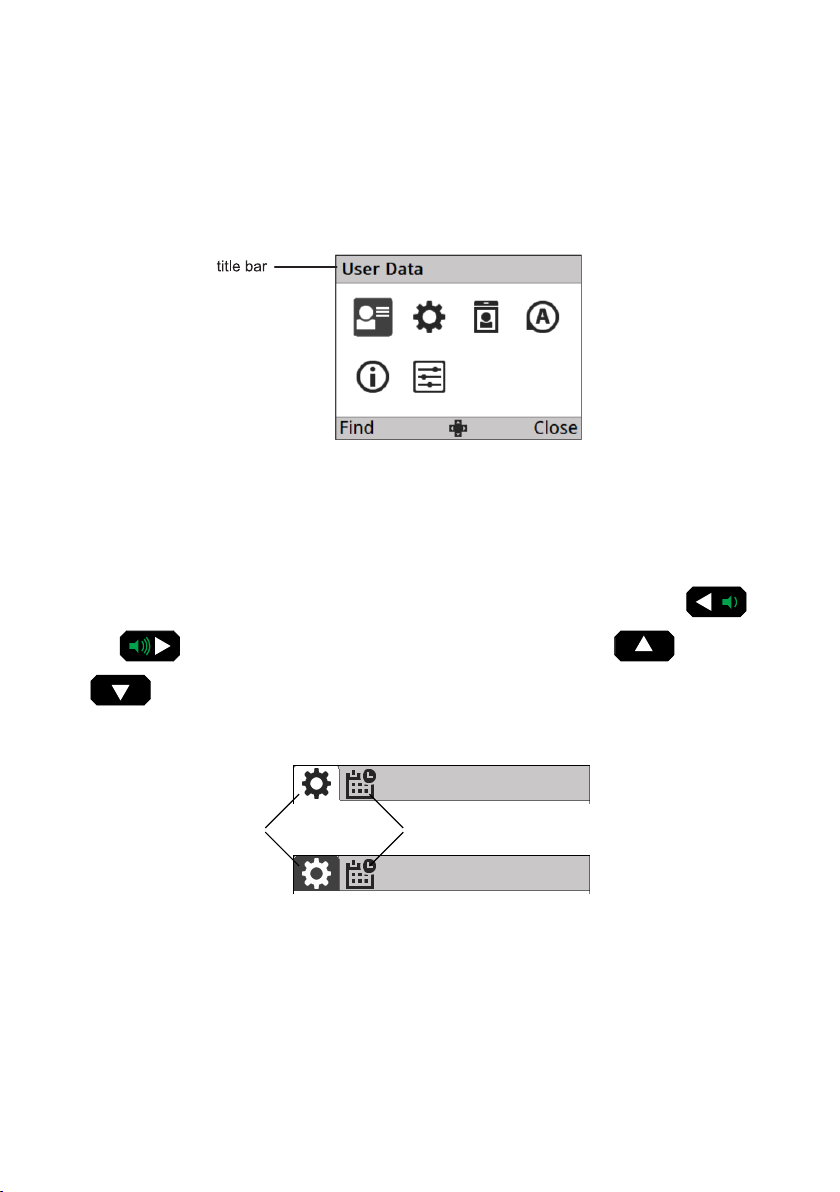
Title bar
The title bar is shown on the menu screen (page 20), it displays the current menu or sub-menu
title.
Tab bar
The tab bar is a variant of the title bar. It is used to group menu items that are related, for
example, grouping Time and Date settings. When a tab bar is selected, you can use the
and navigation keys to cycle through the tabs. You can then use the and
keys to navigate into the menu.
Sentry-H 6110-MP Operator Guide Page 17
Page 20
Front panel and screen overview
The work area
The work area is displayed below the notification bar and is the main work area of any screen. On
the operational screen (page 19) displays important information about the state of the radio. On
the menu screen (page 20), the work area displays menu items or settings.
The menu bar
The menu bar is displayed at the bottom of the screen and displays context for the software keys
and .
The menu also displays several contextual icons, including:
• Volume/Speaker mode indicator .
• Numeral input is available .
• Alpha Numeric input is available .
• Left/Right navigation is available .
Page 18 Sentry-H 6110-MP Operator Guide
Page 21
Note: Depending on your access level and the current setup of the radio, some menu
items may not appear where shown. Contact your HF Network Administrator for more
information.
Front panel and screen overview
• Up/Down navigation is available .
• Up/Down/Left/Right navigation is available .
Screens overview
There are several key screens that make up the 6110-MP user interface, being aware of each
screen type is essential to successfully operating the radio.
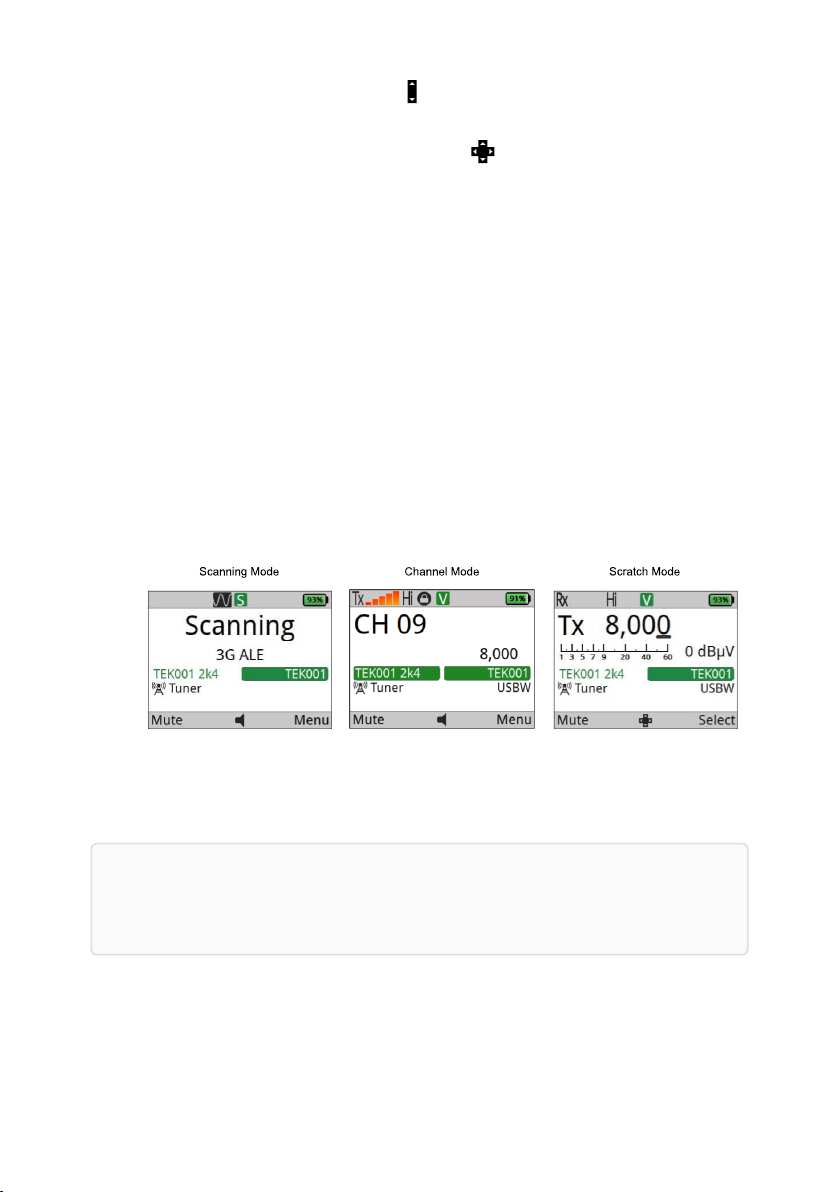
The Operational screen
The operational screen displays information relating to the three main operating modes of the
radio. When in Scanning mode (page 34), the radio is monitoring any configured HF network
channels for incoming calls made to your radio. When in Channel mode (page 34), the radio will
monitor a single channel and will listen for incoming calls or voice transmissions depending on the
mute type selected. The channel selected will be displayed on the Operational screen. When in
Scratch mode (page 35), the radio can be tuned to transmit and receive on an arbitrary frequency.
Elements of the Operational screen
Sentry-H 6110-MP Operator Guide Page 19
Page 22

Rx/Tx level
indicator
Rx/Tx indicator
channel name
status areas
left
software key
right
software key
volume/speaker mode indicator
menu bar
mode indicator
Tx/Rx frequency
battery level
indicator
missed call icon
mute type indicator
(highlighted when mute is on)
call type
indicator
Tx power
setting
Front panel and screen overview
The Menu screen
The menu screen displays all user and system-level configurations for the radio, provides
information about the radio and allows access to advanced views and administrator login on the
radio.
Page 20 Sentry-H 6110-MP Operator Guide
Page 23

Note: You can turn off the screen and key lighting entirely by activating discreet mode.
Front panel and screen overview
You can access the menu screen by pressing from the Operational screen (page 19)
when in Scanning or Channel mode.
The Call screen
The Call screen is displayed when making a call to a station. It contains information about the call
type, HF network in use.
You can access the call screen by pressing from the Operational screen (page 19).
Adjusting screen brightness, auto-dim time and theme
To suit your operational needs, the screen brightness and auto-dim time, which automatically
dims the screen when not in use can be adjusted. The radio can also be switched between light
and dark themes.
Change the screen brightness
The screen brightness can be changed to low, medium or high.
To change the screen brightness:
1. Press the key.
2. Scroll to the brightness level you require and press the key.
Sentry-H 6110-MP Operator Guide Page 21
Page 24

Theme
Menu screenChannel screen
Military Light
(Default)
Military Dark
Front panel and screen overview
3. Press (Save) to save the setting.
Set Auto Dim Time
To change the number of seconds of no input before the screen is automatically dimmed:
1. Press the key.
2. Press to navigate to the Set Auto Dim Time tab, then press .
3. Enter the auto dim-time (in seconds), from 5 to 1200 seconds (20 min).
4. Press (Save) to save the change.
Select the next available theme
To switch between a Military Light and Military Dark theme:
1. Hold the key.
Page 22 Sentry-H 6110-MP Operator Guide
Page 25

Handsets
The H-250 Handset
The 6110-MP radio supports standard audio accessories with U-229 type connectors. The
handset is a standard issue, lightweight, tactical H-250/U type, with built-in earphone, noisecancelling microphone, and PTT (Push To Talk) button. It is connected to the H-250 Audio port
(J5) on the front panel of the radio.
Handsets
Sentry-H 6110-MP Operator Guide Page 23
Page 26

The 2320 Handset
Note: The 2320 handset and the front panel user interfaces are independent of one
another.
The 2320 handset meets MIL-STD-810G environmental standards for shock, vibration, dust,
humidity and IP67 for water and immersion. With an internal microphone and earphone/speaker,
and cradle, the smart handset is designed to provide extended operation and control of the
6110-MP radio.
Handsets
Page 24 Sentry-H 6110-MP Operator Guide
Page 27

Note: Volume adjustment will affect all connected control points and H-250 audio
accessories, for example, increasing the volume on a 2320 handset will also increase the
volume on the front panel speaker and H-250 handset.
Note: The current mute state is set across all connected control points or H-250 audio
accessories.
Speaker and mute
Speaker and mute
Change the speaker volume
The 6110-MP has a front speaker that outputs both received audio as well as system tones. You
can adjust the speaker volume using the volume keys on the front panel. Use the key to
increase the speaker volume and to decrease the volume when you are on the channel
screen.
Muting receive audio
When the 6110-MP is set to a channel or is scanning channels, and mute is switched off, you hear
on-air signals on each channel. If you do not want to listen to this, you can silence the radio by
switching on mute.
You can set the mute to switch off when a voice signal or any other calling activity is detected
(voice mute V), or only when a call addressed to your station is received (selective mute S). Your
choice of voice or selective mute depends on whether or not you have to detect voice signals,
and how much noise and traffic you want to hear. When digital voice is active, and scanning is
switched off or paused, you can also set the mute to switch off only when a secure or clear digital
voice signal is detected (digital voice mute D). The voice signal is output to the front panel
speaker, an H-250 audio accessory or a connected 2320 handset.
Sentry-H 6110-MP Operator Guide Page 25
Page 28

Select mute type
Note: By default, mute is automatically closed after 5 seconds of inactivity.
Note: Opening and closing mute will affect all connected control points and H-250
audio accessories.
Speaker and mute
Mute
type
Voice Mute is opened when speech is detected on a channel in all supported
Selective Mute is opened when a call addressed to you is detected
Digital Mute is opened when digital voice is detected
To select the next mute type, from the channel screen:
Icon Description
modes and when receiving a call addressed to the radio.
1. Press the key.
Opening and closing mute
The mute can be opened (sound on) and closed (sound off) from the Operational screen
1. Press (Mute) to toggle mute open/closed.
Page 26 Sentry-H 6110-MP Operator Guide
Page 29

Discreet mode on
Discreet mode off
Zeroise
WARNING: If the H-250 Discreet Mode Override audio option is enabled, the audio
will still be emitted from any audio device connected to the H-250 (J5) port. Contact your
HF Network Administrator for more information.
Discreet mode and zeroise
Discreet mode and zeroise
Discreet mode switch
The discreet mode switch allows the operator to control audio and light emissions from the radio,
that is to say, that all of the speakers and backlighting on the device turn off when in discreet
mode, allowing the device to operate with reduced sound and light signature.
The discreet mode switch can also be configured to zeroise (erase) or lock the radio to prevent
unauthorised access to the unit when compromised. By default, the zeroise function is set to
prompt the user with erase or lock options.
Turning Discreet mode on and off
Turning on discreet mode ensures that the radio will operate without emitting light or sound.
Sentry-H 6110-MP Operator Guide Page 27
Page 30

CAUTION: Locking the radio requires the operator to enter the Admin PIN before the
radio unlocks. The User PIN will not unlock the radio once it has been locked.
WARNING: A zeroised (erased) radio contains no configuration once erased; this
includes channels, stations, encryption and hopping keys, and settings. You are no longer
able to use the radio effectively.
WARNING: You have 5 seconds to undo this action once initiated, pull the discreet
mode switch outward and turn left to return the switch to the Discrete Mode Active
position to abort the action.
Discreet mode and zeroise
To turn on discreet mode:
1. Set the discreet mode switch to
To turn off discreet mode:
1. Set the discreet mode switch to
Zeroise the radio
There are two actions that the Zeroise function can execute on the radio. The lock action will turn
the radio off and will force the operator to enter the Administrator PIN when the radio starts up
again. The erase action will erase all user configurations, returning the radio to its factory state, it
will then turn the radio off.
To lock or zeroise (erase) the radio:
1. Turn the discreet mode switch to the Active
2. Pull the switch outward then turn to the right to the Zeroise position to initiate the
action.
3. Select the desired activity if prompted.
Page 28 Sentry-H 6110-MP Operator Guide
Page 31

Secure communications
Secure communications
Secure mode is a macro that toggles two optional features of the 6110-MP radio, digital voice and
voice/data encryption. By default, the secure macro will:
• activate and deactivate AES-256 encrypted digital voice and data; or
• if encryption is not available, activate and deactivate digital voice if available; or
• activate CES-128 encryption if available.
Digital Voice
When enabled on your radio, the Standard Digital Bundle (Codan Part Number: 15-10624) enables
Digital Voice. Digital Voice overcomes the potential poor voice quality that comes as a result of
atmospheric effects and interference from other equipment and transmissions. Digital Voice
brings clarity to voice communications over HF by removing the background noise that is typical
with an analogue signal. Check with your HF Network Administrator to find out if Digital Voice is
enabled on your radio.
Encryption
When enabled on your radio, encryption allows you to send secure digital voice and data over HF
using a shared key. Two types of encryption are available, AES-256, which comes with the
Advanced Digital Bundle (Codan Part Number: 15-10625) and CES-128 (Codan Part Number:
15-10642-000). Check with your HF Network Administrator to find out if encryption is enabled on
your radio.
Switching Secure on and off
DV and encryption are toggled on and off using the same key. To toggle Secure on and off:
• From the operational screen, press to toggle digital voice/encryption
Selecting a secure key
The selection of a secure key is only available when the AES-256 or CES-128 Sales Option has
been enabled.
Sentry-H 6110-MP Operator Guide Page 29
Page 32

Active clear digital voice (in Tx) Active encrypted digital voice (in Tx)
digital voice
data rate
digital voice
data rate
Secure communications
To select a secure key, from the channel screen:
• Hold the key to navigate to the secure info screen.
• Navigate to the Select Key Index option and press or to select the
key you want to activate.
• Press to Activate the key change.
Selecting the Digital Voice rate
The Digital Voice rate or DV rate is the bitrate of vocoder used for the digital voice transmission.
Higher vocoder rates will result in a more natural-sounding voice signal at the receiving station,
but it requires better channel conditions than the lower rates. A lower vocoder rate will result in
greater processing artefacts at the receiving station but can operate in very poor channel
conditions. The range of vocoder rates are available to enable the operator to choose the best
rate for best voice quality versus channel condition
The digital voice rate is shown in status area 1 of the channel screen. The Digital Voice Rate can
be changed during voice calls.
To change the DV Rate, from the channel screen:
• Press the key. The DV current rate will display in status area 1. Repeat this
process until you have cycled through to the bitrate you desire.
Page 30 Sentry-H 6110-MP Operator Guide
Page 33

Note: To use Frequency Hopping your radio must have both the Hop and Hop Info
macros assigned to a key, typically .
Note: Closing the screen will not save the changes.
Secure communications
Frequency hopping
Codan’s Frequency Hopping capability (Codan Part Number: 15-10629-000) uses GPS timing to
synchronise radios accurately. The 6110-MP radio may require a GPS antenna (Codan Part
Number: 78-01253) connected to the radio’s GPS antenna port (J4) to get GPS time
synchronisation.
To turn Frequency Hopping on and off:
1. Press the key, to which the Hop macro is assigned.
To select the Frequency Hopping plan:
1. Press and hold the key, to which the Hop Info macro is assigned.
2. Navigate to the Select Plan menu item, then press or to select the
plan.
3. Press to save the change and Activate hopping.
Sentry-H 6110-MP Operator Guide Page 31
Page 34

Entering and editing text
Entering and editing text
Entering text with a USB keyboard
A Ruggedised USB Keyboard (Codan Part Number: 78-11005) can be connected to the USB port
on the front of the radio (J9), a standard USB A (female) to 2320 USB adaptor cable (Codan Part
Number: 08-07436-001) is required. In addition to text entry, navigation of the radios user
interface can be achieved using a keyboard.
Key Function
F1
F2
F3
F4
F9
F10
Space When in editing mode, inserts a space
Ctrl + A Selects all text in the focused field
Ctrl + C Copies the selected text
Ctrl + X Cuts the selected text
Ctrl + V Pastes the copied text
Shift + ← Selects the character on the left side of the cursor
Shift + → Selects the character on the right side of the cursor
CALL key
SCAN key
When not in editing mode, acts as the PTT button
Left Software key
Right Software key
Alert key
Power key
Ctrl + Y Redo
Ctrl + Z Undo
Enter Sends the message when applicable, otherwise inserts a new line if allowed
Page 32 Sentry-H 6110-MP Operator Guide
Page 35

Entering and editing text
Key Function
Ctrl + Enter Inserts a new line if allowed
Ctrl + Shift Opens the Select Input Language Screen when applicable
Alt + * Opens the special characters popup when applicable
Entering a special character with the keypad
You can enter special characters in messages, names, stations, and in addresses of stations that
you call.
The key may be used to enter the global ALL address syntax (@?@) or special 2G ALE
addressing characters easily.
To enter a special character in an address, message or station:
1. Hold the key to see the available special characters.
2. Navigate to the character you require using the navigation keys, then press
(Insert).
Sentry-H 6110-MP Operator Guide Page 33
Page 36

scanning indicator mute type
battery indicator
antenna type
scanning mode
Scanning, channel and scratch modes
Scanning, channel and scratch
modes
The operational screen displays information relating to the three main operating modes of the
radio desribed below.
Scanning mode
The 6110-MP is capable of scanning multiple channels for incoming calls or voice transmissions
(see Select mute type (page 26) for details on selecting the types of transmissions that the radio
will interrupt scanning for), the radio will then lock onto that channel until the transmission has
ended and the scan pause has timed out or until the incoming call has ended or timed out.
To toggle Channel Scanning on and off:
1. Press the key from the Channel Screen.
The icon will appear on the Channel Screen when the radio is Scanning.
Channel mode
The radio is capable of fixed channel communication without the need to establish a network call.
Fixed channel operation allows for voice transmission in both clear and digital voice and can be
used in conjunction with encryption and frequency hopping.
Page 34 Sentry-H 6110-MP Operator Guide
Page 37

To select a fixed channel:
Note: If the scan indicator icon is shown in the notification bar (page
16), press to turn off scanning.
Note: The channel mute will be temporarily open while navigating channels.
See Muting receive audio (page 25) for more information about Channel mute.
1. If you are in a menu screen, press PTT to exit to the operational screen.
2. If the radio is scanning, press to switch off scanning.
Scanning, channel and scratch modes
3. Press or to scroll to the channel that you want to use.
The channel is selected.
Scratch mode
Scratch or fixed frequency mode tunes the 6110-MP receiver and transmitter to a fixed arbitrary
frequency. Scratch mode allows for voice transmission in both clear and digital voice and can be
used in conjunction with encryption and frequency hopping.
Sentry-H 6110-MP Operator Guide Page 35
Page 38

numeric input
tuned frequency
To enter Scratch mode:
Note: You can also use the navigation keys to change the frequency.
1. Ensure that the radio is in Channel mode (page 34).
2. Press the key to enter Scratch mode.
Selecting a fixed frequency
To select a fixed frequency in Scratch mode:
Scanning, channel and scratch modes
1. Press the (Select) key until the numeric input icon is displayed in the
Menu bar (page 18)
2. Use the keypad to enter the frequency you want to tune.
3. Press to change.
Page 36 Sentry-H 6110-MP Operator Guide
Page 39

HF networks
HF networks
An HF Network in the context of your radio is a call system with associated scan tables and
several settings to control privacy and call establishment. The Sentry-H 6110-MP radio supports
2G ALE, 3G ALE and Codan Selcall call systems.
FEATURE SELCALL 2G ALE (CALM) 3G ALE
Incoming call detection FAST FASTER FASTEST
Caller Identification X X X
Station dialling X X X
Call termination detection X X
Automatic channel selection X X
Synchronised channel scanning X
Voice message capability X
Sentry-H 6110-MP Operator Guide Page 37
Page 40

Note: The radio will automatically use appropriate call systems when scanning multiple
HF networks.
HF networks
View and change HF network
There may be several HF networks are available on your radio, and you may, at some point, need
to change the network that you are using. The current HF network appears in the top right corner
of the CALL screen.
To set or change the HF network:
1. Press .
2. Press (Options).
3. Select HF Networks.
4. Select the desired HF network from the list.
5. Press .
Page 38 Sentry-H 6110-MP Operator Guide
Page 41

Call types
The 6110-MP is capable of making and receiving various call types; additional call types are
available through the installation of optional accessories. Refer to the Operator Manual of your
accessory for information on its features.
Call Type Icon Network Description
Call types
ALE Sounding 2G/3G
Channel Test ALL Test the signal quality between two stations.
Alert ALL Make an alert call.
Get Position ALL Request GPS position of the remote station that is
Get Status ALL Request diagnostic information from a station that is
Message ALL Send a text message call.
Phone ALL Relay a phone call to a Codan HF station with a Codan
Selective ALL A selective call is a voice call.
Send Position ALL Send your GPS position to another station.
SMS ALL Send an SMS text message using SprintNet.
Update the Link Quality Assessment (LQA) of your
ALE
station on other radios in your network.
configured to respond to this call type.
configured to respond to this call type.
Telephone Interconnect.
Voice Message 3G ALE Send a recorded audio message over a 3G ALE
network.
Sentry-H 6110-MP Operator Guide Page 39
Page 42

2G ALE special address calls
Call Type Icon Description
ALL An ALL call may be made to all stations that are tuned to or scanning
the same frequency in a 2G ALE/CALM HF network. The ALL address
syntax may be used with the Alert, Message, Phone, Selective, or Send
Position call type.
ANY An ANY call may be made to all stations that are tuned to or scanning
the same frequency in a 2G ALE/CALM HF network. The ANY address
syntax may be used with the Alert, Message, Phone, Selective, or Send
Position call type.
Group A Group Selective call may be made to specific stations that are tuned
to or scanning the same frequency in a 2G ALE/CALM HF network. The
Group Selective address syntax may be used with the Alert, Message,
Phone, Selective, or Send Position call type.
NET A NET call may be made to a single NET address. Many stations may
be programmed to recognise this address when tuned to or scanning
the same frequency in a 2G ALE/CALM HF network. A station may be a
member of a NET or may have the NET programmed in its profile
without being a member of the NET. A NET address may be used with
the Alert, Message, NET, Phone, Selective, or Send Position call type.
Call types
Wildcard A Wildcard call may be made to all stations that are tuned to or
scanning the same frequency in a 2G ALE/CALM HF network. The
Wildcard address syntax may be used with the Alert, Message, Phone,
Selective, or Send Position call type.
Page 40 Sentry-H 6110-MP Operator Guide
Page 43

3G ALE group and broadcast calls
Call type Icon Description
Group call A 3G ALE Group call enables multiple stations to be grouped as a
single address.
Groups are defined in the 3G ALE HF network configuration.
Call types
Broadcast
call
A 3G ALE Broadcast call is a call made to all stations on your 3G ALE
HF network that are configured to accept broadcast calls. Entering the
address 1023 starts the call.
Sentry-H 6110-MP Operator Guide Page 41
Page 44

Answering and ending a call
Answering a call
1. Press the PTT button to answer a call.
Ending a call
To end a call:
1. Press the key to end a call.
Answering and ending a call
Page 42 Sentry-H 6110-MP Operator Guide
Page 45

navigation
indicator
call type
HF network
address
incoming
call
missed
call
outgoing
call
Stations/select HF Network/Async*
* ‘Async’ is for 3G ALE only
Making a 2G or 3G ALE call
Making a 2G or 3G ALE call
Point-to-Point call
A point-to-point call is a general term used to describe a transmission between two radios. There
are several types of calls you can make using your radio. Refer to the call types (page 39) for more
information about the types of calls that are available.
To start a 2G or 3G ALE call:
1. Press the key.
2. Select a call type using the and keys.
3. Enter the address of the station you are calling.
4. Press the key.
5. Enter a text message or select a menu item if prompted.
6. Press to begin the call.
Sentry-H 6110-MP Operator Guide Page 43
Page 46

Making 2G ALE special address calls
Note: Press the key to enter the ?, comma (,) and @ symbols when entering
special addresses.
To start a call:
1. Press the key.
2. Select a call type using the and keys.
3. Press the key, scroll to ALE and press .
4. Enter the address of the stations you want to call.
5. Press the key.
6. Enter a text message or select a menu item if prompted.
7. Press to begin the call.
Making a 2G or 3G ALE call
Page 44 Sentry-H 6110-MP Operator Guide
Page 47

Note: The ?, comma (,), and @ characters are entered using the key.
Making a 2G or 3G ALE call
2G ALE special address syntax
The Wildcard special address syntax is used to address calls to multiple stations within a 2G ALE
HF network. The table below provides examples of the types of
ALE address
syntax
@?@
@A@ A selective ALL call to listening stations that have an A as the last character
@@?
@@A A selective ANY call to listening stations that have an A as the last charac-
@AB A double selective ANY call to listening stations that have AB as the last
@A? A double selective wildcard ANY call to listening stations that have an A as
ABC,JK3MN,PQR
(example only)
NET address A NET call to all stations with that NET programmed in NETs
???
Call sent
A global ALL call to all listening stations
of their self address (A may be any specified upper-case letter or number),
for example, TNAA, EANBA, 1NCA, 23A
A global ANY call to all listening stations
ter of their self address (A may be any specified upper-case letter or number), for example, TNAA, EANBA, 1NCA, 23A
two characters of their self address (A and B may be any specified uppercase letter or number), for example, BAAB, 14BAB, Q2CAB, 1AB<
the second to last character of their self address (A may be any specified
upper-case letter or number) and any upper-case letter or number as the
last character, for example, USAM, 19MA0, -ENA9, *3DAZ
A Group Selective call to the stations specifically addressed
A Wildcard call to listening stations that have a self address matching the
length of the sent address and with any upper-case letter or number as
each of the characters, for example, SAM, NAA, 234, 3AZ
A?B? (example
only)
Sentry-H 6110-MP Operator Guide Page 45
A selective Wildcard call to listening stations that have a self address
matching the length of the sent address with A and B as the first and third
characters respectively (A and B may be any specified upper-case letter or
number), and with any upper-case letter or number in the second and last
characters (in this case), for example, A2BM, ADB1, AZBE, A3B8
Page 48

In-link messaging
In-link messages can be sent while on a 2G ALE selective or alert call.
To send an In-Link message during a Selective or Alert call:
1. Press , the InLink Message screen is displayed.
2. Type your message.
3. Press (Options), scroll to Call and press to send the message.
Making a 2G or 3G ALE call
Page 46 Sentry-H 6110-MP Operator Guide
Page 49

3G ALE Group and Broadcast calls
Note: The Voice Message call type is not a valid group call.
Note: The Voice Message call type is not a valid group call.
3G ALE Group calls
To make a 3G ALE group call:
1. Press the key.
2. Press the key, scroll to Groups, then press the key.
3. Press the or keys to select the call type you want to make.
4. Enter the group address or scroll through the group list.
5. Press the key to begin the call.
3G ALE Broadcast calls
Making a 2G or 3G ALE call
To make a 3G ALE group call:
1. Press the key.
2. Enter 1023 into the address field (1023 is the 3G ALE Broadcast Address).
3. Press the or keys to select the call type you want to make.
4. Press the key.
5. Enter a text message or select a menu item if prompted.
6. Press to begin the call.
Sentry-H 6110-MP Operator Guide Page 47
Page 50

Note: If you are unable to receive GPS signals on your radio, all calls that you make will
be made using asynchronous calling.
Note: If you are unable to get a GPS signal for an extended period, a TOD (Time of Day)
Request call can be made to the TOD master station to syncronise your radio clock.
Making a 2G or 3G ALE call
Asynchronous calling
3G ALE HF networks rely on each station on the network having syncronised clocks. Time
synchronisation is achieved by using the signals from GPS satellites. If a radio is unable to receive
GPS signals, their clock will over time lose sync with the rest of the 3G ALE HF network and will
not be able to receive 3G ALE calls. If the station you are calling is not answering your call, it may
be that their radios clock is out of sync. An asynchronous call may allow you to make calls to a
station that is in this operational state.
To make an asynchronous call:
1. Press the key.
2. Press , then select Async.
3. Select a call type using the and keys.
4. Enter the address of the station you are calling.
5. Press the key.
6. Enter a text message or select a menu item if prompted.
7. Press to begin the call.
Page 48 Sentry-H 6110-MP Operator Guide
Page 51

Making a Selcall call
To start a call:
1. Press the key.
2. Select a call type using the and keys.
3. Enter the address that you want to call.
4. Press the key.
5. Select a channel if prompted.
6. Press the key.
7. Enter a text message or select a menu item if prompted.
8. Press to begin the call.
Making a Selcall call
Sentry-H 6110-MP Operator Guide Page 49
Page 52

Stations
Note: You can create several call types across multiple networks for your contact by
pressing the (Options) key and selecting the Add Call option.
Create a Station
Creating a station call allows you to assign an alias to an address for easier identification. Likely,
your HF Network Administrator has already configured several key stations on your radio.
To create a new station; from the menu screen:
1. Navigate to (User Data), then select (Stations).
2. Press the (Add).
3. Enter the name of the station using the keypad.
4. Press the (Add Call) key.
5. Choose the network and call type you want to create for your contact.
6. Enter the address of the station.
Stations
7. Optional: Change the name for the call type.
8. Press the (Save) key.
.
Page 50 Sentry-H 6110-MP Operator Guide
Page 53

Adding a Station from the Call History
To add a station from the Call Log, Call History, or Last Heard Log:
1. Hold the key to show the Stations and Station History screen.
2. Select the Call History tab.
3. Scroll up or down to find the call that you want to save.
4. Press Left Menu (Options), scroll to Save, then press (Select).
You are informed if there is a matching station for the address in the call and asked
whether or not you want to append this call to that station. If there is no matching
station, you can create a new station.
5. Do one of the following:
• If there is a matching station that you want to use, press (Yes)
• If you do not want to use the matching station, press (No),
create a new station, then edit the call as required.
Stations
• If there are several matching stations, scroll to the station who you want
to use, press , then edit the call as required.
• If there is no matching station, edit the call as required.
6. Press (Save) to save the information.
7. If the station does not exist, enter a name for the station, then press (Save).
Sentry-H 6110-MP Operator Guide Page 51
Page 54

Note: The format of information on the GPS screen is defined by the Settings > GPS >
GPS Format Options setting.
Note: The Sentry-H 6110-MP radio uses two Global Navigation Satellite Systems
(GNSS) to calculate position information with improved accuracy and reduced time for
signal acquisition.
Viewing GPS Information
Viewing GPS Information
Obtaining your position
The GPS screen shows the GPS information obatined from a GPS receiver or latitude and
longitude readings from a GPS receiver, or from Settings > GPS > My Position. Altitude and
speed readings are hidden by default. The spinning circle shows that the GPS receiver is active,
and the Last Fix reading shows the time lapse from the last receipt of valid GPS information.
To view GPS information do one of the following:
• Press the key; or
• From the main menu, select (General), then (GPS).
Page 52 Sentry-H 6110-MP Operator Guide
Page 55

Viewing GPS Information
Distance and bearing
The Sentry-H 6110-MP radio calculates distance and bearing information between your GPS
position and a waypoint. A waypoint is a collection of GPS information for a location. When you
select a waypoint, the transceiver automatically calculates the distance and bearing from your
current GPS information to the waypoint. This information is shown on the Distance and Bearing
tab. Your GPS information may be from either the last fix from a GPS receiver or information
entered into Settings > GPS > My Position.
The waypoint information may be derived from:
• a Get Position call or Send Position call in the Call History
• a Get Position call in Stations
• a selected waypoint
To view the Distance and Bearing tab:
1. Do one of the following:
• Press the key.
• From the main menu, select (General), then (GPS).
2. Press to move to the Distance and Bearing tab.
Sentry-H 6110-MP Operator Guide Page 53
Page 56

CAUTION: An unconfigured radio is not capable of making calls.
CAUTION: Continuing with this process will overwrite the current profile
stored on the radio. This action is not reversible. Select (No) to abort
this action if you need to back up the existing radio profile first.
Update the radio profile with a USB thumb drive
Update the radio profile with a
USB thumb drive
The 6110-MP can be configured in the field using data stored on a USB drive supplied by your
Radio Network Administrator. The drive can be pre-loaded with a radio configuration profile, a set
of encryption keys and software updates.
To update or configure the radio:
1. Connect a USB memory stick to the J9 USB port using a USB Memory Stick Adaptor
cable (Codan Part Number: 08-07436-001).
2. Select Program Profile.
3. Navigate to and select the profile you want to program onto the radio.
4. Select (Yes) when asked if you want to Program the profile from file.
5. Enter the Admin PIN if prompted.
The profile is programmed into the radio.
Page 54 Sentry-H 6110-MP Operator Guide
Page 57

Update the radio profile with a USB thumb drive
6. Once the profile has been programmed into the radio, you may be asked to restart,
press (Yes) to restart.
Sentry-H 6110-MP Operator Guide Page 55
Page 58

Troubleshooting
Troubleshooting
General Troubleshooting
Below is a checklist for basic troubleshooting.
In the unlikely event you have any problems with your 6110-MP radio, check that:
• all connectors are dry and free from dirt
• all connections are sound
• the battery pack is connected to the radio and has some charge
• the selected antenna is appropriate for the distance over which you want to
communicate
• the antenna is deployed correctly, oriented in a suitable direction, and connected to
the radio
• the grounding system is adequate as per instructions provided with the antenna
• the antenna type on the channel screen matches the type of antenna you are using
If required, restart your radio to invoke self-testing. The self-test checks the memory, hardware,
LCD and keys. If a serious fault is reported, contact your HF Network Administrator. Below is a
table with some general tips on troubleshooting your radio.
Problem Solution
The sound from the
front panel speaker is
muffled
Communications are
not clear
I get an RF burn while
transmitting
Page 56 Sentry-H 6110-MP Operator Guide
Drain any moisture from the front panel of the radio by turning it front
panel down.
Try another channel.
Press PTT.
If you are using a whip or long wire antenna, go to the menu screen,
then select User Data > Peripherals > Antenna Type, check that the
antenna selection icon is set to Auto Detect or Always Tune.
If you are communicating over a short distance, try laying the whip
horizontally for near vertical incident skywave operation.
If you are communicating over a long distance, try selecting an antenna
(page 8) with better performance for the distance you are trying to
transmit.
The radio is not adequately earthed. Attach an earth lead or
counterpoise as per the instructions provided with the antenna.
Page 59

Troubleshooting
Problem Solution
GPS is not working Ensure that the front panel of the radio, and hence the GPS antenna, is
facing the sky so that it can receive signals from satellites. Alternatively,
connect a GPS antenna to the GPS port (J4) and place the antenna so
that it is facing the sky.
The 3G ALE link
works in one direction
only
You can hear the 3G
ALE call transmission,
but your radio does
not respond
Called station does
not reply
Tuning errors are
received while using
3G ALE
Digital voice is not
clear or sounds
unnatural
The tune time is not set to the same value in all radios, or it is not set to
the recommended time for the tuner.
Check that the link protection mode, the network address, and the link
protection key are set to the same corresponding value in all radios.
Try calling the station asynchronously (page 48) if using the 3G ALE
network.
Retune all of the channels in the 3G ALE scanning network (page 12).
Avoid using any channels that have poor or failed SNR values.
Try selecting a lower digital voice rate (page 30), if you are using
encryption, make sure you have matching secure keys (page 29) with
the station you are communicating with.
Error messages
The table below contains several error messages that may be displayed by the radio as well as
the steps needed to resolve them.
Error message Resolution
Address is not valid Selcall address must be
numeric with maximum length of 6
Address required No address has been entered on the call
At least one item must be selected This setting requires at least one valid option
Sentry-H 6110-MP Operator Guide Page 57
addresses must be a numerical value between
0 and 999999. Non-numerical values (letters A
through S and special characters) are not
valid.
screen. To make a call enter an address for the
station, group or special call you want to
make.
selected.
Page 60

Error message Resolution
Troubleshooting
Call type X not valid for Y call system
You are attempting to create a contact or call
a call type that is not compatible with the call
system selected.
Call type is not allowed This call type has been restricted on your
radio.
Call type is not allowed and has been replaced
with 'Prompt'
The call type you have selected for this
contact is not available, the contact will
prompt you to select a call type when
selected.
Calling is not possible Handset version
mismatch.
The firmware on the Handset control point
does not match that of the radio. Upgrade the
2320 handset firmware to match the radio
before attempting to use the radio.
Calling is not possible No HF networks are
present
Cannot send voice message to group or
broadcast address
There are no HF networks configured on the
radio. Contact your HF Network Administrator.
Voice message calls can only be sent to other
stations
GPS is unavailable No GPS signal has been detected by the GPS
receiver
Group members cannot be empty At least 1 station address must be added to a
group address
Hopping is not enabled Hopping is not available on this radio
Incoming Call Error There was an error receiving the incoming call
addressed to your radio
Incorrect PIN The pin entered is not correct
Invalid File The file type selected is not compatible with
the radio
Invalid group name Group names must be alpha-numeric and
between 3 and 15 characters in length
Invalid input The key input is not valid on this screen.
Invalid network member name Network member names must be
alpha-numeric and between 3 and 15
characters in length
Page 58 Sentry-H 6110-MP Operator Guide
Page 61

Troubleshooting
Error message Resolution
Link lost, unable to send message The data link to the remote station was lost.
Check your antenna, re-tune (if using the
internal tuner) and re-position if possible and
try again.
Maximum number of users connected No more than 4 control points can be
connected to the radio simultaneously.
Message required Blank text messages cannot be sent.
Messages require at least 1 character.
Name is not unique This name has been used for another entry
New PINs do not match The pin and re-enter pin field do not match.
No channel for call on HF network ... The selected HF network does not have a
channel that it can make a call on. Either there
are no channels available for this network or
the channels do not have a valid mode set
No USB device connected The connection to the USB device is lost.
Check that the USB device is connected
correctly and try again.
No voice or data key is set No key has been set in the secure key index.
press the secure macro key and navigate to
Secure Key Index. Select a key and press
Activate.
No voice or data keys programmed No encryption keys exist for the current secure
mode
Overwrite with current GPS position? This action will overwrite the existing GPS
coordinates with the coordinates detected by
the GPS receiver
Phone number required A telephone number entry is needed for this
call type
PTT rejected Another PTT source is active Another handset has pressed push-to-talk, the
input on the current handset has been
disabled
PTT rejected Rx-only frequency The radio is set to receive only. Push-to-talk is
not available
Rate selection not permitted The selected digital voice rate is not permitted
on this radio, select a different rate
Sentry-H 6110-MP Operator Guide Page 59
Page 62

Troubleshooting
Error message Resolution
Record voice message timeout The Voice Message screen has timed out. You
will need to re-record your message
RM50 module not detected. Proceed anyway? The radio does not detect an RM50 module.
This may affect the outcome of the requested
action.
RM50 power on failed The RM50 module has failed to start up. Digital
Voice, 2G/3G ALE data, and security is not
available on this radio.
RM50 power on timeout The RM50 module has failed boot within the
timeout period. 2G/3G ALE data and security
is not available on this radio.
Rx frequency is out of range The HF band is between 1,600 kHz and 30,000
kHz, values outside of that range are not
available on this radio
Screen closed due to remote update The radio is being updated by another device,
and the current screen has been closed to
allow for this update.
Secure not supported while hopping is on AES-256 Encryption is not available when
hopping is on. Only CES-128 encryption is
compatible with hopping
Settings conflict with sales options The radio has been configured with settings
that are incompatible with the features
available on your radio. These settings will
have no effect.
Start-up Error Please restart unit If error
persists, please contact Codan
A start-up error has occurred. Hold the Power
key for 2 seconds, then release to power down
the radio, press the power key again to restart
the radio. If the problem persists, contact your
HF Network Administrator or Codan
representative.
System busy The selected action is not available as the
radio is performing another action. Wait for the
system to finish this action before trying again.
System initialising... Please try again The selected action is not available while the
radio is starting. Wait for the system to startup
before trying again.
Time not valid The time entered is not valid, the format is
Hours minutes seconds
Page 60 Sentry-H 6110-MP Operator Guide
Page 63

Troubleshooting
Error message Resolution
Timeout The current action has timed out. Try again
TOD Broadcast' is not allowed Transceiver is
not the TOD Master for HF Network ...
Unable to perform channel test with 3G ALE
broadcast address
Unable to perform channel test with ALE group
address
Unable to perform channel test with no
address
This radio is not the Time of Day master of the
current HF network. Only the master can
broadcast the TOD to network members.
Channel tests can only be performed between
stations, group and broadcast addresses are
not available
Channel tests can only be performed between
stations, group and broadcast addresses are
not available
Enter the station address that you want to test
Sentry-H 6110-MP Operator Guide Page 61
Page 64

Definitions
Standards and icons
Icon Description
Definitions
Note
CAUTION
WARNING
the text may be of interest to you
proceed with caution as your actions may lead to loss of data, privacy
or signal quality
your actions may cause harm to yourself or the equipment
Acronyms and abbreviations
This term… Means…
AES advanced encryption standard
ALE automatic link establishment
CALM Codan automated link management
CP Control Point
DC direct current
ESN electronic serial number
GPS global positioning system
HF high frequency
IF intermediate frequency
LCD liquid crystal display
LQA link quality analysis
PTT press-to-talk
RF radio frequency
RFU RF unit
Page 62 Sentry-H 6110-MP Operator Guide
Page 65

This term… Means…
Rx receive, received
SMS short message service
SWR standing wave ratio
USB Universal Serial Bus
Glossary
address
The HF radio equivalent of a telephone number. Your station self address is used by other
stations to call you, and it is sent when you make calls to identify you as the caller. It is
sometimes referred to as an address or a self ID.
Alert call
A call that enables you to trigger an alert tone at a specific station then speak to an operator
there.
call
Relates to when a call system such as 2G or 3G ALE is used to alert a specific station or
group of stations in an HF network to establish a voice or data communication link.
Definitions
channel
A frequency and sideband programmed in the radio that is used to transmit and receive
signals on air.
Channel Test call
A call that enables you to test the quality of channels in an HF network. A Channel Test call
may be made in A 3G ALE and 2G ALE/CALM HF network to identify the best channel to use
for a given station at a given time as well as update the LQA database.
counterpoise
A radial array or a grid network of metallic wires arranged horizontally around the base of an
antenna to provide an effective earth plane.
frequency
The number of cycles per second of a radio wave, usually expressed in kilohertz.
Sentry-H 6110-MP Operator Guide Page 63
Page 66

handset
A held-held device that is used to control the functions of a radio. It most commonly consists
of an earpiece, microphone and PTT button. A handset may also have a display and a
keypad.
HF network
The part of the radio configuration that defines specific details for making calls using Codan
Selcall, 2G ALE or 3G ALE.
macro
A set of instructions to automate a task you perform with the radio. When a macro is
assigned to a key, the key can be used to execute the task quickly.
PTT button
The Press-to-talk button is located on the left side of the handset. This button switches the
radio to transmit mode for analogue and digital voice communications, switch mute off
temporarily. Push-to-talk can also cancel voice calls prior to the point where voice can be
transmitted, cancel calls where data is being transmitted, and exit out of editable screens
without saving changes.
RFU
Definitions
The unit in a radio that modulates audio signals onto radio frequencies that can be
transmitted on air, and that demodulates the radio frequencies it receives into audio signals.
standing wave ratio (SWR)
The ratio of maximum and minimum voltages on a transmission line of the starting wave
resulting from the interaction of the forward and reflected waves. It is a measure of how well
the antenna matches the radio output.
station
A radio in an HF network used for communications.
Page 64 Sentry-H 6110-MP Operator Guide
Page 67

Menu Navigation
Scan Tables
Menu Map
Menu Navigation
Sentry-H 6110-MP Operator Guide Page 65
Page 68

www.codancomms.com
ASIA PACIFIC (Head Office)
Codan Limited
2 Second Avenue
Technology Park
Mawson Lakes SA 5095
AUSTRALIA
T: +61 8 8305 0311
F: +61 8 8305 0411
E: support@codancomms.com
 Loading...