

Page 1

10 The NET List
This section contains the following topics:
About NETs (132)
Settings in the NET List (134)
Programming the NET List (138)
CODAN
2110 SSB Transceiver Reference Manual 131
Page 2

The NET List
About NETs
A NET is a special ALE addressing capability. With NET addressing, two or more
stations are pre-configured to respond to the same NET address. When a station calls a
NET, all stations with that NET address and their self addresses in the Member Address
setting for the NET respond in their designated response slot. In the NGT transceiver, a
NET contains the configuration information required for making and receiving NET
calls. This information defines the process for the handshake during link establishment.
The full 3-way handshake process involves a leading call from the initiating station, a
response from the receiving station, and an acknowledgement from the initiating station.
Following the acknowledgement, all stations that are able to, enter the link.
A station can have a NET programmed in its NET List and either:
• be a member of the NET, that is, their self address is in the Member Address setting
• not be a member of the NET, that is, their self address is not in the Member Address
for the NET
setting for the NET
NETs are used with ALE/CALM networks, which define the channels that the NET may
use when establishing an ALE link, and the Privacy Mode for messaging within a call.
For more information on networks see page 121, The Network List.
You can make a call to a NET by selecting the NET, Emergency, Message, Phone,
Selective, or Send Position call type and entering the NET address. You can set up an
entry in the Address List to make a NET call. For more information on the Address List
see page 145, The Address List.
Figure 28 shows an example of the information required to create a NET. This
information is explained on page 134, Settings in the NET List.
132 2110 SSB Transceiver Reference Manual
Page 3

Figure 28: An example of information stored in the NET List
NET List
NET A Address:
Network:
Member Address:
Outgoing Calls:
Incoming Calls:
Link:
Response:
Tune Time:
LQA Exchange:
Slot Width:
111
North
BOB
JOE
SAM
TOM
TIM
Enabled
Members only
Only if response
Send
2 seconds
Yes
Variable
1 of 5
2 of 5
3 of 5
4 of 5
5 of 5
The NET List
NET B Address:
NOTE
222
Network:
Member Address:
Outgoing Calls:
Incoming Calls:
Link:
Central
BET
MAR
SAM
MIK
JAC
JAN
PET
Disabled
Enabled
Immediately
1 of 7
2 of 7
3 of 7
4 of 7
5 of 7
6 of 7
7 of 7
For successful NET calling and response, the Address, Network, Member
Address, Link, Tune Time, LQA Exchange and Slot Width settings in the
NET List must be identical for all stations that are members of the NET.
Specifically, the order of the member stations in the Member Address
setting must be identical for all member stations, as this order is used to
determine the response slots for all stations.
2110 SSB Transceiver Reference Manual 133
Page 4

The NET List
Settings in the NET List
NOTE
Name
The NET name may be any meaningful name that you want to assign to the NET. The
name may be up to 20 alphanumeric characters including spaces. The NET name is only
used for reference within the transceiver. It is not part of the NET configuration data.
Address
CAUTION This setting must be the same in all member stations.
The Address setting contains the global address used by all members of the NET, and
other stations that have the NET programmed in the NET List, to establish an ALE link
during NET calls. The address may be up to 15 alphanumeric characters however, for
efficiency of NET calls, it is preferable that the address be limited to 3 characters. You
should choose an address that is not the same as any self addresses in the NET or wider
communication audience.
In the following discussion, you will need to log in as administrator to see
the NET List (see page 110, Logging into admin level from user level).
Network
CAUTION This setting must be the same in all member stations.
The Network setting refers to the network containing the channels to be used with the
NET. This is selected from the pre-defined list of networks in the Network List. You can
set up two NETs with the same address but with different networks, say one for Group
Privacy Mode and one for Plain Privacy Mode. If the networks have the same channels,
then the Member Address setting in each NET should be identical.
Member Address
CAUTION This setting must be the same in all member stations.
The Member Address setting contains a sequential list of the self addresses of all
members of the NET. The station uses this list to calculate the response slots, so each
station in the NET can determine when an automatic response is required after the
initiating call. A member address may be up to 15 alphanumeric characters however, for
efficiency of NET calls, it is preferable that the member addresses be limited to
3 characters. To preserve an empty slot use the null address (@@@) in a member
address position.
134 2110 SSB Transceiver Reference Manual
Page 5

The NET List
Outgoing Calls
The Outgoing Calls setting enables you to set up your station to make calls to the NET,
or disable calling to the NET. Unless you need to restrict calling to the NET, you should
set the Outgoing Calls setting to Enabled for all stations in the NET, regardless of their
member status.
If you want to set up your NET so that only one station makes calls to the NET, set the
Outgoing Calls setting for the NET in that station to Enabled. All other stations with this
NET programmed would then have the Outgoing Calls setting for the NET set to
Disabled.
Incoming Calls
CAUTION
If the Link setting is set to Only if response, you must ensure that at least
one member station is set to receive an incoming call from the NET.
The Incoming Calls setting enables you to set up your station to receive all incoming
calls from the NET, receive calls only if you are a member of the NET, or disable
receiving calls from the NET.
If the station has the NET programmed, then it can receive calls from the NET if the
Incoming Calls setting is set to Enabled. If your station has the NET programmed but
you are not a member, and you do not want to receive all of the NET calls, set the
Incoming Calls setting to Members only. As your station is not a member of the NET, it
will not enter the link. If you are a member of the NET but do not want to receive any
calls from the NET, select Disabled.
Link
CAUTION This setting must be the same in all member stations.
The Link setting determines how the initiating station links with the receiving stations. It
can link:
• only if it receives a response from a member station
• even if it doesn’t receive a response from a member station
• immediately
Stations with the NET programmed will only send a response to a NET
call if:
NOTE
• their self address is included in the Member Address setting for the
NET, that is, they are a member of the NET
• the Response setting in the NET List is set to Send
2110 SSB Transceiver Reference Manual 135
Page 6

The NET List
If it is important that you know with which member stations you have linked, then you
must set the Link setting to Only if response. The initiating station will make the call to
the NET using the best channel, on average, for all NET members. If there is no response
to this channel, the initiating station will select the next ranked channel and attempt the
call again, and so on until at least one response is received. Any member station
detecting the call will respond, if they are enabled to do so, then the initiating station
completes the link. Non-member stations with this NET programmed will also enter the
link, but as they are not members, they will not send a response. If you use this setting,
you must be sure that there are stations in your NET that will respond. If the initiating
station does not receive a response to the call after trying all channels for the NET, it will
terminate the link establishment process.
If you want to send a NET call to all stations with the NET programmed, but you do not
need to know which of the member stations have entered the link, set the Link setting to
Even if no response. The initiating station will make the call to the NET using the best
average channel for all NET members. All stations detecting the call will enter the link,
if enabled to do so.
If you want to send a NET call to all stations with the NET programmed without the
delay of the link establishment process, set the Link setting to Immediately. In this case,
the initiating station will establish an implicit link with any stations programmed with
the NET that detected the call. There is no 3-way handshake.
Response
CAUTION
If the Link setting is set to Only if response, you must ensure that at least
one member station is set to respond to a call from the NET.
The Response setting sets whether or not receiving member stations respond to NET
calls during link establishment. Generally, you would set the Response setting to Send,
so that there is confirmation of the station entering the link. However, if for some reason
you do not want the receiving station to transmit on air, you would set the Response
setting to Don’t send. If a station is set to not respond, it will still enter the link when it
receives the acknowledgement from the initiating station.
The Response setting is only applicable to NET calls. It does not affect a
NOTE
station’s ability to respond to an ANY, Group Selective or Wildcard call
(see page 158, Calls you can make and receive).
Tune Time
CAUTION This setting must be the same in all member stations.
The Tune Time setting is the time that the members of the NET wait after the initiating
call before sending the automatic responses to the initiating station. This time should be
set to match the longest tuning time between all members in the NET.
136 2110 SSB Transceiver Reference Manual
Page 7

The NET List
LQA Exchange
CAUTION This setting must be the same in all member stations.
The LQA Exchange setting determines whether or not the exchange of LQA information
occurs during calls within the NET. If this setting is enabled, the transceiver adds an
appropriate amount of time to the slot widths so that LQA information can be exchanged.
Slot Width
CAUTION This setting must be the same in all member stations.
The Slot Width setting determines the width of response slots for each member of the
NET. If the Slot Width setting is set to Fixed, then all slot widths match the width
required for the largest member address for the NET. However, this extends the time to
complete the handshake considerably. Unless required for interoperability reasons, the
recommended setting is Variable. In this case, the transceiver calculates the exact slot
width required for the response from each station.
2110 SSB Transceiver Reference Manual 137
Page 8
The NET List
Programming the NET List
NOTE
Creating a NET
When you create a NET, the transceiver prompts you for various details. It is
recommended that you read page 134, Settings in the NET List before you create a NET.
To create a NET:
In the following discussion, you will need to log in as administrator to see
the NET List (see page 110, Logging into admin level from user level).
1 Press until Main Menu is displayed.
1 Scroll to NET, then press .
1 Use the List Manager to create an entry (for help see page 97, Creating an entry in a
list and page 52, Entering and editing text).
1 Enter the setting information provided in the following table as required, then
press to enter the information.
If this prompt is
displayed...
Do this...
Address? • enter the address of the NET you want to use for
the NET call
NOTE
Network? • select the network you want to use for the NET
NOTE
Member Address? • enter the self address of the first member of the
Add another Member
Address?
Outgoing Calls? • select whether or not you can make NET calls
Incoming Calls? • select whether or not you can receive NET calls
• enter the self address of the next member of the
NOTE
If you leave this setting blank, the NET
cannot be used.
call
If you select <Disable>, the NET cannot be
used.
NET
NET
If you do not want to add another member
address, press .
from this NET
on this NET as a member of the NET
(Members only or Disabled), or
• select whether or not you can receive NET calls
on this NET if you are not a member of the NET
(Enabled or Disabled)
138 2110 SSB Transceiver Reference Manual
Page 9
The NET List
If this prompt is
displayed...
Link? • select how you want member stations to operate
Response? • select whether or not your station will respond to
Tune Time? • increase or decrease the tuning time
LQA Exchange? • select whether or not LQA information is
Slot Width? • select whether the width of the response slot is
The new NET is created and the List Manager remains open.
Do this...
during link establishment
a NET call
NOTE
Only stations that are members of a NET are
able to send a response.
exchanged during NET calls
fixed or variable
1 If you want to view the NET you have created, press to close the List Manager.
Renaming a NET
When you rename a NET, references to the NET in other lists are not automatically
updated; you need to go to the Address List to update any entries that refer to the NET.
For example, if the NET you renamed is used in an entry in the Address List, go to this
entry, find the reference to the old NET name, then change it so that the new name is
displayed (for help see page 155, Editing an entry in the Address List). If you do not
update the reference to the NET, the transceiver will prompt you to enter an address each
time you use the entry to make a call.
Renaming a NET is a standard list function. For help see page 98, Renaming an entry in
a list.
Copying a NET
Copying a NET is a standard list function. For help see page 99, Copying an entry in a
list.
Editing a NET
Editing a NET is a standard list function. For help see page 99, Editing an entry in a list.
Deleting a NET
Deleting a NET is a standard list function. For help see page 100, Deleting an entry from
a list.
2110 SSB Transceiver Reference Manual 139
Page 10

The NET List
This page has been left blank intentionally.
140 2110 SSB Transceiver Reference Manual
Page 11

11 The Phone Link List
This section contains the following topics:
About phone links (142)
Settings in the Phone Link List (142)
Programming the Phone Link List (143)
CODAN
2110 SSB Transceiver Reference Manual 141
Page 12

The Phone Link List
About phone links
A phone link is a connection to a station with a telephone interconnect unit that can route
Phone calls from transceivers to the public telephone network.
The addresses of the phone link stations you use, and the networks and channel/modes
you use to make Phone calls, can be stored in the Phone Link List. If you want to be
prompted for some of these details when you make a Phone call you can leave the
relevant settings in the Phone Link List blank. If you want to be prompted for all of these
details leave the Phone Link List blank.
Settings in the Phone Link List
In the following discussion, you will need to log in as administrator to see
NOTE
the Phone Link List (see page 110, Logging into admin level from user
level).
Address
The Address setting in a phone link is the address of the transceiver connected to the
radio/telephone interface.
Network
The Network setting in a phone link identifies the network through which the call is
made to the transceiver connected to the radio/telephone interface.
Channel/Mode
The Channel/Mode setting in a phone link identifies the channel and mode that are used
to make a call to the transceiver connected to the radio/telephone interface.
142 2110 SSB Transceiver Reference Manual
Page 13
Programming the Phone Link List
In the following discussion, you will need to log in as administrator to see
NOTE
Creating a phone link
To create a phone link:
the Phone Link List (see page 110, Logging into admin level from user
level).
1 Press until Main Menu is displayed.
1 Scroll to Phone Link, then press .
1 Use the List Manager to create an entry (for help see page 97, Creating an entry in a
list and page 52, Entering and editing text).
1 Enter the setting information provided in the following table as required, then
press to enter the information.
The Phone Link List
If this prompt is
displayed...
Address? • enter the address of the phone link station, or
Network? • select the network in which you want to use this
Channel/Mode? • select the channel/mode that you want to use to
The new phone link is created and the List Manager remains open.
Do this...
• leave the address empty if you want to be
prompted to choose an address when you make
the call
phone link, or
• select <blank> if you want to be prompted to
select a network when you make the call
make the call, or
• select <blank> if you want to be prompted to
select a channel/mode when you make the call
1 If you want to view the phone link you have created, press to close the List
Manager.
Renaming a phone link
When you rename a phone link, references to the phone link in the Address List are not
automatically updated; you need to go to the Address List and update any references to
the phone link.
2110 SSB Transceiver Reference Manual 143
Page 14

The Phone Link List
For example, if the phone link you renamed is used in an entry in the Address List, go to
this entry, find the reference to the old phone link, then change it so that the new name is
displayed (for help see page 155, Editing an entry in the Address List). If you do not
update the reference to the phone link, the transceiver will prompt you to select a phone
link each time you use the entry to make a call.
Renaming a phone link is a standard list function. For help see page 98, Renaming an
entry in a list.
Copying a phone link
Copying a phone link is a standard list function. For help see page 99, Copying an entry
in a list.
Editing a phone link
Editing a phone link is a standard list function. For help see page 99, Editing an entry in
a list.
Deleting a phone link
Deleting a phone link is a standard list function. For help see page 100, Deleting an entry
from a list.
144 2110 SSB Transceiver Reference Manual
Page 15

12 The Address List
This section contains the following topics:
About the Address List (146)
Settings in the Address List (147)
Setting up the emergency key (150)
Programming the Address List (154)
CODAN
2110 SSB Transceiver Reference Manual 145
Page 16

The Address List
About the Address List
The Address List is like any personal address book: it is a place to store the names and
addresses of stations you often call. When you have entered the details of a station,
calling the station becomes as simple as going to the entry for it, then pressing CALL.
If you want to be prompted to enter particular details at the time you make a call (for
example, type a message or select a channel) you can leave the relevant settings blank. If
you make several different types of calls to one address you can create several entries
with the same name and address but with different call types.
The Emergency 1 entry is stored in the Address List. This is the entry the transceiver
calls when you press . Setting up this key is covered on page 150, Setting up the
emergency key.
For information on making calls from the Address List and making calls using see
page 173, Making a call.
146 2110 SSB Transceiver Reference Manual
Page 17

Settings in the Address List
CallType–Address
The call type is the type of call that you want to make to the station that you want to call.
For example, if you want to know where a mobile station is located, you send a Get
Position call to the station. The Address setting is the address of the station that you want
to call.
If you have the FED-STD-1045 ALE/CALM option installed, you can use the ALL
address syntax with the Emergency, Message, Phone, Selective, and Send Position call
types. If you have the MIL-STD-188-141B ALE option installed, you can set up the
Address List to use the ALL, ANY, Group Selective, NET, and Wildcard address
syntaxes with the Emergency, Message, Phone, Selective, and Send Position call types.
The transceiver will automatically determine the call type from the ALE address syntax
that you enter in the address.
The Address List
If you enter the ALE
address syntax...
@?@ a global ALL call to all listening stations (see page 159, ALL
@A@ a selective ALL call to listening stations that have an ‘A’ as
@@? a global ANY call to all listening stations (see page 160, ANY
@@A a selective ANY call to listening stations that have an ‘A’ as
@AB a double selective ANY call to listening stations that have
The transceiver will send...
address syntax)
the last character of their self address (‘A’ may be any
specified upper-case letter or number), for example, TNAA,
EANBA, 1NCA, 23A (see page 159, ALL address syntax)
address syntax)
the last character of their self address (‘A’ may be any
specified upper-case letter or number), for example, TNAA,
EANBA, 1NCA, 23A (see page 160, ANY address syntax)
‘AB’ as the last two characters of their self address (‘A’ and
‘B’ may be any specified upper-case letter or number), for
example, BAAB, 14BAB, Q2CAB, 1AB (see page 160, ANY
address syntax)
2110 SSB Transceiver Reference Manual 147
Page 18

The Address List
If you enter the ALE
The transceiver will send...
address syntax...
@A? a double selective wildcard ANY call to listening stations
that have an ‘A’ as the second to last character of their self
address (‘A’ may be any specified upper-case letter or
number) and any upper-case letter or number as the last
character, for example, USAM, 19MA0, ENA9, 3DAZ (see
page 160, ANY address syntax)
ABC,JK3MN,PQR
(example only)
a Group Selective call to the stations specifically addressed
(see page 161, Group Selective address syntax)
NET address a NET call to all stations with that NET programmed in the
NET List (see page 162, NET address syntax)
??? a Wildcard call to listening stations that have a self address
matching the length of the sent address and with any uppercase letter or number as each of the characters, for example,
SAM, NAA, 234, 3AZ (see page 163, Wildcard address
syntax)
A?B? (example only) a selective Wildcard call to listening stations that have a self
address matching the length of the sent address with ‘A’ and
‘B’ as the first and third characters respectively, and with any
upper-case letter or number in the second and last characters,
in this case (‘A’ and ‘B’ may be any specified upper-case
letter or number), for example, A2BM, ADB1, AZBE, A3B8
(see page 163, Wildcard address syntax)
Message
The Message setting in the Address List entry is available when you select Message as
the call type. It may be used for requesting configuration and diagnostic information
from other transceivers in your network, or you can pre-store a standard message that is
sent each time you make a call using this entry in the Address List. For example, you
may need to notify your base station that you are shutting down for the day. Therefore,
you would create an entry in your Address List to send a Message call (call type) to your
base station (address) containing the message ‘Shut down’. The Privacy Mode and
Privacy Password in the network used for the call specify how the data is transmitted, for
example, plain or encrypted (see page 124, Privacy Mode).
Messages are sent using a Codan protocol in Codan Selcall networks, and as an AMD
message in ALE/CALM networks.
A Message call closes the link as soon as the message has been sent.
Phone Link
The Phone Link setting in an Address List entry is available when you select Phone as
the call type. It identifies the phone link station through which the call is made.
148 2110 SSB Transceiver Reference Manual
Page 19

The Address List
Network
The Network setting in an Address List entry identifies the network through which the
call is made to the station that you want to call.
Channel/Mode
The Channel/Mode setting in an Address List entry identifies the channel and mode that
are used to make the call to the address given in the entry.
2110 SSB Transceiver Reference Manual 149
Page 20

The Address List
Setting up the emergency key
When you press the transceiver begins a call to the station specified in the
Emergency 1 entry in the Address List. You can configure this entry to make any type of
call available to you. Emergency calls will trigger an emergency alert tone at the
receiving station. When AMD messaging is used in ALE calls, an emergency alert tone
is triggered by #HELP, #SOS, #MAYDAY, #PANPAN, and #EMERGENCY text. The
key can be set up to call one or more stations in an emergency.
You should pre-set all the settings in the Emergency entries so that the call
CAUTION
Calling one station in an emergency
To set up the key to call one station in an emergency:
is made automatically during an emergency without the transceiver
prompting for information.
1 Press VIEW until the Address List is displayed.
1 Press .
1 Scroll to Emergency 1, then press .
If the Emergency 1 entry has been deleted, create a new entry and
NOTE
name it Emergency 1 (for help see page 154, Creating an entry in the
Address List).
1 Edit the details in each setting to suit the call you want to make (for help see
page 155, Editing an entry in the Address List).
Calling several stations in an emergency
If you want to set up the key to call several stations you can do so in two ways. You
can:
• make one call to several stations simultaneously
• make several different types of calls in succession
150 2110 SSB Transceiver Reference Manual
Page 21

The Address List
Calling several stations simultaneously
If you want to call several stations simultaneously, set up the Emergency 1 entry in the
Address List to make a call.
In an ALE/CALM network, calls to a group of stations can be made using ALL, ANY,
Group Selective, NET, and Wildcard address syntaxes through the Emergency, Message,
Phone, Selective, and Send Position call types if you have the MIL-STD-188-141B ALE
option installed. You can also send a message as part of the ALE call.
For more information on the special ALE address syntax see page 147, CallType–
Address.
In a Codan Selcall network, calls to a group of stations can be made using a group selcall
address through the Emergency, Message, and Selective call types. A group address is an
address that ends in two or more zeros. For example, to call all stations with addresses
that range from 1201 to 1299, you would enter 1200 as the address. To call all stations
with addresses that range from 150001 to 159999, you would enter 150000 as the
address.
To set up the key to call several stations simultaneously:
1 Press VIEW until the Address List is displayed.
1 Press .
1 Scroll to Emergency 1, then press .
If the Emergency 1 entry has been deleted, create a new entry and
NOTE
name it Emergency 1 (for help see page 154, Creating an entry in the
Address List).
1 Enter the details of the call you want to make (for help see page 155, Editing an
entry in the Address List).
1 Enter the group selcall address in the CallType–Address setting.
2110 SSB Transceiver Reference Manual 151
Page 22
The Address List
Making several different types of calls
This capability is available for use in Codan Selcall networks, enabling
you to make different types of calls, or even the same call type on several
channels.
NOTE
In ALE/CALM networks, the channel selection is typically done
automatically, so it is not necessary to set up the Emergency entries in the
Address List to make chain calls.
If you want to make several different types of calls in succession you need to create an
entry in the Address List for each different type of call you want to make, and name the
entries Emergency 1, Emergency 2, Emergency 3 and so on.
When you press , the transceiver calls the station (or stations) specified in the
Emergency 1 entry, then pauses for about 10 seconds. It then calls the station in the
Emergency 2 entry, and so on, until it calls the station in the last Emergency entry. Calls
made this way are referred to as chain calls.
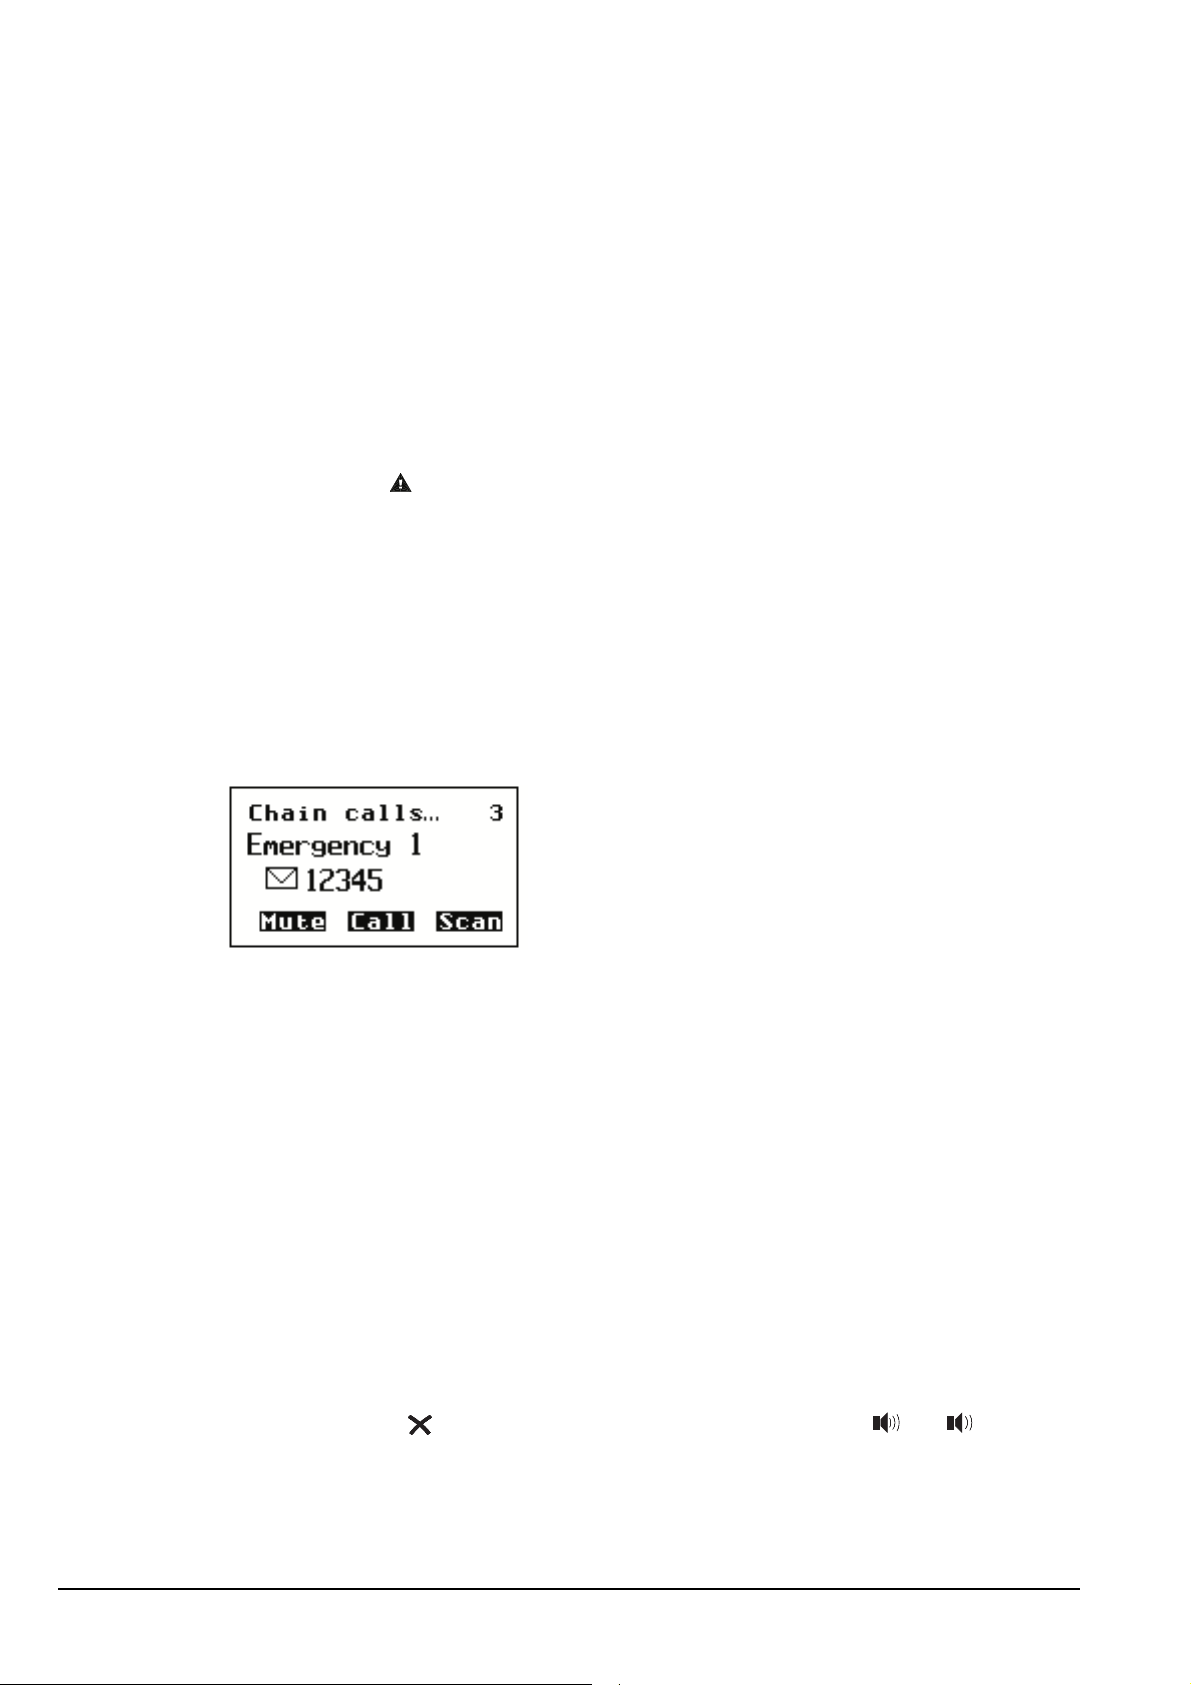
When the transceiver pauses between calls it displays the seconds remaining in the pause
at the top right of the screen, as shown in Figure 29.
Figure 29: The front panel screen during a chain call
You can terminate a chain call by pressing PTT. If you press PTT during:
• an Emergency or Selective call, you can continue with the current call but the chain
call itself is terminated (that is, the transceiver will not call the next Emergency
entry)
• a call in which data is being sent to another station (for example, a Message call), the
current call and chain call are terminated
If you want to make a call that sends data and a call that enables you to
NOTE
speak to an operator, set up the Emergency entries to make the data call
first: once you press PTT to speak to an operator, the chain call is
terminated.
You can also terminate a chain call by pressing any key. The exceptions to this are that:
• you can press to remove messages on the screen, and press and to adjust
the volume at any time, without terminating the call
• if you are prompted to select and/or enter details about the call (for example, a
channel/mode), you can press any keys to do so without terminating the call
152 2110 SSB Transceiver Reference Manual
Page 23

The Address List
To set up the key to call several stations in succession:
1 Decide on the stations you want to call in an emergency, the type of call you want to
make to each station, and the order in which you want to make the calls.
If you want to use a special ALE address syntax, you should set up
the Emergency entries to make calls that create an implicit link, or
NOTE
link immediately first, for example, an ALL call. Address syntaxes
that require a response should be set up in the last Emergency entry
of the chain call, if required.
1 Enter the details of the first call you want to make into the Emergency 1 entry (for
help see page 155, Editing an entry in the Address List).
1 Create an entry in the Address List, name it Emergency 2 and enter the details of the
second call you want to make (for help see page 154, Creating an entry in the
Address List).
1 Create an entry for each subsequent call you want to make, naming the entries
Emergency 3, Emergency 4 and so on.
The number of Emergency entries you can create is limited by the number of entries
you can store in the Address List.
2110 SSB Transceiver Reference Manual 153
Page 24

The Address List
Programming the Address List
Creating an entry in the Address List
To create an entry in the Address List:
1 Press VIEW until the Address List is displayed.
1 Press .
1 Use the List Manager to create an entry (for help see page 97, Creating an entry in a
list and page 52, Entering and editing text).
1 Enter the setting information provided in the following table as required, then
press to enter the information.
If this prompt is
displayed...
New name? • enter a name for the new entry (for example, the
<Call type>? and
<Address>
Message? • enter the message you want to send, or
Do this...
name of the person or station you want to call
using this entry)
• select the call type you want to use, or select
<No call type> if you want to be prompted to
select a call type when you make the call
• enter the address to which you want to send the
call, or leave the address empty if you want to be
prompted for an address when you make the call
If you selected Phone? as the call type,
NOTE
NOTE
enter the telephone number you want to call.
You can enter up to 16 digits.
For information on the address syntaxes for
MIL-STD-188-141B ALE calls see
page 147, CallType–Address.
• leave the message empty if you want to be
prompted to choose a stored message when you
make the call (see page 168, Message call)
Phone Link? • select the phone link station through which you
want to make the call, or
• select <blank> if you want to be prompted to
select a phone link when you make the call
154 2110 SSB Transceiver Reference Manual
Page 25

The Address List
If this prompt is
displayed...
Network? • select the network you want to use to make the
Channel/Mode? • select the channel/mode you want to use to make
The new entry is created and the List Manager remains open.
Do this...
call, or
• select <blank> if you want to be prompted to
select a network when you make the call
the call, or
• select <blank> if you want to be prompted to
select a channel/mode when you make the call
1 If you want to view the entry you have created, press to close the List Manager.
Renaming an entry in the Address List
Renaming an entry in the Address List is a standard list function. For help see page 98,
Renaming an entry in a list.
Copying an entry in the Address List
Copying an entry in the Address List is a standard list function. For help see page 99,
Copying an entry in a list.
Editing an entry in the Address List
Editing an entry in the Address List is a standard list function. For help see page 99,
Editing an entry in a list.
Deleting an entry in the Address List
Deleting an entry in the Address List is a standard list function. For help see page 100,
Deleting an entry from a list.
2110 SSB Transceiver Reference Manual 155
Page 26

The Address List
This page has been left blank intentionally.
156 2110 SSB Transceiver Reference Manual
Page 27

13 Making and receiving calls
This section contains the following topics:
Calls you can make and receive (158)
Making a call (173)
Receiving a call (190)
Detecting transmissions from other stations (196)
CODAN
2110 SSB Transceiver Reference Manual 157
Page 28
Making and receiving calls
Calls you can make and receive
Special ALE address syntaxes
There are five types of special address syntax available for use in ALE/CALM networks
with a 2110 SSB Transceiver:
• ALL address syntax (FED-STD-1045 ALE/CALM option or MIL-STD-188-141B
ALE option)
• ANY address syntax (MIL-STD-188-141B ALE option)
• Group Selective address syntax (MIL-STD-188-141B ALE option)
• NET address syntax (MIL-STD-188-141B ALE option)
• Wildcard address syntax (MIL-STD-188-141B ALE option)
The types of ALE address syntaxes you can use depends on the options installed in the
transceiver.
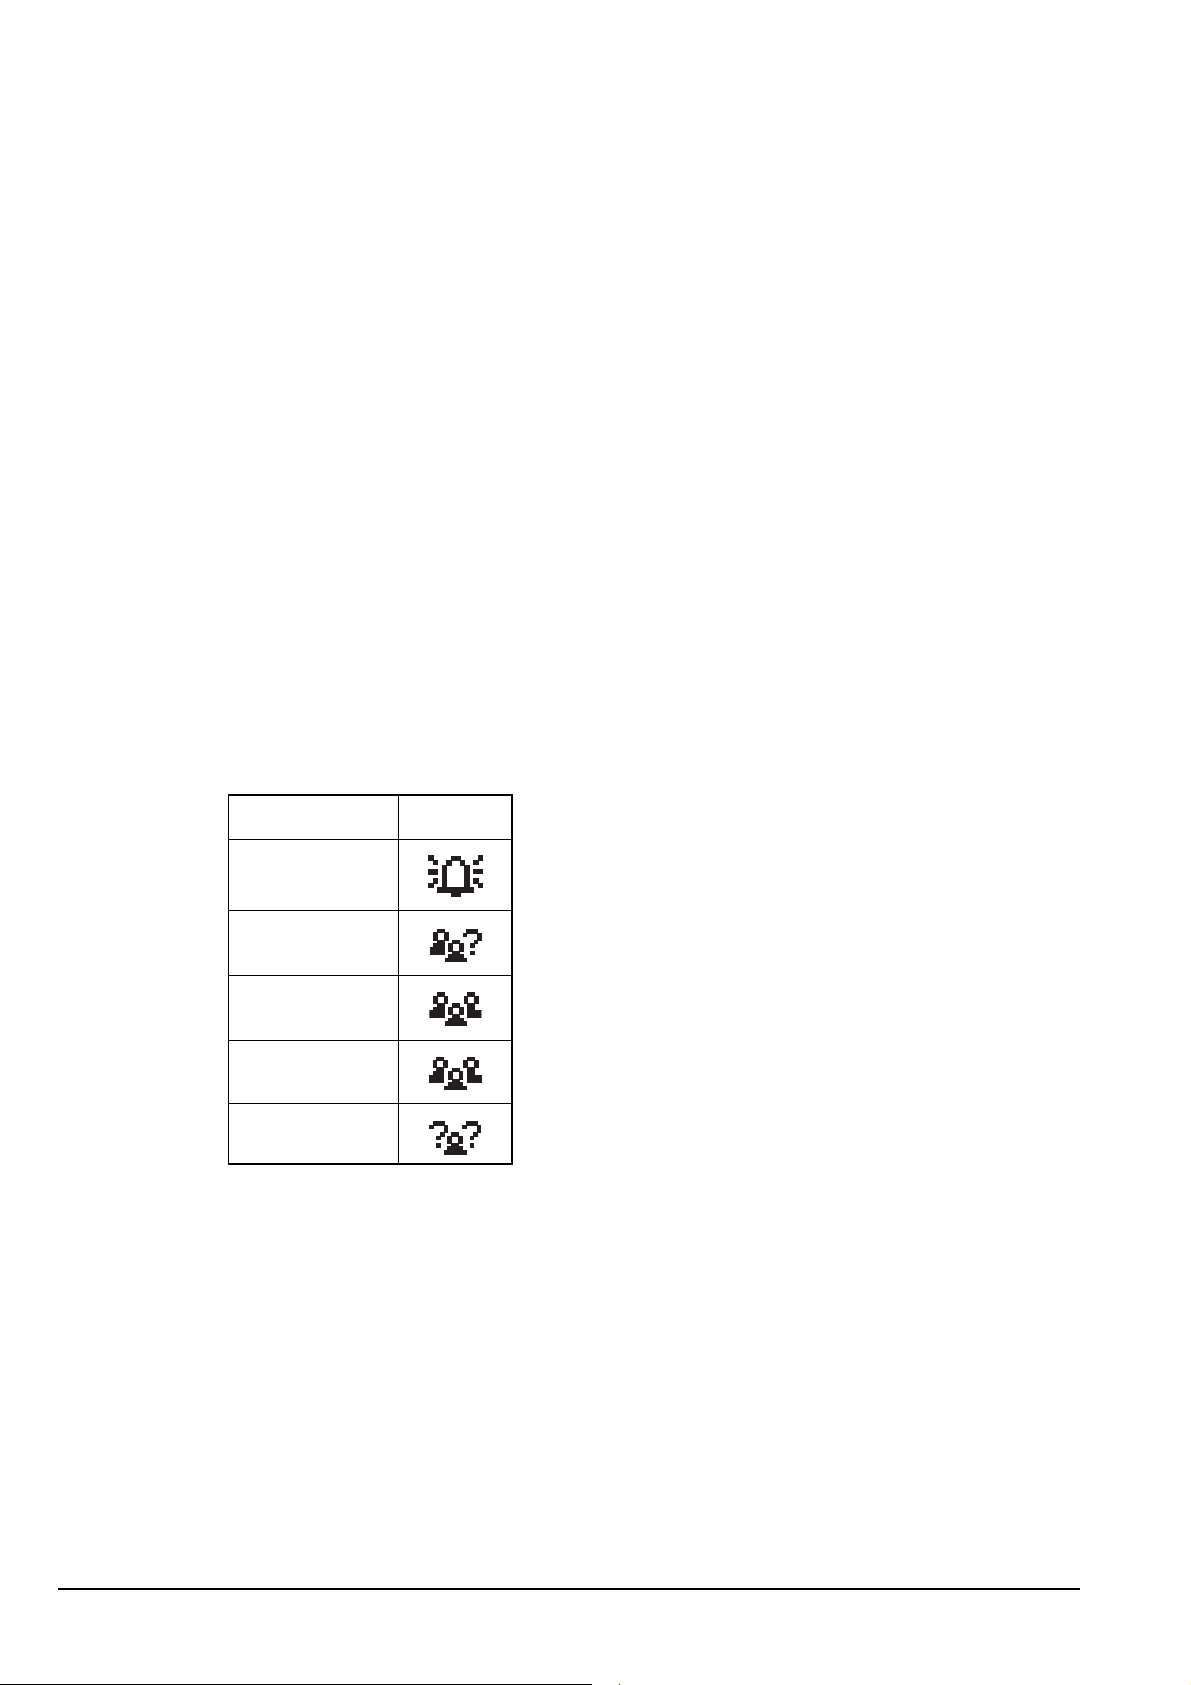
Each address syntax has an icon associated with it that is displayed when you make and
receive calls (see Table 17).
Table 17: Call icons for Selective calls made or received using a special ALE
address syntax
Address syntax Icon
ALL
ANY
Group Selective
NET
Wildcard
Each special ALE address syntax is described below.
158 2110 SSB Transceiver Reference Manual
Page 29

ALL address syntax
Making and receiving calls
NOTE
NOTE
NOTE
The ALL address syntax may be used if the FED-STD-1045 ALE/CALM
option or MIL-STD-188-141B ALE option is installed in the transceiver.
You cannot use the ALL address syntax in the Channel Test, Get Position,
or Get Status call type.
For information on entering text in a call address see page 56, Entering
text in an ALE call address.
If you want to send an ALE call to any station that is tuned to the same frequency in an
ALE/CALM network or scanning the network, make a call through the Emergency,
Message, Phone, Selective, and Send Position call types using the ALL address syntax
(see page 167, Emergency call, page 168, Message call, page 169, Phone call, page 169,
Selective call, and page 170, Send Position call). The ALL call does not specifically call
any stations, and does not request any automatic responses from stations that enter the
link. Stations can be configured to accept or to ignore ALL calls.
NOTE
When you use an ALL address syntax through the Selective call type, the
call icon will change to the ALL call icon ( ) when the call is started.
The global ALL address syntax is @?@. All stations detecting the call will enter an ALE
link with the initiating station, if enabled to do so. The group of linking stations can be
narrowed by using a selective ALL address syntax. In this address, the ? is replaced by
an upper-case letter or number, for example, @A@. All stations detecting the call that
have this letter or number as the last character in their self address for the ALE/CALM
network will enter the link.
If you send a selective ALL call to a group of stations, you can send another selective
ALL call to bring more stations into the link. For example, if you initially call @A@, all
stations tuned to the same frequency in an ALE/CALM network or scanning the network
with an ‘A’ as the last character of their self address will enter the link. If you follow this
with a call to @B@, then a further group of stations with ‘B’ as the last character of their
self address will also enter the link. If the receiving stations are already in a link, this link
will be closed and a new link created with the new call.
Alternatively, you can send multiple ALL addresses together to make a call to a range of
stations, for example, @A@,@B@.
2110 SSB Transceiver Reference Manual 159
Page 30

Making and receiving calls
ANY address syntax
NOTE
NOTE
NOTE
CAUTION
The ANY address syntax may be used if the MIL-STD-188-141B ALE
option is installed in the transceiver.
You cannot use the ANY address syntax in the Channel Test, Get Position,
or Get Status call type.
For information on entering text in a call address see page 56, Entering
text in an ALE call address.
If a station detects an ANY call to its matching self address, it will send a
response over the air.
If you want to send an ALE call to any station that is tuned to the same frequency in an
ALE/CALM network or scanning the network, and receive a response, make a call
through the Emergency, Message, Phone, Selective, and Send Position call types using
the ANY address syntax (see page 167, Emergency call, page 168, Message call,
page 169, Phone call, page 169, Selective call, and page 170, Send Position call). The
ANY call does not specifically call any stations, but it does request an automatic
response from stations that detect the call. These responses are returned in any slot
position (collisions may occur). The operator at the initiating station can use these
responses to gather information on the status of the stations using the network. The
initiating station then completes the link establishment with an acknowledgement sent to
all stations from which it received a response. Stations can be configured to respond to or
to ignore ANY calls.
NOTE
When you use an ANY address syntax through the Selective call type, the
call icon will change to the ANY call icon ( ) when the call is started.
The global ANY address syntax is @@?. All stations detecting the call will send a
response to the initiating station. The group of stations detecting the call can be narrowed
by using a selective ANY address syntax. In this address, the ? is replaced by an uppercase letter or number, for example, @@A. All stations detecting the call that have this
letter or number as the last character in their self address for the ALE/CALM network
will send a response, then enter a link with the initiating station when the
acknowledgement is received.
You can send multiple ANY addresses together to make a call to a range of stations, for
example, @@A,@@B.
The allowable length of the called address is dependent on the length of the self address
used for the call.
If the length of your self address is... The length of the called address can be...
1–3 characters 1–9 characters
4–6 characters 1–3 characters
160 2110 SSB Transceiver Reference Manual
Page 31

Group Selective address syntax
Making and receiving calls
NOTE
NOTE
NOTE
CAUTION
The Group Selective address syntax may be used if the MIL-STD-188141B ALE option is installed in the transceiver.
You cannot use the Group Selective address syntax in the Get Position or
Get Status call type.
For information on entering text in a call address see page 56, Entering
text in an ALE call address.
If a station detects a Group Selective call to its matching self address, it
will send a response over the air.
If you want to send an ALE call to specific stations that are named in the call but are not
members of a pre-determined group, make a call through the Emergency, Message,
Phone, Selective, and Send Position call types using the Group Selective address syntax
(see page 167, Emergency call, page 168, Message call, page 169, Phone call, page 169,
Selective call, and page 170, Send Position call). The Group Selective call requests an
automatic response from stations that detect the call and whose self addresses match one
of those in the call. These responses are sent in reverse order from that provided in the
call. The initiating station then completes the link establishment with an
acknowledgement sent to all stations from which it received a response.
When you use a Group Selective address syntax through the Selective call
NOTE
type, the call icon will change to the Group Selective call icon ( ) when
the call is started.
With Group Selective addresses, the length of the combined address can be no longer
than 12 ALE words, excluding commas. An ALE word has 3 characters. There can be no
more than five different first ALE words in the combined address. For example:
An address of ‘BOB1,BOB2,BOB3,BOB4,TIM,JOHN,MIK,SUE’ has five different first
ALE words, that is, BOB, TIM, JOH, MIK and SUE. However, this address will be
rejected because it has a total of 13 ALE words, that is, BOB, 1, BOB, 2, BOB, 3, BOB,
4, TIM, JOH, N, MIK and SUE.
2110 SSB Transceiver Reference Manual 161
Page 32

Making and receiving calls
NET address syntax
NOTE
NOTE
NOTE
The NET address syntax may be used if the MIL-STD-188-141B ALE
option is installed in the transceiver.
You cannot use the NET address syntax in the Get Position or Get Status
call type.
For information on entering text in a call address see page 56, Entering
text in an ALE call address.
If you want to send an ALE call from one station to other stations that are members of
the NET or have the NET programmed, make a NET call using the NET address through
the Emergency, Message, NET, Phone, Selective, and Send Position call types (see
page 167, Emergency call, page 168, Message call, page 169, Phone call, page 169,
Selective call, and page 170, Send Position call). These stations have a common NET
address. The member stations send an automatic response to the initiating station in a
pre-determined response slot. The initiating station then completes the link establishment
with all member stations. If a member station is set up to not respond during its allocated
response slot, it will still enter the link.
NOTE
When you use a NET address syntax through the Selective call type, the
call icon will change to the NET call icon ( ) when the call is started.
The NET address syntax can be any combination of upper-case letters and numbers up to
15 characters however, for efficiency of NET calls, it is preferable that the address be
limited to 3 characters. To make a call using a NET, the NET must be programmed in the
transceiver and configured correctly (see page 138, Programming the NET List).
162 2110 SSB Transceiver Reference Manual
Page 33

Wildcard address syntax
Making and receiving calls
NOTE
NOTE
NOTE
CAUTION
The Wildcard address syntax may be used if the MIL-STD-188-141B
ALE option is installed in the transceiver.
You cannot use the Wildcard address syntax in the Channel Test, Get
Position, or Get Status call type.
For information on entering text in a call address see page 56, Entering
text in an ALE call address.
If a station detects a Wildcard call to its matching self address, it will send
a response over the air.
If you want to send an ALE call to any station that is tuned to the same frequency in an
ALE/CALM network or scanning the network, and receive a response, make a call
through the Emergency, Message, Phone, Selective, and Send Position call types using
the Wildcard address syntax (see page 167, Emergency call, page 168, Message call,
page 169, Phone call, page 169, Selective call, and page 170, Send Position call). The
Wildcard address syntax, which ALE stations recognise, uses the wildcard character ? as
a placeholder for characters within a self address of a receiving station. Stations that
detect the call and whose self address matches the pattern in the wildcard address will
send a response to the initiating station. These responses are returned in any slot position
(collisions may occur). For example, a call sent to EM? may be responded to by stations
in the network with a self address in the ranges EMA–EMZ and EM0–EM9. The
initiating station then completes the link establishment with an acknowledgement sent to
all stations from which it received a response.
When you use a Wildcard address syntax through the Selective call type,
NOTE
the call icon will change to the Wildcard call icon ( ) when the call is
started.
The wildcard question marks can be in any position within the address.
NOTE
The stations that respond will have an address that is the same length as
the wildcard address sent from the initiating station.
You can send multiple Wildcard addresses together to make a call to a range of stations,
for example, ?A,B??.
The allowable length of the called address is dependent on the length of the self address
used for the call.
If the length of your self address is... The length of the called address can be...
1–3 characters 1–9 characters
4–6 characters 1–3 characters
2110 SSB Transceiver Reference Manual 163
Page 34

Making and receiving calls
Summary of the special ALE address syntaxes
The following summarises the special ALE address syntaxes for the MIL-STD-188141B ALE option. For help with entering the special characters see page 56, Entering
text in an ALE call address.
If you enter the ALE
The transceiver will send...
address syntax...
@?@ a global ALL call to all listening stations (see page 159, ALL
address syntax)
@A@ a selective ALL call to listening stations that have an ‘A’ as
the last character of their self address (‘A’ may be any
specified upper-case letter or number), for example, TNAA,
EANBA, 1NCA, 23A (see page 159, ALL address syntax)
@@? a global ANY call to all listening stations (see page 160, ANY
address syntax)
@@A a selective ANY call to listening stations that have an ‘A’ as
the last character of their self address (‘A’ may be any
specified upper-case letter or number), for example, TNAA,
EANBA, 1NCA, 23A (see page 160, ANY address syntax)
@AB a double selective ANY call to listening stations that have
‘AB’ as the last two characters of their self address (‘A’ and
‘B’ may be any specified upper-case letter or number), for
example, BAAB, 14BAB, Q2CAB, 1AB (see page 160, ANY
address syntax)
164 2110 SSB Transceiver Reference Manual
Page 35

Making and receiving calls
If you enter the ALE
The transceiver will send...
address syntax...
@A? a double selective wildcard ANY call to listening stations
that have an ‘A’ as the second to last character of their self
address (‘A’ may be any specified upper-case letter or
number) and any upper-case letter or number as the last
character, for example, USAM, 19MA0, ENA9, 3DAZ (see
page 160, ANY address syntax)
ABC,JK3MN,PQR
(example only)
a Group Selective call to the stations specifically addressed
(see page 161, Group Selective address syntax)
NET address a NET call to all stations with that NET programmed in the
NET List (see page 162, NET address syntax)
??? a Wildcard call to listening stations that have a self address
matching the length of the sent address and with any uppercase letter or number as each of the characters, for example,
SAM, NAA, 234, 3AZ (see page 163, Wildcard address
syntax)
A?B? (example only) a selective Wildcard call to listening stations that have a self
address matching the length of the sent address with ‘A’ and
‘B’ as the first and third characters respectively, and with any
upper-case letter or number in the second and last characters,
in this case (‘A’ and ‘B’ may be any specified upper-case
letter or number), for example, A2BM, ADB1, AZBE, A3B8
(see page 163, Wildcard address syntax)
Call types
There are 8 different types of calls available with an 2110 SSB Transceiver:
• Channel Test call
• Emergency call
• Get Position call
• Get Status call
• Message call
• Phone call
• Selective call
• Send Position call
The types of calls you can make and receive depend on the options installed in the
transceiver.
Each call type has an icon associated with it that is displayed when you make and receive
calls (see Table 18).
2110 SSB Transceiver Reference Manual 165
Page 36

Making and receiving calls
Table 18: Call types and icons
Channel Test
Get Position
Call type Icon
Emergency
Get Status
Message
Phone
Selective
Send Position
Each type of call is described below.
Channel Test call
If you want to test the suitability of a channel/mode before you use it to transmit voice or
data, make a Channel Test call.
In an ALE/CALM network, a Channel Test call may be sent to an ALE address using a
Group Selective or NET address syntax (if you have the MIL-STD-188-141B ALE
option installed).
NOTE
You cannot use the ALL, ANY, or Wildcard address syntax with a
Channel Test call.
A Channel Test call made in an ALE/CALM network with a Group Selective or NET
address may be used to replace the information in the LQA database. The initiating
station automatically sends a beacon on each channel/mode combination in the ALE/
CALM network, recording local and remote BER and SINAD information, and
calculating an LQA score. The LQA screen is visible during the Channel Test call, and at
the end of the call, displays the best channel on which to make the call.
The LQA information recorded during a Channel Test call in an ALE/CALM network
replaces information already recorded against the same network and self addresses.
Using a Channel Test call in an ALE/CALM network is an immediate method of
replacing the LQA database in the transceiver.
A Channel Test call made in an ALE/CALM network using the text SOUNDING as the
call address may be used to initiate a sounding operation. Transceivers that detect this
sounding will update the relevant information stored in their LQA database.
166 2110 SSB Transceiver Reference Manual
Page 37

Making and receiving calls
In a Codan Selcall network, a Channel Test call sends a request to the station you want to
call on the channel/mode you have selected. The receiving station automatically returns
an audible test signal. The volume and clarity of this signal indicates the quality of the
channel/mode.
You can also test channels once you have started a call (for more information see
page 176, Replacing LQA information as part of a call in an ALE/CALM network and
page 174, Testing a channel as part of a call in a Codan Selcall network).
Emergency call
If you want to trigger an emergency alert tone at a particular station and speak to an
operator, make an Emergency call. If the GPS option is installed in the transceiver (and
you have connected and configured a GPS receiver), your GPS position is automatically
sent with the call. Emergency calls can be sent to several stations at once (see page 150,
Setting up the emergency key and page 170, Group calls in a Codan Selcall network).
If you have the FED-STD-1045 ALE/CALM option installed, you can use the ALL
address syntax with the Emergency call type to send a call to a group of stations using an
ALE/CALM network. If you have the MIL-STD-188-141B ALE option installed, you
can use the ALL, ANY, Group Selective, NET, and Wildcard address syntaxes with the
Emergency call type to send a call to a group of stations using an ALE/CALM network.
NOTE
You can use any of the characters in the basic 38 ASCII subset (A–Z, 0–9,
@ and ?) for the address.
For more information on the ALE address syntaxes you can use with an Emergency call
see page 164, Summary of the special ALE address syntaxes.
Get Position call
NOTE
You cannot use the ALL, ANY, Group Selective, NET, or Wildcard
address syntax with a Get Position call.
The success of your Get Position call will depend upon the setting in the
NOTE
Cfg Respond GPS entry in the Control List of the transceiver you are
polling and the Privacy Mode of the network you are using for the call
(see page 204, Cfg Respond GPS).
If you want to obtain the GPS position of a station that has the GPS option installed in
the transceiver (and a GPS receiver connected to it and configured), make a Get Position
call. Get Position calls are automatically answered by the receiving station so an operator
is not required to take any action.
The information you receive from a Get Position call is displayed on the front panel as it
is received, if permitted, and is stored in the Calls In Log (see page 192, The Calls In
Log).
2110 SSB Transceiver Reference Manual 167
Page 38

Making and receiving calls
Get Status call
NOTE
You cannot use the ALL, ANY, Group Selective, NET, or Wildcard
address syntax with a Get Status call.
The success of your Get Status call will depend upon the setting in the
NOTE
Cfg Respond OTA entry in the Control List of the transceiver you are
polling and the Privacy Mode of the network you are using for the call
(see page 204, Cfg Respond OTA).
If you want to obtain information on the status of a transceiver at another station, such as
the power output of the transmitter or the firmware versions installed, make a Get Status
call. Get Status calls are automatically answered by the receiving station so an operator is
not required to take any action.
The information you receive from a Get Status call is displayed on the front panel as it is
received, if permitted, and is stored in the Calls In Log (see page 192, The Calls In Log).
When you make a Get Status call you need to specify the type of information you
require: diagnostic or configuration. This is described in detail on page 335, Get Status
calls.
Message call
If you want to send a typed message to another station, make a Message call. You can
enter a message at the time you make a call, store up to 10 messages in the Control List
for later use, and store messages in the Address List as part of a Message call.
If you have the FED-STD-1045 ALE/CALM option installed, you can use the ALL
address syntax with the Message call type to send a call to a group of stations using an
ALE/CALM network. If you have the MIL-STD-188-141B ALE option installed, you
can use the ALL, ANY, Group Selective, NET, and Wildcard address syntaxes with the
Message call type to send a call to a group of stations using an ALE/CALM network.
NOTE
You can use any of the characters in the basic 38 ASCII subset (A–Z, 0–9,
@ and ?) for the address.
For more information on the ALE address syntaxes you can use with a Message call see
page 164, Summary of the special ALE address syntaxes.
Message calls are automatically answered by any receiving stations so an operator is not
required to take any action. If you send an ALE call using the Message call type, the link
terminates immediately after the message is sent. Messages you receive are displayed on
the front panel, if permitted, and stored in the Calls In Log (see page 192, The Calls In
Log).
168 2110 SSB Transceiver Reference Manual
Page 39

Making and receiving calls
Phone call
If you want to call a telephone number from the transceiver, make a Phone call. Before
you make a Phone call you need to know the address of a telecommunication station
through which your call can be routed to the public telephone network.
If you have the FED-STD-1045 ALE/CALM option installed, you can use the ALL
address syntax with the Phone call type to send a call to a group of telecommunication
stations using an ALE/CALM network. If you have the MIL-STD-188-141B ALE option
installed, you can use the ALL, ANY, Group Selective, NET, and Wildcard address
syntaxes with the Phone call type to send a call to a group of stations using an ALE/
CALM network.
NOTE
You can use any of the characters in the basic 38 ASCII subset (A–Z, 0–9,
@ and ?) for the address.
For more information on the ALE address syntaxes you can use with a Phone call see
page 164, Summary of the special ALE address syntaxes.
Selective call
If you want to speak to an operator at a particular station, make a Selective call. When
the station receives the call the transceiver rings like a phone to notify the operator.
Selective calls can be heard by any station tuned to or scanning your current channel
with their mute switched off. However, only the transceiver at the station to which the
call has been addressed will ring.
Selective calls can be made to several stations at once (see page 170, Group calls in a
Codan Selcall network).
If you have the FED-STD-1045 ALE/CALM option installed, you can use the ALL
address syntax with the Selective call type to send a call to a group of stations using an
ALE/CALM network. If you have the MIL-STD-188-141B ALE option installed, you
can use the ALL, ANY, Group Selective, NET, and Wildcard address syntaxes with the
Selective call type to send a call to a group of stations using an ALE/CALM network.
The transceiver will automatically determine the call icon from the address syntax that
you enter in the address.
NOTE
You can use any of the characters in the basic 38 ASCII subset (A–Z, 0–9,
@ and ?) for the address.
If you have the MIL-STD-188-141B ALE option installed and the ALE Selective Msg
entry in the Control List enabled, you will be able to send a message with the start of a
call if you press when prompted during the call. You must use an ALE/CALM
network to make the call.
For more information on the ALE address syntaxes you can use with a Selective call see
page 164, Summary of the special ALE address syntaxes.
2110 SSB Transceiver Reference Manual 169
Page 40

Making and receiving calls
Send Position call
If you want to send your GPS information to another station, make a Send Position call.
You can only make Send Position calls if the GPS option has been installed in your
transceiver.
If you have the FED-STD-1045 ALE/CALM option installed, you can use the ALL
address syntax with the Send Position call type to send a call to a group of stations using
an ALE/CALM network. If you have the MIL-STD-188-141B ALE option installed, you
can use the ALL, ANY, Group Selective, NET, and Wildcard address syntaxes with the
Send Position call type to send a call to a group of stations using an ALE/CALM
network. The transceiver will automatically determine the call icon from the address
syntax that you enter in the address.
NOTE
You can use any of the characters in the basic 38 ASCII subset (A–Z, 0–9,
@ and ?) for the address.
For more information on the ALE address syntaxes you can use with a Send Position call
see page 164, Summary of the special ALE address syntaxes.
Send Position calls are automatically answered by any receiving stations so an operator
is not required to take any action. If you send an ALE call using the Send Position call
type, the link terminates immediately after the GPS position is sent. GPS positions you
send are stored in the Calls Out Log (see page 187, The Calls Out Log).
Group calls in a Codan Selcall network
Emergency, Message and Selective calls can be made to a group of stations
simultaneously by using a Codan Selcall network and a group address.
A group selcall address is an address that ends in two or more zeros. For example, to call
all stations with addresses that range from 1201 to 1299, you would enter 1200 as the
address. To call all stations with addresses that range from 150001 to 159999, you would
enter 150000 as the address.
NOTE
170 2110 SSB Transceiver Reference Manual
You can replace the zeros at the end of the address with dots or question
marks, for example, 12.. or 12?? instead of 1200.
Page 41

Special AMD messaging features
Making and receiving calls
NOTE
Special AMD messaging is available if the MIL-STD-188-141B ALE
option is installed.
For interoperability with other transceivers, the 2110 SSB Transceiver recognises special
AMD messaging syntax included at the beginning of an AMD message sent on a
network with a Privacy Mode of Plain. The transceiver will accept and process the
syntax shown in Table 19. You can also manually enter any of this text into an AMD
message. The syntax shown must be followed by a space, then the required information.
Table 19: Special AMD messaging syntax
Syntax Processed as...
#CMD A query call. The command is forwarded to the CICS port or
internal engineering terminal, then the status is returned.
#EMERGENCY An Emergency call. The transceiver will sound an emergency
alert tone.
#GPS A Send Position call. The GPS position data is received
followed by position information.
#GPS? A Get Position call. The GPS position data is received followed
by position information.
#HELP An Emergency call. The transceiver will sound an emergency
alert tone.
#MAYDAY An Emergency call. The transceiver will sound an emergency
alert tone.
#PANPAN An Emergency call. The transceiver will sound an emergency
alert tone.
#SOS An Emergency call. The transceiver will sound an emergency
alert tone.
#TEL <Telephone
number>
A Phone call. The call is transferred to the attached telephone
interconnect unit, which dials the telephone number.
#TEL! A hangup for a Phone call. The hangup from the radio party has
hung up the call.
When you send an Emergency call using a Plain network from 2110 SSB
NOTE
Transceivers, the #HELP text appears in the AMD message of a receiving
vendor transceiver.
2110 SSB Transceiver Reference Manual 171
Page 42

Making and receiving calls
Recognised variable expansion
The variables listed in Table 20 may be added in a Message call or an AMD message
sent with a call. These variables are recognised by the 2110 SSB Transceiver’s firmware.
The firmware expands the variable by inserting the current information associated with
the variable in the message.
Table 20: Recognised variables and their associated information
Keyword Function when used in a message
$DATE Inserts the current date in the following format: <name of day>
<month> <day> <year>
$GPS Inserts the current valid GPS position in the following format:
<latitude> <longitude> <altitude> <UTC>
$TIME Inserts the current time in the following format: <hh>:<mm>:<ss>
$TZ Inserts the time zone offset in the following format: <time zone
offset>
$VER Inserts the current version of the transceiver unit firmware in the
following format: <version number>
If you have the MIL-STD-188-141B ALE option installed and the ALE Selective Msg
entry in the Control List enabled, you will be able to send a message with the start of a
call if you press when prompted during the call. If you enter the following message...
MY POSITION IS $GPS
...the receiving station will display the following:
“MY POSITION IS 8958.04N 13841.23E +0.0M 101622 (A)” 05 FEB 02:05
NOTE
For help on entering $ see page 55, Entering special characters in
messages and names.
The transceiver checks the length of the expanded message before
NOTE
transmission. If you receive an error stating that the message is too long,
review the message and shorten the message as required.
172 2110 SSB Transceiver Reference Manual
Page 43

Making a call
Listen Before Transmit Mode
If you change the setting in the Cfg LBT Mode entry in the Control List
NOTE
The 2110 SSB Transceiver is capable of listening to a channel before initiating a call on
the channel. If the Cfg LBT Mode in the Control List is enabled, the transceiver will
detect whether or not there is traffic on the selected channel, that is, the channel is
occupied. The transceiver will listen on a channel for the length of time specified in the
Cfg LBT Period entry in the Control List. The transceiver will try busy channels twice
before reporting that they are busy.
The Cfg LBT Mode may be set to Enabled, Override allowed, or Disabled.
When the Cfg LBT Mode is set to Enabled, and the transceiver detects that the
channel(s) tried is(are) busy, it will prompt you to try the call again. You can:
you must switch the transceiver off then on again for the change to take
effect.
Making and receiving calls
•press CALL to try the call again using LBT
• press to select a new channel, then press CALL to make a call on this channel
using LBT
If only one channel was tried and found to be busy using LBT, you can
NOTE
When the Cfg LBT Mode is set to Override allowed, and the transceiver detects that the
channel(s) tried is(are) busy, it will prompt you to try the call again. You can:
•press CALL to try the call again using LBT
• hold CALL to try the call again without LBT (send the call regardless of any
detected traffic)
• press to select a new channel, then press CALL to make a call on this channel
using LBT
• hold to select a new channel and try the call on this channel without LBT (send
the call regardless of any detected traffic)
Calls using the Emergency call type or calls made through the key will override the
LBT Mode if it is enabled at either level. For information on setting up the key see
page 150, Setting up the emergency key.
listen for traffic on the channel then, if clear, override LBT by holding
CALL.
2110 SSB Transceiver Reference Manual 173
Page 44

Making and receiving calls
Testing the quality of a channel in a Codan Selcall network
If you want to test the quality of a particular channel/mode in a Codan Selcall network
before you use it to transmit voice or data, you can do so in two ways. You can:
• start making a call then, when prompted to select a channel/mode, test one or more
channel/mode combinations
• make a separate Channel Test call before you make the other call
Testing a channel as part of a call in a Codan Selcall network
NOTE This is the recommended method of making a Channel Test call.
To test a channel/mode as part of a call:
1 Start the call using your preferred method.
For example, go to the Address List then select the entry for the station you want to
call.
1 When the transceiver prompts you to select a channel/mode, scroll to the channel/
mode you want to test then hold CALL.
1 Listen for the revertive signal from the other station.
The volume and clarity of the signal indicates the quality of the channel/mode. You
may need to try another channel.
1 When you have found a suitable channel/mode, press CALL to continue the call.
Making a Channel Test call in a Codan Selcall network
To make a Channel Test call in a Codan Selcall network:
1 Press CALL.
1 Type the address of the station you want to call and select Channel Test? as the
call type.
1 Select the Codan Selcall network in which you want to make the call.
1 Scroll to the channel/mode you want to test, then press CALL.
1 Listen for the revertive signal from the other station.
The volume and clarity of the signal indicates the quality of the channel/mode.
174 2110 SSB Transceiver Reference Manual
Page 45

Making and receiving calls
Replacing LQA information for all channels in an ALE/CALM network
NOTE
You can make a Channel Test call in an ALE/CALM network if you have
the MIL-STD-188-141B ALE option installed.
If your station operates in a rapidly changing environment, for example, interactions
with mobile stations, you may want to replace the network-specific LQA information in
the transceiver’s database just prior to making a call in the network. You can do this by
making a Channel Test call in the network using the Group Selective or NET address
syntax.
If you want to replace the LQA information for an ALE/CALM network in your
transceiver, you can do so in two ways. You can:
• start a call then, when prompted to select a channel/mode, test one or more channel/
mode combinations
• make a separate Channel Test call before you make the other call
You cannot make a Channel Test call using the ALL, ANY, or
CAUTION
Wildcard address syntax, or to a NET that is set up to link
immediately (see page 134, Settings in the NET List).
During a Channel Test call in an ALE/CALM network, the LQA screen will be visible,
indicating the most recent response from a station, and a progress report on the highest
number of responses received on any channel and the number of channels tried.
Figure 30: LQA screen showing the most recent response
station that has responded
most recently
For more information on the LQA screen see page 224, LQA Screen entry.
2110 SSB Transceiver Reference Manual 175
Page 46

Making and receiving calls
Replacing LQA information as part of a call in an ALE/CALM network
To replace LQA information as part of a call:
1 Press SCAN to stop scanning.
1 Start the call using your preferred method.
1 When the transceiver prompts you to select a channel/mode, select <auto>, then
1 View the LQA screen for the best channel/mode to use.
1 Press CALL to continue the call.
1 When prompted again to select a channel/mode, you can either:
For example, go to the Address List then select the entry for the station you want to
call.
hold CALL.
• press to select the best channel/mode combination determined during the
Channel Test call
• select any other channel that had an acceptable LQA score
• select <auto> for the transceiver to select the best channel/mode for the call,
starting with the channel on which the most recent successful link was
established
1 Press CALL to continue the call.
Making a Channel Test call in an ALE/CALM network
To make a Channel Test call in an ALE/CALM network:
1 Press CALL.
1 Type the ALE NET or Group Selective address syntax of the stations for which you
want to replace the LQA information, then select Channel Test? as the call type.
1 Select the ALE/CALM network in which you want to make the call.
NOTE
The LQA Screen will display the best channel for the network, including the LQA
score as a percentage, and the BER/SINAD scores at the local and remote stations.
You do not have to select a network if you are sending the call to a
NET address as the network is already defined by the NET.
176 2110 SSB Transceiver Reference Manual
Page 47

Making and receiving calls
Making a manual sounding operation in an ALE/CALM network
NOTE
If you need to perform a manual sounding operation using the handset, you make a
Channel Test call in an ALE/CALM network using the text SOUNDING as the address.
You can do this as part of a new call, or if you use this feature often, set up an entry in the
Address List, then use this entry to perform a sounding operation in the selected network
(see page 154, Creating an entry in the Address List). The sounding operation will
update the LQA database in transceivers that detect the sounding.
To make a manual sounding operation:
Manual sounding is available if you have the MIL-STD-188-141B ALE
option installed.
1 Press CALL.
1 Select Channel Test? as the call type, then press
as the address, then press CALL.
to enter the text SOUNDING
*
1 Select the ALE/CALM network in which you want to make the sounding, and if
scanning was switched off, the channel/mode on which you want to make the
sounding.
A sounding operation on all channels, or the specified channel, in the network is
performed.
2110 SSB Transceiver Reference Manual 177
Page 48

Making and receiving calls
Selecting the best channel in an ALE/CALM network
NOTE You must have the MIL-STD-188-141B ALE option installed.
In order to select the best channel based on LQA information stored in the transceiver,
you need to provide the context of the best channel, that is, the address that you want to
call and the network in which you want to make the call.
To select the best channel:
1 Press SCAN to switch off scanning.
1 Press CALL.
1 Type the address of the station for which you want to find the best channel.
1 Select any valid call type for the address entered.
1 Select the ALE/CALM network in which you want to make the call.
1 At the channel/mode prompt, press .
The best channel is selected.
178 2110 SSB Transceiver Reference Manual
Page 49

Other ways to make calls
Making a new call
Making a new call is as simple as pressing CALL, typing the address of the station you
want to call, then following the prompts. You can make a new call at any time.
Returning a call
The details of the calls you receive are stored in the Calls In Log. Up to 20 calls can be
stored at a time and you can return any of these calls directly from this log.
When you return a call from the Calls In Log you can either use as many details of the
original call as possible, or review all details and select new details if necessary.
For more information on the log see page 192, The Calls In Log.
Making and receiving calls
Repeating a call
The details of the calls you make are stored in the Calls Out Log. Up to 20 calls can be
stored at one time and you can repeat any of these calls directly from this log.
When you repeat a call from the Calls Out Log you can either use as many details of the
original call as possible, or review all details and select new details if necessary.
For more information on the log see page 187, The Calls Out Log.
Making a call from the Last Heard Log
If you have the MIL-STD-188-141B ALE option installed, your transceiver will keep a
log of the last 100 on-air transmissions it has detected. The information gathered from
each transmission includes the self address used by the heard station, the time/date of the
transmission, and the channel/mode used for the transmission.
When you make a call from the Last Heard Log, you will be prompted with the
information from the log. You may select new details for the call if necessary.
For more information on the log see page 196, Detecting transmissions from other
stations.
Making a call from the Phone Link List
If you make frequent Phone calls from the transceiver you may want to make them from
the Phone Link List. When you begin a call from this list the call type is always Phone
(so you don’t have to scroll to it), and you are not prompted to select a phone link; the
call uses the entry you were on when you began the call.
You may be prompted to select certain details about the call depending on the
configuration of the transceiver.
2110 SSB Transceiver Reference Manual 179
Page 50

Making and receiving calls
Making a voice call
The simplest type of call is a voice call. To make a voice call you:
• select a channel and mode
• press PTT to tune the antenna
• wait until the channel is clear of voice and data traffic
• hold down PTT and begin speaking
Your call can be heard by any station tuned to or scanning this channel with their Mute
Scan entry switched off, set to Scan for Voice, or set to Voice.
180 2110 SSB Transceiver Reference Manual
Page 51

Calling methods
Making and receiving calls
CAUTION
NOTE
To make any type of call to a specific station:
Depending on the configuration of a NET, a NET call may take several
minutes to establish a link.
While a call is being established, the transceiver will show that calling
activity is in progress by flashing the CALL icon in place of the scan
indicator.
1 Decide on the method you want to use to make the call, then use the information in
the following table to start the call.
NOTE For help with entering text see page 52, Entering and editing text.
If you want to... Do this...
make a call from the
Address List
• go to the entry you want to call in the Address
List
• to use as many details from the entry as possible,
press CALL, or
• to review all details and/or select new ones, hold
CALL
make a call in an emergency • hold for at least 2 seconds
make a new call • press CALL
• select the call type you want to use
• enter the address (including any special ALE
address syntax for ALL, ANY, Group Selective,
NET, and Wildcard calls) of the station(s) you
want to call, or if you are making a Phone call,
enter the phone number you want to call
•press CALL
If the ALE Selective Msg entry in the
NOTE
return a call • press CALL LOGS twice to open the Calls In
• go to the call you want to return
• to use as many details from this call as possible,
Control List is enabled, you will be
prompted to press to enter a message.
Log
press CALL, or
• to review all details and/or select new ones, hold
CALL
2110 SSB Transceiver Reference Manual 181
Page 52

Making and receiving calls
If you want to... Do this...
repeat a call • press CALL LOGS to open the Calls Out Log
• go to the call you want to repeat
• to automatically repeat this call, press CALL, or
• to review all details and/or select new ones, hold
CALL
make a call from the Last
Heard Log
make a Phone call from the
Phone Link List
• press CALL LOGS three times to open the Last
Heard Log
• go to the Last Heard entry to which you want to
make a call
• press CALL
• select the call type you want to use
• press CALL
If the ALE Selective Msg entry in the
NOTE
• go to the phone link through which you want to
• press CALL
• enter the telephone number you want to call (you
• press CALL
Control List is enabled, you will be
prompted to press to enter a message.
make this call
can enter up to 16 digits)
1 You may be prompted for details about the call depending on the method you chose
to make the call, the call type you selected, and the configuration of the transceiver.
If you are prompted for any details, use the information in the following table to
enter them, then press CALL.
If this prompt is
displayed...
Select link • select the phone link station through which you
Phone link addr? • enter the address of the phone link station
Do this...
want to make the Phone call
through which you want to make the Phone call
(including any special ALE address syntax for
ALL, ANY, Group Selective, NET, and Wildcard
calls)
182 2110 SSB Transceiver Reference Manual
Page 53

Making and receiving calls
If this prompt is
Do this...
displayed...
Select msg • select the message you want to use
For help on editing a message see page 225,
Messages entry.
NOTE
To retrieve diagnostic information from the
remote station, type 1. To retrieve
configuration information, type 2 (see
page 335, Get Status calls).
Select network • select the network in which you want to make
the call
My address? • select or enter the self address from which you
want to send the call
Select chan/mode In an ALE/CALM network:
• select <auto> if you want the transceiver to
select the best channel/mode for the call, starting
with the channel on which the most recent
successful link was established, or
• select the channel/mode you want to use to make
the call, or
• if you have the MIL-STD-188-141B ALE option
installed, press to select the best channel
based on information in the LQA database
In an ALE/CALM network, you can test the
quality of the channels in a network by
NOTE
sending a Channel Test call (see page 176,
Replacing LQA information as part of a call
in an ALE/CALM network).
In a Codan Selcall network:
• select the channel/mode you want to use to make
the call and check that it is clear of voice and
data traffic
In a Codan Selcall network, you can test the
quality of the selected channel by sending a
NOTE
Channel Test call (see page 174, Testing a
channel as part of a call in a Codan Selcall
network).
2110 SSB Transceiver Reference Manual 183
Page 54

Making and receiving calls
1 If LBT Mode is set to Enabled or Override allowed, you may be prompted to try the
channels again. Use the information in the following table to answer the prompt.
If this prompt is
displayed...
Chan busy:
Try again?
All|<N> chans busy:
Try again?
Do this...
If Cfg LBT Mode is set to Enabled:
• press CALL to try the call again using LBT
• press to select a new channel, then press
CALL to make a call on this channel using LBT
If only one channel was tried and found to
NOTE
If Cfg LBT Mode is set to Override allowed:
• press CALL to try the call again using LBT
• hold CALL to try the call again without LBT
• press to select a new channel, then press
• hold to select a new channel and try the call
be busy using LBT, you can listen for traffic
on the channel then, if clear, override LBT
by holding CALL.
(send the call regardless of any detected traffic)
CALL to make a call on this channel using LBT
on this channel without LBT (send the call
regardless of any detected traffic)
If you made an ANY, Group Selective, NET, or Wildcard call, you will receive popup messages stating from which stations you have received a response.
NOTE
To abort the call before a connection to the other station is made,
press PTT.
184 2110 SSB Transceiver Reference Manual
Page 55

1 To complete the call, use the information in the following table.
If you made an ALL, ANY, Group Selective, NET, or Wildcard call,
you can send data within the established link by pressing CALL and
NOTE
If you are making a... Do this...
Channel Test call In an ALE/CALM network:
following the prompts.
If the link is closed automatically during these inlink messages,
consider extending the Cfg In Call Timeout entry in the Control List.
• wait for the LQA screen to display the best
channel
In a Codan Selcall network:
• listen for the revertive signal
Making and receiving calls
Emergency call
Selective call
Get Position call
Get Status call
Message call
Send Position call
NOTE
In an ALE/CALM network:
• wait until a message informs you that the call has
• hold down PTT then speak, releasing PTT when
•press SCAN to end the call and resume scanning
In a Codan Selcall network:
• wait until a message informs you that the call has
• hold down PTT then speak, releasing PTT when
•press SCAN to end the call and resume scanning
• wait until a message informs you that the call has
NOTE
The call is ended automatically but can be
aborted by pressing PTT or SCAN.
been successful
you have finished speaking
been sent and listen for audible beeps transmitted
from the other station
you have finished speaking
been completed
The call is ended automatically but can be
aborted by pressing PTT or SCAN.
2110 SSB Transceiver Reference Manual 185
Page 56

Making and receiving calls
If you are making a... Do this...
Phone call • wait until you hear a reply from the person you
called
• hold down PTT then speak, releasing PTT when
you have finished speaking
• press SCAN to end the call
In an ALE/CALM network:
The transceiver resumes scanning.
In a Codan Selcall network:
The transceiver asks if you want to send a hangup
signal.
• to send a hangup signal, press
• if the other party has sent a hangup signal via the
phone line, press
The transceiver resumes scanning.
186 2110 SSB Transceiver Reference Manual
Page 57

The Calls Out Log
When you make a call, an entry for the call is created in the Calls Out Log. The entry
lists the:
• type of call that was made
• address to which the call was made
• message or position that was sent if the call was a Message, Get Status or Send
Position call
• time at which the call was made
• self address from which the call was made
• network in which the call was made
• channel/mode on which the call was made
• phone link that was used, if the call was a Phone call
Making and receiving calls
Figure 31: The Calls Out Log showing a Selective call made
icon for type
of call made
date on which
call was made
address to which
call was made
time at which
call was made
If you make a Message, Get Status or Send Position call, the information sent is
displayed instead of the date and time.
Figure 32: The Calls Out Log showing a Message call made
icon for type
of call made
message sent
address to which
call was made
2110 SSB Transceiver Reference Manual 187
Page 58

Making and receiving calls
Figure 33: The Calls Out Log showing a NET call made
NET call
icon
date on which
call was made
Up to 20 calls can be stored at one time and you can repeat any of these calls directly
from the log (see page 189, Repeating a call from the Calls Out Log).
The calls are listed in the order in which they were made with the most recent call at the
top of the list. If you make two or more calls with the same call type and address (and
message or GPS position, if applicable), only the most recent call is kept in the log.
If you make a Get Position or Get Status call, an entry for the call is created in the Calls
Out Log, and the information that is sent to you by the other station is stored in an entry
for the call in the Calls In Log (see page 192, The Calls In Log).
Displaying an entry in the Calls Out Log
To display an entry in the Calls Out Log:
name of NET to which
call was made
time at which
call was made
1 Press CALL LOGS to open the Calls Out Log.
The details of the last call sent are displayed.
1 Scroll through the entries.
1 To display more information about an entry, press .
1 Scroll through the settings.
1 Press to return to the entry.
1 Press to close the Calls Out Log and return to the screen from which you began.
188 2110 SSB Transceiver Reference Manual
Page 59

Repeating a call from the Calls Out Log
To repeat a call from the Calls Out Log:
1 Press CALL LOGS to open the Calls Out Log.
1 Scroll to the call you want to repeat.
1 Either:
• press CALL to automatically repeat the call, or
• hold CALL to review all details and/or select new ones
Deleting an entry from the Calls Out Log
To delete an entry from the Calls Out Log:
1 Press CALL LOGS to open the Calls Out Log.
The details of the last call sent are displayed.
Making and receiving calls
1 Scroll to the entry you want to delete.
1 Hold to open the List Manager.
1 Select Delete entry.
The transceiver asks you to confirm that you want to delete the entry.
1 Press .
The entry is deleted and the List Manager remains open.
1 Press repeatedly to return to the screen from which you began.
2110 SSB Transceiver Reference Manual 189
Page 60

Making and receiving calls
Receiving a call
There are two ways you can receive a call. You can listen to a channel and respond when
you hear a voice, or you can wait until an alert tone notifies you of a call addressed to
your station. This section covers receiving calls addressed to your station.
When you receive a call addressed to your station, the transceiver sounds an audible alert
tone, displays an incoming call screen, if permitted, and creates an entry in the Calls In
Log.
NOTE
The call alert
The call alert varies according to the type of call received. For Message, Phone, Selective
and Send Position calls it continues for about 10 seconds then changes to a series of pips
until you press a key. For Emergency calls it continues for 5 minutes then changes to a
series of pips.
Table 21: Call types and alert tones
Call type Alert tone sounds like...
Emergency heehaw, heehaw, heehaw
Message pip, pip, pip, pip, pip
Phone a telephone ringing
Selective a telephone ringing
These events do not occur when you receive a Channel Test, Get Position,
or Get Status call as the transceiver automatically responds to these calls.
Send Position pip, pip, pip, pip, pip
Group calls:
Emergency calls
all other calls
NOTE
If you want to switch off the audible alert tone when a call is received, set
the Cfg Alert Tones entry in the Control List to Disabled (see page 110,
Logging into admin level from user level and page 200, Entries in the
Control List).
heehaw, heehaw, heehaw
beep, beep, beep, beep, beep, beep
190 2110 SSB Transceiver Reference Manual
Page 61

The incoming call screen
dd
The incoming call screen displays:
• the type of call being received
• the address of the station making the call
• the date and time at which the call was received
• the message, GPS position or status information, if sent
• the call count number
If you want to switch off the audible alert tone when a message is
NOTE
received, set the Cfg Alert Tones entry in the Control List to Disabled (see
page 110, Logging into admin level from user level and page 200, Entries
in the Control List).
If you want to prevent a message being displayed when it is received, set
NOTE
the Cfg Incoming Msg entry in the Control List to Just log (see page 110,
Logging into admin level from user level and page 200, Entries in the
Control List).
Making and receiving calls
Figure 34: An incoming call screen for a Selective call
address
of caller
call type
call count
number
date time
Figure 35: An incoming call screen for a Message call
a
ress
of caller
call type
message
2110 SSB Transceiver Reference Manual 191
call count
number
Page 62

Making and receiving calls
Figure 36: An incoming call screen for a NET call
address of
caller
call type
ALE selective
message
name of
NET
call count number
If you receive one or more calls while the transceiver is unattended, the incoming call
screen displays the details of the most recent call. The call count number at the bottom
right of the screen indicates the number of calls received since the first call (see
Figure 34).
To remove the incoming call screen:
1 Press .
Error reporting in a received AMD message
If you receive a call containing a message in which an error has been detected, the
corrupted part of the message will be replaced with reverse-highlighted bullets.
The Calls In Log
When you receive a call, an entry is created in the Calls In Log. The entry lists the:
• type of call received and the address of the caller
• message, GPS position or status information received if the call was a Message,
• time at which the call was received
• self address to which the call was sent
• network in which the call was received
• channel/mode on which the call was received
• phone link that was used, if the call was a Phone call
Get Position, or Get Status call
NOTE
192 2110 SSB Transceiver Reference Manual
Entries are not created for Channel Test, Get Position, and Get Status
calls.
Page 63

Making and receiving calls
Figure 37: The Calls In Log showing a Selective call received
icon for type of
call received
date of
received call
address from which
call was received
time of
received call
If you receive a Message or Send Position call, or you have made a Get Position or Get
Status call, the information received is displayed instead of the date and time.
Figure 38: The Calls In Log showing a Message call received
icon for type of
call received
message received
address from which
call was received
Figure 39: The Calls In Log showing a Get Status call received
icon for type of
call received
status information
address from which
call was received
Figure 40: The Calls In Log showing a NET call received
NET call icon
self address of sender/NET name
from which call was received
ALE selective message
received with NET call
2110 SSB Transceiver Reference Manual 193
Page 64

Making and receiving calls
Up to 20 calls can be stored at a time and you can return any of these calls directly from
the log (see page 194, Returning a call from the Calls In Log).
The calls are listed in the order in which they were received with the most recent call at
the top of the list. If you receive two or more calls with the same call type and address
(and message or GPS position, if applicable), only the most recent call is kept in the log.
Displaying an entry in the Calls In Log
To display an entry in the Calls In Log:
1 Press CALL LOGS twice to open the Calls In Log.
The details of the last call received are displayed.
1 Scroll through the entries.
1 To display more information about an entry, press .
1 Scroll through the settings.
1 Press to return to the entry.
1 Press to close the Calls In Log and return to the screen from which you began.
Returning a call from the Calls In Log
To return a call from the Calls In Log:
1 Press CALL LOGS twice to open the Calls In Log.
1 Scroll to the call you want to return.
1 Either:
• press CALL to use as many details from this call as possible, or
• hold CALL to review all details and/or select new ones
194 2110 SSB Transceiver Reference Manual
Page 65

Making and receiving calls
Deleting an entry from the Calls In Log
To delete an entry from the Calls In Log:
1 Press CALL LOGS twice to open the Calls In Log.
The details of the last call received are displayed.
1 Scroll to the entry you want to delete.
1 Hold to open the List Manager.
1 Select Delete entry.
The transceiver asks you to confirm that you want to delete the entry.
1 Press .
The entry is deleted and the List Manager remains open.
1 Press repeatedly to return to the screen from which you began.
2110 SSB Transceiver Reference Manual 195
Page 66

Making and receiving calls
Detecting transmissions from other stations
NOTE
The Last Heard Log is available if you have the MIL-STD-188-141B
ALE option installed in your transceiver.
When your station detects transmissions from any other active stations, an entry is
created in the Last Heard Log. The entry lists the:
• the address used by the detected station
• time and date at which the call was detected
• channel/mode on which the call was detected
Figure 41: The Last Heard Log
address used by
detected station
date and time of
detected transmission
Up to 100 detected transmissions can be stored at a time, and you can make a call to any
of the stations recorded in the log directly from the log (see page 197, Making a call from
the Last Heard Log).
The transmissions are listed in the order in which they were detected with the most
recent at the top of the list. If you detect two or more transmissions with the same station
address and channel/mode, only the most recent call is kept in the log.
196 2110 SSB Transceiver Reference Manual
Page 67

Displaying an entry in the Last Heard Log
To display an entry in the Last Heard Log:
1 Press CALL LOGS three times to open the Last Heard Log.
The details of the last transmission detected are displayed.
1 Scroll through the entries.
1 To display more information about an entry, press .
1 Scroll through the settings.
1 Press to return to the entry.
Making and receiving calls
1 Press to close the Last Heard Log and return to the screen from which you began.
Making a call from the Last Heard Log
To make a call from the Last Heard Log:
1 Press CALL LOGS three times to open the Last Heard Log.
1 Scroll to the Last Heard entry to which you want to make a call.
1 Press CALL.
1 Select the call type you want to use.
1 Press CALL.
2110 SSB Transceiver Reference Manual 197
Page 68

Making and receiving calls
This page has been left blank intentionally.
198 2110 SSB Transceiver Reference Manual
Page 69

14 The Control List
This section contains the following topics:
Entries in the Control List (200)
ALE entries (209)
Auto Resume entries (215)
Devices entry (216)
GPS Screen entry (222)
LQA Screen entry (224)
Messages entry (225)
CODAN
2110 SSB Transceiver Reference Manual 199
Page 70

The Control List
Entries in the Control List
The entries in the Control List enable you to customise the transceiver and control the
way it operates. Table 22 provides a complete list of the entries in the Control List that
can be changed at user and admin level. Some of the entries are covered in more detail in
the sections after the table.
The Control List is admin hidden, by default. You will only be able to
access the Control List to view and/or change entries by logging into
NOTE
CAUTION
admin level (see page 110, Logging into admin level from user level). If
the user needs to access any entries in the Control List, the administrator
should set up hot keys to these entries (see page 241, Creating a macro
and assigning it to a hot key).
Some entries in the Control List alter the configuration of the transceiver,
for example, RS232 Mode and RS232 Mode. If your transceiver does not
respond as expected after an entry in the Control List has been altered,
switch the transceiver off then on again.
Table 22: Entries in the Control List
Name of entry Use this entry to... Default
Address Program up to 20 self addresses for your station and specify the
network or networks in which you want to use them. For more
information on self addresses see page 69, Entering your station
self address.
ALE Accept ALL
Call
ALE Accept ANY
Call
ALE Accept Wildcard
Call
ALE AMD Position Set the position in which the transceiver will transmit AMD data.
Set whether or not your transceiver will accept ALL calls that it
detects. For more information see page 209, ALE Accept ALL Call.
Set whether or not your transceiver will accept and respond to
ANY calls that it detects. For more information see page 209,
ALE Accept ANY Call.
Set whether or not your transceiver will accept and respond to
Wildcard calls that it detects. For more information see page 209,
ALE Accept Wildcard Call.
For:
• the shortest possible call duration, select Auto
Enabled
Enabled
Enabled
Auto
• compatibility with other transceivers, select Leading
For more information see page 209, ALE AMD Position.
ALE BER Increase or decrease the value of the BER threshold used in BER
testing. For more information see page 210, ALE BER.
ALE Call Threshold Set the minimum score for a channel to be tried in ALE calls. For
more information see page 210, ALE Call Threshold.
ALE Call Weighting Weight the LQA scoring of ALE channels for data or voice. For
more information see page 211, ALE Call Weighting.
200 2110 SSB Transceiver Reference Manual
12 errors
0%
Mostly voice
Page 71

The Control List
Table 22: Entries in the Control List (cont.)
Name of entry Use this entry to... Default
ALE Golay Set the value of the Golay threshold used in Golay testing. For
more information see page 211, ALE Golay.
ALE Hangup ALL
Call
Set whether or not the initiator of an ALL call can hang up the call
to all linked stations. For more information see page 211,
ALE Hangup ALL Call.
ALE LQA Average Select the way that LQA information will be used when recording
signal quality. For more information see page 211,
ALE LQA Average.
ALE LQA Clear Clear the LQA information in the transceiver. For more
information see page 212, ALE LQA Clear.
ALE LQA Decay Set the length of time it takes for LQA information to artificially
decay, or switch this feature off. For more information see
page 212, ALE LQA Decay.
ALE LQA Exchange Exchange LQA information with stations during each call so that
the link quality can be assessed in both directions. For more
information see page 213, ALE LQA Exchange.
ALE LQA Mapping Set the mapping of LQA information according to its frequency.
For more information see page 213, ALE LQA Mapping.
2
Enabled
Both
15 days
On
Frequency
ALE Retries Set the number of times the transceiver retries a channel when
attempting to establish an ALE link before trying the next best
channel in the network. For more information see page 213,
ALE Retries.
ALE Selective Msg Set whether or not you can send a message with a Selective call
made in an ALE/CALM network. For more information see
page 213, ALE Selective Msg.
ALE Silent Mode Prevent automatic ALE transmissions from the transceiver unit.
For more information see page 213, ALE Silent Mode.
ALE Site Mgr Collect information on unknown ALE transceivers in the network.
For more information see page 214, ALE Site Mgr.
ALE Soundings Set the status of the transceiver following a sounding. For more
information see page 214, ALE Soundings.
Audio Volume Set the audio volume of the transceiver. 8
Auto Resume Listen Set the scan method used when scanning is switched on by the
Auto Resume Mode entry. For more information see page 215,
Auto Resume entries.
1
Enabled
Off
Off
Default
Leave as is
Auto Resume Mode Set the action performed when the Auto Resume Time ends. For
Start scan
more information see page 215, Auto Resume entries.
Auto Resume Time Set the length of time after scanning stops that the transceiver
2 minutes
performs the action set in the Auto Resume Mode entry. For more
information see page 215, Auto Resume entries.
2110 SSB Transceiver Reference Manual 201
Page 72

The Control List
Table 22: Entries in the Control List (cont.)
Name of entry Use this entry to... Default
Battery View the status of the attached battery.
Cfg Abandon Mode Set how the transceiver will shut down following the + key
sequence. If you want the transceiver to:
• not respond to the abandon key sequence, select Never
• shut down and only be accessed by an administrator (if an
admin password has been set), select Lock
• erase all secure keys, channels, networks, NETs, phone links,
addresses, self addresses, call logs, messages, welcome text,
site manager, and LQA information, then admin lock, select
Erase
Cfg Alert Tones Set whether or not the transceiver will give an alert tone (beep or
ring) when it receives a message or a call. If you want the
transceiver to:
• provide a local alert tone and external alarm, if connected,
when it receives a message or a non-message call, select
Normal
• provide an external alarm, if connected, when it receives a
non-message call only, select Messages skip ext alarm
• provides a local alert tone when it receives a non-message
call, select Messages don’t ring
Never
Normal
• provide no alert tones or external alarms, if connected, when it
receives any type of call, select Disabled
Cfg Auto Tune Mode Set the Auto Tune Mode to suit the antenna. If you have:
• a broadband antenna or an antenna that does not require a
tuning cycle, select 50 Ohm
• an antenna that uses a Codan antenna tuning interface (for
example, 9350, 4203, 8558), select Codan
• an antenna that does not conform to Codan’s antenna tuning
interface but provides automatic tuning capability (for
example, 9103), select SWR
• different types of antennas that may require tuning by the
internal antenna tuner, or do not require a tuning cycle, select
ATU/50 Ohm
• an antenna that requires tuning by the internal antenna tuner,
select ATU
Cfg Call Status Time Set the maximum length of time a receiving station has to respond
to a Get Status call with the information you requested.
Cfg Chain Call Pause Set the length of time the transceiver pauses between chained calls,
for example, during an Emergency call.
AT U /5 0
5 seconds
10 seconds
202 2110 SSB Transceiver Reference Manual
Page 73

The Control List
Table 22: Entries in the Control List (cont.)
Name of entry Use this entry to... Default
Cfg Channel Scroll Set the direction in which the key scrolls in the Channel List,
that is, to the next channel or the previous channel.
Go to next
chan
By default, pressing scrolls to the next highest number/next
alphabetically sorted name in the Channel List, that is, 1-2-3-4 or
Chan A-Chan B-Chan C-Chan D.
If you want the key to scroll in the opposite direction, as it does
in other lists in the transceiver, select Go to prev chan.
Cfg Easitalk Select a noise reduction algorithm. Cepstral
Cfg Fast AGC Switch fast auto gain control on or off. Disabled
Cfg In Call Timeout Set the length of time from the last key press on the front panel
30 seconds
after which incoming calls on the transceiver will be hung up.
Cfg Incoming Msg Set whether or not the transceiver will display a message to the
Show and log
operator when it is received. If you want to:
• display messages and log them in the Calls In Log, select
Show and log
• prevent messages from being displayed, but still log them in
the Calls In Log, select Just log
Cfg LBT Mode Set whether or not the transceiver will listen for calls and traffic on
a channel before initiating a call. If you want to:
• use LBT for all calls, select Enabled
• use LBT, with the option to override for all calls, select
Override allowed
• disable LBT for all calls, select Disabled
For more information on listening before transmitting see
page 173, Listen Before Transmit Mode.
Cfg LBT Period Set the length of time that the transceiver will listen for calls and
traffic on a channel before initiating a call.
Cfg Low Current
Mode
Set the level of current used by the transceiver during muted
operation. If you want to:
• extend the time remaining for your battery, select Auto
• reduce the time remaining for your battery and improve the
receiver’s performance in areas of high signal levels, select
Disabled
Cfg Power Preference Set the power preference to suit the power transmission level for
your station. If you want to:
Enabled
2 seconds
Auto
• transmit with high power, select High
• transmit with low power, select Low
Cfg PTT Beeps Transmit astrotones when the PTT button is released during a call.
On
This saves you having to say ‘over’ each time you release PTT.
2110 SSB Transceiver Reference Manual 203
Page 74

The Control List
Table 22: Entries in the Control List (cont.)
Name of entry Use this entry to... Default
Cfg PTT Cutout Time Set the length of time after PTT is held down for the transceiver to
cease transmission and switch to receive. This ensures that, even if
PTT is held down accidentally (because, for example, you are
sitting on the handset), power consumption is minimised and the
transceiver is ready to receive calls. You can also use this entry to
switch this feature off.
Cfg Respond GPS Set the way in which the transceiver will handle its response to a
Get Position call sent through an ALE/CALM or Codan Selcall
network. If you want to:
• respond to a Get Position call regardless of the Privacy Mode
of the network through which the call was made, thus leaving
your encrypted position data open to decryption by others,
select Always
• respond in a proprietary Codan-encoded format to a Get
Position call on a network with the Privacy Mode set to
Registered, Group or None, select Codan
• respond to a Get Position call from another Codan transceiver
on a network with the Privacy Mode set to Group and a
common Privacy Key, select Encrypted
• disable your response to any Get Position call, select Never
10 minutes
Always
NOTE
You will still be able to make Send Position calls if this
entry is set to Never.
Cfg Respond OTA Set the way in which the transceiver will handle its response to an
OTA command sent through an ALE/CALM or Codan Selcall
network. If you want to:
• respond to an OTA command regardless of the Privacy Mode
of the network through which the call was made, thus leaving
your encrypted OTA command open to decryption by others,
select Always
• respond in a proprietary Codan-encoded format to an OTA
command on a network with the Privacy Mode set to
Registered, Group or None, select Codan
• respond to an OTA command from another Codan transceiver
on a network with the Privacy Mode set to Group and a
common Privacy Key, select Encrypted
• disable your response to any OTA command, select Never
For more information on OTA commands contact your Codan
representative.
Cfg RF Pre-Amp Switch the RF pre-amplifier on or off. To increase the receive
sensitivity of the RF unit, select On. To reduce it, select Off.
Codan
On
204 2110 SSB Transceiver Reference Manual
Page 75

The Control List
Table 22: Entries in the Control List (cont.)
Name of entry Use this entry to... Default
Cfg Scan Voice
Extend
Set the period of time that the transceiver holds the scan when
voice is detected. The transceiver will continue to extend by this
amount each time voice is detected on the channel, up to the
maximum hold period set in the Cfg Scan Voice Max Hold entry. If
you do not want the transceiver to hold the scan after voice is
detected, set this entry to Disabled.
Cfg Scan Voice Max
Hold
Set the maximum length of time that the transceiver pauses on a
channel after voice has been detected. This entry overrides the
extend function in the Cfg Scan Voice Extend entry.
Cfg Speaker External Switch an external speaker, connected via the 19-way GPIO
connector, on or off.
Cfg Speaker Internal Switch the internal speaker on or off.
You can also toggle the internal speaker by holding MUTE.
Cfg Units Set the default unit (metric or imperial) for temperature and
distance measurements.
Clarifier Improve the quality of received voice by adjusting the frequency
of the currently selected channel/mode to exactly match that of the
received signal.
5 seconds
5 seconds
Disabled
Enabled
Metric
You can also display the Clarifier screen by pressing CLAR.
Customer Device Display the Codan type number of the device. 2110
Customer Name Display the ISO (sales order number) customer name.
Customer Profile Display the ISO customer profile.
Customer Radio Display the ISO transceiver type. 2110
Customer Reference Display the ISO customer reference.
Devices Do the following:
• display the serial number
• enter option codes
• display the firmware version
• display the product name
• rename the transceiver
• gain access to the lists
For more information see page 216, Devices entry.
Easitalk Switch Easitalk on or off.
Off
You can also toggle Easitalk by pressing EASITALK.
Free Tune Use the transceiver to tune to any frequency between 250 kHz and
30 MHz.
2110 SSB Transceiver Reference Manual 205
Page 76

The Control List
Table 22: Entries in the Control List (cont.)
Name of entry Use this entry to... Default
GPS Error Time Set the time the transceiver waits to receive updated GPS
information before it displays an error message.
You cannot make Send Position calls until the transceiver
receives valid GPS information. If you send an
NOTE
Emergency call before valid GPS information is received,
the message ‘No GPS data available’ is sent with the call.
If you receive a Get Position call, the same message is
sent to the caller.
When valid GPS data is received again a message is displayed on
the front panel to inform you of this.
GPS Screen Display information about your GPS position. For more
information see page 222, GPS Screen entry.
Help Mode Switch Help Mode on or off. When Help Mode is switched on, the
top line of the front panel screen displays a detailed description of
the screen you are on. When Help Mode is switched off, the top
line displays the standard description for the screen.
Key Beep Switch key valid beeps on or off.
When you press a key that is appropriate for the task you are
performing, the transceiver makes a valid beep. When you press an
inappropriate key, the transceiver makes an error beep. The
Key Beep entry enables you to switch valid key beeps on or off.
You cannot switch off error beeps.
10 minutes
Off
On
Key Hold Time Set the length of time that a key must be held down for a hold
action.
Key Repeat Rate Set the speed with which the , , and keys repeat when
they are held down.
Key Scroll Speed Set the speed with which the characters on a key scroll when the
key is held down.
Key Timeout Set the time the transceiver waits between two presses of the same
key to display the next character on the key. When this time
elapses the transceiver inserts the character displayed and moves
the cursor to the next space.
LQA Screen Display information regarding the most recent LQA information
update. The information includes the remote station address, local
and remote BER/SINAD, LQA score, and best channel/mode. For
more information see page 224, LQA Screen entry.
Macro Pause Set the pause time of macros that have been set to operate Before
pause or After pause. The macro pause time is also the time that
each step in a macro is displayed when the Macro Single Step
entry is switched on. For more information on macros and hot keys
see page 237, Hot keys.
0.5 seconds
0.2 seconds
1 second
1 second
3 seconds
206 2110 SSB Transceiver Reference Manual
Page 77

The Control List
Table 22: Entries in the Control List (cont.)
Name of entry Use this entry to... Default
Macro Single Step Switch macro single stepping on or off. This enables you to debug
macros by running them a step at a time. For more information on
macros and hot keys see page 237, Hot keys.
Manual Tune Manually tune the antenna.
You can also display the Manual Tune screen by pressing TUNE.
Messages Store up to 10 messages for use in Get Status and Message calls.
For more information see page 225, Messages entry.
Mode Change the mode used with the currently selected channel.
You can also change the mode by pressing MODE.
For more information on modes see page 229, The Mode List.
Mute Switch mute on or off.
You can also toggle the mute on and off by pressing MUTE.
Mute Scan Set the type of mute selected when scanning starts. If you want
mute to open when:
• a selective call to your station is detected, or when voice is
detected during scanning of channels in a voice network,
select Selcall
No
Vo i c e
• voice is detected on a channel in a voice network, select Voice
• voice is detected on a channel in any type of network (that is,
the scanning rate is reduced), select Scan for Voice
Scan for Voice automatically reverts to Voice when scanning stops.
NOTE
You can toggle the mute type, to prevent mute opening on
detected voice, by pressing V/S.
Password Admin Store a numeric password (up to 10 digits) for administrator access
to the transceiver.
Password User Store a numeric password (up to 6 digits) for user access to the
transceiver.
Power Off Switch off the transceiver.
RS232 Mode Set the mode in which the RS232 19-way serial port operates. If
the port is:
• not in use, select None
• receiving GPS information, select GPS
• controlling and monitoring the transceiver, select CICS
None
RS232 Speed Set the baud rate of the RS232 19-way serial port. 9600
Scan Switch scanning on or off.
Scan Allow Enable or disable scanning. Yes
2110 SSB Transceiver Reference Manual 207
Page 78

The Control List
Table 22: Entries in the Control List (cont.)
Name of entry Use this entry to... Default
Screen Auto-Dim Set the time the transceiver waits after a key has been pressed to
switch off the backlighting on the front panel screen. The
backlighting is automatically switched on again when a key is
pressed.
Screen Brightness Set the brightness of the screen.
Screen Contrast Set the contrast of the screen.
Screen Scroll Rate Set the speed with which characters on the screen scroll when the
line length exceeds the screen width.
Screen Scroll Step Set the number of characters on the screen that scroll as a block
when the line length exceeds the screen width.
Secure Index Select the Corporate key.
Secure Key Set the Corporate key for a particular index.
Secure Mode Set the default operating mode of the voice encryptor when you
press SEC. The options are:
• Global
• Corporate
1 minute
0.8 seconds
1
Global
Time Local Set the local date and time. For more information see page 67,
Setting the time and date.
Time Screen Display the current date and time. For more information see
page 67, Setting the time and date.
Time Zone Offset Set the difference between the time displayed on the date/time
screen and UTC. For more information see page 67, Setting the
time and date.
Update Main Menu Refresh lists in the Main Menu.
Welcome Screen Display the welcome screen. This screen is briefly displayed when
the transceiver is switched on.
Welcome Text Store up to three lines of text to be displayed on the welcome
screen. If all three lines of text are blank, the welcome screen is not
displayed when the transceiver is switched on.
0 hours
208 2110 SSB Transceiver Reference Manual
Page 79

ALE entries
The Control List
NOTE
NOTE
CAUTION
ALE Accept ALL Call
ALL calls are not addressed to a specific station. If your station detects a call with a
matching ALL address syntax, it will enter the linked state and alert the operator. If you
do not want to receive either global or selective ALL calls, disable this feature.
ALE Accept ANY Call
You must have the FED-STD-1045 ALE/CALM option installed to use
the ALE entries in the Control List.
In the following discussion, you will need to log in as administrator to see
the Control List (see page 110, Logging into admin level from user level).
Do not attempt to change the ALE settings in the Control List unless you
are familiar with ALE operation. For more information on ALE, refer to
FED-STD-1045 ALE.
The initial values that are set in your transceiver by Codan should provide
good performance.
ANY calls are not addressed to a specific station. If your station detects a call with a
matching ANY address syntax, it will send a response (random slot) to the initiating
station. Your station will enter a link when it receives an acknowledgement from the
initiating station. If you do not want to receive either global or selective ANY calls,
disable this feature.
ALE Accept Wildcard Call
Wildcard calls are not addressed to a specific station. If your station detects a call with a
matching Wildcard address syntax, it will send a response (random slot) to the initiating
station. Your station will enter a link when it receives an acknowledgement from the
initiating station. If you do not want to receive Wildcard calls, disable this feature.
ALE AMD Position
AMD data can be sent at different positions within an ALE call. You can set the
transceiver to send it in the leading part of the call, or you can set the transceiver to
automatically select the best place to send the AMD data with the call, in either the
leading or acknowledge part of the call.
2110 SSB Transceiver Reference Manual 209
Page 80

The Control List
With ALE calling, the transceiver may cycle through several channels before a link is
established. If you select Leading, the AMD data is always positioned in the leading part
of the call. The data will be transmitted prior to any response from the receiving station.
If the transceiver abandons this channel and moves to the next best channel, it will send
the AMD data again prior to any response being received. The leading position is
required for interoperability with older Codan transceivers (firmware earlier than V4.00)
and may be required for interoperability with transceivers from other vendors. If you
select Auto, the transceiver will determine the best position for the AMD data in the call.
It may move the AMD data from the leading part of the call, sending it after a response
has been received from the other station. Auto is the recommended setting.
NOTE
The ALE AMD Position entry is only effective in Auto when the
networks used to make the call have their Privacy Mode set to Plain.
ALE BER
ALE control information is sent and received in blocks of data called ALE words. Each
word is sent three times to reduce the effects of fading, interference and noise. When the
words are decoded the transceiver records the number of errors that occurred in the
transmission.
The number of errors indicates the quality of the channel used. A bit error rate of 0
indicates perfect reception. A bit error rate of 48 indicates that all bits of the ALE word
were bad.
The ALE BER entry enables you to specify the number of errors you will tolerate in this
test, which indicates the quality of the channels on which you are prepared to accept
calls. Also see page 211, ALE Golay.
CAUTION It is recommended that this entry is not altered from the factory setting.
ALE Call Threshold
When the quality of a channel is tested it is given an LQA score. This score is based on
the results of local and remote measurements for BER and SINAD and on the call
weighting value set in the ALE Call Weighting entry.
NOTE
If the ALE LQA Exchange entry is set to Off, remote measurements are
not used.
Generally, a score of 25% indicates the minimum acceptable standard for voice
communication. A score of 50% or higher indicates a good channel. The ALE Call
Threshold entry enables you to set:
• the minimum score a channel must achieve for it to be tried in ALE calls
• the minimum acceptable standard for the channel at the time when a link is being
established
The transceiver will attempt to make calls on channels for which there is
NOTE
no score, but only after channels with a score above the threshold have
been tried.
210 2110 SSB Transceiver Reference Manual
Page 81

The Control List
ALE Call Weighting
When the quality of a channel is tested the channel is given an LQA score. The ALE Call
Weighting entry enables you to weight the scoring process according to the use of the
transceiver. For example, if the transceiver is mainly used to make voice calls you would
select Mostly voice. When Lowest acceptable is selected the transceiver will attempt a
call on the channel with the lowest frequency (with an LQA score above the set
threshold), then attempt the channel with the next higher frequency and LQA score etc,
until a link is established. In some situations where propagation distances may be less
than a few hundred kilometres, weighting the LQA scores in this way increases their
effectiveness.
ALE Golay
ALE control information is sent and received in blocks of data called ALE words. After
a word has been received, BER tested and accepted, the transceiver performs a Golay
test to check it for errors and correct it if necessary.
The number of error bits per word indicates the quality of the channel used to transmit
the word. Golay testing can detect and correct up to three error bits per ALE word. It can
also detect four error bits but is not guaranteed to correct all four. Note that excessive
errors can sometimes create false readings.
The ALE Golay entry enables you to specify the number of errors you will tolerate and
correct in this test, which indicates the quality of the channels on which you are prepared
to accept calls. Also see page 210, ALE BER.
CAUTION It is recommended that this entry is not altered from the factory setting.
ALE Hangup ALL Call
During an ALL call, a link is established implicitly without the receiving stations
responding to the initiating station. When the ALE Hangup ALL Call entry is enabled,
the initiating station will send a link termination sequence when SCAN is pressed. All
stations that entered the link will hang up the link and return to scanning when they
receive this sequence.
ALE LQA Average
When the transceiver periodically tests the quality of the channels in your network it
stores the results for future use. The transceiver uses an averaging method to reduce the
effect that the new reading may have on the current channel values.
2110 SSB Transceiver Reference Manual 211
Page 82

The Control List
The ALE LQA Average entry enables you to select the averaging method used. If you
want to:
• disable the averaging feature and replace the old results with the new results, select
New
• retain 75% of the old results and 25% of the new, select Mainly old
• retain 87.5% of the old results and 12.5% of the new, select Old
• replace the old results with the average of the old and new results, select Both
LQA information gathered by the initiating station during a Channel Test
call in an ALE/CALM network is not averaged according to the ALE
LQA Average entry. This new information replaces any information
CAUTION
stored for the channels and stations detected during the call.
LQA information gathered by the receiving station during a Channel Test
call in an ALE/CALM network is averaged according to the ALE LQA
Average entry for that station.
ALE LQA Clear
Use the ALE LQA Clear entry to clear the LQA information in the transceiver. If a large
amount of information is stored this may take a few minutes. If a significant change has
occurred to the transceiver, the ALE LQA information will adapt more rapidly to the
new environment if the information is cleared.
ALE LQA Decay
When your transceiver periodically records the quality of the channels in your network it
stores the results for future use. Several factors can affect the accuracy of these results
including:
• an insufficient number of ALE sounding transmissions being made in your network
• an insufficient number of ALE calls being made (which prevents the transceiver
from exchanging channel quality information with other transceivers)
• stations moving their location
• antenna loading, nearby physical structures and local noise for stations mounted in
vehicles
These factors can lead to the deterioration of good channels going unnoticed. To avoid
this, use the ALE LQA Decay entry to artificially decay channel quality information
over time. This forces the transceiver to continually work against the artificial decay to
maintain an accurate picture of channel quality that does not overestimate actual
conditions.
For mobile stations the recommended decay period is 1–4 days. For base stations it is
15–30 days.
If you do not want to use this feature, select Disabled.
212 2110 SSB Transceiver Reference Manual
Page 83

The Control List
ALE LQA Exchange
If you want the transceiver to send and receive LQA information to and from other
stations during calls, set the ALE LQA Exchange entry to On.
If the ALE LQA Exchange entry in your transceiver is set to Off it will not request LQA
information from other stations. Your transceiver will receive any LQA information sent
from the other station.
When the ALE LQA Exchange entry is set to On, it increases the length
NOTE
of time it takes to establish a call by approximately 4 seconds for every
10 channels on which the call is tried.
LQA information is always exchanged during a Channel Test call in an
NOTE
ALE/CALM network, regardless of the setting in the ALE LQA
Exchange entry.
ALE LQA Mapping
The ALE LQA Mapping entry determines the method by which the LQA information is
stored within the transceiver, that is, according to frequency or channel name.
ALE Retries
When you make a call in an ALE/CALM network the transceiver attempts to establish an
ALE link with the other station on the best available channel. If you want the transceiver
to retry each channel before trying the next best channel in the network, set the number
of retries you want in the ALE Retries entry. The transceiver can retry channels up to
five times. If you do not want the transceiver to retry channels, set the ALE Retries entry
to zero.
ALE Selective Msg
When you make a Selective call in an ALE/CALM network you are able to include a
message with the call.
If you want to be prompted to include a message with a Selective call in an ALE/CALM
network, set the ALE Selective Msg entry to Enabled. If you do not need to send
messages with Selective calls on ALE/CALM networks, or your transceiver does not
contain ALE/CALM networks, set this entry to Disabled.
ALE Silent Mode
The ALE Silent Mode entry disables automatic ALE transmissions from the transceiver.
When ALE Silent Mode is switched on you can send ALE calls but not receive them,
and the transceiver receives sounding signals but does not send them. When ALE Silent
Mode is switched off the transceiver operates as a normal ALE station.
2110 SSB Transceiver Reference Manual 213
Page 84

The Control List
ALE Site Mgr
The ALE Site Mgr entry enables the transceiver to collect information on other
transceivers with which it communicates. Each time your transceiver detects an
unknown station address it requests:
• the ESN of the transceiver
• any other station self addresses stored in that transceiver
• the tuning time of the transceiver’s antenna
It requests this information up to three times, and only 2110 SSB Transceivers in which
the FED-STD-1045 ALE/CALM option is installed can respond.
The information collected enables your transceiver to optimise calls to the other
transceiver (by adjusting the time taken to wait for the antenna to tune) and to minimise
soundings.
If your network consists of only a few 2110 SSB Transceivers with the
FED-STD-1045 ALE/CALM option installed and many other
NOTE
transceivers, you may want to set the ALE Site Mgr entry to Off. Your
transceiver will attempt to interrogate the other transceivers in the
network each time calls are made.
ALE Soundings
The ALE Soundings entry enables the transceiver to vary the conclusion that it sends
with a sounding.
If you want the transceiver to:
• send a TWAS conclusion to the sounding, that is, not remain in a state that will
accept a link, select Default
• send a TIS conclusion to the sounding, that is, pause at the end of the sounding ready
to accept a link, select Invite link
• switch off all sounding activity regardless of the Sounding Interval setting in the
Network List, select Disabled
214 2110 SSB Transceiver Reference Manual
Page 85

Auto Resume entries
The Control List
NOTE
The auto resume entries—Auto Resume Time, Auto Resume Mode and Auto Resume
Listen—enable you to set the transceiver to automatically begin a task when scanning is
switched off and there has been no PTT, channel change, scan on/off, mute on/off or call
sending activity for a certain length of time. This enables you to ensure that the
transceiver resumes scanning automatically if it is left unattended.
Use the Auto Resume Time entry to specify the time you want the transceiver to wait,
since the last key was pressed, before it begins the task. You can select from
1–20 minutes.
Use the Auto Resume Mode entry to specify the task. If you:
• want the transceiver to start scanning, select Start scan
• want the transceiver to close the link to end any call in progress and, if it was
scanning prior to the call, resume scanning, select Close link
• do not want the transceiver to resume scanning, select Off
If you selected Start scan as the value in the Auto Resume Mode entry, use the Auto
Resume Listen entry to specify the scan method you want to use. If you want the
transceiver to:
In the following discussion, you will need to log in as administrator to see
the Control List (see page 110, Logging into admin level from user level).
• scan according to the value set in the Mute Scan entry, select Leave as is
• scan for voice and calls addressed to your station, select Voice and calls
• scan only for calls addressed to your station, select Calls only
If the scan method has been altered by the user, the transceiver will return
NOTE
to the scan method specified in the Auto Resume Listen entry following
the time that is specified in the Auto Resume Time entry.
2110 SSB Transceiver Reference Manual 215
Page 86

The Control List
Devices entry
NOTE
In the following discussion, you will need to log in as administrator to see
the Control List (see page 110, Logging into admin level from user level).
The Devices entry in the Control List enables you to display information specific to the
transceiver. You can display the:
• list of built-in tests
•ESN
• version of firmware installed
• product name
• lists stored in the device
You can also use the Devices entry to install new options and to rename the device.
Figure 42 shows the type of information that you can display about the device and the
lists that are stored in the device.
Figure 42: The Devices entry in the Control List
Control List 2110 SSB Transceiver
Control List
Devices
Devices
Built-in Test
Built-in Test
Serial number
Option code
Firmware version
Product name
Rename device
Mode
Channel
Network
Keypad
Control User
Control RF
Address
Calls In
Phone Link
Calls Out
NET
216 2110 SSB Transceiver Reference Manual
Page 87

The Control List
Selecting a built-in test
To select a built-in test:
1 Press until Main Menu is displayed.
1 Scroll to Control, then press .
1 Scroll to Devices, then press .
1 Scroll to Built-in Test, then press .
The hyphen next to the test name, in this case, <Auto>, indicates that the test has
not been run in this session of testing.
1 Scroll to the test that you want to perform, then press .
When the test is in progress, the hyphen is replaced by a large dot.
When the test has been completed, the hyphen is replaced by a or a to show
that the test has passed or failed respectively.
Displaying the electronic serial number of a device
To display the electronic serial number of a device:
1 Press until Main Menu is displayed.
1 Scroll to Control, then press .
1 Scroll to Devices, then press .
1 Scroll to Serial number, then press .
The ESN for the device is displayed and scrolls across the screen.
2110 SSB Transceiver Reference Manual 217
Page 88

The Control List
Installing an option in the transceiver
When you purchase an option for your transceiver (such as FED-STD-1045 ALE/CALM
or GPS) you receive a 16-character option code. To install the option, you need to enter
the option code using the Devices entry in the Control List.
To install an option in the transceiver:
1 Press until Main Menu is displayed.
1 Scroll to Control, then press .
1 Scroll to Devices, then press .
1 Scroll to Option code, then press .
The option code screen is displayed.
1 Enter the code, then press .
NOTE The transceiver automatically adds dashes after each four digits.
The option is installed.
NOTE
Displaying the firmware version of your transceiver
If you need to check the firmware version in your transceiver, use the Firmware version
setting under the Devices entry in the Control List.
To display the firmware version of your transceiver:
Depending on the option you installed, a message may be displayed
that asks you to restart the transceiver.
1 Press until Main Menu is displayed.
1 Scroll to Control, then press .
1 Scroll to Devices, then press .
1 Scroll to Firmware version, then press .
The firmware version is displayed.
218 2110 SSB Transceiver Reference Manual
Page 89

The Control List
Displaying the product name of a device
To display the product name of a device:
1 Press until Main Menu is displayed.
1 Scroll to Control, then press .
1 Scroll to Devices, then press .
1 Scroll to Product name, then press .
The product name is displayed.
Renaming your transceiver
The transceiver is shipped with a standard name, that is, 2110 SSB Transceiver. If you
want to rename the transceiver, use the Rename device setting under the Devices entry in
the Control List.
To rename your transceiver:
1 Press until Main Menu is displayed.
1 Scroll to Control, then press .
1 Scroll to Devices, then press .
1 Scroll to Rename device, then hold .
The name of the transceiver is displayed.
1 Enter a new name for the transceiver, then press .
NOTE For help with entering text see page 52, Entering and editing text.
2110 SSB Transceiver Reference Manual 219
Page 90

The Control List
Accessing lists from the Devices entry
NOTE
In the following discussion, you will need to log in as administrator to see
the Control List (see page 110, Logging into admin level from user level).
You can access all the lists through the Main Menu. You can also access them through
the Devices entry in the Control List (see Figure 43).
Figure 43: Lists as they are displayed in the Main Menu and under the Devices
entry in the Control List
Main Menu
Address
Channel
Control
Keypad
Mode
NET
Network
Phone Link
Devices
Built-in Test
Built-in Test
Serial number
Option code
Firmware version
Product name
Rename device
Mode
Channel
Network
Keypad
Control User
Control RF
Address
Calls In
Phone Link
Calls Out
NET
Displaying a list using the Devices entry
To display a list using the Devices entry in the Control List:
1 Press until Main Menu is displayed.
1 Scroll to Control, then press .
1 Scroll to Devices, then press .
1 Scroll to the list you want, then press .
If the list is not displayed it may be hidden at user or admin level.
NOTE
You may view and edit entries and settings in the list while it is displayed.
Switch full view on, and/or log into admin level to display the list (for
help see page 112, Displaying full and normal view and page 110,
Logging into admin level).
220 2110 SSB Transceiver Reference Manual
Page 91

The Control List
Displaying and editing channels using the Devices entry
When you access the Channel List from the Main Menu the transceiver selects each
channel as you scroll to it. If you access the Channel List through the Devices entry you
can display and edit the channels without stopping channel scanning.
2110 SSB Transceiver Reference Manual 221
Page 92
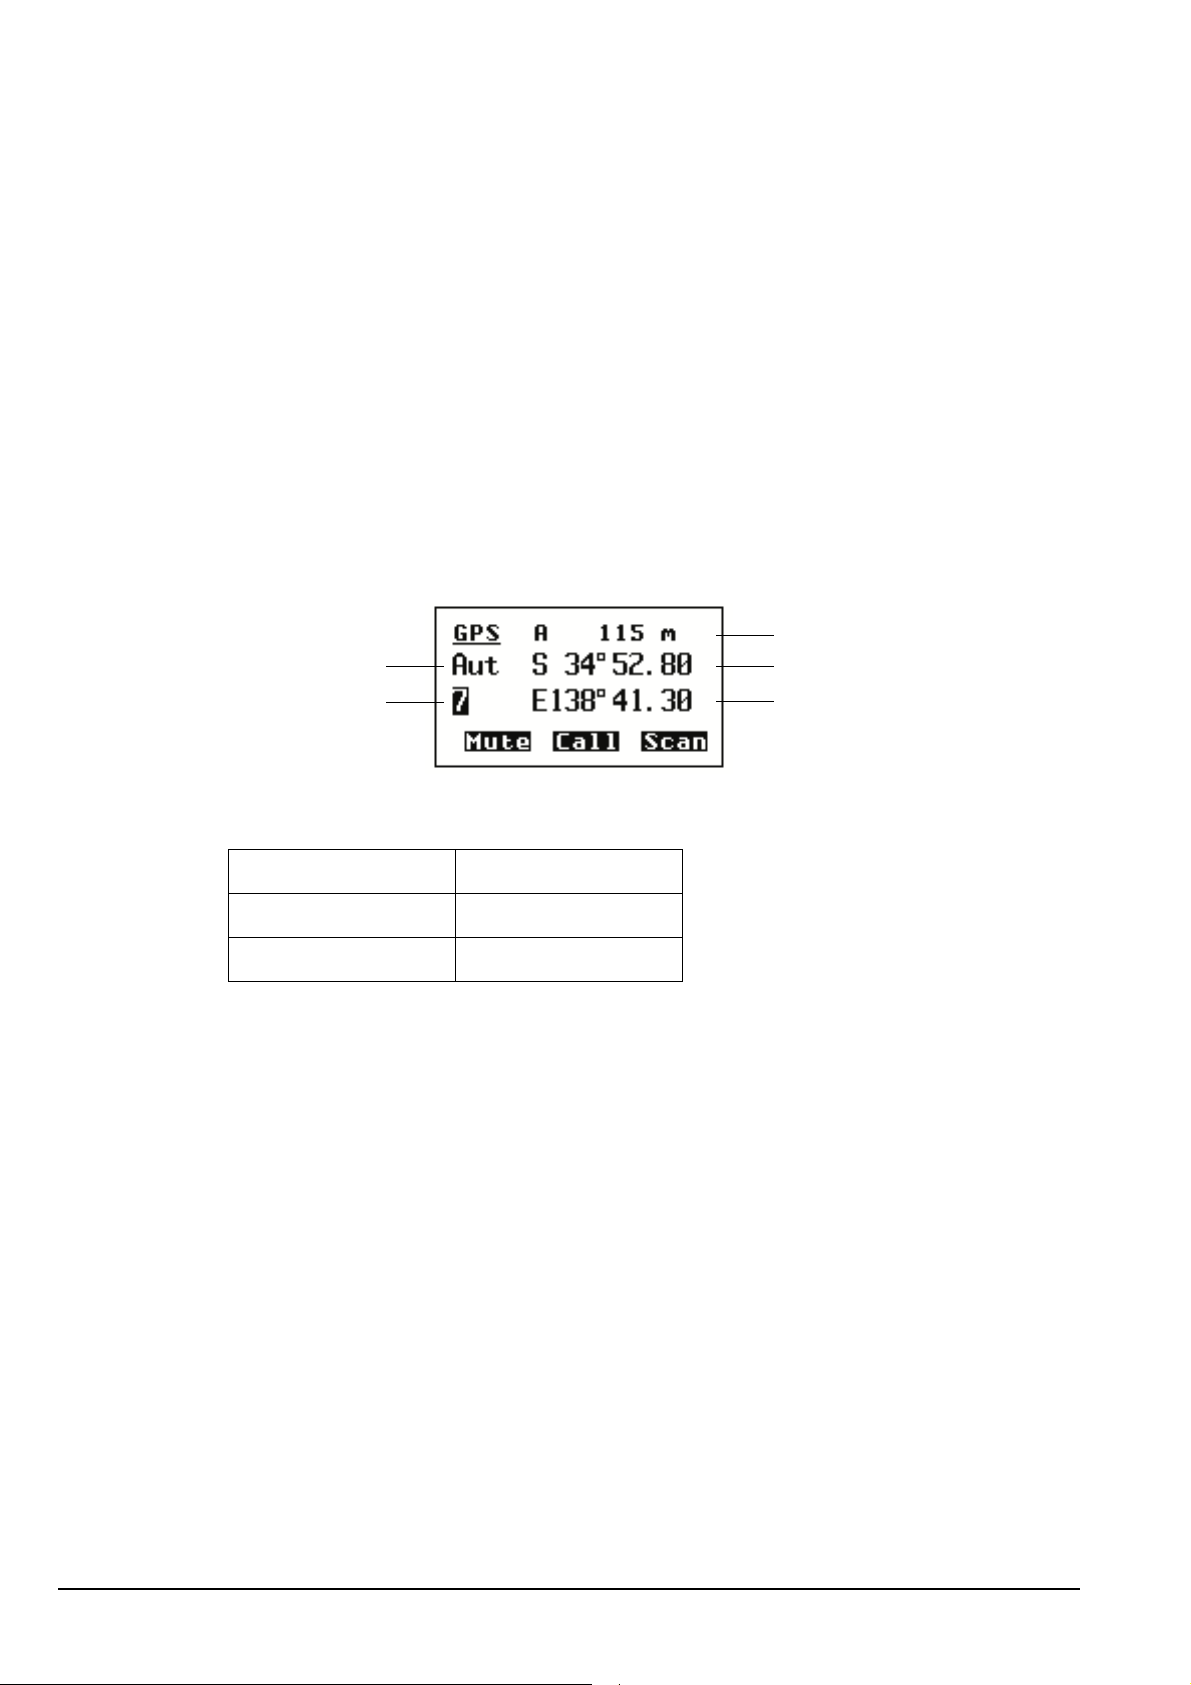
The Control List
GPS Screen entry
The GPS receiver is a hardware option. It must be enabled in the firmware by an option
code.
You can configure the GPS receiver to report in metric or imperial units via the
Cfg Units setting in the Control List.
The GPS Screen entry in the Control List enables you to display your current GPS
position. Press GPS to access the GPS screen.
Table 23 explains the abbreviations for each type of reading you may receive. The new
reading indicator is a number that increments each time a new reading is received. It
cycles from 1 to 9.
Figure 44: The GPS Screen entry in the Control List
type of reading
new reading indicator
Table 23: Types of readings on the GPS screen
Abbreviation Description
Aut Automatic reading
Bad Bad reading
If you connect an external GPS unit to the 2110 SSB Transceiver, and an
internal unit is already fitted, the information from the external GPS unit
NOTE
will take precedence over the internal GPS unit. When you disconnect the
external GPS unit, restart your transceiver to re-initiate the internal GPS
unit.
altitude
latitude
longitude
222 2110 SSB Transceiver Reference Manual
Page 93
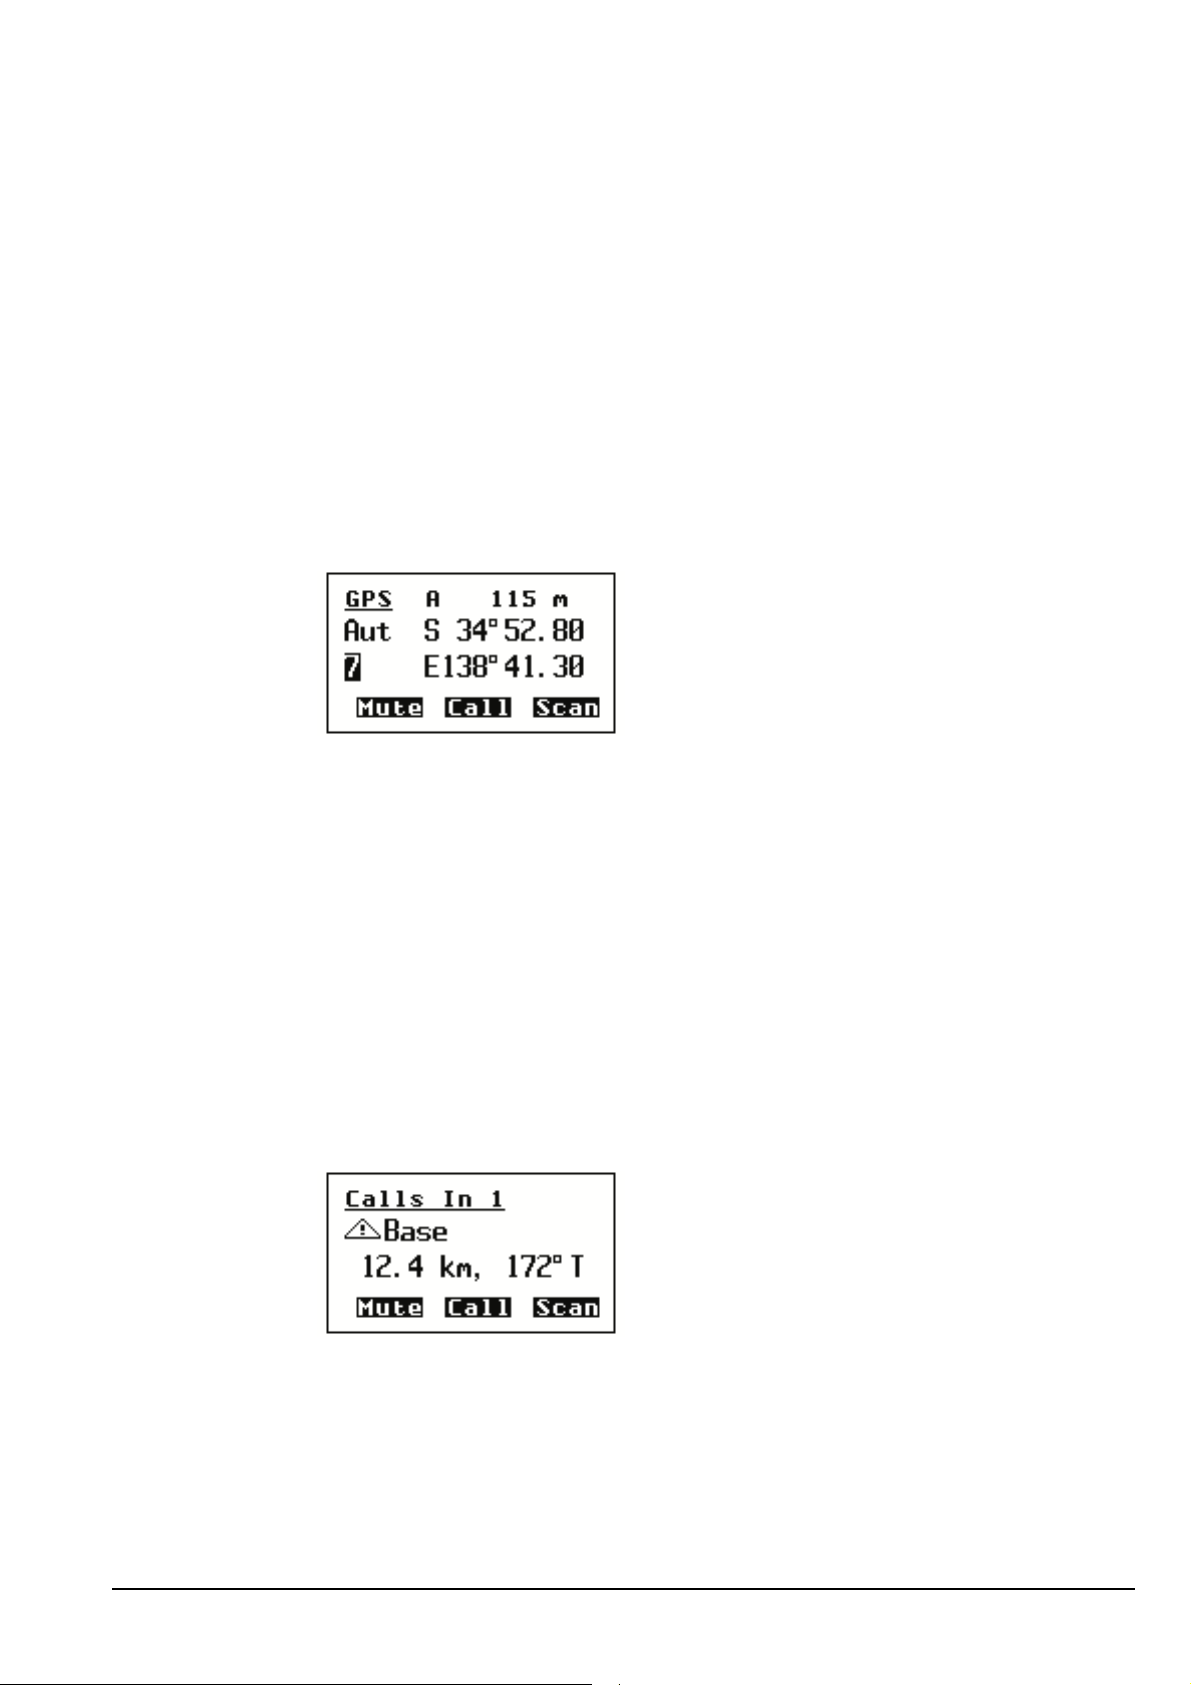
The Control List
Setting up the transceiver
The 2110 SSB Transceiver is compatible with NMEA format 0183 V2.00.
NOTE
Before you display the GPS screen, make sure that the GPS hardware option has been
correctly fitted in the transceiver and is enabled.
Displaying the GPS screen
To display the GPS screen:
It will accept and process the following GPS receiver input sentences:
RMC, GLL and GGA.
1 Press GPS.
The GPS screen is displayed. For example:
NOTE
If no data is displayed on the GPS screen, the transceiver has not
received any valid GPS data.
1 Press GPS to return to the screen from which you began.
Calculating distance and bearing
To calculate the distance and bearing to another station:
1 Go to an Address List or Call Log entry containing a GPS position of the other
station.
The transceiver calculates the distance to the other transceiver and its bearing from
true north with respect to your current location.
2110 SSB Transceiver Reference Manual 223
Page 94

The Control List
LQA Screen entry
NOTE
The LQA Screen entry is only displayed if the MIL-STD-188-141B ALE
option is installed in the transceiver.
The LQA screen is automatically displayed when you make a Channel Test call in an
ALE/CALM network, and is accessed at other times via the LQA Screen entry in the
Control List. It enables you to display the most current LQA information for the best
channel. If you need to refer to this screen frequently, consider creating a hot key to
display it, or making it the home screen (for more information see page 237, Hot keys,
page 329, Example 2: displaying an information screen and page 95, Setting the home
screen).
Figure 45: The LQA Screen entry in the Control List
LQA score BER/SINAD
best channel
highest number
of responses
on a channel
number of
channels tried
The LQA screen contains information on the most recent LQA exchange that has
occurred. This may be due to a Channel Test call in an ALE/CALM network, a sounding,
or an ALE call.
NOTE
LQA information derived from a sounding will not contain BER/SINAD
information from the remote site.
The LQA score is an overall measure of the quality of the information between the two
stations for a particular channel/mode combination. This score is compared with the
ALE Call Threshold to determine whether or not the channel is suitable.
The local and remote BER/SINAD provide a measure of the effectiveness of data/voice
transmission on the channel. The BER may range from 0 (no errors) to 30. The
transceiver typically does not use channels with a BER > 12. The SINAD may range
from 0 (poor channel) to 30.
The channel/mode combination with the highest LQA score is displayed on the LQA
screen. The highest number of replies on a channel/mode is displayed with the number of
channels on which a response was received.
The information presented in the LQA screen reflects information in the LQA database,
and as such will be affected by the ALE LQA Decay entry in the Control List.
224 2110 SSB Transceiver Reference Manual
Page 95

Messages entry
You can store up to 10 messages in the Messages entry for use in Get Status and Message
calls. When you make one of these calls, you can scroll through these messages then
select and/or edit the one you want to send.
To pre-type and store a message:
1 Press CALL.
1 Scroll to Message?, then press .
The Control List
1 Scroll to the setting in which you want to enter your message, then hold .
1 Enter the message, then press .
NOTE For help with entering text see page 52, Entering and editing text.
1 Press or PTT to cancel the call.
2110 SSB Transceiver Reference Manual 225
Page 96

The Control List
This page has been left blank intentionally.
226 2110 SSB Transceiver Reference Manual
Page 97

15 The Keypad List
The Keypad List stores information about the keys on the front panel and the events that
occur when the keys are pressed.
CODAN
NOTE
The Keypad List contains an entry for each key on the front panel. Each entry stores a
list of the macros assigned to the key, and a list of the upper-case, lower-case and
numeric characters that you can enter using the key (see Table 24).
NOTE
It also contains two entries that you can use to create and maintain macros. The Special
entry contains a number of macros that you cannot create from the front panel but that
you can copy and assign to any key. The Unassigned entry is a place where you can store
macros for which you have no immediate use. For more information on macros and the
Special and Unassigned entries see page 237, Hot keys.
Table 24: Entries in the Keypad List
Name of key Macros
# Call Logs - Out A a #
The transceiver is shipped with the Keypad List hidden at admin level. To
display the list see page 113, Hiding and showing information.
There are no entries for the CALL, , , , , , and keys as
you cannot assign macros to these keys.
Upper case Lower case Numeric
assigned to key
* Easitalk . , ’ ? ! & # $
* ( ) - + /
0 Channel Screen 0 space 0 space 0
1QZ Manual Tune QZ1 qz1 1
2ABC Clarifier ABC2 abc2 2
3DEF Next Mode DEF3 def3 3
4GHI Free Rx GHI4 ghi4 4
5JKL JKL5 jkl5 5
6MNO Tx Pwr MNO6 mno6 6
7PRS Mute Type PRS7 prs7 7
8TUV Secure TUV8 tuv8 8
9WXY GPS WXY9 wxy9 9
Emergency Call Emergency
F1 Mute
. , ’ ? ! & # $
* ( ) - + /
.
F2 Call Key
F3 Scan Toggle
2110 SSB Transceiver Reference Manual 227
Page 98

The Keypad List
Table 24: Entries in the Keypad List (cont.)
Name of key Macros
assigned to key
Hang up Scan Toggle
Mute Mute
Power Power Down
Special Power Down
Mute Type
Mute
Call Logs - Out
Call Logs - In
New Call
End Call
Call Key
Scan Toggle
Upper case Lower case Numeric
Unassigned
Call Emergency
Secure
228 2110 SSB Transceiver Reference Manual
Page 99

16 The Mode List
The Mode List stores information about the modes available in the transceiver. A mode
is a set of parameters to be used with a channel consisting of a sideband and an IF filter,
as shown in Table 25. An IF filter may be centred differently in the audio pass band to
suit the particular requirements. For example, USB CW and USB PT use the same
500 Hz filter, but with different centre frequencies.
Table 25: Examples of modes
Name of mode Sideband IF centre IF width
USB USB 1500 Hz 2 500 Hz
LSB LSB 1 500 Hz 2500 Hz
AM AM 1500 Hz 2500 Hz
USB CW USB 900 Hz 500 Hz
LSB CW LSB 900 Hz 500 Hz
CODAN
AM CW AM 900 Hz 500 Hz
USB PT USB 1700 Hz 500 Hz
LSB PT LSB 1700 Hz 500 Hz
USBW USB 1650 Hz 2700 Hz
LSBW LSB 1 650 Hz 2700 Hz
The modes from which you can select depend on the options installed in the transceiver.
The Mode List is display-only: you cannot add, edit or delete modes from it.
2110 SSB Transceiver Reference Manual 229
Page 100

The Mode List
This page has been left blank intentionally.
230 2110 SSB Transceiver Reference Manual
 Loading...