

Cocraft HSR 1300, YT6702 Original Instructions Manual

18-4736 • 31-9311
LAWN RAKER / SCARIFIER
HSR 1300
COMBINED SCARIFIER AND DETHATCHER
MOSSRIVARE/VERTIKALSKÄRARE
MOSERIVER/VERTIKALSKJÆRER
PYSTYLEIKKURI/SAMMALEENPOISTAJA
VERTIKUTIERER/RASENLÜFTER
Important!
Read the entire instruction manual
carefully and make sure that you fully
understand it before you use the
equipment. Keep the manual for future
reference.
Viktig information:
Läs hela bruksanvisningen noggrant och
försäkra dig om att du har förstått den
innan du använder utrustningen. Spara
bruksanvisningen för framtida bruk.
Viktig informasjon:
Les disse anvisningene nøye og forsikre
deg om at du forstår dem, før du tar
produktet i bruk. Ta vare på anvisningene
for seinere bruk.
Tärkeää tietoa:
Lue nämä ohjeet huolellisesti ja varmista
että olet ymmärtänyt ne, ennen kuin
alat käyttää laitetta. Säilytä ohjeet
myöhempää tarvetta varten.
Wichtiger Hinweis:
Vor Inbetriebnahme die komplette
Bedienungsanleitung sorgfältig
durchlesen und aufbewahren.
ENGLISHSVENSKANORSKSUOMIDEUTSCH
Art.no Model
18-4736 YT6702
31-9311 YT6702
Ver. 20161118
Original instructions
Bruksanvisning i original
Originalbruksanvisning
Alkuperäinen käyttöohje
Original Bedienungsanleitung
Lawn Raker/Scarifier
Art.no 18-4736 Model YT6702
ENGLISH
31-9311 YT6702
Please read theentire instruction manual before using theproduct and then save it for future
reference. We reserve theright for any errors in text or images and any necessary changes
made to technical data. In theevent of technical problems or other queries, please contact our
Customer Services (see address details on theback).
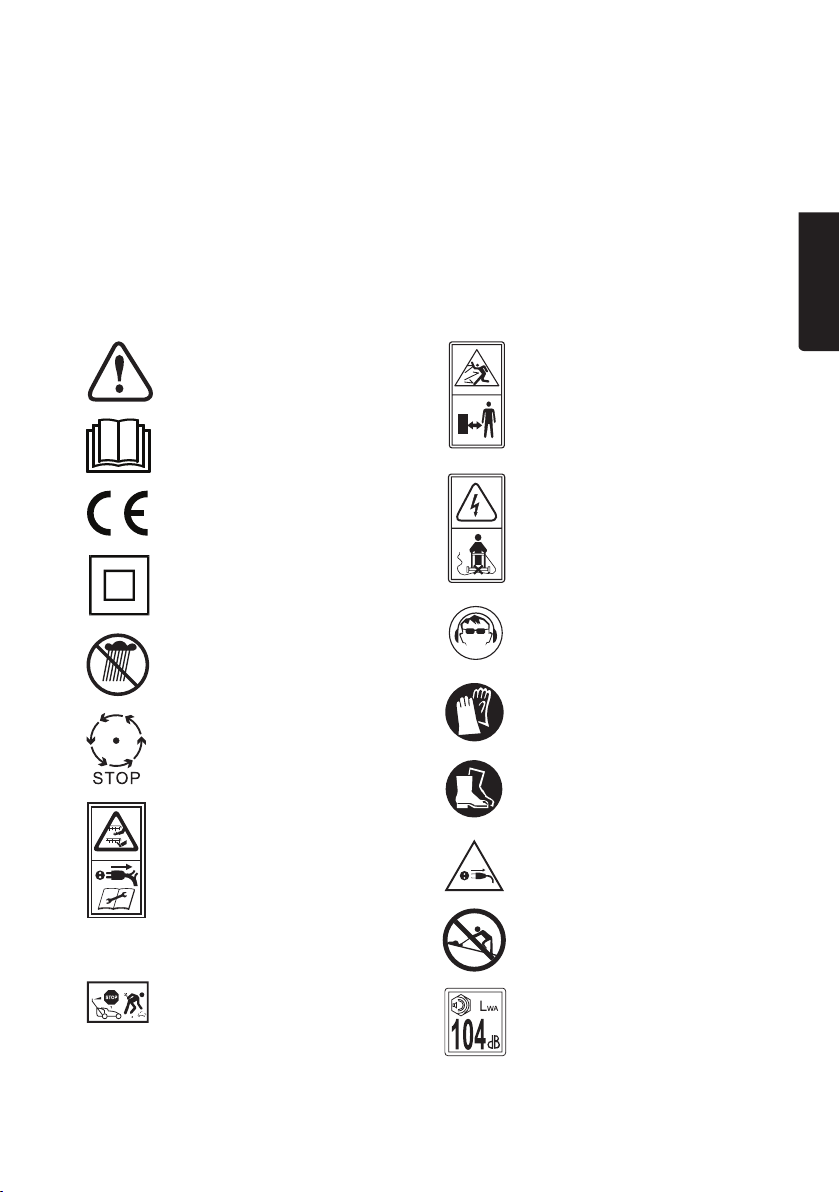
Safety
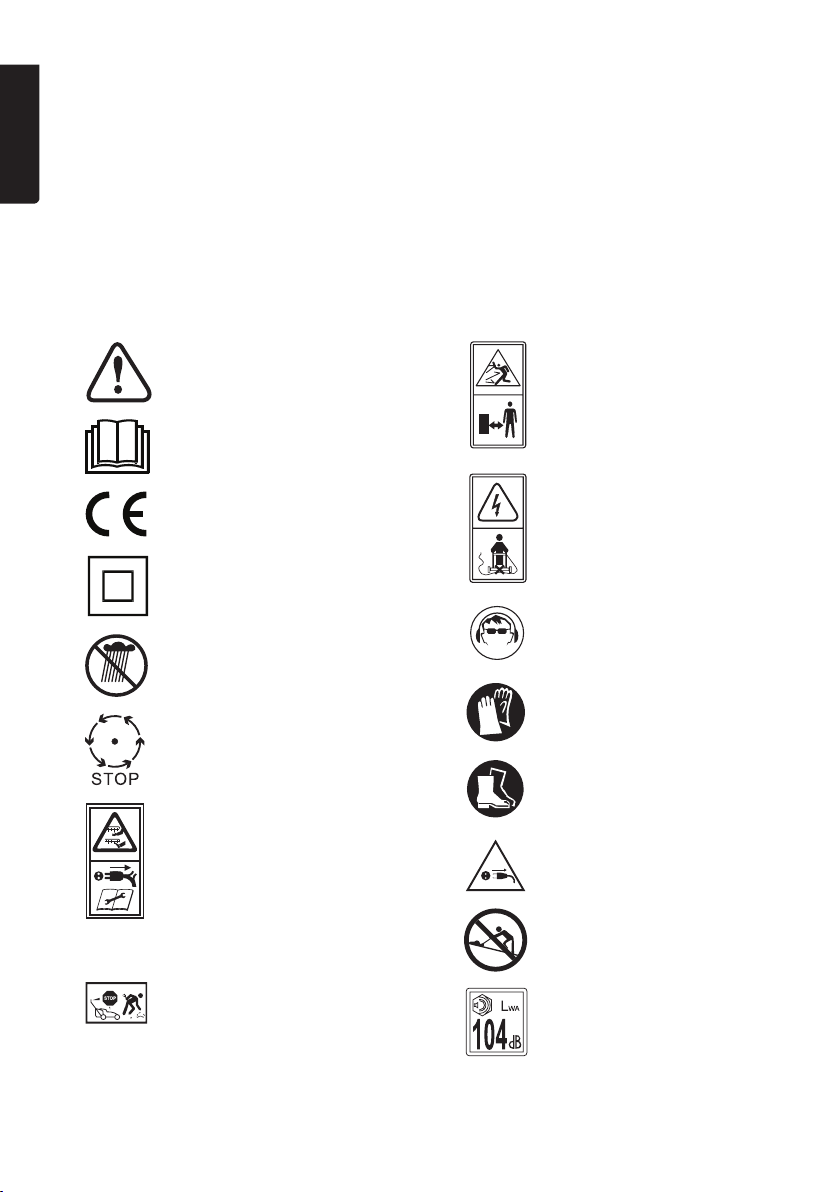
Warning!
Read theinstruction manual before
operating this machine.
CE marking.
Double insulation.
To avoid electric shock avoid cutting
thegrass after it has rained. Donot
leave theraker/scarifier outdoors
duringrain.
Theblades will continue to rotate after
themotor has been turnedoff.
Extremely sharp cutting blades.
Theblades will continue to rotate
after themotor has been turnedoff.
Unplugthemains lead before carrying
out any maintenance, repairs or service.
Inspect thearea to be raked before
starting work. Remove any sticks,
stones or debris that could be thrown
by therotating drum from thepath
of thelawn raker. If you notice any
objects in thepath of theraker, switch
it off and remove theobjects before
continuing work.
Keep bystanders at
asafe distance.
Keep themains lead
away from therotating
cuttingblade.
Always wear approved safety
glasses/visor and hearing
protection.
Wear protective gloves.
Wear safety shoes with steel
toecaps and slip-resistant
soles.
Unplug themains lead
immediately if thecable has
become damaged.
Always work across
theface of slopes,
never up and down.
Guaranteed noise level.
2

General safety instructions
• Thelawn raker must not be used by anyone (including children) suffering from physical
or mental impairment. This product should not be used by anyone that has not read
theinstruction manual unless they have been instructed in its use by someone who will take
responsibility for their safety.
• Never let children play with thelawn raker.
• Thelawn raker must only be used as described in this instruction manual.
• Remember that it is theuser who is ultimately responsible for any accidents or hazards that
cause possible injury to others and to property.
• If themains lead is damaged it must be replaced by aqualified electrician or Clas
Ohlson Customer Services.
• Thelawn raker should be connected to amains outlet protected by a30 mA RCD.
• Never use thelawn raker if you are tired, sick, under theinfluence of alcohol or medicine.
Pre-work safety precautions
• Read theentire instruction manual carefully.
• Never let children or others use thelawn raker without having read theinstruction manual.
Check for any local regulations that may stipulate aminimum operating age.
• Never use thelawn raker in thepresence of bystanders, especially children or animals.
• Always wear sturdy boots or shoes and long trousers. Never use thelawn raker while
barefoot or wearing open-toed sandals.
• Never wear loose-fitting clothing or clothes which have any loose hanging straps or bands.
• Always inspect thearea to be raked/scarified before starting work. Remove any objects that
could be thrown by thelawn raker from thearea to be raked/scarified.
• Make sure that thelawn raker is completely assembled and that all parts are whole and
functioning normally before commencing work.
• Check that all thecables to be used are intact and undamaged. Also check thefixed motor
connection cable on thelawn raker.
• Never use thelawn raker if any of thecables or their connections are damaged.
• Make sure that all screws and bolts are properly tightened and that all safety devices are in
place before commencing work.
ENGLISH
3

Operating safety precautions
• Thelawn raker is not designed for professional use or to be used for hire. Theproduct is only
ENGLISH
intended for domestic use.
• Only use extension leads approved for outdoor use.
• Only use thelawn raker during daylight hours or under good lighting conditions.
• Thelawn raker should only be connected to a230–240 V, 50 Hz mains outlet protected by
a30mA (RCD).
• Avoid raking/scarifying wet grass.
• Always work at arelaxed pace. Never hurry.
• Be extra careful when raking/scarifying on slopes.
• Always rake/scarify across theface of slopes, never up and down.
• Always be extra careful when changing directions on aslope.
• Never rake/scarify on steep slopes.
• Always be extra careful when pulling thelawn raker towards you or walking backwards when
raking.
• Always turn thelawn raker off and unplug it before crossing surfaces other than grass such
as gravel and asphalt.
• Never use thelawn raker if any part of its housing has been damaged. Never use thelawn
raker without having thecollector attached.
• Make sure that thelawn raker stands steady on all four wheels before starting. Keep hands
and feet away from thehousing and therotating drum at all times.
• Turn thelawn raker off and disconnect it from thepower supply whenever taking apause
from work.
• Turn thelawn raker off and disconnect it from thepower supply whenever emptying
thecollector, cleaning or carrying out any other type of maintenance.
• Turn thelawn raker off and disconnect it from thepower supply whenever theblades or
tines on thedrum strike any foreign object. Check theblades, tines and springs for damage.
Repair any eventual damage before restarting thelawn raker.
• If any abnormal vibration or noise is detected, turn off thelawn raker and unplug it
immediately. Check theblades and springs, tighten any loose screws and repair any damage
before recommencing work.
• Always be aware of thelocation of themains lead while raking/scarifying. Make sure that
themains lead does not come into contact with thelawn raker or its rotating blades.
4
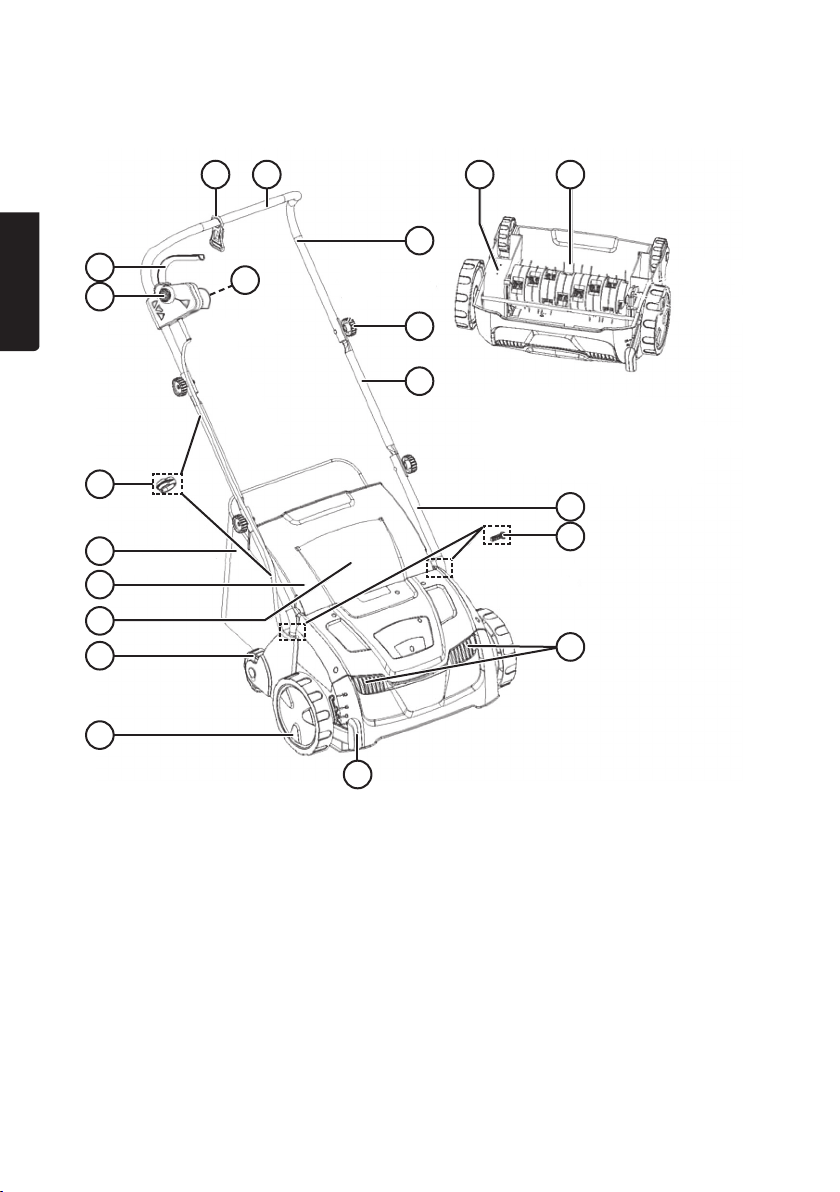
Product description
3
4
6
7
8
9
10
11
1 19 20
2
13
5
14
15
ENGLISH
16
17
18
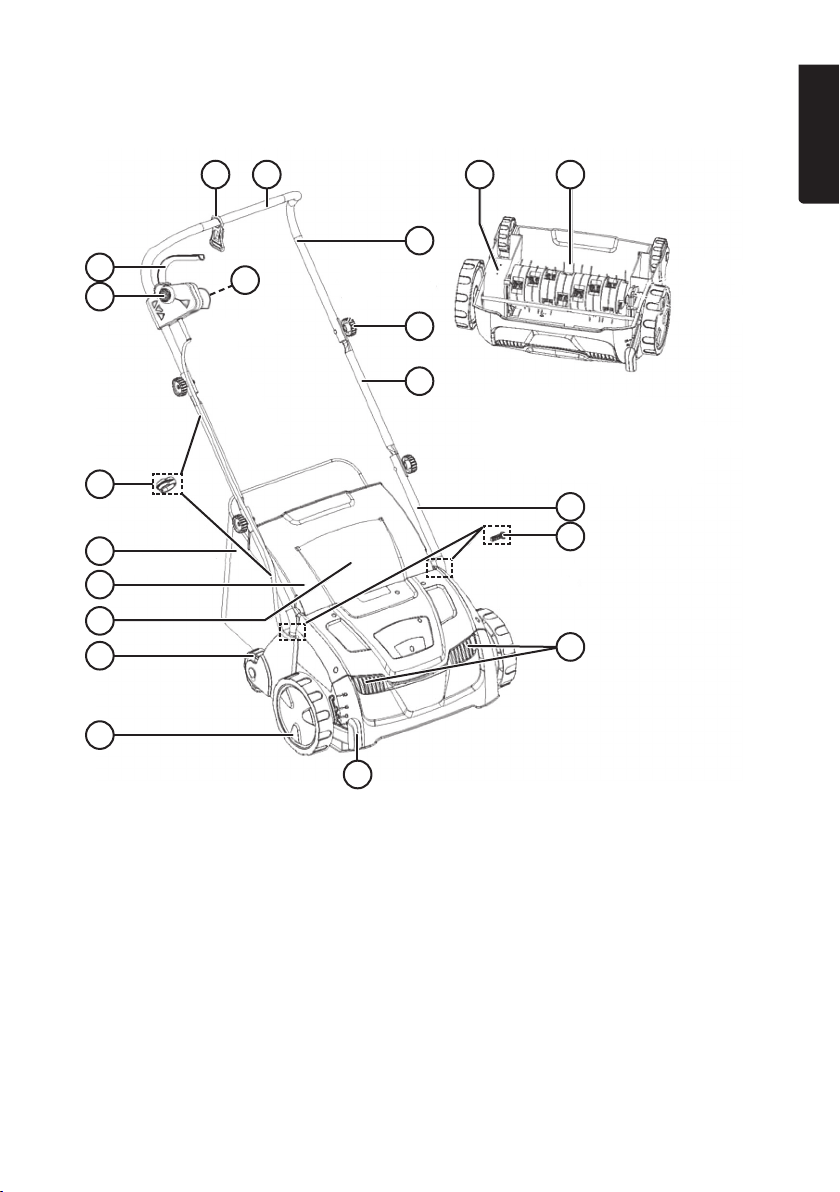
1. Handle
2. Cable hook
3. Start/stop lever
4. Safety switch
5. Power lead socket
6. Cable clips
7. Collector
8. Deck
9. Discharge chute
10. Rear support wheel
12
11. Front wheel
12. Height adjuster
13. Handle, upper section
14. Handle screws and locking knobs (4 ×)
15. Handle, middle section
16. Handle, lower section
17. Lower handle locking screws
18. Ventilation slits
19. Drive shaft
20. Rake drum
5
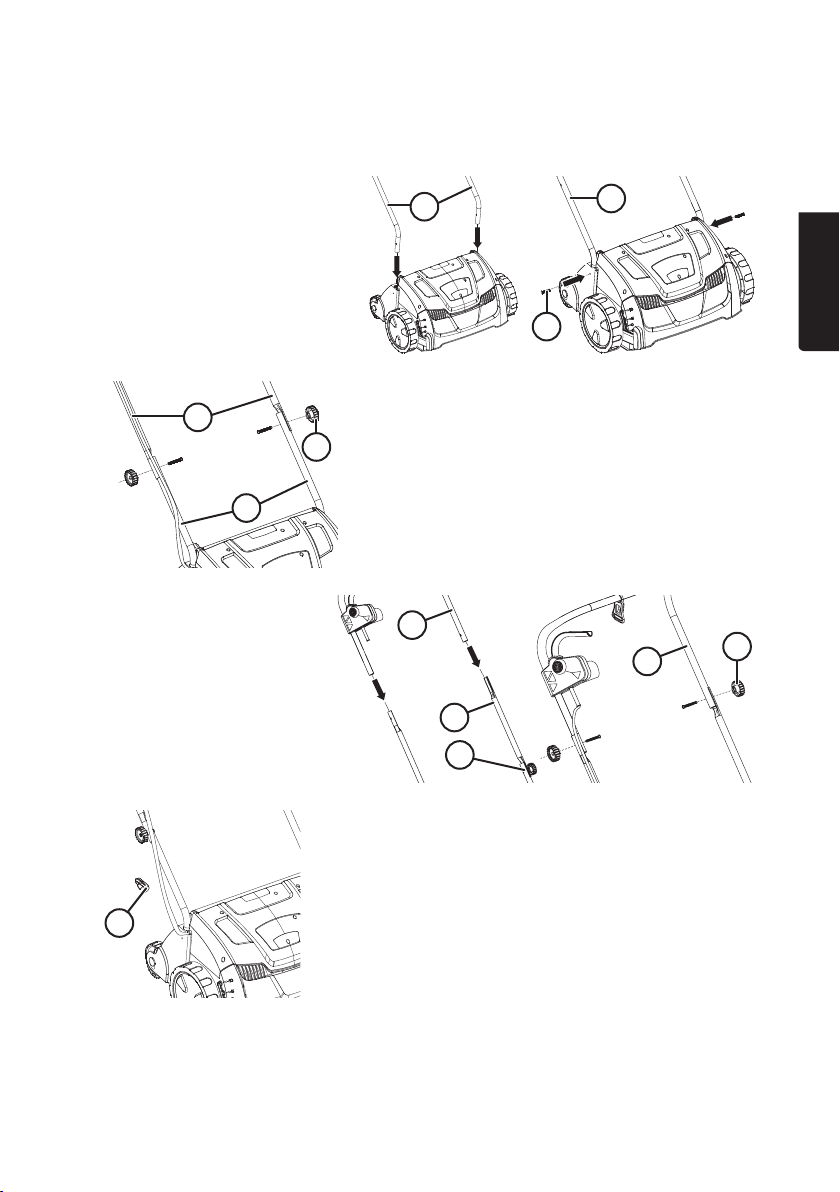
Assembly
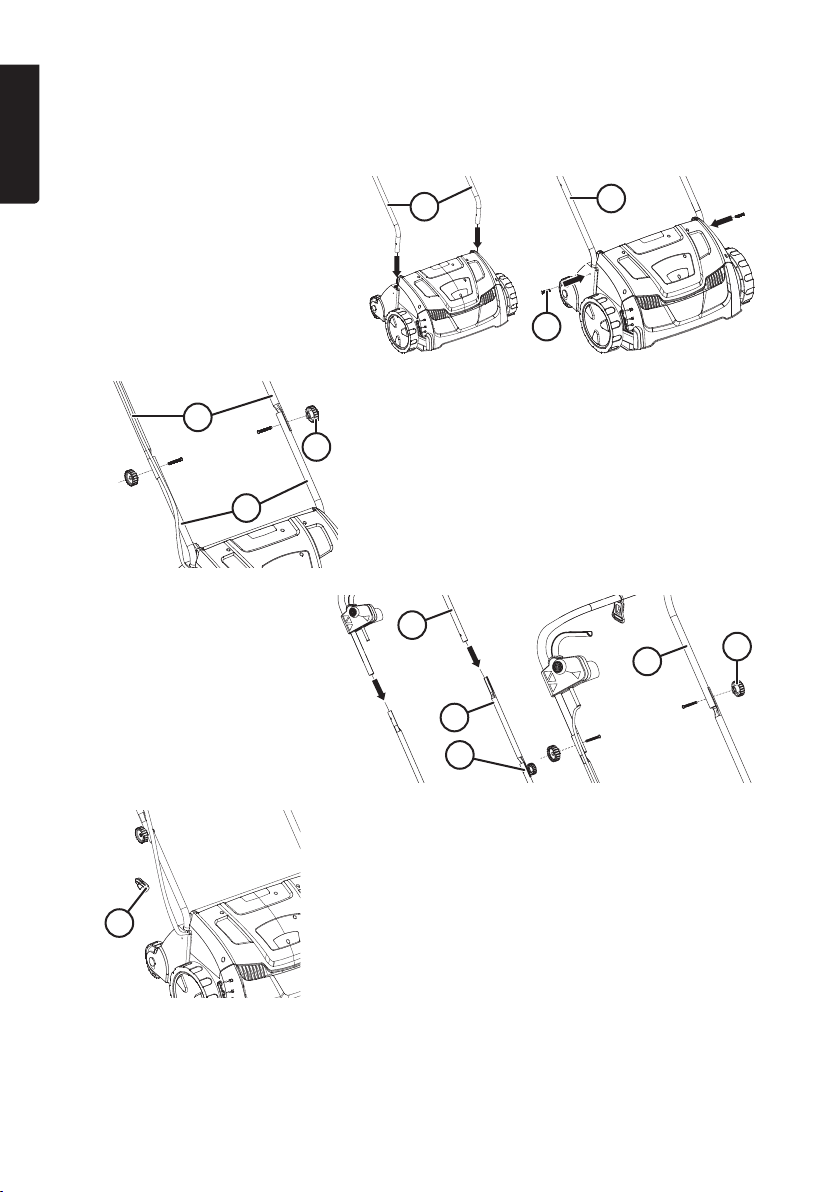
Handle
ENGLISH
1. Slot thelower handle section (16)
into theattachment holes on
thechassis and secure it with
thelocking screws (17).
15
16
16
16
17
14
2. Attach themiddle handle section (15) to thelower
section using screws and locking knobs.
3. Attach theupper handle
section (13) to themiddle
section using screws and
locking knobs.
6
13
15
15
16
4. Fasten themotor connection cable to thehandle
using thesupplied clips.
6
14
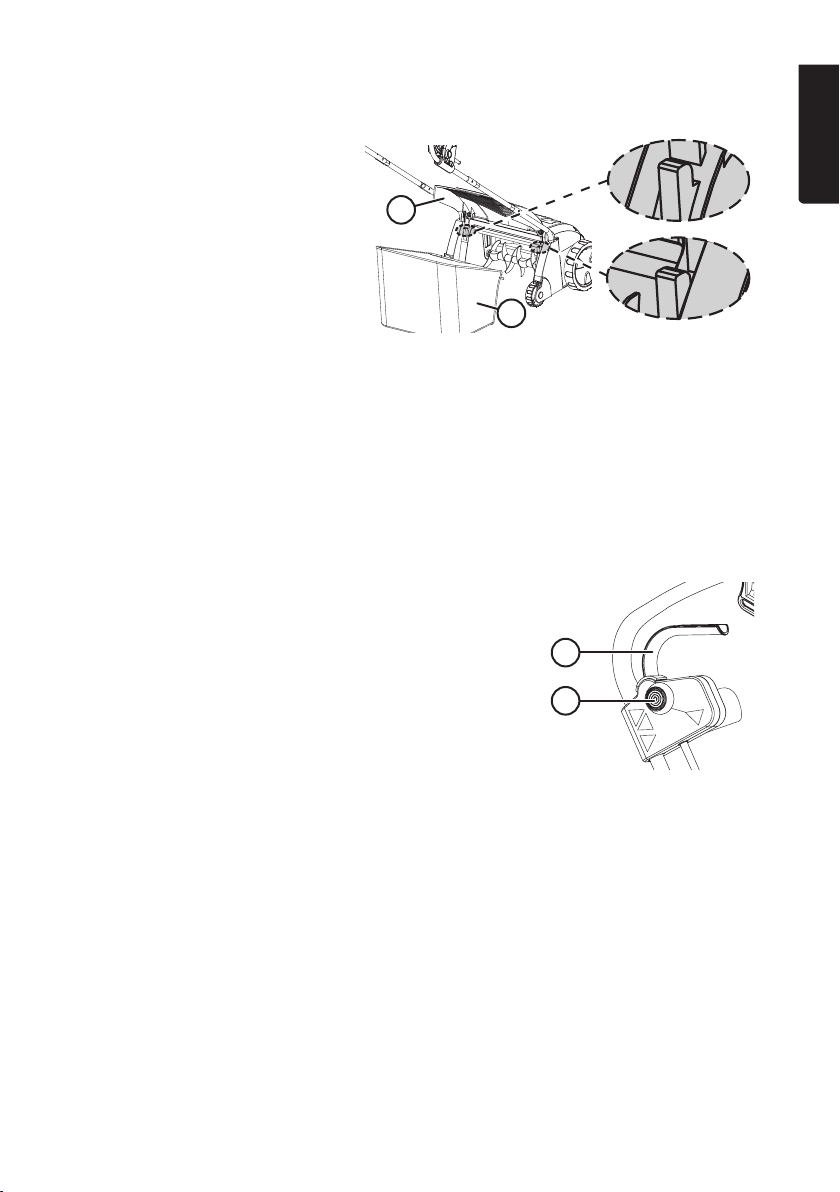
Collector
1. Lift thedeck (8) and hang
thecollector onto its bracket.
2. Lower thedeck onto thecollector.
8
7
Operating instructions
Connecting the mains lead
Note: Only use anextension lead approved for outdoor use.
1. Connect theextension lead to thesocket (5) on thelawn raker and hang thecable on
thestrain relief hook on thehandle (2).
2. Theextension lead should only be connected to a230–240 V, 50 Hz mains outlet protected
by a30 mA (RCD).
Start
Note: When switching thelawn raker on, make sure that
thelawn raker does not grip thelawn and pull away from you.
Set theheight adjuster (12) to thehighest setting. Thelawn
raker is at thehighest setting when theadjuster is closest to
theground. Press theadjuster in to move it. Make sure that
thelawn raker is on aneasily worked surface when it is switched on.
Thereafter, adjust theworking height to theappropriate setting.
1. Press and hold in thesafety switch (4).
2. Press thestart/stop lever (3) completely in towards
thehandle. Thelawn raker will switch on.
3. Keep holding thestart/stop lever and release thesafety switch.
Hold thehandle with both hands.
3
4
ENGLISH
Switching off
Turn off themower by releasing thestart/stop lever.
7
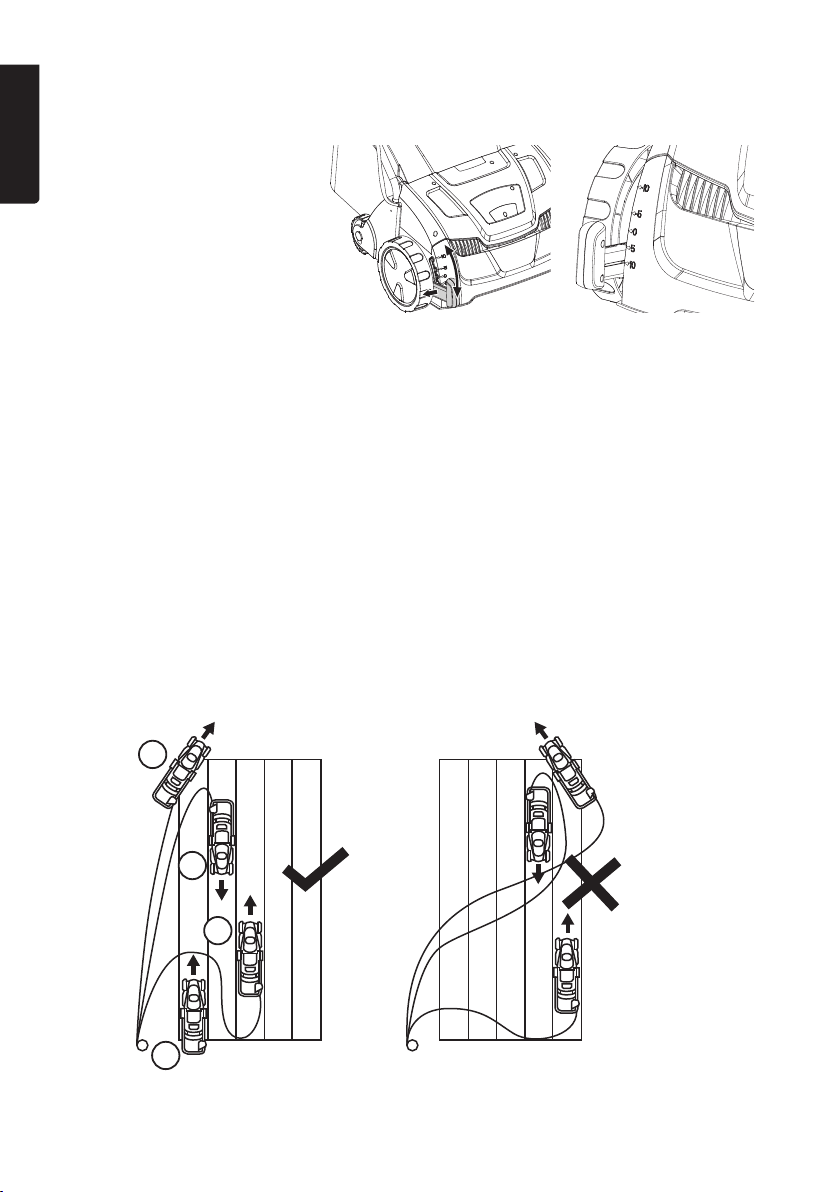
Working height
Theworking height is adjusted
ENGLISH
by moving theheight adjuster
to thecorrect position.
Press theadjuster in to move it.
5 settings are available:
+10: 10mm higher than normal setting, for transport and storage
(adjuster closest to theground)
+5: 5 mm above normal setting
0: normal setting
−5: 5 mm below normal setting
−10: 10mm below normal setting
Scarifying
• Make sure that theextension lead always trails behind or lies on anarea that has already
been scarified.
• Be extra careful not to damage theextension lead or pinch it while working.
• Scarify with aslight overlap to achieve thebest results.
Protecting theextension lead while scarifying:
2
3
4
1
8

Emptying the collector
1. Switch thelawn raker off and disconnect it from thepower supply.
2. Lift thedeck alittle and detach thecollector.
3. Empty thecollector and clean thedischarge chute of any excessive grass and debris.
Use aproper tool for cleaning thechute. Never use your hands or feet.
4. Refit thecollector.
Overload protection
Thelawn raker is fitted with anoverload safety cut-off protection device which switches themotor
off if it is overloaded. Thelawn raker might become overloaded if theworking height setting is
unsuitable for theterrain or if moss or thatch is preventing thedrum from rotating.
If theoverload safety cut-off switch is triggered:
1. Disconnect thelawn raker from thepower supply and let themotor cool.
2. Remove thedebris or alter theworking height setting before resuming work.
Care, maintenance and storage
Note: Always disconnect thelawn raker from theelectrical supply and let it cool before carrying
out any service or maintenance.
Care and maintenance
• Clean theexterior of thelawn raker using adamp cloth. Use only mild cleaning agents,
never solvents or corrosive chemicals.
• Make sure that theventilation slits on themotor housing are clean and free from contaminants.
• Inspect thelawn raker regularly to make sure that all bolts and nuts are tight and that there is
no visible damage.
• Regular checks should be made to ensure that thelawn raker is always in good running condition.
• Repairs must only be carried out by qualified service technicians and only using genuine
spare parts.
• Always keep theunderside of thelawn raker free from grass, moss and debris for optimum
performance.
• Regular checks should be made to make sure that theraker drum is intact.
ENGLISH
Storage
• Before storing thelawn raker, switch it off, unplug it and let it cool.
• Clean thelawn raker thoroughly and check for any signs of visible damage.
• Check that all screws, bolts and nuts are securely tightened.
• Store thelawn raker in adry, sheltered place out of thereach of children.
9

Troubleshooting guide
ENGLISH
Thelawn raker will not start. • Theextension lead is not connected correctly.
• Is thewall socket live?
• Unplug thelawn raker and make sure that theraker drum
can rotate freely and is not hindered by grass and debris in
thedrum housing or discharge chute.
Themotor loses power. • Check theworking height. If thelawn raker is set too low
themotor may struggle and lose power.
• Unplug thelawn raker and make sure that theraker drum
can rotate freely and is not hindered by grass and debris in
thedrum housing or discharge chute.
Abnormal vibrations occur. • Check that theraker drum is not damaged or loose.
Replace if necessary.
• Unplug thelawn raker and make sure that theraker drum
can rotate freely and is not hindered by grass and debris in
thedrum housing or discharge chute.
Responsible disposal
This symbol indicates that this product should not be disposed of with general
household waste. This applies throughout theentire EU. In order to prevent
any harm to theenvironment or health hazards caused by incorrect waste
disposal, theproduct must be handed in for recycling so that thematerial can
be disposed of in aresponsible manner. When recycling your product, take it to
your local collection facility or contact theplace of purchase. They will ensure that
theproduct is disposed of in anenvironmentally sound manner.
Specications
Voltage 230–240 V, 50 Hz
Power 1300W
No-load speed 2990 rpm
Working width 320mm
Weight 11kg
Noise levels LpA = 84.5 dB(A), K = 3 dB(A)
LwA = 97.9 dB(A), K = 3 dB(A)
Vibration value 3.591m/s², K = 1.5 m/s²
10
Mossrivare/vertikalskärare
Art.nr 18-4736 Modell YT6702
31-9311 YT6702
Läs igenom hela bruksanvisningen före användning och spara den sedan för framtida bruk.
Vi reserverar oss för ev. text- och bildfel samt ändringar av tekniska data.
Vid tekniska problem eller andra frågor, kontakta vår kundtjänst (se adressuppgifter på baksidan).
Säkerhet
Varning!
Läs bruksanvisningen.
CE-märkning.
Dubbelisolerad.
För att undvika elektrisk stöt,
klipp inte gräset när det regnar.
Lämnainte heller gräsklipparen
utomhus när det regnar.
Kniven fortsätter att rotera
efter att motorn slagitsav.
Varning för vassa knivblad.
Knivenfortsätter att rotera efter
att motorn slagitsav.
Draut nätkabeln ur vägguttaget
innan skötsel, underhåll eller
service utförs.
Undersök området som ska
klippas innan arbetet påbörjas.
Ta bort alla föremål som skulle
kunna kastas iväg av produkten.
Om du upptäcker föremål
under arbetets gång, stäng
av mossrivaren och avlägsna
föremålen.
SVENSKA
Håll åskådare på avstånd.
Håll nätkabeln på avstånd från
den roterande kniven.
Använd alltid godkända skyddsglasögon/visir och hörselskydd.
Använd skyddshandskar.
Använd skyddsskor med
stålhätta och halkskydd.
Dra omedelbart ut nätkabeln ur
vägguttaget om nätkabeln skadas.
Arbeta längs med sluttningar,
aldrig upp- eller nedför.
Garanterad ljudnivå.
11

Generella säkerhetsföreskrifter
• Mossrivaren får inte användas av personer (inklusive barn) med nedsatt fysisk eller mental förmåga.
Den får inte heller användas av personer utan tillräcklig erfarenhet och kunskap ifall de inte
har fått instruktioner om användningen av någon som ansvarar för deras säkerhet.
• Låt aldrig barn leka med mossrivaren.
• Mossrivaren får endast användas på det sätt som beskrivs iden här bruksanvisningen.
• Tänk på att användaren alltid är ansvarig för olyckor och faror som drabbar andra människor
eller deras egendom.
• Om nätkabeln på något sätt skadas ska den bytas av behörig elektriker eller
SVENSKA
Clas Ohlsons kundtjänst.
• Mossrivaren ska anslutas till ettvägguttag som har säkrats med enjordfelsbrytare (RCD) på 30 mA.
• Använd aldrig mossrivaren om du är trött, sjuk, påverkad av alkohol eller medicin.
Säkerhetsföreskrifter innan arbetet påbörjas
• Läs hela bruksanvisningen noggrant.
• Låt aldrig barn eller personer som inte studerat bruksanvisningen använda mossrivaren.
Lokala bestämmelser kan reglera användarens ålder.
• Använd aldrig mossrivaren när åskådare, särskilt barn eller husdjur, finns inärheten.
• Använd alltid lämpliga grövre skor och långbyxor. Använd aldrig mossrivaren barfota eller
med öppna sandaler.
• Använd aldrig löst sittande kläder eller kläder som har löst hängande remmar eller band.
• Undersök området som ska bearbetas innan arbetet påbörjas. Ta bort alla föremål som skulle
kunna kastas av mossrivaren.
• Kontrollera att mossrivaren är komplett, att alla delar är oskadade och att mossrivaren
fungerar normalt innan arbetet påbörjas.
• Kontrollera att alla kablar som ska användas är hela och oskadade. Kontrollera även
mossrivarens fasta nätkabel till motorn.
• Använd aldrig mossrivaren om någon av kablarna eller dess anslutningar är skadade.
• Kontrollera att alla skruvar och bultar är ordentligt åtdragna samt att alla skyddsanordningar
är monterade innan arbetet påbörjas.
12

Säkerhetsföreskrifter vid användning
• Mossrivaren är inte avsedd att användas yrkesmässigt eller för uthyrning. Den är endast
avsedd för privat användning.
• Använd endast skarvkabel godkänd för utomhusbruk.
• Använd endast mossrivaren idagsljus eller vid god belysning.
• Mossrivaren får endast anslutas till ettvägguttag med 230−240 V, 50 Hz som har säkrats
med enjordfelsbrytare (RCD) på 30 mA.
• Undvik att arbeta på våta gräsmattor.
• Gå lugnt, gå aldrig snabbt.
• Var extra försiktig vid arbete isluttningar.
• Bearbeta alltid lutande mark tvärs över, aldrig upp- och nedför.
• Var mycket försiktig när du byter riktning isluttningar.
• Arbeta aldrig imycket branta sluttningar.
• Var extra försiktig när du backar eller drar mossrivaren mot dig.
• Stäng av mossrivaren och dra ut nätkabeln ur vägguttaget om maskinen ska flyttas över
andra ytor än gräsmattor, t.ex. grusgångar och uppfarter.
• Använd aldrig mossrivaren om någon del av höljet är skadat. Använd den inte heller utan att
uppsamlaren är monterad.
• Se till att mossrivaren står stadigt på alla hjul vid start. Håll undan fötter och händer från höljet
och den roterande kniven på mossrivarens undersida.
• Stäng av mossrivaren och dra ut nätkabeln ur vägguttaget när du tillfälligt avbryter arbetet.
• Stäng av mossrivaren och dra ut nätkabeln ur vägguttaget vid tömning av uppsamlaren,
rengöring eller annat underhåll.
• Stäng av mossrivaren och dra ut nätkabeln ur vägguttaget om den roterande kniven träffar
något främmande föremål. Kontrollera mossrivaren, den roterande kniven och dess fjädrar.
Reparera ev. skador innan mossrivaren startas igen.
• Om onormala vibrationer eller ljud uppstår, stäng av mossrivaren och dra ut nätkabeln ur
vägguttaget. Undersök kniven och dess fjädrar, dra åt alla skruvar och reparera ev. skador
innan arbetet återupptas.
• Var mycket uppmärksam på nätkabeln under arbetets gång. Se till att den aldrig kommer
ikontakt med mossrivaren eller den roterande kniven på undersidan av mossrivaren.
SVENSKA
13
Produktbeskrivning
2
3
4
SVENSKA
6
7
8
9
10
1 19 20
13
5
14
15
16
17
18
11
1. Handtag
2. Dragavlastare
3. Start-/stoppreglage
4. Säkerhetsbrytare
5. Anslutning för nätkabel
6. Kabelclips
7. Uppsamlare
8. Skyddslucka över utkast
9. Utkast
10. Bakre stödhjul
12
11. Framhjul
12. Reglage för höjdjustering
13. Handtag, överdel
14. Skruv och låsvred för montering av handtag (4 ×)
15. Handtag, mellandel
16. Handtag, underdel
17. Låsskruv för handtagets underdel
18. Ventilationsöppningar
19. Drivning
20. Skärvals
14
Montering
Handtag
1. Skjut ner handtagets underdel (16)
isina fästen och lås fast med
låsskruvarna (17).
16
16
15
16
3. Montera handtagets överdel
(13) på handtagets mellandel
med medföljande skruv och
låsvred.
17
14
2. Montera handtagets mellandel (15) på handtagets
underdel med medföljande skruv och låsvred.
13
15
16
4. Fäst elkabeln till handtaget med medföljande clips.
15
SVENSKA
14
6
15
 Loading...