

Cocraft PRO Series, PRO ML10-DB Original Instructions Manual
40-9931
PROEDITION
SLIDING MITRE SAW 1200 W
PRO ML10-DB
KAP- OCH GERINGSSÅG
KAPP- OG GJÆRESAG
KATKAISU- JA JIIRISAHA
KAPP- UND GEHRUNGSSÄGE
Important!
Read the entire instruction manual
carefully and make sure that you fully
understand it before you use the
equipment. Keep the manual for future
reference.
Viktig information:
Läs hela bruksanvisningen noggrant och
försäkra dig om att du har förstått den
innan du använder utrustningen. Spara
bruksanvisningen för framtida bruk.
Viktig informasjon:
Les disse anvisningene nøye og forsikre
deg om at du forstår dem, før du tar
produktet i bruk. Ta vare på anvisningene
for seinere bruk.
Tärkeää tietoa:
Lue nämä ohjeet huolellisesti ja varmista
että olet ymmärtänyt ne, ennen kuin
alat käyttää laitetta. Säilytä ohjeet
myöhempää tarvetta varten.
Wichtiger Hinweis:
Vor Inbetriebnahme die komplette
Bedienungsanleitung sorgfältig
durchlesen und aufbewahren.
ENGLISHSVENSKANORSKSUOMIDEUTSCH
Art.no Model
40-9931 HM1028R
Ver. 20170403
Original instructions
Bruksanvisning i original
Originalbruksanvisning
Alkuperäinen käyttöohje
Original Bedienungsanleitung

Sliding Mitre Saw
ENGLISH
Art.no 40-9931 Mode HM1028R
Please read theentire instruction manual before using theproduct and then save
it for future reference. We reserve theright for any errors in text or images and any
necessary changes made to technical data. In theevent of technical problems or other
queries, please contact our Customer Services (see address details on theback).
Safety
Warning!
When using this tool all basic safety precautions must be followed to avoid the risk of
fire, electrocution and personal injury. Read these instructions carefully before using
the product and keep them for future reference.
• Keep the working area tidy. Cluttered surfaces and benches invite accidents.
• Take stock of your working environment. Do not expose the tool to rain.
• Do not use the tool in moist or wet areas. Keep the working area well lit. Never
operate the tool near flammable liquid or gas.
• Avoid electric shocks. Avoid body contact with earthed objects, such as pipes,
radiators, ovens or refrigerators.
• Keep other people at a safe distance. Do not allow anyone not involved in the
work process to touch the tool or its electric cable, especially children. Keep all
bystanders at a distance.
• Store the tool in a safe place. When your tools are not in use, keep them in a
locked, dry area, away from children.
• Do not overload the tool. The correct feed rate makes the work better and safer.
• Use the correct tool for the job. Do not try to use small tools to perform jobs
requiring more powerful tools. Do not use a tool for a purpose for which it was not
designed, e.g. using a circular saw for lopping branches off trees.
• Wear suitable clothing. Do not wear loose-fitting clothing or jewellery; they could
be caught in moving parts. Non-slip shoes are recommended for outdoor work.
• Wear a hairnet or similar if you have long hair.
• Always use safetywear. Wear safety glasses. Use a dust mask or dust filter when
working in dusty environments.
• Use dust extractors. If the tool is equipped with or connected to a dust extractor/
collector, make sure that it is turned on and used correctly.
• Do not abuse the lead. Do not jerk the lead, grip the plug itself when disconnecting the power. Make sure that the mains lead does not come into contact with
heat, oil, or sharp edges.
2

• Firmly secure the workpiece. If possible use vices or clamps to hold the workpiece in place. This is much safer than holding the workpiece in one hand.
• Do not overreach. Make sure that you stand steady and balanced all times.
• Look after you tools. Make sure that they are clean and that the edges are sharp
for maximum effect and best results. Follow the manual’s recommendations regarding lubrication and replacement of accessories. Inspect the mains lead regularly.
If it is damaged it should be replaced by a qualified service technician. Inspect all
leads and cables regularly to check for any damage. Make sure that the machine’s
handles and controls are clean, dry and free from oil and grease.
• Turn the power off. Pull out the plug and push in the emergency stop button
before servicing or changing any blades, drill bits, cutters or sanding discs.
• Remove all spanners and repair tools. Make a habit of checking to make sure
that the machine is free of all spanners and tools before turning the power on.
• Avoid accidental starts. Do not walk around with your finger on the trigger of a
power tool if it is plugged in. Make sure that the on/off switch is set to OFF before
plugging in any power tool.
• Use the correct extension leads. If you use extension leads outdoors, only use
those designed for outdoor use. Only use extension leads with thick enough diameter core wires and roll out the whole lead.
• Use common sense and be careful. Think before carrying out any task, so that
it is carried out safely. Never operate machines/power tools when you are tired or
under the influence of medicine.
• Check the following before turning the tool on:
- That all guards and other parts are whole and in working order.
- That moving parts are free and correctly aligned.
- That no moving parts can get caught.
- That there are no visible defects.
- Other factors that can influence work execution.
• Use only recommended accessories. The use of non-recommended accessories can cause accidents and personal injury.
• Should only be repaired by a qualified technician. This tool conforms to current
safety requirements. Repairs to the tool should only be carried out by a tradesman
using original spares; otherwise the tool could cause accidents and personal injury.
ENGLISH
3

Additional safety rules for compound mitre saws
• Never use cracked or damaged saw blades.
ENGLISH
• Replace the kerf plate when it is worn.
• Use only saw blades recommended by the manufacturer.
• Never use blades made of high speed steel (HSS).
• Select the correct blade for the material to be cut.
• Never saw material other than that for which the saw blade is intended.
• Observe the maximum speed marked on the saw blade.
• When moving the mitre saw, hold it by the handle.
• Do not operate the machine without the guard in position, or if the guard does not
function or is not maintained properly.
• Keep the surrounding work area free of loose chips and offcuts.
• Use only those spacers and spindle adaptors approved for your saw.
• If the laser is fitted with a laser, it must not be replaced by a different type. If damaged,
have the laser repaired by the manufacturer or an authorised repair agent.
• Do not remove any offcuts or jammed material from around the blade area until the
blade has stopped.
• Before sawing, make sure that the saw is stable and secure. When possible,
always mount the machine to a bench.
• When sawing, always secure the workpiece using clamps or a vice if possible.
• Use a table, roller stand, or similar to support long workpieces.
In spite of the application of the relevant safety rules and the implementation of
safety devices, certain residual risks cannot be avoided. The following hazards
are inherent to the use of mitre saws:
• Contact with uncovered parts of the rotating saw blade.
• Contact with rotating saw blade (cuts).
• Workpiece or parts of it can be ejected back towards the user (kickback).
• Shattered saw blade.
• Flying metal particles if the carbide tips break off.
• Impairment of hearing if ear defenders are not worn.
• Health hazards caused by breathing dust in poorly ventilated work areas.
4

Safety symbol guide
• Class 2 laser product (EN60825-1:2007).
• Never look into thelaserbeam.
• Never point thelaser beam into theeyes of people or animals.
Read theentire instruction manual.
Always use safety glasses, ear defenders and aface mask.
ENGLISH
5
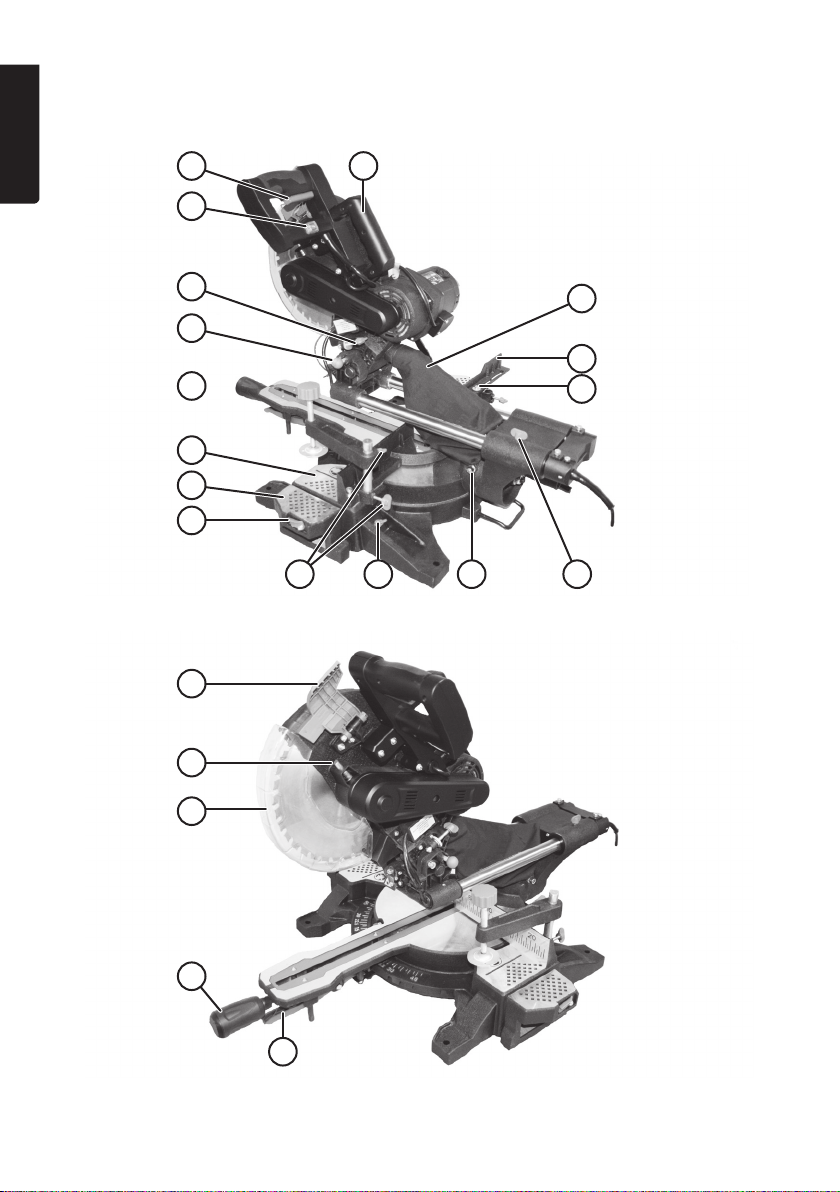
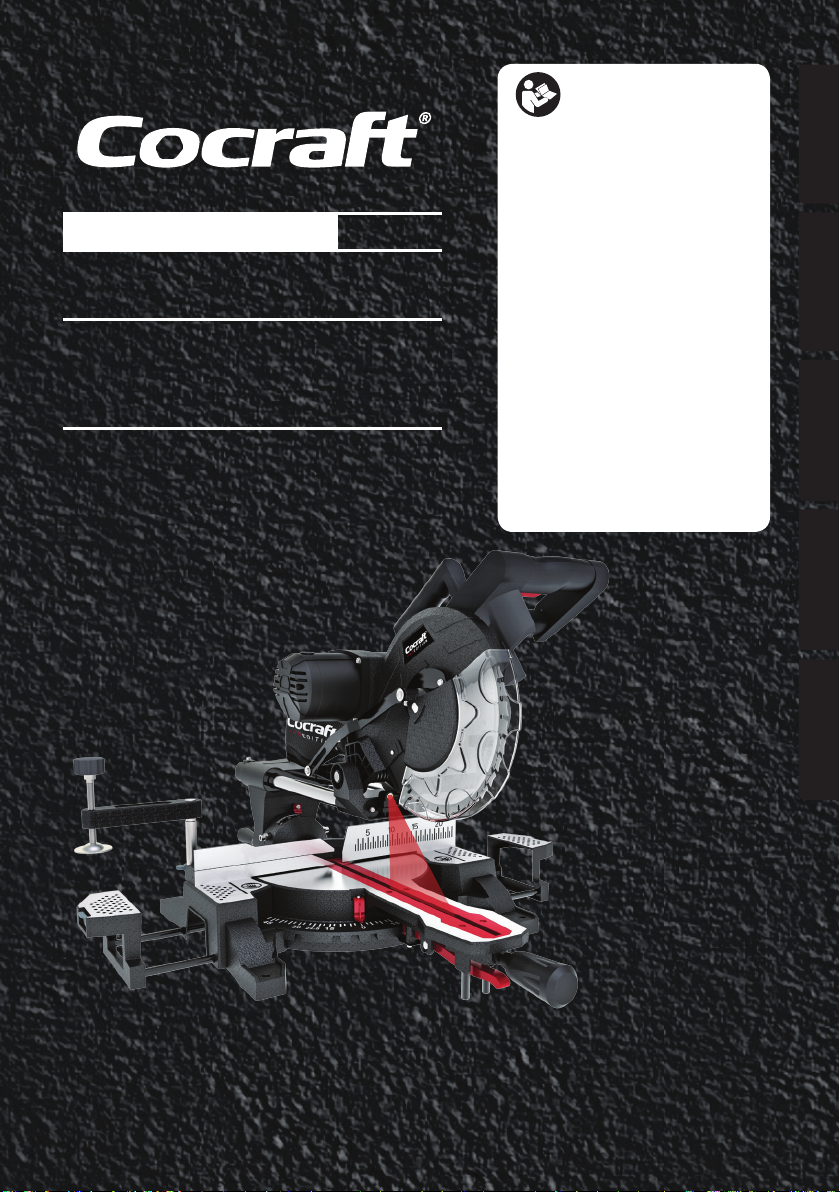
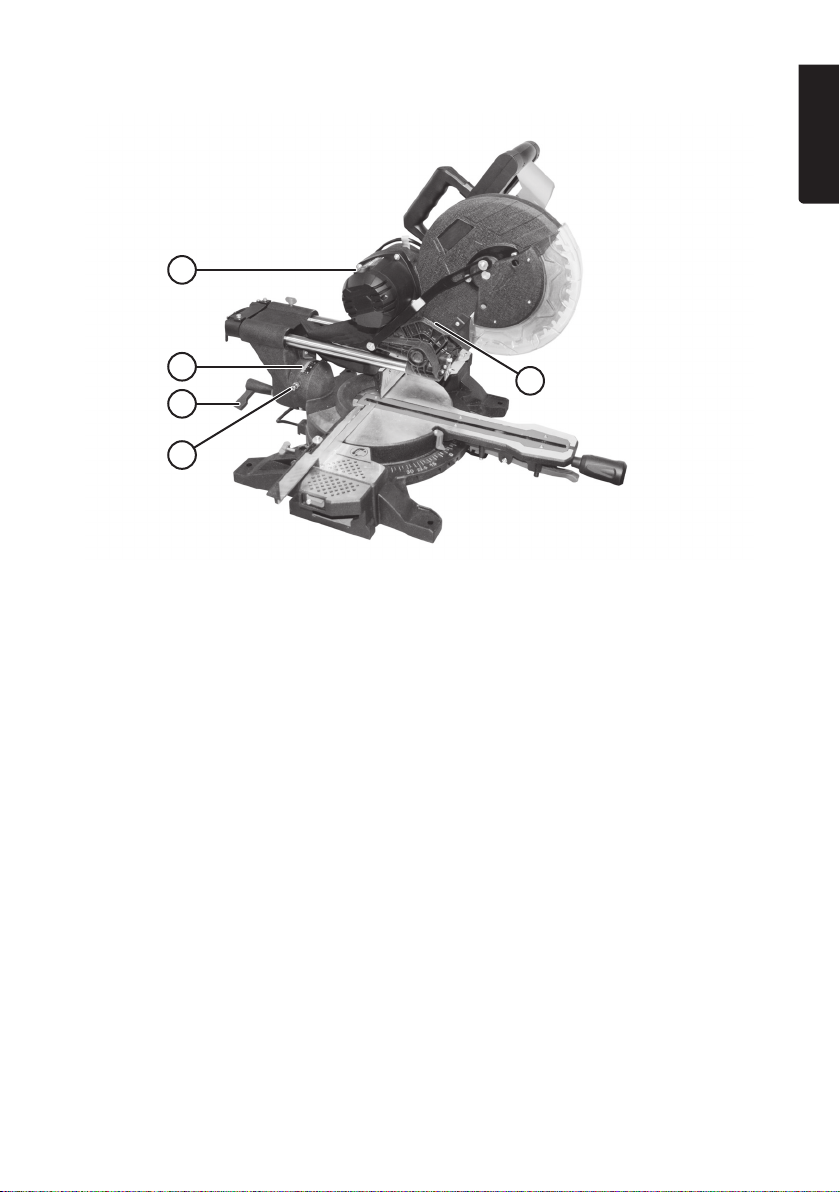
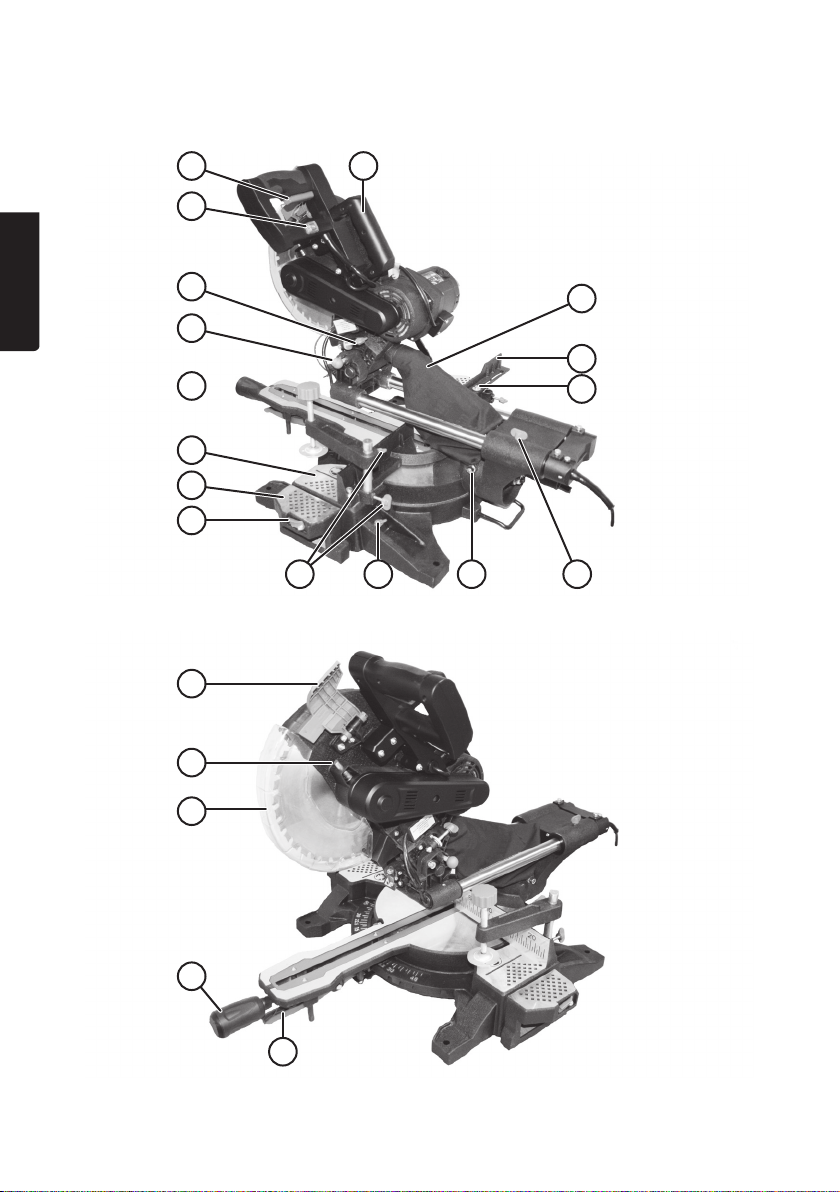
Product description
ENGLISH
3
4
5
6
7
8
9
10 11 16 15
17
12
12
13
14
18
19
20
21
6
22
ENGLISH
23
24
25
1. Handle
2. Power trigger
3. Laser line switch
4. Cutting depth adjuster
5. Saw head lock
6. Material clamp
7. Turntable
8. Work support
9. End stop
10. Material clamp adjuster
11. Work support locking screw
12. Dust bag
13. Fence
26
14. Fence adjustment knob
15. Slide rail locking wing nut
16. Bevel angle 0° adjuster
17. Safety lever
18. Spindle lock
19. Blade guard
20. Locking knob
21. Fixed setting locking lever
22. Carbon brush plug
23. Bevel scale
24. Bevel locking lever
25. Bevel angle 45° adjuster
26. Saw head
7
Before operating the machine
• Thesaw must be securely fastened to aworkbench or stand.
ENGLISH
• All guards and safety devices must be properly fitted.
• Thesaw blade must be able to turn freely in all work settings.
• Make sure that there are no foreign objects (nails, screws) in theworkpiece to be sawn.
• Make sure that thesaw blade is correctly fitted and that all moving parts run smoothly.
Operating instructions
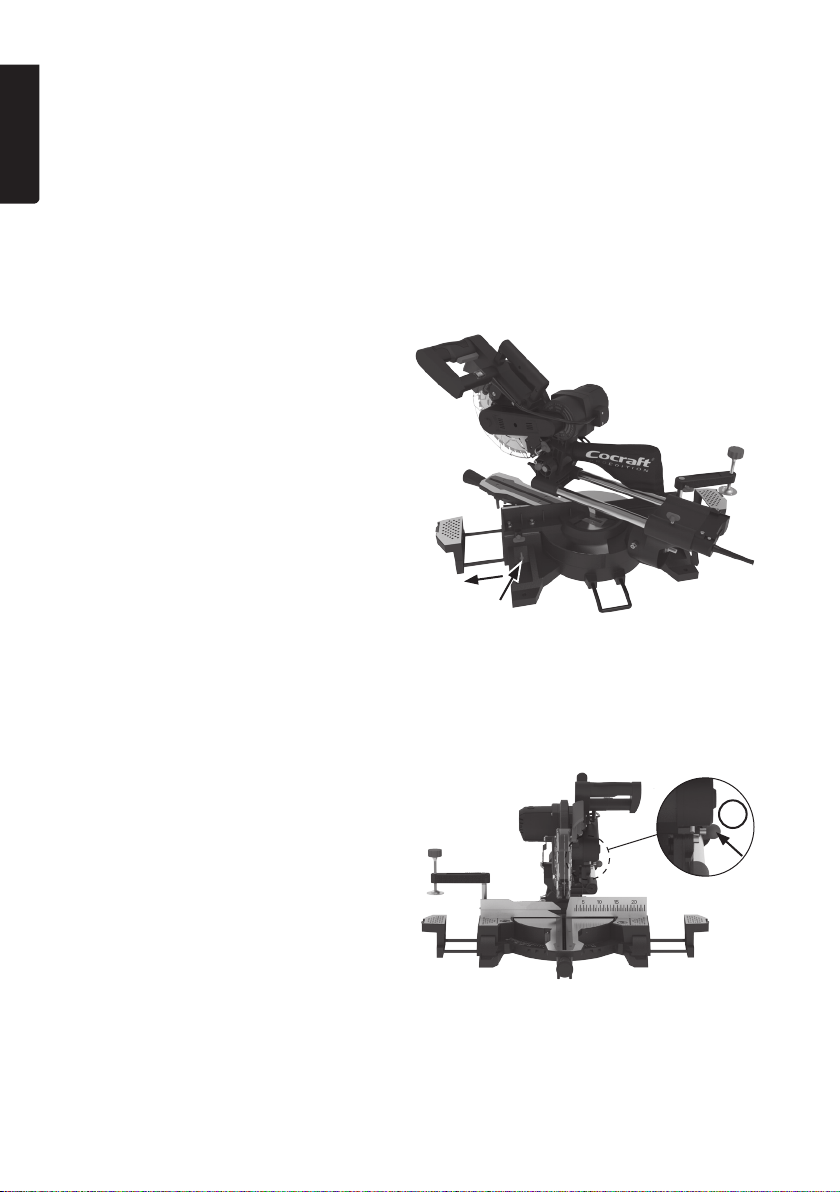
Work support
1. Undo thework support locking
screw (11).
2. Extend thework support.
3. Tighten thelocking screw again.
Cutting operations
Cross-cutting with the saw head at 0˚
Thesaw can cross-cut workpieces up to 120mm wide without using theslide function
and thesaw can be fixed in therearmost setting using theslide rail lock nut (15). If
theworkpiece is wider than 120mm, make sure that theslide rail lock nut is undone and
that thesaw head (26) is able to slide back and forth before beginning to cut.
1. Raise thesaw head to its upper
position by releasing thelock (5).
2. Move thesaw head backwards
using handle (1) and fix it in this
position if necessary (depending on
thewidth of theworkpiece) using
theslide rail lock nut.
3. Place theworkpiece against
thefence (13) on theturntable (7).
4. Secure theworkpiece using
theclamp (6) to prevent it from
moving during thecutting process.
5
8
5. Switch thelaser line on if necessary, using theswitch (3).
6. Press in thepower trigger (2) to start themotor, press in thesafety lever (17) and
carefully lower thesaw head and let theblade cut through theworkpiece.
7. To switch thesaw off, release thepower trigger whilst still maintaining full control
over thesaw head. When theblade has stopped, thesaw head can be moved
back to its upper position.
Warning: Theresetting springs in themachine automatically raise thesaw head after
cutting. Do not simply let go of thesaw head after cutting, hold onto thehandle and
let it come up slowly.
Bevel cutting 0–45°
1. Undo thelocking lever (24) and tilt
theblade to thedesired angle with
thehelp of thebevel scale (23).
2. Tighten thelocking lever to lock
thebevel angle.
3. Cut as described above.
Fine-adjusting the 0° and 45° bevel angle stops
1. Undo thelocking knob (24) and
angle thesaw to 0°.
2. Check theangle between theblade
and theturntable using a90° angle
guide.
3. Adjust theend stop using
theadjuster screw (16) by
slackening thenut and turning
thescrew. Lock thescrew again
afterwards by re-tightening thenut.
4. To adjust the45° end stop, do as
above but use theother adjuster
screw (25) and a45° angle guide.
16
25
24
ENGLISH
9

Mitre cutting -45°/0°/+45°
1. Raise thesaw head (26) to its upper position by releasing thelock (5).
ENGLISH
2. Undo thelocking knob (20), lift thelocking lever (21) and set thesaw to thedesired
mitre angle using thescale on thebase.
3. Tighten thelocking knob and perform cutting operations as described above.
Sawing bowed workpieces
Correct
If the workpiece is bowed, turn it as shown in the figure to prevent it from pinching
the blade towards the end of the cut.
Incorrect
Care and maintenance
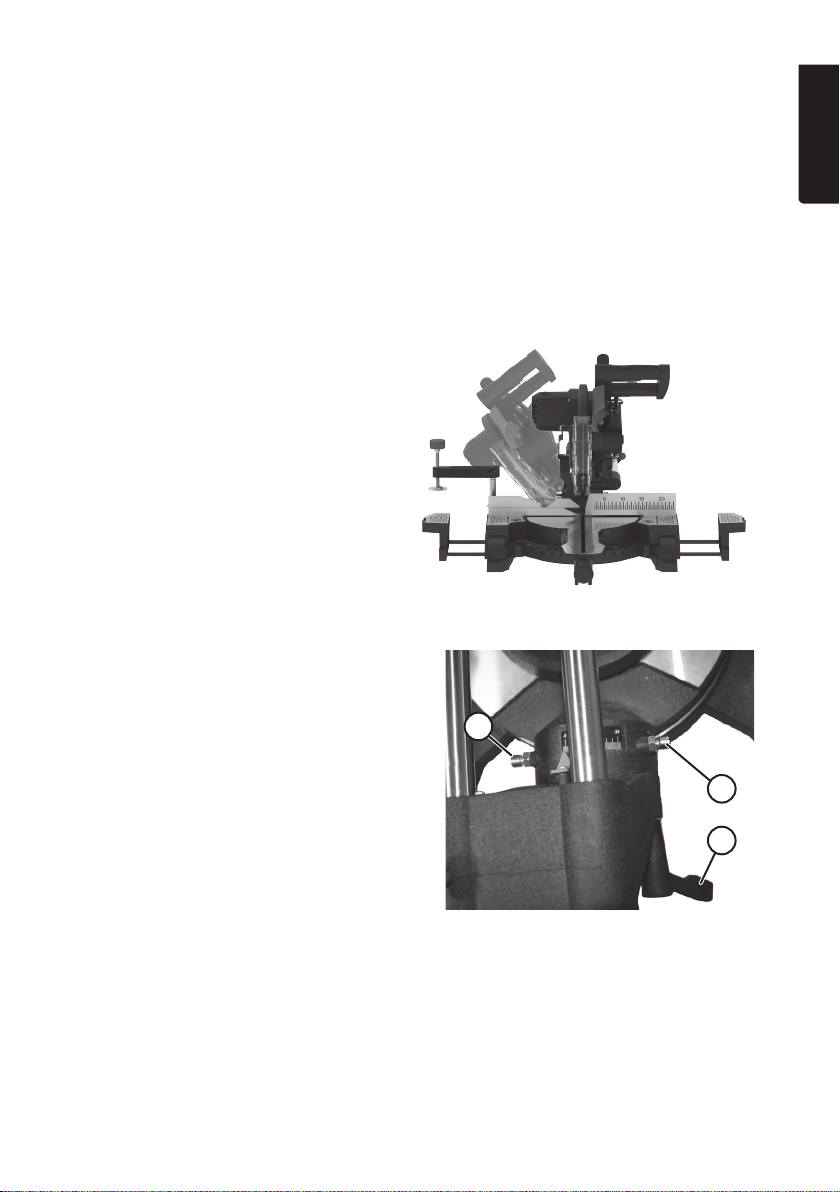
Dust bag
Thesaw is fitted with adust bag (12) which can be emptied by opening thezip on
thebottom. Adust extractor can also be attached to theoutlet instead of thedust
bag.
Changing the blade
Note: Wear gloves whenever handling theblade, it is very sharp.
1. Unplug themains lead from thewall
socket.
2. Raise thesaw head to its upper
position by releasing thelock (5).
3. Alter theposition of theblade
guard alittle so that you can undo
thescrew in thehole as shown in
thefigure.
Note: Do not remove thescrew, just
slacken it.
10

4. Swing back theblade guard to
expose theblade bolt.
5. Press in thespindle lock (18) with
one hand and turn theblade with
your other hand until it locks.
6. Keep thespindle lock pressed
in and undo theblade bolt using
theincluded hex key.
Note: Theblade bolt has aleft-hand
thread so you have to turn thebolt
clockwise to undo it.
7. Remove theblade bolt and
theouter flange.
8. Remove theblade from
theinner flange.
9. Clean thesaw blade flanges and
bolt thoroughly before fitting thenew
blade. Thedirection of rotation of
theblade must be thesame as
thearrow on thehousing.
10. Fit thenew blade in thereverse
order. Swing theblade guard back
into place and tighten thescrew
which you loosened during
step 3 above.
11. Make sure thespindle lock is off.
12. Before using thesaw again, make
sure that all safety devices are in
good working order.
ENGLISH
Warning: Every time you change theblade, make sure that it spins freely in all angle settings.
Warning: Remove thehex key and release thespindle lock before switching themachine on.
11
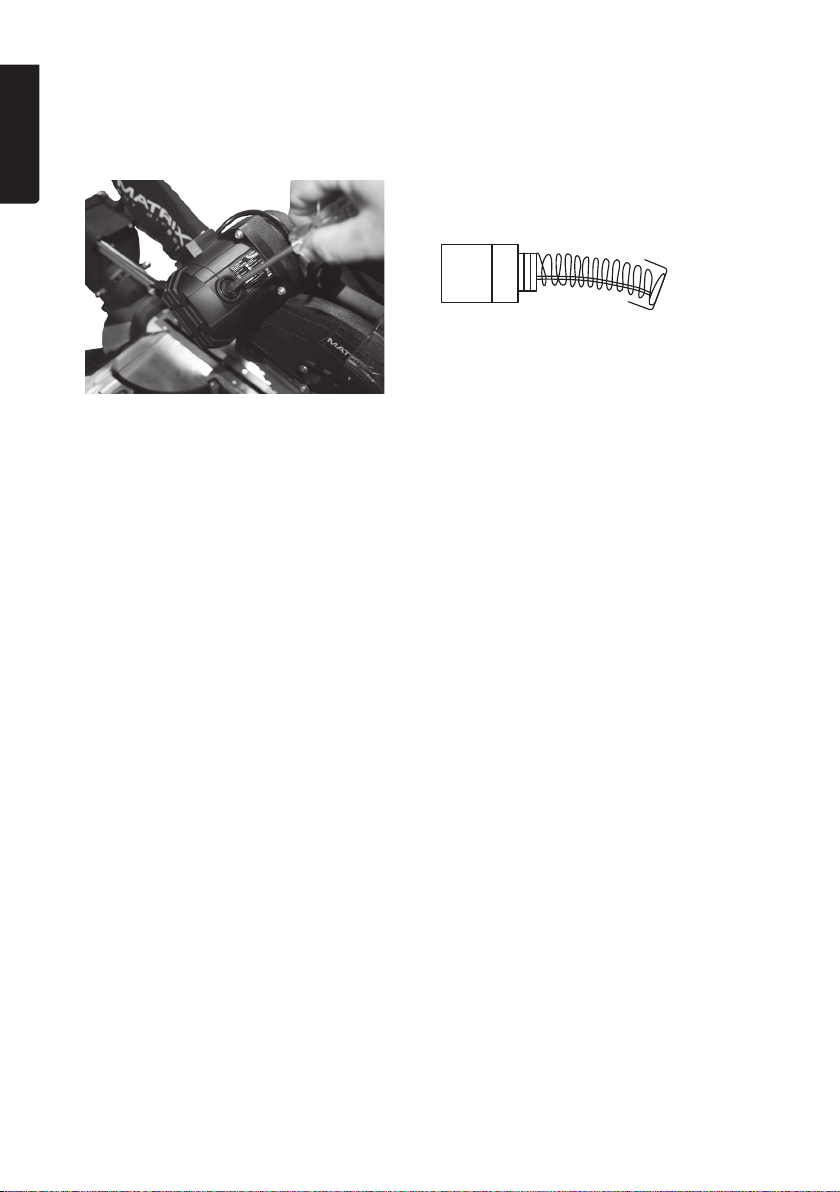
Inspecting and replacing carbon brushes
Warning: Unplug themachine before inspecting thecarbon brushes.
ENGLISH
Min. length 6 mm
Thelife expectancy of thebrushes depends on how hard themotor has been run. If thesaw
is new or if thebrushes have just been replaced, thecondition of thebrushes should be
checked after 50 hours of operation. They should then be checked after every 10 hours
operation until they need to be replaced again. Check thecarbon brushes as follows:
1. Remove theplugs (22) on each side of themotor.
2. Extract thecarbon brushes.
3. Check thelength of thecarbon brushes, they should be at least 6mm in length.
4. If either of thebrushes is shorter than 6 mm or thespring is damaged, they must
both be changed.
Troubleshooting guide - motor
1. To prevent themotor from overheating it should be air-blasted or vacuum-cleaned
regularly to remove any dust or wood chips which might clog theair vents.
2. Use thesaw with anearthed power supply protected by aslow-blow fuse of at
least 10A.
3. Release thepower trigger immediately if themotor does not start straight away.
Unplug thesaw and make sure that theblade spins freely.
4. If theblade binds during acut: Release thepower trigger immediately and pull out
theplug from thewall socket. Remove theblade from theworkpiece, plug thesaw
in again and try starting themotor again.
5. Check all thecables, plug and socket connections.
6. Make sure not to connect any more power tools or appliances such as site lights
to thesame wall socket as themitre saw. Doing so could overload thefuse or
circuit breaker.
7. Any extension leads used should have thefollowing conductor cross-sectional area:
- up to max 7mm: min 1.5mm²
- 7–15m: min 2mm²
- Max extension lead length: 15m
12

Responsible disposal
This symbol indicates that this product should not be disposed of with
general household waste. This applies throughout theentire EU. In order
to prevent any harm to theenvironment or health hazards caused by
incorrect waste disposal, theproduct must be handed in for recycling
so that thematerial can be disposed of in aresponsible manner. When
recycling your product, take it to your local collection facility or contact
theplace of purchase. They will ensure that theproduct is disposed of in
anenvironmentally sound manner.
Specications
Voltage 230–240 V AC, 50Hz
Rated power 1200W
No-load speed 6 000rpm
Saw blade TCT, Ø 255 × Ø 30
Number of teeth 60
Saw blade bevel tilt 0–45°
Variable mitre angle −45°/0°/+45°
Work support 500 × 160mm
Max workpiece size at
0° mitre and 0° bevel 340 × 75 mm
Max workpiece size at
0° mitre and 45° bevel 340 × 45 mm
Max workpiece size at
45° mitre and 0° bevel 240 × 75mm
Max workpiece size at
45° mitre and 45° bevel 240 × 45 mm
Noise emission data LpA 97.5 dB(A), K=3 dB
LwA 106.8 dB(A), K=3 dB
Laser Class 2 in accordance with EN60825-1
P = < 1 mW, λ = 650 nm
Weight 18kg
ENGLISH
13

Kap- och geringssåg
Art.nr 40-9931 Modell HM1028R
Läs igenom hela bruksanvisningen före användning och spara den sedan för framtida bruk.
Vi reserverar oss för ev. text- och bildfel samt ändringar av tekniska data. Vid tekniska
problem eller andra frågor, kontakta vår kundtjänst (se adressuppgifter på baksidan).
Säkerhet
SVENSKA
Varning!
När du använder detta verktyg ska grundläggande försiktighetsåtgärder iakttas för att
minska risken för brand, elektrisk chock och personskada. Läs alla dessa instruktioner
innan du använder produkten och spara dessa instruktioner.
• Håll arbetsplatsen ren. Belamrade ytor och bord inbjuder till olyckor.
• Ta hänsyn till arbetsmiljön. Utsätt inte verktyget för regn. Använd inte verktyget
i fuktiga eller våta utrymmen. Håll arbetsplatsen väl upplyst. Använd inte verktyget
i närheten av lättantändliga vätskor eller gaser.
• Undvik elektrisk chock. Undvik kroppskontakt med jordade föremål som t.ex.
vattenledningar, element, köksspisar och kylskåp.
• Håll andra människor på avstånd. Låt inga människor, speciellt inte barn, som
inte deltar i arbetet röra vid verktyget eller dess skarvsladdar. Håll dem på avstånd
från arbetsplatsen.
• Förvara verktyget i ett säkert utrymme. När verktyget inte används, förvara det
i ett torrt låst utrymme utom räckhåll för barn.
• Överbelasta inte verktyget. Det gör jobbet bättre och säkrare med avsedd
matningshastighet.
• Använd rätt verktyg. Pressa inte små verktyg att utföra stora jobb som kräver
kraftfulla verktyg. Pressa inte ett verktyg eller en tillsats att göra ett arbetsmoment
som den inte är gjord för; använd t.ex. inte en cirkelsåg för att kapa trädgrenar eller
timmer.
• Bär lämplig klädsel. Bär inga löst sittande kläder eller smycken, de kan fastna
i roterande delar. Halksäkra skor rekommenderas vid arbete utomhus. Bär hårnät
eller liknande om du har långt hår.
• Bär alltid skyddsutrustning. Bär skyddsglasögon. Använd också dammfilter eller
skyddsmask vid dammande arbeten.
• Använd utsugningsutrustning. Om verktyget är förberett för anslutning av
utrustning för utsugning och uppsamling av damm, se till att utrustningen är
ansluten och korrekt använd.
14

• Misshandla inte nätsladden. Ryck inte i sladden, utan dra i stickproppen när
du ska ta ut den ur vägguttaget. Se till att nätsladden inte kommer i kontakt med
värme, olja eller vassa kanter.
• Spänn fast arbetsstycket ordentligt. När det är möjligt, använd tvingar eller
skruvstäd för att spänna fast arbetsstycket. Det är säkrare än att hålla fast
arbetsstycket med ena handen.
• Sträck dig inte för långt. Se till att du hela tiden står säkert med god balans.
• Håll verktyget i trim. Se till att det är rent och eggarna vassa för optimal effekt
och ett säkert resultat. Följ bruksanvisningens rekommendationer för smörjning
och byte av tillbehör. Kontrollera nätsladden regelbundet. Om den är skadad ska
den bytas av en kvalificerad servicetekniker. Syna alla skarvsladdar regelbundet
så att de inte är skadade. Se till att maskinens/verktygets handtag och reglage är
torra, rena och helt fria från olja, fett etc.
• Slå av strömmen. Dra ur stickproppen och tryck in nödstopp före service och vid
byte av tillbehör som hyvelstål, borrar, stål, slipband eller blad.
• Ta bort alla nycklar och serviceverktyg. Gör det till en vana att kontrollera att alla
nycklar och serviceverktyg är borttagna från maskinen innan du slår på strömmen.
• Undvik oavsiktlig start. Bär inte ett verktyg med ett finger på strömbrytaren/
avtryckaren om sladden sitter i ett uttag. Se till att strömbrytaren står på OFF när
du sätter i stickproppen.
• Använd rätt skarvsladdar. Om du använder skarvsladdar utomhus, använd
endast de som är avsedda för utomhusbruk. Använd skarvsladdar med tillräcklig
ledararea och rulla ut hela sladden.
• Använd sunt förnuft och var försiktig. Tänk efter innan du utför ett
arbetsmoment, så att du kan utföra det på ett säkert sätt. Använd inte maskinen/
verktyget när du är trött, påverkad av mediciner etc.
• Kontrollera följande innan du startar verktyget:
- Att alla skydd och övriga delar är oskadade och fyller sin funktion.
- Att rörliga delar kan rotera fritt och är rätt inriktade.
- Att inga rörliga delar kan fastna.
- Att ingen defekt har uppstått.
- Andra omständigheter som kan påverka arbetets utförande.
• Använd rekommenderade tillbehör. Användning av ej rekommenderade tillbehör
kan vålla olyckor eller risk för personskada.
• Repareras endast av kvalificerad tekniker. Verktyget överensstämmer
med gällande säkerhetskrav. Reparationer av verktyget ska alltid utföras av
fackman, med originalreservdelar, annars kan verktyget vålla olyckor eller risk för
personskada.
SVENSKA
15

Särskilda säkerhetsföreskrifter kap- och
geringssågar
• Använd aldrig sågklingor som är skadade eller deformerade.
• Byt ut bordsinlägget om det är slitet.
• Använd endast sågklingor som är rekommenderade av tillverkaren.
• Använd aldrig sågklingor som är tillverkade av snabbstål.
• Välj sågklinga som är lämplig för det material du ska såga i.
SVENSKA
• Såga aldrig i andra material än de som är angivna för sågklingan.
• Kontrollera att sågklingan har rätt hastighetsklassning.
• Om du behöver förflytta maskinen, ta tag i handtaget.
• Använd sågen endast om skydden sitter på plats och fungerar problemfritt.
• Håll golvytan fri från spån och spillbitar.
• Använd endast distansbrickor och klingflänsar som passar till just din såg.
• Om maskinen är utrustad med laser får lasern inte bytas mot en annan typ.
Reparationer får endast utföras av lasertillverkaren eller annat auktoriserat
serviceställe.
• Ta inte bort fastnade eller avkapade bitar förrän sågklingan har stannat.
• Före sågning, se till att maskinen står stadigt. Vid behov, fixera maskinen vid ett
arbetsbord eller liknande.
• Vid sågning, spänn alltid fast arbetsstycket med t.ex. en tving.
• Använd ett bord, rullstöd eller liknande som stöd när du arbetar med långa arbetsstycken.
Även om maskinen används helt enligt beskrivningen är det omöjligt att eliminera
alla tänkbara risker. Maskinens konstruktion och användning kan ge upphov till
följande riskmoment vid användning:
• Kontakt med sågklingan där skyddet inte täcker.
• Kontakt med roterande sågklinga (skärskada).
• Arbetsstycket eller delar av det kastas bakåt mot användaren (kickback).
• Brott på sågklinga.
• Hårdmetallskär kan lossna och kastas ut.
• Hörselskada kan uppkomma om inte hörselskydd används.
• Skadligt damm kan ge skador vid användning i dåligt ventilerad lokal.
16

Produktmärkning med säkerhetssymboler
• Laser, klass 2 (EN60825-1:2007).
• Titta aldrig in ilaserstrålen.
• Rikta aldrig laserstrålen mot ögonen på människor ellerdjur.
Läs hela bruksanvisningen.
Använd hörselskydd, skyddsglasögon och andningsskydd.
SVENSKA
17
Produktbeskrivning
3
12
4
SVENSKA
5
6
7
8
9
10 11 16 15
17
18
19
12
13
14
20
21
18

22
SVENSKA
23
24
25
1. Handtag
2. Startreglage
3. Strömbrytare för laserlinje
4. Justering av sågdjup
5. Spärr för såghuvud
6. Tving
7. Geringsbord
8. Stödbord
9. Ändstopp
10. Justering av fastspänningstving
11. Låsning för stödbord
12. Spånpåse
13. Anslag
26
14. Justering av anslag
15. Draganordningens låsskruv
16. Justering av 0° ändläge
17. Säkerhetsspärr
18. Spindellås
19. Klingskydd
20. Låsvred
21. Spärr för fasta vinklar
22. Lock över kolborstar
23. Skala
24. Låsvred för att vinkla sågen
25. Justering av 45° ändläge
26. Såghuvud
19

Åtgärder innan sågen börjar användas
• Sågen ska vara säkert fixerad på arbetsbänk eller stativ.
• Alla skydd och säkerhetsanordningar ska vara rätt monterade.
• Sågklingan ska kunna löpa fritt ialla inställningslägen.
• Kontrollera att inga främmande föremål (t.ex. spik eller skruv) finns iarbetsstycket
om du arbetar med trä som bearbetats tidigare.
• Kontrollera att sågklingan är rätt monterad och att alla rörliga delar löper lätt.
SVENSKA
Användning
Stödbord
1. Öppna stödbordets låsskruv (11).
2. Dra ut stödbordet.
3. Dra åt låsskruven igen.
Kapning
Kapa med klingan vinklad 0°
När du kapar arbetsstycken med upp till 120 mm bredd behöver inte sågens dragfunktion användas och sågen kan vara fixerad isitt bakre läge med låsskruven (15).
Om arbetsstycken som är bredare än 120 mm ska kapas, kontrollera att låsskruven är
lossad och att såghuvudet (26) är rörligt innan du börjar kapa.
1. Släpp upp såghuvudet till sitt övre
läge genom att dra ut spärren (5).
2. För såghuvudet bakåt med handtaget (1) och fixera såghuvudet
idenna position med låsskruven om
det behövs (beroende på arbetsstyckets bredd).
3. Placera arbetsstycket som ska
kapas mot anslaget (13) på
geringsbordet (7).
4. Fäst det med tvingen (6) för att
förhindra att arbetsstycket lossnar
vid kapning.
5
20
 Loading...