

Cocraft PRO DT800-P Original Instructions Manual
40-9912
PROEDITION
DISTANCE METER
80 M
PRO DT800-P
AVSTÅNDSMÄTARE
AVSTANDSMÅLER
ETÄISYYSMITTARI
ENTFERNUNGSMESSER
Important!
Read the entire instruction manual
carefully and make sure that you fully
understand it before you use the
equipment. Keep the manual for future
reference.
Viktig information:
Läs hela bruksanvisningen noggrant och
försäkra dig om att du har förstått den
innan du använder utrustningen. Spara
bruksanvisningen för framtida bruk.
Viktig informasjon:
Les disse anvisningene nøye og forsikre
deg om at du forstår dem, før du tar
produktet i bruk. Ta vare på anvisningene
til senere bruk.
Tärkeää tietoa:
Lue nämä ohjeet huolellisesti ja varmista
että olet ymmärtänyt ne, ennen kuin
alat käyttää laitetta. Säilytä ohjeet
myöhempää tarvetta varten.
Wichtiger Hinweis:
Vor Inbetriebnahme die komplette
Bedienungsanleitung sorgfältig
durchlesen und aufbewahren.
ENGLISHSVENSKANORSKSUOMIDEUTSCH
Art.no Model
40-9912 PRO DT800-P
Ver. 20160510
Original instructions
Bruksanvisning i original
Originalbruksanvisning
Alkuperäinen käyttöohje
Original Bedienungsanleitung


Laser Distance Meter
Art.no: 40-9912 Model: PRO DT800-P
Please read theentire instruction manual before using theproduct and then save
it for future reference. We reserve theright for any errors in text or images and any
necessary changes made to technical data. In theevent of technical problems or other
queries, please contact our Customer Services (see address details on theback).
Safety
Theperson responsible for theinstrument must ensure that all users understand these
directions and adhere to them.
Areas of responsibility
Responsibilities of the manufacturer
Themanufacturer is responsible for supplying theproduct, including theUser Manual
in acompletely safe condition.
Themanufacturer is not responsible for third party accessories.
Responsibilities of the person in charge of the instrument
• To understand thesafety instructions on theproduct and theinstructions in
theUser Manual.
• To be familiar with local safety regulations relating to accident prevention.
• Always prevent access to theproduct by unauthorised personnel.
Permitted use
• Measuring distances.
Prohibited use
• Using theproduct without instruction.
• Using outside thestated limits.
• Deactivation of safety systems and removal of explanatory and hazard labels.
• Opening of theequipment by using tools (screwdrivers, etc.).
• Carrying out modification or conversion of theproduct.
• Use of accessories from other manufacturers without express approval.
• Deliberate dazzling of third parties; also in thedark.
• Inadequate safeguards at thesurveying site (e.g. when measuring on roads,
construction sites, etc.).
• Deliberate or irresponsible behaviour on scaffolding, when using ladders, when
measuring near machines which are running or near parts of machines or
installations which are unprotected.
• Aiming directly in thesun.
ENGLISH
3

Hazards in use
ENGLISH
WARNING! Watch out for erroneous measurements if theinstrument is defective
or if it has been dropped or has been misused or modified. Carry out periodic test
measurements. Particularly after theinstrument has been subject to abnormal use,
and before, during and after important measurements.
CAUTION! Never attempt to repair theproduct yourself. In case of damage,
contact alocal dealer.
WARNING! Changes or modifications not expressly approved could void
theuser’s authority to operate theequipment.
Limits of use
Refer to section Specifications in theInstruction manual. Thedevice is designed for
use in areas permanently habitable by humans. Do not use theproduct in explosion
hazardous areas or in aggressive environments.
Disposal
CAUTION! Flat batteries must not be disposed of with household waste. Care for
theenvironment and take them to thecollection points provided in accordance with
national or local regulations.
Theproduct must not be disposed with household waste.
Dispose of theproduct appropriately in accordance with thenational regulations in
force in your country.
Adhere to thenational and country specific regulations.
Product specific treatment and waste management can be downloaded from our homepage.
Electromagnetic Compatibility (EMC)
WARNING! Thedevice conforms to themost stringent requirements of therelevant
standards and regulations. Yet, thepossibility of causing interference in other devices
cannot be totally excluded. FCC statement (applicable in U.S.) This equipment
has been tested and found to comply with thelimits for aClass B digital device,
pursuant to part 15 of theFCC Rules. These limits are designed to provide reasonable
protection against harmful interference in aresidential installation.
This equipment generates, uses and can radiate radio frequency energy and, if not
installed and used in accordance with theinstructions, may cause harmful interference
to radio communications. However, there is no guarantee that interference will not
occur in aparticular installation. If this equipment does cause harmful interference to
radio or television reception, which can be determined by turning theequipment off
and on, theuser is encouraged to try to correct theinterference by one or more of
thefollowing measures:
• Reorient or relocate thereceiving antenna. Increase theseparation between
theequipment and receiver.
4

• Connect theequipment into anoutlet on acircuit different from that to which
thereceiver is connected.
• Consult thedealer or anexperienced radio/TV technician for help.
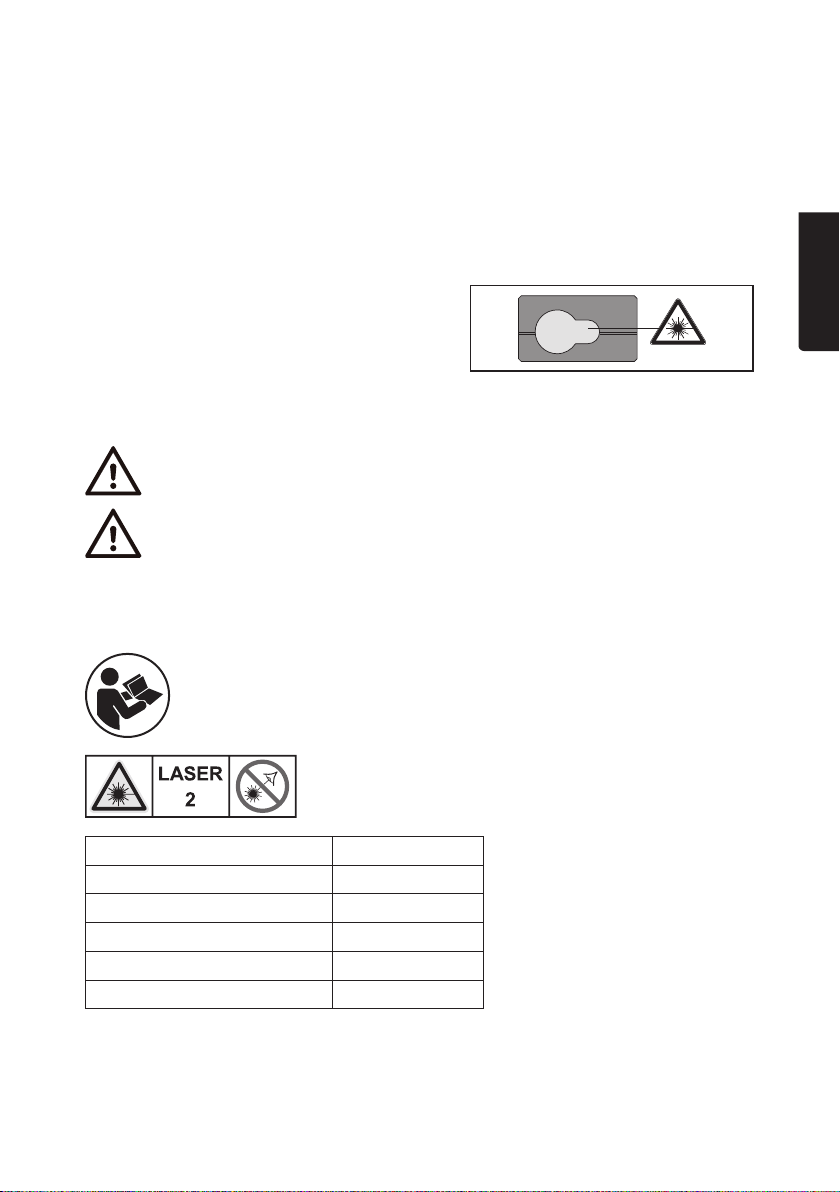
Laser classication
Thedevice produces visible laser beams, which are emitted from theinstrument:
It is aClass 2 laser product in accordance with:
• IEC60825-1 : 2014 “Radiation safety of laser products”
Laser Class 2 products
Do not stare into thelaser beam or direct it towards other people unnecessarily.
Eye protection is normally afforded by aversion responses including theblink reflex.
WARNING! Looking directly into thebeam with optical aids (e.g. binoculars,
telescopes) can be hazardous.
CAUTION! Looking into thelaser beam may be hazardous to theeyes.
For technical information for laser and labelling please check theuser manual.
Care
• Clean thedevice with adamp, soft cloth.
• Never immerse thedevice in water.
• Never use aggressive cleaning agents or solvents.
ENGLISH
5
Laser classication
This meter produces avisible laser beam from
ENGLISH
thefront of theinstrument: it is aClass 2 laser
in accordance with: IEC60825-1 : 2014 Safety
of laser products.
Laser class 2 products
Do not stare into thelaser beam or direct it towards other people or animals.
Risk of serious damage to eyes.
Warning! Do not look directly into thebeam with optical aids such as
binoculars or telescopes. Risk of serious damage to eyes.
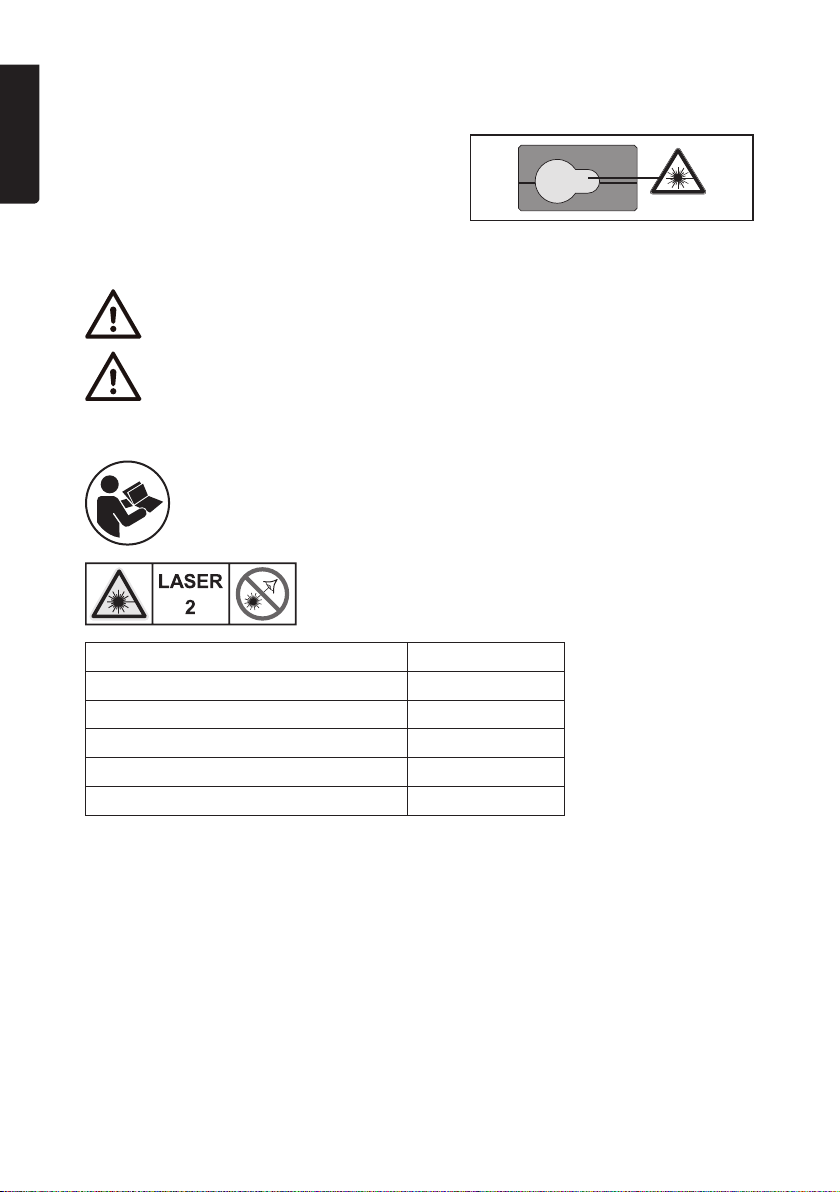
Product safety symbols
Read theentire instruction manual.
Laser class 2
Description Value
Maximum peak radiant output power 0.95 mW
Wavelength 635 nm
Pulse duration > 400 ps
Pulse repetition frequency 320 MHz
Beam divergence 0.16×0.6 mrad
• Make sure not to remove or damage thesafety symbols and warnings found on
thedistance meter.
• Never try to open thehousing, repair or modify thedistance meter in any way.
• Only use accessories that are recommended by themanufacturer or retailer.
• Never use thedistance meter where flammable or explosive substances are used
or stored.
• Do not use thedistance meter on or near highly reflective surfaces since thelaser
beam can be reflected back into your own or someone else’s eyes.
6
• Labelling: Subject to change
(drawings, descriptions and
technical data) without prior
notice.
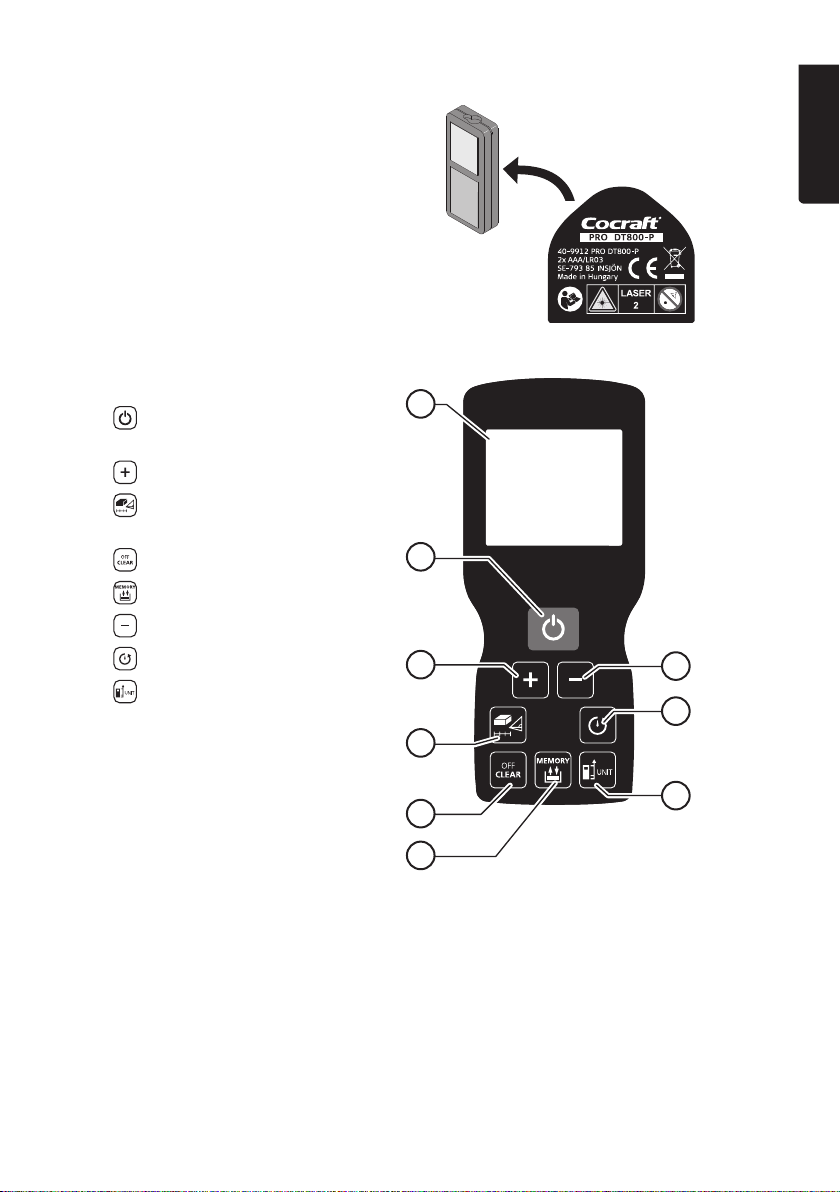
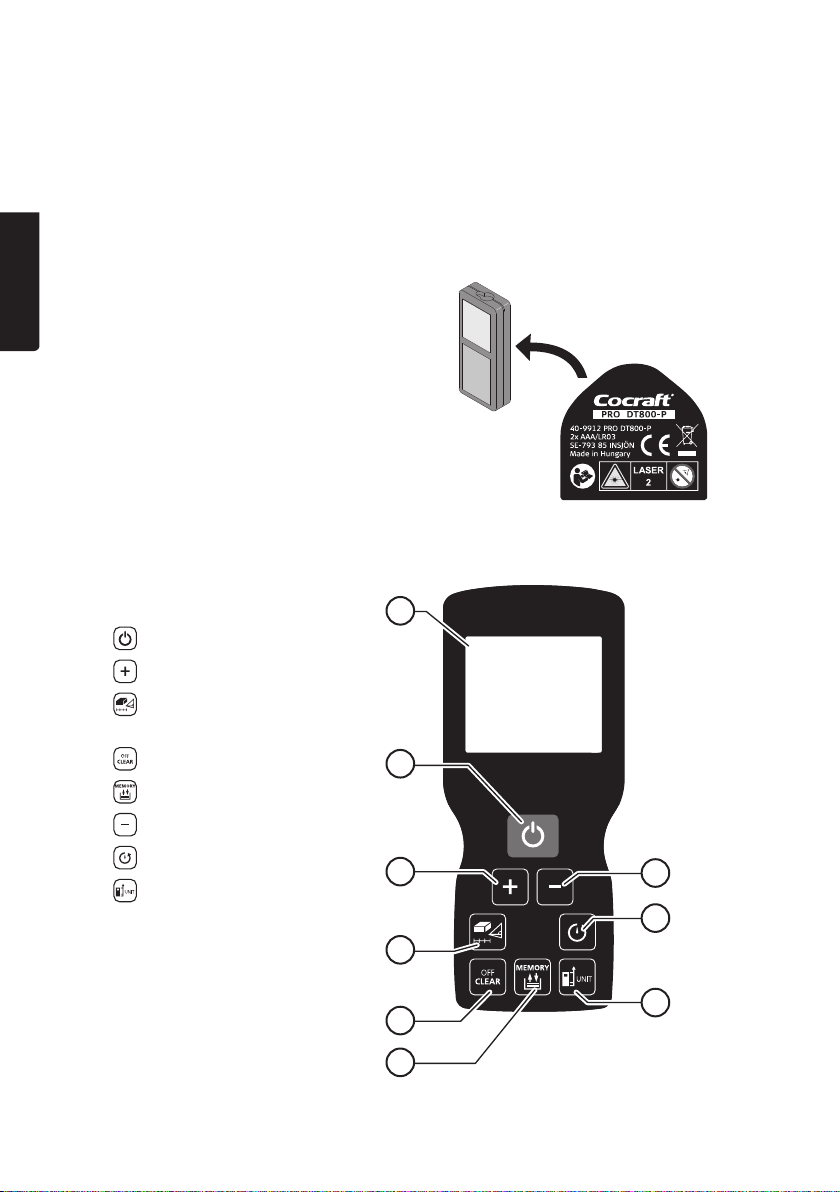
Buttons and functions
1. Display
Turn on thedistance meter/
2.
perform measurement
Add
3.
Select area, volume,
4.
Pythagoras or stake out
Clear, turn off
5.
Memory
6.
Subtract
7.
Timer
8.
Select measurement
9.
reference/ select units of
measurement
ENGLISH
1
2
3
4
7
8
5
6
9
7
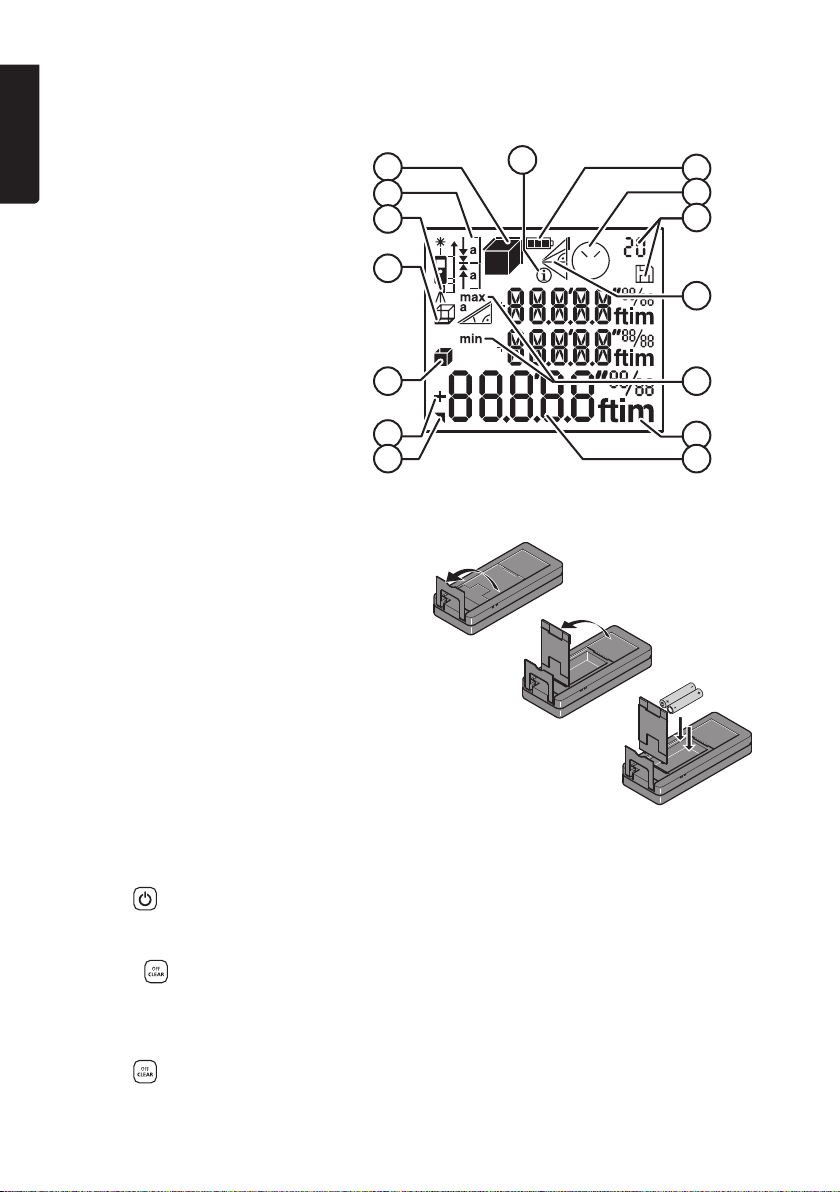
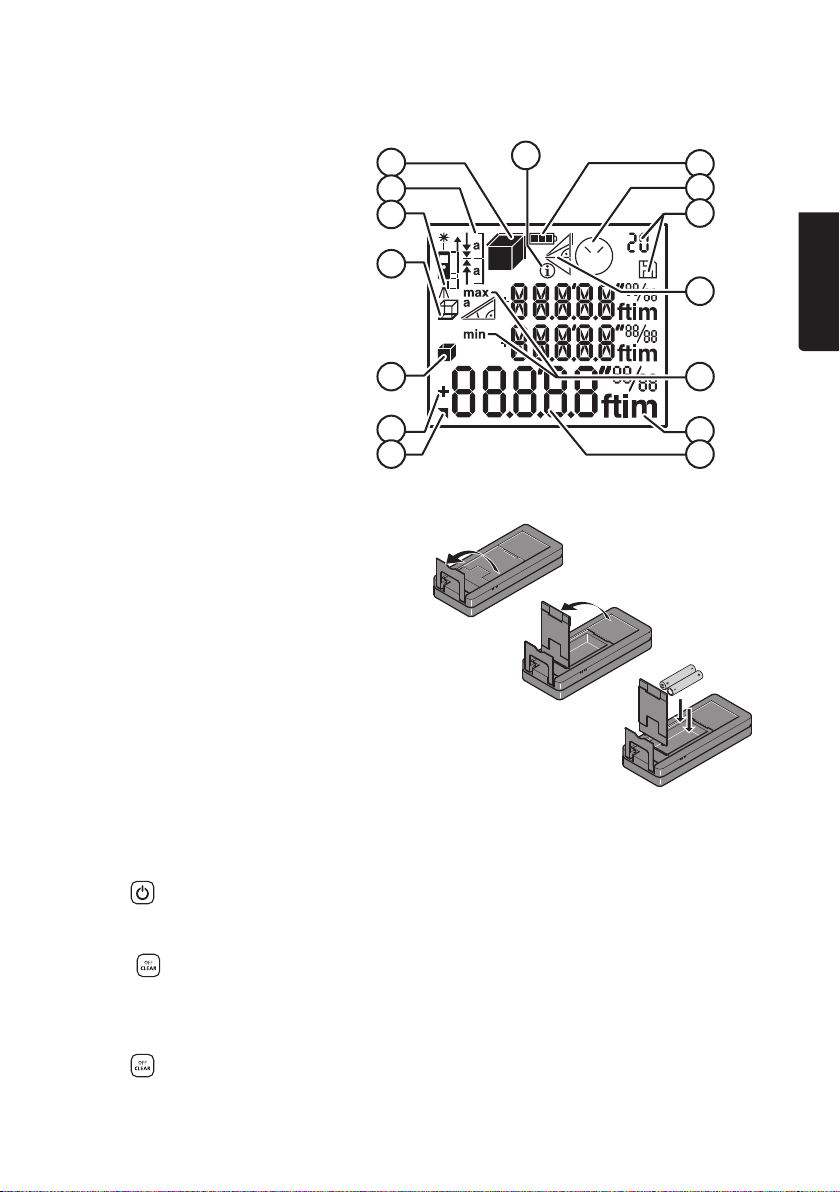
Display
10. Area/ volume
ENGLISH
11. Stake out
12. Selected measurement
reference
13. Circumference
14. Wall area
15. Addition/ subtraction
16. 2nd result
17. Info
18. Battery status
19. Timer
20. Memory
21. Pythagoras
22. Max/min measurement
23. Units of measurement
24. Main line
Operating instructions
Batteries
1. Fold out themultifunctional endpiece.
2. Remove thebattery cover and
insert 2×AAA/LR03 batteries. Note
thepolarity markings on thebottom
of thebattery compartment to
ensure correct insertion.
3. Refit thebattery cover and fold
down themultifunctional endpiece.
10
11
12
13
14 22
15
16 24
17
18
19
20
21
23
Switching on/off, clearing and entering default operation mode
On
Press .
Off
Hold in for 2 seconds.
Note: If no key is pressed for 3 minutes, thedistance meter switches off automatically.
Clear
Press .
8
Go to default operation mode
Press twice.
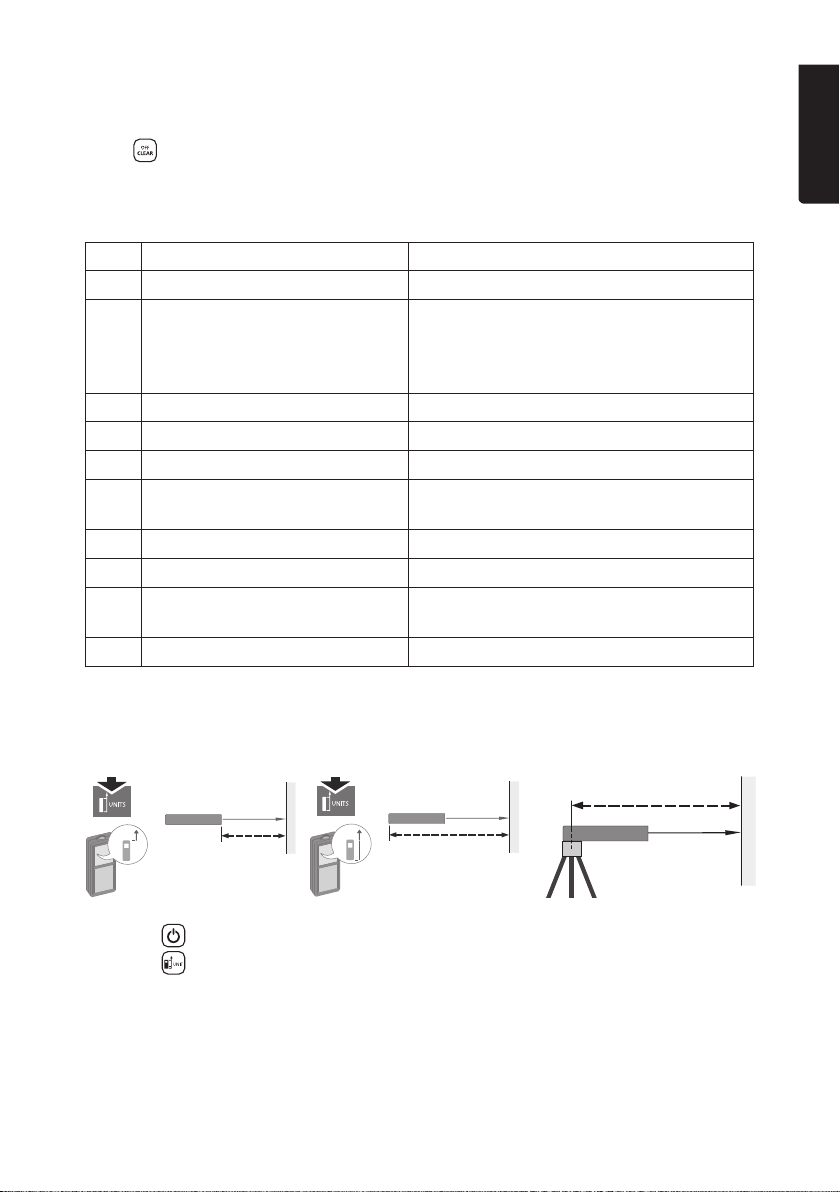
Message Codes
If theinfo icon (17) appears with anumber, refer to thetable below.
No. Cause Correction
156 Transverse tilt greater than 10°. Hold themeter without any transverse tilt.
162 Calibration error Make sure that themeter is placed on
anabsolutely horizontal and flat surface.
Repeat thecalibration procedure. If theerror
remains, contact our customer services.
204 Measuring error Repeat themeasurement.
252 Themeter is too hot. Let themeter cool down.
253 Themeter is too cold. Warm themeter up.
255 Thereceived signal is too weak,
measuring time too long.
256 Thereceived signal is too strong. Change target surface (to e.g. white paper).
257 Too much background light. Shade target area.
258 Measurement is outside
themeasuring range.
260 Laser beam interrupted. Repeat themeasurement.
Change target surface (to e.g. white paper).
Move meter closer to target area.
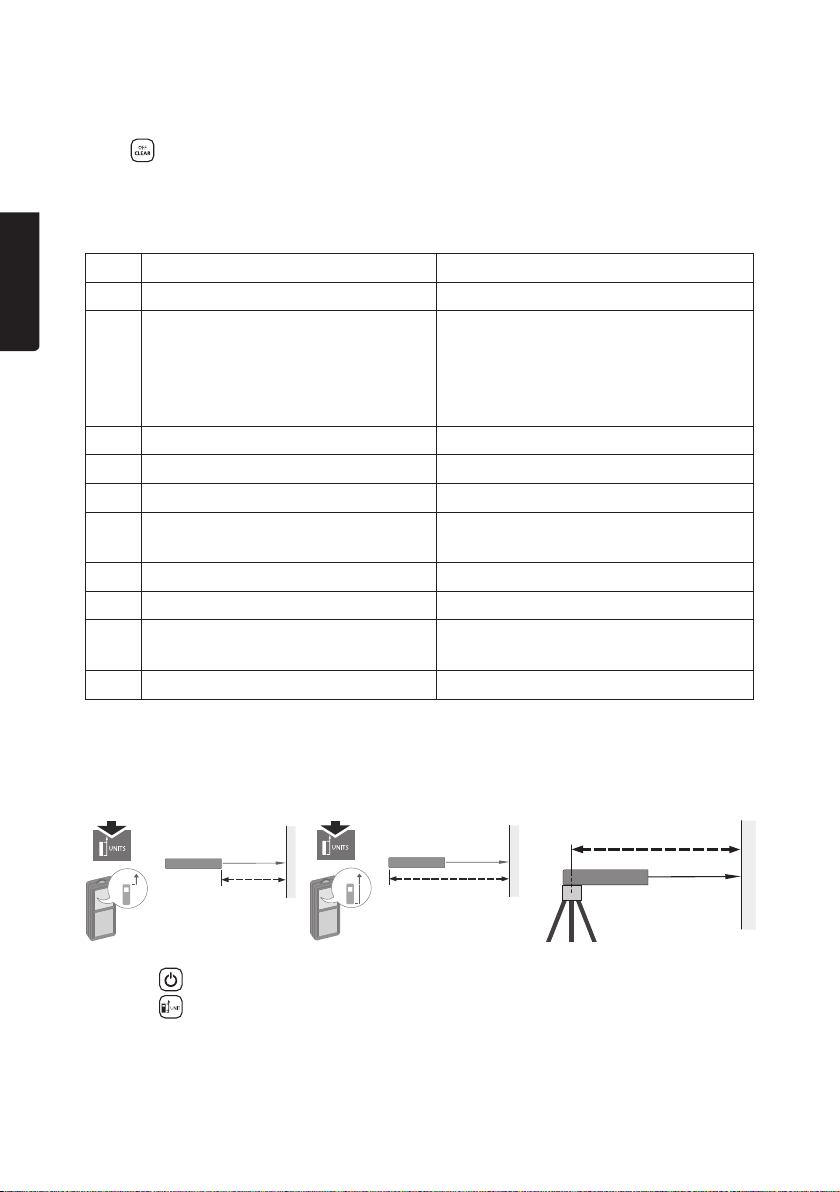
Selecting the measurement reference
Measurements can be made from thefront or rear edge of thedistance meter, from
thecentre of thetripod thread, and using themultifunctional endpiece.
ENGLISH
1. Press to switch thedistance meter on.
2. Press
thedisplay.
to change themeasurement reference, thecurrent reference appears on
9

Multifunctional endpiece
ENGLISH
Note:
• Handle with care! In order for theendpiece to be folded out straight, it needs to be
slid sideways alittle.
• Themeasurement reference is adjusted automatically when theendpiece is folded
down straight.
Units of measurement
1. Press to switch thedistance meter on.
2. Hold in
Metres (m), feet (′, ft) or inches (″, in). Toggle between thefollowing options:
0.000m – 0.0000m – 0.00m – 0.00ft – 0ʹ00″ 1/32 – 0.00in – 0in 1/32.
for 2 seconds repeatedly to toggle between thealternative units.
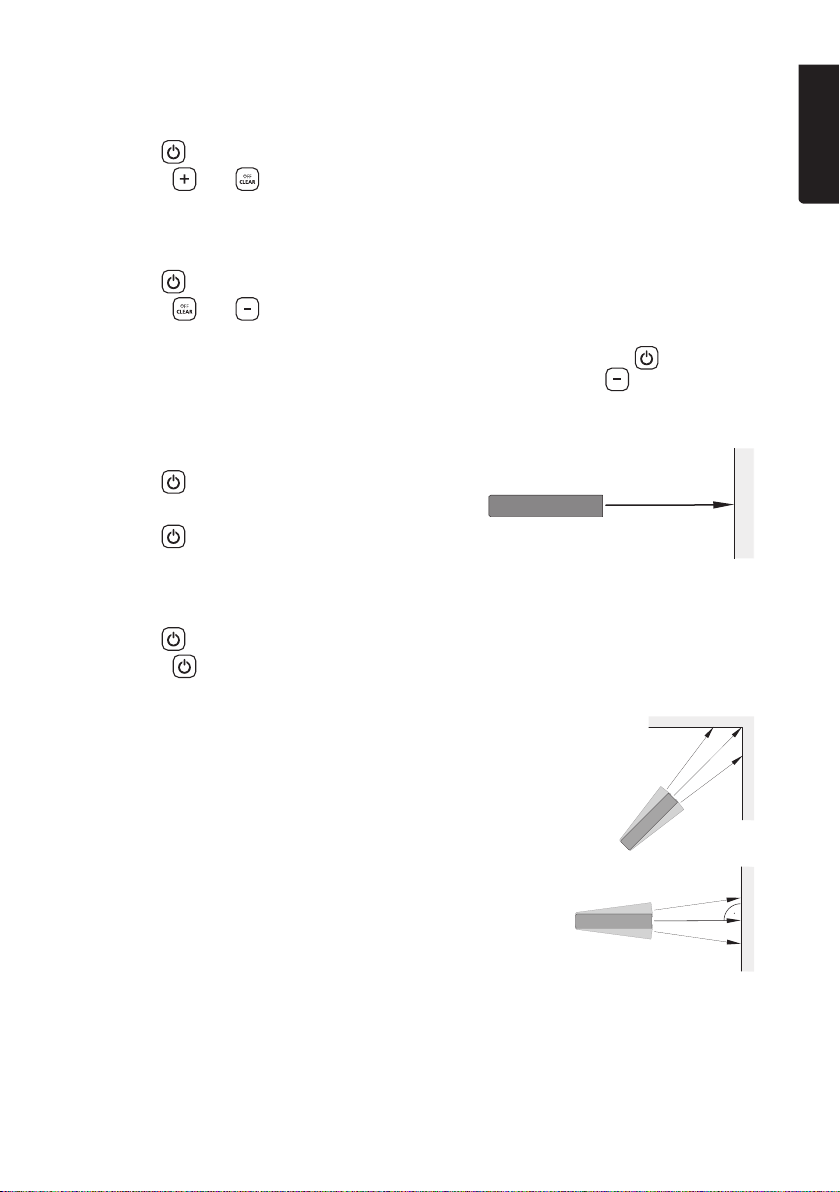
Timer (time-delayed release)
1. Press to switch thedistance meter on.
2. Press
3. Press
thedelay (1–60 sec) press or hold in or .
4. Press
Atime-delayed release is recommended for precise measurements, e.g. at long distances.
It avoids meter movement/shaking when themeasurement button
to to switch thelaser beam off.
to enter thetimer mode. Thestandard setting is 5 sec; to change
to start thetimer.
is pressed.
Beep signal
1. Press to switch thedistance meter on.
2. Hold in
“BEEP On” or “BEEP Off” shows on thedisplay.
and simultaneously for 2 sec to activate/deactivate theBeep signal.
10
Display light (illumination)
1. Press to switch thedistance meter on.
2. Hold in
“ILLU On” or “ILLU Off” shows on thedisplay.
and simultaneously for 2 sec to switch thedisplay light on/off.
Keypad lock
1. Press to switch thedistance meter on.
2. Hold in
“KEY LOCK On” appears on thedisplay and thedistance meter shuts off.
3. To switch thedistance meter on when thekeypad lock is on: Press
themessage “PRESS MINUS” will appear on thedisplay. Press
2 sec to switch thedistance meter on.
and simultaneously for 2 sec to switch thekeypad lock on/off.
Single distance measurement
1. Press to switch thedistance meter on.
2. Aim thelaser beam at thetarget point.
3. Press
on thedisplay.
, themeasured length will appear
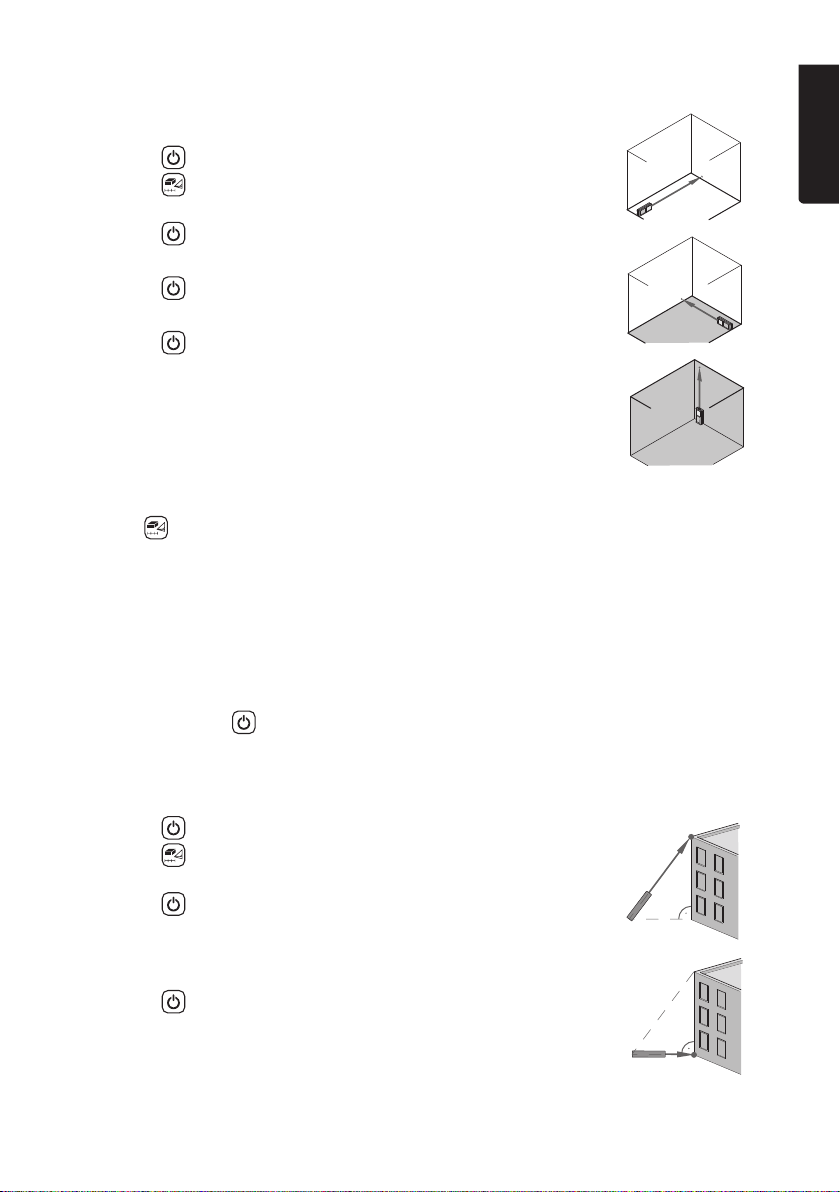
Continuous length measurement
1. Press to switch thedistance meter on.
2. Hold in
3. Thedistance meter measures continuously. Uses include e.g.:
- Measuring room diagonals (max values).
for 2 seconds.
Place thedistance meter on atripod and rotate
it to measure from corner to corner. Add thetwo
measurements together using theaddition function
(see below).
ENGLISH
,
within
- Horizontal distance measurement (min value)
Themaximum and minimum distances measured are displayed as “max” and “min”.
Thelast value measured is displayed on themain line.
11

Adding and subtracting measurements
Addition function
ENGLISH
1. Press to switch thedistance meter on.
2. Aim thelaser beam at thefirst target point and press
Theresult is shown on themain line.
3. Press
aplus “+” appears on thedisplay.
4. Aim thelaser beam at thesecond target point and press
ameasurement.
5. Thenew measurement will appear on the “+” line and thesum of thetwo
measurements will appear on themain line.
. Thefirst measurement moves up on thedisplay and anew line with
to make ameasurement.
to make
Subtraction function
Refer to theabove instructions but press instead. Aline with a “−” (minus sign) will
appear on thedisplay.
Area
Note: When measuring areas, volumes, Pythagoras 2-point, Pythagoras 3-point and
Pythagoras partial height measurements, thepart of thedisplay icon which is to be
measured next will flash.
1. Press to switch thedistance meter on.
2. Press
3. Press
4. Aim thelaser beam at thesecond target point.
5. Press
thedisplay and thearea will appear on theline below them.
once and aim thelaser beam at thefirst target point.
. Thefirst measurement will appear on thedisplay.
. Both of themeasurements will be shown at thetop of
Circumference
Hold in for 2 seconds after completion of anarea measurement. Thecircumference
of themeasured area will appear on thedisplay.
12
Volume
1. Press to switch thedistance meter on.
2. Press
target point.
3. Press
4. Aim thelaser beam at thesecond target point.
5. Press
6. Aim thelaser beam at thethird target point.
7. Press
8. Thevolume is shown on thebottom line of thedisplay and thelast distance measurement is shown on
thetop line.
twice and aim thelaser beam at thefirst
.
.
.
Circumference and wall area
Hold in for 2 seconds after completion of avolume measurement.
Thecircumference and wall area of themeasured area will appear on thedisplay.
Pythagoras measurements (indirect measurement)
• Theresult is shown on themain line and themeasured distance on theline above.
• Areduced level of accuracy, lower than thelevel of accuracy of thedistance meter
itself, must be expected when thePythagoras measuring method is used. For best
results, we recommend using atripod or themultifunctional endpiece.
• Pressing in the
automatically activates theminimum or maximum measurement.
key for 2 seconds when using thePythagoras function,
ENGLISH
Pythagoras 2-point measurement
1. Press to switch thedistance meter on.
2. Press
theupper target point.
3. Press
4. Aim thelaser dot at thelower target point, which must
be at thelevel of (horizontal with) thedistance meter,
otherwise anincorrect measurement will be given.
5. Press
6. Theresult is shown on thebottom line of thedisplay
and thelast distance measurement is shown on
thetop line.
three times and aim thelaser beam at
.
.
13

Pythagoras 3-point measurement
1. Press to switch thedistance meter on.
ENGLISH
2. Press
theupper target point.
3. Press
4. Aim thelaser beam at thehorizontal target point.
5. Press
6. Aim thelaser beam at thelower target point.
7. Press
8. Theresult is shown on thebottom line of thedisplay
and thelast distance measurement is shown on
thetop line.
four times and aim thelaser beam at
.
.
.
Pythagoras partial height
1. Press to switch thedistance meter on.
2. Press
theupper target point.
3. Press
4. Aim thelaser beam at thesecond target point
(partial height).
5. Press
6. Aim thelaser beam at thelower horizontal target point.
7. Press
8. Theresult is shown on thebottom line of thedisplay
and thelast distance measurement is shown on
thetop line.
five times and aim thelaser beam at
.
.
.
14

Stake out
1. Press to switch thedistance
meter on.
2. Press
3. Set thedesired distance by pressing
or holding in
4. Press
5. Move themeter slowly along thestake
out line. Thedistance to thenext stake
out point will be shown.
Example:
While moving the distance meter, this shows that
0.240 m is left until the next 0.625 m measuring
point is reached.
six times.
or .
to confirm theset value.
Memory
Memory of thelast 20 results displayed.
1. Press
2. Press
3. Hold in
4. Hold in
.
or to browse theresults in thememory.
to use thevalue in themain line for further calculations.
and simultaneously for 2 sec to completely delete thememory.
1
ENGLISH
2
3
Care and maintenance
• Clean theproduct using alightly moistened cloth. Use only mild cleaning agents,
never solvents or corrosive chemicals.
• Never immerse thedistance meter in water or other liquid.
• Whenever thedistance meter is not to be used for anextended period,
thebatteries should be removed and it should be stored in adry, dust-free
environment, out of children’s reach.
15

Responsible disposal
This symbol indicates that this product should not be disposed of with
ENGLISH
general household waste. This applies throughout theentire EU. In order
to prevent any harm to theenvironment or health hazards caused by
incorrect waste disposal, theproduct must be handed in for recycling
so that thematerial can be disposed of in aresponsible manner. When
recycling your product, take it to your local collection facility or contact
theplace of purchase. They will ensure that theproduct is disposed of in
anenvironmentally sound manner.
Specications
Batteries 2×AAA/LR03 (sold separately)
Measuring range 0.05–80m
Accuracy in
favourable conditions ±1.5mm (0.06″)
Accuracy in
unfavourable conditions ±2.5mm (0.10″)
Range in favourable conditions 80m (262 ft). Favourable conditions mean
targets that are white and diffuse reflecting
(white painted wall), low background illumination
and moderate temperatures.
Range in
unfavourable conditions 60m (197ft). Unfavourable conditions mean
targets with lower or higher reflectivity,
high background illumination or temperatures
at theupper or lower end of thespecified
temperature range.
Smallest unit displayed 0.1mm (1/32″)
Diameter of laser dot At 10m: 6mm; at 50m: 30mm; at 80m: 48mm
Laser type 635 nm, Class 2, <1mW
IP rating IP54
Automatic laser shut-off after 90 s
Automatic meter shut-off after 180 s
Operating temperature −10 to 50 °C (14–122 °F)
Storage temperature −25 to 70 °C (−13–158°F)
Size 117×57×32mm (4.6×2.4×1.3″)
Weight 0.4kg (4.9oz) (with batteries)
16

Laseravståndsmätare
Art.nr 40-9912 Modell PRO DT800-P
Läs igenom hela bruksanvisningen före användning och spara den sedan för framtida bruk.
Vi reserverar oss för ev. text- och bildfel samt ändringar av tekniska data. Vid tekniska
problem eller andra frågor, kontakta vår kundtjänst (se adressuppgifter på baksidan).
Säkerhet
Den som ansvarar för produkten måste försäkra sig om att alla användare förstår och
följer dessa föreskrifter.
Ansvarsområden
Tillverkarens ansvar
Tillverkaren ansvarar för att produkt, såväl som bruksanvisning, är hel och komplett
vid leverans.
Tillverkaren är inte ansvarig för tillbehör från annan tillverkare.
Instrumentansvariges åligganden
• Att förstå säkerhetsinstruktionerna för instrumentet och instruktionerna i bruksanvisningen.
• Att känna till lokala säkerhets- och arbetarskyddsföreskrifter.
• Att alltid se till att obehöriga inte får tillgång till instrumentet.
Tillåten användning
• Mätning av avstånd
Förbjuden användning
• Användning av instrumentet utan instruktioner.
• Användning utanför angivna gränser.
• Inaktivering av säkerhetssystem och eliminering av förklarande text eller varningsetiketter.
• Öppna instrumentet med hjälp av verktyg (t.ex. skruvmejsel).
• Modifiering eller konvertering av instrumentet.
• Användning av tillbehör från annan tillverkare utan medgivande.
• Medvetet blända annan person, även i mörker.
• Otillräckliga förebyggande säkerhetsanordningar vid uppställning av instrument
(t.ex. vid mätningar av vägar eller byggnadsplatser).
• Medveten eller oansvarig hantering på byggnadsställningar vid användning av
stege när mätning pågår i närheten av drifttagna maskiner eller nära oskyddade
maskiner eller installationer.
• Direkt inriktning mot solen.
SVENSKA
17

Risker vid användande
VARNING! Se upp för felaktiga mätningar om ett defekt instrument används,
efter ett fall eller andra otillåtna påfrestningar resp. förändringar av instrumentet.
Utför periodiska kontrollmätningar. Särskilt efter onormal påfrestning och före/efter
viktiga mätningar.
Obs! Försök inte själv att reparera instrumentet. Vänligen kontakta din
återförsäljare vid defekt instrument.
SVENSKA
VARNING! Ändringar och modifikationer, utan användarens uttryckliga tillstånd,
kan inskränka användarens rätt att använda instrumentet.
Begränsningar i användande
Se kapitel Specifikationer i bruksanvisningen. Instrumentet är anpassat för användning
i miljö lämpad för människor. Använd inte instrumentet i aggressiv eller explosiv miljö.
Avfallshantering
Obs! Tomma batterier får inte avfallshanteras som hushållssopor. Tänk på miljön
och lämna in batterierna till närmaste återvinningsstation enligt gällande miljölagstiftning.
Instrumentet får inte avfallshanteras som hushållssopor.
Se till att instrumentet skrotas på ett sådant sätt att nationella regler efterlevs.
Följ nationella och landsspecifika regler.
Information om avfallshantering kan laddas hem från vår hemsida.
Elektromagnetisk acceptans EMV
VARNING! Instrumentet uppfyller kraven för gällande regler och normer.
Möjligheten för inverkan på annan utrustning kan trots detta inte uteslutas.
Laserklassicering
Instrumentet genererar en synlig laserstråle utgående från instrumentet:
Instrumentet motsvarar laserklass 2 enligt:
• IEC60825-1 : 2014 Lasersäkerhet
Laserklass 2-produkter
Titta inte in i laserstrålen och rikta den inte mot andra personer i onödan. Skydd av
ögat uppstår normalt genom bortvändningsreaktioner och blinkreflexen.
VARNING! Det kan vara farligt att titta in i strålen med ett optiskt instrument,
t.ex. kikare eller teleskop.
Obs! Titta inte in i laserstrålen, det kan vara farligt för ögonen. Se bruksanvisningen
för teknisk information om laser och märkning
18
Underhåll
• Rengör instrumentet med mjuk fuktig trasa.
• Doppa inte instrumentet i vatten.
• Använd inga aggressiva rengöringsmedel eller lösningsmedel.
Laserklassicering
Avståndsmätaren genererar ensynlig laserstråle
utgående från instrumentet: avståndsmätaren
motsvarar laserklass 2 enligt:
IEC60825-1 : 2014 Lasersäkerhet.
Laserklass 2-produkter
Titta inte in ilaserstrålen och rikta den inte mot andra personer eller djur.
Risk för ögonskada.
Varning! Titta aldrig in ilaserstrålen med ettoptiskt instrument, t.ex. kikare
eller teleskop. Risk för ögonskada.
Produktmärkning med säkerhetssymboler
Läs hela bruksanvisningen.
Laserklass 2
Beskrivning Värde
Maximal topp-impulsuteffekt 0,95 mW
Frekvens 635 nm
Pulstid > 400 ps
Pulsfrekvens 320 MHz
Stråldivergens 0,16×0,6 mrad
SVENSKA
19
• Se till att inte avlägsna eller skada de säkerhetssymboler och varningar som finns
på avståndsmätaren.
• Försök aldrig öppna höljet, reparera eller modifiera avståndsmätaren på något sätt.
• Använd endast tillbehör som rekommenderats av tillverkaren eller försäljningsstället.
• Använd aldrig avståndsmätaren imiljöer där explosiva ämnen används eller förvaras.
• Använd inte avståndsmätaren på eller nära högreflekterande ytor, laserstrålen kan
reflekteras in idina eller andras ögon.
• Produktmärkning:
SVENSKA
Illustrationer, beskrivningar och
tekniska specifikationer är icke
bindande och kan ändras vid behov.
Knappar och funktioner
1. Display
På, utför mätning
2.
Addera
3.
Välj area, volym,
4.
Pythagoras eller utsättning
Nollställ, av
5.
Minne
6.
Subtrahera
7.
Timer
8.
Välj referenspunkt
9.
för mätning, välj enhet
1
2
3
4
7
8
5
6
9
20
Display
10. Area, volym
11. Utsättning
12. Vald referenspunkt
på avståndsmätaren
13. Omkrets
14. Väggarea
15. Addition, subtraktion
16. Resultat 2
17. Info
18. Batteristatus
19. Timer
20. Minne
21. Pythagoras
22. Max/min. mätresultat
23. Vald enhet
24. Huvudrad
Användning
Batterier
1. Vik upp bakstycket.
2. Öppna batteriluckan och sätt
i2×AAA/LR03-batterier.
Se märkningen ibotten på batterihållaren så att polariteten blir rätt.
3. Stäng batteriluckan och vik
ner bakstycket.
10
11
12
13
14 22
15
16 24
17
18
19
20
21
23
SVENSKA
Slå på/av, ångra och gå till standardläge
På
Tryck .
Av
Håll in i2 sek.
Obs! Avståndsmätaren stängs automatiskt av efter 3 min inaktivitet.
Ångra
Tryck .
21
Gå till standardläge
Tryck 2 gånger.
Meddelandekoder
Se nedanstående tabell om infoikonen (17) visas tillsammans med ettnummer idisplayen.
Nr. Orsak Åtgärd
SVENSKA
156 Tvärlutning över 10°. Håll avståndsmätaren utan tvärlutning.
162 Kalibreringsfel. Kontrollera att avståndsmätaren är
placerad på enabsolut horisontell
och plan yta. Upprepa kalibreringen.
Om felet fortfarande kvarstår,
kontakta kundtjänst.
204 Mätfel. Gör om mätningen.
252 Avståndsmätaren är för varm. Låt avståndsmätaren svalna.
253 Avståndsmätaren är för kall. Värm avståndsmätaren.
255 Den mottagna signalen är för svag,
mättiden för lång.
256 Den mottagna signalen är för stark. Byt målyta till t.ex. vitt papper.
257 För mycket bakgrundsljus. Skugga målytan.
258 Mätningen är utanför avstånds-
mätarens räckvidd.
260 Laserstrålen bröts. Gör om mätningen.
Byt målyta till t.ex. vitt papper.
Flytta avståndsmätaren närmare
målytan.
Välj referenspunkt på avståndsmätaren
Mätning kan göras med avståndsmätarens fram- eller bakkant, med stativgängan på
avståndsmätarens baksida och med det utvikbara bakstycket som referenspunkt.
1. Tryck för att slå på avståndsmätaren.
2. Tryck
för att ändra referenspunkt, aktuellt val visas idisplayen.
22
 Loading...