

Page 1
F800
Read carefully the instructions contained in this operation manual before you start using the device
Page 2

Page 3

3
F800
User manual
Page 4

4
Page 5

5
Index
Introduction ..................................................................................... 6
Sales package contents ................................................................... 7
Precautions for use .......................................................................... 8
Presentation .................................................................................. 12
Installation ..................................................................................... 14
Keyboard ....................................................................................... 18
Setup Wizard ................................................................................. 21
Main menu ..................................................................................... 22
System icons ................................................................................. 26
Calling ........................................................................................... 27
Messages ...................................................................................... 30
Contacts ....................................................................................... 34
LDAP contacts .............................................................................. 37
Audio profiles ................................................................................. 38
PC suite ......................................................................................... 39
Wi-Fi network connection ............................................................... 40
Bluetooth connection ..................................................................... 41
Settings diagram ............................................................................ 42
Troubleshooting ............................................................................. 45
SAR certification information .......................................................... 48
Regulations ................................................................................... 49
Page 6

6
Introduction
Thank you for choosing the Co-Comm F800 smartphone. This phone is designed
for use with GSM 900/1800 and 900/2100 MHz UMTS networks and for operation
requires a valid SIM card from your network operator. Please consult your network
operator for more information.
Security instructions
Please read the following instructions carefully before you start using your smartphone
Co-Comm F800:
● Keep this manual for future reference.
● Keep the phone away from moisture.
● Place the phone on a stable surface before start using.
● If any of the following situations occurs, have it checked by a qualified service
technician:
● It has been exposed to moisture.
● It has been dropped or damaged.
● It has obvious signs of breakage.
● Do not place the phone at a distance of less than 1.5 m from a water source.
● Do not use the device in areas where there is risk of explosion.
Page 7
7
Sales package contents
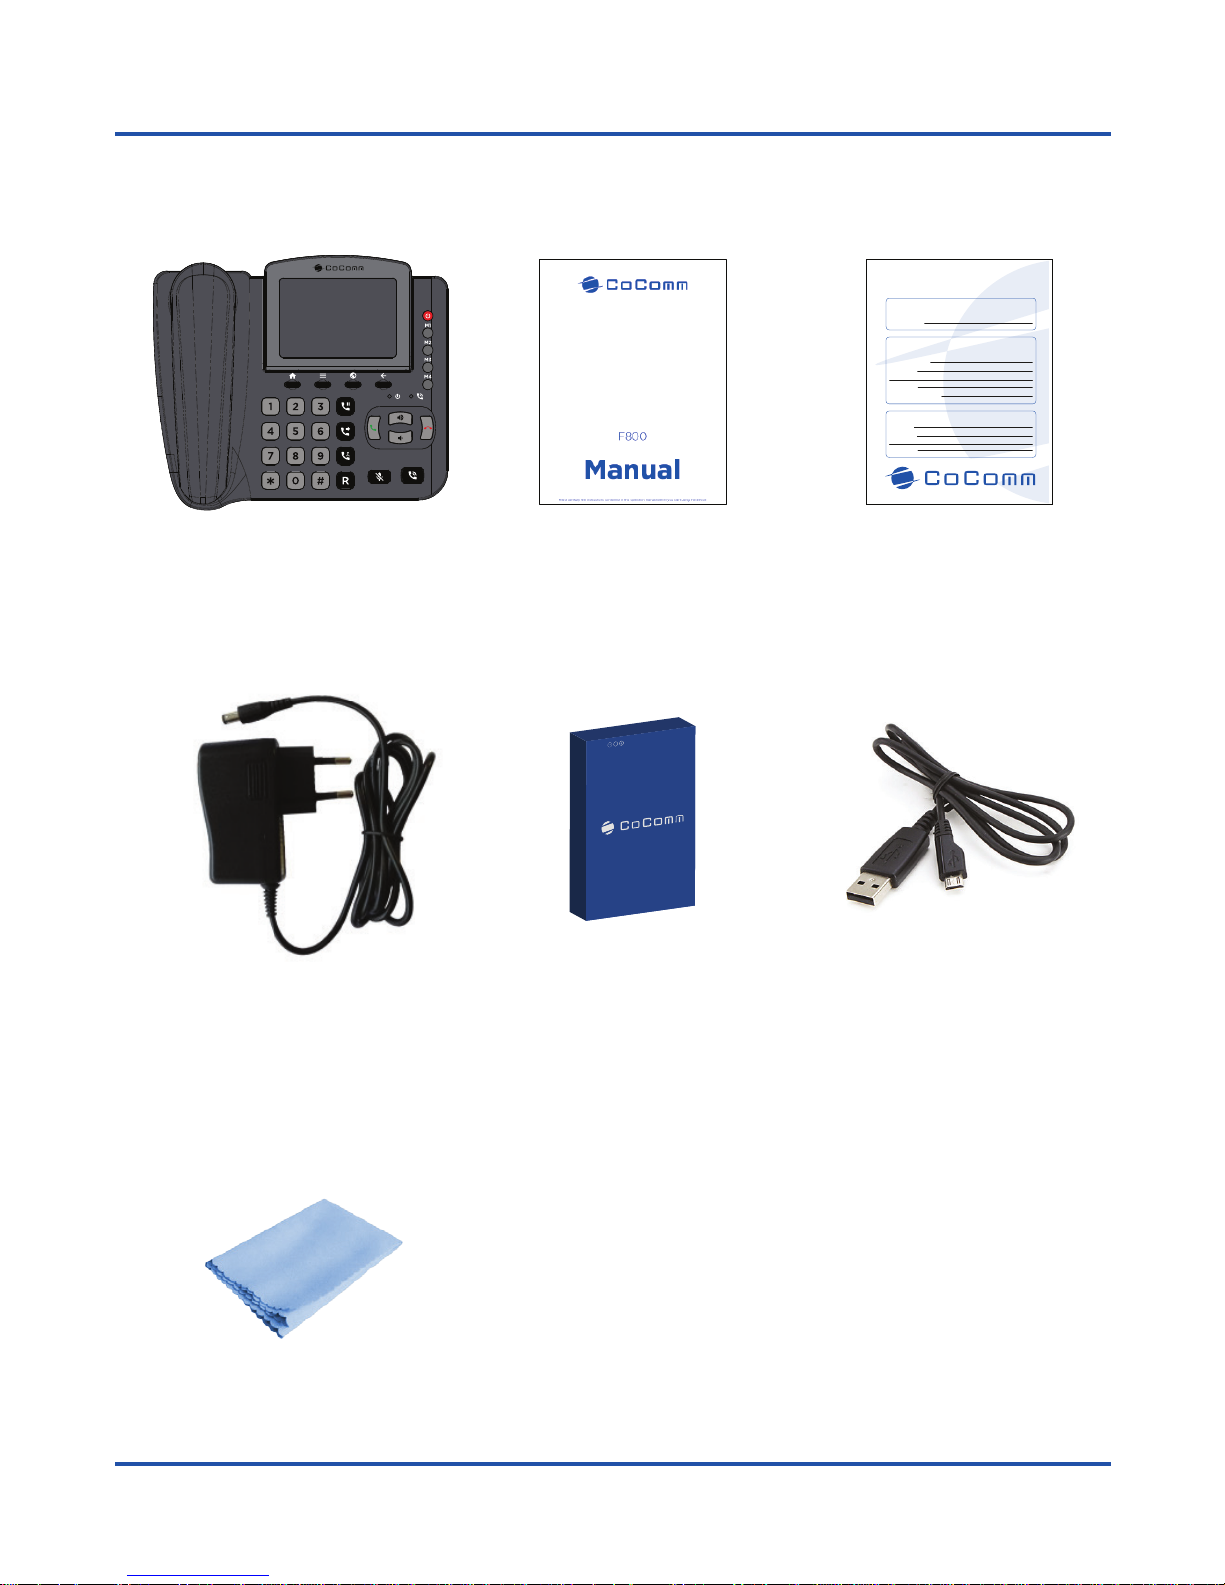
Please check the sales package includes the following components. If any items are
missing, please contact your dealer.
1. F800 terminal
4. AC/DC power
adapter
2. Installation guide
5. Li-ion rechargeable
battery
3. Guarantee card
Cleaning cloth7.
CLIENTE
NOMBRE
DOMICILIO
TELÉFONO
ESTABLECIMIENTO VENDEDOR
RAZÓN SOCIAL
DOMICILIO
TELÉFONO
FECHA DE COMPRA
EQUIPO TELÉFONO INALÁMBRICO 2G/3G
MODELO F800
Nº DE SERIE
CARTA DE GARANTÍA
USB data cable6.
Page 8

8
Precautions for use
Operating Environment
Your phone Co-Comm F800 is an RF transmitter, so please turn off your terminal or
disable the radio functions in the following situations:
● When you are on an airplane.
● When you are in the vicinity of flammable atmospheres and is indicated by the
entity responsible for risk management.
● When you are in the vicinity of electro-explosive devices and is indicated by the
entity responsible for risk management.
Respect special regulations in force in any area, and always switch off your phone
when its use is prohibited, or if it could cause danger. When connecting the phone or
any accessory to another device, read the user manual for detailed safety instructions.
Do not connect incompatible products. It is recommended that the equipment should
only be used in the normal position for proper operation and personnel safety. Do not
expose to temperatures below -10 °C or above 50 °C.
Medical equipments
Be sure to turn off the phone near electronic medical equipment which obviously
require that the phone is turned off (such as pacemakers, hearing aids, etc.).
Most medical devices can be protected from the RF signal of the phone, but not all of
them. If you have any questions or need more information, consult your doctor or the
manufacturer of your medical device.
Page 9

9
Precautions for use
Pacemakers
Pacemaker manufacturers warn that the distance between the phone and the
pacemaker of the heart must be at least 6 inches (15.3 cm), otherwise the phone can
interfere with pacemakers.
People with pacemakers should consider the following:
● Always keep a distance (at least 6 inches) between the phone and pacemaker
when the phone is on.
● Do not carry your phone near your chest.
● Use the phone in the ear that is furthest from the pacemaker.
Please turn off your phone if you feel there is interference, and consult your doctor as
soon as possible.
Emergency calls
Like any mobile phone, this phone works with radio signals that can not guarantee
connection in all conditions. Therefore, you should never rely solely on a mobile phone
for essential communications like medical emergencies. To make or receive calls, the
phone must be switched on and in a service area with adequate signal strength. To
make an emergency call, enter the local emergency number in standby mode and
press the call button.
Page 10

10
Precautions for use
Care and maintenance
Your phone is a product of superior design and should be treated with care. The
following tips will allow you to enjoy this product for a longer period of time:
● Keep the phone away from children and pets. They could damage the phone
accidentally or choke on small parts.
● Keep the phone dry and avoid liquids that could corrode the phone. Do not use
the phone with wet hands, which may cause electric shock.
● Do not place the phone in areas of excessive heat, which may shorten the life of
electronic devices, damage batteries, or melt accessories.
● Do not place the phone in cold areas. When the phone warms up to its normal
operating temperature, moisture can accumulate inside the phone, which may
damage electronic circuits.
● Do not place the phone in areas exposed to sunlight as it may cause overheating.
● Do not place the phone near flammable liquids, gases or explosive substances.
● Do not drop or knock the phone. Rough handling can damage electronic circuits.
● To clean the telephone, use a damp or antistatic cloth. Do not use a dry or static
cloth.
● Do not use chemicals such as cleaning solvents to clean the surface of the phone.
Turn off your phone before cleaning.
● Do not apply paint over the phone, as it can prevent proper operation.
● The manufacturer’s warranty does not cover repair the appliance if the phone or
battery gets wet, or phone label is damaged even when the phone warranty has
not expired.
Page 11

11
Precautions for use
Battery use
● Never use any charger or battery if damaged. Use the battery correctly.
● Do not short-circuit the battery, as this may damage the battery or cause a fire.
● Do not subject the battery to high temperatures or fire as it may explode.
● Return the old battery to the dealer, or place it in locations designated for
recycling.
● Do not throw the battery in household waste.
● The charging time depends on the remaining battery charge, the type of battery
and charger used.
● The battery can be charged and discharged hundreds of times, but its duration
will gradually decrease.
● When the operation time is noticeably shorter than normal, replace the battery
with a new one.
● Use only original chargers, batteries and accessories approved by the
manufacturer.
● Disconnect the charger from the electrical plug and the device when the phone
is not in use.
● Do not overload your battery as it may damage or shorten its life.
● Do not expose the battery to places of extremely hot or cold temperatures, as it
will reduce the battery capacity.
● The Li-ion batteries are particularly affected by temperatures below 0° C.
Page 12

12
Presentation
Front view
R
#
M1
M2
M3
M4
7
8 9
654
1 2 3
0
*
2
7
3
4
17 18
19
20
5
6 14 15 16
13
12
8
9
10
11
21
22
1. [ ] On / Off key
13. [ ] Multi-conference key
16. [ ] Handsfree key
17. [ ] Desktop
18. [ ] Options
21. Charging indicator
22. Handsfree indicator
14. [ ] Redial key
15. [ ] Silent mode key
19. [ ] Browser
20. [ ] Back
12. [ ] Transfer key
11. [ ] Hold key
1
2. Touch screen
3. Headset / Receiver
4. Alphanumeric keyboard
5.
Back to main menu
6.
7. [ - ] Speed dialing
keys
8. [ ] Call key
9. [ ] End call key /
10. [ / ] Volume keys
[ ] Asterisk key
[ ] Pad key
Page 13

13
Presentation
Rear view
23. Microphone for handsfree mode
24. Headphone/Handsfree jack connector
25. Micro-USB data input port
23
24
28
25
27
26. Handset RJ9 connector
27. External microphone jack connector
29. Rechargeable battery compartment
28. DC 5V power connector
30. Wall mounting holes
26
29
30
Page 14
14
Installation
Follow the steps below to install the SIM card and the different accessories of your
desk phone Co-Comm F800:
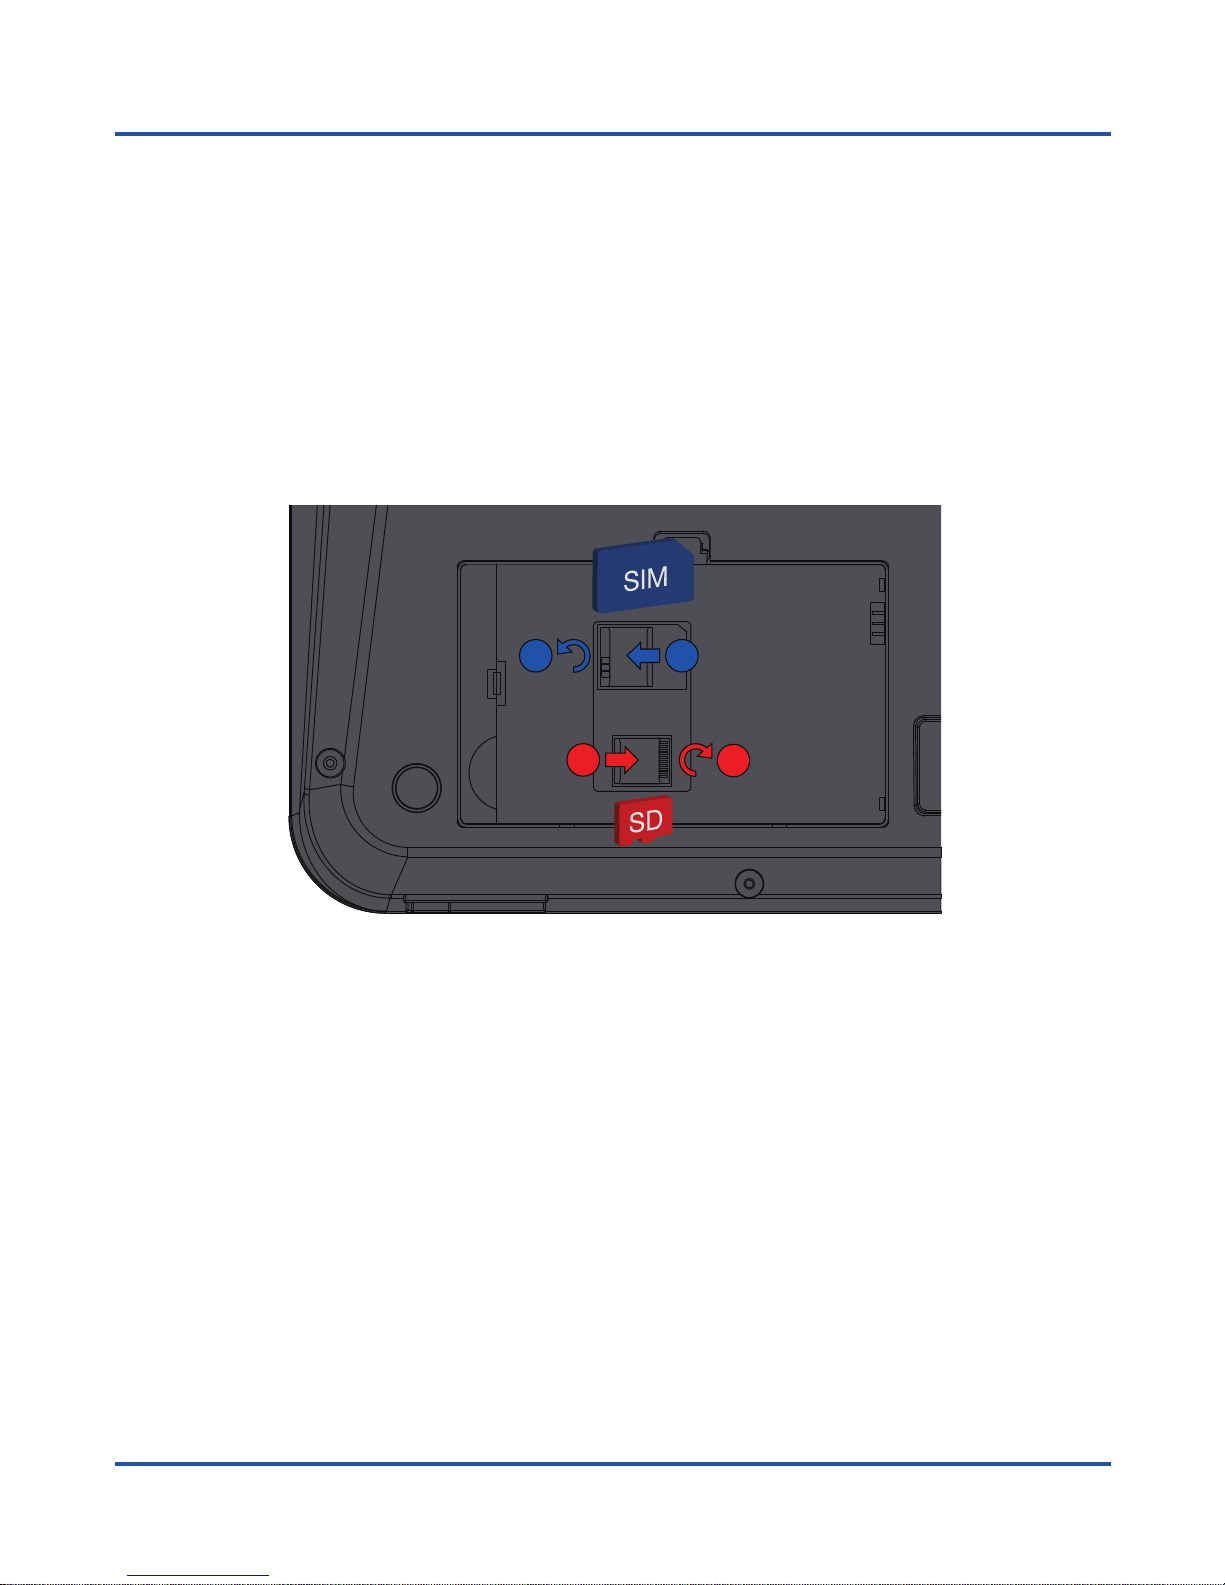
1. Disconnect the power adapter and remove the cover of the battery compartment
on the bottom of the device to install the SIM card and the micro-SD memory
card. To install the SIM card, slide the metal tab to the left to unlock it, turn it up,
and place the card in the position indicated in the figure. Turn the metal tab down
and slide it to the right to lock.
2. Follow the same procedure if you want to install a micro-SD card, but in this
case, slide the metal tab to the right to unlock it, as shown in the figure. Place the
memory card, and then turn down the metal tab and slide it to the right to lock.
1
2
2
1
Page 15
15
Installation
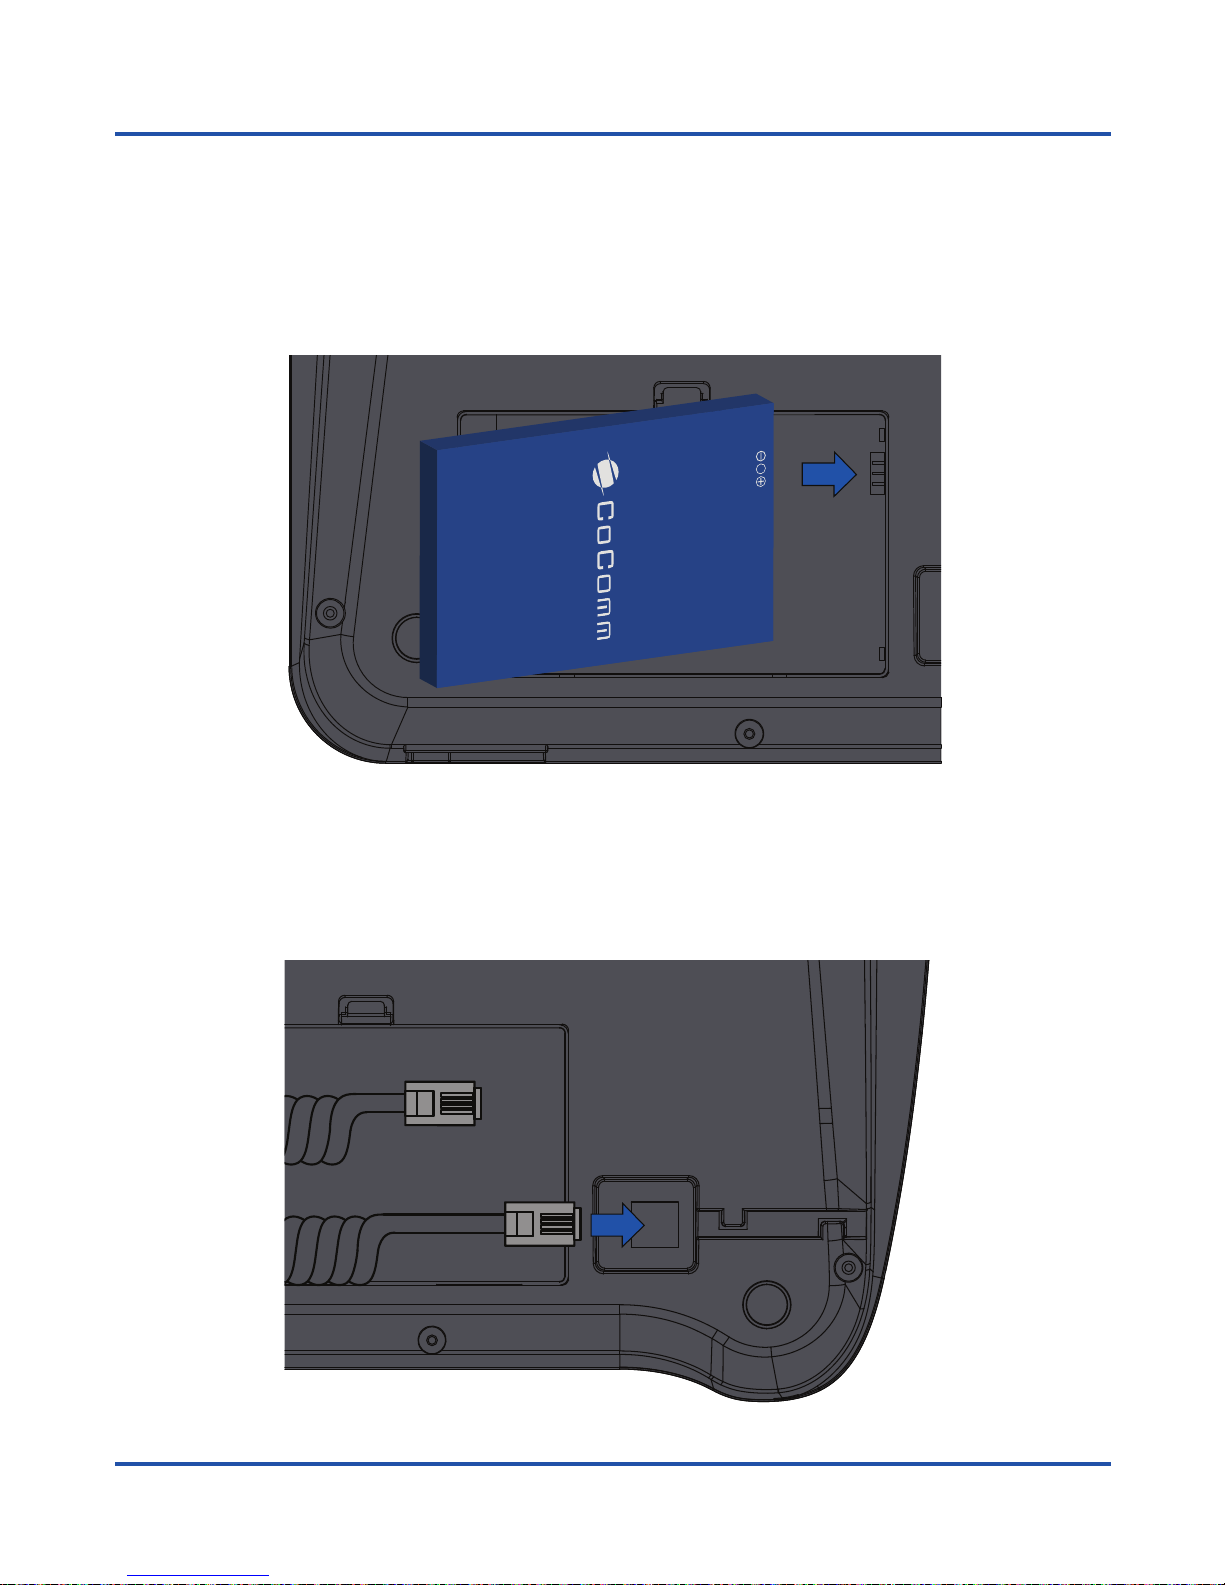
3. Insert the battery into the compartment, making sure that the electrodes of the
connector on the phone match the slots in the top of the battery as shown in
the image. Replace the lid of the battery compartment, making sure it is securely
locked in place.
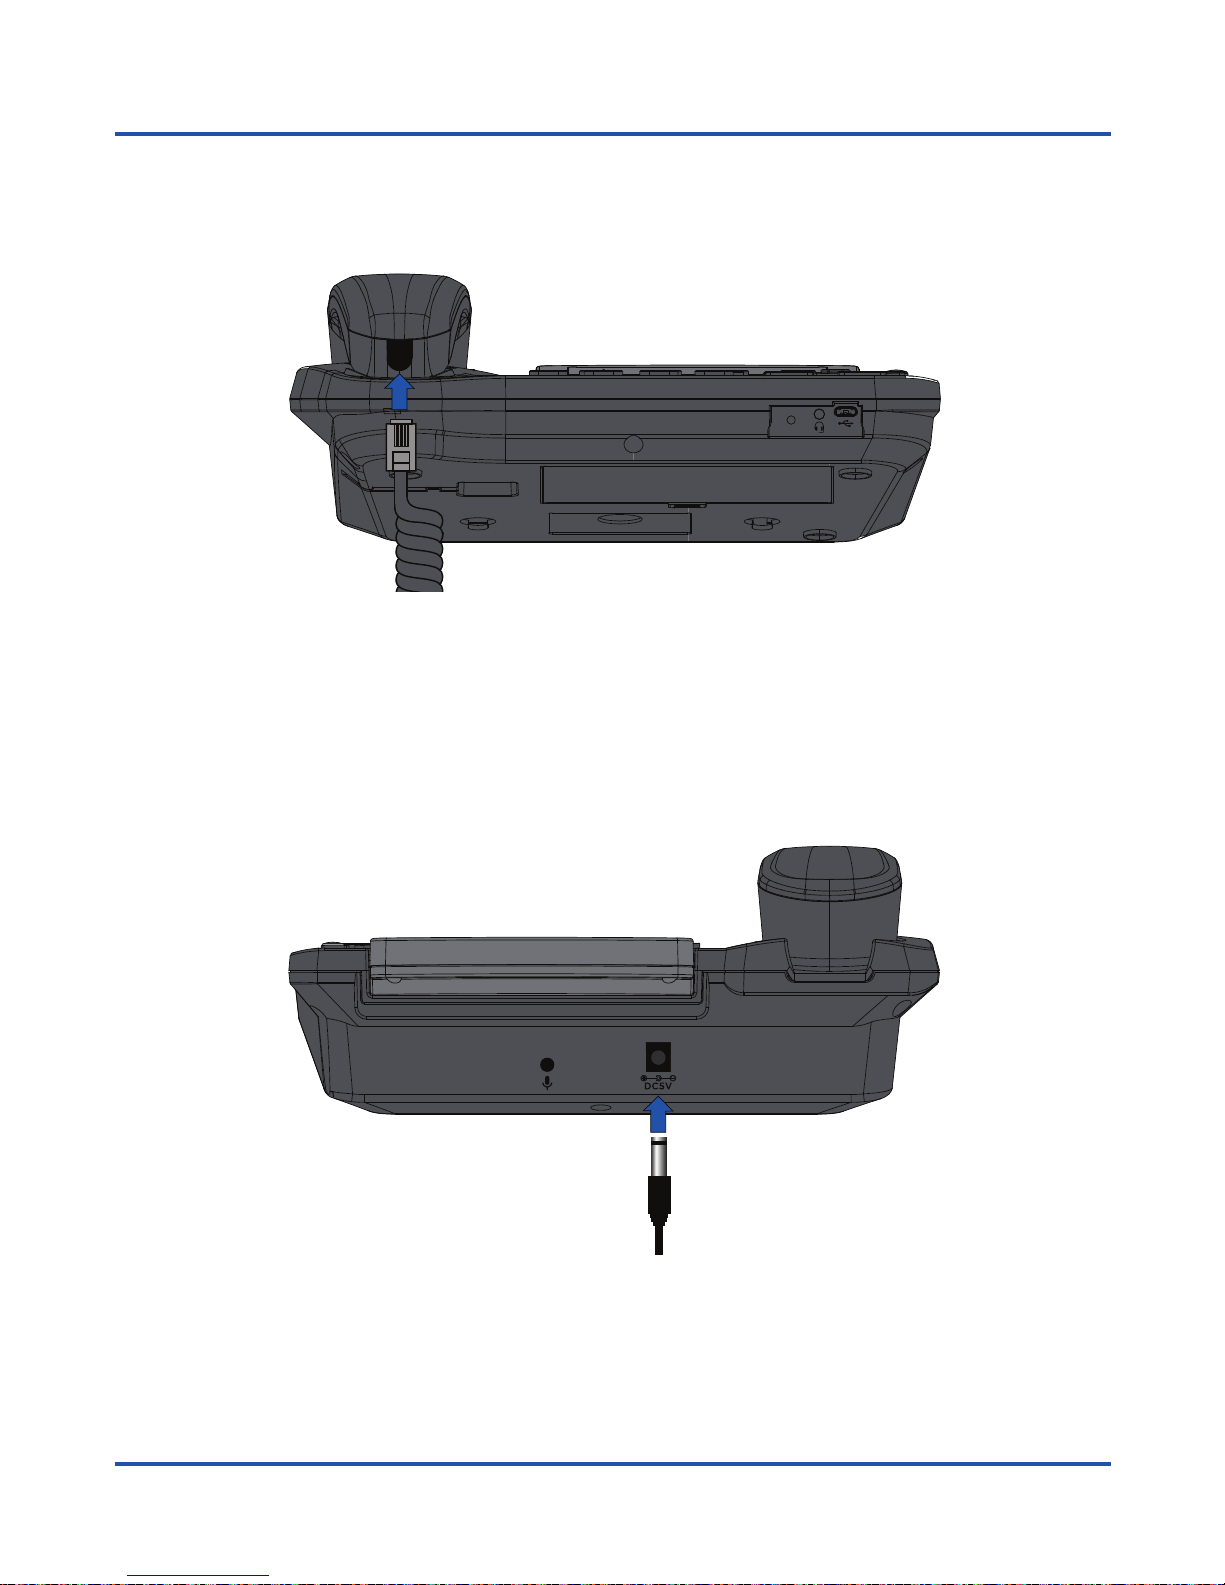
4. Connect the curled handset cord into the base of the phone. The end with longer
cable must be connected uncurled under the base, while the shorter end must be
connected to the handset.
Page 16
16
Installation
5. Connect the short end of the curly cord to the connector on the handset, as
shown in the illustration.
6. Connect the cable from the power supply to the connector on the front of the
phone and then plug the power supply into a household AC power outlet. The
battery level will be displayed on the screen showing the status of the charging
process.
Page 17

17
Installation
Battery Charge
When the battery level is low, there will be a warning tone, a message of low battery,
and the battery icon is displayed in red. Connect the power adapter into the device
to start charging. On-screen battery level is indicated during the charging process
and once it is fully charged, the battery icon appears full. Charging a completely
discharged battery can comprise from 2 to 3 hours.
Fully charge the battery before first use of the device.
Note:
Always make sure your device is turned off before removing your SIM card. This
will prevent data loss and damage to the SIM card. Do not place the SIM card near
surfaces or electromagnetic environments and avoid touching the metal connectors.
For more information, contact your network operator.
Page 18

18
Keyboard
When the terminal is off, press for 3 seconds to turn the
phone. When the terminal is on, press for 3 seconds to turn
off the phone.
In standby mode, press to access the call log. Press to dial an
outgoing call or answer an incoming call.
During an active call, press to end the call. In applications,
press to return to the main menu.
Press to enter numbers or characters.
Insert asterisk character.
Insert pad character. Change the text input method.
Programmable keys to store up to four telephone numbers.
During an active call, press to hold the current call. During two
active calls, press to switch from Call 1 to Call 2.
[ ] Turn On / Off
[ ] Pick up
[ ] Hang up
[ ] Numeric pad
[ ] Asterisk key
[ ] Pad key
[ ] Memory
keys
[ ] Hold button
Key Function
Page 19

19
Keyboard
When you have two calls, one active and one holded, press
to make a call transfer between both calls. You can make a
transfer “Without consultation,” pressing when making the
second call.
You can make conference calls from your phone, press
during a call for 2 or more participants.
In standby mode, press to redial the last number of the call
log.
Press to decrease / increase the volume of handset or
speaker.
Press during an active call to mute the microphone of your
phone.
In standby, press to make a call in handsfree mode, without
lifting the handset. During an active call, press to enable or
disable the hands-free mode on the phone.
In applications, press to return to the main menu or desktop.
[
] Transfer button
[ ] Conference
button
[ ] Recall button
[ ] [ ] Decrease /
Increase volume
[ ] Mute button
[ ] Hansfree
button
[ ] Desktop
Key Function
Page 20

20
Keyboard
Key Function
[ ] Options
[ ] Browser
[ ] Back
In applications, press to display the options menu. Press and
hold to delete shortcuts or widgets on main menu.
Press to launch the Internet browser.
Press to return to the previous level.
Page 21
21
Setup Wizard
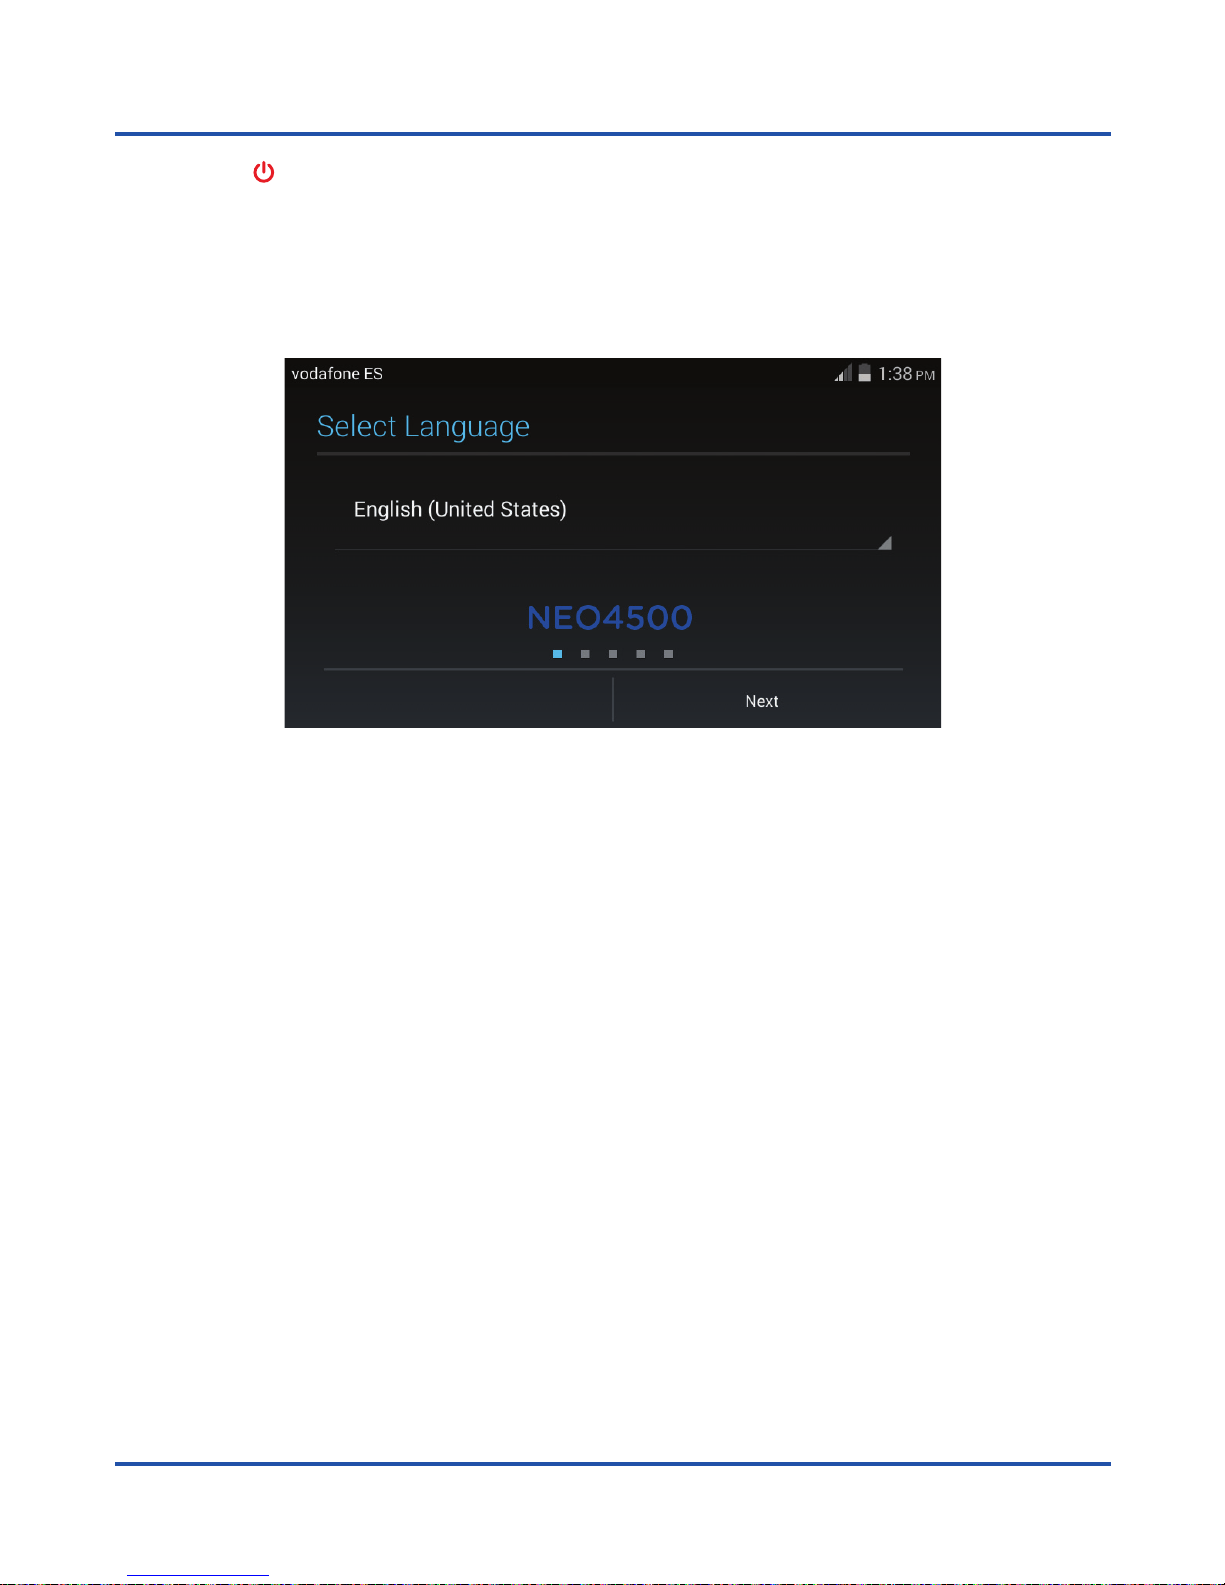
Press the [ ] button for 3 seconds to turn on your terminal. If this is the first time
you start the device, the setup wizard will be displayed. Enter the PIN code of your
SIM card and press OK button to confirm. Then the wizard will guide you through the
phone setup process.
● Select language: press to display the list of available languages, select the desired
language for on-screen menus, and then press Next to continue.
● Date & time: choose Automatic date & time to use automatic date and time
provided by the network, or set the date and time on your phone manually.
● Import SIM contacts: press Import to copy the contacts stored on your SIM card
to the phone memory, or press Skip to continue.
● Internet connection: choose Mobile network or Wi-Fi to allow connecting to the
Internet through your SIM card, or Only Wi-Fi if you have no data plan with your
network operator.
● Select Wi-Fi: press on the button on the screen to activate the Wi-Fi network
adapter and configure the wireless network, or click Next to continue.
After completing the above steps, press Finish to exit the setup wizard. The phone will
be ready for use.
Page 22
22
Main menu
Once you turn on the device and complete the setup process, the main menu will be
displayed on the screen.
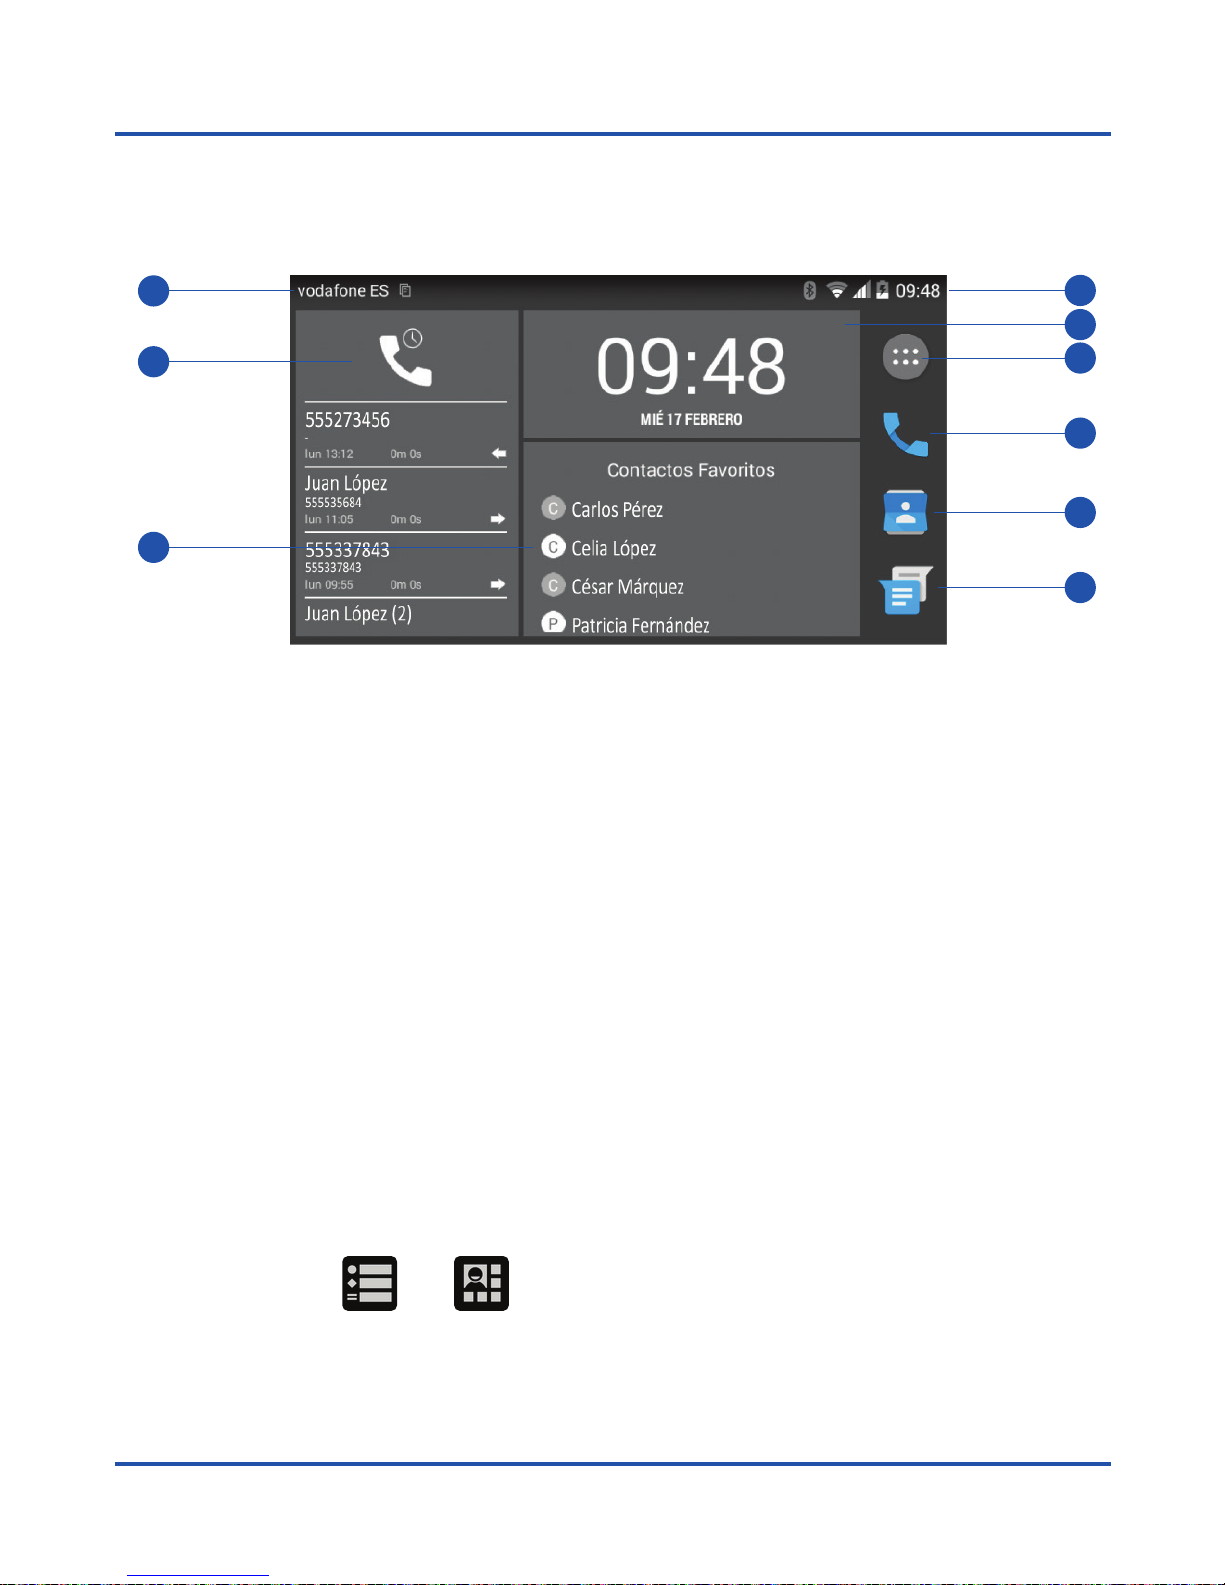
Notification bar and information system
In the upper left corner of the screen are displayed notifications from different
applications installed on your phone, such as messages, email, missed calls, etc.,
while on the right is shown the current state of the system elements as battery level,
network connections, Wi-Fi, Bluetooth, etc. You can expand the notification area
sliding this bar down, and switch between the notification area and the system menu
by pressing on the and icons and respectively.
1. Notification bar
2. System information
3. Clock
6. Applications menu
7. Calls
8. Contacts
4. Call log 9. Messages
5. Favorite contacts
1
2
4
5
3
6
7
8
9
Page 23
23
Main menu
System menu
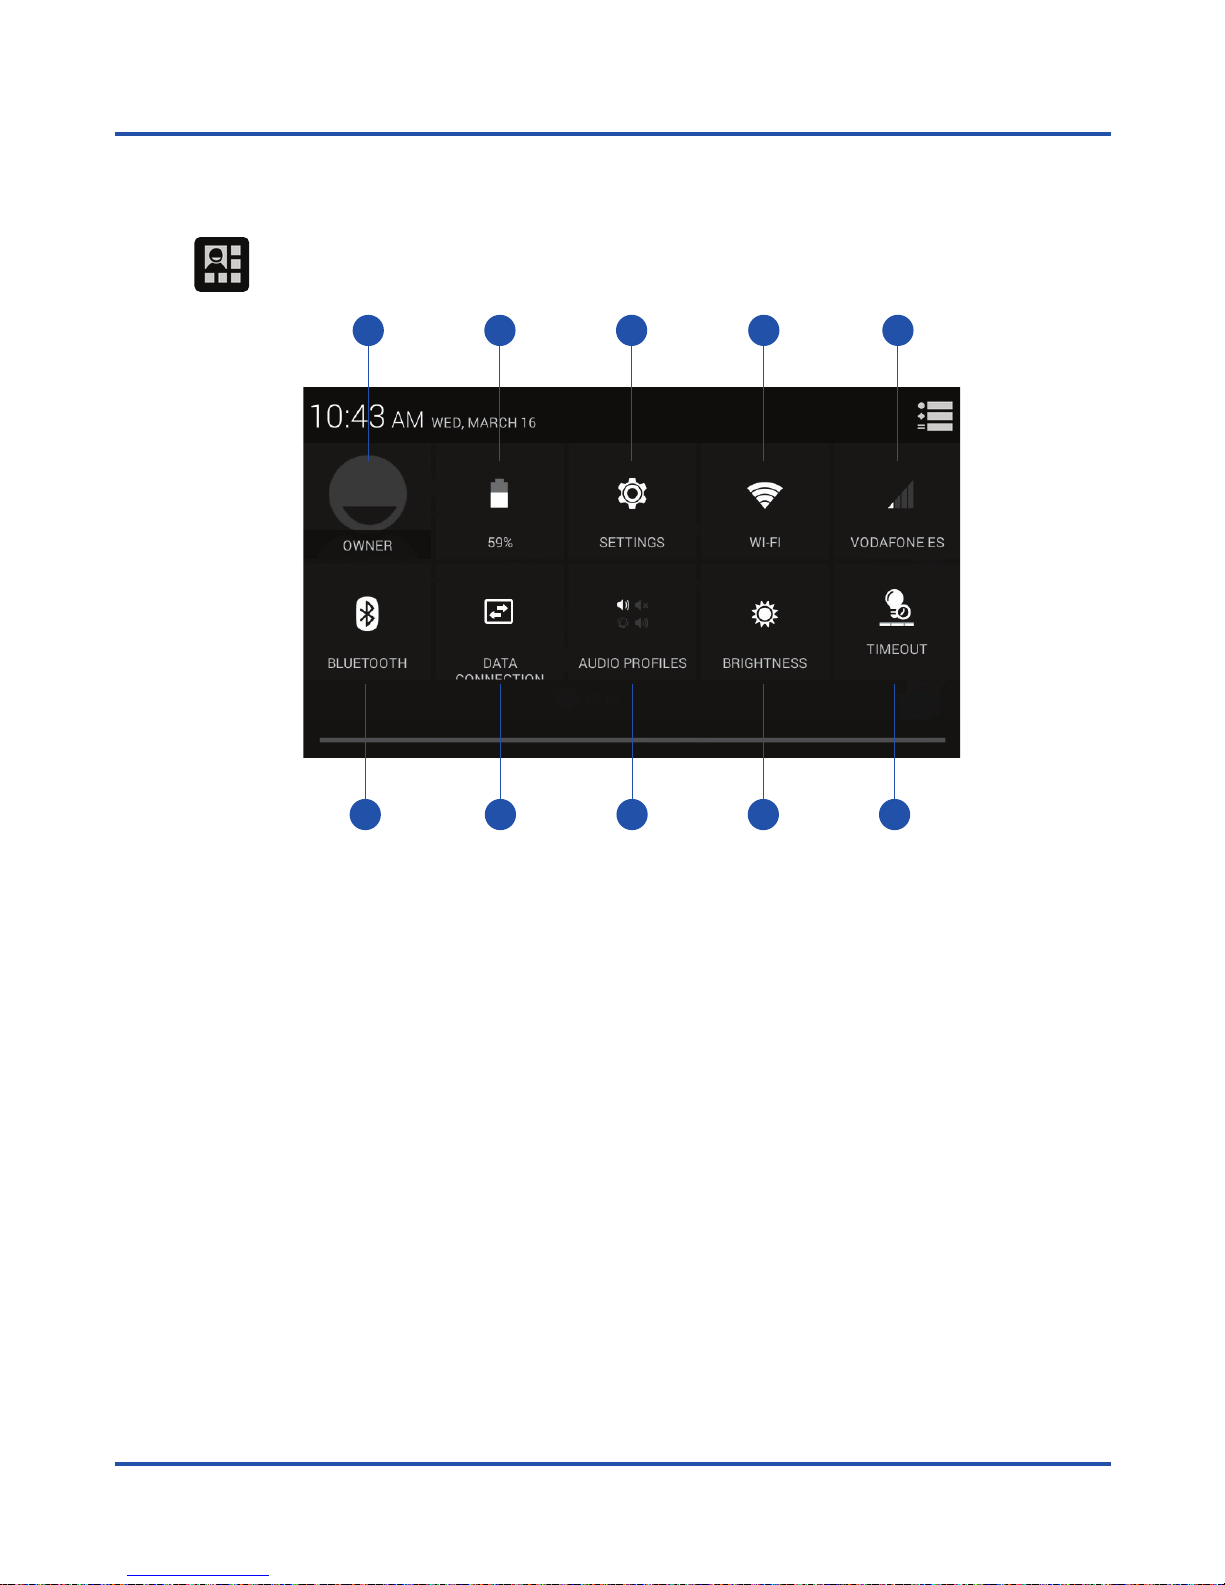
Pull down the notification area by sliding down the top bar of the screen and then press
on the icon to access the system menu.
Press on the proper icon to access the system settings menu, enable or disable Wi-Fi
or Bluetooth connections, change the audio profile, screen brightness, backlight time,
etc. By holding the icon will access the configuration of the corresponding function in
the system settings menu.
1. Owner Information
2. Battery level
3. System settings menu
6. Bluetooth function adapter
7. Data connection
8. Audio profile selection
4. Wi-Fi network adapter 9. Screen brightness selection
5. Network coverage
2
3 4 5
6 7 8 9
1
10
10. Backlight time selection
Page 24
24
Main menu
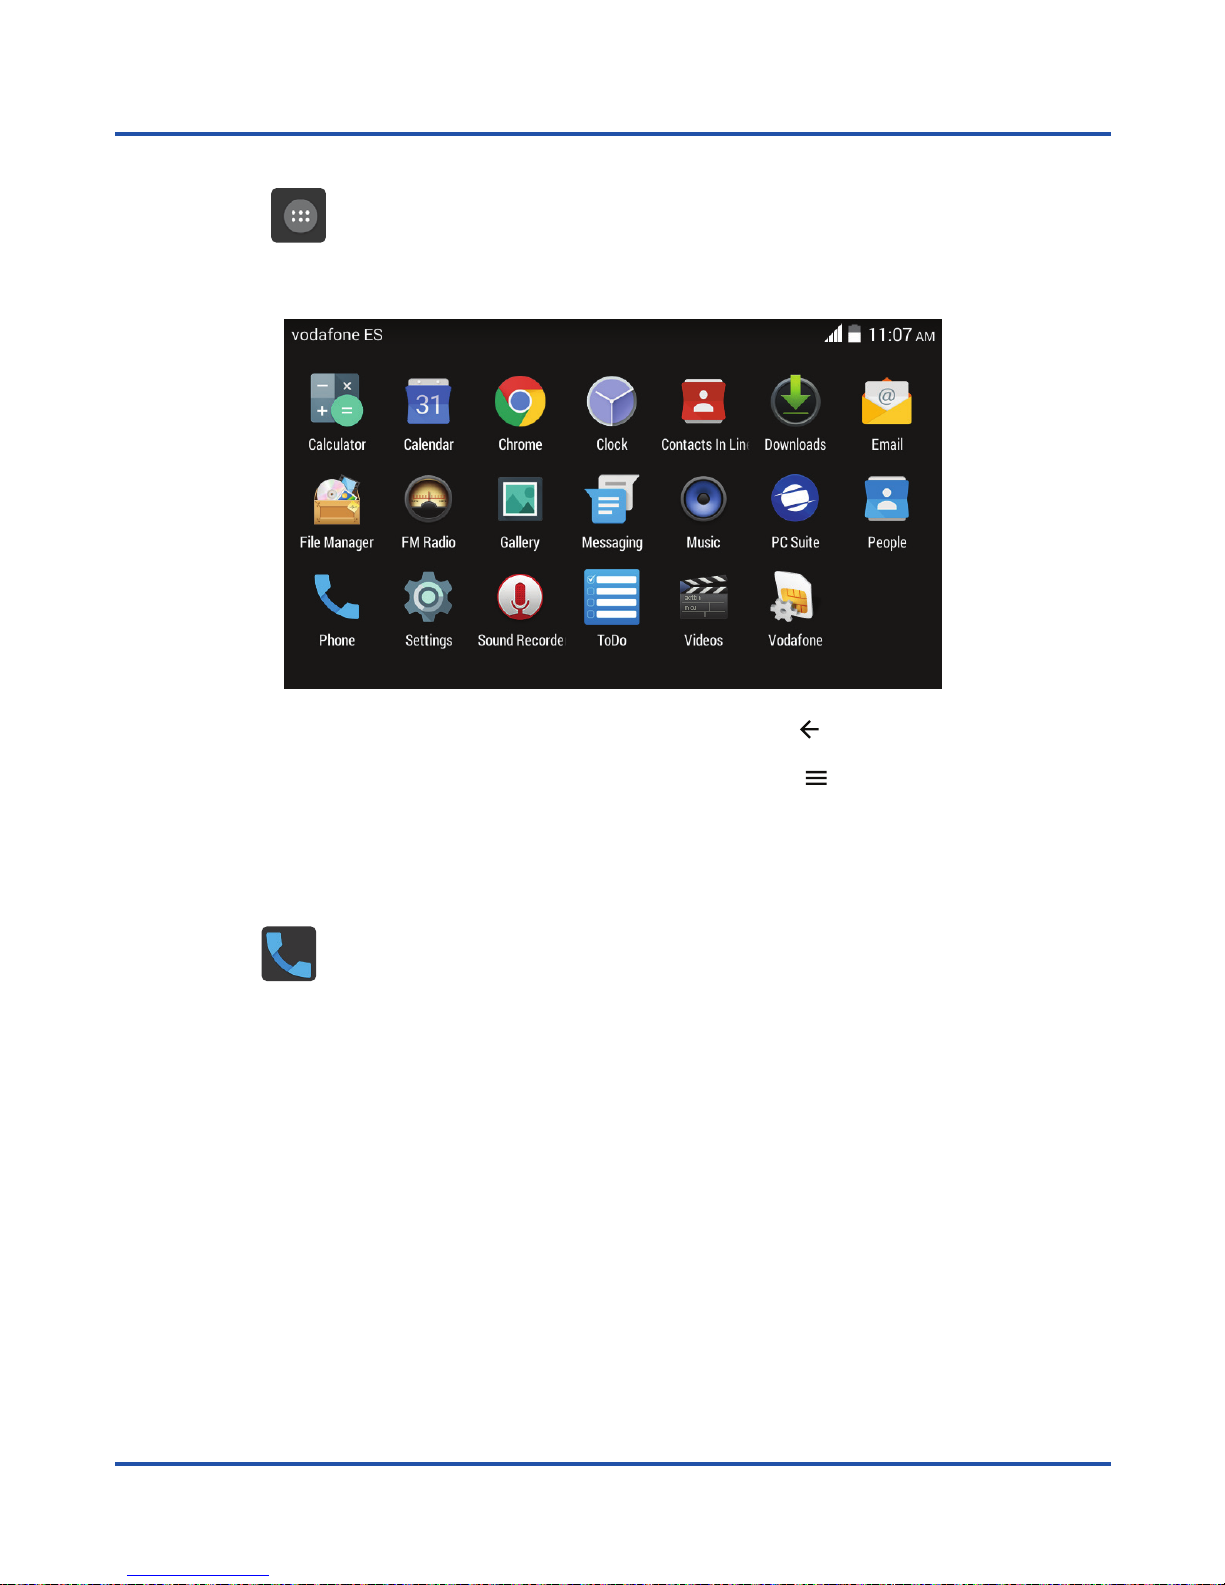
Applications Menu
Press on the icon on the right side of the main menu to access the applications
menu. In this menu you will find the different applications installed in the system.
Press on an application icon of to access, and use the [ ] button to return to the
previous menu. Within an application you can use the [ ] button to access the
options menu.
Call menu
Pres on the icon on the right side of the main menu to access the calls menu.
From this menu you can call to contacts, dial a phone number, or consult the record of
calls made, received and missed. You can also access the call log through the panel
located on the left side of the main menu.
Page 25
25
Main menu
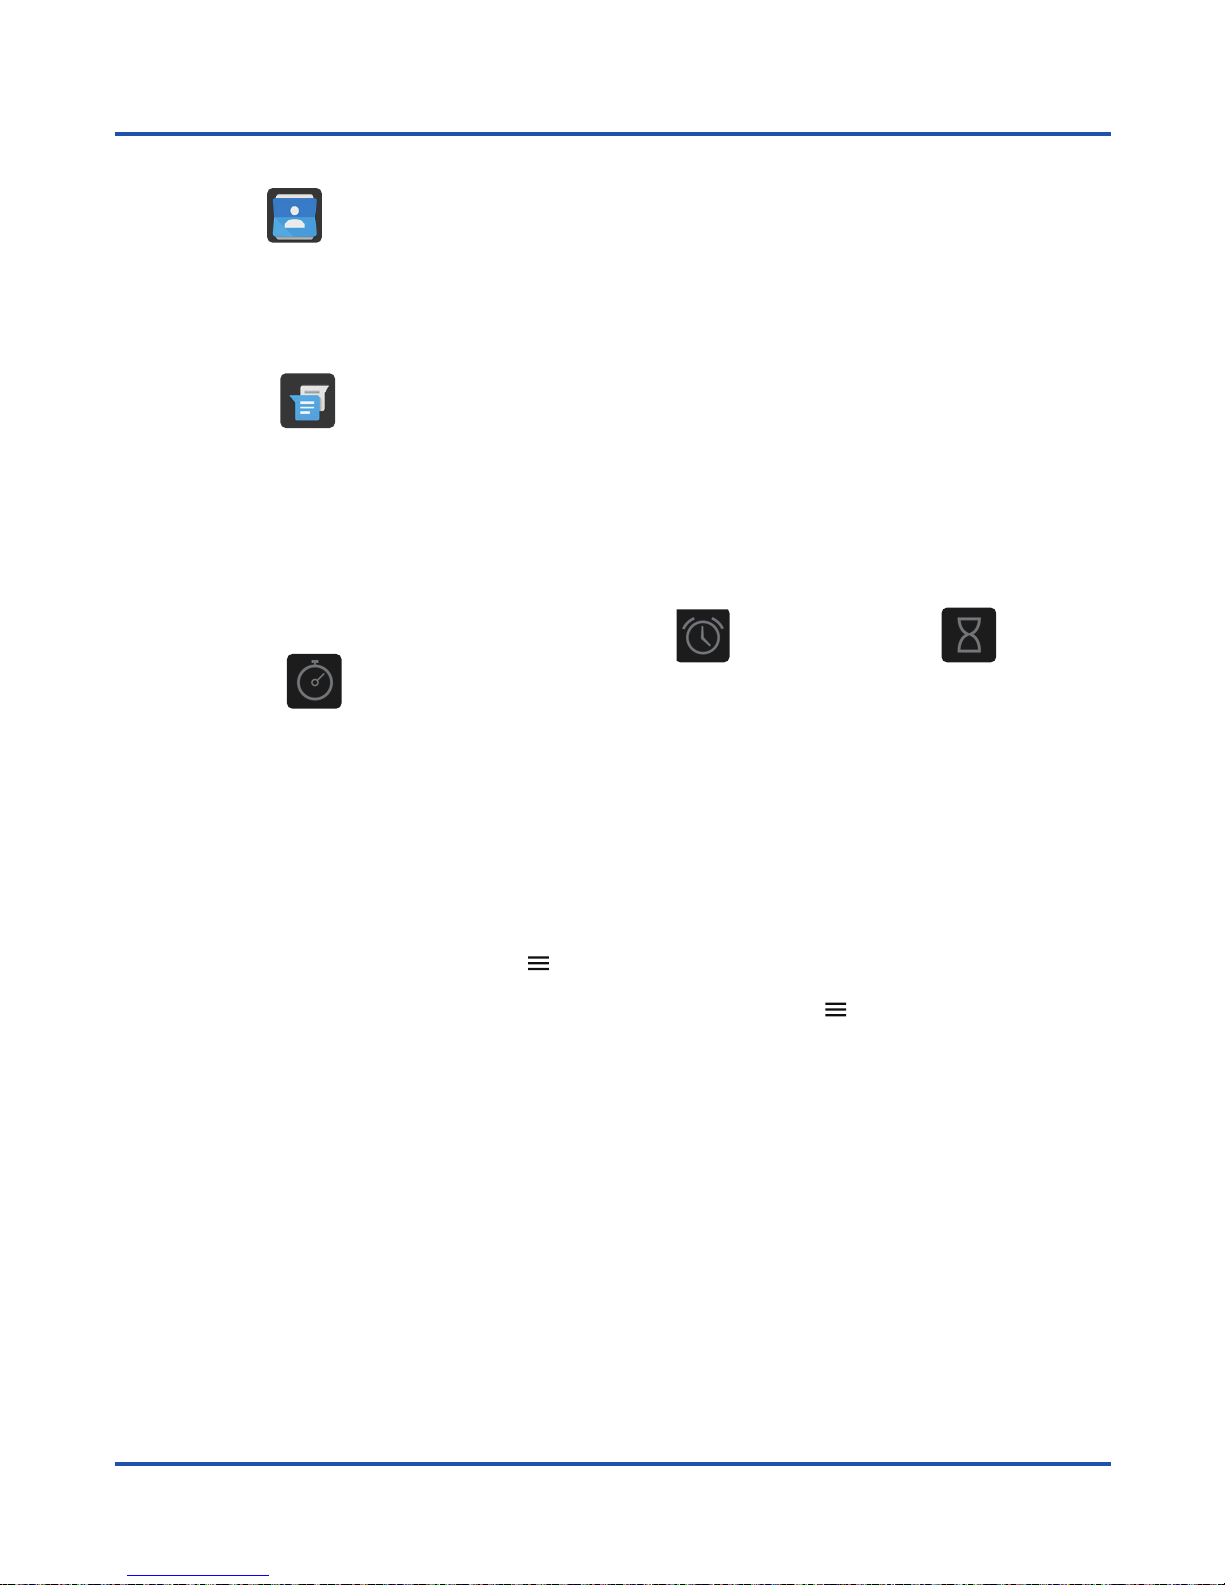
Phonebook
Press on the icon on the right side of the main menu to access the phonebook of
the phone. You can also access your favorite contacts through the main menu panel.
Messages
Press on the icon on the right side of the main menu to access the phone’s
messaging application. In this application you can compose and send SMS text
messages and MMS multimedia messages, as well as check the messages received.
Clock
The Clock application allows you to set alarms , schedule timers and start
chronometers , besides setting the date and time of the phone. Click on the clock
panel in the center of the main menu to access this application.
Editing the main menu
You can customize the phone’s main menu changing or moving the widgets or panels
installed by default.
Within the main menu, press the [ ] button to add new widgets and shortcuts, or
to change the desktop background image. Hold down the [ ] button if you want to
remove any items from the main menu.
You can also change the position of any of the panels or main menu icons, holding the
icon and moving then to the desired position.
Page 26
26
System icons
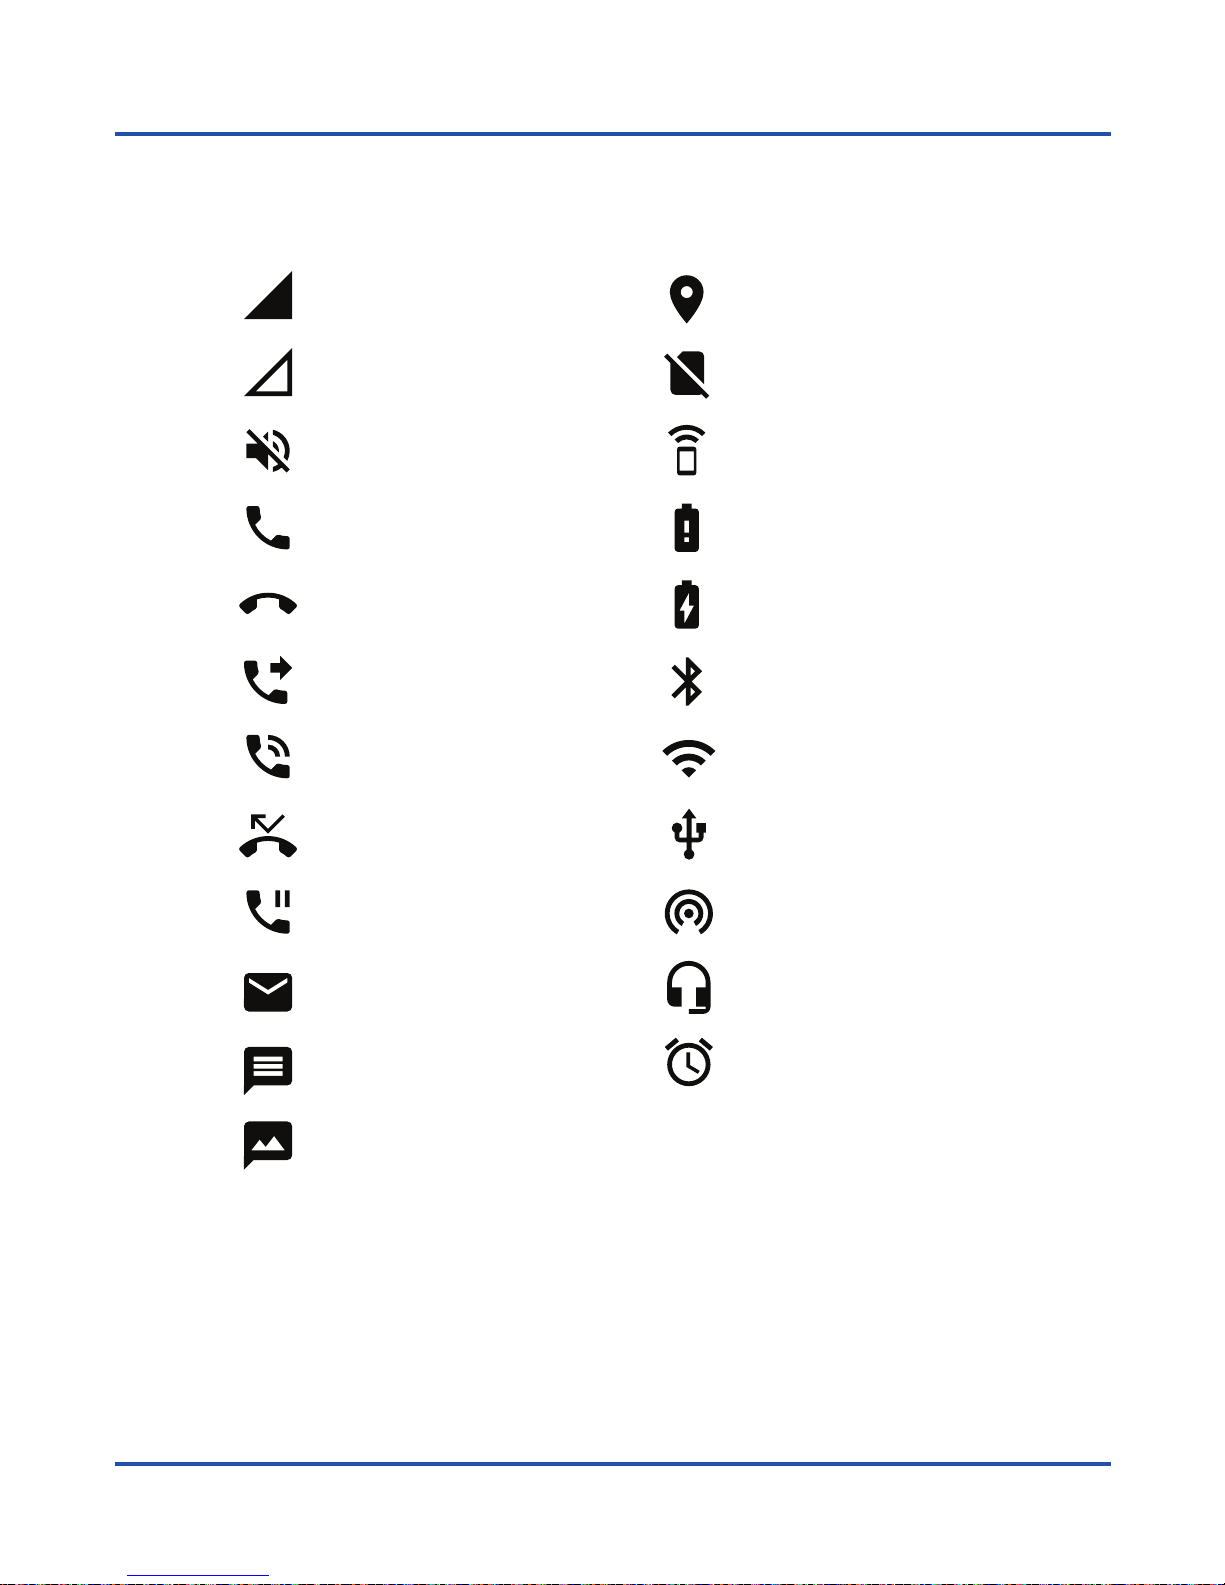
The following illustration explain the meaning of some of the system icons that can be
displayed on your phone:
Signal level
No signal
Mute
Call
Call end
Call transfer
Call in progress
Call missed
Call hold
Email
SMS text message
MMS multimedia message
Location active
No SIM card
Speaker active
Low battery
Charging battery
Bluetooth active
WiFi active
USB connection
Tethering active
Headphones connected
Alarm active
Page 27
27
Calling
There are several ways to perform callings with your terminal Co-Comm F800:
Calling using the alphanumeric keypad
1. In standby mode, enter the phone number using the alphanumeric keypad and
press [ ] button to call.
2. To end the call, press the [ ] button or hang up the handset.
Calling in handsfree mode
1. In standby mode, enter the phone number using the alphanumeric keypad and
press [ ] button to call.
2. Press [ ] button to start handsfree mode. The indicator will glow green,
indicating that the handsfree mode is active.
3. To end the call, press the [ ] button or hang up the handset.
Calling from call log
1. Press on the icon on the right side of the main menu, or directly press the
[ ] button to access the call log. The last call will be shown on screen.
2. Press on the icon to access the list of outgoing, incoming or missed calls.
3. Scroll up and down the list, select an item and press the [ ] button to call.
4. To end the call, press the [ ] button or hang up the handset.
Calling from phonebook
1. Press on the icon on the right side of the main menu to access the
phonebook.
2. Scroll up and down the contact list and select the desired contact.
3. Select the phone number and press [ ] button to call.
4. To end the call, press the [ ] button or hang up the handset.
Page 28
28
Calling
Calling with speed dial keys
1. In standby mode, press one of the memory keys [ ], or hold down a key on
the numeric keypad [ ] to use speed dialing. The call will start automatically.
2. To end the call, press the [ ] button or hang up the handset.
Configuring speed dial keys
1. In the main menu, click on the icon to access the calls menu.
2. Press on the icon, and select Speed Dial from the popup menu.
3. Choose one of the speed dial memories M1 -M4, or 1 - 9 to edit its contents.
4. You can associate a phone number or a contact from the phonebook to the
memory keys [ ], while to the number keys [ ] you can only associate
contacts from the phonebook.
5. Press Add to confirm and complete the operation.
Note:
Please ensure that the contacts have been installed in the memory keys before using
this feature. The [ 1 ] key is reserved for voicemail function.
Answer or silence an incoming call
1. During an incoming call, press [ ] button to answer the call.
2. Before the call is answered, you can mute the ring tone of the incoming call by
pressing the [ ] button.
3. When the call is active, press the [ ] button to mute your microphone.
4. To reject an incoming call, press the [ ] button.
Page 29

29
Calling
Transfer an incoming call
1. During an incoming call, press [ ] button to answer the call.
2. Press on the icon on the screen to start a second call to another phone
number or contact from the phonebook.
3. When the second call is active, press [ ] button to transfer the incoming call
to the second contact, or press [ ] button before the second call is active for a
transfer “without consultation”.
Adjusting the handset volume
During an active call, press the [ ] [ ] buttons to decrease or increase respectively
the volume of your headset or handsfree.
Calling the voicemail
1. In standby mode, press and hold the [ 1 ] button to call the voicemail. The call will
start automatically.
2. To end the call, press the [ ] button or hang up the handset.
Page 30
30
Messages
The Com-Com Neo 4500 terminal supports SMS text messaging and MMS
multimedia messages. This section explains how to send and receive messages and
other features associated.
Create and send messages
1. In the main menu, press on the icon to access the messaging application
of the phone.
2. Press on the icon to create a new message.
3. Enter the phone number or the name of the contact that you want to send a
message, or press on the icon to select a contact from the phonebook.
4. Write the text in the proper field, and press on the icon if you want to add
media files to your message.
5. Press on the icon to send the message.
View and reply to messages
1. In the main menu, press on the icon to access the messaging application
of the phone.
2. Select one of the messages from the list and press to display.
3. To reply to the message, write the text in the proper field, and press on the
icon if you want to add media files to your message.
4. Press on the icon to send the message.
Delete messages
1. In the main menu, press on the icon to access the messaging application
of the phone.
2. Press and hold one of the items until the color changes, and then click on the
button to remove the message from the inbox.
Page 31

31
Messages
Empty inbox
1. In the main menu, press on the icon to access the messaging application
of the phone.
2. Press the [ ] button to open the options menu, and select Delete all threads from
the popup window.
3. Press Delete in the confirmation window to complete the operation and delete all
messages from the inbox.
Message settings
1. In the main menu, press on the icon to access the messaging application
of the phone.
2. Press the [ ] button to open the options menu, and select Settings from the
popup window.
● SMS enabled: press to access the network settings and set the default SMS
application (messages by default).
● Text message (SMS): press to access text messages settings:
● Request delivery report: select this option to receive a delivery report when
sending a message.
● Manage SIM card messages: use this option to delete messages and check
the free and used space on the SIM card.
● Edit quick text: this option allows you to edit and add quick texts which can
be inserted in your messages.
● SMS service center: messaging server network operator, this field should
not be modified.
● SMS storage location: It allows you to choose between the SIM card or
phone memory for storing messages.
● Optimization: disable this option if you want to use accent marks and other
special characters in your text messages.
Page 32

32
Messages
● Multimedia message (MMS): press to access the multimedia message settings:
● Group messaging: use this option to send a message to multiple recipients
using MMS.
● Request delivery report: select this option to receive a delivery report when
sending a message.
● Request read report: select this option to receive a read message report
when sending a message.
● Send a read report: select to send a read message report when it is required
by the sender.
● Auto-retrieve: use this option to automatically download messages.
● Roaming auto-retrieve: use this option to automatically download when you
are in data roaming.
● Creation mode: in free mode, a text message is converted to MMS when you
exceed the maximum number of characters allowed.
● Size limit: it allows you to choose the maximum size for MMS messages.
● Priority: it allows you to choose the priority for MMS messages.
● Notifications: press to access message notifications settings:
● Notifications: press to activate or deactivate message notifications.
● Mute: use this option to temporarily mute message notifications.
● Sound: choose the alert message tone.
● Popup notification: displays pop-up notifications for Push messages. Push
messages are notifications that a server sends to an application alerting that
there is a new information such as an email or a chat message.
Page 33

33
Messages
● General: press to access the general message settings:
● Chat wallpaper: it allows you to select a background image for your
conversations.
● Message font size: select the text size for your conversations.
● Show email address: press to include email address in contact messages.
● Storage settings: it allows you to set a limit of stored messages from which
the oldest messages will be deleted automatically.
● Cell broadcast settings: enables cell broadcasting in the SIM card.
● Service message settings: enables the reception of WAP Push messages. A
WAP Push message is a type of SMS that is used to directly access a WAP
site or page, usually to download files. The user sends an SMS and receive
another one with a welcome message to an URL, which when accepted
opens in the browser the WAP address requested.
Page 34
34
Contacts
This section explains how to create and manage your phonebook.
Creating a new contact
1. In standby mode, use the alphanumeric keypad to enter the number of the new
contact.
2. Press on the icon, and select Add to contacts from the popup menu.
3. Press Create new contact, and then select the destination in which the contact
will be saved (SIM card, phone, online account, etc.).
4. Fill out the form with the data you want to enter for the new contact, and press
Done to save the entry and complete the operation.
Creating a new contact from the call log
1. In the main menu, press on the incon to enter the call log.
2. Press on the icon to display the list of incoming, outgoing and missed calls,
and select an item.
3. Press on Add contacts, and then press Create a new contact, and select the
destination to store the contact (SIM card, phone, online account, etc.).
4. Fill out the form with the data to be entered for the new contact, and press Done
to save the entry and complete the operation.
Page 35

35
Contacts
Import/Export contacts
1. In the main menu, press on the on the right side of the main menu to access
the contacts menu.
2. Press the [ ] button, and then select Import/Export from the popup menu.
3. Choose the source from which you want to copy contacts (SIM card, phone,
internal memory, etc.).
4. Select the destination you want to copy contacts.
5. Select the contacts you want to copy, or press Select all to select all contacts in
the data source, and press OK to complete the operation.
Contact edit
1. In the main menu, press on the on the right side of the main menu to access
the contacts menu.
2. Scroll up and down the contact list and select the desired contact.
3. Press the [ ] button, and then select Edit from the popup menu.
4. Fill out the form with the data to be entered for the new contact, and press Done
to save the entry and complete the operation.
Contact lists management
1. In the main menu, press on the on the right side of the main menu to access
the contacts menu.
2. Press the [ ] button, and then select Contacts to display from the popup menu.
3. Select the contact list you want to display (SIM card, phone, internal memory,
etc.), select Customize to set a custom list.
Page 36
36
Contacts
Add contacts to favorites
1. In the main menu, press on the on the right side of the main menu to access
the contacts menu.
2. Scroll up and down the contact list and select a contact between those who
are stored on the phone, as only contacts stored in the phone can be added to
favorites.
3. Press on the selected contact, and then press on the icon to add it to the
list of favorite contacts. Favorite contacts will be displayed in the contacts panel
of the main menu.
Contact groups management
1. In the main menu, press on the on the right side of the main menu to access
the contacts menu.
2. Select a contact from the list, press [ ] button and then select Edit from the
popup menu.
3. Select a contact group in the Group field, and then press Done to save the entry
and complete the operation.
4. Press on the icon and select one group to display all phonebook contacts
associated with that group.
5. To create a new group, press on the icon, select the destination (SIM card,
phone, online account, etc.), and enter the name of the new group. When you
edit a contact in the phonebook, the new group will appear in the popup list of
the Group field.
Page 37
37
LDAP contacts
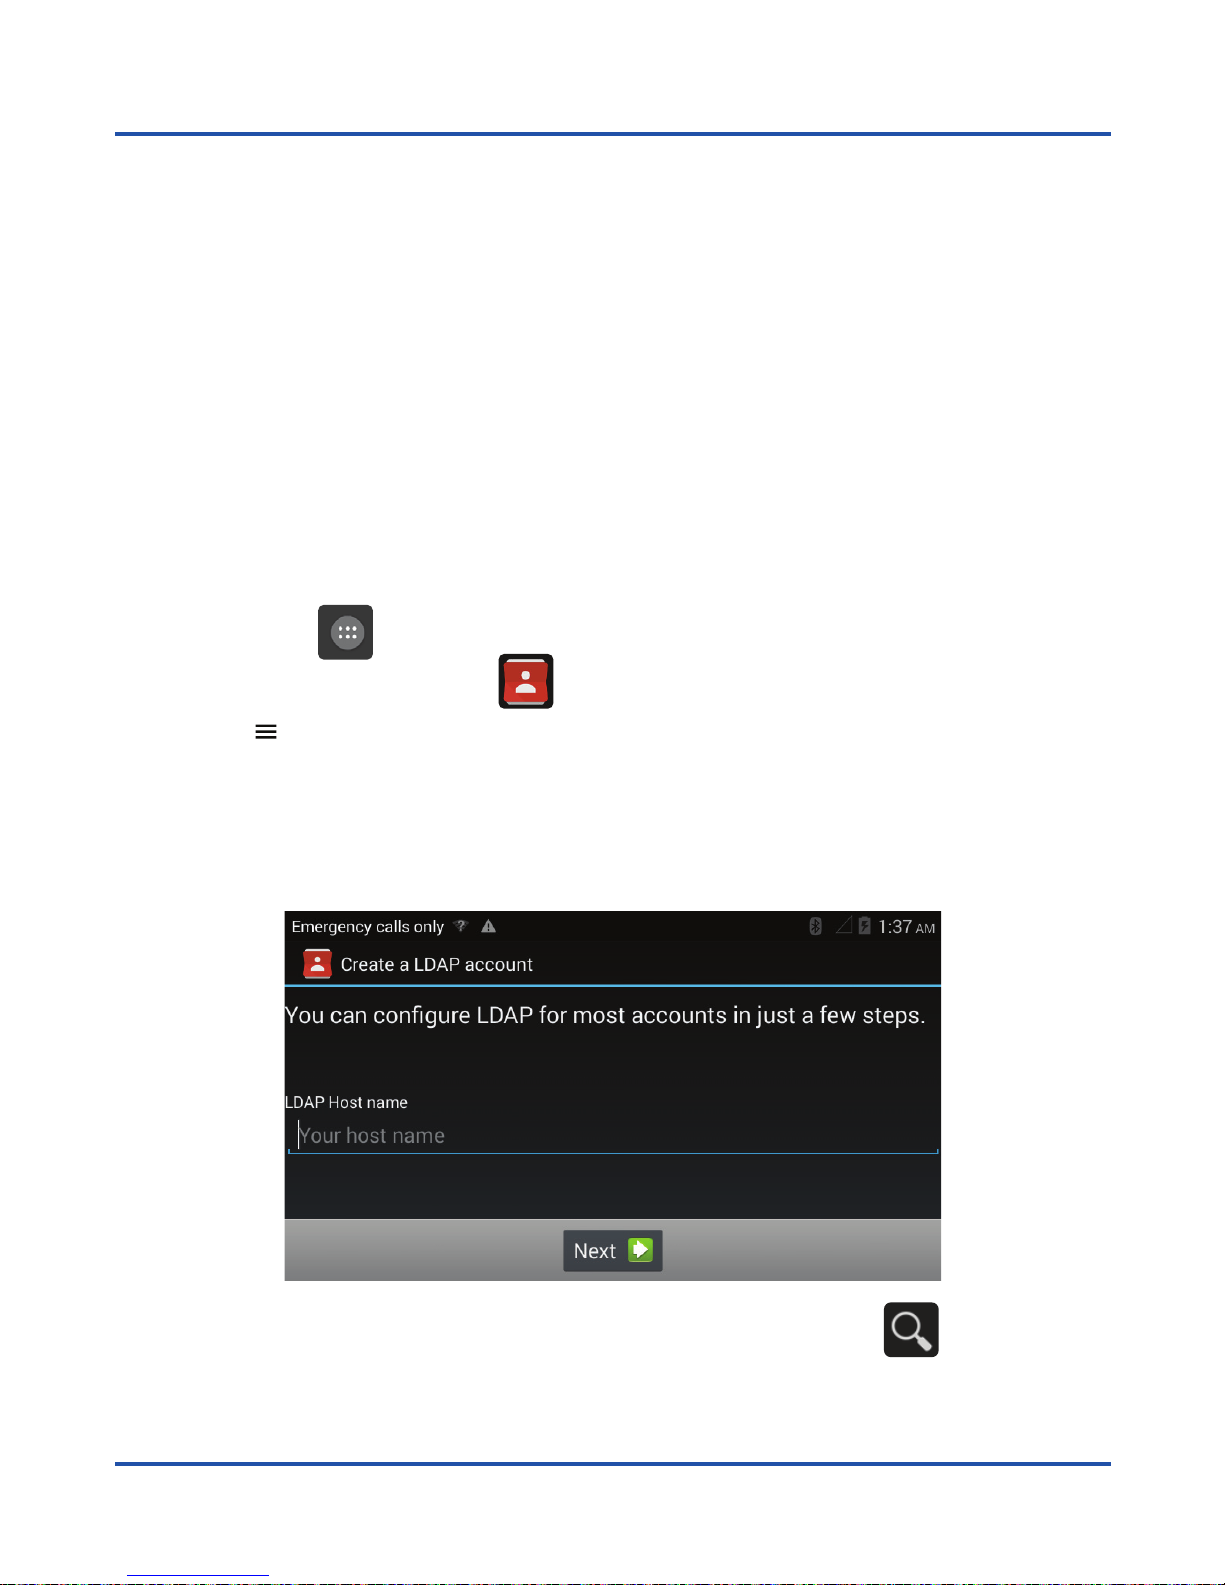
Your Co-Comm F800 terminal allows you to create LDAP contact accounts. An LDAP
account (Lightweight Directory Access Protocol) is used to search for contacts on
a server that can be found on the Internet, at the organization’s intranet, or through
another company that hosts an LDAP server.
The LDAP service requires a network connection to the server, so it must be configured
a connection to Wi-Fi network on your phone. To configure the LDAP contacts, you
need the name and port number of the LDAP server and a user name and password
to connect to server.
Add an account of a LDAP contact server
1. Press on the icon on the right side of the main menu to access the application
menu, and then click on the icon to access the Contacts in line application.
2. Press [ ] button, and then choose Accounts from the popup menu.
3. Press on LDAP inline to add a new LDAP account.
4. Enter the name or IP address of the server, and follow the steps on the screen to
set up your LDAP contact account.
Once the LDAP contact book is configured, you can press on the icon to search
for names of contacts stored on the server.
Page 38
38
Audio profiles
You can select the audio profile of the terminal accessing the system menu, sliding
down the system information bar that is at the top of the screen. The following audio
profiles are available:
● General: default audio settings that can be modified by the user.
● Silent: with this configuration audio tones and notifications are disabled.
● Outdoor: all tones and notifications are at maximum volume.
Editing audio profiles
You can edit the General audio profile to suit to your taste. Press on the icon on
the right side of the main menu to access the application menu, and then click on the
icon to access the system settings. You can find the Audio profiles setting in the
Device section. Press on the icon to modify the General audio profile, or press
Add to create a brand new audio profile. Press Restet to recover the defaulted audio
profile settings.
You can also access the audio profile settings by holding the corresponding icon in
the system menu.
Page 39
39
PC suite
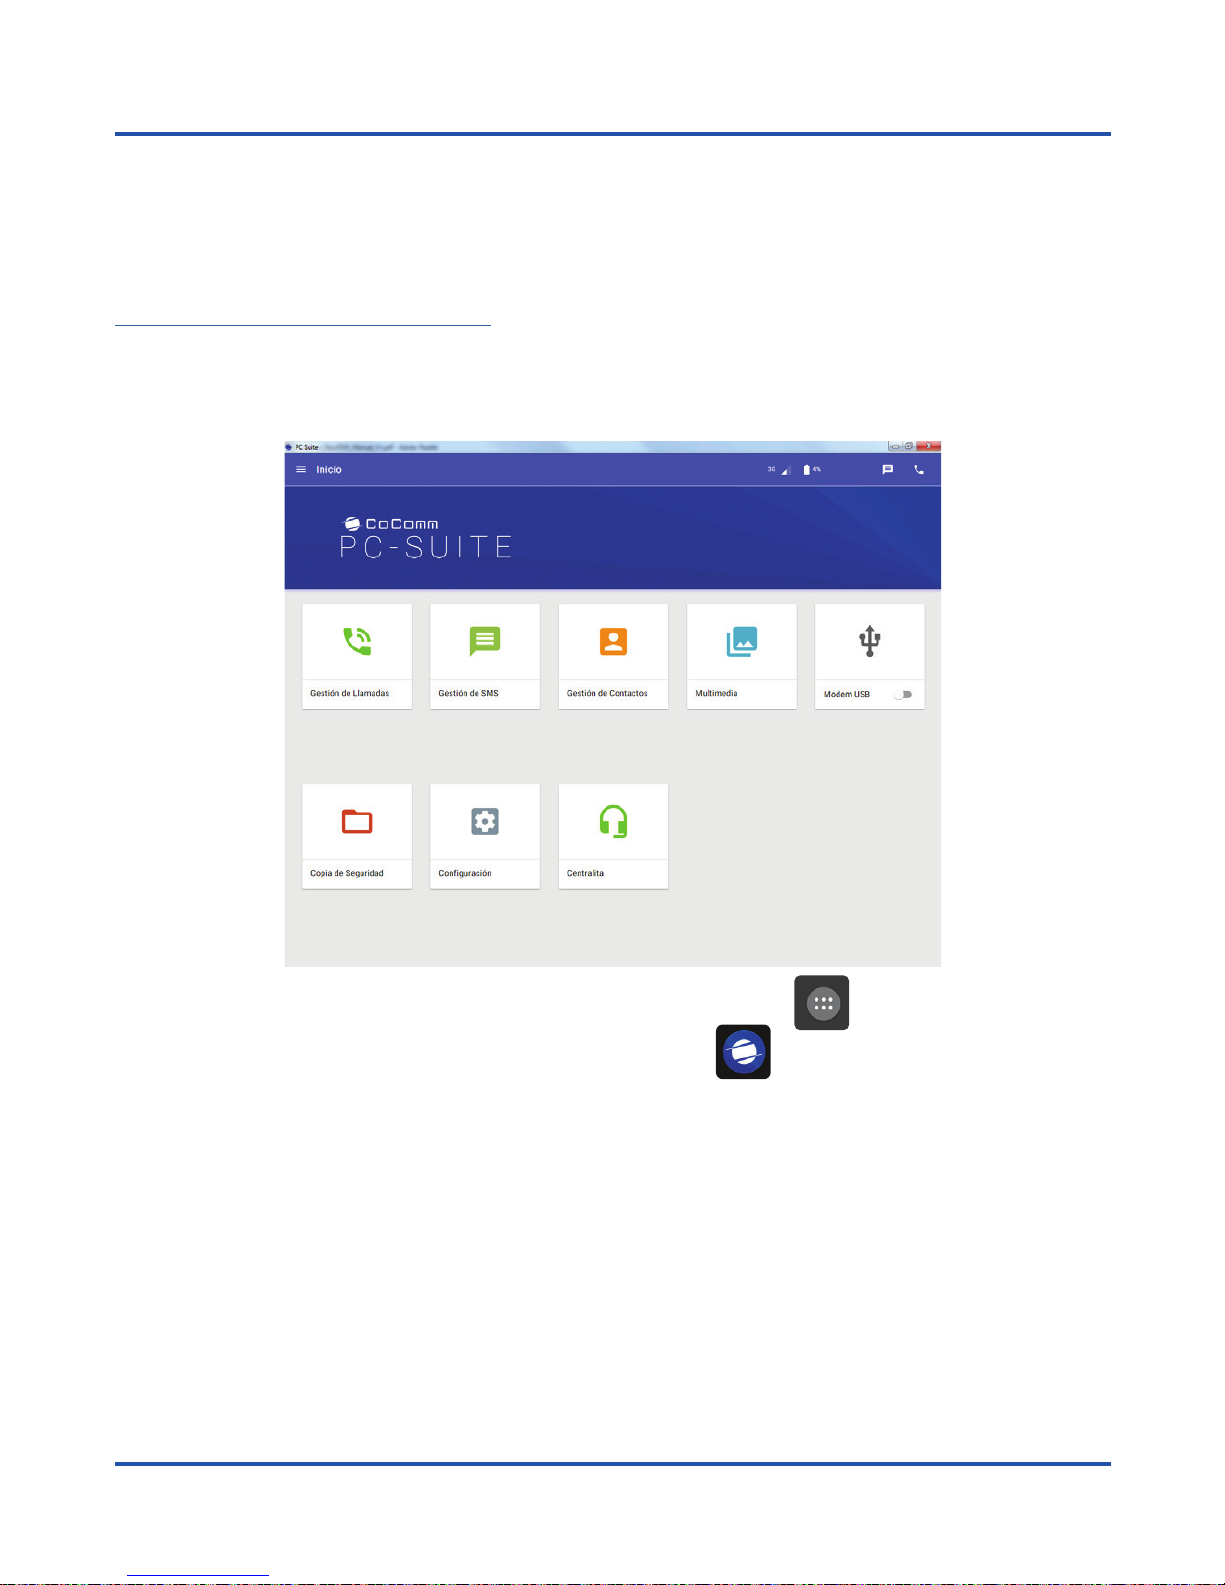
There is a PC application available for your Co-Comm F800 that may let you
manage your calls, messages, contacts, etc. easily from your personal computer.
You can download the PC application fom your Co-Comm F800 on the website
http://www.cocomm.es/pcsuite.
Download and install the application on your PC. When you lauch the application, the
following interface will be displayed:
To enable the PC Suite mode on your phone, press on the icon in the main menu
to access the applications menu, and then on the icon to access the PC Suite
application. Connect the USB cable between the terminal and PC, and then click on
Start PC Suite on the phone screen to connect the terminal to the application installed
on your PC.
Page 40

40
Wi-Fi network connection
To enable the wireless network adapter, slide down the system information bar to
display the system menu, and press on the icon. If any Wi-Fi network previously
configured is within the range of the terminal, it will automatically connect, and the
icon will be displayed in the system information bar.
Set up a Wi-Fi network connection
To connect to a wireless network, this network must have been previously configured
on the terminal. You can access the configuration of Wi-Fi networks either by holding
the icon in the system menu or by pressing on the icon in the main menu and
then on the icon of the applicationd menu to access the system settings menu.
If the Wi-Fi network adapter is active, all the networks within the range of the terminal
will be displayed .
Press on the Wi-Fi network you want to connect, enter the password in the pop-up
window, and press on Connect to save the settings and connect to the network.
Within the Wi-Fi setup menu, press [ ] button to display the Wi-Fi options. In this
menu, you can make advanced settings, as well as set up a Wi-Fi direct network to
connect directly to other Wi-Fi device, or request a PIN for a VPS connection to your
router.
Page 41
41
Bluetooth connection
The Bluetooth function allows you to pair your terminal with other Bluetooth devices,
allowing different functions:
● Using Bluetooth paired headphones to answer calls received in the terminal.
● Exchange files with other Bluetooth paired devices.
● Use the phone as a terminal to answer calls received through another Bluetooth
paired device, such as a mobile phone.
To enable the Bluetooth adapter, slide down the system information bar to display the
system menu, and press on the icon. If any previously paired device is within the
range of the terminal, it will automatically connect, and the icon will be displayed
in the system information bar.
Pairing to a Bluetooth device
Hold down the icon in the system menu to access the Bluetooth settings, or
access through the system settings menu by pressing on the icon in the main
menu, and then on the icon in the applications menu.
Within the Bluetooth configuration menu, click on the name of the terminal to activate
the temporary visibility of the device, and do the same on the other device you want
to pair. Then click on Search for devices, and all Bluetooth devices visible within the
range of the terminal will be displayed on the screen.
Press on the device you want to pair to your terminal, and enter the requested code
in the popup window on both devices. Once the setup is complete, you can click on
the icon to change the name of the paired device and make audio adjustments.
You can also rename your terminal or change the visibility timeout for the Bluetooth
function by pressing the [ ] button within the Bluetooth settings menu.
Page 42

42
Settings diagram
WIRELESS & NETWORKS
SIM management
SIM information
Default settings
Data connection
General settings
Roaming
Wireless & networks
Airplane mode
Default SMS app
Tethering & portable hotspot
Wi-Fi hotspot
USB tethering
Bluetooth tethering
Hotspot & tethering
settings
VPN
Mobile networks
Data connection
Data roaming
Preferred networks
Network mode
Access point names
Network operators
USB Internet
Wi-Fi
Bluetooth
Page 43

43
Settings diagram
DEVICE
Home
Audio profiles
Display
Personalize
Lock screen notifications
Wallpaper
Display
Brightness
Sleep
Daydream
Call settings
Voice call
Voicemail
Call forwarding
Call barring
Aditional settings
Caller ID
Call waiting
Other settings
Fixed dialing numbers
Minute reminder
Noise reduction
Quick responses
TTY mode
International dialing assist
Page 44

44
Settings diagram
PERSONAL
Security
Screen security
Screen lock
Owner info
Accounts
Add account
SIM card lock
Lock SIM card
Change SIM PIN
Passwords
Device administration
Unknown sources
Verify apps
Personal data
DRM reset
Factory data reset
Language & input
Language
Spell checker
Personal dictionary
Keyboard & input methods
Speech
Text-to-speech output
SYSTEM
Date & time
About phone
Page 45

45
Troubleshooting
The phone can not be turned on
● Be sure to hold down the [ ] button for more than 3 seconds.
● Make sure the battery is properly connected to your phone.
● Remove the battery, reinstall it and restart your phone.
● If the battery is low, recharge the battery.
The phone asks for PIN code
● The PIN lock feature is enabled. Each time the phone is switched on, the PIN must
be entered (if you are using your phone for the first time, you must enter the PIN
code provided with the SIM card).
The phone asks for PUK code
● The PIN code has been entered incorrectly three times, and now the SIM card is
locked. Enter the PUK code provided by your network operator.
The phone asks for unlock code
● The automatic locking function has been enabled in the phone. You must enter
the unlock code before you can use the phone.
SIM card error
● Clean the metal contacts on the SIM card with a clean cloth (do not use a solvent).
● The SIM card is not properly placed. Insert the SIM card according to the figure
in the unit.
● The SIM card is damaged, contact your network provider.
Page 46

46
Troubleshooting
Network failure
● It is possible that the phone is located in an area of weak signal, move to a place
with a stronger signal.
It is out of the network service coverage
● The SIM card is not valid, contact your network provider.
You have entered a number but the phone is not calling
● Make sure you have pressed the button correctly.
● Check the call barring options. Verify that barring is disabled for the contact
number.
● Check the fixed dialing setting is disabled.
● Check that the SIM card is within network coverage.
● Your network operator may be experiencing connection problems.
The call quality is poor
● Check the volume.
● It is in a weak signal area, such as near tall buildings or in a basement. Move to a
location with better signal strength.
● Your network operator may be experiencing connection problems.
Your correspondent can not call you
● Make sure the phone is turned on and connected to a network.
● Make sure the SIM card is not locked.
● Check that the SIM card is within network coverage.
● Check that you have not set an incoming call barring.
Page 47

47
Troubleshooting
Your correspondent can not hear you
● Increase the handset volume.
● Check that the handset cable is securely connected to the phone.
The battery duration in standby mode is too short
● The battery standby duration is related to network configuration. You may be in a
weak signal area. If the phone can not receive signals, it will keep sending a signal
to search network and consume additional power, which shortens the battery
duration.
The battery needs to be changed
● If the battery cannot charge properly.
● Make sure the power cord is connected to the unit to charge the battery efficiently.
● Clean the charging contacts in the phone and battery with a clean, dry cloth.
● Replace the battery or charger if it seems to be damaged.
If the above guidelines do not help solve the problem, note the model number and
serial number of your phone, your warranty details and a clear description of the
problem. Then contact the provider after-sales service.
Page 48

48
SAR certification information
This mobile device meets guidelines for exposure to radio waves.
It is a radio transmitter and receiver low power. It is designed not to exceed the limits
for exposure to radio waves as recommended by international guidelines.
These guidelines were established by the International Commission on Non-Ionizing
Radiation (ICNIRP), which is an independent scientific organization, and include safety
measures designed to ensure the protection of persons, regardless of age or health
status.
Specific Absorption Rate (SAR) is the unit of measurement for the amount absorbed
radio when using mobile devices. SAR tests are conducted in standard operating
positions with the phone transmitting at its highest certified power level, however, the
actual SAR level of the phone while operating can be well below the maximum value. In
general, the closer you are to a base station, the lower the power of the phone.
SAR values may vary, depending on the different models of phones. To ensure the
safety and health of users, the phone is designed and manufactured to meet radio
exposure guidelines. The SAR limit required by the FCC for mobile devices used by
the general public is 1.6 watts per kilogram (W/kg) taken over the volume containing a
mass of 1 gram of tissue that is absorbing the most signal.
The highest SAR value found during produce certification is 0.505 W/Kg averaged
over 1g of tissue, measured at WWAN+WLAN simultaneously transmission Body
0mm distance.
Page 49
49
Regulations
Through this, CO-COMM Servicios Telecomunicaciones S.L. declares that this
product meets the essential requirements and other relevant provisions of Directive
1999/5/EC (R&TTE), of the European Parliament and the Council of March 9, 1999.
You can obtain a copy of the declaration of conformity with the directive mentioned
by sending an email to the address [email protected], adding the word DoC in the
Subject line, and specifying the lot number of the product in the body of the message.
This product can be used in all EU countries (and other countries following the 1999/5/
EC directive).
This device complies with part 15B FCC rules. Operation is subject to the following
two conditions: (1) this device may not cause harmful interference (2) this device must
accept any interference, including interference that may cause undesired operation.”
WARNING: Changes or modifications to this unit not expressly approved by the party
responsible for compliance could void the user’s authority to operate the equipment.
ErP product information
Through this, CO-COMM Servicios Telecomunicaciones S.L. declares that this
product complies with Directive 2009/125 / EC and its implementing regulation (EC)
Nº1275 / 2008 amended by (EC) Nº278 / 2009, (EC) Nº642 / 2009 (EU) Nº617 / 2013
(EU) Nº801 / 2013 and its implementing regulation (EC) Nº278 / 2009.
The energy consumption of the product, connected to network, in standby, and with
all its physical and wireless interfaces connected, is 0.232W.
For the information required by the regulations (EU) Nº801 / 2013 that appears on
websites free access for manufacturers, visit http://www.cocomm.es.
0678
Page 50
50
Regulations
This product bears the selective sorting symbol for waste
electrical and electronic equipment (WEEE). This means that
this product must be handled pursuant to European Directive
2002/96/EC in order to be recycled or dismantled to minimize
its impact on the environment. For further information, please
contact your local or regional authorities.
Electronic products not included in the selective sorting process are potentially
dangerous for the environment and human heath due to the presence of hazardous
substances.
In the final product’s price is included the environmental management cost of the
electronic residues, as it is established legally in the R.D. 208/2005.
Bluetooth ® mark and logos are owned byBluetooth SIG, Inc.
Wi-Fi, Wi-Fi Protected Access, Wi-Fi Protected Setup y WPA
are trademarks of the Wi-Fi Alliance.
All other trademarks, products, services and company names mentioned herein
belong to their respective owners.
Copyright © CO-COMM Servicios Telecomunicaciones S.L. 2015. All rights reserved.
CO-COMM Servicios Telecomunicaciones S.L. reserves the right to change or modify
any information or specifications contained in this manual without previous notice.
Page 51

Page 52

Copyright © CO-COMM
Servicios Telecomunicaciones S.L. 2016
Todos los derechos reservados
 Loading...