

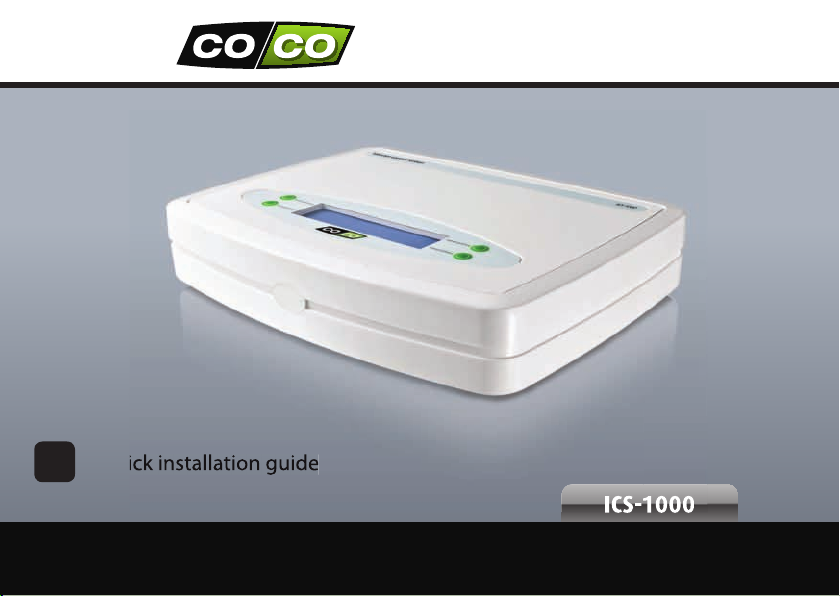
Quick installation guide
EN
Internet Control Station
ICS-1000
3
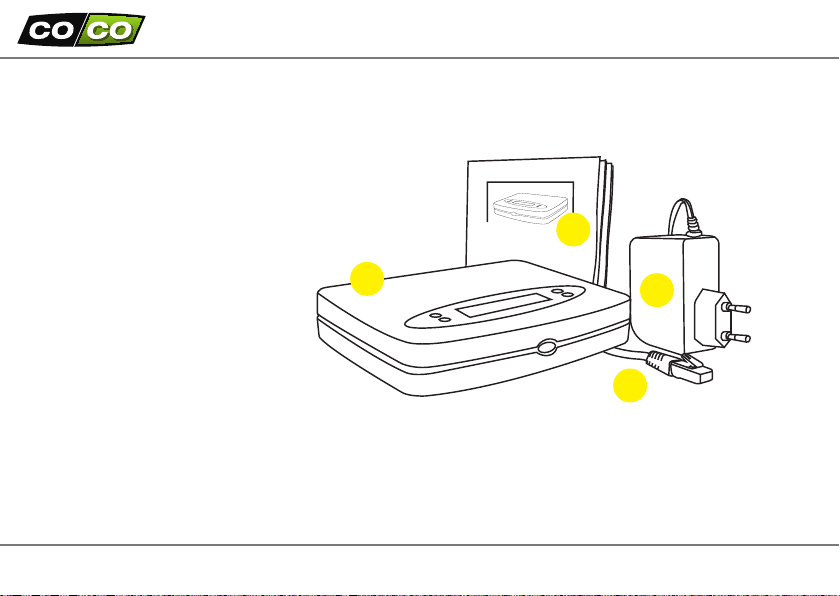
PACKAGE CONTENTS
First, please check if the package
contains the following items:
1. Internet Control Station
2. RJ-45 cable
3. Power adapter
4. Quick installation guide
NOTE: Visit www.coco-technology.com frequently to check if updates are available
Internet Control Station
1
4
3
2
2
CHECKLIST COMPLETE INSTALLATION
Before you can use the Internet Control Station,
please follow these necessary steps:
1. Connect Internet Control Station to your modem/router
2. Install the ‘COCO control’ app on your smartphone or tablet
3. Create an account on www.coco-technology.com
4. Use the ‘COCO control’ app to register your smartphone/tablet with the
Internet Control Station
5. Create at least 1 room in the ‘COCO control’ app and add a lamp or
device to this room
6. Assign the transmission code for that lamp/device to the relevant COCO
receiver
On the following pages all steps are clearly illustrated
3
5
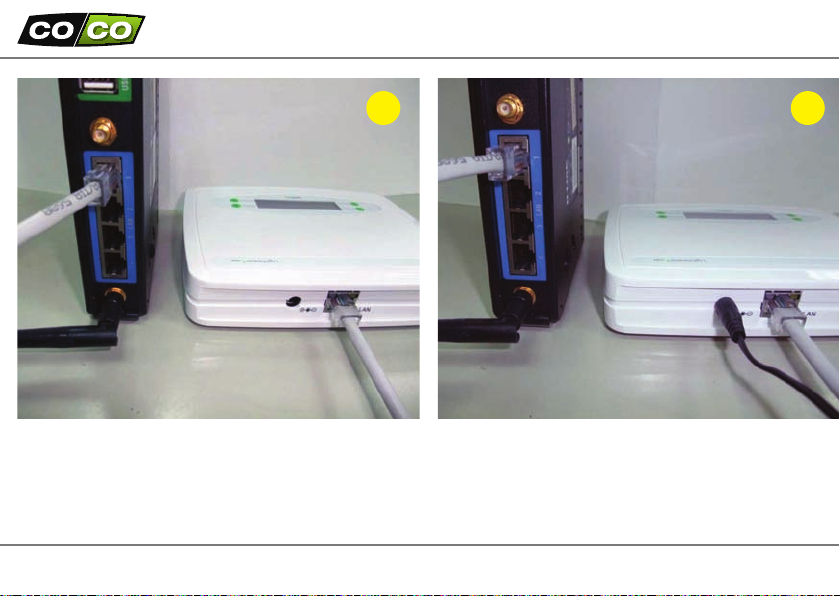
1. CONNECT THE INTERNET CONTROL STATION TO YOUR MODEM/ROUTER
1 2
1. First, connect the Internet Control Station to the modem/router using the RJ-45 cable.
2. Then, connect the power adapter to the Internet Control Station and insert the plug of the power
adapter into a wall socket. The display of the Internet Control Station will illuminate.
4
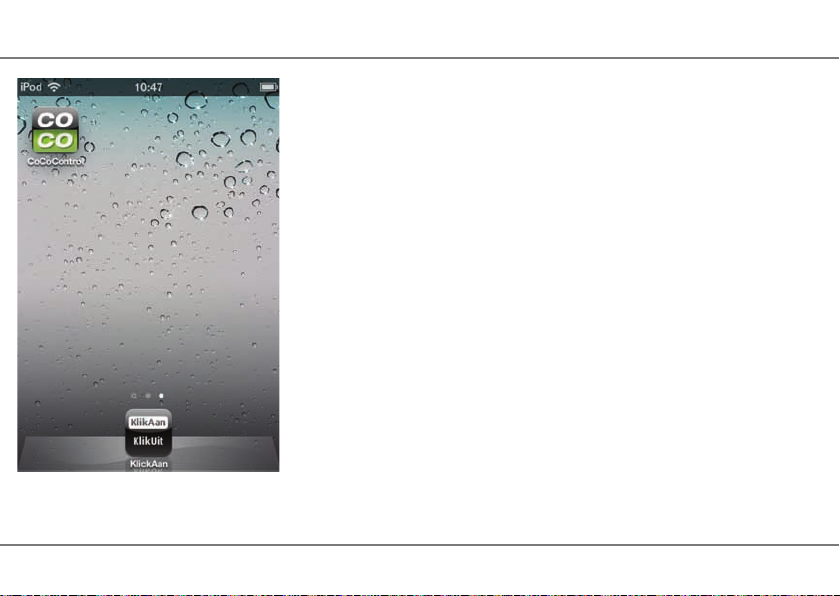
2. INSTALL THE ‘COCO CONTROL’ APP ON YOUR SMARTPHONE OR TABLET
iPhone/iPad:
In the App Store, search for “COCO control“
and download this free app.
Android:
In Google Play, search for “COCO control“
and download this free app.
5
7
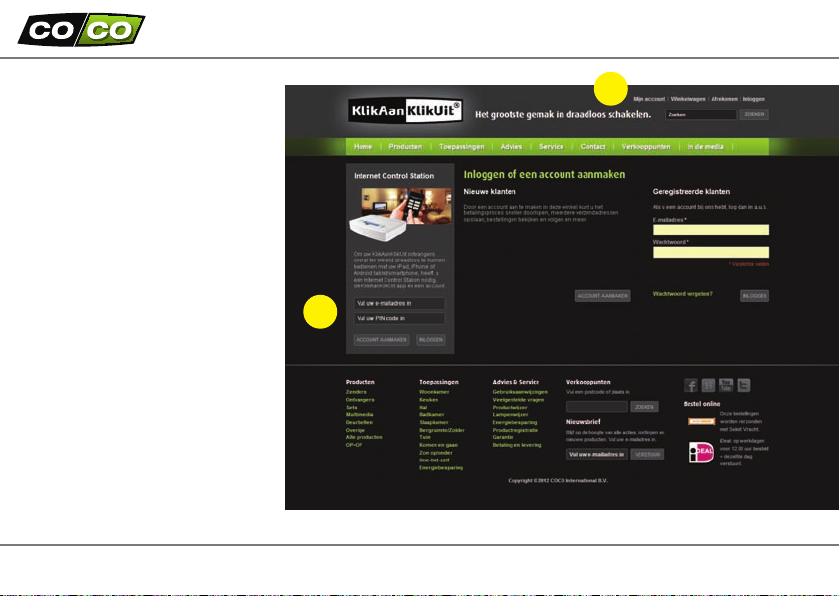
3. CREATE AN ACCOUNT
1. Go to www.coco-technology.
com and click on “My account“ at
the top of the screen.
2. On the left side, enter a correct
and valid e-mail address and a
4-digit PIN code of your choice.
Then, click on “CREATE ACCOUNT“
to create your account.
A new page will appear
automatically. On this page you
can congure various things.
If you prefer to use the ‘COCO
control’ app on your iPhone, iPad
or Android smartphone/tablet,
you don’t need to congure
anything on this page.
1
2
6
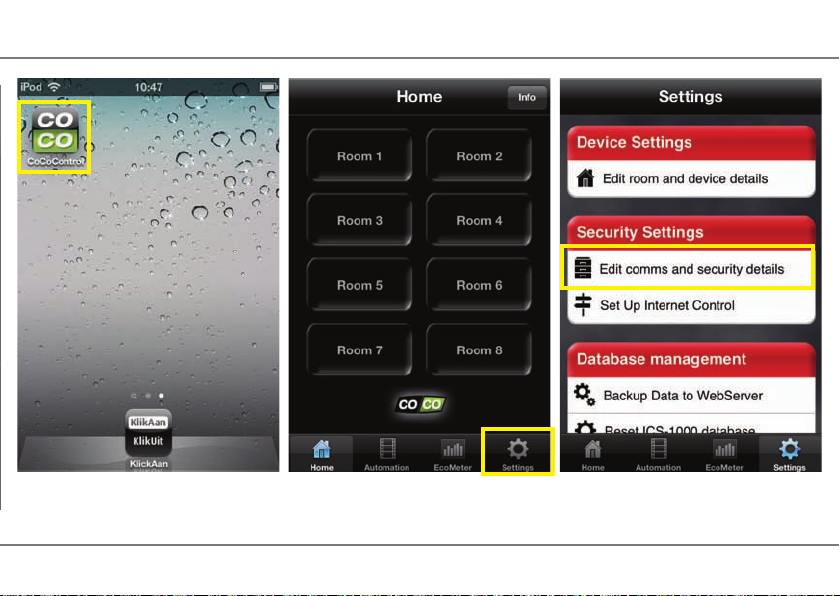
4. REGISTER YOUR SMARTPHONE/TABLET WITH THE INTERNET CONTROL STATION
Step 1: Start the ‘COCO control’ app. Step 2: Click on “Settings“. Step 3: Click on “Edit comms and
security details”
7
9
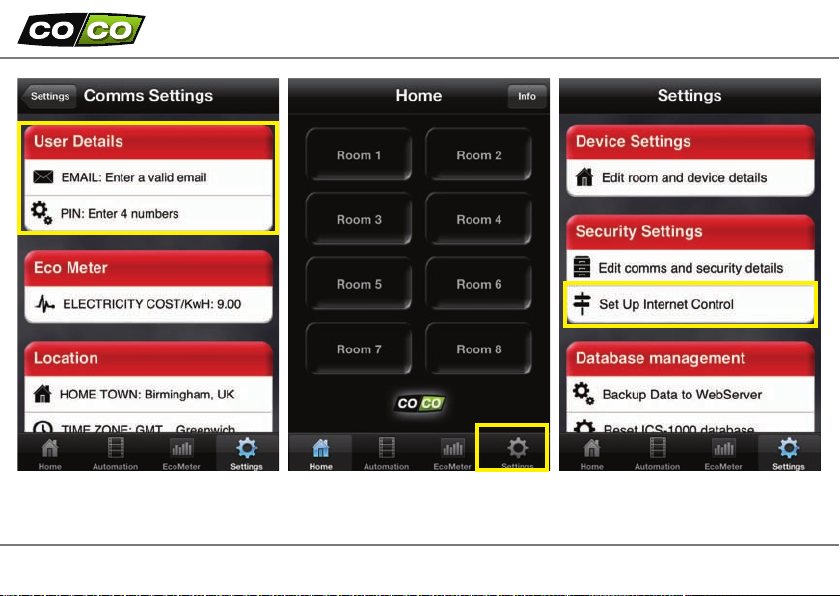
REGISTER YOUR SMARTPHONE/TABLET (continued)
the PIN code of the account
that you have created on
www.coco-technology.com
Step 5: Click on “Settings“.Step 4: Enter the e-mail address and
Step 6: Click on “Set up internet
control“.
8
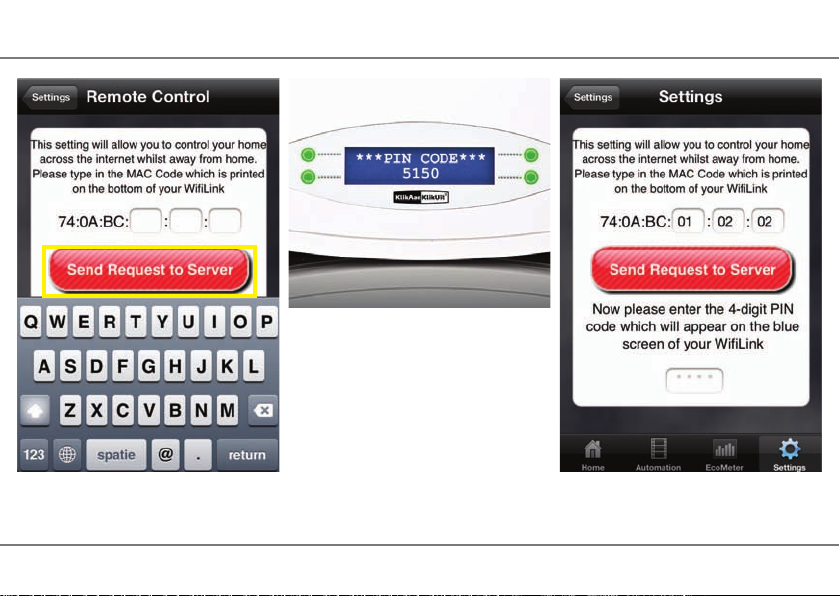
Step 7: Enter the MAC address
(located on the bottom of your
Internet Control Station) and click on
the red button.
Step 8: A new 4-digit code will
appear on the display of your
Internet Control Station.
9
Step 9: Enter this 4-digit code at the
bottom of the screen.
11
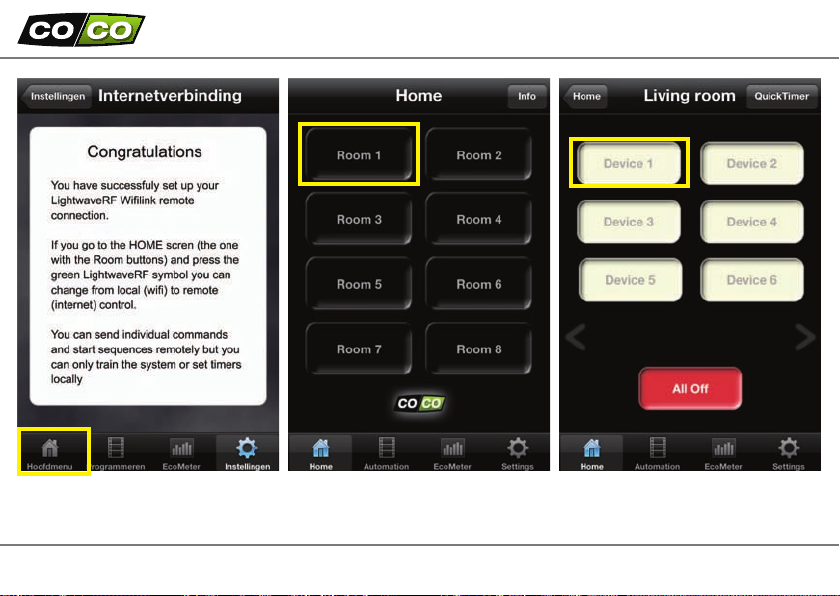
REGISTER YOUR SMARTPHONE/TABLET (continued)
this screen will appear.
Then click on “Home“.
Step 11: Click on “Room 1“.Step 10: If both codes are correct,
Step 12: Then click on a device, for
example “Device 1“.
10
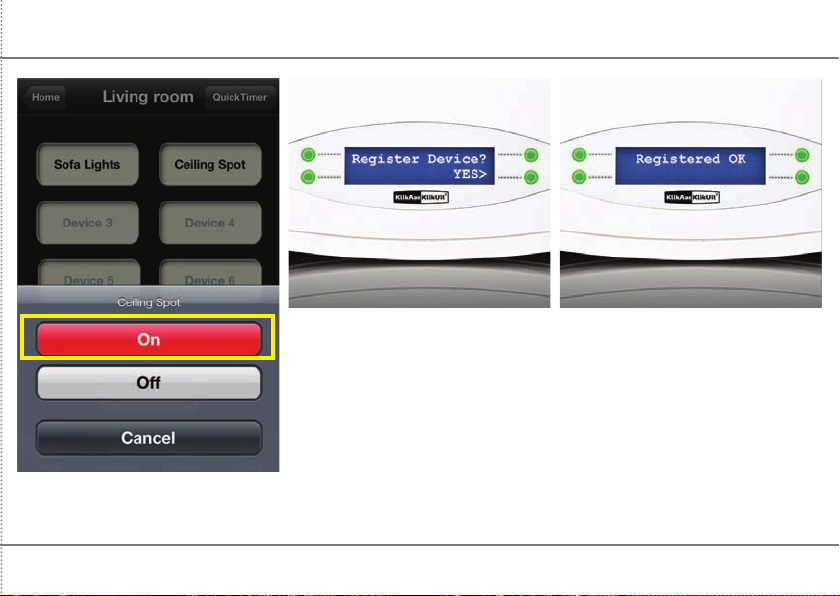
Step 13: Click on “On“. Step 14: A question will appear on
the display of your Internet Control
Station. Press the green button in the
bottom right corner.
11
Step 15: “Registered OK“ will
appear on the display of your
Internet Control Station.
13
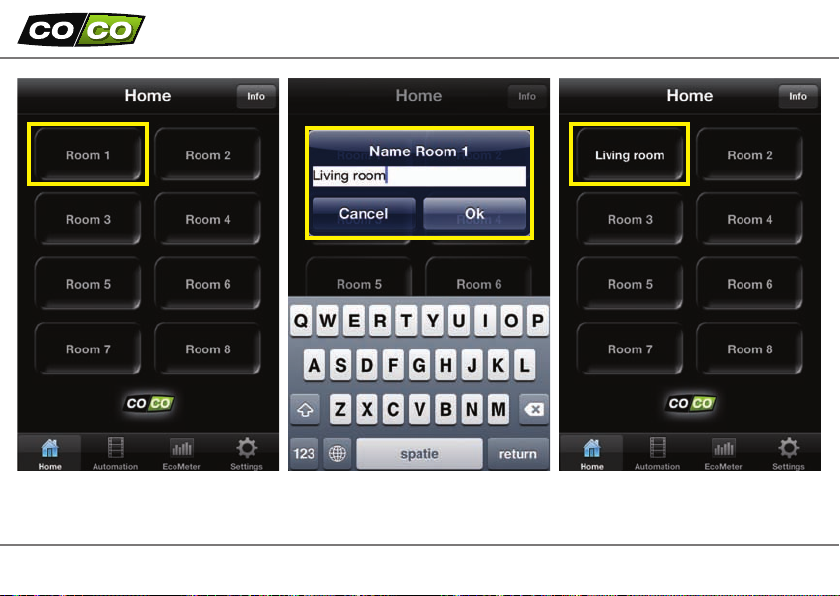
5. CREATE A ROOM AND A DEVICE
Step 1: Select “Room 1”. Step 3: Select “Living room”.
Step 2: Rename “Room 1”
(for example: “Living room“)
and click OK.
12
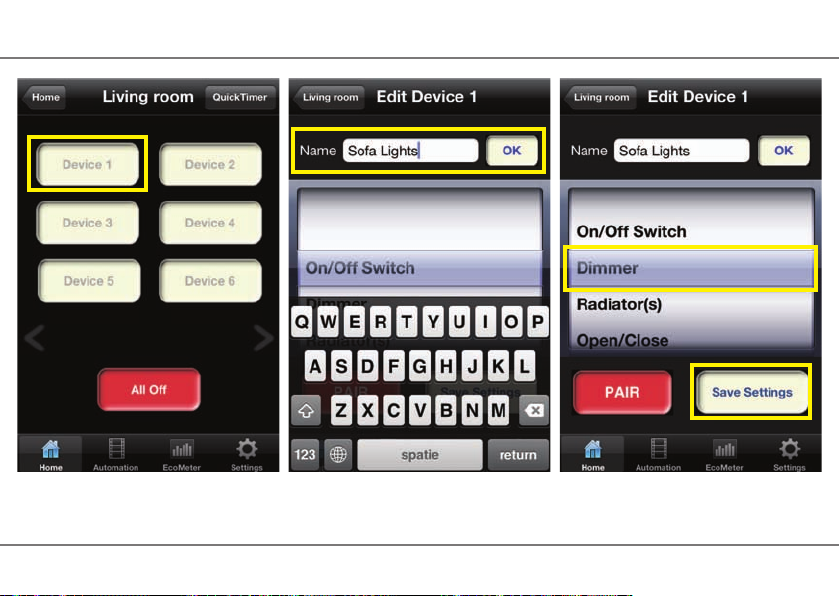
Step 4: Select “Device 1”. Step 5: Rename “Device 1”
(for example: “Sofa lights“)
and click OK.
13
Step 6: Select the correct receiver
type (for example: “Dimmer”)
and click on “Save settings“.

15
6. ASSIGN TRANSMISSION CODE TO RECEIVER
Refer to the manual of the specic
1 sec.
COCO receiver to activate the
‘learn mode’ of the receiver (in
most cases, you can press a little
button on the receiver for 1
second).
While the ‘learn mode’ of the receiver is active (the LED indicator of
the receiver will ash), press the red “PAIR“ button. The receiver
will switch on and o twice to conrm that the signal has been
received.
You need to be physically present within the range of the receiver
and the Internet Control Station, in order to assign transmission
codes.
14
Press the red “PAIR“ button, when
you have activated the learn mode of
the COCO receiver.

WIRELESS CONTROL
If you have performed all
previous steps, you can now
control a lamp or device
wirelessly with the Internet
Control Station.
Select a lamp or device in a
room that you have congured,
for example “Sofa lights“ in
“Living room”.
Depending on the receiver
type (on/o, dimmer or open/
close), a screen with matching
commands will appear. In this
example you can choose a dim
value (100%, 50%, 25% or O)
Select a lamp/device
in a room of your choice.
15
Depending on the receiver type, a
screen with matching commands will
appear.

17
WIRELESS CONTROL (continued)
If you want to set a dierent dim
value, select “More“.
If you set the receiver type to “On/o
switch“, these commands will appear.
16
For electric shades/screens,
these commands will appear.

AUTOMATION: SEQUENCES
If you click on “Automation”, this
screen will appear.
17
In the “Automation” screen
you can create sequences (and
timers).
A sequence is a collection of
up to 10 commands, that are
executed sequentially.
With just 1 touch of a button,
you can simultaneously dim 2
lamps near the sofa 25%, switch
on ceiling spots, close electric
screens, etc.
You can directly activate a
sequence. With a timer, you
can also program sequences to
activate them automatically at
any time and date.

19
AUTOMATION: SEQUENCES (continued)
First click on “Learn a new sequence“. Enter a name for the new sequence,
for example “Watch movie”.
18
Follow the instructions on the screen.
After you click on “OK”, every
command you choose will be added
to the sequence.

1. First select a room,
for example: “Living room”.
2. Then select a device,
for example: “Sofa lights“.
19
3. Select a command,
for example “dim 25%”.

21
AUTOMATION: SEQUENCES (continued)
4. Read the message. To add a second
step to the sequence, click “OK“.
5. If needed, go to “Home”
and select a (dierent) room.
20
6. In the room you have selected,
click on a device. For example:
“Ceiling spots”.

7. Select a command,
for example: “On”.
8. Repeat steps 4 to 7 to add more
steps (max. 10 steps per sequence).
Then click on “OK“.
21
9. When you have added all steps,
click on “Automation“ to return to
that screen.

23
AUTOMATION: SEQUENCES (continued)
10. Click on “Save sequence ‘Watch
movie’” to save the sequence.
Now you can activate the sequence
“Watch movie“ by clicking on it.
22
You can add up to 10 sequences
to “My Sequences”. You can
activate these sequences by
clicking on the name of the
sequence.
Each sequence is performed
as a series of steps. By default,
there is no delay between these
steps. If you want to change
the delay between steps, click
on the small blue arrow of the
sequence rst. Then click on the
small blue arrow of the step you
want to edit.
By assigning timers to
sequences, sequences can be
performed at any date and time.
Read the following pages for
further details.

AUTOMATION: TIMERS
1. In the “Automation” screen,
click on “Make a new timer“.
2. In the “Timers” screen, you can
congure all timer settings for a
sequence. Click on the rst blue arrow.
23
3. Select the sequence that you want
program, for example: “Watch movie“.

25
AUTOMATION: TIMERS (continued)
4. Then click on the second blue
arrow to set the start time.
5. Select a time and click on
“Conrm”. Besides a xed time, you
can also set a time based on “Dawn” or
“Dusk”.
24
6. Click on the third blue arrow to set
the repetition.

7. In this screen, you can choose if the
timer should be performed only once or
repeatingly. For example, choose:
“Days of the week“.
8. Select the days on which the
sequence should be performed.
Then click on “Select days”.
25
9. Depending on the rst three
settings, you can also set a start
date...

27
AUTOMATION: TIMERS (continued)
10. ...and/or end date. 11. If you do not want to set an end
date, click on “Continue until I cancel
manually“.
26
12. If all settings are correct, click on
“Save this timer“.

QUICKTIMERS
A “QuickTimer“ can be used
to automatically perform a
command for a specic lamp
or device at a specic date and
time.
For example, you can program
a QuickTimer today, to switch
on a lamp at 7 AM tomorrow
morning.
13. The new timer that you have just
created is available via “My timers“.
To delete this timer, click on the red
circle.
1. Select a room,
for example: “Living room“.
27

29
QUICKTIMERS (continued)
Learning QuickTimer
2. First click on “QuickTimer“,
then click on “Set QuickTimer now“.
3. Select the device that you want to
program.
28
4. Choose a command, for example:
“O n“.

SETTINGS
In the bottom right
corner, you can nd
the “Settings“ icon. When you
click on this icon, a screen will
appear.
Via this screen, you can:
• Quickly edit rooms and
devices
• Congure your account,
location and time zone
• Set the correct kWh-cost
(for the EcoMeter)
• Congure your internet
connection
• Download/upload/erase
the database
5. Set the date and time and click on
“Set QuickTimer“.
Click on “Edit room and device
29
details“

31
SETTINGS: ROOMS AND DEVICES
Click on the red bar to change the
name of the room or click on 1 of the
blue arrows to change the name and/
or type of the device.
This screen will appear when you
want to change the name of the
room. Enter a new name and click on
“ OK ”.
30
This screen will appear when you
want to change the name and/or type
of the device (on/o, dimmer, open/
close).

SETTINGS: COMMS AND SECURITY
1
2
Click on “Edit comms and security
details“
1
Enter your e-mail address
and/or PIN code here.
2
Edit your location and/or
time zone here.
31
Example of the screen to set your
location.

33
SETTINGS: ECOMETER
First click on “Settings”, then select
“Edit comms and security details“ and
click on “Electricity cost“.
In this screen you can enter the kWh
cost (in Euro cent) for the EcoMeter.
Then click on “OK”.
32
To monitor the current
electricity usage, click
on the “EcoMeter“ icon
(EcoMeters sold separately).

SETTINGS: SETUP INTERNET CONNECTION
Click on “Set up internet control“. Enter the MAC address that you can
nd on the bottom of your
Internet Control Station.
Then enter your PIN code.
33
If the MAC code and PIN code are
correct, this screen will appear.

35
SETTINGS: DOWNLOAD/UPLOAD BACKUP
We advise you to create an online
backup of your conguration, in
order to restore it if needed.
The following pictures explain
how to create a backup, by
uploading your database to the
web.
At any moment, you can
download this database using the
button “Download database from
Web”.
First click on “Settings”.
Then click on “Backup data to web
server“.
34
1
Enter your e-mail address.
2
Click on “Upload database to web”.
1
2

SETTINGS: RESET DATABASE
If you want to erase the database, click
on “Settings” rst, then click on “Reset
ICS-1000 database”.
In this screen, you can conrm that
you want to reset the database by
clicking on “OK”.
35

37
SETTINGS: ERASE ALL SETTINGS
WIFI/3G
To erase all settings,
go to “Home” rst, then click on the
“info“ button (top right corner).
Here, you can erase all settings by
clicking on the “Reset” button.
A conrmation option will appear
rst.
36
Go to “Home“ and click on the COCO
logo. A screen will appear in which
you can switch between
WiFi and 3G.

IMPORTANT INFORMATION (1)
WIRELESS SIGNAL
• The 433.92 MHz radio signal passes through walls, windows and doors.
• Indoor range: up to 30 m. Outdoor range: up to 70 m (optimal conditions).
• The range is dependent on local conditions, such as the presence of metals. For example, the thin
metal coating in Low-emissivity (Low-E) glass can have a negative impact on the range of radio signals.
• There may be restrictions on the use of this device outside the EU. If applicable, check whether this device
complies with local directives.
UPDATES & SUPPORT
Frequently check www.coco-technology.com for hardware and software updates.
If you prefer to be informed automatically, sign up for our newsletter.
You can enter your e-mail address at the bottom of our website (www.coco-technology.com).
37

39
IMPORTANT INFORMATION (2)
Read these simple guidelines. Not following them may be dangerous and faulty installation will invalidate any
warranty that may apply to this product.
LIFE-SUPPORT
Never use COCO products for life-support systems or
other applications in which equipment malfunctions
can have life-threatening consequences.
INTERFERENCE
All wireless devices may be subject to interference,
which could aect performance. The minimum distance
between 2 receivers should be at least 50 cm.
REPAIRING
Do not attempt to repair this product. There are no
user-serviceable parts inside.
WATER-RESISTANCE
This product is not water-resistant. Keep it dry. Moisture
will corrode the inner electronics.
CLEANING
Use a dry cloth to clean this product. Do not use harsh
chemicals, cleaning solvents, or strong detergents.
HANDLING
Do not drop, knock, or shake the device. Rough
handling can break internal circuit boards and ne
mechanics.
ENVIRONMENT
Do not expose the product to excessive heat or cold,
as it can damage or shorten the life of electronic circuit
boards and batteries.
38

WARRANTY AND COPYRIGHT
This product is in compliance with the essential requirements and other relevant provisions of Directive
1999/5/EC (R&TTE).
If possible, dispose of this product at a recycling center. Do not dispose of this product with the household waste.
Warranty
• This product has a two year warranty on components and/or construction errors from date of purchase.
• Save the purchase receipt, as this is the only valid warranty certicate.
• Avoid misuse and/or incorrect installation by reading this manual carefully.
• Save this document, it contains very important information.
• The warranty is void in case of: a short circuit, faulty connections, overloading, improper use, repairs by you or
third parties, damage caused by lightning or broken parts.
• For warranty issues, go back to the store where you have purchased this product. The defective product must
be accompanied by the original purchase receipt.
Copyright
Without prior written permission, reproducing or copying is prohibited. Information in this document is subject to
change without prior notice. Check www.coco-technology.com for updates.
39

41
DECLARATION OF CONFORMITY
COCO International BV declares that the COCO product:
model ICS-1000 INTERNET CONTROL STATION (item number 71080)
is in compliance with the essential requirements and other relevant provisions of the following directives:
EMC Directive (2004/108/EC), Low Voltage Directive (2006/95/EC), R&TTE Directive (1999/5/EC).
The product is compatible with the following norms/standards:
EN301 489-1 V1.8.1 (2008-04)
EN301 489-3 V1.4.1 (2002-08)
EN 55022: 2006+A1:2007 Class B
EN 61000-3-2: 2006+A1:2009 +A2:2009 Class A
EN 61000-3-3:2008
IEC 61000-4-2: 2008
Manufacturer/Authorised representative,
COCO International BV
M.A. Hoekstra, managing director
Dordrecht, 24 April 2012
IEC 61000-4-3: 2006 +A1:2007+A2:2010
IEC 61000-4-4: 2004+A1:2010
IEC 61000-4-5: 2005
IEC 61000-4-6: 2008
IEC 61000-4-11: 2004
EN 60950-1: 2006+A11: 2009
COCO INTERNATIONAL B.V.
P.O. BOX 434
3300AK DORDRECHT
THE NETHERLANDS
www.coco-technology.com
40

INDEX
Subject Page
PACKAGE CONTENTS
CHECKLIST COMPLETE INSTALLATION
CONNECT THE INTERNET CONTROL STATION TO YOUR MODEM/ROUTER 4
INSTALL THE ‘COCO CONTROL’ APP ON YOUR SMARTPHONE OR TABLE T 5
CREATE AN ACCOUNT 6
REGISTER YOUR SMARTPHONE/TABLET WITH THE INTERNET CONTROL STATION 7
CREATE A ROOM AND A DEVICE 12
ASSIGN TRANSMISSION CODE TO RECEIVER 14
WIRELESS CONTROL 15
AUTOMATION: SEQUENCES 17
AUTOMATION: TIMERS 23
QUICKTIMERS 27
SETTINGS: ROOMS AND DEVICES 29/30
SETTINGS: COMMS AND SECURITY 31
SETTINGS: ECOMETER 32
SETTINGS: SETUP INTERNET CONNECTION 33
SETTINGS: DOWNLOAD/UPLOAD BACKUP 34
SETTINGS: RESET DATABASE 35
SETTINGS: ERASE ALL SET TINGS 36
WIFI/3G 36
IMPORTANT INFORMATION (1) 37
IMPORTANT INFORMATION (2) 38
WARRANTY AND COPYRIGHT 39
DECLARATION OF CONFORMITY 40
41
2
3

www.coco-technology.com
 Loading...