

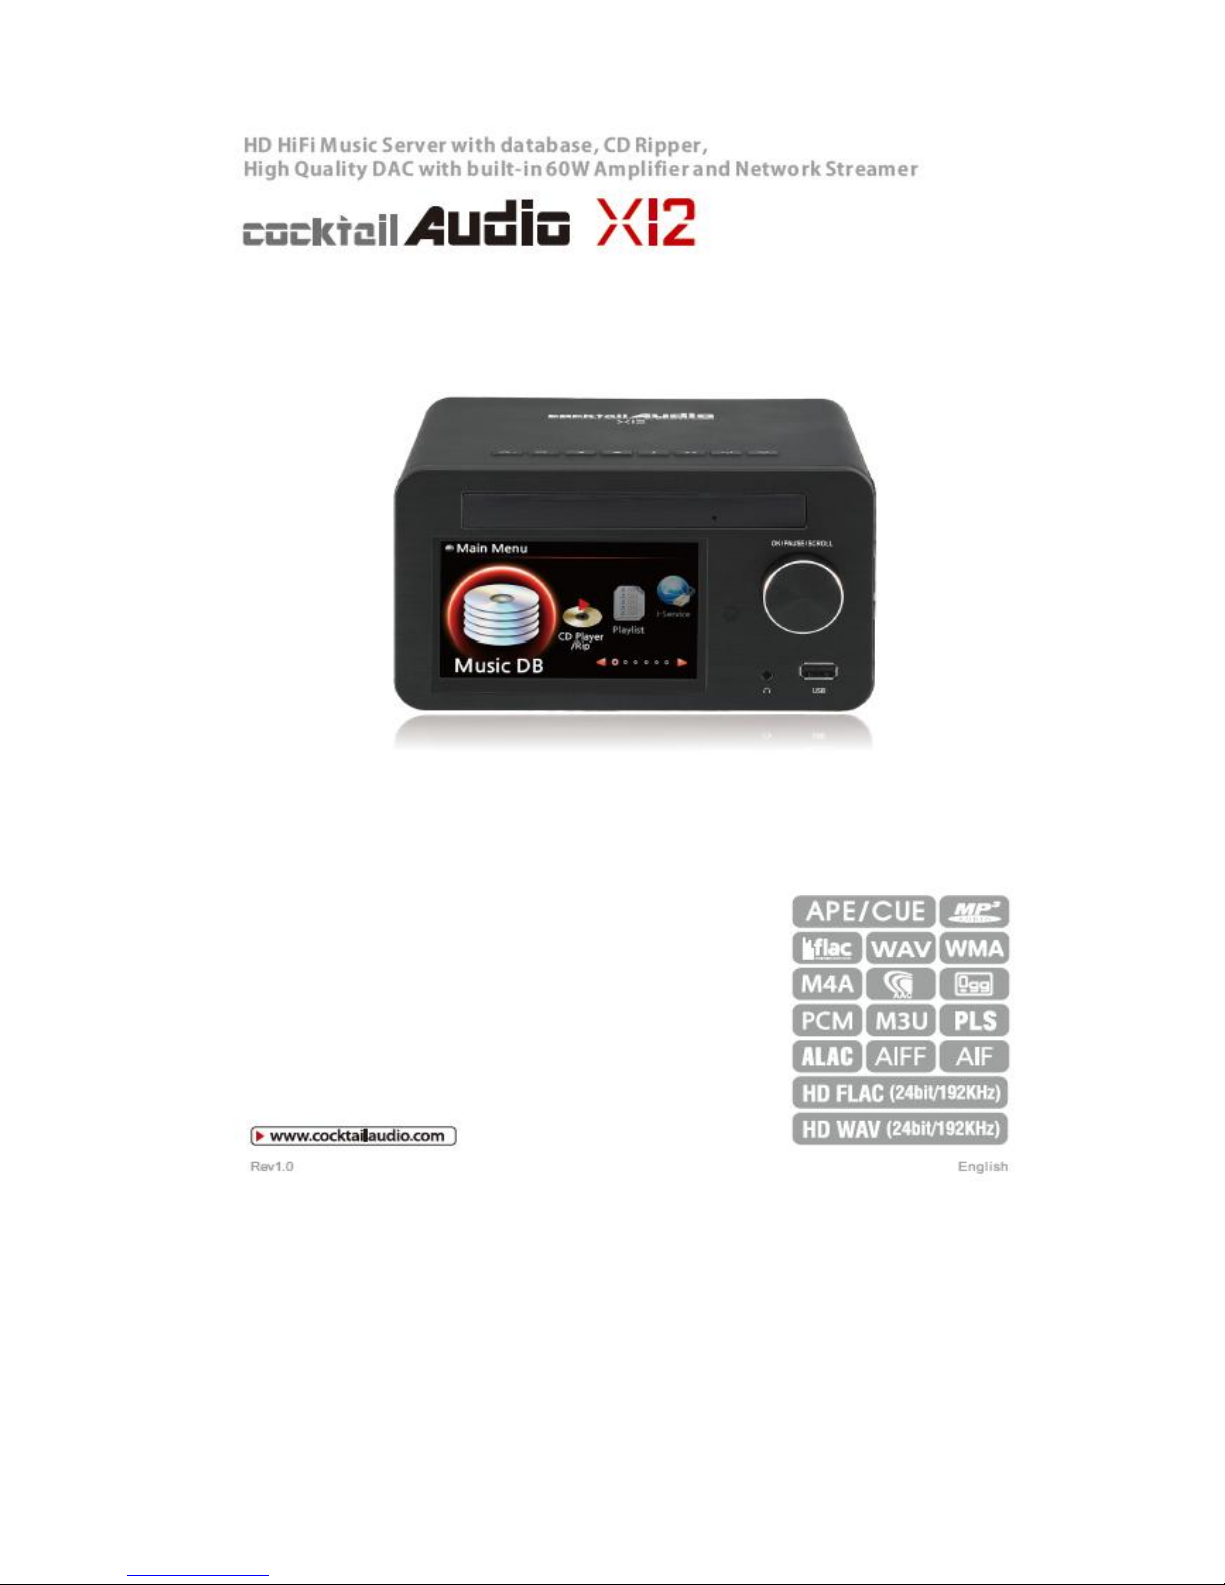
CocktailAudio X12 User Manual
1

2
Contents
Important safety instructions ……………………………………………………………………………………………………… 7
1. Product overview …………………………………………………………………………………………………………. 9
1-1. Top view ………………………..………………………………………………………………………………………. 9
1-2. Front view ………………………………………………………………………………………………………………. 9
1-3. Rear view ………………………………………………………………………………………………….……………. 10
1-4. View of remote control and key function ……………………………………………………………..11
2. Prepare ……………………………………………………………………………………………………………….…….…… 12
2-1. Check the contents of X12 package …………………………………………………………….……….. 12
2-2. Install AAA batteries into the remote controller ………………….……………………….………. 12
2-3. Optional items, WiFi USB dongle …………………......................................................................... 12
2-4. X12 purchased without storage …….………………………………………………….……..……………. 13
2-4-1. HDD installation ……………………………………………………………………………..…………… 13
2-4-2. HDD Format …………………………………………………………….………………………..…………. 13
2-5. X12 purchased with an internal storage installed …………….…..………….……………..……. 13
3. Connection ……………………………………………………………………………………………………………………. 13
3-1. Power connection ……………………………………………………………………........................................ 13
3-2. External devices connection ...……………………………………………………………..…………………. 13
4. Turn ON and Start ……………………………………………………………………..………….…..…………………. 14
4-1. Wizard Setup (Setup Assistant) …………………………………………….…….…….…...………………..14
4-2. Turn ON for normal use ……………………………………………………….….…….………..……………….14
5. SETUP …………………………………………………………………………………………….………………………………. 15
5-1. Music DB ……………………………………………………………………….…….……………………...……………15
5-1-1. Display Mode …………………………………………………….…….………………………....……….….15
5-1-2. Album View …………………………………………………………….….…………..……….…....…….…..16
5-1-3. Track Numbering ……………………………………………………………………………………………. 16
5-1-4. Storage (for Music DB) ….…………………………………………..……..……..……….……….…….16
5-1-5. Recovery ………………………………………………………………………..………………….…….....……17
5-1-5-1. How to run Music DB Recovery function ……………………..………..……...….17
5-1-5-2. Music DB Recovery run …………………………………….…..……….……..….…….….17
5-1-5-3. To create ‘Recovery MM-DD hh-mm’ folder automatically
On HDD(or USB) ………………………………………………………………………..……….18
5-1-5-4. Importing files from the ‘Recovery’ folder to the Music DB again……18
5-1-6. Recovery Result ………..…………………………………………………..………………….…….....……18

3
5-1-7. Backup ……………………………………………………………………………..…..….…………..…………19
5-1-8. Restore …………………………………………………………………………..………………….…..………..19
5-2. CD Ripping ……………………………………………………………………………………….……………………. 19
5-2-1. Bit Rate and Quality ………………………………………………………….………………………….. 20
5-2-2. Audio Rip Format (CD Rip Format) ……………………..…………..…………….…………….. 20
5-2-3. FreeDB TextCode ………………………………………………………………………………………….. 21
5-2-4. FreeDB Install ……………………………………………………………………………………………….. 21
5-2-5. FreeDB Update ……………………………………………………………………………………………... 21
5-3. Audio ……………………………………………………………………………………….………………………………21
5-3-1. Player View………………………………………………………………………………..……………………..22
5-3-2. Equalizer (Preset EQ) ………………………………………………………………….…………………..22
5-3-3. DRC (Dynamic Range Compression) Mode ………………….………………..……………. 23
5-3-4. Digital Out ...............................................................…………………….……………..…….…………23
5-3-5. Speaker Out ……………………..……………………………………………….……….……….…………..23
5-3-6. Analog Out …………………..……………………………………………….………………………………. 23
5-3-7. Gapless Play ……………………………………………………………….……………….….………………24
5-3-8. Slide Show Effect ………………………………………………………………………………………….. 24
5-3-9. Slide Show Time ……………………………………………………….….….……………………………. 24
5-4. Network ……………………………………………………………………….……….………….….….………………. 24
5-4-1. Wired Setup …………………………………………………….………….……………..….……………….. 25
5-4-1-1. DHCP (Auto IP) ………………………………………………………………………………….. 25
5-4-1-2. Static IP ……………………………………………….……….………………………………..…… 25
5-4-2. Wireless Setup …………………………………………………..….………………….………………………25
5-4-2-1. Scan AP List (Open SSID) …………………….……………………………………………. 25
5-4-2-2. Set AP Manually (Hidden SSID) ………..………………………………………………. 26
5-4-3. Network Info …………………………………………………….….………………………………………….26
5-4-4. Wireless Info …………………………………………………….…….………………………………………..27
5-5. Network Service …………………………………………………….…..……….……………………………………27
5-5-1. Samba Server …………………………………………….………….……………….……………………….27
5-5-2. Network Sharing (Samba Client) ……………….………….……………….……………………….28
5-5-3. Web Server ………………………………………………….……………………….……..………………….29
5-5-3-1. How to enable Web Server ………………….……………….….….………………………30
5-5-3-2. How to start WebInterface …………………………………..………………………..…….30
5-5-4. UPnP Server ……………………………………………………..……….……..………………………..…….32
5-5-5. FTP Server …………………………………………………………….……….….…………………….………32
5-6. Internet Service ……………………………………………………….………….….…………………..……..…….32
5-6-1. Simfy ………………………………………………….…………………….………..……………………..…….32
5-6-2. Qobuz ……..….…………………………………………………..………..……..………………………..…….33

4
5-7. System ……………………………………………………………………………….…….………………..…………… 33
5-7-1. OSD Language ………………………………………….………………..….……………….…..………… 33
5-7-2. Auto Play ………………………………………………………………….…………………………..……..... 33
5-7-3. Resume Play ……………………………………………………………..…..…………...…………..….….. 34
5-7-4. Factory Reset ……………………………..……………………………..……...……..….……………..….. 34
5-7-5. HDD Sleep ………………………………………………………………..…………..………………………. 34
5-7-6. Format Storage ……………………………………………………..…….……..…………………………..34
5-7-6-1. Brand new HDD (not partitioned HDD) ………………...…………………..……….35
5-7-6-2. Used HDD (Partitioned HDD) …………………………………..……..…..……..……….35
5-7-7. File System Fix ……………………………………………………………….…….……………….….…36
5-7-8. Brightness ……..……………………………………………………………….….....….………….….…….. 36
5-7-9. Alarm …………………………………………………………………………….…….………………………… 36
5-7-10. Auto Shutdown ………………………………………………………..……..….………………………...37
5-7-11. Scroll Speed …………………………………………………………….…..……..……………………….. 38
5-7-12. List Line Count ……………………………………………………….…….…..…………………………. 38
5-8. Time …………………………………………………………….………………………..…..….…..…….………………. 38
5-8-1. Time Format ……………….………………………………………….…………….…..……....……………. 39
5-8-2. Time Set (Internet) …………………………………………………………….…...………….………….. 39
5-8-3. Time Set (Manually) ….………………………………………………..….…..…..…..….....………….. 39
5-9. Firmware ……………………………………………………………………………..……….....……….……………….39
5-9-1. Current Firmware ………………………………………………………….……...….…….….…....……….40
5-9-2. Update manually (Firmware update manually) …………..………..……...……...…..……..40
5-9-3. Update automatically (Automatic Firmware Update by network) ….…..…………..40
5-9-4. What is Automatic Firmware Update by network ? …………………..……….…….…….41
5-9-5. Check now for new firmware …………………………………………………………………………. 41
6. CD Database(Music DB) …………………………………………………..………….……………..……………….… 41
6-1. What is CD Database(Music DB) of X12 ? ……………..………….……..…..…….……………….….. 41
6-2. What is FreeDB ? …………………………………………………………………..…….…..…..…….………………42
7. CD Loading (Ripping) ………………………………………………………………………...………..…….………….. 42
7-1. When the X12 is connected to network (Internet)…………….………….….……….……………. 42
7-1-1. Ripping All ……………………………………………………………………………….…….…...…………… 43
7-1-2. Ripping Track ………………………………………………………………………….….…...………………. 44
7-2. In the case that X12 is NOT connected to network (Internet) ……..…..….…….….…..…… 45
7-2-1. Ripping All ………………………………………………………………………………………….….…..…….. 45
7-2-2. Ripping Track ………………………………………………………………………….….……….….…...…… 46
7-3. If the FreeDB is installed onto the hard disk of the X12………………………………..……..….. 46
7-4. To check the status of CD ripping and converting………………….……….…..…..……...…..….. 47

5
8. How to use the Music DB(database)…………………………………………………..……..…..………..…… 47
8-1. Play music loaded (ripped) onto the X12.…………………………..………..………..…..…….….….. 47
8-2. SEARCH function ………………………………………………………………………..……….…...….…….…….. 49
8-3. How to manage Music DB ……………………………………………………..…………………….….……… 50
8-3-1. Deleting or renaming music in the Music DB…………………..…..…..……..……………. 50
8-3-2. How to export music from the Music DB to other storage devices……….....……51
8-3-3. History function ………………………………….…………………………………………..………………52
8-3-4. Set ‘Playing Section’ to play it repeatedly ……………………………………………………. 52
9. Editing the TAG information of the music in the Music DB…………..…....….………...…….. 53
10. Audio CD direct play ………………………………………….……………….……………..…….…….…..….…….. 53
10-1. If the X12 is connected to a network (Internet)………………….………….…………..….….…. 53
10-2. If the X12 is NOT connected to network (Internet) ……………………….………......……..… 54
10-3. In case that you have installed the FreeDB data onto the
hard disk of the X12 …………………………………………………………………………………..…..…...…...……. 54
11. Data CD direct play ………………………………………………………………….……………….………….…...…. 54
12. Playlist ………………………………………………………….…………………….………………....……....…..……….. 55
12-1. Playlist …………………………………………………………….…………………………….…………….……….…55
12-1-1. How to make a Playlist ……………………………………………………….………..………………55
12-1-2. How to add songs to a Playlist whilst playing music …………….….……………..….57
12-1-3. How to play a Playlist …………………………………………………………………..……………….57
12-1-4. How to edit a Playlist ……………………………………………………………….….………..…..….58
12-2. My Playlist (Virtual Playlist)………………………………………………………….…….……………..…… 58
12-3. Advanced My Playlist (Virtual Playlist) ………………….….…………....….……….……………..…. 59
13. The Music Streaming function ………….………………………….……………...…..…………..…..………... 59
13-1. UPnP Server/Client and Samba Server/Client function …………..………......……………… 59
13-2. Multiple X12’s on the same network ……………………………………....….……......…….……… 60
13-3. The X12 works as a Music Server with Sonos……………… …………..………..……….……… 60
13-4. Shareplay function ………………………………………………………………………………….……………. 61
14. I – Service …………………………..…………………………………………..…………………………...…..….....……... 61
14-1. Internet Radio …………………………….………………………………………..……….…..….…………….… 61
14-1-1. How to play the Internet radio………………………………………..…….….…..…………… 61
14-1-2. How to add your favorite stations into My Favorites ……….....………..…………. 62
14-1-3. How to play My Favorites ………………………………………………………….…..……..….. 62
14-1-4. How to run a search function on the Internet Radio ……………..……..…….…... 63
14-1-5. Recording from the Internet Radio ………………………………….……...……..………… 63
14-1-5-1. How to record ……………………………………………………….……………….……… 63

6
14-1-5-2. Where is the recorded file stored?............................................................... 63
14-1-5-3. The recorded file name structure………………………….…..….…….…….….. 64
14-1-5-4. How to edit the recorded file …………………………………...……...…….……. 64
14-1-6. Reservation Recording …………………………………………………………..….…….………… 65
14-1-6-1. How to set reservation recording ………………………….….…….…….……… 65
14-1-6-2. How does the reservation recording start …………….……..………………. 65
14-2. Online Music Service (Simfy) …………..…………..….……………………..……..…...……..……….… 66
14-3. Online Music Service (Qobuz) ………………………………………………………….…………………. 66
15. USB host port for USB devices …………………………………………...…………………….………............. 67
16. Browser …………………………………………………………………………………………..………………………….……67
16-1. Play audio file data CDs..………………………………………………..…………..…………..…………......67
16-2. File Management ……………………………………………………………………………..……..…………... 68
16-2-1. Accessing information on the HDD, USB, folder or file ………………..…………. 68
16-2-2. TAG Edit …………………………………………………………………………………………..………… 69
16-2-3. Import to DB ……………………………………………………………………….….…..……..……… 69
16-2-4. Copy Files ………………………………………………………………………….…………...……..…… 70
16-2-5. Move Files ………………………………………………………………………….….………….……….. 70
16-2-6. Delete Files ……………………………………………………………………….……..…..…….……… 70
16-2-7. PLS or M3U files with Internet Radio stations ………………………...…….…….……. 71
16-2-8. Audio file format conversion ……………………………………………..…….……..………… 71
16-2-9. Cut the recorded file (Cut ‘Playing Section’) ……………………..…...…………………. 71
17. Input ………………………………………………………………………………………………..…………..……………...……72
17-1. How to play an external device via Analog Input ………………….……………….………........72
17-2. How to record ……………………………………………………………………………….….……………….……73
17-3. Where is the recorded file stored? ………………………………………………….…….……………… 73
17-4. How to edit the recorded file ………………………………………………………….……..………..…… 74
17-5. How to rip (convert) the edited file into other formats (MP3, FLAC or Ogg)
And load onto the Music DB …………………………………………………………………….………….. 74
18. Extra function ………………………………………………………………………………………………….…...………… 75
18-1. Photo Slide Show …………………………………………………………………………………….…….……... 75
18-2. Listing by Text or Album cover art ……………………………………………………....……….…..…...76
18-3. Bookmark …………………………………………………………………………………………….…………...……. 76
18-4. Preset EQ (Equalizer) ……………………………….…………………………………………….……….…..…. 76
18-5. Resume Play ………………………………………………………………………………………….……….…….... 77
18-6. CLOCK and Display(LCD) OFF………………………………………….………….…………..….………….. 77
18-7. Changing the play mode ……………………………………………………….……....…..….…..….….…... 77
18-8. Alarm set ………………………………………………………………………………………..………..…….….……. 78
18-9. Auto Shutdown …………………………………………………………………………………………….………… 79

7
18-10. Sleep mode ………………………………………………………………………..…………..………..….……. 79
18-11. Auto Play ……………………………………………………………………………..……..….…………..….….. 79
18-12. Shortcut to find file in all list modes ………………………………………………….……………. 80
18-13. Seek function on the Playing Screen…………… ………………………………………………….. 80
19. Specification ……………………………………………………………………….………..………...………………….... 81
20. Troubleshooting …………………………………………………………….………………………..……………….….. 82
Important safety instructions
For your own safety, please read the following important safety instructions carefully before
attempting to connect this unit to the main power supply. They will enable you to get the best
performance from the unit.
1.Read the instructions.
2.Keep the instructions.
3.Heed all warnings.
4.Follow all instructions.
5.Do not use this product near water.
6.Clean only with dry cloth.
7.Do not block any ventilation openings. Install in accordance with the manufacturer’s instructions.
8.Do not remove the casing of this product.
9.Only use this product indoors. Do not expose the product to water, rain or high humidity.
10.Keep this product away from direct sunlight, naked flames or heat.
11.Do not install near any heat sources such as radiators, heat registers, stoves, or other electrical
equipment(including amplifiers) that produce much heat.
12.Do not place any other electrical equipment on the product.
13.Do not place any sources of danger on the product(e.g. objects containing liquid, burning
candles)
14.This product includes batteries. Please refer to safety and disposal instructions for batteries in
this user manual.
15.Unplug this product during lightning storms or when unused for long time.
16.Refer all servicing to qualified service personnel. Servicing is required when the product has
been damaged, such as the power supply cord, damaged plug, liquid spillage, objects dropped on

8
the unit, exposure to rain or moisture, does not operate properly, or has been dropped.
WARNING
- Using headphones at a high volume can impair your hearing. This product can produce
sounds in decibel ranges that may cause hearing loss for a normal person, even for
exposure less than a minute. The higher decibel ranges are offered for those that may be
experiencing some hearing loss. Over time your hearing ‘comfort level’ adapts to higher
volumes of sound, so after prolonged listening, what sounds ‘normal’ can actually be loud
and harmful to your hearing. To guard against this, set your volume to a safe level.
- Loudspeakers: Before making any connections to loudspeakers, make sure all power is
turned off and only use suitable interconnects.
- Only use attachments/accessories specified and supplied by the manufacturer.
FCC regulations
NOTE: THE MANUFACTURER IS NOT RESPONSIBLE FOR ANY RADIO OR TV INTERFERENCE
CAUSED BY UNAUTHORIZED MODIFICATIONS TO THIS EQUIPMENT. SUCH MODIFICATIONS
COULD VOID THE USER AUTHORITY TO OPERATE THE EQUIPMENT.
This equipment has been tested and found to comply with the limits for a Class B
digital device, pursuant to Part 15 of the FCC Rules. These limits are designed to provide
reasonable protection against harmful interference in a residential installation. This equipment
generates, uses and can radiate radio frequency energy. If not installed and used in accordance
with the instructions, may cause harmful interference to radio communications. However, there is
no guarantee that interference will not occur in a particular installation. If this equipment does
cause harmful interference to radio or television reception, which can be determined by turning
the equipment off and on, the user is encouraged to try to correct the interference by one or
more of the following measures.
- Re-orient or relocate the receiving antenna.
- Increase the separation between the equipment and receiver.
- Connect the equipment into an outlet on a circuit different from that to which the
receiver is connected.
- Consult the dealer or an experienced radio/TV technician for help.
9
1. Product overview
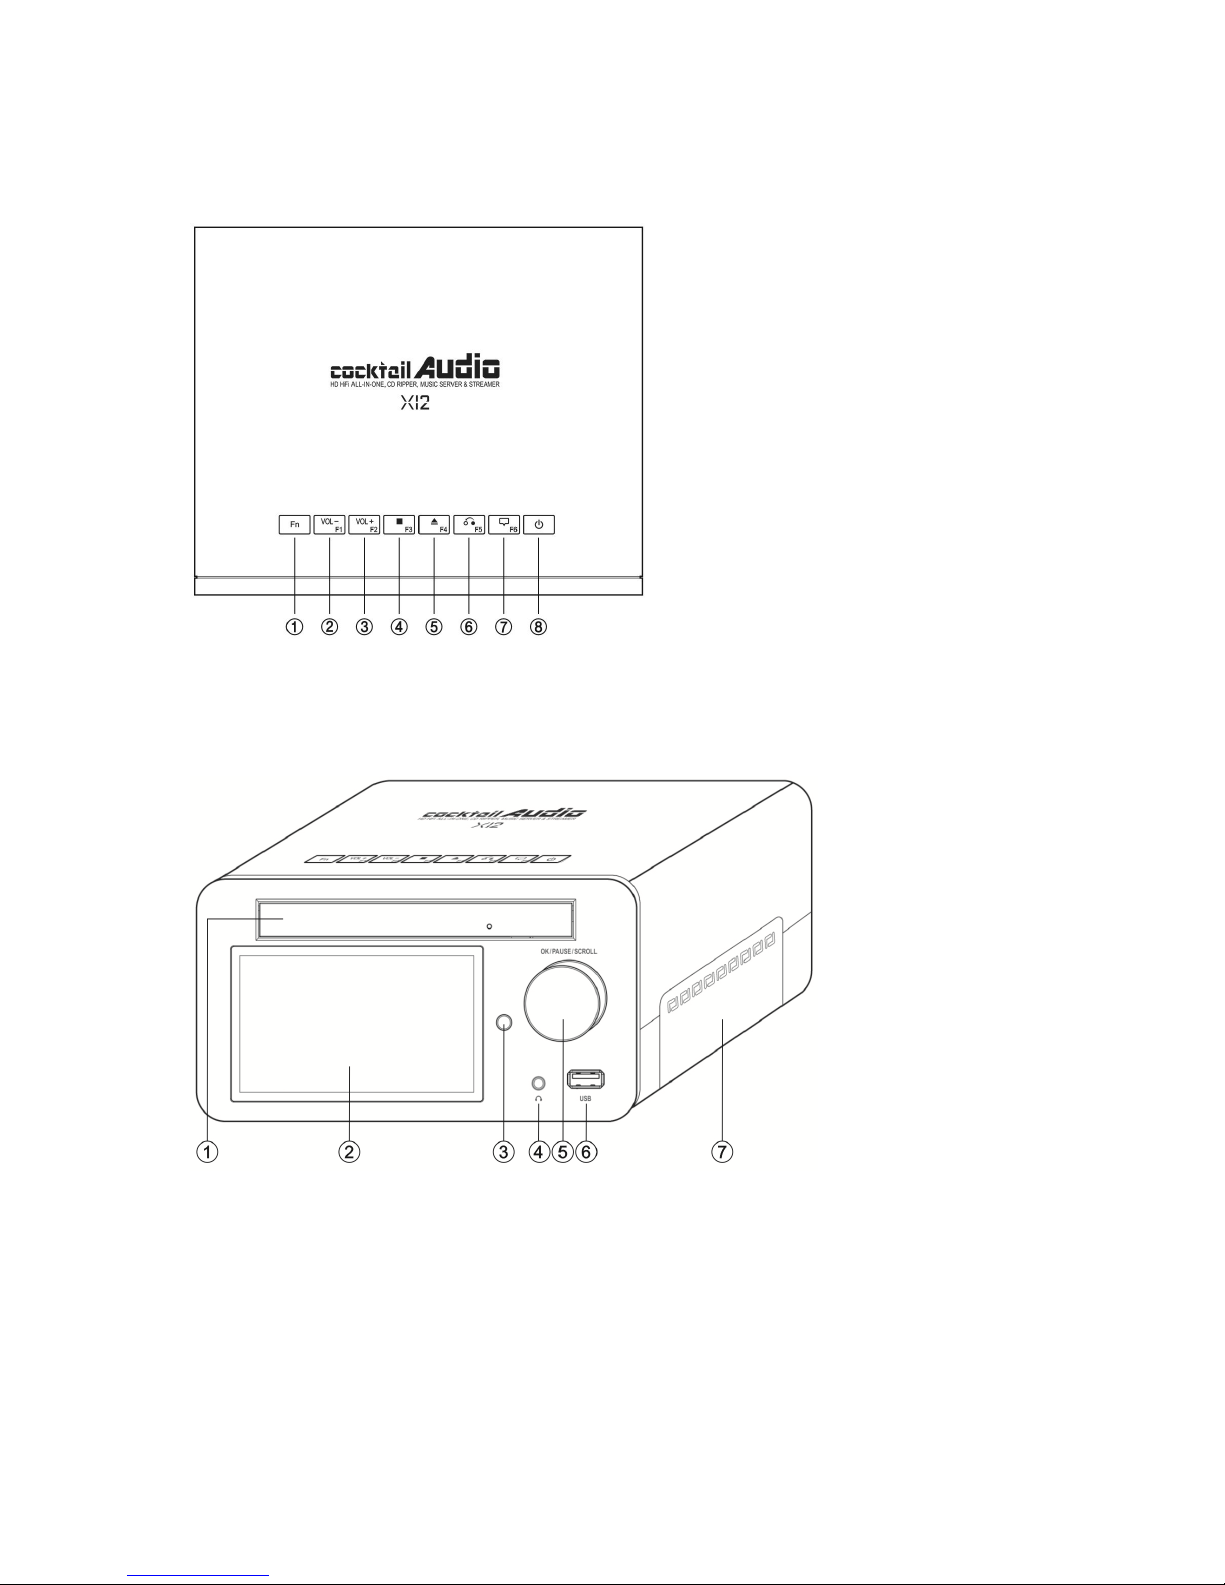
1-1. Top View
1-2. Front View
① Fn : Function key to combine with F1
~F6 keys.
② Volume Down
③ Volume Up
④ Stop
⑤ CD eject
⑥ Return: Go back to upper level
⑦ Menu: Show up menu
⑧ Power : Power ON/OFF
① ODD Drive
② 4.3inch LCD screen
③ Remote control receiver
④ Headphone Out
⑤ Control knob for OK, Pause, Scroll
⑥ USB host port
⑦ Storage door
※ NOTE: Fn (Function) key will be
defined later. You may get its
information from manufacturer’s website
10
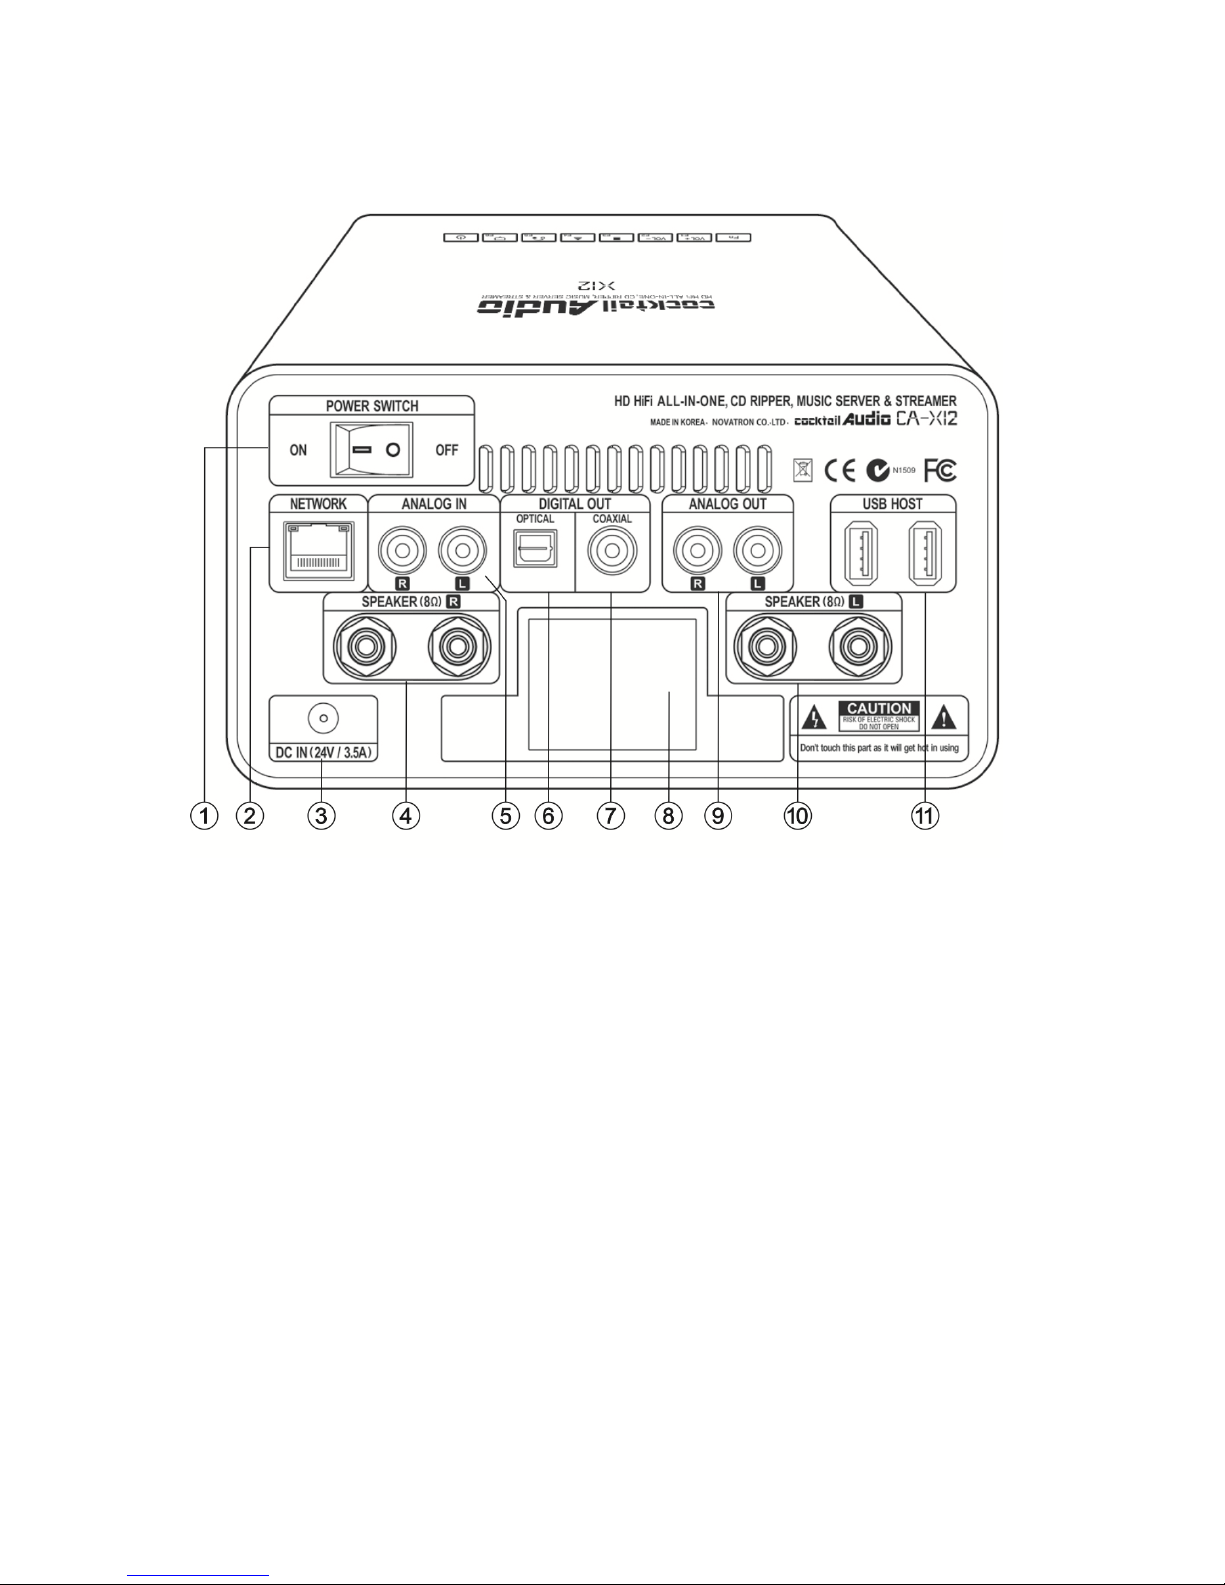
1-3. Rear View
① Power Switch
② Ethernet LAN
③ AC Adaptor (24V/3.5A)
④ Loudspeaker connector (8Ω ,Right)
⑤ Analog In
⑥ Digital Out (Optical)
⑦ Digital Out (COAXIAL)
⑧ Passive cooling system (Heat sink)
⑨ Analog Out (Variable)
⑩ Loudspeaker connector (8Ω, Left)
⑪ USB host port
11
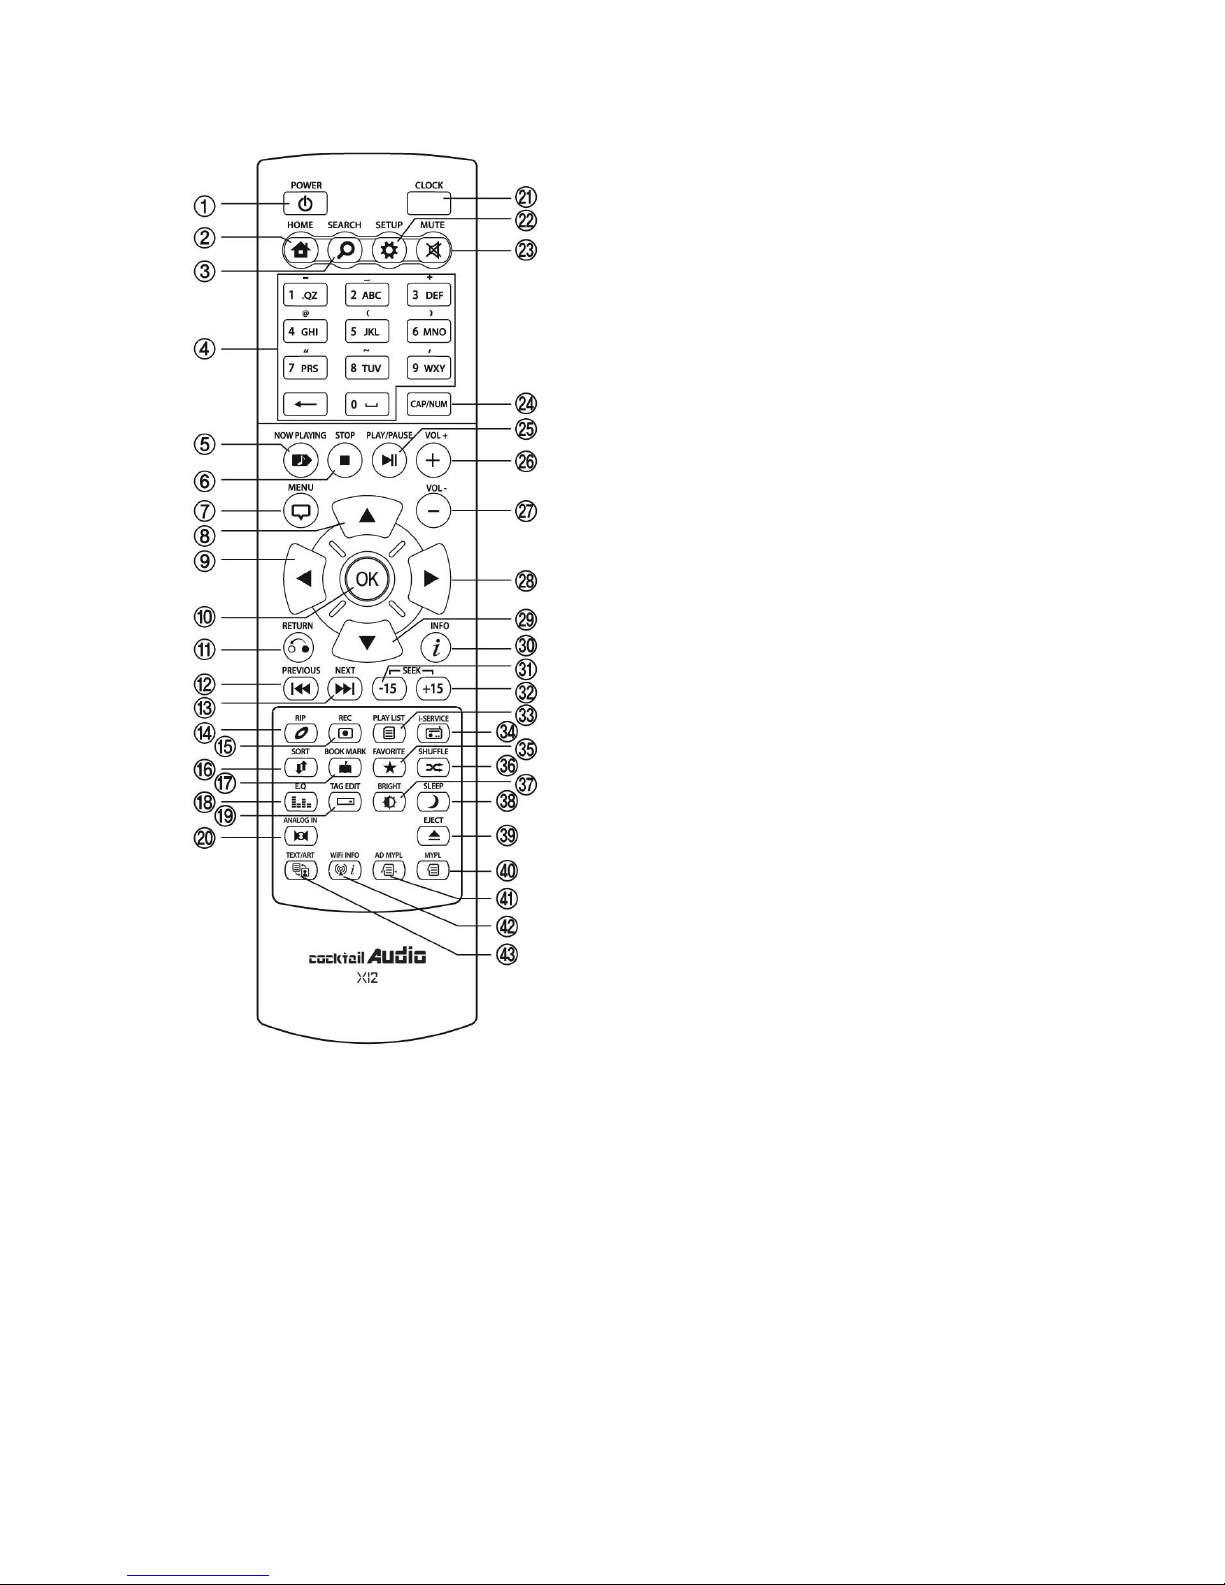
1-4. View of Remote Controller and each key’s function
1. POWER: Power ON/OFF
2. HOME: Go to home screen
3. SEARCH: Pop up search menu
4. Alphanumeric: Enter number &
alphabet/Seek at Playing Screen mode
5. NOW PLAYING: Go to Playing Screen
6. STOP: Stop playing
7. MENU: Popup menu
8. ARROW: Move cursor to upper side
9. ARROW: Move cursor to left side
10. OK: Confirmation
11. RETURN: Go back to upper level
12. PREVIOUS: Play previous music
13. NEXT: Play next music
14. RIP: Pop up ripping menu
15. REC: Pop up recording menu
16. SORT: Sort file list
17. BOOK MARK: Make bookmark
18. E.Q.: Pop up equalizer menu
19. TAG EDIT: Edit song file TAG info
20. Analog IN: Select external source
21. CLOCK: Digital clock display
22. SETUP: Go to setup
23. MUTE: Mute/unmute sound
24. CAP/NUM: Toggle numeric, alphabet and
symbol key
25. PLAY/PAUSE: Toggle Play and Pause
26. VOL+: Volume up
27. VOL-: Volume down
28. ARROW: Move cursor to right side
29. ARROW: Move cursor to down side
30. INFO: Get more detailed information of
current music
31. SEEK/-15: Seek backward by 15 seconds.
32. SEEK/+15: Seek forward by 15 seconds.
33. PLAYLIST: Go to playlist screen
34. i-SERVICE: Go to i-SERVICE screen
35. FAVORITE: Go to favorite list of
i-radio
36. SHUFFLE: Change play mode.
37. BRIGHT: Screen brightness adjustment
38. SLEEP: Go to sleep mode
39. EJECT: Eject CD
40. MYPL: Make My Playlist
41. AD MYPL: Make Advanced My Playlist
42. WiFi INFO: Check WLAN signal level
43. TEXT ART: Switch text or art mode
12
2. Prepare
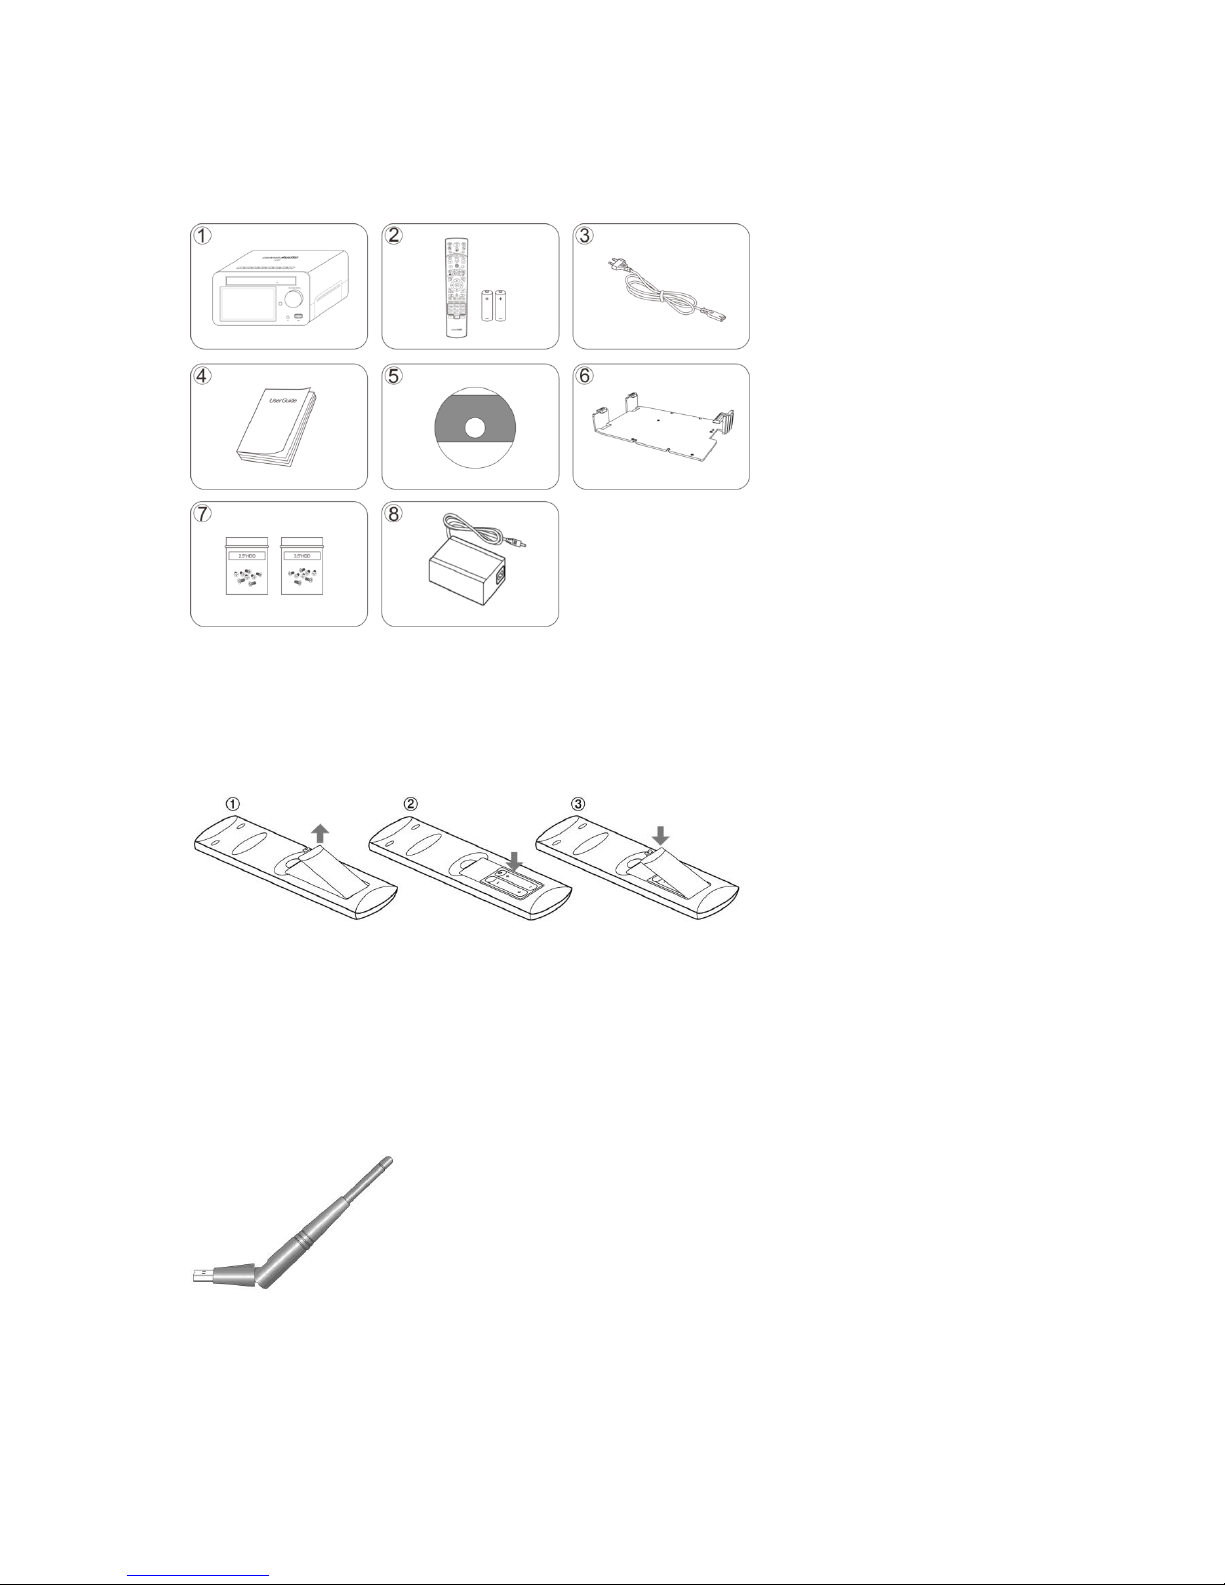
2-1. Check the contents of X12 package
2-2. Install AAA batteries into the remote control.
2-3. Optional items, WiFi USB dongle
If you purchased optional items, the WiFi USB dongle, it looks like below.
801.11b/g/n WiFi USB dongle
① X12 unit,
② Remote control + AAA
Battery x 2EA
③ Power cord
④ Manual
⑤ FreeDB data CD
⑥ HDD Adapter for 2.5inch
hard disk or SSD installation
⑦ Screw for HDD installation
with HDD Adapter
⑧ AC/DC Adapter
Open the battery door and
insert the batteries.
13
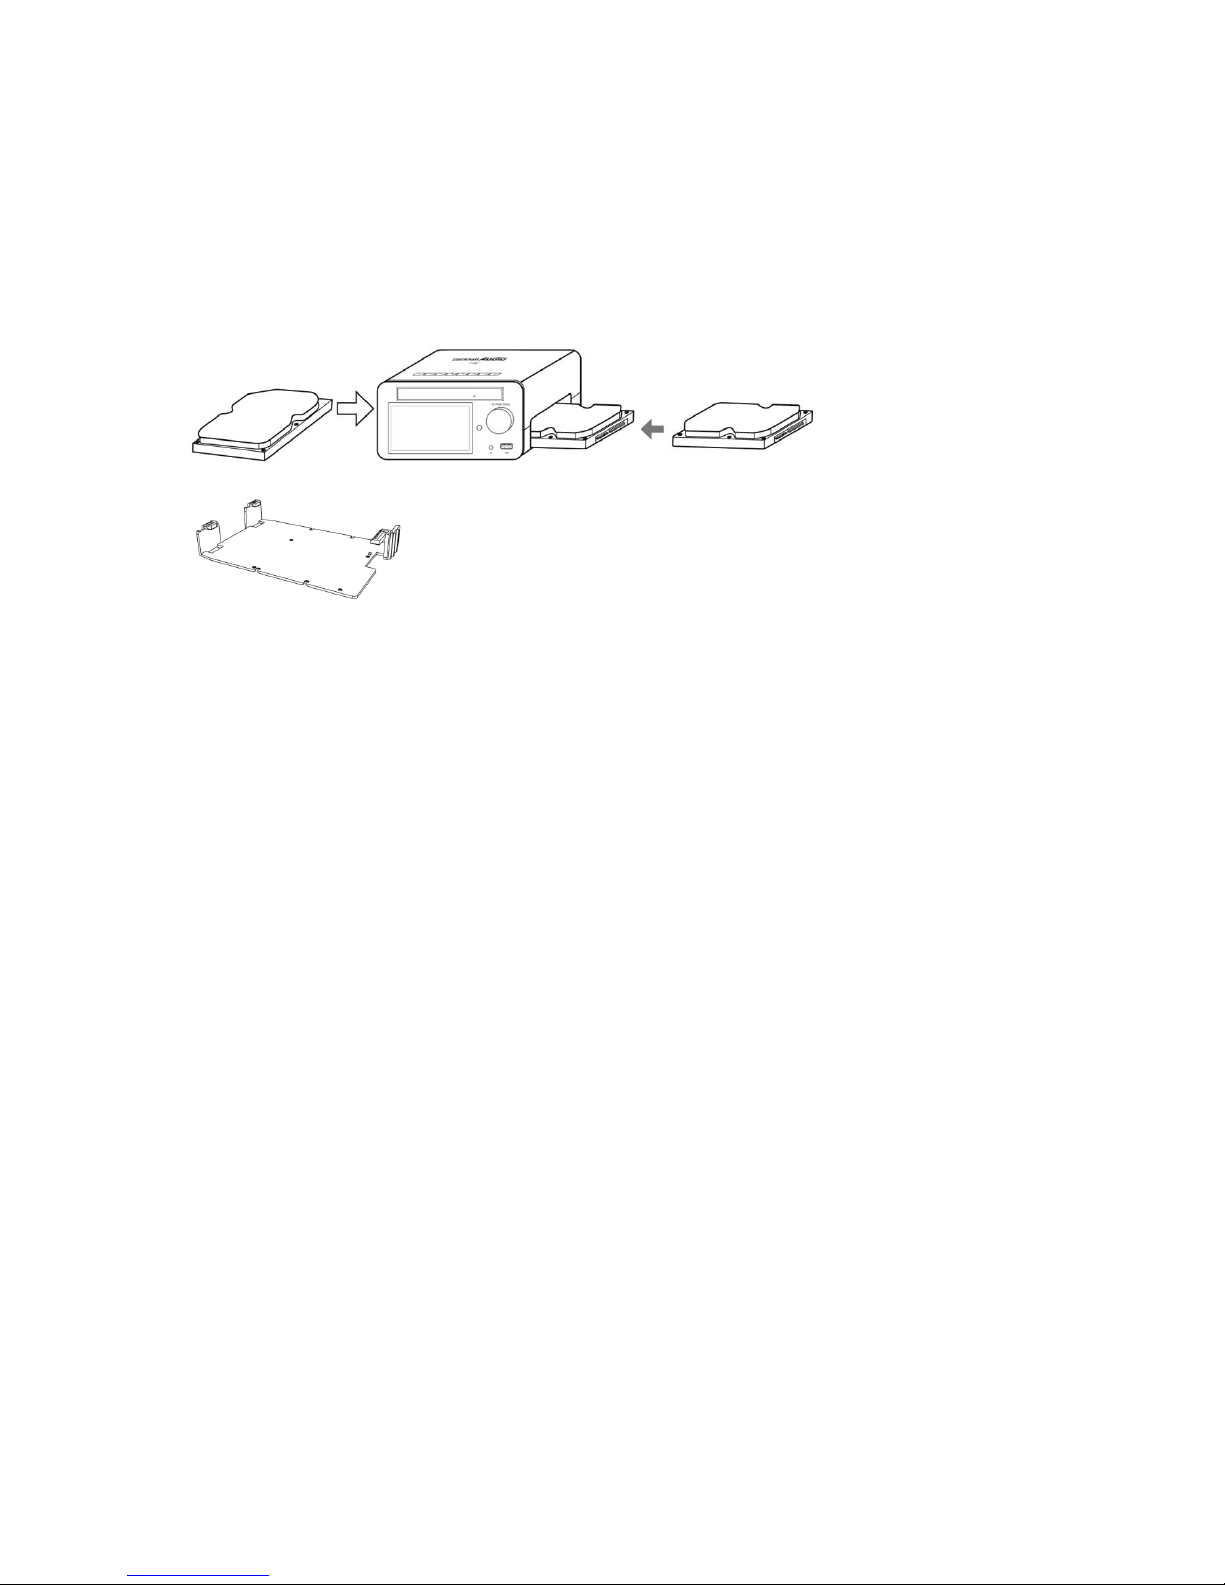
2-4. X12 purchased without storage.
You need a 3.5” or 2.5” SATA hard disk or SSD, and install it into the X12 like below picture and
format it. For formatting of the installed storage into X12, please refer to the 5-7-6. Format
Storage (Page 34)
2-4-1. HDD installation
2-4-2. HDD Format
※ Refer to the 5-7-6. Format Storage (Page 34)
2-5. X12 purchased with an internal storage installed.
Check whether the storage is formatted, or not. If the storage is not formatted, please format it
according to the 5-7-6. Format Storage (Page 34)
3. Connection
3-1. Power connection
Connect power to the X12 via the power inlet and switch on the rear of the X12.
3-2. External devices Connection
Refer to the rear view on page 9. Various devices can be connected to X12 like below according
to your purpose.
Speaker Out terminal (8ohm) : Bookshelf speaker or floor standing (power load)
speakers
Digital Out (Toslink, Coaxial): External DAC, etc
Analog Out (RCA, R/L) : External amplifier, etc
USB Host ports: WiFi USB dongle, external USB devices, etc
【 TIP 1 】 For 2.5” hard disk or SSD installation, please use
the bundled adaptor like the left picture
14
4. Turn On and Start
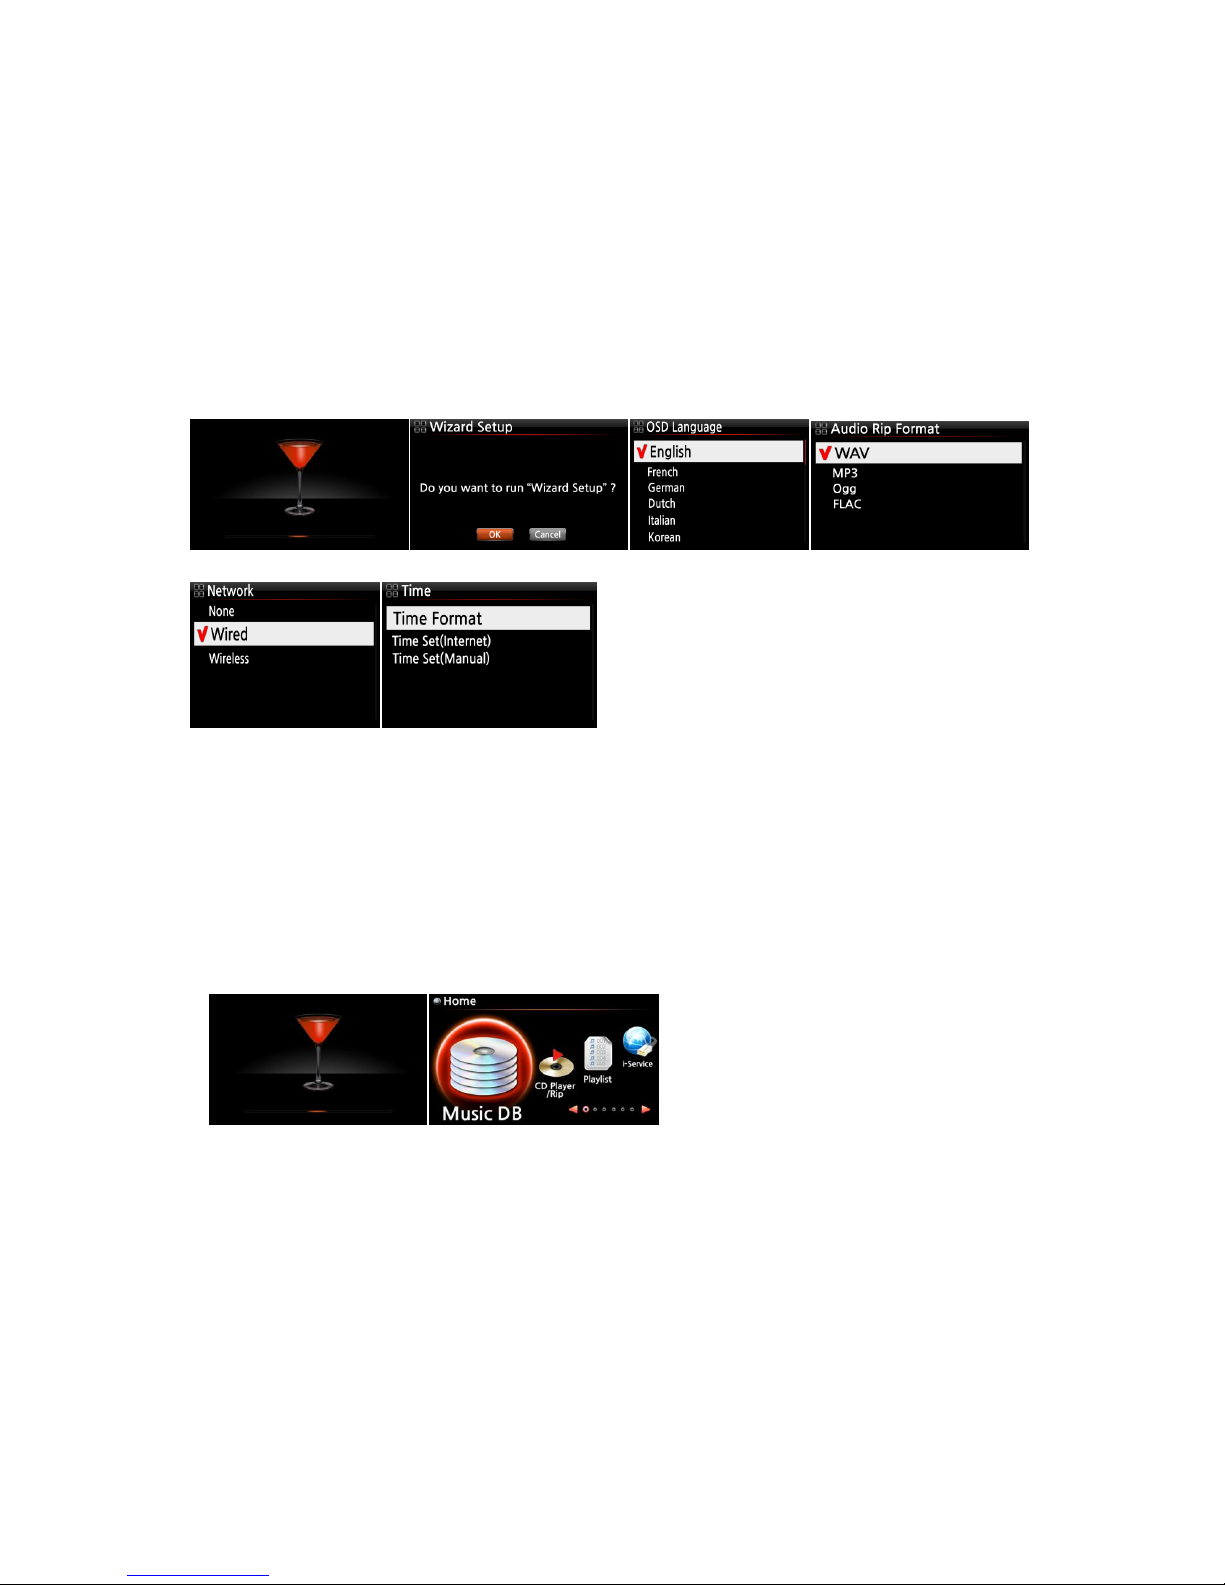
4-1. Wizard Setup (Setup Assistant)
Without HDD installed; if you are installing the HDD you will meet the Setup Assistant (Wizard
Setup) as shown below. Switch the unit on at the rear of X12 and then power it on with the
remote controller or the power button on the front of the X12.
Select OK and confirm with the OK key to start Wizard Setup. If you want to run the set up after
booting up, you can select CANCEL at the 1st step.
4-2. Turn ON for normal use
Switch the unit on at the rear of the X12. Power it on using the remote control or the power
button on the top of the X12. The X12 should take about one minute to boot up as it is looking
to see if a network is connected.
After the X12 is powered ON, the below screen will show up in sequence.
1) Booting image 2) Booting completed and ready for use
Music DB: Play loaded(ripped) music in
X12 Music DB folder.
CD Play/Rip: Load(rip) CD or play it
directly.
Playlist: Make Playlist and play it.
i-Service : Play i-Radio or online music
service
【 TIP ① 】 You will be asked about
formatting the HDD only if the HDD installed
has NOT been formatted.
Browser : See all storages such as hard
disk of X12, USB host and networked
storages.
Setup : Change the settings
15
5. SETUP
Go into SETUP menu with remote controller.
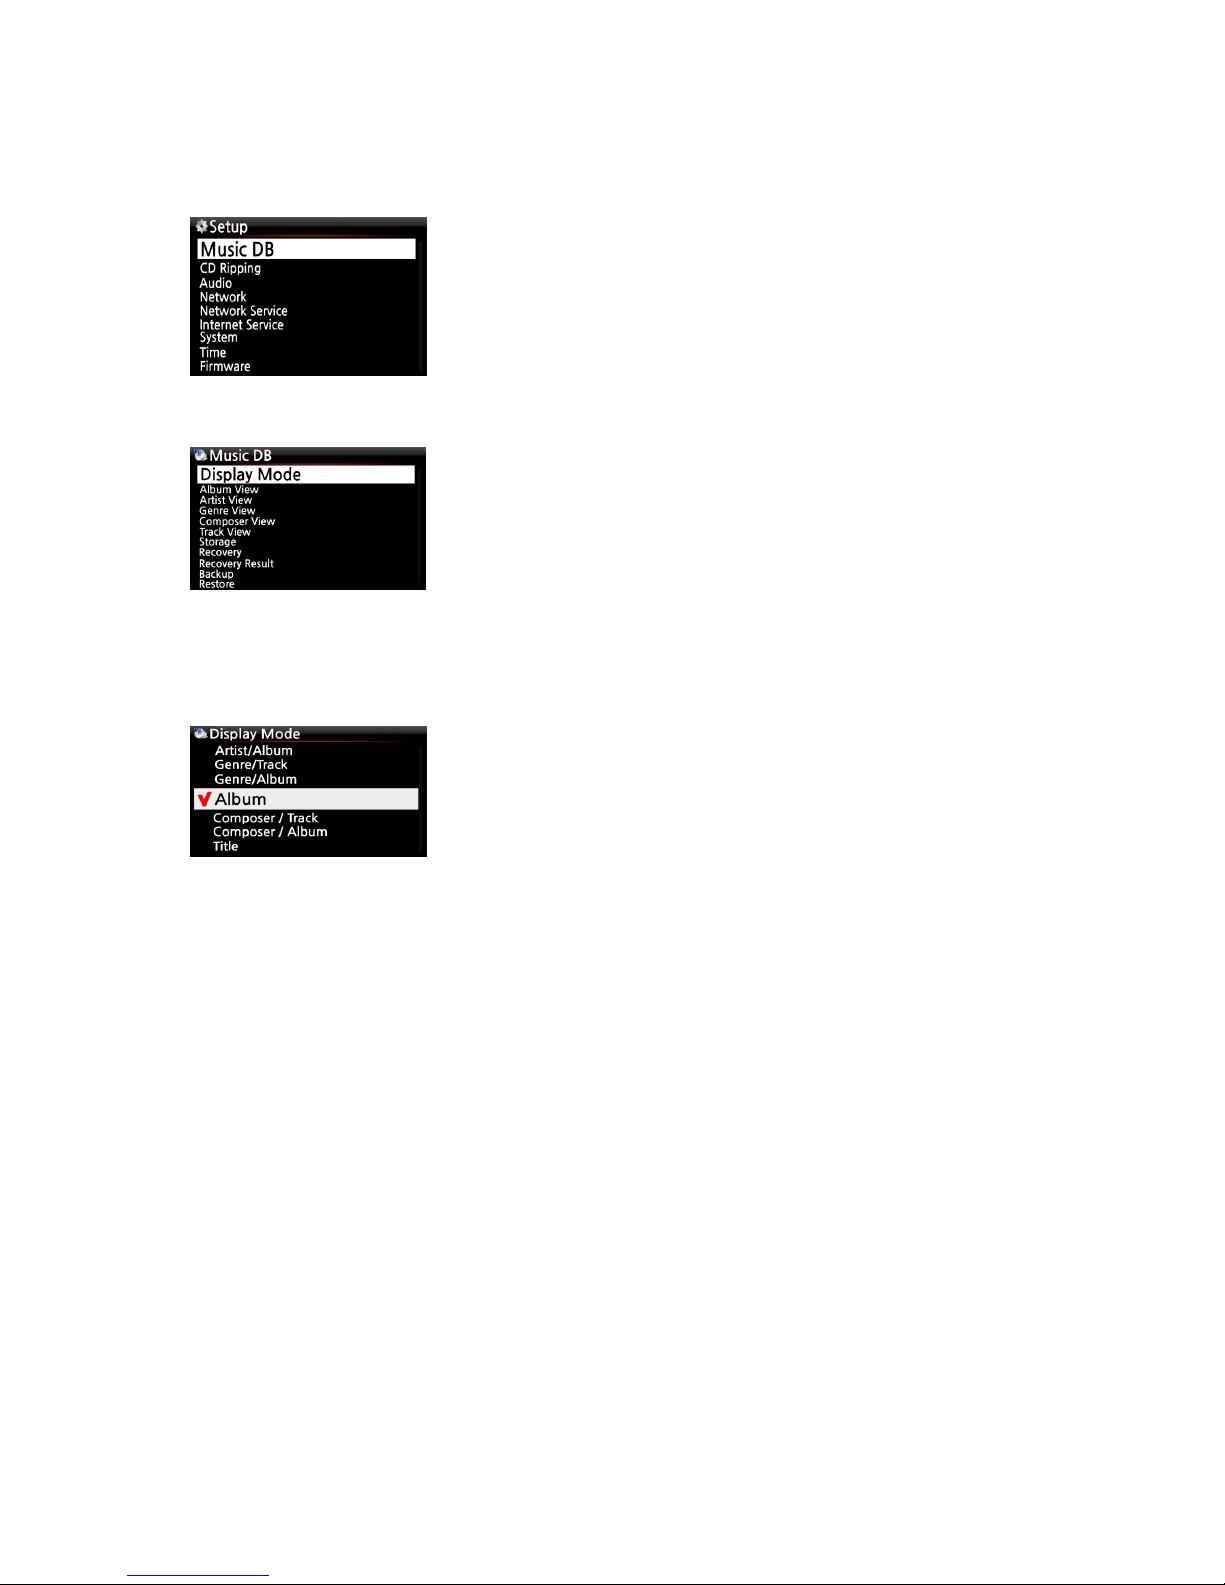
5-1. Music DB
5-1-1. Display Mode
You may set one of eight (8) options, see below. For example, if you set Title, the Music DB will
display the title (song) list when you go into the Music DB. (※ default: Album)
※ Default : Album
You can select each item with the arrow key and confirm it
with the OK button.
Select the Display Mode and confirm with the OK button.
※ Each mode displays like below
Artist/Track : Artist list → Title(song) list
Artist/Album : Artist list → Album list of the artist → Track (song) list of the album
Genre/Track : Genre list → Title(song) list of the genre
Genre/Album : Genre list → Album list of the genre → Title(song) list of the album
Album : Album list → Track list of the album
Composer/Track : Composer list → Track list of the composer.
Composer/Album : Composer list → Album list of the composer
Title : Track(song) list
16
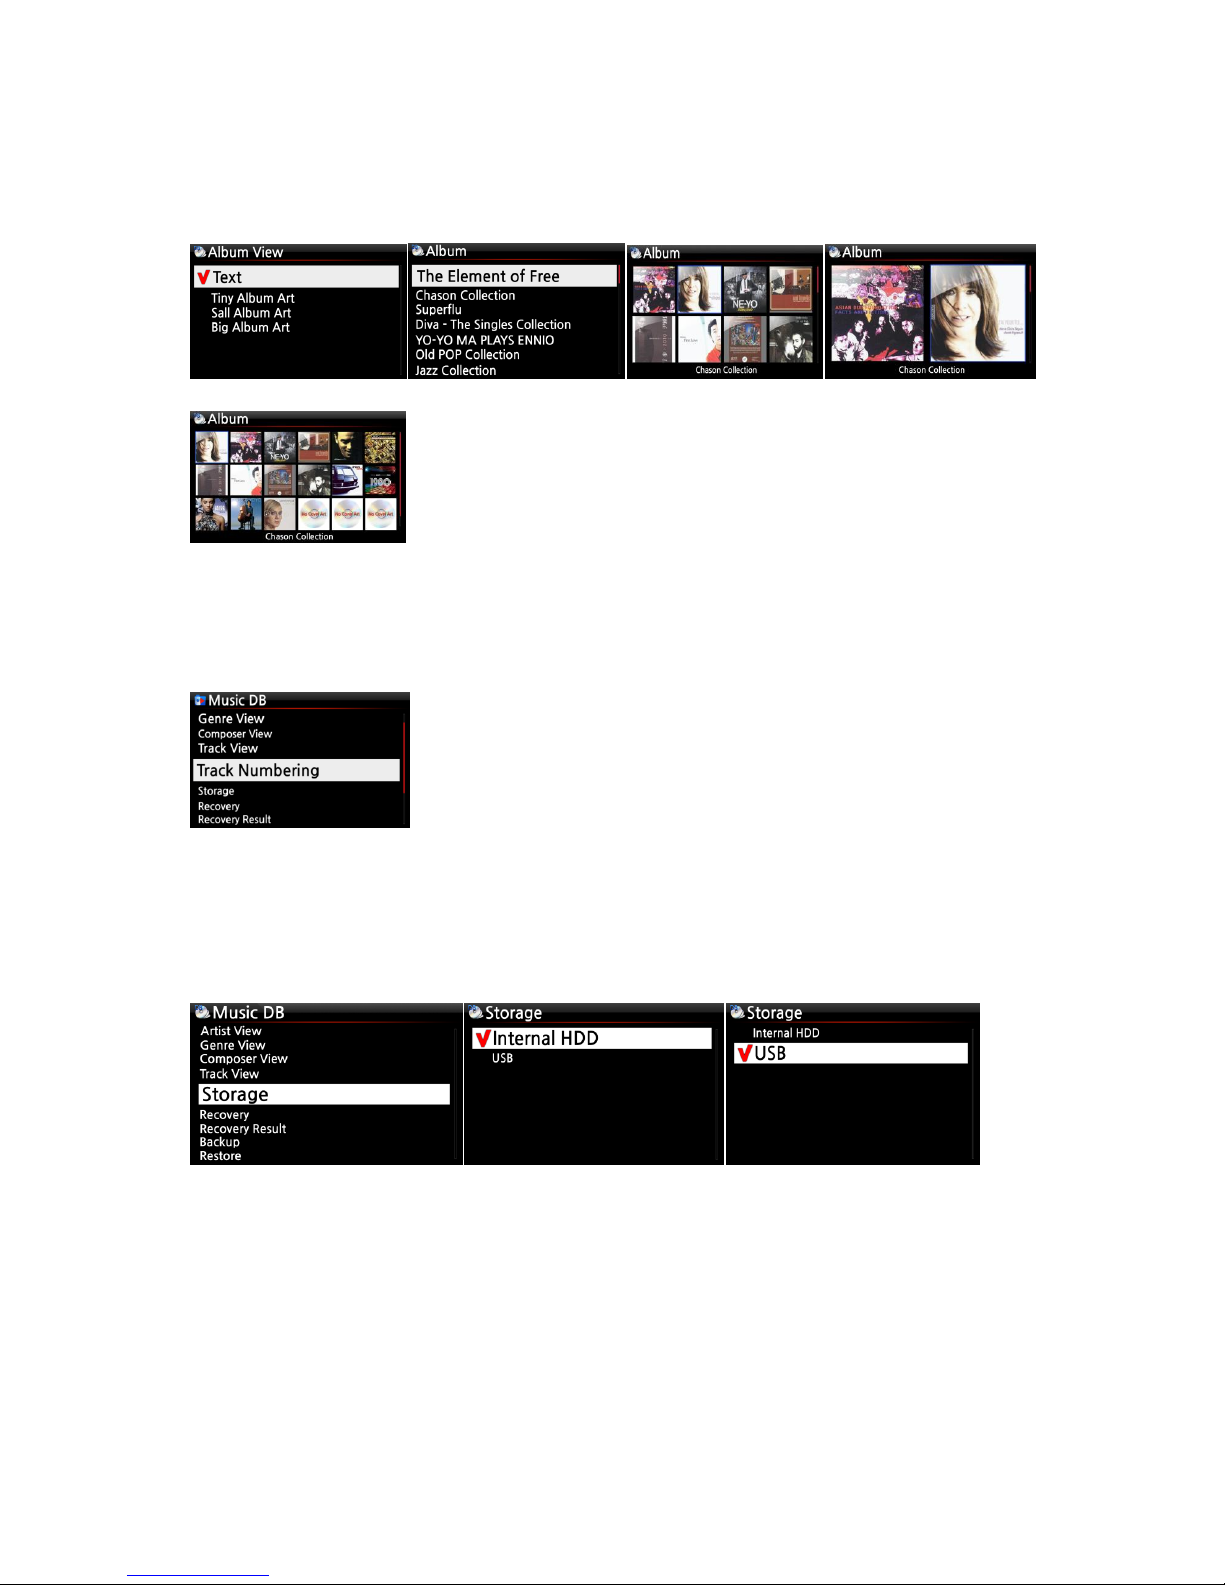
5-1-2. Album View
You can set the list to show albums in the Music DB by its album name (text) or album cover art
using this setup.( ※ default : text mode )
※ Artist view, Artist view, Genre view, Composer view and Track view are also available.
5-1-3. Track Numbering
5-1-4. Storage (for Music DB)
You can select either the internal HDD (SSD) or USB for Music DB storage.
( ※ Default is Internal HDD(SSD))
[CAUTION]
※ NOTE: Please remember to check this setting first when you see ‘Query Error’ on the screen in
trying access to your music DB. For example, you will see ‘Query Error’ on the screen when you
try accessing your Music DB of internal (installed) HDD with Music DB storage set to USB.
※ When you use an external USB hard disk, please make sure to supply Power to the external
USB hard disk in case the external USB hard disk is designed originally to connect to a Power
supply.
With the Track Numbering option at SETUP, you may decide
whether you allow the track number to be added at the front of
title for each track when you rip CD. (※ Default: Enabled)
17
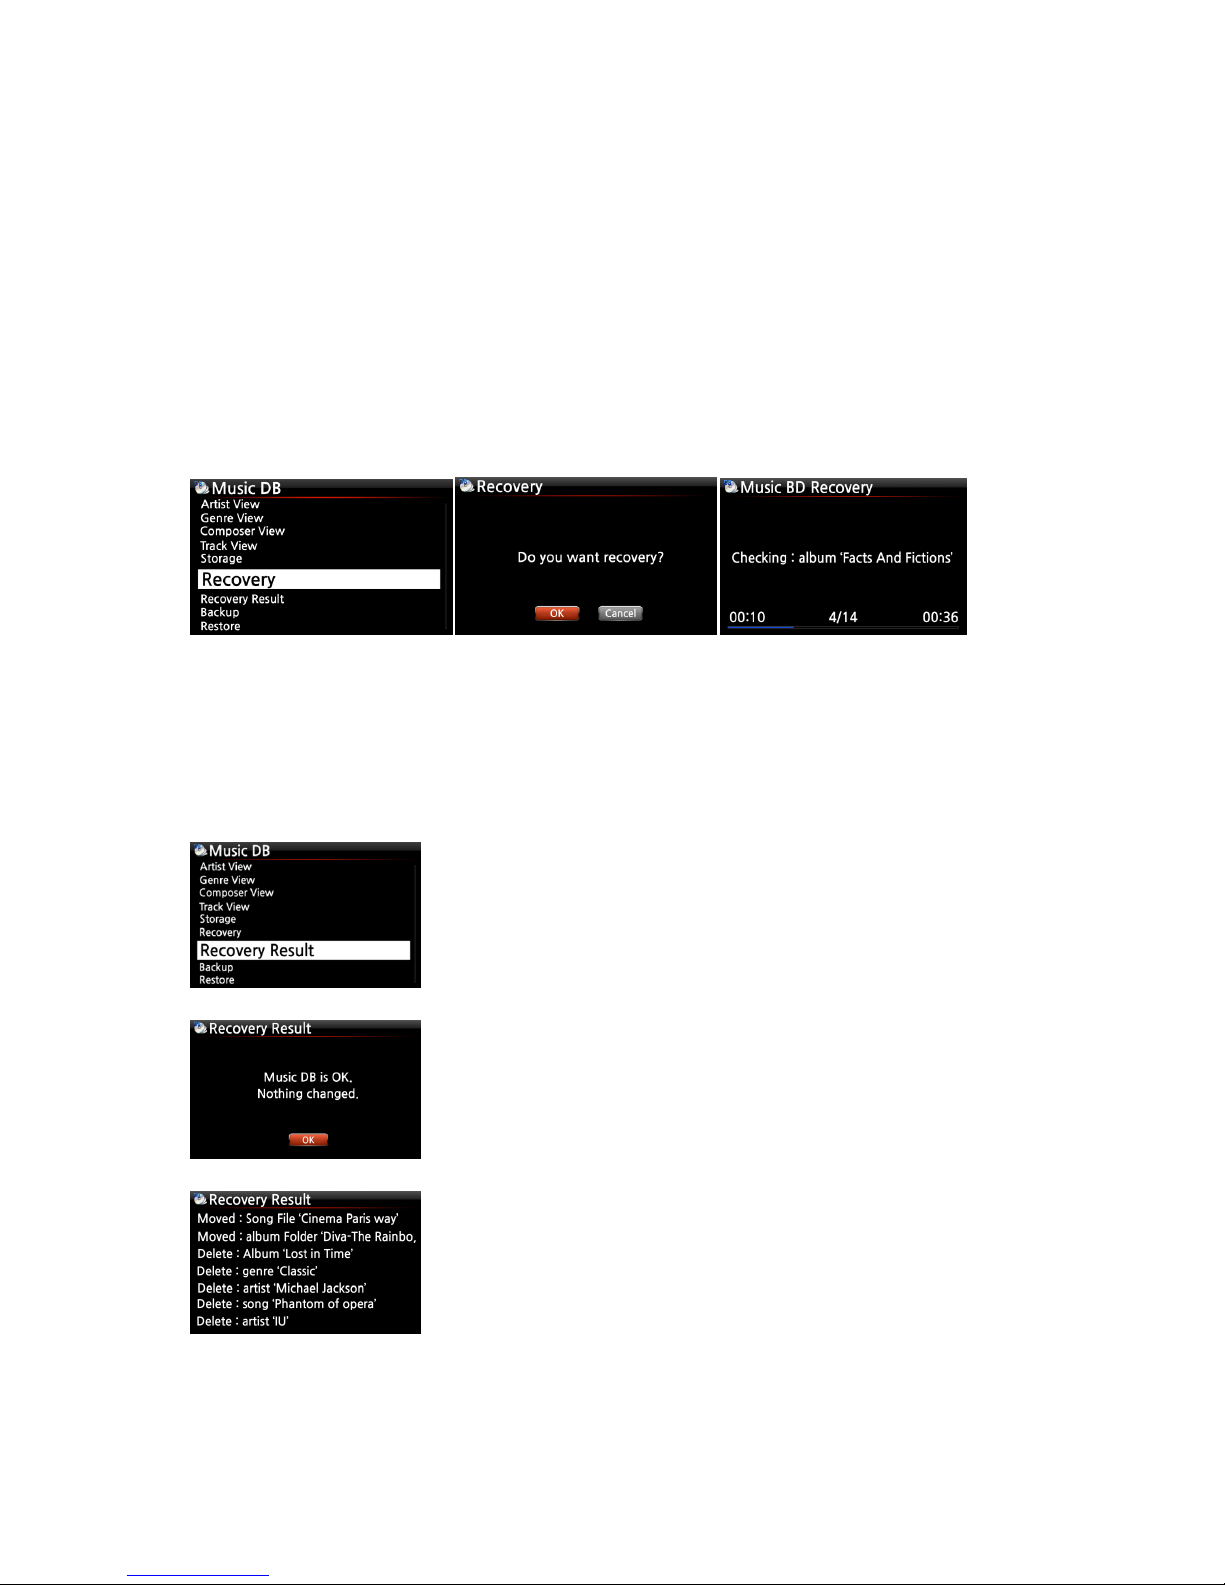
5-1-5. Recovery
It is possible for damage or errors to occur on the album or files in the Music DB when you run
several functions like; ‘Rename, Delete, Copy to DB, or CD ripping’ etc. If there are errors in the
Music DB, the X12 may not play the files properly or may not rip CDs properly. The Music DB
Recovery function will help to clear these problems.
5-1-5-1. How to run Music DB Recovery function
① Go to the Music DB. ② Select Recovery and press the OK key.
※ It will take some time to start and finish if your Music DB is quite large.
5-1-5-2. Music DB Recovery run
After you run the Music DB Recovery, as shown above, you can see the results of the Recovery as
displayed below.
Go to Music DB of SETUP and select Recovery Result.
The left screen will appear if your Music DB is OK
The left screen will appear if something was dubious
※ ‘Moved’ means the song file moved to ‘Recovery’ folder.
※ ‘song file’ is actual file.
※ ‘Deleted’ means the info in the Music DB was deleted.
※ ‘Album’, ‘genre’, ‘artist’ and ‘song’ are just info (text file).
They are not actual music files.
18
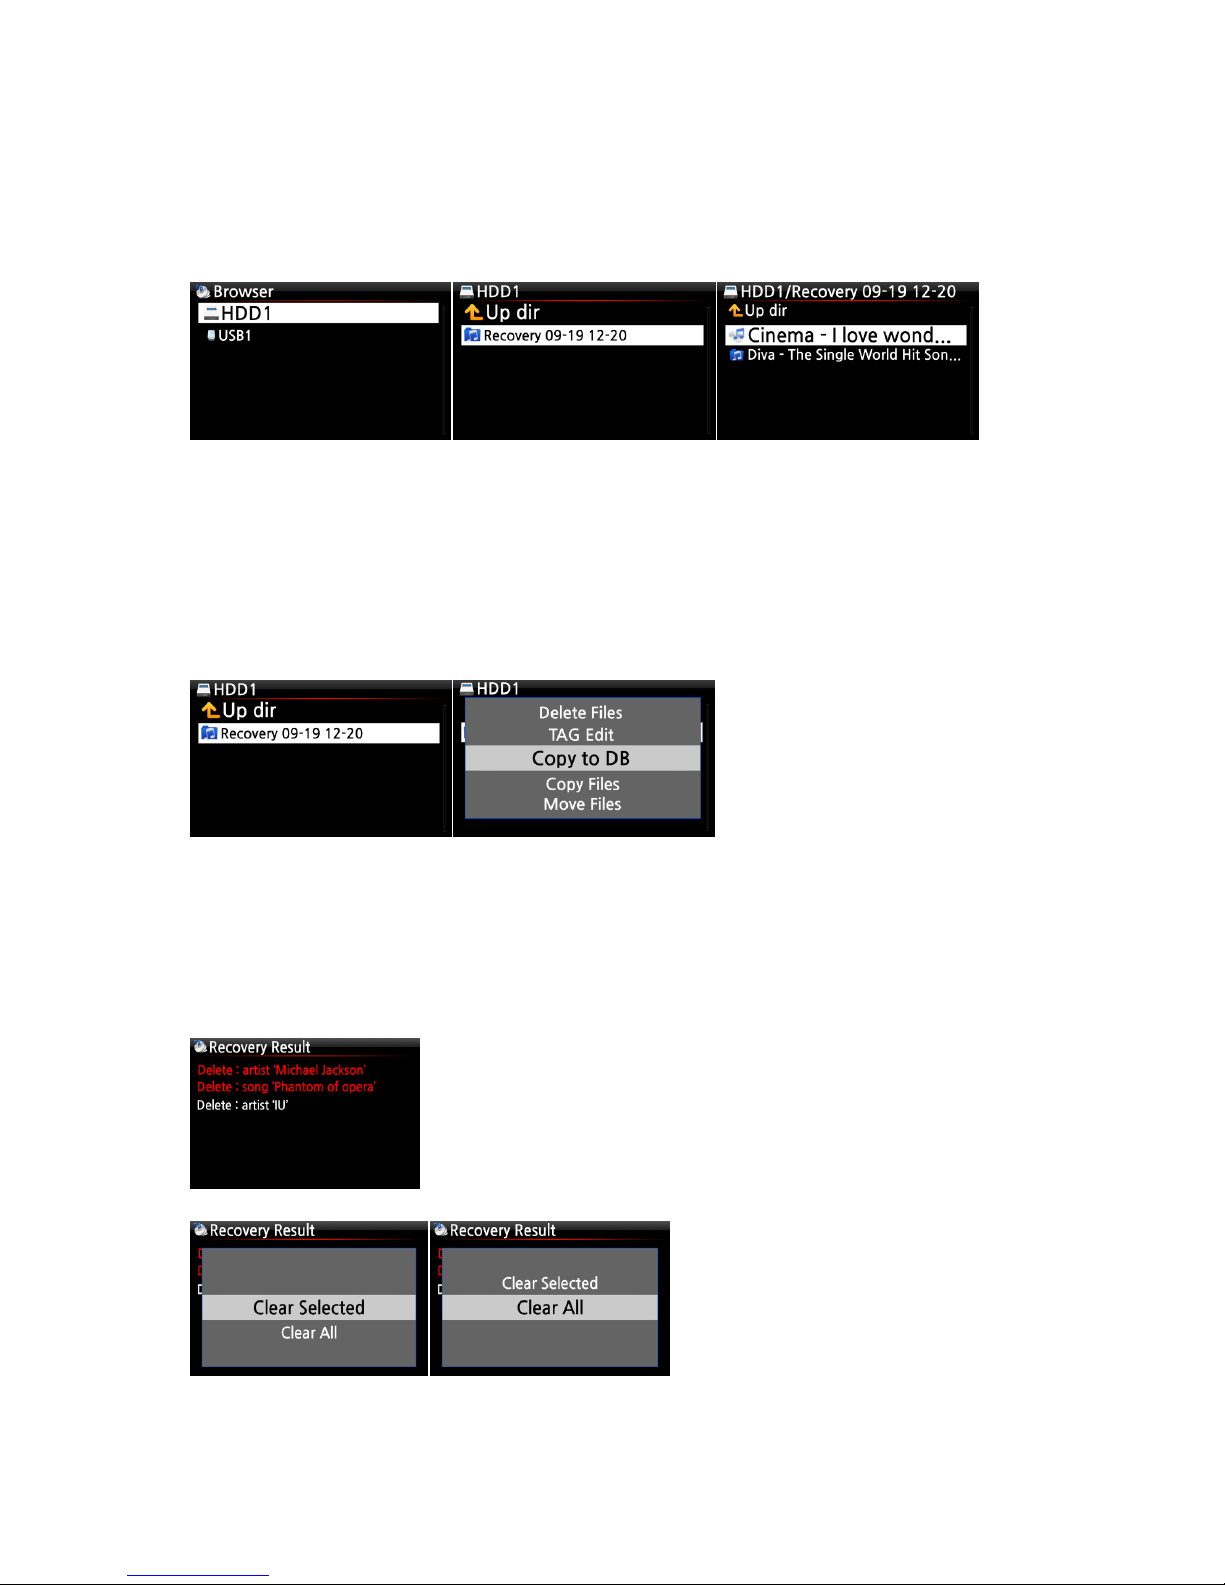
5-1-5-3. To create ‘Recovery MM-DD hh-mm’ folder
automatically on HDD (or USB)
During Music DB Recovery run, the X12 creates a ‘Recovery MM-DD hh-mm’ folder automatically
on the internal HDD (or USB). The checked files or album folders will be stored (moved) there.
5-1-5-4. Importing files from the ‘Recovery’ folder to the Music
DB again.
After checking the files have moved to the ‘Recovery’ folder, you can import them to the Music
DB again with the ‘Copy to DB’ function.
5-1-6. Recovery Result
After running ‘Recovery’, you can clear the list on the Recovery Result as follows.
① Place the cursor on the screen of the Recovery Result.
② Select the list you want to clear with the RIGHT key
③ Press the MENU key
④ You can clear all or the selected list only.
19
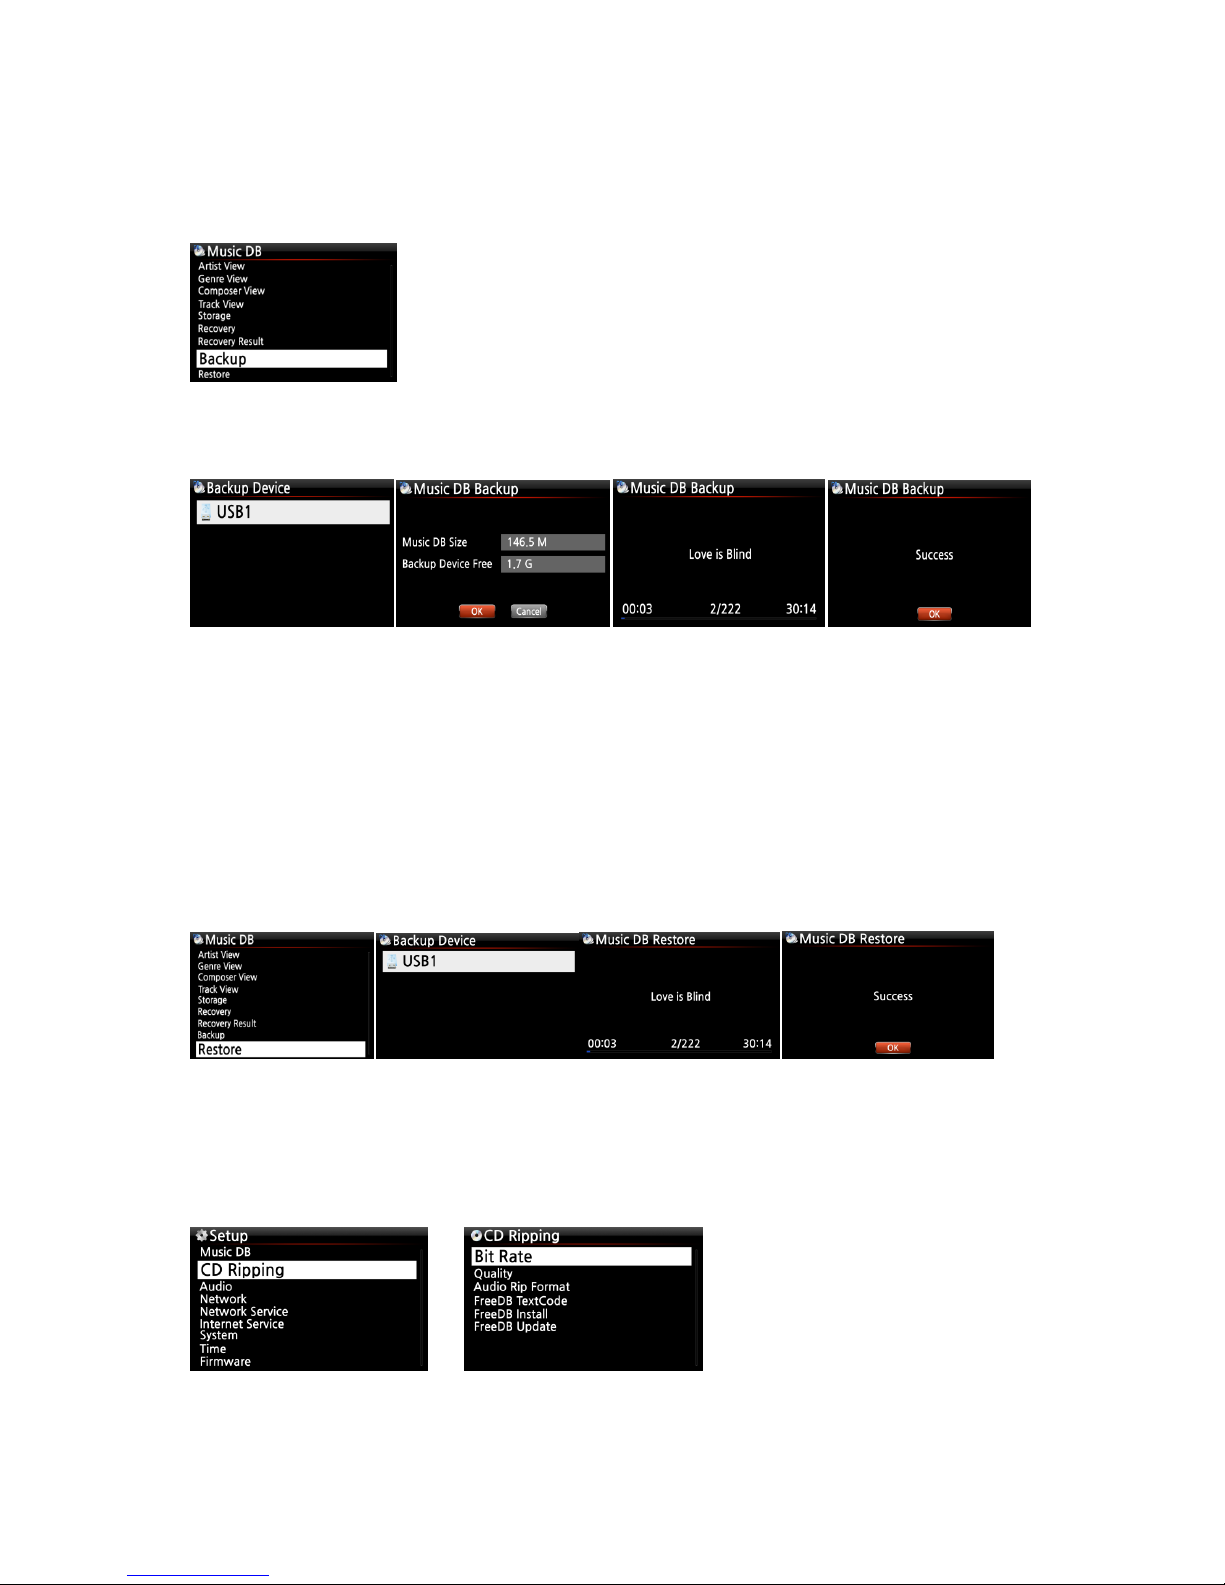
5-1-7. Backup
You can backup your Music DB to an external USB hard disk.
※You need an external USB hard disk drive which has a bigger capacity than the Music DB.
5-1-8. Restore
You can restore the backup data in the Music DB of the X12.
5-2. CD Ripping
Select CD Ripping and confirm it with the OK button. The below items will be displayed.
① Connect the external USB HDD to the USB host port of the X12.
② Go to Music DB of SETUP and select Backup, and confirm with
the OK button.
③ You can see the external USB HDD as shown below. Select and
confirm with the OK key. You will see the Music DB size and Backup
device size, see example below. Press the OK key to start backup.
① Connect the backup device to the USB host port of the X12.
② Go to the Music DB of SETUP and select Restore, and confirm it with the OK button.
③ You can see the backup device and select it, confirm using the OK key to start Restore.
20
5-2-1. Bit Rate and Quality
You can select bit rate and the quality level for ripping to MP3 files.
There are two (2) items.(This is for ripping a CD to an MP3 file)
□ Compressed Rate : 128K / 192K / 320K [default] 192K
□ Quality level : Excellent / Best / Good / Fast / Very fast [default] Very fast
Select one of the above options and confirm with the OK button on the remote control.
【 TIP ① 】 The time required to rip a CD to MP3 format based on each quality level option is
shown below.
Option of quality level
Normal playing time
Required time to convert to MP3
Excellent
The time required to
play music in CD
normally.
X 1.5 (150%)
Best
X 1.08 (108%)
Good
X 1 (100%)
Fast
X 3/4 (75%)
Very fast[Default]
X 1/3 (33.3%)
※Quality level affects on the MP3 and Ogg ripping in view of sound quality, and on the FLAC
ripping in view of file size.
【 TIP ② 】 Estimated Storage capacity
CD Ripping option
500GB HDD
1 TB HDD
2 TB HDD
4 TB HDD
WAV(uncompressed)
650 CDs
1,300 CDs
2,600 CDs
5,200 CDs
MP3 /
OGG
Compressed Rate
128K
7,500 CDs
15,000 CDs
30,000 CDs
60,000 CDs
192K
5,000 CDs
10,000 CDs
20,000 CDs
40,000 CDs
320K
3,000 CDs
6,000 CDs
12,000 CDs
24,000 CDs
These figures may vary slightly according to the number of tracks on a CD
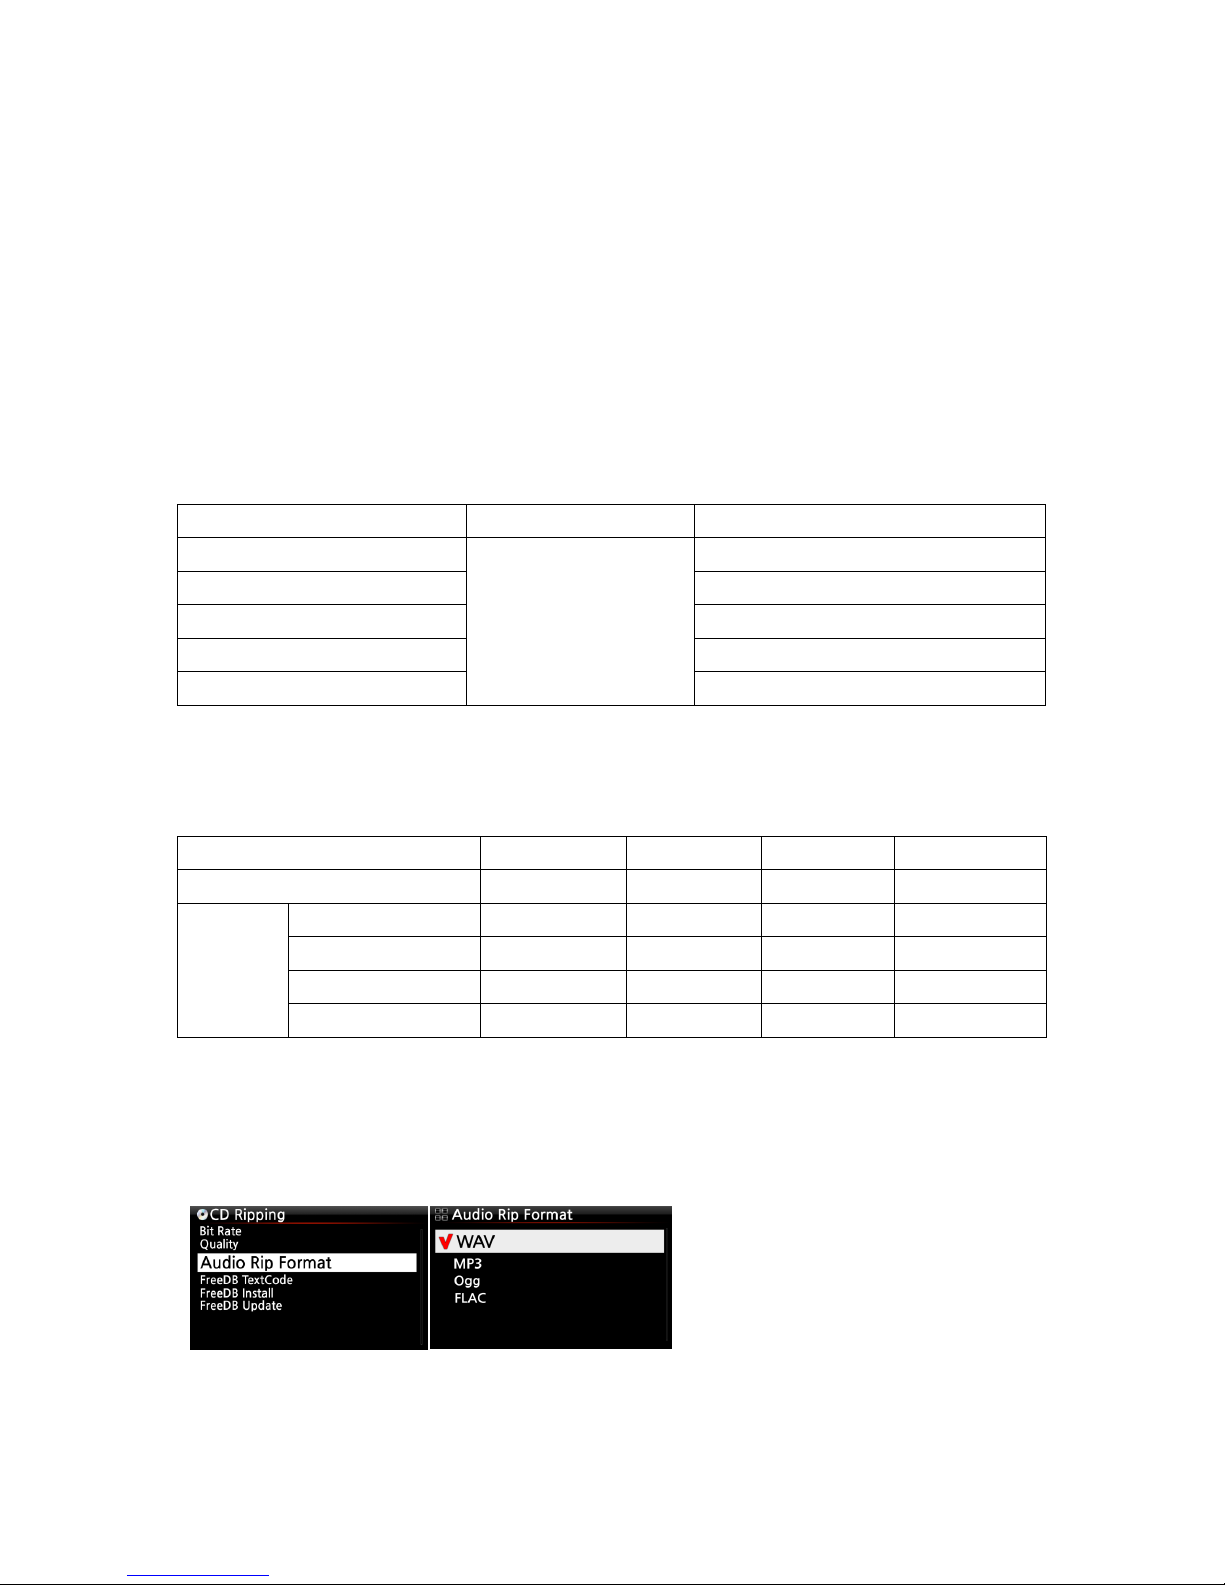
5-2-2. Audio Rip Format (CD Rip Format)
You can select one of the following audio formats for CD Ripping;
※ default is WAV
21
5-2-3. FreeDB TextCode
In the case that the FreeDB text is broken, you may try changing the FreeDB TextCode as shown
below.
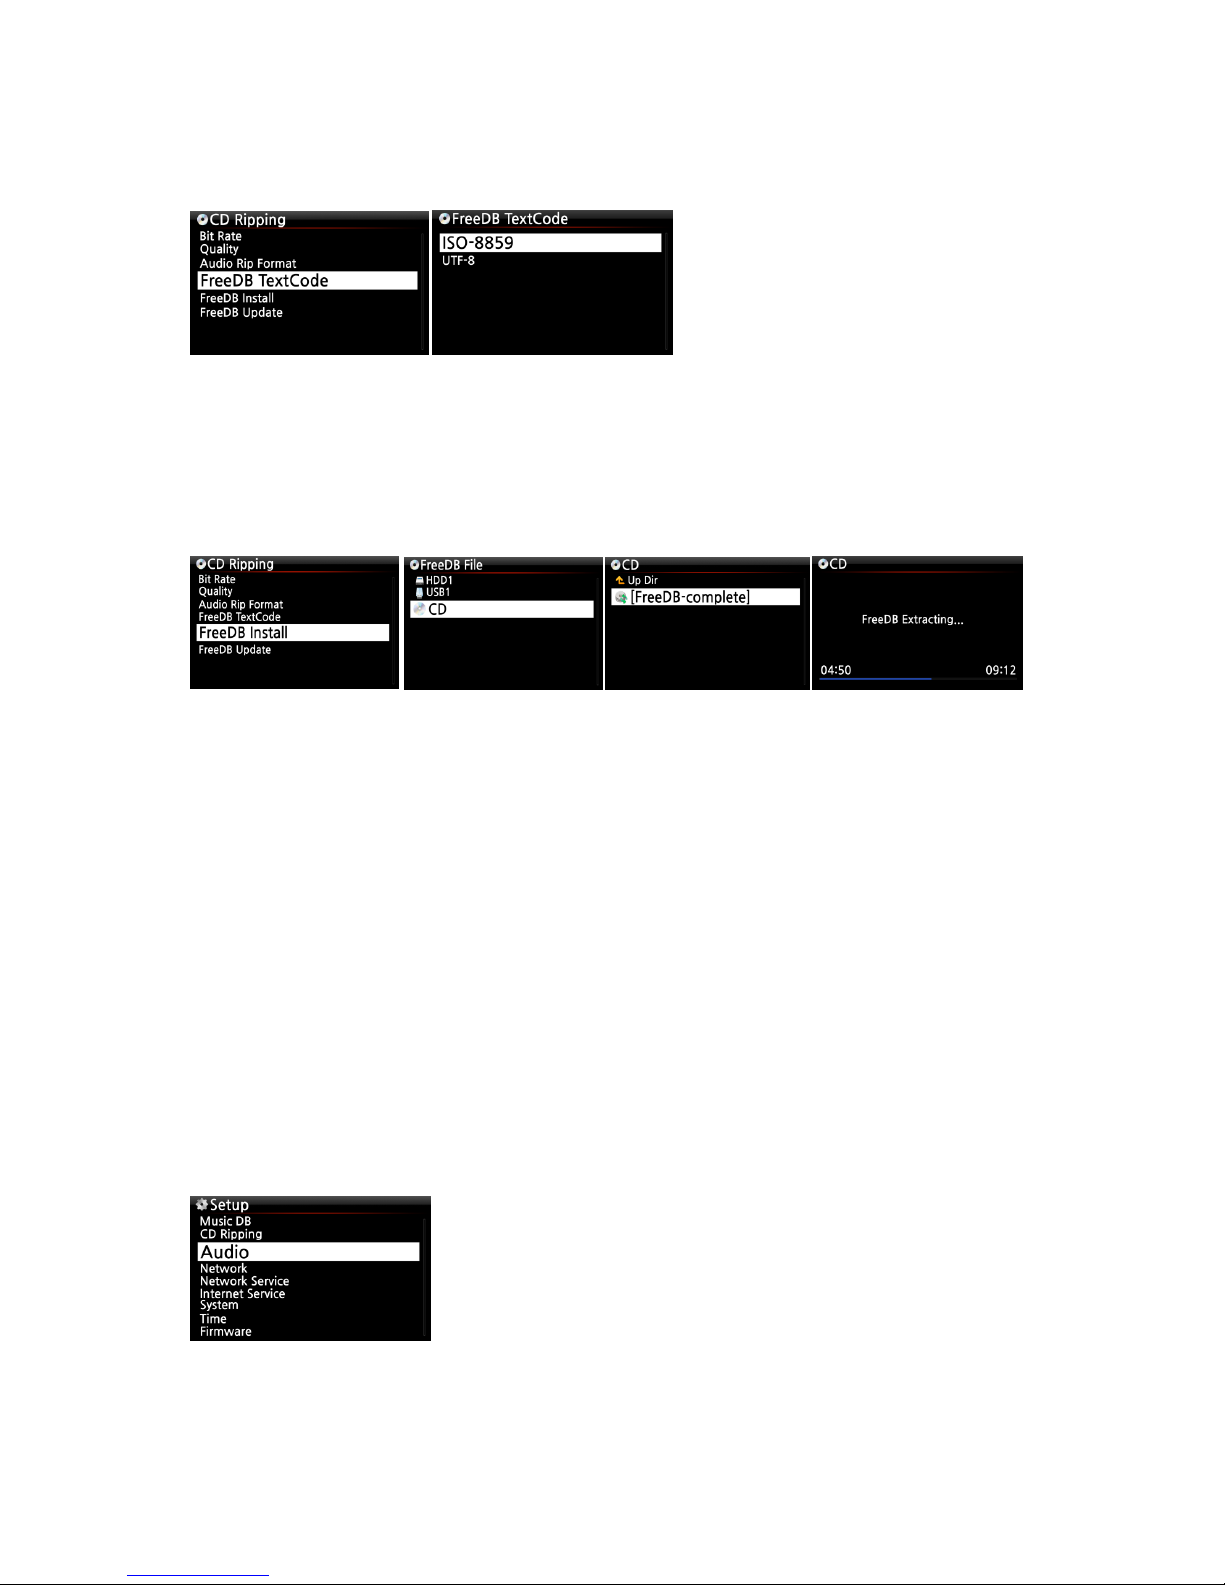
5-2-4. FreeDB Install
You can install the FreeDB data to the storage of the X12 as a FreeDB data (DVD) is supplied by
the manufacturer. Once you install the FreeDB data to the X12 the inserted CD information
(metadata like title, album name, artist, etc) will be displayed on the X12 screen without network
connection.
To install the FreeDB data to the X12 hard disk, insert the FreeDB data DVD into the CD slot of
the X12 and go to SETUP and select FreeDB to install. You will see the CD, select and confirm with
the OK button. The X12 will shut down and reboot to start installing the FreeDB data
automatically.
5-2-5. FreeDB Update
You can get a FreeDB update from the Cocktail Audio website (www.cocktailaudio.com).
To update your copy the FreeDB load the file downloaded from www.cocktailaudio.com to a
memory stick and insert the memory stick into the USB host port of the X12. Navigate to SETUP
and select FreeDB Update. Press the OK button. You can see the USB memory and select it with
the OK button to find the FreeDB update file. Confirm with the OK button to begin the
installation.
5-3. Audio
Select Audio and confirm it with the OK key
22
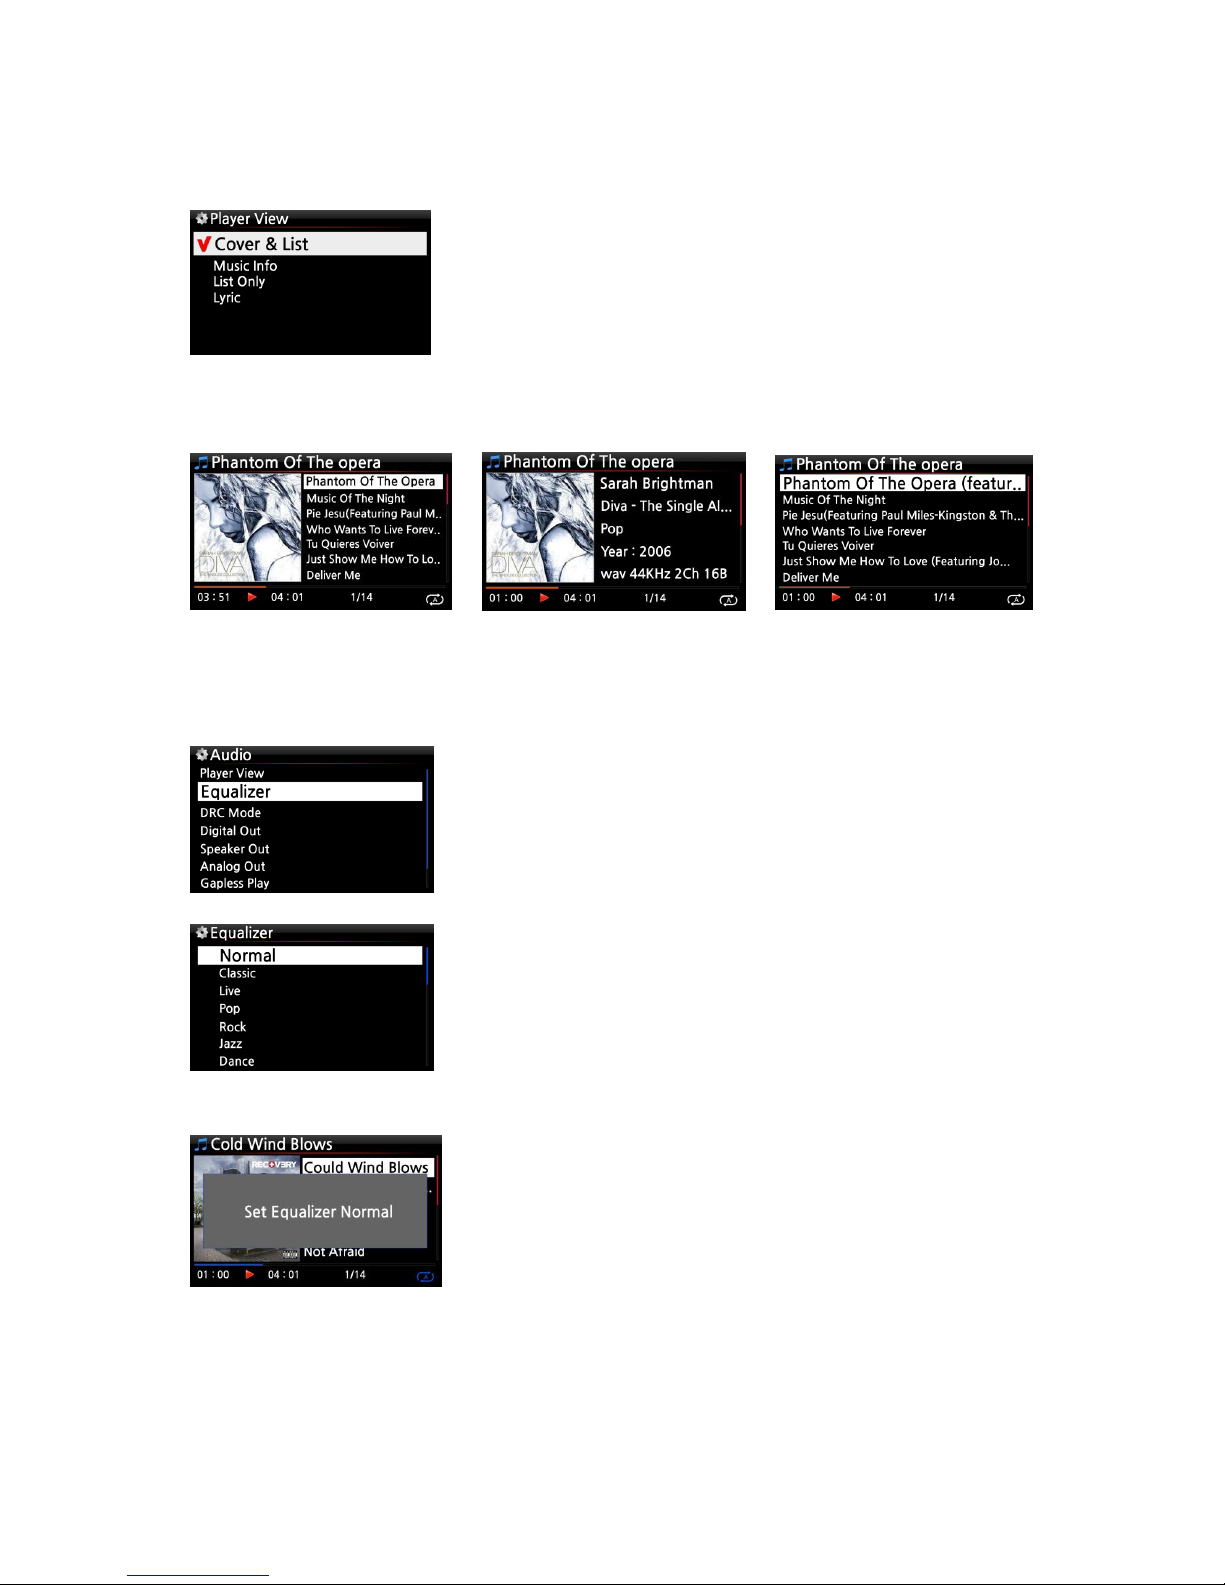
5-3-1. Player View
You can set one of the following; Cover & List, Music Info or List Only.
※ Default: Cover & List
[ Cover & List ] [ Music info ] [ List Only ]
5-3-2. Equalizer (Preset EQ)
You can set one of the following; Normal → Classic → Live → Pop → Rock → Jazz → Dance
→ Vocal → Soft → Bass → Normal
※ NOTE: During playing, you can also change preset EQ using EQ button.
※ NOTE: For more detailed explanation, refer to the 18-4 Preset EQ (Page 76)
※ NOTE : Using INFO button of remote control, you
can change player view to Cover & List, Music Info or
List Only like below.
① Select Equalizer and confirm it with OK key to open the
preset EQ list like below.
② Select one of 10 options
※ NOTE: Equalizer works in Speaker Out (in-built amplifier) only.
23
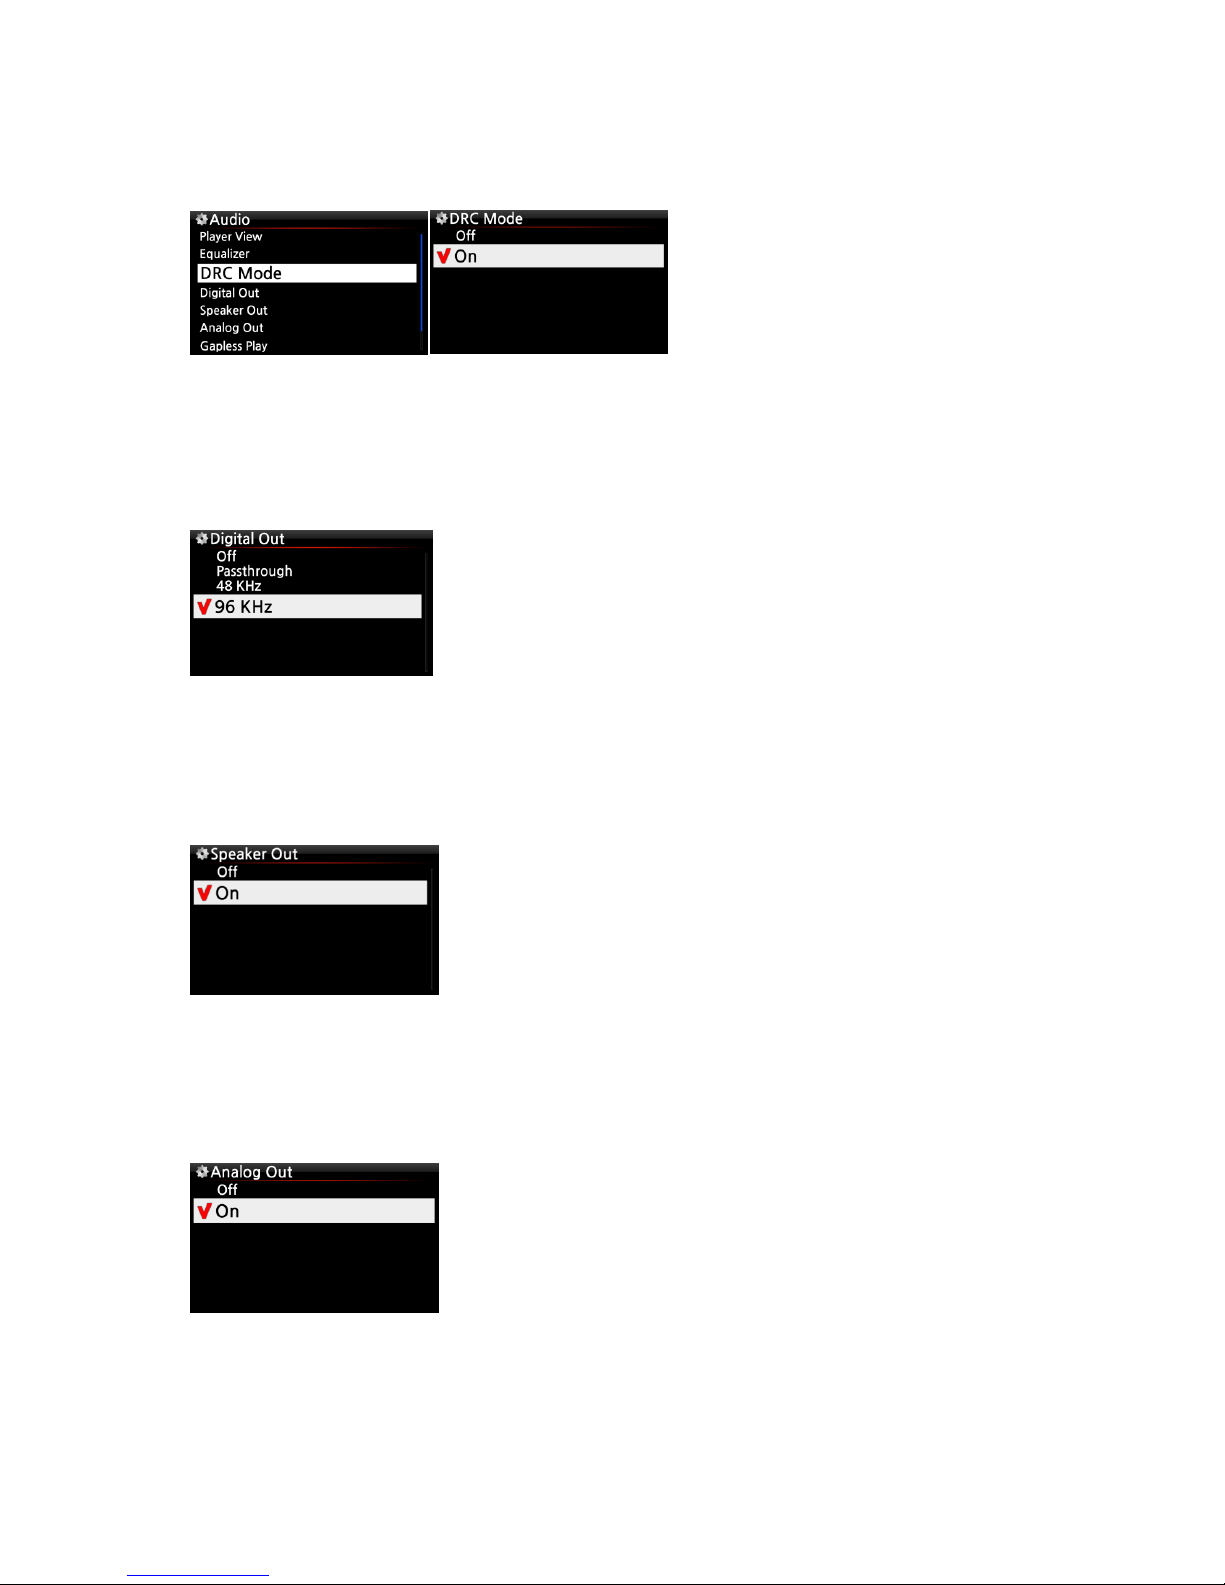
5-3-3. DRC (Dynamic Range Compression) Mode
※ NOTE: DRC Mode works in Speaker Out mode only.
※ Default : ON
※ NOTE: DRC Mode works in Speaker Out mode only.
5-3-4. Digital Out
You can set one of four (4) options like OFF, Passthrough, 48KHz, 96KHz
※ Default: 96KHz
5-3-5. Speaker Out
You can set as ON or OFF here.
※ Default : ON
5-3-6. Analog Out
ON or OFF can be set here
※ Default : ON
1) OFF : No signal from Digital Out
2) Pass-through : Original resolution (Frequency)
3) 48Khz : Max 48KHz frequency
4) 96Khz : Max 96KHz frequency
When you want to use the amplifier of the X12, the speaker
out should be set as ON
In case that you want to use an external amplifier,
the Analog Out should be set as ON, and the
external amplifier should be connected to the
Analog out at the rear of the X12.
24
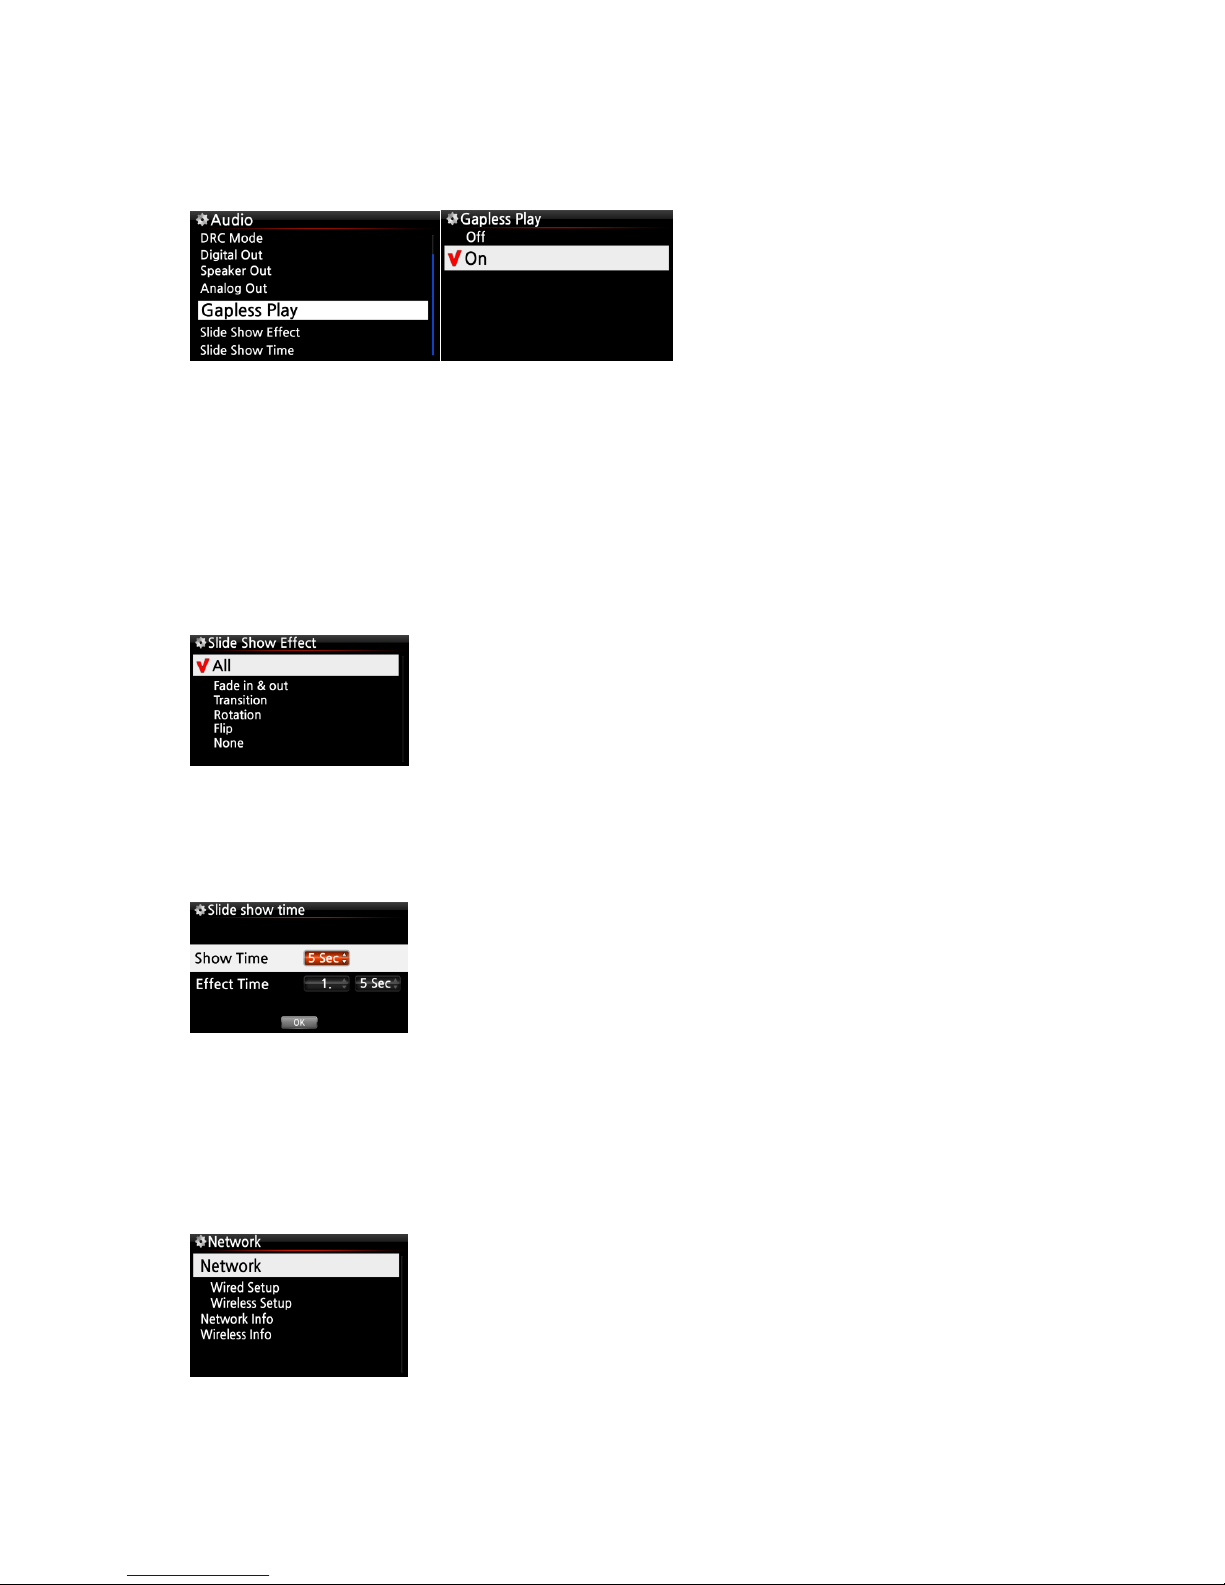
5-3-7. Gapless Play
The X12 supports gapless playback function for MP3 files, WAV and FLAC files only.
※ Default : ON
【 TIP 】
※LAME-encoded MP3 files only supported
※The Gapless play function works properly on ‘Repeat All’ and ‘Normal’ modes only. For example
in ‘Shuffle’ mode Gapless play is not supported
5-3-8. Slide Show Effect
※ NOTE: For detailed explanation, refer to 18-1. Photo Slide Show (Page 75)
5-3-9. Slide Show Time
※NOTE: For detailed explanation, refer to 18-1. Photo Slide Show (Page 75)
5-4. Network
※ Make sure your Ethernet cable or a USB WiFi dongle is connected.
Select Network and press the OK button.
① Select Network and confirm with the OK button.
② Select Wired Setup or Wireless Setup and confirm it with OK
button.
【 TIP 】 To check network information, press Network Info.
Six (6) options are available like All, Fade in & out,
Transition, Rotation, Flip and None.
You can set show time and effect time according to your taste.
※ Show time : The time required to show one photo
※ Effect time : The time required to transit one photo to other
photo
25
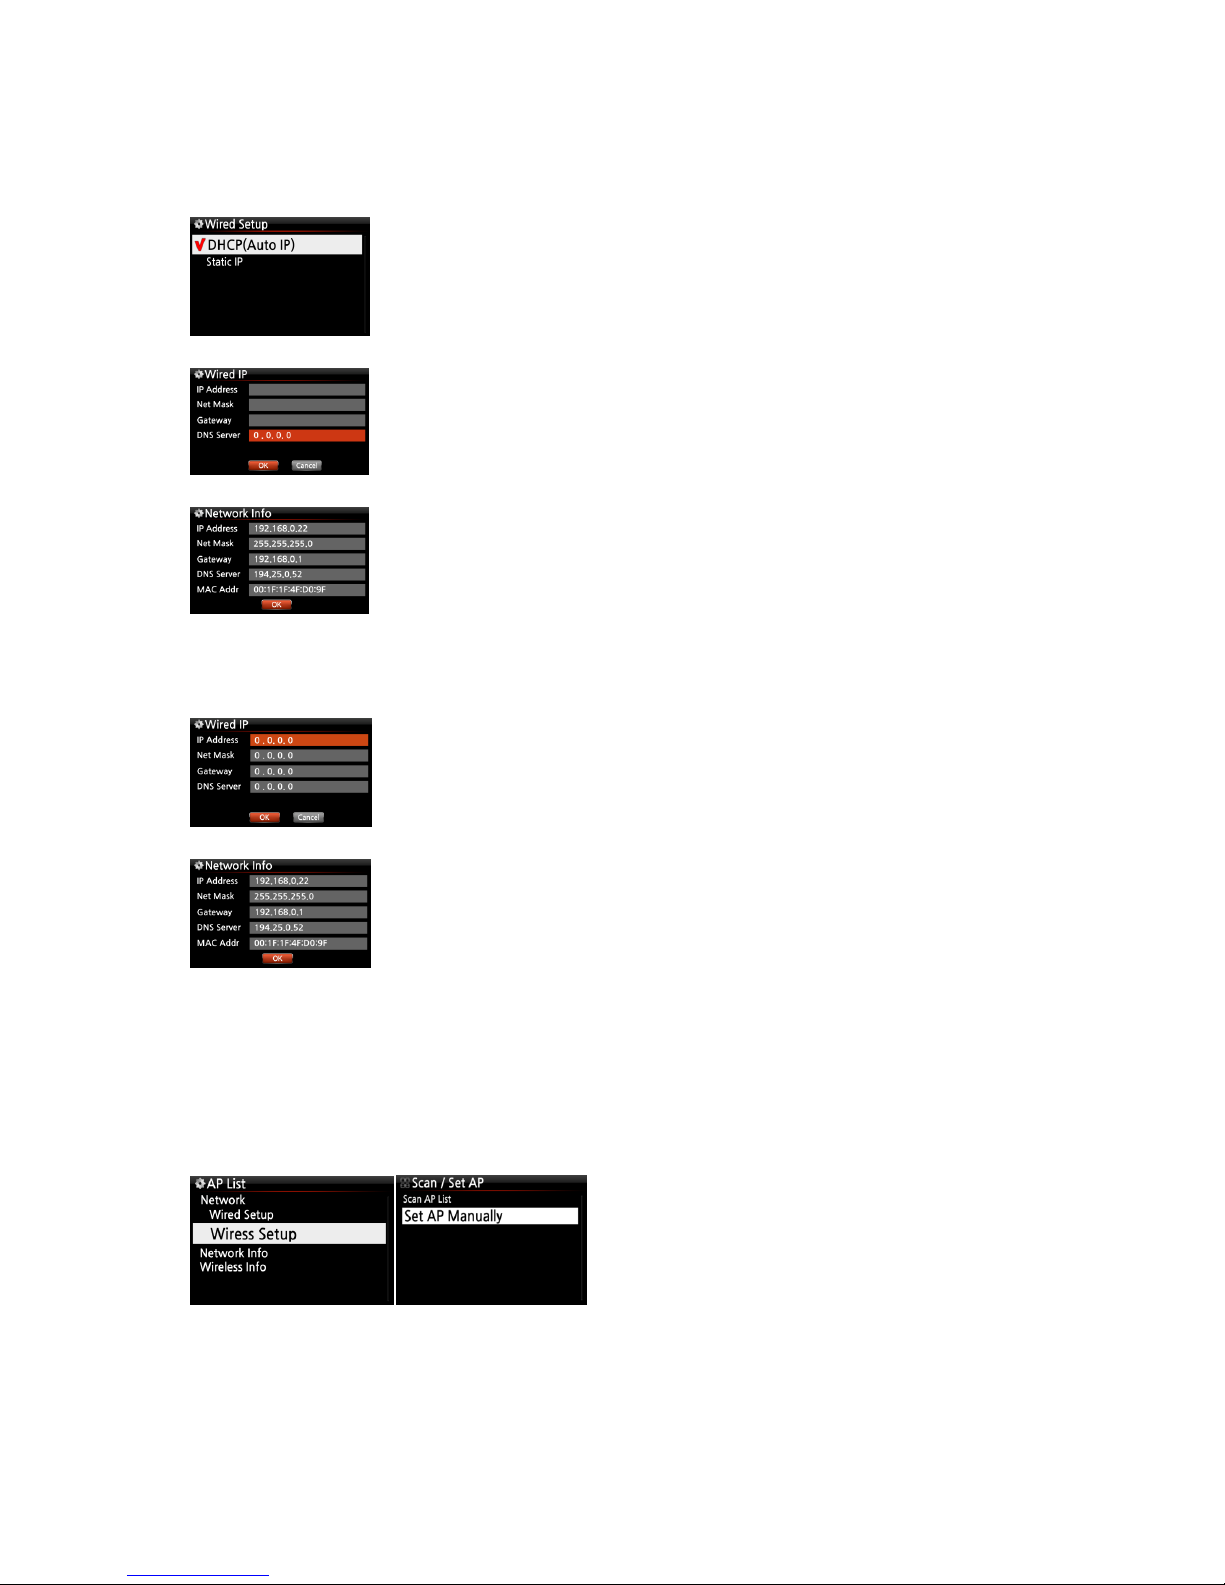
5-4-1. Wired Setup
5-4-1-1. DHCP(Auto IP)
5-4-1-2. Static IP
5-4-2. Wireless Setup.
The X12 offers two kinds of method for wireless network connection
5-4-2-1 Scan AP List (Open SSID)
③ Select DHCP(Auto IP) and confirm with the OK button.
There is no need to enter any values.
④ Select OK and confirm with the OK button.
① Select Static IP and confirm with the OK button.
② Enter the values such as; IP Address, Subnet mask, etc.
③ Select OK and confirm with the OK button
⑤ The screenshot shown on the left will be displayed if the
network is connected successfully.
④ The screen to the left will be shown if the network is
connected successfully.
① Select ‘Wireless Setup’ and confirm with
OK key.
② Select ‘Scan Ap List’. All AP available will
be listed up.
 Loading...