

Page 1

ZHSGBZHT
Wireless TV Streamer
User Manual
Manufacturer:
Cochlear Bone Anchored Solutions AB
Konstruktionsvägen 14, 435 33 Mölnlycke, Sweden
Tel: +46 31 792 44 00 Fax: +46 31 792 46 95
Regional offices:
Cochlear Ltd (ABN 96 002 618 073) 1 University Avenue, Macquarie University, NSW 2109,
Australia Tel: +61 2 9428 6555 Fax: +61 2 9428 6352
Cochlear Americas 13059 E Peakview Avenue, Centennial, CO 80111, USA
Tel: +1 303 790 9010 Fax: +1 303 792 9025
Cochlear AG EMEA Headquarters, Peter Merian-Weg 4, 4052 Basel, Switzerland
Tel: +41 61 205 0404 Fax: +41 61 205 0405
www.cochlear.com
ACE, Advance Off-Stylet, AOS, AutoNRT, Autosensitivity, Beam, Clinicnet, Cochlear, Codacs, Contour,
Contour Advance, Custom Sound, ESPrit, Freedom, Hear now. And always, Hybrid, inHear, Invisible
Hearing, MP3000, myCochlear, NRT, Nucleus, Nucleus in Chinese characters, Off-Stylet, SmartSound,
Softip, SPrint, the elliptical logo and Whisper are either trademarks or registered trademarks of
Cochlear Limited. Ardium, Baha, Baha Divino, Baha Intenso, Baha PureSound, Baha SoftWear,
DermaLock, Vistafix and WindShield are either trademarks or registered trademarks of Cochlear Bone
Anchored Solutions AB. Dolby and the dolby-D symbol are trademarks of Dolby Lab. © Cochlear Bone
Anchored Solutions AB 2015. All rights reserved. FEB15.
ZONE 10
Page 2

1
5
7
6
3 4
11
12
8
9
10
7
2 3
6 1 4 5
A
3
1
2
2
Cochlear Baha Remote Control
**
GB
Welcome
Congratulations on your purchase of a Cochlear™ Wireless TV Streamer.
Page 3
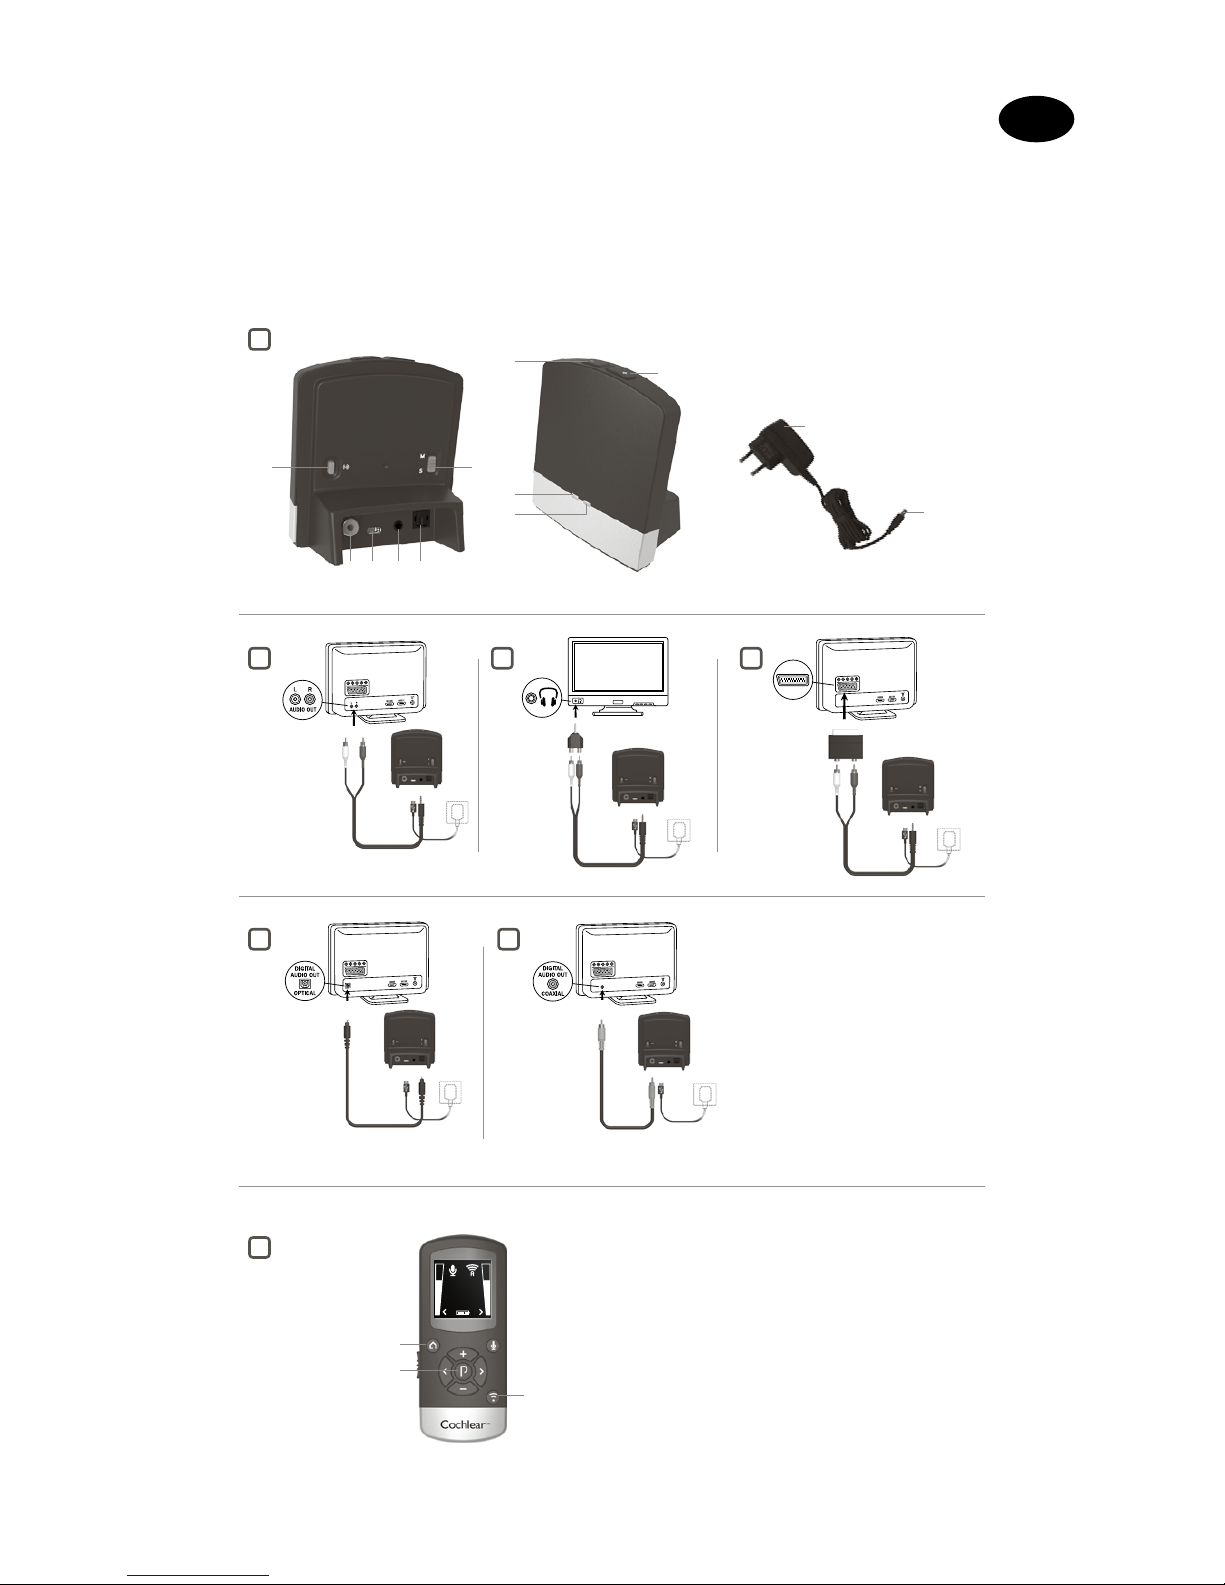
Key to device Se e figure
1
1. Micro-USB power socket
2. Pairing button
3. Mono/stereo switch
4. Analogue mini-jack audio input
5. Optical (Toslink) audio input
6. Coaxial audio input
7. Increase volume
8. Decrease volume
9. Power light (green)
10. Activity light (yellow)
11. Wall plug
12. Micro-USB plug
Introduction
The Cochlear Wireless TV Streamer will provide you with high quality
streamed audio from your TV, stereo, personal computer or similar device
directly to your sound processors.
Please read this manual carefully to fully benefit from the Cochlear Wireless
TV Streamer. Ask your hearing care professional if you have any questions. For
further information you can also visit the w ww.cochlear.com web site.
For your safety, carefully read the chapter “Important Information”.
Warranty
The warranty does not cover defects or damage arising from, associated with,
or related to the use of this product with any non-Cochlear processing unit
and/or any non-Cochlear implant. See “Cochlear Global Limited Warranty
card” for more details.
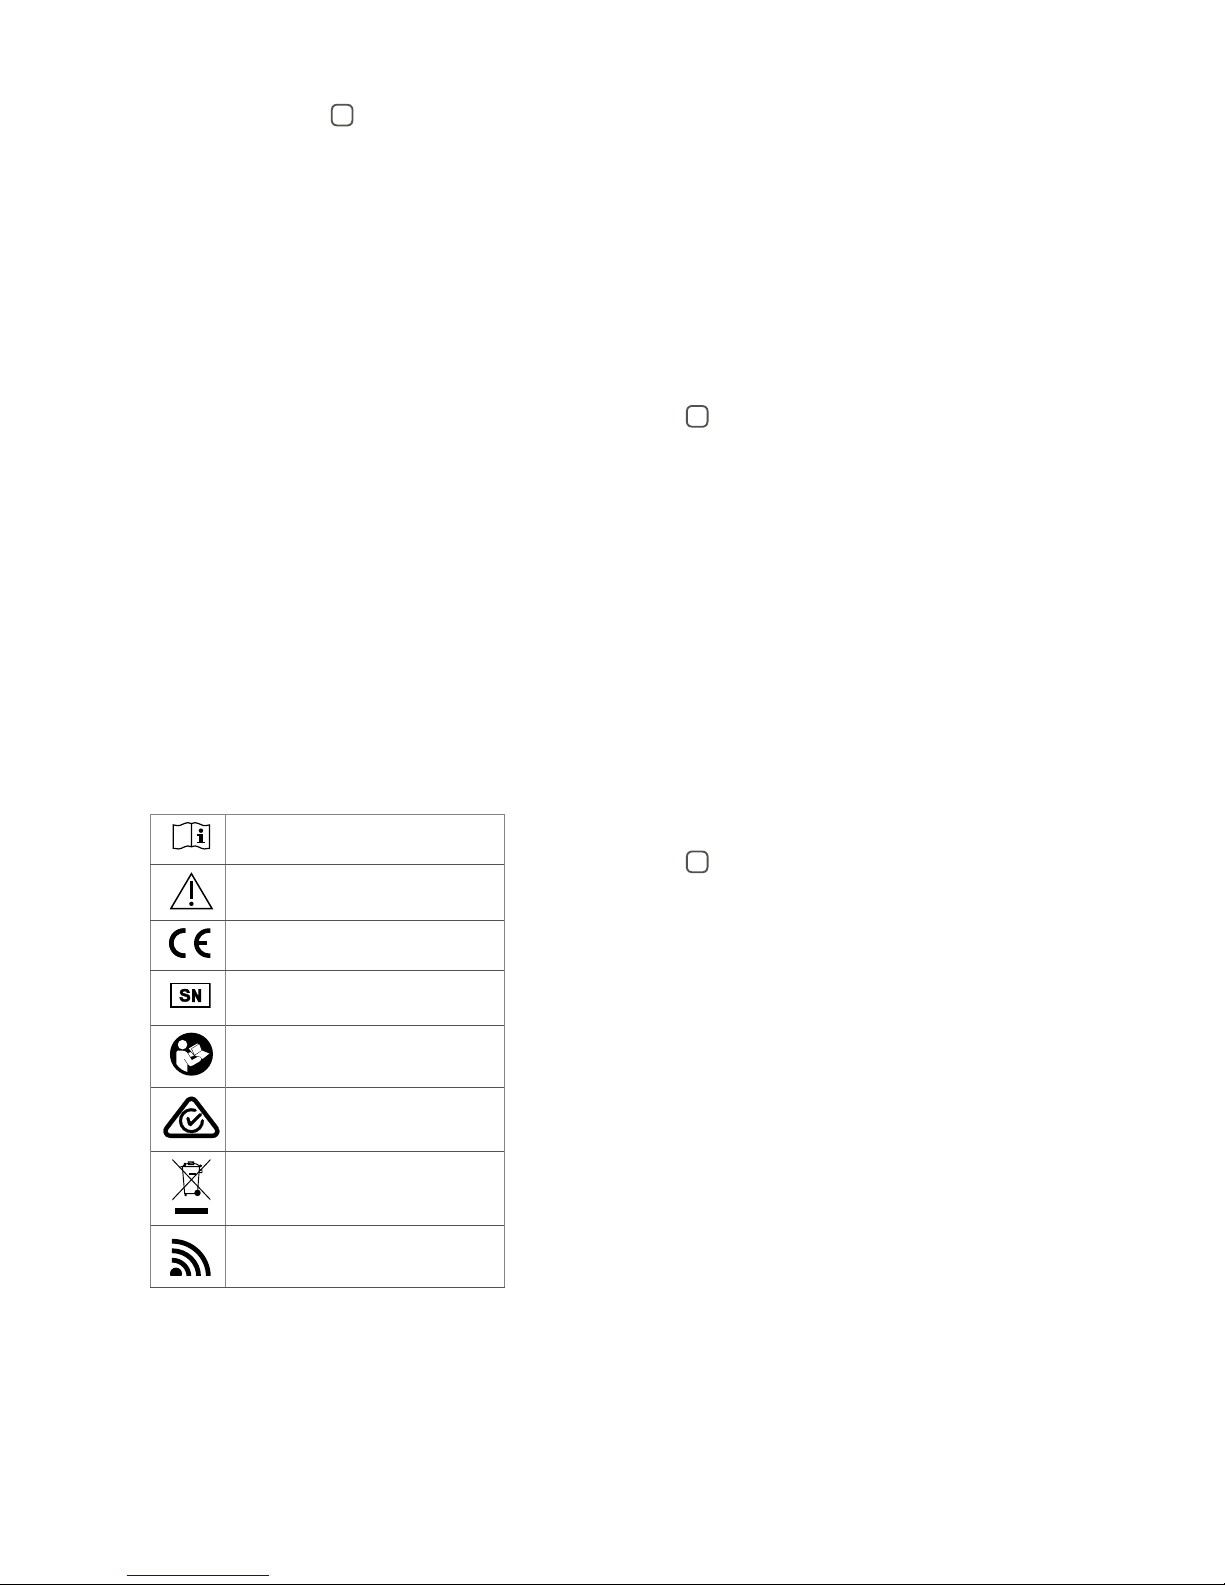
Key to symbols
The following symbols will be used throughout this document.
“Consult instructions for use” or
“Operating instructions”
“Caution” or “Caution, consult
accompanying documents”
CE-mark
Serial Number
Refer to instructions/booklet
ACMA (Australian Communications and
Media Authority) compliant
Please ask your hearing care professional
concerning disposal of this device.
Wireless enabled
Getting Started
Installing the TV Streamer
Depending on your T V, stereo, computer or other audio setup, the installation
of the TV Streamer may be done in several ways, which are described in the
following section. The following steps will guide you through the pairing and
connecting process. Start by connecting cables between the T V Streamer
and the audio source and finish by pairing the TV Streamer to your sound
processors.
Note: The T V Streamer supports both analogue and digital audio input.
Please read the following sections for information about supported audio
formats and how to connect the T V Streamer to audio sources.
Connecting the TV Streamer to an analogue audio
source (e.g. TV or stereo):
See fig ure
2
1. Connect the power supply to the wall socket and insert the cable into the
micro-USB socket on the TV Streamer.
2. Inser t the male stereo mini-jack on the audio cable into the female stereo
mini-jack input on the TV Streamer [no. 4 in figure 1].
3. Plug the other end audio cord into the “AUDIO OUT” terminals on the
audio source. The “AUDIO OUT” is usually marked “L – R” for left and right,
and can usually be found on the back of the audio source.
Note: With this installation, most audio sources will send sound to both
sound processors and additional speakers connected to the audio source
simultaneously. On some audio sources you can adjust the balance
between the AUDIO OUT and the speakers. Consult your audio source
manual for instructions.
Alternative analogue audio cable installations:
If it is not possible to connect the TV Streamer to the AUDIO OUTPUT of
the audio source using the red and white plugs, the following installation
alternatives can be used:
Mini-jack adaptor:
See fig ure
3
1. Connect the power supply to the wall socket and insert the cable into the
micro-USB socket on the TV Streamer.
2. Inser t the male stereo mini-jack on the audio cable into the female stereo
mini-jack input on the TV Streamer [no. 4 in figure 1].
3. Connect the stereo mini-jack adapter to the red and white plugs at the
other end of the audio cable.
4. Plug the stereo mini-jack adapter into the audio source’s “HEADPHONE”
output terminal or alternatively into your computer’s audio terminal.
Note: The HEADPHONE output socket is usually located on the side or
front of the audio source. When using the HEADPHONE socket, usually
only the person wearing the sound processors will hear the sound and
audio source speakers are muted. If muted speakers are not desired,
please refer to the first installation, or the one in the following chapter.
Your audio source may support speakers and HEADPHONE being on
simultaneously; check your audio source manual for instructions.
Page 4
Scart adapter:
See fig ure
4
1. Connect the power supply to the wall socket and insert the cable into the
micro-USB socket on the TV Streamer.
2. Inser t the male stereo mini-jack on the audio cable into the female stereo
mini-jack input on the TV Streamer [no. 4 in figure 1].
3. Connect the scart adapter to the red and white plugs at the other end of
the audio cable.
4. Plug the scart adapter into the audio source’s scart terminal. Note: The
scar t output terminal is usually located on the back or side of the audio
source.
Please consult your audio source’s manual if additional scart output
configuration is needed.
Connecting the TV Streamer to a digital audio source
(e.g. TV or stereo)
Note: The T V Streamer supports both analogue and digital audio input.
When using digital audio input the following formats are supported:
Stereo PCM
- Sample rate: Up to 192 kHz
- Sample resolution: Up to 32 bit
Dolby Digital
- Channels: Max 5.1
- Bitrate: 32 kbs to 640 kbs
- Sample rate: 32, 44.1 and 48 kHz
Note: Dolby Digital Plus (requiring an HDMI inter face), Dolby TrueHD,
Dolby Pro Logic, Dolby Digital EX, Dolby Digital Surround EX, and AAC
(Advanced Audio Coding) are not supported.
Using the optical (Toslink) audio input
See fig ure
5
1. Connect the power supply to the wall socket and insert the cable into the
micro-USB socket on the TV Streamer.
2. Inser t one of the plugs on the optical audio cable into the optical audio
input socket [no. 5 in figure 1] on the TV Streamer.
Note: Most optical cables are delivered with a small protective cap to protect
the tip of the cable. Please remove this protective cap before inserting the
cable.
3. Plug the other end of the optical audio cable into the “Digital Audio Out/
Optical” on your audio source.
Using the coaxial audio input
See fig ure
6
1. Connect the power supply to the wall socket and insert the cable into the
micro-USB socket on the TV Streamer.
2. Connect one of the plugs on the coaxial audio cable to the coaxial plug [no.
6 in figure 1] on the TV Streamer.
3. Plug the other end of the coaxial audio cable into the “Digital Audio Out/
Coaxial” on your audio source.
Pairing with your sound processors
You can pair up to three Cochlear streaming devices with your Cochlear sound
processor.
Select a separate channel for each device paired with the sound processor.
Pairing the TV Streamer in channel 1
1. Make sure that the TV Streamer power supply is plugged into a wall socket
and that the green light indicator on the front of the TV Streamer [no. 9 in
figure 1] is ON. Your sound processors must be OFF.
2. Press the pairing button on the T V Streamer [no. 2 in figure 1] once. The
yellow indicator light on the front of the TV Streamer [no. 10 in figure 1] will
now flash once every 2 seconds to indicate that the TV Streamer is ready
to be paired in channel 1. Your TV Streamer will remain in pairing mode for
20 seconds.
3. While pairing mode is active, turn on your sound processor.
Successful pairing will be indicated by either an audible melody played in the
sound processor, or by a flashing light on the sound processor (depending on
the type of sound processor).
Pairing the TV Streamer in channel 2
1. Press the pairing button twice. The yellow indicator light on the front of the
TV Streamer will now flash twice every 2 seconds to indicate that it is ready
to be paired in channel 2.
2. While pairing mode is active, turn on your sound processor.
Pairing the TV Streamer in channel 3
1. Press the pairing button three times. The yellow indicator light on the front
of the TV Streamer will now flash three times every 2 seconds to indicate
that it is ready to be paired in channel 3.
2. While pairing mode is active, turn on your sound processor.
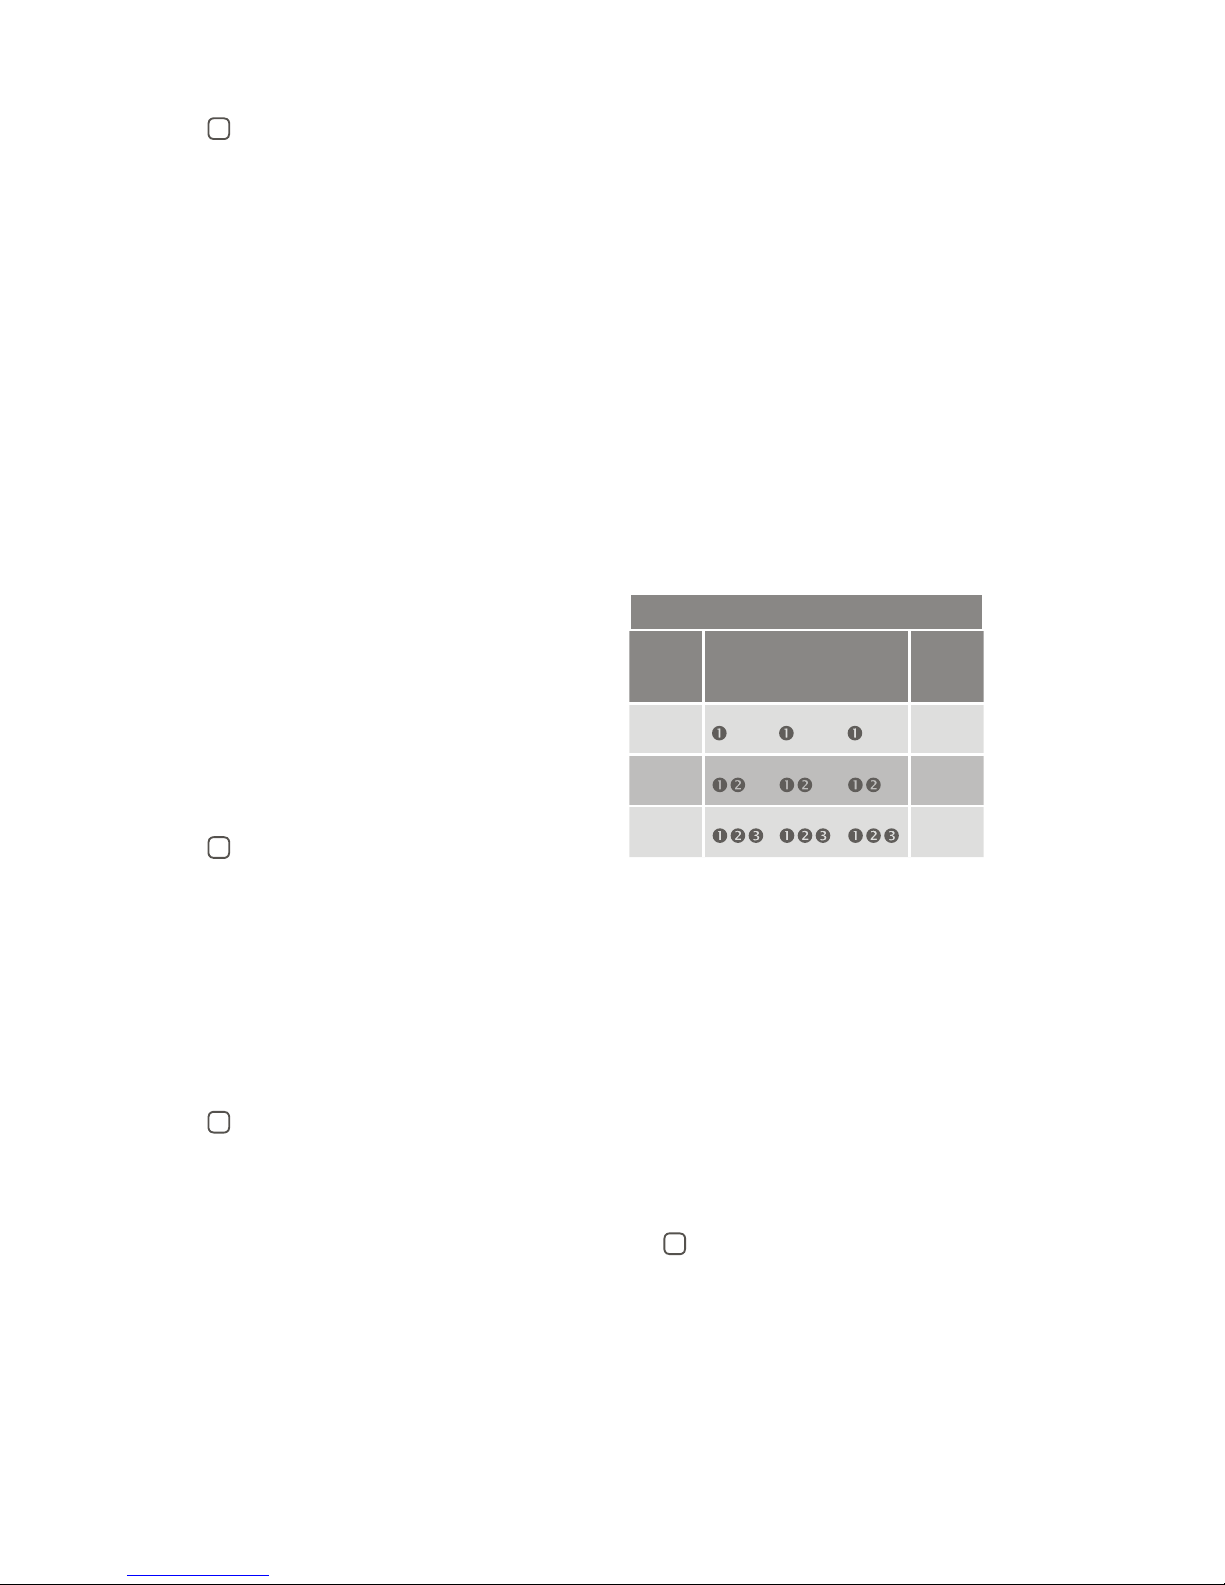
Pairing flashing pattern
Pairing
button
pushes
LED blinking pattern Channel
1
1
2
2
3
3
Streaming
Start streaming
Turn on the T V, stereo, computer or other audio device connected to the TV
Streamer. Make sure your sound processors are turned on as well. Streaming
may be started in one of two ways:
Option A
1. Press and hold the wireless streaming button on your sound processor for
about three seconds.
2. An audible melody or a flashing light (depending on the type of sound
processor) will be followed by streamed audio via the TV Streamer.
Option B
If you have a Cochlear Baha Remote Control** (optional), simply press the
streaming button [no. 3 in figure 7] on this Baha Remote Control**. For more
information, refer to the Baha Remote Control** manual.
Start streaming on a 2nd or 3rd TV Streamer unit Se e
figure
7
If your sound processor is paired with more than one streaming device, you
can start streaming in two ways.
Option A
Press and hold the wireless streaming button on your sound processor for
about three seconds a 2nd or 3rd time to access the 2nd or 3rd Cochlear
streaming device.
Option B
Press the streaming button on a Baha Remote Control** a 2nd or 3rd time to
access the 2nd or 3rd Cochlear streaming device.
Page 5

The Cochlear streaming device(s) are indicated by the letters A, B or C, and the
streaming device in use is shown on the Baha Remote Control** display.
Stop streaming
• Briefly press the streaming button on your sound processor. This will cancel
streaming and return to the last program used.
• To stop streaming with the Baha Remote Control** press the “P” button,
located in the center of the key pad.
• If you are using the telephone with Cochlear Wireless Phone Clip, streaming
from the TV Streamer will be temporarily disrupted. When you have ended
your phone call, streaming will resume.
Note: If you move out of your T V Streamer range (>7m) but return
within the range before 5 minutes have passed, your sound processor will
automatically reconnect and continue streaming.
Controls
Volume control
The T V Streamer is designed to provide a comfortable listening level from the
moment it is activated. However, for some devices or listening environments,
it may be desirable to adjust the listening volume and doing so can be
accomplished in a variety of ways. Keep in mind that volume adjustments
on the T V Streamer apply to the streamed signal only, not to the volume of
normal environmental sounds. Use the “+” and “-” keys [no. 7 and 8 in figure 1]
to adjust volume to a comfortable level. Make sure that your sound processors
are comfortably adjusted before you change the settings with the volume
control. In most cases this adjustment should only be made once since the TV
Streamer will store the most recently set volume level. Use the Baha Remote
Control 2** (optional) to adjust both the streaming volume level and the
sound processor microphone volume level. Ask your hearing care professional
for more information about this accessory. The volume can, in some cases,
be further adjusted at the signal source, for example by turning the TV
volume down. This will adjust the volume of the streamed sound transmitted
wirelessly to the sound processors. Adjusting the TV volume will affect the
listening volume in the room as well.
Adjusting sound processor and streaming volume is only possible with the
Cochlear Baha Remote Control** and Cochlear Baha Sound Processor.
Mono/stereo control
The two-position switch [no. 3 in figure 1] may be used to set Stereo (two
channels) or Mono (one channel) audio streaming. For binaural fittings, the
switch should preferably be set to the Stereo position. For monaural fitting it
should be set to the Mono position.
Adjustable delay mode
In rare cases there may be a misalignment between the audio streamed to the
sound processors and the sound coming from the TV speakers (echo) or even
a misalignment between the streamed audio and the TV picture (lip-sync).
This may be evident in more complex audio setups where the TV Streamer is
not connected directly to the TV (e.g. through a set-top box or other auxiliary
unit). To overcome such misalignments the streaming delay from the TV
Streamer can be adjusted as follows:
1. Make sure that the TV Streamer is turned on and that your sound
processors are receiving the streamed audio.
2. Press and hold the pairing button [no. 2 in figure 1] for 3 seconds. The
TV Streamer will then enter the adjustable delay mode where the green
indicator light on the front of the TV Streamer will flash once every 2
seconds. The yellow indicator light will be on whenever an audio signal is
present.
3. Use the “+” and “-” key [no. 7 and 8 in figure 1] on the top of the T V
Streamer to increase or decrease the delay of the streamed signal in 10-ms
steps. The streamed signal can be delayed in the range of 0-250 ms.
4. When the optimal alignment between the audio streamed to the sound
processors and the sound coming from the TV speakers or alignment
between the streamed audio and the TV picture has been reached, press
and hold the paring button for 3 seconds. Now the TV Streamer will resume
normal operation, indicated by the green indicator light being constantly on.
The offset set in adjustable delay mode will be stored in the T V Streamer. If
you do not exit the adjustable delay mode by pressing and holding the pairing
button for 3 seconds, the TV Streamer will automatically resume normal
operation after 30 minutes. To reset the delay to 0 ms (factory setting),
press and hold the pairing button while simultaneously powering on the TV
Streamer.
Important Information
Maintenance and Care
• Clean the TV Streamer using a damp cloth. Never use household cleaning
products (washing powder, soap, etc.) or alcohol to clean the device.
• When the TV Streamer is not being used for extended periods, unplug the
power supply from the wall socket.
General warnings
• Keep this device out of reach of children.
• The TV Streamer uses low-powered digitally coded transmissions in order
to communicate with other wireless devices. Although unlikely, nearby
electronic devices may be affected. In such cases, move the TV Streamer
away from the affected electronic device.
• When using the TV Streamer and it is affected by electromagnetic
interference, move away from the source of the interference.
Power supply warning
• Use the T V Streamer only with the power supply unit that was supplied with
the product.
• The use of other power suppliers may damage or destroy the product
and could be dangerous. Use of other power suppliers may invalidate any
approval or void the warranty.
• When you disconnect the power cord or any accessory, grasp
and pull the plug, not the cord.
• Never use a power supply that is damaged.
• Do not attempt to disassemble the power supply because it may expose you
to a dangerous electric shock.
• Do not use the power supply outdoors or in damp areas.
General precautions
• Your sound processors and this device were given unique communication
codes during fitting. This ensures that the device will not affect sound
processors worn by others.
• High-powered electronic equipment, larger electronic installations and
metallic structures may impair and significantly reduce the operating range.
• Use only original Cochlear accessories.
• Do not alter or modify this device.
• Opening the TV Streamer might damage it. If problems occur that cannot be
resolved, consult your hearing care professional.
• The TV Streamer may only be repaired by an authorized service centre.
• Do not use the TV Streamer in areas where RF transmission is prohibited,
e.g., in planes, etc.
• Only connect the T V Streamer to connections for which it is explicitly
intended.
Page 6

Technical specifications
Operating range Up to 7 meters
Power supply External wall adapter
Wireless 2,4 GHz
Operating
temperature
0 to 55 °C
Storage
temperature
-20 to 60 °C
Temperature test, transport and storage information
The product is subject to various tests in temperature and damp heating
cycling between -25 °C and +70 °C according to internal and industry
standards.
Wireless Accessory type designations for models
included in this User Manual are:
FCC ID QZ3SAS-3, IC 8039C-SAS3, IC model: SAS-3
Statement
This device complies with Part 15 of the FCC Rules. Operation is subject
to the following two conditions: (1) this device may not cause harmful
interference, and (2) this device must accept any interference received,
including interference that may cause undesired operation. Note: This
equipment has been tested and found to comply with the limits for
a Class B digital device, pursuant to part 15 of the FCC Rules. These
limits are designed to provide reasonable protection against harmful
interference in a residential installation. This equipment generates, uses
and can radiate radio frequency energy and, if not installed and used in
accordance with the instructions, may cause harmful interference to radio
communications. However, there is no guarantee that interference will
not occur in a particular installation. If this equipment does cause harmful
interference to radio or television reception, which can be determined by
turning the equipment off and on, the user is encouraged to try to correct
the interference by one or more of the following measures:
• Reorient or relocate the receiving antenna.
• Increase the separation between the equipment and receiver.
• Connect the equipment into an outlet on a circuit different from that to
which the receiver is connected.
• Consult the dealer or an experienced radio/ TV technician for help.
• Changes or modifications can void the user’s authority to operate the
equipment.
List of countries:
The products are in compliance with the following regulatory
requirements:
• In EU: the device conforms to the Essential Requirements according
to Annex I of Council Directive 93/42/EEC for medical devices (MDD)
and essential requirements and other relevant provisions of Directive
1999/5/EC (R&TTE). The declaration of conformity may be consulted at
www.cochlear.com.
• Products with wireless functionality are intended for sale in countries
within the European Economic Area as well as Switzerland. Specification
of restrictions: You are not allowed to operate the equipment within 20
km of the centre of Ny Ålesund, Norway.
• In US: FCC CFR 47 Part 15, subpart C, section 15.249.
• Other identified applicable international regulatory requirements
in countries outside the EU and US. Please refer to local country
requirements for these areas.
• Products are in compliance with EN 300 328.
• In Canada the TV Streamer is cer tified under the following certification
number: IC:8039C-SAS3.
• This device complies with Industry Canada license exempt RSS
standard(s)
• This Class B digital apparatus complies with Canadian ICES-003. Cet
appareil numérique de la classe B est conforme à la norme NMB-003
du Canada.
• Operation is subject to the following two conditions: (1) this device may
not cause interference, and (2) this device must accept any interference,
including interference that may cause undesired operation of the device.
L’exploitation est autorisée aux deux conditions suivantes : (1) l’appareil
ne doit pas produire de brouillage, et (2) l’utilisateur de l’appareil doit
accepter tout brouillage radioélectrique subi, même si le brouillage est
susceptible d’en compromettre le fonctionnement.
• Equipment includes RF transmitter.
• SAS-3: MSIP-CRI-1CK-SAS-3
해당 무선 설비는 전파혼신 가능성이 있으므로 인명안전과
관련된 서비스는 할 수 없음
** Note: The Baha Remote Control is optional and works only with
Baha Sound Processors.
Page 7
1
5
7
6
3 4
11
12
8
9
10
7
2 3
6 1 4 5
A
3
1
2
2
Cochlear Baha Remote Control
**
ZHS
欢迎使用
祝贺您购买了 Cochlear™ Wireless TV Streamer。
Page 8

设备示意图
请参见图
1
1. Micro-USB 电源插孔
2. 配对按钮
3. 单声道/立体声开关
4. 模拟微型插孔音频输入
5. 使用光纤 (Toslink) 音频输入
6. 同轴音频输入
7. 提高音量
8. 降低音量
9. 电源灯(绿色)
10. 活动灯(黄色)
11. 壁式插头
12. Micro-USB 插头
引言
Cochl ear Wirele ss TV Stre amer(电视适配器) 可以将电视机、立体声设备、
个人电脑或类似设备的音频高质量地直接传送到您的声音处理器。
请 仔 细 阅 读 本 手 册 ,充 分 受 益 于 Cochlear Wireless TV Streamer。如 有 任
何问题,请向听力保健专业人员咨询。
有关更多信息,您还可以访问网站:www.cochlear.com。
为了您的安全起见,请仔细阅读“重要提示”一章。
质保
因将本产品与任何非 Cochlear 处理单元和/或任何非 Cochlear 植入体
一起使用而引起的或与此相关的缺陷或损坏不在质保范围内。更多详
细 信 息 ,请 参 阅“ Cochlear 全 球 有 限 质 保 卡 ”。
符号说明
本文 档中使用了以下符号:
“参阅使用说明”或“操作说明”
“小 心”或“小 心,请 参阅 随附文 档”
CE标志
序列号
参阅说明/手册
符合澳大利亚通讯与媒体局 (ACMA)
的要求
关于如何丢弃此产品,请向您的听力
保健专业人员咨询。
无线已启用
开始使用
安装电视适配器
采用下面一节介绍的多种方式,均可以安装电视适配器,这取决于您
的电视机、电脑或其他音频设置。以下步骤将指导您完成配对和连接
过程。首先连接电视适配器与音源之间的数据线,最后将电视适配器
与声音处理器配对。
注:电视适配器支持模拟和数字音频输入。关于哪些音频格式被支持,
以及如何将 电视适 配器连接到音源,请阅读以下部分。
将电视适配器连接到模拟音源(例如电视机或立体声设
备)
参见图
2
1. 将电源连接到壁式插座,并将电源线插入电视适配器上的 micro-USB
插孔内。
2. 将音 频线上 的立体声公微 型插孔插入电视 适配器上的立体声母微型
插孔[图 1 中的第 4 项]。
3. 将音频线的另一端插入音源的“音频输出”终端。
“音频输出”一般标有表示左和右的“L – R”,这 一 般 在 音 源 的 背
面。
注:通过该安装方式,大多数音源可同时将声音传送到两个声音处理器和
连接到音源的附加扬声器。在某些音源上,您可以调整“音频输出”与扬
声器之间的平衡。请参阅音源手册中的说明。
替代模拟音频线安装:
如果无法用红色和白色插头将电视适配器连接到音源的“音频输出”,
可以使用以下替代安装方式:
微型插孔适配器:
参见图
3
1. 将电源连接到壁式插座,并将电源线插入电视适配器上的 micro-USB
插孔内。
2. 将音 频线上 的立体声公微 型插孔插入电视 适配器上的立体声母微型
插孔[图 1 中的第 4 项]。
3. 将立体声微型插孔适配器连接到音频线另一端的红色和白色插头。
4. 将立体声微型插孔适配器插入音源的“耳机”输出终端或插入电脑
的音频终端。
注:“耳 机”输出 插孔一般位于 音源 的前 面或侧面。在 使用“耳机”插孔
时,一般只有戴着声音处理器的人才能听到声音,音 源扬声器将进入静音
状态。如果不想让扬声器静音,请参考第一种安装,或下一章中的安装。
您的音源可能支持同时开启扬声器和耳机;请 查阅音源手册中的说明。
Scart 接头适配器:
参见图
4
1. 将电源连接到壁式插座,并将电源线插入电视适配器上的 micro-USB
插孔内。
2. 将音 频线上的立体声公微 型插孔 插入电视 适配器上 的立体声母微 型
插孔[图 1 中的第 4 项]。
3. 将 Scart 连接适配器连接到音频线另一端的红色和白色插头。
4. 将 Scart 连接适配器插入音源的 Scart 连接头终端。注:Scart 连接头
输出终端一般位于音源的背面或侧面。
如需更多 Scart 连接头输出配置,请参考音源手册。
Page 9

将电视适配器连接到数字音源
(例如电视机或立体声设备)
注:电视适配器支持模拟和数字音频输入。
在使用数字音频输入时,支持以下格式:
立体声 PCM
- 采样速率:可达 192 kHz
- 采样解析度:可达 32 位
杜比数字
- 通道:最大 5.1
- 比特率:32 kbs 至 640 kbs
- 采样速率:32、44.1 和 48 kHz
注 :不 支 持 Dolby Digital Plus(需要 HDMI 接 口 )、Dolby TrueHD、Dolby
Pro Logic、Dolby Digital EX、Dolby Digital Surround EX 以及 AAC(高级
音 频 编 码 )。
使用光纤 (Toslink) 音频输入
参见图
5
1. 将电源连接到壁式插座,并将电源线插入电视适配器上的 micro-USB
插孔内。
2. 将光纤音频线的一个插头插入电视适配器上的光学音频输入插孔[
图1 中的 5 项]。
注:大 多数 光纤 线均 带有小 型保护帽,用以保护 线头。请 去除保护帽,
然后再 插入音频线。
3. 将光纤音频线的另一端插入音源上的“数字音频输出/光纤”孔。
使用同轴音频输入
参见图
6
1. 将电源连接到壁式插座,并将电源线插入电视适配器上的 micro-USB
插孔内。
2. 将同轴音频线的一个插头连接到电视适配器上的同轴插头[图 1 中
的 6 项]。
3. 将同轴音频线的另一端插入音源上的“数字音频输出/同轴”孔。
与声音处理器配对
Cochlear 声音处理器最多可以与3 个 Cochlear 声流设备配对。
为与声音处理器配对的每个设备设置一个单独的通道。
在通道 1 中配对电视适配器
1. 确保电视适配器电源已插入壁式插孔,且电视适配器前的绿色指示
灯[图 1 中的第 9 项]亮起。声音处理器必须关闭。
2. 按 电 视 适 配 器 上 的 配 对 按 钮 [ 图 1 中的第 2 项] 1 次 。现 在 ,电 视 适 配
器前的黄色指示灯[图 1 中的第 10 项]将每隔 2 秒闪烁 1 次 ,表 示 电
视适配器已准备好在通道 1 配对。电视适配器处于配对模式 20 秒。
3. 在激活配对模式的情况下,打开声音处理器。
声音处理器将播放一段旋律音频或闪光来提示配对成功(取决于声音
处 理 器 的 类 型)。
在通道 2 中配对电视适配器
1. 按 配 对 按 钮 2 次。现在,电视适配器前的黄色指示灯将每隔 2 秒闪
烁 2 次,表示电视适配器已准备好在通道 2 配对。
2. 在激活配对模式的情况下,打开声音处理器。
在通道 3 中配对电视适配器
1. 按 配 对 按 钮 3 次。现在,电视适配器前的黄色指示灯将每隔 2 秒闪
烁 3 次,表示电视适配器已准备好在通道 3 配对。
2. 在激活配对模式的情况下,打开声音处理器。
配对闪烁图案
按配对
按钮
LED 闪烁图案
通道
1
1
2
2
3
3
声流
启动声流模式
打开连接到电视适配器的电视 机、立体声设备、电脑或其他声音设备。
确保声音处理器也打开。启动声流有两种方法:
选项 A
1. 按住声音处理器上的无线声流按钮约 3 秒。
2. 在旋律音频或闪光(取决于声音处理器的类型)提示后,将通过电视
适配器 传送流式音 频。
选项 B
如有 Cochlear Baha Remote Control (远程助手)**( 选 配),只需按 Baha 远
程 助 手* *上的声 流按钮[图 7 中的第 3 项]。更多信息,请参阅 Baha 远
程助 手* *手册。
在第 2 或第 3 只电视适配器上启用声流
参见图
7
如果声音处理器与多个声流设备配对,您可以用两种方式启动声流。
选项 A
第二或第三次按住声音处理器上的声流 按钮约两秒,
可访问第二或第三个 Cochlear 声流设备。
选项 B
第二或第三次按住 Baha 远程助手**上 的 声 流 按 钮 约 两 秒 ,可 访 问 第 二
或第三个 Cochlear 声流设备。
Cochlear 声流设备的指示符为字母 A、B 或 C,且 Baha 远程助手**显示
屏上将显示在用的声流设备。
停止声流
• 短按一下声音处理器上的声流按钮。这将取消声流并返回上次使用
的程 序。
• 要用 Baha Remote Control(远 程 助 手)**来 停 止 声 流 ,可 按 软 键 盘 中
心 的“ P”按 钮 。
• 如果您正借助 Cochlear Wireless Phone Clip(蓝 牙 电话转 接 器)打 电
话,则来自电视适配器的声流将暂时中断。挂电话后,声流将恢复。
注:如果您走出电视适配器的最大工作距离之外(>7 米 ),但在 5 分钟内
重新进入这个范围,声音处理器将自动重新连接,并继续处理声流。
Page 10

控制
音量控制
电 视 适 配 器 的 设 计 能 够 在 其 被 激 活 时 ,提 供 舒 适 的 聆 听 音 量 。但 是 ,对
于某些设备或聆听环境,可能需要调整音量,而这可以通过多种方法
完成。请 记住,对电视适配器的音量调整仅适用于声流传送信号,不适
用于常规环境声音音量。使用“+”和“ -”键 [ 图 1 中的第 7 和 8 项 ] ,将
音量调整到一个舒适的水平。确保已经将声音处理器调整到一个舒适
的音量水平,然后再用音量控制更改设置。在绝大多数情况下,这种调
整应当只进行 1 次,因为电视适配器将储存最近设置的音量水平。使用
Baha Remote Control 2** (二代远程助手)(选配)调整声流音量水平和
声音处理器麦克风音量水平。关于该附件的更多信息,请向听力保健专
业人员咨询。在某些情况下,可以在信号源进一步调整音量,例如调低
电视音量。这将调整通过蓝牙传送到声音处理器的声流传送声音的音
量。调整电视音量还会影响房间内听到的音量。
只有通过 Cochlear Baha Remote Control** (远程助手) 和 Cochlear Baha
声音处理器,才可以调整声音处理器和声流音量。
单声道/立体声控制
可以用两档开关[图 1 中的第 3 项],设置立体声(双通道)或单声道(单
通 道 )音 频 流 。对 于 双 耳 验 配 ,最 好 将 此 开 关 置 于“ 立 体 声 ”位 。对 于 单
耳验配,应将其置于“单声道”位置。
可调延迟模式
在很少的情况下,传送到声音处理器的音频和来自电视扬声器的声音(
回音)之间可能会产生失调,甚至在传送的音频与电视画面之间产生失
调(对口型)。在电视适配器不是直接连接到电视机(例如 通过机顶 盒
或其他辅助设备)的更复杂音频设置情况下,这更明显。为了克服这种
失调,可通过以下方式,调整电视适配器的声流延迟:
1. 确保打开了电视适配器,且声音处理器正在 接收传送的音频。
2. 按 住 配 对 按 钮 [ 图 1 中的第 2 项] 3 秒。然 后 电 视 适 配 器 将 进 入可 调 延
迟模式,这时电视适配器前的绿色指示灯将每 2 秒闪烁 1 次 。只 要 有
音频信号存在,黄色指示灯即会亮起。
3. 使 用 电 视 适 配 器 顶 上 的“ +”和“ -”键 [ 图 1 中的第 7 和 8 项],以 10
毫秒的步幅,增加或降低传送信号的延迟。传送信号的可延迟范围
是 0-250 毫秒。
4. 当在传送到声音处理器的音频和来自电视扬声器的声音之间实现最
佳匹配,或传送的音频与电视画面匹配时,按住配对按钮 3 秒。现
在,电视适配器将恢复正常运行,绿色指示灯常亮,表示这种状态。
可调延迟模式中的补偿设置将被保存在电视适配器中。如果不通过按
住配对 按钮 3 秒,退出可调延迟模式,电视 适配器将在 30 分钟后自动
恢 复 正 常 运 行 。要 将 延 迟 重 置 为 0 毫秒(出厂设置),在同步打开电视
适 配 器 的 同 时 ,按 住 配 对 按 钮 。
重要提示
维护与保养
• 请使用湿巾清洁电视适配器。切勿使用家用清洁产品
(洗衣粉、肥 皂等)或 酒精清洁设备。
• 长期不使用电视适配器时,从壁式插座中拔下电源。
一般警告
• 将设备放在儿童接触不到的地方。
• 电视适配器采用低功耗数字编码传输方式与其他无线设备通信。尽
管可能性不大,但是附近电子设备有可能会 受影响。在 这些情况下,请
将电视适配器移离受影响的电子设备。
• 在使用电视适配器且其受到电磁干扰时,请将其移离干扰源。
电源警告
• 仅使用电视适配器自带的电源为其供电。
• 使用其他电源可能会损坏或毁坏产品,并且有危险。
使用其他电源可能会使许可失效,或使质保无效。
• 在断开电线或任何附件时,请抓住并拔 插头,而非电线。
• 切勿使用损坏的电源。
• 请勿尝试拆散电源,因为这可能会给您带来电击危险。
• 请勿在户外或在潮湿区域使用电源。
一般注意事项
• 在验配期间,对声音处理器和此设备赋予了唯一通信编码。这可以确
保此设备不影响其他人佩戴的声音处理器。
• 高 功率电子 设备、大型电子装置和金属结构可能会影 响并显著缩短
工作距离。
• 请仅使用正品 Cochlear 附件。
• 请勿改变或修改此设备。
• 拆开电视适配器可能会对其造成损害。如果出现无法解决的问题,请
向听力保 健专业 人员咨询。
• 只有授权服务中心才可以维修电视适配器。
• 在禁止射频传输的环境中(如:飞机上),请勿使用电视适配器。
• 仅将电视适配器连接到其明确的目标连接。
技术规格
工作距离 最远可达 7 米
电源 插座适配器
无线
2,4 GHz
工作温 度
0 到 55 °C
存储温度
-20 到 60 °C
温 度 测 试 、运 输 与 存 储 信 息
按照内部和行业标准,在 -25 °C 至 +70 °C 之间对此产品进行了各种温
度和湿热循环测试。
Page 11

本用户手册中所含型号的无线附件类型标号为:
FCC ID QZ3SAS-3,IC 8039C-SAS3,IC 型号:SAS-3
声明
本设备符合 FCC 规则第 15 部分的要求。运行受限于以下两个条件:(1)
该设备不会引起有害干扰,(2) 该设备必须接受接收到的任何干扰,包
括会引起运行异常的干扰。注:该设备经过测试,符 合 FCC 规则第 15
部分 B 类数字设备的限制。这些限制旨在针对居住环境提供合理的有
害干扰防护。此设备会产生、利用并辐射射频能量,如果不按照说明书
安装和使用,可能会对无线通信造成有害干扰。无法保证在特定的环
境下不发生干扰。如果此设备确实对广播或电视信号接收产生了有害
干扰(可以通过关闭再打开设备来确定),则我们鼓励用户采取以下措
施 之 一 ,消 除 干 扰 :
• 改变接收天线的方向或位置。
• 增加设备与接收器之间的距离。
• 将设备连接到与接收器所在电路不同的电源插座上。
• 向经销商或有经验的广播/电视技术员寻求帮助。
• 擅自更改或修改会使用户获得的设备操作授权失效。
国家列表:
这些 产品符 合以下监 管要求:
• 在欧盟内:该设备符合欧洲委员会 93/42/EEC 号医疗设备 (MDD) 指
令 的 基 本 要 求 ,以 及 1999/5/EC (R&TTE) 号指令的基本要求 和其他有
关 规 定 。关 于 符 合 性 声 明 ,请 访 问 www.cochlear.com。
• 带有无线功能的产品用于销往欧洲经济区国家和瑞士。限制规范:在
挪威 Ny Ålesund 中心的 20 公 里 范 围 内,不 可 以 运 行 该 设 备。
• 在 美 国 :FCC CFR 47 第 15 部分 C 项第 15.249 节。
• 在非欧美国家,采用其他明确适用的国际法规要求,关于这些地区请
参考所在国的要求。
• 产品符合 EN 300 328 要求。
• 该 电 视 适 配 器 在 加 拿 大 获 得 了 认 证 ,认 证 号 为 :
IC:8039C-SAS3。该 设 备 符 合 加 拿 大 工 业 局 免 授 权 RSS 标准。该 B 类数
字仪器符 合加拿大 ICES-003 要求。
Cet appareil numérique de la classe B est conforme
à la norme NMB- 003 du Canada.
• 运行受限于以下 两个条 件:(1) 该设备不会引起干扰,(2) 该设
备必须接受接收到的任何干扰,包括会引起设备运行异常的干
扰。L’exploitation est autorisée aux deux conditions suivantes : (1)
l’appareil ne doit pas produire de brouillage, et (2) l’utilisateur de
l’appareil doit accepter tout brouillage radioélectrique subi, même si le
brouillage est susceptible d’en compromettre le fonctionnement.
• 设备带有射频发射器。
• SAS-3: MSIP-CRI-1CK-SAS-3
해당 무선 설비는 전파혼신 가능성이 있으므로 인명안전과
관련된 서비스는 할 수 없음
** 注:Baha Remote Control( 远 程 助 手 )可 选 配 ,且 仅 与 Baha Sound
Processor(声音处理器)结合使用。
Page 12

1
5
7
6
3 4
11
12
8
9
10
7
2 3
6 1 4 5
A
3
1
2
2
Cochlear Baha Remote Control
**
ZHT
歡迎致辭
感謝您購買 Cochlear™ 無線電視串流器(TV Streamer)*。
Page 13

裝置說明 見圖
1
1. 微USB電源插孔
2. 配對按鍵
3. 單聲道/身歷聲開關
4. 類比音訊輸入
5. 光纖(Toslink)音訊輸入
6. 同軸音訊輸入
7. 調高音量
8. 調低音量
9. 電源指示燈(綠色)
10. 啟用指示燈(黃色)
11. 壁裝插頭
12. 微 USB 插頭
介紹
Cochlear 無線電視串流器 (TV Streamer) 將 為 您 提 供 從 電 視 、音 響 系
統、電腦或類似裝置直接串流傳送至聲音處理器的高品質的 串流傳
送音訊。
爲了充分享受 Cochlear 無線電視串流器 (TV Streamer) 帶給您的便利,
請仔細閱讀本手冊。如果有任何問題,請諮詢您的聽力保健專業人員。
如 需 瞭 解 更 多 資 訊 ,請 造 訪 www.cochlear.com 網站。
爲 了 保 證 您 的 安 全 ,請 仔 細 閱 讀「 重 要 資 訊 」章 節 。
保固
本保固條款不包括由於將本產品與任何非 Cochlear 處理裝置和/或非
Cochlear 植入物共用所導致或與其相關的產品缺陷或損壞。更多詳情
請 參閱「Cochlear 全球有限保固卡」。
圖示說明
下列圖示將常見於本手 冊。
「參閱使用說明」或「操作說 明」
「注意」或「注意,請參 閱隨附 文件」
CE 標章
序號
參考說明/手冊
符合 ACMA(澳 大利亞 通 訊與媒 體管
理 局)標 準
如果對本裝置的棄置問題有疑問,請
諮詢您的聽力保健 專業人 員。
已啟用無線 通信
開始使用
安裝電視串流器 (TV Streamer)
根據您的電視、音響系統、電腦或其他音訊設定,可按下面所述的幾種
方法安裝電視串流器 (TV Streamer)。以下步驟將指導您完成配對和連
接過程。首先連接電視串流器 (TV Streamer) 和 音 源 之 間 的 線 纜 ,最 後
將電視串流器 (T V Streamer) 與您的聲音處理器 配對。
請 注 意 :電 視 串 流 器 (TV Streamer)支援類比和數位音訊輸入。請閱讀以
下部分,瞭解關於支援音訊格式和連接電視串流器 (TV Streamer) 至音
源的方法的更多資訊。
將電視串流器 (TV Streamer) 連 接 至 類 比 音 源( 如 電 視
或音響系統)
見圖
2
1. 將電源插頭連接至壁裝插座,將電纜插入電視串流器(TV Streamer)
上的微 USB 插孔。
2. 將音訊線的音響連接公頭插入電視串流器 (TV Streamer) 的音響連接
母 座(圖 1 中的 4 號 鍵)。
3. 將 音 訊 線 的 另 一 端 插 入 音 源 的「AUDIO OUT」 端 子 。「 AUDIO OUT」通
常 標 有「L – R」表 示左側和 右側,並可通常位於音源的背面。
請注意:安裝後,大多數音源將同時發送聲音至連接至音源的聲音處理
器和其他揚聲器。在某些音源上,您可調整 AUDIO OUT 和揚 聲器之間
的平衡。請參考您音源的用戶手冊。
另一種 類比音訊線安裝方法:
如果不能使用紅色和白色插頭將電視串流器 (TV Streamer) 連接至音源
的 AUDIO OUTPUT,可 採 用 以 下 另 一 種 安 裝 方 法 :
迷你插頭適配器:
見圖
3
1. 將電源插頭連接至壁裝插座,將電纜插入電視串流器(T V Streamer)
上的微 USB 插孔。
2. 將音訊線的音響連接公頭插入電視串流器 (TV Streamer) 的音響連接
母 座(圖 1 中的 4 號 鍵)。
3. 將音響系統 適配器連接至音訊線另一端的紅色和白色插頭。
4. 將 音 響 系 統 適 配 器 插 入 音 源 的「 HEADPHONE」輸 出 端 子 ,或 電 腦 的
音訊端 子。
請 注 意 :「 HEADPHONE」輸出插孔通常位於音源的背面或側面。在使用
「HEADPHONE」插孔時,通常只有佩戴聲音處理器者會聽到聲音,音源
揚聲器為靜音狀態。若不希望揚聲器為靜音狀態,請參閱安裝第一步或
下面章節。您的音源可能同時支援揚聲器和「HEADPHONE」;請 參 考 您
的音 源使用 說明書。
Scart 適配器:
見圖
4
1. 將電源插頭連接至壁裝插座,將電纜插入電視串流器(T V Streamer)
上的微 USB 插孔。
2. 將音訊線的音響連接公頭插入電視串流器 (TV Streamer) 上的音響連
接 母 座(圖 1 中的 4 號 鍵 )。
3. 將 scart 適配器連接至音訊線另一端的紅色和白色插頭。
4. 將 scart 適配器插入音源的 scart 端子。請注意:scart 輸出端子通常
位於音源的背面或側面。
如果需進行額外的 scart 輸出配置,請參考您音源的用戶手冊。
Page 14

將電視串流器 (TV Streamer) 連接至數位音源(如電視
或音響系統)
請 注 意 :電 視 串 流 器 (TV Streamer)支援類比和數位音訊輸入。在使用數
位音訊輸入時,支援以下格式:
音響系統 PCM
- 取樣速率:最高為 192 kHz
- 取樣解析度:最高為 32 bit
杜比數位
- 通道:最大 5.1
- 位元速率:32 kbs 至 640 kbs
- 取樣速率:32, 44.1 和 48 kHz
請注意:不支援杜比數位 +(需要 HDMI 介面)、杜比 TrueHD、杜
比 Pro Logic、杜 比 數 位 EX、杜 比 數 位 環 繞 聲 EX,以 及 AAC(進階音
訊 編 碼 )。
使用 Toslink 光纖音訊輸入端子
見圖
5
1. 將電源插頭連接至壁裝插座,將電纜插入電視串流器(T V Streamer)
上的微 USB 插孔。
2. 將光纖音訊線的一個插頭插入電視串流器 (TV Streamer) 上的光纖音
訊 線 插 孔(圖 1 中的 5 號 鍵)。
請注意:大部分光纖線都有一個小防護帽以保護光纖頭。請取下防護
帽再插線。
3. 將光纖音訊線的另一端插入音源的「Digital Audio Out/Optical」。
使用同軸音訊輸入
見圖
6
1. 將電源插頭連接至壁裝插座,將電纜插入電視串流器(T V Streamer)
上的微 USB 插孔。
2. 將同軸音訊線的一個插頭插入電視串流器 (T VStreamer) 上的同軸音訊
線 插 座(圖 1 中的 6 號 鍵)。
3. 將同軸音訊線的另一端插入音源的「Digital Audio Out/Coaxial」。
與您的聲音處理器配對
您最多可以將三個 Cochlear 串流傳送裝置配對到您的 Cochlear 聲音
處理器。
您需要為配對到聲音處理器的每個裝置選擇一個獨立的通道。
將 電視串流器 (TV Streamer) 配對為頻道 1
1. 確定電視串流器 (T V Streamer) 的電源插頭已插入壁裝插座,且電視
串流器 (TV Streamer) 正 面的 綠 色指示燈(圖 1 中的 9 號 鍵 )亮 起 。您
的聲音處理器必須為關閉狀態。
2. 按 一 下 電 視 串 流 器 (TV Streamer) 上 的配 對 按 鍵(圖 1 中的 2 號 鍵)。
電視串流器 (T V Streamer) 正 面的 黃色指示燈( 圖 1 中的 10 號 鍵)現
在會每隔 2 秒閃爍一次,表示電視串流器 (TV Streamer) 將被配對至
頻道 1。您的電視串流器 (TV Streamer) 將保持配對模式 20 秒。
3. 進入配對模式後,開啟您的聲音處理器。
配對成功後,聲音處理器會播放一段音樂旋律或者閃爍燈光(取決於
聲音處理器的型號),以此提示用戶。
將電視串流器 (TV Streamer) 配對為頻道 2
1. 按 兩 下 配 對 按 鍵 。電 視 串 流 器 (TV Streamer) 正面的黃色指示燈現
在會兩秒閃爍兩次,表示電視串流器 (T V Streamer) 將被配對至頻
道 2。
2. 進入配對模式後,開啟您的聲音處理器。
將電視串流器 (TV Streamer) 配對為頻道 3
1. 按 三 下 配 對 按 鍵 。電 視 串 流 器 (T V Streamer) 正面的黃色指示燈現
在會兩秒閃爍三次,表示電視串流器 (TV Streamer) 將被配對至頻
道 3。
2. 進入配對模式後,開啟您的聲音處理器。
配對時的閃爍模式
按下配
對按鍵
LED 閃爍模式
通道
1
1
2
2
3
3
串流傳送
開始串流傳送
打開連接至電視串流器 (TV Streamer) 的 電 視 、音 響 系 統 、電 腦 或 其
他音訊裝置。確保您的聲音處理器也被打開。開始串流傳送的方法
有兩種:
選項 A
1. 按下聲音處理器上的無線串流傳送按鍵,並保持三秒不放。
2. 聲音處理器會透過電視串流器播放一段音樂旋律或者閃爍燈光(取
決於聲音處理器的型號)。
選項 B
如果您有 Cochlear Baha 遙控器**(可選配),按一下這個 Baha 遙控器
上的**串流傳送按鍵(圖 7 中的 3 號鍵)。更多詳情請參考 Baha 遙
控器**手冊。
啟動第二個或第三個串流傳送裝置的串流傳送
見圖
7
如果聲音處理器配對到多個串流傳送 裝置,您可以有兩種方式來啟
動串流傳送。
選項 A
第二次或第三次按下聲音處理器上的無線流傳送按鍵,保持大約 3 秒
鐘,以訪問第二個或第三個 Cochlear 串流傳送裝 置。
選項 B
第二次或第三次按下 Baha 遙控器**上的串流傳送按鍵,以訪問第二個
或第三個 Cochlear 串流傳 送裝 置。
Cochlear 串流傳送裝置分別用字母 A、B、C 表示,正在使用的串流傳送
裝置會顯示在 Baha 遙控器的**顯 示幕上。
停止串流傳送
• 短按聲音處理器上的串流傳送按鍵。這將取消串流傳送,回到最後一
次使用的 程式。
• 如需使用 Baha 遙控器**停 止 播 放 ,請 按 下 鍵 盤 中 間 的「 P」按 鍵。
• 如果您正在使用帶 Cochlear 無線電話夾***功能的電話,則來自電視
串流器的串流傳送將被暫時中斷。
待 您 掛 斷 電 話 後 ,串 流 傳 送 將 繼 續 。
請注意:如果您超出了電視串流器的傳送範圍(即超出 7 公 尺 ),但
在 5 分鐘內回到該範圍中,則您的聲音處理器將自動重新連接並繼續
串流傳送。
Page 15

控制
音量控制
電視串流器 (T V Streamer) 從啟動起便設為提供舒適的聽音水準。然
而,對於一些裝置或聽音環境,您可能希望調整聽音音量,這可以通過
多種方法進行。請謹記: 電視串流器 (TV Streamer) 的音量調整僅適用
於 串 流 傳 送 的 訊 號 ,而 不 是 正 常 環 境 聲 音 的 音 量 。使 用 「+」和「-」按 鍵
(圖 1 中的 7 和8 號鍵)調整音量至舒適的水 準。確保在更改音量控制
設定之前,您的聲音處理器被調整至舒適的水準。在大多數情況下,調
整僅應進行一次,因為電視串流器 (T V Streamer) 會保存最近設置的音
量 水 準 。使 用 Baha 遙控器 2**(可選配)來調整兩側串流傳送的音量
水準和聲音處理器麥克風音量水準。向您的聽力保健專業人員瞭解關
於本配件的更多資訊。有時可以在訊號源上進一步調整音量,例如調低
電視音量。這將調整無線串流傳送至聲音處理器的聲音音量。調整電
視音量也會影響房間裡的聽音音量。
僅可通過 Cochlear Baha 遙控器**和 Cochlear Baha 聲音處理器來調整
聲音處理器和串流傳 送音量。
單聲道/身歷聲控制
可 使 用 雙 位 元 開關(圖 1 中的 3 號 鍵)來 設 定身歷 聲
(兩 個頻道)或 單 聲 道(一 個 頻 道)音訊 串流傳 送。如果是雙 耳選配,
開關應設定為身歷聲位置。如果是單耳選配,開關應設定為單聲道
位置。
調整延遲模式
在少數情況下,串流傳送至聲音處理器的音訊和來自電視揚聲器的聲
音(回聲)可能不同步,甚至串流傳送的音訊和電視圖片(對嘴)也不
同步。這在更複雜的音訊設定中可顯示,電視串流器 (TV Streamer) 並
未直接連接至電視(如透過機上盒或其他輔助裝置)。為解決這類不
同步問題,可以調整來自電視串流器 (T V Streamer) 的串流傳送延遲:
1. 確 保 電 視 串 流 器 (TV Streamer) 打開,且聲音處理器在接受串流傳
送的音訊。
2. 按 下 配 對 按 鍵 (圖 1 中的 2 號鍵),並保持 3 秒鐘。電視串流器 (TV
Streamer) 將進入調整延 遲模式, 電視串流器 (TV Streamer) 正面
的綠色指示燈將兩秒閃爍一次。黃色指示燈將在有音訊訊號時一
直亮起。
3. 使 用 電 視 串 流 器 (TV Streamer) 上 面的「+」和「-」鍵( 圖 1 中的 7 和 8
號 鍵 ),以 10 ms 的幅度增加或減少串流傳送訊號的延遲。串流傳送
的訊號的延 遲範圍為 0-250 ms。
4. 當串流傳送至聲音處理器的音訊和來自電視揚聲器的聲音,或串流
傳送的音訊和電視圖片達到理想同步時,按下配對按鍵並保持 3 秒
鐘 。現 在 電 視 串 流 器 (TV Streamer) 將 恢 復 正 常 工 作 ,並 通 過 綠 色 指
示燈持續亮起來 表示。
調整延遲 模式的偏移設定將保存在電視串流器 (TV Streamer) 中 。如
果您沒有按下 配對按鍵並保持 3 秒鐘,退出調整延遲模式, 電視串
流器 (TV Streamer) 將在 30 分鐘後自動恢復正常工作。要重置延遲
為 0 ms(出廠設定),按下配對按鈕不放,並同時啟動電視串流器 (TV
Streamer) 開關。
重要資訊
維護和保養
• 請用濕布清潔電視串流器 (TV Streamer)。切勿使用家用清潔產品(洗
衣 粉 、肥 皂 等)或 酒 精 來 清 潔 該 裝 置。
• 當電視串流器 (TV Streamer) 長 時 間 不 用 時 ,請 將 電 源 插 頭 從 壁 裝 插
座 上 拔下。
一般警告
• 請將該裝置放在兒 童無法觸及的地方。
• 電視串流器 (T V Streamer) 採用低功率數位編碼傳輸的方式,與其他
無線設備進行通信。設備附近的電子設備可能會因此受到影響,雖
然發生 這種情況的可能性不大。在這種情況下,請將電視串流器 (TV
Streamer)遠離受到影響的電子設備。
• 使用電視串流器 (TV Streamer) 時如果受到電磁干擾,請將它移到遠
離干擾源 的地 方。
電源供應器使用警告
• 只可使用電視串流器 (T V Streamer) 自帶的電源插頭。
• 使用其他電源供應器可能會對產品造成損壞或破壞,并帶來危險。
使用其他電源供 應器可能 會導致 產品的所有保證失效,并失 去保
修權利。
• 需要斷開電源線或任何配件時,請勿拉 扯線纜,正確的 做法是握緊
並拔下插頭。
• 切勿使用受損的電源供應器。
• 請勿嘗試將電源供應器拆開,您有可能觸電。
• 請勿在戶外或潮濕環境中使用電源供應器。
一般注意事項
• 您的聲音處理器和本裝置在驗配時獲得了唯一的通信代碼。這能確
保本裝置不會影響其他人佩戴的聲音處理器。
• 大功率電子設備、大 型電子裝置和金屬結 構可能會影 響並顯著縮短
本產品的工作範圍。
• 只使用原廠生產的 Cochlear 配件。
• 請勿對本裝置進行改動。
• 拆開電視串流器 (TV Streamer) 可能使其受損。如果 遇到無法解決的
問 題 ,請 諮 詢 您 的 聽 力 保 健 專 業 人 員 。
• 電視串流器 (T V Streamer) 只能由授權服務中心進行維修。
• 請勿在禁止使用射頻傳輸的地方使用電視串流器 (TVStreamer),例
如在 飛機 上。
• 只能將電視串流器 (TV Streamer) 連 接到專用介面上。
技術規格
工作範圍
最遠 7 米
電源 外部牆式適配器
無線
2,4 GHz
工作溫 度
0 至 55 °C
儲藏溫度
-20 至 60 °C
溫度測試、運輸和儲藏資訊
本產品依照各種內部及行業標準,在 -25°C 至 +70°C 的溫度範圍內接
受過溫度和潮濕測試。
Page 16

本用戶手冊中所述產品型號的的無線配件型號:
FCC ID QZ3SAS-3, IC 8039C-SAS3, IC 型號:SAS-3
說明
本裝置符合 FCC 規則第 15 部分的規定。裝置的使用應符合以下兩個
條 件 :( 1)本裝置不會造成有害干擾,並且(2)本裝置會接收任何收到
的干擾,包括可能導致不當操作的干擾。請注意:按照FCC規則第15部
分 的 規 定 ,本 裝 置 已 經 經 過 測 試 ,證 明 其 符 合 B類 數 位 裝 置 的 規 定 。這
些規定旨在當裝置用於住宅區時,能夠提 供合理保護,防止有害干擾。
本裝置將會產生、使用和輻射無線電頻率,如果不按照說明進行安裝
和使用,可能會對無線電通訊造成有害干擾。然而,我們不能保證裝置
在某個特定的安裝情況下不會產生干擾。如果通過關閉和打開本裝置
的方法,確定其確實對無線電或電視接收產生干擾,那麼建議用戶嘗
試採 用以下一種或多種 措施 來避免干擾:
• 對接收天線進行重新定向或定位。
• 增加裝置與接收器之間的距離。
• 將裝 置連接到不同於接收器連接線路的電源插座上。
• 向經銷商或有經驗的無線電/電視技術人員諮詢,尋求幫助。
• 對裝置的更改或改裝,可能使用戶失去的操作許可權。
國家列表:
該產品符合以下監管要求:
• 歐 盟 :本 裝 置 符 合 醫 療 器 械( MDD)理 事會指令 93/42/EEC 附件一
的基本要求,以及指令 1999/5/EC (R&TTE) 的基本要求和其他相關規
定。符合聲明可參閱
www. cochlear.com。
• 具有無線功能的產品僅會於歐洲經濟區的國家以及瑞士銷售。限制
說明:您不得在挪威奧勒松(Ny Ålesund)中 心 地 區 20公里的範圍以
內操作該裝置。
• 美 國 :FCC CFR 47第15部分第C子部分第15.249節。
• 歐盟和美國以外其他國家的適用國際法規要求。請參閱這些地區的
具體要求。
• 產品符合EN 300 328的規定。
• 電視串流器已驗證通過加拿大下列認證編號:
IC:8039C-SAS3。本設備符合加拿大工業部免授權 RSS 標準之規定本
B 類數位裝置符合加拿大 ICES-003 的規定。Cet appareil numérique
de la classe B est conforme à la norme NMB-003 du Canada.
• 裝置的使用應符合以下兩個條件:(1)本 裝 置 不 會 造 成 干 擾 ,並 且(2
)本裝 置會接收任何收到的干擾,包 括可能導致不當操作的干擾。
L’exploitation est autorisée aux deux conditions suivantes : (1) l’appareil
ne doit pas produire de brouillage, et (2) l’utilisateur de l’appareil doit
accepter tout brouillage radioélectrique subi, même si le brouillage est
susceptible d’en compromettre le fonctionnement.
• 設備包含射頻發射器。
• SAS-3: MSIP-CRI-1CK-SAS-3
해당 무선 설비는 전파혼신 가능성이 있으므로 인명안전과
관련된 서비스는 할 수 없음
* Cochlear Wireless TV Streamer
** Cochlear Baha Remote Control
請 注意:可選配 Baha 遙控器,但其只能與 Baha 聲音處理器搭
配使用。
*** Cochlear Wireless Phone Clip
 Loading...