

Page 1

Nucleus® CR230
Remote Assistant
User Guide
390460 ISS9 SEP13
Printed in Australia
ACE, Advance Off-Stylet, AOS, AutoNRT, Autosensitivity, Beam, Clinicnet, Cochlear, Codacs, Contour, Contour Advance,
Custom Sound, DermaLock, ESPrit, Freedom, Hear now. And always, Hybrid, inHear, Invisible Hearing, MP3000, myCochlear,
NRT, Nucleus, Nucleus in Chinese characters, Off-Stylet, SmartSound, Softip, SPrint, the elliptical logo and Whisper
are either trademarks or registered trademarks of Cochlear Limited. Ardium, Baha, Baha Divino, Baha Intenso, Baha PureSound,
Baha SoftWear and Vistafix are either trademarks or registered trademarks of Cochlear Bone Anchored Solutions AB.
© Cochlear Limited 2013
Cochlear Ltd
(ABN 96 002 618 073) 1 University Avenue, Macquarie University, NSW 2109, Australia
Tel: +61 2 9428 6555 Fax: +61 2 9428 6352
Cochlear Ltd
(ABN 96 002 618 073) 14 Mars Road, Lane Cove, NSW 2066, Australia
Tel: +61 2 9428 6555 Fax: +61 2 9428 6352
Cochlear Americas
13059 E Peakview Avenue, Centennial, CO 80111, USA
Tel: +1 303 790 9010 Fax: +1 303 792 9025
Cochlear Canada Inc
2500-120 Adelaide Street West, Toronto, ON M5H 1T1, Canada
Tel: +1 416 972 5082 Fax: +1 416 972 5083
Cochlear AG
EMEA Headquarters, Peter Merian-Weg 4, 4052 Basel, Switzerland
Tel: +41 61 205 0404 Fax: +41 61 205 0405
Cochlear Deutschland GmbH & Co. KG
Karl-Wiechert-Allee 76A, 30625 Hannover, Germany
Tel: +49 511 542 770 Fax: +49 511 542 7770
Cochlear Europe Ltd
6 Dashwood Lang Road, Bourne Business Park, Addlestone, Surrey KT15 2HJ, United Kingdom
Tel: +44 1932 26 3400 Fax: +44 1932 26 3426
Cochlear Benelux
NV Schaliënhoevedreef 20 i, B-2800 Mechelen, Belgium
Tel: +32 15 79 55 11 Fax: +32 15 79 55 70
Cochlear France S.A.S. Route de l’Orme aux Merisiers, Z.I. Les Algorithmes – Bât. Homère, 91190 Saint-Aubin, France
Tel: +33 805 200 016 Fax: +33 160 196 499
Cochlear Italia
S.r.l. Via Larga 33, 40138 Bologna, Italy
Tel: +39 051 601 53 11 Fax: +39 051 39 20 62
Cochlear Nordic AB
Konstruktionsvägen 14, 435 33 Mölnlycke, Sweden
Tel +46 31 335 14 61 Fax +46 31 335 14 60
Cochlear Tıbbi Cihazlar ve Sağlık Hizmetleri Ltd. Şti.
Çubuklu Mah. Boğaziçi Cad., Boğaziçi Plaza No: 6/1, Kavacık, TR-34805 Beykoz-Istanbul, Turkey
Tel: +90 216 538 5900 Fax: +90 216 538 5919
Cochlear (HK) Limited
Unit 1810, Hopewell Centre, 183 Queens Road East, Wan Chai, Hong Kong SAR
Tel: +852 2530 5773 Fax: +852 2530 5183
Cochlear Korea Ltd
1st floor, Cheongwon building, 828-5, Yuksam dong, Kangnam gu, Seoul, Korea
Tel: +82 2 533 4663 Fax: +82 2 533 8408
Cochlear Limited (Singapore Branch)
6 Sin Ming Road, #01-16 Sin Ming Plaza Tower 2, Singapore 575585
Tel: +65 6553 3814 Fax: +65 6451 4105
Cochlear Medical Device (Beijing) Co Ltd
Unit 2208 Gemdale Tower B, 91 Jianguo Road, Chaoyang District, Beijing 100022, P.R. China
Tel: +86 10 5909 7800 Fax: +86 10 5909 7900
Cochlear Medical Device Company India Pvt. Ltd.
Ground Floor, Platina Building, Plot No C-59, G-Block, Bandra Kurla Complex, Bandra (E), Mumbai – 400 051, India
Tel: +91 22 6112 1111 Fax: +91 22 6112 1100
Nihon Cochlear Co Ltd
Ochanomizu-Motomachi Bldg, 2-3-7 Hongo, Bunkyo-Ku, Tokyo 113-0033, Japan
Tel: +81 3 3817 0241 Fax: +81 3 3817 0245
www.cochlear.com
Page 2

This guide is intended for Cochlear implant recipients and
their carers using the Cochlear Nucleus CP910 or CP920
Sound Processors.
The remote assistant is compatible with the
CP810 Sound Processor.
Your remote assistant provides access to key information
about your processor, including status (e.g. battery status),
and troubleshooting details.
You can use your remote assistant to adjust your processor
settings. If you are a bilateral recipient, your remote
assistant can be used to control both processors.
If you are a parent or carer, you can use the remote assistant
to monitor and manage a child’s processor.
For more information on your processor, refer to
the Cochlear™ Nucleus® CP910 and CP920 Sound
Processor User Guide.
About
The Cochlear™ Nucleus® CR230 Remote Assistant
is a hand-held device that allows you to control and
monitor the Cochlear™ Nucleus® CP910 or CP920
(“CP900 series”) Sound Processors.
Note
Refer to the Warning s section for
warnings an d cautions relating to the
use of the CR2 30 remote assistant
and components.
ii
Notes
Page 3
1
NUCLEUS® CR230 REMOTE ASSISTANT USER GUIDE
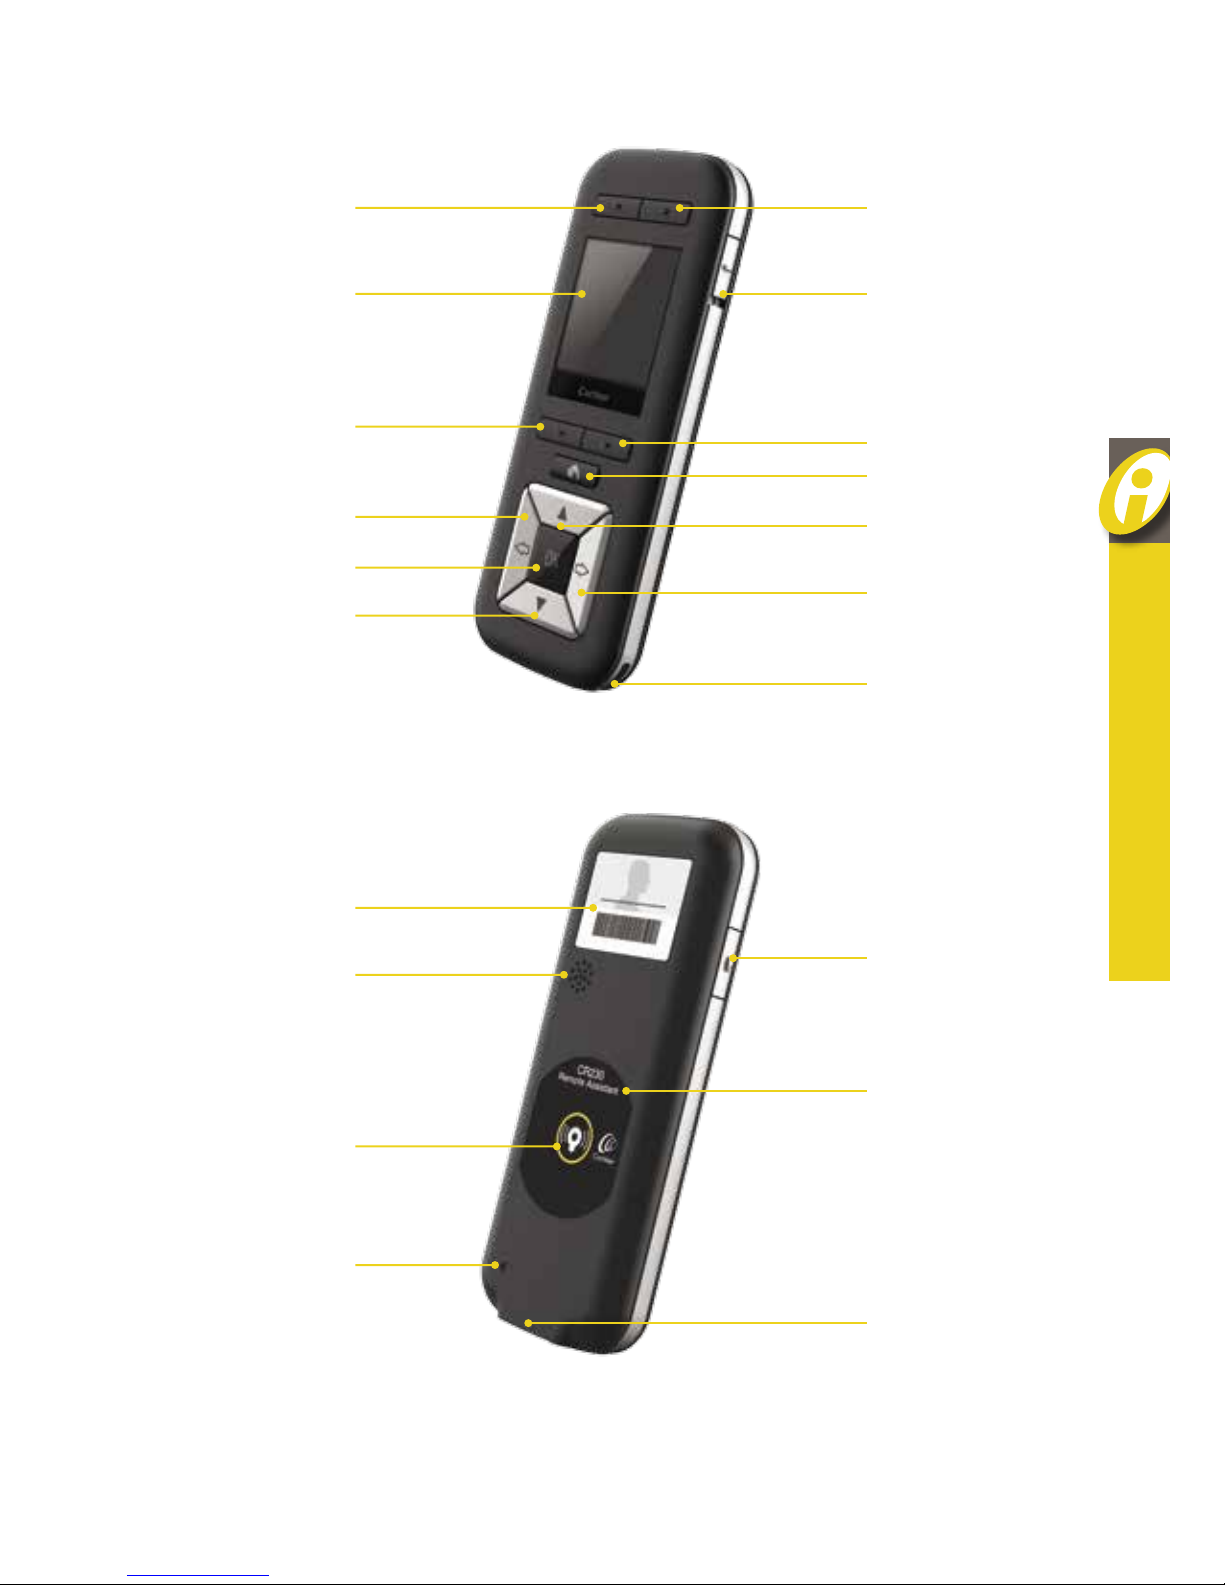
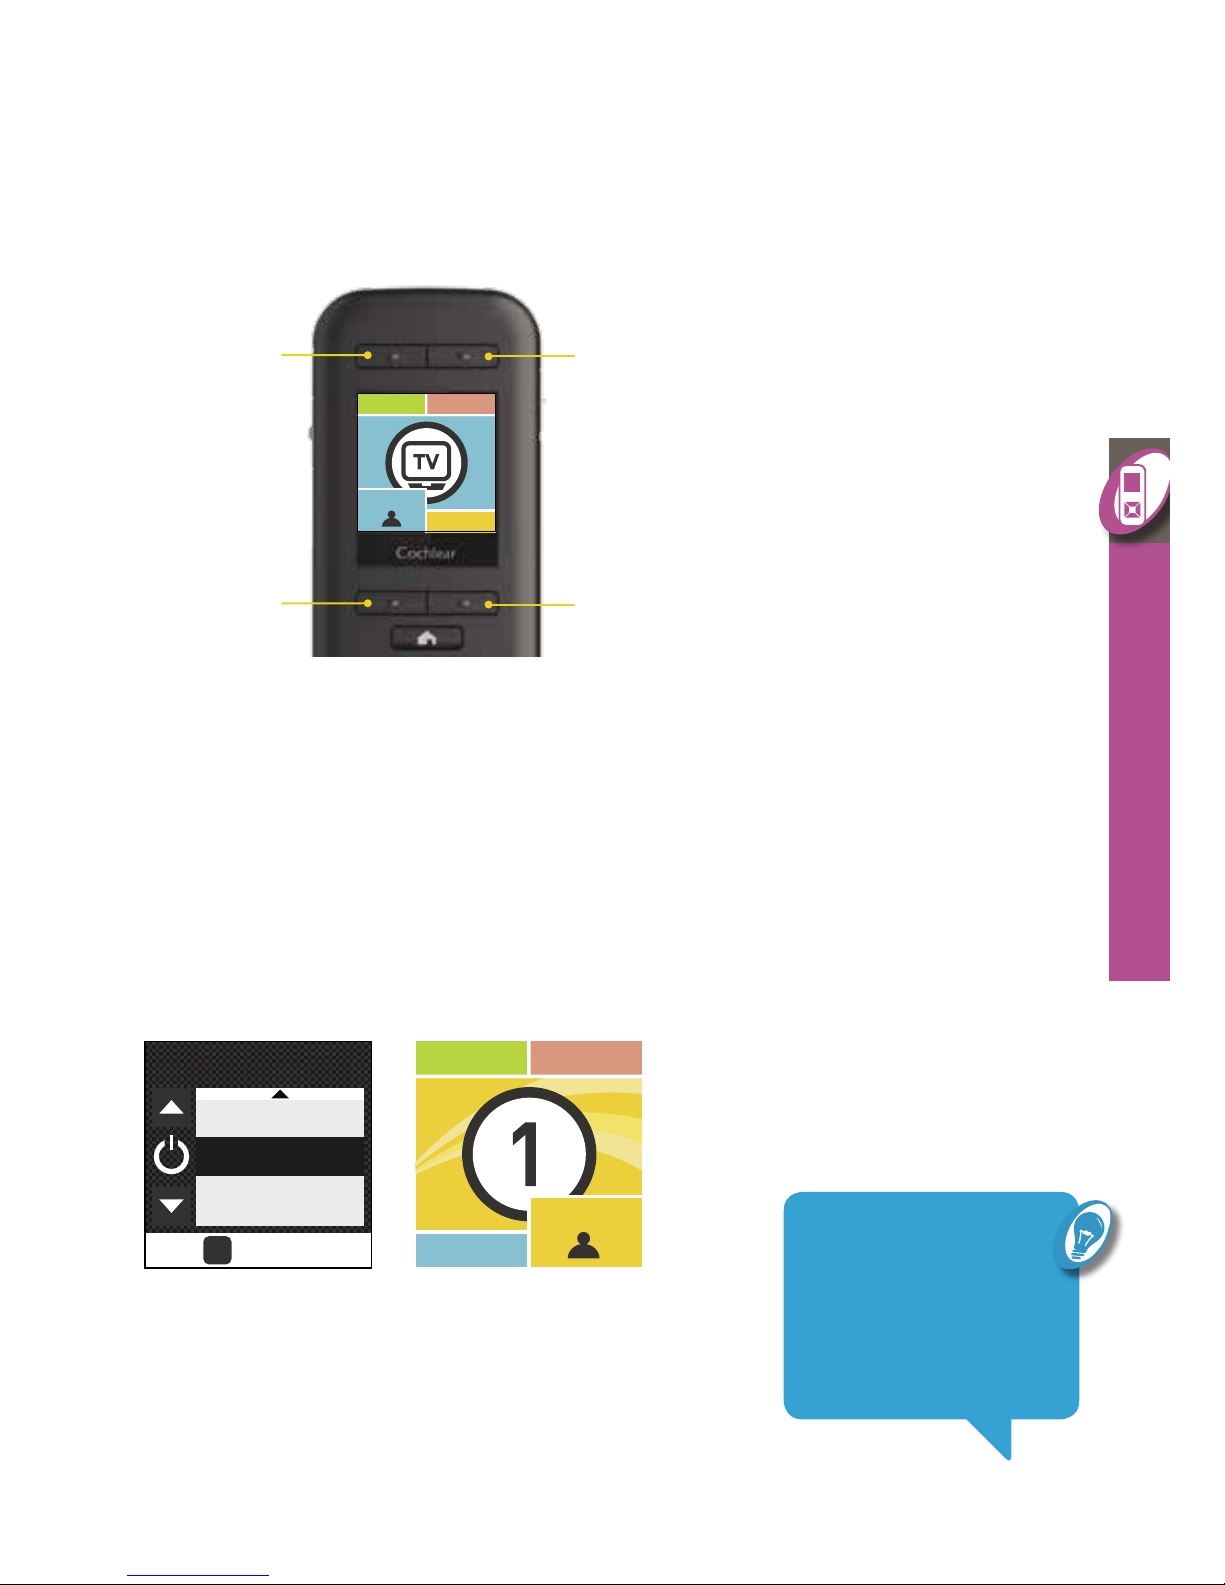
Program button Program button
Lock-unlock slider
Program button
Home button
Up arrow button
Right arrow button
Pin for
attaching lanyard
Display
Program button
Left arrow button
OK button
Down arrow button
CR230 Remote Assistant
Front
Back
Personal
identification label
Telecoil button
Product
information label
USB cable socket
Speaker
Coil guide
for pairing
Hard reset button
ABOUT
Page 4

2
Hold and use
Hold the remote assistant in the palm of your hand. Keep it within
two metres (about six feet) of the sound processor. If the distance is
more than two metres, you may experience longer response times or
loss of communication.
If you experience interference in the communication between your
processor and the remote assistant, try the following:
• Hold the remote assistant in a different position.
• Move away from the vicinity of any electronic equipment that may be
causing interference.
2 metres or less
Page 5

3
NUCLEUS® CR230 REMOTE ASSISTANT USER GUIDE
Navigate
Press the Home
button to return to
the previous menu
or Home screen
When prompted, press
the up and down arrow
buttons to select
options in menus or
change settings
Press the left arrow
button to move back
through the screens
Press the OK button
to select an option
on a screen or enter
a menu
Press the right arrow
button to scroll forward
through the screens
ABOUT
Page 6
4
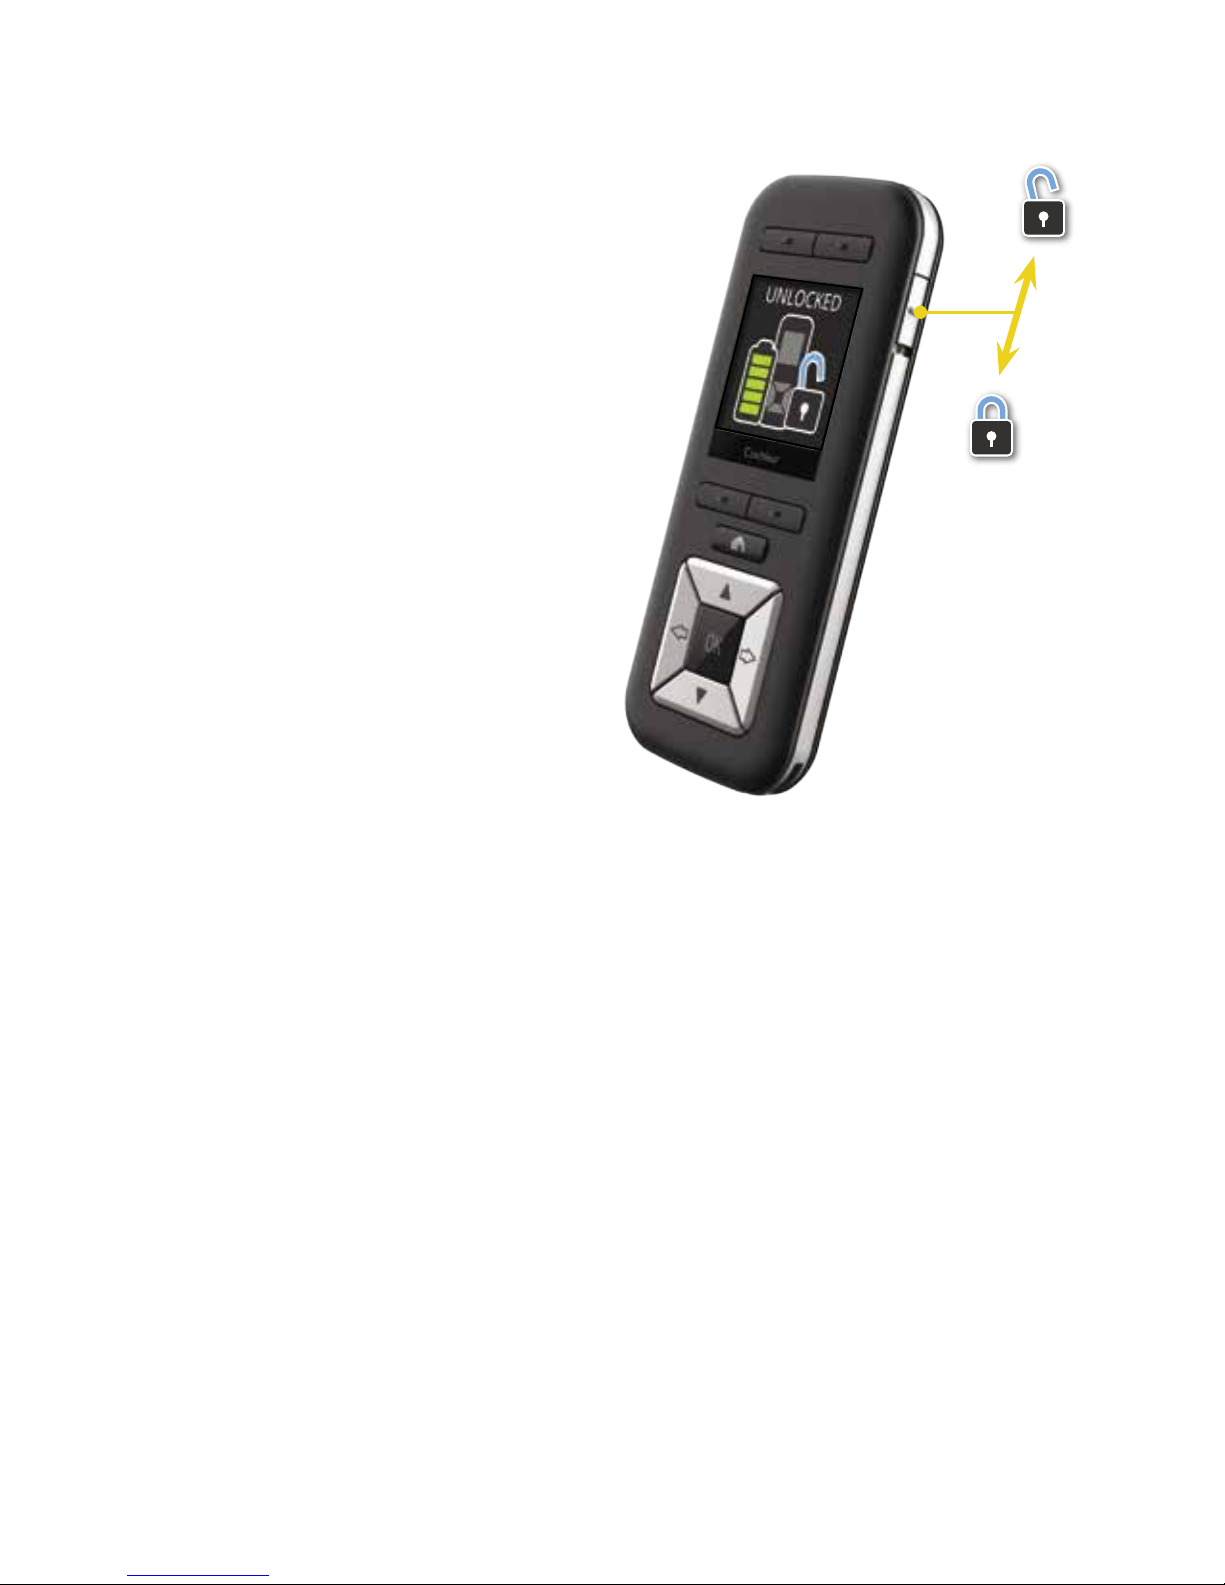
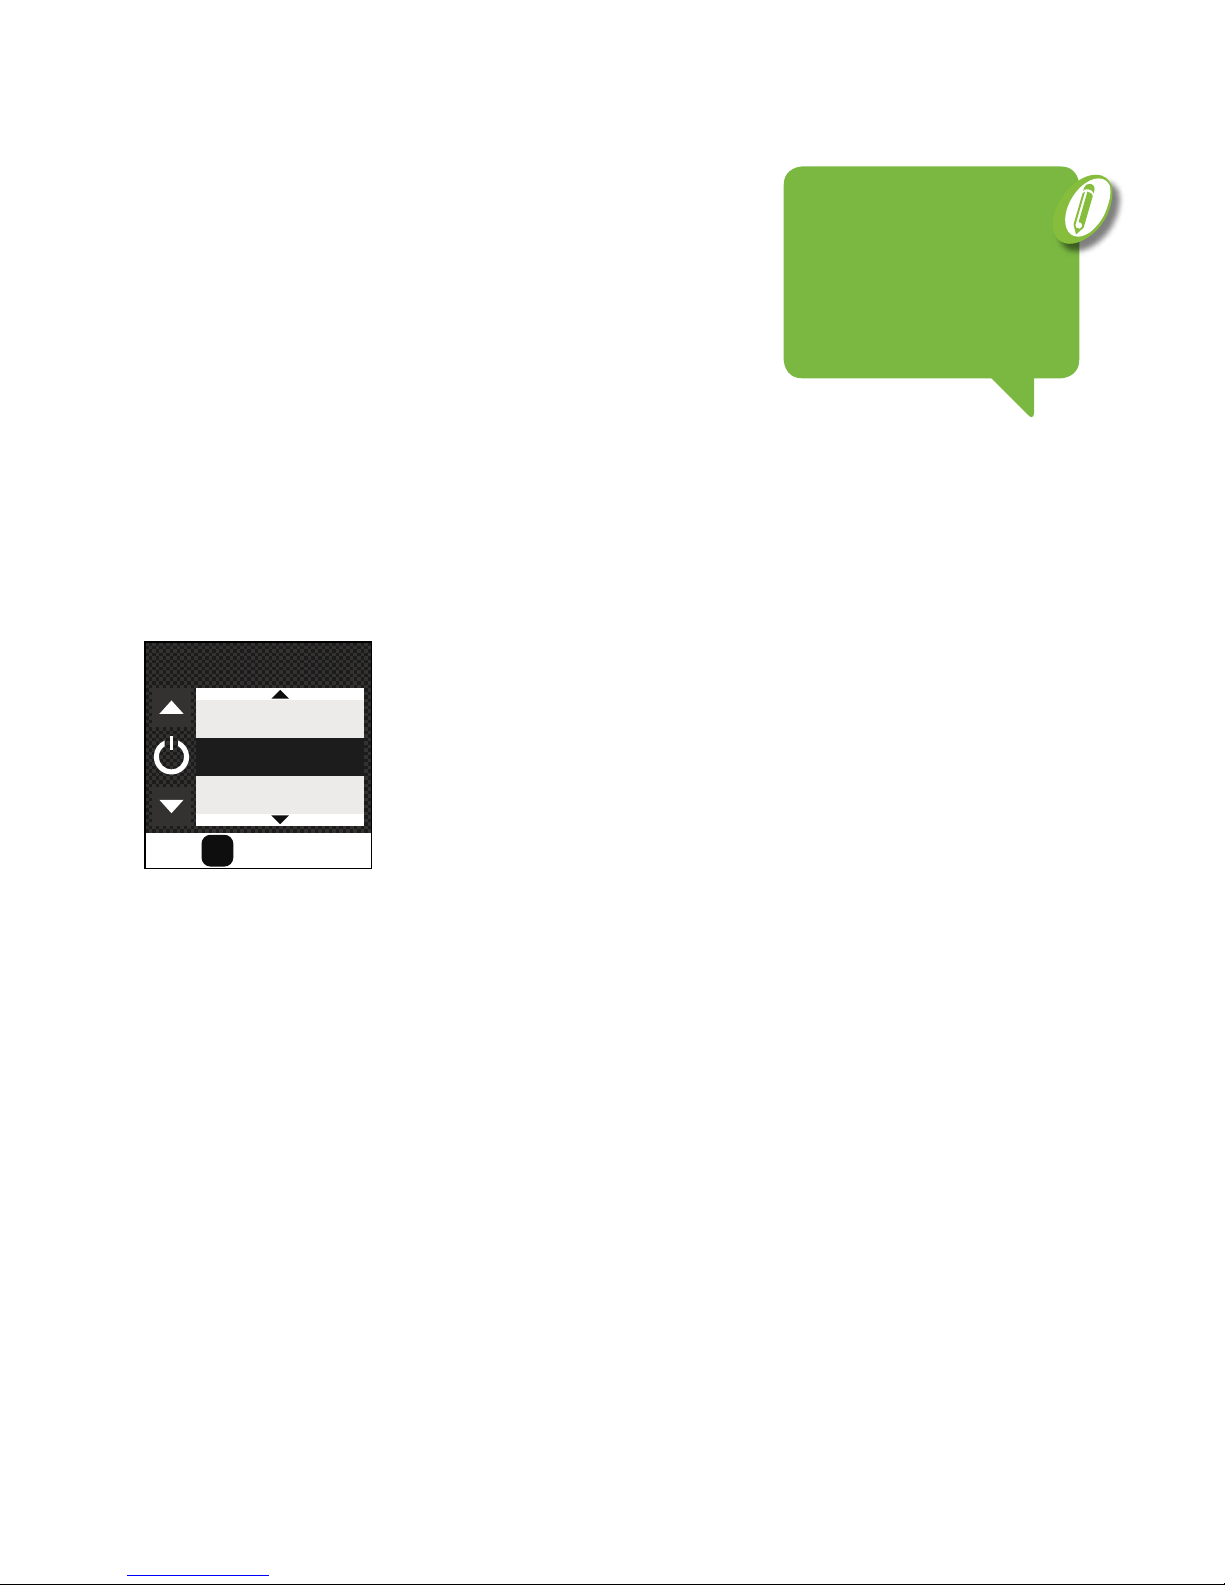
Lock and unlock
The remote assistant can be locked to
prevent buttons being accidentally pressed.
Slide the lock-unlock slider down to lock
the remote assistant, and up to unlock.
Page 7

5
NUCLEUS® CR230 REMOTE ASSISTANT USER GUIDE
ABOUT
TIP
Use the lock-unlock slider
to show the battery level of
your remote assistant.
LOCKED
The Unlocked or Locked screens will display based on the
position of the slider.
You cannot turn off the remote assistant while it is locked.
Page 8

6
Symbols used in this guide
Note
Important information or advice.
Tip
Time saving hint.
Caution (no harm)
Special care to be taken to ensure safety and effectiveness.
Could cause damage to equipment.
Warning (harmful)
Potential safety hazards and serious adverse reactions.
Could cause harm to person.
NOTe
Please refer to the booklet Important
Information: Warnings, Precautions and
Electromagnetic Compatibility for important
information that applies to cochlear
implant systems.
Page 9

7
NUCLEUS® CR230 REMOTE ASSISTANT USER GUIDE
SeCTION GUIDe
About . . . . . . . . . . . . . . . . . . . . . . . . . . . . . . . . . . ii
Charge . . . . . . . . . . . . . . . . . . . . . . . . . . . . . . . . . . 11
Turn on . . . . . . . . . . . . . . . . . . . . . . . . . . . . . . . . 15
Use . . . . . . . . . . . . . . . . . . . . . . . . . . . . . . . . . . . . 21
Adjust . . . . . . . . . . . . . . . . . . . . . . . . . . . . . . . . . 39
Settings . . . . . . . . . . . . . . . . . . . . . . . . . . . . . . . . 45
Care . . . . . . . . . . . . . . . . . . . . . . . . . . . . . . . . . . . 57
Troubleshoot . . . . . . . . . . . . . . . . . . . . . . . . . . 61
Warnings . . . . . . . . . . . . . . . . . . . . . . . . . . . . . . 70
Other information . . . . . . . . . . . . . . . . . . . . . . 71
Section guide
Page 10

8
About . . . . . . . . . . . . . . . . . ii
Front . . . . . . . . . . . . . . . . . . . . . 1
Back . . . . . . . . . . . . . . . . . . . . . 1
Hold and use . . . . . . . . . . . . . . . . 2
Navigate . . . . . . . . . . . . . . . . . . 3
Lock and unlock . . . . . . . . . . . . . . 4
Charge . . . . . . . . . . . . . . . . 11
Turn on . . . . . . . . . . . . . . 15
Select language . . . . . . . . . . . . . . 16
Pair . . . . . . . . . . . . . . . . . . . . . 17
Turn off . . . . . . . . . . . . . . . . . . 19
Use . . . . . . . . . . . . . . . . . . 21
Status indicators . . . . . . . . . . . . . 22
Programs on your Home screen . . . . . 24
SCAN program . . . . . . . . . . . . . . .25
Custom programs . . . . . . . . . . . . 26
Change programs . . . . . . . . . . . . . 27
View numbers instead
of program names . . . . . . . . . . 27
Practice mode . . . . . . . . . . . . . . 28
Advanced mode . . . . . . . . . . . . . 31
Use telecoil . . . . . . . . . . . . . . . . 32
Audio accessories . . . . . . . . . . . . . 34
Bilateral displays and controls . . . . . . 35
Contents
Page 11

9
NUCLEUS® CR230 REMOTE ASSISTANT USER GUIDE
Adjust . . . . . . . . . . . . . . . 39
Volume or sensitivity . . . . . . . . . . . 41
Bass and treble . . . . . . . . . . . . . . 42
Master volume . . . . . . . . . . . . . . 43
Settings . . . . . . . . . . . . . . 45
Telecoil mix . . . . . . . . . . . . . . . . 47
Accessory mix . . . . . . . . . . . . . . . 48
Adjust left/right . . . . . . . . . . . . . . 49
Processor buttons . . . . . . . . . . . . 50
Processor beeps . . . . . . . . . . . . . . 50
Processor lights . . . . . . . . . . . . . . 51
Beeps on remote assistant . . . . . . . . 52
Alert messages . . . . . . . . . . . . . . 53
SCAN icons . . . . . . . . . . . . . . . . 54
Care . . . . . . . . . . . . . . . . . 57
Clean . . . . . . . . . . . . . . . . . . . 58
Store . . . . . . . . . . . . . . . . . . . . 59
Troubleshoot . . . . . . . . . 61
Alert screens . . . . . . . . . . . . . . . .62
View system details . . . . . . . . . . . 64
Reset processor settings . . . . . . . . . 65
Reset remote assistant . . . . . . . . . . 66
Other problems . . . . . . . . . . . . . . .67
Warnings . . . . . . . . . . . . 70
Other information
. . . 71
CONTeNTS
Page 12

10
Page 13

11
Charge
Page 14

12
Charge battery
Cochlear recommends that you fully charge the battery:
• before using the remote assistant for the first time
• when the remote assistant Battery Status screen shows
that the battery is low
• once a week, even if the remote assistant does not
indicate that the battery is low or empty.
It may take two to four hours to fully charge a completely
empty battery. As the battery ages, it may take longer to fully charge the
battery.
A fully charged battery should provide you with enough battery life for one
to two weeks. However, battery life varies depending on:
• amount of usage
• whether you turn off your remote assistant when not in use
• whether your remote assistant is controlling one or two
sound processors.
The battery’s lifespan is at least 400 charge cycles.
TIP
When charging correctly, the Charging
screen will display, followed by the
Charged screen when the battery is full.
TIP
The remote assistant has
an integrated battery that
can only be removed by
trained Cochlear personnel.
Send your remote assistant
to a Cochlear repair centre
to change the battery.
CAUTION
Ensure that you only use battery
charging equipment supplied by
Cochlear to charge the remote
assistant battery.
Page 15

13
NUCLEUS® CR230 REMOTE ASSISTANT USER GUIDE
CHARGe
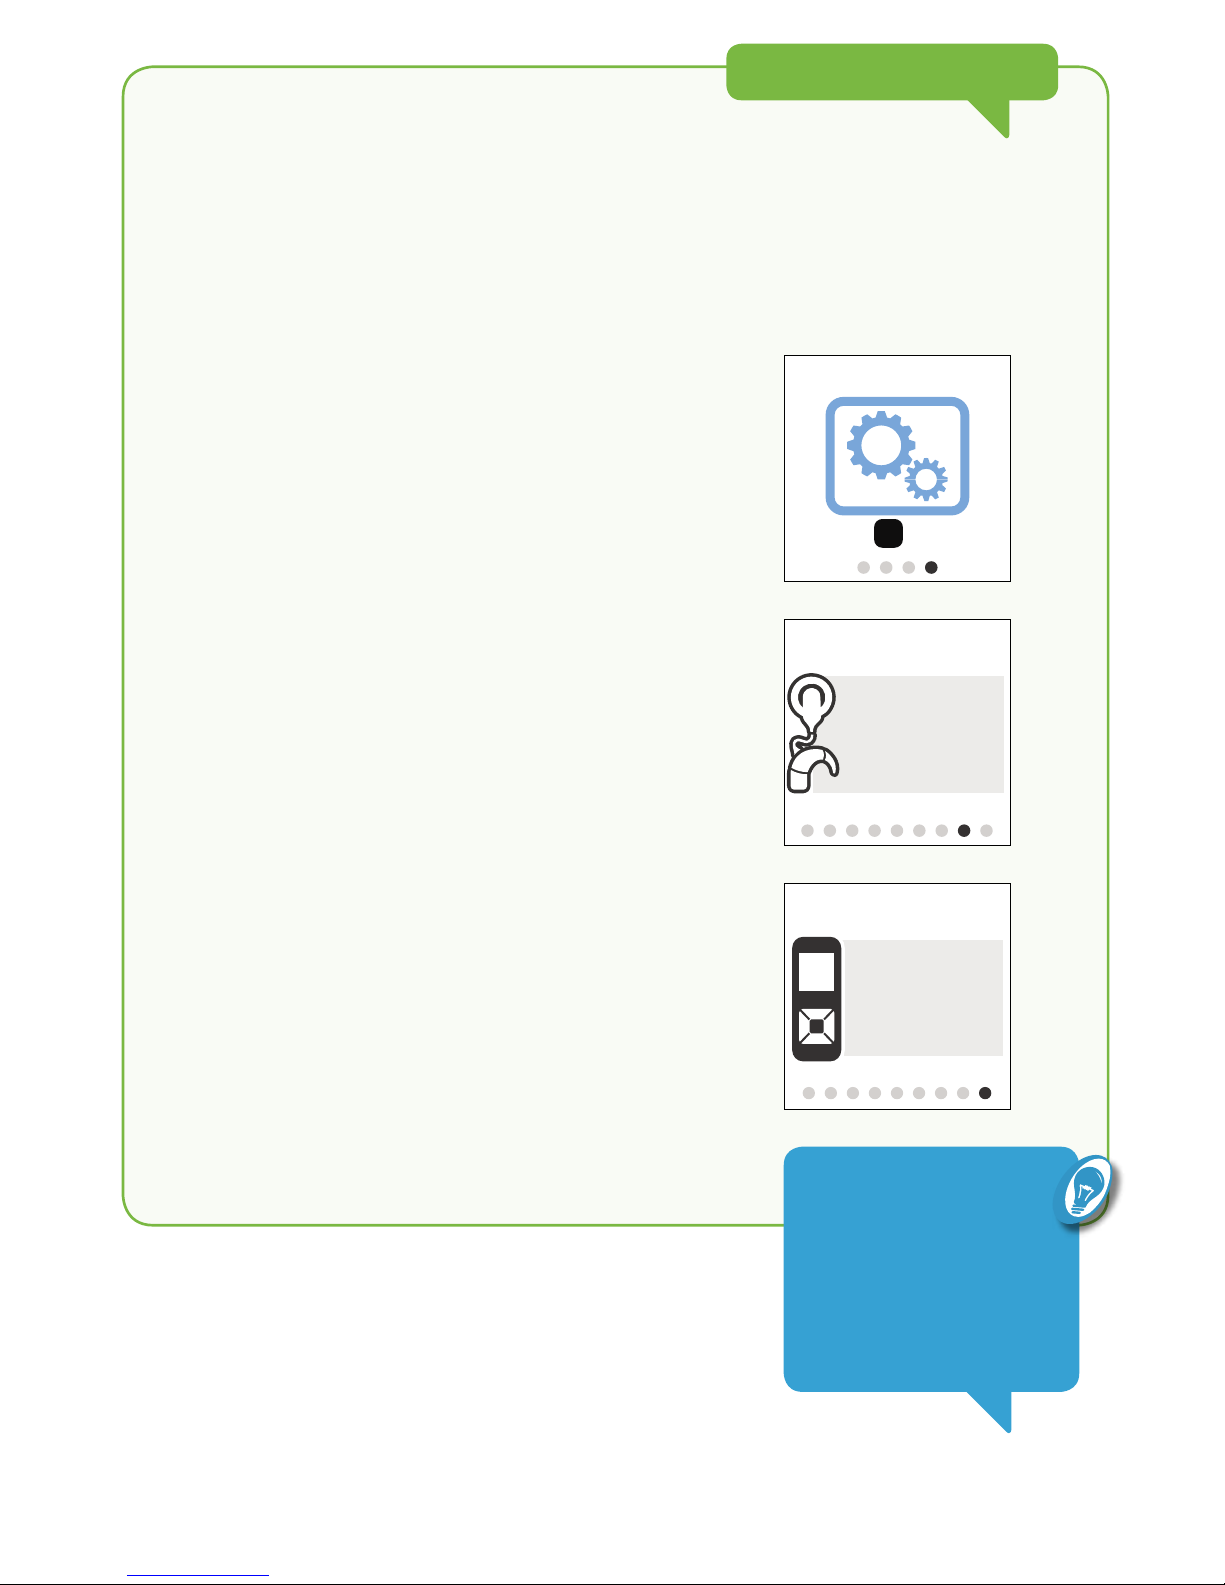
There are three options for charging:
A
Use the Cochlear™ Nucleus® Battery
Charger and the Cochlear™ Nucleus®
Battery Charging Kit.
B
Use the Cochlear™ Nucleus® CR200
Series Charging Kit.
C
Use the USB port on a computer. Leave
the computer turned on to charge the
remote assistant.
NOTe
You cannot switch off the
remote assistant when it is
plugged in.
Page 16

14
Page 17

15
Turn on
Turn on 16
Select language 16
Pair 17
Turn off 19
Page 18
16
Turn on
To turn on the remote assistant, press and hold the OK button until the two
Startup screens display. The Battery Status screen and your Home screen
will display after the Startup screens.
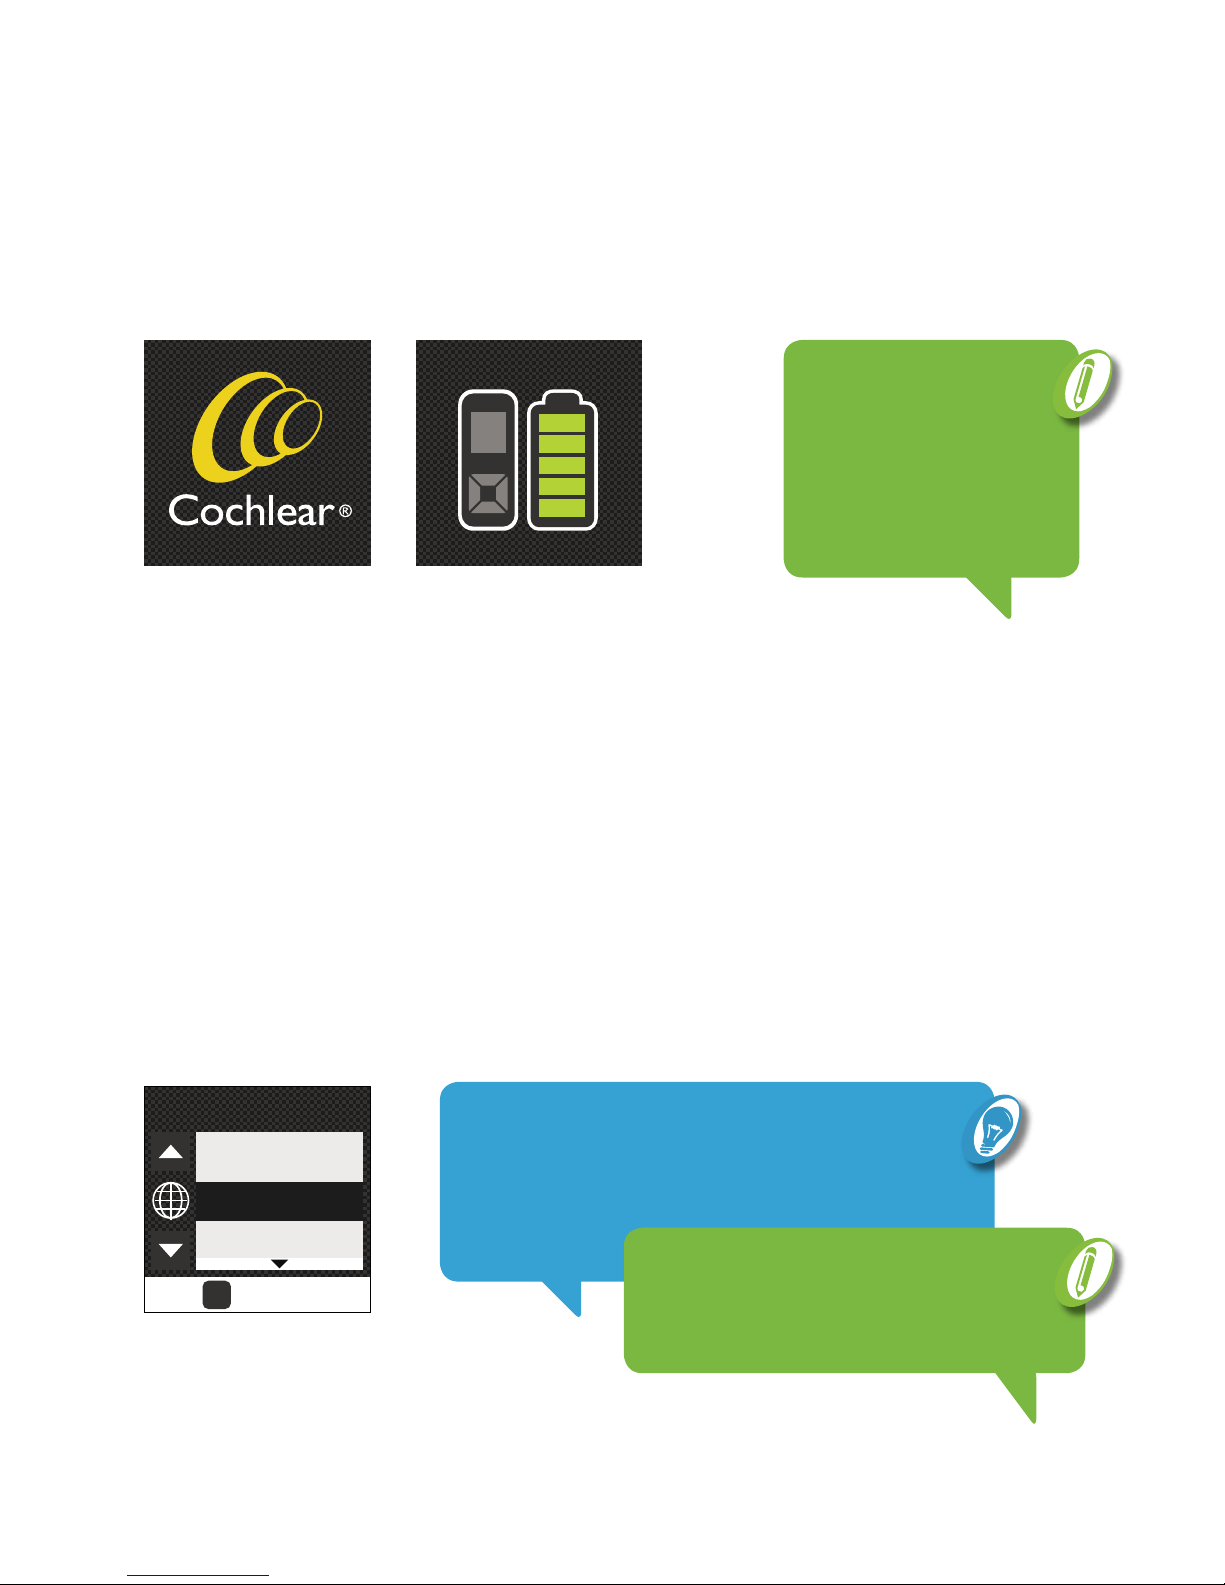
Select language
You will be prompted to select a language the first time you use the
remote assistant:
1. When the Select Language screen displays, press the up or down arrow
button to highlight your preferred language.
Startup screen Battery Status screen
2. Press the OK button to select.
OK
SELECT
English
Deutsch
SELECT LANGUAGE
TIP
You can reset the remote assistant and start again if you
selected the wrong language (see Reset remote assistant
on page 66).
NOTe
If this is the first time the
remote assistant is being
used, the Select Language
screen will display instead of
the Home screen.
NOTe
The remote assistant remembers your
selected language when you turn it off.
Page 19

17
NUCLEUS® CR230 REMOTE ASSISTANT USER GUIDE
TURN ON
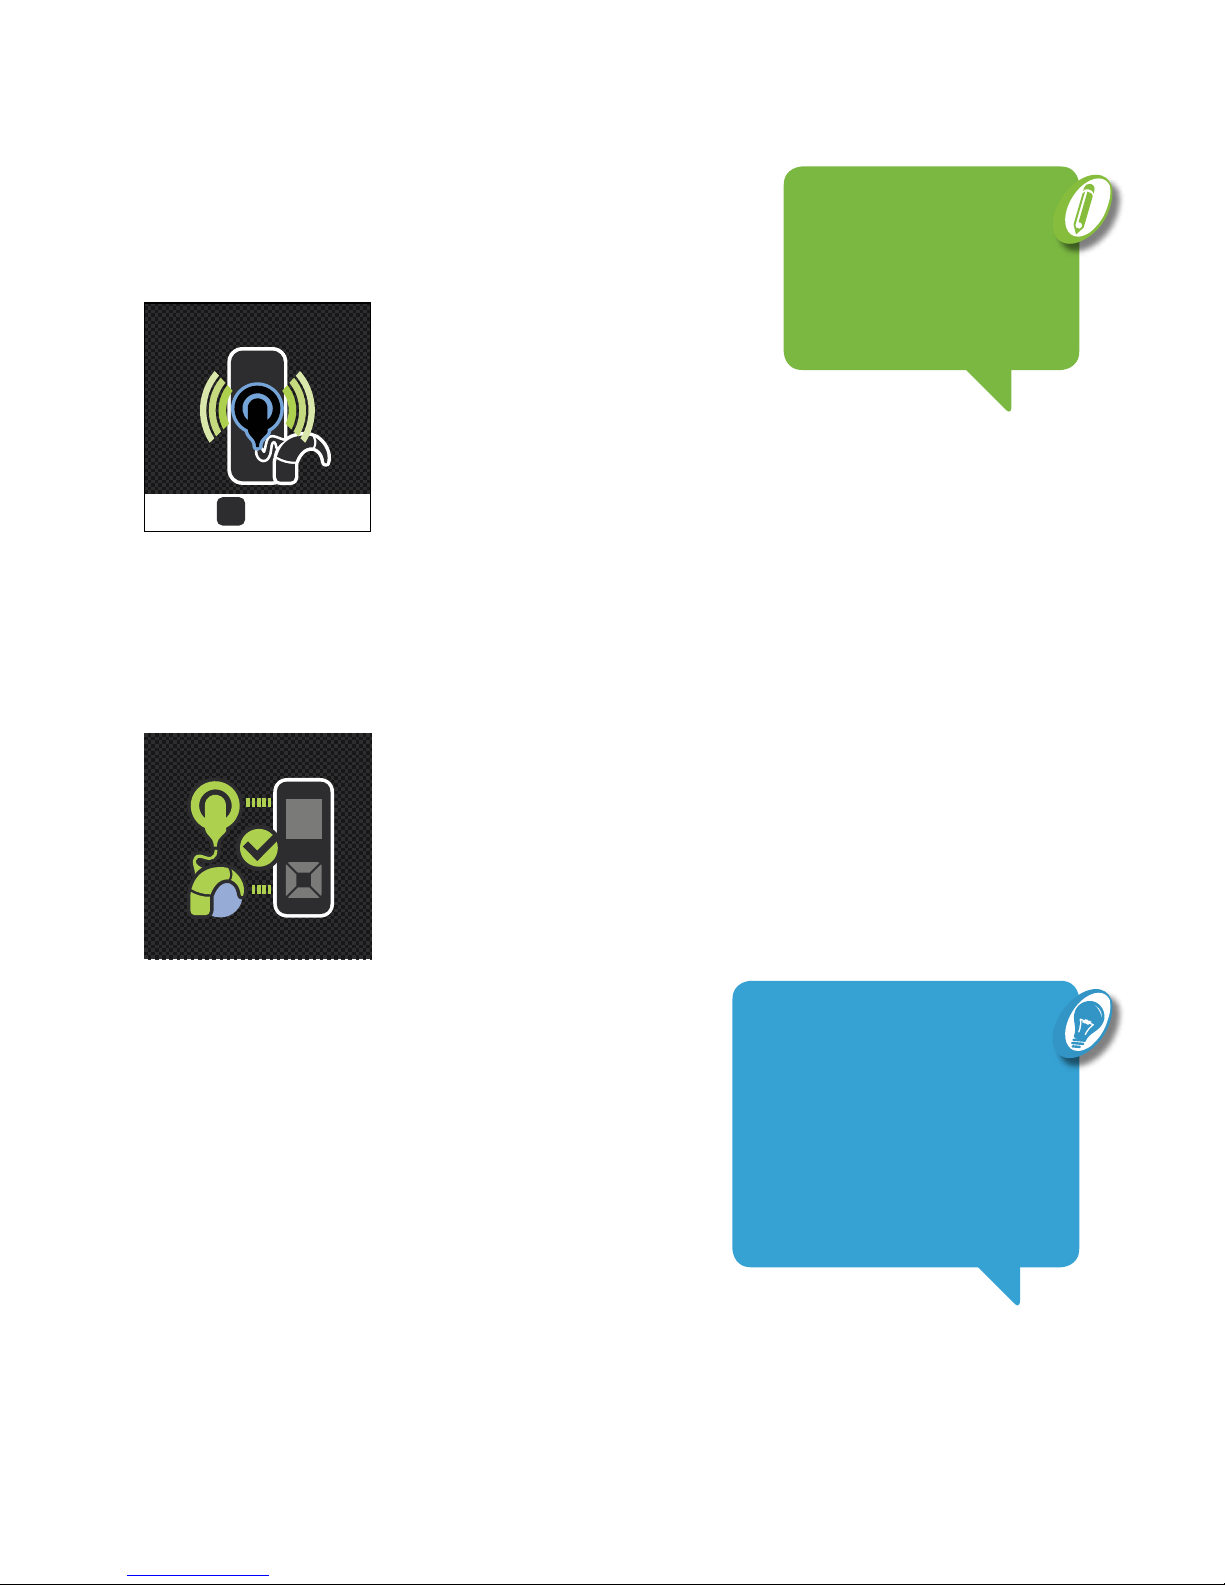
Pair
Pairing allows the remote assistant to communicate with the processor.
If a processor is not paired with the remote assistant, the No Processor
Paired screen will display. Hold the processor coil to the back of the remote
assistant to pair them.
If there is already a processor paired, you can pair again with a different
processor at any time.
Before pairing, ensure the processor is switched on:
1. Hold the coil on the coil guides at the back of the remote assistant.
Hold processor coil
to back of remote
NO PROCESSOR
PAIRED
Page 20
L
PROCESSOR PAIRED
18
TIP
Several remotes can be paired
to one processor. For recipients
who travel, this is useful when a
remote is needed in two locations,
e.g. school and home or home
and clinic.
The Pair Processor screen will display.
2. Press the OK button to pair.
When pairing is complete, the Processor Paired screen will display,
followed by your Home screen.
OK
PAIR
PAIR PROCESSOR ?
NOTe
If you are a bilateral user,
you will need to repeat
steps 1 and 2 for your
second processor.
Page 21

19
NUCLEUS® CR230 REMOTE ASSISTANT USER GUIDE
TURN ON
Turn off
To turn the remote assistant off:
1. Press and hold the OK button until the menu displays.
Switch Off will already be highlighted.
2. Press the OK button to select.
OK
SELECT
Reset Settings
Switch Off
Cancel
Page 22

2020
Page 23

2121
Use
Status indicators 22
Programs on your Home screen 24
Practice mode 28
Advanced mode 31
Use telecoil 32
Audio accessories 34
Bilateral displays and controls 35
Page 24

22
Status indicators
Your remote assistant allows you to display key information about your
processor, including the battery status.
Check processor status
To check the status of your processor press the OK button from your
Home screen. Two animated Status screens will display:
The sound meter bar shows sound being “heard” by the processor.
Soft sound
(20–50 dBA)
Moderate sound
(50–70 dBA)
Loud sound
(70–100 dBA)
The first Status screen will display
the processor status indicator.
Green means everything is working.
The second Status screen will display
information about the processor battery and
sound levels.
STATUS
Press
OK
STATUS
Sound meter bar
Page 25

23
NUCLEUS® CR230 REMOTE ASSISTANT USER GUIDE
Check battery status
A Battery Status screen is displayed when you first switch on your
remote assistant.
If there are problems with the processor or battery, an alert
screen will display. See Alert screens on page 62.
Press
OK
STATUS
TIP
An hourglass may briefly display instead of
the battery in the second Status screen. This
indicates that the remote assistant is waiting
for an update from the processor.
USe
Page 26

24
Programs on your Home screen
While most recipients will have two programs on their remote assistants,
your clinician may provide up to four programs based on your hearing
requirements. These programs will be displayed on your Home screen.
For example:
The tab for the active program will be bigger
than the others.
The program and screen background
colour will match.
The picture on the screen will show
the active program.
Home screen with
two programs
SCAN
2
TIP
The background picture and colour on your
Home screen will change depending on which
program is active.
SCAN
2
Home screen with
four programs
SCAN
TV
WORK CAFE
Page 27

25
NUCLEUS® CR230 REMOTE ASSISTANT USER GUIDE
SCAN program
The SCAN program (if set up by your clinician) detects and automatically
adjusts your processor to the current sound environment.
Icons associated with the SCAN program
USe
SCAN
Speech in noise
Quiet
Wind
Noise
Music
Speech
NOTe
You can hide the SCAN icons by navigating to the
Settings screen and then to the SCAN Icons screen.
When the SCAN icons are hidden, the SCAN feature
will still function normally but you will not see the
icons change on the Home screen.
Page 28

26
Custom icons
Your clinician can set the icon which displays for each of your custom
programs. These icons let you see which program is active.
TV Work
Café Car
Music
Shopping
Home
1 On 1
OutdoorGroups
School
Distance
Page 29
OK
SELECT
Turn on Program
Numbers
Simple Mode
1
2
3 4
27
NUCLEUS® CR230 REMOTE ASSISTANT USER GUIDE
USe
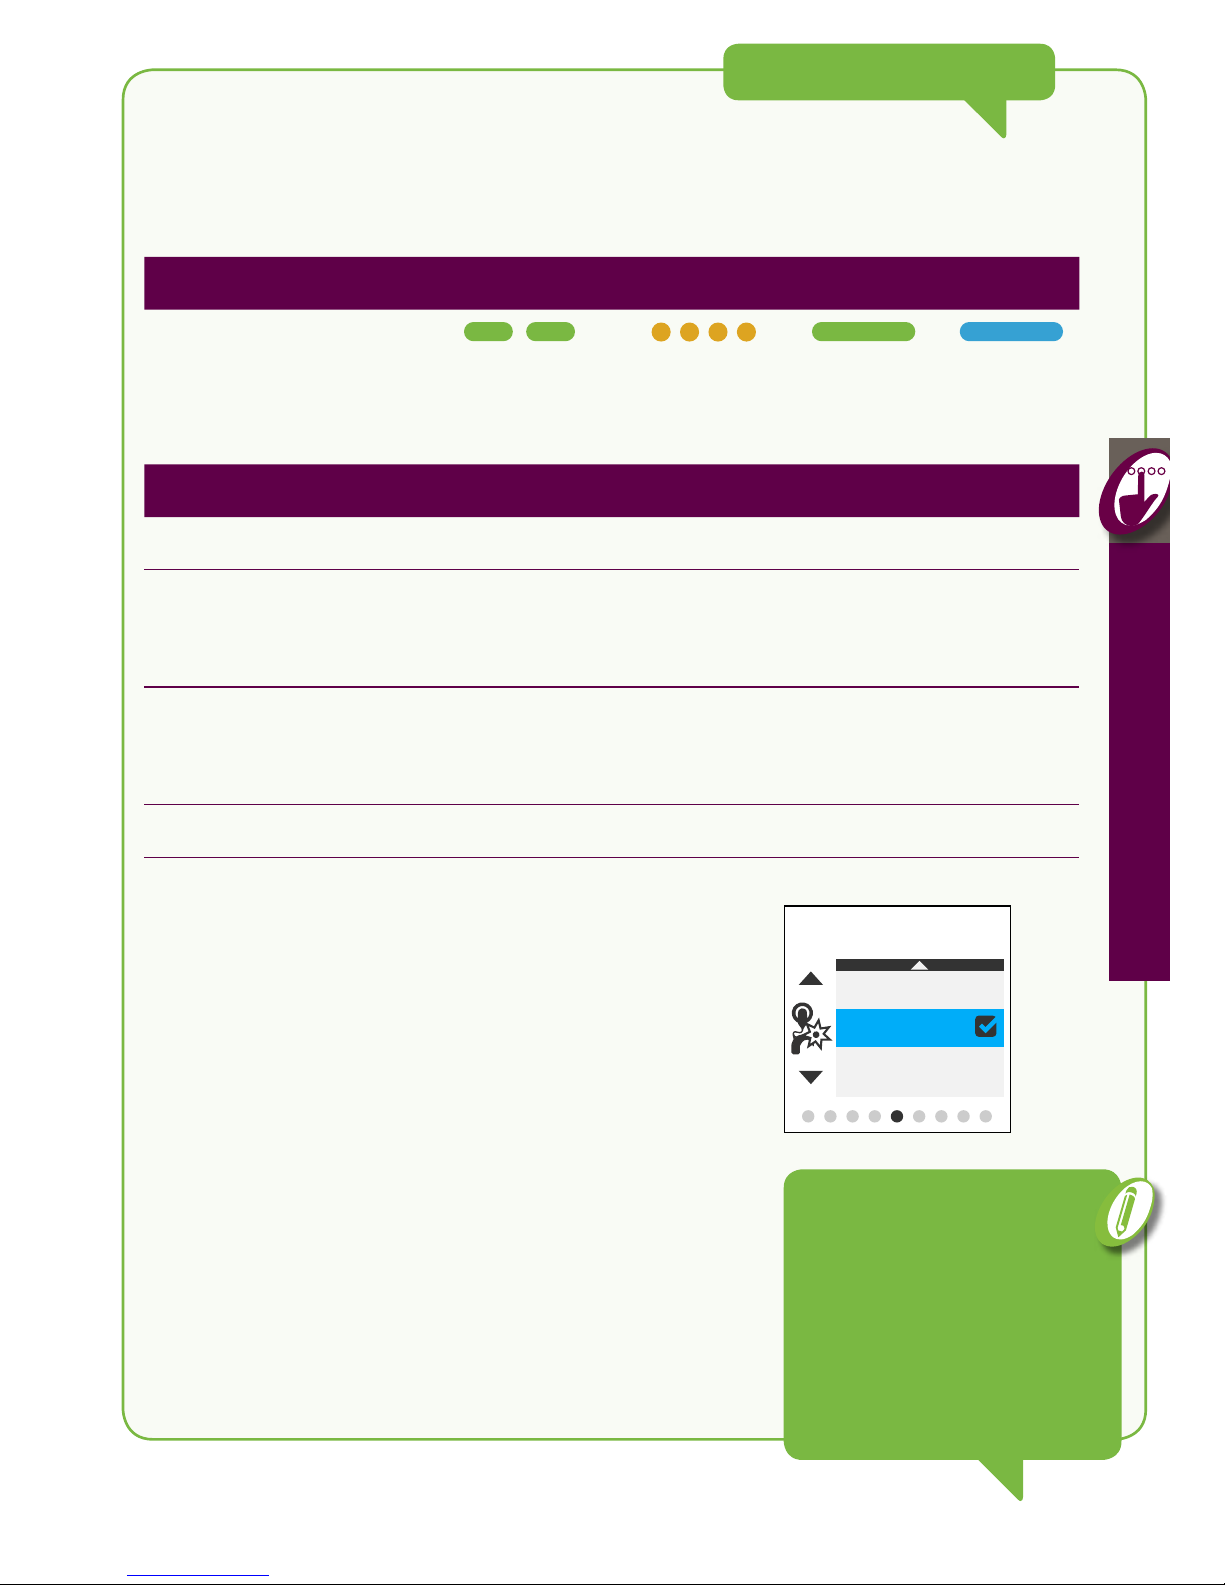
Change programs
Up to four programs may be set up by your clinician.
Use the program buttons to change between programs.
Display numbers instead of program names
If you prefer to see numbers instead of program names displayed on your
Home screen:
1. Press and hold the OK button to display the menu.
2. Press the down arrow button to highlight Turn on Program Numbers.
3. Press the OK button to select.
TIP
To revert to displaying
program names, repeat
these steps but select
the Turn off Program
Numbers option.
Program 3
Program 2
(selected)
Program 4
Program 1
SCAN
TV
WORK CAFE
Page 30
28
Practice mode
Practice mode allows you to familiarise yourself with the
remote assistant before you start using it.
To enter Practice mode:
1. Press and hold the OK button.
2. When the menu displays, press the down arrow button to highlight
Practice Simple or Practice Advanced.
SELECT
OK
Practice
Advanced
Practice Simple
Reset Settings
NOTe
In Practice mode,
adjustments or changes to
settings are not saved or
sent to the processor.
Page 31

29
NUCLEUS® CR230 REMOTE ASSISTANT USER GUIDE
USe
3. Press the OK button to select.
The Start Practice Mode screen will briefly display, followed by the
Home screen in Practice mode.
SCAN
TV
SCAN
TV
TIP
The remote assistant
displays one square for
Simple Practice mode and
two squares for Advanced
Practice mode.
Page 32

30
Finish Practice mode
To finish Practice mode:
1. Press and hold the OK button to display the menu.
Finish Practice Mode will already be highlighted.
2. Press the OK button to select.
The Practice Mode Finished screen will briefly display
followed by the Home screen.
SELECT
OK
Turn On Program
Numbers
Finish Practice
Mode
Switch Off
Page 33

Press to enter
OK
HEARING
ADJUSTMENT
Press to enter
OK
SETTINGS
31
NUCLEUS® CR230 REMOTE ASSISTANT USER GUIDE
USe
Advanced mode
Your remote assistant is set to Simple mode by default. Simple mode
provides access to features that are most relevant for your
hearing requirements.
If required, you can switch to Advanced mode to adjust settings on your
processor and remote assistant.
To change to Advanced mode:
1. Press and hold the OK button to display the menu.
2. Press the down arrow button to highlight Advanced mode.
3. Press the OK button to select.
Navigate to the following screens to adjust hearing or change settings when
you are in Advanced mode.
For more information see Master volume on page 43 and Settings on page 46.
OK
SELECT
Turn on Program
Numbers
Practice
Advanced
Advanced Mode
NOTe
The Hearing Adjustment
screen is only displayed if
enabled by your clinician.
Page 34
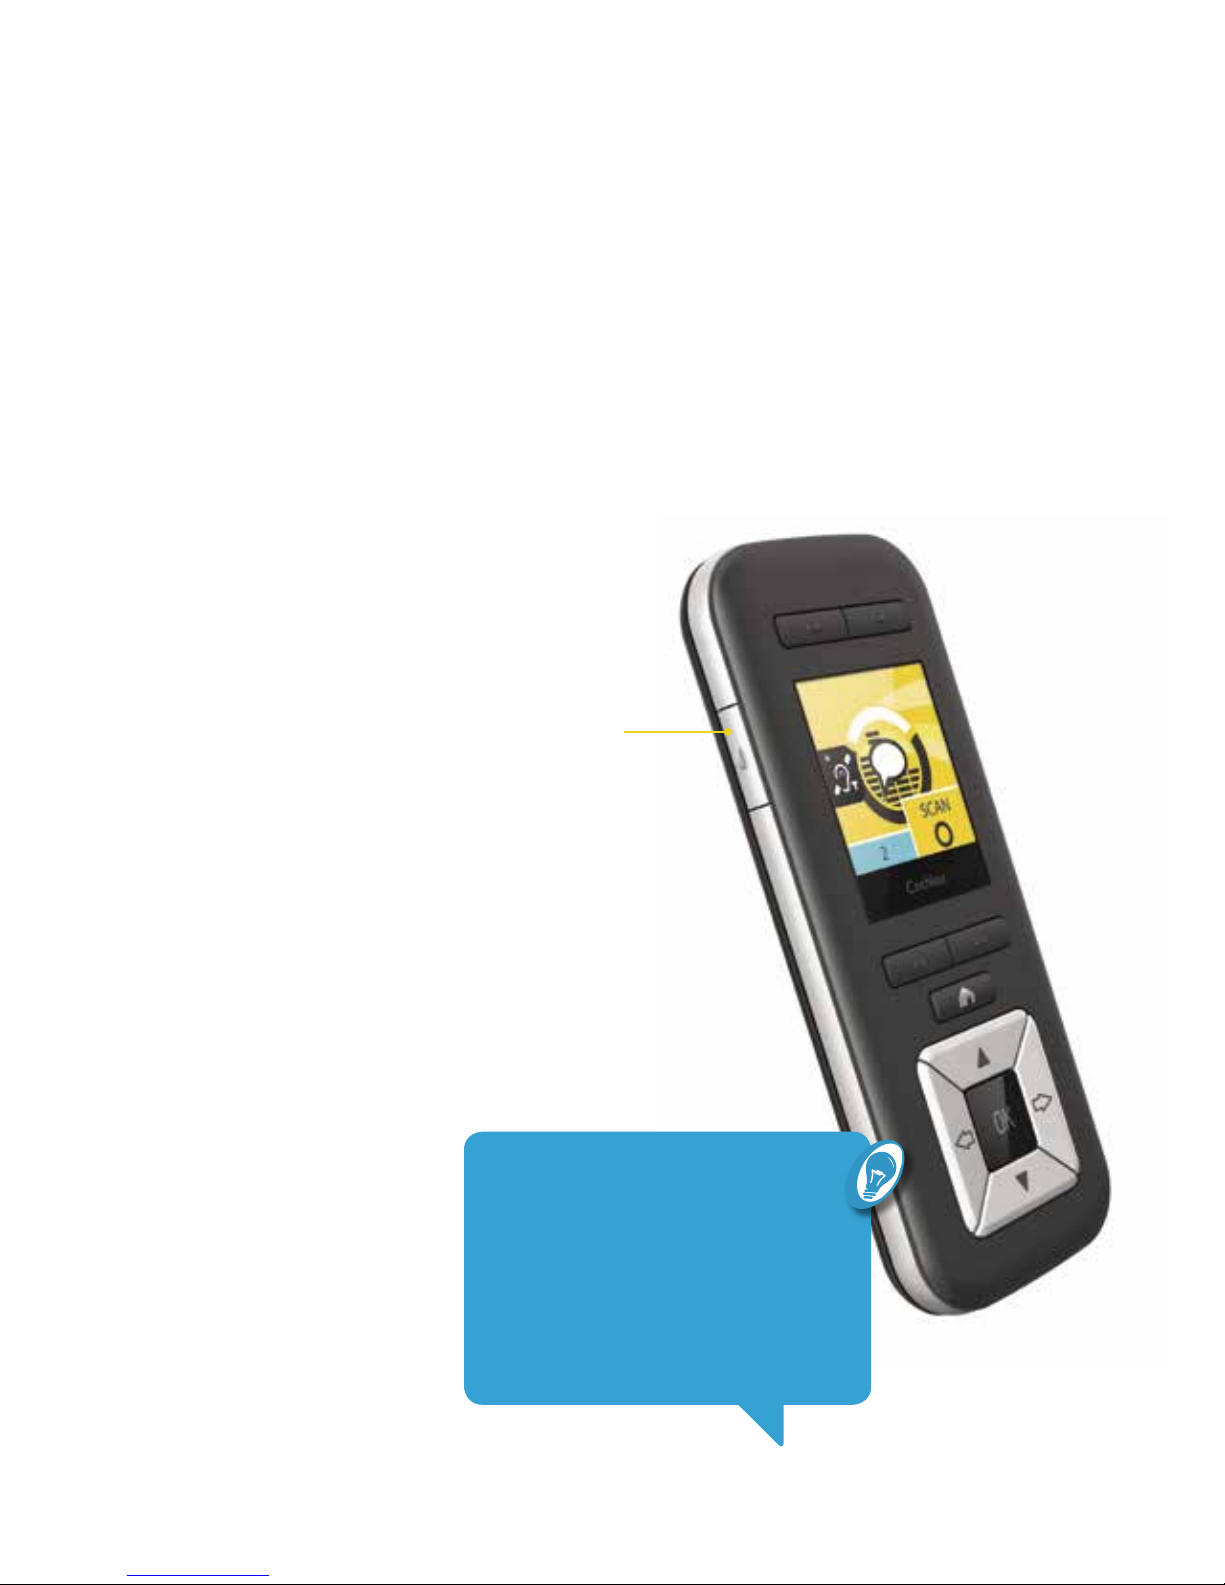
32
Use telecoil
Listen to hearing loops and hear voices on the telephone with the telecoil.
Your clinician can set up your processor with manual telecoil and also auto
telecoil. Auto telecoil detects the telecoil signal automatically whenever
you use a telecoil-compatible phone or are in range of a hearing loop.
You cannot use telecoil while an audio accessory is connected to
your processor.
To use telecoil or auto telecoil:
1. Press the telecoil button once to turn
telecoil on.
2. Press the telecoil button again (within
5 seconds) to turn auto telecoil on.
3. Press the telecoil button again to turn
telecoil or auto telecoil off.
TIP
If you are a bilateral recipient and you
have an accessory plugged into one
processor, pressing the telecoil button
on the remote assistant or the processor
will control the accessory.
Page 35

33
NUCLEUS® CR230 REMOTE ASSISTANT USER GUIDE
USe
When you use the telecoil or auto telecoil, the following icons may display
on your Home screen:
Telecoil
Telecoil on
Telecoil is active on your processor.
Auto telecoil
Auto telecoil on (receiving)
Auto telecoil is on and your processor is in range of and
detecting a hearing loop or telephone.
Auto telecoil on (standby)
Auto telecoil is on, but your processor is not detecting
a hearing loop or telephone.
Telecoil or auto telecoil off
This icon will briefly display on the screen when you turn
off telecoil or auto telecoil.
CAUTION
Certain electronic devices or machinery may automatically turn on
telecoil when you are in auto telecoil mode (you may hear a buzzing
noise). If this happens, move away from the device or machinery and wait
a few seconds for auto telecoil to turn itself off, or turn it off manually.
Page 36

34
Audio accessories
If you connect an audio accessory to your processor, a pop-up will briefly
display on your remote assistant. A small icon will be superimposed over
your Home screen while the accessory is connected, and another pop-up
will briefly display when the accessory is disconnected.
For example:
As soon as an accessory is connected, it
immediately sends sound to the processor.
When an accessory is in the ‘on’, or ‘active’ state,
a small icon with a green dot displays on the
Home screen.
If an accessory is connected to your processor,
you must manually turn off the accessory input
to hear sound from the processor’s microphones.
Use the telecoil button to control the accessory
(on and off) when it is connected. See Use
telecoil, page 32.
SCAN
2
On
SCAN
2
Disconnected
SCAN
2
Off
Accessory on Accessory off Accessory disconnected
SCAN
2
Page 37

35
NUCLEUS® CR230 REMOTE ASSISTANT USER GUIDE
RL
STATUS
Bilateral displays and controls
If you are a bilateral user, some of the screens on your remote assistant
will have left (L) and right (R) symbols to represent your left and
right processors.
For example:
By default, any adjustments you make with your remote assistant will affect
your left and right processors at the same time (together). However, you
can change this setting so that you can make separate adjustments to your
left and right processors. See Adjust left/right on page 49.
Page 38

36
If you are a bilateral user, an option in Advanced mode will allow you to
control your processors separately. When you select ‘Separately’ on the
Adjust Left/Right screen (accessible via the Settings screen), some screens
on your remote assistant will be repeated to allow you to adjust the left
and right processors separately.
For example:
Left and right Home screens
Left and right Volume screens
For information on how to change these settings, see Adjust left/right on page 49.
6
R
VOLUME
6
L
VOLUME
L
SCAN
2
L
SCAN
R
2
R
Page 39

37
NUCLEUS® CR230 REMOTE ASSISTANT USER GUIDE
USe
Page 40

38
Page 41

39
Adjust
Volume and sensitivity 41
Bass and treble 42
Master volume 43
Page 42

40
Adjust
Your clinician may give you the ability to adjust volume, sensitivity, bass,
treble and master volume from your remote assistant.
If these controls are set up on your remote assistant, you can access
the screens to adjust them by pressing the right arrow button from
your Home screen.
Page 43

41
NUCLEUS® CR230 REMOTE ASSISTANT USER GUIDE
6
VOLUME
ADJUST
Volume and sensitivity
Volume controls your perception of loudness, while sensitivity controls
the range of sounds your hear (e.g. soft, background, close or far away).
Up to 10 volume and 21 sensitivity settings are available.
To adjust volume or sensitivity levels:
1. From your Home screen, press the right arrow button to navigate to the
Volume or Sensitivity screen.
2. Press the up or down arrow button to turn the volume or
sensitivity up or down.
6
VOLUME
12
SENSITIVITY
This indicates the
default value set by
your clinician.
This indicates where
you are in relation to
the Home screen.
TIP
Adjust volume (or sensitivity, if
set up) directly from the Home
screen by pressing the up or
down buttons.
Page 44

15
BASS
15
TREBLE
42
Bass and treble
If enabled by your clinician, you can adjust your perception of low or high
pitch sounds on your remote assistant. These adjustments can be made at
the Bass or Treble screens:
To adjust the bass or treble levels:
1. From your Home screen, press the right arrow button to navigate to the
Bass or Treble screens.
2. Press the up or down arrow button to turn the bass or treble levels
up or down.
There are 60 bass and treble levels available to you: -30 to +30.
Page 45

ADVANCeD MODe ONLY
CAUTION
Ensure you only adjust these levels
when you can hear sounds or speech.
Increasing the master volume may
cause loud sounds or discomfort at
high levels. If this occurs, remove the
coil/processor immediately. Decrease
the master volume before replacing
the coil.
43
NUCLEUS® CR230 REMOTE ASSISTANT USER GUIDE
ADJUST
Master volume
If your clinician has enabled bass and treble controls on your remote
assistant, master volume will also be enabled. Master volume allows you to
adjust the overall loudness of your sound processor.
To adjust the master volume level:
1. From your Home screen, press the right arrow button to navigate to the
Hearing Adjustment screen.
2. Press the OK button.
3. At the Master Volume screen, press the up or down arrow button to
adjust the master volume up or down.
4. When you are satisfied with your adjustments, press the Home button
to go back to the Hearing Adjustment screen.
The range of master volume levels is 0 to 255.
Press to enter
OK
HEARING
ADJUSTMENT
190
MASTER VOLUME
Page 46

4444
Page 47

4545
Settings
Telecoil mix 47
Accessory mix 48
Adjust left/right 49
Processor buttons 50
Processor beeps 50
Processor lights 51
Beeps on remote assistant 52
Alert messages 53
SCAN icons 54
Page 48

ADVANCeD MODe ONLY
TIP
To navigate to the Settings screen,
continually press the right arrow button from
your Home screen.
After making your changes, press the
Home button to return to the Settings screen.
Press the Home button again to return to the
Home screen.
46
Settings
In Advanced mode, you have access to settings that allow
you to make additional changes to the way your processor
and remote assistant operate.
The options available to you from the Settings screen
allow you to:
• adjust telecoil to microphone mixing ratio
• adjust accessory to microphone mixing ratio
• adjust left and right processors (if you are a
bilateral user)
• lock/unlock processor buttons
• turn on/off processor beeps
• turn on/off processor lights
• adjust volume of beeps on the remote assistant
• show/hide alert messages on the remote assistant
• show/hide SCAN icons on the remote assistant.
Press to enter
OK
SETTINGS
Page 49
ADVANCeD MODe ONLY
47
NUCLEUS® CR230 REMOTE ASSISTANT USER GUIDE
SeTTINGS
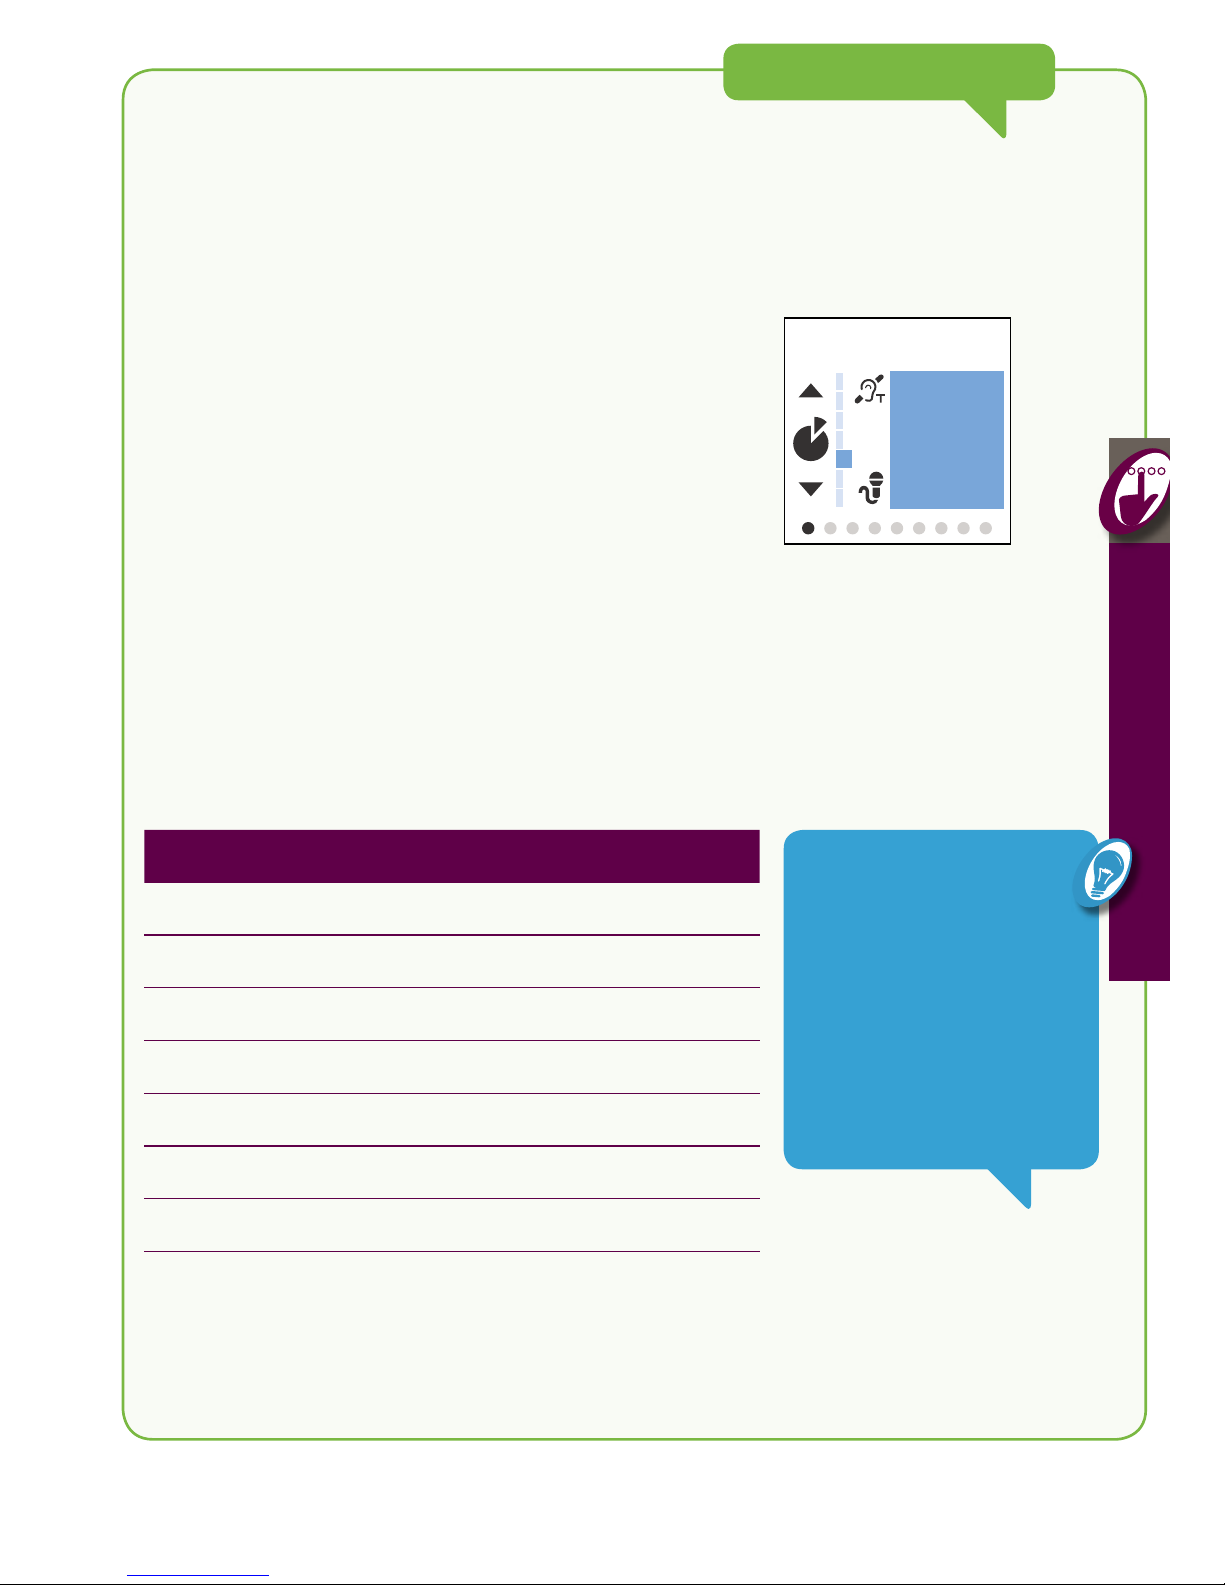
Telecoil mix
Mixing allows you to combine telecoil and
microphone input.
To adjust the telecoil to microphone mixing ratio:
1. Go to the Settings screen and press the OK button.
2. When the Telecoil Mix screen is displayed, press the up
or down arrow button to change the mix.
The number on the screen tells you the ratio of telecoil
sound to microphone sound in the mix.
3
TELECOIL MIX
NUMBER SOUND MIX
100 All telecoil (100%)
6 6 parts telecoil to 1 part microphone
5 5 parts telecoil to 1 part microphone
4 4 parts telecoil to 1 part microphone
3 3 parts telecoil to 1 part microphone
2 2 parts telecoil to 1 part microphone
1 1 part telecoil to 1 part microphone
TIP
To focus more on the telecoil
input and reduce background
sounds, increase the number
displayed on the Telecoil
Mix screen. To hear more
background sounds while
using the telecoil, decrease
the number.
Page 50

ADVANCeD MODe ONLY
48
Accessory mix
To adjust the accessory to microphone mixing ratio
(e.g. when using the Cochlear Nucleus Personal Audio Cable
to listen to music):
1. Go to the Settings screen and press the OK button.
2. Press the right arrow button to navigate to the
Accessory Mix screen.
3. Press the up or down arrow button to change the mix.
The number on the screen tells you the ratio of accessory
sound to microphone sound in the mix.
2
ACCESSORY MIX
NUMBER SOUND MIX
100 All accessory (100%)
6 6 parts accessory to 1 part microphone
5 5 parts accessory to 1 part microphone
4 4 parts accessory to 1 part microphone
3 3 parts accessory to 1 part microphone
2 2 parts accessory to 1 part microphone
1 1 part accessory to 1 part microphone
TIP
To focus more on the
accessory input and reduce
background sounds,
increase the number
displayed on the Accessory
Mix screen. To hear more
background sounds while
using the accessory,
decrease the number.
Page 51

ADVANCeD MODe ONLY
49
NUCLEUS® CR230 REMOTE ASSISTANT USER GUIDE
SeTTINGS
Adjust left/right
If you are a bilateral user, your remote assistant will allow
you to make adjustments to your processors, either
together (at the same time), or separately.
To adjust this setting:
1. Go to the Settings screen and press the OK button.
2. Press the right arrow button to navigate to the Adjust
Left/Right screen.
3. Press the up or down arrow button to highlight Together
or Separately.
4. Press the OK button to select.
For more information about these features, see Bilateral
displays and controls on page 35.
Together
Separately
ADJUST LEFT / RIGHT
NOTe
This feature is only
available for bilateral users.
Page 52

ADVANCeD MODe ONLY
50
Processor buttons
You can lock the buttons on your processor to prevent
accidental button presses that may affect your
preferred settings.
To lock the processor buttons:
1. Go to the Settings screen and press the OK button.
2. Press the right arrow button to navigate to the
Processor Buttons screen.
3. Press the up or down arrow button to highlight Enabled
or Locked.
4. Press the OK button to select.
Processor beeps
Processor beeps can be turned off or on.
To change processor beeps:
1. Go to the Settings screen and press the OK button.
2. Press the right arrow button to navigate to the
Processor Beeps screen.
3. Press the up or down arrow button to highlight Off
or On.
4. Press the OK button to select.
Enabled
Locked
PROCESSOR
BUTTONS
Off
On
PROCESSOR BEEPS
NOTe
Only cochlear implant
recipients will be able
to hear processor
beeps.
Page 53
ADVANCeD MODe ONLY
51
NUCLEUS® CR230 REMOTE ASSISTANT USER GUIDE
SeTTINGS
Processor lights
You can turn on or turn off various indicator lights on your processor.
The following table explains the different options.
To change the indicator lights on your processor:
1. Go to the Settings screen and press the OK button.
2. Press the right arrow button to navigate to the
Processor Lights screen.
3. Press the up or down arrow button to highlight Child,
Monitor, Adult or Suspend.
4. Press the OK button to select.
Monitor
Adult
Suspend
PROCESSOR LIGHTS
TYPE OF INDICATOR
Key Press
Alert
Microphone
activity
Telecoil/
Accessory/
FM
OPTION DISPLAYED?
Child Yes Yes Yes Yes
Monitor
When processor on implant
When processor off implant
Yes
Yes
Yes
Yes
No
No
No
Yes
Adult
When processor on implant
When processor off implant
No
Yes
No
Yes
No
No
No
No
Suspend No No No No
NOTe
Suspend is a temporary mode.
When the processor is switched
off and on again, the indicator
lights on the processor will revert
to the mode that has been set up
by your clinician.
Page 54

ADVANCeD MODe ONLY
52
Beeps on remote assistant
Advanced mode allows you to adjust the volume of alert
and key press beeps.
To adjust the beeps on your remote assistant:
1. Go to the Settings screen and press the OK button.
2. Press the right arrow button to navigate to the
Beeps on Remote screen.
3. Press the up or down arrow button to highlight
Off, Soft or Loud.
4. Press the OK button to select.
Loud
Soft
Off
BEEPS ON REMOTE
Page 55

ADVANCeD MODe ONLY
53
NUCLEUS® CR230 REMOTE ASSISTANT USER GUIDE
SeTTINGS
Alert messages
Alert messages provide information about potential
problems with your processor or remote assistant, for
example a low battery. However, you can change the
setting to either hide or show alert messages.
To change the alert messages setting :
1. Go to the Settings screen and press the OK button.
2. Press the right arrow button to navigate to the
Alert Messages screen.
3. Press the up or down arrow button to highlight
Hide or Show.
4. Press the OK button to select.
For more information, see Alert screens on page 62.
Hide
Show
ALERT MESSAGES
Page 56

ADVANCeD MODe ONLY
Hide
Show
SCAN ICONS
54
SCAN icons
If you are using the SCAN program, the icons will display on
the Home screen to let you know what type of sound
environment the processor has detected.
You can change this setting to either hide or show
SCAN icons.
To change the setting for SCAN icons:
1. Go to the Settings screen and press the OK button.
2. Press the right arrow button to navigate to the SCAN
Icons screen.
3. Press the up or down arrow button to highlight
Hide or Show.
4. Press the OK button to select.
For more information, see SCAN program on page 25.
Page 57

55
NUCLEUS® CR230 REMOTE ASSISTANT USER GUIDE
SeTTINGS
Page 58

5656
Page 59

5757
Care
Clean 58
Store 59
Page 60

58
Clean
Keep your remote assistant dry.
To keep your remote assistant clean, wipe the display and
buttons with a soft dry cloth.
If your remote assistant gets wet:
1. Turn your remote assistant off.
2. Wipe it with a soft dry cloth.
3. Allow your remote assistant to dry for
approximately 12 hours.
NOTe
Do not use alcohol,
household cleaners or
abrasive materials to clean
your remote assistant.
WARNING
Do not use an
oven, microwave
or any other
electrical or
heating device to
dry the remote
assistant.
Page 61

59
NUCLEUS® CR230 REMOTE ASSISTANT USER GUIDE
CARe
Store
To protect your remote assistant against impact and scratches, Cochlear
recommends that you use the Cochlear™ Nucleus® CR200 Series
Protective Case.
When using the remote assistant while it is in a protective case, you may
notice a slight decrease in the operating range. If this happens, either hold
the remote assistant closer to your processor, or remove the remote
assistant from the protective case when using it.
Page 62

6060
Page 63

6161
Troubleshoot
Alert screens 62
View system details 64
Reset processor settings 65
Reset remote assistant 66
Other problems 67
Page 64

62
Alert screens
The remote assistant displays alert screens when problems occur. These
screens include troubleshooting information to help you resolve problems:
Some alerts are warnings (e.g. battery low), while other alerts indicate
actions which need to be taken before you can continue to use your remote
assistant (e.g. battery empty).
Press
OK
PROCESSOR
BATTERY LOW
Replace or
recharge
battery.
Description of problem
How to resolve the problem
TIP
The part with the problem
will flash yellow, e.g. coil,
battery, processing unit.
Page 65

63
NUCLEUS® CR230 REMOTE ASSISTANT USER GUIDE
TROUBLeSHOOT
Alert while screen is locked
If alerts occur while the remote assistant is locked, the
remote assistant will beep and the screen will “wake up”
with a Locked screen that also shows the alert. Unlock the
remote assistant to resolve the alert.
Adjusting while out of range
If you try to make an adjustment to the processor while out
of range, a full screen out-of-range alert will occur. You can
dismiss the alert by pressing the OK button. You will then be
taken back to the last screen you were on.
Out of range alert
If you are out of range, an alert will display on the Home
screen and at the bottom of all subsequent screens.
However, you will not hear an audio alert.
Press
OK
COIL OFF
IMPLANT
VOLUME
SCAN2
Page 66
64
ADVANCeD MODe ONLY
View system details
Advanced mode allows you to view system details, such as:
• remote assistant version
• processor version
• serial numbers.
To view system details:
1. From the Home screen, press the right arrow button to
navigate to the Settings screen.
2. Press the OK button.
3. Keep pressing the right arrow button until you see the
Processor Info screen and the Remote Info screen.
Press to enter
OK
SETTINGS
Version
Serial No.
12.34.567
123456
PROCESSOR INFO
Version
Serial No.
12.34.567
123456
REMOTE INFO
TIP
Press the Home button
to return to the Settings
screen. Press the Home
button again to return to
your Home screen.
Page 67

65
NUCLEUS® CR230 REMOTE ASSISTANT USER GUIDE
TROUBLeSHOOT
Reset processor settings
If you want to reset your processor to the initial settings made by your clinician, you can
select the Reset Settings option on your remote assistant. This will reset volume,
sensitivity and all Advanced mode options.
To reset the settings on your processor:
1. Press and hold the OK button until the menu displays.
2. Press the up or down arrow button to highlight Reset Settings.
3. Press the OK button to select.
OK
SELECT
Reset Settings
Switch Off
Practice Simple
NOTe
If you are not paired to a processor, you
can still access Reset Settings, however,
it will only reset Beeps on Remote and
Alert Messages.
Page 68
66
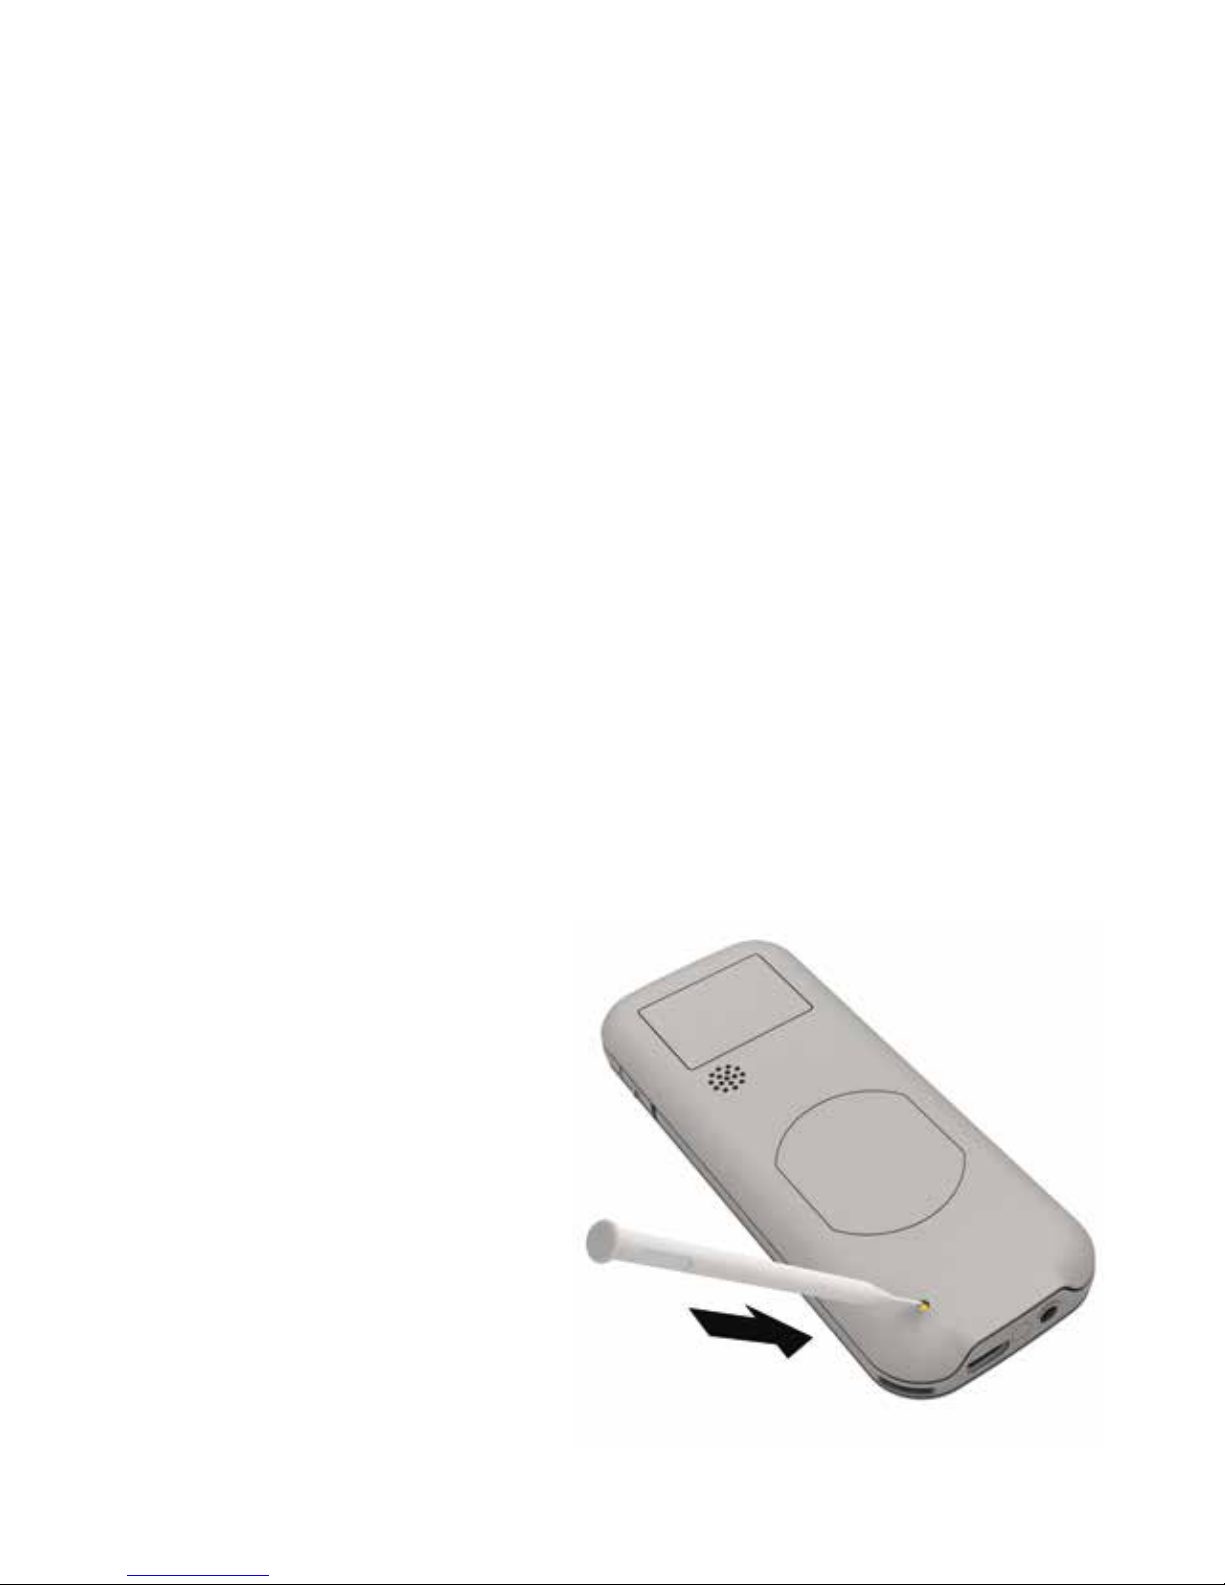
Reset remote assistant
If the Home button does not work or the remote assistant
freezes, you can reset the remote assistant by using a
pointed object to press the hard reset button at the back of
the remote assistant.
This will reset the remote assistant to its original settings.
You will have to:
• select your preferred language again
• reset the loudness of the beeps on the remote assistant
(the default setting is Loud)
• pair the remote assistant to a sound processor again
• reset whether alert messages are shown or hidden
(the default setting is Show)
• reset whether SCAN icons are shown or hidden
(the default setting is Show)
• reset the mode to Simple mode or Advanced mode
(the default setting is Simple mode)
• if you are a bilateral user, reset left/right settings
(the default setting is Together).
Page 69

67
NUCLEUS® CR230 REMOTE ASSISTANT USER GUIDE
TROUBLeSHOOT
Other problems
PROBLEM RESOLUTION
The processor is
unavailable
1. Make sure the processor is turned on and is within
2 metres of your remote assistant. See Turn on,
page 16.
2. Ensure the processor is paired with your remote
assistant. See Pair, page 17.
3. Move to a different location.
4. Try to pair the processor with the remote
assistant again.
5. If you are a bilateral recipient, ensure you have the
correct side selected and displayed for troubleshooting.
See Adjust left/right, page 49.
6. If the problem continues, contact your clinician.
You are pressing a key
and nothing happens
1. If you are pressing a key while the remote assistant is
locked, a Locked screen will display and you will hear a
beep. Unlock the device.
See Lock and unlock, page 4.
2. Try changing to another program.
See Change programs, page 27.
3. Try pressing different keys.
4. Ensure you are pressing the key correctly.
5. Press the hard reset button on the back of the remote
assistant. See Reset remote assistant, page 66.
6. If the problem continues, contact your clinician.
Page 70

68
PROBLEM RESOLUTION
Your remote assistant
battery did not stay
charged for very long
1. Check if anything is pressing on the keys of the remote
assistant, such as an item in your handbag or pocket.
Lock the remote assistant to save power on the battery.
2. When charging, ensure the battery tick appears on
screen before unplugging.
3. If the problem continues, contact your clinician.
Your remote assistant
will not charge
1. Check the connections.
2. Check the USB connector on the remote assistant and
ensure there is no damage or contamination.
3. If you are charging your remote assistant using a
computer, ensure the computer is “awake” and on.
4. Try charging your remote assistant using the USB cable
and the Cochlear Global Power Adaptor (provided in the
Cochlear Nucleus CR200 Series Charging Kit).
See Charge battery, page 12.
5. If the problem continues, contact your clinician.
Page 71

69
NUCLEUS® CR230 REMOTE ASSISTANT USER GUIDE
TROUBLeSHOOT
Page 72

70
Warnings
• Do not use your remote assistant if it
becomes unusually warm. Notify your
clinician immediately.
• Only use battery charging equipment
supplied by Cochlear to charge the
remote assistant.
• Do not place your remote assistant inside
any part of your body (e.g. mouth).
• Do not entangle your sound processor,
coil or earhook with any machinery or
jewellery, e.g. earrings.
• Parents and carers are advised that
unsupervised use of long cables
(e.g. USB cables) may present a risk
of strangulation.
• Do not operate your remote assistant
while driving.
• Do not use or store the device in dusty or
dirty areas, extreme high or cold
temperatures (e.g. do not store in direct
sunlight, behind a window or in a car for
extended periods of time).
• Take care when placing your remote
assistant in a bag or pocket with other
objects as the display may scratch.
Commercially available protective films
may be used to protect the remote
assistant display from scratches.
• Protect your remote assistant in
environments where excessive moisture
and dirt can damage it.
• Keep your remote assistant dry.
• Only use a soft dry cloth to clean the
surface of your remote assistant.
• Do not use any commercial or household
appliance to dry the remote assistant.
• Do not bend or compress the display on
the remote assistant.
• Do not use excessive force when
connecting or disconnecting the USB
cable or when using the buttons on
the remote assistant.
• Do not disassemble, deform or immerse
in water. If the remote assistant is not
working, return it to your clinician.
Warranty will be void if opened.
• Do not attempt to remove the battery.
Removal of the battery should be by
service personnel only.
• Dispose of electrical components in
accordance with your local regulations.
• If you are using a computer to charge
your remote assistant, make sure the
computer bears the mark required by
your local regulation that indicates
compliance to the IEC 60950 safety
standard for information technology
equipment.
• No modification of this equipment
is allowed.
Page 73

71
NUCLEUS® CR230 REMOTE ASSISTANT USER GUIDE
Other information
OTHeR INFORMATION
Physical configuration
The remote assistant comprises:
• Custom analogue and digital integrated
circuits based on a microprocessor
design, with bi-directional wireless
communication capabilities.
• Buttons and a slider for control of
processor features and its own system
features.
• A display for indicating system status
and activity.
• A speaker for sounding an audible alert.
• Coil sensor to check if the coil is receiving
sound signals from the processor and
for pairing.
• On-board battery charging circuit.
• A temperature sensor for battery safety.
• A micro USB connector with ferrite bead
for charging the remote assistant and
updating the firmware.
Materials
The remote assistant housing, including
non-metallic buttons, is made of
polycarbonate.
Page 74

72
Wireless communication link
The remote assistant wireless
communication link operates in the 2.4 GHz
ISM band using GFSK (Gaussian Frequency
Shift Keying) on 5 channels. The link uses a
proprietary bi-directional communication
protocol and operates over a distance of up
to 2 metres from the processor. When
interference is present, the wireless
communication link switches between the
5 channels to find a channel where the
interference least affects the operation of
the link. The remote assistant indicates via
its display when the processor is not within
operating distance, and when the link has
been interrupted due to interference.
Battery life, charge cycles
and lifespan
• Battery life means the time a device will
run before the disposable batteries must
be replaced, or the rechargeable batteries
recharged.
• Battery charge cycle is a full charge and
discharge of the rechargeable battery.
• Battery lifespan means the total number
of charge cycles a rechargeable battery
will last before the battery life degrades
to 80% of its original fully-charged
capacity.
Page 75

73
NUCLEUS® CR230 REMOTE ASSISTANT USER GUIDE
OTHeR INFORMATION
Dimensions
COMPONENT LENGTH WIDTH DEPTH
CR230 Remote Assistant 110.8 mm 46.3 mm 14.0 mm
Weight
COMPONENT WEIGHT
CR230 Remote Assistant 66g
Operating characteristics
CHARACTERISTIC VALUE/RANGE
Wireless technology Proprietary low power bi-directional wireless
link
RF frequency 2.4 GHz
Operating battery voltage 3.7 V
Battery charging voltage 4.2 V
Battery capacity 680 mAh (Internal lithium-ion battery)
Charge cycles ≥ 80% capacity after 400 charge / discharge
cycles at room temperature
Button and slider functions Remote assistant on/off, telecoil/auto
telecoil on/off, lock and unlock, selection of
options, screen navigation, program and
setting changes
Wireless transmission range Up to 2 m
Display 128 x 128 pixels, colour LCD
Page 76

74
Environmental conditions
CONDITION MINIMUM MAXIMUM
Storage & transport temperature -10°C (14°F) +55°C (+131°F)
Storage & transport relative humidity 0% RH 90% RH
Storage & transport pressure 250 hPa 1030 hPa
Operating temperature +5°C (+41°F) +40°C (+104°F)
Operating relative humidity 0% RH 90% RH
Operating pressure 700 hPa 1030 hPa
Page 77
75
NUCLEUS® CR230 REMOTE ASSISTANT USER GUIDE
Equipment classification
Your remote assistant is an accessory to a
medical device as described in the
international standard IEC 60601-1:2005,
Medical Electrical Equipment – Part 1:
General Requirements for Basic Safety and
Essential Performance.
Environmental protection
Your remote assistant contains electronic
components subject to the Directive
2002/96/EC on waste electrical and
electronic equipment.
Help protect the environment by not
disposing of your remote assistant with your
unsorted household waste. Please recycle
your remote assistant according to your
local regulations.
Certification and
applied standards
The CR230 Remote Assistant fulfils
the essential requirements listed in Annex 1
of the EC directive 90/385/EEC on Active
Implantable Medical Devices as per
the conformity assessment procedure
in Annex 2; it also fulfils the essential
requirements listed in the EC directive
1999/5/EC on Radio and Terminal
Telecommunication Equipment as per the
conformity assessment procedure in
Annex IV.
The year in which authorisation to affix the
CE mark was granted, was 2013.
OTHeR INFORMATION
Page 78
76
FCC (Federal Communications
Commission) and Canadian IC
compliance
This device complies with part 15 of the FCC
Rules and with RSS-210 of Industry Canada.
Operation is subject to the following two
conditions:
• This device may not cause harmful
interference.
• This device must accept any interference
received, including interference that may
cause undesired operation.
Changes or modifications made to this
equipment not expressly approved by
Cochlear Limited may void the FCC
authorisation to operate this equipment.
This equipment has been tested and found
to comply with the limits for a Class B
digital device, pursuant to Part 15 of the FCC
Rules. These limits are designed to provide
reasonable protection against harmful
interference in a residential installation.
This equipment generates, uses and can
radiate radio frequency energy and, if not
installed and used in accordance with the
instructions, may cause harmful interference
to radio communications. However, there is
no guarantee that interference will not
occur in a particular installation. If this
equipment does cause harmful interference
to radio or television reception, which can
be determined by turning the equipment off
and on, the user is encouraged to try to
correct the interference by one or more of
the following measures:
• Reorient or relocate the receiving
antenna.
• Increase the separation between the
equipment and receiver.
• Connect the equipment into an outlet
on a circuit different from that to which
the receiver is connected.
• Consult the dealer or an experienced
radio/TV technician for help.
FCC ID: WTOR200FF
IC ID: 8039A-R200FF
Radio compliance for Japan
This device is granted pursuant to the
Japanese Radio Law ( ) and the
Japanese Telecommunications Business Law
( ).
This device should not be modified
(otherwise the granted designation number
will become invalid).
R
202
LSB002
Radio compliance for Korea
Warning: This radio equipment has the
possibility of radio interference during
operation.
KCC-CRMCOH-CR200
Page 79
77
NUCLEUS® CR230 REMOTE ASSISTANT USER GUIDE
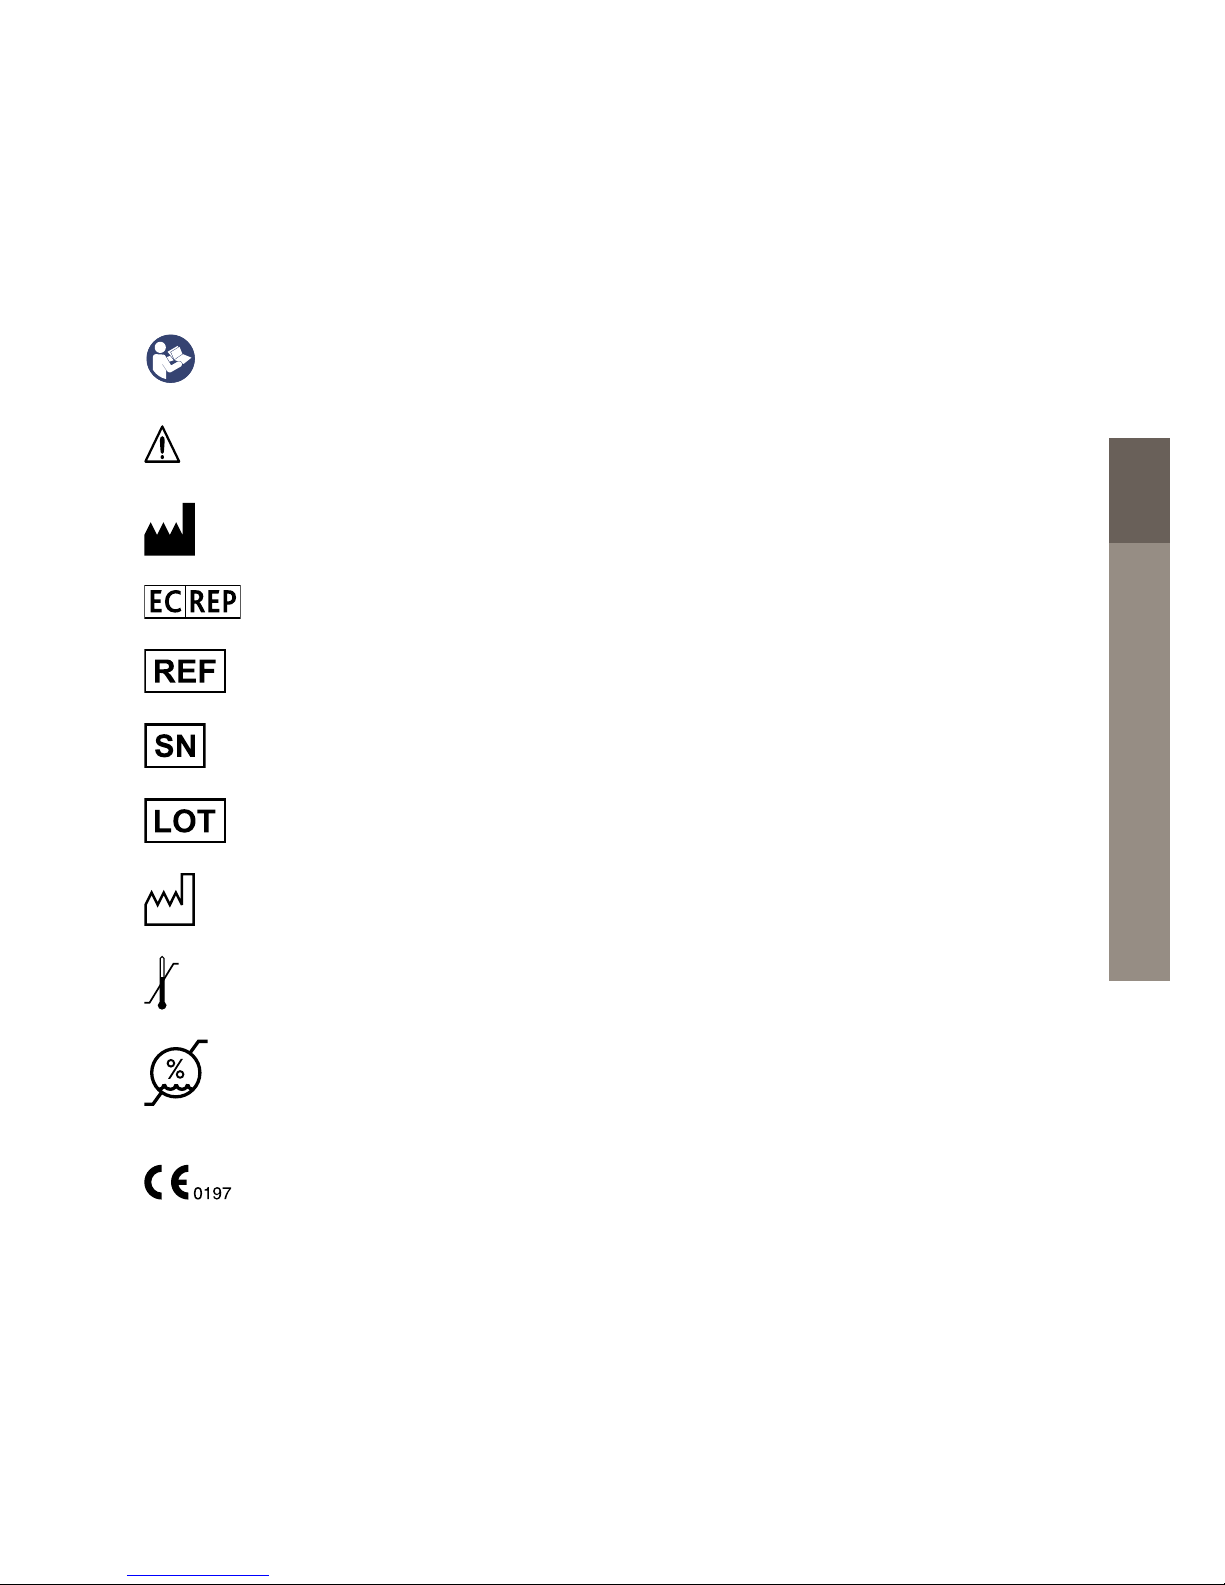
Labelling symbols
The following symbols may appear on your processor or remote components and/
or packaging:
Refer to instruction manual
Specific warnings or precautions associated with the device,
which are not otherwise found on the label
Manufacturer
Authorised representative in the European Community
Catalogue number
Serial number
Batch code
Date of manufacture
Temperature limits
Humidity Limitation
CE registration mark with notified body number. Indicates compliance
with the requirements of the Active Implantable Medical Device Directive
90/385/EEC
OTHeR INFORMATION
Page 80

78
Radio compliance certification for Australia and New Zealand
R
202
LSB002
Radio compliance certification for Japan
KCC-CRMCOH-CR200
Radio compliance certification for Korea
Do not re-use
By prescription
Recyclable material
Dispose of electrical components in accordance with your local regulations
Dispose of lithium-ion batteries in accordance with your local regulations
Keep dry
Coil guide. Used to position the coil against the remote control
when pairing.
Page 81

79
NUCLEUS® CR230 REMOTE ASSISTANT USER GUIDE
Legal statement
The statements made in this guide are
believed to be true and correct as of the
date of publication. However, specifications
are subject to change without notice.
© Cochlear Limited 2013
OTHeR INFORMATION
Page 82

80
Notes
 Loading...