

Page 1

This product may be purchased from Connevans Limited
secure online store at www.DeafEquipment.co.uk
DeafEquipment.co.uk
Offering you choice
Helping you choose
Connevans.info
Solutions to improve the quality of life
Page 2
1
A
2 3
6 1 4 5
8
9
10
7
11
12
GB
2
5
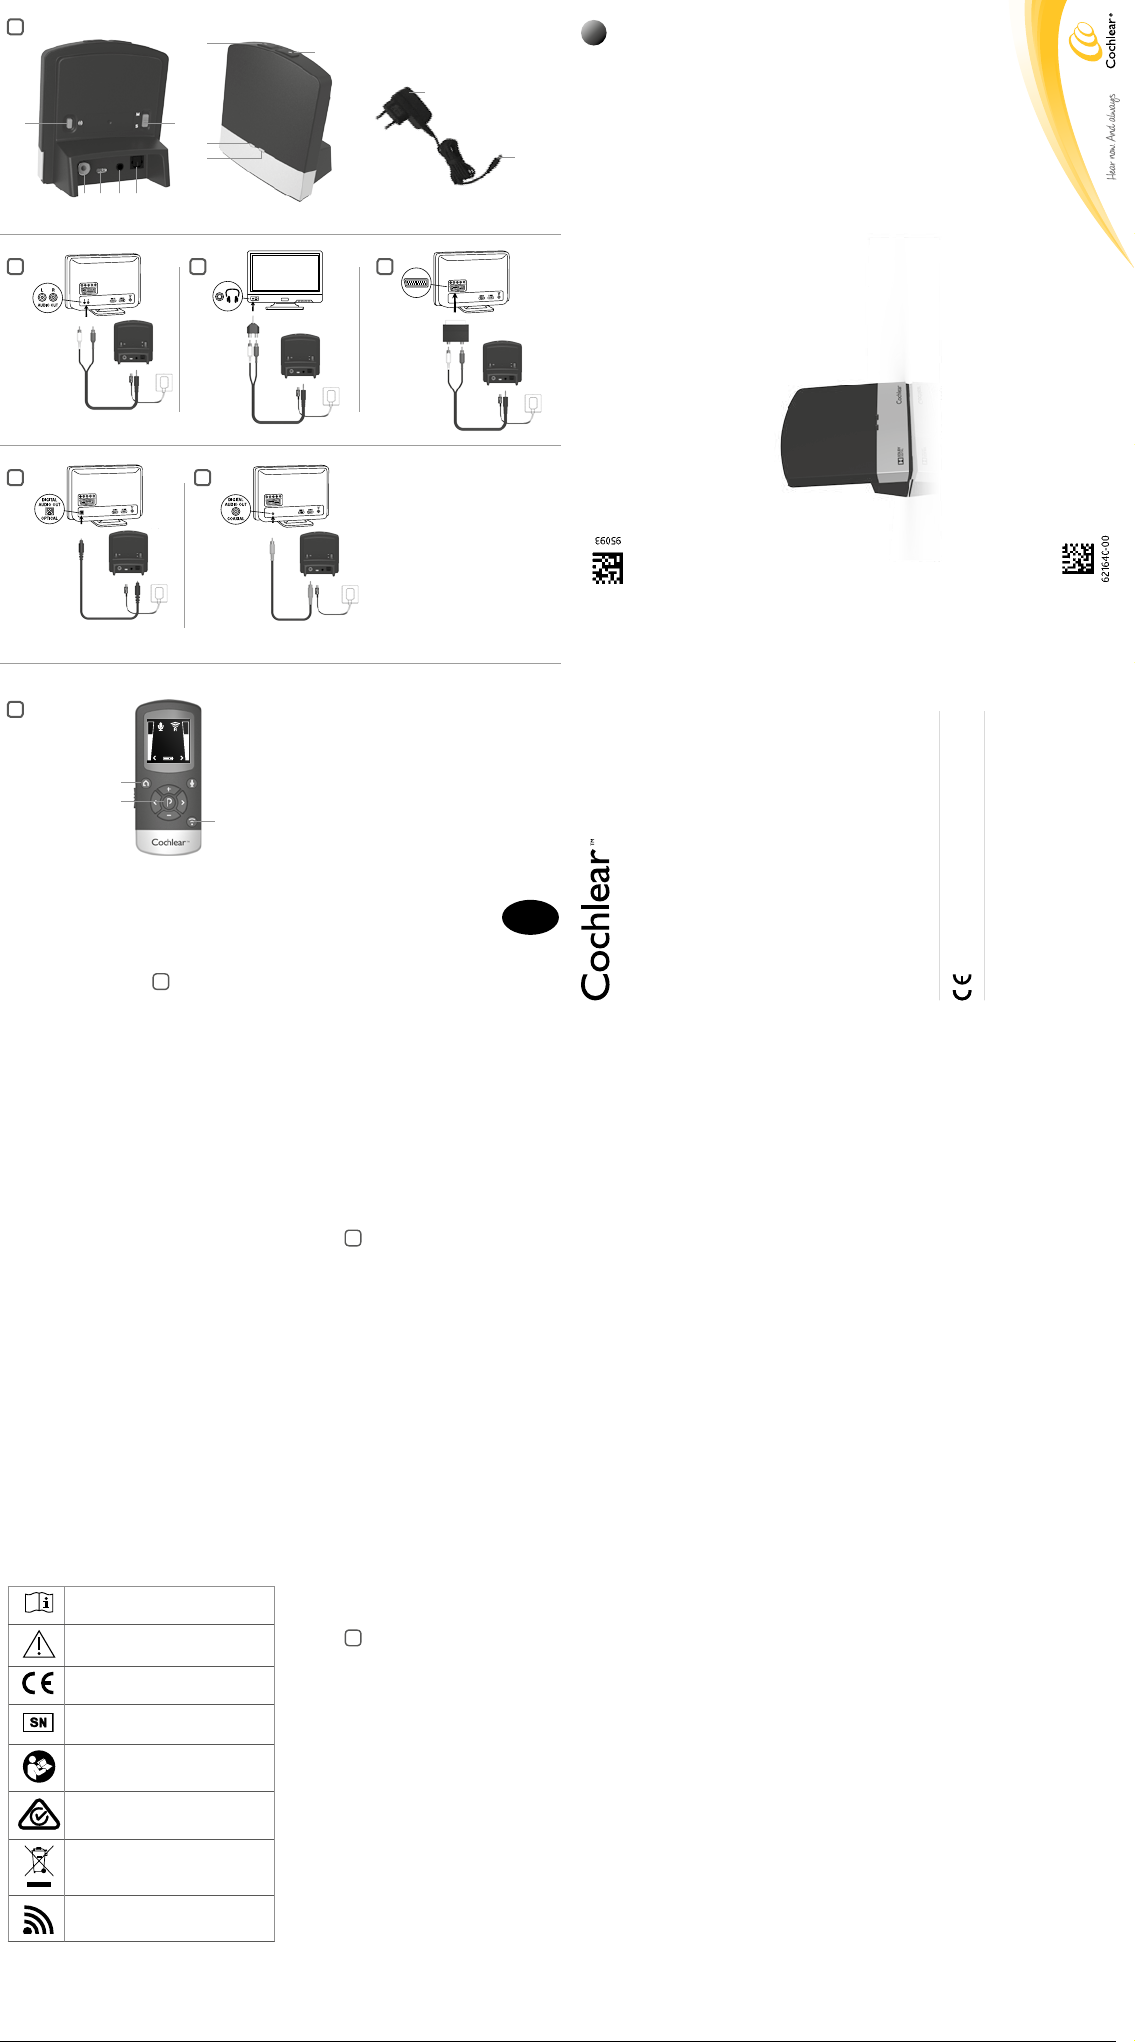
Cochlear Baha Remote Control
7
1
2
3 4
6
*
3
™
User Manual
TV Streamer
Cochlear
Konstruktionsvägen 14, SE - 435 33 Mölnlycke, Sweden
Wireless
Welcome
Congratulations on your purchase of a Cochlear™ Wireless TV Streamer**.
Key to device See f igure 1
1. Micro-USB power socket
2. Pairing button
3. Mono/stereo switch
4. Analogue mini-jack audio input
5. Optical (Toslink) audio input
6. Coaxial audio input
7. Increase volume
8. Decrease volume
9. Power light (green)
10. Activity light (yellow)
11. Wall plug
12. Mini-USB plug
1
Introduction
The Coch lear Wireless T V Streamer wi ll provide you with
high quali ty streamed a udio from your T V, stereo, person al
compute r or similar devic e directly to your s ound processo rs.
Please rea d this manual ca refully to fully be nefit from
the Coch lear Wireless T V Streamer. Ask y our hearing
care prof essional if you ha ve any question s. For furthe r
informat ion you can als o visit the www. cochlear.com web
site.
For your s afety, carefully r ead the chapter “ Important
Information”.
Warranty
The war ranty does n ot cover defect s or damage arisin g from,
associ ated with, or rela ted to the use of this pro duct with
any non-Cochlear processing unit and/or any non-Cochlear
implan t. See “Cochlear G lobal Limited Wa rranty card” f or
more details.
Key to symbols
The follo wing symbol s will be used thro ughout this
document.
“Consult i nstruction s for use” or
“Operating instruction s”
“Caution” or “Caution, consult
accompanying docum ents”
CE-mark
Serial Number
Refer to instructions/booklet
ACMA (Australian Communications and
Media Authority) comp liant
Please a sk your hearing c are profession al
concer ning disposal of t his device.
Wireless enabled
Getting Started
Installing the TV Streamer
Depen ding on your TV, ster eo, computer or ot her audio
setup, the i nstallation o f the TV Stream er may be done in
severa l ways, which are d escribed in th e following sec tion.
The follo wing steps will gu ide you through th e pairing and
connec ting process . Start by conne cting cables b etween the
TV Strea mer and the audi o source and finish b y pairing the T V
Streamer to your sound processors.
Note: The TV Streamer supports both analogue and
digital a udio input. Ple ase read the follo wing sectio ns for
informa tion about sup ported audi o formats and h ow to
connec t the TV Strea mer to audio sour ces.
Connecting the TV St reamer to an analogue
audio so urce (e.g. TV or ste reo):
See figu re 2
2
1. Connect th e power supply to th e wall socket and in sert the
cable into t he micro-US B socket on the T V Streamer.
2. Insert the m ale stereo mini- jack on the audio c able into
the femal e stereo mini-ja ck input on the T V Streamer [no.
4 in figure 1].
3. Plug the other en d audio cord into the “AUD IO OUT”
termina ls on the audio so urce. The “AUDIO O UT” is usually
marked “ L – R” for left and rig ht, and can usual ly be found
on the bac k of the audio sourc e.
Note: With th is installati on, most audio s ources will sen d
sound to both sound processors and additional speakers
connected to the audio source simultaneously. On some
audio so urces you can adju st the balanc e between the
AUDIO O UT and the spea kers. Consult yo ur audio source
manual for instructions.
Alternative analogue audio cable
installations:
If it is not pos sible to connec t the TV Stream er to the AUDIO
OUTPU T of the audio sourc e using the red and w hite plugs,
the follow ing installat ion alternative s can be used:
Mini-jack adaptor:
See figu re 3
3
1. Connect th e power supply to th e wall socket and in sert the
cable into t he micro-US B socket on the T V Streamer.
2. Insert the m ale stereo mini- jack on the audio c able into
the femal e stereo mini-ja ck input on the T V Streamer [no.
4 in figure 1].
3. Connect th e stereo mini-ja ck adapter to the re d and white
plugs at th e other end of the aud io cable.
4. Plug the stereo m ini-jack adapt er into the audio sou rce’s
“HEA DPHONE” outp ut terminal or alte rnatively into yo ur
compute r’s audio termina l.
Note: The HE ADPHONE o utput socket is us ually located
on the sid e or front of the aud io source. Whe n using the
HEAD PHONE socket , usually only th e person wear ing the
sound processors will hear the sound and audio source
speakers are muted. If muted speakers are not desired,
please re fer to the first ins tallation, o r the one on the
followin g page. Your audio so urce may suppor t speakers
and HEADPHONE being on simultaneously; check your
audio so urce manual for in struction s.
GB
Manufacturer:
Cochlear Bone Anchored Solutions AB
Regional offices:
Cochlear Ltd (ABN 96 002 618 073) 1 University Avenue, Macquarie University NSW 2109,
Australia Tel: +61 2 9428 6555 Fax: +61 2 9428 6352
Cochlear Americas 13059 E Peakview Avenue, Centennial, CO 80111, USA
Tel: +1 303 790 9010 Fax: +1 303 792 9025
Cochlear AG EMEA Headquarters, Peter Merian-Weg 4, 4052 Basel, Switzerland
Tel: +46 31 792 44 00 Fax: +46 31 792 46 95
Tel: +41 61 205 0404 Fax: +41 61 205 0405
ACE, Advance Off-Stylet, AOS, AutoNRT, Autosensitivity, Beam, Clinicnet, Cochlear, Codacs, Contour,
Contour Advance, Custom Sound, ESPrit, Freedom, Hear now. And always, Hybrid, inHear, Invisible
www.cochlear.com
Hearing, MP3000, myCochlear, NRT, Nucleus, Nucleus in Chinese characters, Off-Stylet, SmartSound,
Softip, SPrint, the elliptical logo and Whisper are either trademarks or registered trademarks of
Cochlear Limited. Ardium, Baha, Baha Divino, Baha Intenso, Baha PureSound, Baha SoftWear,
DermaLock, Vistafix and WindShield are either trademarks or registered trademarks of Cochlear Bone
Anchored Solutions AB. Dolby and the dolby-D symbol are trademarks of Dolby Lab. © Cochlear Bone
Anchored Solutions AB 2013. All rights reserved. DEC13.
Page 3

Scart adapter:
See figu re 4
4
1. Connect th e power supply to th e wall socket and in sert the
cable into t he micro-US B socket on the T V Streamer.
2. Insert the m ale stereo mini- jack on the audio c able into
the femal e stereo mini-ja ck input on the T V Streamer [no.
4 in figure 1].
3. Connect th e scart adapte r to the red and white p lugs at the
other end o f the audio cable .
4. Plug the scar t adapter into the a udio source’s scar t
termina l. Note: The scar t output termin al is usually
located o n the back or side o f the audio sourc e.
Please co nsult your audio so urce’s manual if add itional scar t
output configuration is needed.
Connecting the TV St reamer to a digita l
audio so urce (e.g. TV or ste reo)
Note: The T V Streamer sup ports both a nalogue and dig ital
audio input. When using digital audio input the following
formats are supported:
Stereo PCM
- Sample r ate: Up to 192 kHz
- Sample r esolution: Up to 32 b it
Dolby Digital
- Channe ls: Max 5.1
- Bitrate: 3 2 kbs to 640 kbs
- Sample r ate: 32, 44.1 and 48 k Hz
Note: Dolby Di gital Plus (requi ring an HDMI i nterface),
Dolby True -HD, Dolby Pro L ogic, Dolby Di gital EX, Do lby
Digital S urround EX , and AAC (Adv anced Audio Cod ec) are
not supported.
Using the optic al (Toslink) audio input
See figu re 5
5
1. Connect th e power supply to th e wall socket and in sert the
cable into t he micro-US B socket on the T V Streamer.
2. Insert on e of the plugs on the op tical audio cab le into
the optic al audio input so cket [no. 5 in figure 1] on th e TV
Stre amer.
1. Note: Most opti cal cables are d elivered with a s mall
protect ive cap to protect t he tip of the cable . Please remove
this prote ctive cap befor e inserting th e cable.
2. Plug the other en d of the optical au dio cable into the
“Digita l Audio Out/Opt ical” on your audi o source.
Using the coaxial audio input
See figu re 6
6
1. Connect th e power supply to th e wall socket and in sert the
cable into t he micro-US B socket on the T V Streamer.
2. Connect on e of the plugs on the co axial audio cab le to the
coaxia l plug [no. 6 in figure 1] on t he TV Streamer.
3. Plug the other en d of the coaxial au dio cable into the
“Digita l Audio Out/Coa xial” on your audi o source.
Pairing with your sound processors
Up to three s treaming devic es, e.g. two T V Streamers an d one
Cochlear Wireless Mini Microphone
can be pa ired with a given pai r of sound proces sors. Ther efore
channe l 1, 2 or 3 must be sele cted when sta rting the pair ing
process.
Pairing the T V Streamer in channel 1
1. Make sure that th e TV Streamer p ower supply is plu gged
into a wall so cket and that the g reen light indica tor on the
front of th e TV Streamer [n o. 9 in figure 1] is ON. Your s ound
proces sors must be OF F.
2. Press the pair ing button on th e TV Streamer [n o. 2 in figure
1] once. Th e yellow indicato r light on the fron t of the TV
Streame r [no. 10 in figure 1] will n ow flash once ever y 2
second s to indicate that th e TV Streamer is r eady to be
paired in c hannel 1. Your T V Streamer will re main in pairing
mode for 20 seconds.
3. While pairin g mode is activat ed, close the bat tery doors
of both sou nd processor s and make sure they a re ON.
Success ful pairing wil l be indicated by an a udible melody
being pl ayed in both sound p rocessors . You are now ready
to use the T V Streamer.
Pairing the T V Streamer in channel 2
1. Press the pair ing button tw ice. The yellow in dicator light on
the front o f the TV Stream er will now flash t wice every 2
second s to indicate that it is re ady to be paired in c hannel 2.
2. While in pairin g mode close the b attery door s on the sound
processors.
Pairing the T V Streamer in channel 3
1. Press the pair ing button thre e times. The ye llow indicator
light on th e front of the TV St reamer will now fl ash three
times eve ry 2 seconds to in dicate that it is rea dy to be
paired in c hannel 3.
2. While in pairin g mode close the b attery door s on the sound
processors.
Pairing flashing pattern
LED bli nking patte rn Channel
Pairing
butto n
pushes
1
2
3
***
(optional accessory)
1
2
3
Start and stop streaming
Turn on the T V, stereo, compute r or other audio dev ice
connec ted to the TV Stre amer. Make sure your s ound
proces sors are turne d on as well. Strea ming may be star ted in
one of two w ays:
1. Press and hold t he button on eith er sound proce ssor for
about th ree seconds. O nce the TV Strea mer has been
connec ted, an audible m elody will play in y our sound
proces sor and will be fol lowed by the strea med sound.
2. If you have a Cochl ear Baha Remote Co ntrol (optional),
simply pr ess the streami ng button [no. 3 in fig ure 7] on this
Remote Con trol. Once the s ound processo rs connect to
the TV St reamer, an audible m elody will play i n both ears
to confirm t he presence of s treamed audio a nd a streaming
icon will a ppear in the disp lay. The stream ed sound can now
be heard in y our sound proce ssor.
Start s treaming on a 2n d or 3rd TV Streamer
See figu re 7
unit
If more th an one TV Stream er device is avail able, you may
press th e streaming but ton [no. 3 in figure 7] on t he Baha
Remote Con trol a 2nd or 3rd time, d epending on whi ch TV
Streame r device you want to li sten to.
Up to 3 TV St reamer units ar e initially desig nated by the
letters A , B or C and the str eaming device in us e is shown on
the Baha R emote Control disp lay. If you do not have a B aha
Remote Con trol, press and h old the button o n the sound
proces sor for about 3 sec onds a 2nd or 3rd time to a ccess the
2nd or 3rd st reaming unit.
7
Stop streaming
Briefly p ress the butto n on either sound p rocessor. This w ill
cancel s treaming on the s ide pressed an d return to the mos t
recently used program.
With the B aha Remote Contro l (optional), simpl y press the
“P” but ton [no. 2 in figure 7], lo cated in the cent re of the
keypad. T his will return th e sound proces sors to the most
recently u sed program. You m ay also press t he home button
[no. 1 in figur e 7] to return to your def ault settings . If you
are using t he telephone wi th the Cochlear W ireless Phone
****
(optional ), streaming fro m the TV Stream er will be
Clip
tempor arily interrup ted. When you hav e ended your pho ne
call, st reaming will res ume.
Note! Your T V Streamer’s ra nge is approxima tely 7 meters.
If you move o ut of range and mov e back into range wi thin 5
minutes , your sound proc essors will au tomatically rec onnect
and continue streaming.
Controls
Volume control
The T V Streamer is desig ned to provide a com fortable
listenin g level from the mo ment it is activa ted. However, for
some dev ices or listenin g environment s, it may be desir able to
adjust th e listening volum e and doing so can b e accomplishe d
in a variet y of ways. Keep in m ind that volume adj ustments
on the T V Streamer appl y to the streamed si gnal only, not
to the volum e of normal envi ronmental sou nds. Use the “+”
and “-” keys [n o. 7 and 8 in figure 1] to adjus t volume to a
comfor table level. Ma ke sure that your sou nd processor s are
comfor tably adjusted b efore you change t he settings wit h
the volum e control. In mos t cases this adj ustment shoul d
only be ma de once since the T V Streamer wil l store the most
recently s et volume level. U se the Baha Remo te Control 2
(optional ) to adjust both the s treaming volum e level and the
sound pr ocessor micro phone volume le vel. Ask your h earing
care professional for more information about this accessory.
The volu me can, in some c ases, be fur ther adjusted at t he
signal so urce, for exampl e by turning the T V volume down.
This will a djust the volum e of the streamed s ound transmi tted
wireles sly to the sound pr ocessors. Ad justing the T V volume
will affe ct the listenin g volume in the roo m as well.
Adjustin g sound proces sor and stream ing volume is only
possibl e with the Cochlea r Baha Remote Cont rol and Cochlea r
Baha Sound Processor.
Mono/stereo control
The two -position s witch [no. 3 in figure 1] ma y be used to
set Stereo (t wo channels) o r Mono (one chann el) audio
streami ng. For binaura l fittings, the s witch should pre ferably
be set to the Ste reo position. F or monaural fit ting it should be
set to the Mo no position.
Adjustable delay mode
In rare c ases there may be a m isalignment b etween the aud io
stream ed to the sound pro cessors and th e sound coming f rom
the TV s peakers (echo) or ev en a misalignme nt between the
stream ed audio and the T V picture (lip -sync). This ma y be
evident i n more complex au dio setups where t he TV Streame r
is not conn ected direct ly to the TV (e.g. thr ough a set-top
box or othe r auxiliary u nit). To overcome such mis alignments
the stre aming delay fro m the TV Streame r can be adjuste d
as follows:
1. Make sure that th e TV Streamer is t urned on and th at your
sound pr ocessors are r eceiving the st reamed audio.
2. Press and hold t he pairing but ton [no. 2 in figure 1] for 3
second s. The TV Strea mer will then ent er the adjustab le
delay mo de where the gre en indicator ligh t on the front
of the TV S treamer will fla sh once every 2 s econds. The
yellow ind icator light will b e on whenever an a udio signal
is present.
3. Use the “+” and “-” key [no. 7 an d 8 in figure 1] on the top
of the TV S treamer to incre ase or decreas e the delay of the
stream ed signal in 10- ms steps. The s treamed signal c an be
delaye d in the range of 0- 250 ms.
4. When the opti mal alignment be tween the audi o streamed
to the soun d processors a nd the sound com ing from the
TV spe akers or alignme nt between th e streamed audi o and
the TV p icture has bee n reached, pre ss and hold the pa ring
button fo r 3 seconds. Now t he TV Streame r will resume
norma l operation, in dicated by the gre en indicator ligh t
being con stantly on.
The off set set in adjusta ble delay mode w ill be stored in th e
TV Strea mer. If you do not exi t the adjustabl e delay mode by
pressin g and holding the p airing button fo r 3 seconds, the T V
Streamer will automatically resume normal operation after
30 minute s. To reset the delay to 0 m s (factory set ting), press
and hold t he pairing butt on while simultan eously power ing on
the TV St reamer.
Important Information
Maintenance and Care
• Clean the Cochle ar TV Streame r using a damp cloth . Never
use hous ehold cleaning p roducts (was hing powder, soap,
etc.) or alco hol to clean the dev ice.
• When the TV St reamer is not bein g used for exten ded
period s, unplug the pow er supply from th e wall socket.
General warnings
• Keep this device ou t of reach of childre n.
• The Cochlear T V Streamer use s low-powere d digitally code d
transm issions in order to c ommunicate wit h other wireles s
devices . Although unli kely, nearby elec tronic devices m ay
be affec ted. In such ca ses, move the Coc hlear TV Strea mer
away from t he affected el ectronic devi ce.
• When using the Co chlear TV Stre amer and it is affe cted by
electr omagnetic inter ference, move a way from the sour ce
of the interference.
Charger warning
• Use the TV Strea mer only with th e power supply uni t that
was supp lied with the pro duct.
• The use of other c hargers may dam age or destroy th e
produc t and could be dang erous. Use of oth er chargers may
invalid ate any approval o r void the warra nty.
• When you discon nect the powe r cord or any access ory, grasp
and pull t he plug, not the co rd.
• Never use a char ger that is damage d.
• Do not attempt to dis assemble the c harger beca use it may
expos e you to a dangerous el ectric shoc k.
• Do not use the cha rger outdoors o r in damp areas.
General precautions
• Your sound proces sors and this de vice were given uni que
communi cation codes du ring fitting. T his ensures that t he
device wil l not affect sou nd processor s worn by others .
• High-powered electronic equipment, larger electronic
instal lations and met allic struct ures may impair a nd
significa ntly reduce the o perating ran ge.
• Use only origina l Cochlear acce ssories.
• Do not alter or modi fy this device.
• Opening the Co chlear TV Strea mer might damag e it. If
problem s occur that can not be resolved, c onsult your
hearing care professional.
• The Cochlear T V Streamer may o nly be repaired b y an
authorized service centre.
• Do not use the Coch lear TV Stream er in areas wher e RF
transm ission is prohibi ted, e.g., in plan es, etc.
• Only connec t the Cochlear T V Streamer to conn ections for
which it is e xplicitly inten ded.
Technical specifications
Temperature test, transport and storage
information
Operating range Up to 7 meter s
Power supply Exter nal wall socket
Wireless 2,4 GHz
Operating
temperature
Storage
temperature
The pro duct is subject to v arious test s in temperature a nd
damp heat ing cycling bet ween -25 °C and +70 ° C according to
internal and industry standards.
0 to 55 °C
-20 to 60 °C
Wireless Accessory type designations
for models included in this User
Manual are:
FCC ID QZ3SA S-3, IC 8039C-SAS3, IC m odel: SAS -3
Statement
This dev ice complies wit h Part 15 of the FCC Rule s. Operatio n
is subjec t to the following t wo conditions: (1) t his device
may not cau se harmful inte rference, and (2) t his device must
accept any interference received, including interference
that may ca use undesired o peration. N ote: This equipm ent
has been t ested and found to c omply with the lim its for a
Class B dig ital device, pur suant to part 15 of th e FCC Rules.
These l imits are desig ned to provide reas onable protec tion
against harmful interference in a residential installation. This
equipm ent generates , uses and can ra diate radio freq uency
energ y and, if not insta lled and used in ac cordance with
the inst ructions, ma y cause harmfu l interference t o radio
communi cations. How ever, there is no guar antee that
interfe rence will not occ ur in a particul ar installati on. If
this equi pment does cau se harmful inter ference to rad io or
televisio n reception, whi ch can be determ ined by turning t he
equipm ent off and on, th e user is encoura ged to try to corr ect
the inter ference by one or m ore of the followi ng measures:
• Reorient or rel ocate the receiv ing antenna.
• Increase the s eparation bet ween the equi pment and recei ver.
• Connect the e quipment into an o utlet on a circuit dif ferent
from that t o which the receiv er is connected .
• Consult the deal er or an experi enced radio/ TV technicia n
for help.
• Changes or mod ifications can v oid the user’s aut hority to
operate the equipment.
List of countries:
The pro ducts are in com pliance with th e following regul atory
requirements:
• In EU: the device co nforms to the Ess ential Require ments
accordin g to Annex I of Counc il Directive 93/42 /EEC for
medica l devices (MDD) an d essential req uirements an d
other rel evant provision s of Directive 19 99/5/EC (R&TTE).
The dec laration of confo rmity may be co nsulted at www.
cochlear.com.
• Products wit h wireless fun ctionality a re intended for sa le
in countr ies within the Euro pean Economic A rea as well as
Switzer land. Speci fication of rest rictions: You are n ot allowed
to opera te the equipment w ithin 20 km of the cen tre of Ny
Ålesund, Norway.
• In US: FCC CFR 47 Part 15 , subpart C, se ction 15.249.
• Other identified applicable international regulatory
require ments in countr ies outside th e EU and US. Please r efer
to local co untry requir ements for the se areas.
• Products ar e in compliance wi th EN 300 328.
• In Canada the T V Streamer is cer tified under t he following
certification number: IC :8039C-SAS3.
• This device com plies with Indu stry Canad a license exempt
RSS standard(s)
• This Class B digit al apparatus c omplies with Ca nadian ICES -
003. Cet ap pareil numéri que de la class e B est conforme à la
norme N MB-003 du C anada.
• Operation is su bject to the follo wing two condit ions: (1)
this devic e may not cause inte rference, and (2) t his device
must accept any interference, including interference that
may caus e undesired ope ration of the dev ice. L’exploitation
est auto risée aux deux co nditions suiva ntes : (1) l’appareil
ne doit pa s produire de brou illage, et (2) l’utilisa teur de
l’appareil doit accepter tout brouillage radioélectrique subi,
même si le b rouillage est su sceptible d’en com promettre le
fonctionnement.
• Equipment incl udes RF transm itter.
™
* Cochlea r
** Cochle ar
*** Cochlear
**** Cochlear
Baha® Remote Control
™
Wirele ss TV Streamer
™
Wireless Mini Microphone
™
Wirele ss Phone Clip
 Loading...