

Page 1
User Manual
GB
2 30 58
86 114
FR DE NL IT
ZONE 1
BP100
BP110 Power
BP110 Power
™ ®
BahaCochlear
BP100
™ ®
BahaCochlear
English Français Deutsch Nederlands Italiano
Page 2
3
English
Welcome
Congratulations on your Cochlear™ Baha® BP100 or Cochlear™ Baha® BP110 Power.
You are now ready to use Cochlear’s highly advanced bone conduction sound
processor.
This user manual is full of tips and advice on how
to best use and care for your Baha sound processor.
By reading this manual and then keeping it handy
for future reference, you’ll ensure that you get the
most out of your Baha BP100 or Baha BP110 Power.
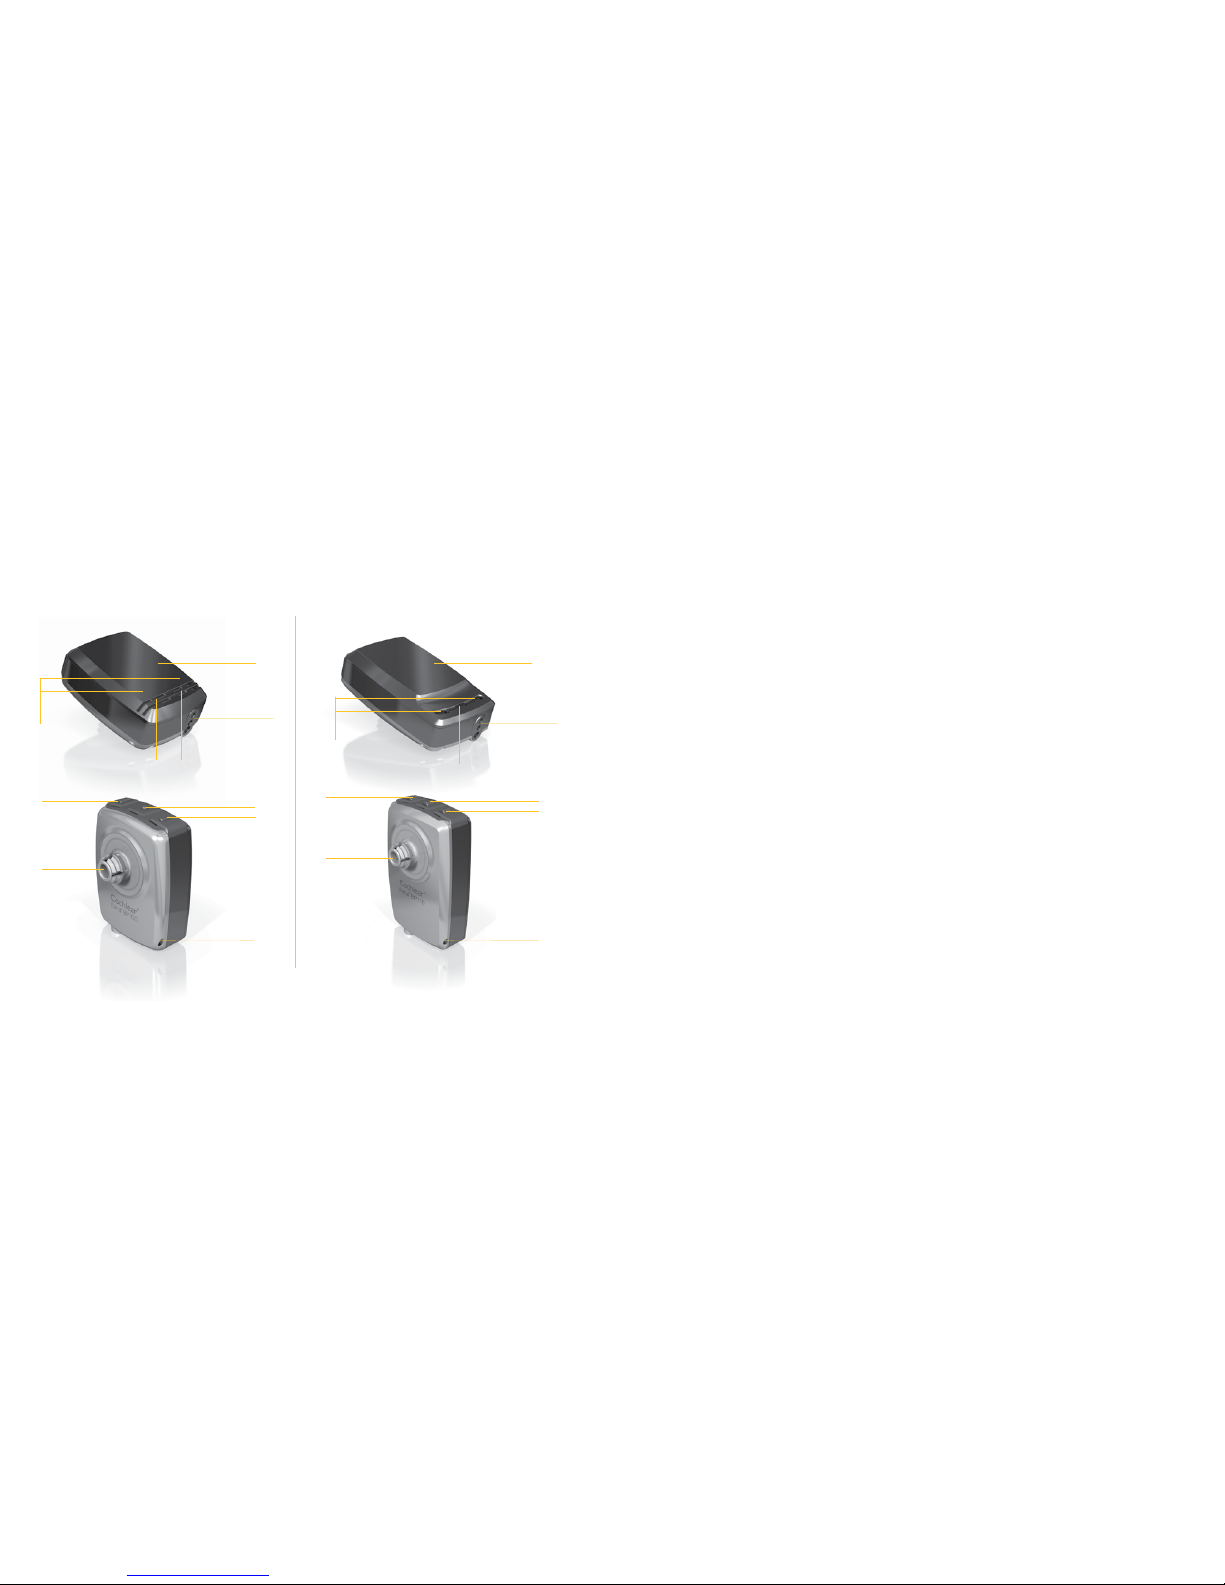
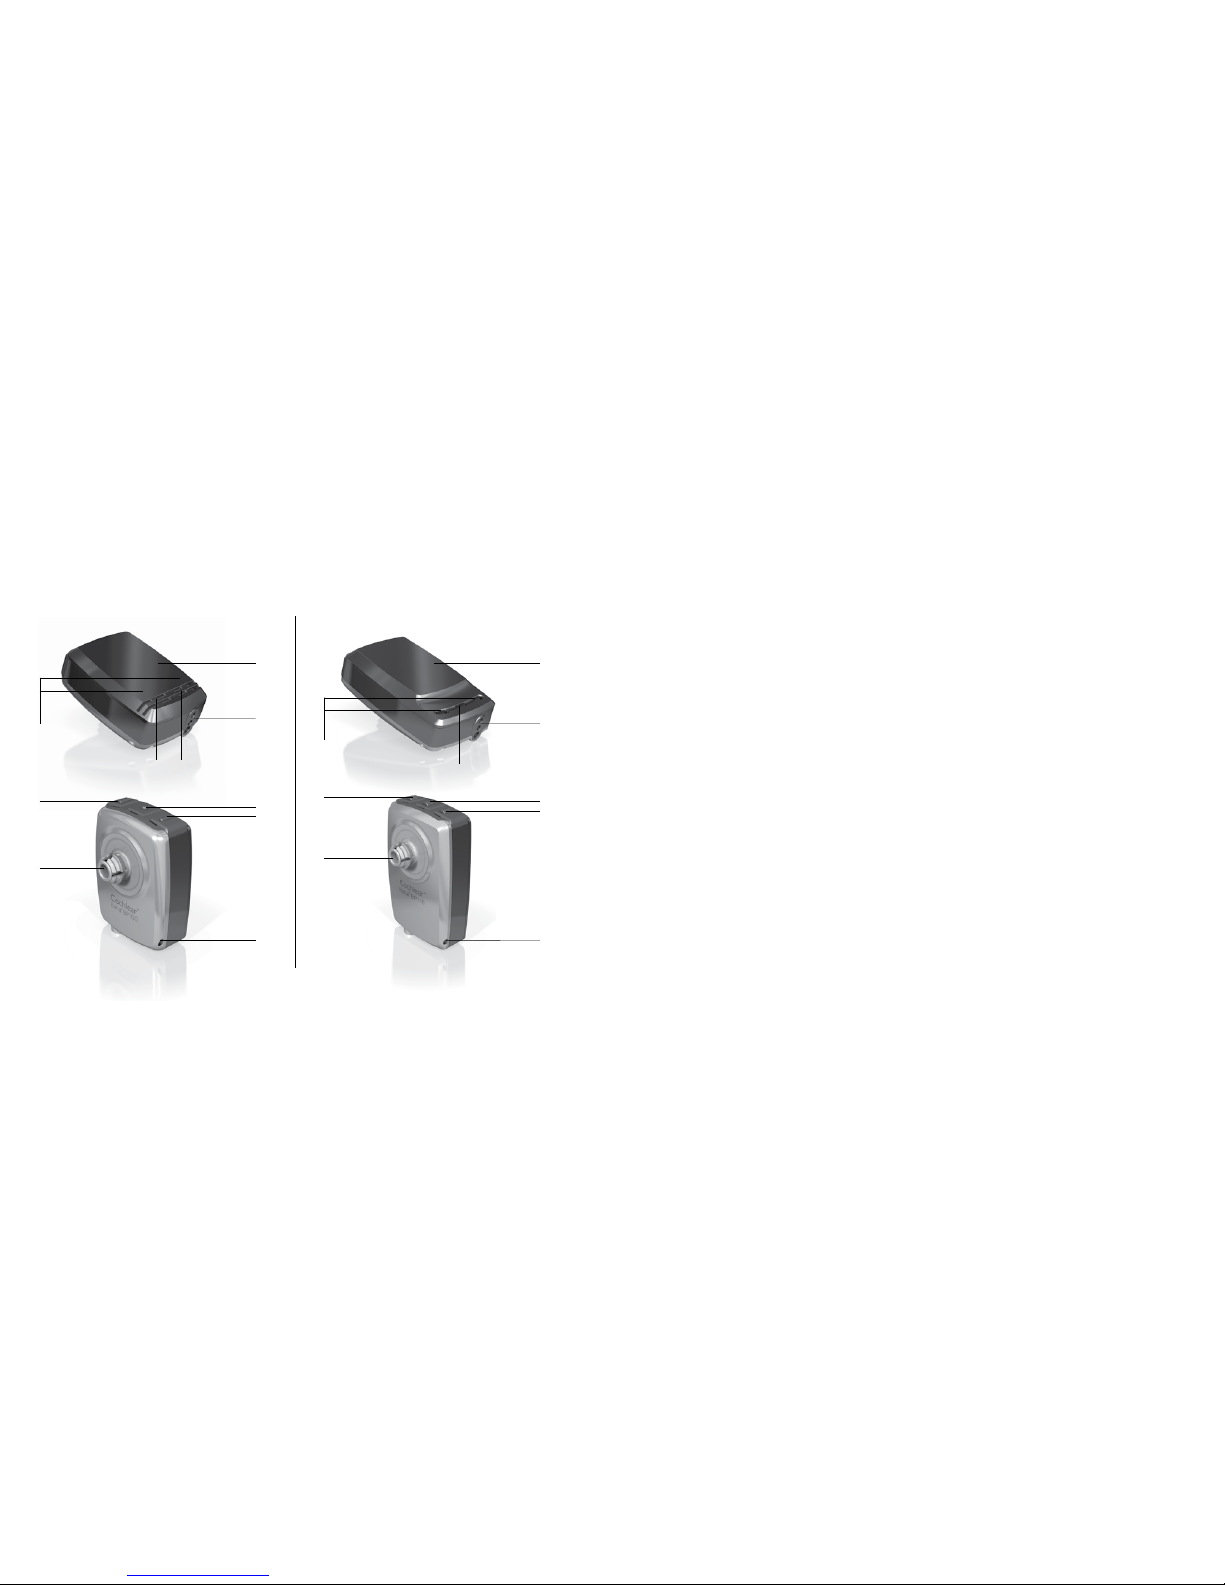
Direct Audio I nput
Microphon es
Visual
status
indicators
Battery co mpartment
door
Plastic snap
connector
Attachmen t point for
the safety lin e
Volume down
button
Volume up
button
Direct Audio I nput
Microphon es
Visual status i ndicators
Battery co mpartment
door
Plastic snap
connector
Attachmen t point for
the safety lin e
Volume down
button
Program butto n,
on/off button
Volume up
button
Program butto n,
on/off button
BP100 BP110 Power
Page 3

4 5
English
Introduction
The Cochlear Baha BP100 and Cochlear Baha BP110
Power are sound processors that use direct bone
conduction to transmit sounds to the cochlea (inner
ear). They work by combining a sound processor
with an abutment and a small titanium implant
that is placed in the skull behind the ear. The
titanium implant integrates with the skull bone
through a process called osseointegration. This
allows sound to be conducted via the skull bone
directly to the cochlea, which improves hearing
performance.
You should have received your Baha sound
processor from your hearing care professional along
with the contents of this kit. To ensure optimal
performance, your hearing care professional will fit
the processor to suit your needs. Be sure to discuss
any questions or concerns that you may have
regarding your hearing, or use of this system, with
your hearing care professional.
Both Cochlear Baha BP100 and Cochlear Baha
BP110 Power can be used with a Baha Softband
which does not require an implant. However, all
applicable instructions in this manual should still be
followed.
Your kit includes the following items:
• Cochlear Baha sou nd processor
• Abutment cleani ng brush
• Pack of batteries
• Abutment cover
• Safety line
• Extra bat tery doors
• Magnetic batter y removal tool
• Share the Exper ience test rod
• Document pack (use r manual, warranty card,
registration ca rd, MRI card)
Contacting customer service
We strive to provide the best possible products and
services to our clients.Your views and experiences
with our products and services are important to us.
If you have any comments you would like to share,
please contact us.
Customer Service – Cochlear Americas
13059 E. Peakview Avenue,
Centennial, CO 80111, USA
Toll free (North America) 1800 523 5798
Tel: +1 303 790 9010, Fax: +1 303 792 9025
E-mail: customer@cochlear.com
Customer Service – Cochlear Europe
6 Dashwood Lang Road
Bourne Business Park, Addlestone,
Surrey KT15 2HJ, United Kingdom
Tel: +44 1932 87 1500, Fax: +44 1932 87 1526
E-mail: info@cochlear.co.uk
Customer Service – Cochlear Asia Pacific
1 University Avenue, Macquarie University
NSW 2109, Australia
Toll free (Australia) 1800 620 929
Toll free (New Zealand) 0800 444 819
Tel: +61 2 9428 6555, Fax: +61 2 9428 6352
or Toll free 1800 005 215
E-mail: customerservice@cochlear.com.au
Warranty
The warrant y does not cover defects or damage
arising from, as sociated with, or related to
the use of this produc t with any non-Cochlear
processing unit an d/or any non- Cochlear
implant. See “Co chlear Baha Global Limited
Warranty card” fo r more details.
Page 4

6 7
English
Using your sound processor
The sound processor is equipped with buttons for
selecting different listening programs and adjusting
the volume level. Audio and visual indicators can be
activated to alert you to the different settings and
processor status.
Your sound processor is programmed to be used
specifically on either the right side or the left side of
your head.
Batch Code
S
Serial Number
Key to symbols
Throughout the manual you will see small symbols.
Please refer to the list below for explanations:
“Consult instructions for use” or
“Consult operating instructions”
“Caution, consult accompanying
documents” or “Attention, see
instructions for use”
Audible signal
CE-mark
Temperature limitation
Interference risk
1 Product name
2 Date of manufacture
3 Serial number
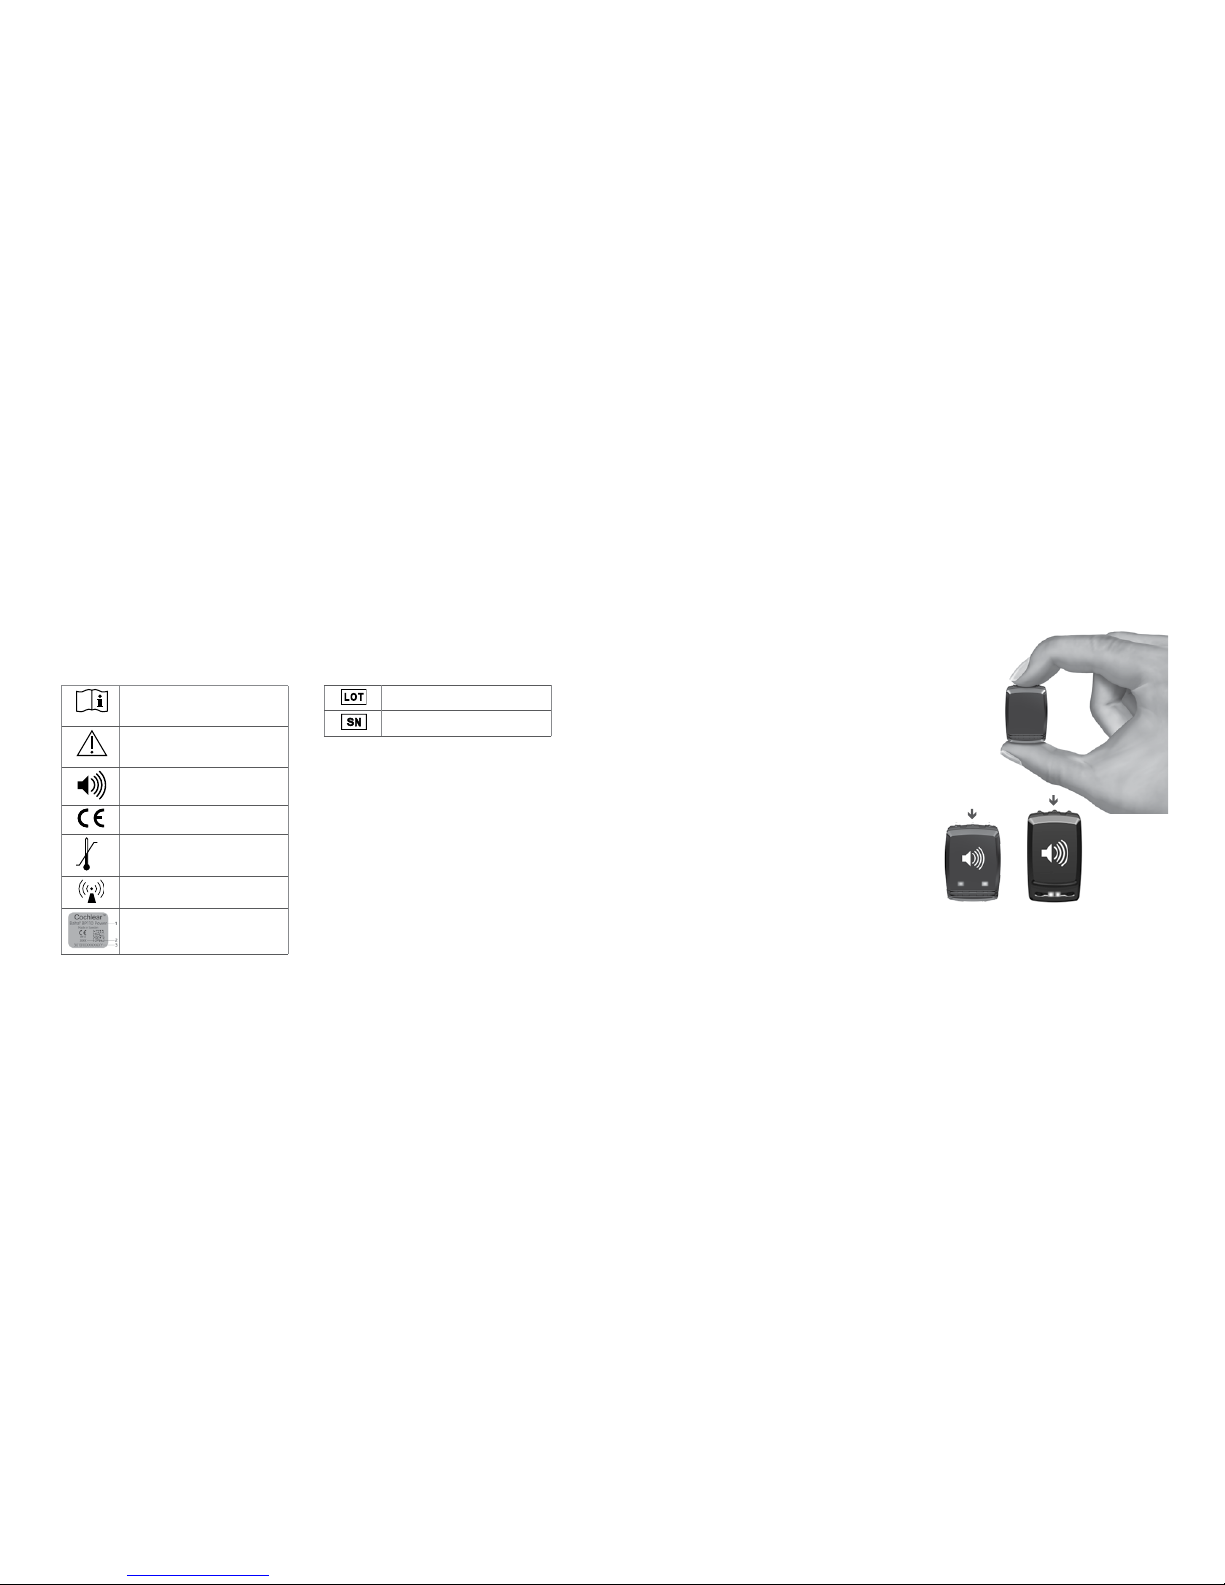
On/off and indicators
Turn on your sound processor by pressing and
holding down the middle button until the visual
indicator flashes 3 times. To turn off your sound
processor, press the middle button and hold it
down for 2 seconds.
If the sound processor is turned off and then
turned on again within 15 minutes, it returns to
the last used program and volume level.
If the sound processor is turned off for longer
than 15 minutes, or if the battery is changed or
removed, it will return to the default program and
volume (as set by your hearing care professional)
when it is turned on again.
Also applicable to
BP110 Power
BP100
BP110 Power
Page 5

8 9
English
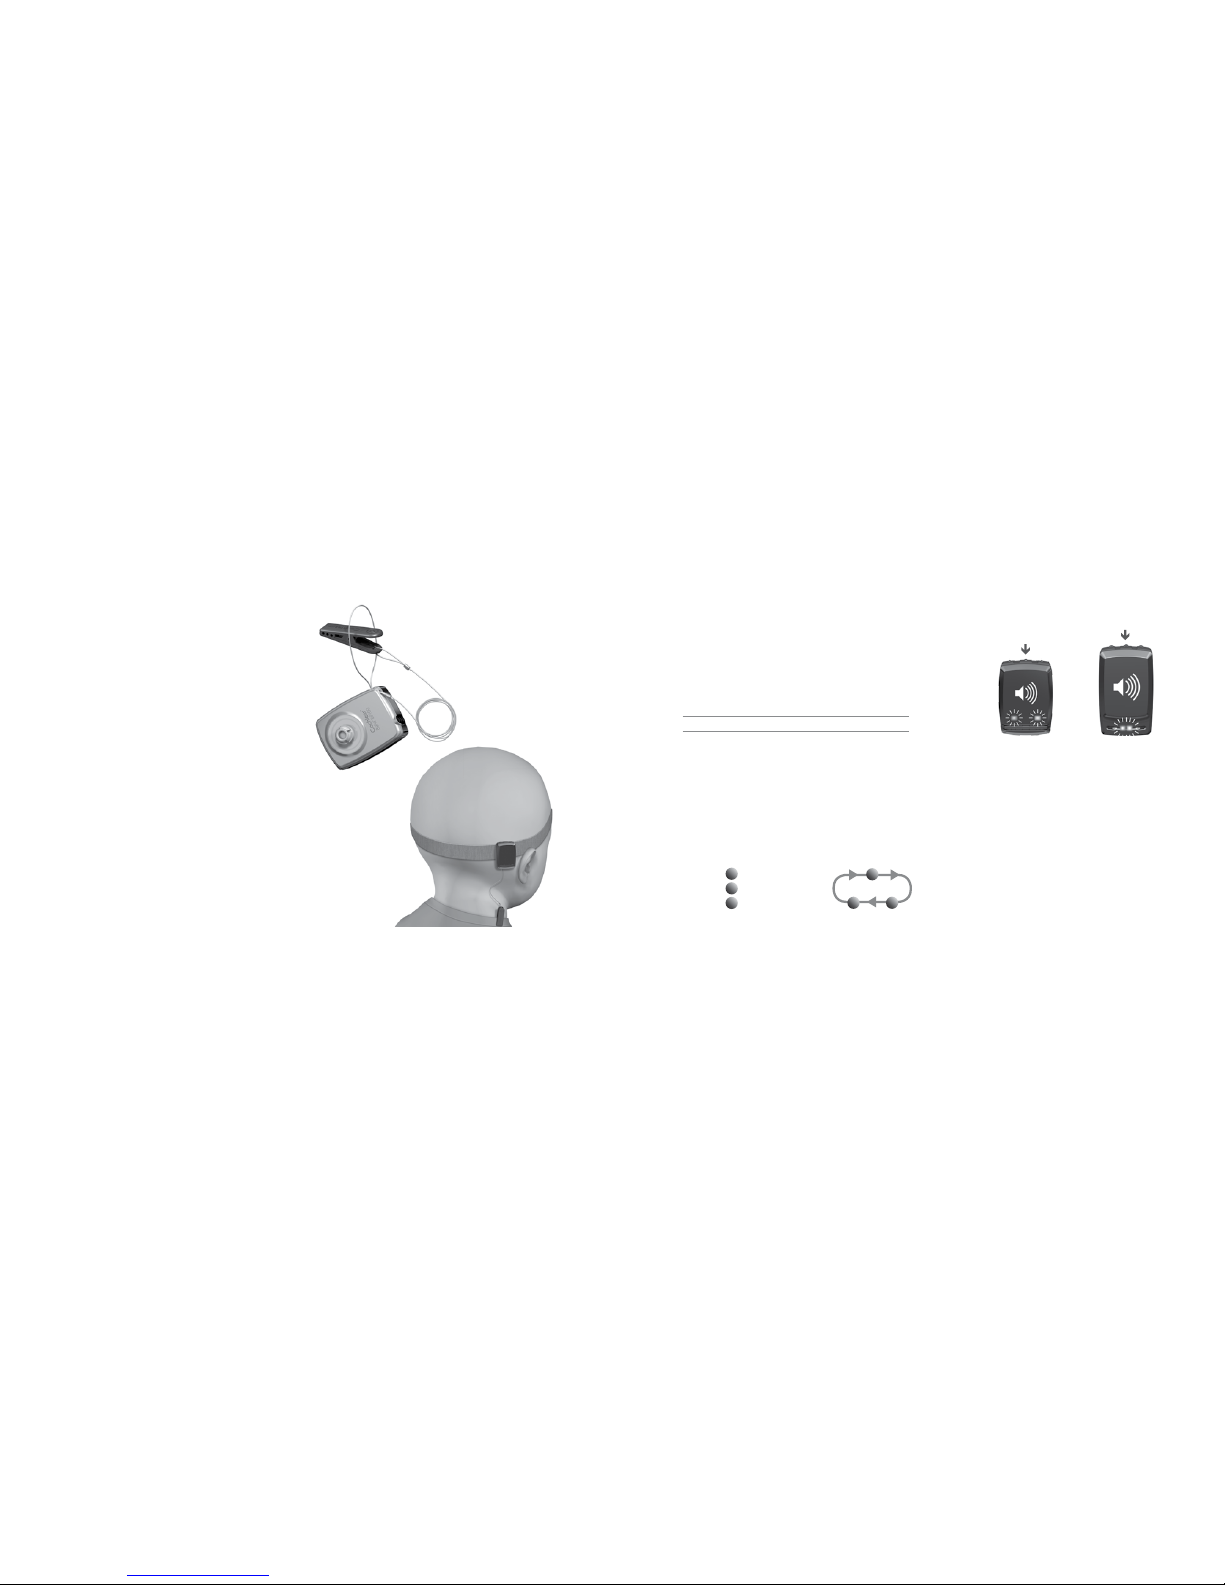
Audible and visual status indicators
Your sound processor is equipped with audible and
visual status indicators
1
(beeps and LEDs). These
provide a simple and effective means of monitoring
the status of the sound processor, and they are
especially useful for caregivers to ensure that their
child’s sound processor is working at all times.
When you turn on your processor, the visible
indicators flash. If they flash orange,
2
your sound
processor is configured for the right side of your
head. If they flash blue,
3
your sound processor is
for the left side. If you are a bilateral user, make sure
your processor is used on the correct side.
Note: Your hearing care professional has the
ability to disable the flashing indicators and
beeps, if desired. However, the orange and blue
indicators at startup cannot be disabled.
BP110 PowerBP100
If your sound
processor flas hes
Then it is confi gured
for use on the
Orange Right side
Blue Left side
3
1
2
3
1
2
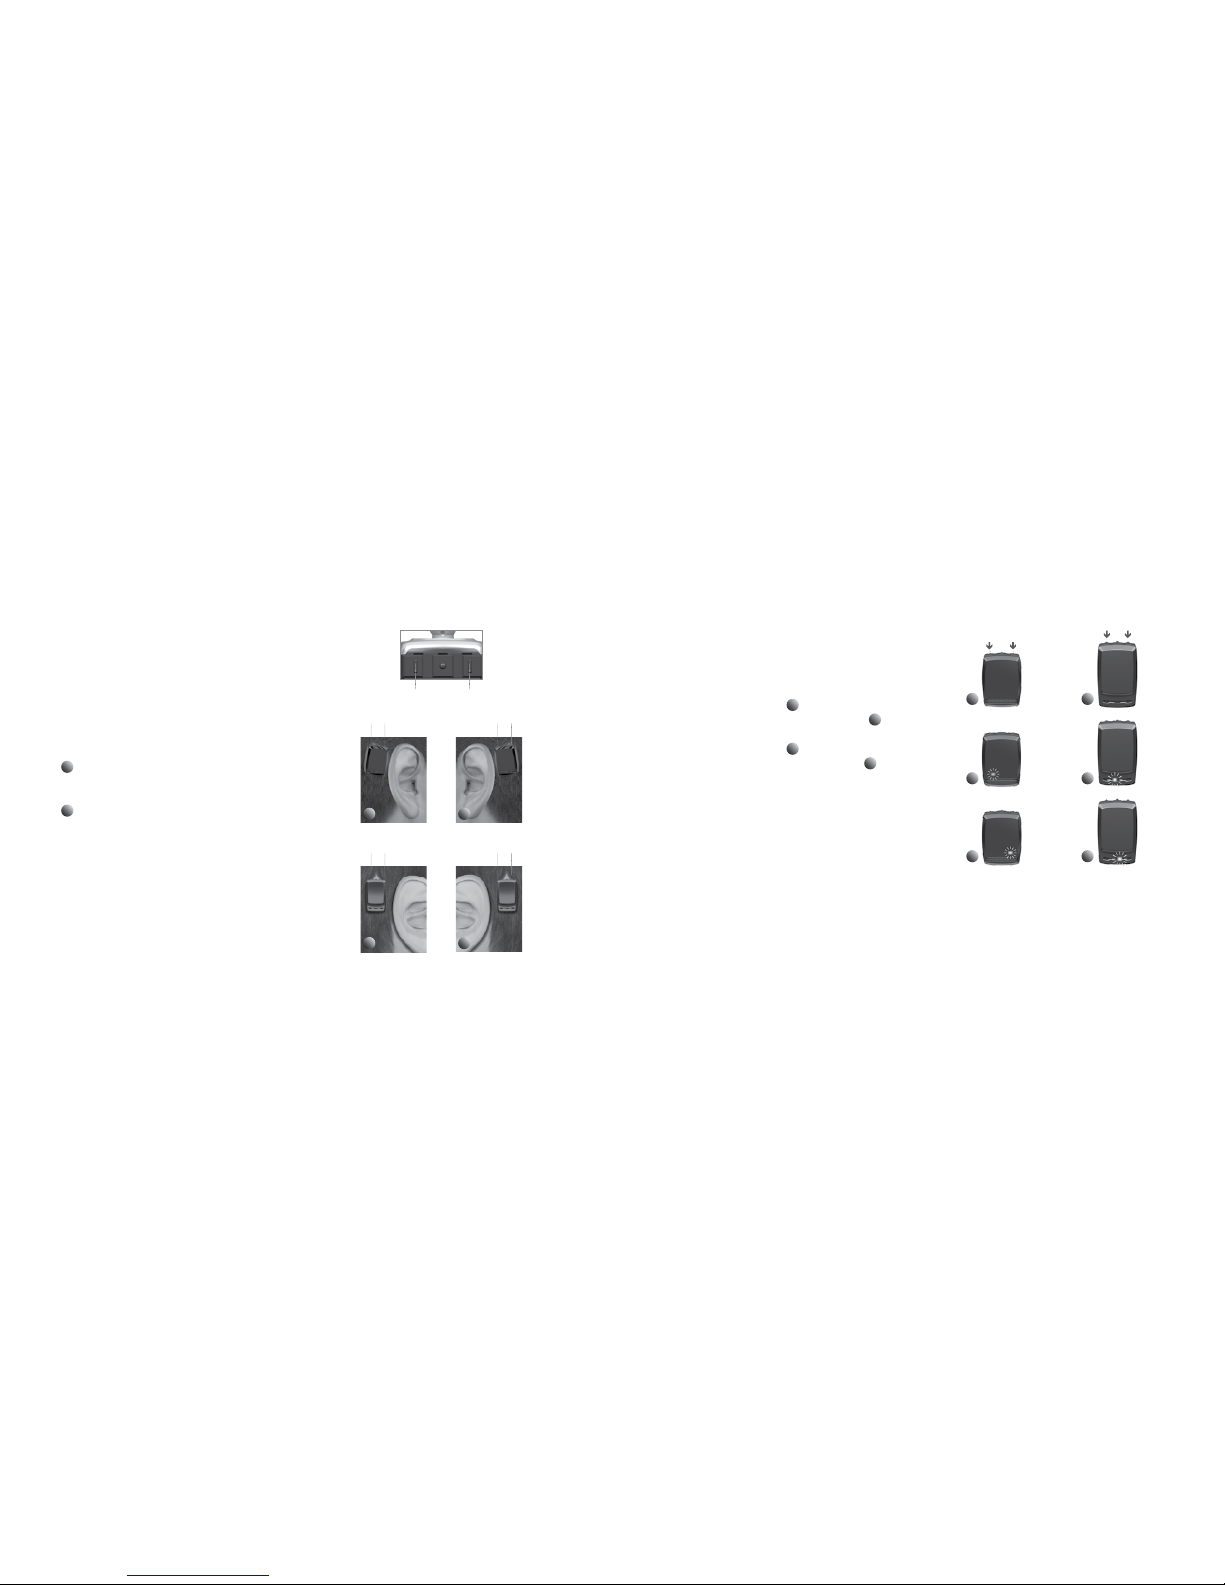
Connecting the sound processor
Use the tilt technique to safely and comfortably
connect and disconnect your sound processor, thus
reducing any undue pressure on the snap connector
and abutment. By tilting the sound processor onto or
off of the abutment, you will avoid any discomfort.
To connect your sound processor:
1
Move hair from the abutment.
2
Hold the sound processor with the buttons
positioned upwards, tilt it and gently snap it into
place.
3
To release, place one finger under the sound
processor and gently tilt until it releases.
Note: To avoid feedback (whistling), ensure that
the sound processor is not touching any other
items, such as glasses or a hat.
3
1
2
Also applicable to BP110 Power
Page 6
10 11
English
Attaching the safety line
Before connecting the sound processor, attach the
safety line to the sound processor and clip the other
end of the safety line to your shirt or jacket.
Cochlear recommends connecting the safety line
when engaging in physical activities. Children should
use the safety line at all times.
Also applicable to BP110 Power
Changing the program
Your hearing care professional has, in discussion with
you, selected up to three programs for your Baha
sound processor:
Program 1:
Program 2:
Program 3:
(These programs are suitable for different listening
environments. Ask your audiologist to fill in your
specific programs).
To switch programs, quickly press and release the
middle button. Audio and visual signals let you know
which program you have switched to:
Program
1
: 1 beep/flash
Program
2
: 2 beeps/flashes
Program
3
: 3 beeps/flashes
1
3
2
BP110 PowerBP100
Page 7
12 13
English
Adjusting volume and setting the Keylock
+
–
+ +– –
21
+ +– –
21
BP100
BP110 Power
Adjusting volume
Your hearing care professional has set the volume
level for your sound processor. You are also able to
manually adjust the volume control.
To control your listening comfort in different
listening environments, you can adjust the volume:
1
For sound processor on right side, press the
front button to increase volume. Press the back
button to decrease volume.
2
For sound processor on left side, press the
front button to decrease volume. Press the back
button to increase volume.
A beep sounds each time a volume button is
pressed. When you reach your default volume,
2 short flashes/beeps occur. When you reach the
minimum or maximum volume level, a long flash/
beep occurs.
BP100
Keylock
Keylock protects program and volume level settings
and ensures they cannot be changed inadvertently.
• To activate Keylock, press and hold both volume
buttons for 5 seconds
1
. The blue visual indicator
flashes to show that Keylock is activated
2
.
• To disable Keylock, press and hold both volume
buttons for 5 seconds
1
. The orange visual indicator
flashes to show that Keylock is disabled
3
.
Note: Keylock remains in effect even when the
battery is removed. When Keylock is enabled,
the visual indicator will flash 6 times when the
processor is turned on.
Note: Do not press and hold all three buttons at
the same time. This will put the sound processor
into a temporary programming mode with flashing
indicators, and is not suitable for listening.
BP110 Power
Note: If both indicators flash - stop. Take out and reinsert the battery.
Retry and make sure to press only the two volume buttons.
3
1
2
3
1
2
Page 8

14 15
English
Supporting the processor
Once you are familiar with your program, you can
change the program and the volume level while the
sound processor is attached to the abutment. Make
sure you support the processor from the bottom with
your thumb as you press the buttons with your
index finger.
Also applicable to BP110 Power
Using the telephone
For best results when talking on the telephone, place
the receiver near the microphone inlet of the sound
processor instead of near your ear canal. Make sure
the receiver does not touch the sound processor as
feedback may result.
Using the abutment cover
The abutment cover protects the abutment when
the sound processor is not in place. This prevents dirt
from collecting in the abutment.
To attach the cover, gently press it onto the
abutment. Gently lift the cover to remove.
Also applicable to BP110 Power
Page 9
16 17
English
2
Also applicable to BP110 Power
Direct Audio Input
The sound processor has a DAI (Direct Audio Input)
port that is used to connect external audio sources,
such as MP3 players (requires the use of the
optional Cochlear Baha Audio adapter), Bluetooth
devices, and the optional Cochlear Baha Telecoil
directly to your sound processor.
1
Match the accessory connector
with the sound processor’s DAI
connector.
2
Holding the sound processor
gently at the corners, carefully
push the accessory connector
into the DAI port.
Dedicated DAI program and
microphone mixing
An optional DAI program that is set by your hearing
care professional allows you to listen exclusively to
sounds from the DAI.
In all other programs, input from the DAI is
combined with input from the microphone.
Using the telecoil
The telecoil unit improves sound when using some
landline (fixed) and mobile telephones. It also gives
you access to loop facilities in homes and public
buildings. Attach the telecoil to the DAI port.
1
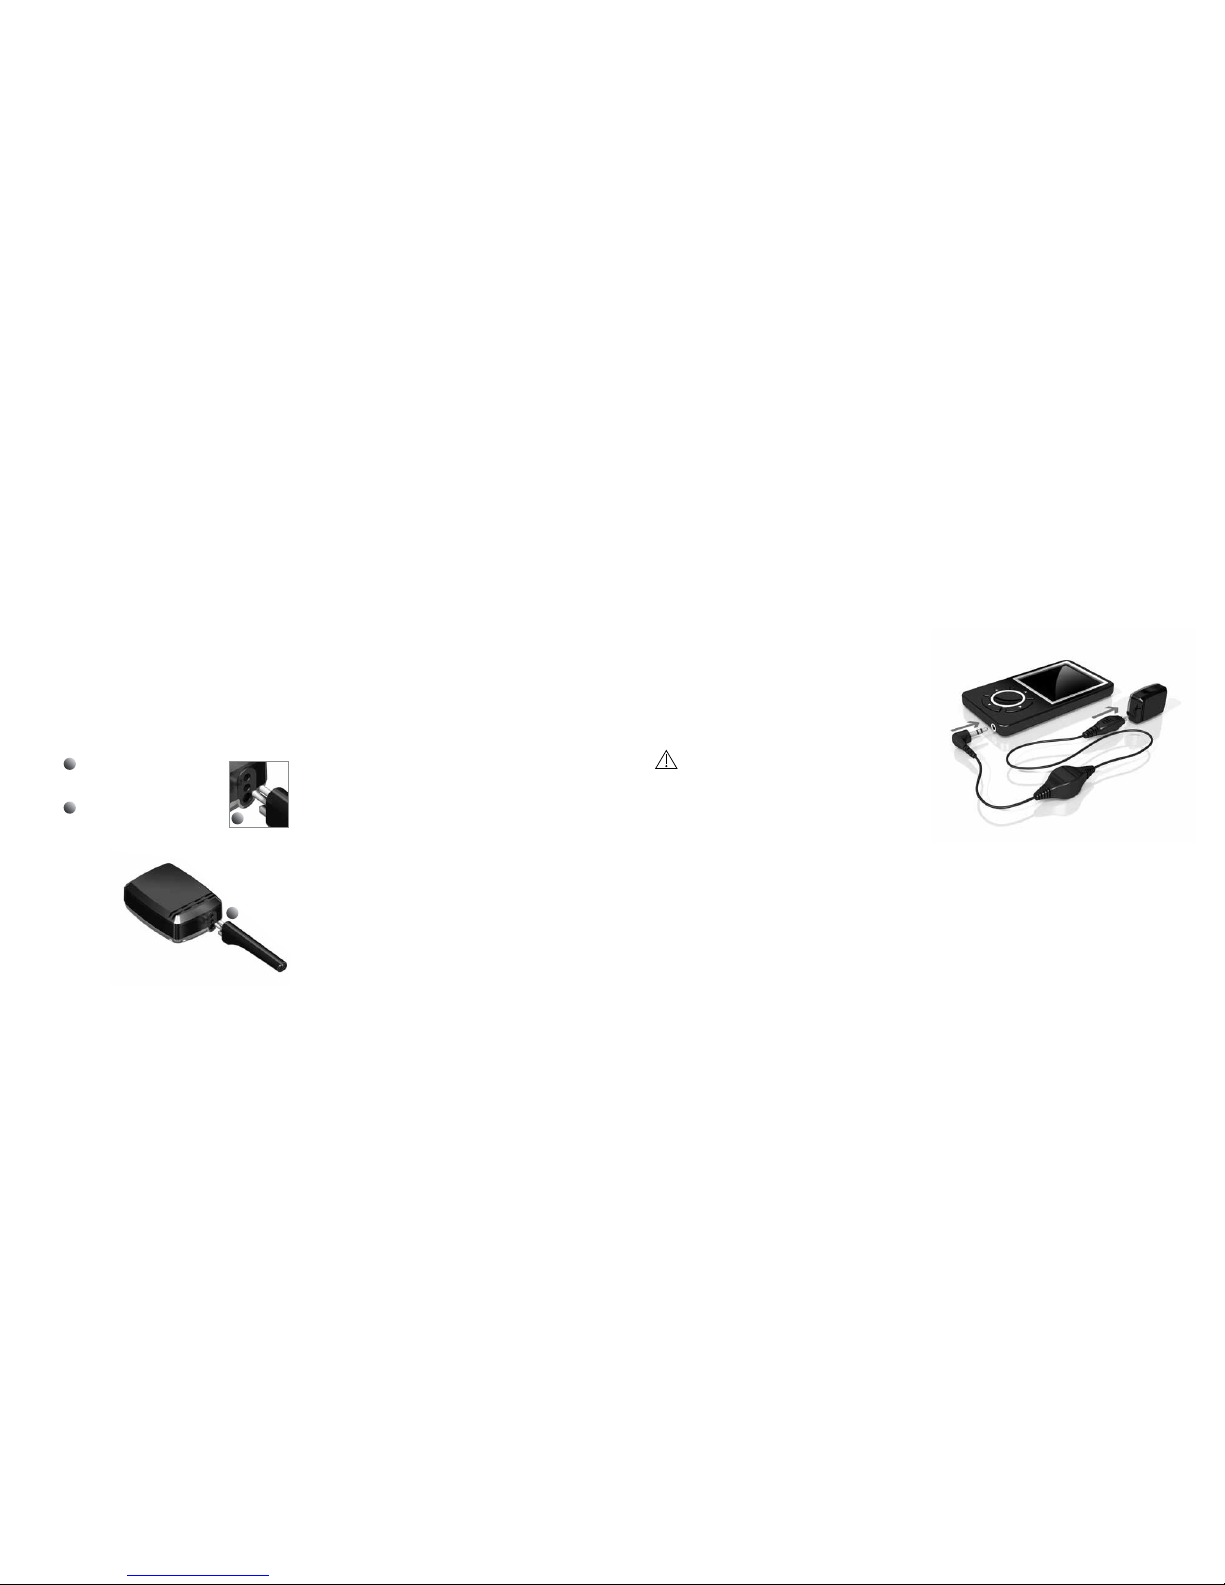
Using the Audio adapter
The Audio adapter allows direct input from
computers, personal stereos, TVs, MP3 players
and other external audio equipment. One end
of the Audio adapter is connected to the sound
processor at the DAI. The other end is connected
to the audio device.
Warning: Connecting electrical equipment
directly to the sound processor is extremely
dangerous. Cochlear is not liable for any damage
arising as a result of connecting incorrect
equipment or incorrect use.
Using an FM receiver
An FM receiver enables the use of FM systems
that are commonly used in school classrooms.
Your hearing care professional can let you know
what FM receivers are available. Attach your FM
receiver to the DAI port.
Also applicable to BP110 Power
Page 10

18 19
English
Care of abutment and sound
processor
Daily and weekly tasks are required to care for your
abutment and sound processor properly.
Cleaning the abutment
Skin debris or other dirt in the abutment can affect
the sound quality and lead to damage of your
sound processor. Therefore it is very important to
clean the abutment area thoroughly. Use the soft
abutment cleaning brush provided in your Baha
sound processor kit for cleaning.
Should you experience persistent irritation,
soreness or other signs of inflammation around
the abutment, contact your doctor or hearing care
professional.
1
Daily care
Clean the area around the abutment daily to avoid
the build up of debris. Bathing or showering is a great
opportunity to do this. Use plenty of mild soap and
warm water.
Brush on the side of the abutment rather than directly
on your skin. Your focus should be to remove crust and
debris from around the base of the abutment rather
than brushing your skin. Clean your soft brush with mild
soap and water after caring for your abutment.
Note: During the first few weeks after dressing
removal, cleaning with the soft brush may feel
a little rough. Use an alcohol free baby wipe
(or similar) until your skin becomes less sensitive and
you can use the brush comfortably.
Once your abutment is clean, gently dry the area with
a clean towel or tissue. Remove any hair that may have
wrapped around the abutment. If you use a hair dryer
avoid overheating the abutment area.
Note: Ask a friend or relative to help you clean
the abutment. You can also use a hand mirror
or pictures from a digital camera to view the
abutment area from all angles to make sure it
gets cleaned properly.
Note: The abutment cleaning brushes should
be changed at regular intervals. Cochlear
recommends every 3 months.
2
Weekly care
Clean the inside of the abutment on a weekly basis,
using the cleaning brush as described previously.
If you use the abutment cover make sure it is cleaned
at least once a week. Use warm soap and water and
your soft brush to clean the cover.
Long-term care
You will have regular check-ups as determined by your
hearing health care professional. These check-ups help
ensure that the processor works and fits properly and
that your implant area is healthy.
1 1 2
Page 11
20 21
English
Changing batteries
When there is approximately one hour of remaining
battery power, 2 beeps/flashes occur 3 times to let
you know that soon the battery will need replacing.
At this time you may experience low amplification.
If the battery runs down completely, the sound
processor will beep/flash and then stop working.
Use one of the included batteries (zinc-air, nonrechargeable) as a replacement. The batteries
included in the sound processor kit reflect Cochlear’s
latest recommendations. Contact your hearing care
professional for additional batteries.
Battery tips
• Battery life decreases as soon as the battery is
exposed to air (plastic strip is removed).
• Battery life depends on daily usage, volume setting,
sound environment, program setting, and battery
strength.
• To maximize battery life, switch off the sound processor
when not in use.
• Keep extra batteries available if using an FM receiver as
they have high energy consumption rates.
• If a battery leaks, immediately replace it.
Note: The inside of the battery door is lined with a
moisture barrier that prevents dust and water from
entering the sound processor. To ensure an effective
seal, Cochlear recommends replacing the battery door
every 6 months. In humid environments, replace the
battery door more frequently.
Contact your hearing care professional
for additional battery doors.
1 2 3
5
4
6
7
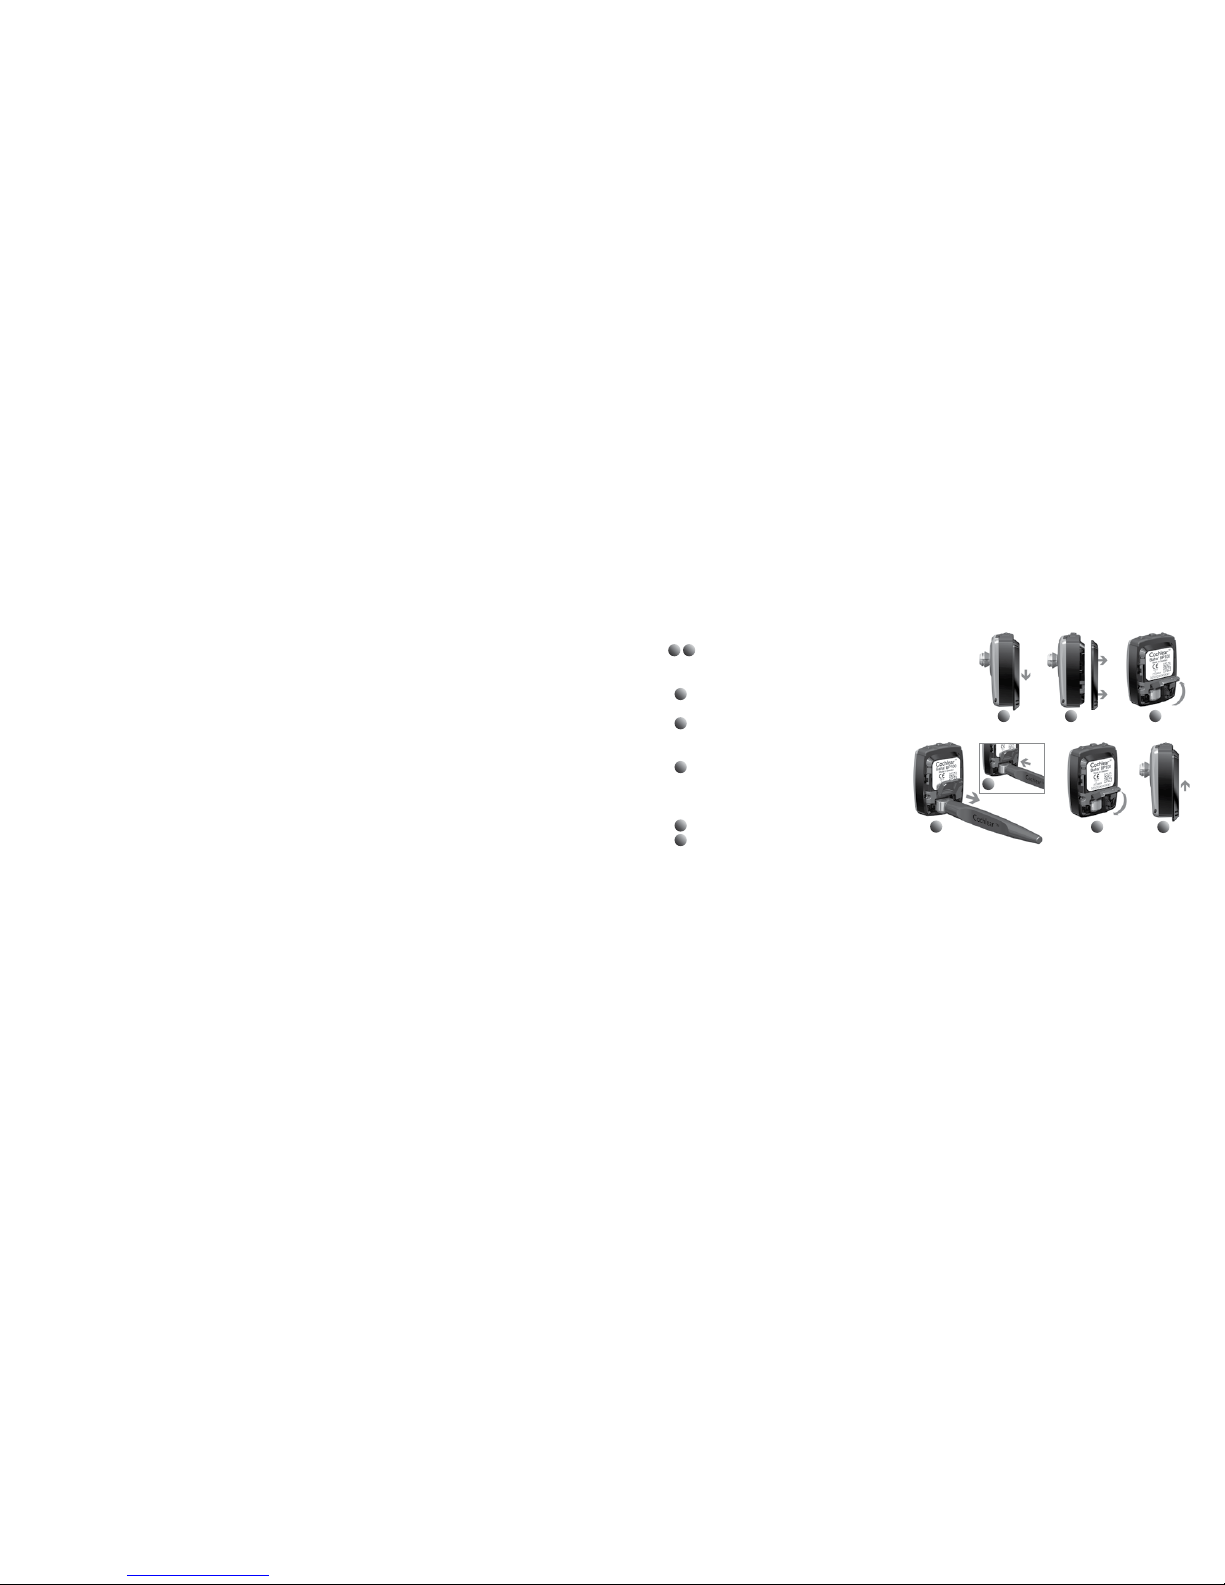
To replace the battery in BP100:
Note: The battery hatch is permanently attached to the sound processor and provides
additional protection against dust and moisture. Extra care should be taken when opening or
closing to avoid accidental damage.
1
2 Gently slide the battery door downwards
until you feel a ”click”. You can now remove
the door.
3
With a fingernail, gently lift the battery
hatch open to expose the battery.
4
Remove the old battery. Use the included
magnetic removal tool if needed. Dispose
of battery according to local regulations.
5
Remove the sticker on the + side of the
new battery. Insert the new battery with
the + sign facing the + marked on the
processor’s battery compartment.
6
Gently press the battery hatch closed.
7
Attach the battery door and slide it gently
back into its locked position.
Page 12
22 23
English
To replace the battery in BP110 Power:
1 2
4
3
5
1
2 Gently slide the battery door downwards until
you feel a ‘click’. You can now remove the
door.
3
Remove the old battery. Use the included
magnetic removal tool if needed. Dispose of
battery according to local regulations.
4
Remove the sticker on the + side of the new
battery. Insert the new battery with the +
sign facing the + marked on the processor’s
battery compartment.
5
Attach the battery door and slide it gently
back into its locked position.
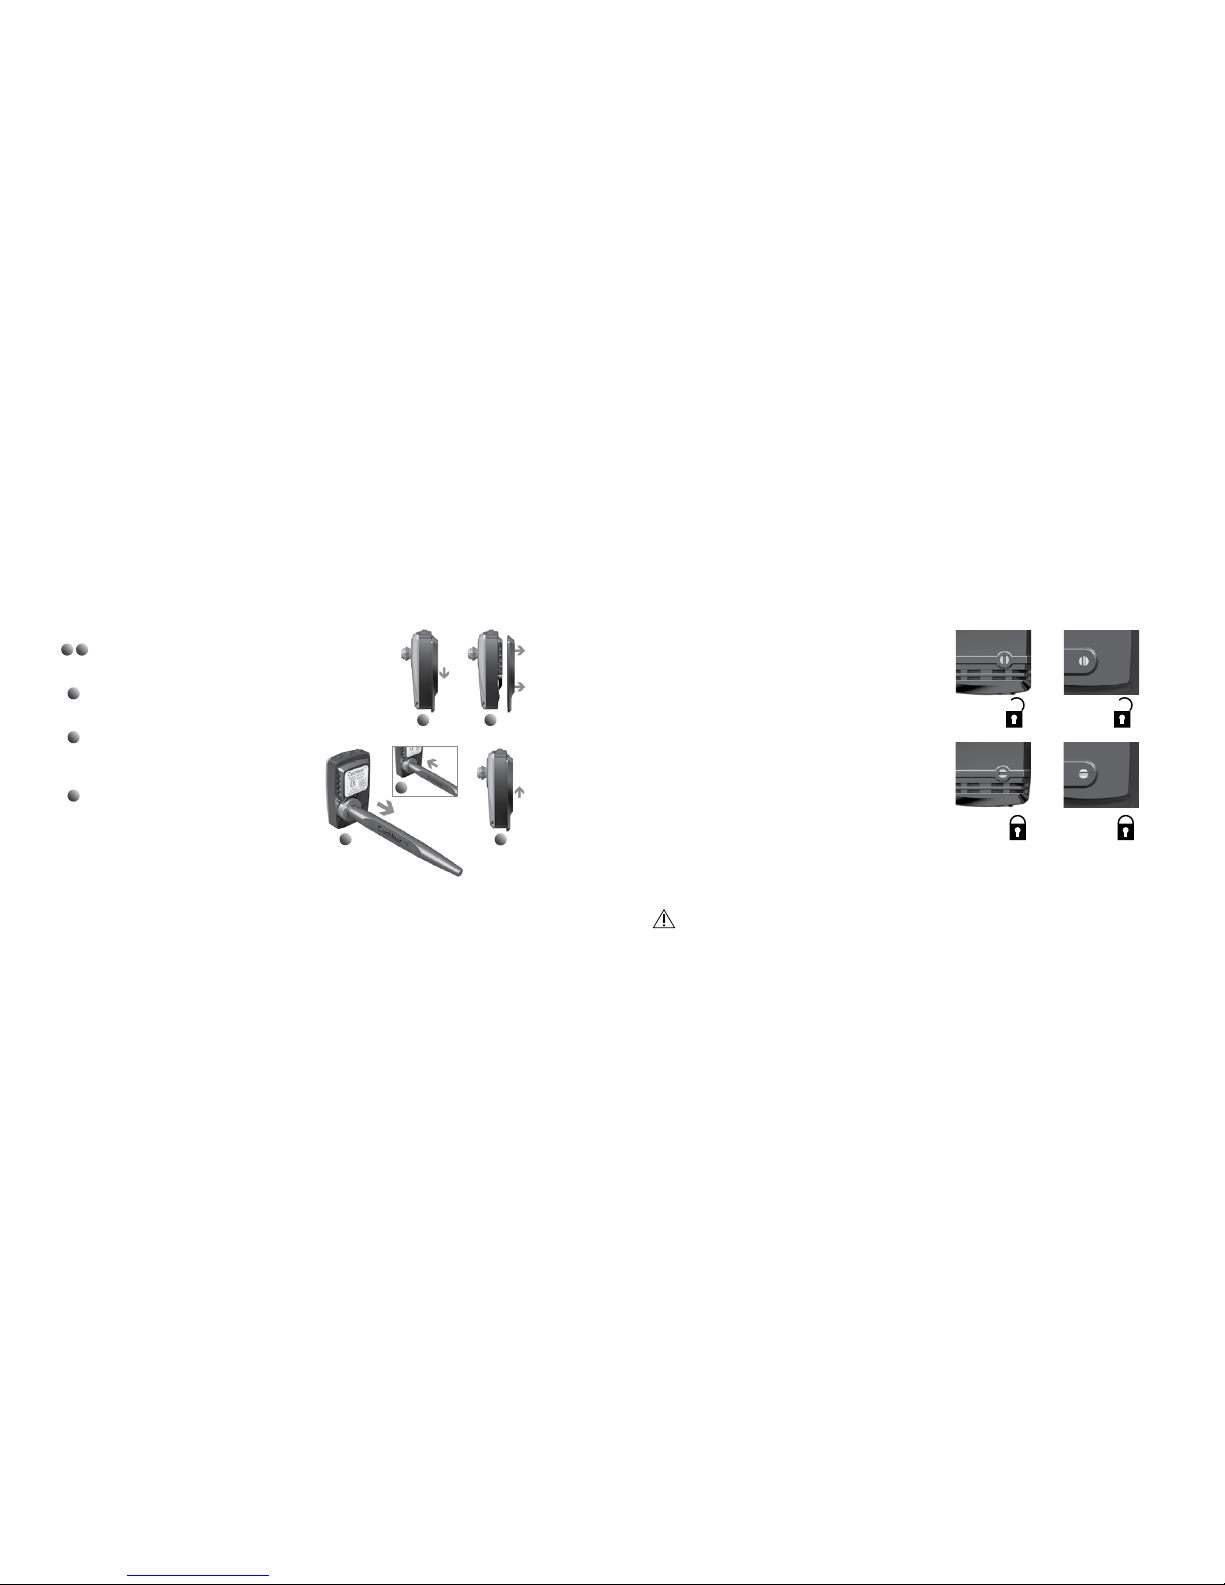
Optional tamper-proof battery door
To prevent the user from accidentally opening the
battery door and exposing the battery, an optional
tamper-proof battery door is available. This is particularly
useful for children. The tamperproof battery door should
only be locked and unlocked using the specially designed
tool included in the tamperproof battery door kit to
avoid accidental damage to the door. Contact your
hearing care professional for tamper-proof battery doors.
To use the tamper-proof battery door:
1. Make sure the screw slot is positioned vertically.
2. Attach the battery door and slide it to its closed
position.
3. Turn the screw a quarter-turn clockwise to lock the
battery door in the horizontal position.
4. To unlock the battery door, turn the screw counter-clockwise one quarter-turn to vertical position.
The battery door can now be removed.
Caution: Batteries can be harmful if swallowed. Be sure to keep your batteries out of reach
of small children, those with mental challenges, and household pets. In the event a battery is
accidentally swallowed, seek immediate medical attention at the nearest emergency center.
BP100 BP110 Power
Page 13
24 25
English
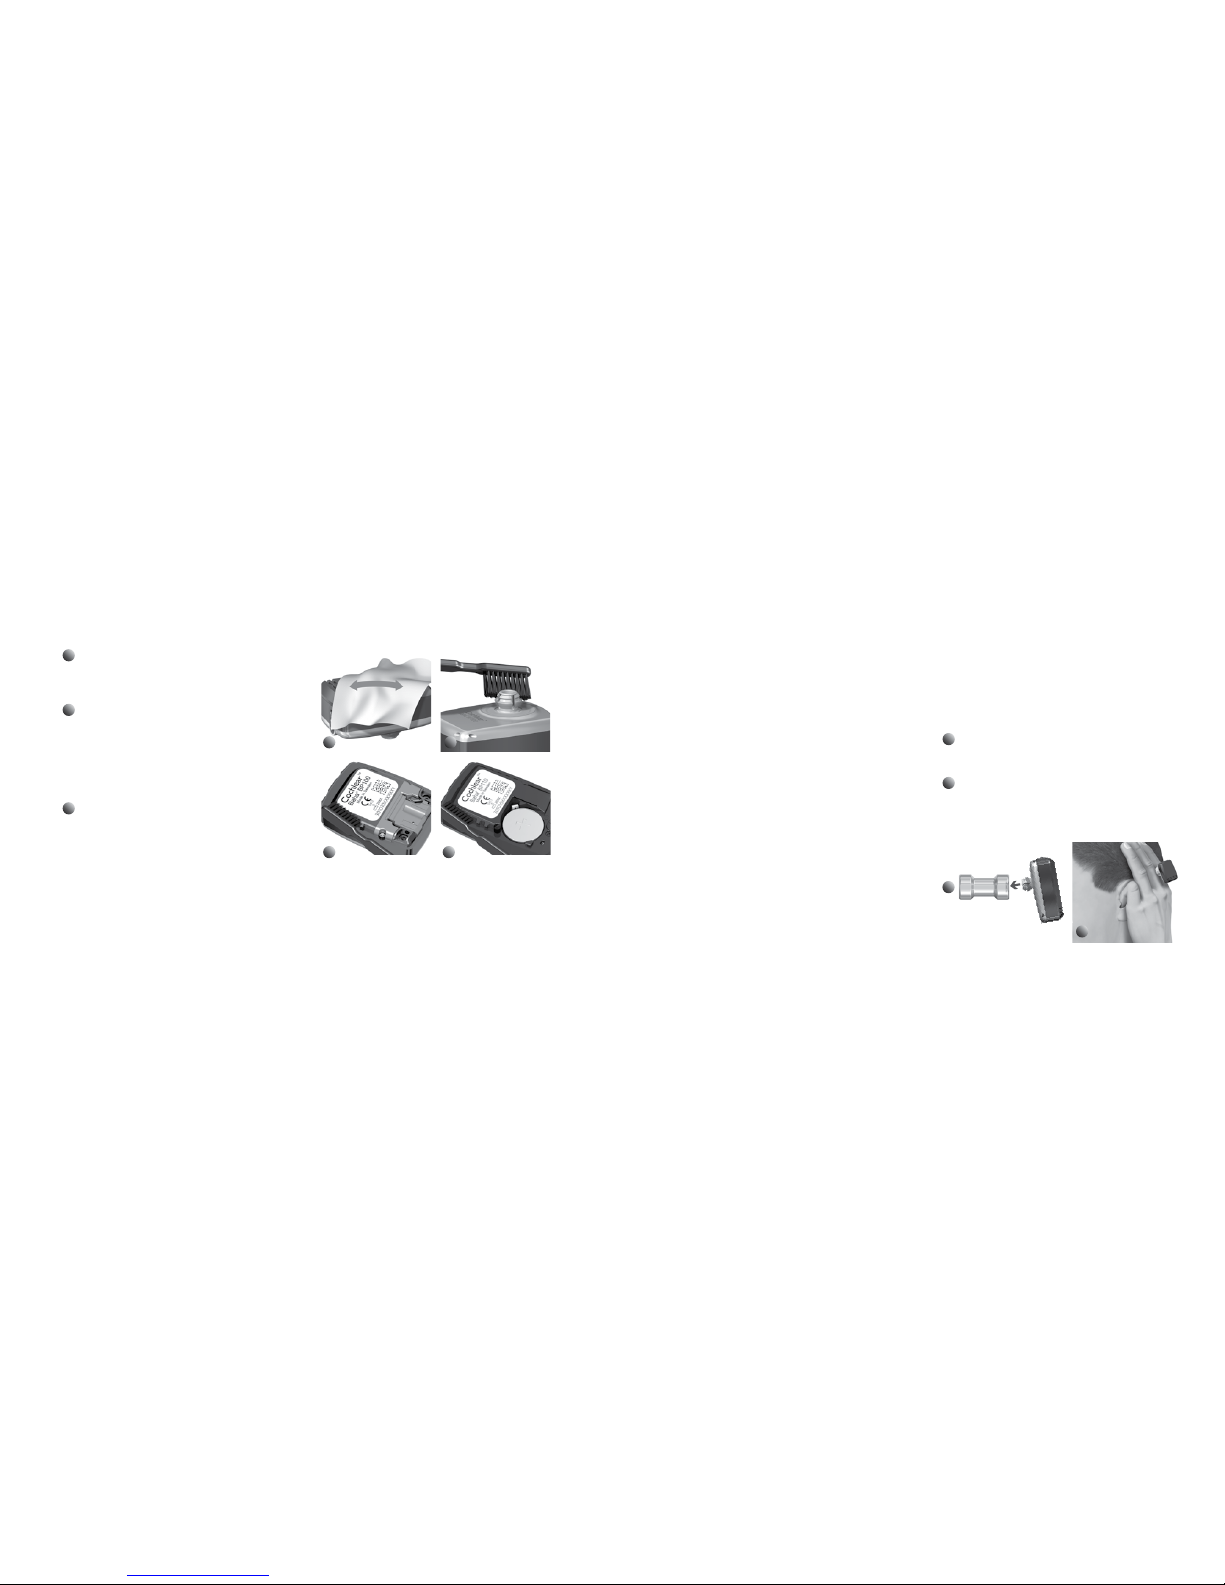
Cleaning the sound processor
1
Clean the sound processor’s housing with an
alcohol-free wipe. Do not use water to clean
your sound processor.
2
Brush the snap coupling clean using the soft
brush. Avoid using excessive cleaning force on
the snap coupling as this could damage the
processor. Your hearing care professional can
provide you with a special after care kit to
keep your sound processor in good condition.
3
Remove the battery door and clean the slots
using the brush to ensure that the battery
door can slide smoothly on and off the sound
processor.
1
3
2
3
BP100 BP110 Power
2
Using Share the Experience
Family members and friends can “share the
experience” of bone conduction hearing. The test rod
is used by others to simulate hearing with the Baha
sound processor.
To use the test rod:
1
Snap the sound processor onto the test rod using
the tilt technique. Hold the rod against the skull
bone behind an ear.
2
Plug both ears and introduce sound.
To avoid feedback (whistling), the sound processor
should not touch anything other than the test rod.
General processor care
Your Baha sound processor is a delicate electrical
instrument. Follow these guidelines to maintain its
proper working order:
• If you will not be using your sound processor for any
length of time, remove the battery door and lift open
the battery hatch (if present) to let the sound
processor ventilate.
• f you will not be using the sound processor for a long
period, remove the battery.
• When not in use, turn off your sound processor and
store it free from dust and dirt.
• During physical activities, secure your sound processor
using the safety line. If the physical activity involves
contact, Cochlear recommends removing your sound
processor and protecting the abutment with an
abutment cover and a sweat band or similar.
• Remove your sound processor before applying hair
spray or gel. If using hair dye, remove the sound
processor and use the abutment cover.
Also applicable to BP110 Power
1
Page 14
26 27
English
Warnings and precautions
General advice
A sound processor will not restore normal
hearing and will not prevent or improve a hearing
impairment resulting from organic conditions.
• Infrequent use of a sound processor may not
permit a user to attain full benefit from it.
• The use of a sound processor is only part of hearing
rehabilitation and may need to be supplemented
by auditory training and instructions in lip-reading.
Warnings
• The sound processor is a digital, electrical, medical
instrument designed for specific use. As such, due
care and attention must be exercised by the user at
all times.
• The sound processor is not waterproof!
Never wear it in heavy rain, in the bath or shower!
• Do not expose the sound processor to extreme
temperatures. The sound processor is designed to
operate within the temperature ranges +5°C (+41°F)
to +40°C (+104°F).
In particular, battery performance deteriorates in
temperatures under +5°C. The processor should
not be subject, at any time, to temperatures below
-20°C (-4°F) or above +50°C (+122°F).
• This product is not suitable for use in flammable
and/or explosive environments.
+50 °C
(+122 °F)
-20 °C
(-4 °F)
• If you are to undergo an MRI (Magnetic Resonance
Imaging), remove the sound processor prior to the
procedure. The implant and abutment remain in
place.
• Always use the audio adapter when connecting an
external audio source to your sound processor.
• Portable and mobile RF (radio frequency)
communications equipment can affect the
performance of your sound processor.
• The sound processor is suitable for use in
electromagnetic environments with mains power of
typical commercial or hospital quality, and power
frequency magnetic fields of typical commercial or
hospital levels.
It is intended for use in an electromagnetic
environment in which radiated RF (radio frequency)
disturbances are controlled.
• Interference may occur in the vicinity of equipment
with the symbol to the right.
• Dispose of batteries and electronic items in
accordance with your local regulations.
• Do not dispose of your sound processor in an
incinerator or into fire.
If the sound processor becomes soaked with
water:
1. Immediately open the battery door, lift the battery
hatch (if present) and remove the battery.
2. Put the sound processor in a container with drying
capsules such as a Dri-aid kit or similar. Leave the
processor to dry out overnight. Drying kits are
available from most hearing care professionals.
Page 15

28 29
English
1
BP110 Power
Feedback (whistling) problems
1
Check that items such as hats and glasses do not
come in contact with the sound processor. Also,
ensure that neither the head nor the ear come in
contact with the sound processor.
2
Decrease the volume.
3
Check that the battery door is closed.
1
BP100
Troubleshooting
Battery function can be related
to a number of problems, such as
no sound, intermittent sound and
crackling/buzzing. Often a new
battery is the solution.
If the possible solutions in this
chart do not solve your problem,
please see your hearing care
professional for further assistance.
Problem Cause Possible Solution
No sound/
weak sound
Weak or dead battery. Replace battery.
Volume too low. Turn up volume.
Feedback
(whistling )
Hat, glasses or other object in
contact with sound processor.
Relocate or remove the
object.
Battery door in wrong
position.
Close battery door.
Sound is
distorted o r
intermit tent
Too high volume. Decrease volume.
Weak battery. Replace battery.
Loose abutment. Contact your hearing care
professional.
Sound
processor
does not
work
Sound processor not turned
on.
Turn on sound processor.
Battery door is not completely
closed.
Gently close the battery door
completely.
Dead battery. Replace battery.
Battery inserted wrong way. Make sure battery is inserted
correctly.
Indicators
flashing
Programming mode enabled. Remove and insert battery.
Page 16
30 31
Français
Bienvenue
Félicitations pour l’acquisition de votre processeur Cochlear™ Baha® BP100
ou Cochlear
™
Baha® BP110 Power. Vous voici prêt à utiliser un processeur Baha
par conduction osseuse de haute technologie de la société Cochlear.
Ce manue l d’utilisateur c ontient tous le s conseils
nécessaires p our utiliser et entretenir votre proces seur
Baha de la meilleu re manière. En lisant ce manuel et en
le conserva nt à portée de main, vous serez s ûr de tirer
le meilleur par ti de votre processeur Baha BP1 00 ou
Baha BP110 Power.
Entrée audio/
accessoire s
Microphon es
Témoins
visuels
Couvercle du
comparti ment pile
Vibrateur
type bouto npression
Point de fixation d u
cordon de sécu rité
Bouton
de diminution
du volume
Bouton
d’augmentation
du volume
Entrée audio/
accessoire s
Microphon es
Témoins visuels
Couvercle du
comparti ment pile
Vibrateur
type bouto npression
Point de fixation d u
cordon de sécu rité
Bouton
de diminution
du volume
Bouton de progr amme,
bouton march e/arrêt
Bouton
d’augmentation
du volume
Bouton de progr amme,
bouton march e/arrêt
BP100 BP110 Power
Page 17

32 33
Français
Introduction
Les Cochlear Baha B P100 et Cochlear Baha BP110 Pow er
sont des proces seurs externes qui utilis ent la conduction
osseuse direc te pour transmettre les son s à la cochlée
(oreille in terne). Le syst ème Baha se co mpose d’un
pro cesseur électronique et d’un p etit implant en titane
placé dans l’épaisseu r de l’os temporal derrière l’oreille.
Cet implant s’intègre totalem ent dans l’os crânien sous
l’effet d’un processus appelé ostéo-intégration. Ceci permet
une cond uction direc te du son ver s la cochlée v ia l’os
crânien, ce qui am éliore les performance s auditives.
Votre audio prothésiste d oit vous avoir r emis votre
processeur Ba ha accompagné de son kit d’accesso ires.
Pour gar antir des per formances optimales, vot re
audioprothésiste a daptera le processeur à vos bes oins.
N’hésitez pas à discuter avec votre audiologiste de toute
question ou pro blème concernant votre audition o u
l’utilisation de ce systè me.
Les processeur s Cochlear Baha BP100 et Coc hlear Baha
BP110 Power peuvent êt re utilisés avec un bandeau soupl e
ou un ser re tête, lorsq ue le patient n’es t pas impla nté.
L’utilisation du processeur Ba ha sur pilier, ou sur bandeau,
doit suivre les inst ructionsdu présent man uel.
Votre boîte comprend
les éléments suivants :
• Processeur externe Cochlear Baha
• Brosse de nettoyage du pilier
• Jeu de piles
• Capuchon pour pilier
• Cordon de sécurité
• Couvercles du compartiment pile supplémentaires
• Outil magnétique d’extraction de la pile
• Plot de test (Test rod)
• Documentations (manuel de l’utilisateur, carte
de garantie, carte d’enregistrement, carte IRM)
Contacter le Service clientèle
Nous nous efforço ns d’offrir les meilleurs produit s et
services po ssibles à nos clients. Votre opinion e t votre
expérience d e nos produits et service s sont importantes
pour nous. Si vous s ouhaitez nous faire part d e vos
commentaires , n’hésitez pas à nous contacter.
Customer Ser vice – Cochlear Am ericas
13059 E. Peakview Avenue,
Centennial, CO 80111, USA
Toll free (North Am erica) 1800 523 5798
Tel: +1 303 790 9010, Fax: +1 303 792 9025
E-mail: custom er@cochlear.com
Customer Ser vice – Cochlear Euro pe
6 Dashwood Lan g Road
Bourne Busin ess Park, Addlestone,
Surrey KT15 2HJ , United Kingdom
Tel: +44 1932 87 1500, Fax: + 44 1932 87 1526
E-mail: info@co chlear.co.uk
Customer Ser vice – Cochlear A sia Pacific
1 University Aven ue, Macquarie University
NSW 2109, Austr alia
Toll free (Australia) 180 0 620 929
Toll free (New Zealand) 08 00 444 819
Tel: +61 2 9428 6555, Fax: +61 2 942 8 6352
or Toll free 1800 005 2 15
E-mail: custom erservice@cochlea r.com.au
Garantie
La garantie n e couvre pas les défauts o u les dommages
associés à, ou d écoulant de l’utilisati on de ce produit
avec un processe ur et/ou un implant d’une ma rque
autre que Cochle ar. Voir la « Carte d e garantie
Cochlear Baha » p our plus d’information s.
Page 18
34 35
Français
Utilisation de votre
processeur
Le processeur es t équipé de boutons pour la sél ection
de différents programmes d’écoute et le réglage du volume.
Des témoins audio et v isuels peuvent être activé s pour
vous informer des d ifférents réglages et de l’état du
processeur.
Votre processeur est p rogrammé pour être por té
spécifiqueme nt du côté droit ou du côté gauche de la tête.
N° de lot
S
Numéro de série
Explication des symboles
Dans ce manuel, vou s verrez de petits symbo les. Veuillez
vous référer à la liste ci- dessous pour leur exp lication.
Marche/arrêt et témoins
Allumez le proces seur externe en appuy ant sur le
bouton du milieu et en le ma intenant enfoncé jusqu’à
ce que le témoin visuel clig note 3 fois. Pour éteindre
votre processeur, appu yez sur le bouton du milieu et
maintenez-le enfon cé pendant 2 secondes.
Si le processeur es t éteint puis rallumé dans un délai
de 15 minutes, il conser ve le dernier programm e utilisé
et le réglage du volume.
Si le processeur es t éteint pendant plus de 15 minutes,
ou si la pile est rempl acée ou enlevée, il revient au
programme et au vo lume par défaut (réglés par votre
audioprothésiste) lor squ’il est rallumé.
S’applique
également au
processeur
BP110 Power
BP100
BP110 Power
« Se reporter à la notice d’utilisation »
ou « Se reporter aux instructions
d’utilisation »
« Attention, se reporter aux documents
joints » ou « Attention, se reporter aux
instructions d’utilisation »
Signal sonore privé
Marquage CE
Limites de température
Risque d’interférence
1 Nom du produit
2 Date de fabrication
2 Numéro de série
Page 19

36 37
Français
Témoins sonores et visuels
Votre processeur est é quipé de témoins sonores et
vi suels
1
(bips et L ED). Ceux-ci vo us donnent un
moyen simple et efficace de contrôler l’état du processeur.
Ils so nt particuli èrement utile s pour perm ettre aux
p ersonnes respons ables d’enfants de vérifier à tout
moment que le proce sseur de l’enfant fonctionne
correctemen t.
Lorsque vous allu mez votre processeur, les témoins
visuels clignotent . La couleur orange
2
indique que
votre processeur e st configuré pour le côté droit de votre
tête. Si la couleur est ble ue,
3
votre processeur e st
destiné au côté gauch e. Si vous êtes un utilisateur
bilatéral, veillez à p lacer le processeur du bon côté.
Remarque : Votre audi oprothésiste peut désac tiver
les témoins clign otants et les bips si vous le souh aitez.
Les témoins ora nge et bleu au démarrage ne pe uvent
toutefois pas être dés activés.
BP110 PowerBP100
Si votre processeur
clignote
Il est configuré pour
utilisation
Orange À droite
Bleu À gauche
Adaptation du processeur externe
Utilisez la techniq ue préconisée pour mettre e n place
et retirer votre proces seur confor t ablement et en toute
sécurité, afin de réduire toute pression inutile sur le vibrateur
type bouton -pression et sur le pilier. Ainsi, vous évite rez
toute gêne.
Pour adapter votre processeur externe :
1
Écartez les cheveux gênants du pilier.
2
Tenez le processeur pour rendre la fixation type
bouton-pression accessible. Mettez le vibrateur au
contact du pilier en prenant un angle puis remettez-le
dans l’axe en poussant doucement. Le processeur se
fixera sur le pilier.
3
Tenez-le pour le libérer, glissez un doigt sous le
processeur externe et faites-le pivoter doucement
jusqu’à ce qu’il se détache.
Remarque : Pour év iter tout larsen (siffleme nt), veillez
à ce que le processe ur n’entre en contact avec aucun
autre objet tel que de s lunettes ou un chapeau.
3
1
2
S’applique égaleme nt au processeur BP110 Powe r
3
1
2
3
1
2
Page 20

38 39
Français
Mise en place du cordon de sécurité
Avant de mettre le pro cesseur externe en pl ace, attachez
le cordon de sécurité a u processeur et fixez-en l’autre
extrémité à votre c hemise ou à votre veste.
Cochlear recomm ande de mettre le cordon de sécu rité en
place avant d’entam er toute activité physique. Les enfa nts
doivent utiliser le cord on de sécurité en permanen ce.
S’applique également au
processeur BP110 Power
Changement de programme
En fonction de vos be soins, il est possible de crée r plusieurs
programmes d’écou te. Ceci est à définir avec votre
audioprothèsiste, q ui a la possibilité d’en choisir jusqu’à 3.
Programme 1 :
Programme 2 :
Programme 3 :
(Ces programmes co nviennent pour différents
environnement s sonores. Demande z à votre
audioprothésiste d e vous indiquer ces programme s
spécifiques).
Pour changer de pro gramme, enfoncez et relâche z
rapidement le bo uton du milieu. Des signaux audio et
visuels vous indiq uent le programme que vous avez c hoisi :
Programme
1
: 1 bip/clignotement
Programme
2
: 2 bips/clignotements
Programme
3
: 3 bips/clignotements
1
3
2
BP110 PowerBP100
Page 21

40 41
Français
Réglage du volume et utilisation du Keylock
+
–
+ +– –
21
+ +– –
21
BP100
BP110 Power
Réglage du volume
Votre audioprothésiste a rég lé le volume de votre
processeur ex terne. Vous pouvez également l’ajuste r
manuellement .
Pour ass urer votre confo rt auditif da ns différent s
environnements sonores, vous pouvez régler le volume :
1
Si le processeur externe est placé à droite,
appuyez sur le bouton en avant pour augmenter
le volume. Appuyez sur le bouton en arrière pour
diminuer le volume.
2
S i le processeur exter ne est placé à gauche,
appuyez sur le bo uton en avant pour réduire le
volume. Appuye z sur le bouton en arriere pour
augmenter le volume.
Vous entendrez un bip chaq ue fois que vous appuyez sur
un bouton de réglag e du volume. Lorsque vous atteigne z
votre volume par défa ut, deux brefs clignotements /bips
sont émis. Lors que vous atteignez le niveau de volume
minimum ou maximu m, un long clignotement/bip
est émis.
BP100
Keylock
Keylock protège les régl ages des programmes et du volu me
et en empêche toute m odification involontaire.
• Pour activer Keylo ck, appuyez sur les deux b outons
de réglage du volume et maintenez-les enfoncés pendant
5 secondes
1
. Le témoin visuel bleu clignote pour indiquer
que Keylock est activé
2
.
• Pour désactiver Keylock, appuyez sur les deux boutons
de réglage du volume et maintenez-les enfoncés pendant
5 secondes
1
. Le témoin visuel ora nge clignote pour
indiquer que Keylock est désactivé
3
.
Remarque : Keyloc k reste actif même lorsque la p ile
est retirée. Lor sque Keylock est activé, le tém oin visuel
clignote ra 6 fois au m oment de la m ise en ser vice
du processe ur externe.
Remarque : N’enfoncez et ne maintenez pas les trois boutons
enfoncés en mêm e temps. Cela activerait s ur le processeur
un mode de programm ation provis oire, où les 2 témoins
BP110 Power
clignotent. Vous ne pouvez alors plus utiliser vos programmes.
Remarque : Si les d eux témoins clignotent, rel âchez les boutons. Retirez l a pile et réinsérez-la.
Refaites un essai e n veillant bien à n’appuyer que su r les deux boutons de réglage du vo lume.
3
1
2
3
1
2
Page 22

42 43
Français
Maintien du processeur
Dès que vous vous ête s familiarisé avec votre programm e
et la manipulation d e votre processeur, vous pouvez cha nger
de programme ou modifier le volume en gardant le processeur
fixé au pilier. Veillez à bien souteni r le processeur par le bas,
à l’aide du pouce, tout en appu yant sur les boutons avec
l’index.
S’applique égaleme nt au processeur BP110 Powe r.
Utilisation du téléphone
Pour obtenir de bons ré sultats au téléphone, place z
le récepte ur près du mic rophone du p rocesseur et non
près de votre conduit a uditif. Veillez à ce que le téléphone
n’entre pas en contact av ec le processeur car cela peut
provoquer du lar sen.
Utilisation du couvre-pilier
Le couvre-pilie r protège le pilier lorsque le proces seur
externe n’est pa s en place. Il empêche la sal eté de
s’amasser dans le pilie r.
Pour la mise en place d u couvre-pilier, pressez-le
doucement sur le pili er. Pour l’enlever, soulevez-le
doucement.
S’applique égaleme nt au processeur BP110 Powe r
Page 23

44 45
Français
2
S’applique égaleme nt au processeur
BP110 Power
Entrée audio directe
Le processeur es t équipé d’un port DAI (Direct A udio
Input) qui permet de connecter des sources audio externes
telles qu e des lecteu rs MP3 (requie rt l’utilisatio n
de l’adapta teur audio Bah a de Cochlear, en option),
des appareils Bluetooth, et la boucle à induction Baha
de Cochlear (en option).
1
Branchez la prise de l’accessoire
à l’entrée audio DAI du processeur
externe.
2
Tout en tenant déli catement
le processeur externe par les angles,
enfoncez doucement l a prise
de l’accessoire dans le port DAI.
Programme DAI (Direct Audio Input)
dédié et mixage avec le microphone
Un programme DAI con figuré par votre audioprothésiste,
vous permet d’écouter exclusivement des sons provenant
d’un acces soire audio co nnecté à votr e processeur.
Les microph ones de votre processeur sont a lors coupés.
Dans tous les autre s programmes, les signaux du DA I
sont combinés à ceu x du microphone.
Utilisation de la boucle à induction
La boucle à induc tion se connecte au por t DAI de
votre processeur. L’utilisation de ce disp ositif consiste
à transmettr e directement au processeur le s on que
vous souhaitez ecouter. Par exemple certains téléphones
sont équipés d’une b oucle à induction sur le combin é,
ce qui permet d’élimine r le bruit exterieur et d’écouter
directement so n interlocuteur. Certains bâtiment s
publics sont é quipés du même dispositif (cinéma,
théâtre, église...).
Utilisation de l’adaptateur audio
L’adaptateur audio permet une ent rée directe à partir
d’ordinateurs, d’appareil s stéréo portables , de téléviseurs,
de lecteurs MP3 et a utres appareils audio ex ternes.
La prise trois broc hes de l’adaptateur audio se branch e
au port DAI du pro cesseur externe. Le jac k se connecte
à l’appareil audio.
Attention : Il est extrêmement dangereux de connecter
un équipement électrique directement à l’appareil auditif.
Cochlea r n’est pas res ponsable de s dommages dus
à la connexion d’un équipement inadéquat ou d’une
utilisation incorrecte.
Utilisation d’un récepteur FM
Un récepteur FM per met l’utilisation de systèmes FM tel s
que ceux qui sont gén éralement utilisés dans les c lasses
d’écoles. Votre audioprot hésiste peut v ous indiquer
les récepteur s FM disponibles. Branch ez votre récepteur
FM au port DAI .
S’applique égaleme nt au processeur BP110 Powe r.
1
Page 24

46 47
Français
Soins du pilier et du
processeur
Le pilier et le process eur demandent des soins quotidi ens
et hebdomadair es.
Nettoyage du pilier
La présence de d ébris de peau ou d’autres saletés dan s
le pilier peut nuire à la q ualité sonore et endommager
votre processeur. Il es t donc très important d e nettoyer
soigneusement l a zone du pilier. Utilisez pour ce faire la
brosse de nettoya ge douce fournie dans votre kit Baha .
Contactez votre mé decin Orl en cas d’irritatio n, de
douleur ou d’autres sign es d’inflammation persista nts
autour du pilier.
1
Soi ns quotidiens
Nettoyez chaqu e jour la zone entourant le pilier pou r éviter
l’accumulation de débr is. Profitez d’un bain ou d’une douche
pour procéder à ce n ettoyage. Utilisez un savon dou x et de
l’eau chaude.
Les poils de la bro sse douce devant être orientés ve rs le pilier
plutôt que directeme nt sur la peau. L’objectif de ce brossage
est d’éliminer les cro ûtes et débris se trouvant autour de l a
base du pilier. Après util isation, nettoyez votre brosse so uple
à l’aide de savon doux et d’eau.
Remarque : Au cou rs des premières semain es suivant le
retrait du pans ement, la brosse douce peut v ous provoquer
une certain e gêne. Si tel est le cas, vous pou vez utiliser une
lingette sans alc ool (ou similaire) jusqu’à ce que votre pe au
soit moins sensi ble et que vous puissiez employer la b rosse.
Après le nettoya ge, séchez doucement la zone e ntourant
le pilier avec une ser viette ou un mouchoir prop re. Enlevez
les cheveux qui pe uvent s’être entortillés autour du pilie r.
Si vous utilisez un sèc he-cheveux, évitez de su rchauffer
la zone du pilier.
Remarque : Dem andez à un ami ou à un parent de
vous aider à nettoyer le pilier. Vous pouvez également
utiliser un miroi r ou les images d’un appareil ph oto
numérique po ur voir la zone du pilier sous tou s les
angles, et ainsi vous assurer de la nettoyer correctement.
Remarque : Les b rosses de nettoyage du pilier s ont
spécifiques, et doivent être remplacées régulièrement.
Cochlear recom mande de le faire tous les 3 mois.
2
Soi ns hebdomadaires
Nettoyez chaqu e semaine l’intérieur du pilier, à l’aide
de la brosse de net toyage douce.
Si vous utilisez le couv re-pilier, n’oubliez pas de le nettoyer
au moins une fois par se maine. Utilisez du savon, de l’eau
chaude et votre bross e douce pour nettoyer le couvre -pilier.
Soins à long term e
Vous subire z des contrôl es réguliers à une fréquen ce
déterminée par votre médecin Orl ou votre audioprothésiste.
Ces contr ôles ont pour but de vérifie r que le proce sseur
fonctionne et s’adapte co rrectement et que la zone de
l’implant est sain e.
1 1 2
Page 25

48 49
Français
Remplacement de la pile
Lorsque la pile ne dis pose plus que d’une heure de charge
environ, 2 bips/clignotem ents se répètent 3 fois pour vous
avertir que la pile devra bientôt être remplacée. L’amplification,
à ce moment, peut vo us paraître faible. Lorsq ue la pile est
complètement déc hargée, le processeur ex terne émet un
bip/clignotement et cesse d e fonctionner.
Utilisez une des piles fournies (zinc-air, non rechargeable)
comme remplacement. Les piles fournies avec le processeur
externe cor respondent aux recomma ndations de Cochlear
les plus récentes en la m atière. Adressez-vous à votre
aud ioprothésiste pour obtenir des pile s supplémentaires.
Conseils rela tifs à la pile
• La longévité de la pile diminue dès que celle-ci est exposée
à l’air (le film plastique est enlevé).
• La longévité de la pile dépend de l’utilisation quotidienne,
du réglage du volume, de l’environnement sonore,
du réglage du programme et de la puissance de la pile.
• Pour faire durer au maximum la pile, éteignez votre
processeur lorsque vous ne l’utilisez pas.
• Si vous utilisez un récepteur FM, ayez une réserve de piles,
car cet appareil a une forte consommation.
• Si une pile fuit, remplacez-la immédiatement.
Remarque : L’intérieu r du couvercle du compartim ent
pile est revêtu d’une ba rrière hydrofuge qui empê che
la poussière et l’eau d e pénétrer dans le process eur
externe. Po ur préserver une étan chéité réelle, Cochlear
recommande de r emplacer ce couvercle tous les 6 m ois.
Dans les zones géo graphiques humides , remplacez le
couvercle plus fréq uemment.
Adress ez-vous à votre audioprothé siste pour ob tenir
des couverc les compartiment pile s upplémentaires.
1 2 3
5
4
6
7
Pour remplacer l a pile dans
le processeur BP 100 :
Remarque : Le clapet du compartiment pile est fixé en permanence au processeur externe
et fournit une protection supplémentaire contre la poussière et l’humidité. Attention à ne
pas l’endommager accidentellement lors de l’ouverture ou de la fermeture.
1 2
Faites doucement glisser le couvercle du
compartiment pile vers le bas jusqu’à ce que
vous sentiez un déclic. Vous pouvez alors
déposer le couvercle.
3
À l’aide d’un ongle, soulevez délicatement
le clapet du compartiment pile pour accéder
à la pile.
4
Ret irez la pile dé chargée. Le c as échéant,
utilisez l’outil magnétique fourni pour extraire
la pile. Éliminez la pile conformément aux
réglementations locales.
5
Retirez l’autocollant du côté + de la pile neuve.
Insérez la pile neuve en plaçant le signe + face
au repère + du compartiment pile.
6
Appuyez délicatement sur le clapet du
compartiment pile pour le refermer.
7
Replacez le couvercle du compartiment pile et
faites-le glisser doucement jusqu’à sa position
verrouillée.
Page 26

50 51
Français
Pour remplacer l a pile dans
le processeur BP 110 Power :
1 2
4
3
5
Couvercle du compartiment pile avec
verrou en option
Pour empêcher to ute ouverture accidentelle du co mpartiment
pile, un couvercle avec ve rrou est disponible en option . Ceci est
parti culièrement u tile chez les e nfants. Le c ouvercle du
compar timent pile av ec verrou ne peut être verr ouillé et
déverro uillé qu’à l’aide de l’outil spécial inclus dans le kit
de couvercle du co mpartiment pile avec verro u pour éviter
tout dommage accid entel du couvercle. Adressez-vou s
à votre audioprothési ste pour obtenir des couvercles du
compartim ent pile avec verrou.
Utilisation du couvercle du compartiment pile avec verrou :
1. Assurez-vous q ue la fente de la vis est vertica le.
2. Placez le couvercle et glissez-le en p osition fermée.
3. Tourn ez la vis d’un quart de tour dans le sen s des aiguilles
d’une montre pour am ener la fente en position horizont ale
et verrouiller le couve rcle.
4. Pour d éverrouiller le couvercle, tourne z la vis d’un quart de tour dans le sen s inverse des aiguilles d’une montre
pour amener la fe nte en position verticale. Vous pou vez maintenant retirer le couvercle du co mpartiment pile.
Attention : Le s piles peuvent être dangereu ses si elles sont avalées. Co nservez toujours les pile s hors de portée
des enfants et d es personnes de faible c apacité mentale, ainsi que d es animaux domestiq ues. Si une pile est
avalée par accide nt, demandez immédiate ment une aide médicale au près du centre d’urgences le plus p roche.
BP100 BP110 Power
1
2 Faites doucement glisser le couvercle du
compartiment pile vers le bas jusqu’à ce que
vous sentiez un déclic. Vous pouvez alors
déposer le couvercle.
3
Retirez la pile déchargée. Le cas échéant,
utilisez l’outil magnétique fourni pour extraire
la pile. Recyclez la pile conformément aux
réglementations locales.
4
Retirez l’autocollant du côté + de la pile neuve.
Insérez la pile neuve en plaçant le signe + face
au repère + du compartiment pile.
5
Replacez le couvercle du compartiment pile et
faites-le glisser doucement jusqu’à sa position
verrouillée.
Page 27

52 53
Français
2
Nettoyage du processeur externe
1
Es suyez le boîtier du process eur externe à l’aide
d’un tampon sans a lcool. N’utilisez pas d’eau pour
nettoyer le proces seur.
2
Ne ttoyez le vibrateur type bou ton-pression à
l’aide de la brosse noire. Évi tez de frotter trop fort
car cela pourr ait endommager le process eur.
Votre audioprothésiste p eut vous fournir un kit
de soins spécial p our conserver votre proces seur
en bon état.
3
Retir ez le couvercle du compartime nt pile et
nettoyez les fentes à l’aide de l a brosse. Cela
facilitera le glisse ment du couvercle lors de son
retrait ou de sa mise e n place.
1
3
2
3
BP100 BP110 Power
Partagez votre expérience grâce au plot
de test Rod
Les membres de l a famille et les amis peuvent « par tager
l’expérience » de l’auditio n en conduction osseuse. La
baguette de test pe rmet aux autres de simuler l’audition
à l’aide du processeur e xterne Baha.
Pour utiliser la baguette de test :
1
Adaptez le processeur externe sur la baguette de test de la
même manière que vous le placez sur le pilier. Appuyez la
baguette de test contre l’os du crâne derrière une oreille.
2
Bouchez les de ux oreilles et faites du bruit.
Pour éviter le larse n (sifflements), le processeur ex terne ne
doit toucher aucun a utre objet que la baguette de test .
Entretien général du processeur
Votre processeur Bah a est un système électron ique délicat.
Suivez ces direct ives pour le conserver en b on état de
fonctionnem ent :
• Si vous ne comptez pas utiliser votre processeur pendant
un certain temps, enlevez le couvercle du compartiment
pile et ouvrez le clap et (le cas échéant) pour aérer
le processeur.
• Si vous ne comptez pas utiliser le processeur pendant
un certain temps, retirez la pile.
• Lorsque vous ne l’utilisez pas, éteignez votre processeur
et rangez-le à l’abri de la poussière et de la saleté.
• Lorsque vous pratiquez des activités physiques, attachez
votre processeur à l’aide du cordon de sécurité.
Si l’activité physique implique des contacts, Cochlear
recommande d’enlever le processeur et de protéger le
pilier à l’aide d’un couvre-pilier et d’un bandeau élastique
ou similaire.
• Enlevez votre processeur avant d’appliquer de la laque ou du
gel pour cheveux. Si vous appliquez une teinture capillaire,
enlevez le processeur et placez le couvre-pilier.
S’applique égaleme nt au
processeur BP110 Powe r
1
Page 28

54 55
Français
Avertissements et précautions
Conseils généraux
Un processeur Baha compense une surdité de transmission,
une surdité mixte, ou un e cophose unilatérale, mais ne
saurait rétabli r une ouïe normale en cas de per te
sensorielle sé vère.
• Une utilisation irrégulière du processeur ne permet pas
à l’utilisateur d’en tirer le meilleur bénéfice possible.
• L’utilisation d’un processeur ne représente qu’une part
de la réhabilitation auditive et il peut être nécessaire
de compléter cette utilisation par une rééducation et
un apprentissage de la lecture labiale.
Avertissements
• Le processeur Baha est un appareil numérique, électrique
et médical destiné à un usage précis. En tant que tel,
l’utilisateur doit en prendre soin à chaque instant.
• Le processeur vocal n’est pas étanche !
Ne jamais le porter en prenant un bain ou une douche
(ou sous une pluie battante) !
• Ne pas exposer le processeur à une chaleur excessive.
Le processeur a été conçu pour fonctionner entre +5 °C
(+41 °F) et +40 °C (+104 °F).
Le rendement de la pile se verra sensiblement affecté par
des températures inférieures à +5 °C. Ne jamais exposer
l’appareil à des températures inférieures à -20 °C (-4 °F)
ou supérieures à +50 °C (+122 °F).
• Il convient de ne pas utiliser ce produit dans des
environnement inflammables ou explosifs.
• Retirer le processeur avant tout examen par IRM (imagerie
par résonance magnétique). L’implant et le pilier restent
en place.
+50 °C
(+122 °F).
-20 °C
(-4 °F).
• Toujours utiliser l’adaptateur audio pour brancher une
source audio externe au processeur.
• Des équipements de communication portables et par RF
(radiofréquence) peuvent nuire aux performances de votre
processeur.
• Le processeur peut être utilisé dans les environnements
électromagnétiques tout public tels qu’on peut les trouver
dans les centres commerciaux ou les hôpitaux. Il peut être
utilisé dans un enviro nnement électro magnétique où
les perturbations radiofréquences sont contrôlées.
• Des interférences peuvent se produire à proximité
d’appareils portant le symbole ci-contre.
• Respecter les réglementations locales pour le recyclage
des piles et des composants électroniques.
• Ne jamais jeter votre processeur dans un incinérateur
ou dans le feu.
Si le processeur externe est mouillé :
1. Ouvrir imméd iatement le couvercle du compar timent
pile, soulever le clap et et enlever la pile.
2. Placer le processeur dans un dé shumidificateur avec
des cap sules de des siccation. La isser le proce sseur
sécher toute la nuit . Des kits de déshumidific ation sont
disponibles aup rès de la plupart des audio prothésistes.
Page 29

56 57
Français
Guide de
dépannage
Une pile défectueuse peut
générer un certain n ombre de
disfonctionn ements tels qu’absence
de son, son intermittent, craquement/
bourdonneme nt. La solution consiste
souvent à rempla cer la pile.
Si les diverses so lutions de ce tableau
ne réso lvent pas votre problème,
adressez-vous à votre audioprothésiste
pour obtenir de l’aide.
1
BP110 Power
Problèmes de larsen (sifflement)
1
Assurez-vous que chapeaux, lunettes et autres objets
n’entrent pas en contact avec le processeur. Vérifiez
également que ni la tête ni l’oreille ne sont en contact
avec le processeur.
2
Diminuez le volume.
3
Vérifiez que le couvercle du logement de pile est fermé.
1
BP100
Problème Cause Solution possible
Pas de son/
son faible
Pile faible ou déchargée. Remplacez la pile.
Volume trop faible. Augmentez le volume.
Effet larsen
(sifflement)
Chapeau, lunettes ou autre
objet en contact avec
le processeur.
Déplacez ou enlevez l’objet.
Couvercle du logement de pile
mal positionné.
Refermez le couvercle.
Le son
présente une
distorsion
ou est
intermittent
Volume trop élevé. Diminuez le volume.
Pile faible. Remplacez la pile.
Pilier dévissé. Adressez-vous à votre
audioprothésiste.
Le processeur
ne fonctionne
pas
Le processeur n’est pas
allumé.
Allumez le processeur.
Le couvercle du logement de
pile n’est pas complètement
fermé.
Refermez délicatement
le couvercle à fond.
Pile déchargée. Remplacez la pile.
Pile placée à l’envers. Assurez-vous que la pile
est placée correctement.
Les témoins
clignotent
Mode de programmation
activé.
Enlevez et replacez la pile.
Page 30

58 59
Deutsch
Willkommen
Herzlichen Glückwunsch zu Ihrem Cochlear™ Baha® BP100 oder Ihrem Cochlear
Baha BP110 Power. Sie können den Cochlear Knochenleitungs-Soundprozessor
jetzt in Betrieb nehmen.
Dieses Benutzerhandbuch enthält viele Tipps und
Hinweise, wie Sie Ihren Soundprozessor optimal
verwenden und pflegen. Wenn Sie diese Anleitung
lesen und während der weiteren Nutzung stets
bereithalten, erzielen Sie mit Ihrem Baha BP100
oder Ihrem Baha BP110 Power das bestmögliche
Ergebnis.
Direkter
Audioeingang
Mikrofone
Optische
Statusanzeigen
Batteriefa ch-Deckel
Kunststof fSchnappkupplung
Öse für die
Sicherheitssc hnur
Taste „Lautst ärke
verringer n“
Taste
„Lautst ärke
erhöhen“
Direkter
Audioeingang
Mikrofone
Optische Statu sanzeigen
Batteriefa ch-Deckel
Kunststof fSchnappkupplung
Öse für die
Sicherheitssc hnur
Taste „Lautst ärke
verringer n“
Programmta ste,
Ein-aus-Taste
Taste „Lautst ärke
erhöhen“
Programmta ste,
Ein-aus-Taste
BP100 BP110 Power
Page 31

60 61
Deutsch
Einleitung
Der Cochlear™ Baha® BP100 und der Cochlea r Baha
BP110 Power sind Soundprozessore n, die den Schall
über direkte Knochenleitung an die Cochlea (Innenohr)
übertragen. Die Geräte bestehen aus einem
Sound-
prozessor mit Schnappkup plung und
einem kleinen
Titanimplantat, das im Schädelknochen
hinter dem
Ohr einge setzt wird. Ei n als Osseointeg ration
bezeichneter Prozess ermöglic ht die Verbindung des
Titanimplantats mit dem Schädelknochen. Hierdurch
können Schallwellen über den Schädelknochen direkt
an die Coc hlea weitergeleitet werden – so kann
die Hörleistung g esteigert werden.
Sie sollten Ihren Baha Sou ndprozessor von Ihrem
Hörger äteakustiker zusa mmen mit dem für dieses
Gerät mitgelieferten Zubehör erhalten haben. Für eine
optimale L eistung wird Ihr H örgeräteakustike r den
Soundpr ozessor individue ll an Ihre Bedü rfnisse
anpassen. Selbs tverständlich können Sie alle Fragen
oder Be denken bezüglic h des Hörens od er zum
Gebrauch des Systems mit Ihrem Hörgeräteakustiker
besprechen.
Sowohl der Cochlear Baha BP100 als auch der Cochlear
Baha BP110 Power können mit einem B aha Softband
getragen werden, wofür kein Impl antat erforderlich
ist. Dennoch sol lten alle maßgeblichen Anweisung en
in dieser Bedienungsa nleitung unbedingt befolgt
werden.
Zu Ihrem Set zählen folgende Artikel:
• Cochlear
™
Baha® Soundprozessor
• Reinigungsbürste für die Schnappkupplung
• Batteriesatz
• Kupplungsabdeckung
• Sicherheitsschnur
• Ersatz-Batteriefach-Deckel
• Magnetisches Batterieentnahmewerkzeug
• Teststab für das Hörerlebnis
• Dokumentenpaket (Benutzerhandbuch,
Garantiekarte, Registrierungskarte, MRT-Karte)
Kundenservice-Adressen
Wir bem ühen uns stets, unseren Kunden die
besten Produkte und Ser viceleistungen anzubieten.
Ihre Meinung ist uns wichtig. Wenn Sie A nregungen
zu unseren Produkten und S erviceleistungen haben,
wenden Sie sich bitte an folgende A dressen:
Customer Ser vice – Cochlear America s
13059 E. Peakview Avenue,
Centennial, CO 80111, USA
Toll free (North America) 180 0 523 5798
Tel.: +1 303 790 9010, Fax: +1 303 792 9025
E-mail: customer@co chlear.com
Customer Ser vice – Cochlear Europe
6 Dashwood Lang Road
Bourne Business Pa rk, Addlestone,
Surrey KT15 2HJ, United King dom
Tel.: +44 1932 87 1500, Fax: +44 1932 87 1526
E-mail: info@cochlear.co.uk
Customer Ser vice – Cochlear Asia Paci fic
1 University Avenue, Macqu arie University
NSW 2109, Australia
Toll free (Australia) 1800 620 929
Toll free (New Zealand) 0800 44 4 819
Tel.: +61 2 9428 6555, Fax: +61 2 9428 6352
or Toll free 1800 005 215
E-mail: customerse rvice@cochlear.com.au
Garantie
Die Garantie de ckt keine Defekte oder Schäden
ab, die durch den Einsat z dieses Produkts mit
Soundprozessor-Einheiten und/oder Implantaten
entstehen, di e nicht von Cochlear
™
stammen.
Weitere Ei nzelheiten en tnehmen Sie der
Garant iekarte (Coch lear Baha
®
globale
eingesc hränkte Gar antie).
Page 32

62 63
Deutsch
Verwendung Ihres
Soundprozessors
Der Soundprozessor ist m it Tasten ausgestattet,
um zwis chen unterschie dlichen Hörp rogrammen
zu wählen und die L autstärke zu regeln. Akustische
und optis che Anzeigen könn en aktivier t werden,
um Ihnen die verschiede nen Einstellungen und
den Status des Soun dprozessors zu melden.
Ihr Soundprozessor ist so eingestellt, dass er speziell
auf der re chten oder linken Seite Ihres Kopfes
verwendet werden ka nn.
Chargennummer
S
Seriennummer
Symbolerklärung
Im Handbuch finden Sie kleine Symbole. Informationen
hierzu finden Sie in den unten aufgeführten Erklärungen.
Ein/aus und Anzeigen
Schalten Sie Ihren Soundprozess or ein, indem Sie
die mittlere Taste gedrückt halten, bis die visu elle
Anzeige d reimal blink t. Halten Sie die m ittlere
Taste zwei Sekunden lang g edrückt, um I hren
Soundprozessor wiede r auszuschalten.
Wird der Soundprozessor ausgeschaltet und danach
innerha lb von 15 Minuten w ieder eingescha ltet,
so sind das zuletzt ve rwendete Programm sowie
die zuletzt eingestellte L autstärke aktiv.
Ist der Soundprozessor länger als 15 Min uten
ausgesch altet oder wird die Batterie gewec hselt
bzw. entnommen, so sind das Sta ndardprogramm
und die Sta ndardlautstä rke (die von Ihrem
Hörgeräteakustiker einges tellt wurden) aktiv,
wenn Sie das Gerät ern eut einschalten.
Gilt auch für den
BP110 Power
BP100
BP110 Power
Siehe Bedienungsanleitung
„Achtung, siehe Begleitdokumente“ oder
„Achtung, siehe Bedienungsanleitung“
Audiosignal
CE-Zeichen
Temperaturbegrenzung
Interferenzrisiko
1 Produktname
2 Produktionsdatum
3 SN, Seriennummer
Page 33

64 65
Deutsch
Akustische und optische Statusanzeigen
Ihr Soundprozessor ist mit akustischen und optischen
Statusanzeigen ausgestattet
1
(Signaltöne und LEDs).
Diese er möglichen Ihn en, einfach und wirkungsvoll
den Status Ihres Soundpr ozessor s zu überwachen.
Sie sind außerdem besonders für Betreuungspersonen
nützlic h, um zu gewähr leisten, dass et wa der
Soundprozessor eines Ki ndes jederzeit funktioniert .
Wenn Sie Ihren Verstärker einscha lten, leuchten
die optischen Anzeigen auf. Blinken sie in der Farb e
Orange
2
, so ist Ihr Soundprozesso r für die rechte
Kopfseite eingestellt. Blinkt da s Gerät in der Farbe
Blau
3
, so ist Ihr Soundprozesso r für die linke
Kopfseite eingestellt. Verfügen Sie auf beid en Seiten
über ein Implantat, stelle n Sie sicher, dass Sie jeden
Verstärker auf der richtigen Seite ver wenden.
Hinweis: Falls gewüns cht, kann Ihr medizinisches
und audiologisches Fachpersonal alle Leuchtanzeigen
und Signaltöne deakti vieren. Die orangefarbenen
und blauen Anzeige n beim Einschalten des Geräts
können jedoch nicht de aktiviert werden.
BP110 PowerBP100
Wenn die Anzeige an Ihrem
Soundprozessor in den
folgenden Farben luchtet,
ist er für die folgende
Kopfseite konfiguriert:
Orange Rechts
Blau Links
Anschließen des Soundprozessors
Verwend en Sie die Kipptec hnik, um Ihren
Sound prozessor sicher u nd bequem anzubringen/
abzunehmen und somit übermäßigen Druck auf die
Schnappkupplung und Distanzhülse zu vermeiden.
Durch eine leichte Kippbewegung d es Geräts
erleichtern Sie das Anbr ingen/Abnehmen.
So schließen Sie Ihren Soundprozessor an:
1
Schieben Sie Ihre Haare im Bereich der
Schnappkupplung beiseite.
2
Halten Sie den Soundprozessor mit den Tasten
nach oben, kip pen Sie ihn leicht an, un d lassen
Sie ihn vorsichtig einrasten.
3
Zum Lösen des Soundprozessors legen Sie einen
Finger unter das Gerät und kippen es, bis es
freigegeben wird.
Hinwei s: Achten Sie zu r Vermeidung von
Rückkopplungen (Pfeifen) darauf, dass Objekte
wie Bri llen oder Hüte d en Soundprozes sor
nicht ber ühren.
3
1
2
Gilt auch für den B P110 Power
3
1
2
3
1
2
Page 34

66 67
Deutsch
Anbringen der Sicherheitsschnur
Bevor Sie den Soundprozesso r anschließen, sollten
Sie die Sicherheitssc hnur am Gerät anbringen und
die Klam mer am Ende der Sicherheitssc hnur an
Ihrer Kleidung befestigen.
Cochlear
™
empfieh lt, die Sicherhei tsschnur
bei sportliche n Tätigkeiten immer zu verwe nden.
Kinder sollten die Sicherheitsschnur immer benutzen.
Gilt auch für den BP110 Power
Programmwechsel
Ihr Hör geräteakustiker h at in Abstimmung mit
Ihnen bis zu drei verschie dene Programme für Ihren
Baha
®
Soundprozessor ausgewäh lt und eingestellt:
Programm 1:
Programm 2:
Programm 3:
(Diese Programme eignen sich f ür unterschiedliche
Hörumg ebungen. Ihr Hö rgeräteakustiker berät
Sie gern bei der Fe stlegung Ihrer individuellen
Programme.)
Drücken Sie kurz die mit tlere Programmta ste,
um zwis chen den Progra mmen zu wechse ln.
Akustische und optische Signale zeigen Ihnen an,
welches Programm Sie ak tiviert haben:
Programm
1
: 1 Signalton/Blinksignal
Programm
2
: 2 Signaltöne/Blinksignale
Programm
3
: 3 Signaltöne/Blinksignale
1
3
2
BP110 PowerBP100
Page 35

68 69
Deutsch
Einstellen der Lautstärke und Verriegelung
gegen ungewollte Benutzung
+
–
+ +– –
21
+ +– –
21
BP100
BP110 Power
Einstellen der L autstärke
Ihr Hörgeräteakustiker hat die L autstärke für
Ihren Soundprozessor eing estellt. Sie können den
Lautstärkeregle r jedoch auch manuell betätigen.
Um Ihren Hörkomfor t in unterschiedlichen
Hörumgebungen zu s teuern, können Sie die
jeweilige Lautstär ke anpassen:
1
Beim Soundprozessor, der auf der rechten
Seite getragen wird, drücken Sie für eine höhere
Lautstärke die vordere Taste. Verringern Sie die
Lautstärke, indem Sie die hintere Taste drücken.
2
Beim Soundprozessor, der auf der linken Seite
getragen wird, drücken Sie die vordere Taste,
um die Lautstärke zu verringern. Drücken
Sie
die hintere Taste, um die Lautstärke zu erhöhen.
Bei jeder Betätigung des L autstärkereglers ertönt ein
akustisches Signal. Erreichen Sie Ihre Standardlautstärke,
erfolgen zwei ku rze Blink- bzw. akustische Signale.
Gelangen Sie zur niedrigsten oder höchsten Lautstärke,
erfolgt ein lange s Blink-/akustisches Signal.
BP100
Tastensperre
Die Tastensperre verhindert, dass Programm- und Lautstärke
-
einstellungen unbeabsichtig t verstellt werden können.
• Zur Aktivierung de r Tastensperre halten Si e beide
Lautstärketasten fünf Sekunden lang gedrückt
1
. Die blaue
Leuchtanzeige signalisiert, dass die Tastensperre aktiviert
ist
2
.
• Zur Deaktivierung der Tastensperre halten Sie beide
Lautstärketasten wiederum fünf Sekunden lang gedrückt
1
.
Die orangefarbene Leuchtanzeige signalisiert, dass die
Tastensperre deaktiviert ist
3
.
Hinwei s: Die Tastensper re bleibt auch d ann aktivie rt,
wenn die Batterie e ntnommen wird. Ist die Tastensperre
aktivi ert, blink t die optische A nzeige bei Ein schalten
des Gerät s sechsmal.
Hinweis: Drücken Sie nie alle drei Tasten gleichzeitig.
Dam it versetzen Sie den Soundp rozessor in ein en
vorübergehenden Programmiermodus mit leuchtenden
Anzeigen.
Sie können in dieser Zeit n ichts hören.
BP110 Power
Hinweis: Sollten beide A nzeigen blinken, drücken Sie bitte keine Taste mehr.
Entnehm en Sie die Bat terie, und legen Sie diese ern eut ein. Nehm en Sie
das Gerät er neut in Betrieb, und achten Sie darauf, dass Sie nu r die beiden
Lautstär ketasten betätigen.
3
1
2
3
1
2
Page 36

70 71
Deutsch
Handhabung des Soundprozessors
Sobald Si e mit Ihrem Progr amm vertraut sind, können
Sie Progra mm und Lauts tärke veränder n, wenn der
Soundpr ozessor an der S chnappkupplung befestigt ist.
Achten Sie darauf, Ihren Daumen unter den Soundprozessor
zu halten, wenn Sie mit Ihrem Zeigefinger die Tasten
drücken.
Gilt auch für den B P110 Power
Telefonieren
Zum bequ emen Telefonieren ha lten Sie den
Telefonhörer am besten dicht an das Mikrofon Ihres
Soundpr ozessors und nic ht unmittelbar a n Ihren
Gehörga ng. Um Rückkopplu ngen zu vermeid en,
sollten Sie darauf achten, d ass der Telefonhöre r
den Soundprozessor nicht b erührt.
Verwendung der Abdeckung für die
Schnappkupplung
Die Abd eckung kann auf d ie Schnappkup plung
aufgesetzt werden , wenn der Soundprozessor nicht
angebracht ist. Die s verhindert das Eindringen von
Fremdkörpern in die Schn appkupplung.
Drücken Sie hierfür die Abdeckung sanf t auf die
Schnappkupplung. H eben Sie die Abdeckung leicht
an, um sie wieder zu entfer nen.
Gilt auch für den B P110 Power
Page 37

72 7 3
Deutsch
2
Gilt auch für den B P110 Power
Direkter Audioeingang
Der Sou ndprozessor ver fügt über eine n direkten
Audioeingang (DAI) für den Anschluss von e xternen
Audioque llen wie beispiel sweise MP3-P layer
(benötigt den zusätzlich erhältlichen Cochlear
™
Baha®
Audioada pter), Bluetooth- Geräten sowie de r
zusätz lich erhältlichen Cochlear Baha Telefonspule.
1
Verbinden Sie den Stecker des
entsprechenden Zubehörs mit der
DAI-Buchse des Soundprozessors.
2
Halten Sie den Soundprozessor
vorsichtig an den Kanten fest,
und verbinden Sie den Stecker
mit der DAI-Buchse.
Spezielles DAI-Programm und
Mikrofonmischung
Mit einem durch Ihren Hör geräteakustiker
eingestellten optionalen DAI- Programm können
Sie Signale ausschließlich über d en direkten
Audioeingang hören.
Bei allen anderen Program men ist der Eingang über
den DAI mit dem Mikrofoneingang kombinier t.
Verwendung der Telefonspule
Die Telefonspule sorgt für die Klangoptimie rung bei
der Benutzung von Fe stnetz- und Mobiltelefonen.
Außerdem ermöglicht sie d as Hören über
Ringschleifenanlagen zu Ha use und in öffentlichen
Gebäuden. Verbinden Sie die Telefonspule mit der
DAI-Buchse.
1
Verwendung des Audioadapters
Der Audioadapter ermögl icht einen Direktanschluss
an Compu ter, Walkma n, Fernseher, MP3 -Player
und ande re externe Au diogeräte. Das ein e Ende
des Audio adapters wird üb er den DAI mit dem
Soundpr ozessor verbund en. Das andere Ende
wird mit de m Audiogerät ver bunden.
Warnung: Der Direktanschluss von Elektrogeräten
an den S oundprozessor ist extrem ge fährlich.
Cochlear
™
haftet nicht für Schä den aufgrund des
Anschlusses fal scher Systemkomponenten oder
infolge fehlerhafter B enutzung.
Verwendung eines FM-Empfängers
Ein FM- Empfänger ermög licht die Verwen dung
von FM-Systemen, die häufig in U nterrichtsräu men
eingeset zt werden. Ih r Hörgeräteakus tiker berät
Sie gern e, welche FM-Em pfänger erhältl ich sind.
Verbinden Sie Ihren FM-Empfänger mit der DAI-Buchse.
Gilt auch für den B P110 Power
Page 38

74 75
Deutsch
Pflege der Schnappkupplung
und des Soundprozessors
Sorgen Sie immer für die ric htige Pflege Ihrer
Schnappkupplung un d Ihres Soundprozessors.
Reinigung der Schnappkupplung
Ablager ungen und Haut schuppen in de r
Schnap pkupplung können die Klangqualit ät
beeinträchtigen und möglicherweise zu Schäden
an Ihrem Soundprozessor führen. Aus die sem
Grund is t eine gründlic he Reinigung des
Schnap pkupplungs-Be reichs äußerst wichtig.
Verwenden Sie hierf ür die im Soundprozessor-Set
enthaltene weiche Reinigungsbürs te.
Sollte die Haut um den Schnapp kupplungs-Bereich
dauerhaft gereiz t sein, eine Wundheilungsstörung
oder Entzündung vor liegen, so wenden Sie sich
bitte an Ihren Arz t oder Hörgeräteakustiker.
1
Tägli che Pflege
Reinigen Si e den Schnappk upplungs-Bere ich täglich,
um das Entstehen von Gewebeablagerungen zu vermeiden.
Beim Baden oder Dus chen bietet sich hierzu eine ideale
Gelegenheit. Verwen den Sie reichlich milde Seife und
warmes Wasser.
Bürsten Sie auf der Seite der Sch nappkupplung statt
direkt auf I hrer Haut. Versuchen Sie dabei, die Ablagerungen von der Schnap pkupplung und weniger die Haut
zu bürsten. Säube rn Sie Ihre weiche Reinigungsbürste
im Anschluss mit milder Seife und wa rmem Wasser.
Hinwei s: In den erste n paar Wochen k ann die
Hautoberfläche noch etwas spröde und die Nutzung
der Bür ste unangeneh m sein. Verwen den Sie ein
alkoholfr eies Reinigungs - oder Kosmetik tuch,
bis Ihre Haut weniger em pfindlich gewo rden ist
und Sie d ie Bürste probl emlos benutze n können.
Nach der Reinigung sollte die Stelle im Bereich der
Schnappkupplung mit ein em sauberen Tuch sanft
abgetupft werden. Entfer nen Sie alle Haare, die sich
gegebenenfalls um die S chnappkupplung gewickelt
haben. Vermeiden Sie beim Ha areföhnen allzu starke
Hitze im Bereich der Sch nappkupplung.
Hinweis: Bitten Si e eine nahestehende Person
oder ein Familienmitgli ed um Unterstützung bei
der Rein igung der Schn appkupplung. A uch ein
kleiner Handspiegel oder Digitalbilder können Ihnen
Hilfestellung bei der rich tigen und gründlichen
Reinigung des Schnappkupplungs-Bereichs geben.
Hinweis: Die Bür sten sollten in regelmäßigen
Abständen ausgeta uscht werden. Cochlear
™
empfiehlt: alle drei Mo nate.
2
Wöch entliche Pflege
Reinigen Sie die Innenseite der Schn appkupplung
jede Woche mit der entspre chenden
Reinigungsbürste, wie bereit s beschrieben.
Falls Sie die Abdeckung für die S chnappkupplung
verwe nden, achten Sie d arauf, diese mind estens
einmal wöchentlich zu reinige n. Benutzen Sie dazu
Seife, warmes Wasser und I hre weiche
Reinigungsbürste.
Langfri stige Pflege
Je nach Festlegung Ihres Hörgeräteakustikers werden
Sie regelm äßig zu Nachkont rollen gebeten. D iese
Nachkontrollen gewährleisten, dass der Soundprozessor
einwandfrei funktio niert, richtig am Ohr sitzt und
Ihr Implantatbereic h gesund ist.
1 1 2
Page 39

76 77
Deutsch
Batteriewechsel
Sobald noch ungefähr eine Stunde Batterielebensdauer
verbleibt , erfolgen drei mal zwei Signaltö ne/
Blinksignale, um Sie dara uf aufmerksa m zu machen,
dass ein Batteriewech sel erforderlich ist. Zu diesem
Zeitpunk t bemerken Sie e ventuell bereit s eine
geringere Verstärkung. Wenn die Batterie vollständig
leer ist, erfolgt ei n Signalton/ein Blinksignal, und de r
Soundprozessor stellt seine n Betrieb ein.
Ersetze n Sie die leere Bat terie mit einer d er
mitgeliefer ten, nichtaufladbaren Zink-Luft-Batterien.
Die im Lieferumfang des Soundprozessors enthaltenen
Batterien entspre chen den neuesten Batterieemp
feh-
lungen von Cochlear
™
. Für weitere Batterien wenden
Sie sich bitte an Ihren Hörger äteakustiker.
Batterieh inweise
• Die Lebensdauer der Batterie nimmt ab, sobald Luft
an die Batterie gelangt (Abziehen des Plastikstreifens).
• Die Lebensdauer der Batterie hängt von der täglichen
Nutzung, der eingestellten Lautstärke, dem Umgebungsgeräusch-Pegel, der Programmeinstellung und
der jeweiligen Batteriekapazität ab.
• Um die Lebensdauer der Batterie zu erhöhen, schalten
Sie den Soundprozessor bei Nichtgebrauch aus.
• Halten Sie zusätzliche Batterien bereit, wenn Sie einen
FM-Empfänger verwenden, weil dies einen erhöhten
Stromverbrauch zur Folge hat.
• Entsorgen Sie ausgelaufene Batterien unverzüglich.
Hinweis: Die Innenseite des Batteriefach-Deckels
ist mit e inem Feuchtigke itsstopp vers ehen,
der das Eindringen von Staub und Wasser in den
Soundp rozessor verhin dert. Um ei nen wirksa men
Schutz zu gewährleis ten, empfiehlt C ochlear
™
, den
Batteriefach-Deckel alle sechs Monate auszutauschen.
In Umgeb ungen mit höhe rer Luftfeuc htigkeit
empfiehlt es sich, den Batteriefach-Deckel in kürzeren
Abständen ausz utauschen.
Wenden Sie sich für zusät zliche Batteriefach-D eckel
an Ihren Hörgerätea kustiker.
1 2 3
5
4
6
7
Für den Batteri ewechsel im BP100:
7
Legen Sie den Batteriedeckel an, und schließen
Sie das Fach wieder,
indem Sie den Deckel sanft in seine Verschlussposition zurückschieben.
Hinweis: Die Batterieklappe ist fest mit dem Soundprozessor verbunden und bietet
dadurch einen zusätzlichen Schutz gegen Staub und Feuchtigkeit. Öffnen und schließen
Sie die Batterieklappe daher besonders vorsichtig, um Schäden zu vermeiden.
1
2 Schieben Sie den Deckel des Batteriefachs
behutsam nach unten, bis Sie ein Klicken
spüren. Sie können die Abdeckung jetzt
entfernen.
3
Heben Sie die Batterieklappe mit einem
Fingernagel leicht an, um die Batterie
freizulegen.
4
Entnehmen Sie die alte Batterie. Benutzen
Sie zur Batterieentnahme im Bedarfsfall das
im Lieferumfang enthaltene magnetische
Werkzeug. Sorgen Sie für eine umweltgerechte
Entsorgung der Batterie entsprechend den
vor Ort geltenden Bestimmungen.
5
Entfernen Sie den Aufkleber am Pluspol der
neuen Batterie. Legen Sie die neue Batterie
in das Batteriefach ein, wobei das + nach
oben zeigen muss.
6
Drücken Sie die Batterieklappe sanft wieder an.
Page 40

78 79
Deutsch
Für den Batteri ewechsel im BP110 Power:
1 2
4
3
5
Optional erhältlicher Batteriefach-Deckel
mit spezieller Sicherung
Zum Schutz gegen unbea bsichtigtes Öffnen des Batteriefach-Deckels und zum Schutz der Batterie ist optional ein
manipula tionsgeschütz ter Batteriefa ch-Deckel mit
speziellem
Verschluss erhältlich. Dies ist vor allem nützlich,
wenn sich Kinder im Haushalt befinden. Der manipulationsgeschützte Batteriefach-Deckel sollte nur mit dem Werkzeug
geöffnet und wieder geschlossen werden, das im Lieferumfang
enthalten ist. So vermeiden Sie Schäden am BatteriefachDeckel. Wenden Sie sich an Ihren Hörgeräteakustiker, wenn
SIe einen manipulationsge schützten Batteriefa ch-Deckel
benötigen.
Verwenden des manipulationsgeschützten
Batteriefach-Deckels:
1. Achten Sie darauf, dass die Befestigungsschraube vertikal
ausgerichtet ist.
2. Legen Sie den Batteriefach-Deckel an, und schließen Sie das Fach, indem Sie den Deckel in seine
Verschlussposition zurückschieben.
3. Bewegen Sie die Schraube um eine Vierteldrehung nach rechts in die horizontale Ausrichtung,
um den Batteriefach-Deckel zu verriegeln.
4. Um das Batteriefach zu öffnen, bewegen Sie die Schraube um eine Vierteldrehung gegen den
Uhrzeigersinn in eine vertikale Ausrichtung. Der Batteriefach-Deckel kann jetzt abgenommen werden.
Achtung: Das Verschlucken vo n Batterien ist gefährlich. Bewah ren Sie die Batterien außerhalb
der Reichweite von Kleinkindern, Menschen mit geistiger Behinderung und Haustieren auf. Falls
versehentlich ein e Batterie verschluckt wird, suche n Sie umgehend den nächsten Notarz t auf.
BP100 BP110 Power
1
2 Schieben Sie den Deckel des Batteriefachs
behutsam nac h unten, bis Sie ein Klicken
spüren. Sie können die Abdeckung jetzt
entfernen.
3
Entnehmen Sie di e alte Batterie. Benutze n
Sie zur Batterieentnahme im Bedarfsfall das im
Lieferumfang enthaltene magnetische Werkzeug.
Sorgen Sie für eine umweltgerechte Entsorgung
der Batterie entsprechend de n vor Ort
geltenden Bestimmungen.
4
Entfernen Sie den Aufkleber am Pluspol der
neuen Batterie. Legen Sie die neue Batterie in
das Batteriefach ein, wobei das + nach oben
zeigen muss.
5
Legen Sie den Batteriedeckel an, und schließen
Sie das Fach wieder, indem Sie den Deckel sanft
in seine Verschlussposition zurückschieben.
Page 41

80 81
Deutsch
2
Reinigung des Soundprozessors
1
Wische n Sie das Gehäuse des Soundprozessors
mit einem alkoholfreien Tuch ab. Verwende n
Sie zur Reinigung des Soundprozess ors kein
Wasser.
2
Ver wenden Sie zum S äubern der Sc hnapp-
kupplung die weiche Reinigungsbürste. Vermeiden
Sie währe nd der Reinigung ü bermäßige
Kraf tanwendung auf die Schnappkupplung,
weil der S oundprozessor h ierdurch Schade n
neh men
kann.
Ihr Hör geräteakustiker k ann
Ihn en für die sach gerechte Behandl ung Ihres
Sou nd prozesso rs ein besonde res Pflegeset
zur Verfügung st ellen.
3
Nehme n Sie den Batteriefach-Deckel ab, und
reinigen Sie den Einschubrahmen mit der Bürste,
damit der Batteriefach-Deckel am Soundprozessor
problemlos auf- und zugeschoben werden kann.
1
3
2
3
BP100 BP110 Power
Teilen Sie Ihr Hörerlebnis
Familienangehörige und Freunde könn en das Hören
über Knochenleitung „dire kt miterleben“. Mit dem
Teststab können auch andere Personen nachempfinden,
wie sich der Bah
a® Soundprozessor anhö rt.
Verwendung des Teststabs:
1
Lassen Sie den Soundprozessor mittels Kipptechnik
auf dem Teststab einrasten. Halten Sie den Teststab
gegen den Schädelknochen hinter das gewünschte Ohr.
2
Halten Sie sich beid e Ohren zu, und sorgen Sie für
Geräusche.
Achten Sie zur Vermeidung von Rückkopplu ngen
(Pfeifen) darauf, dass keine Objekte wie Brillen o der
Hüte zu dicht an den Soundprozess or heranreichen.
Allgemeine Pflege des Soundprozessors
Ihr Baha® Soundprozessor ist ein empfindliches elektronisches
Gerät. Um einen ordnun gsgemäßen Betrieb zu gewährleisten, befolgen Sie bitte die nachfolgen den Hinweise:
• Wenn Sie Ihren Soundprozessor für einen längeren
Zeitraum nicht tragen, entfernen Sie den BatteriefachDeckel, heben die Batterieklappe an (falls vorhanden)
und lassen Luft an den Soundprozessor.
• Wenn Sie Ihren Soundprozessor f ür einen längeren
Zeitraum nicht tragen, entfernen Sie die Batterie.
• Schalten Sie den Soundprozessor bei Nichtbenutzung
aus, und bewahren Sie ihn a n einem staub- und
schmutzfreien Ort auf.
• Achten Sie darauf, Ihren Soundprozessor bei sportlichen
Tätigkeiten mit der Sicherheitsschnur zu befestigen.
Betreiben Sie Kontaktsport, so empfiehlt Ihnen Cochlear™,
den Soundprozessor abzun ehmen und die Schnappkupplung durch eine Abdeckung und ein Schweißband
oder Ähnliches zu schützen.
• Nehmen Sie Ihren Soundprozessor ab, bevor Sie Haarspray
oder Gel verwenden. Nehmen Sie den Soundprozessor
ab, wenn Sie Ihre Haare färben, und verwenden Sie die
Abdeckung für die Schnappkupplung.
Gilt auch für den B P110 Power
1
Page 42

82 83
Deutsch
Hinweise und
Vorsichtsmaßnahmen
Allgemeine Hinweise
Der Soundprozessor ka nn das normale Hören nicht
ersetzen. Organisch bedingte Hörschäden können mit
dem Bah a
®
Soundp rozessor weder b eseitigt noch
verbesser t werden.
• Bei unregelmäßigem Gebrauch des Soundprozessors
kann der Träger des Geräts keine optimale Hörleistung
erzielen.
• Die Verwendung eines Soundp rozessors ist nur
ein Bestandteil der Hörrehabilitation. Sie muss im
Einzelfall von Hörtherapien und Unterweisungen
im Lippenablesen begleitet werden.
Hinweis:
• Der Soundprozessor ist ein batteriebetriebe nes
Medizinprodukt mit digitaler Technik, das für einen
speziellen Z weck entwickelt wurde. Das Gerät ist
deshalb vom Anwende r dauerhaft zu pflegen und
zu warten.
• Der Soundprozessor ist nicht wasserdicht!
Niemals in der Badewanne, unter der Dusche,
in der Sauna oder bei strömendem Regen tragen!
• Der Soundprozessor darf keinen extremen Temperaturen
ausgesetzt werd en. Der Soundprozessor kann in
einem Temperaturbereich von +5 °C bis +40 °C
verwendet werden.
Insbesondere bei Temperaturen unter +5 °C nimmt
die Batterieleistung stark ab. Das Gerät sollte niemals
Temperaturen unter –20 °C oder über +50 °C
ausgesetzt werden.
• Der Soundprozessor darf nicht in der Nähe von
feuergefährlichen Stoffen und/oder explosiven
Umgebungen benutzt werden.
+50 °C
-20 °C
• Bei kernspintomographischen Messungen (MRT)
muss der Soundprozessor vor der Behand lung
abg enommen werden. Das Implantat und die
Schnappkupplung bestehen aus Titan und können
in Ihrer Position verbleiben.
• Verwenden Sie stets den Audioadapter, wenn Sie
eine externe Audioquelle an Ihren Soundprozessor
anschließen.
• Tragbare und mobile RF(Funkfrequenz)-Kommunika-
tionsgeräte können die Leistung Ihres Soun dprozessors beeinträchtigen.
• Der Soundprozessor eignet sich für die Verwendung
in elektromagne tischen Umgebungen mit einer
Qualität der Hauptstromversorgung, die einer üblichen
gewerblichen oder Krankenhausumgebung entspricht.
Die Magnetfeld er der Spannungsfrequenz sol lten
innerhalb eines Bereichs liegen, der charakteristisch
ist für e ine übliche gewe rbliche oder K rankenhausumgebung. Das Gerät ist für die Verwendung
in einer elektromagnetischen Umgebung mit HFStörungen (Hochfrequenz) ausgelegt.
• Im Bereich von Geräten, die das rechts abgebildete
Symbol tragen, können Störungen auftreten.
• Entsorgen Sie Batterien und Altgerät gemäß den
vor Ort geltenden Bestimmungen umweltgerecht.
• Der Soundprozessor darf nicht über den normalen
Hausmüll entso rgt oder hohen Temperaturen
ausge setzt werden. Nicht ins Feuer werfen!
Wenn das Gerät feucht geworden ist:
1. Öffnen Sie sofort den Batteriefach-Deckel, heben
Sie die Batterieklappe an (falls vorhanden), und
entnehmen Sie die Batterie.
2. Legen Sie den Soundprozessor in einen Behälter mit
Trockenkapseln zur Entfeuchtung. Lassen Sie das
Gerät über Nacht zum Trocknen in diesem Behälter.
Trocknungs-Sets sind bei den meisten Hörgeräteakustikern erhältlich.
Page 43

84 85
Deutsch
Fehlersuche
Eine nachlassende
Batterieleistung kann di e Ursache
für viele Probleme sein, et wa kein
Ton, Aussetzen des Tonsignals sowie
knackende/schnarrende Geräusche.
Oftmals emp fiehlt sich einfach
nur ein Batterieaustau sch.
Falls die h ier aufgeführte n
Möglichke iten nicht zur
Problemlö sung beitragen,
wenden Sie sich bitte an Ihren
Hörgeräteakustiker für
weiterführende Hilfe.
1
BP110 Power
Probleme mit Rückkopplung (Pfeifen)
1
Stellen Sie sicher, dass keine Hüte, Brillen oder
Ähnliches mit dem Soundprozessor in Berührung
kommen. Stellen Sie außerdem sicher, dass weder
der Kopf noch das Ohr mit dem Soundprozessor
in Berührung kommt.
2
Verringern Sie die Lautstärke.
3
Überprüfen Sie, ob der Batteriefach-Deckel richtig
geschlossen ist.
1
BP100
Problem Ursache Mögliche Lösung
Kein Ton/
leiser Ton
Schwache oder entladene
Batterie.
Wechseln Sie die Batterie.
Lautstärke zu gering. Erhöhen Sie die Lautstärke.
Rückkopplung (Pfeifen)
Kopfbedeckung, Brillen oder
andere Gegenstände berühren
den Soundprozessor.
Verschieben oder entfernen
Sie den Gegenstand.
Batteriefach-Deckel falsch
aufgesetzt.
Schließen Sie den
Batterie fach-Deckel.
Klang verzerrt
oder mit
Aussetzern
Lautstärke zu hoch. Verringern Sie die Lautstärke.
Schwache Batterie. Wechseln Sie die Batterie.
Lockere Schnappkupplung. Wenden Sie sich an Ihren
Hörgeräteakustiker.
Soundprozessor
funktioniert
nicht
Soundprozessor ist nicht
eingeschaltet.
Schalten Sie den
Soundprozessor ein.
Batteriefach-Deckel ist nicht
vollständig geschlossen.
Schließen Sie den
Batterie fach-Deckel korrekt.
Entladene Batterie. Wechseln Sie die Batterie.
Batterie falsch eingelegt. Achten Sie beim Einsetzen
der Batterie auf die richtige
Polarität.
Leuchtanzeigen blinken
Programmiermodus aktiviert. Entnehmen Sie die Batterie,
und setzen Sie sie erneut ein.
Page 44

86 87
Nederlands
Welkom
Gefeliciteerd met uw Cochlear™ Baha® BP100 of Cochlear™ Baha® BP110 Power.
U kunt nu gebruik maken van Cochlears zeer geavanceerde geluidsprocessor die
werkt via beengeleiding.
Deze gebruikershandleiding geeft u tips en aanbevelingen
over het g ebruik en het on derhoud van uw Baha
geluidsprocessor. Door deze handleiding te lezen en
bij de hand te houden om eventueel in de toekomst te
raadplegen,
bent u er zeker van dat u uw Baha BP100
of Baha BP110 Power optimaal benut.
Directe audio -
ingang
Microfoons
Zichtbare
statusindic atoren
Deurtje va n het
batterijcom partiment
Kunststof
snapkoppel ing
Bevestigings punt voor
het veiligheids koordje
Volumetoets
omlaag
Volumetoets
omhoog
Directe
audio-inga ng
Microfoons
Zichtbare st atusindicatoren
(led-lamp jes)
Deurtje va n het
batterijcom partiment
Kunststof
snapkoppeling
Bevestigings punt voor
het veiligheids koordje
Volumetoets
omlaag
Programmato ets,
aan/uit-toets
Volumetoets
omhoog
Programmato ets,
aan/uit-toets
BP100 BP110 Power
Page 45

88 89
Nederlands
Inleiding
De Cochlear Baha BP10 0 en Cochlear Baha BP110
Power zijn geluidsprocessors die geluid overbrengen
naar het slakkenhuis (het binn enoor) door middel
van direc te beengeleidin g. Hierbij wordt e en
geluidsprocessor gecombin eerd met een abutment
en een klein titanium implanta at dat in de schedel
achter het oor wordt aangebr acht. Het botweefsel
van de schedel vergroeit met het titanium implantaat
via een proces dat osseointegrati e wordt genoemd.
Hierdoor kan geluid via de sch edel rechtstreeks
naar het slakkenhuis worden ge leid, waardoor het
hoorverm ogen verbetert.
U hebt uw Baha geluidsprocess or ontvangen van
uw audioloog samen met de in houd van deze set.
Om de be ste prestaties te garanderen, zal uw
audioloog de geluidsprocess or afstemmen op uw
behoeften. Ne em contact op met uw audioloog
bij vragen of bezorgdheid bet reffende uw gehoor
of het gebruik van dit systee m.
Zowel de Cochlear Baha BP100 als de Cochlear
Baha
BP110 Power kan worden gebruikt in combinatie
met
een Baha Softband. In dat geval is er geen implantaat
vereist. Ook dan diene n alle relevante instructies
in deze handleiding te worden opgevol gd.
Uw set bevat de volgende onderdelen:
• Cochlear Baha geluidsprocessor
• Borstel voor het schoonmaken van het abutment
• Batterijen
• Afdekkapje voor het abutment
• Veiligheidskoordje
• Extra deurtjes voor het batterijcompartiment
• Magnetisch hulpmiddel voor het verwijderen
van de batterij
• Teststaafje waarmee u anderen via uw
geluidsprocessor kunt laten horen
• Documentatiepakket (gebruikershandleiding,
garantiekaart, registratiekaart, MRI-kaart)
Contact met onze klantenservice
We streven ernaar onze kla nten de best mogelijke
producten en diensten te leveren . Uw mening over
en ervaring m et onze producten en diensten is dan
ook waardevol voor ons. Indien u opmerkingen hebt,
aarzel dan niet om contac t met ons op te nemen.
Customer Ser vice – Cochlear America s
13059 E. Peakview Avenue,
Centennial, CO 80111, USA
Toll free (North America) 180 0 523 5798
Tel: +1 303 790 9010, Fax: +1 303 792 9025
E-mail: customer@co chlear.com
Customer Ser vice – Cochlear Europe
6 Dashwood Lang Road
Bourne Business Pa rk, Addlestone,
Surrey KT15 2HJ, United King dom
Tel: +44 1932 87 1500, Fax: +44 1932 87 1526
E-mail: info@cochlear.co.uk
Customer Ser vice – Cochlear Asia Paci fic
1 University Avenue, Macqu arie University
NSW 2109, Australia
Toll free (Australia) 1800 620 929
Toll free (New Zealand) 0800 44 4 819
Tel: +61 2 9428 6555, Fax: +61 2 9428 6352
or Toll free 1800 005 215
E-mail: customerse rvice@cochlear.com.au
Garantie
De garantie geldt niet vo or gebreken of schade
voortvloe iend uit, in verband met of gerelateerd
aan het gebruik va n dit product in combinatie
met een niet-Coch lear processor en/of een
niet-Cochlear im plantaat. Zie de “Cochlear
Baha Wereldwijde Bep erkte Garantie-kaar t”
voor meer detail s.
Page 46

90 91
Nederlands
Het gebruik van uw
geluidsprocessor
De geluidsprocessor is voorzien van toetsen waarmee
u verschillende luisterpro gramma’s kunt selecteren
en het volume kunt regelen. Er kunn en hoorbare
indicatoren (piepjes) en zichtbare indic atoren (ledlampjes) worden geactiveerd om u te inform eren
over de verschillende instell ingen en de status van
de geluidsprocessor.
Uw geluidsprocessor wordt ge programmeerd voor
specifiek gebruik aan of wel de rechter-, ofwel de
linkerzijde van uw hoofd.
Lotcode
S
Serienummer
Betekenis van de symbolen
In deze gebruikershandle iding zult u een aantal kleine
symbolen tegenkomen . Hieronder worden deze
symbolen toegelicht :
Aan/uit en indicatoren
Om uw gel uidsprocessor a an te zetten,
houdt u de middelste toet s ingedrukt totdat
het led- lampje 3 keer k nippert. Om de
geluidsprocessor uit te zetten, ho udt u de
middelste toets 2 seco nden ingedrukt.
Als de geluidsprocesso r binnen 15 minuten
na het uitschakelen weer wo rdt aangezet,
keert hij terug naar het laats t gebruikte
program ma en geluidsniveau.
Als de geluidsprocesso r langer dan 15 minuten
uitgesch akeld blijft, of al s de batterij w ordt
vervangen of verwijderd, keert hij bij het aanzetten
terug naar het standaard programma en volume
(zoals ingesteld door uw audio loog).
Ook van
toepassing op
BP110 Power
BP100
BP110 Power
“Raadpleeg de gebruiksaanwijzingen” of
“Raadpleeg de bedieningsinstructies”
“Waarschuwing: Raadpleeg bijbehorende
documenten” of
“Opgelet: Zie gebruiksaanwijzingen”
Hoorbaar signaal
CE-markering
Temperatuurbeperking
Interferentierisico
1 Productnaam
2 Fabricagedatum
3 Serienummer
Page 47

92 93
Nederlands
Hoorbare en zichtbare statusindicatoren
Uw geluids processor is vo orzien van ho orbare en
zichtbare statusindicatoren 1 (piepjes en led-lampjes).
Hiermee krijgt u o p eenvoudige en effectieve wijze
informati e over de status v an de geluidspro cessor.
Daarnaa st zijn ze bijzond er nuttig voor ve rzorgers
om er op elk moment zeker van te zijn dat de geluidsprocess or van een kind naar behoren f unctioneert.
Wanneer u de geluidsprocess or aanzet, knipperen
de led-lampjes. A ls de led-lampjes oranje knippere n,
2
is de geluidsprocessor geconfigureerd voor gebruik
aan de rechterzijde van u w hoofd. Als de led-lampjes
blauw knipperen,
3
is de geluidsprocessor geconfi gureerd voor gebruik aan de lin kerzijde van uw hoofd.
Als u aan beide zijden ee n geluidsprocessor draagt,
let er dan op dat de geluidsprocess or wordt gebruikt
aan de zijde waarvo or hij is geconfigureerd.
Opmerkin g: Uw audioloog kan de led-lampjes en
de piepjes uitscha kelen, als u dat wenst. De oranje
en blauwe indicatie lampjes die knipperen bij het
aanzetten van de geluid sprocessor kunnen echter
niet worden uitgeschakeld.
BP110 PowerBP100
Als uw geluidsprocessor
knippert in de kleur
Dan is hij geconfigureerd
voor gebruik aan de
Oranje Rechterzijde
Blauw Linkerzijde
Het plaatsen van de geluidsprocessor
op het abutment
Gebruik de kanteltechniek voo r het veilig en pijnloos
vastklikken en loskoppele n van de geluidsprocessor.
Op die manier wordt eventuele overm atige druk op
de snapkoppeling en het ab utment beperkt. Door
de geluidsprocessor met ee n kantelende beweging
op het abutment vast te klikken of van het abutment
los te koppelen, wordt eventueel ongemak vermeden.
Het plaatsen van uw geluidsprocessor:
1
Zorg ervoor dat uw haar niet in de weg zit.
2
Houd de geluidsprocessor vast met de toetsen
omhoog gericht, kantel de geluidsprocessor en
klik hem voorzichtig op zijn plaats.
3
Om hem los te koppelen, plaatst u één vinger
onder de geluidsprocessor en kantelt u hem
voorzichtig totdat hij loslaat.
Opmerkin g: Zorg ervoor dat de geluidsprocess or
niet in aanraking komt m et andere voorwerpen,
zoals een bril of een hoed, om fluiten te vermijden.
3
1
2
Ook van toepa ssing op BP110 Power
3
1
2
3
1
2
Page 48

94 95
Nederlands
Het bevestigen van het
veiligheidskoordje
Voordat u de geluidsprocessor aansluit, bevestigt
u het veiligheidskoordje aan de geluidsprocessor
en klemt u het andere uitein de van het
veiligheidskoordje aan uw overhemd of ja s.
Cochlear raadt aan het veiligh eidskoordje te
gebruiken wanneer u lich amelijke activiteiten
verricht. Voor kinderen is het r aadzaam het
veiligheidskoordje altijd te gebruiken.
Ook van toepassing op BP110 Power
Overschakelen naar een ander
programma
Uw audioloog heeft in over leg met u maximaal
drie programma’s geselec teerd voor uw Baha
geluidsprocessor:
Programma 1:
Programma 2:
Programma 3:
(Deze programma’s zijn geschikt vo or verschillende
luisteromstandigheden . Vraag uw audioloog de voor
u geselecteerde progra mma’s hier in te vullen).
Om naar een ander prog ramma over te schakelen,
drukt u kort op de midd elste toets. De hoorbare
en zichtbare signalen laten u w eten naar welk
programma u bent overges chakeld:
Programma
1
: 1 piepje/flits
Programma
2
: 2 piepjes/flitsen
Programma
3
: 3 piepjes/flitsen
1
3
2
BP110 PowerBP100
Page 49

96 97
Nederlands
Aanpassen van het volume en inschakelen
van de toetsblokkering
+
–
+ +– –
21
+ +– –
21
BP100
BP110 Power
Aanpassen v an het volume
Uw audiol oog heeft het v olume van uw gelu idsprocessor ingesteld. U kunt zelf dat volume handmatig
aanpassen.
U kunt onder verschillende luisteromstandigheden uw
luistercomfort regelen door het volume aan te passen:
1
Voor een geluidsprocessor aan de rechterzijde:
druk op de voorste toets om het volume te verhogen.
Druk op de achterste toets om het volume te verlagen.
2
Voor een ge luidsprocessor aan de linker zijde:
druk op de voorste toet s om het volume te verlagen.
Druk op de achterste toets om het volume te verhogen.
Telkens wanneer een volumetoets wo rdt ingedrukt,
klinkt er een piepje. Wanne er u uw standaard volume
bereikt, knipper t het led-lampje 2 keer kort/klinken e r
2 korte piepjes. Wanneer u h et minimum of maximum
volume bereikt, knipp ert het led-lampje lang/k linkt
er een lange pieptoon.
BP100
Toetsblokkering
Door middel van toetsblokkering kunt u de instellingen
voor programma en volume b eschermen en ervoor
zorgen dat ze niet onbedoeld kunnen worden gewijzigd.
• Voor het inschakelen van de toetsblokkering,
houdt u beide volumetoetsen gedurende 5 seconden
ingedrukt
1
. Het blauwe led-lampje knippert om aan
te geven dat de toetsblokkering is ingeschakeld
2
.
• Voor het opheffen van de toe tsblokkering, houdt
u beide volumetoetsen gedurende 5 seconden
ingedrukt
1
. Het oranje led-lampje knippert om aan
te geven dat de toetsblokkering is opgeheven
3
.
Opmerkin g: De toetsblokkering blijft actief z elfs
wanneer de bat terij wordt verwijderd. Wanneer de
toetsblokkering is inge schakeld, zal het led-lampje
6 keer knipperen wan neer de geluidsprocessor
wordt aangezet.
Opmerking: Zorg ervoor dat u niet alle drie de toetsen
tegelijk indrukt; hierdoor zal de geluidsprocessor in een
BP110 Power
tijdelijke programmeermodus geraken met knipperende
led-lampjes, en is hij niet geschikt om mee te luisteren.
Opmerkin g: Als beide led-lampjes knip peren, stop dan met het indrukken van
de toet sen. Haal de b atterij uit de g eluidsprocess or en plaats h em er weer in.
Probeer het opnieuw e n zorg ervoor dat u alleen de twee volume toetsen indrukt.
3
1
2
3
1
2
Page 50

98 99
Nederlands
Het ondersteunen van
de geluidsprocessor
Zodra u v ertrouwd bent met uw programm a,
kunt u -terwijl de geluidsprocessor op het abutment
zit- overschakelen naar een ander p rogramma en
het volum e wijzigen. Zorg e rvoor dat u hie rbij
de geluidsprocessor aan d e onderzijde met uw
duim onders teunt, terwijl u de toetsen bed ient
met uw wijsv inger.
Ook van toepa ssing op BP110 Power
Het gebruik van de telefoon
Plaats voor de beste re sultaten tijdens een telefoongesprek de hoorn dicht b ij de microfooninga ng van
de geluidsprocessor in pla ats van bij uw oor.
Zorg ervoor dat de geluidsprocessor niet in aanraking
komt met de hoorn, omdat de ge luidsprocessor dan
kan gaan fluiten.
Het gebruik van het afdekkapje voor
het abutment
Het afdekkapje bescher mt het abutment wanneer
de geluidsprocessor niet op het abutment is aangebracht.
Het voorkomt dat vuil zich ophoopt in het abutment.
Voor het bevestigen van het afdekka pje, drukt u het
afdekkapj e voorzichtig o p het abutment. Voor het
verwijderen van het afdekkapje, tilt u het afdekkapje
voorzichtig op.
Ook van toepa ssing op BP110 Power
Page 51

100 101
Nederlands
Directe audio-ingang
De geluidsprocessor he eft een DAI-poort (directe
audio-ingang) die wordt gebruikt voor het rechtstreeks
aansluiten van exter ne geluidsbronnen, zoals mp3-
spelers (hiervoor is h et gebruik van d e optionele
Cochlear Baha audio-ad apter vereist), Blueto othapparaten en de optionele Cochlear Baha luisterspoel
(Telecoil, ontvanger voor ringle iding).
1
Controleer of de aansluiting van de
externe geluidsbron overeenkomt
met de DAI-aansluiting van de
geluidsprocessor.
2
Houd de geluidsprocessor
voorzichtig bij de hoekpunten vast en
druk de aansluiting van
de accessoire
voorzichtig in
de DAI-poort.
Specifiek DAI-programma en
gecombineerde microfooninput
Een optioneel DAI-progr amma, dat uw audioloog
kan instellen, stelt u in staat uit sluitend te luisteren
naar gelu iden die via de DAI binnenkomen.
In alle andere programm a’s wordt input via de DAI
gecombineerd met input via de mic rofoon.
Het gebruik van de luisterspoel
De luisterspoel (Telecoil, ont vanger voor ringleiding)
verbeter t het geluid bij h et gebruik van b epaalde
vaste en mobiele telefoons. Daa rnaast geeft het
u toegang tot ringleidingsystemen i n woningen en
openbare gebouwen . Sluit de luisterspoel aan op
de DAI-poor t.
1
Het gebruik van de audio-adapter
De audio-adapter maakt directe input van computers,
stereo’s, tv’s, mp3-speler s en andere externe audioappara tuur mogelijk. H et ene uiteinde va n de
audio-adapter wordt aange sloten op de DAI van
de geluidsprocessor. Het andere uiteinde w ordt
aangesloten op het audio-a pparaat.
Waarschuwing: Het direct aansluiten van
elektrische apparatuur op het hoortoestel is zeer
gevaarlijk. Coch lear is niet aansprakelij k voor
schade die ontstaat als gevolg van onjuist gebruik
of het aansluiten van ongeschikte apparatuur.
Het gebruik van een FM-ontvanger
Met een FM-ont vanger kunt u gebruik maken van
FM-systemen die veel in klaslokalen gebruikt worden.
Uw audioloog kan u ver tellen welke FM-ont vangers
er verkrijgbaar zijn. Sluit de FM -ontvanger aan op
de DAI-poor t.
Ook van toepa ssing op BP110 Power
2
Ook van toepa ssing op BP110 Power
Page 52

102 103
Nederlands
Het onderhoud van het abutment
en de geluidsprocessor
Om het abutment en de geluidsp rocessor goed
te onder houden, moeten dagelijks en weke lijks
onderhoudsta ken worden uitgevoerd.
Het schoonmaken van het abutment
De aanwezigheid van huidresten of vuil in het abutment
kan de geluidskwaliteit negatief beïnvloeden en leiden
tot beschadiging van de geluidspro cessor. Daarom is
het zeer belangrijk het abut ment en het gebied er
om heen grondig schoon te ma ken. Gebruik voor
het scho onmaken van het abutment de za chte
reinigingsborstel die bij de Baha geluid sprocessor
wordt geleverd.
Mocht u a anhoudende ir ritatie, pijn of teke nen
van ontstek ing rond het abutment ervaren, neem
dan contact op met uw ar ts of audioloog.
1
Dagel ijks onderhoud
Maak het gebied rond het abutment dagelijks schoon
om opho ping van huidres ten te vermijden. Baden of
douchen is een uitstekend e gelegenheid om dit te
doen. Gebruik milde zee p en veel warm water.
Plaats de borstel op de zijkant van het abutment in plaats
van op u w huid. Richt u voo ral op het ver wijderen van
de korstjes en schilfers rond d e basis van het abutment
en niet op het borstelen v an uw huid. Maa k na het
schoon maken van het abu tment de zachte borstel
schoon met water en milde zeep.
Opmerkin g: De eerste weken na het verwijderen va n
het verband kan het on prettig zijn om de borstel te
gebruiken bij het schoo nmaken. Gebruik alcoholvrije
babydoek jes (of iets gelij ksoortigs) tot uw h uid wat
minder gevoelig is en u de bo rstel probleemloos kunt
gebruiken.
Dep, na het schoonmaken v an het abutment, de huid
rondom h et abutment voo rzichtig droog m et een
schone handdoek of tissue. Als er haren om het abutment
heen ged raaid zitten, h aal deze dan weg. Als u een
haardroger gebruikt, zorg er dan voor dat het gebied
rondom het abutment niet te heet w ordt.
Opmerkin g: Vraag een vriend of familielid u te
helpen het abutment schoon te maken. U kunt ook
gebruik maken van een h andspiegel of foto’s die
genome n zijn met een d igitale camera om het
abutment en het gebied er omheen van alle kanten
te bekijke n om er zeker va n te zijn dat dit g oed
is schoongema akt.
Opmerking: De reinigingsborstel moet regelmatig
worden ve rvangen. Co chlear advise ert elke
3 maanden.
2
Wekelijk s onderhoud
Maak de binnenkant va n het abutment wekelijks
schoon met behulp va n de reinigingsborstel zoals
hiervoor bes chreven.
Als u het afdekkapje gebr uikt, zorg er dan voor dat dit
minstens eenmaal per we ek wordt schoongemaakt.
Gebruik warm water, zeep en de za chte borstel om
het afdekkapje schoon te maken.
Langetermij n-onderhoud
Wellicht zult u regelmatig op controle moeten komen
bij uw audioloog. Tijdens deze controles wordt bekeken
of de geluidsprocessor goed w erkt en goed past en of
het gebied rond het implanta at gezond is.
1 1 2
Page 53

104 105
Nederlands
Het vervangen van de batterij
Wanneer de batterij nog on geveer 1 uur kan werken,
klinken er driemaal 2 piepjes/knippert het led-lampje
driemaal 2 keer als waa rschuwing dat de batterij
spoedig moet worden vervangen. Vanaf dat moment
kunt u een afname van de ver sterking waarnemen.
Als de batterij helem aal leeg is, zal de geluidsprocessor piepen/knipperen en vervolgens uitschakelen.
Gebruik één van de me egeleverde batterijen (zinklucht, niet-oplaadbaar) als ve rvanging. De bij uw
geluidsprocessor geleverde bat terijen voldoen aan
de meest recente aanbevelingen van Cochlear. Neem
contact op met uw audiolo og voor extra batterijen.
Tips met betre kking tot de batterij
• De levensduur van de batterij neemt af zodra
de batterij wordt blootgesteld aan lucht (zodra
de plastic strip wordt verwijderd).
• De levens duur van de bat terij is afhankelij k van
het dagel ijks gebruik, h et ingestelde vol ume,
de geluidsomgeving, het ingestelde programma
en de capaciteit van de batterij.
• Zet voor een optimale levensduur van de batterij de
geluidsprocessor steeds uit als deze niet wordt gebruikt.
• Zorg ervoor dat u bij het gebruik van een FM-ontvanger
over extra batterijen beschikt, omdat een FM-ontvanger
relatief veel stroom verbruikt.
• Als de batterij lekt, vervang deze dan onmiddellijk.
Opmerkin g: De binnenzijde van het deurtje v an het
batterijcompar timent is voorzien van een vocht strip
die voorkomt dat stof en water de gelu idsprocessor
binnendringen . Om zeker te zijn van een effectieve
afdichting, raadt Coc hlear aan het deurtje van het
batterijcompar timent elke 6 maanden te vervangen .
In vochtige omgevingen mo et het deurtje van het
batterijcompar timent vaker worden vervangen .
Neem contact op m et uw audioloog voor extra
deurtjes voor he t batterijcompartiment.
1 2 3
5
4
6
7
Het vervange n van de batterij bij de BP10 0:
van de batterij naar de ’+’ markering in het batterijcompartiment is gericht.
6
Druk het batterijklepje voorzichtig dicht.
7
Plaats het deurtje van het batterijcompartiment weer terug en schuif het voorzichtig
dicht totdat het vastklikt.
Opmerking: Het batterijklepje is permanent aan de geluidsprocessor bevestigd en biedt
extra bescherming tegen stof en vocht. Het openen en sluiten van het batterijklepje
moet zeer voorzichtig gebeuren om onbedoelde beschadiging te voorkomen.
1
2 Schuif het deurtje van het batterij-
compartiment voorzichtig naar beneden
tot u een ’kli k’ voelt. Nu kunt
u het deurtje verwijderen.
3
Gebruik uw n agel om het batterijklepj e
op te tillen, waardoor de batterij zichtbaar
wordt.
4
Verwijder de oude batterij. Gebruik hierbij
zo nodig het meegeleverde magnetische
hulpmiddel. Gooi de batterij weg volgens
de lokale voorschriften.
5
Verwijder de sticker van de ’+’ pool van
de nieuwe batterij. Plaats de nieuwe
batterij in het batterijcompartiment van
de geluid processor, waarbij het ’+’ teken
Page 54

106 107
Nederlands
Het vervangen van de batterij bij de BP110 Power:
1 2
4
3
5
Optioneel vergrendelbaar deurtje voor
batterijcompartiment
Om ervoor te zorgen d at de gebruiker niet onbedoeld
het deurtje van het bat terijcompartiment opent, is een
optioneel vergrendelbaar deurtje verkrijgbaar. Dit is vooral
nuttig vo or kinderen. H et vergrendelba re deurtje mag
alleen wo rden vergrendeld en ontgrendeld m et behulp
van het speciaal ont worpen hulpmiddel (bijgeleverd bij
het vergrendelbare deur tje) om schade aan het deurtje
te voorkomen. Neem cont act op met uw audioloog voor
vergrendelbare deur tjes voor het batterijcompartiment.
Het gebruik van het vergrendelbare deurtje van het
batterijcompartiment:
1. Zorg ervoor dat de schroefgleuf verticaal geplaatst wordt.
2. Bevestig het deurtje en schuif het dicht.
3. Draai de schroef een kwartslag rechtsom (tot in
horizontale positie) om het deurtje te vergrendelen.
4. Voor het ontgrendelen van het deurtje, draait u de schroef een kwartslag
linksom (tot in verticale positie). Het deurtje kan nu worden verwijderd.
Opgelet : Batterijen zijn schadelij k bij inslikken. Houd om die re den uw batteri jen buiten
het bere ik van kleine k inderen, pers onen met een verstandelijke beperking en huisdieren.
Mocht iemand per ongeluk een batterij hebben ingeslikt, raadpleeg dan onmiddellijk een arts.
BP100 BP110 Power
1
2
Schuif het deurtje van het batterijcompartiment
voorzichtig naar beneden tot u een ’klik’ voelt.
Nu kunt u het deurtje verwijderen.
3
Verwijder de oude batterij. Gebruik hierbij
zo nodig h et meegeleverde m agnetische
hulpmiddel. Gooi de batterij weg volgens
de lokale voorschriften.
4
Verwijder de sticker van de ’+’ pool van de
nieuwe batterij. Plaats de nieuwe batterij in het
batterijcompartiment van de geluidprocessor,
waarbij het ’+’ teken van de batterij naar de ’+’
markering in het batterijcompartiment is
gericht.
5
Plaats het deurtje van het batterijcompartiment
weer terug en schuif het voorzichtig dicht totdat
het vastklikt.
Page 55

108 109
Nederlands
2
Het schoonmaken van
de geluidsprocessor
1
Maak de b ehuizing van de geluidsprocessor
schoon met een alcoho lvrij doekje. Gebruik
geen water bij het schoonma ken van de
geluidsprocessor.
2
Bor stel de snapkop peling schoon met de
zachte b orstel. Vermijd ov ermatige kracht
tijdens het schoonmaken van de snapkoppeling,
omdat dit de geluidsprocessor kan beschadigen.
Via uw audioloog is een specia le onderhoudskit
verkrijgbaar waar mee u uw geluidsprocessor
in een goede conditie kunt houd en.
3
Ver wijder het deur tje van het bat terijcom-
partiment en maak d e gleuven met de borstel
schoon om er voor te zorgen dat het deurtje
soepel heen en wee r geschoven kan worden.
1
3
2
3
BP100 BP110 Power
Anderen via uw geluidsprocessor laten
horen (Share the Experience)
U kunt de geluidserva ring via beengeleiding delen met
uw familieleden en vrie nden. Het teststaafje kan door
anderen worden gebruik t om het horen met de Baha
geluidsprocessor te simuleren .
Het gebruik van het teststaafje:
1
Klik de geluidsprocessor op het teststaafje door
middel van de kanteltechniek. Houd het teststaafje
achter het oor tegen de schedel.
2
Sluit beide oren af en laat een geluid h oren.
Zorg ervoor dat de geluids processor niet in aanraking
komt met andere voorw erpen dan het teststaafje om
fluiten te vermijden.
Algemene verzorging van
de geluidsprocessor
Uw Baha geluidsprocesso r is een gevoelig elektrisch
appara at. Volg onders taande richtlijn en om ervoor
te zorgen dat hij naar behor en blijft functioneren:
• Als u uw geluidsprocessor voor langere tijd niet gebruikt,
verwijder dan het deurtje van het batterijcompartiment
en open het batterijklepje (indien aanwezig) om de
geluidsprocessor te ventileren.
• Als u uw geluidsprocessor langere tijd niet gebruikt,
haal dan de batterij eruit.
• Schakel de geluidsprocessor uit wanneer deze niet in
gebruik is en bewaar hem op een schone plaats.
• Maak de geluidsprocessor tijdens lichamelijke activiteiten
vast met het veiligheidskoord je. Als de lichamelijke
activiteiten gepaard gaan met contact, raadt Cochlear
aan de geluidsprocessor te verwijderen en het abutment
te beschermen met het afdekkapje en een zweetband
of iets gelijksoortigs.
• Doe uw geluid sprocessor af voordat u haars pray of
gel aanbrengt. Als u haarverf gaat gebruiken, doe dan
eerst uw geluidsprocessor af en bescherm het abutment
met het afdekkapje.
Ook van toepassing op BP110 Power
1
Page 56

110 111
Nederlands
Waarschuwingen en
voorzorgsmaatregelen
Algemene adviezen
Een geluidsprocessor her stelt de normale gehoorfuncti es niet en kan geh oorstoorniss en door een
afwijking van or ganische aard niet voorkomen of
verhelpen.
• Onregelmatig gebruik van een geluidsprocessor kan
afbreuk doen aan de totale verbetering die daarmee
verkregen zou kunnen worden.
• Het gebruik van een geluidsprocessor is slechts een
deel van de gehoorrevalidatie. Mogelijk zijn gehoortraining en het leren liplezen ook noodzakelijk.
Waarschuwingen
• De geluidsprocessor is een digitaal, elektrisch,
medisch toestel, ontworpen voor een specifieke
toepassing. Dit betekent dat de gebruiker er altijd
voorzichtig mee moet zijn en goed moet opletten.
• De geluidsprocessor is niet waterbestendig!
Draag de geluidsprocessor daarom nooit tijdens een
zware regenbui of tijdens het baden of douchen!
• Stel de geluidsprocessor niet bloot aan extreme
temperaturen. De geluidsprocessor is ontwikkeld
voor een goede werking bij temperaturen van +5 °C
(+41 °F) tot +40 °C (+104 °F).
Bij temperaturen onder +5 °C neemt de werking van
de batterij aanzienlijk af. De geluidsprocessor mag
niet worden blootgesteld aan temperaturen onder
-20 °C (-4 °F) of boven +50 °C (+122 °F).
• De geluidsprocessor is niet geschikt voor gebruik in
brandbare en/of explosieve omgevingen.
+50 °C
(+122 °F)
-20 °C
(-4 °F)
• Indien u een MR I-onderzoek (Magnetic Res onance
Imaging) moet ondergaan, dient u voorafgaand aan
het onderzoek uw geluidsprocessor af te doen.
Het impla ntaat en het abutment kunnen gewoon
blijven zitten.
• Gebruik altijd de audio-adapter wanneer u een externe
geluidsbron a ansluit op uw geluidsproce ssor.
• Draagbare en mob iele RF (radiofrequentie )-
communicatieapparatuur kan de prestaties van uw
geluidsprocessor beïnvloeden.
• De geluidsprocessor is geschikt voor gebruik in
elektromagnetische omgevingen met een stroomvoorziening die standaard is in commerciële of
ziekenhuisomgevingen. De magnetische velden van
de stroomfrequentie moeten een niveau hebben dat
standaard is in commerciële of ziekenhuisomgevingen.
Het toestel is bestemd voor gebruik in elektromagnetische omgevingen waar uitgestraalde
RF (radiofrequentie)-verstoringen onder controle
worden gehouden.
• Er kan interfere ntie optreden in de buurt van
apparatuur waarop het hier rechts weergegeven
symbool staat afgebeeld.
• Het wegwerpen van batterijen en elektronische
onderd elen dient te gebeuren volgens de lokale
voorschriften.
• Werp uw geluidsprocessor aan het einde van zijn
levensduur niet weg in een verbrandingsoven en
gooi hem niet in het vuur.
Als de geluidsprocessor erg nat wordt:
1. Open onmiddellijk het deurtje van het batterijcompartiment, til het batterijklepje op (indien aanwezig)
en verwijder de batterij.
2. Plaats de geluidsprocessor in een doosje met
droogcapsules, zoals Dri-Aid of iets gelijksoortigs.
Laat de geluidsprocessor een nacht drogen. Droogsetjes zijn bij de meeste audiologen verkrijgbaar.
Page 57

112 113
Nederlands
Hulp bij problemen
De werking van de bat terij kan
gerelateerd zijn aan verschillen de
problemen, zoals: ge en geluid,
onderbroken geluid en kr aken/
ruisen. Vaak kan het problee m
worden opgelost door ee n
nieuwe batterij te plaatse n.
Raadpleeg uw audioloog voo r
advies als u aan de ha nd van dit
overzicht uw probleem ni et kunt
oplossen.
1
BP110 Power
Problemen door fluiten
1
Controleer of de geluidsprocessor niet in contact
komt met voorwerpen zoals hoeden en brillen.
Zorg er bovendien voor dat zowel uw hoofd
als uw oor niet in contact komen met de
geluidsprocessor.
2
Verlaag het volume.
3
Controleer of het deurtje van het
batterijcompartiment gesloten is.
1
BP100
Probleem Oorzaak Mogelijke oplossing
Geen geluid/
zwak geluid
De batterij is leeg of bijna leeg. Vervang de batterij.
Het volume is te laag. Verhoog het volume.
Fluiten Hoed, bril of ander voorwerp
komt in contact met de
geluidsprocessor.
Verplaats of verwijder
het voorwerp.
Het deurtje van het batterijcompartiment zit niet goed.
Sluit het deurtje van het
batterijcompartiment.
Het geluid
is vervormd
of wordt
onderbroken
Het volume is te hoog. Verlaag het volume.
De batterij is bijna leeg. Vervang de batterij.
Het abutment zit los. Neem contact op met uw
audioloog.
De geluidsprocessor
werkt niet
De geluidsprocessor staat
niet aan.
Zet de geluidsprocessor aan.
Het deurtje van het batterijcompartiment is niet volledig
gesloten.
Schuif het deurtje van
het batterijcompartiment
helemaal dicht.
De batterij is leeg. Vervang de batterij.
De batterij is niet goed
geplaatst.
Zorg ervoor dat de batterij
goed geplaatst is.
De indicatoren
knipperen
De programmeermodus
is ingeschakeld.
Verwijder de batterij en
plaats hem terug.
Page 58

114 115
Italiano
Presentazione
Congratulazioni per aver acquistato Cochlear™ Baha® BP100 o Cochlear™ Baha®
BP110 Power. L’avanzatissimo processore Cochlear a conduzione ossea è ora
pronto per l’uso.
Questo manua le utente è ricco di sugger imenti
e consigli su come utilizzare e conservare nel modo
migliore i l processore Ba ha. Leggendo questo
manuale e tenendolo a por tata di mano p er
consultazioni successive, potrete ottenere il meglio
dal vostro Baha BP100 o Baha BP110 Power.
Ingresso aud io
diretto (DAI)
Microfoni
Indicatori
visivi di stato
Sportello d ella batteria
Attacco a
scatto in
plastica
Punto di fissag gio per
cordino di sicure zza
Pulsante di ri duzione
volume
Pulsante di
incremento
volume
Ingresso aud io
diretto (DAI)
Microfoni
Indicatori vi sivi di stato
Sportello d ella batteria
Attacco a scat to
in plastica
Punto di fissag gio per
cordino di sicure zza
Pulsante di ri duzione
volume
Pulsante di mo difica
del programm a, Pulsante di
accensione/spegni mento
Pulsante di
incremento
volume
Pulsante di mo difica
del programm a, Pulsante di
accensione /spegnimento
BP100 BP110 Power
Page 59

116 117
Italiano
Introduzione
Cochlear Baha BP100 e Cochlear Baha BP110 Power
sono processori che utilizzano la conduzione ossea
diretta per trasmettere i suoni alla coclea (orecchio
interno). Funzionano combinando un processore con
un pilastro e un piccolo impianto in titanio collocato
nel cranio, dietro l’orecchio. L’impianto in titanio si
integra con l’osso attraverso un processo chiamato
osteointegrazione. Ciò consente al suono di propagarsi
per cond uzione attrave rso le ossa del cranio,
e di arrivare direttamente alla coclea, migliorando
così la qualità dell’udito.
La consegna del processore Baha con il relativo kit
e l’installazione dell’apparecchio vengono effettuate
da uno specialista. Per assicurare prestazioni ottimali,
lo specialis ta regolerà il processore in base alle
esigenze del pa ziente. Chiarire con lo speci alista
eventuali dubbi relativi all’udito oppure all’utilizzo
del sistema.
Sia Cochlear Baha BP100 che Cochlear Baha BP110
Power possono essere utilizzati con una fascia Baha
Softband, che non richiede un impianto. Tuttavia,
si consiglia di seguire tutte le istruzioni riportate in
questo manuale.
Il kit dell’utente Baha include i seguenti
elementi:
• Processore Cochlea r Baha
• Spazzolino p er il pilastro
• Batteria
• Copripilastro
• Cordino di sicurez za
• Sportelli bat teria aggiuntivi
• Estrattore magn etico per la batteria
• Test rod “Share the Expe rience”
• Documentaz ione (manuale utente, scheda di
garanzia, scheda di registrazione, scheda per RM)
Come contattare l’assistenza clienti
È un nostro obiettivo costante offrire sempre il
meglio a tutti nostri clienti. Le vostre esperienze ed
opinioni sui nostri prodotti e servizi sono importanti
per noi. Per eventuali commenti, non esitate a
contattarci.
Customer Service – Cochlear Americas
13059 E. Peakview Avenue,
Centennial, CO 80111, USA
Toll free (North America) 1800 523 5798
Tel: +1 303 790 9010, Fax: +1 303 792 9025
E-mail: customer@cochlear.com
Customer Service – Cochlear Europe
6 Dashwood Lang Road
Bourne Business Park, Addlestone,
Surrey KT15 2HJ, United Kingdom
Tel: +44 1932 87 1500, Fax: +44 1932 87 1526
E-mail: info@cochlear.co.uk
Customer Service – Cochlear Asia Pacific
1 University Avenue, Macquarie University
NSW 2109, Australia
Toll free (Australia) 1800 620 929
Toll free (New Zealand) 0800 444 819
Tel: +61 2 9428 6555, Fax: +61 2 9428 6352
or Toll free 1800 005 215
E-mail: customerservice@cochlear.com.au
Garanzia
La presente Garanzia esclude ogni responsabilità
per dife tti o danno c onseguenti o c orrelati
all’uso dei prodotti co n altri dispositivi acustici
e/o impia nti non realiz zati da Coch lear.
Per ulter iori dettag li vedere la “Ga ranzia
limitat a Globale Coch lear Baha”.
Page 60

118 119
Italiano
Uso del processore
Il processore è dotato di pulsanti per la selezione
di diversi progra mmi di ascolto e di regolazion e
del volume. Sono inoltre presenti degli indicatori
acustici e visivi, che possono attivarsi per avvisare
l’utente sui diversi tipi di im postazione e di stato
del processore.
Il processore è programmato per essere utilizzato
specificament e sul lato destro o sul lato sinistro
della testa.
Codice lotto
S
N
Numero di serie
Simboli utilizzati
Nel manuale sono riportati dei piccoli simboli.
Consultare l’elenco seguente per la spiegazione
del relativo significato:
Indicatori di accensione/spegnimento
Accendere il p rocessore premendo e tenendo
premuto il pu lsante centrale finché l’indi catore
visivo non la mpeggia per 3 volte. Per spe gnere
il proces sore, premere i l pulsante centr ale
e tenerlo premuto per 2 secondi.
Se il process ore viene spento e riacceso ent ro
15 minuti, ritornerà all’ultimo programma e livello
di volume utilizzati.
Se invece il processore viene spento per oltre
15 minuti (oppure se la batteria viene sostituita
o rimoss a), una volta riacce so, ritornerà
al programma e al volume predefiniti (in base
alle impostazioni dello specialista).
Illustrazione
valida anche per
BP110 Power
BP100
BP110 Power
“Consultare le istruzioni per l’uso”
“Attenzione, consultare la documentazione
allegata” oppure
“Attenzione, vedere le Istruzioni per l’uso”
Segnale acustico
Marchio CE
Limiti di temperatura
Rischio di interferenza
1 Nome prodotto
2 Data di produzione
3 Numero di serie
Page 61

120 121
Italiano
Indicatori di stato acustici e visivi
Il processore è dotato di indicatori di stato acustici
e visivi
1
(segnali acustici e LED), che forniscono un
mezzo semplice ed efficace per monitorare lo stato
del processore. Sono perciò particolarmente utili
a genitori, tu tori o assistenti, che vengono
costantemente informati con precisione sul corretto
funzionamento del processore utilizzato dai bambini.
Quando il processore viene acceso, gli indicatori visivi
lampeggiano. Se la luce lampeggiante è arancione,
2
il processore è configurato per il lato destro della
testa. Se invece la luce lampeggiante è blu,
3
il
processore è impostato per il lato sinistro. Gli utenti
bilaterali dovranno assicurarsi che ciascun processore
venga utilizzato sul lato corretto.
Nota: Se si desidera, l’audiologo è in grado di
disabilitare gli indicatori lampeggianti e i segnali
acustici. Tuttavia, gli indicatori arancione e blu
che lampeggiano all’avvio non possono essere
disabilitati.
BP110 PowerBP100
Se la luce lamp eggiante
del processo re è:
Il processo re è
c onfigurato per il lato:
Arancione Destro
Blu Sinistro
Collegamento del processore
Utilizzare la tecnica dell’oscillazione per collegare
e scollegare il processore in modo comodo e sicuro,
riducendo così la pressione eccessiva sull’attacco
a scatto e sul pilastro. Inclinare il processore avanti
e indietro ri spetto al pilastro, in mo do da evitare
ogni disagio.
Per collegare il processore:
1
Allontanare i capelli dal pilastro.
2
Tenere il processore con i pulsanti rivolti verso
l’alto, inclina rlo e farlo scattare delicatamen te
in posizione.
3
Per sg anciarlo, posizionare un di to sotto
il processore e inclinarlo delicatamente finché
non si scollega.
Nota: per evit are problemi di feedback (fischi) ,
assicurarsi che il processore non si trovi a contatto
con altri oggetti, come occhiali o cappelli.
3
1
2
Illustrazione valida anche per BP110 Power
3
1
2
3
1
2
Page 62

122 123
Italiano
Collegamento del cordino di sicurezza
Prima di a pplicare il pro cessore, collega rvi
un’estremità del cordino di sicurezza e agganciare
l’altra estremità agli indumenti.
Cochlear consiglia di collegare il cordino di sicurezza
quando si svolgono attività fisiche. I bambini, invece,
dovranno util izzare il cordino di sicurezza in ogni
occasione.
Illustrazione valida anche per BP110 Power
Modifica del programma
In accordo con l’utente, lo specialista può selezionare
fino a tre programmi per il processore Baha:
Programma 1:
Programma 2:
Programma 3:
(Questi programmi sono predisposti per diversi ambienti
di ascolto. Chi edere allo specialista di impostare
i programmi in base alle esigenze specifiche del paziente).
Per passare da un programma all’altro, premere
e rilasciare rapidamente il pulsante centrale. I segnali
acustici e visivi indicheranno il programma selezionato:
Programma
1
: 1 segnale acustico / lampeggiamento
Programma
2
: 2 segnali acustici / lampeggiamenti
Programma
3
: 3 segnali acustici / lampeggiamenti
1
3
2
BP110 PowerBP100
Page 63

124 125
Italiano
Regolazione del volume e impostazione
del blocco pulsanti
+
–
+ +– –
21
+ +– –
21
BP100
BP110 Power
Regolazione del volume
Il livello di volume del processore viene preimpostato
dallo specialista. Tuttavia, anche l’utente può regolare
il volume manualmente.
È possibile regolare il volume per migliorare il comfort
acustico a seconda dei diversi ambienti di ascolto:
1
Per il processore del lato destro, premere
il pulsante anteriore per aumentare il volume,
e il pulsante posteriore per ridurre il volume.
2
Per il processore del lato sinistro, premere
il pulsante anteriore per ridurre il vol ume,
e il pulsante posteriore per aumentare il volume.
Ogni volta che viene premuto un pulsante del volume,
viene emesso un segnale acustico. Quando si raggiunge
il volume predefi nito, vengono emessi due brevi
lampeggiamenti / segnali acustici. Quando invece si
raggiunge il livello di volume minimo o massimo, viene
emesso un lungo lampeggiamento / segnale acustico.
BP100
Blocco pulsanti
Il blocco pulsanti protegge le impostazioni del programma
e del livello di volume, evitando che vengano modificate
inavvertitamente.
• Per attivare il b locco pulsanti, premere e te nere
premuti entrambi i pulsanti del volume per 5 secondi
1
.
L’indicatore visivo blu lampeggerà per indicare ch e
il blocco pulsanti è attivato
2
.
• Per disattivare il blocco pulsanti, premere e tenere
premuti entrambi i pulsanti del volume per 5 secondi
1
.
L’indicatore visivo arancione lampeggerà per indicare
che il blocco pulsanti è disattivato
3
.
Nota: il blocco pulsanti rimane attivo anche quando
la batteria viene rimossa. Se il blocco pulsanti è attivo,
l’indicat ore visivo lamp eggerà 6 volte n on appena
il processore viene acceso.
Nota: non premere e tenere premuti tutti e tre i pulsanti
allo stesso tempo. In questo modo il processore verrebbe
impost ato temporanea mente sulla mo dalità di
programmazione con gli indicatori lampeggianti,
rendendo così impossibile l’ascolto.
BP110 Power
Nota: s e entrambi gli indicatori la mpeggiano, r ilasciare i pul santi, quind i estrarre
e reinserire la batteria. Ritentare e assicurarsi di premere solo i due pulsanti del volume.
3
1
2
3
1
2
Page 64

126 127
Italiano
Come maneggiare il processore
Una volta acquisita familiarità con il funzionamento
del processore, è possibile modificare sia il programma
che il livell o del volume anche quando il p rocessore
è collegato al pilastro. Sostenere il processore tenendo
il pollice sotto la parte inferiore, mentre si premono
i pulsanti con il dito indice.
Illustrazione valida anche per BP110 Power
Uso del telefono
Per ottenere i migliori risultati quando si parla al
telefono, posizionare il ricevitore vicino all’ingresso
del microfono del processore anziché in prossimità
del canale uditivo. Assicurarsi che il ricevitore non
tocchi il processore, in quanto potrebbero verificarsi
problemi di feedback.
Uso del copripilastro
Il copripilastro protegge il pilastro quando il processore
non viene utili zzato. Ciò evita anche l’accum ulo di
sporcizia sul pilastro.
Per collegare il copripilastro, premerlo delicatamente
sul pilas tro. Sollevarlo poi delicatame nte per
rimuoverlo.
Illustrazione valida anche per BP110 Power
Page 65

128 129
Italiano
2
Illustrazione valida anche per BP110 Power
Ingresso audio diretto (DAI)
Il processore ha una porta di ingresso audio diretto
(DAI), che viene utilizzata per collegare direttamente
le sorge nti audio estern e, come i lettori MP3
(attraverso l’adattatore audio opzionale Cochlear
Baha), oppure i dispositivi Bluetooth e la telebobina
opzionale Cochlear Baha.
1
Inserire i connettori di questi
accessori nella porta DAI del
processore.
2
Tenendo delicatamente
il processore per i bordi, inserire
con cautela il connettore
dell’accessorio nella porta DAI.
Programma DAI dedicato e
combinazione con il microfono
Un programma DAI opzionale, impostato dallo
specialista, consente di ascoltare esclusivamente
il suono proveniente dal DAI.
In tutti gli altri programmi, l’ingresso del DAI
è combinato con quello del microfono.
Uso della telebobina
La telebobina migliora il suono quando si utilizzano
dei telefoni fissi e dei cellulari. Questo accessorio
consente di accedere ai circuiti chiusi negli edifici che
ne sono dotati. Collegare la telebobina alla porta DAI.
1
Uso dell’adattatore audio
L’adattatore audio consente il collegamento diretto
di computer, stereo portatili, TV, lettori MP3 e altri
dispositivi audio esterni. Un’estremità dell’adattatore
audio è collegata al processore sulla porta DAI, mentre
l’altra estremità è collegata al dispositivo audio.
Avvertenza: il collegamento di dispositivi elettrici
direttamente a l processore è estremamente
pericoloso. Cochlear non risponde di eventuali
danni dovuti al collegamento o all’utilizzo errato
dei dispositivi.
Uso del ricevitore FM
Il ricevitore FM consente l’uso dei sistemi FM
normalmente utilizzati nelle aule scolastiche.
Lo specialista comunicherà all’utente i tipi di
ricevitori FM disponibili. Collegare il ricevitore
FM alla porta DAI.
Illustrazione valida anche per BP110 Power
Page 66

130 131
Italiano
Cura del pilastro e del
processore
Per una corretta manutenzione del pilastro e del
processore, è necessario svolgere delle specifiche
operazioni quotidiane e settimanali.
Pulizia del pilastro
Residui di pelle o altra sporcizia, accumulandosi sul
pilastro, poss ono compromettere la qualità sonora
e provoca re danni al proc essore. È perci ò molto
importante pulire accuratamente l’area del pilastro.
Utilizzare lo spazzolino morbido appositamente
fornito nel kit di pulizia del pilastro del processore Baha.
Qualora si dovessero acc usare irritazi oni o dolori
persistenti oppure altri segni di infiammazione intorno
al pilastro, contattare il medico o l’audiologo.
1
Cura quotidiana
Pulire giornalmente l’area intorno al pilastro per evitare
l’accumulo di sporcizia. Un’ottima occasione per svolgere
questa pulizia si presenta durante il bagno o la doccia.
Utilizzare acqua calda e sapone neutro in abbondanza.
Passare lo spazzolino sul bordo esterno del pilastro anziché
direttamente sulla pelle. Infatti, devono essere rimosse le
croste e la sporcizia dalla base del pilastro, e non occorre
spazzolare la pelle. Dopo aver pulito il pilastro, pulire
anche lo spazzolino con acqua e sapone neutro.
Nota: nelle prime settimane dopo la rimozione della
medicazione, an che la pulizia con uno spazzolino
morbid o può risultare leggermente d olorosa.
Utilizzare perciò una salvietta per neonati senza alcol
(o simili) finché la pelle non diventerà meno sensibile
e sarà possibile utilizzare lo spazzolino senza problemi.
Una volta pulito il pilastro, asciugarne delicatamente
l’area con un panno o un asciugamano pulito. Rimuovere
i capelli eventualmente attorcigliati al pilastro. Se si utilizza
un asciugacapelli, evitare di surriscaldare l’area del pilastro.
Nota: chiedere aiuto a un amico o a un parente per
effettuare la pulizia del pilastro. È inoltre possibile
utilizzare uno specchietto o scattare delle foto con
una fotocamera digitale. Ciò consentirà di vedere
l’area del pilastro da tut te le angolazio ni e di
garantirne così una pulizia adeguata.
Nota: lo spazzolino per la pulizia del pilastro dovrà
essere cambiato a intervalli regolari. Coch lear
consiglia di sostituirlo ogni 3 mesi.
2
Cura settimanale
Pulire la parte interna del pilastro ogni settimana,
utilizzando lo spazzolino come descritto in precedenza.
Se si utilizza il copripilastro, assicurarsi di pulirlo almeno
una volta la se ttimana. Per pulire il copri pilastro,
utilizzare lo spazzolino con acqua calda e sapone.
Cura a lungo termine
Lo specia lista, in base alla propria va lutazione,
programmerà per l’utente una serie di regolari visite
di controllo. Tali visite hanno lo scopo di assicurare
il corret to funzionamen to e adattamento del
processore, nonché il normale stato di salute dell’area
intorno all’impianto.
1 1 2
Page 67

132 133
Italiano
Sostituzione della batteria
Se l’autonomia residua della batteria diminuisce fino
a circa un’ora, vengono emessi due segnali acustici /
lampeggiamenti per tre volte, indicando che la batteria
va sostituita appena possibile. In questi casi l’utente
potrebbe riscontrare un basso livello di amplificazione.
Se la batteria si esaurisce completamente, il processore
emetterà un segnale acustico / lamp eggiamento
e quindi si spegnerà.
In sostituzione, utilizzare una delle batterie fornite
(zinco-aria, non ricaricabile). La batteria inclusa nel
kit del processore è conforme alle raccomandazioni
più recenti di Cochlear. Contattare lo specialista per
ottenere nuove batterie.
Suggerimenti sulla batteria
• La durata della batteria diminuisce non appena
la batteria vie ne esposta all’aria (rimuoven do
la striscia di plastica).
• La durata della batteria dipende dall’uso
quotidiano, dalla regolazion e del volume,
dall’ambiente s onoro, dall’impostazione del programma
e dalla potenza della stessa batteria.
• Per massimizzare l’autonomia della batteria, spegnere
il processore quando non viene utilizzato.
• Tenere a portata di m ano alcune batterie di ri serva se
si utilizza un ricevitore FM, in quant o tali dispositivi
hanno un alto livello di consumo energetico.
• Se la batteria presenta una fuoruscita dei materiali interni,
sostituirla immediatamente.
Nota: la parte interna dello sportello della batteria
è rivestita con una barriera antiumidità, che impedisce
l’ingresso di ac qua e polvere nel processore.
Per assicurare un’efficace tenuta stagna della batteria,
Cochlear consiglia di sostituire lo sportello della batteria
ogni 6 mesi. In ambienti umidi la sostituzione della
batteria dovrà ess ere effettuata con maggiore
frequenza.
Contattare lo specialista per ottenere nuovi sportelli
della batteria.
1 2 3
5
4
6
7
Per sostituire la batteria in BP100:
6
Chiudere delicatamente il copribatteria.
7
Ricollocare lo sportello della batteria facendolo scorrere delicatamente verso
l’alto fino alla posizione di blocco.
Nota: il copri batteria è collegato al proc essore in modo permanent e, e fornisce una
protezione aggiuntiva contro polvere e umidità. Per evitare danni accidentali, è necessario
prestare una particolare attenzione durante l’apertura o la chiusura del copribatteria.
1
2 Far scorrere delicatamente lo sportello
della batteria verso il basso, finché non si
sente uno scatto. È ora possibile rimuovere
lo sportello.
3
Con l’unghia di un dito, sollevare
delicatamente il copribatteria per esporre
la batteria.
4
Rimuovere la vecchia batteria. Se necessario,
utilizzare l’estrattore magnetico fornito con
il prodotto. Smaltire la batteria nel rispetto
delle norme locali.
5
Rimuovere l’adesivo presente sul lato “+”
della nuova b atteria. Inserire la nuov a
batteria in modo che il segno “+” sia rivolto
verso il segno “+” presente nel vano
batteria del processore.
Page 68

134 135
Italiano
Per sostituire la batteria in BP110 Power:
1 2
4
3
5
Sportello batteria antimanomissione
Per evitare che l’utente apra lo sportello della batteria
ed esponga la batteria accidentalmente, è disponibile
uno sportello batteria antimanomissione. Tale sportello
è particolarmente utile per i bambini. Per evitare danni
accidentali allo sportello batteria del processore, lo sportello
batteria antimanomissione dovrà essere bloccato e sbloccato
utilizzando esclusivamente l’apposito strumento fornito
con il relativo kit. Contattare lo specialista per ottenere
degli sportelli batteria antimanomissione.
Per utilizzare lo sportello batteria antimanomissione:
1. Assicurarsi che la scanalatura della vite si trovi in
posizione verticale.
2. Applicare lo sportello della batteria facendolo scorrere
fino alla posizione di chiusura.
3. Girare la vite in senso orario fino alla posizione orizzontale per bloccare lo sportello della batteria.
4. Per sbloccare lo sportello della batteria, girare la vite in senso antiorario fino alla posizione verticale.
È ora possibile rimuovere lo sportello della batteria.
Attenzione: le batterie possono essere pericolose in caso di ingestione. Tenere sempre le batterie
fuori d alla portata di bambini, pe rsone con rid otte capacità mentali o anim ali. In caso d i
ingestione accidentale di una batteria, recarsi immediatamente al pronto soccorso più vicino.
BP100 BP110 Power
1
2 Far scorrere delicatamente lo sportello della
batteria verso il basso, finché non si sente uno
scatto. È ora possibile rimuovere lo sportello.
3
Rimuovere la vecchia batteria. Se necessario,
utilizzare l’estra ttore magnetico fornito con
il prodotto. Smaltire la batteria nel rispetto
delle norme locali.
4
Rimuovere l’adesivo presente sul lato “+” della
nuova batteria. Inserire la nuova batteria in
modo che il segno “+” sia rivolto verso il segno
“+” presente nel vano batteria del processore.
5
Ricollocare lo sportello della batteria facendolo
scorrere delicat amente verso l’alto fino alla
posizione di blocco.
Page 69

136 137
Italiano
2
Pulizia del processore
1
Pulire l’alloggiamento esterno del processore
con una salvi etta senza alcol. Non p ulire
il processore con acqua.
2
Pulire l’attacco a scatto utilizzando lo spazzolino
morbido. Evitare di esercitare una forza eccessiva
durante l a pulizia, in qua nto ciò potrebbe
danneggiare il processore. Lo specialista fornirà
all’utente un apposito kit di post-terapia, che
consentirà di mantenere il processore in buone
condizioni.
3
Rimuovere lo sportello della batteria e utilizzare
lo spazzolino per pulire le scanalatu re sui due
lati del vano bat teria. Ciò assicurerà che lo
sportello possa scorrere uniformemente durante
l’apertura e la chiusura.
1
3
2
3
BP100 BP110 Power
Uso del test rod “Share the Experience”
Parenti e amici possono condividere l’esperienza
dell’udito a conduzione ossea. Il test rod consente infatti
alle altre persone di simulare l’ascolto reso possibile dal
processore Baha.
Per utilizzare il test rod:
1
Inserire il processore nel test rod utilizzando la tecnica
dell’oscillazione. Premere il test rod contro la parete
laterale della testa, immediatamente dietro l’orecchio.
2
Tappare entrambe le orecchie e iniziare ad ascoltare
dei suoni.
Per evitare problemi di feedback (fischi), il processore
non dovrà toccare altri oggetti all’infuori del test rod.
Cura generale del processore
Il processore Baha è uno strumento elettrico delicato.
Attenersi alle indicazioni seguenti p er conservarne
il corretto funzionamento:
• Se il processore non viene utilizzato per un certo tempo,
rimuovere lo sp ortello della batteria (s e presente) e
sollevare il copribatteria, per consentire la ventilazione
del processore.
• In caso di inutil izzo prolungato del processo re,
rimuovere la batteria.
• Quando il processore non viene utilizzato, spegnerlo
e conservarlo in un ambiente pulito e protetto dalla
polvere.
• Quando si svolgono attività fisiche, fissare il processore
con il cordino di sicurezza. In caso di attività fisiche
che prevedono il contatto, Cochlear consiglia di
rimuovere il processore e di proteggere il pilastro con
il copripilastro e una fascia elastica per la testa o simili.
• Rimuovere il processore prima di applicare prodotti
spray o gel per capelli. Se si utilizzano tinture per capelli,
rimuovere il processore e utilizzare il copripilastro.
Illustrazione valida anche per
BP110 Power
1
Page 70

138 139
Italiano
Avvertenze e precauzioni
Note generali
Un processore non ripristina il normale udito e non
migliora problemi di udito dovuti a lesioni organiche.
• L’utilizzo saltuario di un processore potrebbe non
consentire di ottenere i massimi benefici.
• L’utilizzo di un processore fa parte di un programma
di riabilitazione dell’udito, e deve essere integrato
con corsi di logopedia.
Avvertenze
• Il processore è un dispositivo medico elettrico e
digitale progettato per un uso specifico. Come tale,
deve essere utilizzato e sottoposto a manutenzione
con cura e attenzione.
• Il processore non è resistente all’acqua.
Non indossarlo mai sotto la pioggia, né durante
il bagno o sotto la doccia.
• Non esporre il processore a temperature estreme.
Il processore è progett ato per funzionare entro
intervalli di temperatura compresi tra +5 °C e +40 °C.
In particolare, a temperature inferiori a +5 °C le
prestazioni della batteria subiscono una riduzione.
In ogni c aso, il processo re non deve ess ere mai
utilizzato a temperature inferiori a -20 °C o superiori
a +50 °C.
• Questo prodotto non è idoneo per l’uso in ambienti
infiammabili e/o esplosivi.
+50 °C
-20 °C
• Rimuovere il processore prima di sottoporsi a una
risonanza magnetica. L’impianto e il pilastro
rimangono in posizione.
• Utilizzare sempre l’adattatore audio quando si
collega una sorgente audio esterna al processore.
• I dispositivi di comunicazione a radiofrequenza fissi
e mobili possono compromettere le prestazioni del
processore.
• Il processore è omologato per l’uso in ambienti
elettromagnetici con alimentazione elettrica e con
campi magnetici di livello commerciale o ospedaliero.
È inoltre omologato per l’uso in ambienti
elettromagnetici con controllo delle interferenze
di radiofrequenza.
• In presenza del simbolo sulla destra possono
verificarsi interferenze al processore.
• Smaltire le batterie e i dispositivi elettronici
nel rispetto delle norme locali.
• Non smaltire il processore in un inceneritore
o nel fuoco.
Se il processore si bagna:
1. Aprire immediatamente lo sportello della batteria
(se presente), sollevare il copribatteria e rimuovere
la batteria.
2. Collocare il processore in un contenito re con
capsule deumidificanti come un kit Dri-aid o simili.
Lasciar e asciugare il dis positivo per una n otte.
I kit deu midificanti sono disponibili pres so
la mag gior parte dei n egozi di audioprote si.
Page 71

140 141
Italiano
Risoluzione dei
problemi
Il funzionamento della batteria
può essere collegato a numerosi
problemi, quali assenza di suono,
suono intermittente e brusio
o ronzio. Spesso la soluzione
è rappresentata dall’uso di una
nuova batteria.
Se le soluzioni proposte in questa
tabella non risolvono il problema,
contatt are lo specialis ta per
ricevere ulteriore assistenza.
1
BP110 Power
Problemi di feedback (fischi)
1
Verificare che oggetti come cappelli e occhiali
non vengano a contatto con il processore. Inoltre,
controllare che il processore non tocchi la testa
o l’orecchio.
2
Ridurre il volume.
3
Verificare che lo sportello della batteria sia chiuso.
1
BP100
Problema Causa Possi bile soluzione
Assenza d i
suono / suono
debole
Batteria scarica o in
esaurimento.
Sostituire la batteria.
Volume troppo basso. Aumentare il volume.
Feedback
(fischi)
Cappelli, occhiali o altri oggetti
sono a contatto con il processore.
Riposizionare o rimuovere
l’oggetto.
Sportello della batteria in
posizione errata.
Chiudere lo sportello della
batteria.
Il suono è
distorto o in termitten te
Volume troppo alto. Ridurre il volume.
Batteria in esaurimento. Sostituire la batteria.
Pilastro allentato. Contattare lo specialista.
Il processore
non funziona
Il processore non è stato acceso. Accendere il processore.
Lo sportello della batteria non è
stato chiuso completamente.
Chiudere delicatamente e
completamente lo sportello
della batteria.
Batteria scarica. Sostituire la batteria.
Batteria inserita in modo errato. Assicurarsi che la batteria sia
stata inserita correttamente.
Lampeggiamento degli
indicatori
Modalità di programmazione
attivata.
Rimuovere e inserire di nuovo
la batteria.
Page 72

Additional Information
Instructions for use in the USA
Caution: Federal law (USA) restricts this device to
sale or by the order of a medical practitioner.
Warning to hearing aid dispensers
A prospective user of Baha
®
must always have
a medical evaluation by a licensed physician
(preferably an ear specialist) and have an implant
placed in the skull bone before a Baha sound
processor can be dispensed. The Baha sound
processor can be used with a softband which
does not require an implant. However, a medical
evaluation is still warranted.
Important notice for prospective users of
a Baha
®
sound processor
• A prospective user of Baha must always have
a thorough medical evaluation by a licensed
physician (preferably a physician who specializes in
diseases of the ear, otolaryngologist, otologist, or
otorhinolaryngologist) and have an implant placed
in the skull bone before a Baha sound processor is
purchased.
• The purpose of the medical evaluation is to ensure
that all medically treatable conditions that may
affect hearing are identified and treated before
the sound processor is purchased. Following
the medical evaluation, the physician will give
you a written statement that states that your
hearing loss has been medically evaluated and
that you may be considered a candidate for Baha.
The physician will refer you to an audiologist or
a hearing aid dispenser, as appropriate, for an
audiological evaluation.
• Federal law restricts the sale of Baha sound
processors to those individuals who have obtained
a medical evaluation from a licensed physician.
Federal law permits a fully informed adult to sign a
waiver statement declining the medical evaluation
for religious or personal beliefs that preclude
consultation with a physician. The exercise
of such a waiver is not in your best health interest
and its use is strongly discouraged.
A word of caution about batteries
Batteries can be harmful if swallowed. Be sure to
always keep your batteries out of reach of small
children, pets, or people of diminished capacity. In
the event a battery is accidentally swallowed, seek
prompt medical attention at the nearest emergency
center, or call the National Button Battery Hotline
collect at (202) 625 – 3333.
Page 73

E81816
Baha, Baha Divino, Baha Intenso and Vistafix are trademarks of Cochlear Bone Anchored Solutions. Cochlear and
the elliptical logo are trademarks of Cochlear Limited. © Cochlear Bone Anchored Solutions 2011. All rights reserved.
JUN11. Printed in Sweden.
 Loading...