

Page 1

Ardium, Baha, Baha Divino, Baha Intenso, Baha SoftWear, BCDrive, DermaLock, Vistafix and
WindShield are either trademarks or registered trademarks of Cochlear Bone Anchored Solutions AB.
Cochlear, SmartSound, Hear now. And always and the elliptical logo are either trademarks or registered
trademarks of Cochlear Limited. © Cochlear Bone Anchored Solutions AB 2015. All rights reserved.
JAN15.
CZGB PL HU
Baha
®
Remote Control 2
User Manual
Manufacturer:
Cochlear Bone Anchored Solutions AB
Konstruktionsvägen 14, 435 33 Mölnlycke, Sweden
Tel: +46 31 792 44 00 Fax: +46 31 792 46 95
Regional offices:
Cochlear Ltd (ABN 96 002 618 073) 1 University Avenue, Macquarie University, NSW 2109,
Australia Tel: +61 2 9428 6555 Fax: +61 2 9428 6352
Cochlear Americas 13059 E Peakview Avenue, Centennial, CO 80111, USA
Tel: +1 303 790 9010 Fax: +1 303 792 9025
Cochlear AG EMEA Headquarters, Peter Merian-Weg 4, 4052 Basel, Switzerland
Tel: +41 61 205 0404 Fax: +41 61 205 0405
Cochlear Latinoamerica, S. A. International Business Park Building 3835, Office 403,
Panama Pacifico, Panama Tel. +507 830 6220 Fax: +507 830 6218
ZONE 7
Page 2

1
11
5
3
4
1
2
7
6
98
10
2
4
5
6 7
8
10
12
1 2
Everyday Noise Noise
11
1 2
Everyday
1 2 3
A
A A
3
Noise
1 2
Noise Noise
1 2
Everyday
9
A
A
13
Noise
Noise
GB
Welcome
Congratulations on your purchase of a Cochlear™ Baha® Remote Control 2.
Page 3

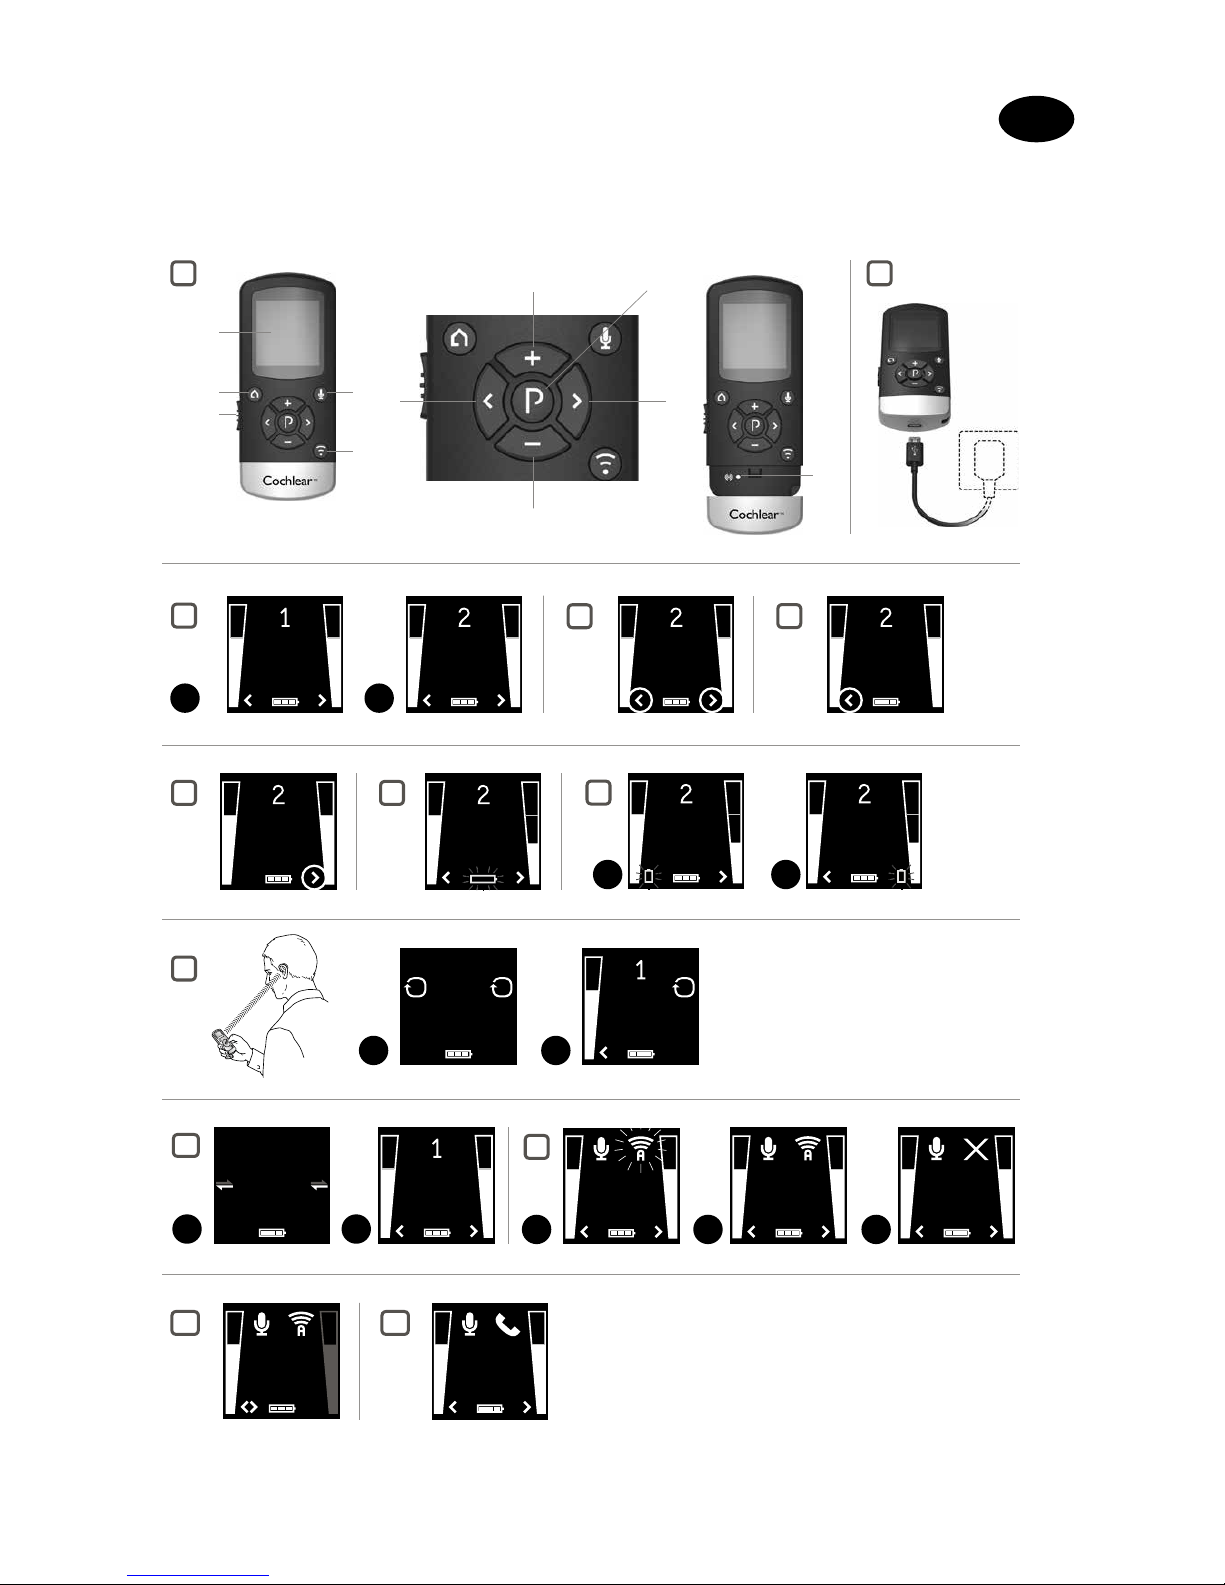
Key to device See figu re
1
1. ON/OFF control
2. Display
3. Streaming (optional TV Streamer or Mini Microphone)
4. Home button
5. Sound Processor microphone mute
6. Increase volume
7. Decrease volume
8. Select left Sound Processor only
9. Select right Sound Processor only
10. Program change
11. Pairing button
Note: Th e instructio ns in this manual des cribe operati on of the Cochlear™ Baha® Remote
Control wi th one Cochlear Ba ha sound proces sor. If you are a bilatera l recipient (using tw o
Cochlea r sound processo rs), note that one Coch lear Baha Remote Con trol can be used wit h
two Bah a sound process ors. If this is the ca se, the same inst ructions app ly to both sound
processors.
Introduction
The Coch lear Baha Remote Control will allow y ou to operate your Co chlear Baha wirel ess
sound pr ocessors. It is b oth an elegant and us er-frie ndly Remote Control a s well as a status
indicato r that gives you acce ss to other wireless f unctions on you r sound process or. If you
are using t wo wireless Bah a sound processo rs, the Cochlea r Baha Remote Control can be
used to adju st both of your sound processor s simultaneous ly. Or you can control b oth sound
proces sors individual ly, allowing you to per fectly fine tune yo ur sound proces sor to any
specific hearing situation.
Please rea d this manual caref ully to fully benefi t from the Cochlear Baha Remote Con trol. Ask
your hear ing care professi onal if you have any que stions. For fur ther informat ion you can also
visit the www.coch lear.com web site.
For your s afety, carefully rea d the chapter “Imp ortant Infor mation”.
Warranty
The war ranty does not c over defects or damage arisin g from, associate d with, or related to th e
use of this pr oduct with any no n-Cochlear processing uni t and/or any non- Cochlear impla nt.
See “Coch lear Global Limite d Warranty card ” for more details .
Key to symbols
The follo wing symbol s will be used throu ghout the docum ent.
“Consult instructions for use” or “Operating instructio ns”
“Cautio n” or “Caution, con sult accompany ing document s”
CE-mark
Serial Number
Refer to instructions/booklet
ACMA (Aus tralian Commu nications and M edia Authorit y) compliant
Please as k your hearing ca re professiona l concerning di sposal of this dev ice.
Wireless enabled
Intended use
The Remote Control is inten ded to enable the us er to control a wireles s Baha Sound Processor
remotely. T he essential pur pose of the Remote Con trol is to transfer sig nals to a Baha soun d
proces sor in order to adjust v olume and selec t a program.
Getting Started
Charging the Battery
See figur e
2
Before using your Remote Con trol, the batter y must be fully ch arged. To do so, plug in th e
chargin g cable as shown be low. Then plug the oth er end into a power out let. During char ging,
the battery meter will display one , two or three bar s. When fully cha rged, all three ba rs will be
shown continuously.
For safet y reasons, rech arge the batter y only with chargers supplie d by Cochlear.
Caution: Do not charge th e Cochlear Remote C ontrol while it is b eing worn.
Turning your Remote Control 2 ON and OFF
See figur e
1
no. 1
To turn your Rem ote Control ON slide t he ON/OFF control d own to the ON positio n. A white
“I” icon w ill be visible at the ba se of the control and t he display will tur n on. To turn your
Remote Cont rol OFF, slide the ON/OF F control up to the OFF po sition.
Changing program
See figur e
3
The “P ” button [no. 10 in figur e 1] is used to change the prog rams that your hea ring care
professi onal has program med into your sound processor. The name of the pr ogram displayed
can be con figured by your hear ing care professi onal. Each time yo u press the “P” bu tton
the progr am advances on e step, returning to pr ogram 1 at the end of eac h cycle (e.g., 1, 2,
3, 1). Each prog ram change is acco mpanied by beep to nes in both sound pr ocessors and th e
progra m currently in use is sh own in the display. Fo r optimal perfor mance it is recomm ended
that both s ound processors be set to the sa me program.
1
Program 1 “ Everyday”
2
Program 2 “Noise”
Adjusting volume
Adjust volume on two sound processors
See figur e
4
The “+” and “-” keys are u sed to adjust volum e [no. 6 and 7 in figure 1]. Volume m ay be
adjusted on both sound processors simultaneously or on each side independently. By default,
both soun d processors a re “active,” which is ind icated in the displa y by two arrowhea ds
(< and >) located ne xt to the volume bars. Both sou nd processors c an simultaneou sly be
made loud er by pressing the “+” key or sof ter by pressing th e “-” key. Each adjustmen t is
accompa nied by beep tone s in the sound proce ssors as well as a visual change in t he volume
bars sho wn in the display. Th e default volume leve l is indicated by a hor izontal green line i n
the volum e bars.
Adjusting volume on the left sound processor only
See figur e
5
To adjust volum e on the left side on ly, first press the “<” key on the key pad [no. 8 in figure 1].
Doing so makes the left s ound processor “active” and th e right sound proce ssor “inactive”.
This is ind icated by a left arro whead (<) in the display, with th e right arrowhead t urned off.
Press “+” or “-” to adjus t volume on the left s ound processo r only.
Adjusting volume on the right sound processor only
See figur e
6
To adjust volum e on the right side on ly, first p ress the “>” key on the keypad [n o. 9 in figure
1]. Doing so ma kes the right side “ac tive” and the left si de “inactive”. This is ind icated by a
right arr owhead (>) in the display with t he left arrowhead turned of f. Press “+” or “-” to adjust
volume on t he right side only.
To return to simul taneous adjust ment mode, pres s either the < or > keys on t he keypad [no.
8 or 9 in figure 1] un til both arrowhea ds appear in the dis play, indicating tha t both sound
proces sors are again “act ive”.
Mute/Unmute
Mute and un mute the sound pro cessors’ microp hones by pressi ng the mute button [n o. 5 in
fig 1] on the Rem ote Control.
Muting or u nmuting applie s to both sound proce ssors simultan eously and cann ot be selected
for the left or right one separately. When the microphones are muted, the microphone
icon will b e replaced by a micro phone muted icon a nd the volume bars w ill be dimmed. To
unmute the sound processor microphones, press the mute button again.
Activate streaming
If you are using an optiona l Cochlear stream ing device such as th e Cochlear™ Wireless TV
Streamer or Cochlear
™
Wireless Mini Microp hone, input from t hese devices ca n be activated
by pressi ng the streaming button no. 3 in figu re 1. See also the se ction “Using opt ional audio
streaming devices”.
Page 4
Return to Home settings
Home set tings, i.e., thos e that apply when ever the sound pro cessor is first tu rned on, are
activa ted by pressing the H ome button [no. 4 in fi gure 1]. Pressing the H ome button will:
1. Activate progr am 1 in your sound pr ocessor
2. Adjust your sou nd processor to th e default volume set tings
3. Set the volume to sim ultaneous adjustment mod e
The hom e button will als o terminate any stre amed audio signal s from any optiona l Cochlear
streaming device.
Low battery indicator
Remote Control low batter y indicator
See figur e
7
The bat tery level of the Re mote Control is indicated by a batter y meter comprisin g three bars.
As the ba ttery is gradu ally depleted the ba rs will disappea r one by one. When t he battery is
low on powe r, the meter w ill start flashing, indic ating that rechar ging is needed.
Sound Processor low battery indicator
See figur e
8
When th e sound processo r’s battery is al most flat, you may s till be able to use it, bu t the
Remote Cont rol functiona lity may be disabl ed. Should this hap pen, we recomme nd you
replace t he battery in yo ur sound process or.
1
Low batte ry on left soun d processor
2
Low batte ry on right sound p rocessor
Operating range
See figur e
9
The ope rating range bet ween the Remote Co ntrol and the soun d processor is app roximately 1
meter (40”). I f the current statu s is not displayed on t he Remote Control, hold Remote Contro l
it in front of your chest as s hown in the illustration.
If the Remote Control can not determine the s ound processo r’s status, searc h icons will appear
on its display. Hold the Re mote Control as show n above to establis h contact with bot h sound
processors.
1
Searching for two sound processors
2
Searching for the right sound processor
Connected to the left sound processor
Display
To conser ve battery life, th e Remote Control has a p ower saving feature t hat automatically
turns of f the display and pu ts the Remote Contro l in standby mode after 20 secon ds of
inacti vity. Simply pres s any button on the key pad to reactivate the display and t hen perform
the desired action.
Remote control performance
The Remote Control per forms best when buttons ar e pressed one ste p at a time rather tha n
in rapid se quence. When ad justing volume, for example, br iefly press a button as descri bed
below an d wait for the tone befo re continuing. This t ip applies to all but ton use but is
especi ally relevant to volume adjustme nts.
Pairing
See figur e
10
Pairing is t he process of est ablishing communication bet ween your sound p rocessor and
your Remote Control. Your he aring care profes sional can help you with this pro cedure when
fitting yo ur sound proces sor. Alternatively, you c an follow the steps b elow to pair your sou nd
processor with the Remote Control:
1. Make sure the Remo te Control is fully cha rged and is turne d on.
2. Turn off y our sound processor.
3. Press the pair ing button on the Re mote Control once. T his will activate th e pairing mode
1
which wil l be active for 20 seconds.
4. While pairing m ode is activated , turn on your sound p rocessor. Succes sful pairing will b e
indicate d by an audible melod y played in your sou nd processor an d program 1 will be sh own
as active in the Remote Con trol display
2
. You are now ready to use the Remo te Control.
Using optional audio streaming devices
The T V Streamer and the M ini Microphone a re optional audio an d speech stream ing devices
availab le for your sound pro cessor. The TV St reamer streams a udio signals (stere o) from your
TV, stereo , computer, etc., direc tly to your sound pro cessor.
The Mini M icrophone str eams speech and a udio signals direc tly to your sound pr ocessor. To
star t audio streaming f rom the TV Stream er or Mini Microph one, press the st reaming button
[no. 3 in figure 1] on the Remote Con trol. The sound p rocessor will s tart searching f or your
streaming device.
Activating streaming from the Cochlear TV Streamer
See figur e
11
To start au dio streaming fro m the TV, stereo or any ot her device conne cted to your TV
Streamer, simply turn on th e audio device and th en press the strea ming button [no. 3 in fi gure
1]. The sou nd processor wil l immediately sta rt searching for th e TV Streamer and connect to
it.
1
Searching for a TV
2
Connected to a TV
3
No TV fo und
You can have up to 3 C ochlear streami ng devices set up for yo ur sound processor. Each
Cochlea r streaming device i s indicated in the dis play by the letter A , B or C. If more than o ne
Cochlea r streaming device i s in use, press the st reaming button ag ain until the desire d audio
signal is heard.
Streaming mode volume adjustment
When in streaming mod e, both the sound pr ocessor’s volum e (left volume bar) a nd the
stream ed audio volume (right v olume bar) are by defa ult set to “active”. This is ind icated in the
display by t he two arrows (< and >) loca ted next to the volu me bars. To adjust bot h the sound
proces sor and the streamed audio volu me simultaneous ly, press the “+” or “-” key [no. 6 or 7 in
figure 1] on th e Remote Control.
Note: If you are u sing two sound p rocessors, any v olume adjustme nts will apply to
both of the m. It is also poss ible to make individ ual volume adjus tments for the s ound
processors and the streamed audio signal respectively.
Adjust sound processor volume only
See figur e
12
To adjust the sound proces sor volume, pres s the left “<” key on the keypad [no . 8 in figure
1] once. Th ere will be two ar rows “<>” next to the he aring instrum ent volume bar and t he
“stream ed audio” volume bar wi ll be dimmed. Pres s “+” or “-” [no. 6 or 7 in figu re 1] to adjust
hearing instrume nt volume. To return to simul taneous adjust ment mode, pres s the “>”
key [no. 9 in figur e 1] on the keypad until one arrow app ears next to each v olume bar in the
display, ind icating that both vo lume levels are “ac tive”.
Adjust streamed audio volume only
To adjust the s treamed audio volu me, press the right “>” key on the keypad [no. 9 in fi gure
1] once. Th ere will be two ar rows “<>” next to the streamed volu me bar and the “hearing
instru ment” volume bar w ill be dimmed. Pre ss “+” or “-” [no. 6 or 7 in fig ure 1] to adjust the
stream ed audio volume. To retur n to simultaneous a djustment mode, p ress the “<” key [no.
8 in figure 1] on the keypad until o ne arrow appear s next to each volu me bar in the display,
indicating that both volume levels are “active”.
Cochlear Wireless Phone Clip (optional)
See figur e
13
The Pho ne Clip also work s with the Remote Con trol. The displ ay will indicate whe n the
Phone Cli p is in use. Once the ph one call has ended, the sound p rocessor will return to the
previou sly used program . That program is sh own on the display of t he Remote Control.
Volume adjus tments made du ring the phone ca ll will not be trans ferred to your prev iously
used prog ram. Phone cal ls will tempora rily interrupt st reaming from your o ptional streamin g
devices b ut streamed audi o will be restored once the phon e call has ended.
Appendix: exceptions to normal operation
If you have b een fitted with tw o sound process ors, it is recomme nded that both of the m be
set to the sa me program at all tim es. However, it is pos sible to have different programs on
the two s ound processo rs, such as Progra m 1 on the left side and streamed au dio on the right.
Under th ese circumstan ces, the remote con trol function s slightly different ly, as the following
examples illustrate.
Situation #1: You have star ted with P1 on both sides but have ch anged the right sid e to
P2 by pushing t he button on the right sound pro cessor. If you then pr ess the P button on t he
remote cont rol, the left sou nd processor wil l advance to P2, matchi ng the one on the righ t.
Furth er presses of the P bu tton will advan ce both sound proce ssors, thus kee ping the same
progra m on both sides.
Situation #2: You have set the lef t sound proces sor to P1 and the righ t sound processo r to
P2. If you the n press the Streami ng button, both so und processor s will receive strea med audio
from the s ame source (e.g., the T V). If you then p ress the P button on the remote cont rol,
streami ng will be cancelled on both sides and both soun d processors wil l return to their
previou s programs (P1 and P2).
Situation #3: The left s ound processo r is in program 1. Streaming is activ ated in the right
sound pr ocessor via its s treaming button . If you then press t he “P” button, th e right sound
proces sor will return to it s previous progra m, and the left sound process or will advance to th e
next p rogram (if availab le). Anoth er press on the “P ” button will align b oth sound proces sors
to the sam e program. If you in stead press the Streaming butto n, both sound proc essors will be
set to the sa me streamed audio device.
Situation #4: If your sound p rocessors are u sing different sou nd processor pro grams, only
the progr am numbers for ea ch sound processor will be sho wn. No program la bel/name will
be shown.
Situation #5: If one soun d processor is in st reaming mode and t he other one is in one of
the soun d processor prog rams, only the streaming disp lay will be shown wit h no indication of
the soun d processor’s pr ogram number an d label/name.
Page 5

Important information
Maintenance and Care
• Clea n the Remote Control u sing a damp cloth. Ne ver use household c leaning produc ts
(washing p owder, soap, etc.) or alco hol to clean the devi ce.
• Wh en the Remote Control i s not in use, turn it off a nd store it safely.
• Prote ct the Remote Contro l from excessive m oisture (bathing , swimming) an d heat
(radiator, ca r dashboard).
• Protect it f rom excessive sho ck and vibratio n.
General warnings
•
Keep this de vice out of reach of child ren.
• The Remote Control uses l ow-powered digi tally coded tran smissions in order to
communi cate with other wire less devices. Alt hough unlikely, near by electronic d evices may
be affected. In such cases, move the Remote Control away from the affected electronic
device.
• When using the Remote Control and it is aff ected by electro magnetic interf erence, move
away from t he source of the inter ference.
General precautions
• Do not use this device i n locations wher e the use electro nic devices are pro hibited.
• X-r ay radiation (e.g., C T/MRI sca ns) may adversely af fect the func tioning of this device.
Switch it of f before undergoin g the procedure an d keep it outside the r oom.
• High-powered electronic equipment, larger electronic install ations and metallic structures
may impai r and significantly r educe the operat ing range.
• Your so und processor s and this device were given unique communicatio n codes during
fitting. T his ensures that t he device will not af fect sound proce ssors worn by oth ers.
• Do not alter or modif y this device.
• Op ening the Remote Cont rol might damage it. If problems occur that cann ot be resolved,
consult your hearing care professional.
• Th e Remote Control may on ly be repaired by an au thorized ser vice centre.
• Do not use the Remote Co ntrol in areas whe re RF transmissio n is prohibited, e.g., i n
airplanes, etc.
• Only connect the Remote Control to connections for which it is explicitly intended.
Built-in battery care
Please observe the following:
• Your pro duct is powered by a r echargeable bat tery. A new batte ry perform s optimally after
two or th ree complete charg e and discharge c ycles.
• Th e battery can b e charged and disc harged hundred s of times, but will eve ntually wear out.
• Unp lug the charger fr om the mains socket a nd the product w hen not in use.
• If lef t unused, a fully c harged batter y will lose its cha rge over time.
• Leav ing the product in h ot places will redu ce the battery ’s capacity and s ervice life.
• A pro duct with a cold bat tery may not work te mporarily, even if f ully charged. Ba ttery
performance is partic ularly limited in temperatures well below freezing.
Battery warning
Caution : The battery u sed in this produc t may present a risk of fi re or chemical bur n if
misused.
• The bat tery in your prod uct cannot be rem oved or replaced b y the user. Do not attem pt to
open the p roduct. Any at tempt to do so may result i n damage. Using othe r batteries may
presen t a risk of fire or explos ion and void the war ranty.
• Only rec harge the Remote Control with the re charger that was s upplied with the p roduct.
• Dispose o f batteries according to local reg ulations. Pleas e recycle when po ssible.
• Do not disp ose of the batter y as household wa ste or in a fire as it may ex plode.
Charger care
Please ob serve the follow ing if the product i s supplied with a cha rger.
• Do not atte mpt to charge your pro duct with anyt hing other than th e AC adapter provided .
The use of ot her chargers ma y damage or destro y the product and c ould be dangerous . Use
of other ch argers may invali date any approval or v oid the warrant y.
• For availability of approved accessories, please check with your hearing care professional.
• Charge the product according to the instructions provided.
Charger warning
•
When you d isconnect the p ower cord or any acce ssory, grasp an d pull the plug, not t he
cord.
• Never use a charger that i s damaged.
• Do not atte mpt to disassembl e the charger bec ause it may expos e you to a dangerous
electric shock.
• Incorrect reassembly can cause electric shock or fire when the product is subsequently used.
• Avoid char ging your produc t in extremely high or low temper atures and do not us e the
charge r outdoors or in dam p areas.
Technical specifications
Temperature test, transport and storage information
Operating range Up to 3 meters
Wireless 2,4 GHz
Operating temperature 0 to 55 °C
Storage tem perature -20 to 60 °C
The pro duct is subject to va rious tests in temperature a nd damp heating cycling betw een -25
°C and +70 °C ac cording to internal a nd industry st andards.
Wireless Accessory type designations for models included in
this User Manual are:
FCC ID QZ3R C-2, IC 8039C-R C2, IC model: R C-2
Statement
This dev ice complies wit h Part 15 of the FCC Rul es. Operatio n is subject to the fo llowing
two cond itions: (1) this dev ice may not cause ha rmful interfe rence, and (2) this de vice
must acce pt any interfere nce received, in cluding inter ference that may ca use undesired
operat ion. Note: This e quipment has b een tested and fou nd to comply with the l imits for
a Class B di gital device, pur suant to part 15 of t he FCC Rules. The se limits are des igned to
provide reasonable protection against harmful interference in a residential installation.
This equipment generates, uses and can radiate radio frequency energy and, if not
instal led and used in acco rdance with the in structions , may cause harmf ul interferen ce
to radio co mmunication s. However, there is no g uarantee that in terference wi ll not occur
in a par ticular instal lation. If this e quipment does c ause harmful i nterference to r adio
or televis ion reception, w hich can be deter mined by turnin g the equipmen t off and on,
the user i s encouraged to tr y to correct the i nterference by o ne or more of the foll owing
measures:
• Reorient or relocate the receiving antenna.
• Increase the separation between the equipment and receiver.
• Connec t the equipment i nto an outlet on a circu it different fro m that to which the
receiver is connected.
• Consult the d ealer or an expe rienced radio /TV techn ician for help.
• Changes o r modification s can void the user ’s authority to o perate the equi pment.
List of countries:
The pro ducts are in com pliance with the f ollowing regulat ory requirem ents:
• In EU: the dev ice conforms to the E ssential Requ irements acco rding to Annex I of
Council Directive 93/42/EEC for medical devices (MDD) and essential requirements
and othe r relevant provis ions of Directiv e 1999/5/EC (R&TT E). The declar ation of
conform ity may be consulte d at www. cochle ar.com.
• Product s with wireless f unctionalit y are intended fo r sale in countri es within the
Europea n Economic Area as w ell as Switzerl and. Specific ation of restri ctions: You
are not allo wed to operate the e quipment with in 20 km of the centre o f Ny Ålesund,
Nor way.
• In US: FCC CFR 47 P art 15, subpar t C, section 1 5.249.
• Other identified applicable international regulatory requirements in countries outside
the EU and U S. Please refer to loc al country req uirements for t hese areas.
• Product s are in complian ce with EN 300 328.
• In Canada t he Remote Control i s certified un der the following c ertificatio n number:
IC:8039C-RC2.
• This devi ce complies with I ndustry Ca nada license exe mpt RSS standa rd(s)
• This Clas s B digital appar atus complies w ith Canadian IC ES-003. C et appareil
numér ique de la classe B e st conforme à la no rme NMB- 003 du Canada .
• Operat ion is subject to th e following two con ditions: (1) this dev ice may not cause
interference, and (2) this device must accept any interference, including interference
that may ca use undesired o peration of the d evice. L’exploitatio n est autorisée a ux deux
conditi ons suivantes : (1) l’ap pareil ne doit pa s produire de brou illage, et (2) l’utilis ateur
de l’appar eil doit accepter to ut brouillage ra dioélectriq ue subi, même si le b rouillage est
susceptible d’en compromettre le fonctionnement.
• Equipment includes RF transmitter.
Page 6
1
11
5
3
4
1
2
7
6
98
10
2
4
5
6 7
8
10
12
1 2
Everyday Noise Noise
11
1 2
Everyday
1 2 3
A
A A
3
Noise
1 2
Noise Noise
1 2
Everyday
9
A
A
13
Noise
Noise
CZ
Vítejte
Gratulujeme vám ke koupi dálkového ovládání Cochlear™ Baha® Remote Control 2.
Page 7

Popis zařízení Viz obrázek
1
1. Vypínač
2. Displej
3. Přenos zvuku (volitelné zařízení TV Streamer nebo Mini Microphone)
4. Tlačítko Domů
5. Ztlumení mikrofonu zvukového procesoru
6. Zvýšení hlasitosti
7. Snížení hlasitosti
8. Výběr pouze levého zvukového procesoru
9. Výběr pouze pravého zvukového procesoru
10. Změna programu
11. Tlačítko párování
Poznámka: Pokyny v této příručce popisují fungování dálkového ovládání Cochlear™ Baha®
Remote Cont rol s jedním zvukovým procesorem Cochlear Baha. Pokud používáte dva zvukové
procesory Cochlear (jeden na každé straně), všimněte si prosím, že jedno dálkové ovládání
Cochlear Baha Remote Control lze používat se dvěma zvukovými procesory Baha. Pokud je toto
váš případ, platí pro oba zvukové procesory stejné pokyny.
Úvod
Zařízení Cochlear Baha Remote Control vám umožní ovládat bezdrátové zvukové procesory
Cochlear Baha. Je to zároveň elegantní a uživatelsky přívětivé dálkové ovládání a ukazatel stavu,
který vám zajistí přístup k dalším bezdrátovým funkcím ve zvukovém procesoru. Pokud používáte
dva bezdrátové zvukové procesory Baha, lze pomocí zařízení Cochlear Baha Remote Control
nastavovat oba zvukové procesory současně. Nebo můžete ovládat oba zvukové procesory
jednotlivě, což vám umožní dokonale je vyladit pro jakoukoli konkrétní situaci.
Přečtěte si prosím pozorně tuto příručku, abyste mohli dálkové ovládání Cochlear Baha Remote
Control využít co nejlépe. Pokud máte nějaké dotazy, zeptejte se svého ušního lékaře.
Další informace najdete také na webových stránkách
www.cochlear.com.
Pečlivě si přečtěte kapitolu „Důležité informace“, která se týká vaší bezpečnosti.
Záruka
Záruka se nevztahuje na vady nebo poškození, které vzniknou na základě používání tohoto
výrobku s jakýmikoli procesorovými jednotkami nebo implantáty, které nepocházejí od společnosti Cochlear, nebo v souvislosti s takovým používáním. Další informace najdete na „Záručním
listu globální omezené záruky na výrobky Cochlear“.
Klíč k symbolům
V dokumentu budou používány následující symboly.
„Přeč těte si návod k pou žití“ nebo „Ná vod k obsluze“
„Varování“ nebo „Varování, přečtěte si přiloženou dokumentaci“
Značka CE
Výrobní číslo
Viz návod/příručka
Splňuj e požadavky ú řadu ACMA (Aus tralian Commu nications and M edia Authorit y)
Na likv idaci tohoto zař ízení se zeptejte sv ého ušního lék aře.
Bezdrátový přenos povo len
Účel použití
Dálkové ovládání je určeno k dálkovému ovládání bezdrátového zvukového procesoru Baha.
Základním účelem dálkového ovládání je přenos signálů do zvukového procesoru Baha za účelem
úpravy hlasitosti a výběru programu.
Začínáme
Nabíjení baterie
Viz obrázek
2
Před použitím dálkového ovládání musí být baterie plně nabitá. Za tímto účelem zapojte nabíjecí
kabel, jak je znázorněno níže. Pak zapojte druhý konec do elektrické zásuvky. Při nabíjení bude
měřič baterie zobrazovat jeden, dva nebo tři proužky. Při plném nabití budou nepřetržitě zobrazeny všechny tři proužky.
Z bezpečnostních důvodů nabíjejte baterii pouze nabíječkami, které dodává společnost Cochlear.
Varování: Nenabíjejte dálkové ovládání Cochlear Remote Control, když jej máte na
sobě.
Vypnutí a zapnutí dálkového ovládání Remote Control 2
Viz obrázek 1 č. 1
Chcete-li dálkové ovládání zapnout, posuňte vypínač dolů do polohy ON (zapnuto). U vypínače
bude vidět bílá ikona „I“ a displej se zapne. Chcete-li dálkové ovládání vypnout, posuňte vypínač
nahoru do polohy OFF (vypnuto).
Změna programu
Viz obrázek
3
Tlačítko „P“ [č. 10 na obrázku 1] se používá ke změně programů, který váš ušní lékař naprogramoval do zvukového procesoru. Zobrazovaný název programu může nastavit váš ušní lékař. Při
každém stisknutí tlačítka P se program posune o jeden krok, přičemž na konci každého cyklu se
vrátí k programu 1 (např. 1, 2, 3, 1). Každá změna programu je doprovázena pípáním v obou zvukových procesorech a aktuálně používaný program se zobrazuje na displeji. K dosažení optimálního
výkonu se doporučuje nastavit oba zvukové procesory na stejný program.
1
Program 1 „Každodenní“
2
Program 2 „Hluk“
Nastavení hlasitosti
Nastavení hlasitosti ve dvou zvukových procesorech
Viz obrázek
4
Tlačítka „+“ a „–“ se používají k nastavení hlasitosti [č. 6 a 7 na obrázku 1]. Hlasitost lze nastavovat
v obou zvukových procesorech současně nebo na každé straně samostatně. Ve výchozím
nastavení jsou oba zvukové procesory „aktivní“, což je na displeji znázorněno dvěma šipkami (<
a >) vedle proužků hlasitosti. Hlasitost obou zvukových procesorů lze současně zvýšit stisknutím
tlačítka „+“ nebo snížit stisknutím tlačítka „–“. Každé nastavení je doprovázenou pípáním ve
zvukových procesorech a zároveň vizuální změnou v proužcích hlasitosti zobrazených na displeji.
Výchozí úroveň hlasitosti je označena vodorovnou zelenou čárkou v proužcích hlasitosti.
Nastavení hlasitosti pouze v levém zvukovém procesoru
Viz obrázek
5
Pokud chcete nastavit hlasitost pouze na levé straně, nejprve stiskněte tlačítko „<“ na klávesnici
[č. 8 na obrázku 1]. Tím se „aktivuje“ levý zvukový procesor a „deaktivuje“ pravý zvukový procesor.
To je na displeji znázorněno levou šipkou (<), přičemž pravá šipka nebude zobrazena. Pomocí
tlačítek „+“ nebo „–“ nastavte hlasitost pouze v levém zvukovém procesoru.
Nastavení hlasitosti pouze v pravém zvukovém procesoru
Viz obrázek
6
Pokud chcete nastavit hlasitost pouze na pravé straně, nejprve stiskněte tlačítko „>“ na klávesnici
[č. 9 na obrázku 1]. Tím se „aktivuje“ pravá strana a „deaktivuje“ levá strana. To je na displeji
znázorněno pravou šipkou (>), přičemž levá šipka nebude zobrazena. Pomocí tlačítek „+“ nebo „–“
nastavte hlasitost pouze na pravé straně.
Pokud se chcete vrátit do režimu současného nastavování, stiskněte tlačítko < nebo > na klávesnici [č. 8 nebo 9 na obrázku 1] a podržte ho, dokud se na displeji neobjeví obě šipky, což značí, že
jsou oba zvukové procesory opět „aktivní“.
Ztlumení / zrušení ztlumení
Mikrofony zvukových procesorů můžete ztlumit nebo zrušit jejich ztlumení stisknutím tlačítka
ztlumení [č. 5 na obr. 1] na dálkovém ovládání.
Ztlumení nebo zrušení ztlumení platí pro oba zvukové procesory současně a nelze jej vybrat pouze
pro levý nebo pravý procesor. Když jsou mikrofony ztlumené, bude ikona mikrofonu nahrazena
ikonou ztlumeného mikrofonu a proužky hlasitosti budou šedivé. Pokud chcete zrušit ztlumení
mikrofonů zvukových procesorů, znovu stiskněte tlačítko ztlumení.
Aktivace přenosu zvuku
Pokud používáte volitelné zařízení Cochlear pro přenos zvuku, jako je například Cochlear™ Wireless
TV Streamer nebo Cochlear
™
Wireless Mini Microphone, lze vstup z těchto zařízení aktivovat
stisknutím tlačítka pro přenos zvuku č. 3 na obrázku 1. Viz také část „Používání volitelných zařízení
pro přenos zvuku“.
Návrat k základnímu nastavení
Základní nastavení, tj. to, které se použijí při prvním zapnutí zvukového procesoru, se aktivuje
stisknutím tlačítka Domů [č. 4 na obrázku 1]. Stisknutím tlačítka Domů se provede následující:
1. Ve zvukovém procesoru se aktivuje program 1.
2. Zvukový procesor se nastaví na výchozí hlasitost.
3. Aktivuje se režim současného nastavování hlasitosti.
Tlačítkem Domů se rovněž ukončí veškerý přenos zvukových signálu z jakýchkoli volitelných
zařízení Cochlear pro přenos zvuku.
Indikátor slabé baterie
Indikátor slabé baterie dálkového ovládání
Viz obrázek
7
Stav baterie v dálkovém ovládání je znázorněn měřičem baterie, který se skládá ze tří proužků.
Když se baterie postupně vybíjí, proužky budou jeden po druhém mizet. Když je baterie téměř
vybitá, začne měřič blikat, což znamená, že je potřeba baterii dobít.
Indikátor slabé baterie zvukového procesoru
Viz obrázek
8
Když je baterie ve zvukovém procesoru téměř vybitá, možná ho budete moci ještě používat, ale
funkce dálkového ovládání mohou být deaktivovány. Pokud by k tomu došlo, doporučujeme
vyměnit baterii ve zvukovém procesoru.
1
Slabá baterie v levém zvukovém procesoru
2
Slabá baterie v pravém zvukovém procesoru
Page 8

Provozní dosah
Viz obrázek
9
Provozní dosah mezi dálkovým ovládáním a zvukovým
procesorem je přibližně 1 metr (40”). Pokud se na dálkovém
ovládání nezobrazuje aktuální stav, podržte jej před sebou, jak
je znázorněno na obrázku.
Pokud dálkové ovládání nedokáže zjistit stav zvukového procesoru, na displeji se objeví ikony
hledání. Podržte dálkové ovládání tak, jak je zobrazeno výše, aby navázalo kontakt s oběma
zvukovými procesory.
1
Hledání dvou zvukových procesorů
2
Hledání pravého zvukového procesoru
Připojeno k levému zvukovému procesoru
Displej
Abyste šetřili životnost baterie, má dálkové ovládání funkci úspory energie, která po 20 sekundách
bez aktivity automaticky vypne displej a přepne dálkové ovládání do pohotovostního režimu. Stačí
stisknout jakékoli tlačítko na klávesnici a displej
se znovu aktivuje. Pak můžete provést požadovanou akci.
Fungování dálkového ovládání
Dálkové ovládání funguje nejlépe, když se tlačítka mačkají postupně a nikoli v rychlém sledu. Když
například nastavujete hlasitost, krátce stiskněte tlačítko, jak je popsáno níže, a před pokračováním počkejte, než se ozve tón. Tento tip platí pro používání všech tlačítek, ale týká se zejména
nastavování hlasitosti.
Spárování
Viz obrázek
10
Spárování je proces navázání komunikace mezi zvukovým procesorem a dálkovým ovládáním. Váš
ušní lékař vám může při nastavování zvukového procesoru s tímto postupem pomoci. Případně
můžete postupovat dle níže uvedených kroků pro spárování zvukového procesoru s dálkovým
ovládáním:
1. Ujistěte se, že je dálkové ovládání plně nabité a zapnuté.
2. Vypněte zvukový procesor.
3. Jednou stiskněte tlačítko pro párování na dálkovém ovládání. Tím se aktivuje režim párování
1
,
který bude aktivní po dobu 20 sekund.
4. Když je režim párování aktivován, zapněte zvukový procesor. Po úspěšném spárování se ve
zvukovém procesoru přehraje melodie a na displeji dálkového ovládání se bude jako aktivní
zobrazovat program 1
2
. Nyní jste připraveni k používání dálkového ovládání.
Používání volitelných zařízení pro přenos zvuku
TV Streamer a Mini Microphone jsou volitelná zařízení pro přenos zvuku a řeči, která jsou k dispozici pro váš zvukový procesor. TV Streamer přenáší zvukové signály (stereo) z televize, přehrávače,
počítače atd. přímo do zvukového procesoru.
Mini Microphone přenáší řeč a zvukové signály přímo do zvukového procesoru. Chcete-li spustit
přenos zvuku ze zařízení TV Streamer nebo Mini Microphone, stiskněte na dálkovém ovládání
tlačítko pro přenos zvuku [č. 3 na obrázku 1]. Zvukový procesor začne vyhledávat zařízení pro
přenos zvuku.
Aktivace přenosu zvuku ze zařízení Cochlear TV Streamer
Viz obrázek 11
Chcete-li spustit přenos z televize, přehrávače nebo jakéhokoli jiného zařízení připojeného k zařízení TV Streamer, jednoduše zvukové zařízení zapněte a potom stiskněte tlačítko pro přenos zvuku
[č. 3 na obrázku 1]. Zvukový procesor začne ihned vyhledávat TV Streamer a připojí se k němu.
1
Vyhledávání televize
2
Připojeno k televizi
3
Nebyla nalezena žádná televize
Ke zvukovému procesoru můžete nastavit až 3 zařízení Cochlear pro přenos zvuku. Každé takové
zařízení je na displeji označeno písmenem A, B nebo C. Pokud se používá více zařízení Cochlear pro
přenos zvuku, stiskněte znovu tlačítko pro přenos zvuku, dokud se neozve požadovaný zvukový
signál.
Nastavení hlasitosti režimu přenosu zvuku
V režimu přenosu zvuku jsou ve výchozím nastavení hlasitost zvukového procesoru (levý sloupec
hlasitosti) a hlasitost přenášeného zvuku (pravý sloupec hlasitosti) nastaveny na „aktivní“. To je na
displeji vyjádřeno dvěma šipkami (< a >), které se nacházejí vedle sloupců hlasitosti. Pokud chcete
současně upravit hlasitost zvukového procesoru i přenášeného zvuku, stiskněte na dálkovém
ovládání tlačítko „+“ nebo „–“ [č. 6 nebo 7 na obrázku 1].
Poznámka: Pokud používáte dva zvukové procesory, bude jakákoli úprava hlasitosti platit
pro oba. Je rovněž možné provést oddělené nastavení hlasitosti pro zvukové procesory a pro
přenášený zvukový signál.
Nastavení hlasitosti pouze
zvukového procesoru
Viz obrázek 12
Pokud chcete nastavit hlasitost zvukového procesoru, jednou stiskněte levé tlačítko „<“ na
klávesnici [č. 8 na obrázku 1]. Vedle sloupce hlasitosti naslouchacího zařízení budou dvě šipky
„<>“ a sloupec hlasitosti „přenášeného zvuku“ bude šedivý. Stisknutím tlačítka „+“ nebo „–“ [č.
6 nebo 7 na obrázku 1] upravte hlasitost naslouchacího zařízení. Pokud se chcete vrátit do režimu
současného nastavování, stiskněte tlačítko „>“ na klávesnici
[č. 9 na obrázku 1] a podržte ho, dokud se na displeji neobjeví jedna šipka vedle každého sloupce
hlasitosti, což značí, že jsou obě úrovně hlasitosti „aktivní“.
Nastavení hlasitosti pouze
přenášeného zvuku
Pokud chcete nastavit hlasitost přenášeného zvuku, jednou stiskněte pravé tlačítko „>“ na
klávesnici [č. 9 na obrázku 1]. Vedle sloupce hlasitosti přenášeného zvuku budou dvě šipky „<>“
a sloupec hlasitosti „naslouchacího zařízení“ bude šedivý. Stisknutím tlačítka „+“ nebo „–“ [č.
6 nebo 7 na obrázku 1] upravte hlasitost přenášeného zvuku. Pokud se chcete vrátit do režimu
současného nastavování, stiskněte tlačítko „<“ na klávesnici
[č. 8 na obrázku 1] a podržte ho, dokud se na displeji neobjeví jedna šipka vedle každého sloupce
hlasitosti, což značí, že jsou obě úrovně hlasitosti „aktivní“.
Cochlear Wireless Phone Clip (volitelný)
Viz obrázek 13
Zařízení Phone Clip rovněž funguje s dálkovým ovládáním. Když se používá zařízení Phone Clip,
bude to na displeji znázorněno.
Po ukončení telefonního hovoru se zvukový procesor vrátí k předchozímu používanému programu.
Tento program je zobrazen na displeji dálkového ovládání. Nastavení hlasitosti provedené během
telefonního hovoru nebude přeneseno do předchozího používaného programu. Telefonní hovory
dočasně přeruší přenos zvuku z volitelných zařízení pro přenos zvuku, ale po ukončení telefonního
hovoru bude přenos zvuku opět obnoven.
Příloha: výjimky z běžného fungování
Pokud používáte zároveň dva zvukové procesory, doporučuje se mít vždy oba nastavené na stejný
program. Je ovšem možné mít ve dvou zvukových procesorech různé programy, například Program
1 na levé straně a přenášený zvuk na pravé. Za takových okolností funguje dálkové ovládání trochu
odlišně, jak ukazují následující příklady.
Situace č. 1: Na obou stranách jste spustili P1, ale stisknutím tlačítka na pravém zvukovém
procesoru jste pravou stranu změnili na P2. Pokud pak na dálkovém ovládání stisknete tlačítko
P, levý zvukový procesor se přepne na P2, takže bude mít stejný program jako pravý procesor.
Dalším stisknutím tlačítka P se změní program v obou zvukových procesorech, takže bude na
obou stranách stejný.
Situace č. 2: Levý zvukový procesor jste nastavili na P1 a pravý zvukový procesor na P2. Pokud
pak stisknete tlačítko pro přenos, bude do obou zvukových procesorů přenášen zvuk ze stejného
zdroje (např. z televize). Pokud pak na dálkovém ovládání stisknete tlačítko P, bude přenos zrušen
na obou stranách a oba zvukové procesory se vrátí ke svým předchozím programům (P1 a P2).
Situace č. 3: Levý zvukový procesor je v programu 1. V pravém zvukovém procesoru je aktivo-
ván přenos zvuku prostřednictvím tlačítka pro přenos. Když stisknete tlačítko „P“, pravý zvukový
procesor se vrátí ke svému předchozímu programu a levý zvukový procesor přejde k dalšímu
programu (pokud je k dispozici). Dalším stisknutím tlačítka „P“ sladíte oba zvukové procesory na
stejný program. Pokud místo toho stisknete tlačítko pro přenos, budou oba zvukové procesory
nastaveny na stejné zařízení pro přenosu zvuku.
Situace č. 4: Pokud zvukové procesory používají různé programy zvukových procesorů, budou
zobrazeny pouze čísla programu pro každý zvukový procesor. Nebude zobrazen název programu.
Situace č. 5: Pokud je jeden zvukový procesor v režimu přenosu zvuku a druhý v jednom
z programů zvukového procesoru, bude zobrazen pouze displej přenosu zvuku bez uvedení čísla a
názvu programu zvukového procesoru.
Důležité informace
Údržba a péče
• Dálkové ovládání čistěte vlhkým hadříkem. K čištění zařízení nikdy nepoužívejte čisticí produkty
pro domácnost (prášek na praní, mýdlo atd.) ani alkohol.
• Když dálkové ovládání nepoužíváte, vypněte ho a bezpečně ho uložte.
• Dálkové ovládání chraňte před nadměrnou vlhkostí (koupání, plavání) a teplem (radiátor,
palubní deska auta).
• Chraňte jej před přílišnými nárazy a vibracemi.
Obecná upozornění
•
Toto zařízení udržujte mimo dosah dětí.
• Dálkové ovládání používá digitálně kódované vysílání s nízkým výkonem, aby mohlo komuniko-
vat s jinými bezdrátovými zařízeními. I když je to nepravděpodobné, může to mít vliv na blízká
elektronická zařízení. V takových případech přesuňte dálkové ovládání pryč od ovlivněného
elektronického zařízení.
• Pokud používáte dálkové ovládání a je ovlivňováno elektromagnetickým rušením, přesuňte se
pryč od zdroje rušení.
Page 9

Obecná bezpečnostní opatření
• Toto zařízení nepoužívejte na místech, kde je zakázáno používat elektronická zařízení.
• Rentgenové záření (např. CT nebo MRI skeny) může nepříznivě ovlivnit fungování tohoto
zařízení. Před absolvováním procedury zařízení vypněte a nechte ho mimo místnost.
• Elektronická zařízení s vysokým výkonem, větší elektronické instalace a kovové konstrukce
mohou narušit a významně omezit provozní dosah.
• Vašim zvukovým procesorům a tomuto zařízení byly při instalaci přiděleny jedinečné komuni-
kační kódy. To zajišťuje, že zařízení nebude ovlivňovat zvukové procesory jiných lidí.
• Toto zařízení nijak neupravujte ani nemodifikujte.
• Otevřením dálkového ovládání může dojít k jeho poškození. Pokud přetrvávají problémy, které
nelze vyřešit, poraďte se se svým ušním lékařem.
• Dálkové ovládání může opravovat pouze autorizované servisní centrum.
• Nepoužívejte dálkové ovládání na místech, kde je zakázáno vysokofrekvenční vysílání, například
v letadlech atd.
• Dálkové ovládání připojujte pouze k přípojkám, pro které je výslovně určeno.
Péče o vestavěnou baterii
Dodržujte prosím následující pokyny:
• Produkt je napájen dobíjecí baterií. Nová baterie dosáhne optimálního výkonu po dvou nebo
třech úplných nabitích a vybitích.
• Baterie vydrží stovky nabití a vybití, ale nakonec se opotřebuje.
• Když nabíječku nepoužíváte, odpojte ji od sítě a od produktu.
• Pokud baterii plně nabijete a nebudete ji používat, v průběhu času bude nabití ztrácet.
• Necháváním produktu na horkých místech dochází ke snižování kapacity a životnosti baterie.
• Produkt se studenou baterií nemusí dočasně fungovat, i když je baterie plně nabitá. Výkon
baterie je omezen zejména při teplotách pod bodem mrazu.
Upozornění týkající se baterie
Varování: Baterie použitá v tomto produktu může při nesprávném použití představovat riziko
požáru nebo chemického popálení.
• Baterii v produktu nemůže uživatel vyjmout ani vyměnit. Nepokoušejte se produkt otevřít.
Jakýkoli takový pokus může vést k poškození. Použití jiných baterií může představovat riziko
požáru nebo výbuchu a způsobí ztrátu záruky.
• Dálkové ovládání dobíjejte pouze nabíječkou, která byla dodána s produktem.
• Baterie zlikvidujte v souladu s místními předpisy. Pokud je to možné, recyklujte je.
• Baterii nelikvidujte jako domovní odpad, protože v ohni může explodovat.
Péče o nabíječku
Pokud je produkt dodáván s nabíječkou, dodržujte prosím následující pokyny.
• Nepokoušejte se produkt nabíjet ničím jiným než dodanou síťovou nabíječkou. Použití jiných
nabíječek může produkt poškodit nebo zničit a mohlo by být nebezpečné. Použitím jiných
nabíječek může dojít ke zneplatnění souhlasů a zrušení záruky.
• Informace o dostupnosti schváleného příslušenství vám poskytne váš ušní lékař.
• Produkt nabíjejte v souladu s uvedenými pokyny.
Upozornění týkající se nabíječky
•
Když odpojujete napájecí kabel nebo jakékoli příslušenství, uchopte zástrčku a zatáhněte za ni,
nikoli za kabel.
• Nikdy nepoužívejte poškozenou nabíječku.
• Nepokoušejte se nabíječku rozebrat, protože byste mohli utrpět úraz elektrickým proudem.
• Nesprávné opětovné sestavení může způsobit úraz elektrickým proudem nebo požár při
následném použití produktu.
• Vyvarujte se nabíjení produktu při velmi vysokých nebo nízkých teplotách a nepoužívejte
nabíječku venku nebo na vlhkých místech.
Technické specifikace
Provozní dosah Až 3 metr y
Bezdrá tový přenos 2,4 GHz
Provozní teplota 0 až 55 °C
Skladovací teplota -20 až 60 °C
Informace o testování teploty, dopravě a skladování
Produkt prochází různými zkouškami se střídáním teplot a zahříváním za vlhka v rozsahu -25 °C až
+70 °C dle interních a oborových standardů.
Označení typu bezdrátového příslušenství pro modely obsažené
v této uživatelské příručce je následující:
FCC ID QZ3RC-2, IC 8039C-RC2, IC model: RC-2
Prohlášení
Toto zařízení splňuje požadavky části 15 pravidel komise FCC. Jeho provozování je možné při
splnění následujících dvou podmínek: (1) toto zařízení nesmí způsobovat škodlivé rušení a (2) toto
zařízení musí přijímat veškeré rušení včetně takového, které může způsobit nežádoucí fungování.
Poznámka: Testováním tohoto zařízení bylo zjištěno, že splňuje limity pro digitální zařízení třídy B
dle části 15 pravidel komise FCC. Účelem těchto limitů je zajistit přiměřenou ochranu před škodlivým rušení při instalaci v obytných prostorech. Toto zařízení vytváří, používá a může vyzařovat
vysokofrekvenční energii, a pokud nebude nainstalováno a používáno v souladu s pokyny, může
způsobovat škodlivé rušení rádiové komunikace. Nelze ovšem zaručit, že při konkrétní instalaci
k rušení nedojde. Pokud bude toto zařízení způsobovat škodlivé rušení příjmu rádiového nebo
televizního signálu, což lze zjistit vypnutím a opětovným zapnutím zařízení, doporučuje se, aby
uživatel zkusil rušení napravit pomocí následujících opatření:
• Přesměrování nebo přemístění přijímací antény.
• Zvýšení vzdálenosti mezi zařízením a přijímačem.
• Připojení zařízení do zásuvky v jiném okruhu, než do
kterého je zapojen přijímač.
• Žádost o pomoc prodejce nebo zkušeného rádiového
či televizního technika.
• Změny nebo úpravy mohou způsobit, že uživatel již
nebude nadále oprávněn zařízení provozovat.
Seznam zemí:
Produkty splňují požadavky následujících předpisů a směrnic:
• V EU: zařízení splňuje základní požadavky dle Přílohy I Směrnice Rady 93/42/EHS o zdravot-
nických prostředcích a základní požadavky a další relevantní ustanovení Směrnice 1999/5/ES
(R&TTE). Do prohlášení o shodě lze nahlédnout na webových stránkách www.cochlear.com.
• Produkty s funkcí bezdrátového přenosu jsou určeny k prodeji v zemích Evropského hospodářského prostoru a ve Švýcarsku. Specifikace omezení: Zařízení nesmíte používat v okruhu 20 km
od středu města Ny Ålesund v Norsku.
• V USA: FCC CFR 47 část 15, podčást C, oddíl 15.249.
• Další identifikované požadavky platných mezinárodních předpisů v zemích mimo EU a USA. Viz
místní požadavky příslušných zemí pro tyto oblasti.
• Produkty splňují specifikace směrnice EN 300 328.
• V Kanadě je dálkové ovládání certifikováno pod následujícím číslem certifikace: IC:8039C-RC2.
• Toto zařízení splňuje standard(y) RSS nevyžadující licenci organizace Industry Canada.
• Toto digitální zařízení třídy B splňuje požadavky kanadské normy ICES-003. Cet appareil numé-
rique de la classe B est conforme à la norme NMB-003 du Canada.
• Jeho provozování je možné při splnění následujících dvou podmínek: (1) toto zařízení nesmí
způsobovat rušení a (2) toto zařízení musí přijímat veškeré včetně takového, které může
způsobit jeho nežádoucí fungování. L’exploitation est autorisée aux deux conditions suivantes
: (1) l’appareil ne doit pas produire de brouillage, et (2) l’utilisateur de l’appareil doit accepter
tout brouillage radioélectrique subi, même si le brouillage est susceptible d’en compromettre le
fonctionnement.
• Zařízení obsahuje vysokofrekvenční vysílač.
Page 10

1
11
5
3
4
1
2
7
6
98
10
2
4
5
6 7
8
10
12
1 2
Everyday Noise Noise
11
1 2
Everyday
1 2 3
A
A A
3
Noise
1 2
Noise Noise
1 2
Everyday
9
A
A
13
Noise
Noise
PL
Witamy
Gratulujemy nabycia pilota zdalnego sterowania Cochlear™ Baha®
Remote Control 2.
Page 11

Popis zařízení Viz obrázek
1
1. Vypínač
2. Displej
3. Přenos zvuku (volitelné zařízení TV Streamer
nebo Mini Microphone)
4. Tlačítko Domů
5. Ztlumení mikrofonu zvukového procesoru
6. Zvýšení hlasitosti
7. Snížení hlasitosti
8. Výběr pouze levého zvukového procesoru
9. Výběr pouze pravého zvukového procesoru
10. Změna programu
11. Tlačítko párování
Poznámka: Pokyny v této příručce popisují fungování dálkového ovládání Cochlear™ Baha®
Remote Control s jedním zvukovým procesorem Cochlear Baha. Pokud používáte dva zvukové
procesory Cochlear (jeden na každé straně), všimněte si prosím, že jedno dálkové ovládání
Cochlear Baha Remote Control lze používat se dvěma zvukovými procesory Baha. Pokud je toto
váš případ, platí pro oba zvukové procesory stejné pokyny.
Úvod
Zařízení Cochlear Baha Remote Control vám umožní ovládat bezdrátové zvukové procesory
Cochlear Baha. Je to zároveň elegantní a uživatelsky přívětivé dálkové ovládání a ukazatel stavu,
který vám zajistí přístup k dalším bezdrátovým funkcím ve zvukovém procesoru. Pokud používáte
dva bezdrátové zvukové procesory Baha, lze pomocí zařízení Cochlear Baha Remote Control
nastavovat oba zvukové procesory současně. Nebo můžete ovládat oba zvukové procesory jednotlivě, což vám umožní dokonale je vyladit pro jakoukoli konkrétní situaci.
Přečtěte si prosím pozorně tuto příručku, abyste mohli dálkové ovládání Cochlear Baha Remote
Control využít co nejlépe. Pokud máte nějaké dotazy, zeptejte se svého ušního lékaře.
Další informace najdete také na webových stránkách
www.cochlear.com.
Pečlivě si přečtěte kapitolu „Důležité informace“, která se týká vaší bezpečnosti.
Záruka
Záruka se nevztahuje na vady nebo poškození, které vzniknou na základě používání tohoto
výrobku s jakýmikoli procesorovými jednotkami nebo implantáty, které nepocházejí od společnosti Cochlear, nebo v souvislosti s takovým používáním. Další informace najdete na „Záručním listu
globální omezené záruky na výrobky Cochlear“.
Klíč k symbolům
V dokumentu budou používány následující symboly.
„Přeč těte si návod k pou žití“ nebo „Ná vod k obsluze“
„Varování“ nebo „Varování, přečtěte si přiloženou dokumentaci“
Značka CE
Výrobní číslo
Viz návod/příručka
Splňuj e požadavky ú řadu ACMA (Aus tralian Commu nications and M edia Authorit y)
Na likv idaci tohoto zař ízení se zeptejte sv ého ušního lék aře.
Bezdrátový přenos povo len
Účel použití
Dálkové ovládání je určeno k dálkovému ovládání bezdrátového zvukového procesoru Baha.
Základním účelem dálkového ovládání je přenos signálů do zvukového procesoru Baha za účelem
úpravy hlasitosti a výběru programu.
Začínáme
Nabíjení baterie
Viz obrázek
2
Před použitím dálkového ovládání musí být baterie plně nabitá. Za tímto účelem zapojte nabíjecí
kabel, jak je znázorněno níže. Pak zapojte druhý konec do elektrické zásuvky. Při nabíjení bude
měřič baterie zobrazovat jeden, dva nebo tři proužky. Při plném nabití budou nepřetržitě zobrazeny všechny tři proužky.
Z bezpečnostních důvodů nabíjejte baterii pouze nabíječkami, které dodává společnost Cochlear.
Varování: Nenabíjejte dálkové ovládání Cochlear Remote Control, když jej máte na
sobě.
Vypnutí a zapnutí dálkového ovládání Remote Control 2
Viz obrázek 1 č. 1
Chcete-li dálkové ovládání zapnout, posuňte vypínač dolů do polohy ON (zapnuto). U vypínače
bude vidět bílá ikona „I“ a displej se zapne. Chcete-li dálkové ovládání vypnout, posuňte vypínač
nahoru do polohy OFF (vypnuto).
Změna programu
Viz obrázek
3
Tlačítko „P“ [č. 10 na obrázku 1] se používá ke změně programů, který váš ušní lékař naprogramoval do zvukového procesoru. Zobrazovaný název programu může nastavit váš ušní lékař. Při
každém stisknutí tlačítka P se program posune o jeden krok, přičemž na konci každého cyklu se
vrátí k programu 1 (např. 1, 2, 3, 1). Každá změna programu je doprovázena pípáním v obou zvukových procesorech a aktuálně používaný program se zobrazuje na displeji. K dosažení optimálního
výkonu se doporučuje nastavit oba zvukové procesory na stejný program.
1
Program 1 „Každodenní“
2
Program 2 „Hluk“
Nastavení hlasitosti
Nastavení hlasitosti ve dvou zvukových procesorech
Viz obrázek
4
Tlačítka „+“ a „–“ se používají k nastavení hlasitosti [č. 6 a 7 na obrázku 1]. Hlasitost lze nastavovat
v obou zvukových procesorech současně nebo na každé straně samostatně. Ve výchozím
nastavení jsou oba zvukové procesory „aktivní“, což je na displeji znázorněno dvěma šipkami (<
a >) vedle proužků hlasitosti. Hlasitost obou zvukových procesorů lze současně zvýšit stisknutím
tlačítka „+“ nebo snížit stisknutím tlačítka „–“. Každé nastavení je doprovázenou pípáním ve
zvukových procesorech a zároveň vizuální změnou v proužcích hlasitosti zobrazených na displeji.
Výchozí úroveň hlasitosti je označena vodorovnou zelenou čárkou v proužcích hlasitosti.
Nastavení hlasitosti pouze v levém zvukovém procesoru
Viz obrázek
5
Pokud chcete nastavit hlasitost pouze na levé straně, nejprve stiskněte tlačítko „<“ na klávesnici
[č. 8 na obrázku 1]. Tím se „aktivuje“ levý zvukový procesor a „deaktivuje“ pravý zvukový procesor.
To je na displeji znázorněno levou šipkou (<), přičemž pravá šipka nebude zobrazena. Pomocí
tlačítek „+“ nebo „–“ nastavte hlasitost pouze v levém zvukovém procesoru.
Nastavení hlasitosti pouze v pravém zvukovém procesoru
Viz obrázek
6
Pokud chcete nastavit hlasitost pouze na pravé straně, nejprve stiskněte tlačítko „>“ na klávesnici
[č. 9 na obrázku 1]. Tím se „aktivuje“ pravá strana a „deaktivuje“ levá strana. To je na displeji
znázorněno pravou šipkou (>), přičemž levá šipka nebude zobrazena. Pomocí tlačítek „+“ nebo „–“
nastavte hlasitost pouze na pravé straně.
Pokud se chcete vrátit do režimu současného nastavování, stiskněte tlačítko < nebo > na klávesnici [č. 8 nebo 9 na obrázku 1] a podržte ho, dokud se na displeji neobjeví obě šipky, což značí, že
jsou oba zvukové procesory opět „aktivní“.
Ztlumení / zrušení ztlumení
Mikrofony zvukových procesorů můžete ztlumit nebo zrušit jejich ztlumení stisknutím tlačítka
ztlumení [č. 5 na obr. 1] na dálkovém ovládání.
Ztlumení nebo zrušení ztlumení platí pro oba zvukové procesory současně a nelze jej vybrat pouze
pro levý nebo pravý procesor. Když jsou mikrofony ztlumené, bude ikona mikrofonu nahrazena
ikonou ztlumeného mikrofonu a proužky hlasitosti budou šedivé. Pokud chcete zrušit ztlumení
mikrofonů zvukových procesorů, znovu stiskněte tlačítko ztlumení.
Aktivace přenosu zvuku
Pokud používáte volitelné zařízení Cochlear pro přenos zvuku, jako je například Cochlear™ Wireless
TV Streamer nebo Cochlear
™
Wireless Mini Microphone, lze vstup z těchto zařízení aktivovat
stisknutím tlačítka pro přenos zvuku č. 3 na obrázku 1. Viz také část „Používání volitelných zařízení
pro přenos zvuku“.
Návrat k základnímu nastavení
Základní nastavení, tj. to, které se použijí při prvním zapnutí zvukového procesoru, se aktivuje
stisknutím tlačítka Domů [č. 4 na obrázku 1]. Stisknutím tlačítka Domů se provede následující:
1. Ve zvukovém procesoru se aktivuje program 1.
2. Zvukový procesor se nastaví na výchozí hlasitost.
3. Aktivuje se režim současného nastavování hlasitosti.
Tlačítkem Domů se rovněž ukončí veškerý přenos zvukových signálu z jakýchkoli volitelných zařízení
Cochlear pro přenos zvuku.
Page 12

Indikátor slabé baterie
Indikátor slabé baterie dálkového ovládání
Viz obrázek
7
Stav baterie v dálkovém ovládání je znázorněn měřičem baterie, který se skládá ze tří proužků. Když
se baterie postupně vybíjí, proužky budou jeden po druhém mizet. Když je baterie téměř vybitá,
začne měřič blikat, což znamená, že je potřeba baterii dobít.
Indikátor slabé baterie zvukového procesoru
Viz obrázek
8
Když je baterie ve zvukovém procesoru téměř vybitá, možná ho budete moci ještě používat, ale
funkce dálkového ovládání mohou být deaktivovány. Pokud by k tomu došlo, doporučujeme
vyměnit baterii ve zvukovém procesoru.
1
Slabá baterie v levém zvukovém procesoru
2
Slabá baterie v pravém zvukovém procesoru
Provozní dosah
Viz obrázek
9
Provozní dosah mezi dálkovým ovládáním a zvukovým
procesorem je přibližně 1 metr (40”). Pokud se na dálkovém
ovládání nezobrazuje aktuální stav, podržte jej před sebou, jak *je znázorněno na obrázku.
Pokud dálkové ovládání nedokáže zjistit stav zvukového procesoru, na displeji se objeví ikony
hledání. Podržte dálkové ovládání tak, jak je zobrazeno výše, aby navázalo kontakt s oběma
zvukovými procesory.
1
Hledání dvou zvukových procesorů
2
Hledání pravého zvukového procesoru
Připojeno k levému zvukovému procesoru
Displej
Abyste šetřili životnost baterie, má dálkové ovládání funkci úspory energie, která po 20 sekundách
bez aktivity automaticky vypne displej a přepne dálkové ovládání do pohotovostního režimu.
Stačí stisknout jakékoli tlačítko na klávesnici a displej se znovu aktivuje. Pak můžete provést
požadovanou akci.
Fungování dálkového ovládání
Dálkové ovládání funguje nejlépe, když se tlačítka mačkají postupně a nikoli v rychlém sledu. Když
například nastavujete hlasitost, krátce stiskněte tlačítko, jak je popsáno níže, a před pokračováním počkejte, než se ozve tón. Tento tip platí pro používání všech tlačítek, ale týká se zejména
nastavování hlasitosti.
Spárování
Viz obrázek
10
Spárování je proces navázání komunikace mezi zvukovým
procesorem a dálkovým ovládáním. Váš ušní lékař vám může
při nastavování zvukového procesoru s tímto postupem pomoci. Případně můžete postupovat dle
níže uvedených kroků pro spárování zvukového procesoru s dálkovým ovládáním:
1. Ujistěte se, že je dálkové ovládání plně nabité a zapnuté.
2. Vypněte zvukový procesor.
3. Jednou stiskněte tlačítko pro párování na dálkovém ovládání. Tím se aktivuje režim párování
1
,
který bude aktivní po dobu 20 sekund.
4. Když je režim párování aktivován, zapněte zvukový procesor. Po úspěšném spárování se ve
zvukovém procesoru přehraje melodie a na displeji dálkového ovládání se bude jako aktivní
zobrazovat program 1
2
. Nyní jste připraveni k používání dálkového ovládání.
Používání volitelných zařízení pro přenos zvuku
TV Streamer a Mini Microphone jsou volitelná zařízení pro přenos zvuku a řeči, která jsou k dispozici pro váš zvukový procesor. TV Streamer přenáší zvukové signály (stereo) z televize, přehrávače,
počítače atd. přímo do zvukového procesoru.
Mini Microphone přenáší řeč a zvukové signály přímo do zvukového procesoru. Chcete-li spustit
přenos zvuku ze zařízení TV Streamer nebo Mini Microphone, stiskněte na dálkovém ovládání
tlačítko pro přenos zvuku [č. 3 na obrázku 1]. Zvukový procesor začne vyhledávat zařízení pro
přenos zvuku.
Aktivace přenosu zvuku ze zařízení Cochlear TV Streamer
Viz obrázek 11
Chcete-li spustit přenos z televize, přehrávače nebo jakéhokoli jiného zařízení připojeného
k zařízení TV Streamer, jednoduše zvukové zařízení zapněte a potom stiskněte tlačítko pro přenos
zvuku [č. 3 na obrázku 1]. Zvukový procesor začne ihned vyhledávat TV Streamer a připojí se
k němu.
1
Vyhledávání televize
2
Připojeno k televizi
3
Nebyla nalezena žádná televize
Ke zvukovému procesoru můžete nastavit až 3 zařízení Cochlear pro přenos zvuku. Každé takové
zařízení je na displeji označeno písmenem A, B nebo C. Pokud se používá více zařízení Cochlear pro
přenos zvuku, stiskněte znovu tlačítko pro přenos zvuku, dokud se neozve požadovaný zvukový
signál.
Nastavení hlasitosti režimu přenosu zvuku
V režimu přenosu zvuku jsou ve výchozím nastavení hlasitost zvukového procesoru (levý sloupec
hlasitosti) a hlasitost přenášeného zvuku (pravý sloupec hlasitosti) nastaveny na „aktivní“. To je na
displeji vyjádřeno dvěma šipkami (< a >), které se nacházejí vedle sloupců hlasitosti. Pokud chcete
současně upravit hlasitost zvukového procesoru i přenášeného
zvuku, stiskněte na dálkovém ovládání tlačítko „+“ nebo „–“
[č. 6 nebo 7 na obrázku 1].
Poznámka: Pokud používáte dva zvukové procesory, bude jakákoli úprava hlasitosti platit
pro oba. Je rovněž možné provést oddělené nastavení hlasitosti pro zvukové procesory a pro
přenášený zvukový signál.
Nastavení hlasitosti pouze
zvukového procesoru
Viz obrázek 12
Pokud chcete nastavit hlasitost zvukového procesoru, jednou stiskněte levé tlačítko „<“ na
klávesnici [č. 8 na obrázku 1]. Vedle sloupce hlasitosti naslouchacího zařízení budou dvě šipky
„<>“ a sloupec hlasitosti „přenášeného zvuku“ bude šedivý. Stisknutím tlačítka „+“ nebo „–“ [č.
6 nebo 7 na obrázku 1] upravte hlasitost naslouchacího zařízení. Pokud se chcete vrátit do režimu
současného nastavování, stiskněte tlačítko „>“ na klávesnici [č. 9 na obrázku 1] a podržte ho,
dokud se na displeji neobjeví jedna šipka vedle každého sloupce hlasitosti, což značí, že jsou obě
úrovně hlasitosti „aktivní“.
Nastavení hlasitosti pouze
přenášeného zvuku
Pokud chcete nastavit hlasitost přenášeného zvuku, jednou stiskněte pravé tlačítko „>“ na
klávesnici [č. 9 na obrázku 1]. Vedle sloupce hlasitosti přenášeného zvuku budou dvě šipky „<>“
a sloupec hlasitosti „naslouchacího zařízení“ bude šedivý. Stisknutím tlačítka „+“ nebo „–“ [č.
6 nebo 7 na obrázku 1] upravte hlasitost přenášeného zvuku. Pokud se chcete vrátit do režimu
současného nastavování, stiskněte tlačítko „<“ na klávesnici
[č. 8 na obrázku 1] a podržte ho, dokud se na displeji neobjeví jedna šipka vedle každého sloupce
hlasitosti, což značí, že jsou obě úrovně hlasitosti „aktivní“.
Cochlear Wireless Phone Clip (volitelný)
Viz obrázek 13
Zařízení Phone Clip rovněž funguje s dálkovým ovládáním. Když se používá zařízení Phone Clip,
bude to na displeji znázorněno.
Po ukončení telefonního hovoru se zvukový procesor vrátí k předchozímu používanému programu.
Tento program je zobrazen na displeji dálkového ovládání. Nastavení hlasitosti provedené během
telefonního hovoru nebude přeneseno do předchozího používaného programu. Telefonní hovory
dočasně přeruší přenos zvuku z volitelných zařízení pro přenos zvuku, ale po ukončení telefonního
hovoru bude přenos zvuku opět obnoven.
Příloha: výjimky z běžného fungování
Pokud používáte zároveň dva zvukové procesory, doporučuje se mít vždy oba nastavené na stejný
program. Je ovšem možné mít ve dvou zvukových procesorech různé programy, například Program
1 na levé straně a přenášený zvuk na pravé. Za takových okolností funguje dálkové ovládání trochu
odlišně, jak ukazují následující příklady.
Situace č. 1: Na obou stranách jste spustili P1, ale stisknutím tlačítka na pravém zvukovém
procesoru jste pravou stranu změnili na P2. Pokud pak na dálkovém ovládání stisknete tlačítko
P, levý zvukový procesor se přepne na P2, takže bude mít stejný program jako pravý procesor.
Dalším stisknutím tlačítka P se změní program v obou zvukových procesorech, takže bude na
obou stranách stejný.
Situace č. 2: Levý zvukový procesor jste nastavili na P1 a pravý zvukový procesor na P2. Pokud
pak stisknete tlačítko pro přenos, bude do obou zvukových procesorů přenášen zvuk ze stejného
zdroje (např. z televize). Pokud pak na dálkovém ovládání stisknete tlačítko P, bude přenos zrušen
na obou stranách a oba zvukové procesory se vrátí ke svým předchozím programům (P1 a P2).
Situace č. 3: Levý zvukový procesor je v programu 1. V pravém zvukovém procesoru je aktivo-
ván přenos zvuku prostřednictvím tlačítka pro přenos. Když stisknete tlačítko „P“, pravý zvukový
procesor se vrátí ke svému předchozímu programu a levý zvukový procesor přejde k dalšímu
programu (pokud je k dispozici). Dalším stisknutím tlačítka „P“ sladíte oba zvukové procesory na
stejný program. Pokud místo toho stisknete tlačítko pro přenos, budou oba zvukové procesory
nastaveny na stejné zařízení pro přenosu zvuku.
Situace č. 4: Pokud zvukové procesory používají různé programy zvukových procesorů, budou
zobrazeny pouze čísla programu pro každý zvukový procesor. Nebude zobrazen název programu.
Situace č. 5: Pokud je jeden zvukový procesor v režimu přenosu zvuku a druhý v jednom
z programů zvukového procesoru, bude zobrazen pouze displej přenosu zvuku bez uvedení čísla a
názvu programu zvukového procesoru.
Důležité informace
Údržba a péče
• Dálkové ovládání čistěte vlhkým hadříkem. K čištění zařízení nikdy nepoužívejte čisticí produkty
pro domácnost (prášek na praní, mýdlo atd.) ani alkohol.
• Když dálkové ovládání nepoužíváte, vypněte ho a bezpečně ho uložte.
• Dálkové ovládání chraňte před nadměrnou vlhkostí
(koupání, plavání) a teplem (radiátor, palubní deska auta).
• Chraňte jej před přílišnými nárazy a vibracemi.
Page 13

Obecná upozornění
•
Toto zařízení udržujte mimo dosah dětí.
• Dálkové ovládání používá digitálně kódované vysílání s nízkým výkonem, aby mohlo komuniko-
vat s jinými bezdrátovými zařízeními. I když je to nepravděpodobné, může to mít vliv na blízká
elektronická zařízení. V takových případech přesuňte dálkové ovládání pryč od ovlivněného
elektronického zařízení.
• Pokud používáte dálkové ovládání a je ovlivňováno elektromagnetickým rušením, přesuňte se
pryč od zdroje rušení.
Obecná bezpečnostní opatření
• Toto zařízení nepoužívejte na místech, kde je zakázáno používat elektronická zařízení.
• Rentgenové záření (např. CT nebo MRI skeny) může nepříznivě ovlivnit fungování tohoto
zařízení. Před absolvováním procedury zařízení vypněte a nechte ho mimo místnost.
• Elektronická zařízení s vysokým výkonem, větší elektronické instalace a kovové konstrukce
mohou narušit a významně omezit provozní dosah.
• Vašim zvukovým procesorům a tomuto zařízení byly při
instalaci přiděleny jedinečné komunikační kódy. To zajišťuje,
že zařízení nebude ovlivňovat zvukové procesory jiných lidí.
• Toto zařízení nijak neupravujte ani nemodifikujte.
• Otevřením dálkového ovládání může dojít k jeho poškození. Pokud přetrvávají problémy, které
nelze vyřešit, poraďte se se svým ušním lékařem.
• Dálkové ovládání může opravovat pouze autorizované servisní centrum.
• Nepoužívejte dálkové ovládání na místech, kde je zakázáno vysokofrekvenční vysílání, například
v letadlech atd.
• Dálkové ovládání připojujte pouze k přípojkám, pro které je výslovně určeno.
Péče o vestavěnou baterii
Dodržujte prosím následující pokyny:
• Produkt je napájen dobíjecí baterií. Nová baterie dosáhne optimálního výkonu po dvou nebo
třech úplných nabitích a vybitích.
• Baterie vydrží stovky nabití a vybití, ale nakonec se opotřebuje.
• Když nabíječku nepoužíváte, odpojte ji od sítě a od produktu.
• Pokud baterii plně nabijete a nebudete ji používat, v průběhu času bude nabití ztrácet.
• Necháváním produktu na horkých místech dochází ke snižování kapacity a životnosti baterie.
• Produkt se studenou baterií nemusí dočasně fungovat, i když je baterie plně nabitá. Výkon
baterie je omezen zejména při teplotách pod bodem mrazu.
Upozornění týkající se baterie
Varování: Baterie použitá v tomto produktu může při nesprávném použití představovat riziko
požáru nebo chemického popálení.
• Baterii v produktu nemůže uživatel vyjmout ani vyměnit. Nepokoušejte se produkt otevřít.
Jakýkoli takový pokus může vést k poškození. Použití jiných baterií může představovat riziko
požáru nebo výbuchu a způsobí ztrátu záruky.
• Dálkové ovládání dobíjejte pouze nabíječkou, která byla dodána s produktem.
• Baterie zlikvidujte v souladu s místními předpisy. Pokud je to možné, recyklujte je.
• Baterii nelikvidujte jako domovní odpad, protože v ohni může explodovat.
Péče o nabíječku
Pokud je produkt dodáván s nabíječkou, dodržujte prosím následující pokyny.
• Nepokoušejte se produkt nabíjet ničím jiným než dodanou síťovou nabíječkou. Použití jiných
nabíječek může produkt poškodit nebo zničit a mohlo by být nebezpečné. Použitím jiných
nabíječek může dojít ke zneplatnění souhlasů a zrušení záruky.
• Informace o dostupnosti schváleného příslušenství vám poskytne váš ušní lékař.
• Produkt nabíjejte v souladu s uvedenými pokyny.
Upozornění týkající se nabíječky
•
Když odpojujete napájecí kabel nebo jakékoli příslušenství, uchopte zástrčku a zatáhněte za ni,
nikoli za kabel.
• Nikdy nepoužívejte poškozenou nabíječku.
• Nepokoušejte se nabíječku rozebrat, protože byste mohli utrpět úraz elektrickým proudem.
• Nesprávné opětovné sestavení může způsobit úraz elektrickým proudem nebo požár při
následném použití produktu.
• Vyvarujte se nabíjení produktu při velmi vysokých nebo nízkých teplotách a nepoužívejte
nabíječku venku nebo na vlhkých místech.
Technické specifikace
Provozní dosah Až 3 metr y
Bezdrá tový přenos 2,4 GHz
Provozní teplota 0 až 55 °C
Skladovací teplota -20 až 60 °C
Informace o testování teploty, dopravě a skladování
Produkt prochází různými zkouškami se střídáním teplot a zahříváním za vlhka v rozsahu -25 °C až
+70 °C dle interních a oborových standardů.
Označení typu bezdrátového příslušenství pro modely obsažené
v této uživatelské příručce je následující:
FCC ID QZ3RC-2, IC 8039C-RC2, IC model: RC-2
Prohlášení
Toto zařízení splňuje požadavky části 15 pravidel komise FCC. Jeho provozování je možné při
splnění následujících dvou podmínek: (1) toto zařízení nesmí způsobovat škodlivé rušení a (2) toto
zařízení musí přijímat veškeré rušení včetně takového, které může způsobit nežádoucí fungování.
Poznámka: Testováním tohoto zařízení bylo zjištěno, že splňuje limity pro digitální zařízení třídy B
dle části 15 pravidel komise FCC. Účelem těchto limitů je zajistit přiměřenou ochranu před škodlivým rušení při instalaci v obytných prostorech. Toto zařízení vytváří, používá a může vyzařovat
vysokofrekvenční energii, a pokud nebude nainstalováno a používáno v souladu s pokyny, může
způsobovat škodlivé rušení rádiové komunikace. Nelze ovšem zaručit, že při konkrétní instalaci
k rušení nedojde. Pokud bude toto zařízení způsobovat škodlivé rušení příjmu rádiového nebo
televizního signálu, což lze zjistit vypnutím a opětovným zapnutím zařízení, doporučuje se, aby
uživatel zkusil rušení napravit pomocí následujících opatření:
• Přesměrování nebo přemístění přijímací antény.
• Zvýšení vzdálenosti mezi zařízením a přijímačem.
• Připojení zařízení do zásuvky v jiném okruhu, než do kterého je zapojen přijímač.
• Žádost o pomoc prodejce nebo zkušeného rádiového či televizního technika.
• Změny nebo úpravy mohou způsobit, že uživatel již nebude nadále oprávněn zařízení provozovat.
Seznam zemí:
Produkty splňují požadavky následujících předpisů a směrnic:
• V EU: zařízení splňuje základní požadavky dle Přílohy I Směrnice Rady 93/42/EHS o zdravot-
nických prostředcích a základní požadavky a další relevantní ustanovení Směrnice 1999/5/ES
(R&TTE). Do prohlášení o shodě lze nahlédnout na webových stránkách www.cochlear.com.
• Produkty s funkcí bezdrátového přenosu jsou určeny k prodeji v zemích Evropského
hospodářského prostoru a ve Švýcarsku. Specifikace omezení: Zařízení nesmíte používat v okruhu
20 km od středu města Ny Ålesund v Norsku.
• V USA: FCC CFR 47 část 15, podčást C, oddíl 15.249.
• Další identifikované požadavky platných mezinárodních předpisů v zemích mimo EU a USA. Viz
místní požadavky příslušných zemí pro tyto oblasti.
• Produkty splňují specifikace směrnice EN 300 328.
• V Kanadě je dálkové ovládání certifikováno pod následujícím číslem certifikace: IC:8039C-RC2.
• Toto zařízení splňuje standard(y) RSS nevyžadující licenci organizace Industry Canada.
• Toto digitální zařízení třídy B splňuje požadavky kanadské normy ICES-003. Cet appareil
numérique de la classe B est conforme à la norme NMB-003 du Canada.
• Jeho provozování je možné při splnění následujících dvou podmínek: (1) toto zařízení nesmí
způsobovat rušení a (2) toto zařízení musí přijímat veškeré včetně takového, které může
způsobit jeho nežádoucí fungování. L’exploitation est autorisée aux deux conditions suivantes
: (1) l’appareil ne doit pas produire de brouillage, et (2) l’utilisateur de l’appareil doit accepter
tout brouillage radioélectrique subi, même si le brouillage est susceptible d’en compromettre le
fonctionnement.
• Zařízení obsahuje vysokofrekvenční vysílač.
Page 14

1
11
5
3
4
1
2
7
6
98
10
2
4
5
6 7
8
10
12
1 2
Everyday Noise Noise
11
1 2
Everyday
1 2 3
A
A A
3
Noise
1 2
Noise Noise
1 2
Everyday
9
A
A
13
Noise
Noise
HU
Üdvözöljük!
Gratulálunk Cochlear™ Baha® Remote Control 2 távirányító készülékéhez!
Page 15

Ábramagyarázat Lásd az
1.
ábrát!
1. Be- és kikapcsoló gomb
2. Kijelző
3. Streamelés (opcionális TV Streamer vagy Minimikrofon)
4. Főmenü gomb
5. Beszédprocesszor-mikrofon némító gomb
6. Hangerő fel
7. Hangerő le
8. Csak bal oldali beszédprocesszor választása
9. Csak jobb oldali beszédprocesszor választása
10. Programváltás
11. Párosítás gomb
Megjegyzés: A kézikönyvben szereplő utasítások a Cochlear™ Baha® távirányító egy Cochlear
beszédprocesszorral való közös használatára vonatkoznak. A kétoldali (két Cochlear beszédprocesszort viselő) felhasználók is tudnak egy Cochlear Baha távirányítóval két Cochlear
beszédprocesszort szabályozni. Az ő esetükben ugyanazok az utasítások érvényesek mindkét
beszédprocesszorra.
Bevezetés
A Cochlear Baha távirányító segítségével szabályozhatja a Cochlear Baha vezeték nélküli beszédprocesszorok működését. Az elegáns kivitelben készült, felhasználóbarát készülék tájékoztatást
ad a beszédprocesszor állapotáról és hozzáférést biztosít az egyéb vezeték nélküli funkciókhoz.
A Cochlear Baha távirányítóval egyidejűleg lehet két vezeték nélküli Baha beszédprocesszort
szabályozni. A távirányító szintén alkalmas a két beszédprocesszor egyedi szabályozására, így a
beszédprocesszorok tökéletesen finomhangolhatók.
A Cochlear Baha távirányító előnyeinek teljes körű kihasználása érdekében kérjük, gondosan
olvassa el ezt a kézikönyvet. Kérdéseivel forduljon bizalommal hallásgondozó szakemberünkhöz!
További információkért látogasson el a www.cochlear.com honlapra!
Biztonsága érdekében kérjük, alaposan tanulmányozza át a „Fontos tudnivalók” fejezetet.
Garancia
A garancia nem vonatkozik olyan meghibásodásra vagy sérülésre, amely a beszédprocesszor nem
Cochlear gyártmányú hangfeldolgozó egységgel és/vagy nem Cochlear gyártmányú implantátummal történő együttes használata miatt vagy használatával összefüggésben merül fel. További
részletek a Cochlear Korlátozott Globális Garanciajegyen olvashatók.
Jelmagyarázat
Az alábbi jelek a dokumentumban több helyen is szerepelnek.
Olvass a el a használat i vagy kezelési u tasítás vonat kozó részeit!
„Vigyáz at!” vagy „Vigy ázat, olvass a el a mellékelt dok umentumokat !”
CE-jelölés
Sorozatszám
Olvassa el az utasításokat/tájékoztatót!
ACMA (Ausztrál Kommunikációs és Médiafelügyelet) előírásainak megfelelő
A készülék ártalmatlanításával kapcsolatban kérdezze a hallásgondozó szakembert!
Vezeték nélküli csatlakozásra alkalmas
Rendeltetés
A távirányító vezeték nélküli módon képes a Baha beszédprocesszort vezérelni. A távirányító alapvető feladata a beszédprocesszor hangerejének módosítása és a programváltás lehetővé tétele.
Kezdő lépések
Az akkumulátor töltése
Ld. a 2. ábrát!
A távirányítót az első használat előtt teljesen fel kell tölteni. Ehhez az alábbiakban bemutatott
módon csatlakoztassa a szükséges kábelt! A kábel másik végét csatlakoztassa az elektromos hálózatba! Töltés közben a töltöttségjelző egy, kettő vagy három rovátkát mutat. Teljesen feltöltött
állapotban a három rovátka folyamatosan látható.
Az akkumulátor újratöltéséhez biztonsági okokból kizárólag a Cochlear-tól beszerzett töltőt
használjon!
Figyelem! A Cochlear távirányítót tilos viselés
közben tölteni.
A Remote Control 2 eszköz be- és kikapcsolása
Ld. az 1/1. ábrát!
A távirányító bekapcsolásához csúsztassa a be- és kikapcsoló gombot ON állásba! Ekkor a kezelőgomb aljánál egy fehér I ikon jelenik meg, és a kijelző bekapcsol. A távirányító kikapcsolásához
csúsztassa a be- és kikapcsoló gombot OFF állásba!
Programváltás
Ld. a 3. ábrát!
A P gomb [1/10. ábra] segítségével válthatja a hallásgondozó szakember által beállított programokat a beszédprocesszoron. A kijelzett programnevet a hallásgondozó szakember határozhatja meg.
A P gomb minden egyes megnyomásával a készülék egy programot lép előre, és minden ciklus
végén az 1-es programra tér vissza (pl. 1, 2, 3, 1). A programváltást csipogó hang jelzi mindkét
beszédprocesszoron, és az aktuális programot a kijelző mutatja. Optimális teljesítmény akkor
érhető el, ha mindkét beszédprocesszoron ugyanaz a program van beállítva.
1.
1-es program: Általános
2.
2-es program: Zaj
Hangerő-módosítás
Hangerő-módosítás két beszédprocesszoron
Ld. a 4. ábrát!
A hangerőt a + és - gombbal lehet módosítani [1/6. és 7. ábra]. A hangerő a két beszédproceszszoron egyidejűleg vagy külön-külön is módosítható. Alapértelmezetten mindkét beszédprocesszor aktív; ezt a kijelzőn a hangerőjelző mellett a < és > jelek mutatják. A hangerő egyidejű
növeléséhez a két beszédprocesszoron nyomja meg a + gombot, csökkentéséhez a - gombot! A
hangerő-módosítást csipogó hang és a kijelzőn látható hangerőjelző változása jelzi. Az alapértelmezett hangerőszintet a hangerőjelzőn áthaladó vízszintes zöld vonal jelzi.
Hangerő-módosítás csak a bal
oldali beszédprocesszoron
Ld. a 5. ábrát!
Csak a bal oldali beszédprocesszor hangerejének módosításához először nyomja meg a < gombot
a billentyűzeten [1/8. ábra]! Ezzel a lépéssel a bal oldali beszédprocesszort aktiválja, míg a jobb
oldali eszközt inaktív állapotba helyezi. Ekkor a kijelzőn a < jelzés látható, és a > jelzés kikapcsolódik. Ezután a bal oldali beszédprocesszor hangerejét a + és - jelek használatával módosíthatja.
Hangerő-módosítás csak a
jobb oldali beszédprocesszoron
Ld. a 6. ábrát!
Csak a jobb oldali beszédprocesszor hangerejének módosításához először nyomja meg
a > gombot a billentyűzeten (1/9. ábra)! E zzel a lépésse l a jobb oldali beszédprocess zort
aktiválja, míg a bal old ali eszközt inak tív állapotba he lyezi. Ekkor a kijel zőn a > jelzés lát ható,
és a < jelzé s kikapcsoló dik. Ezután a jo bb oldali beszédprocesszo r hangerejét a + és - jele k
használatával módosíthatja.
Az egyidejű szab ályozás üzemmód ba való visszatér éshez tart sa lenyomva a < vag y > gombot
a billent yűzeten [1/8. vag y 9. ábra], amíg min dkét jel meg nem jelen ik a kijelzőn, ami azt
mutatja, h ogy mindkét bes zédprocesszor ú jra aktív állap otban van.
Mikrofon kikapcsolása/bekapcsolása:
A beszédprocesszor mikrofonjainak kikapcsolásához és bekapcsolásához nyomja meg a
távirányítón lévő némítás gombot [1/5. ábra]!
A mikrofon kikapcsolása és bekapcsolása egyidejűleg érvényesül mindkét beszédprocesszoron;
ennél a műveletnél nem lehet oldalt v álasztani. A mikor a mikrofonok k i vannak kapcs olva,
a kijelz őn a mikrofon ikont a ném a mikrofon ikon váltja fe l, és a hangerősk ála elhalványu l. A
beszédprocesszor mikrofonjainak bekapcsolásához nyomja meg újra a némítás gombot!
A streamelés (hangközvetítés) elindítása
A külön meg vásárolható Co chlear streami ng eszközök, pl. a Coc hlear™ Wireless TV Stream er
vagy Cochlear
™
Wireless Mini Microphone vezeték nélküli eszközök felhasználói a streamelés
gomb [1/3 . ábra] megnyomás ával indíthatják a h angközvetítést . Olvassa el az „O pcionális
streami ng eszközök haszná lata” fejezetet is!
Alapbeállítások visszaállítása
A beszédprocesszor minden egyes bekapcsolásakor érvényes alapbeállítások aktiválásához
nyomja meg a F őmenü gombot (1/4. áb ra)! A Főmenü gom b megnyomásakor :
1. Az 1-es program aktiválódik a beszédprocesszoron
2. Az alapértelmezett hangerő-beállítások lesznek elérhetők
3. A ha ngerő-módo sításhoz az egyi dejű szabályozá s mód lesz elérhe tő
A Főmen ü gomb megnyomás akor megszakad a z audiojelek közvet ítése is a Cochlear op cionális streaming eszközeiből.
Alacsony akkufeszültség-figyelmeztetés
Távirányító alacsony töltöttségi szintje
Ld. a 7. ábrát!
A távirá nyító akkumulátor ának töltöttsé gi szintjét 3 pálciká ból álló feszült ségjelző mu tatja.
Az akkumulátor lem erülését a pálcik ák egyenkénti elt űnése jelzi. A mikor az akkumul átor már
majdnem teljesen lem erült, a feszültségjel ző villogással je lzi, hogy a kész üléket fel kell tölteni.
Page 16

Beszédprocesszor alacsony töltöttségi szintje
Ld. a 8. ábrát!
Amikor a be szédprocessz or eleme/akkumulátora már ma jdnem teljesen le merül, a beszédproces szor a legtöbb eset ben még tovább has ználható, viszont a távirányító val ekkor már
általáb an nem lehet az esz közt szabályozni . Javasoljuk, hogy ilyen es etben cserélje k i a beszédprocesszor elemét/akkumulátorát.
1.
Alacs ony töltöttségi sz int a bal oldali bes zédprocesszor ban
2.
Alacs ony töltöttségi sz int a jobb oldali be szédprocesszo rban
Hatótávolság
Ld. a 9. ábrát!
A távirá nyító és a beszédprocesszor közöt ti hatótávolság k b. 1 méter. Ha az aktuáli s állapotot
nem látja a t ávirányító kijel zőjén, tart sa a készüléket a mell kasa előtt a képe n látható módon!
Ha a távir ányító nem tudja megh atározni a beszéd processzor áll apotát, keresés i konok je lennek meg a kijelzőn. A t ávirányító és a két be szédprocesszo r közötti kapcsol at létrehozásáh oz
tart sa a távirányítót a fe nt bemutatott mó don!
1.
Két beszédprocesszor keresése
2.
Jobb oldali beszédprocesszor keresése
Bal oldali beszédprocesszorhoz csatlakozva
Kijelző
Az akkumulátor optimális élettartama érdekében a távirányító energiatakarékos funkciója
20 másod perc inaktivit ás esetén automati kusan kikapc solja a kijelzőt és ké szenléti módba
kapcs olja a távirányítót . A kijelző újraa ktiválásáh oz nyomjon meg egy tet szőleges gomb ot a
billent yűzeten és végez ze el a kívánt műve letet!
Távirányító teljesítménye
A távirá nyító optimális telje sítményét úgy biz tosíthatja, ha a go mbokat nem gyo rs egymásutánban, hanem egyszeri nyomással használja. Hangerő-módosításnál például röviden
nyomja meg a g ombot az alább leí rt módon, és c sak a hangjel zés után folyta ssa a műveletet!
Ez az eljá rás az összes gom bhasználatr a vonatkozik, de a hang erő-módosí tásnál különös en
fontos.
Párosítás
Ld. a
10.
ábrát!
A párosítás műveletéve l lehet a beszédpr ocesszor és a távi rányító közötti kapc solatot létrehozni. A be szédprocesszor illeszté sekor a hallásgon dozó szakember is s egítséget tud nyújt ani a
párosít ás elvégzéséhe z. Az alábbi lép ések végrehajt ásával Ön is elvége zheti a beszédp rocesszor
és a távir ányító párosítás át:
1. Elle nőrizze, hog y a távirányító tel jesen fel van- e töltve és be van- e kapcsolva!
2. Kapcsolja ki a beszédprocesszor(oka)t!
3. Nyo mja meg egyszer a p árosítás gombot a t ávirányítón! Ez zel aktiválja a p árosítás módot
1.
20 másodperces időtartamra.
4. A pá rosítás mód időtartama al att kapcsolj a be a beszédproce sszort! A sikere s párosítást eg y
dallam jelzi a beszé dprocesszoro n, és a távirányító k ijelzőjén az 1- es program jelenik meg
aktív programként
2.
. Ezutá n a távirányító rend eltetésszerűe n használható.
Opcionális streaming
eszközök használata
A Cochlea r TV Streamer és M inimikrofon a beszé dprocesszor hoz külön megvás árolható,
beszéd é s egyéb hangok a zonnali közvetíté sére (streamelé sére) szolgáló tar tozék. A Cochlear
TV Streamer az audiojeleket (sztereó) a tévékészülékéből, zenelejátszójáról, számítógépéről,
stb. eg yenesen és azon nal a beszédpro cesszorba közve títi.
A Cochlea r Minimikrofon eg yenesen és azon nal a beszédprocesszorba köz vetíti a beszéde t
és egyé b audiojeleket. A T V Streamer vagy a Minimikrofon e szközön keresztü li streamelés
elindításához nyomja m eg a távirányítón t alálható stream elés gombot [1/3. á bra]! A beszédprocesszor ekkor streaming eszköz keresése módba kapcsol.
Streamelés indítása a Cochlear TV Streamer eszközről
Ld. a
11.
ábrát!
A stream elés indításáh oz a tévéből, zenelejátszóról va gy bármely eg yéb, a Cochlear T V
Streamer-hez csatl akoztatott eszköz ről, egyszer űen kapcsolj a be az adott eszköz t, majd
nyomja meg a s treamelés gom bot [1/3. ábra]! A be szédprocesszo r azonnal keresn i kezdi a T V
Streamer-t és csatlakozik hozzá.
1.
Tévékészülék keresése
2.
Tévékészülékhez csatlakozva
3.
Nem talált tévékészüléket
A Cochlea r beszédproces szorral akár 3 Co chlear streamin g eszközt is párosít hat. Az egye s
streami ng eszközöket az A, B é s C betűk jelzik a kij elzőn. Ha eg yszerre több Coch lear streaming
eszköz van h asználatban , nyomkodja a stream elés gombot addig , amíg a kívánt audi ojelet meg
nem hallja!
Hangerő-módosítás streamelés üzemmódban
Streamel és üzemmódban a b eszédproces szor hangereje (ba l oldali hangerőj elző) és a
stream elt hang hangereje ( jobb oldali ha ngerőjelző) a lapértelme zetten aktív áll apotban
van. Ez t a kijelzőn a hangerőjelz ő mellett elhely ezkedő < és > jelek mu tatják. A beszéd proces szor és a streamelt h ang erősségén ek egyidejű mód osításához nyomj a meg + vagy
- gombot [1/6 . vagy 7. ábra] a távirá nyítón!
Megjegyzés: Kétoldali felhasználók esetén minden hangerő-módosítás mindkét beszédprocesszoron érvényesül. Szintén lehetséges a beszédprocesszorok és a streamelt hang
erősségét külön-külön átállítani.
Hangerő-módosítás csak
a beszédprocesszoron
Ld. a
12.
ábrát!
A beszédprocesszor hangerejének módosításához nyomja meg egyszer a bal oldali < gombot
a billent yűzeten [1/8. ábr a]! Ekkor a beszédp rocesszor hange rőjelzője mel lett ez a két jel (<>)
látható, é s a streamelt hang ha ngerőjelzőj e elhalványul. A b eszédproces szor hangerejének
módosít ásához nyomja meg a + v agy - jelet [1/6. vag y 7. ábra]! A z egyidejű sza bályzás módh oz
való viss zatéréshez tar tsa lenyomva a > g ombot [1/9. ábra] a bil lentyűzeten ad dig, amíg a két
jel meg ne m jelenik a két hangerő jelző mellett , ami azt jelenti, h ogy mindkét hang erőszint
akt ív.
Csak a streamelt hang módosítása
A stream elt hang erősségé nek módosítás ához nyomja meg egyszer a jobb old ali > gombot
a billent yűzeten [1/9. ábra] ! Ekkor a streamelt h ang hangerőjel zője mellett ez a két j el (<>)
látható, és beszédprocesszor hangerőjelzője elhalványul. A beszédprocesszor hangerejének
módosít ásához nyomja meg a + v agy - jelet [1/6. vag y 7. ábra]! A z egyidejű sza bályzás módh oz
való viss zatéréshez tar tsa lenyomva a < g ombot [1/8. ábra] a billentyű zeten addig, amíg a két
jel meg ne m jelenik a két hangerő skála mellett , ami azt jelenti, h ogy mindkét hangerőszint
akt ív.
Cochlear Wireless Phone Clip (külön
megvásárolható vezeték nélküli tartozék)
Ld. a
13.
ábrát!
A vezeték né lküli Phone Clip es zközt is lehet vezér elni a távirányító val. A távirányí tó kijelzője
jelzi, h a a Phone Clip működi k. A telefonhívás b efejeztével a bes zédprocesszor on az előzőleg
haszná lt program lesz elé rhető. Ez a progra m is látható a távirán yító kijelzőjén . A telefonhívás
közben vég zett hangerő- módosítás nem é rvényesül az e lőzőleg használt p rogramon. A
telefonhí vás közben az opcio nális tartozékon ke resztüli stre amelés időlege sen megszaka d, de a
hangköz vetítés a hívás végét köv etően automatiku san újraindul.
Melléklet: az általános üzemtől eltérő esetek
Ha Ön kétolda li beszédproce sszor felhasználó, javasoljuk, hogy a két e szköz mindig ugya narra
a progra mra legyen állít va. Úgy lehet séges különböz ő programokat be állítani a két beszé dprocesszor on, hogy az eg yiken például az 1- es program akt ív, a másikon p edig streamelt audiojel
hallható . Ilyen körülmény ek esetén a távirán yító működése kism értékben elté r az általánostó l,
ahogy e zt az alábbi pé ldák is szemléltetik :
1. eset: El őször mindkét olda lon a P1 program volt b eállítva, de kés őbb a jobb oldalon a
P2 progra mra váltott a jobb ol dali beszédpro cesszor gombján ak megnyomásáv al. Ha ekkor
megnyomja a P gombot a távir ányítón, a bal olda li beszédproce sszor – a jobb oldalival megegyez ően - a P2 programra l ép. A P gomb további me gnyomásakor a pro gramváltás mind két
beszéd processzoron é rvényesül, íg y ugyanaz a pro gram lesz elérh ető mindkét oldalon.
2. eset : A bal oldali be szédprocessz ort a P1 program ra, a jobb oldali be szédprocesszort a P2
progra mra állította. H a ekkor megnyomja a st reamelés gombo t, mindkét eszközön eg y azonos
forrásból (pl. tévéből) származó streamelt audiojelek lesznek hallhatók. Ha ekkor megnyomja
a P gombot a tá virányítón, a str eamelés mindkét ol dalon abbamar ad, és mindkét beszé dprocesszor a z előzőleg beállí tott programra ( p1 és P2) lép viss za.
3. eset: A b al oldali beszédprocesszor az 1-es prog ramra van állít va. A streamel ést a jobb
oldali be szédprocessz oron a streamelé s gombbal aktiv álták. Ha ekkor m egnyomja a P gombot,
a jobb olda li beszédproce sszoron az előző leg használt progr am lesz elérhet ő, a bal oldali
beszéd processzor a következő program ra lép (ha van ilyen). A P gomb újbóli megny omásakor mindkét b eszédprocess zor ugyanarra a programr a lép. Ha ekkor a stre amelés gombot
nyomja meg , mindkét beszéd processzor ug yanarra a stre amelt hangot közvet ítő eszközre lesz
beállítva.
4. eset: Amikor a két beszédprocesszoron eltérő beszédprocesszor-programok vannak
beállít va, a kijelzőn c sak az aktuál is programok szá ma látható. A progr am képe/neve nem
jelenik m eg a kijelzőn.
5. eset: Amikor az egyik beszédprocesszor streamelés üzemmódban van, a másikon pedig
valamelyik beszédprocesszor-program van beállítva, csak a streamelés kijelző lesz látható, a
progra m száma, képe és nev e nem lesz feltüntet ve.
Fontos tudnivalók
Gondozás és karbantartás
• A táv irányítót nedve s ruhával tiszt ítsa meg a szennye ződésektől ! A készüléket tilos há z-
tartási tisztítószerekkel (mosóporral, szappannal, stb.) vagy alkohollal tisztítani.
• A ha sználaton kívü li távirányítót kap csolja ki és tár olja biztonságo s helyen!
• Óv ja a távirányítót a túl zott nedvess égtől (fürdés, zu hanyozás közben) és sz élsőséges
hőhatástól (fűtőtest, járművek műszerfala)!
• Ne tegy e ki a készüléket túlzott rázkódásnak és fizik ai behatásnak !
Page 17

Általános figyelmeztetések
•
Tartsa a ké szüléket gyerm ekektől távol!
• A távirá nyító kis teljesítm ényű, digitálisa n kódolt jelátvi tellel kommunikál a tö bbi vezeték
nélküli eszközzel. Ritka esetben előfordulhat, hogy ez befolyásolja a közelben található
elektr onikus eszközök mű ködésé t. Ilyen esetbe n távolítsa el a táv irányítót az érintet t eszköz
közeléből!
• Ha a távir ányító használ ata közben elektro mágneses inter ferencia zavar ja a készülék
működé sét, távolítsa e l az eszközt az inter ferencia forrá sától!
Általános óvintézkedések
• Ne használja a készüléket olyan helyeken, ahol tilos elektronikus eszközöket használni!
• A rön tgensugárzá s (pl. CT/MRI berendezések ) zavarhatja a kész ülék működését . Ilyen jellegű
vizsgálatok esetén ka pcsolja ki a kész üléket, és ne vigye m agával a vizsgáló h elyiségbe!
• Nagy teljesítményű elektronikus berendezések, nagyobb villamosművek és fémszerkezetek
gyengí thetik és jelentős en csökkenthe tik a készülék hatókör ét.
• A z Ön beszédproc esszorát és a távi rányítót az illesz tés során egyedi kommunik ációs kóddal
látták el. Az egy edi kód miatt az Ön kés züléke nem fogja m ások beszédpr ocesszorána k
működését befolyásolni.
• A kés züléket tilos átala kítani vagy bá rmilyen formában módosíta ni.
• A táv irányító kinyitá sa kárt okozhat a ké szülékben. Ha o lyan probléma me rül fel, amelyet
egyed ül nem tud
megoldani, kérje hallásgondozó szakember segítségét!
• A távirányító javítás át kizárólag hivatalos szer viz
személyzete végezh eti.
• Ne h asználja a távir ányítót olyan helye n, ahol tilos a rádióhullámok s ugárzása, p éldául
repülőgépen!
• A táv irányítót kizáró lag a kifejezett re ndeltetési céljána k megfelelő eszközö khöz csatlakoz-
tassa!
A beépített akkumulátor gondozása
Kérjük, t artsa szem el őtt az alábbi infor mációkat és uta sításokat:
• A kés zülék energiael látását akkum ulátor biztosítja . Az új akkumulát or optimális teljes ít-
ményét két va gy három teljes fe ltöltési és lemerítési ciklust követően éri el.
• A z akkumulátor t több száz alkalommal lehet fe ltölteni és lemeríte ni, de egy idő utá n
elhasználódás miatt cserélni kell.
• A ha sználaton kívü li töltőt húzza ki a z elektromos hál ózatból és a készülékből is!
• A telj esen feltöltött, de n em használt akk umulátor is lemer ül egy bizonyos id ő után.
• A készülék magas hőmérsékletnek való kitétele csökkenti
az akkum ulátor teljesítm ényét és hasznos é lettartamá t.
• Elő fordulhat, hogy a teljesen feltö ltött, de hideg akku mulátor miatt a készülék egy id eig nem
indul el . Az akkumuláto r teljesítménye er ősen fagyos hő mérsékleti vis zonyok között romlik
a legnag yobb mértékb en.
Figyelmeztetések az akkumulátorra vonatkozóan
Figyelem! A készülékben található akkumulátor nem rendeltetésszerű használat esetén tüzet
vagy kém iai égést okozhat.
• A készülé kben található a kkumulátort a készülék has ználója nem távolí thatja el és nem
cseré lheti ki. Kérjük, n e kísérelje meg a kész üléket kinyitni. A kés zülék kinyitás ának kísérlete a
készülék meghibáso dását, sérülé sét okozhatja. Egyéb akkumulá torok használat a tüzet vagy
robban ást okozhat és a gara ncia érvényte lenítését vonhatja maga után.
• A távirá nyító újratöltéséh ez kizárólag a kés zülékhez kapo tt töltő használh ató.
• Az akk umulátor árta lmatlanítását a helyi előír ásoknak megf elelően végez ze! Kérjük,
lehetséges esetben törekedjen az akkumulátor újrahasznosítására.
• Az elemet ne dobja a háztartá si hulladékok közé vagy tűzbe, m ert túlhevülv e felrobbanhat!
A töltő gondozása
A készülékhez kapot t töltő esetén kérjük , tartsa szem e lőtt az alábbi info rmációkat és
utasításokat:
• A készülé k feltöltését kizár ólag a kapott, vá ltakozó áramú adapte r használatáv al végezze!
Egyéb tö ltők használat a a készül ék meghibásodá sát, tönkremen etelét okozhatja és veszélyekkel jár hat. Egyéb töltő k használata min denfajta engedély és a garanc ia érvénytele nítését
vonhatja m aga után.
• Az engedélyezet t tartozékok kínál atával kapcs olatban kérjük, l épjen kapcsol atba hallásgon -
dozó szakemberünkkel.
• A készülé k feltöltését a megad ott utasítások nak megfelelő en végezze!
Figyelmeztetések a töltőre vonatkozóan
•
Amikor kih úzza a hálózati c satlakozózsinó rt vagy egy t artozékot, ne a vezeté ket, hanem
mindig a dug aszt fogja meg é s húzza!
• Ne hasz nálja a töltőt, ha az sé rült!
• Ne kísé relje meg szétsze relni a töltőt, mer t veszélyes áram ütést szenvedhe t!
• A szétszerelt, majd helytelenül összeszerelt készülék későbbi használatkor áramütést vagy
tüzet okoz hat.
• Ne tölts e a készüléket szab ad téren, párás he lyen és szélsős égesen magas va gy alacsony
hőmérsékleti viszonyok között!
Műszaki információk
Hatótávolság Max. 3 m
Vezeték nélküli kommunikáció 2,4 GHz
Üzemi hőmérséklet-tartomány 0—55 °C
Tárolási hőmérséklet-tartomány -20 —60 °C
Hőmérsékleti teszt, szállításra és tárolásra vonatkozó tudnivalók
A készüléket több, bels ő és ipari szabvá nyoknak megfel elő, -25° C és +70° C közötti ta rtományban végzett hőmérsékleti és pára tesztnek vetették alá.
A felhasználói kézikönyvben szereplő modellekre vonatkozó
vezeték nélküli tartozék típus elnevezések:
FCC ID QZ3R C-2, IC 8039C-R C2, IC modell : RC-2
Megfelelőségi nyilatkozat:
Ez a készü lék megfelel az FCC el őírások 15. fejeze tében foglaltakn ak. A készülék ha sználata
az alább i feltételekhez kötöt t: (1) a készülék nem okozh at káros interfer enciát és (2) a
készüléknek el kell vis elnie bármely in terferenciát, b eleértve a mű ködést zavaró in terferenciát
is. Meg jegyzés: A kés zülék bevizsgá lása során meg állapították , hogy megfelel a z FCC előírások
15. fejezeté ben meghatározot t, B osztályú digi tális eszközökre vo natkozó határérté keknek.
Ezeket a hat árértékeket úgy állapított ák meg, hogy me gfelelő védelm et nyújtsanak a ká ros
interferenciák ellen lakóhelyiségekben történő használat esetén. Ez a készülék rádiófrekvenciás
energiát állít elő, has znál és sugározhat . Amennyiben ne m az előírások nak megfelelő en állítják
üzembe é s használják, ká ros interferenc iával zavarhat ja a rádióforgalmat . Ettől eltekintv e nem
szavato lható, hogy adot t helyzetekben n em fog fellépni inter ferencia. Ha a kés zülék a rádióvagy tel evízióvételben káros interferenciát okoz (amel y a készülék ki- és be kapcsolás ával
állapítható meg), a felhasználó az alábbi módszerekkel kísérelheti meg az interferencia
megszüntetését:
• Forgassa el vag y helyezze át a vevőantennát!
• Növe lje meg a készülék és a v evőberendezé s közötti távolsá got!
• Cs atlakoztassa a ké szüléket és a vevőb erendezést má s-más hálózaton lé vő aljzatba!
• Kérje n segítséget a forg almazótól vagy e gy tapaszt alt rádió- és tévés zerelőtől!
• A mód osítások vagy változtatá sok a felhasználó üzemeltetési jo gának érvény telenítését
eredményezhetik.
Földrajzi területek:
A termékek megfelelnek az alábbi előírások rendelkezéseinek:
• Az EU-ban: az e szköz megfelel a Tanác s 93/42/EG K orvostechni kai eszközökről sz óló
irányelve 1-es Függelékében foglalt alapvető követelményeknek, valamint az 1999/5/EK
irányelv alapvető követelményeinek és vonatkozó rendelkezéseinek. A megfelelőségi tanúsítvány megtekinthető a
www.cochlea r.com címen.
• A vezeték nélküli fu nkcióval rendelke ző termékek forgal mazása az Európ ai Gazdasági Térsé g
orszá gaiban és Svájcban történik. H asználati korl átozások: A kész üléket tilos a norvégiai Ny
Ålesund köz pont 20 km-es kö rzetében üzeme ltetni.
• Az U SA-ban: FCC CFR 47 15. fej ezet, C alfejezet, 15. 249. cikk
• Eg yéb meghatározott vonatkozó nemze tközi előírások Eur ópán és az USA-n k ívül. Ezekbe n az
orszá gokban a helyi elő írások érvé nyesek.
• A term ékek megfeleln ek az EN 300 328 szabv ánynak.
• A kan adai tanúsítási e ljárás eredményeként a távirá nyító az alábbi ta núsítási számot k apta:
IC:8039C-RC2.
• Ez a z eszköz megfelel az I ndustry Can ada nem engedély köteles rádiófrek venciás készü lékekre
vonatkozó szabványainak.
• Ez a B os ztályú digitál is berendezés me gfelel a kanadai I CES-003 sz abványnak. Cet a ppareil
numéri que de la classe B es t conforme à la nor me NMB-0 03 du Canada.
• A kész ülék üzemeltetése a z alábbi feltételek hez kötött: (1) a készül ék nem okozhat káros
interfe renciát és (2) a készülé knek el kell viseln ie bármely inter ferenciát, bele értve a
működé st zavaró interferenciát is. L’expl oitation est autor isée aux deux con ditions suivante s
: (1) l’appareil n e doit pas produire d e brouillage, et (2) l’utilisateur de l’appa reil doit accepter
tout broui llage radioéle ctrique subi, mê me si le brouillage e st susceptible d’en co mpromettre
le fonctionnement.
• A kész ülék RF jeladót ta rtalmaz.
 Loading...