

Page 1
10. Accessories List
Instruction Manual
Portable 7 COLOR TFT LCD TELEVISION SET
Name
AC Adaptor
Remote Control
AV Cable RCA Jack
Car Cord
Car Stand (Optional)
Instruction Manual
Exterior Antenna Jack
Fixed Screws PWA3*14)
Battery Compartment(Optional)
Quantity
1 piece
1 piece
1 piece
1 piece
1 piece
1 piece
1 piece
AV/TV
PIC
4
POWER
MUTE
CH+
SETUP
TUNE
VOL+VOL-
CH-
2
9
4 pieces
1 piece
Dear Customer:
Thank you for purchasing this product.
Please read this manual carefully before connecting, operating or
adjusting this product in order to ensure the best efficiency and
14
safety of this product. Please keep the manual for future reference.
Page 2

9. General Troubleshooting
Problem Reasons
No picture & sound
No picture
No sound
Poor reception
Dark or blurred picture
Improper connection of AC adaptor or car adaptor.
The batteries are run down or installed incorrectly..
Antenna is not properly attached. Relocate the TV to a place
where reception is better.
Sound volume is too low. The signal is too weak.
TV antenna is not adjusted properly or reception is too weak.
The brightness & contrast are too low.
Unclear or unstable picture
Picture moves up &
down, blurs or folds over
Sound on some channels
but not all
No color
TV antenna is not properly adjusted or reception is too weak.
TV antenna is not adjusted correctly. The reception is too
weak or compromised by buildings or nearby mountains.
Adjust FINE function up or down in the MENU until sound
is clear.
Color is not set correctly.
This troubleshooting guide is provided to help you if you experience any
problems with this TV. If you are still having difficulty, please contact
Technical Support, Monday-Friday 8:00 AM-11:00 PM EST,
Saturday and Sunday 9:00 AM-11:00 PM EST.
You can also reach us online at techsupport@cobyusa.com.
1-800-681-2629 or 718-416-3197
13
Page 3

8. General Specification:
1 Description: Portable 7 TFT LCD Color TV Set
2 TV System: NTSC3.58 System
3 AV System: NTSC3.58 / PAL4.43 System
4 Audio System: M
5 Display device: Color TFT-LCD
6 Display Screen Size: 7 inches
7 Video Input: 1Vp-p
8 Audio Output: 250mW (MAX)
9 Power Consumption: 11w
10 Resolution: 1440 (H)*234 (V)
11 Dots Distance: 0.107(H) X 0.372(V)mm
12 Visible Range: 154.08(H) X87.05(V)mm
13 Power Source: AC adaptor or car adaptor (normal: DC 12V)
14 Measurement: 195 (L) X 135 (W) X 30(D) mm
15 Weight: Approx. 490g
16 Connection terminals:
. Antenna Jack
. AV Input Jack
. Headphone Jack
. External Power Source Input Jack
,,
Table of ContentsTable of Contents
1. User Safety Instructions
2. General Parts
3. Connection
4. Operation Instructions
5. Battery Installation
6. Stand Fixture
7. Basic Characteristics and Functions
8. General Specification
9. General Troubleshooting
10. Accessories List
(2)
(3-4)
(5)
(6-9)
(10)
(10)
(11)
(12)
(13 )
(14)
12
Page 4

1. Safety Instructions
1) Read these instructions carefully.
2) Keep these instructions for future reference.
3) Heed all warnings.
4) Follow all instructions.
5) Do not expose to water or moisture.
6) Clean only with a dry cloth.
7) Keep objects away from ventilation openings. Do not block any ventilation openings at
any time.
8) Do not install near any heat sources such as stoves, computer towers, amplifiers or any
apparatus that produce heat.
9) Do not force the power plug in the wall outlet. A polarized plug as two blades with one
wider than the other. The wide blade is provided for your safety. If the provided plug does
not fit into your outlet, consult an electrician for replacement of the obselete outlet.
10) Place the power cord so that it is protected from being walked on, pinched by objects, torn
and exposed to liquids, especially at plugs, convenience receptacles, and the point where
they exit from the product.
11) Only use attachments/accessories specified by the manufacturer. Use of attachments/accessories
not recommended by the product manufacturer may cause hazards.
12) Use only with a cart, stand, tripod, bracket, or table specified by the manufacturer, or sold
with the apparatus. When a cart is used, use caution when moving the cart/apparatus
combination to avoid injury from tip-over.
13) Unplug the apparatus during lightning storms or when unused for long periods of time.
14) Do not use this apparatus near water, and no objects filled with liquids, such as vases,
shall be placed on the apparatus.
15) Refer all servicing to authorized service personnel.
For recycling or disposal information about this product,
please contact your local authorities or the Electronics
Industries Alliance: www.eiae.org
7. Basic Characteristics and Functions
1. TV System: NTSC3.58 System
2. AV System: NTSC3.58 / PAL4.43 System
3. Full Menu on-Screen Display
4. AUTO Search TV channel programming
5. GAME/DVD AV Equipment Connection Port
6. Brightness, Contrast & Color Adjustment
7. Stand By Mode
8. Detachable TV Battery Compartment Stand
9. Headphone Jack
10. Chinses/English/Japanese OSD language options
11
Page 5

5. Battery Installation( Optional):
Open and remove the battery door located on
the bottom of the battery compartment stand.
Insert 10 “AA” (UM-3) batteries into thebattery
compartment (see right p i cture). B e su re the
pol arity (+and-) matches the markings inside.
Close the battery door, and connect the power
cord of the battery compartment to the power
source input jack of the unit.
NOTE:
Do not mix new batteries with old or used ones.
Only use the batteries of the same type and brand.
Remove the batteries when not in use for a long period of time.
Do not connect the AC adaptor to the battery compartment while the power cord from the
battery compartment is connected to the unit.
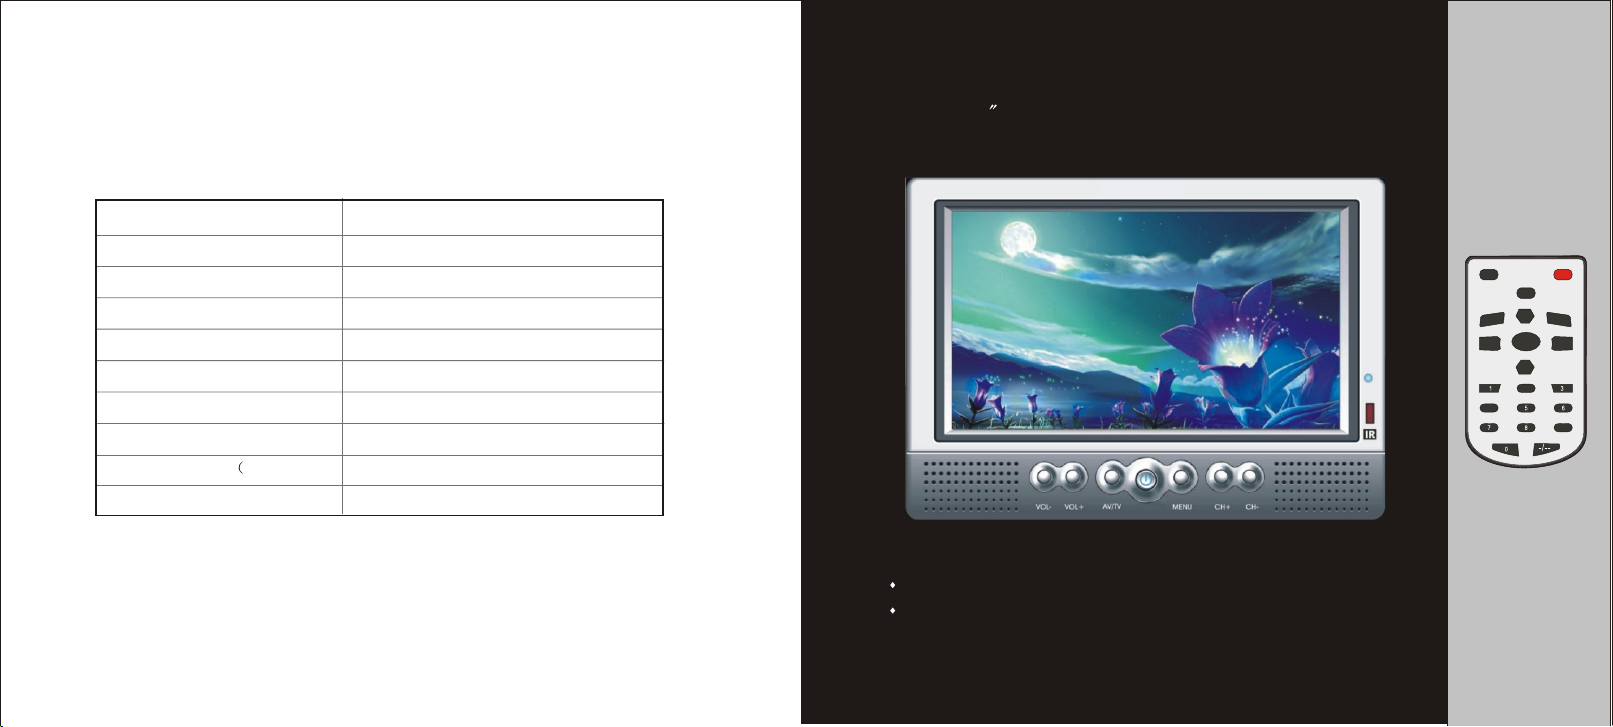
2. General Part
VOL- VOL+ CH-CH+AV/TV
1. Volume Down Control
2. Volume Up Control
3. AV/TV Switch
4. Stand By Button
5. Menu Button
6. Channel Up Button
7. Channel Down Button
8. Remote Control Sensor
MENU
9. Power/Standby Indicator
10. Built In Speakers
6. Stand Fixture(Optional)
- Loosen the metal washer on the top of
the stand, but do not separate it from
the stand (see picture 3-1).
- Insert the metal washer with the stand
into the slot on the back of the unit,
and slide the stand up to a suitable
height (see picture 3-2).
- Tighten Knob 1 (see picture 3-3) to
fasten the stand to the unit. Adjust the
angle of the unit, and then tighten
Knob 2 (see picture 3-3) to lock it in
place.
Metal washer
3-1
10
3-2
3-3
Knob1
Knob2
FRONT VIEW
11.Rotary Telescopic
Antenna
12. Stand Holder(Plastic)
3
Page 6

ANT.
AV IN
DC IN-12V
- -
++
SIDE VIEW
(2). Remote Control
AV/TVAV/TV
1
11
2
3
PICPIC
1 1
44
77 88
00
MUTEMUTE
CH+CH+
TUNETUNE
CH-CH-
2 2
55
13. Antenna Jack
14. AV IN Jack
15. Headphone Jack
16. Power Source Input Jack
POWERPOWER
SETUPSETUP
VOL+VOL+VOL-VOL-
4
5
6
12
7
8
9
3 3
66
99
-/--
10
18. Power Cord to DC 12V INPUT
17. Detachable Battery Compartment Stand
10 X AA UM-3 SIZE batteries are not included)
19. Car Stand
1. AV/TV Switch
2. Volume Down Control
3.
Number Selector
Stand By button
4.
Button
5. Mute
6. Channel Up Control
4
7. Tune
Mode
8.
Volume Up Control
9.
Channel Down Control
10.
Single/Two/Three Digits Selector
11. Picture Button
12. Set Up Button
- AUTO
Use this feature to program all available channels. Use the CH up or CH down
button to highlight the AUTO feature. Then, press VOL up or VOL down to initiate
this feature. Allow the unit to search all possible channels.
NOTE:
If some channels do not have sound use the FINE feature to fine-tune th e ch annel .
If sound does not appear please refer to the Troubleshooting section.
3. AV/TV button
Use the AV/TV button to switch between watching VID E O an d T V. Swit ch to
VIDEO. when using an external video source such a s a DVD o rVCR .Switch to
TV to watch TV through the antenna or cable TV.
4. MUTE button
Press the MUTE button one time, there is mute signal on the screen, press again,
the volume will resume.
5. VOL up / VOL down button
Use the VOL up and VOL down buttons to adjust the volume of the unit. The
volume range is 0-63. VOL up and VOL down buttons are also used to adjust
features in the MENU.
6. CH up/ CH down button
Use the CH up and CH down buttons to go from channel to channel. Also use the
CH up and CH down buttons to navigate the MENU functions.
7. NUMERICAL button(0-9)
Numerical button 0-9 is used for selecting program number , button 0-9 has the
function of power on when the TV is in waiting status.
8. -/-- button
If you want to select two-figure o r there-figur e program numbe r , yo u nee d to
press -/-- button, after -/-- shows on the screen, you can use the numerical button
to input the desired program number.
9
Page 7

- PRESET
Press MENU button of the unit or the TUNE button on the remote
until the PRESET screen appears (see picture 2-5).
Press CH up or CH down to scroll through these options.
Press VOL up or VOL down to adjust the desired option.
PRESET
PROG 120
SKIP OFF
BAND VHF-L
FINE
SIGNAL CATV
AUTO
- PROG
This function shows the current channel displayed. Use the VOL up
or VOL down buttons to scroll through the channels.
- SKIP
This function allows you to add or delete any channel. If you would
like to delete a channel simply navigate to the desired channe l with
the PROG button and press the VOL up or VOL down button unti l
this function reads ON .
- BAND
2-5
This feature simply displays what type of frequency is currently displayed (UHF, VHF, etc).
If you would like to add a channel simply press the VOL up or VOL
down button until the SKIP feature reads OFF .
The BAND function can not be adjusted.
- FINE
The FINE feature controls the fine tuning of each channel. Use the VOL up and VOL down but tons to fine tune each frequency for better sound and picture.
-
SIGNAL
The unit can work with both cable TV and an antenna. Simply adjust this feature to either ANT
for use with an antenna or CATV for use with cable TV.
The unit can receive up to 80 channels with the antenna setting (ANT) and 136 cha nnels wi th
cable TV(CATV) setting.
8
3. Connection
. Connection of the Antenna (See picture 1-1)
1
Plug the antenna into the ANT jack (13).
NOTE: The unit can receive CATV/ANT signals from the ANT jack input.
. Connection of the External AV Equipment
2
Plug the AV cable into the AV IN jack(14) . (Press AV/TV button(1) to enable the con nection of external audio and video equipment).
. Use of Headphone
3
- Connect the Headphone to at (15) for private listening.
- The speakers will not operate when headphones are connected.
CAUTION : Listening at high power for too long could damage your ears.
. Connection to the Power Source
4
(1) Connect one round end of attached AC adaptor to the power source
input jack (16 ) and the other end to the wall outlet at the suitable voltage .(1-1)
(2) Connect the detachable battery compartment stand power cord to the power source
input jack (16).
ANT.
AV IN
DC IN-12V
- -
++
(See picture 1-1)
,,
,,
(See picture 1-2)
Antenna
Red
YELLOW
Headphone
(not included)
AC Adaptor
AUDIO INPUT
VIDEO INPUT
(See picture 1-1)
or car adaptor
Detachable Battery Compartment Stand
10 X AA UM-3 SIZE batteries are not included)10 X AA UM-3 SIZE batteries are not included)
AC Adaptor
(Options)
(1-2)(1-1)
5
Power Cord to
DC 12V Input
(Options)
ANT.
AV IN
DC IN-12V
- -
++
Page 8

4. The operation of the TV set and remote control
1. The POWER button
After plugging the unit in the power light(9) should be red, press the POWER
button of the unit or the remote to turn the unit on and off.
2. MENU /PIC/SETUP/TUNE button
The MENU button of the unit controls the following three on-screen functions:
1) PICTURE: To adjust brightness, contrast, etc.
2) FUNCTION: To adjust system , language, and clock functions.
3) PRESET: To adjust auto search, add/delete, fine tuning, etc.
Press the MENU button to scroll through these three on-screen options.
- PICTURE
Press MENU button of the unit once or the PIC button on the remote to enter.
The PICTURE screen will show the following content
Press CH up or CH down to scroll through these options.
Press VOL up or VOL down to adjust each option.
PICTURE FUNCTION PRESET
2-2
(see picture 2-3).
PICTURE
BRIGHT 32
CONTRAST 32
COLOR 32
TINT 00
2-3
- BRIGHT
Press VOL up to make picture brighter and VOL
down to make picture darker.
- CONTRAST
Press VOL up to i ncrease c ontrast and V OL d own
to decrease contrast.
- COLOR
Press VOLu p o rV OL d own t o a djust c olor l evels.
- TINT
Press VOL up or VOL down to adjust tint levels.
6
- FUNCTION
Press MENU button of the unit again or the SETUP button on the remote until
FUNCTION screen appears (see picture 2-4).
Press CH up or CH down to scroll through these options.
Press VOL up or VOL down to adjust each option.
FUNCTION
SYSTEM SYS1
/ENG/ ENG
- SYSTEM
System has been disabled for this unit.
- LANGUAGE
The unit support OSD language in Chinese /English/Japanese.
- CLOCK
VOL up is used for setting hour, Press VOL up one time, the time will add one
hour. VOL down is used for setting minutes. Press VOL down one time and the
Clock will add one minute.
CLOCK --:--
2-4
7
 Loading...