

Page 1
- 1 -
Important Safety Instructions
alerts the user
to “dangerous voltage” which could cause electric shock.
er to read
WARNING:
To reduce the risk of fire
or electric shock, DO NOT expose
this product to rain or moisture.
The lighting flash with ar rowhead symbol, within a triangle,
The exclamation point within a triangle is indicates to the us
important operating and maintenance instructions in the manual.
Notes
1) Read these instructions.
2) Keep these instructions.
3) Heed all warnings.
4) Follow all instructions.
5) Do not use near water.
6) Clean only with dry cloth.
7) Do not block any ventilation openings. Maintain well-ventilated conditions around
the product. Do not put product on bed, sofa or anything that blocks ventilation.
Install in accordance with the manufacturer’s instructions.
8) Do not install near any heat sources such as radiators, heat registers, stoves, or
other apparatus (including amplifiers) that produce heat.
9) This unit is equipped with a polarized plug. A polarized plug has two blades with
one wider than the other. A grounding type plug has two blades and a third
grounding prong. The wide blade or the third prong is provided for your safety. If
the plug provided doesn’t fit in your outlet, consult an electrician for replacement
of the obsolete outlet. Removal of the polarized plug will diminish the plugs level
of safety.
10) Protect the power cord from being walked on or pinched particularly at plugs,
convenience receptacles, and the point where they exit from the apparatus.
11) Only use attachments/accessories specified by the manufacturer.
12) Use only with the cart, stand, tripod, bracket, or table specified by the
manufacturer, or sold with the apparatus. When a cart is used, use caution when
moving the cart/apparatus combination to avoid injury from tip-over.
13) Unplug this apparatus during lightning storms or when unused for long periods of
time.
14) Refer all servicing to qualified service personnel. Servicing is required when the
apparatus has been damaged in any way, for example, power -supply cord or plug
is damaged, liquid has been spilled or objects have fallen into the apparatus, the
apparatus has been exposed to rain or moisture, does not operate normally, or
has been dropped.
15) Apparatus should not be exposed to dripping or splashing and no objects filled
with liquids, such as vases, should be placed on the apparatus.
NOTE: Do not touch the color TFT LCD screen by hand directly.
Prop. 65 Warning: Handling the coated electrical wires of this product exposes you to lead, a chemical known to
the State of California to cause cancer, birth defects and other reproductive harm. Wash hands after use.
Page 2

- 2 -
Features
The PMP7040 is a personal multimedia player (PMP) that can play various
types of audio, video and digital images. The 40GB built -in hard disk drive
allows you to store many of your favorite videos, music and pictures and
enjoy them wherever you go. You can directly record onto the PMP by
connecting it to a TV, and view the videos on a TV. The PMP7040 has USB
On-the-Go (OTG) that allows you to download from other USB devices.
LCD (Liquid Crystal Display) Screen:
The 7" widescreen color LCD displays
videos and pictures.
Playback and Recording:
The PMP7040 supports video playback,
music playback, picture slideshow with
music, voice recording and video
recording.
Audio/Video Output:
The PMP7040 can be connected to a
TV, LCD, slide projector, etc. via the
supplied A/V cable.
Audio/Video Input:
The PMP7040 can be connected to
external audio/video sources to record
programs.
Voice Recording Function
The built-in microphone allows you to
record voice memos, lectures, etc.
USB:
The PMP7040 has a USB 2.0 port that
can be up to 40 times faster than USB
1.0.
It also has a USB 2.0 OTG port that can
be used to download files from external
USB device by using the supplied USB
host cable.
Supported File Format s:
Supports most MPEG1, MPEG2 and
MPEG4 (MPG, DAT, VOB, AVI) video
files, MP3 and WMA audio files, and
JPG and BMP image files.
Hard Disk Drive:
The 40GB hard disk drive can store
many MPEG4 video files and/or
thousands of MP3 audio files.
A PC recognizes the PMP7040 as a
USB mass storage device. You can
easily transfer documents, data, videos,
audio, and pictures without any special
software.
SD /MMC Card:
The PMP7040 is designed with an
SD /MMC card slot. You can insert an
SD card from a camera and look at the
pictures.
Page 3
- 3 -
Accessories
USB Cable
s:
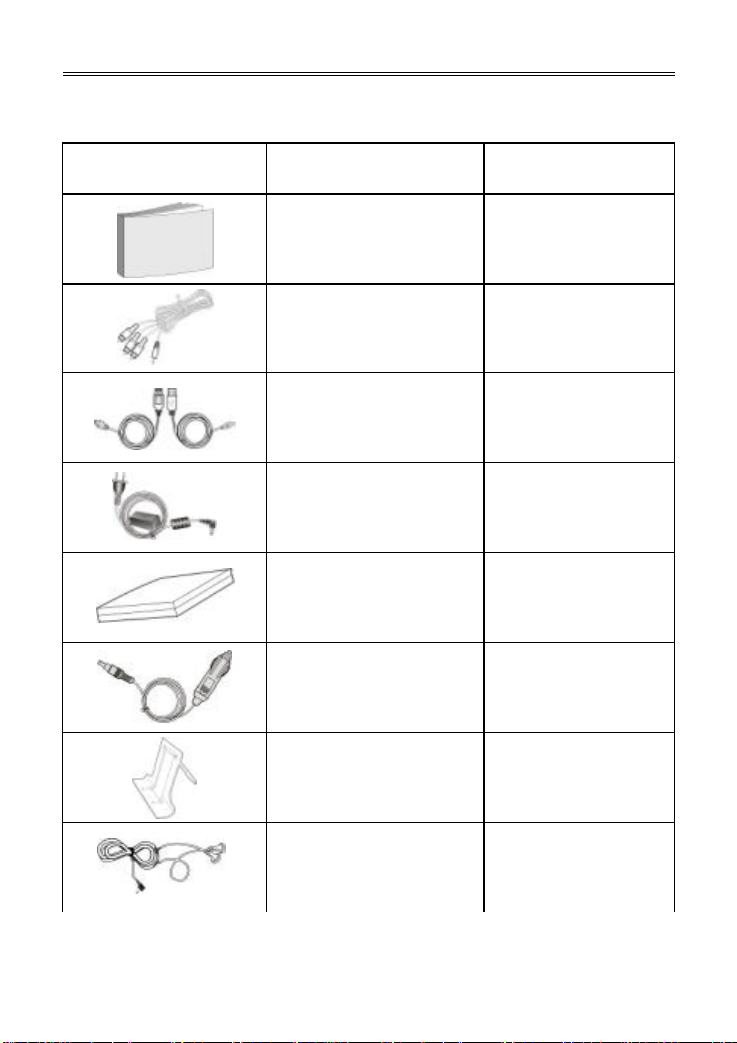
Please refer to the following table to make sure that all these items are included with
the PMP.
Picture
Name
User’s Manual
A/V Cable
(Host and Mini)
Power Adapter
Rechargeable Battery
Car Adapter
Stand
Number
1
1
1 of each
1
1
1
1
NOTE: If you are missing any of the accessories listed above, please contact the store
that you purchased this item from.
Earphones
1
Page 4

- 4 -
Table Of Contents
11 12 13 14 15 15 16 17 17 21 23 25 26 26 27 28 29 29 30 31 31 32 33 34 35 36
Important Safety Instructions ----------------------------------------------------------------------Features ---------------------------------------------------------------------------------------------------Accessories ----------------------------------------------------------------------------------------------Table of Contents ---------------------------------------------------------------------------------------Layout and Description - Front/Top/Sides -----------------------------------------------------Layout and Description - Back ---------------------------------------------------------------------Rechargeable Battery ---------------------------------------------------------------------------------Connections -----------------------------------------------------------------------------------------------
Power Adapter -------------------------------------------------------------------------------------A/V Output ------------------------------------------------------------------------------------------A/V Input --------------------------------------------------------------------------------------------DC Adapter -----------------------------------------------------------------------------------------PC ----------------------------------------------------------------------------------------------------USB --------------------------------------------------------------------------------------------------Earphones -------------------------------------------------------------------------------------------
Main Menu --------------------------------------------------------------------------------------------------
Movie ------------------------------------------------------------------------------------------------Music -------------------------------------------------------------------------------------------------Photo -------------------------------------------------------------------------------------------------File Manager ---------------------------------------------------------------------------------------Settings -----------------------------------------------------------------------------------------------
Display Setting ----------------------------------------------------------------------------Audio Setting -------------------------------------------------------------------------------Slideshow Setting -------------------------------------------------------------------------Power Setup -------------------------------------------------------------------------------Player Information ------------------------------------------------------------------------Password Setting -------------------------------------------------------------------------Reset -----------------------------------------------------------------------------------------Format HDD ---------------------------------------------------------------------------------
Recording --------------------------------------------------------------------------------------------------USB/SD -----------------------------------------------------------------------------------------------------System Upgrading---------------------------------------------------------------------------------------Troubleshooting ------------------------------------------------------------------------------------------Specifications----------------------------------------------------------------------------------------------
1
2
3
4
5
7
8
11
Page 5
- 5 -
Layout and Description
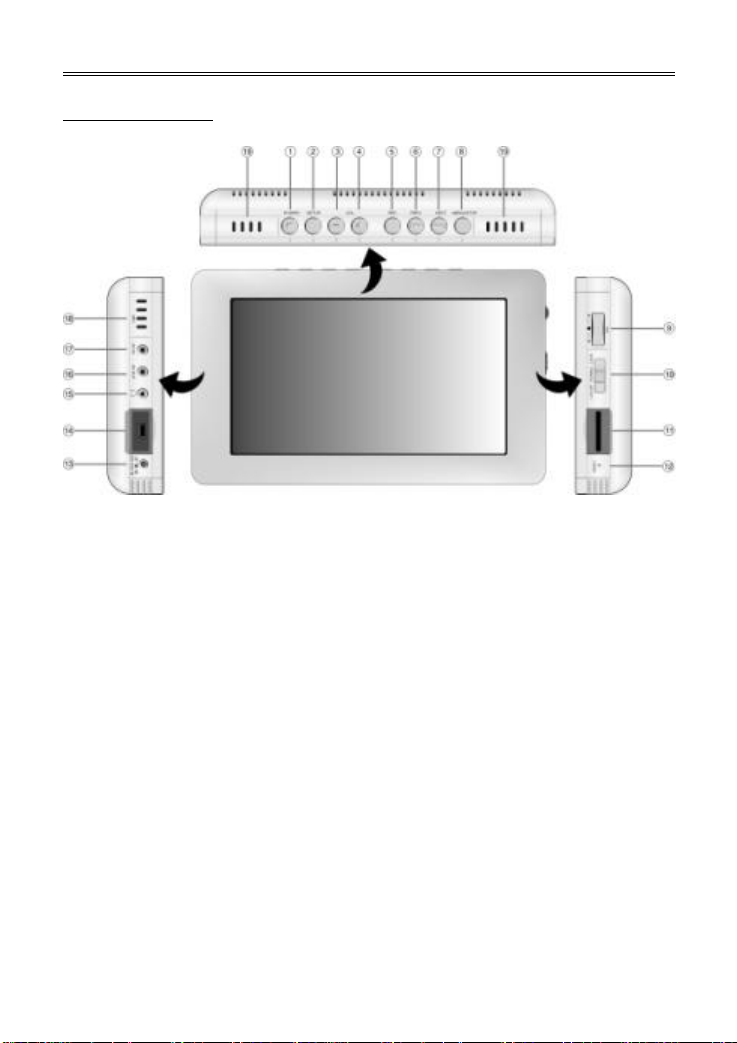
Front/Top/Sides
1. POWER Button/Power Indicator/Charge Indicator
Press and hold for about 2 second s to turn on/off the power.
When the power is off and the battery is being charged, the indicator is red.
It turns off when charging is complete.
When the power is on and the battery is being charged, the indicator is orange.
It become green when charging is complete.
2. SETUP Button
This button can activate various functions or options depending on the mode. See
the movie, music, photo and file manager sections for more information.
3. VOLUME – Button
Press to decrease the volume.
4. VOLUME + Button
P ress to increase the volume.
5. REC Button
Press to enter the record mode.
Press to adjust the brightness, contrast or color in the video, music or photo
playback mode.
6. 9 PREV Button
Press to skip to the previous file in the video, music or photo playback mode.
Press to adjust settings in the various setting menus.
Press to display the previous page of files/folders in the file/folder list.
Page 6

- 6 -
Layout and Description
7. : NEXT Button
Press to skip to the next file in the video, music or photo playback mode.
Press to adjust settings in the various setting menus.
Press to display the next page of files/folders in the file/folder list.
8. MENU/STOP Button
Press to return to the previous menu.
P ress to stop playback in the video, music or photo playback mode.
P ress to stop recording in the video or voice recording mode.
9. Three-Way Button (ENTER, UP, DOWN)
Click this button (press in) for “ENTER”. Use the “ENTER” button to
enter/open/confirm the selected item/selection. It is also used to play/pause files.
Roll this button up (press up) for “UP”. Use the “UP” button to select an item. It is
also used to fast forward.
Roll this button down (press down) for “DOWN”. Use the “DOWN” button to select
an item. It is also used to fast backward.
10. LCD OFF/NORMAL/LOCK Switch
To turn off the LCD, set the switch to “LCD OFF”.
To lock the functions of the buttons (HOLD), set the switch to “LOCK”.
Set the switch to “NORMAL ” to turn off HOLD and turn on the LCD.
11. SD/MMC Card Slot
Insert an SD /MMC card.
12. RESET Button
Press to reset the player.
13. DC 9.5V IN Jack
Connect the supplied 9.5V power adapter.
14. USB Port
Connect a USB cable.
15. Earphone Jack
Connect earphones.
16. A/V Out Jack
Connect the supplied A/V cable. Connect the other end to a TV, projector, etc. to
display videos and pictures on a larger screen.
17. A/V In Jack
Connect the supplied A/V cable. Connect the other end to a TV, VCR, camcorder,
etc. to directly record video.
18. MIC
The built-in microphone is used for voice recording.
19. Speakers
The speakers deliver high output stereo sound .
Page 7
- 7 -
Layout and Description
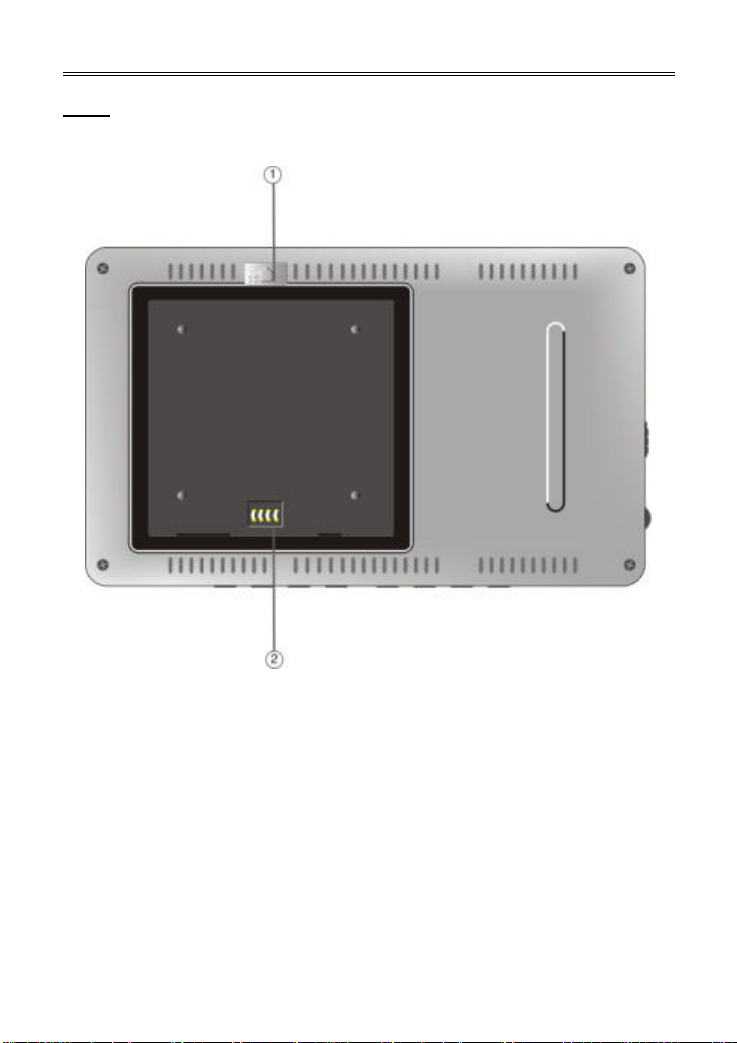
Back
1. Battery Release
Push outward to detach the rechargeable battery ( see page 10).
2. Rechar geable Battery Contacts
Used to connect with the rechargeable battery.
Note: Do not touch or press the rechargeable battery contact s.
Page 8

- 8 -
Rechargeable Battery
The included lithium polymer battery can power the PMP for portable use.
About the rechargeable battery
Fully charge the battery before the initial use. Charging time is normally about 5 hours.
A fully charged battery provides about 3.5 hours of use for video playback.
Working conditions and precautions for the rechargeable battery
Ø Under normal conditions, the charging time of the battery is about 5 hours. The
fully charged battery will last for 3.5 hours for video playback in room
temperature. If the temperature is too hot or too cold, the battery will not last as
long.
Ø When the power is off and the battery is being charged, the indicator is red. I t
turns off when charging is complete.
Ø The battery will slowly lose its charge when not used for a long period of time.
Ø It is recommended to detach the battery when the PMP is not in use.
Ø If the battery will not be used for a long period of time, it is recommended to fully
charge the battery first, then detach the battery from the PMP for storage. This
will help prolong the lifespan of the battery.
Ø When the battery is low, a message will appear on the screen. The battery will
turn off automatically one minute later.
Ø The battery should be stored in a dry, cool place and away from direct sunlight.
Ø Do not throw the battery into a fire.
Ø Keep the rechargeable battery from being exposed to moisture.
Ø Do not connect any metal objects to the contacts of the battery.
Ø Do not open or disassemble the battery.
Ø Do not short the battery terminals.
Warning:
Do not touch any metal objects to the battery connectors, as it will put the
battery in standby mode. To exit the standby mode, connect the battery and the
PMP to AC power.
Page 9
- 9 -
Rechargeable Battery
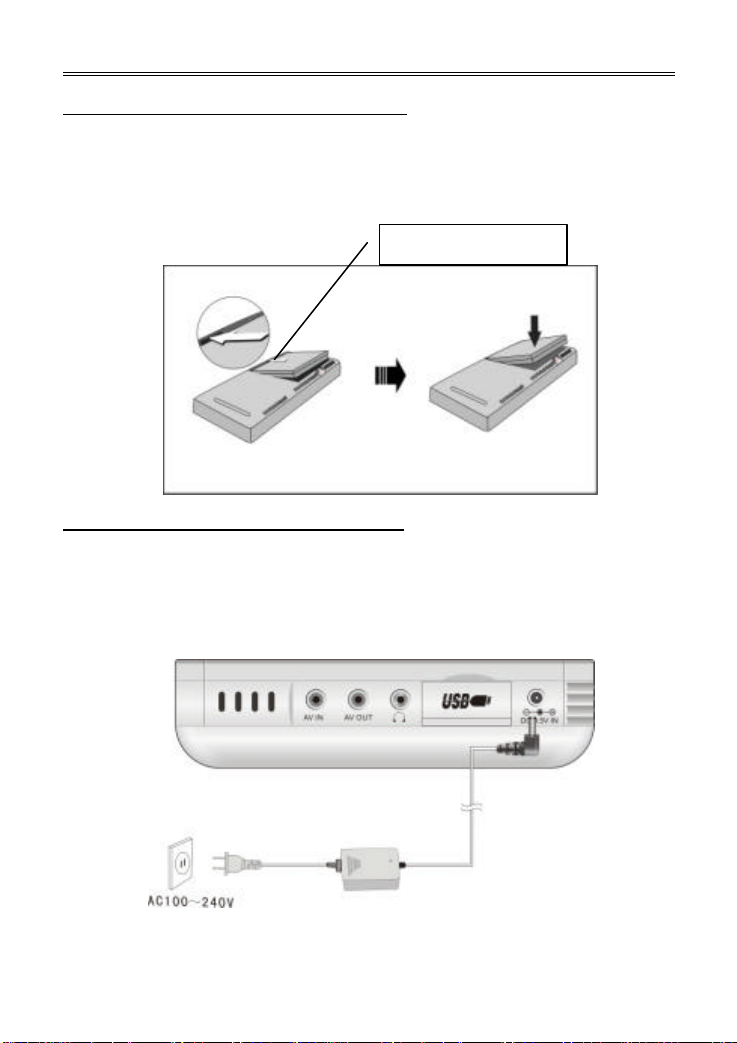
Attaching The Rechargeable Battery
1. Place the player on a flat surface with the bottom facing up.
2. Align the plastic tabs on the rechargeable battery with the slots on the player. Be
sure to place the battery over the contacts. P ush the battery downward until it is
goes into the battery slot, and you will hear a slight click. See the diagram below :
Charging The Rechargeable Battery
The battery must be attached to the PMP to charge it.
1. Attach the battery to the PMP as shown above.
2. Plug the supplied power adapter into the power jack marked “DC 9.5V IN” on the
left side of the player.
3. Plug the other end of the power adapter into an AC outlet, as shown below:
It is recommended to charge the battery when the player is in standby mode.
Insert this side first.
Page 10
- 10 -
Rechargeable Battery
NOTE: The rechargeable battery will discharge gradually when not used for a long
period of time.
NOTE: If the PMP will not be used for a long period of time, detach the battery from
the player in order to prolong the life of the battery.
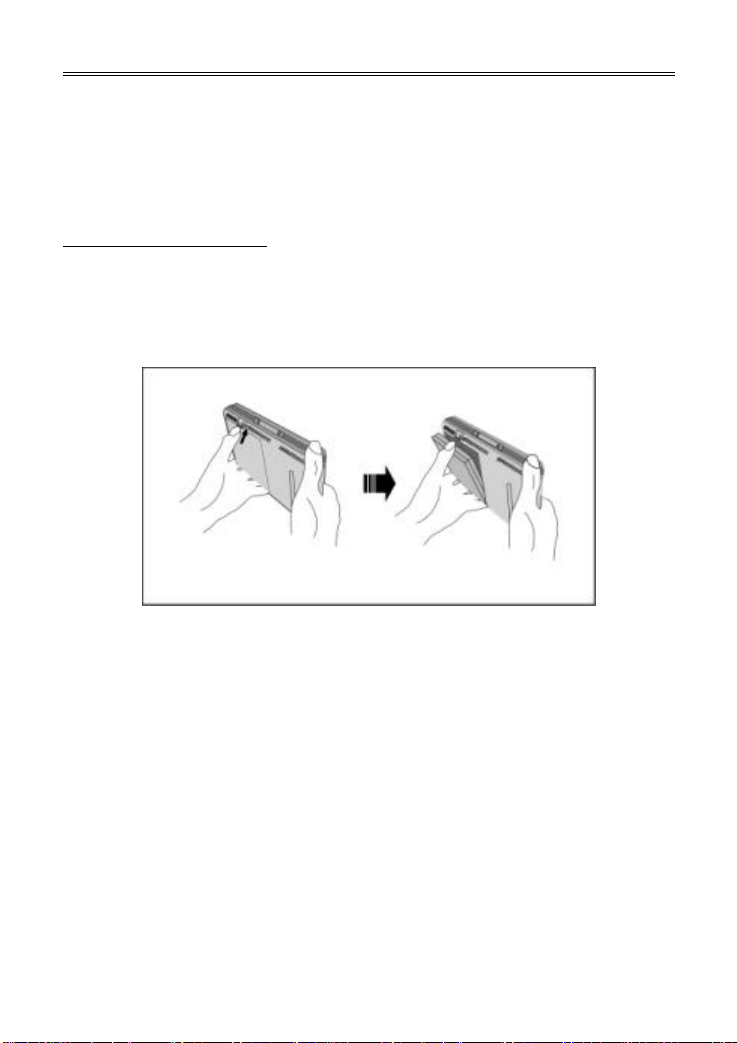
Detaching the battery
Slant the player with the bottom downward, and push the battery release in the
direction of the arrow. The battery will automatically come out. See the diagram below:
NOTE: Do not touch the LCD screen when attaching or detaching the battery.
Page 11
- 11 -
Connections
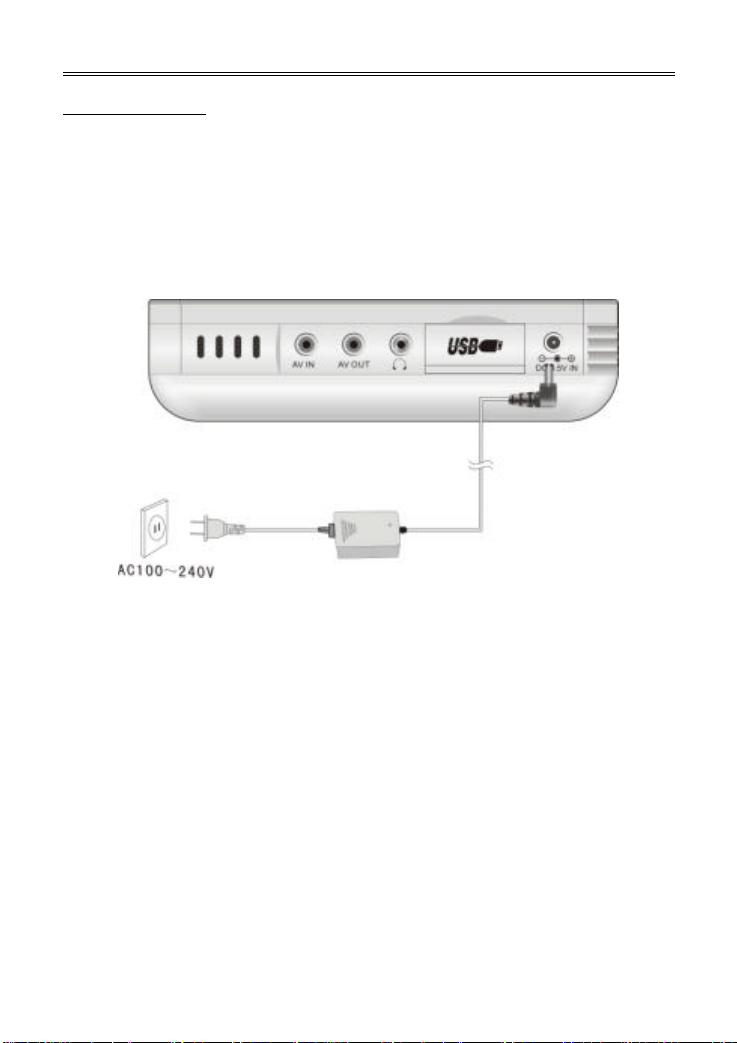
Power Adapter
The PMP is supplied with an AC adapter for powering the unit and charging the
battery.
1. Connect the AC adapter to the left side of the player in the jack marked “DC 9.5V
IN”, as shown below.
2. Plug the two-prong end of the power cord into an electrical outlet.
Page 12

- 12 -
Connections
A/V Output
The PMP has an A/V output function. Follow the steps below to connect the PMP to
another device, such as a TV.
Plug the 3.5mm plug into the “AV OUT” jack on the left side of the PMP.
Plug the RCA plugs into the input jacks of the external device, such as a TV. Be sure
to match up the yellow, red and white plugs with the corresponding jacks. See the
diagram below :
Page 13

- 13 -
Connections
A/V Input
The PMP has an A/V input function. Follow the steps below to connect the PMP to
another device, such as a TV.
Plug the 3.5mm plug into the “AV IN” jack on the left side of the PMP.
Plug the RCA plugs into the output jacks of the external device, such as a TV. Be sure
to match up the yellow, red and white plugs with the corresponding jacks. See the
diagram below :
NOTE: In the recording previewing mode, the external A/V signal input will be
displayed on the screen.
Page 14

- 14 -
Connections
DC Adapter
When using the PMP in a vehicle, you can use the supplied DC adapter to power the
PMP .
1. Connect the DC adapter to the ”DC 9.5V IN” jack on the left side of the PMP .
2. Plug the other end into the vehicle DC outlet (cigarette lighter socket) as shown
below.
Note:
Ø Do not operate the unit or view videos while driving a vehicle.
Ø Disconnect the PMP from the DC adapter when starting the vehicle.
Ø Detach the battery pack when using the DC adapter.
Ø Do not use the DC adapter to charge the battery.
Page 15

- 15 -
Connections
PC
Use the supplied USB cable to connect the PMP to a personal computer.
Plug one end into the USB jack on the left side of the PMP and the other end into the
USB port of the computer. See the diagram below:
Other USB Devices (OTG)
Use the supplied USB host cable to connect the PMP to an external USB device.
Plug one end of the USB host cable into the USB jack on the left side of the PMP and
the other end into the USB device, such as an MP3 player. See the diagram below :
Page 16

- 16 -
Connections
If the external USB device does not have a built-in USB port, such as a digital camera,
connect the device to the host cable using its supplied USB cable. See the diagram
below:
Earphones
Turn the volume down before you connect the earphone s to the earphone jack of the
PMP . See the diagram below:
The speakers will automatically be muted when the earphones are connected.
NOTE: Excessively loud volume can damage your hearing.
Page 17

- 17 -
Main Menu
Press the “POWER ” button for 2 seconds to turn on the power. The main menu will be
displayed on the screen. There are five items in the main menu: Movie, M usic, Photo,
File Manager and Settings.
Movie
The movie player is used to view video files. Compatible file types are AVI, MPG, DAT,
and VOB.
1. In the main menu, use the “UP/DOWN” button to select “Movie”, and press the
“ENTER” button.
2. The PMP will go to the movie mode and display the video file/folder list. Use the
“UP/DOWN” button to select a file/folder. P ress the “PREV/NEXT (9 / :)”
button to display the previous/next page of files/folders in the file/folder list .
3. Press the “ENTER” button to play the selected video file. Press the “ENTER”
button to enter the selected folder . Press the “MENU/STOP” button to return to
the previous menu or folder.
NOTE: Some video files may not playback in the movie player. This may be due to the
way a video file was encoded.
Ø During playback, press the “PREV/NEXT (9 / :)” button to play the
previous/next video file.
Ø P ress the “ENTER” button to pause/resume playback.
Ø Press the “UP/DOWN” button to fast forward / fast backward. Press again to
increase the speed (2x, 4x, 8x). Press the “ENTER” button to resume normal
playback.
Ø Press the “MENU/STOP” button to stop playback and return to the video
file/folder list.
Ø Press the “SETUP ” button to switch the screen aspect ratio (4:3 and16:9).
Ø Press and hold the “SETUP ” button to enter the time search. Use the
“UP/DOWN” buttons to decrease/increase the digit. Use the “PREV/NEXT (9 /
:)” buttons to select the hour, minute, and second digits. Press the “ENTER”
button to start playback from the inputted time. If the time inputted is beyond the
length of the file, the time will be reset to “00:00:00”.
Ø Press the “REC” button to enter the brightness, contrast and color adjust ment
mode. Press the “PREV/NEXT (9 / :)” button to adjust the setting. Press the
“REC” button to go to the next setting.
NOTE: Some video files may not support the fast forward/rewind and time search
functions because the index information is incomplete or there is no key frame.
Page 18

- 18 -
Main Menu
Ø Play mode: Press the “SETUP” button in the video file/folder list to display a
menu at the bottom of the screen. Press the “UP/DOWN” button to select “Play
mode”, and press the “ENTER” button.
Press the “PREV/NEXT (9 / :)” button to select a video play mode (OFF,
Normal, Repeat One, Repeat All, Shuffle). Press the “MENU/STOP” button to
return to the previous menu.
Ø Playlist: Press the “SETUP” button in the video file/folder list to display a menu
at the bottom of the screen. Press the “UP/DOWN” button to select “Playlist”,
and press the “ENTER” button.
Use the “UP/DOWN” buttons to select a video file in the file/folder list window on
the left, and press the “ENTER” button to add that video file to the playlist. Use
the “MENU/STOP” button to return to the previous folder. Press the “NEXT (:)”
button to switch to the playlist window on the right. Select a file in the playlist,
and press the “ENTER” button to remove the file from the playlist. Press the
“MENU/STOP” button to return to the previous menu. In the video file/folder list,
“Playlist_Video” will be shown at the top. Play that item to begin playback of the
files in the playlist.
Ø Favorites: Press the “SETUP” button in the video file/folder list to display a
menu at the bottom of the screen. Press the “UP/DOWN” button to select
“Favorites”, and press the “ENTER” button.
Page 19

- 19 -
Main Menu
Use the “UP/DOWN” buttons to select a video file in the file/folder list window on
the left, and press the “ENTER” button to add that video file to the favorites. Use
the “MENU/STOP” button to return to the previous folder. Press the “NEXT (:)”
button to switch to the favorites window on the right. Select a file in the list, and
press the “ENTER” button to remove the file from the favorites. Press the
“MENU/STOP” button to return to the previous menu. In the video file/folder list,
“HDD/My Favorites” will be listed at the top. Play that item to begin playback of
the files in the favorites.
Ø Copy: Press the “SETUP” button in the video file/folder list to display a menu at
the bottom of the screen. Press the “UP/DOWN” button to select “Copy”, and
press the “ENTER” button.
Use the “UP/DOWN” buttons to select a video file that you want to copy in the
file/folder list window on the left, and press the “ENTER” button to highlight that
video file. Use the “UP/DOWN” buttons to select another video file that you want
to copy, and press the “ENTER” button to highlight that video file. Use the
“UP/DOWN” buttons to select a highlighted video file, and press the “ENTER”
button to un-highlight that video file. Use the “MENU/STOP” button to return to
the previous folder. Press the “NEXT (:)” button to switch to the folder list
window on the right. Use the “UP/DOWN” buttons to select a folder to copy the
Page 20

- 20 -
Main Menu
files to, and press the “ENTER” button to copy the video files. “/HDD” is the root
directory of the PMP. Press the “MENU/STOP” button to return to the previous
menu.
Ø Delete: Use the “UP/DOWN” buttons to select a file that you want to delete in
the video file/folder list, and press the “SETUP” button.
Press the “UP/DOWN” button to select “Delete”, and press the “ENTER” button.
Press the “PREV (9)” button to select “YES”, and press the “ENTER” button to
delete the file.
Ø Rename: Use the “UP/DOWN” buttons to select a video file/folder that you want
to rename in the video file/folder list, and press the “SETUP” button.
Use the “UP/DOWN” button to select “Rename”, and press the “ENTER” button.
Use the “UP/DOWN/PREV/NEXT (9 / :)” buttons to select letters on the
keyboard, and press the “ENTER” button to input the letter. When you are
finished entering the new name, select “ENTER” on the keyboard, and press the
“ENTER” button to rename the file. Press the “MENU/STOP” button to return to
the previous menu.
Page 21

- 21 -
Main Menu
Music
The music player is used to play audio files. Compatible file types are MP3 and WMA.
1. In the main menu, use the “UP/DOWN” button to select “Music” , and press the
“ENTER” button.
2. The PMP will go to the music mode and display the audio file/folder list. Use the
“UP/DOWN” button to select a file/folder. P ress the “PREV/NEXT (9 / :)”
button to display the previous/next page of files/folders in the file/folder list .
3. Press the “ENTER” button to play the selected audio file. Press the “ENTER”
button to enter the selected folder . Press the “MENU/STOP” button to return to
the previous menu or folder .
Ø During playback, press the “PREV/NEXT (9 / :)” button to play the
previous/next audio file.
Ø P ress the “ENTER” button to pause/resume playback.
Ø Press the “UP/DOWN” button to skip backwards/forwards by 10 seconds.
Ø Press the “MENU/STOP” button to stop playback and return to the audio
file/folder list.
Ø Press the “SETUP ” button to switch the play mode (NORMAL, REPEAT ONE,
REPEAT ALL, SHUFFLE).
Ø Press the “REC” button to enter the brightness, contrast and color adjustment
mode. Press the “PREV/NEXT (9 / :)” button to adjust the setting. Press the
“REC” button to go to the next setting.
Ø Play mode: Press the “SETUP” button in the audio file/folder list to display a
menu at the bottom of the screen. Press the “UP/DOWN” button to select “Play
mode”, and press the “ENTER” button. Press the “PREV/NEXT (9 / :)” button
to select an audio play mode (OFF, Normal, Repeat One, Repeat All, Shuffle).
Press the “MENU/STOP” button to return to the previous menu.
Ø Playlist: Press the “SETUP” button in the audio file/folder list to display a menu
at the bottom of the screen. Press the “UP/DOWN” button to select “Playlist”,
and press the “ENTER” button. Use the “UP/DOWN” buttons to select an audio
file in the file/folder list window on the left, and press the “ENTER” button to add
that audio file to the playlist. Use the “MENU/STOP” button to return to the
previous folder. Press the “NEXT (:)” button to switch to the playlist window on
the right. Select a file in the playlist, and press the “ENTER” button to remove
the file from the playlist. Press the “MENU/STOP” button to return to the
previous menu. In the audio file/folder list, “Playlist_Audio” will be shown at the
top. Play that item to begin playback of the files in the playlist.
Ø Favorites: Press the “SETUP” button in the audio file/folder list to display a
menu at the bottom of the screen. Press the “UP/DOWN” button to select
“Favorites”, and press the “ENTER” button. Use the “UP/DOWN” buttons to
select an audio file in the file/folder list window on the left, and press the
“ENTER” button to add that audio file to the favorites. Use the “MENU/STOP”
button to return to the previous folder. Press the “NEXT (:)” button to switch to
Page 22

- 22 -
Main Menu
the favorites window on the right. Select a file in the list, and press the “ENTER”
button to remove the file from the favorites. Press the “MENU/STOP” button to
return to the previous menu. In the audio file/folder list, “HDD/My Favorites” will
be listed at the top. Play that item to begin playback of the files in the favorites.
Ø Copy: Press the “SETUP” button in the audio file/folder list to display a menu at
the bottom of the screen. Press the “UP/DOWN” button to select “Copy”, and
press the “ENTER” button. Use the “UP/DOWN” buttons to select an audio file
that you want to copy in the file/folder list window on the left, and press the
“ENTER” button to highlight that audio file. Use the “UP/DOWN” buttons to
select another audio file that you want to copy, and press the “ENTER” button to
highlight that audio file. Use the “UP/DOWN” buttons to select a highlighted
audio file, and press the “ENTER” button to un-highlight that audio file. Use the
“MENU/STOP” button to return to the previous folder. Press the “NEXT (:)”
button to switch to the folder list window on the right. Use the “UP/DOWN”
buttons to select a folder to copy the files to, and press the “ENTER” button to
copy the audio files. “/HDD” is the root directory of the PMP. Press the
“MENU/STOP” button to return to the previous menu.
Ø Delete: Use the “UP/DOWN” buttons to select a file that you want to delete in
the audio file/folder list, and press the “SETUP” button. Press the “UP/DOWN”
button to select “Delete”, and press the “ENTER” button. Press the “PREV (9)”
button to select “YES”, and press the “ENTER” button to delete the file.
Ø Rename: Use the “UP/DOWN” buttons to select an audio file/folder that you
want to rename in the audio file/folder list, and press the “SETUP” button. Use
the “UP/DOWN” button to select “Rename”, and press the “ENTER” button. Use
the “UP/DOWN/PREV/NEXT (9 / :)” buttons to select letters on the keyboard,
and press the “ENTER” button to input the letter. When you are finished entering
the new name, select “ENTER” on the keyboard, and press the “ENTER” button
to rename the file. Press the “MENU/STOP” button to return to the previous
menu.
Page 23

- 23 -
Main Menu
Photo
The photo viewer is used to view image files. Compatible file types are JPG and BMP.
1. In the main menu, use the “UP/DOWN” button to select “Photo”, and press the
“ENTER” button.
2. The PMP will go to the photo mode and display the image file/folder list. Use the
“UP/DOWN” button to select a file/folder. P ress the “PREV/NEXT (9 / :)”
button to display the previous/next page of files/folders in the file/folder list .
3. Press the “ENTER” button to view the selected image file. Press the “ENTER”
button to enter the selected folder . Press the “MENU/STOP” button to return to
the previous menu or folder .
Ø During photo viewing, press the “PREV/NEXT (9 / :)” button to rotate the
image 90° counterclockwise/clockwise.
Ø P ress the “ENTER” button to pause/resume playback.
Ø Press the “UP/DOWN” button to display the previous/next image.
Ø Press the “M ENU/STOP” button to return to the image file/folder list.
Ø Press the “SETUP ” button to enter the zoom mode. Press the “PREV/NEXT
(9 / :)” button to zoom out/in. Press the “UP/DOWN” button to vertically
stretch/shrink the image.
Ø Press the “REC” button to enter the brightness, contrast and color adjustment
mode. Press the “PREV/NEXT (9 / :)” button to adjust the setting. Press the
“REC” button to go to the next setting.
Ø Wallpaper: Use the “UP/DOWN” buttons to select a file that you want to use as
the wallpaper (background image) in the image file/folder list, and press the
“SETUP” button. Press the “UP/DOWN” button to select “Wallpaper”, and press
the “ENTER” button. The selected image is now used as the background image.
Ø Playlist: Press the “SETUP” button in the image file/folder list to display a menu
at the bottom of the screen. Press the “UP/DOWN” button to select “Playlist”,
and press the “ENTER” button. Use the “UP/DOWN” buttons to select an image
file in the file/folder list window on the left, and press the “ENTER” button to add
that image file to the playlist. Use the “MENU/STOP” button to return to the
previous folder. Press the “NEXT (:)” button to switch to the playlist window on
the right. Select a file in the playlist, and press the “ENTER” button to remove
the file from the playlist. Press the “MENU/STOP” button to return to the
previous menu. In the audio file/folder list, “Playlist_Photo” will be shown at the
top. Play that item to begin viewing the files in the playlist.
Page 24

- 24 -
Main Menu
Ø Favorites: Press the “SETUP” button in the image file/folder list to display a
menu at the bottom of the screen. Press the “UP/DOWN” button to select
“Favorites”, and press the “ENTER” button. Use the “UP/DOWN” buttons to
select an image file in the file/folder list window on the left, and press the
“ENTER” button to add that image file to the favorites. Use the “MENU/STOP”
button to return to the previous folder. Press the “NEXT (:)” button to switch to
the favorites window on the right. Select a file in the list, and press the “ENTER”
button to remove the file from the favorites. Press the “MENU/STOP” button to
return to the previous menu. In the image file/folder list, “HDD/My Favorites” will
be listed at the top. Play that item to begin viewing the files in the favorites.
Ø Copy: Press the “SETUP” button in the image file/folder list to display a menu at
the bottom of the screen. Press the “UP/DOWN” button to select “Copy”, and
press the “ENTER” button. Use the “UP/DOWN” buttons to select an image file
that you want to copy in the file/folder list window on the left, and press the
“ENTER” button to highlight that image file. Use the “UP/DOWN” buttons to
select another image file that you want to copy, and press the “ENTER” button
to highlight that image file. Use the “UP/DOWN” buttons to select a highlighted
image file, and press the “ENTER” button to un-highlight that image file. Use the
“MENU/STOP” button to return to the previous folder. Press the “NEXT (:)”
button to switch to the folder list window on the right. Use the “UP/DOWN”
buttons to select a folder to copy the files to, and press the “ENTER” button to
copy the image files. “/HDD” is the root directory of the PMP. Press the
“MENU/STOP” button to return to the previous menu.
Ø Delete: Use the “UP/DOWN” buttons to select a file that you want to delete in
the image file/folder list, and press the “SETUP” button. Press the “UP/DOWN”
button to select “Delete”, and press the “ENTER” button. Press the “PREV (9)”
button to select “YES”, and press the “ENTER” button to delete the file.
Ø Rename: Use the “UP/DOWN” buttons to select an image file/folder that you
want to rename in the image file/folder list, and press the “SETUP” button. Use
the “UP/DOWN” button to select “Rename”, and press the “ENTER” button. Use
the “UP/DOWN/PREV/NEXT (9 / :)” buttons to select letters on the keyboard,
and press the “ENTER” button to input the letter. When you are finished entering
the new name, select “ENTER” on the keyboard, and press the “ENTER” button
to rename the file. Press the “MENU/STOP” button to return to the previous
menu.
NOTE: The PMP can display pictures as a slideshow that is set to music (MP3 file).
See “Settings – Slideshow setting” (page xx).
Page 25

- 25 -
Main Menu
File Manager
The file manager is used to view the files on the PMP, create new folders and copy,
delete and rename files/folders.
1. In the main menu, use the “UP/DOWN” button to select “File manager”, and
press the “ENTER” button.
2. The PMP will go to the file manager and display the file manager file/folder list.
Use the “UP/DOWN” button to select a file/folder. P ress the “PREV/NEXT (9 /
:)” button to display the previous/next page of files/folders in the file/folder list .
3. P ress the “ENTER” button to enter the selected folder. Press the “MENU/STOP”
button to return to the previous menu or folder .
Ø New folder: Enter the folder in the file/folder list where you wish to create a new
folder. Press the “SETUP” button to display a menu at the bottom of the screen.
Press the “UP/DOWN” button to select “New folder”, and press the “ENTER”
button. Use the “UP/DOWN/PREV/NEXT (9 / :)” buttons to select letters on
the keyboard, and press the “ENTER” button to input the letter. When you are
finished entering the name, select “ENTER” on the keyboard, and press the
“ENTER” button to create the new folder. Press the “MENU/STOP” button to
return to the previous menu.
Ø Copy: Press the “SETUP” button in the file manager file/folder list to display a
menu at the bottom of the screen. Press the “UP/DOWN” button to select
“Copy”, and press the “ENTER” button. Use the “UP/DOWN” buttons to select a
file that you want to copy in the file/folder list window on the left, and press the
“ENTER” button to highlight that file. Use the “UP/DOWN” buttons to select
another file that you want to copy, and press the “ENTER” button to highlight
that file. Use the “UP/DOWN” buttons to select a highlighted file, and press the
“ENTER” button to un-highlight that file. Use the “MENU/STOP” button to return
to the previous folder. Press the “NEXT (:)” button to switch to the folder list
window on the right. Use the “UP/DOWN” buttons to select a folder to copy the
files to, and press the “ENTER” button to copy the files. “/HDD” is the root
directory of the PMP. Press the “MENU/STOP” button to return to the previous
menu.
Ø Delete: Use the “UP/DOWN” buttons to select a file that you want to delete in
the file manager file/folder list, and press the “SETUP” button. Press the
“UP/DOWN” button to select “Delete”, and press the “ENTER” button. Press the
“PREV (9)” button to select “YES”, and press the “ENTER” button to delete the
file.
Page 26

- 26 -
Main Menu
Ø Rename: Use the “UP/DOWN” buttons to select a file/folder that you want to
rename in the file manager file/folder list, and press the “SETUP” button. Use
the “UP/DOWN” button to select “Rename”, and press the “ENTER” button. Use
the “UP/DOWN/PREV/NEXT (9 / :)” buttons to select letters on the keyboard,
and press the “ENTER” button to input the letter. When you are finished entering
the new name, select “ENTER” on the keyboard, and press the “ENTER” button
to rename the file. Press the “MENU/STOP” button to return to the previous
menu.
Settings
In settings, you can change various settings, view the player information, set the
password, reset the PMP and format the hard disk drive (HDD).
1. In the main menu, press the “UP/DOWN” button to select “Settings”, and press
the “ENTER” button.
2. The PMP will display eight menu items: Display setting, Audio setting, Slideshow
setting, Power, Player information, Password setting, Reset, Format HDD. Use
the “UP/DOWN/PREV/NEXT (9 / :)” buttons to select a menu item, and press
the “ENTER” button.
3. Press the “MENU/STOP” button to return to the previous menu or folder .
Display setting
There are six settings in the display settings menu: Language, Video Format, TV
Aspect Ratio, Brightness, Contrast, Color. See the figure below:
Press the “UP/DOWN” button to select an item. Use the “PREV/NEXT (9 / :)”
buttons to adjust the setting. Press the “MENU/STOP” button to return to the previous
menu.
Page 27

- 27 -
Main Menu
Ø Language: Only English is available on this PMP.
Ø Video Format: Select the TV system: NTSC, PAL. NTSC is the system used in
the United States. Set the PMP when you connect it to a PAL TV. When you
select PAL the LCD of the PMP will turn off.
Ø TV Aspect Ratio: Select the aspect ratio: 4:3 Pan&Scan, 4:3 Letter Box, 16:9
Wide.
Ø Brightness: Set the brightness of the LCD: 0 – 24.
Ø Contrast: Set the contrast of the LCD: 0 – 24.
Ø Color: Set the color of the LCD: 0 – 24.
Audio setting
There are two settings in the audio settings menu: Audio Output, Volume. See the
figure below:
Press the “UP/DOWN” button to select an item. Use the “PREV/NEXT (9 / :)”
buttons to adjust the setting. Press the “MENU/STOP” button to return to the previous
menu.
Ø Audio Output: Set the audio output of the PMP: Stereo, L-Mono, R-Mono,
MixMono.
Ø Volume: Set the volume of the PMP: 0 – 31.
Page 28

- 28 -
Main Menu
Slideshow setting
There are two settings in the slideshow settings menu: Interval time, Play m ode. See
the figure below:
Press the “UP/DOWN” button to select an item. Use the “PREV/NEXT (9 / :)”
buttons to adjust the setting. Press the “MENU/STOP” button to return to the previous
menu.
Ø Interval time: Set the time that an image is displayed on screen during the
picture slideshow: 3 – 120 seconds.
Ø Play mode: Set the play mode of the slideshow: OFF, Play All-One Time,
Repeat All. When you select “Repeat All”, another setting will appear: Slide with
music.
Ø Slide with music: Press the “ENTER” button to display an audio file/folder list.
Select an MP3 file (WMA is not supported with the slidesh ow function) that you
want the PMP to play during the slideshow.
NOTE: If you set the play mode to “Play All-One Time” or “Repeat All”, the PMP will do
a slideshow when you select an image file to display.
Page 29

- 29 -
Main Menu
Power Setup
There are two settings in the slideshow settings menu: Screen Saver, Sleep Timer.
See the figure below:
Press the “UP/DOWN” button to select an item. Use the “PREV/NEXT (9 / :)”
buttons to adjust the setting. Press the “M ENU/STOP” button to return to the previous
menu.
Ø Screen Saver: Set the time before the screen saver is displayed: OFF, 5min,
10min, 15min, 20min, 25min, 30min.
Ø Sleep Timer: Set the time before the PMP automatically turns off: OFF, 30min,
60min, 90min, 120min, 150min, 180min.
Player Information
There are four items in the player information window: Hard drive capacity, Available
hard drive space, Used hard drive space, Software Version. See the figure below:
Press the “MENU/STOP” button to return to the previous menu.
Page 30

- 30 -
Main Menu
Password Setting
You can change the password and lock the PMP. See the figure below:
1. Press the “UP/DOWN” button to highlight “Enter current password”. Use the
“UP/DOWN/PREV/NEXT (9 / :)” buttons to select a number, and press the
“ENTER” button to input the number. When you are finished entering the current
password. Select “ENTER” and press the “ENTER” button.
2. Use the “UP/DOWN/PREV/NEXT (9 / :)” buttons to select a number, and
press the “ENTER” button to input the number . When you are finished entering
the new password. Select “ENTER” and press the “ENTER” button.
3. Use the “UP/DOWN/PREV/NEXT (9 / :)” buttons to select a number, and
press the “ENTER” button to input the number. When you are finished
re-entering the new password. Select “ENTER” and press the “ENTER” button.
4. Press the “UP/DOWN” button to highlight “Click to lock unit after next reboot”.
Press the “ENTER” button to check the box. When the player is turned on, the
password must be entered to unlock the unit.
NOTE: The super password is 631800. This password can always be used as the
current password.
NOTE: The password must be at least six digits.
Page 31

- 31 -
Main Menu
Reset
You ca n reset the wallpaper and the PMP to the factory default settings. See the figure
below:
Press the “UP/DOWN” button to select an item. Press the “ENTER” button to reset the
setting. Press the “MENU/STOP” button to return to the previous menu.
Ø Reset wallpaper: Reset the wallpaper to the default.
Ø Reset to factory setting: Reset all settings to the factory default.
Format HDD
You can format the hard disk drive of the PMP. See the figure below:
Press the “PREV (9)” button to select “YES”, and press the “ENTER” button to format
the HDD. Press the “MENU/STOP” button to return to the previous menu.
NOTE: If you select “YES”, it will format the HDD and all the data on the PMP will be
erased. Regularly formatting the HDD will ensure that the PMP performs at maximum
performance.
Page 32

- 32 -
Recording
A/V Recording
1. Connect the PMP with an external A/V source (see page 13).
2. Turn on the power of the PMP and the external A/V source.
3. P ress the “REC” button (not during video, music or photo playback), and a
message will be displayed on the screen: “Attention: Please pull out the SD card
before REC!” If there is an SD/MMC card in the slot, remove it. Press the
“UP/DOWN” button to select “Video”, and press the “ENTER” button to enter the
recording mode.
4. Press the “UP/DOWN” button to select a recording time (30Min, 60Min, 90Min,
180Min, 360Min), and press the “ENTER” button.
5. Press the “ENTER” button to start recording. Press the “ENTER” button to stop
the recording.
6. During recording, p ress the “REC” button to enter the brightness, contrast and
color adjustment mode. Press the MENU/STOP button to exit from the recording
mode.
NOTE: The recorded files will be saved in the “Record” folder. The first file will be
named “Record.avi”. Subsequent files will be named “Record001.avi”, “Record002.avi”,
etc. If the size of the recording exceeds 500MB, the current recording will be saved,
and a new file will automatically be created.
NOTE: In the recording preview mode, there will be sound coming out of the speakers
of the PMP. However, the sound will be muted during recording.
Voice Recording
1. Turn the power on.
2. P ress the “REC” button (not during video, music or photo playback), and a
message will be displayed on the screen: “Attention: Please pull out the SD card
before REC!” If there is an SD/MMC card in the slot, remove it. Press the
“UP/DOWN” button to select “Audio”, and press the “ENTER” button to enter the
recording mode.
3. A time box will appear on the screen that displays the recording time.
4. Press the “MENU/STOP” button to stop and save the recording, and exit the
recording mode.
NOTE: The recorded files will be saved in the “Record” folder. The files will be named
“Record-001.wav”, “Record-002.wav”, etc.
Page 33

- 33 -
USB/SD
The PMP is equipped with a USB OTG 2.0 port, you can download files from a PC.
Follow the steps below:
1. Turn the PMP on; and connect it to the computer with the supplied USB cable
(see page 15).
2. The LCD will turn off.
3. The computer will recognize the PMP as a USB mass storage device.
4. Use the mouse to select a file/folder (or files/folders by holding shift or Ctrl), and
copy (Ctrl -C) or cut (Ctrl -X) the file/folder .
5. Select the PMP, and paste (Ctrl-V)” the file/folder into the desired folder.
6. Use the mouse to select a file/folder , and press “Delete” on the keyboard to
delete it.
NOTE: You can also use the mouse to drag and drop files/folders.
NOTE: If the operating system of you PC is Windows ME /2000/XP, there is no need to
install a driver. However, if the operating system is Windows 98 SE, you must install
the driver from the supplied CD.
USB OTG 2.0
1. Plug the supplied USB host cable to the PMP and the other end to the USB device
(see page 15).
2. Select “YES”, and press the ”ENTER” button to start copying files from the USB
device.
3. Do not unplug the USB cable or device until copying is complete.
NOTE: The copied files will be saved in folders named “dsk00000”, “dsk00001”, etc.
SD CARD
The player is equipped with an SD /MMC card slot. An SD/MMC card can be inserted,
and the files on it can be copied to the PMP. Compatible files on the SD/MMC card
can be played by the PMP.
When the SD card is inserted into the player, an SD icon will be displayed on the
bottom right corner of the screen.
Files/folders on the SD/MMC card will be listed in the file/folder list preceded by “/SD/”.
Page 34

- 34 -
System Upgrading
The PMP supports system upgrading. Please follow the steps below:
1. Use the USB cable to connect the player to a PC, and then turn on the power of
the PMP.
2. After the computer recognizes the PMP successfully, copy the file, ROMFS.BIN,
to the root folder on the PMP.
3. Disconnect the USB cable after copying, the player will restart and go to the main
setup menu. Press the “UP/DOWN” button to select “Settings”, and press the
“ENTER” button.
4. P ress the “ENTER” button. The screen will display a selecting menu; select
“Upgrade BIOS”. Press the “ENTER” button, select “YES” and press the
“ENTER” button to confirm.
5. The PMP will return to the main setup menu after upgrading.
NOTE: Use the AC adapter when upgrading.
NOTE: If the player cannot be restarted after upgrading, please contact technical
support for help.
Page 35

- 35 -
Troubleshooting
.
Symptom How To Check
l Make sure that the power is turned on.
The LCD screen is black
l Make sure the LCD OFF/NORMAL/LOCK switch is
not switched to LCD OFF.
l Make sure that file format is supported by the PMP.
The LCD screen is too
bright or too dark
The player does not work
There is no sound in the
speakers
Play a section repeatedly
and can not continue.
There is no function when
pressing buttons
l Adjust the brightness of the image in the display
setup menu.
l Make sure that the file is supported by the PMP
l Check if the volume is turned down or the
earphones are connected.
l Make sure that the PMP is not in standby mode.
l Check if the compressed audio file format is MP3 or
WMA
l Make sure that the file was not damaged.
l Make sure the LCD OFF/NORMAL/LOCK switch is
not switched to LOCK.
Other possibilities:
Static or other external interference may cause the player to function abnormally.
Insert a paper clip or pin into the reset hole to reset the player so that normal
operation can resume. If you are still having problems, then disconnect the power to
the PMP and consult a qualified technician.
Electromagnetic interference may cause error s or abnormal behavior to the player,
please reset the player or reinsert the USB cable.
If you need assistance with this product, please contact technical support.
1-800-681 -2629 or 718-416-3197
Monday-Friday 8:00 AM - 11:00 PM EST
Saturday and Sunday 9:00 AM - 11:00 PM EST
You can also reach us by e -mail at techsupport@cobyusa.com
Page 36

- 36 -
Specifications
Hard Disk Drive 40GB
Audio Response 20Hz~ 20kHz ±2.5dB
Audio Signal-to- Noise = 85dB
Audio Distortion + Noise = -70dB( 1kHz)
Channel Separation = 70dB ( 1kHz)
Dynamic Range = 80dB ( 1kHz)
Audio Out Output Level: 1.5V±
Video Out Output Level: 1V
Unbalanced Negative
Power AC100~ 240V, 50/60Hz
Dimension 198mm×121mm×32mm (L*W*D)
Weight 1.65 lbs
LCD Screen Size 7 inches
DESIGN AND SPECIFICATIONS ARE SUBJECT TO CHANGE WITHOUT NOTICE
0.2
, Load:10kO
1.0
±0.2, Load:75O
P-P
 Loading...