

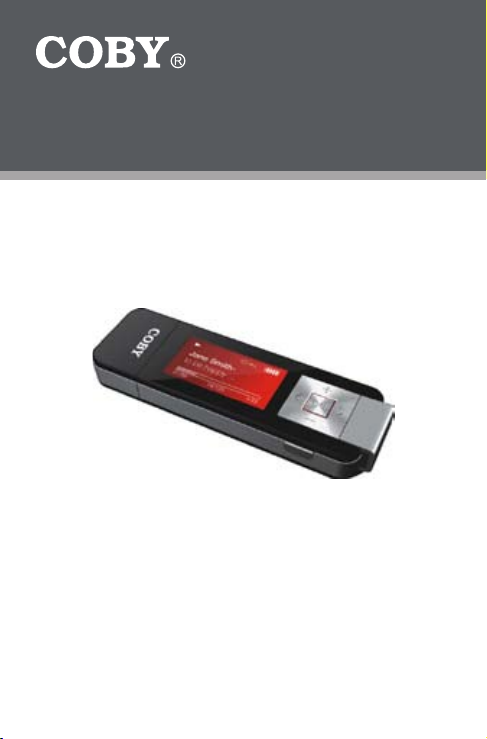
MP-C896
USB-Stick MP3 Player with
LCD Display and FM Radio
INSTRUCTION MANUAL
Please read this manual carefully before operation.
www.cobyusa.com Page 3
PRECAUTIONS
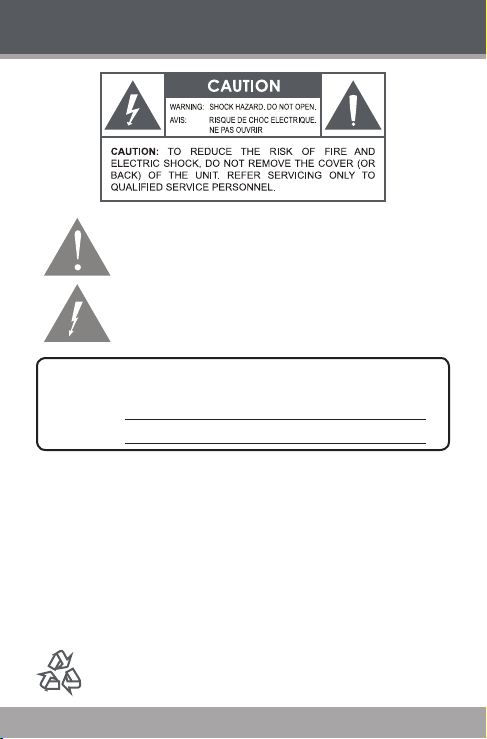
The lightning as h with arrowhead symbol within an e quilateral triangle
is inten ded to aler t the user to the presenc e of uninsulate d “dangerous
voltage” within the product ’s enclo sure that may be o f sufcient m agnitude to co nstitute a risk of electr ic shock.
The exclamatio n point with in an equilat eral triang le is intende d to alert
the u ser to th e presence of impor tant oper ation and servicing instructions in t he literature ac companying the a ppliance.
For Cus tomer Use:
Enter bel ow the serial numb er that is located on the unit . Retain this information f or
future r eference.
Model N o. MP-C 896
Seria l No.
WARNING:
To prevent re or shock hazard, do not expose thi s device to rain or moisture. Dangerous high
voltage is presen t inside the enclo sure. Do not open th e cabinet.
CAUTION:
To prevent elec tric shock, match wide bl ade of plug to wide sl ot of outlet and fully inser t.
WARNING:
Handlin g the cords on this pro duct will expose yo u to lead, a chemi cal known to the State
of C alifornia to caus e cancer, and birth defects or other reproduc tive harm. Wa sh hands
afte r handling.
For re cycling or disposal i nformation about this product, please contact your
local au thorities or t he Electronic s Industries A lliance: www.ei ae.org.
Page 2 Coby Electron ics Cor por ation

PRECAUTIONS
PROTECT YOUR HEAR ING:
Hearing experts advise against th e constant use of p ersonal stereo s played at high
volume. C onstant exposur e to high volumes ca n lead to hearing l oss. If you should
experi ence ringing in t he ears or hearin g loss, discont inue use and seek me dical advice.
NOTICE :
This product is protected by cert ain intellec tual proper ty rights of Micros oft. Use or distribut ion
of such tec hnology outsi de of this produc t is prohibited wi thout a license f rom Microsof t.
NOTICE:
Please refer to the packaging for this product for the technologies supported by this product.
Window s Media® is a regis tered trademar k of Microsoft Corpor ation.
USB® is a r egistered trad emark of USB Impl ementers Forum , Inc.
All trademarks , registered tra demarks and log os are of their resp ective holder s.
www.cobyusa.com Page 3
www.cobyusa.com Page 5
IMPORTANT SAFETY INSTRUCTIONS
Read Ins truct ions: All th e safety and oper ating inst ructio ns should be read
1.
before th e product i s operate d.
Retai n In stru ction s: Th e s afety and oper ating instruction s s hould be re-
2.
tained fo r future re ference.
Heed Warni ngs: A ll war nings on the product an d in the op erating instruc-
3.
tions sho uld be adhe red to.
Follow Instructions: All operating and usage instructions should be followed.
4.
Cleani ng: Un plug th is pro duct f rom t he wall outlet befor e clea ning. D o not
5.
use liqui d cleaner s or aeroso l cleaner s. Use a damp c loth for c leaning.
Attac hment s: Use only at tachme nts recom mended by th e m anufact urer.
6.
Use of othe r attach ments may be ha zardou s.
Water and Mo isture: Do not use thi s produ ct near water (e.g., near a b ath
7.
tub, washb owl, kitc hen sink, la undry tu b, in wet base ments, or ne ar a swim ming poo l and the like).
Acces sorie s: Do not place this product on a n un-
8.
stable c art, st and, trip od, bracket , or table. Us e
only wit h cart s, stand s, tripo ds, bracke ts, or tab les
recomm ended by the manufactur er or sold with
the product. Any moun ting of the product should
follow the manuf acturer ’s ins tructi ons and s hould
use a m ounting acces sory recomm ended by the
manufac turer.
A product and cart com binatio n should be moved with
9.
care. Quick stops, excessive force, and u neven surfaces may cause the
produc t and car t combina tion to over turn.
Ventila tion: Slot s and openings in the c abinet are provi ded for ventila tion to
10.
ensure reliab le ope ration of th e pro duct a nd to protect it from overheat ing.
These opening s sho uld neve r be blocked by placing the p roduct on a bed,
sofa, rug, or other sim ilar surf ace. This product s hould not be place d in a
built-i n inst allatio n suc h as a bo okcase or rack u nless proper ventilation is
provide d or the manu facturer i nstruc tions have b een adhere d to.
Power Sources: This product should be operated only from the type of
11.
power so urce ind icated o n the rat ing label . If you ar e not sure of the ty pe of
power supp ly to your home, con sult your prod uct dealer or lo cal power co mpany. For product s intended to ope rate from bat tery powe r or other sourc es,
refer to the o peratin g instruc tions.
Grounding or Polariz ation: This pr oduct may be equip ped with a pol arized
12.
alternating- current line plug that has one blade wider than the other. This plug
will only t into the power outlet in one direction. This is a safety feature. If you
are unable to ins ert the plug fully into the ou tlet, try rever sing the direc tion of
the plug. If the plug shoul d still fail t o t, contac t an electr ician to repl ace the
obsolete outlet. Do not defeat the safet y purpose of the polarized plug.
Page 4 Coby Electron ics Cor por ation
IMPORTANT SAFETY INSTRUCTIONS
Power- Cord Prot ectio n: Power supply cords sh ould be routed so that th ey
13.
are not likely to b e wa lked on or pinched by i tems placed upon or against
them, paying par ticular att ention to cords at plugs, conven ience recep tacles,
and at the po int which t hey exit fro m the produc t.
Protec tive Attachm ent Plug: The product may b e equippe d with an a t-
14.
tachme nt plug with overload protection. This is a safe ty feature. See the
operati ng i nstruc tions for replac ement or direc tions to reset the protec tive
device. If re placem ent of the plug is re quired, be sur e the serv ice techni cian
has us ed a r eplacem ent plu g that has th e same overlo ad prote ction as the
origin al plug as spe cied by t he manufac turer.
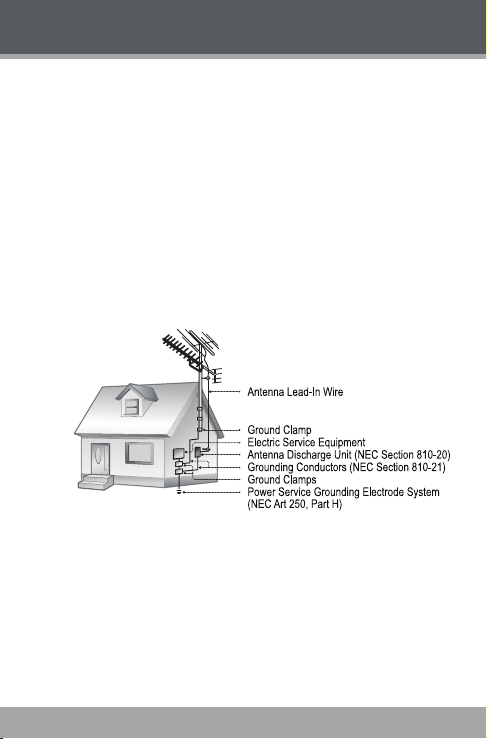
Outdo or Anten na G round ing: If an outside antenna is connec ted to the
15.
produc t, be sure t he antenna system is gro unded so a s to provide some
protect ion agai nst volt age surg es and bu ilt-up static c harges. Arti cle 810 of
the National Electrical Code, ANS/ NFPA 70 provide s i nformat ion with re gard to pro per ground ing of the mast a nd suppor ting str ucture, gr ounding of
the lead -in wire to an an tenna- dischar ge unit, size of gr ounding c onducto rs,
locati on of antenna- discharge unit, co nnectio n to grounding ele ctrode s, and
require ments for t he groundi ng electr ode (see gu re).
Light ning: For added protectio n for th is product, unplug it fr om the wa ll
16.
outlet and disc onnect the antenna or cable system d uring a lightni ng stor m
or w hen i t is left unat tended and unused for long perio ds of time. This will
prevent dam age to the pr oduct due to l ightning o r power-li ne surges.
Power Line s: An outside ant enna system sho uld not be locat ed in the vicin-
17.
ity of overhead powe r lines or other electri c light or power circuit s, or where it
can fall int o such power li nes or circ uits. When i nstallin g an outside a ntenna
system, extreme care sh ould be taken to keep from touchin g such power
lines or ci rcuits, a s contac t with them m ight be fat al.
Overl oading: Do no t overload wall out lets, exten sion cords , or integral con -
18.
venienc e recepta cles as th is can resu lt in a risk of re or elect ric shoc k.
www.cobyusa.com Page 5

www.cobyusa.com Page 7
IMPORTANT SAFETY INSTRUCTIONS
Objec t and Liquid Entr y: Never push ob jects o f any kin d into t his pro duct
19.
through opening s as they m ay touch d angerous voltage points o r shout- out
parts t hat could res ult in a re or elec tric shoc k. Never spill li quid of any kind
on the pro duct.
Serv icing: Do not attemp t to servi ce this pro duct yourself as ope ning or
20.
removin g c overs may expose you to dangerous voltage or other hazards.
Refer all se rvici ng to quali ed serv ice per sonnel.
Damag e Req uirin g Ser vice: Unpl ug th is pro duct from the wall o utlet and
21.
refer ser vicing to qu alied se rvic e personn el under the fo llowing co ndition s:
a) when the power- supply or plug is dam aged; b) if liquid has been spilled
or if obj ects have f allen into the prod uct; c) if the product has been ex posed
to rain o r water; d) if the pr oduct do es not op erate nor mally by f ollowin g the
operati ng instru ctions. Adjust only t hose controls that a re covere d b y t he
operati ng instruc tions as impro per adjustme nt of other contro ls may result in
damage and wi ll often req uire extens ive work by a quali ed technic ian to restore the pr oduct to it s normal op eration; e) if the pr oduct has b een droppe d
or damaged in any way; f ) when the prod uct exhibit s a distinct change in
perfo rmance —this indicat es a need for s ervic e.
Replac ement Parts: When replacement parts are required , be sure that
22.
your ser vice te chnicia n has used replace ment par ts specied by t he manufacture r or have th e same ch aracter istics as the or iginal pa rt. Un authori zed
substit utions may r esult in re , electr ic shock, o r other haz ards.
Safet y C heck: Upon co mpletion of any service or repair s to this pr oduct,
23.
ask the ser vice technicia n to perfo rm safet y checks to en sure that th e product is in pr oper oper ating con dition.
Wall or Ceilin g Mount ing: The product should be mounted to a wall or
24.
ceiling o nly as rec ommende d by the manuf acturer.
Heat: The produc t shou ld be situated away from heat source s suc h as ra-
25.
diators , heat registers, stoves, or other pro ducts (inclu ding a mplie rs) that
produc e heat.
Page 6 Coby Electron ics Cor por ation

TABLE OF CONTENTS
PRECAUTIONS .................................................................2
IMPORTANT SAFETY INSTRUCTIONS ..............................4
TABLE OF CONTENTS ....................................................... 7
PACKAGE CONTENTS ..................................................... 9
FEATURES .......................................................................10
GETTING STARTED ......................................................... 11
MP-C896 at a Glance ................................................................11
Front View ..........................................................................11
Rear View ...........................................................................11
Top View .............................................................................11
Bottom V iew ......................................................................11
Display at a G lance ...................................................................12
Music Mode Screen ..........................................................12
Record Mode Screen .......................................................12
Connecting Headp hones ...................................................... 13
Connecting Power .................................................................... 13
Loadi ng a Battery ............................................................ 13
USB Power ...........................................................................14
Using the MP-C896 Control s .....................................................14
Power On/Off ....................................................................14
Hold Sw itch ........................................................................14
Reset Function ...................................................................15
Navigating the Menu Interface .....................................15
Main Menu ..................................................................................16
NAVIGATOR MODE ....................................................... 17
Navigator Menu Cont rols .........................................................17
Play Music Controls ................................................................... 18
Music Options ................................................................... 18
Repeat A-B Mode ............................................................ 19
www.cobyusa.com Page 7

www.cobyusa.com Page 9
TABLE OF CONTENTS
FM TUNER MODE ...........................................................20
FM Tuner Control s ...................................................................... 20
Automat ically Saving Preset Stations ...........................20
Manually Saving Preset Stations .................................... 21
Deleting Preset Statio ns .................................................. 21
FM Recording Controls ............................................................. 22
RECORD MODE .............................................................23
Record Controls ......................................................................... 23
SETTINGS MODE ............................................................24
Setting Your Player’s Options .................................................. 24
Settings Menu Controls ................................................... 24
Settings Options ............................................................... 24
DEL FILES MODE ............................................................27
Deleting Files on Your Playe r ...................................................27
Del Files Menu Cont rols ................................................... 27
ABOUT MODE ................................................................28
USB CONNECTIONS ......................................................29
Minimum PC Requirements ..................................................... 29
USB Driver Installation (Window s 98SE Only) ......................... 30
Connecting to a Computer ....................................................30
Transferr ing Files ........................................................................ 31
Microsoft Window s .......................................................... 32
Macintosh OS X ................................................................ 33
Disconnecting from a Computer ...........................................33
Microsoft Window s .......................................................... 33
Macintosh OS X ................................................................ 34
WINDOWS MEDIA PLAYER 10 ....................................... 35
FIRMWARE UPGRADES .................................................. 36
ABOUT MP3/WMA MUSIC FILES................................... 37
TROUBLESHOOTING ......................................................38
SPECIFICATIONS ........................................................... 41
Page 8 Coby Electron ics Cor por ation
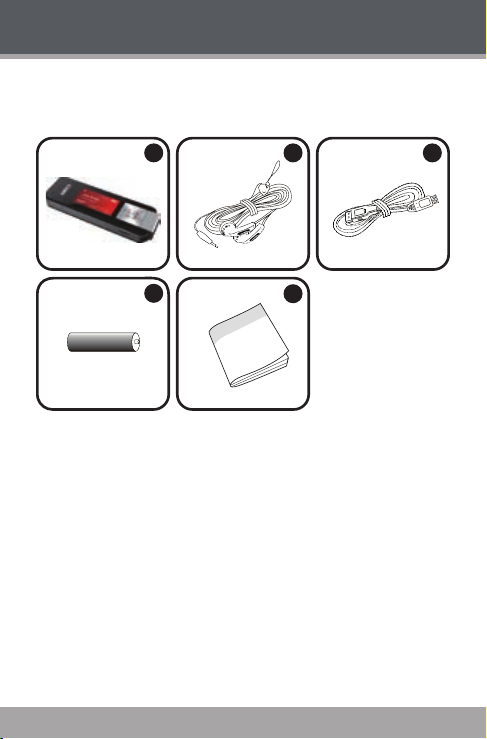
PACKAGE CONTENTS
1
4
2
5
3
Please make sure that the items listed below are included
in the package. Should an item be missing, please contact
the local retailer from which you purchased this product.
MP-C896
1.
Stereo Earphones
2.
USB Extension Cable
3.
1 x “AAA” Battery
4.
Instruction Booklet
5.
www.cobyusa.com Page 9

www.cobyusa.com Page 11
FEATURES
2GB Integrated Flash Memory
High-Contrast LCD Display with Backlight
Plays MP3 and WMA Digital Music Files
Plays Digital Music from most online stores and
subscription services*
ID3 and LRC support for song and synchronized lyric
information display
Integrated FM Radio and Recorder
Integrated Microphone for Digital Voice Recording
Mobile Data Storage Function
USB 2.0 for Fast File Transfers
* Music Se rvice must sup port Windows M edia DRM (WM DRM). WMDRM10 requires
Window s XP and Windows Me dia Player 10 or n ewer.
Page 10 Coby Electron ics Cor por ation
GETTING STARTED
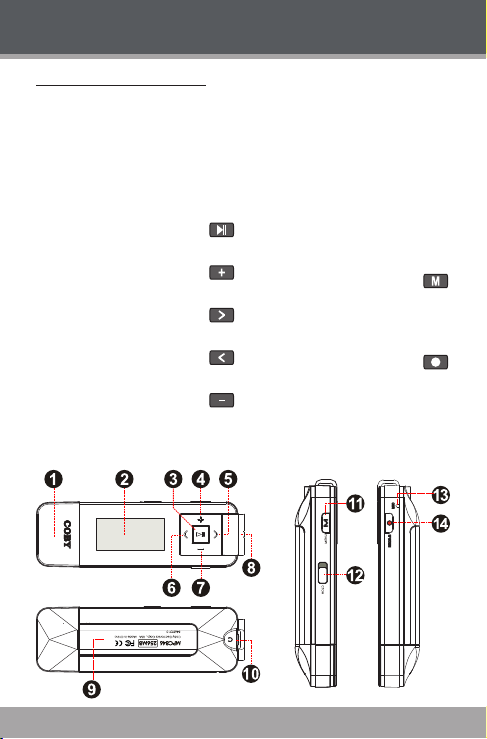
MP-C896 at a Glance
Front View
USB Cap
1.
LCD Display
2.
Power On/Off (hold)
3.
Navigation: Enter
Play/Pause
Navigation: Up
4.
Volume +
Navigation: Enter
5.
Next/Fwd
Navigation: Escape
6.
Previous/Rev
Navigation: Down
7.
Volume –
Neckstrap Hook
8.
Rear View
Battery Compartment
9.
Cover
Headphone Out Jack
10.
Top View
HOLD switch
11.
MODE
12.
Bottom View
Record/
13.
Repeat A-B
Integrated Microphone
14.
www.cobyusa.com Page 11
www.cobyusa.com Page 13
GETTING STARTED
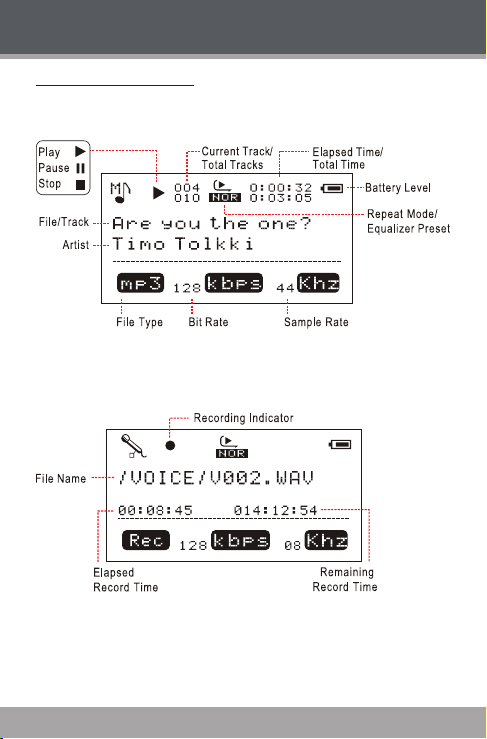
Display at a Glance
Music Mode Screen
Record Mode Screen
Page 12 Coby Electron ics Cor por ation
GETTING STARTED
Connecting Headphones
Connect headphones/earphones to the Headphone Out
jack for private listening.
Lower the volume level before connecting head-
phones, then gradually increase the volume for
comfortable listening.
Hearing experts advise against the constant use of
personal stereos played at high volume.
Constant high-volume use can lead to hearing loss.
If you experience ringing in your ears or hearing
loss, discontinue use immediately and seek medical
advice.
Connecting Power
The MP-C896 operates on 1 x “AAA” battery for music
playback.
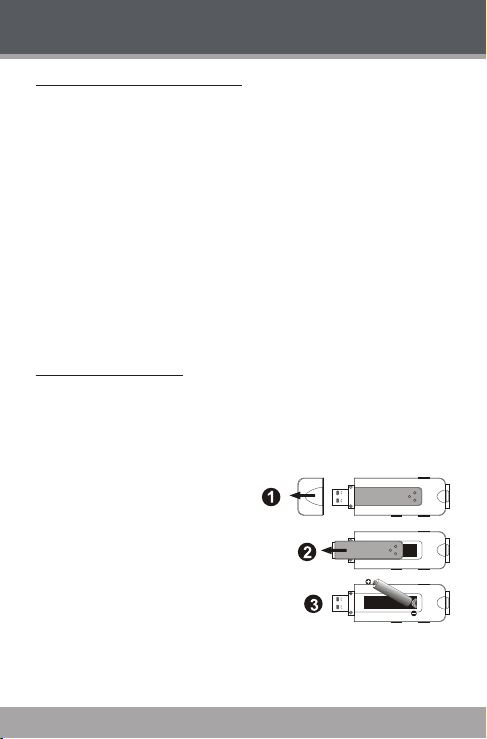
Loading a Battery
Remove the USB Cap.
1.
Remove the Battery
2.
Compartment Cover.
Insert 1 x “AAA” battery,
3.
taking care to match the
“+” and “–” polarities of
the batter y with the markings inside the battery
compartment.
Replace the Battery Cover.
4.
www.cobyusa.com Page 13

www.cobyusa.com Page 15
GETTING STARTED
USB Power
When the MP-C896 is connected to a computer’s
powered USB port, it will draw power over the USB connection.
Using the MP-C896 Controls
Power On/Of f
To turn your player on, press and hold . The
screen will display the COBY logo.
To turn your player off, press and hold . The
screen will display “Continue Holding on To Power
Off ”. Do not release the button until the screen
displays “GOOD BYE”.
Hold Switch
The Hold feature locks (disables) your player’s controls to
prevent accidental key presses when it is in your pocket
or bag.
To lock the player’s controls, slide the
HOLD switch to the left. A Lock icon will be
displayed on the screen.
To unlock the player’s controls, slide the HOLD
switch to the right.
Page 14 Coby Electron ics Cor por ation

GETTING STARTED
Reset Function
Reset your player if it should freeze or otherwise behave
abnormally.
Disconnect your player if it is connected to a
1.
computer.
Remove the battery from the player. Wait 10
2.
seconds, and then replace the battery.
Power on your player. Your player has now been
3.
reset.
Navigating the Menu Interface
It is easy to use the MP-C896 controls to select menu
options, items, and les on your player.
To move the selection cursor (highlight), use the
navigation keys [ / / / ]. To move the
cursor quickly, press and hold the corresponding
key.
To select the previous item (up), press .
To select the next item (down), press .
To conrm and enter the current selection,
press .
To escape (return) to the previous screen,
press .
www.cobyusa.com Page 15

www.cobyusa.com Page 17
GETTING STARTED
Main Menu
The Main Menu gives you access to the different function
modes of your player.
To enter the Main Menu, press . To exit the Main
Menu, press and hold .
To select a function mode in the Main Menu, press
or to highlight the mode, and then press
to conrm.
Navigator
FM Tuner
Record
Settings
Del Files
About
Page 16 Coby Electron ics Cor por ation
View or play music les from your player.
Listen to FM radio broadcasts.
Record FM radio broadcasts.
Record from the integrated microphone.
Set your player’s internal options.
Delete les from your player.
View rmware, date, and memory information.

NAVIGATOR MODE
Enter NAVIGATOR mode from the Main Menu to nd
and play music on your player.
NAVIGATOR mode will display all folders and compatible
audio les on your player.
Select and conrm an audio le to star t playback.
Navigator Menu Controls
Use the following controls in Navigator mode.
Key Function
Press
Press
Press
Press
Press
Move the selection up.
Move the selection down.
Return to the previous folder.
Display the contents of the selected folder.
If a folder is selected: Play all music in the
•
selected folder.
If a le is selected: Play the selected le.
•
www.cobyusa.com Page 17

www.cobyusa.com Page 19
NAVIGATOR MODE
Play Music Controls
Use the following controls during music playback.
Key Function
Start /Resume track playback.
Press
Hold (2 sec) Stop playback completely.
Press Play the next track.
Hold Fast-forward through the current track.
Press Play the previous track.
Hold Reverse through the current track.
Press Decrease the volume level.
Press Increase the volume level.
Press
Hold
Press Return to the Main Menu.
For more information about how to get music onto your
player, please refer to the Quick Start Guide that was
included with your player, or visit the Coby Electronics
website at www.cobyusa.com.
Music Options
Music playback options may be set in the SETTINGS menu.
Please see the “Settings” section for more information.
During playback, press to pause
playback.
Start Repeat A-B Mode.
Enter Record Mode and start recording.
Page 18 Coby Electron ics Cor por ation

NAVIGATOR MODE
Repeat A-B Mode
Set a segment of a music track to repeat in a continuous
loop. During playback:
To set the starting point “A” of the loop, press .
To set the end point “B” of the loop, press again.
The loop will now play from point “A” to point “B”.
To resume normal playback, press again.
www.cobyusa.com Page 19

www.cobyusa.com Page 21
FM TUNER MODE
Enter FM TUNER mode from the Main Menu to listen
to or record FM radio broadcasts.
Earphones or headphones must be connected to the
headphone jack for radio operation (the earphone cord is
used as an FM antenna).
FM Tuner Controls
Use the following controls in FM TUNER mode.
Key Function
Press Switch between Preset and Search tuning mode.
Press
Hold Search: Auto-seek the next highest frequency.
Press
Hold Search: Auto-seek the next lowest frequency.
Press Decrease the volume level.
Press Increase the volume level.
Hold
Automatically Saving Preset Stations
To automatically scan and save all available broadcast
frequencies to Preset Station memory:
Enter FM Tuner mode.
Press and hold .
Page 20 Coby Electron ics Cor por ation
Preset: Tune to a higher preset station.
Search: Tune to a higher frequency.
Preset: Tune to a lower preset station.
Search: Tune to a lower frequency.
Start FM Recording.

FM TUNER MODE
There are 30 available Preset Stations. Auto Scan will
overwrite any previously stored Preset Stations.
All saved preset stations will be indicated with CHXX,
where XX corresponds to the numerical sequence.
Manually Saving Preset Stations
Make sure the player is in SEARCH mode.
Manually tune to the station you would like to save
as a Preset Station (e.g., “92.7”).
Press . The screen will display “Store” and ash
the Preset Number.
Press or to select a Preset Station number
(e.g., “CH03”).
Press to conrm and save. (The station “92.7”
has now been saved as Preset Station “CH03”.)
Deleting Preset Stations
Make sure the player is in PRESET mode.
Turn to the preset station that you want to delete
from the preset stations (e.g., “CH03”).
Press . The screen will display “Delete” and ash
the Preset Number.
Press to conrm and delete. (Preset Station
“CH03” will be deleted.)
www.cobyusa.com Page 21

www.cobyusa.com Page 23
FM TUNER MODE
FM Recording Controls
Make digital recordings of FM radio broadcasts.
While the player is in FM Tuner mode, press
to start recording, or select RECORD from the FM
Tuner menu.
Recording will start immediately when RECORD is
selected from the FM Tuner menu.
Use the following controls during FM recording.
Key Function
Press
Press or
Recordings are saved to the folder “FM/”.
Recorded les are named “FXXX.WAV” where XX X
corresponds to the numerical sequence in which the
recording was made (numbering starts from 001).
Start /Resume recording.
During recording, press to pause
recording.
Stop and save the recording.
Page 22 Coby Electron ics Cor por ation

RECORD MODE
Enter RECORD mode from the Main Menu to record
from the integrated microphone (voice).
To quickly access record mode during music playback,
press and hold .
Recording will start immediately when RECORD is
selected from the Main Menu.
The MP-C896 can also record from the FM Tuner. Refer
to the FM Tuner section for details.
Record Controls
Use the following controls in RECORD mode.
Key Function
Press
Press or
Recordings are saved to the folder “VOICE”.
Recorded voice les are named “V XX X.WAV”
where XXX corresponds to the numerical sequence
in which the recording was made (numbering starts
from 001).
EnterNAVIGATORmodetondandplayyour
recordings.
Start /Resume recording.
During recording, press to pause
recording.
Stop and save the recording.
www.cobyusa.com Page 23

www.cobyusa.com Page 25
SETTINGS MODE
Setting Your Player’s Options
To set your player’s options, select and conrm
SETTINGS from the Main menu. The following options are
available in the Settings menu: Play Mode, Eq, Contrast,
Backlight, Lightcolor, Power, Rec Set, Lyric, or Language.
Settings Menu Controls
Use the following controls in the Settings mode menu.
Key Function
Press Move the selection up
Press Move the selection down
Press Enter a selection
Press Return to the previous screen
Settings Options
Menu Item Function
Adjust the order in which tracks are played.
Normal: Play tracks in sequential order.
Repeat one: Play the current track repeatedly.
Playmode
Repeat all: Play all tracks repeatedly.
Shufe: Play tracks in random order.
Preview: Play the rst 10 seconds of each
track.
Page 24 Coby Electron ics Cor por ation

SETTINGS MODE
Menu Item Function
Adjust the equalizer mode settings to change the
Eq (Equalizer)
Contrast
Backlight
Lightcolor
Power
Rec Set
way music sounds on your player.
Set the option that best matches the music you
are listening to: Normal, Rock, Jazz, Classic,
Pop, or Bass.
Adjust the contrast of the player’s display (01 =
lowest contrast; 10 = highest contrast).
Adjust the duration of time the display backlight
will remain on for after the last key press.
A setting of “ON” will keep the backlight on; a
setting of “OFF” will turn the backlight off.
Adjust the color of the backlight. A setting of
“Auto” will change the color of the backlight with
each key press.
Adjust the duration of time the player will remain
on for when it is idle.
A setting of “DISABLE” will keep the player on.
Adjust the quality of recordings made by your
player. Higher-quality recordings will take up
more memory on your player.
Press or to select Rate.
•
Press or to change the recording
•
quality option: Normal, Middle, or High.
Select and enter Exit.
•
www.cobyusa.com Page 25

www.cobyusa.com Page 27
SETTINGS MODE
Menu Item Function
Turn Lyric display support on or off.
Lyric
Languages
Lyric display supports “.LRC” les which may
be found on the internet or may be created with
a lyric le editor. LRC les may also contain
synchronized timing information.
Select the language that the player’s menus are
displayed in: English, French, German, Spanish,
Portuguese, Italian, Polish, Hungarian, Chinese
PRC, or Chinese TRA.
Page 26 Coby Electron ics Cor por ation

DEL FILES MODE
Deleting Files on Your Player
To delete les from your player, select and conrm DEL
FILES from the Main menu.
Del Files Menu Controls
Use the following controls in Del Files mode.
Key Function
Press Move the selection up
Press Move the selection down
Press Display the contents of the selected folder
Press Return to the previous folder
Press
Press
You may also connect your player to a computer to
managethelesonyourplayer.Pleaserefertothe
documentation that came with your computer for more
informationaboutlemanagement.
Mark a le for deletion [ ]. Press
again to unmark the le.
Multiple les may be marked for deletion.
Delete les marked for deletion. The player
will prompt you for conrmation. Select and
conrm “Yes” to delete.
www.cobyusa.com Page 27

www.cobyusa.com Page 29
ABOUT MODE
Enter ABOUT mode to view information about your player
(Firmware version, Free Memory, and Total Memory).
Page 28 Coby Electron ics Cor por ation

USB CONNECTIONS
Minimum PC Requirements
You can connect the MP-C896 to a computer with a
USB port to transfer les to your player or to manage the
les on your player. The minimum requirements listed
below will allow you to perform basic le management
functions; advanced features will require a faster PC and
Windows conguration.
MS Windows 98SE (Service Pack 1) or ME [USB -MSC];
MS Windows 2000 (Service Pack 3 or above) with Windows
Media Player 9 [USB-MSC];
MS Windows XP (Service Pack 1 or above) with Windows
Media Player 10 or newer [USB-MSC]
Pentium 166 MMX processor (or equivalent)
96MB RAM
50MB of available hard drive space
Internet c onnection
Video Display card
Sound card
USB 1.0 or USB 2.0 Full-Speed por t
New versions of Windows Media Player may be downloaded from the Microsoft website at www.microsoft.com.
www.cobyusa.com Page 29

www.cobyusa.com Pag e 31
USB CONNECTIONS
USB Driver Installation (Windows 98SE Only)
It is not necessary to install the USB driver if your
computer is running Microsoft Windows ME/2000/XP
or newer, or Macintosh OS X. Computers running these
operating systems will recognize your player automatically when connected.
If your computer is running Windows 98 SE:
Insert the Installation CD into your computer’s CD
1.
or DVD drive. Make sure to place the mini-CD in the
center, recessed well of the drive tray.
Navigate to MY COMPUTER and double-click on
2.
the CD/DVD drive icon (usually “D:”).
Double-click on the SETUP icon (SETUP.EXE) to
3.
start the USB driver installation program.
Follow the on-screen instructions to complete the
4.
installation and then restart your computer.
Mini- CDs should only be used in normal tray-loading CD/
DVD drives. Mini- CDs may be used in slot-loading drives
with the pr oper adapter; please contact your computer or
drive manufacturer for more information.
Connecting to a Computer
Make sure the player is turned off.
1.
Remove the USB Cap and plug the MP-C896
2.
directly into your computer’s USB port. You may
choose to use a USB extension cable to connect to
a computer.
Page 30 Coby Electron ics Cor por ation

USB CONNECTIONS
Your computer will automatically recognize the
player. An icon representing your player will
appear as a “Removable Disk” when you open
“My Computer”.
It may take your computer several minutes to recognize
andsetupthedevicethersttimeitisconnected
dependingonyourhardwareconguration.
Transferring Files
The USB 2.0 Full-Speed connection makes it easy
to transfer music les (or any other data les) quickly
between the player and your computer. Simply use the
player as you would a oppy disk using basic operating
system commands.
If you need fur ther assistance with transferring les,
please refer to your operating system’s instruction manual or on-screen help. If you are using media management
software such as iTunes, Winamp, or Windows Media
Player, please refer to their documentation for support.
Do not disconnect or otherwise interr upt the player
during transmission - this could damage or corrupt the
player’srmwareoryourles.Iftheplayerisaccidentally disconnected and is not working properly, reset your
player (see the Getting Started section for details).
For more information and support regarding music trans-
fer and synchronization with Windows Media Player
(WMP), please see the help section included with WMP
(click Help > Synchronizing Content to Devices).
www.cobyusa.com Pag e 31

www.cobyusa.com Page 33
USB CONNECTIONS
Microsoft Windows
Double-click the "My Computer" icon on your
1.
desktop and then double-click the MP-C896 icon
(MTP Multimedia Player).
Your player contains two folders: Data and Media.
2.
Drag your media les to the Media folder (e.g.,
MP3, WMA les).
Drag all other types of les to the Data folder for
storage (e.g., TXT, DOC, XLS, etc). Data les
are only visible from a computer; these les will
not be available from within the player itself.
Page 32 Coby Electron ics Cor por ation

USB CONNECTIONS
Macintosh OS X
Open a Finder window. Locate the les you would
1.
like to transfer from your computer. Select the
les/folders with the mouse and press APPLE-C
(copy) on the keyboard.
Click on the Removable Disk icon located on the left
2.
side of the nder window. The computer will display
all les and folders currently stored in the player.
Press APPLE-V (paste) on the keyboard to transfer
3.
the les you selected in Step 1 to the player.
Disconnecting from a Computer
If your player is recognized as an MTP device, you may
simply unplug the cable to disconnect from a computer.
If it is recognized as a USB Mass Storage device (i.e.,
a “Removable Disk”), then follow the steps below to
prevent data loss or corruption.
Microsoft Windows
Double-click the green arrow
1.
in the taskbar located on the
lower-right side of the computer screen (Safely Remove
Hardware).
www.cobyusa.com Page 33

www.cobyusa.com Page 35
USB CONNECTIONS
Safely Remove
2.
Hardware:
Select “USB Mass
Storage Device” from
the list that appears
and then click on
“Stop”.
Stop a Hardware
Device: Select
“USB Mass Storage
Device” from the list
that appears and then click on “OK”.
Select “USB Mass Storage Device” from the list that
appears and then click on “OK”.
When the “Safe to Remove Hardware” window ap-
3.
pears, click the OK button and disconnect the USB
cable from the player and your computer.
Macintosh OS X
On the left side of the Finder
1.
window, identify the appropriate Removable Disk icon.
Click on the “Eject” arrow on
2.
the right of the Removable Disk icon.
Disconnect the USB cable from the player and your
3.
computer.
Page 34 Coby Electron ics Cor por ation

WINDOWS MEDIA PLAYER 10
You can use Windows Media Player and a USB -MTP
connection to manage your music media library with
Microsoft Windows XP or newer.
Please refer to the Quick Start Guide included with your
player for more information.
For more information and support regarding music trans-
fer and synchronization with Windows Media Player
(WMP), please see the help section included with WMP
(click Help > Synchronizing Content to Devices).
www.cobyusa.com Page 35

www.cobyusa.com Page 37
FIRMWARE UPGRADES
From time to time, COBY may release rmware updates
to improve the performance of the MP-C896 or to add additional features. Please check the COBY website periodically at www.cobyusa.com to see if new rmware has been
released for your player. If you are experiencing abnormal
behavior with your player, you may choose to restore (format)
your player before updating its rmware.
Donotinterruptthe rmwareupgradeprocess —doing
so could damage your player and render it inoperable.
Download the latest rmware for your player from w ww.
1.
cobyusa.com. Save this le to the computer.
Double-click the downloaded le (you may need a le
2.
compression utility installed on your computer). In the
window that appears, double-click the le “Setup.exe” to
begin installing the rmware update utility.
Follow the on-screen instructions to complete installa-
3.
tion of the rmware update utility.
Connect your player to the computer af ter the utility has
4.
been installed.
Run the rmware update utility from the Star t menu
5.
(i.e., click “Start > Programs > SigmaTel > MTPMSCN
Firmware Download > Download Firmware”). The
utility will commence searching for your player that is
connected to the computer.
Click “Start ” to begin the rmware update. DO NOT
6.
INTERRUPT THE FIRMWARE UPDATE.
Disconnect your player from the computer when the
7.
update has completed and restart your player.
Page 36 Coby Electron ics Cor por ation

ABOUT MP3/WMA MUSIC FILES
For more information about digital MP3 and WMA les,
please visit our website at www.cobyusa.com.
Most online music stores and subscription services use
WMDRM10les*.Pleaserefertothedocumentationof
either Microsof t or the store from which you purchased
your music for more information and support.
WMDRM9 may be used for music purchases, only. WM
DRM10 is necessary for subscription- based services .
Content owners use Windows Media digital rights
management technology (WMDRM) to protect their
intellectual property, including copyrights. This device
uses WMDRM sof tware to access WM DRM-protected
content. If the WMDRM software fails to protect the
content, content owners may ask Microsof t to revoke
the software’s ability to use WMDRM to play or copy pro
tected content. Revocation does not affect unprotected
content. When you download licenses for protected content, you agree that Microsoft may include a revocation
list with the licenses . Content owners may require you to
upgrade WMDRM to access their content. If you decline
an upgrade, you will not be able to access content that
requires the upgrade.
* A few examples of online music stores that sup -
port WMDRM are: AOL Music Now, Napster To Go,
URGE, Virgin Digital, and Y! Music ( Yahoo! Music).
Music purchased and downloaded from the iTunes music
storeareAAClesencryptedwithAppleFairplayDRM.
TheMP- C89 6doesnotsupportAACleplayback.
PleaseuseonlyMP3,WMA,orWAVmusicleswith
your player.
-
-
www.cobyusa.com Page 37

www.cobyusa.com Page 39
TROUBLESHOOTING
If you have a problem with this device, please read the
troubleshooting guide below and check our website
at www.cobyusa.com for Frequently Asked Questions
(FAQs) and rmware updates. If these resources do not
resolve the problem, please contact Technical Suppor t.
COBY Electronics Technical Support
Address: 56- 65 Rust St.
Hours: 8:00 AM–11:00 PM EST, seven days a week
Phone: 718-416-3197 or 800 -681-2629
Email: techsupport@cobyusa.com
Web: www.cobyusa.com
The player does not turn on.
The buttons do not work.
Maspeth, NY 11378
Ensure that the battery retains a charge. Try replacing the battery with a new one.
Try resetting your player (remove and replace the
battery).
Ensure that the Hold switch is disengaged.
Ensure that the battery retains a charge. Try replacing the battery with a new one.
Ensure that the Hold switch is disengaged.
Page 38 Coby Electron ics Cor por ation

TROUBLESHOOTING
I cannot transfer les to the player.
Ensure that your computer is running a suppor ted
operating system.
If you are running Microsoft Windows 98 SE, ensure
that the USB driver has been properly installed.
If using the supplied USB extension cable, ensure
that it is securely attached to the player and the PC,
or try using another USB cable.
If you have connected the player through a USB
hub, try connecting the player directly to your
computer.
Ensure that the player’s memory capacity is not full.
Ensure that the Hold switch is disengaged.
There is no sound during playback.
Check the volume level.
Ensure that the headphones are attached securely
to the player.
The sound quality of the music is poor.
Try playing the le on your computer. If the sound
quality is still poor, try downloading the le again or
re-encoding the le yourself.
Ensure that the bit rate of the le is not too low. The
higher the bit rate of the le, the better it will sound.
The minimum recommended bitrate is 128kbps for
MP3s and 96kbps for WMAs.
www.cobyusa.com Page 39

www.cobyusa.com Pag e 41
TROUBLESHOOTING
Try lowering the volume of the player.
Ensure that the headphones are attached securely
to the player.
The player will not play my music le.
Ensure that the le is in a compatible format.
The le may be copy-protected and you no longer
have authorization to play this le. If you feel this is
in error, please contact the service from which you
downloaded the le.
The LCD characters are corrupted or something is
wrong with the display.
Ensure that the correct menu language has been set.
Try resetting your player (remove and replace the
battery).
The player has malfunctioned.
Try resetting your player (remove and replace the
battery).
Try updating the player’s rmware. Please refer to
the Firmware Upgrades section of this manual for
detailed instructions.
Page 40 Coby Electron ics Cor por ation

SPECIFICATIONS
Display Type 128 x 64 Dot-Matrix LCD with Backlight
Memory 2GB Integrated Flash Memory
Audio Format Support MP3, WMA
DRM Support WMDRM10*
Song Info Support ID3, LRC
Recording Format IMA-ADPCM Encoding
FM Frequency Range 87.5 - 108.0MHz
PC Interface USB 2.0 Full-Speed
Plug and Play Support Windows 98SE/2000/ME/XP or newer
Audio Output 3.5mm Stereo (Headphone)
Audio Input Integrated Microphone
Menu Language
Support
Power Supply 1 x “AAA” Battery
Unit Dimensions 2.2” x 2.87” x 0.82” (WHD)
* Music Se rvice must sup port Windows M edia DRM (WM DRM). WMDRM10 requires
Window s XP and Windows Me dia Player 10 or n ewer.
Speci cationsandmanua laresubje cttochang ewithou tpriornotice.
Mac OS X
English, French, German, Hebrew,
Italian, Por tuguese, Spanish, Chinese
(Trad), Chinese (Simp)
www.cobyusa.com Pag e 41
846ST D10

www.cobyusa.com Page 43
NOTES
Page 42 Coby Electron ics Cor por ation

NOTES
www.cobyusa.com Page 43

COBY Electronics Corp.
56- 65 Rust Street
Maspeth, NY 11378
ww w.cobyusa.com
ww w.ecoby.com
 Loading...