

Page 1
Pendant MP3 Player with SD Card Slot,
FM Radio, and Color LCD Display
MP-C654
MP-C684
MP-C694
INSTRUCTION MANUAL
Please read this manual carefully before operation
Page 2
www.cobyusa.com Page 3
PRECAUTIONS
The lightning as h with arrowhead symbol within an e quilateral triangle
is inten ded to aler t the user to the presenc e of uninsulate d “dangerous
voltage” within the product ’s enclo sure that may be o f sufcient m agnitude to co nstitute a risk of electr ic shock.
The exclamatio n point with in an equilat eral triang le is intende d to alert
the u ser to th e presence of impor tant oper ation and servicing instructions in t he literature ac companying the a ppliance.
For Cus tomer Use:
Enter bel ow the serial numb er that is located on the unit . Retain this information f or
future r eference.
Model N o.
Seria l No.
WARNING:
To prevent re or shock hazard, do not expose thi s device to rain or moisture. Dangerous high
voltage is presen t inside the enclo sure. Do not open th e cabinet.
CAUTION:
To prevent elec tric shock, match wide bl ade of plug to wide sl ot of outlet and fully inser t.
WARNING:
Handlin g the cords on this pro duct will expose yo u to lead, a chemi cal known to the State
of C alifornia to caus e cancer, and birth defects or other reproduc tive harm. Wa sh hands
afte r handling.
For re cycling or disposal i nformation about this product, please contact your
local au thorities or t he Electronic s Industries A lliance: www.ei ae.org.
Page 2 Coby Electron ics Cor por ation
Page 3

PRECAUTIONS
PROTECT YOUR HEAR ING:
Hearing experts advise against th e constant use of p ersonal stereo s played at high
volume. C onstant exposur e to high volumes ca n lead to hearing l oss. If you should
experi ence ringing in t he ears or hearin g loss, discont inue use and seek me dical advice.
FCC Noti ce:
This equipment has b een tested and found to comp ly with the limits for a Class B digital
device p ursuant to Part 15 of t he FCC Rules. These limits are designe d to provide reaso nable protection against ha rmful interf erence in a residential ins tallation. Thi s equipment
generat es, uses, and can r adiate radio frequency energy and, if not installed and us ed in
accor dance with the in structions, m ay cause harmful interf erence to radio or televisi on
recept ion. However, there is n o guarantee that in terference w ill not occur in a par ticular
installation. If this equipment doe s cause harmful i nterference to radio or t elevision
recept ion (which can be d etermined by tur ning the equipment off and on), the user is
encour aged to try and c orrect the interference by one or m ore of the following measur es:
- Reorie nt or relocate the receiv ing antenna.
- Increa se the separation between the equi pment and the receiver.
- Connec t the equipment into an outlet o n a circuit diff erent from that to w hich the
receiv er is connected.
- Consult the deale r or an experienc ed audio/TV t echnician for help.
NOTICE :
This product is protected by cert ain intellec tual proper ty rights of Micros oft. Use or distribut ion
of such tec hnology outsi de of this produc t is prohibited wi thout a license f rom Microsof t.
NOTICE :
Please refer to the pa ckaging for this p roduct for the technologies supp orted by the prod uct.
Window s Media® is a regis tered trademar k of Microsoft Corpor ation.
USB® is a r egistered trad emark of USB Impl ementers Forum , Inc.
The eMusic name and logo are trademar ks of eMusic.com, Inc. in th e United States an d
abroad.
All trademarks , registered tra demarks and log os are of their resp ective holder s.
www.cobyusa.com Page 3
Page 4
www.cobyusa.com Page 5
IMPORTANT SAFETY INSTRUCTIONS
Read Ins truct ions: All th e safety and oper ating inst ructio ns should be read
1.
before th e product i s operate d.
Retai n In stru ction s: Th e s afety and oper ating instruction s s hould be re-
2.
tained fo r future re ference.
Heed Warni ngs: A ll war nings on the product an d in the op erating instruc-
3.
tions sho uld be adhe red to.
Follow Instru ction s: All operating and u sage instructio ns should be fol-
4.
lowed.
Cleani ng: Un plug th is pro duct f rom t he wall outlet befor e clea ning. D o not
5.
use liqui d cleaner s or aeroso l cleaner s. Use a damp c loth for c leaning.
Attac hment s: Use only at tachme nts recom mended by th e m anufact urer.
6.
Use of othe r attach ments may be ha zardou s.
Water and Mo isture: Do not use thi s produ ct near water (e.g., near a b ath
7.
tub, washb owl, kitc hen sink, la undry tu b, in wet basem ents, or near
a swimmin g pool and th e like).
Acces sorie s: Do not place this pro duct on an
8.
unstabl e ca rt, stand, tripod , bra cket, o r ta ble.
Use onl y with car ts, sta nds, tr ipods, brackets , or
tables rec ommended by the manufac turer or sold
with the product. Any mounting of the product
should follo w the manufacture r’s instruct ions and
should u se a mounti ng acce ssory recomm ended
by the manuf acturer.
A p roduct and ca rt combination should be moved
9.
with care. Quick stops, excessi ve forc e, and uneven
surfa ces may cau se the prod uct and ca rt comb ination t o overtur n.
Ventila tion: Slot s and openings in the c abinet are provi ded for ventila tion to
10.
ensure reliab le ope ration of th e pro duct a nd to protect it from overheat ing.
These opening s sho uld neve r be blocked by placing the p roduct on a bed,
sofa, rug, or other sim ilar surf ace. This product s hould not be place d in a
built-i n inst allatio n suc h as a bo okcase or rack u nless proper ventilation is
provide d or the manu facturer i nstruc tions have b een adhere d to.
Power Sources: This product should be operated only from the type of
11.
power so urce ind icated o n the rat ing label . If you ar e not sure of the ty pe of
power supp ly to your home, con sult your prod uct dealer or lo cal power co mpany. For product s intended to ope rate from bat tery powe r or other sourc es,
refer to the o peratin g instruc tions.
Grounding or Polariz ation: This pr oduct may be equip ped with a pol arized
12.
alternating- current line plug that has one blade wider than the other. This plug
will only t into the power outlet in one direction. This is a safety feature. If you
are unable to ins ert the plug fully into the ou tlet, try rever sing the direc tion of
the plug. If the plug shoul d still fail t o t, contac t an electr ician to repl ace the
obsolete outlet. Do not defeat the safet y purpose of the polarized plug.
Page 4 Coby Electron ics Cor por ation
Page 5
IMPORTANT SAFETY INSTRUCTIONS
Power- Cord Prot ectio n: Power supply cords sh ould be routed so that th ey
13.
are not likely to b e wa lked on or pinched by i tems placed upon or against
them, paying par ticular att ention to cords at plugs, conven ience recep tacles,
and at the po int which t hey exit fro m the produc t.
Protec tive Attachm ent Plug: The product may b e equippe d with an a t-
14.
tachme nt plug with overload protection. This is a safe ty feature. See the
operati ng i nstruc tions for replac ement or direc tions to reset the protec tive
device. If re placem ent of the plug is re quired, be sur e the serv ice techni cian
has us ed a r eplacem ent plu g that has th e same overlo ad prote ction as the
origin al plug as spe cied by t he manufac turer.
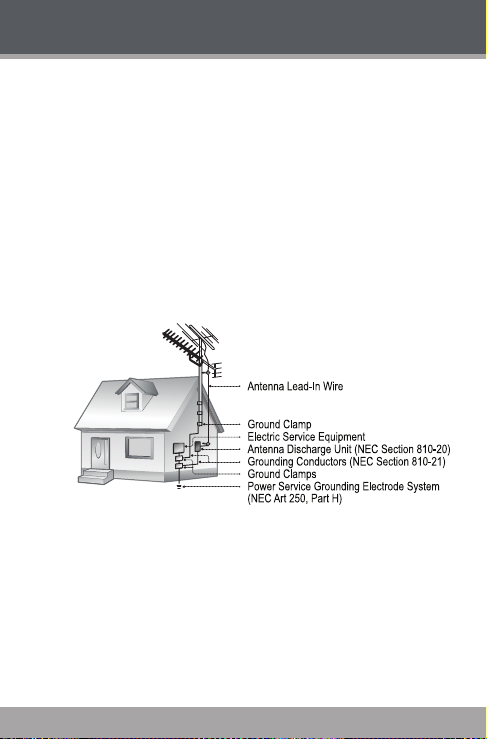
Outdo or Anten na G round ing: If an outside antenna is connec ted to the
15.
produc t, be sure t he antenna system is gro unded so a s to provide some
protect ion agai nst volt age surg es and bu ilt-up static c harges. Arti cle 810 of
the National Electrical Code, ANS/ NFPA 70 provide s i nformat ion with re gard to pro per ground ing of the mast a nd suppor ting str ucture, gr ounding of
the lead -in wire to an an tenna- dischar ge unit, size of gr ounding c onducto rs,
locati on of antenna- discharge unit, co nnectio n to grounding ele ctrode s, and
require ments for t he groundi ng electr ode (see gu re).
Light ning: For added protectio n for th is product, unplug it fr om the wa ll
16.
outlet and disc onnect the antenna or cable system d uring a lightni ng stor m
or w hen i t is left unat tended and unused for long perio ds of time. This will
prevent dam age to the pr oduct due to l ightning o r power-li ne surges.
Power Line s: An outside ant enna system sho uld not be locat ed in the vicin-
17.
ity of overhead powe r lines or other electri c light or power circuit s, or where it
can fall int o such power li nes or circ uits. When i nstallin g an outside a ntenna
system, extreme care sh ould be taken to keep from touchin g such power
lines or ci rcuits, a s contac t with them m ight be fat al.
Overl oading: Do no t overload wall out lets, exten sion cords , or integral con -
18.
venienc e recepta cles as th is can resu lt in a risk of re or elect ric shoc k.
www.cobyusa.com Page 5
Page 6

www.cobyusa.com Page 7
IMPORTANT SAFETY INSTRUCTIONS
Objec t and Liquid Entr y: Never push ob jects o f any kin d into t his pro duct
19.
through opening s as they m ay touch d angerous voltage points o r shout- out
parts t hat could res ult in a re or elec tric shoc k. Never spill li quid of any kind
on the pro duct.
Serv icing: Do not attemp t to servi ce this pro duct yourself as ope ning or
20.
removin g c overs may expose you to dangerous voltage or other hazards.
Refer all se rvici ng to quali ed serv ice per sonnel.
Damag e Req uirin g Ser vice: Unpl ug th is pro duct from the wall o utlet and
21.
refer ser vicing to qu alied se rvic e personn el under the fo llowing co ndition s:
a) when the power- supply or plug is dam aged; b) if liquid has been spilled
or if obj ects have f allen into the prod uct; c) if the product has been ex posed
to rain o r water; d) if the pr oduct do es not op erate nor mally by f ollowin g the
operati ng instru ctions. Adjust only t hose controls that a re covere d b y t he
operati ng instruc tions as impro per adjustme nt of other contro ls may result in
damage and wi ll often req uire extens ive work by a quali ed technic ian to restore the pr oduct to it s normal op eration; e) if the pr oduct has b een droppe d
or damaged in any way; f ) when the prod uct exhibit s a distinct change in
perfo rmance —this indicat es a need for s ervic e.
Replac ement Parts: When replacement parts are required , be sure that
22.
your ser vice te chnicia n has used replace ment par ts specied by t he manufacture r or have th e same ch aracter istics as the or iginal pa rt. Un authori zed
substit utions may r esult in re , electr ic shock, o r other haz ards.
Safet y C heck: Upon co mpletion of any service or repair s to this pr oduct,
23.
ask the ser vice technicia n to perfo rm safet y checks to en sure that th e product is in pr oper oper ating con dition.
Wall or Ceilin g Mount ing: The product should be mounted to a wall or
24.
ceiling o nly as rec ommende d by the manuf acturer.
Heat: The produc t shou ld be situated away from heat source s suc h as ra-
25.
diators , heat registers, stoves, or other pro ducts (inclu ding a mplie rs) that
produc e heat.
Page 6 Coby Electron ics Cor por ation
Page 7

TABLE OF CONTENTS
PRECAUTIONS .................................................................2
IMPORTANT SAFETY INSTRUCTIONS ..............................4
TABLE OF CONTENTS ....................................................... 7
PACKAGE CONTENTS ................................................... 10
FEATURES ....................................................................... 11
CONTROL S AT A GLANCE ............................................12
Front View ....................................................................................12
Rear View ....................................................................................12
Left View ..................................................................................... 13
Right V iew ................................................................................... 13
Bottom V iew ............................................................................... 13
Music Mode Screen ...................................................................14
Record Mode Screen ................................................................14
GETTING STARTED .........................................................15
Poweri ng Your Player ................................................................15
Turning Your Player On/Off .......................................................16
Hold Sw itch ..................................................................................16
Insta lli ng an SD/MMC Memo ry Ca rd (optional) ...................16
Main Menu Overvi ew ................................................................17
MUSIC MODE ................................................................18
Music Mode Controls ................................................................ 18
Music Options ............................................................................ 19
Repeat ............................................................................... 19
Equalize r ............................................................................ 19
Play Rate ........................................................................... 20
File ......................................................................................20
Repeat A-B Mode .....................................................................2 0
VIDEO MODE................................................................. 21
Video Mode Controls ............................................................... 21
Repeat ........................................................................................ 22
www.cobyusa.com Page 7
Page 8

www.cobyusa.com Page 9
TABLE OF CONTENTS
PHOTO MODE ................................................................23
Browsing Your Photo Library .................................................... 23
Photo Display Controls ............................................................. 23
VOICE MODE ................................................................24
Voice Controls ........................................................................... 24
Voice Options ............................................................................ 25
Repeat ...............................................................................25
Equalize r ............................................................................ 26
Play Rate ........................................................................... 26
Voice .................................................................................. 26
Voice Recording ....................................................................... 26
FM MODE .......................................................................28
FM Mode Co ntrol s ..................................................................... 28
FM Options Men u ...................................................................... 29
Managing FM Preset Stations .................................................. 29
Saving Preset Stat ions Automatically ...........................29
Saving Preset Stat ions Manua lly .................................... 29
Deleting Preset Statio ns .................................................. 30
FM Recording Controls ............................................................. 31
EBOOK MODE ...............................................................32
Browsing Your E Book Libra ry .................................................... 32
EBook Display Controls ............................................................. 32
DELETE MODE ................................................................33
Delete Controls .......................................................................... 33
Delete a F ile (or folde r) ................................................... 33
SETUP MODE ..................................................................34
USB CONNECTIONS ......................................................37
Minimum PC Requirements ..................................................... 37
USB Driver Installation (Window s 98SE Only) ......................... 38
USB Mode (MSC/MTP) ............................................................... 38
Connecting to a Computer ....................................................40
USB-MTP Mode ................................................................. 40
USB-MSC Mode ................................................................ 41
Page 8 Coby Electron ics Cor por ation
Page 9

TABLE OF CONTENTS
Transferr ing Files ........................................................................ 41
Disconnecting from a Computer ...........................................43
USB-MTP Mode ................................................................. 43
USB-MSC Mode ................................................................ 43
WINDOWS MEDIA PLAYER ............................................ 44
VIDEO CONVERSION ...................................................45
System Req uirements ............................................................... 46
Insta llation ..................................................................................46
Video Conver ter at a Glance ................................................. 47
Conver ting Video ............................................................ 48
FIRMWARE UPGRADES .................................................. 49
TROUBLESHOOTING ......................................................50
SPECIFICATIONS ...........................................................53
www.cobyusa.com Page 9
Page 10
www.cobyusa.com Page 11
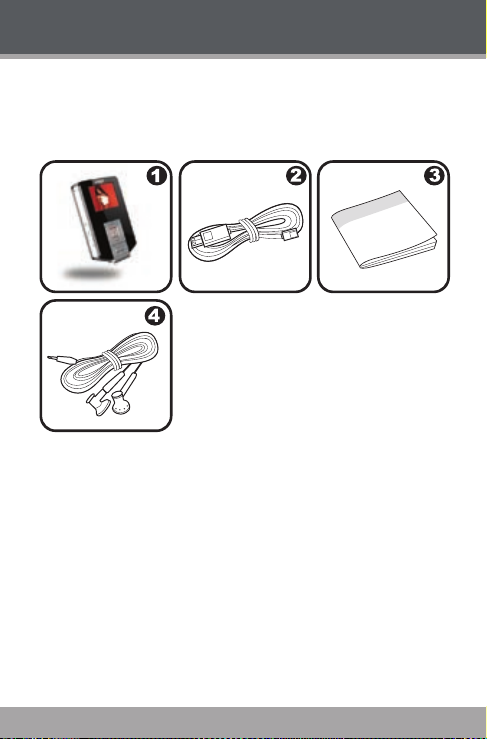
PACKAGE CONTENTS
Please make sure that the items listed below are included
in the package. Should an item be missing, please
contact the local retailer from which you purchased this
product.
Coby MP3 Player
1.
USB Cable
2.
Instruction Manual
3.
Stereo Earphones
4.
Page 10 Coby Electron ics Cor por ation
Page 11

FEATURES
Integrated Flash Memory
SD/MMC Card Slot for Easy Memory Capacity
Upgrades (SD/MMC Card not included)
Full-Color Display
Plays MP3 and WMA Digital Music Files
Plays Digital Music from most online stores and
subscription services*
Displays JPEG Digital Photo Files
ID3 and LRC support for song and synchronized lyric
information display
Integrated FM Radio and Recorder
Integrated Microphone for Digital Voice Recording
Mobile Data Storage Function
USB 2.0 for Fast File Transfers
* Music Se rvice must sup port Windows M edia DRM (WM DRM). WMDRM10 requires
Window s XP and Windows Me dia Player 10 or n ewer.
www.cobyusa.com Page 11
Page 12
www.cobyusa.com Page 13
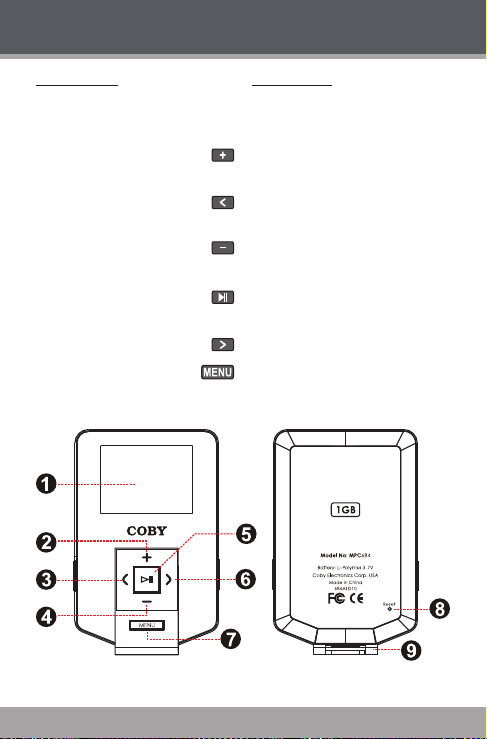
CONTROLS AT A GLANCE
Front View
LCD Display
1.
Navigation: Up
2.
Volume +
Navigation: Left
3.
Previous/Reverse
Navigation: Down
4.
Volume –
Navigation: Enter
5.
Play/Pause
Navigation: Right
6.
Next/Forward
Menu
7.
Rear View
Reset button
8.
Neckstrap Hook
9.
Page 12 Coby Electron ics Cor por ation
Page 13
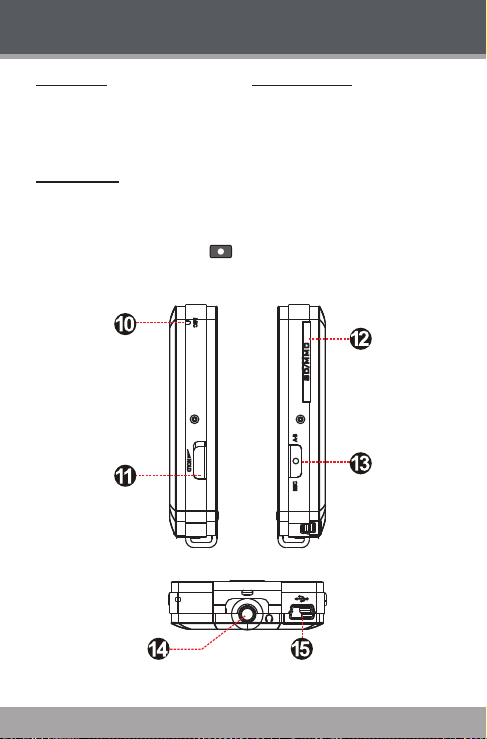
CONTROLS AT A GLANCE
Left View
Integrated Microphone
10.
Hold Switch
11.
Right View
SD/MMC Card Slot
12.
Record
13.
Repeat A-B
Bottom View
Headphone Out Jack
14.
USB Port
15.
www.cobyusa.com Page 13
Page 14
www.cobyusa.com Page 15
CONTROLS AT A GLANCE
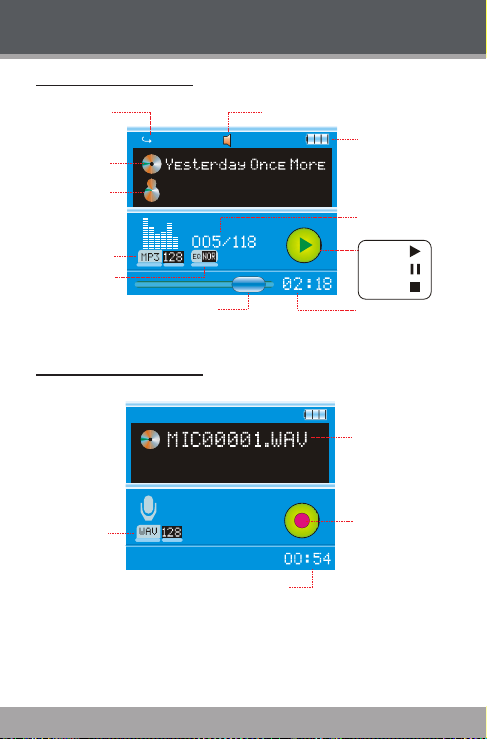
14N
Repea t mod e
Volum e Level
Batte ry le vel
Track nam e
File t ype
Equal izer
Progr ess b ar
Elaps ed ti me
Curre nt tr ack/
Total tra cks
Artis t
Play
Pause
Stop
Recor ding
file n ame
File t ype /
Bitrate
Recor ding tim e
Recor ding
indic ator
Music Mode Screen
Record Mode Screen
Page 14 Coby Electron ics Cor por ation
Page 15

GETTING STARTED
Powering Your Player
Your player has an integrated rechargeable battery that
will provide up to 5 hours of music play time.
The battery should be charged fully (minimum 4 hours)
before its initial use to ensure optimum lifetime per formance.
Charge through your computer’s USB Port:
Your player can be charged through a PC USB
connection. Plug one end of the USB cable into the
player’s USB port and plug the other end into the
USB port of a powered-on computer.
When connected to a USB hub, the hub must
be self-powered to charge the player’s battery.
File transfers will extend the charging time.
The batter y used in this device may present a re or
chemical burn if mistreated. Do not disassemble, incinerate, or heat the bat tery.
Do not connect the player to a power source other
than that which is indicated here or on the label as
this may result in the risk of re or electric shock.
Do not handle the power plug with wet hands. Doing
so may cause electric shock.
Use only AC adapters that have an output voltage of
5V and a minimum output current of 200mA. Failure
to do so may cause a re or damage the player.
www.cobyusa.com Page 15
Page 16
www.cobyusa.com Page 17
GETTING STARTED
Turning Your Player On/Of f
To turn the player on or off, hold for a few
seconds.
Hold Switch
The Hold feature locks (disables) your player’s controls to
prevent accidental key presses when it is in your pocket
or bag.
To lock the player’s controls, slide the HOLD
switch to the up in the direction of the arrow.
A Lock icon will be displayed on the screen.
To unlock the player’s controls, slide the HOLD
switch down.
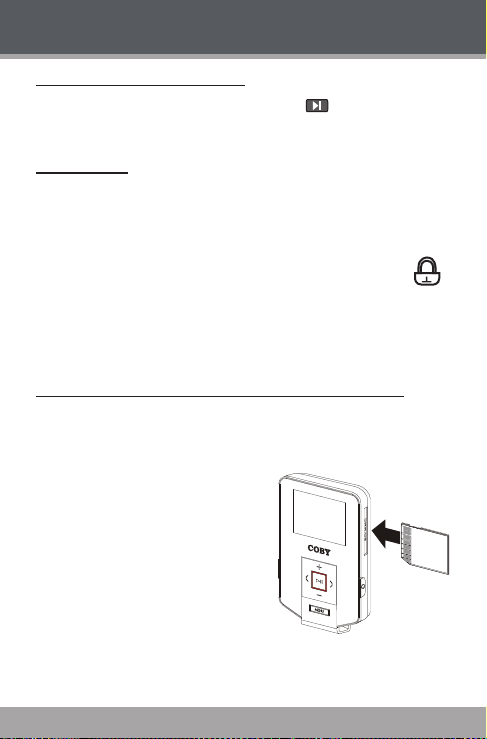
Installing an SD/MMC Memory Card (optional)
You can upgrade the memory capacity of your player by
adding an Secure Digital (SD) or Multimedia Card (MMC)
memory card.
Insert an SD or MMC
card into the slot as
shown in the diagram.
This player supports
memory cards up to 2GB
in size.
Page 16 Coby Electron ics Cor por ation
Page 17
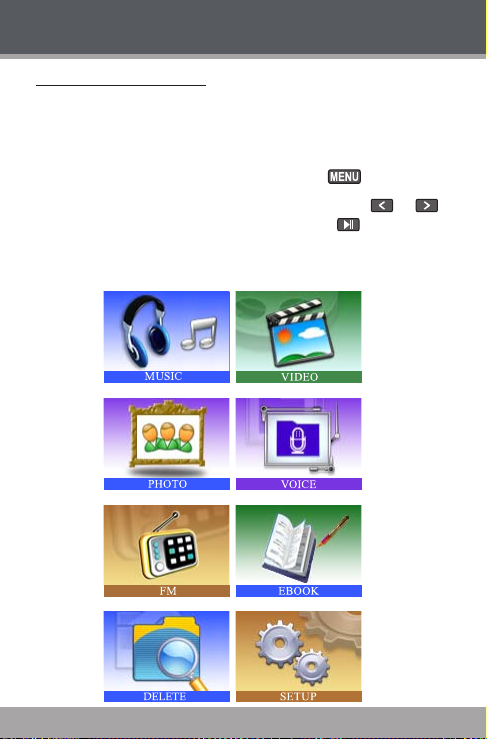
MAIN MENU
Main Menu Overview
The Main Menu gives you access to the different function
modes of your player.
The player will enter MUSIC mode when you turn it
on. To access the Main Menu, hold .
To select a mode in the Main Menu, press or
to highlight the mode, and then press to conrm.
For a detailed description of each item, see their respective sections in this manual.
www.cobyusa.com Page 17
Page 18

www.cobyusa.com Page 19
MUSIC MODE
Enter MUSIC mode from the Main Menu to play your
MP3, WMA, or WAV audio les.
Music Mode Controls
Use the following controls during music playback.
Key Function
Start /Resume track playback.
Press
Press Play the next track.
Press Play the previous track.
Hold Fast-forward through the current track.
Hold Reverse through the current track.
Press Increase the volume level.
Press Decrease the volume level.
Press Start Repeat A-B Mode.
Press
Hold
For more information about how to get music onto
your player, please refer to the section “USB Connections” of this manual.
During playback, press to pause
playback.
Access the Music Options menu.
Return to Main Menu.
Page 18 Coby Electron ics Cor por ation
Page 19

MUSIC MODE
Music Options
During music playback, press to access the Music
Options menu. The Music Options are: Repeat, Equalizer,
Play Rate, and File.
To select a option, press or to scroll the option
and then press .
To exit the Music Options menu, press .
Repeat
Change the order in which tracks are played. The Repeat
Mode options are:
Item Description
No Repeat Play tracks once in sequential order.
Repeat One Play the current track repeatedly.
Repeat All Play all tracks repeatedly.
Random All Play all tracks in random order.
Dir Normal Play tracks once in sequential order in the cur-
Dir Repeat Play all tracks repeatedly in the current folder.
Dir Random Play tracks in random order in the current folder.
Equalizer
Change the way music sounds on your player. The
Equalizer options are: Normal, Pop, Rock, Classic, Jazz,
and Bass.
rent folder.
www.cobyusa.com Page 19
Page 20

www.cobyusa.com Page 21
MUSIC MODE
Play Rate
Adjust playback tempo. The options range from 0.67X to
1.33X where 1X equals normal tempo, 0.67X equals slow-
est tempo, and 1.33X equals fastest tempo.
File
Browse all audio tracks loaded on your player. Use the
following keys to search for les or folders.
Key Function
Press Move the selection up.
Press Move the selection down.
Press Conrm (Enter) a selection:
Enter a folder to view its contents.
•
Conrm a le to play it.
•
Return to the previous folder (folder up).
•
Press
Repeat A-B Mode
Set a segment of a music track to repeat in a continuous
loop. During music playback:
To set the starting point “A” of the loop, press .
To set the end point “B” of the loop, press again.
The loop will now play from point “A” to point “B”.
To resume normal playback, press again.
Cancel or return to the previous folder (folder up).
Page 20 Coby Electron ics Cor por ation
Page 21

VIDEO MODE
Enter VIDEO mode from the Main Menu to play video
les in the MT V format loaded on your player.
Video Mode Controls
Use the following controls during video playback.
Key Function
Press
Press Play the next track.
Press Play the previous track.
Hold Fast-forward through the current track.
Hold Reverse through the current track.
Press Increase the volume level.
Press Decrease the volume level.
Press
Hold
Start /Resume track playback.
During playback, press to pause playback.
Access the Video Options menu.
Return to Main Menu.
www.cobyusa.com Page 21
Page 22

www.cobyusa.com Page 23
VIDEO MODE
Repeat
Adjust the Repeat Mode settings to change the order in
which tracks are played. The Repeat Mode options are:
No Repeat, Repeat One, Repeat All, Random All, Dir
Normal, Dir Repeat, and Dir Random.
Press to access the Video Options menu while
the player is in video playback /pause mode.
Press , and then press or to select a
Repeat option. Press to conrm.
Press to return to the Video List mode.
Item Description
No Repeat Play tracks once in sequential order.
Repeat One Play the current track repeatedly.
Repeat All Play all tracks repeatedly.
Random All Play all tracks in random order.
Dir Normal Play tracks once in sequential order in the cur-
Dir Repeat Play all tracks repeatedly in the current folder.
Dir Random Play tracks in random order in the current folder.
rent folder.
Page 22 Coby Electron ics Cor por ation
Page 23

PHOTO MODE
Enter PHOTO mode from the Main Menu to display your
JPEG photo les.
Browsing Your Photo Library
Upon entering PHOTO mode, the le browser will appear.
Use the following controls to search for photo les or folders.
Key Function
Press Move the selection up.
Press Move the selection down.
Press Conrm (Enter) a selection:
Enter a folder to view its contents.
•
Conrm a le to play it.
•
Return to the previous folder (folder up).
•
Press
Photo Display Cont rols
While a photo is being displayed, use the following controls.
Key Function
Press Display a photo.
Press Display the next photo.
Press Display the previous photo.
Press
Hold
Cancel or return to the previous screen (folder up).
Return to the File Browser list.
Return to Main Menu.
www.cobyusa.com Page 23
Page 24

www.cobyusa.com Page 25
VOICE MODE
Enter VOICE mode from the Main Menu to play your
recorded les (Voice or FM Tuner). If no recordings have
been made yet, the display will read “No File”.
The rst 3 letters of voice recording les are “MIC”.
The rst 2 letters of FM Tuner recording les are “FM”.
VOICE mode will play all compatible audio recording
les on your player, regardless of directory.
Voice Controls
Use the following controls in VOICE mode.
Key Function
Press
Press Play the next track.
Press Play the previous track.
Hold Fast-forward through the current track.
Hold Reverse through the current track.
Press Increase the volume level.
Press Decrease the volume level.
Press
Press
Hold
Page 24 Coby Electron ics Cor por ation
Start /Resume track playback.
During playback, press to pause playback.
During playback: Start Repeat A-B Mode.
•
Paused playback: Start Microphone
•
recording.
Access the Music Options menu.
Return to Main Menu.
Page 25

VOICE MODE
Voice Options
During voice playback, press to access the Voice
Options menu. The Voice options are: Repeat, Equalizer,
Play Rate, and Voice.
To select a option, press or to scroll the option
and then press .
To exit the Voice Options menu, press .
Repeat
Adjust the Repeat Mode settings to change the order in
which tracks are played. The Repeat Mode options are:
No Repeat, Repeat One, Repeat All, Random All, Dir
Normal, Dir Repeat, and Dir Random.
Item Description
No Repeat Play tracks once in sequential order.
Repeat One Play the current track repeatedly.
Repeat All Play all tracks repeatedly.
Random All Play all tracks in random order.
Dir Normal Play tracks once in sequential order in the
Dir Repeat Play all tracks repeatedly in the current folder.
Dir Random Play tracks in random order in the current folder.
current folder.
www.cobyusa.com Page 25
Page 26

www.cobyusa.com Page 27
VOICE MODE
Equalizer
The digital equalizer presets allow you to change the way
music sounds on your player. The Equalizer options are:
Normal, Pop, Rock, Classic, Jazz, and Bass.
Play Rate
Use the Play Rate function to adjust playback tempo.
The options range from 0.67X to 1.33X. Set the play rate
to 1X for normal playback, 0.67X for slowest playback,
1.33X for fastest playback.
Voice
Select and conrm Voice to browse recording les saved
on the player.
Voice Recording
With playback paused in Voice Mode, press to start
recording through the integrated microphone.
During recording:
Press or to pause recording; press or
again to resume recording.
Press to stop and save the recording. The
player will return to VOICE mode automatically to
play the recorded le.
Recordings are saved to the folder
“MICIN.DIR”. Select “Voice” in the Voice
Options menu to view saved les.
Page 26 Coby Electron ics Cor por ation
Page 27

VOICE MODE
Voice recording les are named “MICXXXXX.
WAV” where XXXXX corresponds to the
numerical sequence in which the recording was
made (numbering starts from 00001).
You can also star t voice rec ording from the Voice Op -
tions menu.
www.cobyusa.com Page 27
Page 28

www.cobyusa.com Page 29
FM MODE
Enter FM mode from the Main Menu to listen to or record
FM radio broadcasts.
Earphones or headphones must be connected to the
headphone jack for radio operation (the earphone cord
is used as an FM antenna).
FM Mode Controls
Use the following controls in FM mode.
Key Function
Press Switch between Preset and Manual tuning.
Press
Press
Hold
Hold
Press Decrease the volume level.
Press Increase the volume level.
Press
Preset Tuning: Tune to a higher preset station.
Manual Tuning: Tune to a higher frequency.
Preset Tuning: Tune to a lower preset station.
Manual Tuning: Tune to a lower frequency.
Manual Tuning: Auto-seek the next highest
frequency within reception range.
Manual Tuning: Auto-seek the next lowest
frequency within reception range.
Enter the FM Mode Menu.
Page 28 Coby Electron ics Cor por ation
Page 29

FM MODE
FM Options Menu
To enter the FM Options Menu, press while the
player is in FM mode.
Item Description
Save Sta. Save a Preset Station.
AUTO SCAN
Delete Delete a Preset Station.
Managing FM Preset Stations
Saving Preset Stations Automatically
To automatically scan and save all available broadcast
frequencies to Preset Station memory:
Enter the FM Options Menu (press ).
Select and enter “Auto Scan”.
There are 30 available Preset Stations. Auto Scan will
Saving Preset Stations Manually
While in Manual Tuning:
Manually tune to the station you would like to save
as a Preset Station (e.g., “92.7”).
Enter the FM Mode Menu (press ).
Automatically scan and save all available station
frequencies to Preset Station memory.
overwrite any previously stored Preset Stations.
www.cobyusa.com Page 29
Page 30

www.cobyusa.com Pag e 31
FM MODE
Select and enter “Save Sta”. The display will read
“SavePreset”
Press or to select a Preset Station number to
save to (e.g., “03”).
Press to conrm and save. (The station “92.7”
has now been saved as Preset Station “03”.)
Press to cancel the save proc ess.
Deleting Preset Stations
While in Preset Tuning:
Tune to the Preset Station you wish to delete.
Enter the FM Options Menu (press ).
Select and enter “Delete”. The display will read
“Delete”.
Press or to select a Preset Station number to
delete (e.g., “03”).
Press to conrm and delete. (Preset Station “03”
will be deleted.)
Press to cancel the delete process.
Page 30 Coby Electron ics Cor por ation
Page 31

FM MODE
FM Recording Controls
Make digital recordings of FM radio broadcasts.
Press while the player is in FM Mode. Recording
will start immediately.
Use the following controls during FM Recording.
Key Function
Pause/Resume recording.
Press or
Press
During recording, press or to pause
recording.
Stop and save the recording.
Recordings are saved to the folder
•
“FMIN.DIR”. Select “Voice” in the Voice
Options menu to view saved les.
Recorded voice les are named
•
“FMXXXXX.WAV” where XXXXX corresponds to the numerical sequence in
which the recording was made (numbering starts from 00001).
The player will return to FM Mode after
•
saving the recording.
www.cobyusa.com Pag e 31
Page 32

www.cobyusa.com Page 33
EBOOK MODE
Enter EBOOK mode from the Main Menu to nd and play
text les (TXT) loaded on your player.
Browsing Your EBook Librar y
Upon entering EBOOK mode, the le browser will appear.
Use the following controls to search for text les or folders.
Key Function
Press Move the selection up.
Press Move the selection down.
Press Conrm (Enter) a selection:
Enter a folder to view its contents.
•
Conrm a le to play it.
•
Return to the previous folder (folder up).
•
Press
EBook Display Controls
While a text le is being displayed, use the following controls:
Press to skip to the next page.
Press to skip to the previous page.
Press to return to the browser list.
Cancel or return to the previous screen (folder up).
Page 32 Coby Electron ics Cor por ation
Page 33

DELETE MODE
Enter DELETE mode to delete les (or folders) on your
player.
You can also connect your player to a computer to easily
manage your le library.
Delete Controls
A director y tree will be displayed on-screen upon entering DELETE mode from the Main Menu.
Use the following controls in FILE mode.
Key Function
Press Move the selection down.
Press Move the selection up.
Press Display the selected folder’s contents.
Press
Hold
Delete a File (or folder)
Press or to highlight and select the le (or
1.
folder) that you wish to delete.
Press . The player will ask you to conrm
2.
deletion.
Select “Yes” and then press to delete the le or
3.
folder (or select “No” to cancel).
Hold to return to the Main Menu.
4.
Access the Delete Options menu.
Return to Main Menu.
www.cobyusa.com Page 33
Page 34

www.cobyusa.com Page 35
SETUP MODE
Enter SETUP mode from the Main Menu to change your
player’s internal option settings.
The Setup Options menu contains 6 options: Power,
Language, Display, Record, Sys Tools, and Storage.
To select an option, press or . To conrm and
enter, press .
To exit the Setup Menu, hold .
Setup Option Description
Set the duration of time that your player will
remain on for when it is idle.
Power
Language
Display
Auto Off: 1, 3, 5, or 10 minutes.
•
Always On: Disable this power saving
•
feature off.
Set the menu and display language:
English, Spanish, Portuguese, French,
•
German, Chinese (Traditional), Chinese
(Simplied)
Set the Display options:
Brightness: Adjust the brightness of the
•
display.
Backlight: Set the duration of time (in
•
seconds) that the backlight will remain
on after a key press. A setting of “On”
will keep the backlight on continuously.
Page 34 Coby Electron ics Cor por ation
Page 35

SETUP MODE
Setup Option Description
Set the Recording Quality Level for Voice
and FM recordings. The options are: High
Record
Sys Tools
Qty., Middle Qty., and Low Qty.
Lower quality recordings will take up less
memory than higher quality recordings.
Use the System Tools:
Format: Use the Format function to
•
format your player. It may become
necessary to format your player if data
or les become corrupt. Always use the
Format function of your player and not
your computer’s format utility.
Formatting will destroy all data on
your player so make sure to backup
your data rst.
If you have installed an SD/MMC
card and have selected “SD/MMC
Card” from the STORAGE menu,
the SD/MMC card will be formatted
instead.
Reset: Return all of your player’s internal
•
options to their factor y-default settings.
Sys Info: View rmware and system
•
information.
www.cobyusa.com Page 35
Page 36

www.cobyusa.com Page 37
SETUP MODE
Setup Option Description
To set which storage option that the
player will use.
Select “Internal” to use the player’s
Storage
•
integrated ash memory.
Select “SD/MMC Card” to use an SD
•
or MMC card that has been installed
(optional).
Page 36 Coby Electron ics Cor por ation
Page 37

USB CONNECTIONS
Minimum PC Requirements
You can connect your Coby MP3 player to a computer
with a USB port to transfer les to your player or to manage the les on your player. The minimum requirements
listed below will allow you to perform basic le manage-
ment functions; advanced features will require a faster
PC and Windows conguration.
MS Windows 98SE (Service Pack 1) or ME [USB-
MSC];
MS Windows 2000 (Ser vice Pack 3 or above) with
Windows Media Player 9 [USB -MSC];
MS Windows XP (Service Pack 1 or above) with
Windows Media Player 10 or newer [USB-MTP]
Pentium 166 MMX processor (or equivalent)
96MB RAM
50MB of available hard drive space
Internet connection
Video Display card
Sound card
USB 1.0 port (a USB 2.0 Hi-Speed por t will enable
faster le transfers).
New versions of Windows Media Player may be downloaded from the Microsoft website at www.microsoft.com.
www.cobyusa.com Page 37
Page 38

www.cobyusa.com Page 39
USB CONNECTIONS
USB Driver Installation (Windows 98SE Only)
It is not necessary to install the USB driver if your
computer is running Microsoft Windows ME/2000/XP
or newer, or Macintosh OS X. Computers running these
operating systems will recognize your player automatically when connected.
If your computer is running Windows 98 SE, download the
driver from COBY website: www.cobyusa.com.
USB Mode (MSC/MTP)
The player can use either USB-Mass Storage Class
(USB-MSC) mode or USB-Media Transfer Protocol
(USB-MTP) mode to connect to your computer. Both
USB modes allow for simple, high-speed transfers of les
between your player and a computer, and allow you to
use your computer’s operating system to view, manage,
and transfer les to your player from your computer
There are, however, a few differences to take note of:
USB-MSC USB-MTP
Simple plug-and-play suppor t
for all major operating systems
(Microsoft Windows 98SE/
ME/2000, Macintosh OS X,
Linux)
Simple plug-and-play suppor t
for Microsoft Windows XP with
Service Pack 1 and Windows
Media Player 10 (or newer)
Page 38 Coby Electron ics Cor por ation
Page 39

USB CONNECTIONS
USB-MSC USB-MTP
Supports Windows Media
DRM 9
-- Windows Media Playlist support
USB 2.0 Hi-Speed le transfers USB 2.0 Hi-Speed le transfers
In general, USB-MSC mode enjoys wider compatibility
with different computers and operating systems, while
USB- MTP mode enables advanced features (e.g., playlist
synchronization), but requires Windows XP SP1 and
Windows Media Player 10 or newer.
To transfer and synchronize encrypted WMDRM10
les, USB-MTP mode (in conjunction with Windows
XP and Windows Media Player 10) is required. Most
online music stores and subscription ser vices use
WMDRM10 les*. Please refer to the documentation
of either Microsoft or the store from which you purchased your music for more information and support.
WMDRM9 may be used for music purchases, only.
WMDRM10 is necessary for subscription-based services.
* A few examples of online music stores that sup-
port WMDRM are: AOL Music Now, Napster To Go,
URGE, Virgin Digital, and Y! Music (Yahoo! Music).
Supports Windows Media DRM
9 (WMDRM9)
Supports Windows Media DRM
10 (WMDRM10) -- requires
Windows XP and Windows
Media Player 10 or newer
www.cobyusa.com Page 39
Page 40

www.cobyusa.com Pag e 41
USB CONNECTIONS
Content owners use Windows Media digital rights
management technology (WMDRM) to protect their
intellectual proper ty, including copyr ights. This device
uses WMDRM sof tware to access WMDRM- protected content. If the WMDRM software fails to protect
the content, content owners may ask Microsof t to revoke the software’s ability to use WM DRM to play or
copy protected content. Revocation does not affect
unprotected content. When you download licenses for
protected content, you agree that Microsoft may include a revocation list with the licenses. Content owners may require you to upgrade WMDRM to access
their content. If you decline an upgrade, you will not
be able to access content that requires the upgrade.
Music purchased and downloaded from the iTunes
music store are A AC les encrypted with Apple Fairplay DRM. The player does not suppor t AAC le playback. Please use only MP3, WMA, or WAV music les
with your player.
Connecting to a Computer
Connect the player to your computer with the supplied
USB cable.
You can switch between USB modes quickly after
your player has been connected to the computer.
Hold during connection to toggle between the
USB modes.
USB-MTP Mode
When the player is connected under USB-MTP mode:
Page 40 Coby Electron ics Cor por ation
Page 41

USB CONNECTIONS
Your computer will automatically recognize the
player as an MTP Device. An icon representing
your player will appear under “Audio Devices” when
you open “My Computer”.
It may take Windows several minutes to recognize
and set up the device the rst time it is connected
depending on your hardware conguration.
USB-MSC Mode
When the Player is connected under USB-MSC mode:
Your computer will automatically recognize the
player as an MSC Device. An icon representing
your player will appear as a “Removable Disk” when
you open “My Computer”.
It may take Windows several minutes to recognize
and set up the device the rst time it is connected
depending on your hardware conguration.
Transferring Files
The USB 2.0 Hi-Speed connection makes it easy to
transfer music les (or any other data les) quickly
between the player and your computer. Simply use the
player as you would a oppy disk using basic operating
system commands.
If you need fur ther assistance with transferring les,
please refer to your operating system’s instruction manual or on-screen help. If you are using media management
software such as iTunes, Winamp, or Windows Media
Player, please refer to their documentation for support.
www.cobyusa.com Pag e 41
Page 42

www.cobyusa.com Page 43
USB CONNECTIONS
Do not disconnect or otherwise interrupt the player dur-
ing transmission - this could damage or corrupt the
player’s rmware or your les. If the player is accidentally disconnected and is not working properly, reset
your player (see the Getting Started section for details).
Files transferred in USB-MTP mode will appear in a fold
er called “MTPMEDIA” when the player is in USB-MSC
mode.
-
Page 42 Coby Electron ics Cor por ation
Page 43

USB CONNECTIONS
Disconnecting from a Computer
Disconnect your player as instructed below to prevent
data loss or le/rmware corruption.
USB-MTP Mode
If you are using a USB-MTP connection, you can simply
disconnect the cable from your player.
USB-MSC Mode
Double-click the green arrow
1.
in the taskbar located on the
lower-right side of the computer
screen (Safely Remove Hardware).
Safely Remove
2.
Hardware: Select
“USB Mass Storage
Device” from the list
that appears and then
click on “Stop”.
Stop a Hardware
Device: Select
“USB Mass Storage
Device” from the list
that appears and then
click on “OK”.
Select “USB Mass Storage Device” from the list that
appears and then click on “OK”.
When the “Safe to Remove Hardware” window ap-
3.
pears, click the OK button and disconnect the USB
cable from the player and your computer.
www.cobyusa.com Page 43
Page 44

www.cobyusa.com Page 45
WINDOWS MEDIA PLAYER
You can use Windows Media Player and a USB -MTP
connection to manage your music media library with
Microsoft Windows XP or newer.
New versions of Windows Media Player may be downloaded from the Microsoft website at www.microsoft.com.
For more information, please refer to the Coby MP3
Quick Start Guide.
For more information and suppor t regarding music
transfer and synchronization with Windows Media
Player (WMP), please see the help section included
with WMP (click Help > Synchronizing Content to De vices).
Page 44 Coby Electron ics Cor por ation
Page 45

VIDEO CONVERSION
Use the video conversion software utility included on the
Installation CD to create video les that are suitable for
playback on your Coby MP3 player.
Your player supports MTV les with the follow-
ing specications:
96 x 64 resolution at 15 frames per second (fps)
For detailed instructions and information about
the video conversion software, please refer to
the manual included on the installation CD.
Note:
The video conversion software is included for your convenience and
is compatible with Microsoft Windows operating systems only. There
are many other video conversion utilities available for download or purchase on the internet.
Because the program is licensed free of charge, there is no warranty for the
program, to the extent permitted by applicable law. Except when otherwise
stated in writing the copyright holders and/or other parties provide the program “as is” without warranty of any kind, either expressed or implied, includ-
ing, but not limited to, the implied warranties of merchantability and tness
for a particular purpose. The entire risk as to the quality and performance of
the program is with you. Should the program prove defective, you assume
the cost of all necessary servicing, repair or correction.
In no event unless required by applicable law or agreed to in writing will any
copyright holder, or any other party who may modify and/or redistribute the
program as permitted above, be liable to you for damages, including any
general, special, incidental or consequential damages arising out of the use
www.cobyusa.com Page 45
Page 46

www.cobyusa.com Page 47
VIDEO CONVERSION
or inability to use the program (including but not limited to loss of data or data
being rendered inaccurate or losses sustained by you or third parties or a failure of the program to operate with any other programs), even if such holder or
other party has been advised of the possibility of such damages.
System Requirements
OS Support: Microsoft Vista, XP, 2K, Me, 98
Memory (RAM): 50MB
Free HD Space: 100MB
CPU: Pentium class equivalent or better
Video: Adapter capable of 24-bit color for
Sound: DirectX 7-compatible sound card
DirectX: DirectX 9.0
QuickTime: QuickTime 7.0
WMP: WMP9 or better
Installation
Copy the folder “MTV Video Converter” to your
1.
computer.
To start the software, double-click the le “Video-
2.
Convert.exe”.
QuickTime support
supporting 2 audio channels (stereo)
sampled at 16-bit/44.1Khz or better
Page 46 Coby Electron ics Cor por ation
Page 47

VIDEO CONVERSION
2
2
2
2
2
2
Video Converter at a Glance
Seek Bar for preview
1.
and time selection.
Starting and Ending
2.
time-point selection.
Select the video le
3.
to convert
Select the size of
4.
the converted video
(ensure that this is set
to 96X64).
Select the destination
5.
folder of the con-
verted video le.
www.cobyusa.com Page 47
Page 48

www.cobyusa.com Page 49
VIDEO CONVERSION
Converting Video
Start the Video Conversion program.
1.
Select the source video le to conver t. The source
2.
le must be one of the following video types: AVI
(*.avi), WMV (*.wmv, *.asf), MPEG-1 (*.mpg),
QuickTime (*.mov, *.qt), MPEG-2 (*.vob), RealMedia
(*.rm, *.rmvb), MPEG-4, or 3GP (*.3gp).
Direct X 9.0, Windows Media Player 9.0, and other co-
decs must be installed to suppor t all media types.
Select the destination folder that the converted le
2.
will be saved to.
Ensure that the Output Frame Size is set to “96X64”.
3.
Click “Start Conversion” to start the conversion
4.
process.
When the conversion is complete, copy the con-
5.
verted les to your player for playback.
Page 48 Coby Electron ics Cor por ation
Page 49

FIRMWARE UPGRADES
From time to time, COBY may release rmware upgrades
to improve the per formance of the player or to add
additional features. Please check the COBY website
periodically at www.cobyusa.com to see if new rmware
has been released for your player. If you are experiencing
abnormal behavior with your player, you may choose to
restore (format) your player before updating its rmware.
Do not interrupt the rmware upgrade process — doing
so could damage your player and render it inoperable.
See the documentation that is included with the rm
ware upgrade le for detailed instructions.
Connect your player to the computer.
1.
Download the latest rmware for your player from
2.
www.cobyusa.com. Save this le to the computer.
Double-click the downloaded le (you may need a
3.
le compression utility installed on your computer).
In the window that appears, double-click the le
“factory4.exe” to star t the upgrade utility.
Follow the on-screen instructions to start the
4.
upgrade process.
When the upgrade is complete, disconnect your
5.
player from the computer.
Turn on your player to complete the rmware
4.
upgrade process.
-
www.cobyusa.com Page 49
Page 50

www.cobyusa.com Page 51
TROUBLESHOOTING
If you have a problem with this device, please read the
troubleshooting guide below and check our website
at www.cobyusa.com for Frequently Asked Questions
(FAQs) and rmware updates. If these resources do not
resolve the problem, please contact Technical Suppor t.
Address COBY Electronics Technical Support
Email techsupport@cobyusa.com
Web w ww.cobyusa.com
Phone 800-727-3592: Weekdays 8:00AM–11:00PM EST
The player does not turn on.
The buttons do not work.
I cannot transfer les to the player.
Page 50 Coby Electron ics Cor por ation
56- 65 Rust Street
Maspeth, NY 11378
Weekends 9:00AM–5:30PM EST
718-416-3197: Weekdays 8:00AM–5:30PM EST
Ensure that the player has been charged.
Ensure that the Hold switch is disengaged.
Try resetting your player (use a pin to press the
Reset button located on the rear of the player).
Ensure that the player has been charged.
Ensure that the Hold switch is disengaged.
Page 51

TROUBLESHOOTING
Ensure that your computer is running a suppor ted
operating system.
If you are running Microsoft Windows 98 SE, ensure
that the USB driver has been properly installed.
If using the supplied USB extension cable, ensure
that it is securely attached to the player and the PC,
or try using another USB cable.
If you have connected the player through a USB
hub, try connecting the player directly to your
computer.
Ensure that the player’s memory capacity is not full.
Ensure that the Hold switch is disengaged.
There is no sound during playback.
Check the volume level.
Ensure that the headphones are attached securely
to the player.
The sound quality of the music is poor.
Try playing the le on your computer. If the sound
quality is still poor, try downloading the le again or
re-encoding the le yourself.
Ensure that the bit rate of the le is not too low. The
higher the bit rate of the le, the better it will sound.
The minimum recommended bitrate is 128kbps for
MP3s and 96kbps for WMAs.
Try lowering the volume of the player.
www.cobyusa.com Page 51
Page 52

www.cobyusa.com Page 53
TROUBLESHOOTING
Ensure that the headphones are attached securely
to the player.
The player will not play my music le.
Ensure that the le is in a compatible format.
The le may be copy-protected and you no longer
have authorization to play this le. If you feel this is
in error, please contact the service from which you
downloaded the le.
The LCD characters are corrupted or something is
wrong with the display.
Ensure that the correct menu language has been set.
Try resetting your player (use a pin to press the
Reset button located on the rear of the player).
The player has malfunctioned.
Try resetting your player (use a pin to press the
Reset button located on the rear of the player).
Try updating the player’s rmware. Please refer to
the Firmware Upgrades section of this manual for
detailed instructions.
Page 52 Coby Electron ics Cor por ation
Page 53

SPECIFICATIONS
Display Type 1.33 ” Full-Color CSTN LCD
Memor y Integrated Flash Memor y
Audio Format Suppor t MP3, WM A, WMA-DRM, WAV
Video For mat Support MTV: 96x64, 15fps
Photo Format Suppor t JPEG
DRM Support WMDRM10
Song Info Support ID3, Windows Media
Recording Format IMA-ADPCM Encoding
FM Frequency Range 87.5 - 108.0MHz
PC Interface USB 2.0 Hi -Speed (MSC or MTP)
Plug and Play Support Windows 98SE/2000/ME/XP or newer
Audio Output 3.5mm Stereo (Headphone)
Audio Input Integrated Microphone
Menu Language Support English, Spanish, Por tuguese, French,
Power Supply Rechargeable Lithium-ion Battery
Unit Dimensions 1.84” x 2.76” x 0.55” (WHD)
MP-C654: 512MB
MP-C684: 1GB
MP-C694: 2GB
SD/MM C Card Slot for Expanded Memory
Capacit y (up to 2GB cards)
Mac OS X
German, Chinese (Trad), Chinese (Simp)
USB Charge
Design , specications, and manu al are subject to change witho ut prior
notice.
www.cobyusa.com Page 53
654ALD10 / 684ALD10 / 694ALD10
Page 54

www.cobyusa.com Page 55
NOTES
Page 54 Coby Electron ics Cor por ation
Page 55

NOTES
www.cobyusa.com Page 55
Page 56

COBY Electronics Corp.
56- 65 Rust Street
Maspeth, NY 11378
ww w.cobyusa.com
ww w.ecoby.com
 Loading...