

Page 1

MP-C353
Micro MP3 Player with
Integrated Stereo Speakers
INSTRUCTION MANUAL
Please read this manual carefully before operation.
Page 2
www.cobyusa.com Page 3
PRECAUTIONS
The lightning as h with arrowhead symbol within an e quilateral triangle
is inten ded to aler t the user to the presenc e of uninsulate d “dangerous
voltage” within the product ’s en closure that m ay be of sufc ient magnitude to co nstitute a risk of electr ic shock.
The exclamatio n point with in an equilat eral triang le is intende d to alert
the u ser to th e presence of impor tant oper ation and servicing instructions in t he literature ac companying the a ppliance.
WARNI NG:
For Cus tomer Use:
Enter bel ow the serial numb er that is located on the bot tom of the unit. Retain this
inform ation for future r eference.
Model N o. MP-C 353
Seria l No.
To prevent re or shock hazard, do not expose thi s devic e to rain or moistu re. Dan gerous high
voltage is presen t inside the enclo sure. Do not open th e cabinet.
CAUTIO N:
To prevent elec tric shock, match wide bl ade of plug to wide sl ot of outlet and fully inser t.
WARNI NG:
Handlin g the cords on this pro duct will expose yo u to lead, a chemi cal known to the State
of C alifornia to caus e cancer, and birth defects or other reproduc tive harm. Wa sh hands
afte r handling.
Page 2 Coby Electron ics Cor por ation
Page 3

PRECAUTIONS
PROTECT YO UR HEAR ING:
Hearing experts advise against th e constant use of p ersonal stereo s played at high
volume. C onstant exposur e to high volumes ca n lead to hearing l oss. If you should
experi ence ringing in t he ears or hearin g loss, discont inue use and seek me dical advice.
Notic e:
This pro duct is protecte d by certain intellectu al property r ights of Micros oft. Use or dist ribution of suc h technology out side of this produc t is prohibited without a lic ense from Micro soft.
For recycl ing or disposal infor mation about this product, plea se contact your loca l
author ities or the Elec tronics Indus tries Alliance: www.eiae.org.
www.cobyusa.com Page 3
Page 4
www.cobyusa.com Page 5
IMPORTANT SAFETY INSTRUCTIONS
Read Inst ruct ions: All the safet y an d op erating instructio ns s hould
1.
be read before the pr oduct is o perated.
Retai n Instru ctions: The safety and oper ating instr uctio ns should be
2.
retaine d for futu re reference.
Heed Warning s: All warnings on the product and in the op erating
3.
instru ctions s hould be adhered to.
Follow Instr ucti ons: All operat ing and usage in structions should be
4.
followe d.
Cleaning: Unplu g this produ ct from the wall outlet before cleaning.
5.
Do not use liquid cleaners or aeroso l cleaners. Use a damp c loth f or
cleaning.
Attachmen ts: Use on ly attachment s recom mended by the manu fac-
6.
turer. Use of other atta chments may be haza rdous.
Water and Mois ture: Do n ot use this produc t near wate r (e.g., near
7.
a bath tub, washbo wl, kitc hen sink, laundr y tub, i n wet basements, or
near a swim ming poo l and the like).
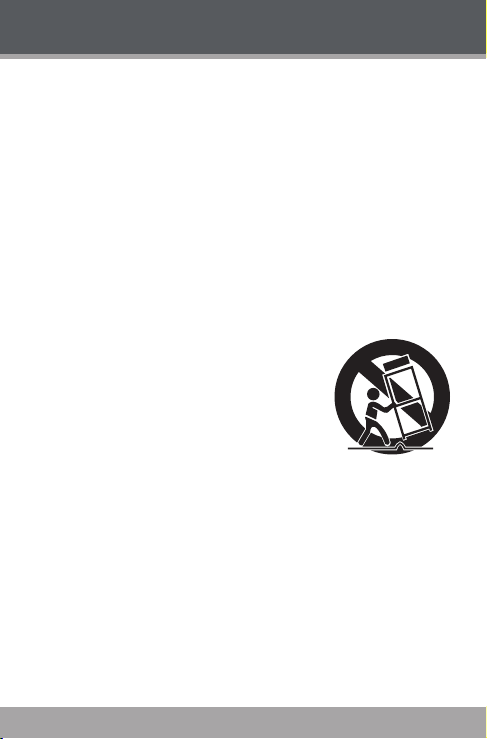
Acces sorie s: Do not place this produ ct on an
8.
unstable car t, st and, t ripod, bracket , or t able.
Use only with carts, stands, tripods, brackets,
or table s recomm ended by the manufacturer
or sold wit h the produc t. Any mounting of the
produc t shou ld fol low th e manu facturer’s in struc tions and sh ould u se a mountin g acc essory recomme nded by the manufact urer.
A produc t and car t combi nation sh ould be
9.
moved with car e. Quic k stops, excessive forc e, and u neven sur face s
may cause t he produ ct and car t comb ination t o overturn.
Ventil ation: Slots and openings in the cabinet are provi ded for ven -
10.
tilation to ensure reliable operation of the product and to protect it
from overhe ating. These openings should never be blocked by placing
the pro duct on a b ed, sofa , rug, or other similar sur face. This pro duct
should not be placed in a built-in installatio n suc h as a bookcase or
rack unless proper vent ilation is pr ovided or the manufactu rer instructions have b een adher ed to.
Power So urces: This product sh ould be operate d only fr om the t ype
11.
of power source indicated on the rating label. If you are not sure of
the typ e of power supp ly to your hom e, consul t your produ ct dealer o r
local power comp any. For produc ts intended to operate from batter y
power or ot her sourc es, refe r to the oper ating ins truct ions.
Page 4 Coby Electron ics Cor por ation
Page 5
IMPORTANT SAFETY INSTRUCTIONS
Groun ding or Po lariz atio n: This product may be equipped with a
12.
polarized alternating- curren t line plug that has one blade wider than
the ot her. This plug will only t into the power o utlet in one direc tion.
This is a safet y fe ature. If yo u are unable to inser t th e plu g ful ly into
the outlet, try rever sing the direction of th e plug. If the plug should stil l
fail to t, contac t an electri cian to repla ce the obsol ete out let. D o not
defeat th e safety purpose of the polar ized plu g.
Power- Cord Protecti on: Power suppl y c ords should be routed so
13.
that they are not l ikely to be walked o n or pinche d by items placed
upon or agai nst them, paying par ticular attenti on to cord s at plugs,
conveni ence receptacles, and at th e point which they exit from the
produc t.
Protec tive A ttachment Plug: The produc t may be eq uipped w ith an
14.
attac hment plug with overload prote ction. Thi s is a safety feature. See
the operating instructio ns for replacement or di rectio ns to reset the
protective d evice. If replacement of th e plu g is required, be sur e the
service technician has us ed a repla cement plug that has the same
overloa d prote ction as the origin al plug as specied by the manufa cturer.
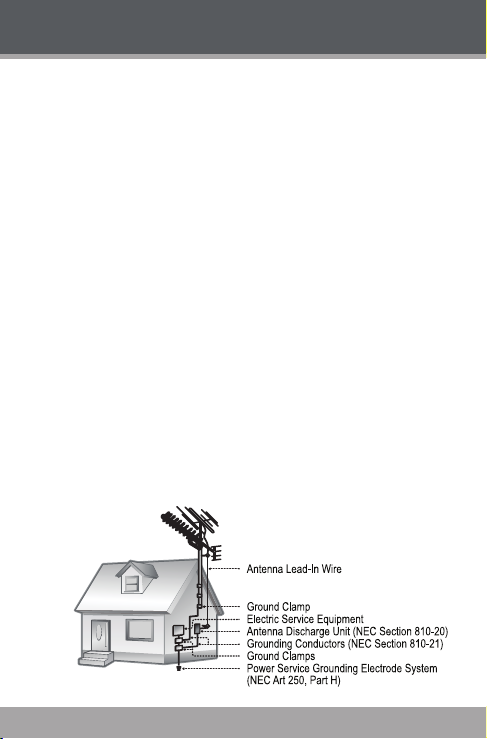
Outdoor Antenna Gro unding: If an outsi de antenna is c onnected to
15.
the prod uct, be sur e the antenn a system is gr ounded so a s to provide
some protection against voltag e s urges and buil t-up static c harges .
Article 810 of the National Electrical Code, ANS/NFPA 70 provi des
inform ation w ith reg ard to p roper g roundin g of the mast and suppor ting structure, grounding o f th e le ad-in wire to an antenna -disc harge
unit, size of groundi ng conduct ors, locat ion of antenna- discha rge unit,
connec tion to grounding elect rodes, and req uirement s for the ground -
ing elec trode (see gure).
www.cobyusa.com Page 5
Page 6

www.cobyusa.com Page 7
IMPORTANT SAFETY INSTRUCTIONS
Light ning: For added protection for this pr oduct, unplug i t f rom the
16.
wall outl et and disc onnect the antenna or cable sy stem duri ng a lightning storm or w hen it is left unatten ded a nd unu sed f or lo ng periods
of time. This w ill prevent damage to the product due to lightning or
power-li ne surges .
Power Lines: An outside antenn a system should not be loc ated in
17.
the vicinity of ove rhead power lines o r other electri c light or p ower
circui ts, or where i t can fall into s uch power lines or circ uits. When
installing an o utside antenna sys tem, extrem e c are should be taken
to keep from touchi ng such power lines o r circuits, as co ntact with
them might be fatal.
Overl oadin g: Do not overloa d wall outlets, extension cords, or in-
18.
tegral convenienc e r ecepta cles as this can r esult in a risk of re or
electr ic shoc k.
Objec t and Liquid Entr y: Never push ob jects of any kind i nto this
19.
produc t throu gh open ings as they may tou ch dang erous voltage
points or shout- out parts t hat c ould resul t in a re or e lectr ic shock.
Never spil l liquid of any kind on the p roduct .
Servicing: Do not attempt to se rvic e this product yourself as opening
20.
or removing cover s may expos e you to dangerous voltage or other
hazards. Refer all s ervicing to qual ied service personnel.
Damag e Requir ing Ser vice: Unplug this product fr om the wall out let
21.
and refer servi cing to qualied serv ice personnel under the following conditions: a) w hen the power-sup ply or pl ug is damaged; b) if
liquid has been spilled or if objects have fallen i nto the pr oduct; c) if
the pro duct ha s been ex posed to rain o r water; d) if the produ ct doe s
not operate norma lly by following the o peratin g instr uction s. Adjust
only those controls th at are cover ed by the o perating instructions a s
improp er adj ustment of other c ontrols may result in damage and will
often require extensi ve work by a qualied technician to restore t he
produc t to its normal op eration; e) if the pro duct has been drop ped or
damaged in any way; f) when t he produc t exhibits a distinct ch ange in
perf ormanc e—t his indic ates a need for ser vice.
Repla cemen t Par ts: W hen replacement pa rts are re quired, be sure
22.
that you r serv ice tec hnicia n has use d replacement parts speci ed by
the manufac turer or have the same character istic s as the original part.
Unautho rized substi tutions may result in r e, electric shock , or other
hazards.
Safet y Check: Upon completi on of any service or repai rs to this prod-
23.
uct, ask the ser vice techn ician to perf orm safety checks to ensure that
the prod uct is in proper oper ating co ndition.
Page 6 Coby Electron ics Cor por ation
Page 7

IMPORTANT SAFETY INSTRUCTIONS
Wall or Ceiling Moun ting: T he prod uct sho uld be mounted to a wall
24.
or ceili ng only as re commen ded by the ma nufacturer.
Heat: The product should be situate d away from hea t so urces such
25.
as radiators, heat registers , stoves, or other products (including ampli-
ers) that produce heat.
www.cobyusa.com Page 7
Page 8

www.cobyusa.com Page 9
TABLE OF CONTENTS
PRECAUTIONS ...................................................................................... 2
IMPORTANT SAF ETY INSTRUCT IONS ................................................... 4
TABLE OF CO NTEN TS ........................................................................... 8
PACKAGE CONT ENTS ........................................................................ 10
FEATU RES .............................................................................................11
GET TING S TARTE D .............................................................................. 12
MP-C 353 at a Glance ....................................................................................12
Front View ...........................................................................................12
Top View ..............................................................................................12
Left Vi ew .............................................................................................12
Right Vi ew ...........................................................................................12
Connec tions ...................................................................................................13
Connec ting Hea dphones ...................................................................13
Connec ting Power ..............................................................................13
AC Adapter ...............................................................................13
USB Char ge .............................................................................13
Connec ting to a Co mputer.................................................................. 14
Disco nnecting from a Co mputer ........................................................15
Microsoft Windows .............................................................................15
Macintosh OS X ..................................................................................15
MP-C 353 Display ..........................................................................................17
Using the MP-C 353 Controls ........................................................................18
NAVIGATOR MODE ........................................................................... 20
Playing M usic .................................................................................................20
USB Dri ver Insta llation ............................................................16
Play Mode ........................................................................................... 17
Record M ode ......................................................................................17
Power On/Off ......................................................................................18
Hold Func tion ......................................................................................18
Reset Function ....................................................................................18
Adjusti ng the Volume ..........................................................................18
Navigat ing the Me nu ...........................................................................18
Main Men u at a Glanc e ............................................................19
Navigat or Menu Co ntrols ....................................................................20
Music Playback Co ntrols ....................................................................20
Music Op tions .....................................................................................21
Repeat A -B Mod e ...............................................................................21
Page 8 Coby Electron ics Cor por ation
Page 9

TABLE OF CONTENTS
RECOR D MODE ..................................................................................2 2
Record ing Voice ............................................................................................22
Record ing Controls .............................................................................22
Saved Rec ordings...............................................................................2 2
SET TINGS MODE ................................................................................. 23
Setting Your Player’s Options .......................................................................23
Settings Menu C ontrols ......................................................................23
Settings Optio ns .................................................................................23
DEL FILES MODE ................................................................................. 25
Deleting Files on Your Player ........................................................................25
Del Files Menu Controls .....................................................................25
File Brow ser Opti ons .........................................................................................
ABOUT MODE ..................................................................................... 26
FIRMWARE UPGRADE S ......................................................................27
Upgrading the Fir mware ................................................................................27
ABOUT W INDOWS MED IA PLAYER ...................................................28
ABOUT M P3/WM A MUSIC FILES .......................................................29
TROUB LESH OOTING .......................................................................... 30
SPECI FICATIONS ................................................................................3 2
www.cobyusa.com Page 9
Page 10
www.cobyusa.com Page 11
PACKAGE CONTENTS
1
4
2
5
6
3
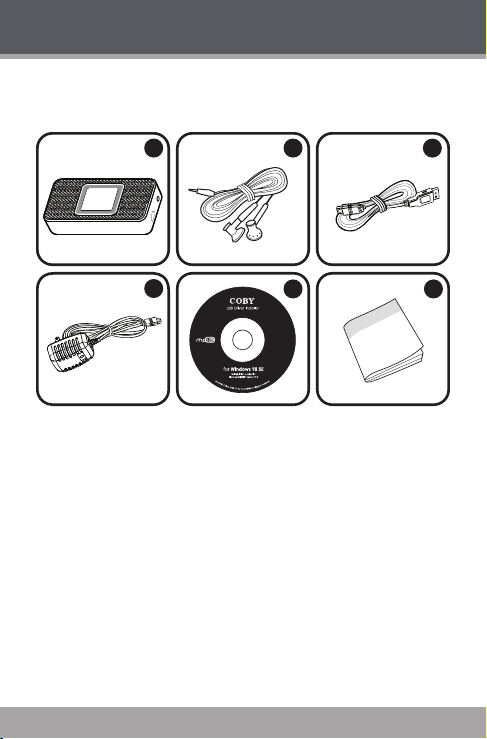
Please make sure that the items listed be low are include d in the pack age.
Should an item be mis sing, p lease c ontac t the l ocal r etailer from which you
purchased this pr oduct.
MP-C 353
1.
Stereo E arphones
2.
USB Ex tension C able
3.
AC Adapter
4.
Installation CD
5.
Instru ction Booklet
6.
Page 10 Coby Electron ics Cor por ation
Page 11

FEATURES
512 MB Integrate d Flash Me mory st ores up to 24 0 Songs
High- Contr ast LCD Dis play with B acklig ht
Integra ted Stere o Speaker s
Plays MP3 and WMA Digital Music Files
Plays Digital Music from mo st online stores and subscription ser vice s
ID3 and LRC support for song and syn chronized lyric inform ation dis-
play
Integra ted Micr ophone fo r Digital Voice Rec ording
Mobile D ata Stor age Functi on
USB 2.0 Ful l-Speed for Fast File Transfers
www.cobyusa.com Page 11
Page 12

www.cobyusa.com Page 13
MP-C353 at a Glance
2
3
4
10
12
11
14
13
6
8
5
7
9
1
Front View
Display S creen
1.
Stereo S peakers
2.
Top View
Menu
3.
Record
4.
Repeat A -B (pre ss and hol d)
Previou s
5.
Reverse (p ress and h old)
Play/Pause
6.
Power (pre ss and hol d)
Next
7.
Forward (press a nd hold)
Volume Dow n
8.
Volume Up
9.
Left View
Microphone
10.
Hold Sw itch
11.
Righ t View
Headphone Out
12.
Neckst rap Hook
13.
USB Por t
14.
GETTING STARTED
Page 12 Coby Electron ics Cor por ation
Page 13

GETTING STARTED
To USB Port
To AC Wall Outlet:
AC 100-240V
Connections
Conne cti ng Headphon es
Connec t headpho nes/ear phones
to the Headph one Ou t jack for pr i- v a t e
listening.
Lower the volume level before connecting
headphones, then gradually increase the vol- u m e
for comfort able listening.
Hearing experts advise against the constant use of personal stereos played
at high volume.
Constant high-volume use can lead to hear ing loss. If you experience
ringin g in your ears or hear ing loss, discontinue use immediately and
seek medical adv ice.
Conne cti ng Power
The MP- C353 operates on an integ rated rechargeable lithium-ion battery.
The battery should be char ged full y b efore using your player fo r t he
rst t ime. The re are two w ays to charg e your player:
AC Adapter
This AC adapter shoul d be used wi th 100- 240V 50/ 60Hz AC wa ll outlet s.
Plug the supplied AC adapter into an AC 100 -240V e lectrical wall outlet.
The red charge lamp will light to indicate that power has been connected.
Connec t the other end of the adapter to your player’s USB port. The
green charge lamp w ill light to indicate that char ging is underway.
When c harging has
been completed,
the green charge
lamp wil l dim or
turn of f.
USB Cha rge
Use the supplied USB
cable to con nect your player to a computer. Your player will be charge d while
it is connecte d to a powered-o n computer. USB- charging will take more time
than charging wit h the AC adapt er.
www.cobyusa.com Page 13
Page 14

www.cobyusa.com Page 15
GETTING STARTED
USB Port
USB Port
(mini)
Computer
Conne cti ng to a Com pute r
If you are us ing Wi ndows 9 8 SE, you must install the USB driver cont ained
on the supplied Install ation C D. Please see the U SB Driver Inst allation section for m ore infor mation .
To connect to a computer:
Turn the player off.
1.
Connect the player to your computer using the supplied USB cable. It may
2.
take Window s several minute s to recognize and set up the devic e the rst
time it is c onnect ed depending on your hardware c ongur ation
If your computer is running Windows XP and W indows Media
Player 10 or newer, your player will be detected as an “MTP Audio
Device” when you open “My Computer”.
If your computer is running Windows 98 SE, NT, 2000, or ME, your
player will be detected as a “Removable Disk” when you open “My
Computer”.
If you ar e us ing Windows Media Player 10 (WMP10), WM P10
can be set to sync hronize with your player automatically upon
connection.
For more info rmation and suppor t regardin g music transf er and
synchro nization wit h Windows Media Player (WMP), please
see the help section i ncluded with WMP (c lick Hel p > Synchro nizing Content to Dev ices).
Page 14 Coby Electron ics Cor por ation
Page 15

GETTING STARTED
Disco nnec ting from a Co mput er
If your p layer is recogni zed a s an MTP devic e, yo u may simply unplug the
cable to disconnect from a compu ter. If it is recognize d as a USB Mass
Storage device (i.e., a “Removable Disk”), then follow the steps below to
prevent dat a loss or c orrup tion.
Microsof t Wind ows
Double -cli ck the gre en arrow in the task bar
1.
locate d on the lowe r-right s ide of the c omputer
screen (S afely Rem ove Hardwa re).
Safel y Remove H ardware:
2.
Select “ USB Ma ss Storage Device” fr om the list that appears
and then c lick on “Stop”.
Stop a Ha rdwar e Device:
Select “ USB Ma ss Storage Device” fr om the list that appears
and then c lick on “O K”.
Select “ USB Ma ss Storage Device” fr om the list that appears
and then c lick on “O K”.
When the “S afe to Remove
3.
Hardware” window appears,
click the OK button and disconnect the USB c able from the
player and your computer.
Maci ntosh O S X
On the l eft si de of the Finder w indow, ide n-
1.
tify t he approp riate Rem ovable Dis k icon.
Click on the “Eject” a rrow on the r ight of the
2.
Removable Disk icon.
Disco nnect the USB cable fr om t he player
3.
and your computer.
www.cobyusa.com Page 15
Page 16

www.cobyusa.com Page 17
GETTING STARTED
USB Dr iver I nstallat ion
It is not neces sary to install the USB driver if your computer is running
Microsoft Window s ME /200 0/X P or newer, o r Mac intosh OS X . Co mputers
running thes e operating systems will recognize your player automaticall y
when connected.
If your co mputer is r unning Windows 98 SE:
Inser t t he Installation CD into your co mputer ’s CD or DVD drive. Make
1.
sure to pla ce the mini-CD i n the center, recesse d well of the d rive tray.
Navigat e to MY COM PUTER and double- click on the CD/DVD drive ic on
2.
(usually “ D:”).
Double-click on the folder “ Win98 USB Drivers” and then on the folder
3.
“english”.
Double -cli ck on the SETUP icon (SE TUP.EXE) to star t the USB driver
4.
installation pr ogram.
Follow the on-screen instructio ns to complete the installation and then
5.
restart your computer.
Mini- CDs should o nly be used in normal tray- loadin g CD/ DVD
drives . Mini- CDs may be used in slot-loadi ng drives with the
proper adapter; please contact your computer o r dr ive manufacturer for more i nformation.
Page 16 Coby Electron ics Cor por ation
Page 17

GETTING STARTED
1
2
3
4
5
6
1
2
3
4
MP-C353 Display
Play M ode
Playbac k Status
1.
(Play, Pause, Stop)
Current Track Number /
2.
Total Number o f Tracks
Batter y Level
3.
Equalize r Mode
4.
Song Tit le / Filena me
5.
Elapsed Trac k Time /
6.
Total Track Time*
* A “ / ” symbol separating the Elap sed
Track Time and Total Trac k Time indicate s that the number of tr acks and
folder s loaded on the player is less than
200 and 140 , respec tively.
A “ | ” symbo l indicates that the n umber of tracks and folders lo aded on the
player i s greate r than 200 and 140,
respec tively.
Record M ode
Record ing Status
1.
(Recor d, Pause, Sto p)
Batter y Level
2.
Current Recordi ng File
3.
Elapsed R ecord Time /
4.
Total Recor d Time Availa ble
www.cobyusa.com Page 17
Page 18

www.cobyusa.com Page 19
GETTING STARTED
Using the MP-C353 Controls
Power On/O ff
To turn your playe r on, pres s .
To turn your playe r off, pre ss until t he screen displays “ Bye Bye!”
Hold F unct ion
The Hold switc h (located on the left side of your player) locks/unlo cks the key
controls of your pl ayer to prevent them from being pre ssed accidenta lly.
To lock the key controls, slide th e HOLD switch in the direc tion of th e arrow. The screen will display a “ Lock” icon.
To u nlock the key controls, slide the HOLD switch in t he
opposi te direct ion of the arrow.
Reset Funct ion
The Reset key (located on the rear of your p layer) will power off and reset
your player. I f you r player f reezes or other wise behaves abnormally, use a
pin to push t his key to rese t your player.
Adjus ting the Volume
When your player is in Play Mode, press or to adjust the volume
level down o r up, respectively.
Navi gating th e Menu
To acc ess the Main menu at any t ime, press . To exit the Main menu,
press again.
To move the selec tion lef t, pres s .
To move the selec tion ri ght, pres s .
To conrm (ente r) a select ion, pres s .
To cancel or to r eturn to the previou s menu screen, pres s .
Page 18 Coby Electron ics Cor por ation
Page 19

GETTING STARTED
Main M enu at a Gl ance
Menu Item Function
Navigat or Find and pl ay music fol ders or les
Record Make digital voice record ings
Settings
Del Files Delete l es from yo ur player
About View info rmation about your player
Exit Exit th e Menu
Adjust th e player’s op tions:
Play Mode, EQ, Contr ast, Backlight, Lightcol or,
Power, Rec Set, Lyr ic, or Lan guages
www.cobyusa.com Page 19
Page 20

www.cobyusa.com Page 21
NAVIGATOR MODE
Playing Music
To play music and folders on yo ur p layer, s elect and conrm N AVIGATOR
from the M ain menu.
Navi gato r Menu C ontr ols
Use the following c ontrol s in Naviga tor mode menu.
Key Function
Press
Press
Press
Press
Press
Musi c Playback Con trols
Use the following c ontrol s during mu sic playb ack in Play M ode.
Key Function
Press
Press
Press and hold
Press
Press and hold
Move the se lectio n up
Move the se lectio n down
Return to t he previo us folder
Enter the selected f older
If a fol der is s electe d, plays all music in the
select ed folder.
If a le is se lected, p lays the selected le.
Pause playback. Press again to resume
playbac k
Play the previous track
Reverse through th e current track
Play the nex t track
Fast-for ward through the c urrent track
Page 20 Coby Electron ics Cor por ation
Page 21

NAVIGATOR MODE
Key Function
Press or
Press
Press and hold
Musi c Opti ons
Music playback o ptions may be set in t he SET TINGS menu. Please see the
Settings section for more inform ation.
Repea t A-B Mode
Repeat A-B mode allows you can dene a segment of an aud io tr ack to be
played rep eatedly i n a loop.
During m usic play back, pre ss to set th e start point “A” of the loop.
Press again to s et the e nd point “B” of the loop. T he trac k segment
will now play repeatedly in a loo p from poi nt “A” to point “B ”.
Press ag ain to resu me norma l playbac k.
Adjust th e volume level down or up
Enter Repe at A-B m ode
Enter Rec ord mode and star t recording
www.cobyusa.com Page 21
Page 22

www.cobyusa.com Page 23
RECORD MODE
Record ing Voice
To record voice les, s elect and conrm RECORD f rom the Ma in menu.
Record ing will st art immediatel y.
To quic kly access record mode during music playback, press
and hold .
Speak into the integr ated micro phone locate d on the left si de
of the player.
Record ing Co ntro ls
Use the following c ontrol s during recording in Recor d Mode.
Key Function
Press
Press
Saved Re cordi ngs
To stop and save your recordi ng, press in Reco rd mode. Your record ing
will be saved to the VOIC E folde r as a le named “VX XX.WAV” where XX X
corre sponds to the numerica l s equenc e i n which the rec ording was ma de
(numbering star ts from 0 01).
You can play bac k your reco rdings f rom NAVIG ATOR mode.
Pause re cordin g. Press again to resume
recording
Stop and s ave reco rding. The player will exit to
the Main m enu.
Page 22 Coby Electron ics Cor por ation
Page 23

SETTINGS MODE
Sett ing Your Player’s Options
To set your player ’s option s, selec t and con rm
SETT INGS from the Ma in men u. The following options are avail able in the Sett ings menu: Play Mode,
EQ, Contras t, Backlight, Lightcol or, Power, Rec Set,
Lyric, or Languages
Sett ings Menu Co ntro ls
Use the following c ontrol s in the Set tings mo de menu.
Key Function
Press
Press
Press
Press
Sett ings Opti ons
Menu Item Function
Playmod e
Eq (Equaliz er)
Move the se lectio n left
Move the se lectio n right
Enter a sele ction
Return to t he previo us screen
Adjust th e order in which trac ks are playe d.
Norma l: Play tracks in s equential order.
Repeat on e: Play the c urrent tr ack repe atedly.
Repeat al l: Play a ll tracks r epeated ly.
Shufe: Play track s in random o rder.
Preview: Play the r st 10 secon ds of each
Adjust t he equa lizer mo de set tings to change the
way music so unds on your player.
Set the opt ion that best match es the music you
are listenin g to: Normal, Rock, Jazz , Classic, Pop,
or Bass.
track.
www.cobyusa.com Page 23
Page 24

www.cobyusa.com Page 25
SETTINGS MODE
Menu Item Function
Adjust the contr ast of the player’s display (01 =
Contra st
Backli ght
Lightcolor
Power
Rec Set
Lyric
Languages
lowest c ontrast ; 10 = highest c ontras t).
Press when you have nished adjusting the
contrast.
Adjust the d uration of t ime the display back light
will remain on for af ter the la st key press.
A settin g of “ON” w ill keep the backlight o n; a setting of “O FF” will t urn the backlight off.
Adjust th e color of t he backl ight. A set ting of
“Auto” will c hange the c olor of th e backli ght with
each key pre ss.
Adjust the durati on of time the player will remain
on for whe n it is idle.
A settin g of “DIS ABLE” w ill keep the p layer on.
Adjust th e qualit y of recor dings mad e by your
player. Highe r-quali ty reco rdings will take up
more mem ory on yo ur player.
Press or to select Rate.
1.
Press to chang e the recordi ng quality op-
2.
tion: Nor mal, Mid dle, or Hig h.
Select a nd enter Exit.
3.
Turn Lyric displ ay suppor t on or of f.
Lyric display supports “.LRC” les whic h may be
found on the internet or may be create d with a
lyric le edito r. L RC les may also contain synchroni zed timin g information.
Select t he language that the player’s menus are
displaye d in: English, French, German, Spa nish,
Portu guese, Chinese PRC, o r Chinese T RA.
Page 24 Coby Electron ics Cor por ation
Page 25

DEL FILES MODE
Deleting Files on Your Player
To delete les f rom your pl ayer, select an d conr m
DEL FILES f rom the Main menu.
Del Fi les Me nu Control s
Use the following c ontrol s in the Del Fi les mode m enu.
Key Function
Press
Press
Press
Press
Press
Press
You may also c onnect your player to a compu ter to manage
the les on your player. Plea se refer to the documen tation t hat
came w ith you r computer for more infor mation about le man-
agement .
Move the se lectio n up
Move the se lectio n down
Return to t he previo us folder
Enter the selected f older
If a le is selecte d, the le will be mar ked for deletion [ ]. Press again t o unmark the le.
Multip le les may b e marked fo r deletio n.
If les have bee n marked for del etion, p ress
to delete the marked les. The p layer will pro mpt
you fo r conrmation. S elect and c onrm “Yes” to
delete.
www.cobyusa.com Page 25
Page 26

www.cobyusa.com Page 27
ABOUT MODE
To view inform ation about your player, select and
conr m ABOUT f rom the Main menu. Firmware
version, Free Memo ry, and Total Mem ory may be
viewed in t his mode.
Page 26 Coby Electron ics Cor por ation
Page 27

FIRMWARE UPGRADES
Upgrading the Fi rmwa re
From time to time, COBY may r elease rmware updates to improve the performan ce of the MP- C353 or to add additional features. Pleas e c heck the
COBY website per iodically at w ww.coby usa.com to see if new rmw are has
been released for yo ur player. If you are experiencing abnormal behavior
with y our player, you may choo se to restore (forma t) your player b efore u p-
dating it s rmwar e.
Do not interrup t the rmware upgrad e process — doing so
could damage your pl ayer and render it inop erable.
Downlo ad the latest rmware for your player from www.cobyus a.com.
1.
Save this le to the computer.
Double -cli ck the downl oaded le (yo u may need a le compression utility
2.
installed on your co mputer). In th e window tha t appears , double -clic k the
le “Setup.exe” to begi n install ing the r mware upd ate utility.
Follow the on-screen instructio ns to comp lete insta llation o f the rmwa re
3.
update ut ility.
Connec t your player to the computer af ter the uti lity has b een installed.
4.
Run the rmware update utility from the Start menu (i .e., click “Start >
5.
Progra ms > SigmaTel > MTPMSCN Firmware Downl oad > Download
Firmwar e”). The uti lity will commen ce searc hing for your player that i s
connec ted to the c omputer.
Click “Start ” to begin the r mware update. D O NOT INTER RUPT THE
6.
FIRMWA RE UPDATE.
Disco nnect your player from the c omputer when the up date has c om-
7.
pleted an d restar t your player.
www.cobyusa.com Page 27
Page 28

www.cobyusa.com Page 29
ABOUT WINDOWS MEDIA PLAYER
You can use Windows Media Player 10 (WMP10) and a USB- MTP connectio n to manage your music media librar y wi th Mi crosof t Wi ndows XP or
newer.
Window s Media Player can be dow nloade d from Microsof t free of charge
at w ww.microsoft.com. Please see the docum entatio n tha t is included w ith
Window s Media Player for more i nformation and su pport .
Notic e: This product is protected by cer tain intellectual prope rty rights of
Microsoft. Use or distr ibutio n of such technology o utside of this product is
prohibited with out a lice nse from M icroso ft.
Content owner s use Windows Med ia digital r ights management te chnolo gy
(WMD RM) to pr otect their intellectual proper ty, inclu ding copyrights. This
device uses WMD RM softwa re to access WMDRM -prote cted content . If
the W MDRM software fails to protect the content, content ow ners may ask
Microsoft to r evoke the softwar e’s abilit y to use WM DRM to p lay or copy
protected conte nt. Revocation does n ot affect unprotected content. When
you download licenses fo r protected content , you agree that M icrosoft m ay
include a revocatio n list with the licenses. Conte nt owne rs may requir e you
to upgra de WMD RM to ac cess t heir co ntent. If you decl ine an up grade, yo u
will not be able to acc ess content that re quires the upgrade.
Page 28 Coby Electron ics Cor por ation
Page 29

ABOUT MP3/WMA MUSIC FILES
For more in formation about d igital M P3 and WM A les, pl ease visit our
website at www.co byusa.c om.
www.cobyusa.com Page 29
Page 30

www.cobyusa.com Pag e 31
TROUBLESHOOTING
If you have a problem with this device, please rea d the troubleshootin g guide
below and check our website at ww w.cobyusa.com for Frequen tly Asked
Questi ons ( FAQs) and rmwar e updates. If these resourc es do not resolve
the prob lem, plea se contact Technica l Suppor t.
COBY Ele ctron ics Techni cal Sup port
Addres s: 56- 65 Rust S t.
Hours: Monday to Fr iday, 8:30 AM –11:00 PM EST
Phone: 800 -681-2629 or 718- 416- 3197
Email: techsup port @cobyus a.com
Web: www.c obyusa.c om
The playe r does n ot turn on .
The but tons do no t work.
I cannot t ransf er les to the player.
Page 30 Coby Electron ics Cor por ation
Maspet h, NY 11378
Saturday t o Sunday, 9:00 A M–11:00 PM EST
Ensure that the player i s charge d or is oper ating on AC power.
Ensure that the Lock s witch is di sengaged.
Try pressi ng the Rese t key on the back of the player w ith a pin.
Ensure that the player is charged or is operating on AC power
Ensure that the Lock s witch is di sengaged.
Ensure that your com puter is running a sup porte d operating system.
If you are runni ng Microsoft Window s 98 SE , ensure that th e USB dr iver
has been properl y install ed.
Ensure that the suppl ied USB cable is secure ly attached to the player and
the PC, or t ry using another USB cable.
If you have connected the pl ayer thr ough a USB hub, try conne cting the
player dir ectly to yo ur compu ter.
Ensure that the player ’s memor y capac ity is not full.
Page 31

TROUBLESHOOTING
There i s no sound du ring playback .
Check th e volume leve l.
Ensure that the headphones ar e attached secur ely to the player.
The sound qualit y of the mus ic is poor.
Try playin g the le on yo ur comp uter. If th e sound qualit y is sti ll poor, try
downloading the le again or re-encoding t he le your self.
Ensure that the bit rate of the le is not to o lo w. The higher th e bit rat e
of the le, t he bet ter it will sound. The minim um rec ommended bitrate is
128kbps fo r MP3s an d 96kbp s for WMA s.
Try lowering the volum e of the playe r.
Ensure that the headphones ar e attached secur ely to the player.
The playe r will not play my music le.
Ensure that the le is i n a compat ible for mat (MP3 , WMA).
The le may be co py-prot ected and you no l onger have aut horiz ation to
play this le. If you feel this is in error, please contact the ser vice from
which you downloa ded the le.
The LCD characte rs are c orrup ted or so methin g is wrong with the
displ ay.
Ensure that the cor rect lan guage has b een selected.
Try pressi ng the Rese t key on the back of the player w ith a pin.
The playe r has mal functi oned.
Try pressi ng the Rese t key on the back of the player w ith a pin.
Try updating the player’s rmware. Pleas e refer to the Firmwa re Upgrades
section of this manual for det ailed ins truct ions.
www.cobyusa.com Pag e 31
Page 32

www.cobyusa.com Page 33
SPECIFICATIONS
Display Type 96 x 64 D ot Matri x LCD
Memor y 512MB Integr ated Flash M emor y
Audio For mat Suppo rt MP3, WMA
DRM Support WMDRM10 (require s Windows XP and
Song Info Suppor t ID3, LRC
Record ing Forma t IM A-ADPCM enc oding
PC Inter face USB 2.0 Full-Spee d (MSC/ MTP)
Plug and Play Suppor t Wi ndows 98 SE/2 000/ME/ XP or newer
Audio Output 3.5mm S tereo (He adphone)
Audio Inp ut Integra ted Micr ophone
Menu Lan guage Sup port English, French, German, Portuguese, Span-
Power Supp ly Rechargeable Li thium- Ion
Unit Dim ensions 2.85” x 1.77 ” x 0.70” (WHD)
Speci cations and manua l are subje ct to chang e withou t prior notice.
Window s Media Player 10 or newer)
Mac OS X
ish, Chinese (Trad), Chinese (Simp)
Page 32 Coby Electron ics Cor por ation
Page 33

NOTES
www.cobyusa.com Page 33
Page 34

www.cobyusa.com Page 35
NOTES
Page 34 Coby Electron ics Cor por ation
Page 35

NOTES
www.cobyusa.com Page 35
Page 36

COBY Electronics Corp.
56- 65 Rust Street
Maspeth, NY 11378
ww w.cobyusa.com
ww w.ecoby.com
 Loading...