

Page 1
2.8” High-Resolution
MP3 & Video Player with
Touchscreen Controls
MP826-2G
MP826-4G
MP826-8G
Instruction Manual
Please read t his m anua l care ful ly be fore o pera tio n
Page 2

Table of Contents
TABLE OF CONTENTS .......................................................2
PACKAGE CONTENTS .....................................................5
CONTROL S AT A GLANCE .............................................. 6
Using the Touchscreen Controls ...................................8
Disabling the Controls (Hold) .......................................9
GETTING STARTED ......................................................... 10
Charging the Battery ...................................................10
Turning Your Player On/Off ......................................... 11
Resetting the Player .....................................................12
MAIN MENU ..................................................................13
Main Menu Controls..................................................... 13
MUSIC MODE ................................................................ 14
Music Browser Controls ................................................ 14
Now Playing Controls (Music Playback) ................... 15
Quick Option Menu ............................................. 17
VIDEO MODE................................................................. 20
Video Browser Controls ...............................................20
Video Playback Controls ............................................ 21
PHOTO MODE ................................................................22
Photo Browser Controls ................................................2 2
Photo Viewer Controls .................................................22
RADIO MODE ................................................................25
Radio Tuning Controls ..................................................25
Quick Option Menu .............................................26
Page 2 Coby Ele ctronics Corporat ion
Page 3

Table of Contents
TEXT MODE ....................................................................29
Text Browser Controls ...................................................29
Text Reader Controls ....................................................30
Quick Option Menu .............................................30
EXPLORER MODE ..........................................................32
Explorer Controls ..........................................................32
CALCULATOR MODE ....................................................33
OTHER FUNCTION MODE .............................................34
Calendar .......................................................................34
StopWatch .....................................................................35
Time ................................................................................ 36
Date ................................................................................37
SETTING MODE .............................................................. 39
TRANSFERRING FILES TO THE PL AYER ..........................40
Connecting to a Computer........................................40
Microsoft Windows ...............................................42
Macintosh OS X .....................................................43
Disconnecting from a Computer ..............................44
Microsoft Windows ...............................................44
Macintosh OS X .....................................................45
VIDEO CONVERSION ...................................................46
FIRMWARE UPGRADES .................................................. 47
SAFET Y NOTICES ...........................................................48
TROUBLESHOOTING ...................................................... 53
www.cobyusa .com Page 3
Page 4

Table of Contents
FEATURES .......................................................................56
SPECIFICATIONS ...........................................................57
Page 4 Coby Ele ctronics Corporat ion
Page 5
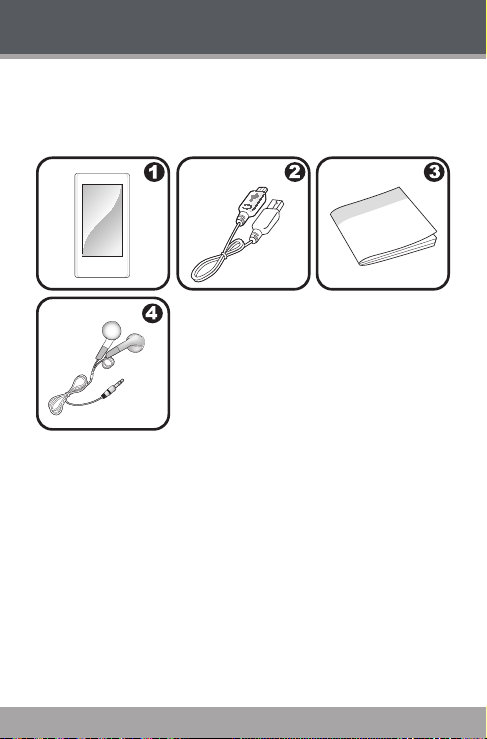
Package Contents
Please make sure that the items shown below are included in the package. Should an item be missing, please
contact the local retailer from which you purchased this
product.
1. COBY Player
2. USB Cable
3. Instruction Manual
4. Professional Stereo Earphones
www.cobyusa .com Page 5
Page 6
Controls at a Glance
1
6
5
3
4
2
7
Page 6 Coby Ele ctronics Corporat ion
Page 7
Controls at a Glance
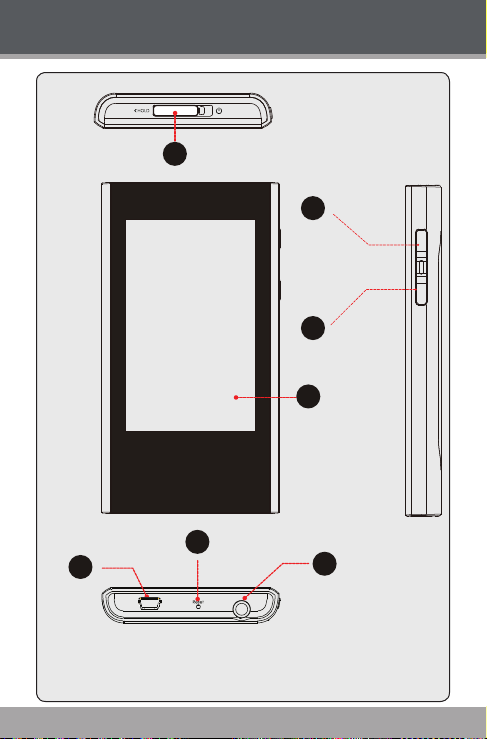
Top View
1. Power / Hold Switch
Slide and hold the switch to the
right for Power.
Slide the switch left for Hold.
Front View
2. LCD Touchscreen
Touch with your nger (or ngernail) to activate
the on-screen control.
Right View
3. Volume Up <VOL UP>
4. Volume Down <VOL DOWN>
Bottom View
5. USB Port
Connect to a computer to transfer media les to
the player.
6. Reset Button <RESET>
7. 3.5mm Headphone Jack
<POWER>
www.cobyusa .com Page 7
Page 8
Controls at a Glance
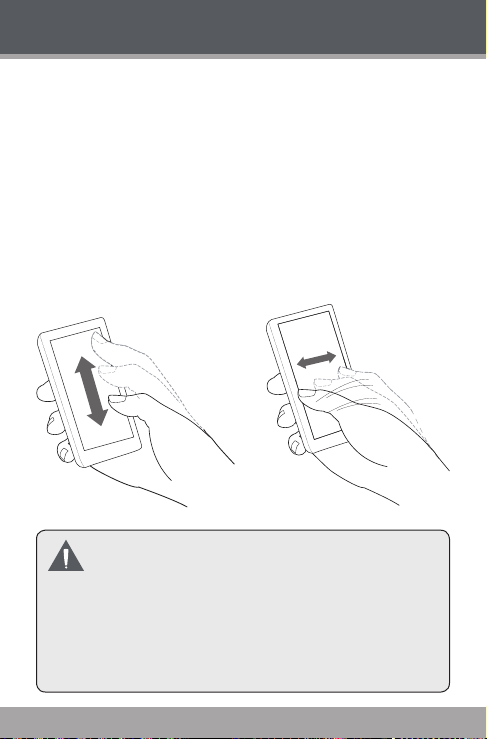
Using the Touchscreen Controls
Your player comes equipped with an easy-to-use touchscreen that controls all of its functions. Different controls
will be available to you based on the mode that the player
is in.
Use your nger tip to touch the area of the screen where a
control icon is displayed. If you touch and hold an icon, it
will register as a continuous button press.
You can also use your nger to swipe up/down or left/right
to move the selection up/down or left/right, respectively.
Do not use force when touching the screen, as it
may cause damage to the screen.
To avoid damage to the screen, do not use any ob -
ject other than your ngers to operate it.
Avoid touching the screen if your ngers are not
clean.
Page 8 Coby Ele ctronics Corporat ion
Page 9

Controls at a Glance
More information about the controls available in each mode
are given in their corresponding section of this manual.
Disabling the Controls (Hold)
When the Power/Hold switch is engaged, the player’s
controls are disabled.
To disable the controls, slide the <POWER> switch
to the left until it clicks into the Lock position.
To enable the controls, slide the <POWER> switch
back to the right.
You may want to disable the controls to avoid turn-
ing on the player or activating the controls accidentally when it is in your pocket or bag.
A lock icon will appear on the screen when the
controls are disabled. Re-enable the controls to
continue.
www.cobyusa .com Page 9
Page 10

Getting Started
Charging the Battery
Your player has an integrated rechargeable battery. Upon
initial use, the battery should be charged fully to ensure
optimal performance and batter y life.
If the player has not been used in a while, the battery
may need to be recharged.
Upon initial use, the battery should be charged fully
(8 hours) to ensure optimal performance and bat-
tery life.
The bat tery used in this device may present a re
or chemical burn if mistreated. Do not disassemble, incinerate, or heat the battery. Do not leave
the battery in a place subject to direct sunlight, or
in a car with its windows closed.
Do n ot connect the player to a po we r sou rce
other than that which is indicated here or on the
label as this may result in the risk of re or electric
shock.
Page 10 Coby Ele ctronics Corporat ion
Page 11

Getting Started
Charging with a Computer
Your player can be charged through a
USB computer connection. Use the
supplied USB cable to connect the
player to a high-power USB port of a
computer. The computer must
be powered on and not
in sleep mode.
When the player is
connected and charging, a
USB symbol will be displayed
USB Port
on the player’s screen.
When connected to a USB hub, the hub must be
self-powered to charge the player’s battery.
Turning Your Player On/Off
To turn the player on, slide the <POWER> switch to
the right and hold it until the screen turns on.
To turn the player off, slide the <POWER> switch to
the right and hold it until the screen turns off.
USB Port
www.cobyusa .com Page 11
Page 12

Getting Started
Resetting the Player
Reset the player if it should freeze and not respond or
otherwise malfunction.
1. Disconnect your player if it is connected to a
computer.
2. Use a paper clip to gently press the Reset button located on the bottom of the player.
Page 12 Coby Ele ctronics Corporat ion
Page 13

Main Menu
When you turn on the player, you will see the Main menu.
The Main menu gives you access to the different function
modes of your player. These modes are:
Music Browse and play music
Video Browse and play movies
Photo Browse and view pictures
Radio Listen to FM radio broadcasts
eBook Browse and read text les
Explorer Browse all les
Calculator Launch the calculator program
Other Function Launch the calendar, or StopWatch
Settings Adjust the player’s options
program, or set the internal Time
and Date
Main Menu Controls
All icons of the modes will congregate on one screen.
To enter a mode, tap on the icon of the desired
menu.
Change the Menu Style
You can change the style of the main menu screen.
Tap the
corner of the main menu screen.
icon that located on the right-down
www.cobyusa .com Page 13
Page 14
Music Mode
Browse for and play your music les.
For more information
about how to get music
onto your player, please
refer to the section
“Transferring Files to the
Player”.
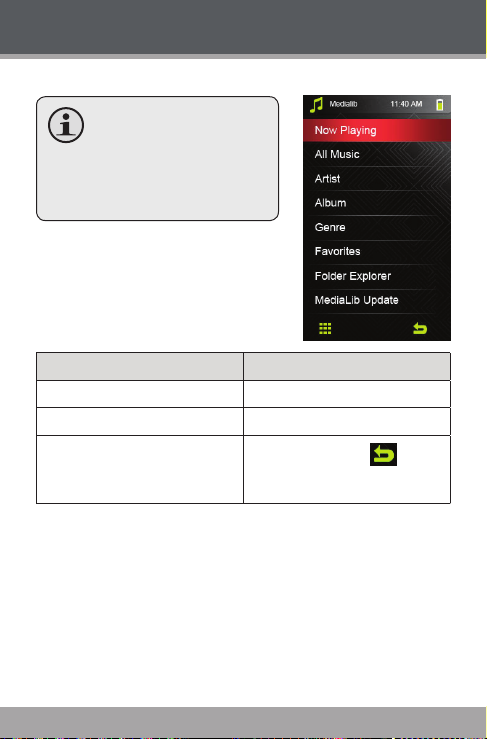
Music Browser Controls
When you choose MUSIC mode
from the Main menu, you will see
the Music Browser screen.
Function Key Action
To browse through a list Tap on the item to highlight it
To select/play an item Tap on the desired selection again
To return to the previous screen
located on the right-down corner
of scree.
If your music les contain ID3 song information tags,
you will be able to view your tracks by Artist, Album,
Track (song title) or Genre.
To view all les (including those that do not contain
ID3 information), select “All Music” or use the Folder
Explorer option.
If music is already playing, you will have the ad-
ditional option to return to the Now Playing screen.
Page 14 Coby Ele ctronics Corporat ion
Tap on the back icon [
] that
Page 15

Music Mode
Add Song(s) to the Favorite List
1. Select “All Music” from the Music Browser screen.
2. Use the Browser controls to select a song to add.
3. Tap
, the screen will display “BackPlay”, “Add To
Favorite”, or “Exit”.
BackPlay: Back to the Music Playing screen.
Add to Favorite: Add the current song to
the Favorite List. This playlist can then be
played by selecting “Favorites” from the Music
Browser.
Exit: Back to the “All Music” Music Browse
screen.
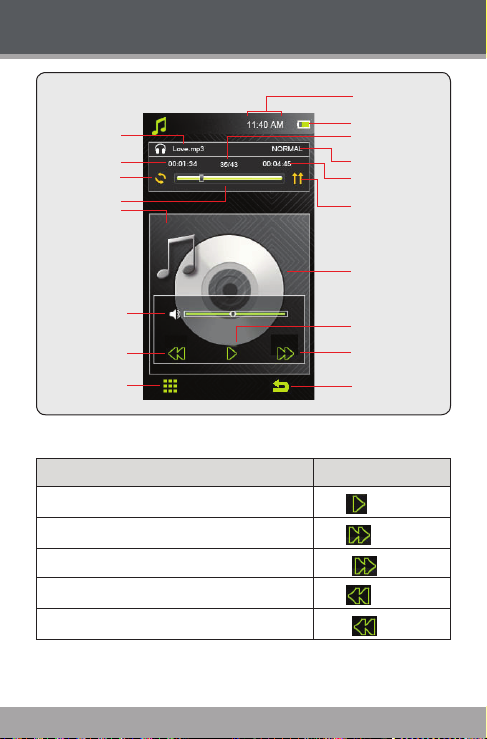
Now Playing Controls (Music Playback)
To start playing music, browse for a song and then touch
it to start playback.
When a song is playing, the Now Playing screen appears
(see below).
www.cobyusa .com Page 15
Page 16
Music Mode
Time Display
Tap
Tap
Hold
Tap
Hold
Battery Level
Current Track/
Total Tracks
Equalizer
Total Time
Play Mode
Album Cover
Display
Play status
Next/Fast Forward
Back icon
File name
Elapsed Time
Repeat Mode
Progress Bar
Volume Level
Previous/Reverse
Quick Option
Menu icon
Use the following controls during music playback.
Function Key Action
To pause/resume playback
To play the next track
To forward-scan through the track
To play the previous track
To reverse-scan through the track
Page 16 Coby Ele ctronics Corporat ion
Page 17
Music Mode
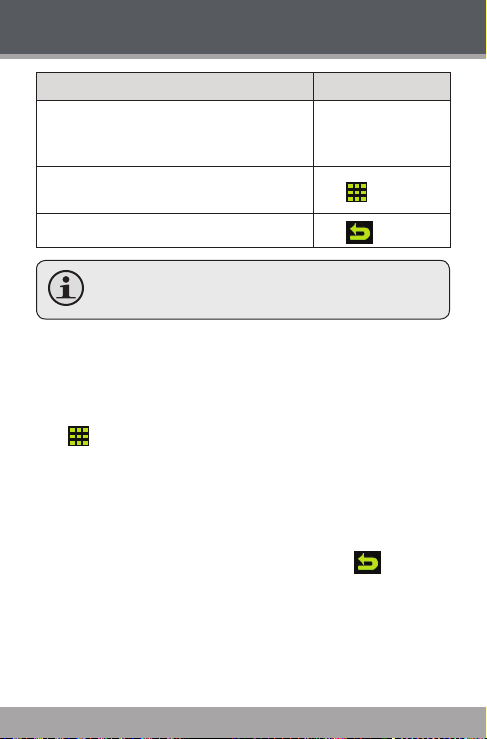
Function Key Action
To adjust the volume level
To access the Quick Option menu (see
section below for details)
To return to the Music Explorer screen
To view the controls when the music is playing,
touch the screen once.
Quick Option Menu
The Quick Option menu gives you easy access to your
player’s option settings.
Tap
to access the Quick Option menu during
music playback.
To browse through the settings, tap on the desired
item to highlight it.
To select a setting, tap on the selection again.
To return to the previous screen, touch
Repeat Mode
Change the repeat options to adjust the order in which
tracks are played.
Press the <VOL
UP> or <VOL
DOWN> button
Tap
Tap
.
www.cobyusa .com Page 17
Page 18

Music Mode
Item Description
Once Play the current track once
Repeat Play the current track repeatedly
All Play all tracks once
Repeat All Play all tracks repeatedly
Intro Play the rst 10 seconds of earch track
Play Mode
Set the play mode as “In Order” or “Shuf e”.
MSEQ
The MSEQ(PlayFx) has 3 options: 3D, Bass, and
LEQ(Auto Volume: consistent volume level respectively).
EQ Sel
Select a digital equalizer preset. The options are:
Normal, MSEQ, Rock, Pop, Classic, Jazz, and User EQ.
User EQ Setup
Tap on the different band up or down to adjust. Set
the left bands to adjust low (bass) frequencies; set
the bands in the middle to adjust mid-frequencies;
and set the right bands to the right to adjust high
frequencies (treble).
Display
Page 18 Coby Ele ctronics Corporat ion
Page 19

Music Mode
Set song ID3 or Lyric display support on or off. Lyric dis-
play requires a “.LRC” lyric le which may be found on
the internet or may be created with a Lyric le editor. Lyric
les can contain synchronized timing information as well
as lyric information.
Lyric les must have the same name as its cor-
responding music le (e.g., “SongTitle1.lrc” and
“SongTitle1.mp3”) and must be placed in the
same directory.
www.cobyusa .com Page 19
Page 20

Video Mode
Browse for and play your video les.
Your player supports AVI les encoded with XviD
at 400 x 240 and 30 fps. Videos may need to be
encoded with the included software for device
playback.
For more information about converting video,
please refer to the section “Video Conversion”.
For more information about how to get movies onto
your player, please refer to the section “Transferring Files to the Player”.
Video Browser Controls
When you choose VIDEO mode from the Main menu, you
will see the Video Browser screen.
Use the Video Browser to nd all folders and video les
loaded on your player.
Function Key Action
To browse through a list
To select/play an item Tap on the desired selection again
To return to the previous screen
Tap on the item to highlight it, or tap
on the
or icon to move
the selection up or down.
Tap on the back icon [
] that
located on the right-down corner
of scree.
Page 20 Coby Ele ctronics Corporat ion
Page 21

Video Mode
Video Playback Controls
When a video is playing, hold the
player horizontally (landscape).
The orientation of the controls will
change accordingly.
The following function may be
performed from the video playing screen.
Function Key Action
To pause/resume playback
To play the next track
To forward-scan through the track
To play the previous track
To reverse-scan through the track
To adjust the volume level
To set the video display as full-screen or
original size
To return to the Music Explorer screen
To view the controls when the video is playing,
touch the screen once.
Tap
Tap
Hold
Tap
Hold
Press the <VOL
UP> or <VOL
DOWN> button
Tap
Tap
or
www.cobyusa .com Page 21
Page 22

Photo Mode
Browse for and view your photo les.
For more information about how to get photo
les onto your player, please refer to the section
“Transferring Files to the Player”.
Photo Browser Controls
When you choose PHOTO mode from the Main menu,
the Photo Explorer will appear on screen, and all availabel
photos will displays as the thumbnail images.
Use the Photo Browser to nd folders and photo les
loaded on your player.
Function Key Action
To browse through a list
To select/play an item Tap on the desired selection again
To return to the previous screen
Tap on the item to highlight it, or tap
on the
the selection up or down.
Tap on the back icon [
located on the right-down corner
of scree.
or icon to move
] that
Photo Viewer Controls
To view a photo, browse through the thumbnail pictures
and then tap it to conrm.
The following functions may be per formed from the Photo
Viewer screen.
Page 22 Coby Ele ctronics Corporat ion
Page 23

Photo Mode
Function Icon
Tap on the icon and then slide your nger on the LCD
to pan around the magnied picture. Tap on the icon
again to disable this function.
Rotate the photo left.
Rotate the photo right
Turn the slideshow mode on or off, and set the
amount of time between photos during slideshow
mode.
www.cobyusa .com Page 23
Page 24

Photo Mode
Function Icon
To view the previous photo. Or you can position and
slide your nger on the LCD leftward to view the
previous photo.
To view the next photo. Or you can position and slide
your nger on the LCD rightward to view the next
photo.
Zoom in the display.
Zoom out the display.
To return to the Photo Explorer.
To view the controls when the photo is display,
touch the screen once.
Page 24 Coby Ele ctronics Corporat ion
Page 25

Radio Mode
Listen to FM radio broadcasts.
You must have a pair of headphones connected
to the headphone jack to receive FM broadcasts;
your player will utilize the headphone cord as an
antenna.
Radio Tuning Controls
When you choose RADIO from the Main menu, you will
see the Radio Tuning screen. You can search for stations, tune to stations manually, or tune to preset stations.
Change the tuning mode between Preset and
Manual in the Quick Option menu.
You must save preset stations prior to using pre-
set tuning mode. See the Quick Option Menu section below for details.
The following functions may be per formed from the Radio
Tuning screen.
Action Function
Manual Mode: Tune to the next station
Tap
or
Hold
or
Press the <VOL
UP> or <VOL
DOWN> button
www.cobyusa .com Page 25
manually.
Preset Mode: Tune to the next preset station.
Manual Mode: Auto-seek to the next
available station.
To adjust the volume level
Page 26

Radio Mode
Action Function
Tap
Tap
Or you can turn to the desired station manually by
taping the frequency directly on the ruler.
Quick Option Menu
The Quick Option menu gives you easy access to your
player’s option settings.
Touch
to access the Quick Option menu from the
Radio Tuning screen.
To browse through the settings, tap on the desired
item to highlight it.
To select a setting, tap on the selection again.
To return to the previous screen, touch
Manual Mode
Set the tuning mode as Manual to tune to stations manually for precise control.
To access the Quick Options menu (see the
section below for details)
To return to the Main menu
.
Th e c urre n t tun i ng mod e i s i n dic a ted on t he
Radio Tuning screen.
Page 26 Coby Ele ctronics Corporat ion
Page 27

Radio Mode
Auto Presetting
Scan for all stations in broadcast reception range. The
player will automatically seek and save all frequencies
with a broadcast signal to the Preset Station list.
The auto scan feature will overwrite any previously
stored Preset Stations.
Preset Mode
Set the tuning mode as Preset (You should add presets
prior to using this tuning method).
Save channel
Save the current station to the Preset Station list.
Select an “Empty” slot to save the station as a new
preset.
Select an existing slot to over write the preset.
Delete channel
Delete station(s) from the Preset Station list.
1. Press <UP> or <DOWN> to select a Preset Station
and press <ENTER> to delete. A warning screen
will appear.
Select “YES” and press <ENTER> to conrm deletion.
Sensitivity
Set the sensitivity of the Auto Preset function.
www.cobyusa .com Page 27
Page 28

Radio Mode
Force Mono
Set this to “On” in order to force mono radio reception.
Use mono reception for weak station signals.
Area
Set the FM frequency range area (China, Japan,
US(World), Europe(others), Campus Radio).
Page 28 Coby Ele ctronics Corporat ion
Page 29

Text Mode
Read text les loaded on your player ( TXT).
Text Browser Controls
When you choose TEXT from the Main menu, you will see
the Text Browser Screen.
Use the Text Browser to nd folders and photo les
loaded on your player.
Your text les will be displayed in a list.
Function Key Action
To browse through a list
To select/play an item Tap on the desired selection again
To return to the previous screen
Tap on the item to highlight it, or tap
on the
the selection up or down.
Tap on the back icon [
located on the right-down corner
of scree.
or icon to move
] that
Text Reader Controls
To display a text le, select and conrm the le from the
Text Browser.
Function Key Action
To go to the next page.
To go the the previous page
Tap
Tap
www.cobyusa .com Page 29
Page 30

Text Mode
Function Key Action
To move the display one line
To return to the Text Browser screen
To access the Quick Option Menu
Quick Option Menu
The Quick Option menu gives you easy access to your
player’s option settings.
Touch
Text Reader screen.
To browse through the settings, tap on the desired
To select a setting, tap on the selection again.
To return to the previous screen, touch
Page Jump
Skip to a page directly.
Tap on the desired eld, the num-
Tap
Tap
to access the Quick Option menu from the
item to highlight it.
ber will start ash.
or to adjust the selected eld.
to conrm and go to the set page.
Pointed and slide
your nger on the
screen up or down
Tap
Tap
.
Save Mark
Page 30 Coby Ele ctronics Corporat ion
Page 31

Text Mode
Save the current location as a bookmark.
LoadMark
Open (go to) a saved bookmark.
DelMark
Delete a saved bookmark.
Set Font
Set the font size of the text display.
Set Color
Set the text color of the display.
Browser Mode
Set the page scroll as Auto or Manual.
Flip T ime
Adjust the amount of time between pages during Auto
Scroll mode.
www.cobyusa .com Pag e 31
Page 32

Explorer Mode
Enter Explorer mode to view all folders and les
loaded on your player.
To enter Explorer mode, select and conrm EXPLORER
from the Main Menu.
Files and folders will be displayed in a list. If a compatible
le is selected, it will be played in its corresponding mode.
Music Mode: MP3, WMA
Video Mode: AVI, WMV, ASF, 3GP
Photo Mode: JPG, BMP, GIF, PNG
Text Mode: TX T
Explorer Controls
Function Key Action
To browse through a list
To select/play an item Tap on the desired selection again
To return to the previous screen
Tap on the item to highlight it, or tap
on the
the selection up or down.
Tap on the back icon [
located on the right-down corner
of scree.
or icon to move
] that
Page 32 Coby Ele ctronics Corporat ion
Page 33

Calculator Mode
Perform basic mathematical operations with the
calculator.
To input a value, tap the number on the screen.
To cancel and reset, touch
To exit Calculator mode, touch
.
.
www.cobyusa .com Page 33
Page 34

Other Function Mode
Access the Calendar, Time, Date, and Stop Watch
utilities.
To select a utility, tap on the desired menu.
To return to the Main menu, tap
.
Calendar
Set or view a calendar.
Tap
Tap
to highlight the Month or Year to adjust.
or to adjust.
Page 34 Coby Ele ctronics Corporat ion
Page 35

Other Function Mode
Stop Watch
Record the elapsed time.
Tap to start account.
Tap
again to save the record.
The player can save 3 records totally.
www.cobyusa .com Page 35
Page 36

Other Function Mode
Time
Set the internal time display of your player.
Point and slide your nger on the LCD up or down to
adjust the Hour(hours) or Minute(mins).
Tap
to save the setting.
Page 36 Coby Ele ctronics Corporat ion
Page 37

Other Function Mode
Date
Set the internal date display of your player.
Point and slide your nger on the LCD up or down to
adjust the Month, Date, Year(from lef t to right).
Tap
to save the setting.
www.cobyusa .com Page 37
Page 38

Settings Mode
Enter SETTINGS mode to set your player’s system
options.
To enter Settings mode, select SETTINGS from the Main
menu.
To browse through the settings, tap on the desired
item to highlight it.
To select a setting, tap on the selection again or tap
.
To return to the previous screen, touch
Setting Options
Item Description
.
Display Setting
LightTime Adjust the duration of time (in seconds) that
Brightness Adjust the brightness of the screen.
the backlight will remain on after a key press. A
setting of “Always On” will keep the backlight on
continuously.
System Setting
Restorable Restore all of the player's settings to their
ScreenCharge
factory-default state.
Follow the screen signal to calibrate the touch
point of LCD.
Page 38 Coby Ele ctronics Corporat ion
Page 39

Settings Mode
Item Description
Set the USB connection mode when connecting
the player to a computer.
• Auto (MTP): The player will utilize an MTP connec-
tion if it is available. The MTP connection mode
enables advanced synchronization features if you
USB Mode
are using Windows Media Player 10 (WMP10) or
newer.
If an MTP connection is not available, the player will
revert to MSC.
• MSC: This setting enables the widest compatibility
with all systems, and allows the player to be used as a
removable storage device.
Language
-- Set the langu age that the on-screen menu s
appear in.
System Information
-- View the player's rmware and storage version.
Sleep
-- Set the duration of time (in minutes) that th e
player will remain on when it is idle. The settng
of "OFF" will disable this power-saving feature.
www.cobyusa .com Page 39
Page 40

Transferring Files to the Player
Connect the Coby player to a computer with the provided
USB cable to:
Transfer les to and from your player
Per form basic le management functions.
Connecting to a Computer
Connect the player to your computer with the supplied
USB cable. Upon connection:
Your computer will
automatically recognize
the player as an MTP
Device. An icon
representing your player
will appear under “Audio
Devices” when you open
“My Computer”.
It may take Windows
several minutes to
recognize and set up
USB Port
the device the rst
time it is connected depending on your hardware
conguration.
USB Port
Page 40 Coby Ele ctronics Corporat ion
Page 41

Transferring Files to the Player
Transferring Files
The USB 2.0 Hi-Speed connection makes it easy to
transfer music, video, photo, and text les (or any other
data) quickly between the player and your computer.
Simply use the player as you would a oppy disk using
basic operating system commands.
If you need further assistance with transferring les,
please refer to your operating system’s instruction manual or on-screen help. If you are using media management
software such as iTunes, Winamp, or Windows Media
Player, please refer to their documentation for support.
Do not disconnect or otherwise interrupt the play-
er during transmission—this could damage or
corrupt the player’s rmware or your les. If the
player is accidentally disconnected and is not
working properly, try reset ting the player.
Content owners use Windows Media digital rights management technology (WMDRM) to protect their intellectual
proper ty, including copyrights. This device uses WMDRM
software to access WMDRM -protected content. If the WMDRM sof tware fails to protect the content, content owners
may ask Microsoft to revoke the sof tware’s ability to use
WMDRM to play or copy protected content. Revocation
does not affect unprotected content. When you download
licenses for protected content, you agree that Microsoft
may include a revocation list with the licenses. Content
owners may require you to upgrade W MDRM to access
their content. If you decline an upgrade, you will not be
able to access content that requires the upgrade.
www.cobyusa .com Pag e 41
Page 42

Transferring Files to the Player
Microsoft Windows
1. Double-click the “My Computer” icon on your desktop and then double-click the icon that represents
your Coby player (e.g., MP826 / MTP Multimedia
Player).
2. Your player contains two folders: Data and Media.
Drag your media les to the Media folder (e.g.,
music, video, pictures, or text les).
Drag all other types of les to the Data folder
for storage. Data les are only visible from a
computer; these les will not be available from
within the player itself.
Using Windows Media Player
You can use Windows Media Player and a USB-MTP
connection to manage your music media library with
Microsoft Windows XP or newer.
Page 42 Coby Ele ctronics Corporat ion
Page 43

Transferring Files to the Player
The latest version of Windows Media Player can be
downloaded from the Microsoft website:
ht tp:// www.m icr oso ft. com /wi ndows /
windowsmedia/default.mspx
Please refer to the Quick Start Guide included with your
player for more information.
For more information and support regarding mu-
sic transfer and synchronization with Windows
Media Player (WMP), please see the help section
included with WMP (click “Help > Synchronizing
Content to Devices”).
Macintosh OS X
1. Open a nder window. Locate the les you would
like to transfer from your computer. Select the
les/folders with the mouse and press APPLE- C
(copy) on the keyboard.
2. Click on the Removable Disk icon located on the left
side of the nder window. The computer will display
all les and folders currently stored in the player.
3. Press APPLE-V (paste) on the keyboard to transfer
the les you selected in Step 1 to the player.
www.cobyusa .com Page 43
Page 44

Transferring Files to the Player
Disconnecting from a Computer
Disconnect your player as instructed below to detect data
loss or le/rmware corruption.
Microsoft Windows
1. Double-click the green arrow in the taskbar located
on the lower-right side
of the computer screen
(Safely Remove Hardware).
2. Safely Remove
Hardware:
Select “USB Mass
Storage Device”
from the list that
appears and then
click on “Stop”.
Stop a Hardware Device:
Select “USB Mass
Storage Device”
from the list that
appears and then click on “OK ”.
3. When the “Safe to Remove Hardware” window appears, click the OK button and disconnect the USB
cable from the player and your computer.
Page 44 Coby Ele ctronics Corporat ion
Page 45

Transferring Files to the Player
Macintosh OS X
1. On the left side of the
Finder Window, identify
the appropriate Removable Disk icon.
2. Click on the “Eject”
arrow on the right of the Removable Disk icon.
3. Disconnect the USB cable from the player and your
computer.
www.cobyusa .com Page 45
Page 46

Video Conversion
For movie and music synchronisation and conversion,
please use “Coby Media Manager ” software supplied on
the player.
Coby Media Manager manual is also included on your
player.
Page 46 Coby Ele ctronics Corporat ion
Page 47

Firmware Upgrades
From time to time, COBY may release rmware upgrades
to improve the performance of the Player or to add
additional features. Please check the COBY website
periodically at w ww.cobyusa.com to see if new rmware
has been released for your player. If you are experiencing
abnormal behavior with your player, you may choose to
restore (format) your player before updating its rmware.
Do not interrupt the rmware upgrade process—
doing so could damage your player and render it
inoperable.
See the documentation that is included with the
rmware upgrade le for detailed instructions.
www.cobyusa .com Page 47
Page 48

Safety Notices
The lightning ash with arrowhead symbol within an equilateral triangle is intended to alert the user to the presence of
uninsulated “dangerous voltage” within the product’s enclo -
sure that may be of sufcient magnitude to constitute a risk
of electric shock.
The exclamation point within an equilateral triangle is intended to aler t the user to the presence of impor tant operation
and servicing instructions in the literature accompanying the
appliance.
For Customer Use:
Enter below the serial number that is located on the rear of the unit. Retain
this information for future reference.
Model No.
Serial No.
WARNING: To prevent re or shock hazard, do not expose this device to
rain or moisture. Dangerous high voltage is present inside the enclosure. Do
not open the cabinet.
CAUTION: To prevent electric shock, match wide blade of plug to wide slot
of outlet and fully insert.
WARNING: Handling the cords on this product will expose you to lead, a
chemical known to the State of California to cause canc er, and birth defects or
other reproductive harm. Wash hands after handling.
Page 48 Coby Ele ctronics Corporat ion
Page 49

Safety Notices
NOTICE:
This product is protected by c ertain intellectual proper ty rights of Microsof t.
Use or distribution of such technology outside of this product is prohibited
without a license from Microsof t.
Content owners use Windows Media digital rights management technology
(WMDRM) to protect their intellectual property, including copyrights. This device
uses WMDRM soft ware to access WMDRM-protected content. If the WMDRM
software fails to protect the content, c ontent owners may ask Microsoft to revoke the software’s ability to use WMDRM to play or copy protected content.
Revocation does not af fect unprotected content. When you download licenses
for protected content, you agree that Microsoft may include a revocation list with
the licenses. Content owners may require you to upgrade WMDRM to access
their content. If you decline an upgrade, you will not be able to access content
that requires the upgrade.
Protect your hearing:
Hearing experts advise against the constant use of personal stereos played at high
volume. Constant exposure to high volumes can lead to hearing loss. If you should
experience ringing in the ears or hearing loss, discontinue use and seek medical
advice.
Note: If the product suddenly has no response or powers off, an electrostatic
discharge may be the cause. In this circumst ance, please follow the procedures
below for recover y:
• Turn of f the unit by pushing and holding the slide button at the right (Power
off position) for 15 seconds.
• Turn on the unit again
For recycling or disposal information about this prod-
uct, please contact your local authorities or the Electronics Industries Alliance: www.eiae.org.
www.cobyusa .com Page 49
Page 50

Safety Notices
FCC Statement:
This device complies with Part 15 of the FCC Rules. Operation is subject to the
following two conditions:
(1) This device may not cause harmful inter ference, and
(2) This device must accept any interference received, including interference
that may cause undesired operation.
Note: This equipment has been tested and found to comply with the limits for
Class B digital devices, pursuant to Part 15 of the FCC rules. These limits are
designed to provide reasonable protection against harmful interference in a resi-
dential installation. This equipment generates, uses and can radiate radio fre quency energy and, if not installed and used in accordance with the instructions,
may cause harmful interference to radio communications. However, there is no
guarantee that interference will not occur in a particular installation. If this equipment does cause harmful inter ferenc e to radio or television reception, which can
be determined by turning the equipment off and on, the user is encouraged to try
to correct the interference by one or more of the following measures:
• Reorient or reloc ate the receiving antenna.
• Increase the separation between the equipment and receiver.
• Connect the equipment into an outlet on a circuit different from that to which
the receiver is connected.
• Consult the dealer or an experienced radio/ TV technician for help
Use of shielded c able is required to comply with Class B limits in Subpart B of
Part 15 of the FCC rules.
Do not make any changes or modications to the equipment unless otherwise
specied in the manual. If such changes or modications should be made, you
could be required to stop operation of the equipment.
Page 50 Coby Ele ctronics Corporat ion
Page 51

Safety Notices
Important Safety Instructions
1. Re ad Instr ucti ons: All the safety and operating instructi ons should be
read before the product is opera ted.
2. Re tain Instru ctions: The safety and ope rating instr ucti ons should be
retain ed for future refe rence.
3. H eed Warnings: All warnin gs on the product and in the o perat ing in-
struc tions s hould be adhere d to.
4. Fo llow I nstructio ns: Al l ope rating and usage instructi ons s hould be f ol-
lowed.
5. Cleaning: Unplug this product from the wall outlet before cleaning. Do not
use liquid cleaners or aerosol cleaners. Use a damp cloth for cleaning.
6. Attachments: Use only att achme nts recom mended by the manufacturer.
Use of other atta chments may be ha zardo us.
7. Wat er and Moisture: Do not use this product near water (e.g., near a bat h
tub, washb owl, kitc hen sink, lau ndry tub, in wet basem ents, or near a
swimming pool and the like).
8. Vent ilati on: S lots and ope nings in the cab inet are provided for venti la-
tion to en sure reliable operation of the p roduc t and to protect it from
overhea ting. These open ings should never be bl ocked by placing the
produc t on a bed, sofa, rug, or other simila r surfac e. This product should
not be plac ed in a built- in installati on such as a bookca se or rack unless proper ventil ation is provided or the manufac turer instruct ions have
been adh ered to.
9. Po wer Source s: Thi s pro duct shoul d be opera ted o nly f rom t he t ype o f
power source indicated on the rating lab el. If you are not sure of the type
of power supply to your home, consult your product deale r or local power
company. For produ cts int ended t o opera te from batter y power or oth er
sources, refer to the ope rating instructio ns.
10. Overloading: Do not overload wall outlets, extension cords, or integral con-
venience receptacles as this can result in a risk of re or electric shock.
11. Obj ect and Liqui d Entry: Neve r push objects of any kind into this produ ct
throug h openings as they may touch dan gerou s voltage po ints or shou t-
out par ts th at could result in a re or el ectr ic shoc k. Neve r spill liquid of
any kind on t he prod uct.
12. Ser vicing: Do no t attem pt to ser vice this product yo ursel f as opening or
removing cover s may expose you to dangerous voltage or other haz-
ards. Refer all ser vic ing to qua lied s ervi ce per sonne l.
www.cobyusa .com Page 51
Page 52

Safety Notices
13. Damage Requiring Ser vice: Unplug this product from the wall outlet and
refer servicing to qualied ser vice personnel under the following conditions:
a) when the power-supply or plug is damaged; b) if liquid has been spilled
or if objects have fallen into the product; c) if the product has been exposed
to rain or water; d) if the product does not operate normally by following the
operating instructions. Adjust only those controls that are covered by the
operating instructions as improper adjustment of other controls may result
in damage and will often require extensive work by a qualied technician
to restore the product to its nor mal operation; e) if the product has been
dropped or damaged in any way; f) when the product exhibits a distinct
change in performance—this indicates a need for ser vice.
14. Replacement Parts: When replacement parts are required, be sure that
your service technician has used replacement parts specied by the manufacturer or have the same characteristic s as the original part. Unauthorized
substitutions may result in re, electric shock, or other hazards.
15. Safe ty Check : Upon completion of any ser vice or repairs to this product,
ask t he s ervice technician to per form safet y c hecks to ensure that the
produc t is in pro per ope rating condi tion.
16. Heat: Th e pro duct shoul d be situated a way fr om heat sources suc h as
radiato rs, heat registers, stoves , or other products (including ampl iers)
that pro duce he at.
Page 52 Coby Ele ctronics Corporat ion
Page 53

Troubleshooting
If you have a problem with this device, please read the
troubleshooting guide below and check our website
at www.cobyusa.com for Frequently Asked Questions
(FAQs) and rmware updates. If these resources do not
resolve the problem, please contact Technical Support.
Address COBY Elect ronic s Technical Support
Email techsupport@cobyusa.com
Web www.cobyusa.com
Phone 800-727-3592: Weekdays 8:30AM –5:3 0PM EST
56- 65 Rust Street
Maspeth, NY 11378
718-416-3197: Weekdays 8:0 0AM –5:3 0PM EST
The player does not turn on.
Ensure that the player is fully charged. Try charging
the player overnight (8 hours).
Ensure that the Power switch is set to the “On”
position.
Reset the player (use a paper clip to gently press the
Reset button on the rear of the player) and try again.
The but tons do not work.
Ensure that the Hold switch is disengaged.
Reset the player (use a paper clip to gently press the
Reset button on the rear of the player) and try again.
www.cobyusa .com Page 53
Page 54

Troubleshooting
I cannot transfer les to the player.
Ensure that your computer is running a supported
operating system.
If using a USB extension cable, ensure that it is
securely attached to the player and the PC, or try
using another USB cable.
If you have connected the player through a USB
hub, try connecting the player directly to your
computer.
Ensure that the player’s memory capacity is not full.
Ensure that the Hold switch is disengaged.
There is no sound during playback.
Check the volume level.
Ensure that the headphones are attached securely
to the player.
The sound quality of the music is poor.
Try playing the le on your computer. If the sound
quality is still poor, try downloading the le again or
re-encoding the le yourself.
Ensure that the bit rate of the le is not too low. The
higher the bit rate of the le, the better it will sound.
The minimum recommended bitrate is 128kbps for
MP3s and 96kbps for WMAs.
Try lowering the volume of the player.
Page 54 Coby Ele ctronics Corporat ion
Page 55

Troubleshooting
Ensure that the headphones are attached securely
to the player.
The player will not play my music le.
Ensure that the le is in a compatible format.
The le may be copy-protected and you no longer
have authorization to play this le. If you feel this is
in error, please contact the service from which you
downloaded the le.
The LCD characters are corrupted or something is
wrong with the display.
Ensure that the correct menu language has been set.
Reset the player (use a paper clip to gently press the
Reset button on the rear of the player) and try again.
The player has malfunctioned.
Reset the player (use a paper clip to gently press the
Reset button on the rear of the player) and try again.
Try updating the player’s rmware. Please refer to
the Firmware Upgrades section of this manual for
instructions.
www.cobyusa .com Page 55
Page 56

Features
Integrated Flash Memory
Intuitive Touchscreen Control
2.8” High-Resolution TFT Display
Plays Music, Video, Photos and Text
Plays Digital Music from most online stores and
subscription ser vices*
ID3 and LRC Support for song and synchronized
lyric information display
Integrated FM Radio
USB 2.0 Hi-speed for fast le transfers
* Music Ser vice must support Windows Media DRM
(WMDRM). WMDRM10 requires Windows XP and Windows Media Player 10 or newer.
Page 56 Coby Ele ctronics Corporat ion
Page 57

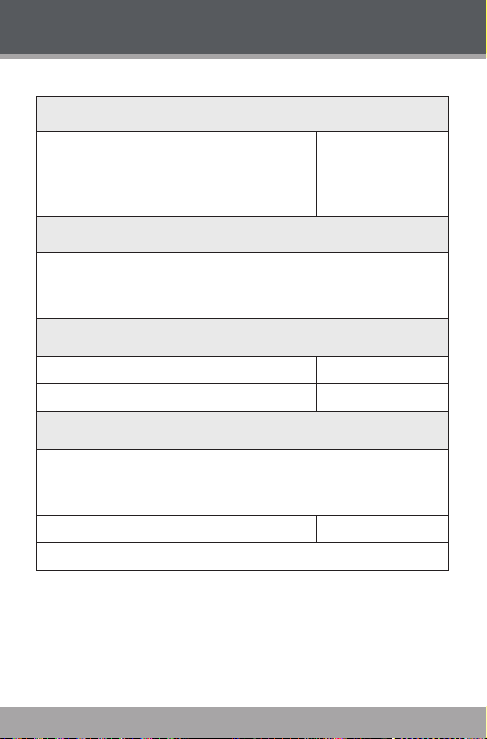
Specications
Display Type 2.8” Full-Color TFT @ 240x400
Memory MP826-2G: 2GB Flash
Audio Format Support MP3, WMA, OGG
Video Format Support WMV, ASF, MPEG-4 (AVI/XviD):
Photo Format Support JPG, GIF, PNG, BMP
Text Format Support TXT
DRM Support WMDRM10
Song Info Support ID3, Windows Media
FM Frequency Range 87.5 - 108.0MHz
PC Interface USB 2.0 (MSC or MTP)
Plug and Play Support Windows 2000/XP/Vista
Audio Output 3.5mm Stereo (Headphone)
Power Supply Rechargeable Lithium-Polymer
Unit Dimensions 2.0” x 3.8” x 0.4” (WHD)
Design, specicat ions and m anual ar e subject to chan ge without noti ce.
MP826-4G: 4GB Flash
MP826-8G: 8GB Flash
400x240@30fps
Macintosh OS X
Battery
USB Charge
www.cobyusa .com Page 57
Page 58

Notes
Page 58 Coby Ele ctronics Corporat ion
Page 59

www.cobyusa .com Page 59
Page 60

Coby Electronics Corporation
1991 Marcus Avenue, Suite 301
Lake Success, NY 11042
ww w.cobyusa.com
ww w.ecoby.com
Coby is a re gis tered t rade mar k of
Coby El ectronic s Cor pora tion .
Pri nted in Ch ina .
826RC D10
 Loading...