

Page 1
2.4” LCD High-Resolution
MP3 and Video Player
MP-805
Instruction Manual
Please read t his m anua l care ful ly bef ore op eration
Page 2
www.cobyusa.com Page 3
Precautions
The lightning ash with ar rowhead symbo l within an equil ateral triangl e
is inten ded to aler t the user to the presenc e of uninsulate d “dangerous
voltage” withi n the product ’s enclosure th at may be of suf cient magnitude to co nstitute a risk of electr ic shock.
The exclamatio n point within an equilateral triang le is intended to alert
the u ser to th e presence of impor tant oper ation and servicing instructions in t he literature ac companying the a ppliance.
For Cus tomer Use:
Enter bel ow the serial numb er that is located on the unit. Retain t his information for
future r eference.
Model N o.
Seria l No.
WARNING:
To prevent re or shock hazard, do not expose thi s device to rain or moisture. Dangerous high
voltage is prese nt inside the encl osure. Do not open the cabin et.
CAUTIO N:
To prevent elec tric shock, match wide b lade of plug to wide s lot of outlet and fully inser t.
WARNING:
Handlin g the cords on this p roduct will exp ose you t o lead, a chemical known to the Stat e
of C alifornia to caus e cancer, and birth defects or other reproductive harm. Wash hand s
afte r handling.
For re cycling or disposal i nformation about this product, please contact your
local au thorities or t he Electronic s Industries A lliance: www.ei ae.org.
Page 2 Coby Electron ics Co rpo rati on
Page 3

Precautions
PROTECT YOUR HEA RING:
Hearing exper ts advise agains t the constant us e of personal ster eos played at high vo lume.
Consta nt exposure to high volumes c an lead to hearin g loss. If you shoul d experience
ringin g in the ears or hear ing loss, disco ntinue use and see k medical advic e.
FCC Notice:
This equipment has been tested and found to comply with the limits for a Class B digital device
pursuant to Part 15 of the FCC Rules. These limits are designed to provide reasonable protection against harmful interference in a residential installation. This equipment generates, uses,
and can radiate radio frequency energy and, if not installed and used in accordance with the
instructions, may cause harmful interference to radio or television reception. However, there is
no guarantee that interference will not occur in a particular installation. If this equipment does
cause harmful interference to radio or television reception (which can be determined by turning
the equipment off and on), the user is encouraged to try and correct the interference by one or
more of the following measures:
- Reorient or relocate the receiving antenna.
- Increase the separation between the equipment and the receiver.
- Connect the equipment into an outlet on a circuit different from that to which the receiver is
connected.
- Consult the dealer or an experienced audio/TV technician for help.
NOTICE :
This product is prote cted by certa in intelle ctual property right s of Microsof t. Use or distributi on
of such tec hnology outsi de of this produc t is prohibited wi thout a license f rom Microsof t.
NOTICE :
Please refer to the packaging of this product for the technologies supported by this product .
Window s Media® is a regis tered trademar k of Microsoft Corpo ration.
USB® is a r egistered trad emark of USB Impl ementers Forum , Inc.
The eMusic name and logo are tr ademarks of eMusic.com, I nc. in the Un ited Sta tes and
abroad.
All trademarks, regist ered trademar ks and logos are of their respectiv e holders.
www.cobyusa.com Page 3
Page 4
www.cobyusa.com Page 5
Important Safety Instructions
Read Ins truc tions: Al l the safety an d operatin g instruc tions sho uld be read
1.
before th e produc t is operat ed.
Retai n I nstr uctio ns: The safety a nd operat ing instr uction s s hould be re-
2.
tained fo r future r eferenc e.
Heed Warni ngs: All w arning s on the p roduc t and in t he op erating instruc-
3.
tions sho uld be adhe red to.
Follow Instru ction s: All op erating and usage instruc tions should be fol -
4.
lowed.
Cleani ng: Un plug this p roduct from the w all ou tlet b efore cleani ng. Do not
5.
use liqui d cleaner s or aeros ol clea ners. Use a d amp clot h for clean ing.
Attac hment s: Use onl y attac hments recommen ded by the manufactur er.
6.
Use of othe r attach ments may b e hazard ous.
Water and Mo istur e: Do n ot use this pr oduct near wat er (e.g., ne ar a ba th
7.
tub, washb owl, kitc hen sink , laundr y tub, in wet ba sement s, or near a s wimming poo l and the like).
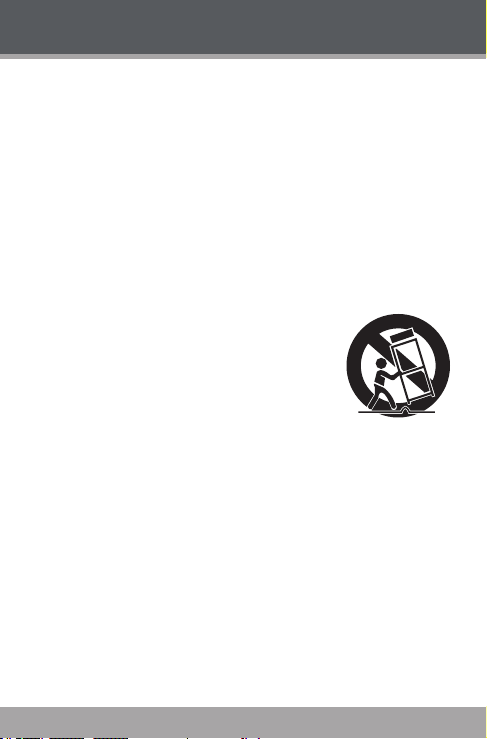
Acces sorie s: Do not place thi s product on an uns table
8.
cart , stand, tripod, bracket, or t able. Use only with
cart s, stands, t ripods , brackets , or tables rec ommended by the manufac turer or sol d with the p roduct. Any mountin g of the produc t sho uld f ollow the
manufac turer ’s instructions and should use a mounting accessory recommen ded by the manufacturer.
A product a nd cart c ombinat ion shou ld be moved
with care. Quick stop s, excessive force , and uneven
surfa ces may ca use the pr oduct and c art c ombinat ion to over turn.
Ventila tion: Slo ts and openin gs in the cabinet are pr ovided for vent ilation to
9.
ensure reliab le op eratio n of the produc t and to protect it f rom overheat ing.
These openin gs sh ould never b e blo cked by placing th e pro duct on a bed,
sofa, rug, or other sim ilar surface. This prod uct should not be placed in a
built-i n ins tallat ion s uch a s a bookc ase o r rac k un less proper ventilation is
provide d or the manu factur er instr uction s have been ad hered to.
Power Sources: This product should be operated only from the type of
10.
power so urce in dicated on the r ating la bel. If yo u are not sure of t he typ e of
power supp ly to your home, co nsult your pro duct deal er or local po wer company. For product s intended to op erate from ba tter y power or other so urces,
refer to the o perati ng instr uction s.
Grounding or Polariz ation: This product may be equipped with a polarized
11.
alternating- current line plug that has one blade wider than the other. This plug
will only t into the power outlet in one direction. This is a safety feature. If you
are unable to ins ert the plu g fully into the outlet, tr y reversing the direction of
the plug. If the plug sho uld still fail to t, c ontact an el ectrician to replace t he
obsolete outlet. Do not defeat the safet y purpose of the polarized plug.
Page 4 Coby Electron ics Co rpo rati on
Page 5
Important Safety Instructions
Power- Cord Prot ecti on: Power supply cor ds should be rout ed so that they
12.
are not likely to be walked on or pinched by items placed upon or against
them, paying par ticula r attention to cords at plugs, conve nience rec eptacl es,
and at the po int which t hey exit fr om the pro duct.
Protec tive Attach ment Plug: The pr oduct may be equipped with an at-
13.
tachme nt plug wi th overload protection. This is a safety feature. See t he
operati ng instru ctions for rep laceme nt o r di rectio ns to r eset the protec tive
device. If re placem ent of the plug i s required , be sure the ser vice technician
has us ed a r eplace ment p lug th at has the same over load protec tion a s the
origin al plug as sp ecie d by the manuf acture r.
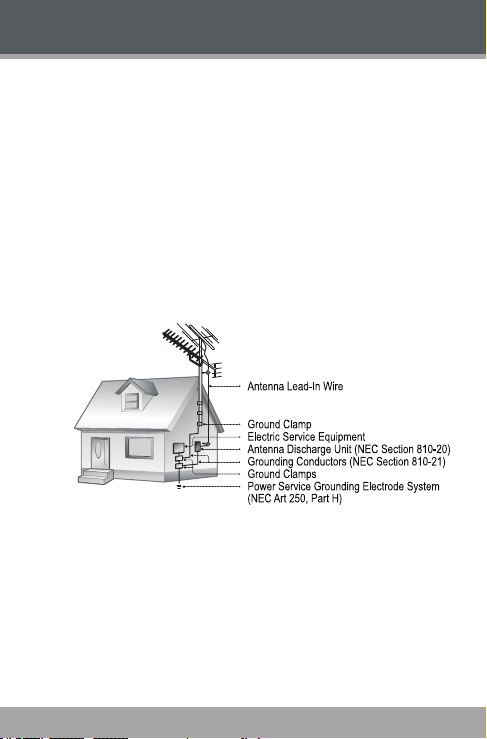
Outdo or Ante nna Grounding: If an outside antenna is con nected to the
14.
produc t, be sure the antenna system is g rounded so as to prov ide some
protect ion aga inst vol tage su rges an d built- up sta tic cha rges. A rtic le 810 of
the National Electrical Code, ANS/ NFPA 70 provid es infor mation with regard to pro per groun ding of the ma st and suppo rtin g struct ure, groun ding of
the lead -in wire to an a ntenna- disch arge unit, s ize of groun ding cond uctors ,
locati on of antenna -disc harge unit , connect ion to ground ing elect rodes, and
require ments for t he groun ding elec trode (see gure).
Light ning: For added protect ion for this product, unplug it from the wall
15.
outlet and dis connec t the antenna or ca ble sys tem dur ing a l ightnin g stor m
or w hen i t is left unat tended and unused for long peri ods of t ime. This will
prevent dam age to the pr oduct du e to lightn ing or power- line surg es.
Power Line s: An outsid e antenna system sh ould not be loc ated in the vici n-
16.
ity of overhead powe r lines or other electr ic light or power circui ts, or where it
can fall int o such powe r lines or cir cuits. W hen insta lling an out side anten na
system, extreme care sh ould be taken to kee p from touching such powe r
lines or ci rcuits , as conta ct with t hem might b e fatal.
Overl oading : Do not overload wal l outlets, ex tension co rds, or integr al con-
17.
venienc e recept acles as t his can re sult in a ri sk of re or el ectri c shock.
www.cobyusa.com Page 5
Page 6

www.cobyusa.com Page 7
Important Safety Instructions
Objec t and Liqui d Entr y: Never push object s of any kind i nto thi s produ ct
18.
through openin gs as they may touc h danger ous volt age poi nts or s hout- out
parts t hat could re sult in a re or ele ctric sh ock. Never sp ill liquid of any k ind
on the pro duct.
Serv icing: Do not attempt to service this p roduct yourself as opening or
19.
removin g c overs may expo se you to danger ous volta ge or other hazards.
Refer all se rvic ing to quali ed ser vice personne l.
Damag e Re quiri ng S ervi ce: U nplug this produc t f rom t he wa ll o utlet and
20.
refer ser vicin g to qualie d servi ce pers onnel unde r the follow ing cond itions:
a) when the power- supply or plug is d amaged; b) i f liq uid has b een spilled
or if obj ects have fallen in to the pr oduct; c) i f the pro duct has b een expo sed
to rain o r water; d ) if the p roduct does not operat e norma lly by fol lowing t he
operati ng instruction s. Adjust only those c ontrol s that are c overed by the
operati ng instruc tions as impr oper adjust ment of other cont rols may result in
damage and wi ll often re quire exten sive work by a qual ied tech nician to re store the pr oduct to it s normal o perati on; e) if the produc t has been dr opped
or damage d i n any way; f) when the p roduct exhibits a disti nct change in
perfo rmanc e—t his indic ates a nee d for ser vice.
Replac emen t Part s: When re placem ent parts are req uired, be s ure that
21.
your ser vice t echnic ian has us ed repl acement part s speci ed by the manufacture r or have t he same c haract eristi cs as th e origi nal par t. Unau thoriz ed
substit utions ma y result in re, elect ric sho ck, or othe r hazard s.
Safet y Check: Upon c ompleti on of a ny s ervic e or repairs to this product,
22.
ask the ser vice technicia n to perf orm safet y chec ks to ensure t hat the pro duct is in pr oper oper ating co nditio n.
Wall or Ceilin g Mounting: The product should be mounted to a wall or
23.
ceiling o nly as rec ommend ed by the manu factur er.
Heat: The produc t shou ld be situated aw ay fro m hea t sou rces such as r a-
24.
diators , hea t re gister s, st oves, or o ther produc ts (includ ing a mplie rs) th at
produc e heat.
Page 6 Coby Electron ics Co rpo rati on
Page 7

Table of Contents
PRECAUTIONS ................................................................. 2
IMPORTANT SAFETY INSTRUCTIONS ..............................
TABLE OF CONTENTS .......................................................
PACKAGE CONTENTS .....................................................
FEATURES .......................................................................
GETTING STARTED .........................................................
Controls at a Glance .................................................................11
Display at a Glance ...................................................................12
Now Playing Screen (Music Mode) ................................12
Poweri ng Your Player ................................................................ 13
Charg ing Your Player ...................................................... 13
Power On/Off ....................................................................14
Insta lling a miniSD Memory Card (optiona l) .........................14
Connecting Headphones ........................................................15
MAIN MENU ..................................................................16
Main Menu Ove rview ................................................................16
MUSIC MODE ................................................................ 17
Music List ......................................................................................17
Now Playing (Music Mode) Control s...................................... 18
Repeat Mode ................................................................... 18
Repeat A-B Mode ............................................................ 19
VIDEO MODE................................................................. 20
Video List .................................................................................... 20
Video Playback Control s ......................................................... 20
PHOTO MODE ................................................................22
Photo List ..................................................................................... 22
Photo Controls ........................................................................... 2 2
Displaying Pi ctures Manually ......................................... 22
Displaying Pi ctures as a Sl ides how ............................... 23
10
11
4
7
9
www.cobyusa.com Page 7
Page 8

www.cobyusa.com Page 9
Table of Contents
RADIO MODE ................................................................24
Basic FM Radio Operation ....................................................... 24
Radio Settings Menu ................................................................. 24
Store Presets Manually .................................................... 25
Store Presets Automatically ............................................ 26
Delete a Preset Station .................................................... 26
EBOOK MODE ...............................................................27
EBook List ....................................................................................27
EBook Controls ........................................................................... 27
EXPLORER MODE ..........................................................28
Navigator Controls .................................................................... 28
SETTINGS MODE ............................................................29
USB CONNECTIONS ......................................................
Connecting to a Computer .................................................... 33
Transferr ing Files ........................................................................ 34
Microsoft W indows .......................................................... 35
Macintosh OS X ................................................................ 35
Disconnecting from a Computer ........................................... 36
Microsoft W indows .......................................................... 36
Macintosh OS X ................................................................ 36
VIDEO CONVERSION ...................................................38
Insta llation ..................................................................................39
Conver ting Video ..................................................................... 39
WINDOWS MEDIA PLAYER ............................................42
FIRMWARE UPGRADES ..................................................
ABOUT MP3/WMA FILES ...............................................
TROUBLESHOOTING ......................................................
SPECIFICATIONS ...........................................................
33
43
44
45
48
Page 8 Coby Electron ics Co rpo rati on
Page 9
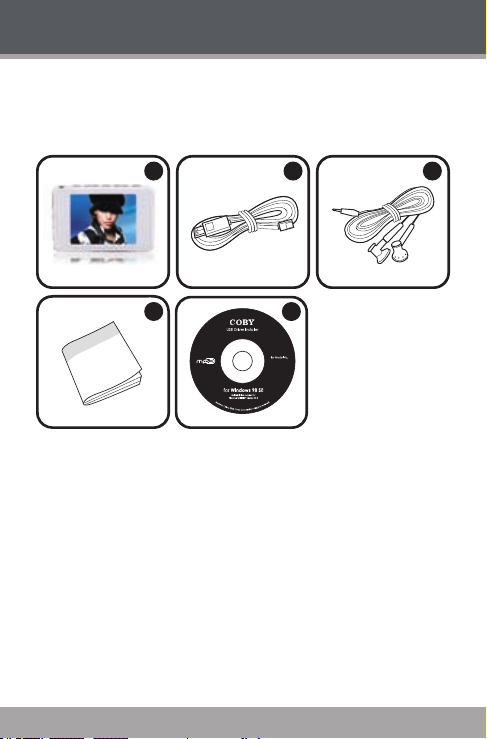
Package Contents
1
4
2
3
5
Please make sure that the items listed below are included
in the package. Should an item be missing, please
contact the local retailer from which you purchased this
product.
COBY MP3 Player
1.
2.
3.
4.
5.
USB Cable
Stereo Earphones
Installation Booklet
Installation CD
www.cobyusa.com Page 9
Page 10

www.cobyusa.com Page 11
Features
2.4” TFT LCD full-color display
Integrated ash memory
miniSD card slot for easy memory capacity up-
grades (miniSD card not included)
Plays music, video*, photos, and text
Plays digital music from most online stores and
subscription services**
Integrated FM radio
ID3 tag support for song information display
USB 2.0 Hi-Speed for fast le transfers
Integrated rechargeable batter y
* Video playback on device may require transcoding with included software.
** Music Service must support Windows Media DRM (WMDRM). WMDRM10
requires Windows XP and Windows Media Player 10 or newer.
Page 10 Coby Electron ics Co rpo rati on
Page 11
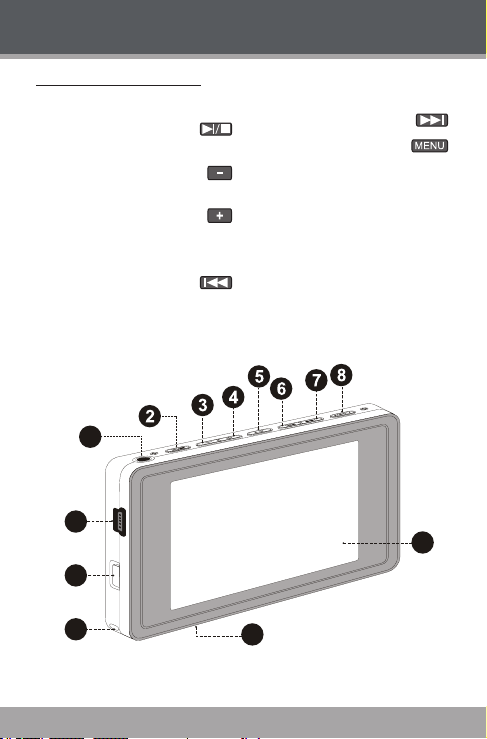
Controls at a Glance
1
9
10
11
13
12
Headphone Jack
1.
2.
Play/Pause
Navigation: Up
3.
Volume -
Navigation: Down
4.
Volume +
A-B Repeat
5.
Navigation: Left
6.
Prev/Rev
Getting Started
Navigation: Right
7.
Next/Fwd
Menu
8.
USB Port
9.
Power Switch
10.
Neckstrap Hook
11.
miniSD Card Slot
12.
LCD Display
13.
www.cobyusa.com Page 11
Page 12
www.cobyusa.com Page 13
Getting Started
6
7
8
A-
5
1
2
3
4
9
10
11
12
13
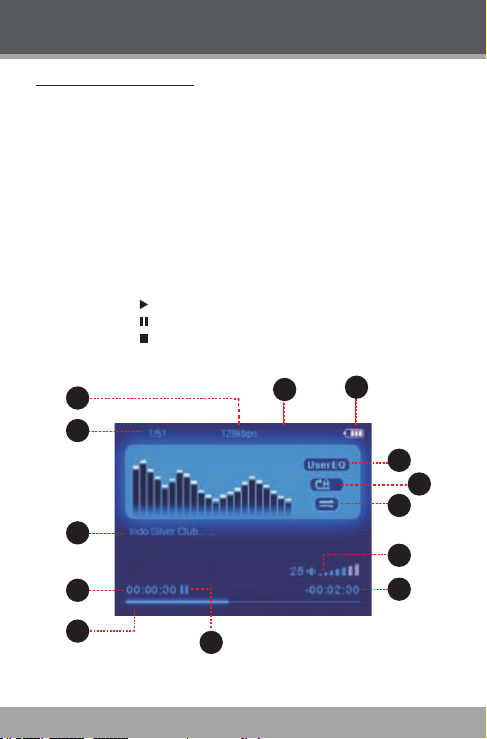
Display at a Glance
Now Playing Screen (Music Mode)
Bit Rate
1.
Current Track /
2.
Total Tracks
ID3 & LRC Info
3.
Elapsed Time
4.
Progress Bar
5.
Play Status:
6.
Play
Pause
Stop
A-B Repeat
7.
Batter y Level
8.
Equalizer
9.
Repeat Mode
10.
Shufe Mode
11.
Volume Level
12.
Remaining Time
13.
Page 12 Coby Electron ics Co rpo rati on
Page 13
Getting Started
Powering Your Player
Your player has an integrated rechargeable battery that
will provide up to 8 hours of music play time.
The battery should be charged fully before its initial
use to ensure optimum lifetime performance.
Music play time is an estimated value. Actual play
time may vary depending on encoding method used
and other factors.
Charging Your Player
Your player can be charged through a PC USB connec tion. Plug one end of the USB cable into the player’s
USB Port and plug the other end into the USB port of a
powered- on computer.
Ensure that the Power Switch is set to the “ON ”
position, other wise the unit will not charge.
When connected to a USB hub, the hub must be self-
powered to charge the player’s battery.
Thebatteryusedinthisdevicemaypresentare
or chemical burn if mistreated. Do not disassemble,
incinerate, or heat the batter y.
Do not connect the player to a power source other
than that which is indicated here or on the label as
thismayresultintheriskofreorelectricshock.
www.cobyusa.com Page 13
Page 14
www.cobyusa.com Page 15
Getting Started
Power On/Of f
To turn the player on, set the Power switch to the
ON position, and then press and hold .
To place the player in standby mode, press and hold
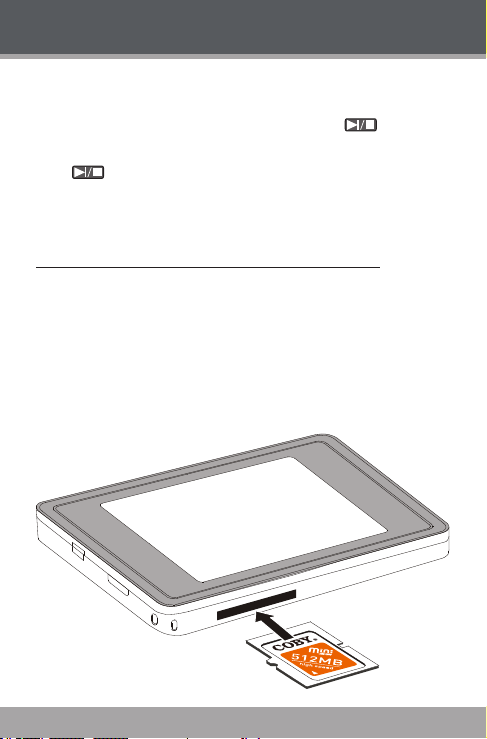
Installing a miniSD Memory Card (optional)
You can upgrade the memory capacity of your player by
adding a miniSD memory card.
again.
To turn the player off completely, set the Power
switch to the OFF position.
Insert a miniSD card into the slot as shown in the
illustration below.
This player supports memory cards up to 2GB in
size.
Page 14 Coby Electron ics Co rpo rati on
Page 15

Getting Started
Connecting Headphones
Connect headphones or earphones to the Headphone
Out jack for private listening.
Lower the volume level before connecting head -
phones, then gradually increase the volume for
comfor table listening.
Hearing experts advise against the constant use of
personal stereos played at high volume.
Constant high-volume use can lead to hearing loss.
If you experience ringing in your ears or hearing
loss, discontinue use immediately and seek medical
advice.
www.cobyusa.com Page 15
Page 16
www.cobyusa.com Page 17
Main Menu
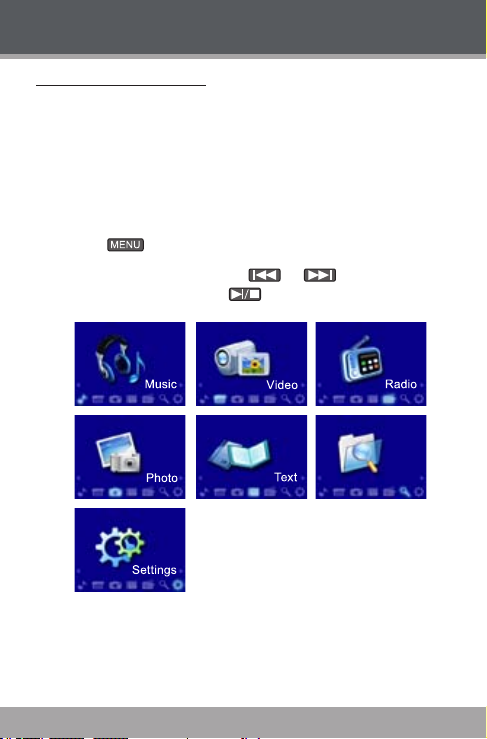
Main Menu Overview
The Main Menu gives you access to the different function
modes of your player. When your player is powered on, it
will enter the Main Menu automatically.
The main menu consists of 9 items: Music, Video, Radio,
Photo, Text, Explorer, and Settings.
To return to the Main Menu at any time, press and
hold .
To select a mode, press or to highlight the
mode and then press .
Explorer
Page 16 Coby Electron ics Co rpo rati on
Page 17

Music Mode
Enter MUSIC mode from the Main Menu to play digital
MP3, WMA or WAV audio les.
For more information about how to get music onto
your player, please refer to the section “ USB
Connections > Transferring Files”.
For more information about digital MP3 and WMA mu
sicles,pleaserefertothesection“AboutMP3/WMA
Music Files”.
Music List
Use the Music List to view all compatible music tracks
loaded on your player. Press while in MUSIC mode
to view the Music List.
Press to move the selection down; press to
move the selection up.
Press to enter a folder or to play a selection.
Press to return to the previous screen.
Press and hold to cancel and return to the
Main Menu.
Press to toggle between the Music List and
Now Playing screens.
-
www.cobyusa.com Page 17
Page 18

www.cobyusa.com Page 19
Music Mode
Now Playing (Music Mode) Controls
Use the following controls during music playback (Now
Playing).
Key Function
Press
Press Play the next track.
Hold Fast-forward through the current track.
Press Play the previous track.
Hold Reverse through the current track.
Press Decrease the volume level.
Press Increase the volume level.
Press
Hold Return to Main Menu.
Repeat Mode
Adjust the Repeat Mode settings to change the repeat
playback options. The Repeat Mode options are: Once,
Repeat One, Folder Once, All Once, All Repeat and Intro.
Start /Resume track playback.
During playback, press to pause
playback.
Toggle between the Music List and Now
Playing screens.
Please refer to the “Settings Mode > Music > Repeat
Mode” section to set the Repeat Mode options.
Page 18 Coby Electron ics Co rpo rati on
Page 19

Music Mode
Item Description
Once Play the current track once.
Repeat One Play the current track repeatedly.
Folder Once Play all tracks in the current folder once.
Folder Repeat Play all tracks in the current folder repeat-
All Once Play all tracks once.
All Repeat Play all tracks repeatedly.
Intro Play the rst 10 seconds of each track.
Repeat A-B Mode
Set a segment of a music track to repeat in a continuous
loop. During playback:
To set the starting point “A” of the loop, press .
To set the end point “B” of the loop, press again.
The loop will now play from point “A” to point “B”.
To resume normal playback, press again.
edly.
www.cobyusa.com Page 19
Page 20

www.cobyusa.com Page 21
Video Mode
Enter VIDEO mode to play AVI video les loaded on
your player.
Yourplayersuppor tsAVIlesencodedwithXviDat
320 x 240 and 20 fps. Videos must be encoded with
the included software for device playback.
For more information about converting video, please
refer to the section “Video Conversion”.
Video List
Use the Video List to view all compatible video les
loaded on your player.
Press to move the selection down; press to
move the selection up.
Press to enter a folder or to play a selection.
Press to return to the previous screen.
Press and hold to cancel and return to the
Main Menu.
Video Playback Controls
Use the following controls during video playback.
Key Function
Press Play/Pause the playback.
Press
Hold
Press
Play the next track.
Fast-forward through the current track.
Play the previous track.
Page 20 Coby Electron ics Co rpo rati on
Page 21

Video Mode
Key Function
Hold
Press Decrease the volume level.
Press Increase the volume level.
Press
Hold
Reverse through the current track.
Return to the Video List.
Return to Main Menu.
www.cobyusa.com Page 21
Page 22

www.cobyusa.com Page 23
Photo Mode
Enter PHOTO mode from the Main Menu to nd and
play JPEG image les loaded on your player.
Photo List
Use the Photo List view all picture les loaded on your player.
Press to move the selection up; press to
move the selection down.
Press to conrm and display a selection.
Press and hold to cancel and return to the
Main Menu.
Photo Controls
The viewer can display photos with manual control or
as a slideshow (photos are automatically displayed in
sequence).
Displaying Pictures Manually
To display a picture, select it from the Photo List and
press to conrm.
Press to skip to the next picture; press to
skip to the previous picture.
Press to return to the Photo List.
Page 22 Coby Electron ics Co rpo rati on
Page 23

Photo Mode
Displaying Pictures as a Slideshow
Select a photo from the Photo List and press to
conrm.
Press to start the slideshow. Press again
to stop the slideshow.
Press to cancel the slideshow and return to
the Photo List.
You can change the duration of time bet ween the
photos in the Settings menu. Please refer to the
section “Settings Mode” for more information.
www.cobyusa.com Page 23
Page 24

www.cobyusa.com Page 25
Radio Mode
Enter Radio Mode to listen to FM radio broadcasts.
You must have a pair of headphones connected to
the headphone jack to receive FM broadcasts; your
player will utilize the headphone cord as an antenna
Basic FM Radio Operation
Upon entering Radio mode, you can tune to stations
manually (MANUAL) or to preset stations (PRESET).
You can set the Radio mode to MANUAL or PRESET
mode in the Radio Settings menu. Please refer to the
section “Radio Settings Menu” below for more
information.
MANUAL: Press or to tune to stations
manually. To auto-seek to the next available broadcast station, press and hold or .
PRESET: Press or to tune to the next
Preset Station. You must save Preset Stations prior
to using this tuning method.
Radio Settings Menu
To enter the Radio Settings menu, press while the player
is in Radio Mode.
Press to move the selection down; press to
move the selection up.
Press to conrm the selection.
Press to go back one level.
.
Page 24 Coby Electron ics Co rpo rati on
Page 25

Radio Mode
Item Description
Manual Select to set the player in MANUAL mode.
Preset Select to set the player in PRESET mode.
Mem Save a Preset Station.
Del Delete a Preset Station.
Auto
Storing Preset Stations
Your player can store up to 30 station presets (01 to 30).
Store Presets Manually
Tune to the station you want to store as a preset
1.
(e.g., 91.5).
Press to access the Radio Settings menu.
2.
Select and conrm “ Mem”.
Press or to select the desired Preset number
3.
and then press (e.g., CH01). A “Save Channel?” warning will appear on the screen.
Use or to select “YES” and then press
4.
station 91.5).
Automatically scan and save all available station
frequencies to Preset Station memory.
to conrm. (Preset CH01 is now set to the
www.cobyusa.com Page 25
Page 26

www.cobyusa.com Page 27
Radio Mode
Store Presets Automatically
Press to access the Radio Settings menu. Select
and conrm “Auto”. The player will automatically seek
and store the rst 30 frequencies with a broadcast signal.
This will overwrite all previously stored
preset stations.
Delete a Preset Station
Press to access the Radio Settings menu.
1.
Select and conrm “Del”.
Press or to select the Preset number that
2.
you want to delete and then press . A “Delete
Channel?” warning will appear on the screen.
Use or to select “YES” and then press
3.
to delete the station.
Page 26 Coby Electron ics Co rpo rati on
Page 27

EBook Mode
Enter EBOOK mode from the Main Menu to play text
les (TXT) loaded on your player.
EBook List
Use the EBook List to view all text les loaded on your
player.
Press to move the selection up; press to
move the selection down.
Press to conrm and display a selection.
Press and hold to cancel and return to the
Main Menu.
EBook Controls
To display a text le, select and conrm the le from the
EBook List. While the text le is displayed:
Press or to skip to the next page.
Press or to skip to the previous page.
Press to display the pages with automatic
scrolling (Auto Play); press again to stop the
Auto Play.
Press to return to the EBook List.
Press and hold to return to the Main Menu.
www.cobyusa.com Page 27
Page 28

www.cobyusa.com Page 29
Explorer Mode
Enter EXPLORER mode to view all folders and les
loaded on your player. If a compatible le is selected and
conrmed, the le will be played in its corresponding
mode.
Music Mode: MP3, WMA
Video Mode: AVI
Photo Mode: JPEG
EBook Mode: TXT
Navigator Controls
Press to move the selection up; press to
move the selection down.
Press to conrm a selection.
If a folder has been selected, the contents of
the folder will be displayed.
If a compatible le has been selected, the le
will be played in its corresponding mode.
Press to cancel a screen and return to the
previous folder.
Press and hold to return to the Main Menu.
Page 28 Coby Electron ics Co rpo rati on
Page 29

Settings Mode
Enter SETUP mode from the Main Menu to change
your player’s internal option settings.
To select an option, press or . To conrm and
enter, press .
Press to cancel and return to the previous
screen.
To exit the Setup Menu, press and hold .
The Setup Menu contains 7 options: Music, Radio,
Display, Auto Play Set, System, PowerOff Time, and
Default Set.
www.cobyusa.com Page 29
Page 30

www.cobyusa.com Pag e 31
Settings Mode
Item Description
Set a Repeat Mode option.
Once: Play the current track once.
Repeat
Mode
Play Mode
Music
EQ Select
User EQ Set
Stereo
Switch
Radio
FM Region
Repeat One: Repeat the current track.
Folder Once: Play all tracks in current folder once.
Folder Repeat all tracks in current folder.
All Once: Play all tracks once.
All Repeat: Play all tracks repeatedly.
Intro: Play the rst 10 seconds of each track.
Set a Play Mode option.
Order: Play tracks in order.
Shufe: Play tracks in random order.
Set a digital equalizer preset. The options are
Normal, 3D, Rock, Pop, Classic, Bass, Jazz,
and User EQ.
Set a custom equalizer setting.
Press or to select a band to
•
adjust.
Press or to adjust the selected
•
band level.
Use or to select YES or NO.
•
Set the reception mode.
On: Stereo reception.
Off: Mono reception.
Set the FM frequ ency ran ge area: Ch ina,
Europe, Japan, or U.S.A.
Page 30 Coby Electron ics Co rpo rati on
Page 31

Settings Mode
Item Description
Adjust the duration of time (in seconds) that
BLight Time
Display
Lum
Text
Jpeg
Auto Play Set
Langauge
About
Upgrade
System
USB Mode
the backlight will remain on after a key press.
A setting of “Always On” will keep the backlight on continuously.
Adjust the brightness (luminescence) of the
display.
Adjust the EBook mode "Auto Play" time
interval.
Adjust the Photo mode Slideshow time
interval.
Set the Language that the menus appear in.
View the player's Firmware and capacity info.
Select to upgrade the rmware (please refer to
the section “Firmware Upgrades” for details).
Set the USB connection mode (MTP or MSC)
when connecting the player to a computer.
MTP: This setting enables advanced
•
synchronization features if you are using
Windows Media Player 10 (WMP10) or
newer. If an MTP connection is not available, the player will revert to MSC.
MSC. This setting enables the widest
•
compatibility with all systems, and allows
the player to be used as a removable storage device
www.cobyusa.com Pag e 31
Page 32

www.cobyusa.com Page 33
Settings Mode
Item Description
Set the duratio n of time (in minu tes) that
PowerOff Time
Default Set
the player will remain on when it is idle. The
settng of "OFF" will disable the Power Saving
feature.
Select to restore all of the player's setting to
their factory-default state.
Page 32 Coby Electron ics Co rpo rati on
Page 33

USB Port
USB Port
Computer
USB Connections
Connect the player to a computer with the USB 2.0 cable
provided to:
Transfer les to and from your player.
Perform basic le management functions.
Connecting to a Computer
Connect the player to your computer with the supplied
USB cable.
Upon connection:
Your computer will automatically recognize the
player as an MTP Device. An icon representing your
player will appear under “Audio Devices” when you
open “My Computer”.
It may take Windows several minutes to recognize
and set up the device the rst time it is connected
depending on your hardware conguration.
For more information and support regarding music
transfer and synchronization with Windows Media
Player (WMP), please see the help section included
with WMP (click “Help > Synchronizing Content to
Devices” ).
www.cobyusa.com Page 33
Page 34

www.cobyusa.com Page 35
USB Connections
Transferring Files
The USB 2.0 connection makes it easy to transfer music
les (or any other data les) quickly between the player
and your computer. Simply use the player as you would
any removable storage device using basic operating
system commands.
If you need fur ther assistance with transferring les,
please refer to your operating system’s instruction manual or on-screen help. If you are using media management
software such as iTunes, Winamp, or Windows Media
Player, please refer to their documentation for support.
Do not disconnect or otherwise interrupt the player
during transmission—this could damage or corr upt
theplayer’srmwareoryourles.Iftheplayeris
accidentally disconnected and is not working
properly, use the Power switch to turn your player of f,
and then back on again.
Conten t owners us e Windows Media digital rights
management technology (WMDRM) to protect thei r
intellectual property, including copyr ights. This devic e
uses WMDRM sof twar e to access WMDR M-protected
content. If the WM DRM software fails to protect the
content, content owners may ask Microsoft to revoke the
soft ware’s abil ity to use WMDR M to play or co py
protected content. Revocation does not affect
unprotected content. When you download licenses for
protected content, you agree that Mic rosof t may include
a revocati on list wi th the licenses. Content owners may
require you to upgr ade WMDRM to access their content.
If you decline an upgrade, you will not be able to access
content that requires the upgrade.
Page 34 Coby Electron ics Co rpo rati on
Page 35

USB Connections
Microsoft Windows
Double-click the “My Computer” icon on your
1.
desktop and then double-click the Player icon (MTP
Multimedia Player).
Your player contains two folders: Data and Media.
2.
Drag your media les to the Media folder (e.g.,
MP3, WAV, WMA les).
Drag all other types of les to the Data folder
for storage (e.g., TXT, DOC, XLS, etc). Data
les are only visible from a computer; these
les will not be available from within the player
itself.
Macintosh OS X
Open a nder window. Located the les you would
1.
like to transfer from your computer. Select the
les/folders with the mouse and press APPLE-C
(copy) on the keyboard.
Click on the Removable Disk icon located on the left
2.
side of the nder window. The computer will display
all les and folders currently stored in the player.
Press APPLE-V (paste) on the keyboard to transfer
3.
the les you selected in Step 1 to the player.
www.cobyusa.com Page 35
Page 36

www.cobyusa.com Page 37
USB Connections
Disconnecting from a Computer
Disconnect your player as instructed below to prevent
data loss or le/rmware corruption.
Microsoft Windows
Double-click the green arrow
1.
in the taskbar located on the
lower-right side of the computer
screen (Safely Remove Hardware).
Safely Remove
2.
Hardware: Select
“USB Mass Storage
Device” from the list
that appears and
then click on “Stop”.
Stop a Hardware
Device: Select
“USB Mass Storage
Device” from the list
that appears and
then click on “OK”.
Select “USB Mass Storage Device” from the list that
appears and then click on “OK”.
When the “Safe to Remove Hardware” window ap-
3.
pears, click the OK button and disconnect the USB
cable from the player and your computer.
Macintosh OS X
On the left side of the Finder Window, identify the
1.
appropriate Removable Disk icon.
Page 36 Coby Electron ics Co rpo rati on
Page 37

USB Connections
Click on the “Eject”
2.
arrow on the right of the
Removable Disk icon.
Disconnect the USB
3.
cable from the player
and your computer.
www.cobyusa.com Page 37
Page 38

www.cobyusa.com Page 39
Video Conversion
Use the video conversion software utility included on the
Installation CD to create video les that are suitable for
playback on the player.
Your player supports XviD -encoded AVI les with the
following specications:
320 x 240 resolution at 20 frames per second (fps).
The video conversion sof tware is included for your
convenience and is compatible with Microsoft Windows
operating systems only. There ar e many other video
conversion utilities available for download or purchas e
on the inter net.
Because the program is licensed free of charge, there
is no warranty for the program, to the extent permitted
by applicable law. Except when otherwise stated in
writingthecopyrightholdersand/orotherpartiesprovide
the program “as is” without warranty of any kind, either
expressed or implied, including, but not limited to, the
impliedwarrantiesofmerchantabilityandtnessfora
particular purpose. The entire risk as to the quality and
performance of the program is with you. Should the
program prove defective, you assume the cost of all
necessary ser vicing, repair or correction.
In no event unless required by applicable law or agreed to
in writing will any copyright holder, or any other party who
maymodifyand/orredistributetheprogramaspermitted
above, be liable to you for damages, including any general,
special, incidental or consequential damages arising out
of the use or inability to use the program (including but not
limited to loss of data or data being rendered inaccurate or
losses sustained by you or third parties or a failure of the
program to operate with any other programs), even if such
holder or other party has been advised of the possibility of
such damages.
Page 38 Coby Electron ics Co rpo rati on
Page 39

Video Conversion
Installation
Locate the AVI Converter setup le on the Installa-
1.
tion CD:
AVIConverter CHN-EN Package Setup.exe.
Double-click the le to start the installation process.
2.
Follow the on-screen instructions to complete the
3.
installation process.
Converting Video
To start the program, double-click the AVIConver ter
shortcut on your desktop. The application window shown
below will appear.
Click the “Add” button. The Conversion Setting
screen will appear. Use this screen to add video
conversion jobs to the queue.
www.cobyusa.com Page 39
Page 40

www.cobyusa.com Pag e 41
3
4
5 6
1 2
Video Conversion
Set the Resolution to “320x240” as shown in the
1.
diagram above [1].
To select the Source File to convert, click the
2.
shaded box indicated in the diagram above [2]. The
source le must be one of the following video types:
AVI, RM, RMVB, MPG, MPEG, MP4, ASF, WMV,
MKV, DAT, or VOB.
DirectX 9.0, Media Player 9.0, and other codecs
must be installed to support all media types.
To select the Target File Path (destination folder)
3.
that the converted video will be saved to, click the
shaded box indicated in the diagram [3].
Type the desired le name for the converted video in
4.
the box indicated in the diagram [4].
After all options have been selected, click the “Save”
5.
button [5] to save this conversion job to the queue.
Page 40 Coby Electron ics Co rpo rati on
Page 41

Video Conversion
Once there are no more video conversion jobs to
6.
add to the queue, click the Close button [6] to return
to the application window shown below.
The application window should now list all conver-
7.
sion jobs that you have added to the queue. Click
the “Conver t Now” button to start the conversion
process.
To exit the program, click the “Close” button.
8.
www.cobyusa.com Pag e 41
Page 42

www.cobyusa.com Page 43
Windows Media Player
You can use Windows Media Player and a USB-MTP
connection to manage your music media library with
Microsoft Windows XP or newer.
The latest version of Windows Media Player can be
downloaded from the Microsoft website:
http:// www.microsoft.com/windows/windowsmedia /default.mspx
Please refer to the Quick Start Guide included with your
player for more information.
For more information and support regarding music
transfer and synchronization with Windows Media
Player (WMP), please see the help section included
with WMP (click “Help > Synchronizing Content to
Devices” ).
Page 42 Coby Electron ics Co rpo rati on
Page 43

Firmware Upgrades
From time to time, COBY may release rmware upgrades
to improve the per formance of the Player or to add
additional features. Please check the COBY website
periodically at www.cobyusa.com to see if new rmware
has been released for your player. If you are experiencing
abnormal behavior with your player, you may choose to
restore (format) your player before updating its rmware.
Donotinterruptther mwareupgradeprocess —
doing so could damage your player and render it
inoperable.
See the documentation that is inc luded with the
rmwareupgradelefordetailedinstructions.
www.cobyusa.com Page 43
Page 44

www.cobyusa.com Page 45
About MP3/WMA Files
For more information about digital MP3 and WMA les,
please visit our website at w ww.cobyusa.com.
Page 44 Coby Electron ics Co rpo rati on
Page 45

Troubleshooting
If you have a problem with this device, please read the
troubleshooting guide below and check our website
at www.cobyusa.com for Frequently Asked Questions
(FAQs) and rmware updates. If these resources do not
resolve the problem, please contact Technical Support.
Address CO BY Electronics Technical Support
Email techsupport@cobyusa.com
Web www.cobyusa.c om
Phone 800 -727-359 2: Weekdays 8:00AM–11:00 PM EST
56- 65 Rust Street
Maspeth, NY 11378
Weekends 9:0 0AM –5:3 0PM EST
718-416-3197: Weekdays 8:00AM– 5:30PM EST
The player does not turn on.
Ensure that the player is fully charged. Try charging
the player overnight (8 hours).
Ensure that the Power switch is set to the “On”
position.
Use the Power switch to turn the player off com-
pletely, and the turn it back on.
The buttons do not work.
Ensure that the Hold switch is disengaged.
Use the Power switch to turn the player off com-
pletely, and the turn it back on.
www.cobyusa.com Page 45
Page 46

www.cobyusa.com Page 47
Troubleshooting
I cannot transfer les to the player.
Ensure that your computer is running a supported
operating system.
If using a USB extension cable, ensure that it is
securely attached to the player and the PC, or try
using another USB cable.
If you have connected the player through a USB
hub, try connecting the player directly to your
computer.
Ensure that the player’s memory capacity is not full.
Ensure that the Hold switch is disengaged.
There is no sound during playback.
Check the volume level.
Ensure that the headphones are attached securely
to the player.
The sound quality of the music is poor.
Try playing the le on your computer. If the sound
quality is still poor, try downloading the le again or
re-encoding the le yourself.
Ensure that the bit rate of the le is not too low. The
higher the bit rate of the le, the better it will sound.
The minimum recommended bitrate is 128kbps for
MP3s and 96kbps for WMAs.
Try lowering the volume of the player.
Page 46 Coby Electron ics Co rpo rati on
Page 47

Troubleshooting
Ensure that the headphones are attached securely
to the player.
The player will not play my music le.
Ensure that the le is in a compatible format.
The le may be copy-protected and you no longer
have authorization to play this le. If you feel this is
in error, please contact the service from which you
downloaded the le.
The LCD characters are corrupted or something is
wrong with the display.
Ensure that the correct menu language has been
set.
Use the Power switch to turn the player off com-
pletely, and the turn it back on.
The player has malfunctioned.
Use the Power switch to turn the player off com-
pletely, and the turn it back on.
Try updating the player’s rmware. Please refer to
the Firmware Upgrades section of this manual for
instructions.
www.cobyusa.com Page 47
Page 48

www.cobyusa.com Page 49
Specications
Display Type
Memor y Integrated Flash M emory
Audio Format Support MP3, WMA, WMA- DRM, WAV
Video For mat Support MPEG -4 (XviD): 320 x 240, 20 fps
Photo Format Suppor t JPEG
DRM Support WMDRM10*
Song Info Suppor t ID3, LRC
Recording Format IMA-ADPCM Encoding
FM Frequency Range 87.5 - 108.0 MHz
PC Interface USB 2.0 (MSC or MTP)
Plug and Play Suppor t Windows 200 0/XP or newer
Audio Output 3.5mm Stereo (Headphone)
Menu Language Support English, Korean, Chinese, Spanish, French,
Power Supply Rechargeable Lithium-ion Bat tery
Unit Dimensions 1.61” x 3.1” x 0.67” ( WHD)
* Music Se rvice must sup port Windows M edia DRM (WM DRM). WMDRM10 requires
Window s XP and Windows Me dia Player 10 or newer.
Design, speci cations, and ma nual are subject to c hange without p rior notice.
2.4” Full-Color TFT @ 320 x 240
Mac OS X
German, Italian, Portuguese, Russian
USB Charge
Page 48 Coby Electron ics Co rpo rati on
Page 49

Notes
www.cobyusa.com Page 49
Page 50

www.cobyusa.com Page 51
Notes
Page 50 Coby Electron ics Co rpo rati on
Page 51

Notes
www.cobyusa.com Page 51
Page 52

Coby Electronics Corporation
COBY Electronics Corp.
56- 65 Rust Street
56- 65 Rust Street
Maspeth, NY 11378
Maspeth, NY 11378
ww w.cobyusa.com
ww w.cobyusa.com
ww w.ecoby.com
ww w.ecoby.com
Coby is a re gis tered t rademar k of Coby E lect roni cs Cor pora tion.
Printed in Ch ina.
 Loading...