

Page 1
EN
ES
FR
DVD978
5.1-Channel Home Theater DVD System
Instruction Manual ........................................................Page 2
Sistema DVD Home Theater de 5.1 Canales
Manual de la instrucción ..............................................Page 60
Système Cinéma-Maison DVD de Canaux 5.1
Manuel d’instruction ................................................. Page 124
Please read carefully before use • Léa el manual antes de usar •
Veuillez lire ce livret avant utilisation
Page 2

Table of Contents
THANK YOU ......................................................................... 5
In the Box ........................................................................................................................5
Features ........................................................................................................................... 6
English
ABOUT OPTICAL DISCS ...................................................... 7
Disc Requirements ...................................................................................................... 7
DVD Features ................................................................................................................. 7
DVD Region Codes ...................................................................................................... 8
Disc Care and Maintenance ...................................................................................... 8
Handling a Disc .............................................................................................. 9
Cleaning a Disc ............................................................................................... 9
AT A GLANCE ..................................................................... 10
Front Panel ................................................................................................................... 10
Rear Panel ..................................................................................................................... 11
Remote Control .......................................................................................................... 12
Using the Remote Control ........................................................................ 18
Battery Installation ...................................................................................... 18
CONNECTIONS .................................................................. 19
Video System ............................................................................................................... 19
Composite Video Out (Standard) ........................................................... 20
HDMI Video Out (Best) ..............................................................................20
Audio System .............................................................................................................. 21
Speakers ......................................................................................................... 22
Coaxial Digital Audio Out (Optional, Best) ..........................................22
Stereo Line Input ......................................................................................... 23
Power Supply & Installation ...................................................................................24
Power Supply ................................................................................................24
Power Management ................................................................................... 24
Installation ..................................................................................................... 24
Page 2 Coby Electronics Corporation
Page 3

Table of Contents
GETTING STARTED ............................................................ 25
Turning the Unit On .................................................................................................. 25
Select the TV Input Source .....................................................................................25
Select the DVD978 Source Mode .........................................................................25
Load a Disc (or other media) .................................................................................. 26
Basic Playback Instructions ..................................................................................... 26
Play/Pause/Stop ........................................................................................... 26
Previous/Next (Skip) ................................................................................... 27
Forward/Reverse (Scan) ............................................................................27
Step .................................................................................................................. 27
Repeat Playback ........................................................................................... 27
Adjusting the Sound ................................................................................................. 28
OPERATION MODES .......................................................... 29
DVD/CD Discs .............................................................................................................. 29
Additional DVD Controls ...........................................................................29
Digital Media Discs .................................................................................................... 30
Menu Operation .......................................................................................... 30
JPEG Picture Discs ...................................................................................................... 30
Thumbnail Mode Operation .................................................................... 31
USB Flash Drives ......................................................................................................... 32
Menu Operation .......................................................................................... 32
Tuner (FM Radio) ........................................................................................................33
English
SYSTEM SETUP .................................................................. 34
General Setup Page ..................................................................................................34
TV Display ...................................................................................................... 34
Angle Mark .................................................................................................... 35
OSD Language ............................................................................................. 35
Screen Saver .................................................................................................. 35
Last Memory ................................................................................................. 35
Closed Captions ........................................................................................... 36
www.cobyusa.com Page 3
Page 4

Table of Contents
Audio Setup Page ...................................................................................................... 36
Analog Audio Setup ................................................................................... 36
Digital Audio Setup .................................................................................... 38
English
Video Setup Page ......................................................................................................44
HDMI Setup.................................................................................................................. 45
Preference Page .........................................................................................................46
Password ....................................................................................................................... 48
Channel Delay .............................................................................................. 39
Equalizer ......................................................................................................... 39
3D PROCESSING ........................................................................................... 40
HDCD ............................................................................................................... 42
Karaoke Setup ..............................................................................................42
Dolby Digital Setup ....................................................................................43
Video Output ................................................................................................ 44
Resolution ...................................................................................................... 44
Color Setting ................................................................................................. 44
HDMI ................................................................................................................ 46
TV Type ...........................................................................................................46
PBC (Play Back Control) .............................................................................46
Audio, Subtitle and Disc Menu ...............................................................47
Parental ........................................................................................................... 47
Password Mode............................................................................................48
Password ........................................................................................................48
Default ............................................................................................................48
SPECIFICATIONS ................................................................49
TROUBLESHOOTING
SAFETY NOTICES
Page 4 Coby Electronics Corporation
......................................................... 50
............................................................... 54
Page 5

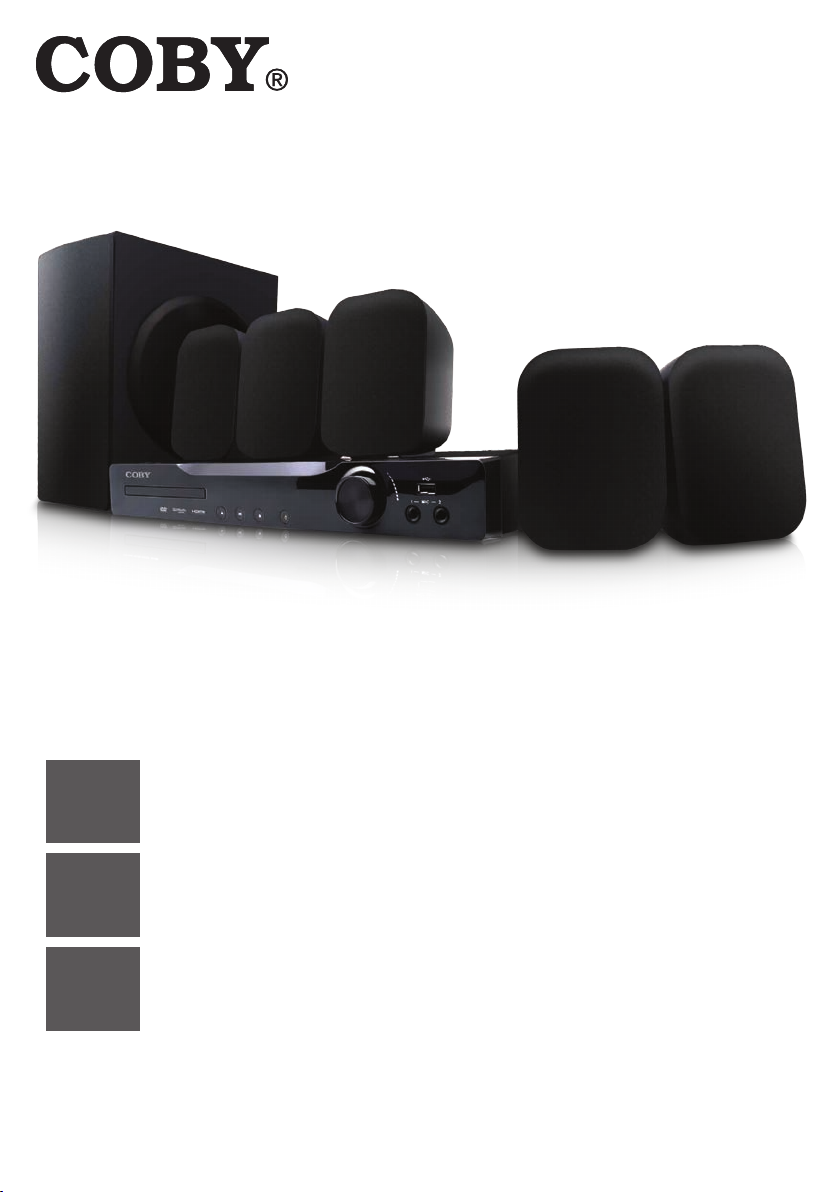
Thank You
Congratulations on your purchase of a Coby Home Theater System. This
manual is designed to help you learn how to operate and enjoy your
new system for years to come. Please read this manual carefully and
retain it for future reference.
In the Box
Please make sure that the items shown below are included in the package. Should an item be missing, please contact the local retailer from
which you purchased this product.
Main unit
Front speakers (x)
Surround speakers (x)
Center speaker (x)
Subwoofer speaker (x)
Video cable
FM antenna
Remote control
Two () “AAA” batteries
English
www.cobyusa.com Page 5
Page 6

Thank You
Features
5.1-CHANNEL DVD PLAYER with INTEGRATED AMPLIFIER
English
DVD, DVD±R/RW, CD, CD-R/RW, and JPEG compatible
Plays digital media les directly from USB ash drives
Integrated digital FM tuner with -station preset memory
HDMI output for perfect digital signal transmission to your TV over a
single cable
Dolby Digital decoder
.-channel audio for surround sound systems
Digital and analog AV outputs
HOME THEATER SPEAKERS
.-channel surround sound system
Five full-range satellites and one subwoofer deliver crisp highs and
deep bass
Wall-mountable or desktop speaker design
Page 6 Coby Electronics Corporation
Page 7
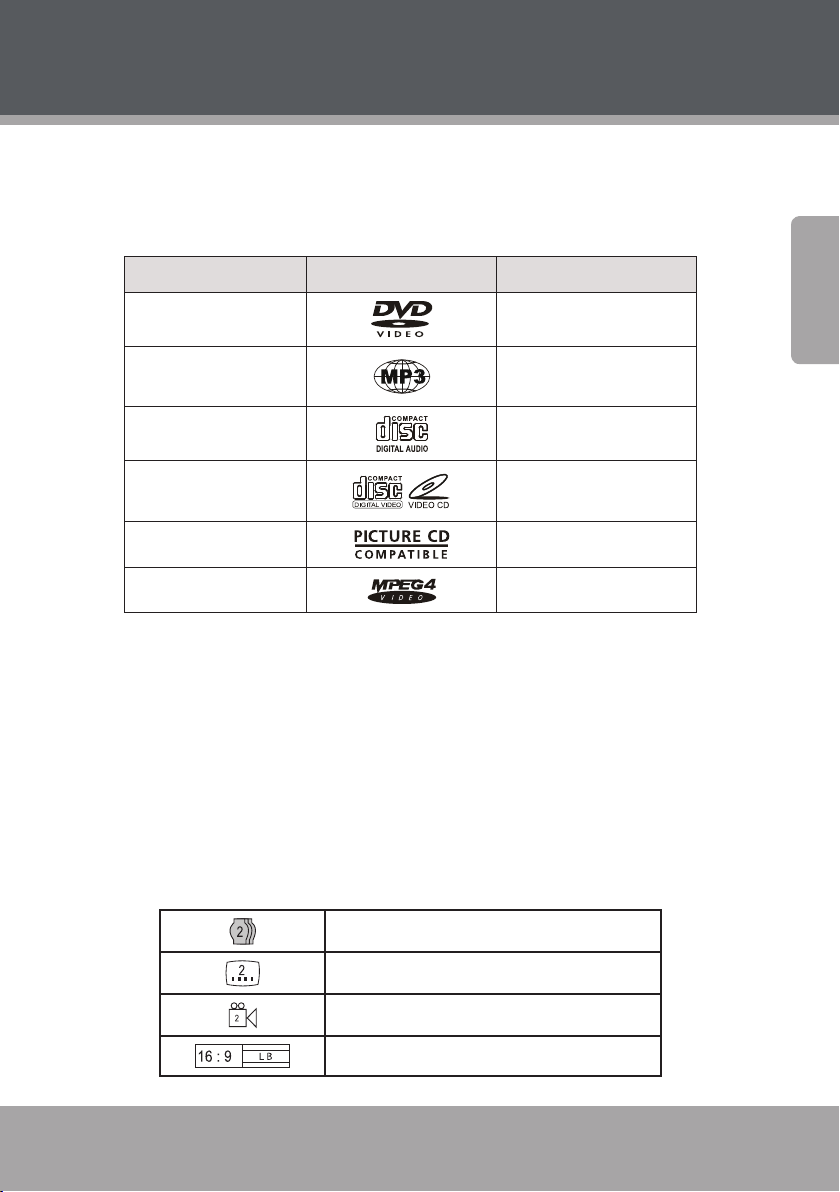
About Optical Discs
Disc Requirements
This DVD player supports playback of the following media types and
discs.
Type Disc Mark Content Type
DVD Audio + Video
MP3 Audio
CD Audio
Video CD (VCD) Audio + Video
Picture CD (JPEG) Still Picture
MPEG-4 Audio + Video
This unit can play back optical discs or memory cards that contain MP,
MPEG-, or JPEG les. Discs and media types not listed above are not
supported by this unit (e.g., PC CD-ROM, CD-Extra, CD-G, CD-I, etc.)
DVD Features
Each DVD disc contains features that may vary depending upon the
production of the disc. Some of the icons you may see that represent
these features are shown below.
English
Number of Audio Tracks
Number of Subtitles
Angle Indicator
Screen Format (Aspect Ratio)
www.cobyusa.com Page 7
Page 8
About Optical Discs
Zoom
English
Some of the DVD features enabled by this player depend on
how the DVD was produced. Some features may not be enabled
if the disc does not support the feature, or it may require special
settings. Check the features printed on the DVD package or follow the instructions found on the disc’s on-screen menu.
DVD Region Codes
DVD discs and DVD players are manufactured under a compulsory
worldwide agreement, the DVD Regional Code System. DVD players
will only operate with DVD discs encoded with the same corresponding
Regional Code.
Region Code Region
1 Canada, USA
2 Europe (including Poland, Romania, Czech Republic), Japan, Middle East
(including Saudi Arabia, Egypt, Iran, South Africa)
3 East Asia (including Hong Kong, Taiwan, South Korea), Southeast Asia
4 Australia, Caribbean, Central America, South America, Mexico, New Zealand
5 Africa, the former Soviet Union, India, North Korea, Pakistan, Turkmenistan
6 China
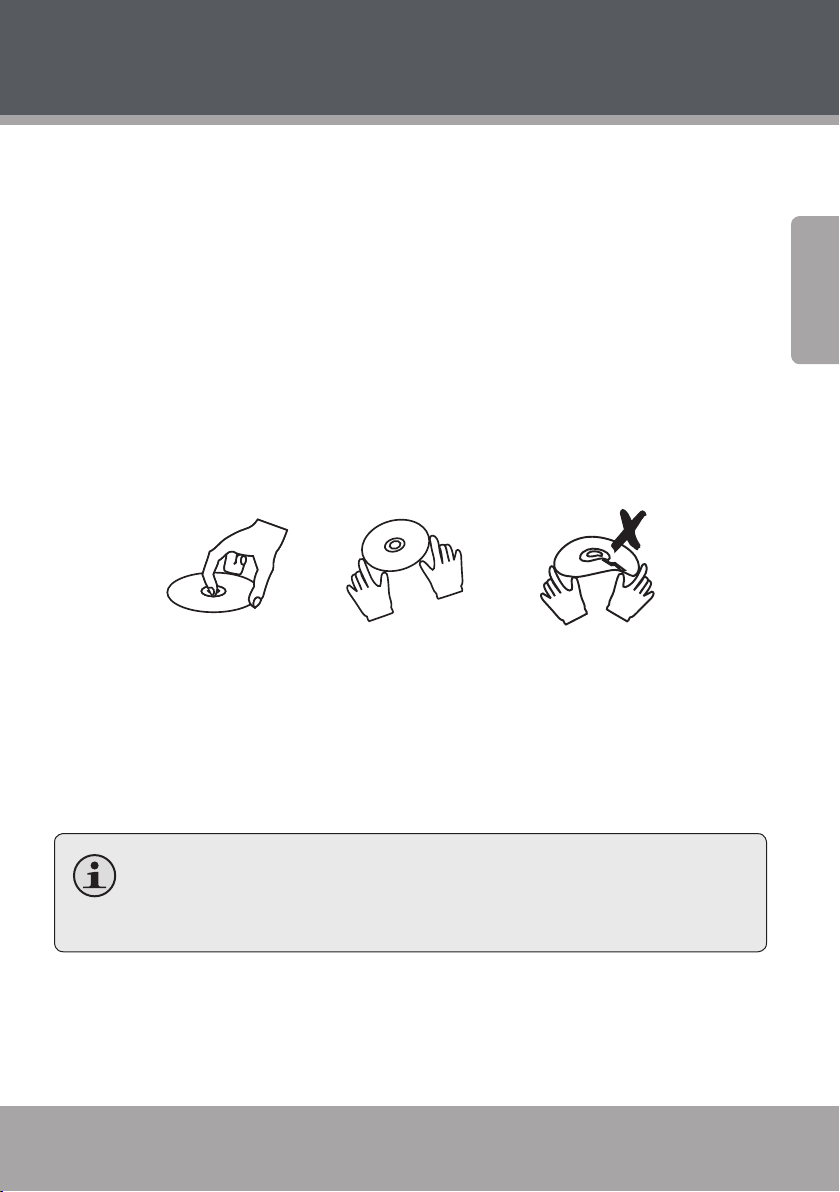
Disc Care and Maintenance
Optical discs (DVDs, CDs) contain high-density compressed data and
need proper handling.
Page 8 Coby Electronics Corporation
Page 9
About Optical Discs
Handling a Disc
Hold a DVD/CD by its edges. Avoid touching the recorded side of the
disc. To remove a DVD/CD from its storage case, press down on the
center retention mechanism of the case and lift the disc out.
Do not bend or press discs.
Do not subject discs to prolonged exposure to direct sunlight, high
humidity, or high temperatures.
To reduce the risk of scratches, always put discs back in their case
after use. Store discs vertically in a cabinet.
Do not place stickers or labels on either side of a disc.
English
Cleaning a Disc
Use a dry, soft cloth to wipe o any ngerprints and dusts from the playing surface of the disc. Wipe in a straight line radially from the center to
the outside edge of the disc. Small dust particles and light stains will not
aect playback quality.
Never use chemicals such as record sprays, anti-static sprays,
benzene, or thinners to clean a disc. Doing so will damage the
surface of the disc permanently.
www.cobyusa.com Page 9
Page 10
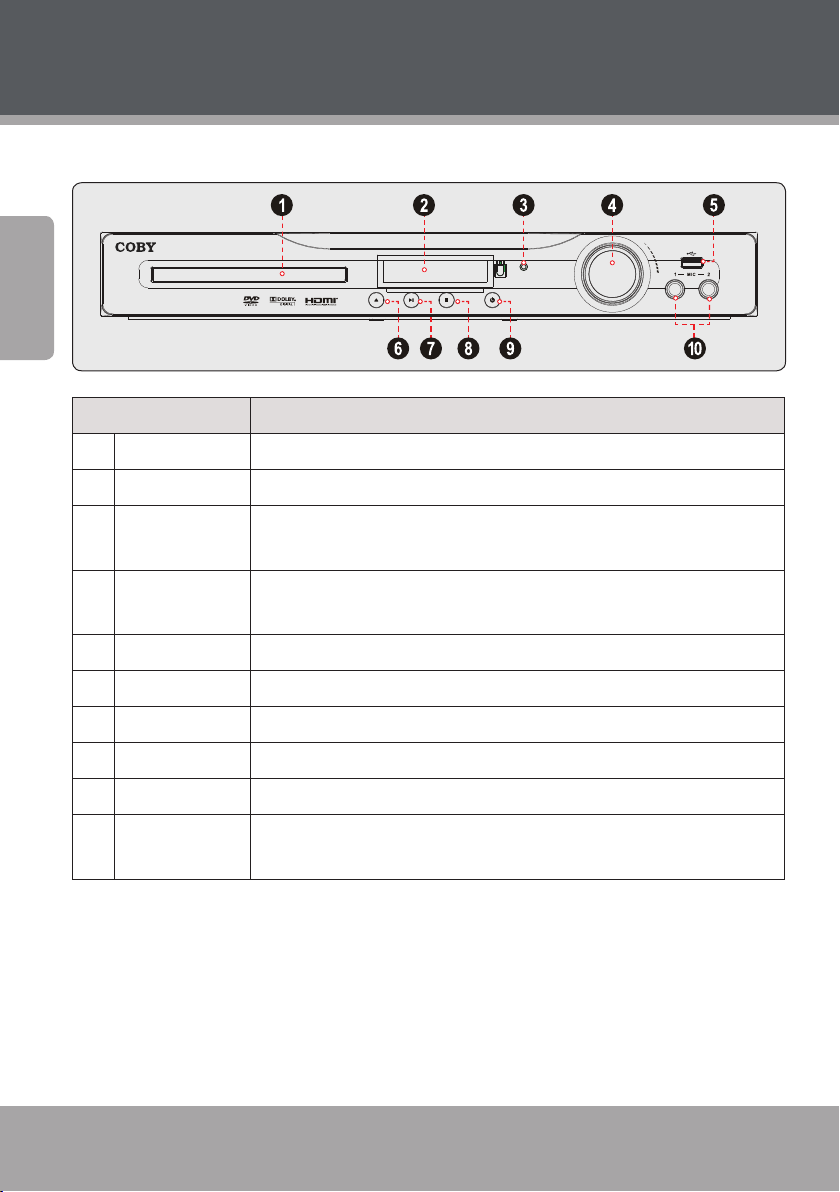
At a Glance
Front Panel
English
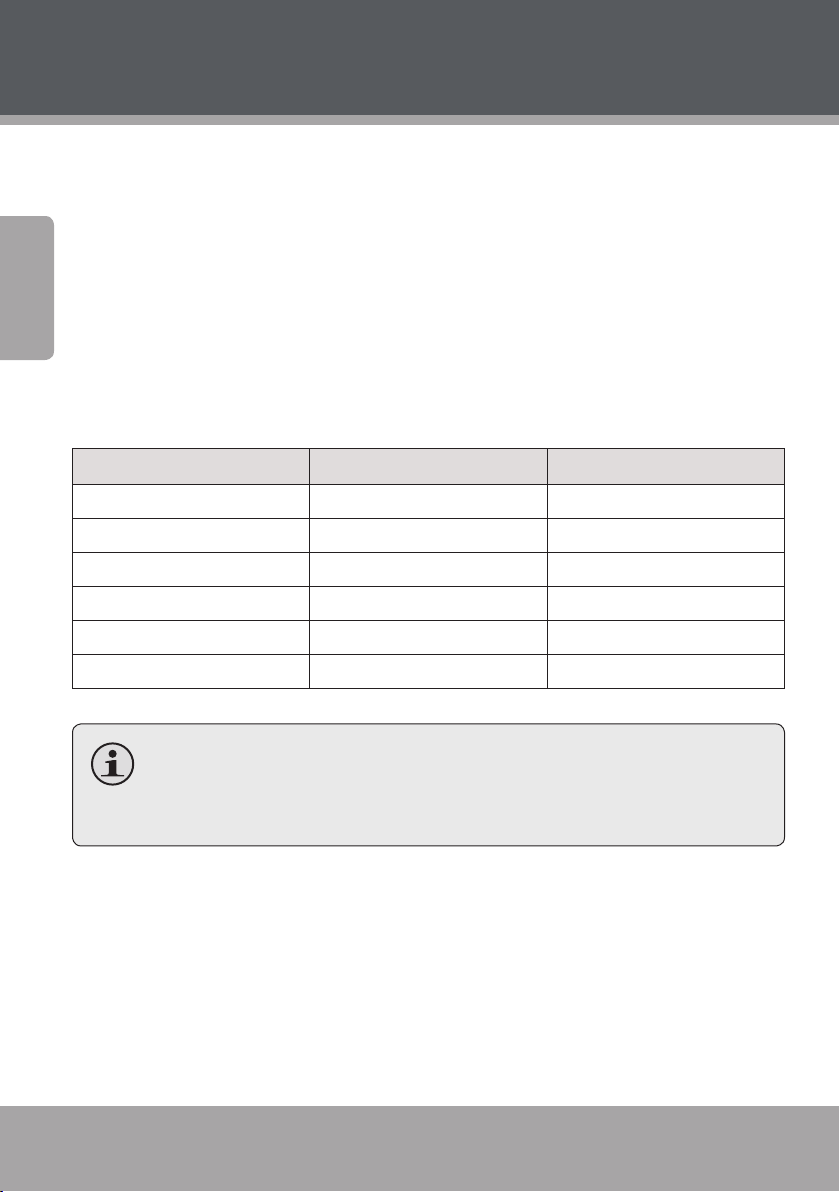
Name Description
1 Disc Tray Load optical discs into the open tray for playback.
2 Display Screen Displays system status information.
3 Power Indicator Lights red when power is connected and the system is in standby (o)
mode.
4 Master Volume
Knob
5 USB port Connect a USB ash drive to play supported digital media les.
6 Open/ Close Open or close the disc tray.
7 Play/Pause Start or pause playback.
8 Stop Stop playback.
9 Power Turn the unit on or o.
10 Microphone
input
Page 10 Coby Electronics Corporation
Turn clockwise to increase the volume level; turn counter-clockwise to
decrease the volume level.
Connect microphones to enjoy karaoke discs.
Page 11
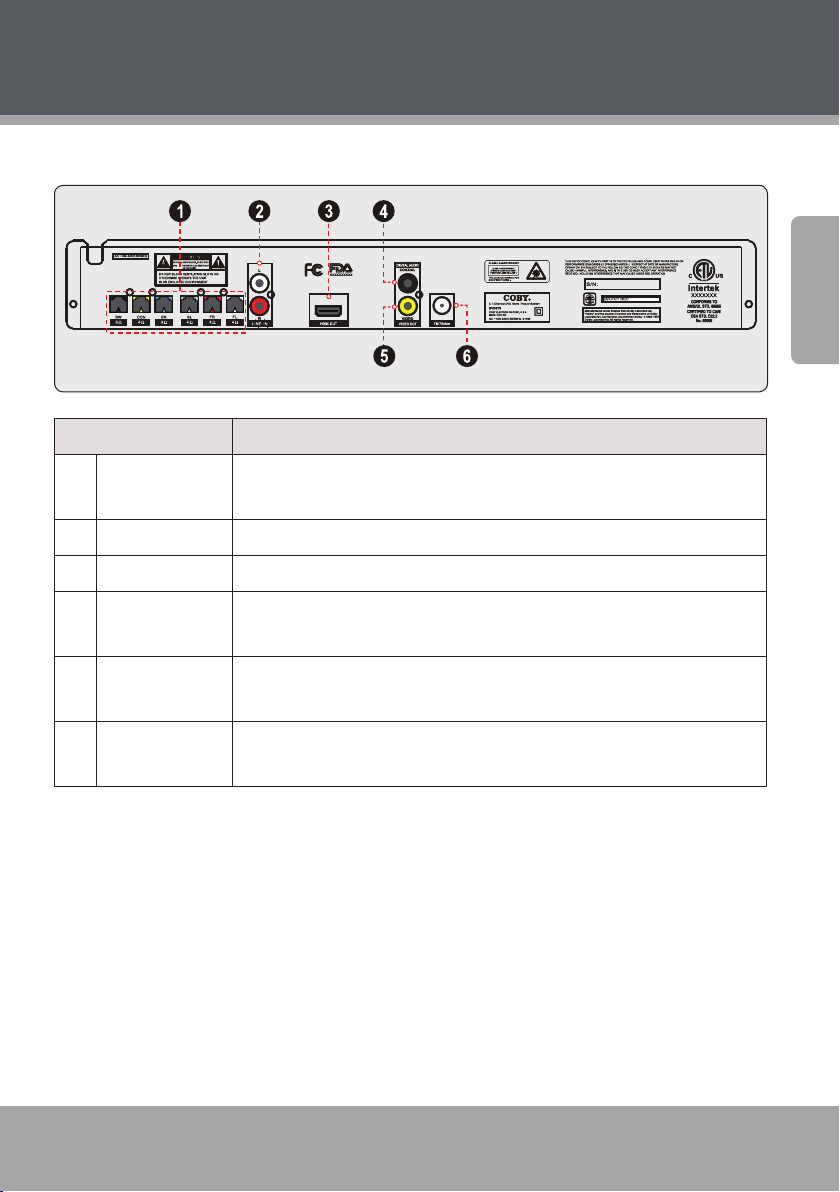
At a Glance
Rear Panel
Name Description
English
1 Speaker Output
Panel
2 Line input Connect and play stereo audio from external devices.
3 HDMI output Connect to an HDTV or other display equipped with HDMI input.
4 Coaxial Digital
Audio Output
5 Composite
Video Output
6 FM Antenna
Connector
Connect the front, surround, center, and subwoofer speakers for
5.1-channel surround sound.
Connect to a receiver or other device capable of decoding digital audio
streams.
Connect to a TV or other display equipped with composite video input.
Connect the FM antenna to receive FM radio signals.
www.cobyusa.com Page 11
Page 12
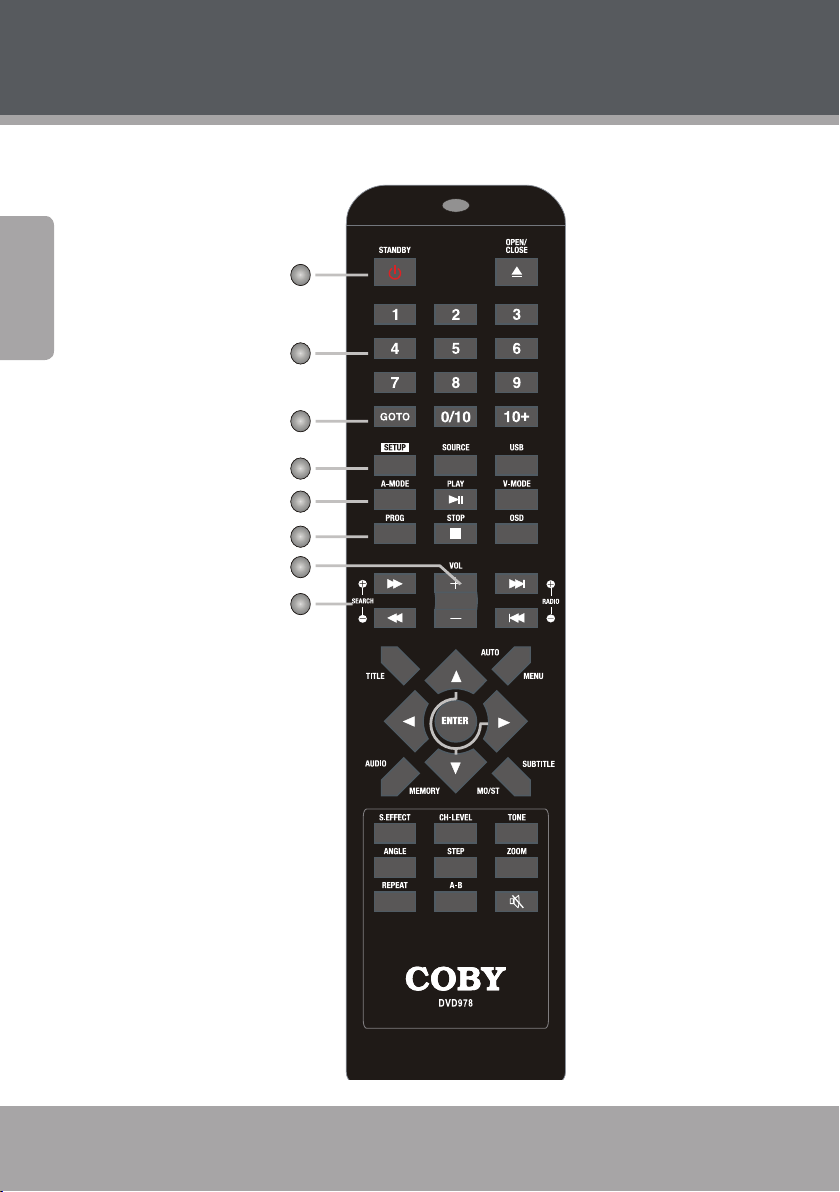
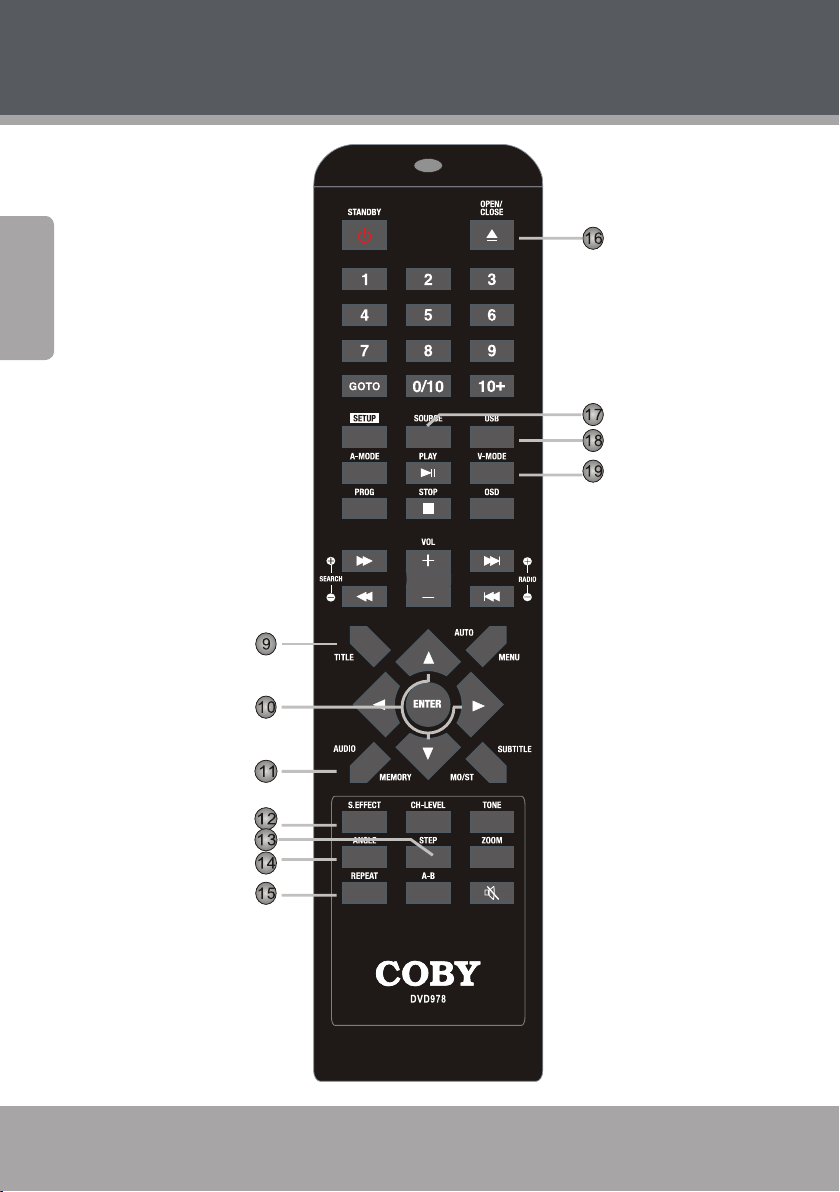
At a Glance
Remote Control
English
Page 12 Coby Electronics Corporation
Page 13
At a Glance
Name Description
1 POWER Turn the unit on or o (standby).
2 Numeric
Keypad
3 GOTO <GOTO> Enter Direct Access mode to go to a specic part of a movie.
4 SETUP <SETUP> Enter the main setup menu of the system.
5 Audio Out-
put Mode
6 Program <PROG> Enter Program mode to create a custom playlist.
7 Volume + <VO L+> Increase the volume level.
Volume – <VOL–> Decrease the volume level.
8 Forward /
Search +
Reverse /
Search –
<1-9, 0/10> Use the numeric keypad to input numbers where appropri-
ate.
<+10> Add 10 to input numbers higher than 10. For example, press
<+10> twice and then press <5> to input the number “25”.
Use the numeric keypad and navigation keypad to enter a
specic title or chapter to go to.
<A-MODE> Press to switch the audio mode between 5.1-CHANNEL
OUTPUT and STEREO OUTPUT.
[Video & Music] Change the forward play speed to scan
quickly through a track.
<SE ARC H+> [Radio] Tune to a higher station frequency.
[Video & Music] Change the reverse play speed to scan
quickly through a track.
English
< SEARCH–> [Radio] Tune to a lower station frequency.
9 Title <TITLE> [DVD] Access the DVD Title menu.
www.cobyusa.com Page 13
Page 14
At a Glance
English
Page 14 Coby Electronics Corporation
Page 15
At a Glance
Name Description
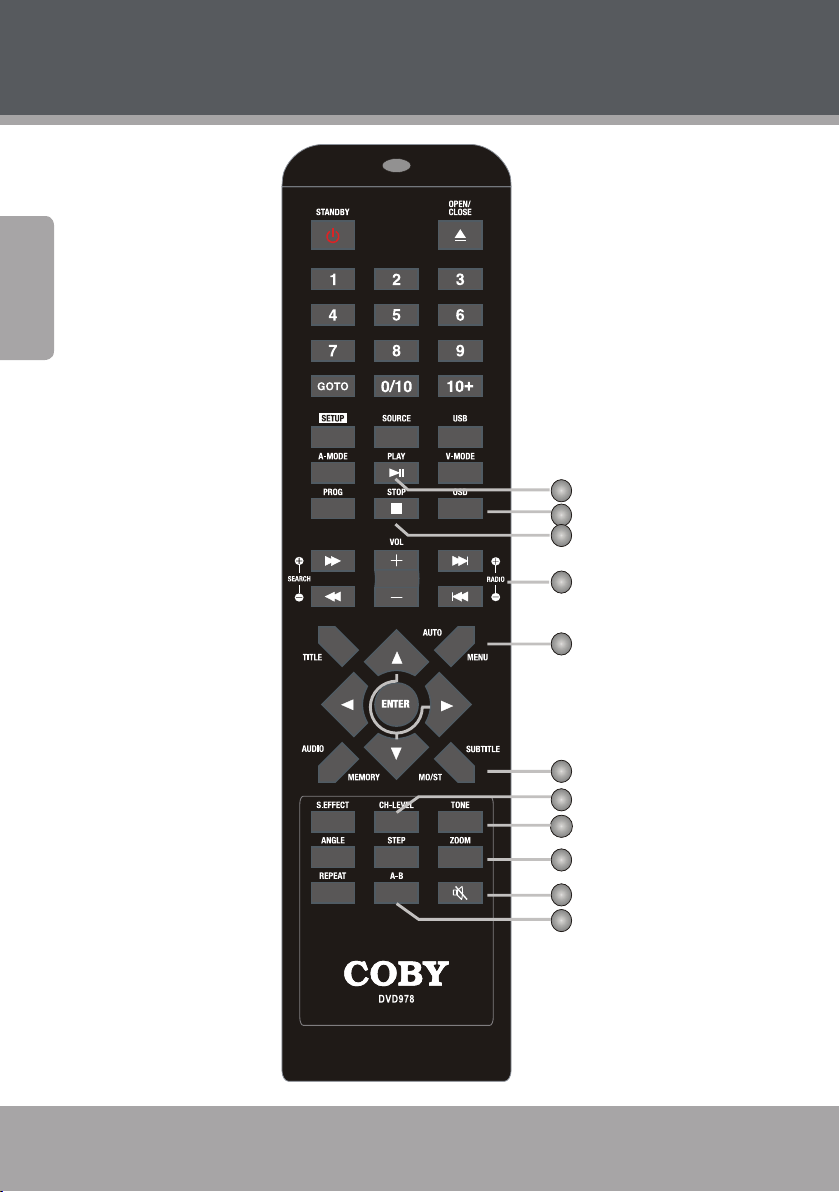
10 Navigation
Keypad
11 Audio <AUDIO> [DVD] Change the DVD audio channel (requires a DVD
Memory <MEMORY> [Radio] Manually save the current frequency as a preset
12 Sound
Eect
13 Step <STEP> [DVD} Play DVD video frame by frame.
14 Angle <ANGLE> [DVD] Change the angle view (requires a DVD mastered
15 Repeat <R EPEAT> Change the repeat playback options.
16 Open/Close <OPEN/
17 Source <SOURCE> Change the source input mode of the unit (e.g., DVD-
<L EFT>
<R IGHT>
<UP>
<DOWN>
<ENTER> Select a menu option.
<S.EFFECT> Change the sound eect options.
CLOSE>
Browse on-screen menu options.
mastered with multiple audio channels).
station.
with multiple camera angles).
Open/Close the disc tray.
VIDEO, LINE, TUNER).
English
18 USB <USB> When the system is in DVD-VIDEO mode, press to change
the source input mode between DVD and USB.
19 Video
Mode
www.cobyusa.com Page 15
<V-MODE> Change the video output mode of the unit to match
the video connection used. Select HDMI for HDMI video
(1080p/720p, 1080i, or 480p); select CVBS for composite
video (480i).
Page 16
At a Glance
English
Page 16 Coby Electronics Corporation
Page 17
At a Glance
Name Description
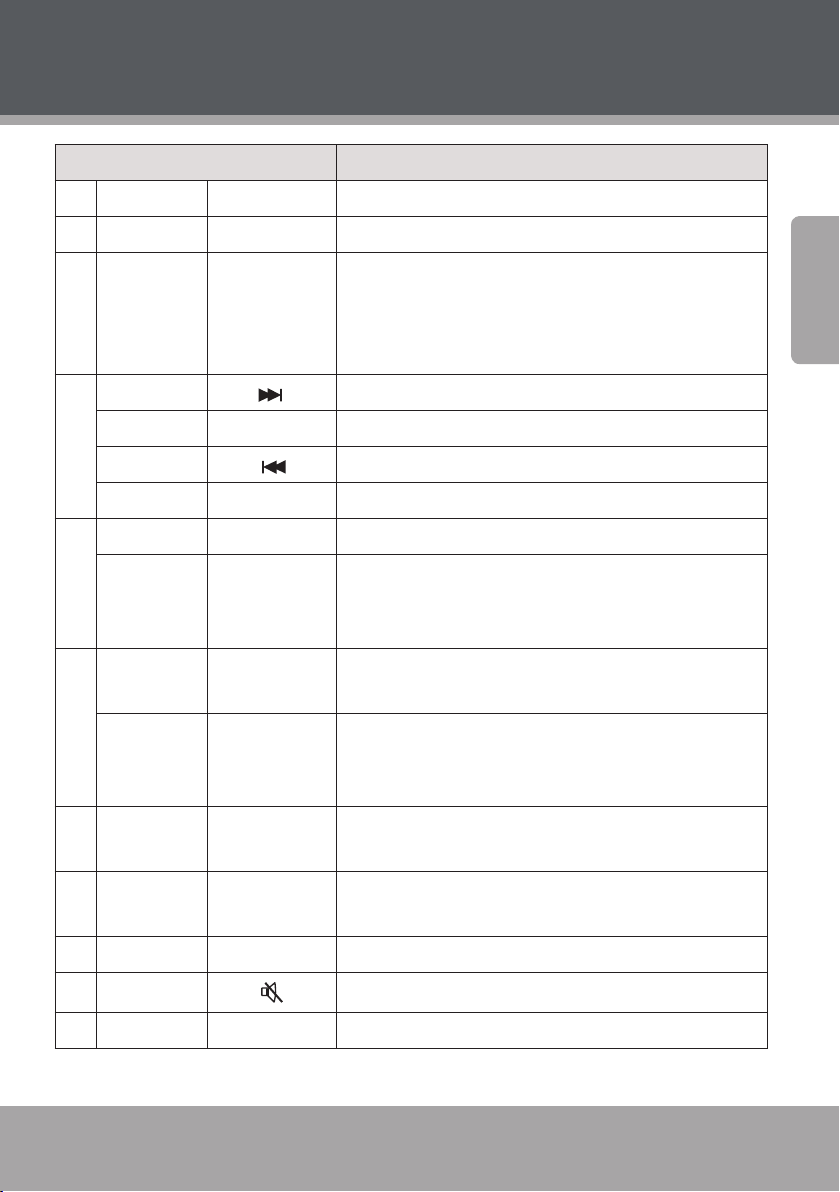
20 PLAY/ PAUSE <PLAY> Start or pause playback.
21 OSD <OSD> Toggle on-screen information display.
22 STOP <STOP> Press once to stop disc playback. The player will save and
resume playback from the stop location.
Press twice to stop disc playback completely. The player
will resume playback from the beginning of the disc.
23 Next [Video & Music] Skip to the next track.
Radio + < RAD IO +> [Radio] Tune to a higher station preset.
Previous [Video & Music] Skip to the previous track.
Radio – <R ADI O–> [Radio] Tune to a lower station preset.
24 Menu <MENU> [DVD] Access the DVD Root menu.
Auto <AUTO> [Radio] Automatically scan for and save stations within
reception as preset stations. Using this function will
over-ride and erase all previously saved presets.
25 Subtitle <SUBTITLE> [DVD] Change the subtitle display (requires a DVD mas-
tered with multiple subtitles).
English
Mono/Ste-
reo
26 Channel
Level
27 Tone <TONE> Adjust the bass and treble tone levels (use in conjunc-
28 Zoom <ZOOM> [DVD] Use the picture zoom feature.
29 Mute Temporarily disable the sound.
30 Repeat A-B <A-B> Use the Repeat A-B function to create a playback loop.
www.cobyusa.com Page 17
<M O/ST> [Radio] Change between mono and stereo reception
modes. Use mono mode for stations with weak reception.
<CH-LEVEL> Adjust the audio channel levels (use in conjunction with
<VOL+> and <VOL–>.
tion with <VOL+> and <VOL–>).
Page 18
At a Glance
Using the Remote Control
The remote control transmits a directional infrared beam. Be sure to aim
the remote control directly at the infrared remote sensor during opera-
English
tion. The sensor may not be able to receive signals properly if the sensor
is covered, if there is a large object between the remote control and the
sensor, or if it is exposed to direct sunlight or a strong articial light (e.g.,
uorescent or strobe lights). If possible, change the position of the light
source or reposition the unit to avoid direct lighting.
To use the remote, point it at the remote sensor of the player. Operate
the remote within feet of the sensor and at an angle of ± degrees.
Battery Installation
1. Remove the battery compartment cover located on the rear of the
remote control.
2. Insert two (2) “AAA” batteries, making sure to match their polarities
(+/-) to the markings on the inside of the compartment.
3. Replace the cover.
Batteries in the remote will last for approximately 1 year. Replace
the batteries if the remote control does not work. Always dispose
of batteries according to your local municipal regulations.
The batteries used in the remote control may present a re or
chemical burn if mistreated. Do not recharge, disassemble, incinerate, or heat the battery (~212°F). Do not mix old with new
batteries, or dierent types of batteries. Remove the batteries
from the remote if it will not be used for a long period of time.
Keep batteries away from children.
Page 18 Coby Electronics Corporation
Page 19
Connections
Video System
Choose the best available video connection. Avoid using more than
one connection at the same time to prevent signal interference. The
video settings of the unit must match the video connection used. Press
<V-MODE> on the remote to change the video setting, or change the
video settings in the System Setup menu (please refer to the System
Setup section of this manual for more information).
English
www.cobyu sa.com Page 19
Page 20
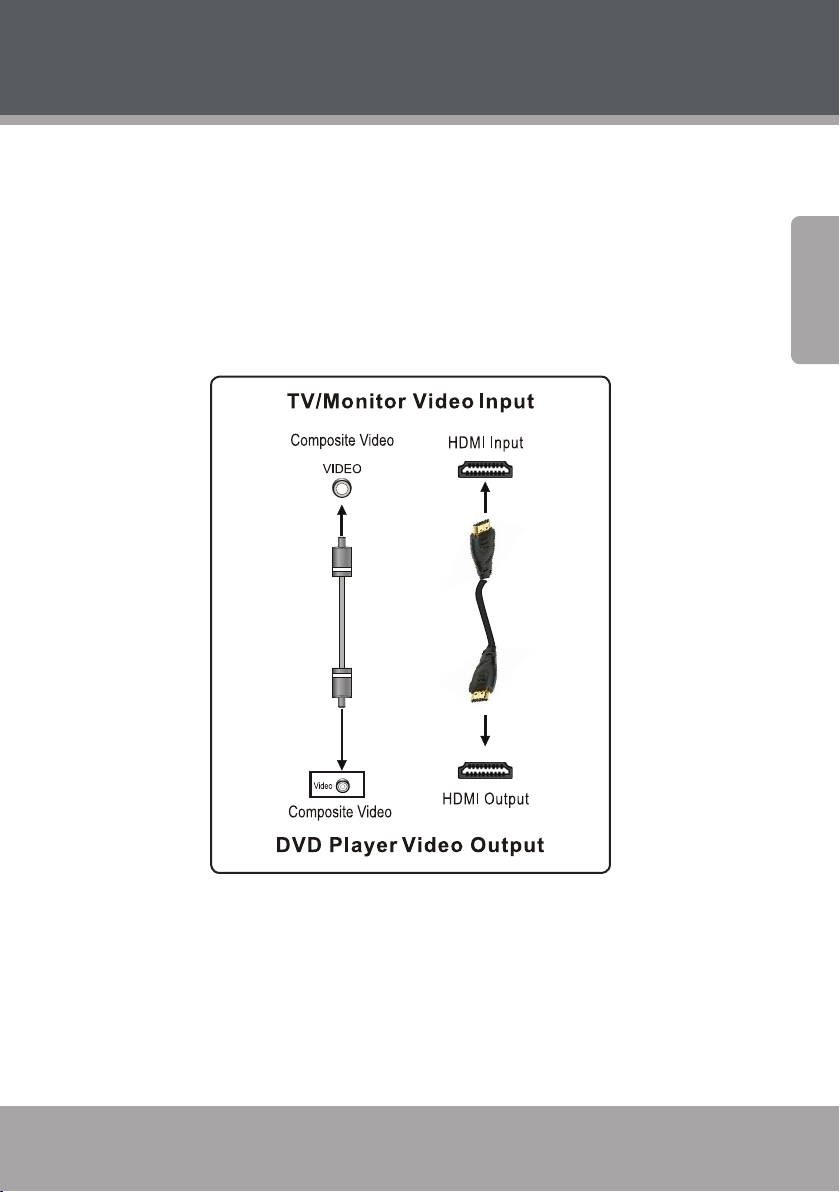
Connections
Composite Video Out (Standard)
Using the supplied AV cable:
1. Connect one end of the yellow cable to the yellow Video Out jack of
English
the unit.
2. Connect the other end of the yellow cable to the yellow Video In
jack of a TV.
Press <V-MODE> on the remote until you see “CVBS” on the TV
screen to set the unit to the composite video mode.
The maximum output resolution for the composite video con-
nection is 480i.
HDMI Video Out (Best)
HDMI output presents the highest possible resolutions and video quality. If an HDMI input jack is present on your television, use it.
1. Connect one end of an HDMI cable (not supplied) to the HDMI
output of the player.
2. Connect the other end of the HDMI cable to the HDMI input of your
TV/monitor.
You may also press <V-MODE> on the remote until you see
“HDMI” on the TV screen to set the unit to the HDMI video mode.
The maximum output resolution for the HDMI video connection
is 1080p.
Page 20 Coby Electronics Corporation
Page 21
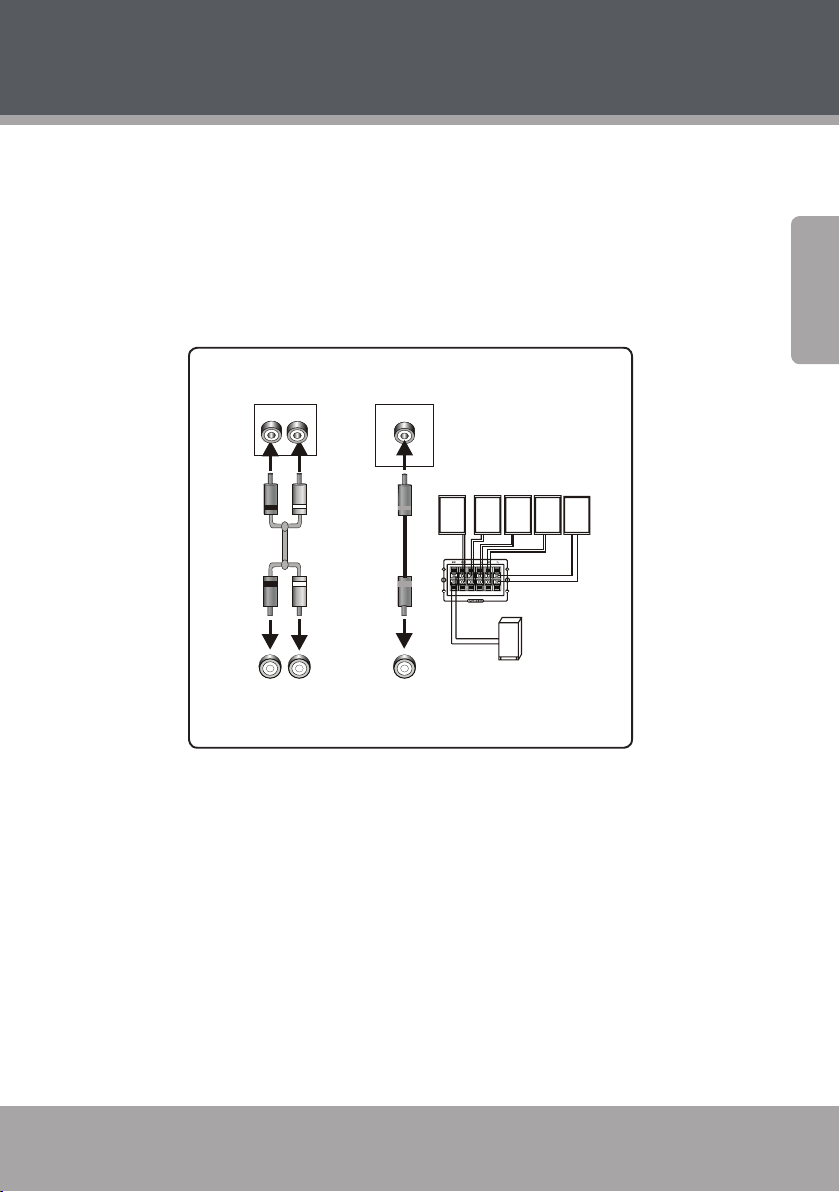
Connections
TV/Monitor/Amplier Audio Input
DVD Audio Output
SUBWOOFER
FR S P EAKER
SL SPEAKE R
S R SPEAKER
CENTER SPEAKER
Speake r Output
FL S P EAKER
&2$;,$/
&2$;,$/
'LJLWDO$XGLR2 XWSXW
'LJLWDO$XGLR,QSXW
5
/
/
5
&+$XGLR2XWSXW
&+$XGLR,QSXW
Audio System
Choose the best available audio connection. Avoid using more than one
connection at the same time to prevent signal interference. The audio
settings of the unit must match the audio connection used. Change the
audio settings in the System Setup menu (please refer to the System
Setup section of this manual for more information).
English
www.cobyusa.com Page 21
Page 22
Connections
Speakers
This unit has an integrated amplier. Connect the supplied speakers to
enjoy your movies with .-channel surround sound!
English
The speaker cables and the terminals located on the rear of the
DVD are color-coded for your convenience. The chart below
shows the terminal each speaker should be connected to.
Plug each speaker to its corresponding terminal. The tab on each
of the cables should face up; the cables will click into place when
they have been inserted correctly.
Terminal Speaker Color
SW Subwoofer Black
CEN Center Yellow
SR Surround Right Blue
SL Surround Left Gray
FR Front Right Red
FL Front Left White
Disconnect the power cord from the wall outlet before making
any connections. The cables plug into the terminals in one direction only. Do not force the cables into the terminals.
Coaxial Digital Audio Out (Optional, Best)
For use with a digital decoding external amplier/audio system. Using
an optional coaxial digital audio cable:
1. Connect one end of the coaxial cable to the black Digital Audio Out
jack of the unit.
Page 22 Coby Electronics Corporation
Page 23
Connections
2-CH AUDIO OUTPUT
LINE IN
L R
L R
DVD Audio Input
Audio Output of Extra Devices
2. Connect the other end of the coaxial cable to the Digital Audio In
jack of an external audio system.
Please refer to the documentation included with your external
audio system for further help using this connection.
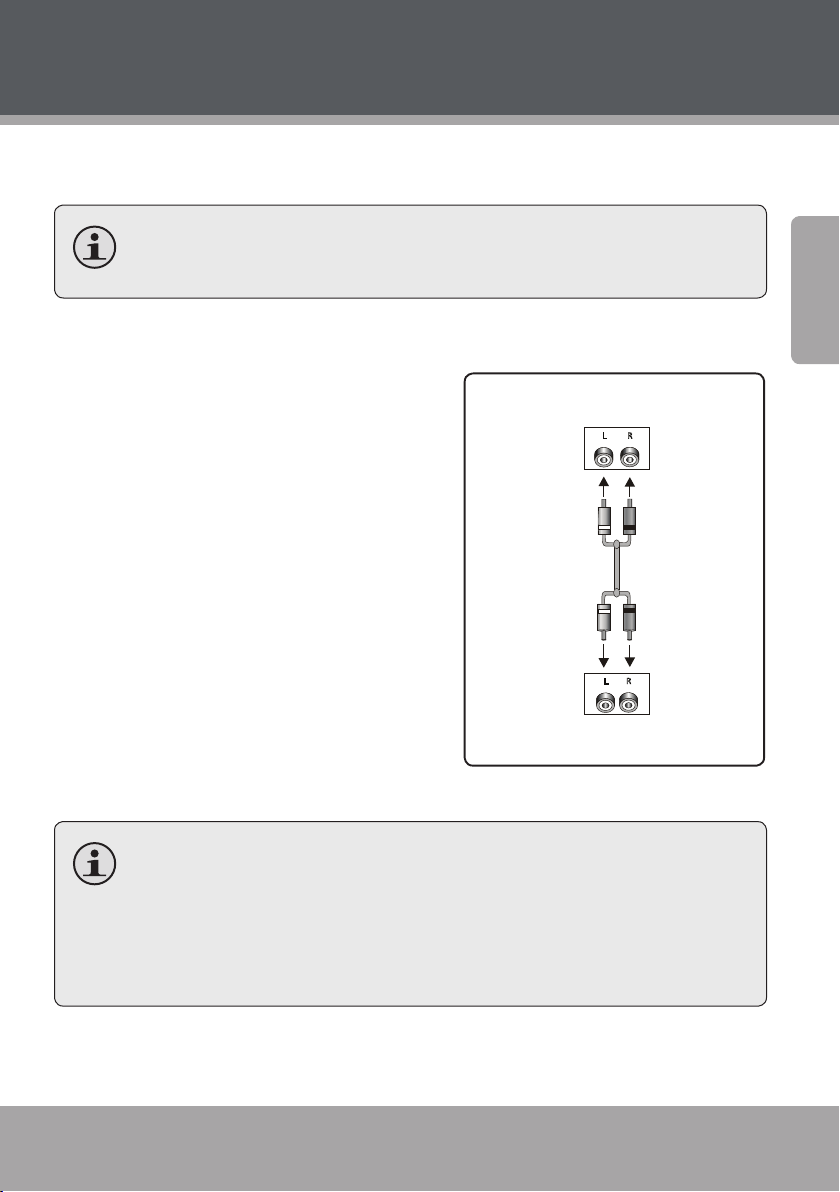
Stereo Line Input
For use with an external playback
device with stereo audio output (e.g.,
a VCR, MP, or CD player). Using an
optional RCA stereo audio patch cable:
1. Connect one end of the white and
red cables to the white and red Line
Input jacks of the unit (L, R).
2. Connect the other end of the cable
to the output jack(s) of an external
audio playback device.
English
After this connection has been made,
press <SOURCE> on the remote to
switch to “LINE” mode to enjoy audio
from the external device.
Depending on the type of patch cable used, you can use this
connection with external devices with a 3.5mm stereo output
jack or RCA stereo output jacks.
Please refer to the documentation included with your external
audio system for further help using this connection.
www.cobyusa.com Page 23
Page 24
Connections
Power Supply & Installation
Power Supply
English
Plug the power cord of this unit into an AC -V Hz wall outlet,
only. Make all video, speaker, and audio connections before con-
necting the power.
Do not connect the power plug to a power outlet other than that
which is indicated here and on the rating label as this may result
in the risk of re or electric shock.
Do not handle the power plug with wet hands. Doing so may
cause electric shock.
Power Management
If the unit will not be in use for a long period of time, turn the unit o
and unplug it from the AC power supply, and remove the batteries from
the remote control.
Installation
Install the unit on a level, at and rm surface with good ventilation.
Never block the cabinet vents; blocked vents will cause the unit to
overheat and malfunction.
Do not install the unit in a place exposed to heating sources or direct
sunlight.
Do not install the unit in a place exposed to moisture or rain.
Page 24 Coby Electronics Corporation
Page 25
Getting Started
Turning the Unit On
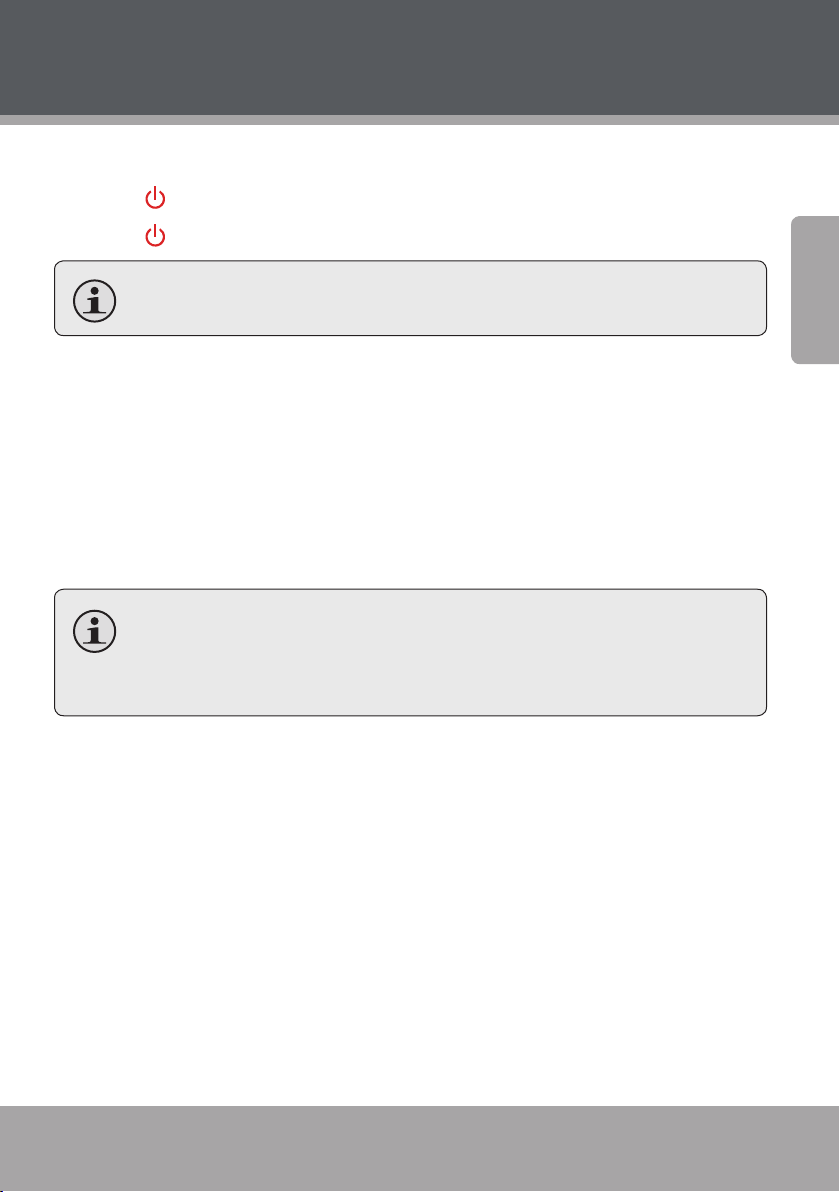
1. Press to turn the player on.
2. Press to turn the player o and place it in standby.
Unplug the system from power to turn it o completely.
Select the TV Input Source
1. Press <V-MODE> on the remote to set the video mode that corresponds to the video connection used (e.g., HDMI or Composite
video). See the Connections section for details.
2. Set your TV to display the input that the DVD978 is connected to
(e.g., HDMI, AV1, Composite, etc.) The Coby logo will be displayed on
the TV screen when the proper input has been selected.
TVs usually have a button labeled “Source” or “Input” that will
change its input source when pressed. To learn how to change
the input source of your TV, refer to its instruction manual.
Select the DVD978 Source Mode
For more information about each of the source modes, please refer to
their respective sections in this manual.
Press <SOURCE> on the remote to switch between DVD-VIDEO,
TUNER, and LINE modes.
English
Select DVD-VIDEO mode to play optical discs from the disc tray
(e.g., DVD, CD).
Select TUNER to enjoy FM radio broadcasts.
www.cobyusa.com Page 25
Page 26
Getting Started
Select LINE mode to enjoy audio from an external device con-
nected to the LINE IN jacks (optional).
Press <USB> to switch between USB and DVD-VIDEO modes.
English
Select USB to play digital media from USB ash memory drives
connected to the USB Port.
USB mode is available only when the system is in DVD-VIDEO
mode. Press <SOURCE> to switch to DVD-VIDEO mode rst, then
press <USB> on the remote to change between USB and DVDVIDEO modes.
Load a Disc (or other media)
Press <OPEN/CLOSE> to open the disc tray. Insert a disc with the labelside up. Press <OPEN/CLOSE> again to close the disc tray.
If a single-sided disc is inserted upside-down, the unit will display
“NO DISC” or “BAD DISC”.
To play from media other than a disc, connect a USB ash drive,
then press <USB> on the remote to change to USB mode.
Basic Playback Instructions
Press <PLAY> to start playback.
Some discs may start playing automatically or display a DVD menu
specic to the disc. If a menu appears, use the <Navigation Keypad> to
select a desired feature or option and then press <ENTER> to conrm.
Play/Pause/Stop
Press <PLAY> to play the disc for the rst time
Page 26 Coby Electronics Corporation
Page 27
Getting Started
To pause playback, press <PLAY>. Press <PLAY> again to resume
playback.
To stop playback, press <STOP> once during playback (“Pre-Stop”).
The system will remember when you stopped the disc and playback
will resume from that point when you press <PLAY>.
To stop playback completely, press <STOP> twice during playback.
Playback will start from the beginning of the disc when you press
<PLAY> again.
Previous/Next (Skip)
Press to skip to the next track (DVD, CD, etc).
Press to return to the previous track (DVD, CD, etc).
Forward/Reverse (Scan)
Press to forward-scan through the current track. Each successive
press will change the scan speed. Press <PLAY> to resume normal
playback.
Press to reverse-scan through the current track. Each successive
press will change the scan speed. Press <PLAY> to resume normal
playback.
Step
Press <STEP> for frame-by-frame playback. Each successive press of
<STEP> will advance the video one frame. Press <PLAY> to resume
normal playback.
English
Audio will be muted during fast-forward, fast-reverse, and
stepped playback.
Repeat Playback
Press <REPEAT> to change the repeat playback mode.
www.cobyusa.com Page 27
Page 28
Getting Started
Adjusting the Sound
Press <VOL +> to increase the volume level.
English
Press <VOL –> to decrease the volume level.
Press to disable the sound. Press again to restore the sound to
the previous level.
Press <A-MODE> to toggle between audio output modes (.-chan-
nel surround and -channel stereo).
Press <CH-LEVEL> to select an audio channel to adjust and then use
the <VOL +>/<VOL –> keys to adjust the selected level.
Audio Channel TV Screen Display Screen
Front Left VOL_FL FL
Front Right VOL_FR Fr
Left Surround VOL_LS LS
Right Surround VOL_RS rS
Center VOL_CEN Cn
Subwoofer VOL_SW S_
All Channels VOL VL
When the Audio Mode is set to 2-channel stereo, only the
Front Left and Front Right channels can be adjusted.
Press <TONE> to select BASS or TREBLE and then use the <VOL
+>/<VOL –> keys to adjust the selected tone.
Press <S.EFFECT> to change the sound eects mode. Set the sound
eects mode to NORMAL when playing a Dolby .-channel disc to
avoid interference with Dolby Digital decoding.
Page 28 Coby Electronics Corporation
Page 29
Operation Modes
DVD/CD Discs
1. Press <SOURCE> to place the unit in DVD source mode (LOADING/
DVD-VIDEO will appear on screen).
2. Load a compatible DVD-video or CD-audio disc into the disc tray. A
content menu will appear on screen.
3. Press <PLAY> to start playback.
Some discs may start playing automatically or display a DVD
menu specic to the disc. If a menu appears, use the <Navigation
Keypad> to browse the menu options; press <ENTER> to select
an option.
Additional DVD Controls
See the Getting Started section for basic playback controls (Play/Pause,
Next/Forward, etc.)
On the remote… Function
Press <TITLE> Access the title menu of the DVD.
English
Press <MENU> Return to the root menu of the DVD.
Press <OSD> Change the on screen display of information.
Press <SUBTITLE> Change the subtitle display (requires a DVD mastered with mul-
tiple subtitles).
Press <AUDIO> Change the audio track (requires a DVD mastered with multiple
audio channels).
Press <ANGLE> Change the angle display (requires a DVD mastered with multiple
camera angles).
Press <ZOOM> Change the magnication level of the image. When the magnica-
tion level is greater than “1” (Zoom), use the Navigation Keypad to
pan across the image (up, down, left, right).
www.cobyusa.com Page 29
Page 30
Operation Modes
Digital Media Discs
1. Press <SOURCE> to place the unit in DVD source mode (LOADING/
English
DVD-VIDEO will appear on screen).
2. Load a disc with compatible MP3 les into the disc tray. A content
menu will appear on screen.
Menu Operation
Press the <UP> or <DOWN> arrows of the navigation keypad to browse
folders and les, then press <ENTER> to select a folder or to start playing
a le. (You can also use the numeric keypad to enter folders and les.)
Press or to skip to the previous or next menu page, respec-
tively.
Press the <LEFT> arrow to return to the previous folder level.
Press <PROG> to toggle between FOLDER and FILELIST view.
Press <MENU> to return to the content menu when playing a disc (if
available).
See the Getting Started section for basic playback controls (Play/
Pause, Next/Forward, etc.)
JPEG Picture Discs
1. Press <SOURCE> to place the unit in DVD source mode (LOADING/
DVD-VIDEO will appear on screen).
2. Load a JPEG picture CD into the disc tray; the unit will load the disc
contents automatically.
3. Press <STOP> to enter the thumbnail mode to preview the pictures.
Page 30 Coby Electronics Corporation
Page 31

Operation Modes
Thumbnail Mode Operation
To view a picture, use the navigation keypad to select a picture and
then press <ENTER>.
To start a picture slide show, use the navigation keypad to select the
“Slide Show” option and then press <ENTER>.
To go to the previous or next page, use the navigation keypad to
select the “Previous” or “Next” option, and then press <ENTER>.
To view a list of Remote Key functions, use the navigation keypad to
select the “Menu” option and then press <ENTER>. The remote key
functions are as follows:
On the remote… Function
Press <PLAY> Start or pause slideshow playback.
Press <PROG> Change the slide show transition eect. Available during a
slide show only.
Press or View the next or previous picture, respectively.
English
Press <STOP> Return to thumbnail mode.
Press <RIGHT> or <LEFT> Rotate the picture.
Press <UP> or <DOWN> Flip the picture.
Press <ZOOM> When viewing a picture, press <ZOOM> to activate zoom
mode, and then press or to increase or decrease the
magnication level, respectively.
• When the magnication level is above 100%, use the
navigation keypad to pan around the magnied picture.
• Press <ZOOM> again to exit and return to normal viewing mode.
www.cobyusa.com Page 31
Page 32

Operation Modes
USB Flash Drives
1. Press <SOURCE> to place the unit in DVD-VIDEO source mode
English
(LOADING/DVD-VIDEO will appear on screen).
2. Load a USB ash drive with compatible MP3 les into the USB port.
3. Press <USB> to place the unit in USB mode (USB will appear on
screen). The system will read the contents of the USB drive and a le
browser menu will appear on screen.
If the unit should freeze when reading a USB drive or memory
card, turn o the unit and unplug the power cord from the AC
outlet. When you turn the unit back on the unit will return to normal status. The USB drive or memory card may not be compatible; this unit will only read certied USB drives/memory cards.
Menu Operation
Press the <UP> or <DOWN> arrows of the navigation keypad to select a
folder or a le, then press <ENTER> to enter the selected folder or play
the selected le. (You can also use the numeric keypad to select and
conrm folders and les.)
Press or to skip to the previous or next menu page, respec-
tively.
Press the <LEFT> arrow to return to the previous folder level.
Press <PROG> to toggle between FOLDER and FILELIST view.
Press <MENU> to return to the le browser menu.
See the Getting Started section for basic playback controls (Play/
Pause, Next/Forward, etc.)
Page 32 Coby Electronics Corporation
Page 33

Operation Modes
Tuner (FM Radio)
Press <SOURCE> to place the unit in Tuner source mode (INPUT: TUNER
will appear on screen). Use the following remote keys to control the
tuner:
On the remote… Function
Press <MO/ST> Toggle between Mono and Stereo reception modes.
Use Mono reception to stabilize weak radio signals.
Press <MEMORY> To save a preset station:
• Tune to the desired station (e.g., “92.7”)
• Press <MEMORY>
• Use the numeric keypad to enter the desired twodigit preset station number (e.g., 02). The radio station “92.7” has now been saved as preset number 2.
Press <AUTO> Automatically scan for and save stations within
reception as preset stations. Using this function will
over-ride and erase all previously saved presets.
You may press <STOP> to interrupt the auto-scan
process.
Numeric Keypad Input a two-digit preset station number to tune to it
directly. (e.g., press <0> then <2> to tune to Preset
2; press <1> then <5> to tune to Preset 15.
Press <RADIO +> or < RADIO –> Tune to a higher or lower preset station number,
respectively.
English
Press < SEARCH +> or < SEARCH –> Tune to a higher or lower station frequency, respec-
tively.
www.cobyusa.com Page 33
Page 34

System Setup
Use the System Setup menu to adjust your player’s system options.
In DVD-VIDEO mode, press <SETUP> on the remote control to access
English
the System Setup menu.
Press the <LEFT> or <RIGHT> navigation keys to browse the setup
pages at the top of the menu (i.e., GENERAL, AUDIO, DOLBY, VIDEO,
PREFERENCE). Press <ENTER> to select a page and browse its menu
options.
Press <UP> or <DOWN> to browse the menu options. Press
<ENTER> to select an option or press <LEFT> to return to the previous menu level.
Press <SETUP> to exit the System Setup menu.
General Setup Page
TV Display
If the system is connected to an HDTV, select :. If it is connected to
a conventional TV set, select : PANSCAN or : LETTERBOX. The :
image will be displayed in full screen in its native aspect ratio.
: PANSCAN: The wide-screen image will be displayed on the screen
in its native aspect ratio with some part on the left and right cut o.
: LETTERBOX: The wide-screen image will be displayed in its native
aspect ratio with black bands on the upper and lower sections of the
screen.
:: If the unit is connected to a widescreen TV set, select this
option. The widescreen image will be displayed in full screen in its
native aspect ratio while the : image will be stretched out horizontally to t in the screen.
Page 34 Coby Electronics Corporation
Page 35

System Setup
Angle Mark
Set this item to ON. When a disc encoded with multiple camera
angles is playing, the angle mark will display on the screen. Then you
can view the video of dierent camera angles by pressing <ANGLE>
on the remote control.
Set this item to OFF to disable this function.
This function only works with those discs mastered with multiple
camera angles.
OSD Language
Set the language of the on-screen display and system menus with
this item.
Screen Saver
ON: If the image remains motionless on the screen for several min-
utes, (e.g., the disc is paused, stopped etc.,) a screen saver will appear
on the screen. You can press any key or button except <STANDBY>
to wake it up. The unit will go into the standby mode after about
minutes being in the screensaver mode. You can press <STANDBY>
to switch it on.
English
OFF: Disable the screen saver function.
Last Memory
ON: During playback or in the paused/stopped mode when you
open the disc tray, the unit will memorize the last playback time. The
next time that you insert the same disc and close the disc tray to
load the disc, the unit will play from the memorized point.
OFF: Disable the Last Memory function.
www.cobyusa.com Page 35
Page 36

System Setup
Closed Captions
Set this item to ON. When a disc is encoded with closed captions, the
closed captions will be shown on the screen.
English
Set this item to OFF to hide it. You can also press <SUBTITLE> on the
remote control to show or hide the closed captions.
This function only works with those discs encoded with closed
captions.
Audio Setup Page
Analog Audio Setup
Downmix
LT/RT: The .-channel audio is mixed into left and right channels and
is output via the front speakers.
STEREO: The .-channel audio is mixed into a stereo signal and is
output via the front speakers.
D SURROUND: This mode attempts to create a virtual surround ef-
fect with the front speakers.
.CH: Turn o the DOWNMIX mode and use all speakers. This option
should be selected for the DVD.
This function only applies to the Dolby AC -3 encoded 5.1-chan-
nel discs.
Page 36 Coby Electronics Corporation
Page 37

System Setup
Front, Center, Rear Speaker and Subwoofer
The options that are adjustable depend on which downmix mode has
been seelcted. To adjust all of the speakers, set DOWNMIX mode to
.CH.
The FRONT SPEAKER may be set to LARGE or SMALL (small is recom-
mended).
The CENTER SPEAKER may be set to LARGE, SMALL or OFF (small is
recommended).
The REAR SPEAKERS may be set to LARGE, SMALL or OFF (small is
recommended).
The SUBWOOFER may be set to ON or OFF.
If the speaker is set to LARGE, the output level will be higher than
that of SMALL.
If the speaker is set to SMALL, the output level will be lower than
that of LARGE.
If a speaker is set to OFF, no audio is output from it.
DIALOG
When DOWNMIX mode is set to LT/RT or STEREO, this item is available. Adjust
the value of this item to control the dialog volume (e.g., spoken audio).
English
When playing a disc encoded with 5.1 channels, this item can be
used to adjust the volume of the speakers.
www.cobyusa.com Page 37
Page 38

System Setup
D.R.C. (Dynamic Range Control)
You can set this item to AUTO, ON or OFF. When D.R.C. is set to on, the
system will automatically adjust the audio levels to minimize the dier-
English
ence between the softest sounds and the loudest sounds. The volume
will be reduced for loud sounds, and the volume will be increased for
quiet sounds.
Digital Audio Setup
Digital Output
Set this option to SPDIF/RAW or SPDIF/PCM to activate the coaxial digital
audio output connection.
SPDIF/OFF: There will be no digital audio signal output. (Coaxial o)
SPDIF/RAW: The digital audio signal output will be in its raw format.
This mode is usually used for DTS & Dolby Digital . signals.
SPDIF/PCM: The digital audio signal output will be in PCM format.
This mode is usually used for audio CD signals.
LPCM Out
When the DIGITAL OUTPUT option is set to SPDIF/PCM, this item is available.
Select a sample rating for the analog audio output. There are two options, KHz and KHz.
Use the standard 48 KHz option unless your amplier/receiver can
support a sample rate of 96 KHz over a coaxial digital connection.
Page 38 Coby Electronics Corporation
Page 39

System Setup
Channel Delay
Set the delay time for the center, rear speakers and the subwoofer.
You may need to set a delay to compensate for the difference in
audio propagation times caused by the distance of the speakers to
the listener.
Use the navigation keys <UP> or <DOWN> to select a speaker,
then use the navigation keys <LEFT> or <RIGHT> to adjust the
distance differential.
This unit does not support delays for when the distance between
the center or surround speakers and the listener are greater than
that between the front speakers and the listener.
In case the channel delay settings cannot match your speaker
conguration, set all distances to 0 cm.
Equalizer
English
Sound Mode
Select a sound mode in this item.
Bass Boost
Set it to ON to boost the bass sound.
Super Bass
Set it to ON for an extreme super bass sound eect
Treble Boost
Set it to ON to boost the treble sound.
www.cobyusa.com Page 39
Page 40

System Setup
D PROCESSING
D processing provides a virtual surround sound experience using just
two speakers.
English
PRO LOGIC II
This unit allows you to congure Dolby Pro Logic II to expand -channel
source audio into full -channel surround sound.
Pro Logic II functionality is eective only when DOWNMIX is set
to 5.1CH and DIGITAL OUTPUT is set to SPDIF/RAW.
PRO LOGIC II
This item is used to turn on or o the Pro Logic II processing.
ON: Pro Logic II processing is always on.
OFF: Pro Logic II processing is disabled
AUTO: Pro Logic II processing is on only when Dolby Pro Logic II
encoded content is detected.
When the Pro Logic II processing is turned o, all the following
items (MODE,PANORAMA, DIMENSION and CENTER WIDTH) are
unavailable.
Mode
This item is used to set the processing mode of Pro Logic II.
MUSIC: The surround experience is tailored for multi-channel
music playback.
Page 40 Coby Electronics Corporation
Page 41

System Setup
MOVIE: Emphasis is given to the center channel as two-channel
audio is decoded and played back into your surround system.
PRO LOGIC: This activates decoding and processing of the origi-
nal Dolby Pro Logic processing with mono-surround channel. We
recommend using the Dolby Pro Logic Movie mode instead of
this -channel surround format.
AUTO: Automatically selects processing mode based on the
input format.
Panorama
This item is used to turn on/o panorama mode and is available only
when MODE is set to MUSIC. When panorama mode is turned on,
the front stereo audio is partially fed into the surround channels for
an enveloping eect.
Dimension
This item is available only when MODE is set to MUSIC. This item
allows gradual adjustment of the soundeld either towards the front
or towards the rear. This is useful in setting a more even balance
from all speakers with some rooms.
English
Center Width
This item is available only when MODE is set to MUSIC. This item can
be used to control the width of the center channel sound eect by
blending the center speaker to the left and right speakers. As the
level number increases, the center channel sound moves toward the
left and right speakers.
Reverb Mode
Select a reverb effect mode.
www.cobyusa.com Page 41
Page 42

System Setup
HDCD
Enable High Denition Compatible Digital (HDCD) processing. For use
with HDCD audio discs.
English
High Denition Compatible Digital (HDCD) is a patented en-
code/decode process for delivering full, rich, detailed sound
from HDCD-encoded CDs.
Karaoke Setup
Adjust the microphone options. Connect microphones to the system to
sing over karaoke tracks.
MIC
Turn the microphone input connectors on or o.
MIC VOL
Adjust the microphone input level. Increase the level to make the microphone louder in the audio mix; decrease the level to make the microphone quieter.
ECHO LEVEL
Adjust the reverb eect level of the microphone.
Page 42 Coby Electronics Corporation
Page 43

System Setup
Dolby Digital Setup
Dual Mono
STEREO: The player outputs the left-channel audio and right-channel
audio via the FL and FR speaker respectively.
L-MONO: The player outputs the left-channel audio only via both the
FL and FR speaker.
R-MONO: The player outputs the right-channel audio only via both
the FL and FR speaker.
MIX-MONO: The player outputs the average signal of the left-chan-
nel and right channel audio via the FL speaker and the FR speaker.
This function only applies to Dolby AC -3 and 2-channel encod-
ed discs.
Dynamic
English
When you watch lms with large dynamic audio range at low volume (at
night, for example) you can increase the dynamic value to avoid losing
sonic detail resulting from the low volume.
www.cobyusa.com Page 43
Page 44

System Setup
Video Setup Page
Video Output
English
CVBS: Set the composite video signal format for the yellow video
output connector.
Resolution
Select the resolution of the video output signal to match your TV. If you
don’t know the native resolution and refresh rate of your TV, please refer
to the documentation provided by its manufacturer.
Select i/P for NTSC systems.
Select i/P for ATSC systems.
Select P, i, or P for HDTVs.
Select Hz resolutions in the United States; you may need to select
Hz resolutions in other parts of the world.
Color Setting
Sharpness
There are three options (HIGH, MEDIUM and LOW) for you to choose in
this item.
Brightness, Contrast, Hue and Saturation
Adjust the brightness, contrast, hue, and color saturation of the picture.
Page 44 Coby Electronics Corporation
Page 45

System Setup
HDMI Setup
About HDMI
HDMI (High-Denition Multimedia Interface) is the newest interface
for audiovisual equipment such as high-denition television and home
theater systems. With wires wrapped in a single cable that resembles
a USB wire, HDMI is able to carry a bandwidth of Gbps (gigabits per
second). This is more than twice the bandwidth needed to transmit
multi-channel audio and video, future-proong HDMI for some time to
come. This and several other factors make HDMI much more desirable
than its predecessors, component video, S-Video and composite video.
HDMI is an uncompressed, all-digital signal, while the aforementioned
interfaces are all analog. With an analog interface, a clean digital source
is translated into less precise analog, sent to the television, then converted back to a digital signal to display on screen. At each translation,
the digital signal loses integrity, resulting in some distortion of picture
quality. HDMI preserves the source signal, eliminating analog conversion
to deliver the sharpest, richest picture possible.
English
HDMI supports standard video formats, enhanced video and high-denition. It is also backwards compatible with DVI (Digital Video Interface).
High-end graphics cards featuring a DVI port can connect to a HDMI
interface via a DVI/HDMI cable. This is simply a cable with a DVI connector on one end and a HDMI connector on the other. As a rule, HDMI
cables should not run longer than feet ( meters), or degradation of
the signal could occur.
www.cobyusa.com Page 45
Page 46

System Setup
HDMI
Set this item ON or OFF to enable/disable the HDMI connection. You
may want to disable HDMI when it is not being used to avoid interfer-
English
ence with the composite video signal.
Preference Page
This setup page is available when there is no disc in the disc tray,
the disc tray is open, or when disc playback is stopped completely.
TV Type
This product supports both NTSC (National Television System
Committee) and PAL (Phase Alternating Line) television broadcasting
standards.
PAL: Select this mode if the unit is connected to a PAL-format TV
(used in China, Hong Kong, Europe, etc). It will convert the video
signal of an NTSC disc and output in PAL format.
AUTO: Select this mode to have the system detect the video signal
of the disc and match the video signal output format to it.
NTSC: Select this mode if the unit is connected to an NTSC-format TV
(used in Taiwan, America, Canada, etc). It will convert the video signal
of a PAL disc and output in NTSC format.
Selecting the wrong TV Type will cause the quality of the image
to be extremely poor. Be sure to select the correct TV Type.
PBC (Play Back Control)
ON: Activate the PBC function. When playing a disc encoded with PBC
function, press <MENU> to return to the PBC menu.
Page 46 Coby Electronics Corporation
Page 47

System Setup
OFF: Disable the PBC function.
This function only works with those discs encoded with PBC
function. DVD and CD formats do not support PBC menus.
Audio, Subtitle and Disc Menu
Select a preferred audio language, subtitle language and disc menu
language in these items. You can select the audio language by pressing
the <AUDIO> key and the subtitle language by pressing the <SUBTITLE>
key on the remote control.
If the selected language is not available for the disc, the disc’s
default setting will remain enabled.
Parental
This item allows the user to set a maximum rating for which viewing
is permitted. Movies rated higher than the level set cannot be viewed
without inputting the correct password. The password must also be
entered to reset or change the parental control level.
The default password is .
This function works only with those discs that are encoded with
a rating level.
English
www.cobyusa.com Page 47
Page 48

System Setup
Password
Password Mode
English
Switch the password function on/o.
You must key in the correct password and press <ENTER> to con-
rm before you change the option in this item. The default password is 136900.
Password
Change the password. You will need to enter the old password rst, and
then enter the new password twice.
The default password (136900) will always be recognized even if
the password has been changed or reset.
Default
Enter to restore all options to their factory-default state. The PARENTAL
settings and PASSWORD will not be reset.
Page 48 Coby Electronics Corporation
Page 49

Specications
Media Support DVD, DVD±R/RW, CD, CD±R/RW, USB Flash Drive
Format Support Video: MPEG-1, MPEG-2 (DVD), MPEG-4 (XviD)
Audio: CD, MP3
Photo: JPEG
Digital Audio Decoders Dolby Digital
DVD Video System NTSC/PAL
Tuner FM Range 87.5 MHz – 108 MHz
English
Amplier Power Output
(Max)
Frequency
Response
Connections Output HDMI
Input RCA stereo
Power Supply AC 100-240, 50/60Hz
Consumption 105W
Operating Environment
Specications and manual are subject to change without notice.
Temperature Approx -10º – +35º C (14º – 95º F)
Relative Humidity Approx 5% – 90%
15W x 5 (speakers)
30W x 1 (subwoofer)
20 – 20,000 Hz
Coaxial digital audio
Composite video
5.1-channel speaker
6.3mm microphone (x 2)
www.cobyusa.com Page 49
Page 50

Troubleshooting
If you have a problem with this device, please read the troubleshooting
guide below and check our website at www.cobyusa.com for Frequently
Asked Questions (FAQs) and rmware updates. If these resources do not
resolve the problem, please contact Technical Support.
English
Address
Coby Electronics Technical Support
150 Knowlton Way
Savannah, Georgia 31407
Email
techsupport@cobyusa.com
Web
www.cobyusa.com
Phone
800-727-3592: Monday to Friday, :AM–:PM EST
Saturday, :AM–:PM EST
Page 50 Coby Electronics Corporation
Page 51

Troubleshooting
Symptom Cause Remedy
No Power The AC power cord is not
connected to the power
supply or is not connected
securely
There is no picture
or the picture is
distorted
There is no sound or
the sound is distorted
The Video Input mode of
the connected TV is set
incorrectly.
The Video Output mode is
set incorrectly.
The video cable connection is loose.
The audio cable connections are loose.
The volume is set at the
lowest level.
The sound is switched o
(MUTE is active).
Please check that the AC power cord is
connected securely.
Set the TV to the correct source mode.
Most TVs have a “Source,” “Input,” or
“TV/Video” button that changes the
source mode. Please refer to the documentation provided by the TV manufacturer for further assistance.
Press <V-MODE> repeatedly until the
picture becomes normal again.
Connect the video cable securely.
Connect the audio cables securely.
Turn up the volume.
Press [MUTE] on the remote control to
re-enable the sound.
English
The disc is in forward or
reverse scan mode.
www.cobyusa.com Page 51
Press [PLAY] to resume normal playback.
Page 52

Troubleshooting
Symptom Cause Remedy
Unable to play a disc The disc is loaded incor-
English
The buttons on the
unit don't work
The remote control
does not function
rectly in the disc tray
The disc is incompatible
with the unit.
The rating of the disc is
higher than permitted
by the parental control
rating.
System Setup menu. Clean the disc.
Static electricity may have
interfered temporarily
with the operation of the
unit.
There are no batteries in
the remote control.
The batteries have lost
their charge.
Check that the disc is placed in the disc
tray with its label side upwards.
Load a compatible disc. Refer to the
About Optical Discs section of this
manual to review disc compatibility
requirements.
Reset or lower the Parental Control settings in the
Switch o and unplug the unit. Then connect the unit to the AC supply and switch
it on again
Install two AAA/1.5V batteries in the
remote.
Replace the batteries with new ones.
The remote control isn't
pointed at the remote
sensor.
The remote control is beyond its working distance.
The unit has shut down. Switch the unit o and disconnect it from
Page 52 Coby Electronics Corporation
Make sure that there are no large objects
between the remote control and the sensor on the front panel of the unit.
Make sure the remote control is within 15
feet of the sensor.
the AC outlet. Then, reconnect the power
and switch it on again.
Page 53

Troubleshooting
Symptom Cause Remedy
The player freezes
when a USB drive
is connected to the
player
The USB drive is not compatible with this system.
If the player should freeze or otherwise
malfunction, switch it o and unplug it
from the AC power outlet. Remove the
incompatible USB drive. Then, reconnect
the power and switch it on again. The
player will return to normal operation.
English
www.cobyusa.com Page 53
Page 54

Safety Notices
English
The lightning ash with arrowhead symbol within an equilateral triangle is
intended to alert the user to the presence of uninsulated “dangerous voltage”
within the product’s enclosure that may be of sufcient magnitude to constitute a
risk of electric shock.
The exclamation point within an equilateral triangle is intended to alert the user
to the presence of important operation and servicing instructions in the literature
accompanying the appliance.
On Protection Against Laser Energy Exposure
• As the laser beam used in this product is harmful to the eyes, do not attempt to disassemble
the casing.
• Stop operation immediately if any liquid or solid object should fall into the cabinet.
• Do not put anything in the safety slot. If you do, the laser diode will be ON when the disc compartment door is still open.
• If the unit is not to be used for a long period of time, make sure that all power sources are
disconnected from the unit. Remove all batteries from the battery compartment, and unplug the
AC-DC adapter from the wall outlet. Make it a practice to remove the AC-DC adapter by grasping the main body and not by pulling the cord.
• This unit employs a laser. The use of controls or adjustment or performance of procedures
other than those specied here may result in exposure to hazardous radiation.
Page 54 Coby Electronics Corporation
Page 55

Safety Notices
Important Safety Instructions
1. Read Instructions: All the safety and operating instructions should be read
before the product is operated.
2. Retain Instructions: The safety and operating instructions should be retained for future reference.
3. Heed Warnings: All warnings on the product and in the operating instructions should be adhered to.
4. Follow Instructions: All operating and usage instructions should be followed.
5. Cleaning: Unplug this product from the wall outlet before cleaning. Do not
use liquid cleaners or aerosol cleaners. Use a damp cloth for cleaning.
6. Attachments: Use only attachments recommended by the manufacturer.
Use of other attachments may be hazardous.
7. Water and Moisture: Do not use this product near water (e.g., near a bath
tub, washbowl, kitchen sink, laundry tub, in wet basements, or near a swimming pool and the like).
8. Accessories: Do not place this product on an unstable cart, stand, tripod, bracket, or table. Use
only with carts, stands, tripods, brackets, or tables
recommended by the manufacturer or sold with the
product. Any mounting of the product should follow
the manufacturer’s instructions and should use a
mounting accessory recommended by the manufacturer. A product and cart combination should be moved
with care. Quick stops, excessive force, and uneven surfaces may cause
the product and cart combination to overturn.
9. Ventilation: Slots and openings in the cabinet are provided for ventilation to
ensure reliable operation of the product and to protect it from overheating.
These openings should never be blocked by placing the product on a bed,
sofa, rug, or other similar surface. This product should not be placed in a
built-in installation such as a bookcase or rack unless proper ventilation is
provided or the manufacturer instructions have been adhered to.
English
www.cobyusa.com Page 55
Page 56

Safety Notices
10. Power Sources: This product should be operated only from the type of
power source indicated on the rating label. If you are not sure of the type
of power supply to your home, consult your product dealer or local power
company. For products intended to operate from battery power or other
English
sources, refer to the operating instructions.
11. Grounding or Polarization: This product may be equipped with a polarized
alternating-current line plug that has one blade wider than the other. This
plug will only t into the power outlet in one direction. This is a safety feature. If you are unable to insert the plug fully into the outlet, try reversing
the direction of the plug. If the plug should still fail to t, contact an electrician to replace the obsolete outlet. Do not defeat the safety purpose of the
polarized plug.
12. Power-Cord Protection: Power supply cords should be routed so that they
are not likely to be walked on or pinched by items placed upon or against
them, paying particular attention to cords at plugs, convenience receptacles, and at the point which they exit from the product.
13. Protective Attachment Plug: The product may be equipped with an attachment plug with overload protection. This is a safety feature. See the operating instructions for replacement or directions to reset the protective device.
If replacement of the plug is required, be sure the service technician has
used a replacement plug that has the same overload protection as the origi-
nal plug as specied by the manufacturer.
14. Outdoor Antenna Grounding: If an
outside antenna is connected
to the product, be sure the antenna system is grounded so
as to provide some protection against voltage surges
and built-up static charges.
Article 810 of the National
Electrical Code, ANS/NFPA
70 provides information with
regard to proper grounding of
the mast and supporting structure,
grounding of the lead-in wire to an antenna-discharge unit, size of grounding conductors, location of antenna-discharge unit, connection to ground-
ing electrodes, and requirements for the grounding electrode (see gure).
Page 56 Coby Electronics Corporation
Page 57

Safety Notices
15. Lightning: For added protection for this product, unplug it from the wall
outlet and disconnect the antenna or cable system during a lightning storm
or when it is left unattended and unused for long periods of time. This will
prevent damage to the product due to lightning or power-line surges.
16. Power Lines: An outside antenna system should not be located in the vicinity of overhead power lines or other electric light or power circuits, or
where it can fall into such power lines or circuits. When installing an outside
antenna system, extreme care should be taken to keep from touching such
power lines or circuits, as contact with them might be fatal.
17. Overloading: Do not overload wall outlets, extension cords, or integral con-
venience receptacles as this can result in a risk of re or electric shock.
18. Object and Liquid Entry: Never push objects of any kind into this product
through openings as they may touch dangerous voltage points or shout-out
parts that could result in a re or electric shock. Never spill liquid of any kind
on the product.
19. Servicing: Do not attempt to service this product yourself as opening or
removing covers may expose you to dangerous voltage or other hazards.
Refer all servicing to qualied service personnel.
20. Damage Requiring Service: Unplug this product from the wall outlet and re-
fer servicing to qualied service personnel under the following conditions:
a) when the power-supply or plug is damaged; b) if liquid has been spilled
or if objects have fallen into the product; c) if the product has been exposed
to rain or water; d) if the product does not operate normally by following the
operating instructions. Adjust only those controls that are covered by the
operating instructions as improper adjustment of other controls may result
in damage and will often require extensive work by a qualied technician
to restore the product to its normal operation; e) if the product has been
dropped or damaged in any way; f) when the product exhibits a distinct
change in performance—this indicates a need for service.
21. Replacement Parts: When replacement parts are required, be sure that
your service technician has used replacement parts specied by the manufacturer or have the same characteristics as the original part. Unauthorized
substitutions may result in re, electric shock, or other hazards.
22. Safety Check: Upon completion of any service or repairs to this product,
ask the service technician to perform safety checks to ensure that the product is in proper operating condition.
English
www.cobyusa.com Page 57
Page 58

Safety Notices
23. Wall or Ceiling Mounting: The product should be mounted to a wall or ceiling only as recommended by the manufacturer.
24. Heat: The product should be situated away from heat sources such as ra-
English
diators, heat registers, stoves, or other products (including ampliers) that
produce heat.
WARNING: To prevent re or shock hazard, do not expose this device to rain or
moisture. Dangerous high voltage is present inside the enclosure. Do not open the
cabinet.
CAUTION: To prevent electric shock, match wide blade of plug to wide slot of outlet
and fully insert.
For recycling or disposal information about this product, please contact
your local authorities or the Electronics Industries Alliance: www.eiae.org.
Page 58 Coby Electronics Corporation
Page 59

Safety Notices
FCC Statement:
This device complies with Part 15 of the FCC Rules. Operation is subject to the following two
conditions: (1) This device may not cause harmful interference, and (2) This device must accept
any interference received, including interference that may cause undesired operation.
Note: This equipment has been tested and found to comply with the limits for Class B digital
devices, pursuant to Part 15 of the FCC rules. These limits are designed to provide reasonable
protection against harmful interference in a residential installation. This equipment generates,
uses and can radiate radio frequency energy and, if not installed and used in accordance with
the instructions, may cause harmful interference to radio communications. However, there is no
guarantee that interference will not occur in a particular installation. If this equipment does cause
harmful interference to radio or television reception, which can be determined by turning the
equipment off and on, the user is encouraged to try to correct the interference by one or more of
the following measures:
• Reorient or relocate the receiving antenna.
• Increase the separation between the equipment and receiver.
• Connect the equipment into an outlet on a circuit dierent from that to which the receiver is
connected.
• Consult the dealer or an experienced radio/TV technician for help.
English
Use of shielded cable is required to comply with Class B limits in Subpart B of Part 15 of the FCC
rules.
Do not make any changes or modications to the equipment unless otherwise specied in the
manual. If such changes or modications should be made, you could be required to stop operation of the equipment.
www.cobyusa.com Page 59
Page 60

Índice
MUCHAS GRACIAS ............................................................ 63
Contenido de la caja .................................................................................................63
Características .............................................................................................................64
ACERCA DE LOS DISCOS ÓPTICOS .................................. 65
Requerimientos de los discos ................................................................................ 65
Características de los DVD ......................................................................................65
Códigos de región de los DVD .............................................................................. 66
Cuidado y mantenimiento de los discos ............................................................67
Español
Manipulación de un disco ........................................................................ 67
Limpieza de un disco ................................................................................. 67
PANORAMA GENERAL DE DVD978 ................................. 68
Panel delantero ..........................................................................................................68
Panel posterior............................................................................................................69
Remote Control ..........................................................................................................70
Acerca del control remoto ........................................................................76
Instalación de las baterías.........................................................................77
CONEXIONES ..................................................................... 78
Sistema de video ........................................................................................................78
Salida de video compuesto (Estándar).................................................79
Salida de video HDMI (La mejor) ............................................................ 79
Sistema de audio ........................................................................................................80
Altavoces ........................................................................................................ 80
Salida de audio digital coaxial (opcional, mejor) .............................. 82
Entrada de línea estéreo ...........................................................................82
Alimentación e instalación ..................................................................................... 83
Fuente de alimentación ............................................................................83
Manejo de la alimentación ....................................................................... 83
Instalación ......................................................................................................84
Page 60 Coby Electronics Corporation
Page 61

Índice
PARA EMPEZAR ................................................................. 85
Encendido de la unidad ........................................................................................... 85
Conguración de la fuente de entrada del televisor ..................................... 85
Selección del modo de fuente del DVD978 ......................................................86
Carga de un disco (u otro dispositivo) ................................................................86
Instrucciones de reproducción básica ................................................................ 87
Play/Pause/Stop (Reproducir/Pausa/Detener) ................................... 87
Anterior/Siguiente (Saltar) ........................................................................ 87
Retroceso/Avance (Buscar) ....................................................................... 88
Paso ..................................................................................................................88
Repetición de la reproducción................................................................88
Ajuste del sonido .......................................................................................................88
MODOS DE OPERACIÓN ................................................... 90
Discos DVD/CD............................................................................................................90
Controles adicionales del DVD ...............................................................90
Discos MP3 ................................................................................................................... 91
Operación de los menús ........................................................................... 91
Discos de imágenes JPEG ........................................................................................92
Operación del modo de vistas en miniatura ...................................... 92
Dispositivos USB con memoria ash ................................................................... 93
Operación de los menús ........................................................................... 94
Sintonizador (Radio FM) ..........................................................................................94
Español
CONFIGURACIÓN DEL SISTEMA ...................................... 96
Página de conguraciones básicas ...................................................................... 96
Tipo de Pantalla de Televisor ...................................................................96
Marca de ángulos ........................................................................................ 97
Idioma de visualización en pantalla ...................................................... 97
Salva pantallas .............................................................................................. 97
Última memoria ........................................................................................... 98
Subtítulos ....................................................................................................... 98
www.cobyusa.com Page 61
Page 62

Índice
Página de conguraciones de audio ...................................................................98
Conguración de audio analógico ........................................................ 98
Conguración de audio digital ............................................................. 101
Retardo de canal ........................................................................................ 102
Ecualizador ..................................................................................................103
PROCESAMIENTO 3D ................................................................................103
Conguración del karaoke .....................................................................106
Conguración del Dolby Digital ...........................................................106
Pagina de conguraciones de video .................................................................107
Español
Salida de video ........................................................................................... 107
Resolución ...................................................................................................107
Conguración de colores ........................................................................108
CONFIGURACIÓN DE HDMI ..................................................................................108
HDMI ..............................................................................................................109
Página de preferencias ...........................................................................................109
Tipo de TV .................................................................................................... 109
PBC (Control de reproducción) ............................................................. 110
Audio, subtítulos y menú del disco ..................................................... 110
Control de padres .......................................................................................111
Contraseña ..................................................................................................................111
Modo Contraseña .......................................................................................111
Contraseña....................................................................................................111
Predeterminado ......................................................................................... 112
ESPECIFICACIONES ..........................................................113
SOLUCIÓN DE PROBLEMAS
AVISOS DE SEGURIDAD Y REGULACIÓN
Page 62 Coby Electronics Corporation
............................................114
...................... 118
Page 63

Muchas Gracias
Felicitaciones por su compra de un Sistema Home Theater Coby. Este
manual está diseñado para ayudarle a aprender cómo utilizar y disfrutar
su nuevo sistema en los próximos años. Lea este manual cuidadosamente y guárdelo para referencias futuras.
Contenido de la caja
Asegúrese de que los elementos que se muestran más abajo estén
incluidos en el paquete. Si faltara algún artículo, comuníquese con el
minorista local a quien compró el producto
Unidad principal
Altavoces frontales (x)
Altavoces de sonido envolvente (x)
Altavoz central (x)
Altavoz de subwoofer (x)
Cable de video
Antena de FM
Control remoto
Dos () baterías “AAA”
Español
www.cobyusa.com Page 63
Page 64

Muchas Gracias
Características
REPRODUCTOR DE DVD DE 5.1 CANALES con AMPLIFICADOR
INTEGRADO
Compatible con DVD, DVD±R/RW, CD, CD-R/RW y JPEG
Reproduce archivos de medios digitales directamente desde memo-
rias ash USB
Español
Sintonizador digital FM integrado con memoria precongurada con
estaciones
Salida HDMI para la transmisión perfecta de señales digitales a su
televisor a través de un solo cable
Decodicador Dolby Digital
Audio de . canales para sistemas de sonido envolvente
Salidas AV digitales y analógicas
ALTAVOCES DEL HOME THEATER
Sistema de sonido envolvente de . canales
Cinco satélites de rango completo y un subwoofer brindan altos
nítidos y bajos profundos
Diseño de altavoz para escritorio o montaje en pared
Page 64 Coby Electronics Corporation
Page 65

Acerca de los Discos Ópticos
Requerimientos de los discos
Este reproductor de DVD soporta la reproducción de los siguientes tipos
de medios y discos.
Tipo Marca de disco Tipo de contenido
DVD Audio + Video
MP3 Audio
CD Audio
CD de video (VCD) Audio + Video
CD de imágenes (JPEG) Imagen estática
MPEG-4 Audio + Video
Esta unidad puede reproducir discos ópticos o tarjetas de memoria que
contengan archivos MP, MPEG- o JPEG. Los discos y tipos de medios
no enumerados anteriormente no son compatibles con esta unidad (por
ejemplo, PC CD-ROM, CD-Extra, CD-G, CD-I, etc.)
Español
Características de los DVD
Cada disco DVD tiene características que pueden variar dependiendo
de la producción del disco. Algunos de los iconos que pueda llegar a ver
representan las características que se muestran a continuación.
Número de pistas de audio
Número de subtítulos
Indicador de ángulo
www.cobyusa.com Page 65
Page 66

Acerca de los Discos Ópticos
Formato de pantalla (relación de aspecto)
Zoom (Acercar/Alejar)
Algunas de las características de DVD disponibles en este repro-
ductor dependen de la manera en que el disco DVD fue producido. Algunas características pueden no estar disponibles si el
disco no presenta esa característica, o puede requerir de cong-
Español
Códigos de región de los DVD
Los discos y reproductores DVD son fabricados bajo un acuerdo global
obligatorio, el Sistema de códigos regionales de los DVD. Los reproductores de DVD funcionarán únicamente con discos DVD codicados con
el mismo Código regional correspondiente.
uraciones especiales. Verique las características impresas en el
envoltorio del DVD o siga las instrucciones del menú en pantalla
del disco.
Código
regional
1 Canadá, EE. UU.
2 Europa (incluido Polonia, Rumania, República Checa) Japón, Medio Oriente
(incluido Arabia Saudita, Egipto, Irán, Sudáfrica)
3 Asia Oriental (incluido Hong Kong, Taiwán, Corea del sur), Sudeste de Asia
4 Australia, El Caribe, América Central, América del Sur, México, Nueva Zelanda
5 África, la ex Unión Soviética, India, Corea del Norte, Pakistán, Turkmenistán
6 China
Page 66 Coby Electronics Corporation
Región
Page 67

Acerca de los Discos Ópticos
Cuidado y mantenimiento de los discos
Los discos ópticos (DVD, CD) contienen datos con compresión de alta
densidad y requieren una manipulación adecuada.
Manipulación de un disco
Tome el DVD/CD de los bordes. Evite tocar el lado grabado del disco.
Para extraer un DVD/CD de su estuche, presione el mecanismo de
retención del centro del estuche y retire el disco.
No someta los discos a una exposición prolongada a la luz solar
directa, alta humedad o altas temperaturas.
No doble ni presione los discos.
Para reducir el riesgo de rayones, coloque siempre los discos nueva-
mente en su estuche después de su uso. Almacene los discos verti-
calmente en un gabinete.
No coloque etiquetas o adhesivos en ninguno de los lados de un disco.
Español
Limpieza de un disco
Utilice un paño suave seco para limpiar cualquier huella digital o polvo
de la supercie de reproducción del disco. Limpie en líneas radiales
desde el centro hacia el borde externo del disco. Pequeñas partículas de
polvo y manchas superciales no afectarán la calidad de reproducción.
Nunca utilice productos químicos como aerosoles para discos,
aerosoles antiestáticos, benceno o diluyentes para limpiar un disco.
Si lo hace, dañará la supercie del disco de forma permanente.
www.cobyusa.com Page 67
Page 68

Panorama General de DVD978
Panel delantero
Español
Nombre Descripción
1 Bandeja de
Disco
2 Pantalla de
información
3 Indicador de
encendido
4 Perilla de volu-
men principal
5 Puerto USB Conecta una memoria ash USB para reproducir archivos de medios
6 Abrir/Cerrar Abre o cierra la bandeja de discos.
7 Reproducir/
Pausar
8 Detener Detiene la reproducción.
9 Encendido Enciende o apaga la unidad.
10 Entrada para
micrófono
Cargue los discos ópticos en la bandeja abierta para reproducir.
Muestra la información de estado del sistema.
Enciende la luz roja cuando la alimentación está conectada y el sistema
está en el modo de espera (apagado).
Gire a la derecha para subir el nivel de volumen, gire a la izquierda
para bajar el nivel de volumen.
digitales compatibles.
Inicia o pausa la reproducción.
Conecta los micrófonos para disfrutar discos de karaoke.
Page 68 Coby Electronics Corporation
Page 69

Panorama General de DVD978
Panel posterior
Nombre Descripción
1 Panel de salida
de altavoz
2 Entrada de línea Se conecta y reproduce audio estéreo desde dispositivos externos.
3 Salida HDMI Se conecta a un televisor de alta denición u a otra pantalla equipada
Se conecta los altavoces frontales, de sonido envolvente, centrales y de
subwoofer para un sonido envolvente de 5.1 canales.
con entrada HDMI.
Español
4 Salida de audio
digital coaxial
5 Salida de video
compuesto
6 Conector para
antena FM
www.cobyusa.com Page 69
Se conecta a un receptor u otro dispositivo capaz de decodicar
secuencias de audio digital.
Se conecta a un televisor u otra pantalla equipada con entrada de
video compuesto.
Se conecta a la antena FM para recibir señales de radio FM.
Page 70

Panorama General de DVD978
Remote Control
Español
Page 70 Coby Electronics Corporation
Page 71

Panorama General de DVD978
Name Description
1 Encendido Enciende o apaga la unidad (espera).
2 Teclado
Numérico
3 Ir A <GOTO> Ingresa al modo de acceso directo para ir a una parte espe-
4 Congura-
ción
5 Modo De
Salida De
Audio
6 Programa <PROG> Ingrese al modo Programa para crear una lista de repro-
7 Volume + <VO L+> Sube el nivel de volumen.
Volume – <VOL–> Baja el nivel de volumen.
8 Forward /
Search +
<1 -9 >,
<0/10>
<+10> <+10>: Utilice el 10 para ingresar números mayores a 10.
<SETUP> Ingresa al menú de conguración principal del sistema.
<A-MODE> Presione este botón para cambiar el modo de audio entre
<0-9, 10>: Utilice el teclado numérico para ingresar
números cuando resulte apropiado.
Por ejemplo, presione dos veces <+10> y luego presione
<5> para ingresar el número “25”.
cíca de la película. Utilice el teclado numérico y el teclado
de navegación para ingresar un título o capítulo especíco
al que desea ir.
SALIDA DE 5.1 CANALES y SALIDA ESTÉREO.
ducción personalizada.
[Video y música] Cambia la velocidad de avance de reproducción para buscar rápidamente a través de una pista.
Español
<SE ARC H+> [Radio] Sintoniza la radio en una estación de frecuencia
más alta.
Reverse /
Search –
< SEARCH–> [Radio] Sintoniza la radio en una estación de frecuencia
www.cobyusa.com Page 71
[Video y música] Cambia la velocidad de retroceso de reproducción para buscar rápidamente a través de una pista.
más baja.
Page 72

Panorama General de DVD978
Español
Page 72 Coby Electronics Corporation
Page 73

Panorama General de DVD978
Name Description
9 Título <TITLE> [DVD] Accede al menú de títulos del DVD.
10 Teclado de
Navegación
11 Audio <AUDIO> [DVD] Cambia el canal de audio del DVD (requiere un DVD
Memory <MEMORY> [Radio] Guarda manualmente la estación actual como
12 Efectos de
Sonido
13 Paso <STEP> [DVD] Reproduce video DVD cuadro por cuadro.
14 Ángulo <ANGLE> [DVD] Cambia el ángulo de la toma (requiere un DVD
15 Repetición <REPEAT> Cambia las opciones de reproducción con repetición.
16 Abrir/Cer-
rar
17 Fuente <SOURCE> Cambia la fuente de entrada de señal de la unidad (por
<L EFT>
<R IGHT>
<UP>
<DOWN>
<ENTER> Selecciona una opción del menú.
<S.EFFECT> Cambia las opciones de los efectos de sonido.
<OPEN/
CLOSE>
Navegan por las opciones del menú de pantalla.
masterizado con múltiples canales de audio).
una estación precongurada.
masterizado con tomas desde varios ángulos).
Abre/cierra la bandeja de discos.
ejemplo, DVD-VIDEO, LINE, TUNER).
Español
18 USB <USB> Cuando el sistema está en el modo DVD-VIDEO, presione
para cambiar el modo de entrada de fuente entre DVD y
USB.
19 Modo
Salida de
Video
www.cobyusa.com Page 73
<V-MODE> Cambia el modo de salida de video de la unidad para que
coincida con la conexión de video que se está utilizando.
Seleccione HDMI para video HDMI (1080p/720p, 1080i o
480p), seleccione CVBS para video compuesto (480i).
Page 74

Panorama General de DVD978
Español
Page 74 Coby Electronics Corporation
Page 75

Panorama General de DVD978
Name Description
20 Reproducir/
Pausar
21 OSD <OSD> Activa la visualización de información en pantalla.
22 Detener <STOP> Presione una vez para detener la reproducción del disco. El
23 Siguiente [Video y música] Salta a la siguiente pista.
Radio + <R ADI O+> [Radio] Sintoniza la radio en una estación precongurada
Anterior [Video y música] Salta a la pista anterior.
Radio – <R ADI O–> [Radio] Sintoniza la radio en una estación precongurada
24 Menú <MENU> [DVD] Accede al menú raíz del DVD.
Auto <AUTO> [Radio] Busca automáticamente y guarda las estaciones de
<PLAY> Inicia o pausa la reproducción.
reproductor guardará la posición para reanudar la reproducción desde la ubicación donde se detuvo.
Presione dos veces para detener completamente la reproducción del disco. El reproductor reanudará la reproducción
desde el inicio del disco.
más alta.
más baja.
radio de mejor recepción como estaciones preconguradas.
El uso de esta función anulará y borrará todas las preconguraciones grabadas anteriormente.
Español
25 Subtítulo <SUBTITLE> [DVD] Cambia los subtítulos en pantalla (requiere un DVD
masterizado con subtítulos en varios idiomas).
Mono/
Estéreo
26 Nivel de
Canal
www.cobyusa.com Page 75
<M O/ST> [Radio] Cambia los modos de recepción entre mono y es-
téreo. Utilice el modo mono para estaciones con recepción
débil.
<CH-LEVEL> Ajusta los niveles de los canales de audio (utilizar en con-
junto con <VOL+> y <VOL–>.
Page 76

Panorama General de DVD978
Name Description
27 Tono <TO NE> Ajusta los niveles de tono de graves y agudos (utilizar en
conjunto con <VOL+> y <VOL–>).
28 Zoom <ZOOM> [DVD] Activa la función de acercar/alejar de la película.
29 Silencio
30 Repeat A-B <A-B> Utiliza la función Repetición A-B para crear un ciclo de
Español
Desactiva el sonido temporalmente.
reproducción.
Acerca del control remoto
El control remoto emite un haz de luz infrarroja direccionada. Asegúrese
de apuntar el control remoto directamente al sensor infrarrojo remoto
durante el funcionamiento. El sensor no podrá recibir señales apropiadamente si es cubierto, si se encuentra un objeto de grandes dimensiones
entre el control remoto y el sensor, o si se encuentra expuesto a la luz
solar directa o a una luz articial intensa (por ejemplo, luces uorescentes o estroboscópicas). Si fuera posible, cambie la dirección de la fuente
de luz o vuelva a posicionar la unidad para evitar la iluminación directa.
Para usar el control remoto, apúntelo hacia el sensor del control remoto
del reproductor. Utilice el control remoto a menos de pies ( metros)
del sensor y en un ángulo de +/- grados.
Pag e 76 Coby Electronics Corporation
Page 77

Panorama General de DVD978
Instalación de las baterías
1. Retire la cubierta del compartimiento para baterías que se encuentra
en la parte posterior del control remoto.
2. Inserte dos (2) baterías de tipo “AAA” y asegúrese de que las polaridades (+/-) coincidan con las marcas que se encuentran en la parte
interna del compartimiento.
3. Vuelva a colocar la cubierta.
Las baterías en el control remoto durarán aproximadamente 1
año. Reemplace las baterías si el control remoto no funciona.
Deseche siempre las baterías de acuerdo a sus reglamentaciones municipales locales.
Las baterías utilizadas en este control remoto pueden producir
incendios o quemaduras químicas si se las trata de manera incorrecta. No recargue, desarme, incinere ni caliente las baterías
(~212 °F). No combine baterías nuevas con baterías usadas, ni
diferentes tipos de baterías. Extraiga las baterías del control remoto si no lo utilizará durante un tiempo prolongado. Mantenga las baterías alejadas de los niños.
Español
www.cobyusa.com Page 77
Page 78

Conexiones
Sistema de video
Elija la mejor conexión de video disponible. Evite utilizar más de una
conexión al mismo tiempo para evitar interferencias en la señal. Las
conguraciones de video deben coincidir con la conexión de video
utilizada. Presione <V-MODE> en el control remoto para cambiar la
conguración de video, o cambie la conguración de video en el menú
conguración del sistema (consulte la sección Conguración del sistema
de este manual para obtener más información).
Español
Page 78 Coby Electronics Corporation
Page 79

Conexiones
Salida de video compuesto (Estándar)
Utilice el cable AV suministrado:
1. Conecte un extremo del cable amarillo al enchufe amarillo de salida
de video de la unidad.
2. Conecte el otro extremo del cable amarillo al enchufe amarillo de
entrada de video del televisor.
Presione <V-MODE> (modo video) en el control remoto hasta
que vea “CVBS” en la pantalla del televisor para congurar la
unidad en el modo de video compuesto.
La máxima resolución de salida para la conexión de video com-
puesto es de 480i.
Salida de video HDMI (La mejor)
La salida HDMI presenta la calidad de video y resoluciones más altas
posible. Si tiene un enchufe de entrada HDMI en su televisor, utilícelo.
Español
1. Conecte un extremo del cable HDMI (no suministrado) a la salida
HDMI del reproductor.
2. Conecte el otro extremo del cable HDMI a la entrada HDMI de su
televisor o monitor.
También puede presionar <V-MODE> (modo video) en el con-
trol remoto hasta que vea “HDMI” en la pantalla del televisor
para congurar la unidad en el modo de video HDMI.
La máxima resolución de salida para la conexión de video HDMI
es de 1080p.
www.cobyusa.com Page 79
Page 80

TV/Monitor/Amplier Audio Input
DVD Audio Output
SUBWOOFER
FR S P EAKER
SL SPEAKE R
S R SPEAKER
CENTER SPEAKER
Spea ker Output
FL S P EAKER
&2$;,$/
&2$;,$/
'LJLWDO$X GLR2 XWSXW
'LJLWDO$X GLR,QSXW
5
/
/
5
&+$XGLR2XWSXW
&+$XGLR,QSXW
Conexiones
Sistema de audio
Elija la mejor conexión de audio disponible. Evite utilizar más de una
conexión al mismo tiempo para evitar interferencias en la señal. La conguración de audio deben coincidir con la conexión de audio utilizada.
Cambie la conguración de audio en el menú Conguración del sistema
(consulte la sección Conguración del sistema de este manual para
obtener más información).
Español
Altavoces
La unidad posee un amplicador integrado. ¡Conecte los altavoces suministrados para disfrutar sus películas con sonido envolvente .!
1. Si fuera necesario, quite 3/8” (10 mm) de la aislación de cada extremo
2. Mientras presiona las palancas del terminal de cada altavoz, inserte
Page 80 Coby Electronics Corporation
del cable de altavoz.
el cable desnudo en el agujero, luego libere la palanca para asegurar
la conexión.
Page 81

Conexiones
3. Mientras presiona las palancas del terminal del altavoz de la unidad,
inserte el cable desnudo en el agujero, luego libere la palanca para
asegurar la conexión.
4. Para su comodidad, el cable del altavoz y el terminal para cada
altavoz poseen un código de colores. La tabla a continuación le
ayudará a hacer coincidir los altavoces con los terminales correspondientes:
Terminal Altavoz Color
SW Subwoofer Verde
CEN Central Rojo
SR Sonido envolvente
derecho
SL Sonido envolvente
izquierdo
FR Frontal derecho Gris
FL Frontal izquierdo Blanco
Asegúrese de que los terminales estén conectados a los termina-
les desnudos y no a la aislación. Haga coincidir siempre los terminales positivos (+) y los terminales negativos (-) en cada una
de las conexiones. Si se encontraran invertidos, el sonido estará
fuera de fase y no se reproducirá correctamente. No conecte más
de un cable al terminal de cada altavoz; no conecte un altavoz a
varios terminales.
Azul
Amarillo
Español
www.cobyusa.com Page 81
Page 82

Conexiones
2-CH AUDIO OUTPUT
LINE IN
L R
L R
DVD Audio Input
Audio Output of Extra Devices
Salida de audio digital coaxial (opcional, mejor)
Para utilizar con un amplicador o sistema de audio externo que cuente
con un decodicador digital. Utilice un cable coaxial opcional de audio
digital:
1. Conecte un extremo del cable coaxial al enchufe negro de salida de
audio digital de la unidad.
2. Conecte el otro extremo del cable coaxial a la entrada de audio
Español
digital de un sistema de audio externo.
Remítase a la documentación incluida con su sistema de audio
externo para ayuda adicional en el uso de esta conexión.
Entrada de línea estéreo
Para utilizar con un dispositivo de
reproducción externo con una salida
de audio estéreo (por ejemplo, un VCR,
MP o un reproductor de CD). Utilice un
cable de conexión RCA estéreo opcional:
1. Conecte un extremo de los cables
blanco y rojo a los enchufes de
entrada de línea blanco y rojo de la
unidad (izquierdo, derecho).
2. Conecte el otro extremo de los
cables a las salidas de audio de un
dispositivo de reproducción de
audio externo.
Luego de realizar esta conexión,
presione <SOURCE> (fuente) en el control remoto para cambiar a
modo “LINE” (línea) para disfrutar del audio proveniente del dispositivo externo.
Page 82 Coby Electronics Corporation
Page 83

Conexiones
Dependiendo del tipo de cable de conexión utilizado, puede uti-
lizar esta conexión con dispositivos con enchufe de salida estéreo de 3.5 mm o enchufes de salida estéreo tipo RCA.
Remítase a la documentación incluida con su sistema de audio
externo para ayuda adicional en el uso de esta conexión.
Alimentación e instalación
Fuente de alimentación
Conecte el cable de alimentación de la unidad a una toma de CA de
pared de -V Hz, únicamente. Realice todas las conexiones de
video, altavoces y audio antes de conectar la alimentación.
No conecte el enchufe de alimentación a la salida de aliment-
ación que no sea la indicada en este manual o en la etiqueta de
especicaciones, ya que puede tener como resultado un riesgo
de incendio o descarga eléctrica.
Español
No manipule el enchufe con las manos húmedas. Hacerlo po-
dría provocar descargas eléctricas.
Manejo de la alimentación
Si la unidad no se utilizará durante un período de tiempo prolongado,
apague la unidad, desenchúfela de la toma de CA y retire las baterías del
control remoto.
www.cobyusa.com Page 83
Page 84

Conexiones
Instalación
Instale la unidad en una supercie nivelada, plana y rme con buena
ventilación. Nunca obstruya las ventilaciones del gabinete; hacerlo
causará a la unidad sobrecalentamiento y mal funcionamiento.
No instale la unidad en un lugar expuesto a fuentes de calor o luz
solar directa.
No instale la unidad en un lugar expuesto a la humedad o lluvia.
Español
Page 84 Coby Electronics Corporation
Page 85

Para Empezar
Encendido de la unidad
1. Presione para encender el reproductor.
2. Presione para apagar el reproductor y colocarlo en modo de
espera.
Desenchufe el sistema de la alimentación para apagarlo por
completo.
Conguración de la fuente de entrada del
televisor
1. Presione <V-MODE> en el control remoto para congurar el modo
de video que corresponde a la conexión de video utilizada (p. ej.
HDMI o video compuesto). Vea la sección Conexiones para obtener
más detalles.
2. Congure su televisor para mostrar la entrada a la que el DVD978
está conectado (p. ej. HDMI, AV1, compuesto, etc.). Aparecerá el
logotipo de Coby en la pantalla del televisor cuando se haya seleccionado la entrada adecuada.
Por lo general, los televisores tienen un botón denominado
“Source” o “Input” (Fuente o Entrada) que cambiará su fuente
de entrada al presionarlo. Para aprender cómo cambiar la
fuente de entrada de su televisor, consulte su manual de instrucciones.
Español
www.cobyusa.com Page 85
Page 86

Para Empezar
Selección del modo de fuente del DVD978
Para obtener más información acerca de cada uno de los modos de
fuente, remítase a las respectivas secciones de este manual.
Presione <SOURCE> en el control remoto para cambiar entre los
modos DVD-VIDEO, TUNER y LINE.
Seleccione el modo DVD-VIDEO para reproducir discos ópticos
Español
desde la bandeja de discos (p. ej., DVD, CD).
Seleccione TUNER para disfrutar transmisiones de radio FM.
Seleccione el modo LINE para disfrutar audio desde un disposi-
tivo externo conectado a los enchufes LINE IN (opcional).
Presione <USB> para cambiar entre los modos USB y DVD-VIDEO.
Seleccione USB para reproducir medios digitales desde dispositi-
vos USB con memoria ash conectados al puerto USB.
El modo USB estará disponible solamente cuando el sistema se
encuentre en el modo DVD-VIDEO. Primero presione <SOURCE>
para cambiar al modo DVD-VIDEO, luego presione <USB> en el
control remoto para cambiar entre los modos USB y DVD-VIDEO.
Carga de un disco (u otro dispositivo)
Presione <OPEN/CLOSE> para abrir la bandeja de discos. Inserte un disco
con el lado de la etiqueta hacia arriba. Presione <OPEN/CLOSE> nuevamente para cerrar la bandeja de discos.
Si inserta al revés un disco que tiene un único lado, el reproductor
mostrará el mensaje “NO DISC” (sin disco) o “BAD DISC” (disco incorrecto).
Page 86 Coby Electronics Corporation
Page 87

Para Empezar
Para reproducir otro medio que no sea un disco, conecte un dis-
positivo ash USB, luego presione <USB> en el control remoto
para cambiar al modo USB.
Instrucciones de reproducción básica
Presione <PLAY> para iniciar la reproducción.
Algunos discos pueden iniciar la reproducción automáticamente o
mostrar un menú especíco del disco DVD. Si un menú aparece, utilice
el Teclado de navegación para seleccionar la característica u opción
deseada y luego presione <ENTER> para conrmar.
Play/Pause/Stop (Reproducir/Pausa/Detener)
Presione <PLAY> para reproducir el disco por primera vez.
Para pausar la reproducción, presione <PAUSE>. Presione <PLAY>
nuevamente para reanudar la reproducción.
Español
Para detener la reproducción, presione <STOP> una vez durante la
reproducción (“Pre-Stop”) (detención previa). El sistema recordará la
posición en la que detuvo el disco y la reproducción se reanudará
desde ese momento al presionar <PLAY>.
Para detener la reproducción por completo, presione <STOP> dos
veces durante la reproducción. La reproducción comenzará desde el
principio del disco cuando presione nuevamente <PLAY>.
Anterior/Siguiente (Saltar)
Presione para saltar a la siguiente pista (DVD, CD, etc.).
Presione para regresar a la pista anterior (DVD, CD, etc.).
www.cobyusa.com Page 87
Page 88

Para Empezar
Retroceso/Avance (Buscar)
Presione para avanzar y buscar en la pista actual. Cada vez que
presione se cambiará la velocidad de búsqueda. Presione <PLAY>
para reanudar la reproducción normal.
Presione para retroceder y buscar en la pista actual. Cada vez que
presione se cambiará la velocidad de búsqueda. Presione <PLAY>
para reanudar la reproducción normal.
Español
Paso
Presione <STEP> para obtener una reproducción cuadro por cuadro.
Cada vez que presione <STEP> de forma sucesiva, avanzará un
cuadro en el video. Presione <PLAY> para reanudar la reproducción
normal.
El audio se silenciará durante el avance rápido, retroceso rápido
y la reproducción en cuadro por cuadro.
Repetición de la reproducción
Presione <REPEAT> para cambiar el modo de repetición de la repro-
ducción.
Ajuste del sonido
Presione <VOL +> para aumentar el nivel de volumen.
Presione <VOL –> para disminuir el nivel de volumen.
Presione <MUTE> para desactivar el sonido. Presione <MUTE> nue-
vamente para restablecer el sonido al nivel anterior.
Presione <A-MODE> para alternar entre los modos de salida de
audio (sonido envolvente de . canales y estéreo de canales).
Page 88 Coby Electronics Corporation
Page 89

Para Empezar
Presione <CH-LEVEL> para seleccionar un canal de audio para
ajustar y luego use las teclas <VOL +>/<VOL –> para ajustar el
nivel seleccionado.
Canal de audio Pantalla del televisor Pantalla de información
Frontal izquierdo VOL_FL FL
Frontal derecho VOL_FR Fr
Sonido envolvente izquierdo VOL_LS LS
Sonido envolvente derecho VOL_RS rS
Central VOL_CEN Cn
Subwoofer VOL_SW S_
Todos los canales VOL VL
Cuando el modo de audio esté congurado para estéreo de
2 canales, solamente podrán ajustarse los canales frontales
izquierdos y frontales derechos.
Presione <TONE> para seleccionar BASS (bajos) o TREBLE (agudos)
y luego use las teclas <VOL +>/<VOL –> para ajustar el tono
seleccionado.
Presione <S.EFFECT> para cambiar el modo de efectos de sonido.
Congure el modo de efectos de sonido en NORMAL cuando reproduzca un disco Dolby de . canales para evitar interferencias con el
decodicador Dolby Digital.
Español
www.cobyusa.com Page 89
Page 90

Modos de Operación
Discos DVD/CD
1. Presione <SOURCE> para colocar la unidad en el modo DVD (LOADING/DVD-VIDEO aparecerá en la pantalla).
2. Coloque un disco compatible de DVD-video o un CD de audio en la
bandeja de discos. Un menú de contenidos aparecerá en la pantalla.
3. Presione <PLAY> para iniciar la reproducción.
Español
Algunos discos pueden iniciar la reproducción automáticamente
o mostrar un menú especíco del DVD en el disco. Si aparece un
menú, utilice el Teclado de navegación para navegar a través de
las opciones del menú y luego presione <ENTER> para seleccionar una opción.
Controles adicionales del DVD
Vea la sección Para empezar para ver los controles de reproducción
básica (Play/Pause, Next/Forward, etc.)
En el control remoto... Función
Presione <TITLE> Accede al menú de títulos del DVD.
Presione <MENU> Regresa al menú raíz del DVD.
Presione <OSD> Cambia la visualización en pantalla.
Presione <SUBTITLE> Cambia los subtítulos en pantalla (requiere un DVD
masterizado con subtítulos en varios idiomas).
Presione <AUDIO> Cambia la pista de audio (requiere un DVD masterizado
con múltiples canales de audio).
Presione <ANGLE> Cambia el ángulo de la toma (requiere un DVD master-
izado con tomas desde varios ángulos).
Page 90 Coby Electronics Corporation
Page 91

Modos de Operación
En el control remoto... Función
Presione <ZOOM> Cambia el nivel de ampliación de la imagen. Cuando
el nivel de ampliación es mayor a “1” (Zoom), utilice el
teclado de navegación para desplazarse dentro de la
imagen (arriba, abajo, izquierda, derecha).
Discos MP3
1. Presione <SOURCE> para colocar la unidad en el modo DVD (el
mensaje LOADING/DVD-VIDEO aparecerá en pantalla).
2. Coloque un disco con archivos compatibles con MP3 en la bandeja
de discos. Un menú de contenidos aparecerá en la pantalla.
Operación de los menús
Presione las echas <ARRIBA> o <ABAJO> del teclado de navegación
para buscar carpetas y archivos, luego presione <ENTER> para seleccionar una carpeta o para empezar a reproducir un archivo. (Puede utilizar
también el teclado numérico para acceder a carpetas y archivos).
Presione o respectivamente para saltar a la página anterior o
siguiente del menú.
Presione la echa <IZQUIERDA> para regresar al nivel de carpeta
anterior.
Presione <PROG> para alternar entre la vista FOLDER (carpeta) y
FILELIST (lista de archivos).
Presione <MENU> para regresar al menú de contenidos mientras
reproduce un disco (si estuviera disponible).
Vea la sección Para empezar para ver los controles de reproduc-
ción básica (PLAY, Next/Forward, etc.)
Español
www.cobyusa.com Page 91
Page 92

Modos de Operación
Discos de imágenes JPEG
1. Presione <SOURCE> para colocar la unidad en el modo DVD (el
mensaje LOADING/DVD-VIDEO aparecerá en pantalla).
2. Coloque un CD con imágenes JPEG en la bandeja de discos; la
unidad leerá los contenidos del disco automáticamente.
3. Presione <STOP> para ingresar al modo de vistas en miniatura para
tener una vista previa de las imágenes.
Español
Operación del modo de vistas en miniatura
Para ver una imagen, utilice el teclado de navegación para seleccio-
nar una imagen y luego presione <ENTER>.
Para iniciar el modo de diapositivas, utilice el teclado de navegación
para seleccionar la opción “Slide Show” y luego presione <ENTER>.
Para acceder a la página anterior o siguiente, utilice el teclado de
navegación para seleccionar la opción “Previous” o “Next”, y luego
presione <ENTER>.
Para visualizar el modo de función de teclas remotas, utilice el
teclado de navegación para seleccionar la opción “Menu” y luego
presione <ENTER>. Las teclas de función remota son las siguientes:
En el control remoto... Función
Presione <PLAY> Inicia o pausa el modo de visualización de diapositivas.
Presione <PROG> Cambia el efecto de transición de la reproducción de dia-
positivas. Solamente disponible durante la visualización de
diapositivas.
Presione
Presione <STOP> Vuelve al modo de vistas en miniatura.
Presione <DERECHA> o
<IZQUIERDA>
Page 92 Coby Electronics Corporation
o Muestra la imagen siguiente o anterior, respectivamente.
Gira la imagen.
Page 93

Modos de Operación
En el control remoto... Función
Presione <ARRIBA> o
<ABAJO>
Presione <ZOOM> Al visualizar una imagen, presione <ZOOM> para activar
Voltea la imagen.
el modo para acercar/alejar y luego presione o para
aumentar o disminuir el nivel de ampliación, respectivamente.
• Cuando el nivel de ampliación esté por encima del 100%,
utilice el teclado de navegación para desplazarse por la
imagen ampliada.
• Presione <ZOOM> nuevamente para salir y volver al modo
de vista normal.
Dispositivos USB con memoria ash
1. Presione <SOURCE> para colocar la unidad en el modo de fuente
DVD-VIDEO (el mensaje LOADING/DVD-VIDEO aparecerá en pantalla).
2. Coloque un dispositivo USB con archivos MP3 compatibles en el
puerto USB.
3. Presione <USB> para colocar la unidad en el modo USB (USB aparecerá en pantalla). El sistema leerá los contenidos del dispositivo
USB y aparecerá un menú de navegación de archivos en la pantalla.
Español
Si la unidad se congelara en la lectura de un dispositivo USB o
una tarjeta de memoria, apague la unidad y desenchufe el cable
de alimentación de la toma de CA. Cuando vuelva a encender la
unidad, volverá al estado normal. El dispositivo USB o la tarjeta
de memoria pueden no ser compatibles; esta unidad leerá únicamente dispositivos USB y tarjetas de memoria certicadas.
www.cobyusa.com Page 93
Page 94

Modos de Operación
Operación de los menús
Presione las echas <ARRIBA> o <ABAJO> del teclado de navegación
para seleccionar una carpeta o un archivo, luego presione [ENTER] para
acceder a la carpeta seleccionada o reproducir el archivo seleccionado.
(Puede utilizar también el teclado numérico para seleccionar y conrmar
carpetas y archivos).
Presione o respectivamente para saltar a la página anterior o
Español
siguiente del menú.
Presione la echa <IZQUIERDA> para regresar al nivel de carpeta
anterior.
Presione <PROG> para alternar entre la vista FOLDER (carpeta) y
FILELIST (lista de archivos).
Presione <MENU > para regresar al menú de navegación de archivos.
Vea la sección Para empezar para ver los controles de reproduc-
ción básica (PLAY, Next/Forward, etc.)
Sintonizador (Radio FM)
Presione <SOURCE> para colocar la unidad en el modo sintonización de
radio (INPUT: TUNER aparecerá en la pantalla). Utilice las siguientes teclas
del control remoto para controlar el sintonizador:
En el control remoto... Función
Presione <MO/ST> Cambia el modo de recepción entre Mono y Estéreo. Utilice el modo
de recepción Mono para estabilizar señales de radio débiles.
Page 94 Coby Electronics Corporation
Page 95

Modos de Operación
En el control remoto... Función
Presione <MEMORY> Para guardar una estación precongurada:
• Sintonice la estación deseada (p. ej. “92.7”)
• Presione <MEMORY>
• Utilice el teclado numérico para ingresar el número de estación
precongurada de 2 dígitos deseado (p. ej. 02). La estación de
radio “92.7” ha sido guardada en el número precongurado 2.
Presione <AUTO> Buscará automáticamente y guardará las estaciones de radio de
mejor recepción como estaciones preconguradas. El uso de esta
función anulará y borrará todas las preconguraciones grabadas
anteriormente.
Puede presionar <STOP> para interrumpir el proceso de búsqueda
automática.
Teclado numérico Ingrese un número de estación precongurada de dos dígitos para
sintonizarla directamente. (Por ejemplo, presione <0> luego <2>
para sintonizar la preconguración 2; presione <1> luego <5>
para sintonizar la preconguración 15).
Español
Presione <RADIO +> o
<R ADI O–>
Presione <SEARCH +> o
<SE AR CH –>
www.cobyusa.com Page 95
Sintonice una estación de radio precongurada de número más alto
o más bajo, respectivamente.
Sintonice una estación de radio de frecuencia más alta o más baja,
respectivamente.
Page 96

Conguración del Sistema
Utilice el menú de Conguración del sistema para ajustar las opciones
del sistema del reproductor.
En el modo DVD-VIDEO, presione <SETUP> en el control remoto
para acceder al menú de Conguración del sistema.
Presione las teclas de navegación <IZQUIERDA> o <DERECHA> para
navegar en las páginas de conguración en la parte superior del
menú (p. ej. GENERAL, AUDIO, DOLBY, VIDEO, PREFERENCE). Presione
Español
<ENTER> para seleccionar una página y navegue en las opciones del
menú.
Presione <ARRIBA> o <ABAJO> para navegar en las opciones del
menú. Presione <ENTER> para seleccionar una opción o presione
<IZQUIERDA> para volver al nivel de menú anterior.
Presione <SETUP> para salir del menú de Conguración del sistema.
Página de conguraciones básicas
Tipo de Pantalla de Televisor
Si el sistema está conectado a un televisor de alta denición, seleccione :. Si está conectado a un televisor convencional, seleccione :
PANSCAN o : LETTERBOX. La imagen de relación de aspecto : se
mostrará en pantalla completa en su relación de aspecto original.
: PANSCAN: La imagen de tipo pantalla de cine se mostrará en la
pantalla en su relación de aspecto original con alguna parte faltante
de los extremos derecho e izquierdo.
: LETTERBOX: La imagen de tipo pantalla de cine se mostrará en
la pantalla en su relación de aspecto original con sectores negros en
las partes superior e inferior de la pantalla.
Page 96 Coby Electronics Corporation
Page 97

Conguración del Sistema
: : Si la unidad está conectada a un televisor de pantalla ancha, se-
leccione esta opción. La imagen de tipo pantalla de cine se mostrará
en pantalla completa en su relación de aspecto original, mientras
que la imagen de relación de aspecto : se ajustará horizontalmente para adaptarse a la pantalla.
Marca de ángulos
Congure este elemento en la posición ON (encendido). Cuando se
reproduce un disco codicado con múltiples ángulos de cámara, la
marca de ángulo se mostrará en la pantalla. En ese momento puede
ver el video desde los diferentes ángulos de cámara presionando
<ANGLE> en el control remoto.
Congure este elemento en la posición OFF (apagado) para desacti-
var esta función.
Esta función trabaja únicamente con aquellos discos masteriza-
dos con tomas desde varios ángulos.
Español
Idioma de visualización en pantalla
Congure el idioma de visualización en pantalla y de los menús del
sistema con este elemento.
Salva pantallas
Si la imagen permanece sin movimiento en la pantalla por varios
minutos (por ejemplo, el disco está pausado, detenido, etc.), aparecerá un salva pantallas en la pantalla. Puede presionar cualquier
tecla o botón excepto <STANDBY> para volver al estado anterior. La
unidad pasará a modo de espera después de alrededor de minutos de encontrarse en el modo de salva pantalla. Puede presionar
<STANDBY> para encenderla nuevamente.
Desactiva la función de salva pantallas.
www.cobyusa.com Page 97
Page 98

Conguración del Sistema
Última memoria
ON: Durante la reproducción o en el modo de pausa/detención,
cuando abra la bandeja de discos, la unidad memorizará el último
tiempo de reproducción. La próxima vez que coloque el mismo
disco y cierre la bandeja de discos para cargarlo, la unidad iniciará la
reproducción desde el punto memorizado.
OFF: Desactiva la función de Última memoria.
Español
Subtítulos
Congure este elemento en la posición ON (encendido). Cuando un
disco está codicado con subtítulos, los subtítulos se mostrarán en la
pantalla.
Congure este elemento en la posición OFF (apagado) para ocultar-
los. Puede también presionar<SUBTITLE> en el control remoto para
mostrar u ocultar los subtítulos.
Esta función sólo se activa con los discos codicados con subtí-
tulos.
Página de conguraciones de audio
Conguración de audio analógico
Mezcla hacia el frente
LT/RT: El audio de . canales se mezcla en los canales izquierdo y
derecho y sale a través de los altavoces frontales.
STEREO: El audio de . canales se mezcla en la señal estéreo y sale a
través de los altavoces frontales.
Page 98 Coby Electronics Corporation
Page 99

Conguración del Sistema
D SURROUND: Este modo intenta crear un efecto envolvente virtual
con los altavoces frontales.
.CH: Apague el modo DOWNMIX y utilice todos los altavoces. Esta
opción debe seleccionarse para el DVD.
Esta función solo se aplica a los discos de 5.1 canales codicados
AC-3 de Dolby.
Español
www.cobyusa.com Page 99
Page 100

Conguración del Sistema
Altavoces frontales, central, traseros y de sub-bajos
Las opciones que se pueden ajustar dependen del modo Downmix que
se ha seleccionado. Para ajustar todos los altavoces, congure el modo
DOWNMIX a .CH.
El ALTAVOZ FRONTAL debe congurarse en LARGE (GRANDE) o
SMALL (PEQUEÑO) (se recomienda en SMALL).
El ALTAVOZ CENTRAL puede congurarse en LARGE (GRANDE),
Español
SMALL (PEQUEÑO) u OFF (APAGADO) (se recomienda en SMALL).
Los ALTAVOCES POSTERIORES pueden congurarse en LARGE
(GRANDE), SMALL (PEQUEÑO) u OFF (APAGADO)(se recomienda en
SMALL).
El SUBWOOFER puede congurarse en ON (ENCENDIDO) u OFF
(APAGADO).
Si el altavoz se congura en LARGE (GRANDE), el nivel de salida
será mayor que si se lo congura en SMALL (PEQUEÑO).
Si el altavoz se congura en SMALL (PEQUEÑO), el nivel de salida
será menor que si se lo congura en LARGE (GRANDE).
Si un altavoz está congurado en OFF (APAGADO), no habrá
salida de audio.
DIÁLOGO
Cuando el modo DOWNMIX está congurado en LT/RT o STEREO
(ESTÉREO), este elemento está disponible. Ajuste el valor de este elemento para controlar el volumen de diálogo (p. ej., audio de conversación).
Page 100 Coby Electronics Corporation
 Loading...