

Page 1
DVD-755
Compact 5.1-Channel Progressive Scan DVD Player
Instruction Manual
Please read this manual carefully before operation.
Page 2
Page 2 Coby Electronics Corporation www.cobyusa.com Page 3
PRECAUTIONS
For Customer Use:
Enter below the serial number that is located on the
bottom of the unit. Retain this information for future
reference.
Model No. DVD-755
Serial No.
The lightning ash with arrowhead symbol within an equilateral triangle is intended to aler t
the user to the presence of uninsulated “dangerous voltage” within the product’s enclosure
that may be of sufcient magnitude to c onstitute a risk of electric shock.
The exclamation point within an equilateral triangle is intended to alert the user to the presence of important operation and servicing instructions in the literature accompanying the
applianc e.
WARNING:
To prevent re or sh ock hazard, do not expo se this devic e to rain or mo isture. Dan gerous high voltage is present ins ide the
enclos ure. Do not op en the cabinet.
CAUTION :
This Dig ital Vide o Disc player employs a las er system. To prevent direct expo sure to the laser beam, do not try to ope n the
enclos ure or defeat t he safety i nterlocks. When open and the inter locks are defeated, visible laser radiation is present.
Use of con trols, adj ustments , or perfo rmance of procedur es other than those spe cied herein may resul t in hazard ous radia -
tion exposure. DO NOT STARE INTO THE BEAM.
FCC Noti ce:
This equi pment has be en tested and found to com ply with th e limits for a C lass B digital device p ursuant wi th the FCC Rule s,
Part 15. Th ese limits are designed to provide r easonable protect ion against harmful in terference in a resi dential in stallati on.
This equi pment gene rates, uses, and can rad iate radio f requency e nergy, and if not installed a nd used in accordanc e with the
instru ctions may c ause harm ful inter ference to radio com munication.
CAUTION :
To prevent electric shoc k, match wide blade of plu g to wide slot of outlet and f ully inser t.
NOTICE:
This pro duct inco rporate s copyright protect ion technology that i s protecte d by U.S. patent s and other int ellectua l proper ty
rights . Use of this copyright p rotectio n technol ogy must be au thorized by Macrovis ion, and is intended for home and other
limited v iewing use s only unles s otherwise autho rized by Mac rovision. Reverse eng ineering o r disasse mbly is proh ibited.
This player has built- in copy-
Manufactured und er license from Dolby L aboratories. Dol by and
the double-D sym bol are tra demarks of D olby Laboratories .
Condential Unpu blished Wor ks.
© 1992-1997 Dol by Laborat ories. All rights re served.
right protection technology
that prevents copying from a
DVD disc to any media.
If a video re corder is c onnected to the
player, th e video output image will b e
distor ted durin g recordi ng.
For recycling or disposal information about this product, please
contact your local authorities or the Electronics Industries Alliance:
www.eiae.org.
Page 3
IMPORTANT SAFETY INSTRUCTIONS
Read Instructions: All the safety and operating instructions should be read before the product is operated.
1.
Retain Instructions: The safety and operating instructions should be retained for future reference.
2.
Heed Warnings: All warnings on the product and in the operating instructions should be adhered to.
3.
Follow Instructions: All operating and usage instructions should be followed.
4.
Cleaning: Unplug this product from the wall outlet before cleaning. Do not use liquid cleaners or aerosol
5.
cleaner s. Use a damp cloth for cleaning.
Attachments: Use only attachments recommended by the manufacturer. Use of other attachments may
6.
be hazardous.
Water and Moisture: Do not use this product near water (e.g., near a bath tub, wash-
7.
bowl, kitchen sink, laundry tub, in wet basements, or near a swimming pool and the
like).
Accessories: Do not place this product on an unstable c art, stand, tripod, bracket,
8.
or table. Use only with car ts, stands, tripods, brackets, or tables recommended
by the manufacturer or sold with the produc t. Any mounting of the product should
follow the manufacturer’s instructions and should use a mounting accessory recommended by the manufacturer.
A product and cart combination should be moved with care. Quick stops, excessive force, and uneven
9.
surfaces may cause the product and cart combination to overturn.
Ventilation: Slots and openings in the cabinet are provided for ventilation to ensure reliable operation of
10.
the product and to protect it from overheating. These openings should never be blocked by placing the
product on a bed, sofa, rug, or other similar surfac e. This product should not be placed in a built-in installation such as a bookcase or rack unless proper ventilation is provided or the manufacturer instructions
have been adhered to.
Power Sources: This product should be operated only from the type of power source indicated on the rating label.
11.
If you are not sure of the type of power supply to your home, consult your product dealer or local power company.
For products intended to operate from battery power or other sources, refer to the operating instructions.
Grounding or Polarization: This product may be equipped with a polarized alternating- current line plug
12.
that has one blade wider than the other. This plug will only t into the power outlet in one direction. This is
a safety feature. If you are unable to insert the plug fully into the outlet, tr y reversing the direction of the
plug. If the plug should still fail to t, contact an electrician to replace the obsolete outlet. Do not defeat
the safety purpose of the polarized plug.
Power-Cord Protection: Power supply cords should be routed so that they are not likely to be walked on or
13.
pinched by items placed upon or against them, paying particular attention to cords at plugs, convenience
receptacles, and at the point which they exit from the product.
Protective Attachment Plug: The product may be equipped with an attachment plug with overload pro-
14.
tection. This is a safety feature. See the operating instr uctions for replacement or directions to reset
the protective device. If replacement of the plug is required, be sure the service technician has used a
replacement plug that has the
same overload protection as
the original plug as specied
by the manufacturer.
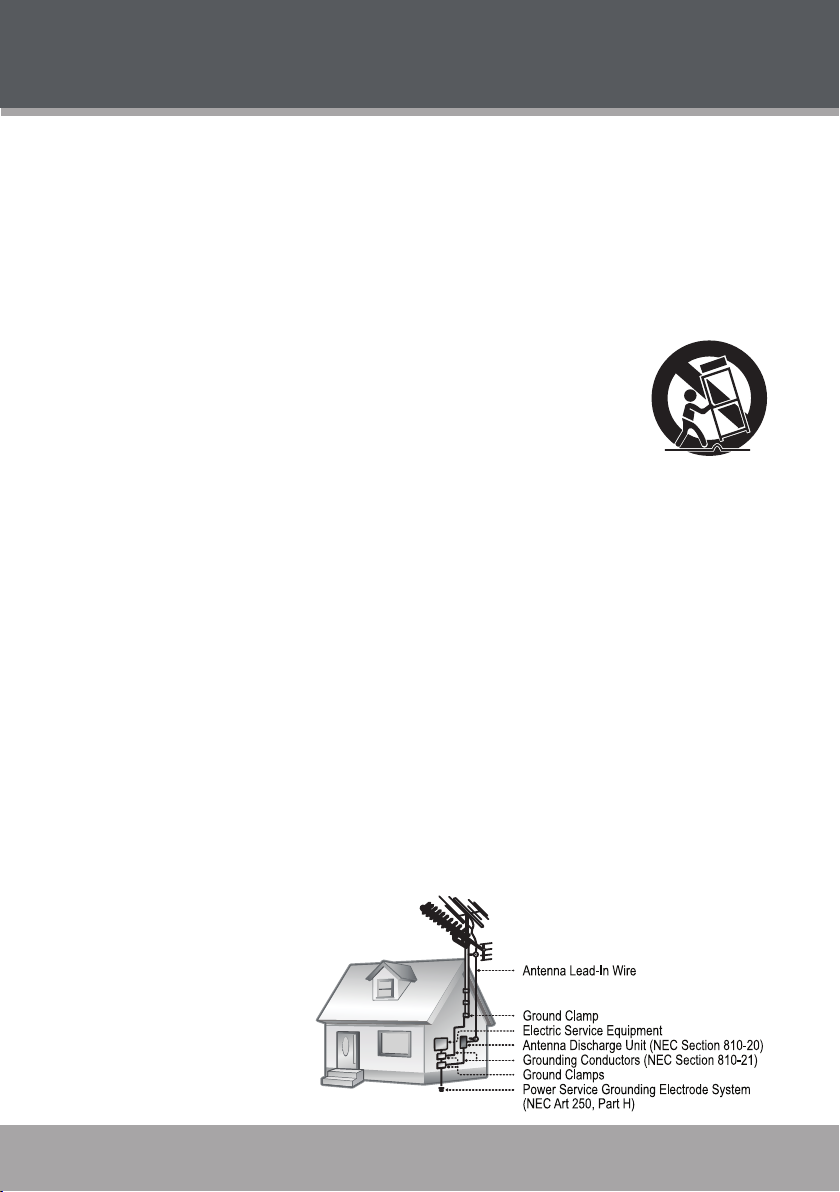
Outdoor Antenna Grounding:
15.
If an outside antenna is con-
nected to the product, be sure
the antenna system is grounded
so as to provide some protection
against voltage surges and built-
up static charges. Ar ticle 810
of the National Electrical Code,
ANS/NFPA 70 provides informa-
Page 4

Page 4 Coby Electronics Corporation www.cobyusa.com Page 5
IMPORTANT SAFETY INSTRUCTIONS
tion with regard to proper grounding of the mast and supporting structure, grounding of the lead-in wire to
an antenna-discharge unit, size of grounding conductors, location of antenna-discharge unit, connection to
grounding electrodes, and requirements for the grounding electrode (see gure).
Lightning: For added protection for this product, unplug it from the wall outlet and disconnect the antenna
16.
or cable system during a lightning storm or when it is left unat tended and unused for long periods of time.
This will prevent damage to the product due to lightning or power-line surges.
Power Lines: An outside antenna system should not be located in the vicinity of overhead power lines or
17.
other electr ic light or power circuits, or where it can fall into such power lines or circuits. When installing an
outside antenna system, extreme care should be taken to keep from touching such power lines or circuits,
as contact with them might be fatal.
Overloading: Do not overload wall outlets, extension cords, or integral convenience receptacles as this
18.
can result in a risk of re or electric shock.
Object and Liquid Entry: Never push objects of any kind into this product through openings as they may
19.
touch dangerous voltage points or shout-out parts that could result in a re or electric shock. Never spill
liquid of any kind on the product.
Servicing: Do not attempt to service this product yourself as opening or removing covers may expose you
20.
to dangerous voltage or other hazards. Refer all servicing to qualied service personnel.
Damage Requiring Service: Unplug this product from the wall outlet and refer servicing to qualied ser-
21.
vice personnel under the following conditions: a) when the power-supply or plug is damaged; b) if liquid
has been spilled or if objects have fallen into the product; c) if the product has been exposed to rain or
water; d) if the product does not operate normally by following the operating instructions. Adjust only
those controls that are covered by the operating instructions as improper adjustment of other controls
may result in damage and will often require extensive work by a qualied technician to restore the product
to its normal operation; e) if the product has been dropped or damaged in any way; f) when the product
exhibits a distinct change in performance—this indicates a need for ser vice.
Replacement Parts: When replacement parts are required, be sure that your service technician has used
22.
replacement parts specied by the manufacturer or have the same characteristic s as the original par t.
Unauthorized substitutions may result in re, electric shock, or other hazards.
Safety Check: Upon completion of any service or repairs to this product, ask the service technician to
23.
perform safety checks to ensure that the product is in proper operating condition.
Wall or Ceiling Mounting: The product should be mounted to a wall or ceiling only as recommended by
24.
the manufacturer.
Heat: The product should be situated away from heat sources such as radiators, heat registers, stoves,
25.
or other products (including ampliers) that produce heat. Read these instructions carefully. Keep these
instructions for future reference.
Note:
The rating label is located on the rear panel of the device.
Page 5

TABLE OF CONTENTS
PRECAUTIONS ................................................................................................................................2
IMPORTANT SAFETY INSTRUCTIONS .............................................................................................3
TABLE OF CONTENTS ......................................................................................................................5
ABOUT OPTICAL DISCS .................................................................................................................7
Disc Requirements ...........................................................................................................................7
Disc Care and Maintenance ............................................................................................................7
Handling a Disc ........................................................................................................................7
Cleaning a Disc ........................................................................................................................7
FEATURES ........................................................................................................................................8
LOCATION OF CONTROL S ............................................................................................................9
Front Panel .......................................................................................................................................9
Rear Panel .......................................................................................................................................9
Remote Control ..............................................................................................................................10
CONNECTIONS ............................................................................................................................11
Audio/Video Connections at a Glance ..........................................................................................11
Progressive Scan Video (480p) Connection .................................................................................12
Standard Television Connection ....................................................................................................12
Stereo (2-Channel) Audio Connection with Amplier ....................................................................13
Surround (5.1-Channel) Audio Connection with Amplier .............................................................13
Remote Control ..............................................................................................................................14
Power Supply .................................................................................................................................14
BASIC OPERATIONS .....................................................................................................................15
Basic Playback ...............................................................................................................................15
Play/Pause/Stop ....................................................................................................................15
Previous/Next (Skip) ..............................................................................................................15
Forward/Reverse (Search) ....................................................................................................15
Slow........................................................................................................................................15
Menu Navigation ............................................................................................................................16
Numeric Keypad .............................................................................................................................16
Adjusting the Volume .....................................................................................................................16
Disc Error Messages .....................................................................................................................16
Power Management .......................................................................................................................16
PLAYER FUNCTIONS .....................................................................................................................17
Menu / Title ...................................................................................................................................17
Setup ..............................................................................................................................................17
On-Screen Display .........................................................................................................................17
Repeat Mode ..................................................................................................................................17
Repeat A-B Mode ..........................................................................................................................18
Multi-Angle/Subtitle/Audio .............................................................................................................18
Zoom ..............................................................................................................................................18
Program/Random ...........................................................................................................................18
DVD Program Mode ...............................................................................................................19
CD Program Mode .................................................................................................................19
Page 6

Page 6 Coby Electronics Corporation www.cobyusa.com Page 7
TABLE OF CONTENTS
SETUP ............................................................................................................................................ 20
Language Settings .........................................................................................................................20
Display Settings .............................................................................................................................20
Speaker Settings ............................................................................................................................21
Audio Settings ................................................................................................................................21
Parental Settings ............................................................................................................................21
SPECIFICATIONS ......................................................................................................................... 22
TROUBLESHOOTING .................................................................................................................... 23
Page 7
ABOUT OPTICAL DISCS
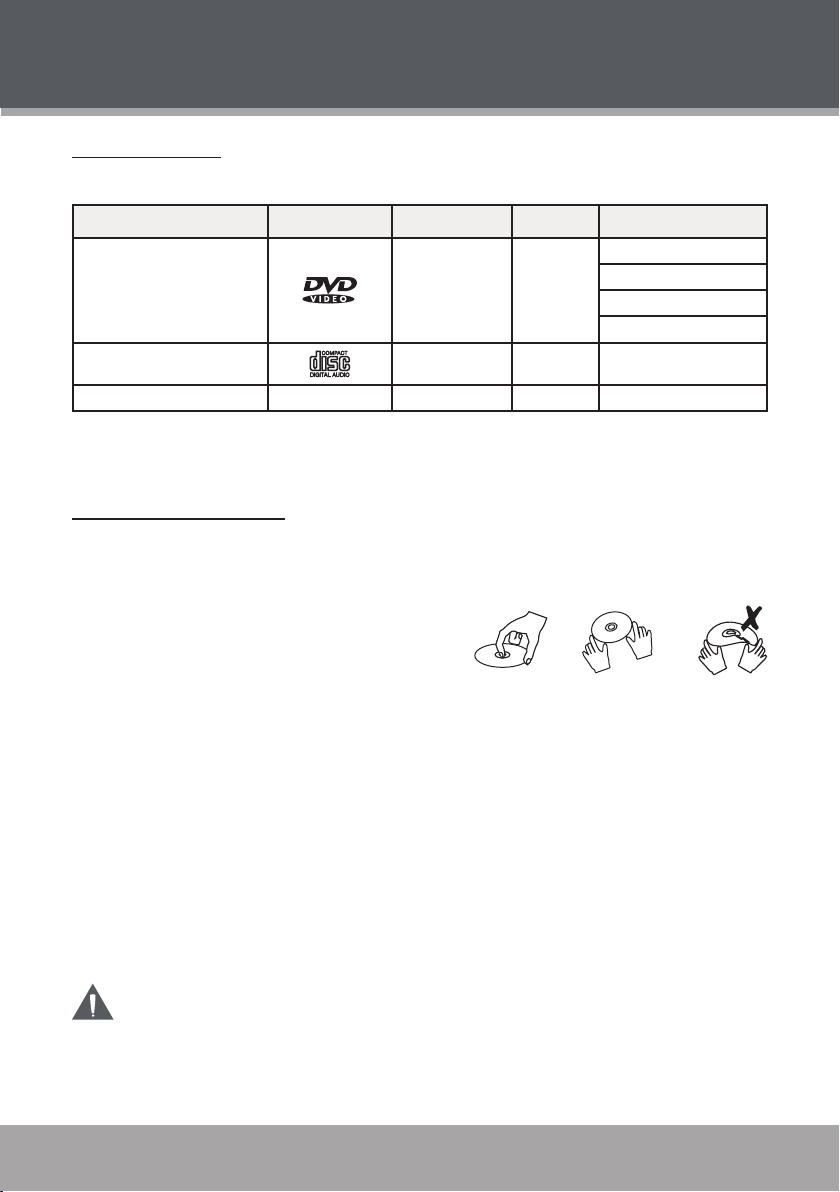
Disc Requirements
This DVD player supports playback of the following discs.
Type Disc Mark Content Type Disc Size Max. Playback Time
133 min (SS- SL)
DVD-Video Discs
Audio Compact Discs (CDs) Audio 12 cm 74 min
JPEG CDs -- Still Picture 12 cm --
Audio + Video
(moving picture)
12 cm
This unit can play back CD-R and CD-RW discs that contain audio titles or JPEG picture les.
Discs not listed above are not supported by this unit (e.g., PC CD-ROM, CD-Extra, CD-G, CD-I,
etc.)
Disc Care and Maintenance
Optical discs (DVDs, CDs) contain high-density compressed data and need proper handling.
Handling a Disc
Hold a DVD/CD by its edges. Avoid touching the
•
recorded side of the disc. To remove a DVD/CD
from its storage case, press down on the center
retention mechanism of the case and lift the disc
out.
Do not subject discs to prolonged exposure to direct sunlight, high humidity, or high tem-
•
peratures.
Do not bend or press discs.
•
To reduce the risk of scratches, always put discs back in their case after use. Store discs
•
vertically in a cabinet.
Do not place stickers or labels on either side of a disc.
•
242 min (SS- DL)
266 min (DS-SL)
484 min (DS-DL)
Cleaning a Disc
Use a dry, soft cloth to wipe off any ngerprints and dusts from the playing surface of the disc.
Wipe in a straight line radially from the center to the outside edge of the disc. Small dust particles
and light stains will not affect playback quality.
Never use chemicals such as record sprays, anti-static sprays, benzene, or thinners to
clean a disc. Doing so will damage the surface of the disc permanently.
Page 8

Page 8 Coby Electronics Corporation www.cobyusa.com Page 9
FEATURES
Progressive Scan DVD Player
•
Compact and Slim Design
•
DVD, DVD±R/RW, CD, CD-R/RW, and JPEG Compatible
•
Dolby Digital Decoder
•
5.1-Channel Audio for Surround Sound Systems
•
Optical, Digital, and Analog AV Outputs for Home Theater Use
•
NTSC/PAL Compatible
•
Convenient Front Panel and On-Screen Display
•
Multiple Language, Subtitle, and Camera Angle Support
•
Picture Zoom Function
•
Parental Lock Control
•
100-240V Automatic Power Switching
•
Page 9
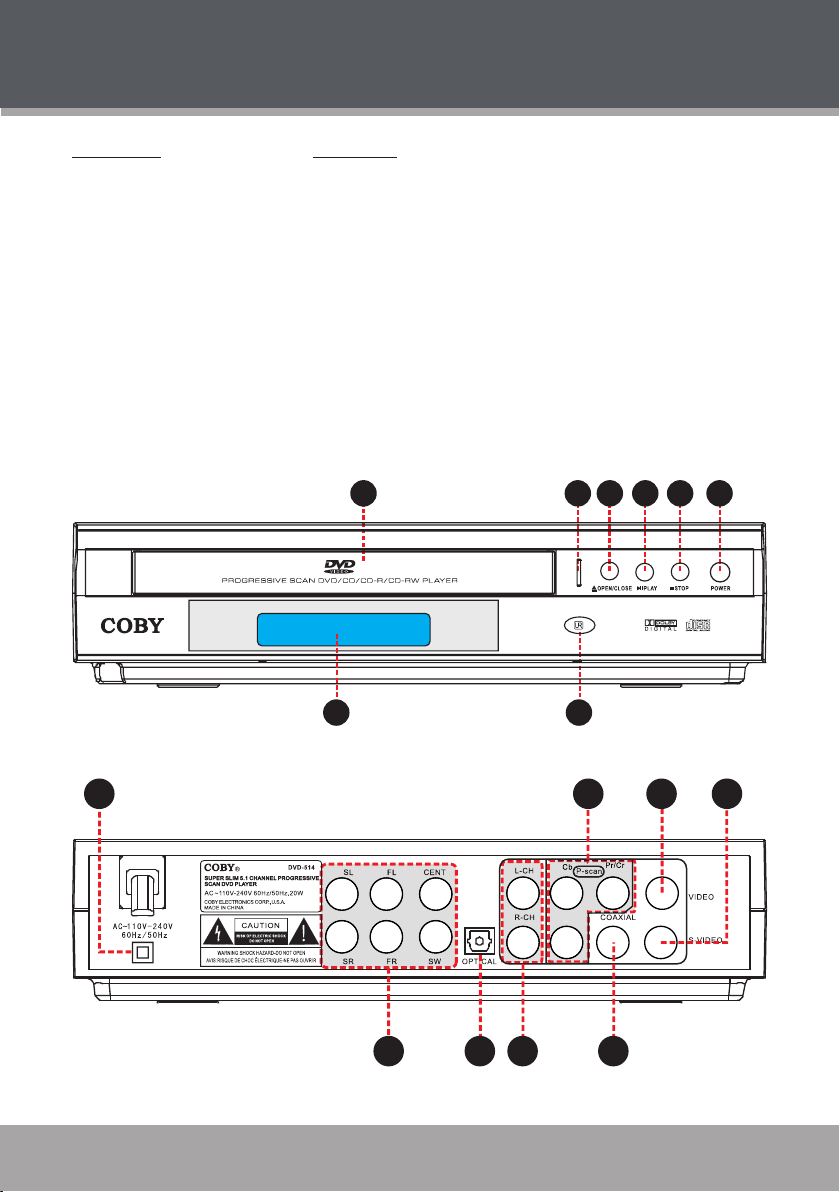
LOCATION OF CONTROLS
7 8
21 3 4 5 6
Y
13 14 15 16
10 11 129
Front Panel
Disc Tray
1.
Power Indicator
2.
Open/Close Button
3.
Play/Pause Button
4.
Stop Button
5.
Power Button
6.
Front Panel Display
7.
Remote Control Sensor
8.
Rear Panel
AC Power Cord
9.
Component Video Out
10.
(Progressive Scan)
Composite Video Out
11.
S-Video Out
12.
5.1-Channel Audio Out:
13.
SL (Surround Left)
SR (Surround Right)
FL (Front Left)
CENT (Center)
SW (Subwoofer)
Optical Digital Audio Out
14.
2.1-Channel Audio Out:
15.
L-CH (Left Channel)
R-CH (Right Channel)
Coaxial Digital Audio
16.
Out
Page 10

Page 10 Coby Electronics Corporation www.cobyusa.com Page 11
LOCATION OF CONTROLS
1
2
3
4
5
6
8
7
9
10
11 12 13 14
15
16
17
19
21
18
20
22
23
2425
Remote Control
Power/Standby
1.
Title
2.
Subtitle
3.
Menu PBC
4.
Audio
5.
Mute
6.
Program
7.
Setup
8.
Navigation Keypad
9.
Slow
10.
Play/Pause
11.
Stop
12.
Prev/Rev
13.
Next/Fwd
14.
Step
15.
Volume + / -
16.
Progressive Scan
17.
Zoom
18.
Repeat A-B
19.
Repeat
20.
Clear
21.
Numeric Keypad
22.
Open/Close
23.
On-Screen Display
24.
Angle
25.
The remote control transmits a directional infrared beam. Be sure to aim the remote control directly at the infrared remote sensor during operation. The sensor may not be able
to receive signals properly if the sensor is covered, if there is a large object between the
remote control and the sensor, or if it is exposed to direct sunlight or a strong articial light
(e.g., uorescent or strobe lights). In this case, change the direction of the light or reposi-
tion the unit to avoid direct lighting.
Page 11

CONNECTIONS
S-VIDEO
Composite Video
2-Channel Audio
5.1-Channel Audio
S-VIDEO Cable
Optical
Input
Coaxial
Input
Y
Amplifier with 5.1-ch
RCA Jacks
Amplifier with
Digital Decoding
Connect the AC power
cord to the wall outlet
AFTER all other cables
are connected.
Connect only one type
of audio or video
connection at a time to
minimize interference.
Audio/ Video Connections at a Glance
Page 12

Page 12 Coby Electronics Corporation www.cobyusa.com Page 13
CONNECTIONS
Gre en
Yell ow
To TV Co mposite Vide o Input
To TV Co mponent Vide o Input
RedBlu e
Y
Y
Connect the player’s Composite Video Output to the TV’s
Composite Video Input (yellow).
Connect the player’s 2-Channel L&R Audio Outputs to the
TV’s L&R Audio Inputs (red/white).
Connect the player’s Component Video Output to the TV’s
Component Video Input (red/green/blue).
Connect the player’s 2-Channel L&R Audio Outputs to the
TV’s L&R Audio Inputs (red/white).
The player is equipped with composite AV outputs at the
rear panel (yellow/red/white). Your TV will require at least
one set of AV inputs. The supplied AV patch cord will
connect your player’s AV output to your TV’s inputs.
Depending on the brand of your TV, you may need to
press a button labeled “Line”, “Input”, or “Video/TV” in
order to set your TV to the correct input line. This will
switch the TV from broadcast reception mode to on of
the AV input signals. (Some TVs may have more than
on AV input line.
The player is equipped with 2-channel stereo or 5.1channel surround sound outputs on the rear panel. For
stereo or surround sound, a Stereo TV or Surround AV
receiver is necessary. For Mono TVs, you can connect
either the Left or Right stereo audio output to the Mono
TV’s audio input.
Whi te
Red
Whi te
Red
Standard Television Connection
Progressive Scan Video (480p) Connection
Page 13

CONNECTIONS
Use only ONE of the following connections to
avoid signal interference:
1) 5.1-Channel Audio Out
2) Optical Digital Audio Out*
3) Coaxial Digital Audio Out*
*requires a Digital Decoding Amplifier
Component or Composite
Video Connection
Component or Composite
Video Connection
Digital Output can be output in two formats: Raw or PCM. For
more information, please see the “Setup > Audio Settings”
section of this manual or refer to your amplifier’s documentation.
Stereo (2-Channel) Audio Connection with Amplier
Surround (5.1-Channel) Audio Connection
with Amplier
Page 14

Page 14 Coby Electronics Corporation www.cobyusa.com Page 15
GETTING STARTED
Remote Control
Refer to the diagram. Remove the battery
•
compartment cover located on the rear of the
remote control. Insert batteries, making sure
to match their polarities (+/-) to the markings
on the inside of the compar tment. Replace
the cover.
To use the remote, point it at the remote sen-
•
sor of the player. Operate the remote within
15 feet of the sensor and at an angle of +/- 60
degrees.
Batteries in the remote will last for approxi-
•
mately 1 year. Replace the batteries if the
remote control does not work. Do not mix old
with new batteries, or different types of bat-
teries.
Remove the batteries from the remote if it will
•
not be used for a long period of time.
WARNING
The batteries used in the remote control may present a re or chemical burn if mistreated. Do
•
not recharge, disassemble, incinerate, or heat the battery (~212○F).
Keep batteries away from children.
•
Power Supply
This unit should be used with 100-240V 50/60Hz AC wall outlets, only.
Caution:
Do not connect the power plug to a power outlet other than that which is indicated here and
•
on the label as this may result in the risk of re or electric shock.
Do not handle the power plug with wet hands. Doing so may cause electric shock.
•
Page 15

BASIC OPERATIONS
Basic Playback
Prepare the connections and power supply.
1.
Set the Power Switch to the ON position to turn the player on.
Load a disc.
2.
Press the Open/Close button to open the disc tray. Insert a disc with the label-side up.
Press the Open/Close button again to close the disc tray.
If a single-sided disc is inserted upside-down, the player will display “NO DISC” or
•
“BAD DISC”.
Start playback.
3.
Press PLAY to start playback (some discs may start playing automatically).
Play/Pause/Stop
Press to play the disc for the rst time.
•
Press during playback to pause. Press again to resume playback.
•
Press during playback to stop the disc (“Pre-Stop”). Press to resume playback at the
•
time-point at which the disc was stopped.
Press when the disc is “Pre-Stopped” to stop playback completely. (When is pressed,
•
the disc will start playing from the beginning.)
Previous/Next (Skip)
Press to skip to the next track (DVD, CD, etc).
•
Press to return to the previous track (DVD, CD, etc).
•
Forward/Reverse (Search)
Press and hold to fast forward through the current track. Continue holding to change
•
the rate of for ward playback.
Normal
Press and hold to reverse through the current track. Continue holding to change the
•
rate of reverse playback.
Normal
Slow
Press SLOW for slow-motion playback. Each successive press of SLOW will change the
•
rate of slow-motion playback. Press to resume normal playback.
Normal
Press STEP frame-by-frame playback. Each successive press of STEP will advance the
video one frame. Press to resume normal playback.
Note:
Audio will be muted during fast-forward, fast-reverse, and slow-motion playback.
x2 x4 x8 x16 x32
x2 x4 x8 x16 x32
x1/2 x1/4 x1/8 x1/16 x1/32
Page 16

Page 16 Coby Electronics Corporation www.cobyusa.com Page 17
BASIC OPERATIONS
Menu Navigation
To navigate DVD disc menus or the player’s setup menus:
Press the NAVIGATION keys (arrows) to select a desired feature or
•
option in the menu.
Press ENTER to conrm a selection in the menu.
•
For some menu options, you may be able to use the numeric
•
keypad to input data.
Clear
Press
•
Numeric Keypad
Use the numeric keypad to skip directly to a DVD chapter or CD track.
•
(Some discs may not allow direct access function.)
Use the numeric keypad to input numeric data in menu option elds
•
when possible.
Adjusting the Volume
Press VOL+ or VOL- to adjust your player’s volume level output.
•
Disc Error Messages
The following messages will be displayed on-screen if there is a problem with the format of the
loaded disc.
WRONG REGIONAL DISC. The region code of the disc does not match the player’s region
•
code (Region 1).
WRONG PASSWORD. The parental rating level of the disc is higher than the parental rating
•
level setting of the player. The player will not play the disc.
WRONG DISC. The player is equipped with automatic disc quality detection software. If the
•
player detects a disc that is damaged or has a format problem, it may play the disc at a lower
quality or stop play completely, depending on how damaged the disc is.
DTS Discs: This player does not have a built-in DTS decoder.
•
•
•
to cancel an entry.
Connect to a digital amplier using a Digital Audio Connection (optical or coaxial) to
enjoy DTS audio discs.
Select Dolby 5.1 or 2-Channel Stereo Downmix instead of the DTS setting.
Note:
DVD disc production quality may vary; some discs may deviate from the industry standard.
Some incorrectly-formatted discs may still play, however, the playback and operational quality of
the disc may be substandard.
Power Management
If the player will not be in use for a long period of time, set the Power Switch to the OFF position,
unplug the player, and remove the batteries from the remote control.
Page 17

PLAYER FUNCTIONS
OSD Time Info: DVD
ENG1/1
CH1/1
OSD Status Info: DVD
1/20
OSD Time Info: CD
Tracks Time
Menu / Title
Press the MENU/PBC key during DVD playback to return to the disc’s Main menu.
•
Press the TITLE key during DVD playback to return to the disc’s Title menu.
•
Setup
Press the SETUP key to enter the player’s setup menu. Enter the Setup menu to adjust the player’s internal settings; please see the SETUP section for more details.
On-Screen Display
The On-Screen Display (OSD) indicator is a user-friendly interface designed to display playback
type status. The OSD indicator will display information based on the type of disc that has been
loaded (i.e., DVD or CD).
Press the OSD key once to show time information on-screen; press it twice to show status information on-screen; press it a third time to exit the on-screen display mode. The on-screen display
will disappear automatically if another function key is pressed.
Repeat Mode
Press REPEAT to change the repeat mode of the player. Each successive press of REPEAT will
change the mode as follows:
DVD Mode CD Mode
REPEAT x1 Repeat Title Repeat Track
REPEAT x2 Repeat Chapter Repeat Disc
REPEAT x3 Repeat Off Repeat Off
Note:
Some DVD discs do not allow Repeat mode.
Page 18

Page 18 Coby Electronics Corporation www.cobyusa.com Page 19
PLAYER FUNCTIONS
Repeat A-B Mode
To repeat a specic section of a disc (play on a loop):
Press A- B to set the desired start point (“A”) of the section to be repeated.
1.
Press A- B again to set the desired end point (“B”) of the section to be repeated.
2.
The section “A-B” will now play repeatedly as a loop. Press A- B again to resume normal
3.
playback.
Multi-Angle/Subtitle/Audio
During playback of a DVD that has been mastered with multiple angles, press ANGLE to view
•
the available alternate camera angles. (A DVD may have up to 9 selectable angles.)
During playback of a DVD that has been mastered with subtitles, press SUBTITLE to view the
•
available subtitle tracks. (A DVD may have up to 32 selectable subtitles.)
During playback of a DVD that has been mastered with alternate language/audio tracks, press
•
AUDIO to hear the alternate tracks. (A DVD may have up to 8 selectable audio tracks.)
Zoom
Press ZOOM to change the magnication level of the picture.
During DVD playback, each successive press of ZOOM will change the level of magnication
•
to: Zoom x2, Zoom x4, Normal.
During JPEG CD playback, each successive press of ZOOM will change the level of magni-
•
cation to: 25%, 50%, 100%, 150%, 200%.
When the magnication level is greater than Normal/100%, use the NAVIGATION keys to pan
around the magnied picture.
When the magnication level is equal to 100%, use the NAVIGATION keys to rotate the picture.
Note: The picture quality will decrease as the zoom level (magnication) increases.
Program/Random
To play tracks in random order, press PROGRAM twice to display “Random” and then press ENTER to conrm.
To create a custom sequence of tracks to be played, press PROGRAM three times to display
“PROGR AM” and then press ENTER to conrm.
(Program mode is available only when the player is in NAVIGATE OFF mode. Press the PBC
key to set the player to NAVIGATE OFF mode.)
Note:
Use the numeric keypad to input numbers directly to the elds. Use the navigation keys to move
between entry elds.
Page 19

PLAYER FUNCTIONS
DVD Program Mode
Load a DVD and enter Program mode.
•
Use the navigation keys to select a eld.
•
Use the numeric keypad to enter track num-
•
bers in the left “Tt” columns (or press CLEAR
to delete).
Use the numeric keypad to enter chapter
•
numbers in the right “Chp” columns (or press
CLEAR to delete).
To start over, use the navigation keys to select “Clear All” to delete all Track/Chapter selec-
•
tions.
To play your programmed selections, use the navigation keys to select “Play” or press PRO-
•
GRAM to cancel.
CD Program Mode
Load a CD and enter Program mode.
•
Use the navigation keys to select a eld.
•
The left column designates the program order
•
number.
Use the numeric keypad to enter track
•
numbers in the right “Trk” columns (or press
CLEAR to delete).
To start over, use the navigation keys to select “Clear All” to delete all Track selections.
•
To play your programmed selections, use the navigation keys to select “Play” or press PRO-
•
GRAM to cancel.
Page 20

Page 20 Coby Electronics Corporation www.cobyusa.com Page 21
SETUP
Enter Setup mode to adjust the various internal settings
of the player. Make sure the player has been completely
stopped before entering Setup mode.
Press SETUP to enter Setup mode.
1.
Use the NAVIGATION keys to select a desired item.
2.
Press ENTER to conrm a selection.
3.
Press SETUP to exit Setup mode (or select EXIT
4.
and press ENTER).
Language Settings
Use the NAVIGATION keys to highlight the desired language selection and press ENTER to conrm.
Item Description Default Setting
OSD
Menu Sets the default menu language of loaded DVDs. English
Audio
Subtitle Sets the default subtitle track of loaded DVDs. English
Screen Saver
Default Resets all settings to their factory-default state.
Sets the language of the player’s on-screen
display.
Sets the default language audio track of loaded
DVDs.
The screensaver prevents burn-in damage to the
player’s screen.
English
English
On
Display Settings
Use the NAVIGATION keys to highlight the desired display selection and press ENTER to conrm.
Item Description Default Setting
Aspect Ratio
TV Type
Video Out
Sets the aspect ratio of the display. 4:3 is used
with standard television displays; 16:9 is used
with widescreen television displays.
Sets the player’s Video Out signal type. Set this
to correspond with your T V’s Video System type.
NTSC is the standard used in North America.
Sets your player’s video output mode. Set this to
correspond with the type of connection used with
your TV.
S-Video+CVBS: S-Video or Composite Video
P-Scan: Component Video (Progressive Scan)
YUV: Component Video
4:3L-Box (Letterbox)
NTSC
S-Video+CVBS
Page 21

SETUP
Speaker Settings
Use the NAVIGATION keys to highlight the desired speaker selection and press ENTER to conrm.
Item Description Default Setting
3D/EQ
Reverb
Surround Delay Sets the surround delay (in milliseconds). 0ms
Center Delay Sets the center delay (in milliseconds). 0ms
Audio Settings
Use the NAVIGATION keys to highlight the desired audio selection and press ENTER to conrm.
Item Description Default Setting
SPDIF Digital
Channel Output
Sets the audio equalizer option (Off, 3D, Rock,
Classic, Jazz, Pop).
Sets the audio reverb effects option (Normal,
Living Room, Hall, Arena, Cave, Concert Hall,
Bathroom, Church).
Sets the digital audio output signal type (PCM,
RAW, OFF). For use with 5.1-channel digital
decoding receivers (see your receiver’s manual
for more information).
Sets the audio channel mix mode (5.1 Channel,
LT/RT, Stereo).
Off
Off
RAW
Stereo
Parental Settings
Use the NAVIGATION keys to highlight the desired parental selection and press ENTER to conrm.
Item Description Default Setting
Password
Change Password
Rating Level
You must input the four-digit password to access the Parental settings.
The initial password is 8888.
Enter the old password, the new password, and then the new password
again to verify and change the Parental Settings password. Restoring the
player’s default settings will not reset the password. DO NOT FORGET
THE PASSWORD; this password cannot be reset.
Sets the maturity rating level of the player. The
player will not play any discs rated higher than this
setting.
There are eight rating levels. Level 1 will restrict
playback to discs suitable for people of all ages.
Level 8 will allow playback of all discs, including
those suitable for adults only.
8
Page 22

Page 22 Coby Electronics Corporation www.cobyusa.com Page 23
SPECIFICATIONS
Display Type Front Panel, On-Screen
Disc Support DVD, DVD±R/RW, CD, CD-R/RW, JPEG
Video Output Component Video (Progressive Scan)
Audio Output Optical Digital Audio
Digital Audio Decoders Dolby Digital
Video System NTSC/PAL
Power AC 100-240V
Unit Dimensions 8.86” x 2.0” x 10.43” (WHD)
S-Video
Composite Video
Coaxial Digital Audio
RCA 5.1-Channel Surround Audio
RCA 2-Channel Stereo Audio
20W (max)
Specications and manual are subject to change without notice. 514SS
Page 23

TROUBLESHOOTING
If you have a problem with this player, please read the troubleshooting guide below and check
our website at www.cobyusa.com for Frequently Asked Questions (FAQs) and rmware updates.
If these resources do not resolve the problem, please contact Technical Support.
COBY Electronics Technical Support
56- 65 Rust Street
Maspeth, NY 11378
Hours: 8:00 AM–11:00 PM EST, seven days a week.
Email: techsupport@cobyusa.com
Phone: 718-416-3197, 800-681-2629, or 800-727-3592
Web: www.cobyusa.com
There is no power to the device.
Ensure that the Power Switch on the main unit is physically set to the ON position.
•
Ensure that the AC adapter cord is securely connected to the player and the proper wall outlet.
•
The device will not play the disc.
Ensure that a supported disc is loaded in the player label-side up.
•
Ensure that the disc’s rating level does not exceed the player’s parental rating level.
•
Ensure that the disc is not damaged or too dirty. Clean the disc or try another disc.
•
Moisture may have condensed inside the player. Remove the disc and leave the player on for
•
1-2 hours and then try again.
There is no picture.
Ensure that the T V set has been powered on and is set to the correct AV mode.
•
Ensure that the connections between the player and the TV are secure and correct.
•
Check if the connection cables are damaged.
•
Restore the player to it’s factory-default settings: open the disc tray, and then press PRO-
•
GRAM and ZOOM together.
The picture is noisy or distorted.
The disc may be damaged or dirty. Clean the disc or try another one.
•
Reset your TV’s color system.
•
Ensure that the player is connected directly to the TV (and not through a VCR, cable box,
•
satellite receiver, etc.)
The picture is not full-screen.
Change the aspect ratio setting of your player from the Setup menu.
•
Select a different aspect ratio option from the DVD disc menu.
•
Page 24

Page 24 Coby Electronics Corporation www.cobyusa.com Page 25
TROUBLESHOOTING
There is no sound or distorted sound.
Ensure that the T V and amplier have been turned on and properly set up.
•
Ensure that the T V and amplier connections are secure and correct.
•
Try a different Audio track of the DVD by pressing AUDIO.
•
Ensure that the MUTE function of the TV, Amplier, or Player is not engaged.
•
The remote control doesn’t work.
Ensure that the Power Switch has been physically set to the ON position.
•
Ensure that there are no obstacles between the remote and the player.
•
Point the remote at the remote sensor on the main unit.
•
Ensure that the batteries in the remote retain a charge and have been installed correctly.
•
Try replacing the remote’s batteries.
•
The player has malfunctioned.
Unplug the player. After 30 minutes, plug in and power on the player -- the restore function
•
should reset the player.
Page 25

NOTES
Page 26

Page 26 Coby Electronics Corporation www.cobyusa.com Page 27
NOTES
Page 27

NOTES
Page 28

COBY Electronics Corp.
56- 65 Rust Street
Maspeth, NY 11378
ww w.cobyusa.com
ww w.ecoby.com
 Loading...