

Page 1
CX-R60
Voice-Activated Cassette Recorder with
Integrated Speaker
INSTRUCTION MANUAL
Please read this manual carefully before operation.
Page 2
www.cobyusa.com Page 3
PRECAUTIONS
The lightning as h with arrowhead symbol within an e quilateral triangle
is inten ded to aler t the user to the presenc e of uninsulate d “dangerous
voltage” within the product ’s enclo sure that may be o f sufcient m agnitude to co nstitute a risk of electr ic shock.
The exclamatio n point with in an equilat eral triang le is intende d to alert
the u ser to th e presence of impor tant oper ation and servicing instructions in t he literature ac companying the a ppliance.
For Cus tomer Use:
Enter bel ow the serial numb er that is located on the unit . Retain this information f or
future r eference.
Model N o. CX-R60
Seria l No.
WARNI NG:
To prevent re or shock hazard, do not expose thi s device to rain or moisture. Dangerous high
voltage is presen t inside the enclo sure. Do not open th e cabinet.
CAUTIO N:
To prevent elec tric shock, match wide bl ade of plug to wide sl ot of outlet and fully inser t.
PROTECT YO UR HEAR ING:
Hearing experts advise against th e constant use of p ersonal stereo s played at high
volume. C onstant exposur e to high volumes ca n lead to hearing l oss. If you should
experi ence ringing in t he ears or hearin g loss, discont inue use and seek me dical advice.
Speci cations and manua l are subje ct to chang e withou t prior notice.
For recycl ing or disposal infor mation about this product, plea se contact your loca l
author ities or the Elec tronics Indus tries Alliance: www.eiae.org.
Page 2 Coby Electron ics Cor por ation
Page 3

IMPORTANT SAFETY INSTRUCTIONS
Read Ins truct ions: All th e safety and oper ating inst ructio ns should be read
1.
before th e product i s operate d.
Retai n In stru ction s: Th e s afety and oper ating instruction s s hould be re-
2.
tained fo r future re ference.
Heed Warni ngs: A ll war nings on the product an d in the op erating instruc-
3.
tions sho uld be adhe red to.
Follow Instru ction s: All operating and u sage instructio ns should be fol-
4.
lowed.
Cleani ng: Un plug th is pro duct f rom t he wall outlet befor e clea ning. D o not
5.
use liqui d cleaner s or aeroso l cleaner s. Use a damp c loth for c leaning.
Attac hment s: Use only at tachme nts recom mended by th e m anufact urer.
6.
Use of othe r attach ments may be ha zardou s.
Water and Mo isture: Do not use thi s produ ct near water (e.g., near a b ath
7.
tub, washb owl, kitc hen sink, la undry tu b, in wet base ments, or ne ar a swim ming poo l and the like).
Acces sorie s: Do not place this pro duct on an
8.
unstabl e ca rt, stand, tripod , bra cket, o r ta ble.
Use onl y with car ts, sta nds, tr ipods, brackets , or
tables rec ommended by the manufac turer or sold
with the product. Any mounting of the product
should follo w the manufacture r’s instruct ions and
should use a mountin g acce ssor y reco mmended
by the manuf acturer.
A p roduct and ca rt combination should be moved
9.
with care. Quick stops, excessive force, and uneven
surfa ces may cau se the prod uct and ca rt comb ination t o overtur n.
Ventila tion: Slot s and openings in the c abinet are provi ded for ventila tion to
10.
ensure reliab le ope ration of th e pro duct a nd to protect it from overheat ing.
These opening s sho uld neve r be blocked by placing the p roduct on a bed,
sofa, rug, or other sim ilar surf ace. This product s hould not be place d in a
built-i n inst allatio n suc h as a bo okcase or rack u nless proper ventilation is
provide d or the manu facturer i nstruc tions have b een adhere d to.
Power Sources: This product should be operated only from the type of
11.
power so urce ind icated o n the rat ing label . If you ar e not sure of the ty pe of
power supp ly to your home, con sult your prod uct dealer or lo cal power co mpany. For product s intended to ope rate from bat tery powe r or other sourc es,
refer to the o peratin g instruc tions.
Grounding or Polariz ation: This pr oduct may be equip ped with a pol arized
12.
alternating- current line plug that has one blade wider than the other. This plug
will only t into the power outlet in one direction. This is a safety feature. If you
are unable to ins ert the plug fully into the ou tlet, try rever sing the direc tion of
the plug. If the plug shoul d still fail t o t, contac t an electr ician to repl ace the
obsolete outlet. Do not defeat the safet y purpose of the polarized plug.
www.cobyusa.com Page 3
Page 4
www.cobyusa.com Page 5
IMPORTANT SAFETY INSTRUCTIONS
Power- Cord Prot ectio n: Power supply cords sh ould be routed so that th ey
13.
are not likely to b e wa lked on or pinched by i tems placed upon or against
them, paying par ticular att ention to cords at plugs, conven ience recep tacles,
and at the po int which t hey exit fro m the produc t.
Protec tive Attachm ent Plug: The product may b e equippe d with an a t-
14.
tachme nt plug with overload protection. This is a safe ty feature. See the
operati ng i nstruc tions for replac ement or direc tions to reset the protec tive
device. If re placem ent of the plug is re quired, be sur e the serv ice techni cian
has us ed a r eplacem ent plu g that has th e same overlo ad prote ction as the
origin al plug as spe cied by t he manufac turer.
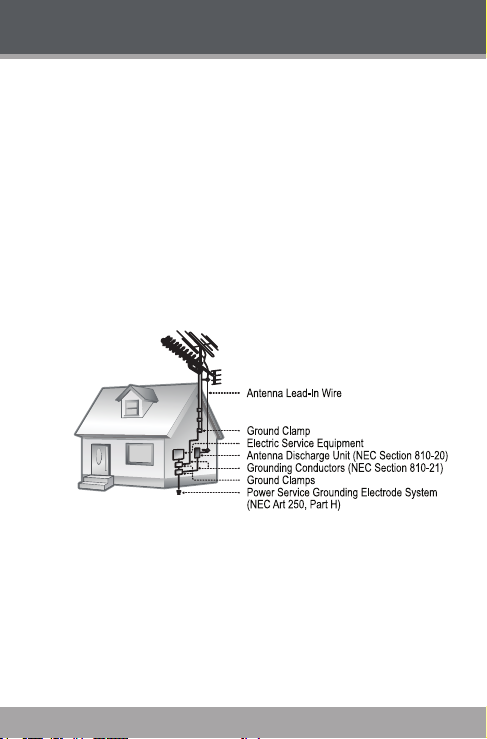
Outdo or Anten na G round ing: If an outside antenna is connec ted to the
15.
produc t, be sure t he antenna system is gro unded so a s to provide some
protect ion agai nst volt age surg es and bu ilt-up static c harges. Arti cle 810 of
the National Electrical Code, ANS/ NFPA 70 provide s i nformat ion with re gard to pro per ground ing of the mast a nd suppor ting str ucture, gr ounding of
the lead -in wire to an an tenna- dischar ge unit, size of gr ounding c onducto rs,
locati on of antenna- discharge unit, co nnectio n to grounding ele ctrode s, and
require ments for t he groundi ng electr ode (see gu re).
Light ning: For added protectio n for th is product, unplug it fr om the wa ll
16.
outlet and disc onnect the antenna or cable system d uring a lightni ng stor m
or w hen i t is left unat tended and unused for long perio ds of time. This will
prevent dam age to the pr oduct due to l ightning o r power-li ne surges.
Power Line s: An outside ant enna system sho uld not be locat ed in the vicin-
17.
ity of overhead powe r lines or other electri c light or power circuit s, or where it
can fall int o such power li nes or circ uits. When i nstallin g an outside a ntenna
system, extreme care sh ould be taken to keep from touchin g such power
lines or ci rcuits, a s contac t with them m ight be fat al.
Overl oading: Do no t overload wall out lets, exten sion cords , or integral con -
18.
venienc e recepta cles as th is can resu lt in a risk of re or elect ric shoc k.
Page 4 Coby Electron ics Cor por ation
Page 5

IMPORTANT SAFETY INSTRUCTIONS
Objec t and Liquid Entr y: Never push ob jects o f any kin d into t his pro duct
19.
through opening s as they m ay touch d angerous voltage points o r shout- out
parts t hat could res ult in a re or elec tric shoc k. Never spill li quid of any kind
on the pro duct.
Serv icing: Do not attemp t to servi ce this pro duct yourself as ope ning or
20.
removin g c overs may expose you to dangerous voltage or other hazards.
Refer all se rvici ng to quali ed serv ice per sonnel.
Damag e Req uirin g Ser vice: Unpl ug th is pro duct from the wall o utlet and
21.
refer ser vicing to qu alied se rvic e personn el under the fo llowing co ndition s:
a) when the power- supply or plug is dam aged; b) if liquid has been spilled
or if obj ects have f allen into the prod uct; c) if the product has been ex posed
to rain o r water; d) if the pr oduct do es not op erate nor mally by f ollowin g the
operati ng instru ctions. Adjust only t hose controls that a re covere d b y t he
operati ng instruc tions as impro per adjustme nt of other contro ls may result in
damage and wi ll often req uire extens ive work by a quali ed technic ian to restore the pr oduct to it s normal op eration; e) if the pr oduct has b een droppe d
or damaged in any way; f ) when the prod uct exhibit s a distinct change in
perfo rmance —this indicat es a need for s ervic e.
Replac ement Parts: When replacement parts are required , be sure that
22.
your ser vice te chnicia n has used replace ment par ts specied by t he manufacture r or have th e same ch aracter istics as the or iginal pa rt. Un authori zed
substit utions may r esult in re , electr ic shock, o r other haz ards.
Safet y C heck: Upon co mpletion of any service or repair s to this pr oduct,
23.
ask the ser vice technicia n to perfo rm safet y checks to en sure that th e product is in pr oper oper ating con dition.
Wall or Ceilin g Mount ing: The product should be mounted to a wall or
24.
ceiling o nly as rec ommende d by the manuf acturer.
Heat: The produc t shou ld be situated away from heat source s suc h as ra-
25.
diators , heat registers, stoves, or other pro ducts (inclu ding a mplie rs) that
produc e heat.
www.cobyusa.com Page 5
Page 6

www.cobyusa.com Page 7
TABLE OF CONTENTS
PRECAUTIONS ...................................................................................... 2
IMPORTANT SAF ETY INSTRUCT IONS ................................................... 3
TABLE OF CO NTEN TS ........................................................................... 6
FEATU RES .............................................................................................. 7
GET TING S TARTE D ................................................................................8
CX-R60 a t a Glance ........................................................................................ 8
Front View .............................................................................................8
Rear View ..............................................................................................9
Connec ting Power .........................................................................................10
Loading B atter ies ................................................................................10
AC Adapter (Optional)......................................................................... 10
Connec ting an Externa l Microphone (Optional) ...........................................10
Connec ting Hea dphones (Optional) .............................................................11
OPER ATION ........................................................................................ 12
Making a Recording .......................................................................................12
Setting the Record Sensi tivit y ............................................................ 12
Setting the Record Speed ..................................................................13
Setting Voice Act ivated Sy stem Reco rding ( VOX) ............................13
Playing a Re cordin g ......................................................................................14
Erasing a Recording ...................................................................................... 14
SUPPORT ............................................................................................. 15
Page 6 Coby Electron ics Cor por ation
Page 7

FEATURES
Voice Act ivated Rec ording S ystem
Integra ted Omni -Dire ctiona l Microphone
High- Output Speaker
LED Reco rding Indicator
Headphone Jack fo r Private L istening
Microphone Jac k for Optional Ex ternal Microphones
Require s 2 x “AA” Batte ries (not in cluded)
www.cobyusa.com Page 7
Page 8

www.cobyusa.com Page 9
CX-R60 at a Glance
6
1
7
11
12
13
9
10
8
2
3
4
5
Front View
Integra ted Micr ophone
1.
Record I ndicator
2.
Headphone Out
3.
Microphone In (E xtern al)
4.
Volume Dial
5.
Rewind
6.
Fast Forward
7.
GETTING STARTED
Stop
8.
Record
9.
Play
10.
Casset te Compa rtment Door
11.
Casset te Door W indow
12.
Integra ted Speake r
13.
Page 8 Coby Electron ics Cor por ation
Page 9

GETTING STARTED
SPEED PAUSE VAS
LOW NOR OFF ON OFF ON
1
2
3
4
5
Rear View
Speed Switc h
1.
LOW, NOR (Nor mal)
Pause Sw itch
2.
OFF, ON
Voice Activated System (VAS) Swi tch
3.
OFF, ON
Batter y Comp artment Door
4.
Power In (D C 3V)
5.
www.cobyusa.com Page 9
Page 10

www.cobyusa.com Page 11
GETTING STARTED
Conne cting Power
The CX-R60 opera tes on DC 3V po wer (2 x “AA” batteries).
Loading Ba tte ries
Open the B atter y Compa rtmen t Door.
1.
Inser t 2 x “AA” batte ries, t aking ca re to match t he “+” and “–” polar end s
2.
of the bat teries w ith the ma rkings i nside the c ompar tment.
Close th e Batter y Compartme nt Door.
3.
Please n ote that the cover is hing ed; do no t attem pt to re move
the cover.
Alkalin e-type batte ries are r ecommended.
Remove the ba tterie s fro m the recor der i f it will be un used f or
more than 3 0 days.
AC Adapter (Optional)
The CX-R60 may be powered by an AC ada pter with D C 3V output t hrough
the Power In jack loc ated on the b ottom of t he recor der.
Conne cting an Ex ter nal Microphone (Option al)
The CX-R60 is equip ped with both an inte grated mi cropho ne and a micr ophone inp ut jack that can be use d to conne ct an external mic rophone.
The MIC In jack will a ccept mi cropho nes with a 3 .5mm co nnector plug.
If an exter nal microphone i s connec ted to the M IC In jack, the integr ated
microp hone will b e disabled.
Page 10 Coby Electron ics Cor por ation
Page 11

GETTING STARTED
Conne cting Headphon es (Optional)
The CX-R60 is equip ped with both an inte grated sp eaker and a he adphone
output jack that can be used to c onnect h eadphon es or an exte rnal spe aker
system.
The Head phone Out jack will a ccept he adphone s or speakers with a
3.5mm c onnect or plug.
If headph ones or sp eakers are connec ted to the He adphone O ut jack,
the integ rated spe aker will be d isabled.
www.cobyusa.com Page 11
Page 12

www.cobyusa.com Page 13
OPERATION
Making a Reco rdin g
A casset te shoul d be loade d in the Cassette Co mpart ment. The side that
will be recorded t o should fa ce out and b e visible t hrough t he Casset te
Compar tment w indow.
Press and together to start re cordin g. The Rec ord Indic a-
1.
tor be lit du ring rec ording.
Speak into the int egrated microphone located at the top of
the recorder. If you have connecte d an optio nal, external micropho ne to the M icroph one In jack locate d at the top of the
recorder, the integr ated mic rophone w ill be disabled.
Set the PAUSE switch t o the “On” p osition to pa use rec ording .
Return the PAUSE switch to the “ Off ” position to re sume recordin g.
If the VAS (Voice Activated System) switch is set t o the “On”
positi on, the rec order will pause recording automatically when
no sound is detected.
Press to stop rec ording.
3.
If a casset te is loaded but the button is locked, make
sure that the record protecti on tab has not been removed from
the top of the casset te tape.
Sett ing t he Record Speed
Set the SPEED switch to the “Nor” (normal) posit ion to rec ord at a
normal speed. The available r ecording time wi ll be the same as the
rated rec ording t ime of a cas sette t ape.
Set the Speed switc h to the “L ow” position to re cord at a lo wer speed.
This will double th e available recording time of a c asset te tape (tapes
rated for 9 0 minute s will be ex tended to 18 0 minutes).
Page 12 Coby Electron ics Cor por ation
Page 13

OPERATION
Sett ing Voi ce Activated System Re cordi ng (VOX)
Set the VAS swi tch to the O FF position to record from t he microphone
contin uously wh en recording.
Set the VAS swi tch to the O N positi on to reco rd from th e microp hone
only when sound is det ected.
The beginning of the recording may be clippe d slightly when
VAS is active.
The recor der will pause automatically after 2 to 6 seconds of silence. A chang e in speaking volume will not cause the recor der
to p ause. Set the Pause switc h to the “ON ” positi on t o pau se
recording manually.
A distanc e of approxi mately 8 inches should be maintain ed between the speaker and the integr ated microphone at normal
speaki ng levels.
The integ rated audi o level detector will set the r ecordi ng sensi tivity automati cally whe n VAS is active.
www.cobyusa.com Page 13
Page 14

www.cobyusa.com Page 15
OPERATION
Playing a Recording
A casset te shoul d be loade d in the Cassette Co mpart ment. The side con taining the reco rding sho uld face o ut and be vis ible through the Ca ssette
Compar tment w indow.
Press to star t playbac k of the cas sette t ape.
1.
Press to spool the tape for ward quickly (fast forward).
Press to resume playback.
Press to spo ol the tape in reverse quickly (rewind).
Press to resume playback.
Set t he PAUSE switch to the “On” positi on to pause playback.
Return the PAUS E switch to the “ Off ” po sition to re sume p layback.
Set the S PEED swi tch to match the s peed at w hich the recor d-
ing was mad e (Low or Nor mal).
Adjust th e VOLUME di al to adjust the volume level.
Eras ing a Re cordi ng
To erase a reco rding, record over t he secti on of the ca ssette t ape that
contains the rec ording.
Page 14 Coby Electron ics Cor por ation
Page 15

SUPPORT
If you have a pr oblem with this devi ce, plea se check o ur website a t www.
cobyus a.com for Frequentl y Asked Que stions (FAQs) and rmware
updates . If these re sources do not res olve the pr oblem, please contact
Technical Suppor t.
COBY Ele ctron ics Techni cal Sup port
Addres s: 56- 65 Rust S t.
Hours: Monday to Fr iday, 8:00 AM –11:00 PM EST
Phone: 718-416- 3197 or 800 -681-2629
Email:
Web:
Maspet h, NY 11378
Saturday t o Sunday, 8:00 A M–11:00 PM EST
techsup port @cobyus a.com
www.c obyusa.c om
www.cobyusa.com Page 15
Page 16

COBY Electronics Corp.
56- 65 Rust Street
Maspeth, NY 11378
ww w.cobyusa.com
ww w.ecoby.com
 Loading...