

Page 1
CX-CD377
Micro CD Player Stereo System with
AM/FM Tuner
INSTRUCTION MANUAL
Please read this manual carefully before operation.
Page 2
www.cobyusa.com Page 3
PRECAUTIONS
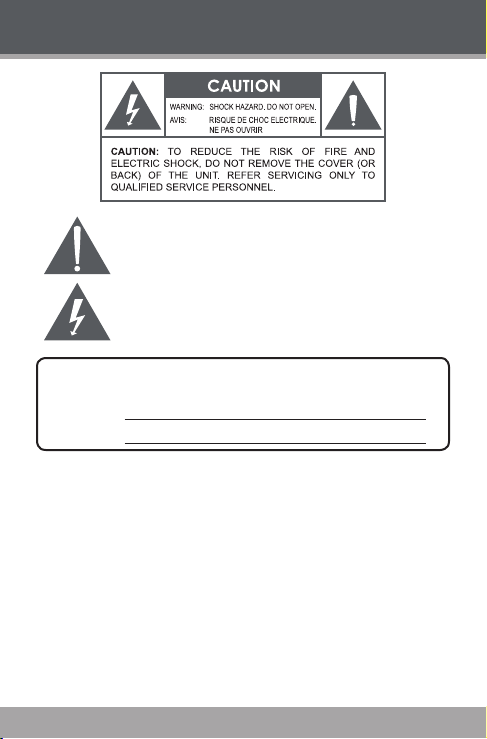
The lightning as h with arrowhead symbol within an e quilateral triangle
is inten ded to aler t the user to the presenc e of uninsulate d “dangerous
voltage” within the product ’s en closure that m ay be of sufc ient magnitude to co nstitute a risk of electr ic shock.
The exclamatio n point with in an equilat eral triang le is intende d to alert
the u ser to th e presence of impor tant oper ation and servicing instructions in t he literature ac companying the a ppliance.
For Cus tomer Use:
Enter bel ow the serial numb er that is located on the unit . Retain this information f or
future r eference.
Model N o. CX-CD37 7
Seria l No.
WARNI NG:
To prevent re or shock hazard, do not expose thi s devic e to rain or moist ure. Dangerous high
voltage is presen t inside the enclo sure. Do not open th e cabinet.
CAUTIO N:
To prevent elec tric shock, match wide bl ade of plug to wide sl ot of outlet and fully inser t.
WARNI NG:
Handlin g the cords on this pro duct will expose yo u to lead, a chemi cal known to the State
of C alifornia to caus e cancer, and birth defects or other reproduc tive harm. Wa sh hands
afte r handling.
PROTECT YO UR HEAR ING:
Hearing experts advise against th e constant use of p ersonal stereo s played at high
volume. C onstant exposur e to high volumes ca n lead to hearing l oss. If you should
experi ence ringing in t he ears or hearin g loss, discont inue use and seek me dical advice.
Page 2 Coby Electron ics Cor por ation
Page 3
PRECAUTIONS
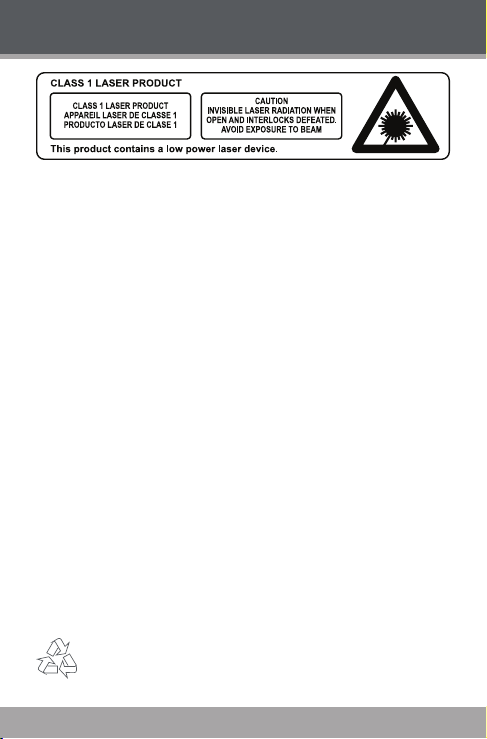
ON PROTEC TION AGAINST L ASER ENERGY EX POSURE
As the las er beam used in this c ompact disc playe r is harmful to the eye s, do not attempt
to disassemble the casing .
Stop ope ration immediately if any li quid or solid obje ct should fall int o the cabinet.
Do not put anyt hing in the s afety slot. If you do, the laser diode w ill be ON when the C D
door is st ill open.
If the uni t is not to be us ed for a long per iod of t ime, make s ure that all power sources
are disc onnected fro m the unit. Remove all batteries from the ba ttery compartment, and
unplug t he AC-DC ad apter from the wall outlet. M ake it a practi ce to remove th e AC-DC
adapter by g rasping the main b ody and not by pulling the cord .
This unit employs a laser. The use of control s or adjustment or perfor mance of proce-
dures oth er than those spe cied here may re sult in exposure to hazardo us radiation.
ON PLACE MENT
Do not use t he unit in places wh ich are extreme ly hot, cold, dust y, or humid.
Place th e unit on a at and even sur face.
Do not rest rict th e air ow of the u nit by placing it in a plac e with poor ventilation, by
coveri ng it with a cloth, or by placing i t on a carpet.
ON COND ENSATION
When l eft in a he ated room w here it is w arm and damp, water droplets or condensatio n
may form inside the u nit.
When the re is condensat ion inside the uni t, the unit may not fun ction normally.
Let the unit stand 1 to 2 hour s before turn ing the power on, or gra dually heat the roo m up
and dry t he unit before use.
Should any trouble occur, remove the power source and refer servicing to qualied personnel.
For recycl ing or disposal infor mation about this product, plea se contact your loca l
author ities or the Elec tronics Indus tries Alliance: www.eiae.org.
www.cobyusa.com Page 3
Page 4
www.cobyusa.com Page 5
IMPORTANT SAFETY INSTRUCTIONS
Read Inst ruct ions: All the safet y an d op erating instructio ns s hould
1.
be read before the pr oduct is o perated.
Retai n Instru ctions: The safety and oper ating instr uctio ns should be
2.
retaine d for futu re reference.
Heed Warning s: All warnings on the product and in the op erating
3.
instru ctions s hould be adhered to.
Follow Instr ucti ons: All operat ing and usage in structions should be
4.
followe d.
Cleaning: Unplu g this produ ct from the wall outlet before cleaning.
5.
Do not use liquid cleaners or aeroso l cleaners. Use a damp c loth f or
cleaning.
Attachmen ts: Use on ly attachment s recom mended by the manu fac-
6.
turer. Use of other atta chments may be haza rdous.
Water and Mois ture: Do n ot use this produc t near wate r (e.g., near
7.
a bath tub, washbo wl, kitc hen sink, laundr y tub, i n wet basements, or
near a swim ming poo l and the like).
Acces sorie s: Do not place this produ ct on an
8.
unstable car t, st and, t ripod, bracket , or t able.
Use only with carts, stands, tripods, brackets,
or table s recomm ended by the manufacturer
or sold wit h the produc t. Any mounting of the
produc t shou ld fol low th e manu facturer’s in struc tions and sh ould u se a mountin g acc essory recomme nded by the manufact urer.
A produc t and car t combi nation sh ould be
9.
moved with car e. Quic k stops, excessive forc e, and u neven sur face s
may cause t he produ ct and car t comb ination t o overturn.
Ventil ation: Slots and openings in the cabinet are provi ded for ven -
10.
tilation to ensure reliable operation of the product and to protect it
from overhe ating. These openings should never be blocked by placing
the pro duct on a b ed, sofa , rug, or other similar sur face. This pro duct
should not be placed in a built-in installatio n suc h as a bookcase or
rack unless proper vent ilation is pr ovided or the manufactu rer instructions have b een adher ed to.
Power So urces: This product sh ould be operate d only fr om the t ype
11.
of power source indicated on the rating label. If you are not sure of
the typ e of power supp ly to your hom e, consul t your produ ct dealer o r
local power comp any. For produc ts intended to operate from batter y
power or ot her sourc es, refe r to the oper ating ins truct ions.
Page 4 Coby Electron ics Cor por ation
Page 5
IMPORTANT SAFETY INSTRUCTIONS
Groun ding or Po lariz atio n: This product may be equipped with a
12.
polarized alternating- curren t line plug that has one blade wider than
the ot her. This plug will only t into the power o utlet in one direc tion.
This is a safet y fe ature. If yo u are unable to inser t th e plu g ful ly into
the outlet, try rever sing the direction of th e plug. If the plug should stil l
fail to t, contac t an electri cian to repla ce the obsol ete out let. D o not
defeat th e safety purpose of the polar ized plu g.
Power- Cord Protecti on: Power suppl y c ords should be routed so
13.
that they are not l ikely to be walked o n or pinche d by items placed
upon or agai nst them, paying par ticular attenti on to cord s at plugs,
conveni ence receptacles, and at th e point which they exit from the
produc t.
Protec tive A ttachment Plug: The produc t may be eq uipped w ith an
14.
attac hment plug with overload prote ction. Thi s is a safety feature. See
the operating instructio ns for replacement or di rectio ns to reset the
protective d evice. If replacement of th e plu g is required, be sur e the
service technician has us ed a repla cement plug that has the same
overloa d prote ction as the origin al plug as specied by the manufa cturer.
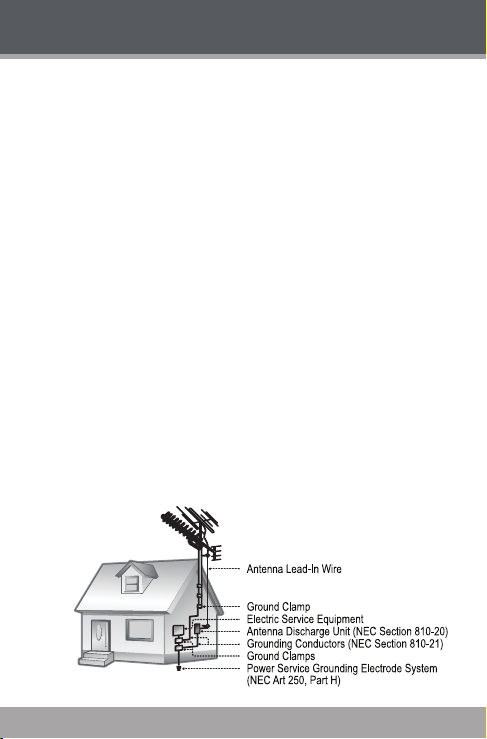
Outdoor Antenna Gro unding: If an outsi de antenna is c onnected to
15.
the prod uct, be sur e the antenn a system is gr ounded so a s to provide
some protection against voltag e s urges and buil t-up static c harges .
Article 810 of the National Electric al Code, ANS/NFPA 70 provides
inform ation w ith reg ard to p roper g roundin g of the mast and suppor ting structure, grounding o f th e le ad-in wire to an antenna -disc harge
unit, size of groundi ng conduct ors, locat ion of antenna- discha rge unit,
connec tion to grounding elect rodes, and req uirement s for the ground -
ing elec trode (see gure).
www.cobyusa.com Page 5
Page 6

www.cobyusa.com Page 7
IMPORTANT SAFETY INSTRUCTIONS
Light ning: For added protection for this pr oduct, unplug i t f rom the
16.
wall outl et and disc onnect the antenna or cable sy stem duri ng a lightning storm or w hen it is left unatten ded a nd unu sed f or lo ng periods
of time. This w ill prevent damage to the product due to lightning or
power-li ne surges .
Power Lines: An outside antenn a system should not be loc ated in
17.
the vicinity of ove rhead power lines o r other electri c light or p ower
circui ts, or where i t can fall into s uch power lines or circ uits. When
installing an o utside antenna sys tem, extrem e c are should be taken
to keep from touchi ng such power lines o r circuits, as co ntact with
them might be fatal.
Overl oadin g: Do not overloa d wall outlets, extension cords, or in-
18.
tegral convenienc e r ecepta cles as this can r esult in a risk of re or
electr ic shoc k.
Objec t and Liquid Entr y: Never push ob jects of any kind i nto this
19.
produc t throu gh open ings as they may tou ch dang erous voltage
points or shout- out parts t hat c ould resul t in a re or e lectr ic shock.
Never spil l liquid of any kind on the p roduct .
Servicing: Do not attempt to se rvic e this product yourself as opening
20.
or removing cover s may expos e you to dangerous voltage or other
hazards. Refer all s ervicing to qual ied service personnel.
Damag e Requir ing Ser vice: Unplug this product fr om the wall out let
21.
and refer servi cing to qualied serv ice personnel under the following conditions: a) w hen the power-sup ply or pl ug is damaged; b) if
liquid has been spilled or if objects have fallen i nto the pr oduct; c) if
the pro duct ha s been ex posed to rain o r water; d) if the produ ct doe s
not operate norma lly by following the o peratin g instr uction s. Adjust
only those controls th at are cover ed by the o perating instructions a s
improp er adj ustment of other c ontrols may result in damage and will
often require extensi ve work by a qualied technician to restore t he
produc t to its normal op eration; e) if the pro duct has been drop ped or
damaged in any way; f) when t he produc t exhibits a distinct ch ange in
perf ormanc e—t his indic ates a need for ser vice.
Repla cemen t Par ts: W hen replacement pa rts are re quired, be sure
22.
that you r serv ice tec hnicia n has use d replacement parts speci ed by
the manufac turer or have the same character istic s as the original part.
Unautho rized substi tutions may result in r e, electric shock , or other
hazards.
Safet y Check: Upon completi on of any service or repai rs to this prod-
23.
uct, ask the ser vice techn ician to perf orm safety checks to ensure that
the prod uct is in proper oper ating co ndition.
Page 6 Coby Electron ics Cor por ation
Page 7

IMPORTANT SAFETY INSTRUCTIONS
Wall or Ceiling Moun ting: T he prod uct sho uld be mounted to a wall
24.
or ceili ng only as re commen ded by the ma nufacturer.
Heat: The product should be situate d away from hea t so urces such
25.
as radiators, heat registers , stoves, or other products (including ampli-
ers) that produce heat.
www.cobyusa.com Page 7
Page 8

www.cobyusa.com Page 9
COMPLIANCE WITH FCC REGULATIONS
This equipment has been te sted and found to comply with the limits for
a Class B Digital Device, pursuant to Part 15 of the FCC Rules. These
limits are designed to prov ide reasonable protection against harmful
interference in a residential installation. This equipment generates,
uses, and can radiate radio frequency energy and, if not inst alled and
used in acc ordanc e wit h the instr uctions, may cause harmful interference to radio communications. However, there is no guarantee that
interference will not occ ur in a particular installation. If this equipm ent
does cause harmful interference to radio or television reception, whic h
can be determined by t urning the equipment off and on, the user is
encouraged to tr y to co rrect the inter ferenc e by one or more of the
following measures:
Reorient or reloc ate the rec eiving antenna.
Increase the separation between the equipment and receiver.
Connec t the equipment into an outlet on a circuit different fr om
that to which the rec eiver is connected.
Consult the dealer o r an experi enced radio technician for help.
Page 8 Coby Electron ics Cor por ation
Page 9

CD CARE & MAINTENANCE
Handling CDs
Hold a CD by its edges. Avoid touching the recorded side of the disc. To
remove a CD from its storage case, press down on the center retention
mechani sm of the case and lif t the disc out.
Cleaning CDs
Use a dry, soft cloth to wipe off any ngerprints and dusts from the playing surface of the disc. W ipe in a straight line radially from the center
to the outside edge of the disc. Small dust par ticl es and light stains will
not affect playback qualit y.
Never use chemicals such as record sprays, anti-static sp rays,
benzene, or thinners to clean your CDs.
To reduce the ris k of scratches, always put CDs back in their
case af ter use.
Do not subject CDs to prolonged exposure to direct sunlight, high
humidit y, or high temperatures.
Do not plac e sticker s or labels on either side of the CD.
Cleaning t he CD Player Lens
A dirt y lens can c ause CD playback to skip. If the lens is very dir ty, the
CD may not work at all. Unplug the power supply, open the CD door,
and clean the lens as fo llows:
For Dust or Dr y Part icles - use a cam era lens brush/blower to
blow on the lens a few times. Then, wipe the lens gently with the
brush, an d blow on the l ens once more.
For Fingerprint s - use a dr y cot ton swab to wipe the lens in a
straight line radially from the center to t he outside edge.
www.cobyusa.com Page 9
Page 10

www.cobyusa.com Page 11
TABLE OF CONTENTS
PRECAUTIONS .............................................................................. 2
IMPORTANT SAFETY I NSTRUCTIONS ........................................... 4
COMPLIANCE WITH FCC REGULATIONS ................................... 8
CD CARE & MAINTENANCE ........................................................ 9
Handling CDs ......................................................................................... 9
Cleaning CDs ......................................................................................... 9
Cleaning the CD Player Lens ................................................................9
TABLE OF CONTENTS ................................................................. 10
PACKAGE CONTENTS ................................................................ 12
FEATURES .................................................................................... 13
GETTING S TARTED ...................................................................... 14
CX-CD377 at a Glance ........................................................................ 14
Bottom V iew ............................................................................... 15
Top View..................................................................................... 15
Remote Control .......................................................................... 15
Digital Display ............................................................................ 15
Mountin g the CX-CD377 ..................................................................... 16
Connec tions ......................................................................................... 17
Speakers .................................................................................... 17
Auxiliary (optional) ..................................................................... 17
Power ......................................................................................... 17
CD MODE ................................................................................... 18
Basic Operation ................................................................................... 18
CD Functions .......................................................................................18
Play/Pause/Stop ........................................................................ 18
Previous /Next (Skip) .................................................................. 18
Reverse/ Forward (Scan) ........................................................... 18
Repeat /Random Mode .............................................................. 19
Program (Memor y)..................................................................... 19
RADI O MODE .............................................................................2 0
Basic Operation ................................................................................... 20
Tuning .........................................................................................20
Reception ................................................................................... 20
Page 10 Coby Electron ics Cor por ation
Page 11

TABLE OF CONTENTS
AUX MODE ................................................................................. 21
Basic Operation ................................................................................... 21
SETU P MODE ............................................................................... 22
Clock /Display ....................................................................................... 22
TROUBLESHOOTING................................................................... 23
SPECI FICATIONS ........................................................................25
www.cobyusa.com Page 11
Page 12

www.cobyusa.com Page 13
PACKAGE CONTENTS
Please make sure the following items are included in the package. If
any items are missing, c ontact your loca l dealer.
CX-CD377 Main Unit
Stereo Speakers (x 2)
Remote Control
3.5mm male-to -male Line-in Cable
Mountin g Plate with Screws (3 x 10 PWA)
Pedestal Base
Page 12 Coby Electron ics Cor por ation
Page 13

FEATURES
Vertical Loading CD Player
Multi-Function Backlit LCD Display
Electronic Volume Control
Analog AM/FM Stereo Tuner (Rotary Tuning, Digital Readout)
Dynamic Bass Boost System (D BBS)
Full-Range Speaker System
110/220V Dual Volt age
www.cobyusa.com Page 13
Page 14

www.cobyusa.com Page 15
GETTING STARTED
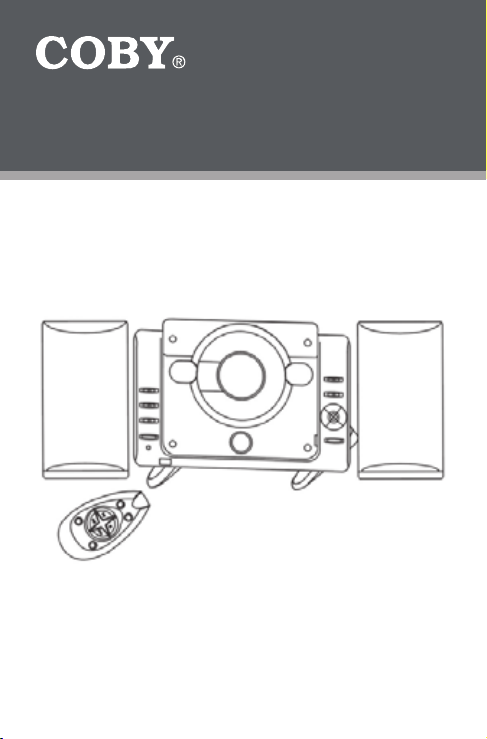
CX-CD377 a t a Glance
Page 14 Coby Electron ics Cor por ation
Page 15

GETTING STARTED
Bottom View
1.
AC Power Cord
2.
Speaker Out Jacks (Left,
Right)
3.
Voltage Selector
(110/220V)
Mountin g Slots
11.
FM Antenna Lead
23.
Top View
Power (On/O ff)
4.
Power Indicator
5.
6.
Function S witch
(CD/Aux /Radio)
7.
Bass Switch (On/O ff)
Auxiliary Line -In Jack
8.
Volume Down / Up
9.
10.
Remote Sensor
12.
Play/Pause
Stop
13.
14.
Repeat /Random
15.
Next
16.
Previous
17.
Program
Open CD Door
18.
19.
CD Door
20.
Digital Display
21.
AM/FM Tuning Dial
22.
Band Selector Switch
(AM/FM/FM ST.)
www.cobyusa.com Page 15
/
Remote Control
1.
Power/Standby
2.
Program
3.
Play/Pause
4.
Stop
Next
5.
Previous
6.
Volume Up
7.
8.
Volume Down
Digital D isplay
Page 16

www.cobyusa.com Page 17
GETTING STARTED
Hooks
Screws
Mounting Plate
Mounting t he CX-CD377
To mount your CX-CD377 to either a wall or the pedestal base:
Using 4 screws, afx the mounting plate to either a wall or to the
1.
pedestal base.
2.
Align the 4 mounting slots on the bottom of the main unit to
hang on the hooks of the mounting plate.
Page 16 Coby Electron ics Cor por ation
Page 17

GETTING STARTED
Connections
Speakers
Always connect the speakers before connecting the power supply.
Connec t the black wire of the left speaker to the black terminal
marked “ L-” on the rear of th e main unit.
Connec t the red wire of the left speaker to the red terminal
marked “ L+” on the rear of the main unit.
Connec t the black wire of the right speaker to the black terminal
marked “ R-” on the rear of the main unit.
Connec t the red wire of the right speaker to the red terminal
marked “ R+” on the rear of the main unit.
Auxiliary (optional)
Use a 3.5mm male-to -male line-in cable to connect the line-
out or headphone out jack of an audio device to the CX- CD377
Auxiliary Line -In jack.
Power
This unit r uns on AC 110V or 220V powe r.
1.
Make sure that the voltage selector on the bottom of the unit
is set to the proper voltage. If you are unsure which voltage
setting to use, please contact the loc al retailer from which you
purchased this product.
2.
Plug the power cord into an AC wall socket.
3.
To turn the player on, set the POW ER switch to the “On”
position.
www.cobyusa.com Page 17
Page 18

www.cobyusa.com Page 19
CD MODE
Basic Operation
Press POWER to turn the player on.
1.
To open the CD Door, press . Inser t a CD with it s label
2.
facing up. Close the CD Door (it will click into place).
3.
Set the FUN CTION sw itch to the “ CD” position.
4.
Press to star t CD playback.
CD Function s
Play/Pause/Stop
Press to star t playback.
Press during playbac k to pause. Press again to resume
playback.
Press during playback to stop the disc.
Previous/Next (Skip)
Press to skip to the previous t rack.
Press to skip to the next trac k.
Reverse/Forward (Scan)
Press and hold to scan through the cur rent track in a reverse
direction.
Press and hold to scan through the current trac k in a forward
direction.
Page 18 Coby Electron ics Cor por ation
Page 19

CD MODE
Repeat/Random Mode
Press to set the re peat/random mode of the player. Each successive press of will change the mode as follow s:
Repeat One: repeat the current track (ashing REPEAT display)
Repeat All: repeat the entire CD (ste ady REPE AT display)
Random: play all tracks in r andom sequence (steady R AND OM
display)
Normal/Off: play all tr acks in sequential order (no indic ator)
Program (Memo ry)
Press Program to set a custom sequence of up to 20 tracks to be
played.
Press to stop playback.
1.
Press to enter Pro gram mode.
2.
Press or to select a track and then press to
3.
store it in memory.
4.
Repeat Step 3 until you have completed storin g the program, or
when you have stored 20 tracks.
Press to star t program playback . To cancel pro gram
5.
playback, press or open the CD Door.
www.cobyusa.com Page 19
Page 20

www.cobyusa.com Page 21
RADIO MODE
Basic Operation
Press POWER to turn the player on.
1.
Set the FUN CTION sw itch to the “ Radio” position.
2.
3.
Set the BAND SELECTOR switch to:
AM: Listen to AM broadcasts.
FM: Listen to FM Mono broadcasts (use this setting if reception i s weak).
FM ST: Listen to FM Stereo broadc asts.
Tuning
Turn the AM/FM Tuning Dial down to tune to a lower station frequency.
Turn t he AM/FM Tuning Dial up to tune to a higher station fre-
quency.
Recept ion
For FM broadcasts, extend the FM antenna fully and adjust its
position for best r eception.
For AM broadcasts, the unit should be positioned for best signal
strength (the AM antenna is built into the unit).
Page 20 Coby Electron ics Cor por ation
Page 21

AUX MODE
Auxiliary (Aux) mo de allows you to play any audio device (e.g., MP3,
casset te player, etc.) through your CX-CD377 system.
Basic Operation
Use a 3.5mm male- to-male line-in cable to connect the Line -out
1.
or Headphone out jac k of an audio device to the CX- CD377
Auxiliary Line -In jack.
2.
Press POWER to turn the player on.
3.
Set the FUN CTION sw itch to the “AUX ” position.
4.
Start playback on the external audio device.
You must use the external audio device to control
playback
To avoid distortion, do not set the volume from
the exter nal audio device to ver y high levels.
www.cobyusa.com Page 21
Page 22

www.cobyusa.com Page 23
SETUP MODE
Clock/Dis play
Place in the player in St andby mode (press POWER if the
1.
player is currently o n). The time will be displaye d when the
player is in Standby.
2.
Press to enter Setup mode. The 12H /24H set ting will
ash. Press or to change t he setting.
12H: Displays the time in 12-hour time.
24H: Displays the time in 24-hour time.
Press . The hour setting wi ll ash. Pre ss or
1.
to change t he setting.
Press . The minutes setting will ash. Press or
2.
to change t he setting.
3.
Press once more to save your changes.
Page 22 Coby Electron ics Cor por ation
Page 23

TROUBLESHOOTING
If you have a problem with this devic e, please read the troubleshooting
guide below and check our website at ww w.cobyusa.com for Frequently
Asked Q uestions (FAQs) and rmware updates. If these resources do
not resolve the problem, please contact Technical Support.
COBY Electronics Technical Support
Address: 56- 65 Rust S t.
Hours: Monday to Friday, 8:30 AM–11:00 PM EST
Phone: 800 -681-2629 or 718- 416-3197
Email: techsupport@cobyusa.com
Web: www.cobyusa.c om
Maspeth, NY 11378
Saturday to Sunday, 9:00 AM–11:00 PM EST
There is no power to the devic e.
Ensure that the power cord is securely connected to the unit and the
proper wall outlet.
Ensure that the voltage selector has been set properly (110V or
220V).
The device does not play.
Moisture may have condensed inside the player. Remove the
disc and leave the player on for 1-2 hours and then tr y again.
There is no sound.
Ensure that the speaker connections are secure and c orrec t.
Try adjusting the volume.
Ensure that the player is in the proper mode (CD, Aux, Radio).
Ensure that headphones are not connecte d to the unit.
www.cobyusa.com Page 23
Page 24

www.cobyusa.com Page 25
TROUBLESHOOTING
The sound is distor ted.
The unit may be positioned too closely to a large appliance (e.g, a
TV or ref rigerator). If possible, turn the appliance off or move the
unit to another location.
Ensure that the radio is in broadc ast reception range.
Decrease the volum e level.
The remote control doesn’t work.
Ensure that t here are no obstacles between the remote and the
player.
Point the remote at the remote sensor on the main unit.
Strong light (e.g. direc t sunlight, uorescent lights, strobe lights)
may inter fere with the remote signal.
Ensure that the batteries in the remote retain a charge and have
been inst alled correct ly.
Try replacing the remote’s batteries.
The CD will not play.
Ensure that the CD has be en loaded with its label facing up.
Ensure that the CD is not damaged, sc ratched, or dirt y.
Playback is “skipping”.
Ensure that the CD is not damaged, sc ratched, or dirt y.
Ensure that the unit has been installed in a stable location to
avoid vibration and shock.
The player will only play one track, re peate dly.
Ensure that REPEAT mode is off (pre ss REPEAT to cancel).
The Function mode is not working.
Ensure that the CD Compartm ent Lid is cl osed.
Page 24 Coby Electron ics Cor por ation
Page 25

SPECIFICATIONS
Power Supply
Tuning System
Audio Output
Audio Input
Output Power
Speaker Dimensions 4.33” x 8.07” x 6.38” (WH D)
Unit Dimensions 11.46” x 3.03” x 7.91” (WHD)
Net Weight 6.28 lbs
AC 110/220V 60/50Hz (Dual Voltage)
AM: 530 - 1710kHz
FM: 88 - 108MHz
Stereo Speakers (x2)
3.5mm Aux Line-In
2.2W RMS x 2
Speci cations and manua l are subje ct to chang e withou t notice.
www.cobyusa.com Page 25
Page 26

www.cobyusa.com Page 27
NOTES
Page 26 Coby Electron ics Cor por ation
Page 27

NOTES
www.cobyusa.com Page 27
Page 28

COBY Electronics Corp.
56- 65 Rust Street
Maspeth, NY 11378
ww w.cobyusa.com
ww w.ecoby.com
 Loading...