

Page 1
1
2
3 4 5 6
7 8 9 10
11
13
12
15
17
16
14 18 19 2021 22
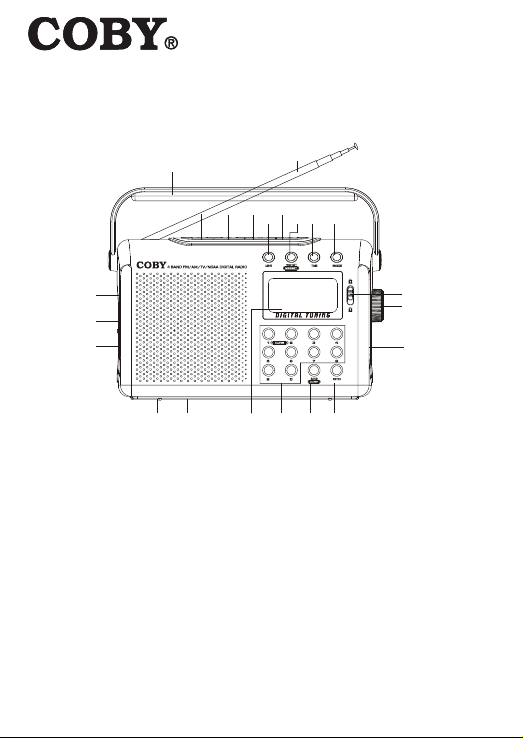
Handle Bar
1.
Antenna
2.
Hour / Tuning Down
3.
Minute / Tuning Up
4.
Sleep
5.
Power
6.
Light
7.
Time Set / Memory
8.
Time
9.
Snooze
10.
External Antenna Jack
11.
CX-788
Operation Manual
DIGITAL TUNING FM/AM/TV/NOAA RADIO
DX / Local Switch
12.
DC Jack
13.
LCD
14.
Hold Switch
15.
Volume Control Dial
16.
3.5mm Earphone Jack
17.
Number Buttons
18.
Band / Alert Button
19.
Enter Button
20.
Battery Compartment (Rear)
21.
AC Cord Socket (Rear)
22.
- 1 - - 2 - - 3 -
Page 2

PRECAUTIONS
Read these instructions carefully.
1.
Keep these instructions for future reference.
2.
Heed all warnings.
3.
4.
Follow all instructions.
5.
Do not expose to water or moisture.
6.
Clean only with a dry cloth.
7.
Keep objects away from ventilation openings. Do not block any ventilation openings
at any time.
8.
Do not install near any heat sources such as stoves, radiators, ampliers or any
apparatus that produce heat.
Do not force the power plug in the wall outlet. A polarized plug has two blades with one
9.
wider than the other. The wide blade is provided for your safety. If the provided plug
does not t into your outlet, consult an electrician for replacement of the obsolete outlet.
10.
Place the power cord so that it is protected from being walked on, pinched by
objects, torn and exposed to liquids, especially at plugs, convenience receptacles,
and the point where they exit from the product.
11.
Only use attachments/accessories specied by the manufacturer. Use of attachments/
accessories not recommended by the product manufacturer may cause hazards.
12.
Use only with a cart, stand, tripod, bracket, or table specied by the manufacturer,
or sold with the apparatus. When a cart is used, use caution when moving the
cart/apparatus combination to avoid injury from tip-over.
Unplug the apparatus during lightning storms or when unused for long periods of time.
13.
14.
If the set will not be used for a long time, remove all the batteries to prevent potential damage due to possible battery leakage.
15.
There is a strong magnet inside the radio. Keep credit cards, recorded tapes,
watches, etc. away from the radio, especially the speaker.
16.
Do not drop the radio or subject it to strong impacts.
17.
Do not use this apparatus near water, and no objects lled with liquids, such as
vases, shall be placed on the apparatus.
18.
Refer all servicing to authorized service personnel.
For recycling or disposal information about this product, please contact your local
authorities or the Electronics Industries Alliance: www.eiae.org
Page 3

POWER SOURCE
BATTERY OPERATION
Open the battery cover.
1.
Insert 3 “D” size (UM-1 or equivalent) batteries into the battery compartment, mak-
2.
ing sure that the batteries are installed with the proper polarities (“+” and “-”).
TO PREVENT POSSIBLE DAMAGE TO THIS UNIT
Load new batteries with their polarities (“+” and “-”) aligned correctly.
1.
If the radio will not be used for a long time, remove all of the batteries, and store
2.
them in a cool and dry place.
Remove dead batteries immediately and properly dispose of them.
3.
Do not use old and new or different types of batteries (e.g., alkaline and manga-
4.
nese) together.
BATTERY LIFE
If the sound becomes low or distorted, replace all of the batteries with new ones.
TO USE AC HOUSE CURRENT
Plug the AC cord into the AC cord socket located on the rear of the radio, and the other
end into an AC wall outlet.
RADIO OPERATION
Set the hold switch off (slide up).
1.
Press the power button to turn on the radio.
2.
Adjust the volume by turning the volume control dial.
3.
Select the preferred frequency band (AM/FM/TV/NOAA) by pressing the BAND /
4.
ALERT button. The selected band will appear on the display.
Press the light button to turn the backlight on for about 8 seconds.
5.
Use the TUNING DOWN / UP buttons or the NUMBER buttons to tune to a station.
6.
The frequency will be displayed on the LCD. Please see page 4 (TUNING) for more
information.
Press and hold the TIME button to switch from FM stereo mode to FM mono mode.
7.
Press the TIME button once to show the time. Press it again to display the time for
8.
alarm 1. Press it again to display the time for alarm 2. Press it again to display the frequency. The radio will automatically return to displaying the frequency after 5 seconds.
Adjust the antenna. See page 5.
9.
Press the power button to off the radio.
10.
Before turning the radio off, set the NOAA band to your local NOAA frequency. When
11.
the radio is off, press the BAND / ALERT button to turn on the NOAA alert function.
NOAA will be shown on the bottom right of the LCD. When there is a NOAA alert, the
radio alarm will sound, the light will turn on and the radio will turn on to the NOAA band.
Page 4

- 5 -
TUNING
AUTOMATIC TUNING
Press and hold the TUNING DOWN / UP button to tune to the previous / next station.
MANUAL TUNING
Press the TUNING DOWN / UP button to change the frequency down / up by one step.
DIRECT TUNING
Use Direct Tuning to enter a specic station frequency to tune to directly.
In the AM/FM mode, press the ENTER button to enter the direct tuning mode. Press the
NUMBER buttons to enter the desired frequency, and press the ENTER button.
TUNING TO STORED STATIONS
You can store 20 radio stations: 10 for AM and 10 for FM.
HOW TO STORE A RADIO STATION
Select the frequency band and tune to the desired station.
1.
To store the radio station, press the TIME SET / MEMORY button. “MEMO” will
2.
appear on the bottom right of the LCD and ash. Press a number button, and press
the TIME SET / MEMORY button to store the radio station. The preset number will
be displayed on the right of the LCD.
To select a stored station, select the frequency band, and press a number button.
3.
The radio will go to the stored station, and the preset number and the frequency are
shown on the display.
CLOCK
SHOWING THE CLOCK
When the radio is off, the time is displayed on the LCD. When the radio is on, the
frequency is displayed. Press the TIME button to display the time. Press it again to
display the alarm 1 time. Press it again to display the alarm 2 time. Press once more to
display the frequency.
SETTING THE TIME
When the radio is off, press the TIME SET / MEMORY button, and the time will ash. Press
the HOUR and MIN. buttons to adjust the time. Ensure that the AM/PM is set correctly.
SLEEP TIMER
When the radio is on, press the SLEEP button. “90” will be displayed on the top right
corner of the LCD and “SLEEP” will appear on the top of the LCD and ash. Press the
SLEEP button to decrease the sleep timer by 10 minutes. The radio will automatically
turn off when the sleep timer reaches 0. Press the SLEEP button to turn off the sleep
timer.
- 4 -
Page 5

ALARMS
Turn off the radio.
1.
Press the TIME SET / MEMORY button twice. “AL1” will appear on the bottom of the
2.
LCD, and the alarm 1 time will ash. Press the HOUR and MIN. buttons to adjust
the alarm 1 time. Ensure that the AM/PM is set correctly. Press the TIME SET /
MEMORY button.
“AL2” will appear on the bottom of the LCD, and the alarm 2 time will ash. Press
3.
the HOUR and MIN. buttons to adjust the alarm 2 time. Ensure that the AM/PM is
set correctly. Press the TIME SET / MEMORY button.
Press the ALARM 1 button once and “ “ will be displayed on the bottom of the
4.
LCD. The alarm 1 is now turned on, and the radio will beep at the alarm 1 time.
Press the ALARM 1 button again and “ “ will be displayed on the bottom of the
LCD. The alarm 1 is on, and the radio will turn on to the current radio station at the
alarm 1 time. Press the ALARM 1 button again to turn off the alarm.
Press the ALARM 2 button once and “ “ will be displayed on the bottom of the
5.
LCD. The alarm 2 is now turned on, and the radio will beep at the alarm 2 time.
Press the ALARM 2 button again and “ “ will be displayed on the bottom of the
LCD. The alarm 2 is on, and the radio will turn on to the current radio station at the
alarm 2 time. Press the ALARM 2 button again to turn off the alarm.
You can press the SNOOZE button when the alarm is sounding to pause the alarm
6.
for 8 minutes.
ANTENNA
FM/TV/NOAA
Pull out the telescopic antenna and adjust its length and angle for optimum reception.
AM
The sensitive ferrite core antenna inside the set will provide excellent AM reception in
most areas. For optimum reception, change the position of the radio because the AM
antenna is directional.
- 5 - - 6 -
Page 6

SUPPORT
If you need assistance with this product, please contact technical support.
COBY Electronics Technical Support
56-65 Rust Street
Maspeth, NY 11378
Email: techsupport@cobyusa.com
Web: www.cobyusa.com
Phone: 800-727-3592 (8:00 AM–11:00 PM EST, seven days a week)
SPECIFICATIONS
Power Source: 3 “D” Size/UM-1 Batteries (DC: 4.5V)
Frequency Range: AM 520 – 1710 kHz
CH2 162.400 MHz
CH3 162.475 MHz
CH4 162.425 MHz
CH5 162.450 MHz
CH6 162.500 MHz
CH7 162.525 MHz
Speaker: 8 ohm 1W
Power Output: 200mW
Output Jack: Earphone 32 ohm
WARNING: The power cord on this product contains lead, a chemical known to the State of California to
cause cancer, and birth defects or other reproductive harm. Wash hands after handling.
800-681-2629 (8:00 AM–5:30 PM EST, Monday to Friday)
718-416-3197 (8:00 AM–5:30 PM EST, Monday to Friday)
FM 87.5 – 108 MHz
TV CH2 – CH13
NOAA CH1 – CH7
CH1 162.550 MHz
 Loading...