

Page 1
AM/FM DESKTOP RADIO with USB PORT for
DIGITAL MP3 PLAYBACK
CX-166
Instruction Manual
Please read this manual carefully before operation.
Page 2
2
PRECAUTIONS
CAUTION
RISK OF E LECTRIC S HOCK
DO NOT OPEN
CAUTION : TO REDUCE THE RISK OF FIRE AND ELECTRIC SHOCK , DO NOT R EMOVE THE COVER (OR BACK)
OF THE UNIT. REFER SERVICING ONLY TO QUALIFI ED
SERVIC E PERSONN EL.
The lightning ash with arrowhead symbol within an equilateral triangle is intended to aler t
the user to the presence of uninsulated “dangerous voltage” within the product’s enclosure
that may be of sufcient magnitude to c onstitute a risk of electric shock.
The exclamation point within an equilateral triangle is intended to alert the user to the presence of important operation and servicing instructions in the literature accompanying the
applianc e.
WARNING:
To prevent re or sh ock hazard, do not expo se this devic e to rain or mo isture. Dan gerous high voltage is present ins ide the
enclos ure. Do not op en the cabinet.
CAUTION :
To prevent electric shoc k, match wide blade of plu g to wide slot of outlet and f ully inser t.
WARNING:
Handlin g the cords on this prod uct will exp ose you to lead, a chemical known to th e State of Cal ifornia to cause can cer, and
birth defects or other repro ductive ha rm. Wash hands afte r handli ng.
Protec t your hea ring:
Hearing expert s advise against the co nstant use of personal stereos played at high volume. Const ant exposure to high volumes can lead to hear ing loss. If y ou should exp erienc e ringing in t he ears or he aring los s, discontinue use and s eek medic al
advice.
For Customer Use:
Enter below the serial number that is located on the
bottom of the unit. Retain this information for future
reference.
Model No. CX-166
Serial No.
For recycling or disposal information about this product, please
contact your local authorities or the Electronics Industries Alliance:
www.eiae.org.
Page 3
3
IMPORTANT SAFETY INSTRUCTIONS
In addition to the careful attention devoted to quality standards in the manufacture of this device,
safety is a major factor in the design of every instrument. However, safety is your responsibility,
too. This sheet lists important information that will help to assure your enjoyment and proper use
of this device and accessory equipment. Please read this carefully before operation and use of
your device.
Read these instructions carefully. Keep these instructions for future reference.
1.
Heed all warnings and follow all instructions.
2.
Do not expose to water or moisture.
3.
Clean only with a dry cloth.
4.
This device should be operated only from the type of power source indicated on the rating la-
5.
bel. If you are not sure of the type of power supply to your home, consult your video dealer or
local power company. For devices intended to operate from battery power or other sources,
refer to the operating instructions.
Do not overload wall outlets or extension cords as this can result in a risk of re or electric
6.
shock. Overloaded AC outlets, extension cords, frayed power cords, damaged or cracked
wire insulation, and broken plugs are dangerous. They may result in a shock or re hazard.
Examine the cord periodically, and if its appearance indicates damage or deteriorated insulation, have it replaced by a service technician.
Do not force the power plug into a wall outlet. If the plug provided does not t into your outlet,
7.
consult an electrician for replacement of the obsolete outlet. (A polarized plug has two blades
where one is wider than the other; the wide blade is provided for your safety.)
Do not place heavy objects on the power cord. Protect the cord from being walked on, pinched
8.
by objects, or torn and exposed to liquids (especially at plugs, convenience receptacles, and
the point at which they exit from the device).
Use only with a cart, stand, tripod, bracket, or table specied by the manu-
9.
facturer, or sold with the device. When a cart is used, use caution when
moving the cart/device combination to avoid injury from tip-over.
Use only with attachments/accessories specied by the manufactur-
10.
er. Use of attachments/accessories not recommended by the product
manufacturer may be hazardous.
Do not use this device near water. Do not place objects lled with liquids
11.
(e.g., vases) on the device. Never spill liquid of any kind on the device.
Do not drop or otherwise subject the device to impact. Keep objects away from ventilation open-
12.
ings. Do not block ventilation openings at any time.
Never push objects of any kind into this device through openings as they may touch dangerous
13.
voltage points or short out parts that could result in a re or electric shock.
Do not install near any apparatus that produces heat such as stoves, radiators, ampliers, etc.
14.
Unplug the device during lightning storms. Unplug the device and remove any batteries when
15.
the device will be unused for long periods of time.
Do not open or attempt to repair this device. Refer all repairs to authorized service personnel.
16.
When replacements parts are required, be sure the service technician has used replacement
17.
parts specied by the manufacturer or that have the same characteristics as the original part.
Unauthorized substitutions may result in re, electric shock, or other hazards.
Upon completion of any service or repairs to this device, ask the service technician to per-
18.
form safety checks to determine that the device is in proper operating condition.
Page 4

4
TABLE OF CONTENTS
PRECAUTIONS .................................................................................................................................2
IMPORTANT SAFETY INSTRUCTIONS ............................................................................................. 3
TABLE OF CONTENTS ...................................................................................................................... 4
FEATURES ......................................................................................................................................... 5
LOCATION OF CONTROL S ............................................................................................................ 6
Front Panel ...............................................................................................................................6
Rear Panel ...............................................................................................................................6
POWERING YOUR RADIO .............................................................................................................. 7
AC Operation ...........................................................................................................................7
Adjusting the Volume ...............................................................................................................7
AM/FM RADIO ................................................................................................................................ 8
AM/FM Antenna .......................................................................................................................8
Selecting the Band (AM or FM) ...............................................................................................8
Tuning to a Station Frequency .................................................................................................8
MP3 MODE ...................................................................................................................................... 9
About USB Drives ....................................................................................................................9
Playing MP3 Music Files through the USB Port ......................................................................9
Connecting a USB Drive ..................................................................................................9
MP3 Playback Controls ...................................................................................................9
AUXILIARY (AUX) MODE .............................................................................................................. 10
TROUBLESHOOTING ......................................................................................................................11
SPECIFICATIONS ........................................................................................................................... 12
Page 5

5
FEATURES
AM/FM Desktop Radio
•
USB Port for MP3 Playback from USB Drives
•
Plays All Portable Audio Devices through a 3.5mm Stereo Line-In Jack
•
Wooden Cabinet with a High-Performance 3” Speaker
•
Experience Ultra-Bass Response When Connected to a Dedicated Subwoofer
•
Page 6

6
1
2 3
65 87 9 101112
4
13
14
16
15
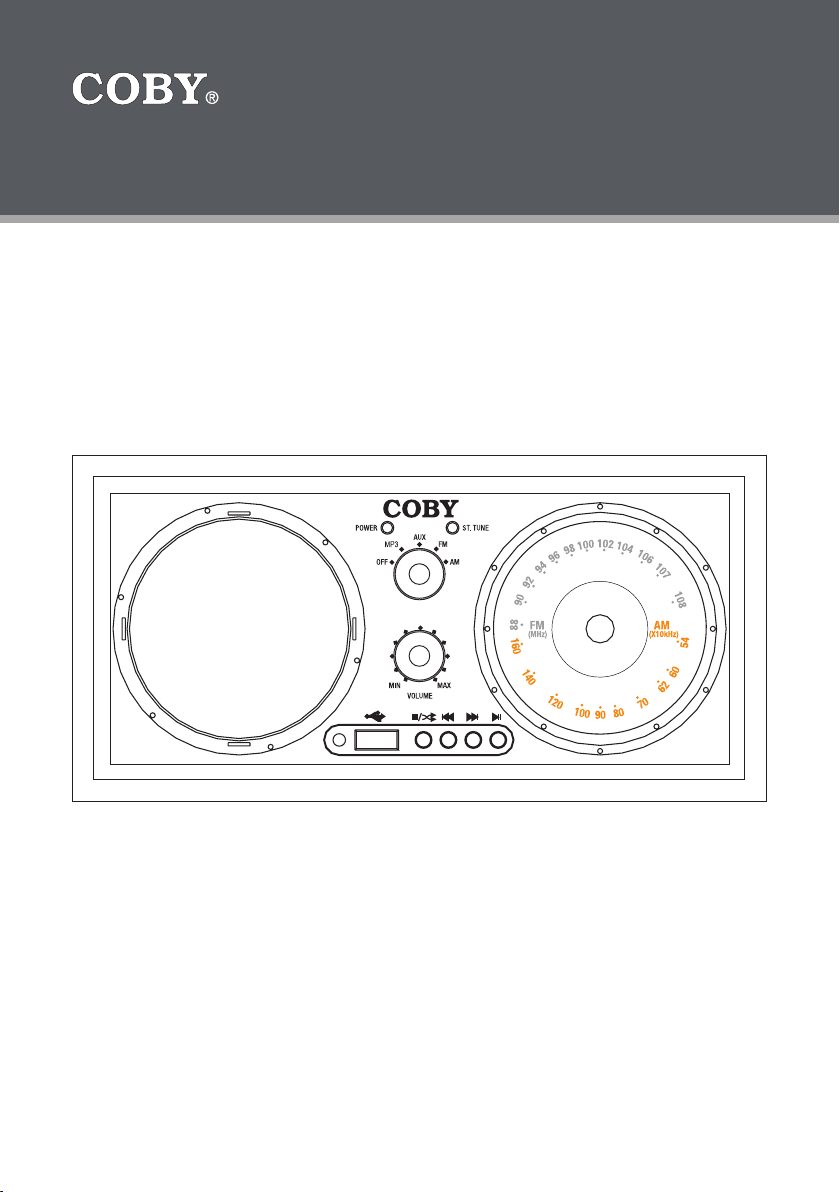
FRONT PANEL
REAR PANEL
LOCATION OF CONTROLS
Front Panel
Power Indicator: Lights red when unit is on.
1.
ST. TUNE Indicator: Indicator lights
2.
green when tuner is locked on a stereo
broadcast.
MODE: Turn knob to select from Of f,
3.
USB, AUX, FM, and AM modes.
TUNING: Turn dial to adjust the AM/FM
4.
tuning frequency.
Speaker
5.
VOLUME: Turn knob to adjust the volume
6.
level.
USB Drive Indicator
7.
USB Port: Connect USB drives for MP3
8.
playback.
Stop/Shuf e button (MP3 control)
9.
Previous/Reverse button (MP3 control)
10.
Next/Forward button (MP3 control)
11.
Play/Pause button (MP3 control)
12.
Rear Panel
Main Power switch
13.
FM Antenna
14.
Subwoofer Out jack
15.
Auxiliary Line-In jack
16.
Page 7

7
POWERING YOUR RADIO
AC Operation
Plug the power cord into an AC 120V wall outlet.
•
Locate the Main Power switch on the rear of the unit and set it to the ON position.
•
Press the Volume/Power knob on the front of the unit to turn your stereo on or off.
•
WARNING:
Do not connect the power plug to a power outlet other than that which is indicated here and
•
on the label as this may result in the risk of re or electric shock.
Do not handle the power plug with wet hands. Doing so may cause electric shock.
•
Adjusting the Volume
Turn the Volume knob to adjust the volume level.
•
Page 8

8
AM/FM RADIO
Set the Mode knob to the AM or FM position to listen to AM or FM broadcasts.
AM/FM Antenna
Your stereo comes equipped with an internal AM antenna. Large appliances or other devices
•
that create an electrical eld may interfere with AM reception; for best reception, please try
to locate the stereo away from such devices.
Your stereo comes equipped with an external FM wire antenna. Adjust the position and loca-
•
tion of the FM antenna for best reception.
Selecting the Band (AM or FM)
To listen to AM broadcasts, turn the Mode knob to the AM position.
•
To listen to FM broadcasts, turn the Mode knob to the FM position.
•
Tuning to a Station Frequency
Turn the Tuning dial to adjust the AM or FM tuning frequency. When the tuner is locked into a
•
stereo broadcast, the ST. TUNE indicator will light up.
Page 9

9
MP3 MODE
Set the Mode knob to the MP3 position to play digital MP3 audio les from a USB drive. For
more information about MP3 or WMA digital audio les, please visit our website at www.
cobyusa.com.
About USB Drives
USB drives are storage devices that have a USB inter face. Some examples of USB drives are:
USB Thumb drives (ash memor y)
•
USB Micro Drives (mini hard drive)
•
USB Card Reader with ash memory installed (e.g., Compact Flash, SD/MMC, Memory
•
Stick, etc.)
Although you may connect other MP3 players through the USB port for playback, we recommend
that you use the provided Auxiliary Line-In jack for such devices to take advantage of your MP3 player’s display and controls (please see the AUXILIARY (AUX) MODE section for more information).
Playing MP3 Music Files through the USB Port
Connecting a USB Drive
Transfer the MP3 les onto the USB drive you wish to connect (you may need to use a
1.
computer to do this).
Connect the USB drive to the radio’s USB port using the appropriate USB cable (not
2.
included). The appropriate USB cable was likely provided with your USB drive.
Turn the Mode knob to the USB position.
3.
MP3 Playback Controls
Press to start playback. Press again to pause playback or press to stop playback.
•
Press again to resume playback.
To select the next track, press . To fast forward through the current track, press and hold .
•
To select the previous track, press . To reverse through a track, press and hold .
•
To toggle the shufe (random play) feature on or off, press while playback is stopped.
•
Page 10

10
AUXILIARY (AUX) MODE
Set the Mode knob to the AUX position to listen to external audio devices connected
through the 3.5mm Auxiliary Stereo Line-In jack.
Use a 3.5mm Male-to-Male Stereo cable (not included) to connect any external audio
1.
device with a 3.5mm Headphone or Line- Out jack to the AUX IN jack on the rear panel of
the stereo.
Start playback on the external audio device. Adjust the volume on the audio device (do not
2.
set the volume too high to avoid distor tion). You may also adjust the volume on the CX-166.
To control playback function, use the controls provided by the external audio device.
3.
Page 11

11
TROUBLESHOOTING
If you have a problem with this player, please read the troubleshooting guide below and check
our website at www.cobyusa.com for Frequently Asked Questions (FAQs) and rmware updates.
If these resources do not resolve the problem, please contact Technical Support.
COBY Electronics Technical Support
Hours: Monday to Friday, 8:30 AM–11:00 PM EST
Email: techsupport@cobyusa.com
Phone: 800-681-2629 or 718-416-3197
Web: www.cobyusa.com
There is no sound.
•
•
•
•
•
The sound is distorted.
•
•
Saturday to Sunday, 9:00 AM–11:00 PM EST
Ensure that the Main Power Switch on the rear panel is physically set to the ON position.
Ensure that the AC adapter cord is securely connected to the proper wall outlet.
Ensure that the volume is not set too low.
If you are using the USB-MP3 function, check to see if the USB drive is functioning.
If you are using the USB-MP3 function, make sure that there are compatible MP3 les on the
USB drive.
Ensure that the volume is not too high.
Ensure that the MP3/WMA le is not corrupt. Try playing the le on a computer or try downloading the le again.
Page 12

12
SPECIFICATIONS
Display Type Analog AM/FM Tuning Dial
Memory No internal memory
Interface USB
Audio Format Support MP3
Frequency Range FM: 87.5 - 108.0 MHz
AM: 520 - 1620 kHz
Audio Input 3.5mm Stereo
Audio Output 3” High-Performance Full-Range Driver
Subwoofer Out
Output Power 3.5W
Unit Dimensions 8.66” x 5.12” x 4.45” (WHD)
Weight 4.85lbs
Specications and manual are subject to change without notice.
Page 13

131415
Page 14

Page 15

Page 16

COBY Electronics Corp.
COBY Electronics Corp.
56- 65 Rust Street
56- 65 Rust Street
Maspeth, NY 11378
Maspeth, NY 11378
ww w.cobyusa.com
ww w.cobyusa.com
ww w.ecoby.com
ww w.ecoby.com
 Loading...