

Page 1
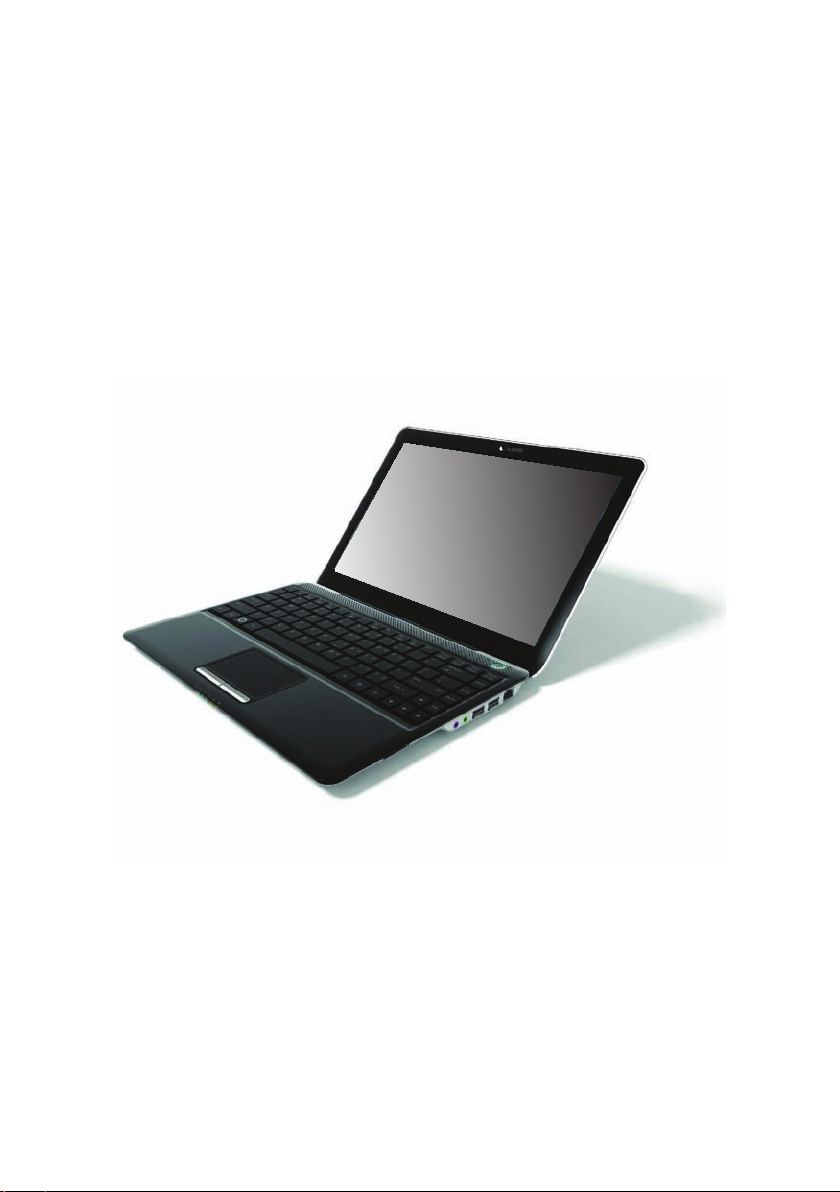
NBPC1330
Ultra-Portable NETBOOK PC
INSTRUCTION MANUAL
Please read this instruction carefully before the operation
Page 2

Table of Contents
PACKAGE CONTENTS ........................................................ 4
SAFETY PRECAUTIONS ..................................................... 5
English
General Operation .................................................................................................. 5
Battery ........................................................................................................................ 6
Power Connection ................................................................................................... 6
Unit Components .................................................................................................... 7
NETBOOK AT A GLANCE ................................................... 8
Top View ..................................................................................................................... 8
Left View ................................................................................................................... 10
Bottom View ............................................................................................................ 11
BASIC OPERATION ...........................................................12
Power ......................................................................................................................... 12
AC Power ................................................................................................... 12
Battery Power ........................................................................................... 12
Getting Started ....................................................................................................... 14
Turning On Your Computer .................................................................14
Sleep Mode ............................................................................................... 14
Shut Down ................................................................................................ 14
Keyboard Functions .............................................................................................. 15
Function Key Combinations ................................................................15
Numeric Keypad ...................................................................................... 16
Using the Touchpad .............................................................................................. 17
Page 2
Page 3

Table of Contents
FEATURES .........................................................................18
Using Memory Cards ............................................................................................ 18
Using the Web Camera ........................................................................................ 18
Using the Internet .................................................................................................. 18
LAN Port ..................................................................................................... 18
Wireless ...................................................................................................... 19
Installing Device Drivers ...................................................................................... 19
EXTERNAL DEVICES ........................................................ 20
Connecting a Universal Serial Bus (USB) Device ..........................................20
Connecting an External Display ........................................................................20
Connecting an Audio Device ............................................................................. 21
Connecting an External Microphone .............................................................. 21
TROUBLESHOOTING ....................................................... 22
SPECIFICATIONS .............................................................. 27
English
Page 3
Page 4
Package Contents
Congratulations on your purchase of the netbook computer. This
instruction manual guides you in setting up and using your new computer. Please read the manual carefully before operation, and keep it
for future reference.
English
This package contains:
Computer unit
–V AC adapter
-cell lithium-ion battery
This package may contain plastic bags or other materials that
pose a hazard to children. Be sure to safely dispose of all packing materials after opening.
Product names used herein are for identification purposes only
and may be the trademarks of their respective companies. Microsoft®, Windows® XP, Windows® 7, and Windows Sound System are trademarks of Microsoft Corporation. Intel®, Intel®
Core™, Intel® HD Audio (Azalia) are registered trademark of Intel
Corporation. All other brands or product names mentioned in
this manual are trademarks or registered trademarks of their
respective companies.
Page 4
Page 5

Safety Precautions
Follow the guidelines below to ensure the safe operation of
your computer.
General Operation
Set up and store the computer on a firm, flat surface. Make sure
that your workspace allows for proper ventilation.
To avoid overheating, do not operate the computer on a soft
surface, such as a bed, for long periods of time.
Keep the computer away from water. Exposure to moisture may
cause malfunction or risk of electric shock.
Do not expose the computer to excessive heat, including direct
sunlight and heat-producing appliances.
To avoid potential damage to the hard drive, do not expose the
computer to electromagnetic fields from stereos, microwaves, or
other household appliances.
If liquid is spilled on or into the computer, unplug it immediately
and contact customer service.
Clean with a damp cloth or mild detergent; do not use harsh
chemicals.
Handle your computer gently to avoid hard drive damage. Do not
drop the computer.
English
Back up your hard drive regularly to avoid loss of data in the event
of damage.
Page 5
Page 6

Safety Precautions
Battery
Use only the recommended battery pack.
English
Keep metallic objects, such as keys and clips, away from the bat-
tery pack.
To avoid risk of fire, keep electrical appliances away from the bat-
tery pack.
Do not expose the battery pack to heat or moisture.
Do not short-circuit the battery terminals.
To avoid damage to the battery, make sure that the battery catch
locks firmly in place upon installation.
Power Connection
Connect to a properly grounded outlet of the recommended volt-
age, only.
Do not use the power cord if it is damaged or frayed.
Do not connect the power cord to a loose or damaged socket.
To unplug the power cord, hold the body of the plug and pull
gently. Do not yank or stress the cord.
Disconnect the cord before cleaning the computer.
Disconnect the cord during electrical storms.
Page 6
Page 7

Safety Precautions
Unit Components
Do not connect the LAN port to a telephone line.
Connect only appropriate devices and drives to the SD, USB and
modem ports on the unit. Do not insert other objects into these
ports.
Do not stress, bend, or scratch the LCD. Doing so may cause it to
break.
Do not touch or ingest the liquid that spills from a broken LCD.
Do not operate the wireless internet within meters of a micro-
wave oven or plasma lamp.
English
Page 7
Page 8
Netbook at a Glance
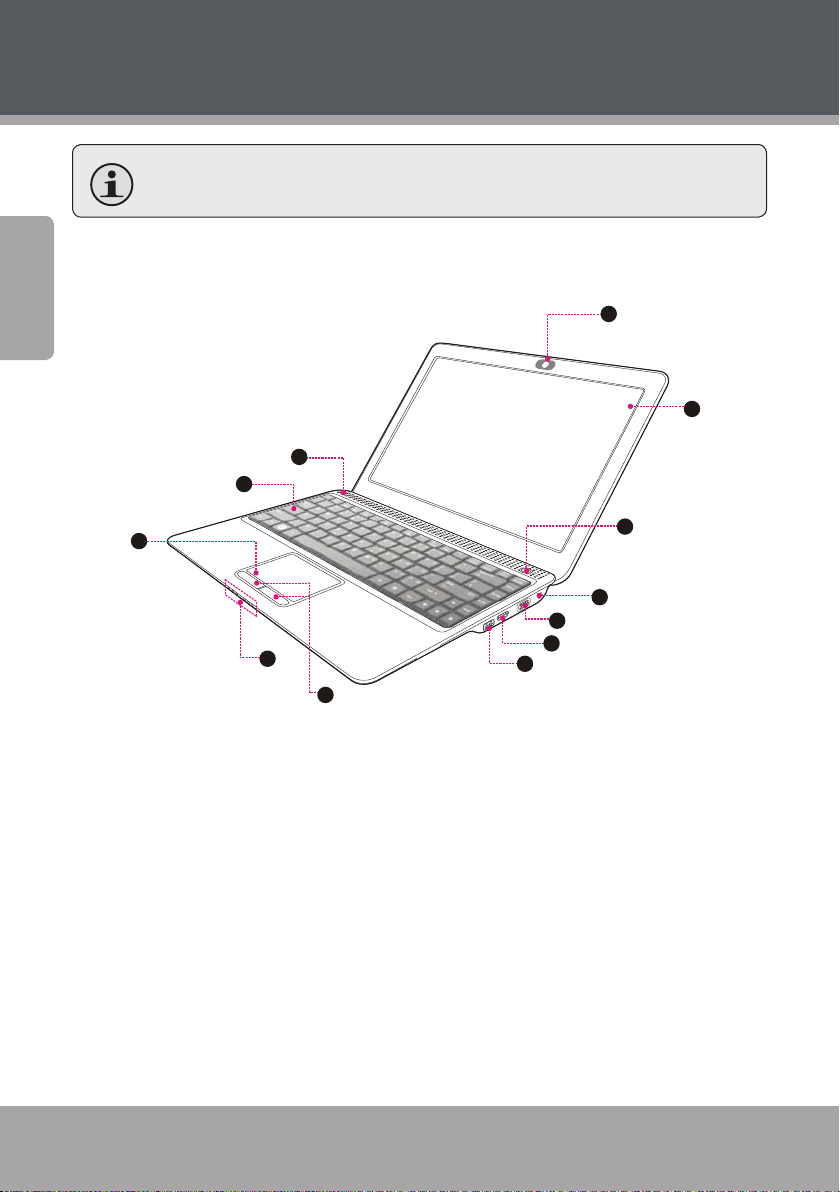
Illustrations in this manual may differ from the actual product.
English
Top View
12
11
1
2
10
9
8
1. Web camera
2. Display panel
3. Power button
4. AC adapter jack
5. VGA connection (monitor or
projector input)
6. HDMI input
7. USB port
8. Integrated mouse (left/right
click)
3
4
5
6
7
9. System status indicators
10. Touchpad
11. Keyboard
12. Speakers
Page 8
Page 9
Netbook at a Glance
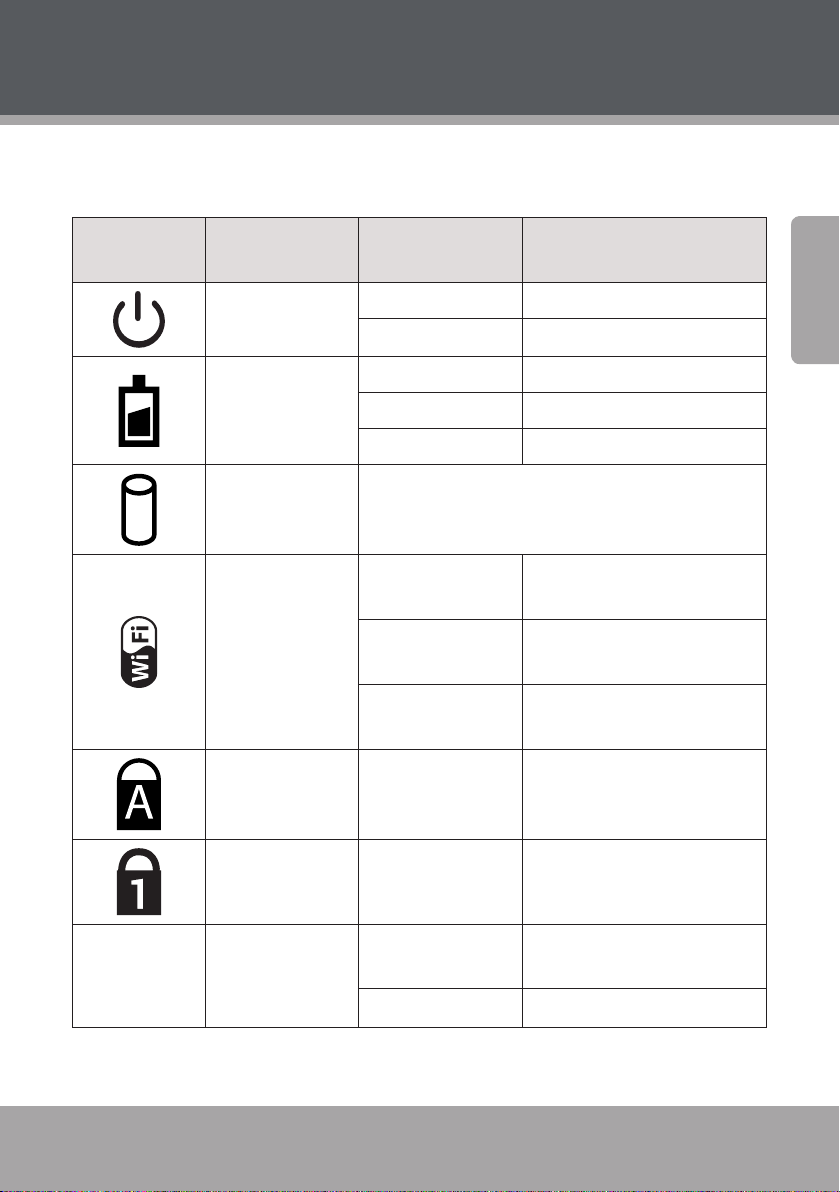
These indicators display your computer’s current status. Please refer to
the table below for more information.
Indicator
Symbol
Indicator Type Appearance Status
Power Solid blue System on
English
Flashing blue System in standby mode
Battery Off Battery charged
Solid blue Charging
Flashing blue Low battery
HDD The HDD indicator will flash blue when data is being
written to/read from the hard disk.
Wireless LAN Off No power to wireless card/ RF
deactivated
Flashing blue, slow Wireless client is not associ-
ated with the network
Flashing blue, rapid Wireless transmitting/receiv-
ing data
Caps Lock Solid blue Caps lock on
Number lock on/numeric
Number Lock Solid blue
3G
Page 9
3G Network
(Optional)
Flashing blue 3G Network transmitting/
Off 3G Network off/hibernating
keypad active
receiving data
Page 10
Netbook at a Glance
Left View
English
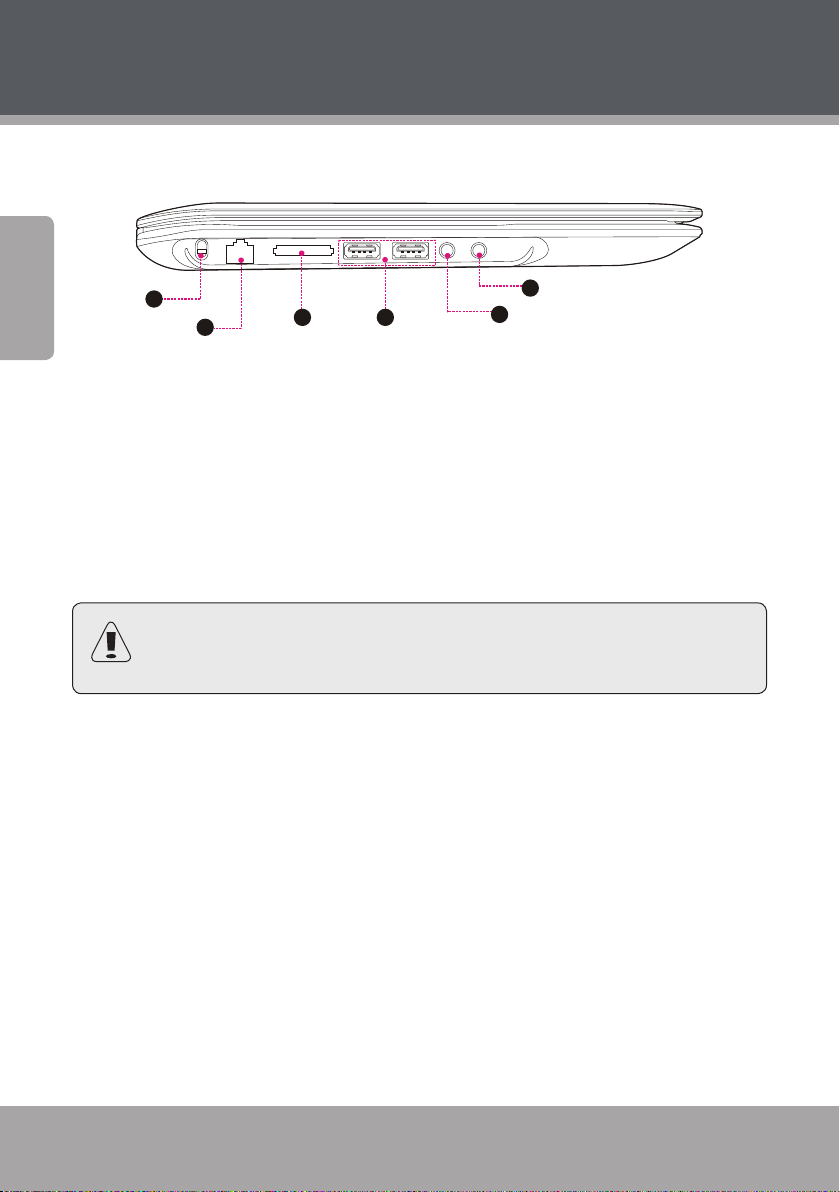
1
2
3 4
6
5
1. Security key port (security cable not included)
2. LAN connection (broadband or cable internet input)
3. SD card slot (SDHC compatible)
4. USB port(x2)
5. Headphone jack
6. Microphone jack
To avoid overheating, do not block the vents when the com-
puter is in use.
Page 10
Page 11
Netbook at a Glance
Bottom View
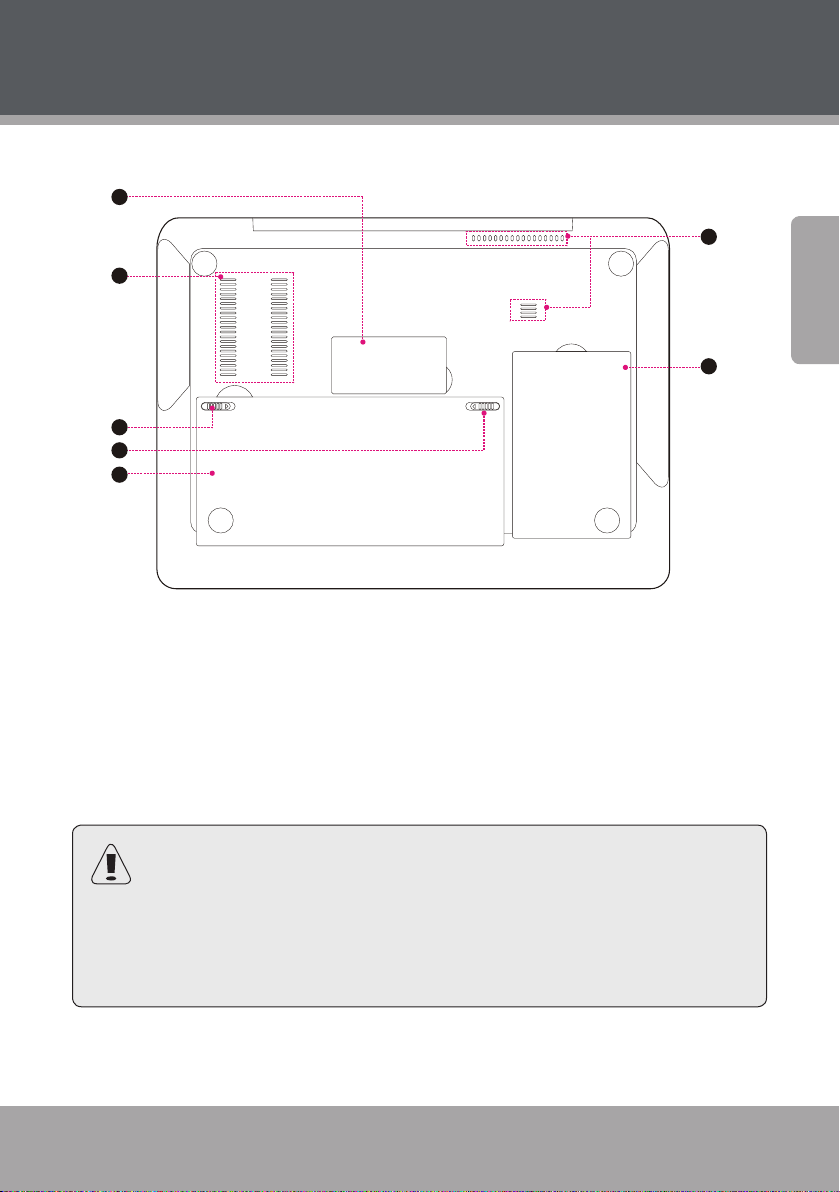
5
4
3
2
1
6
English
7
1. Battery Pack
2. Battery latch (automatic/
spring-loaded)
3. Battery latch (manual)
4. Vent
5. DDRII RAM card compartment
6. Vent
7. Hard drive compartment
Do not attempt to disassemble or replace your hard drive. For
assistance with hard drive replacement and repair, contact a
qualified service professional.
To avoid overheating, do not block the vents when the com-
puter is in use.
Page 11
Page 12

Basic Operation
Power
Your computer includes both an AC adapter and built-in, rechargeable
lithium-ion battery for maximum portability.
English
AC Power
Use the AC adapter to run your computer on AC power and charge the
battery. To connect the AC adapter:
Connect the power cord to the transformer pack.
Plug the power cord into an electrical outlet.
Connect the AC adapter to the AC power adapter jack of the com-
puter.
Battery Power
Make sure the battery is fully charged before first use. The battery
power status indicator will flash when the battery is low. Connect the
AC adapter as instructed above to charge the battery.
To replace the battery:
Shut down the computer and disconnect all cables, including the
AC power cord.
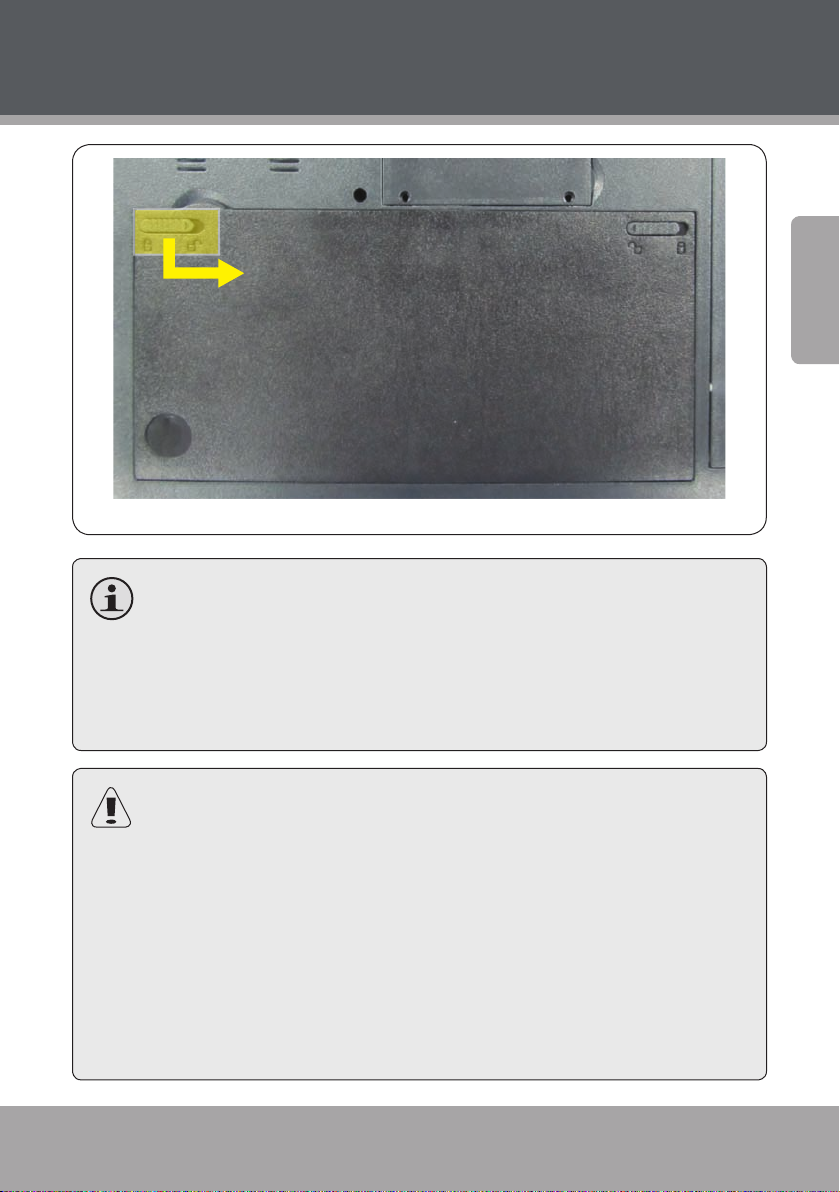
Turn the computer over to access the battery release. Slide the bat-
tery release latch to the unlock position and hold.
Pull out the battery.
Press the replacement battery into the compartment until it clicks
into place. Slide the release latch to the locked position.
Page 12
Page 13
Basic Operation
The components and programs on your computer consume
power at different rates. Using power-intensive components/
programs will cause the battery to drain faster.
English
Your computer’s operating system may run more slowly when
operating on battery power.
Use only approved battery packs to power your computer. Us-
ing an incompatible battery may increase the risk of fire or explosion.
Do not attempt to disassemble or modify the battery pack. A
battery pack other than the one specified by us, or a disassembled or modified battery pack, is not covered by the warranty.
When disposing of the battery, comply with local ordinances
and regulations. Do not attempt to dispose of the battery in
your household trash.
Page 13
Page 14
Basic Operation
Getting Started
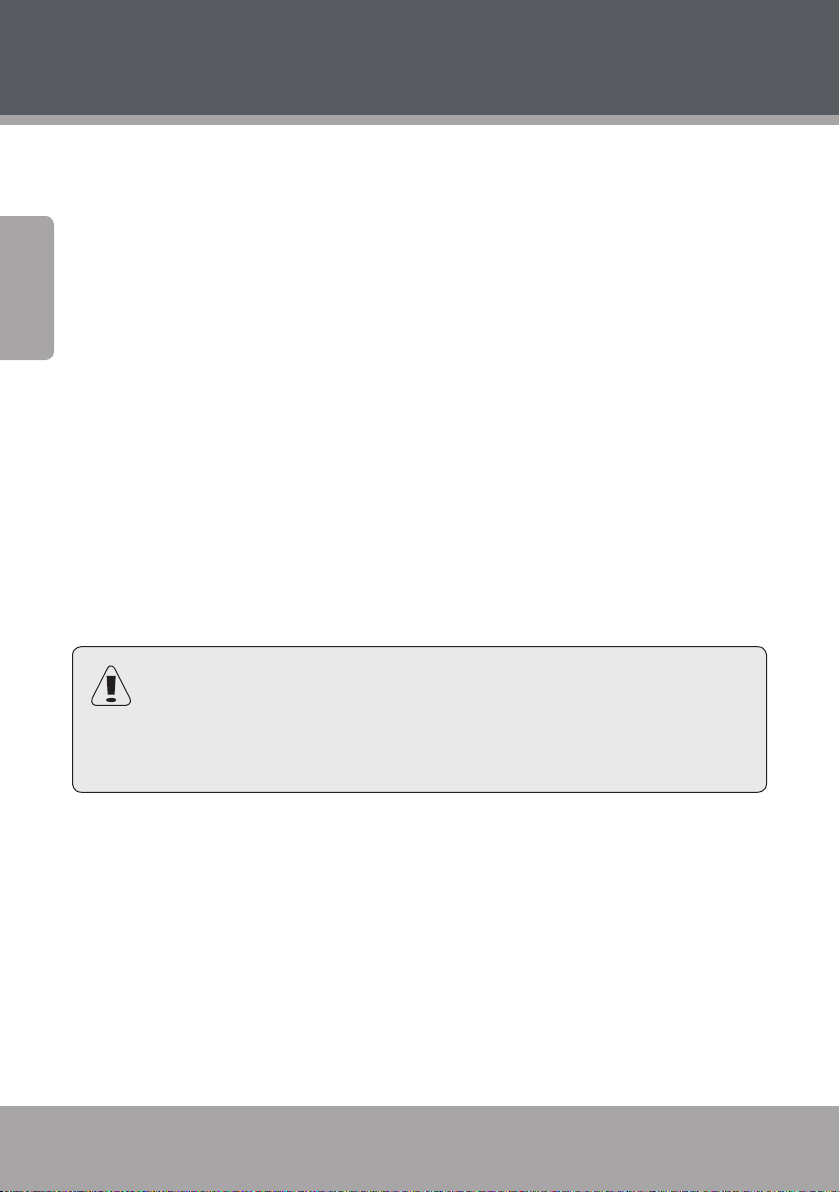
Open the computer and adjust the display panel for comfortable viewing.
English
Turning On Your Computer
Press and hold the power button to turn on the computer.
Sleep Mode
When you finish working with your computer, you can put it to sleep
or shut it down.
Use sleep mode if you will be away from your computer for only a
short time. To enter sleep mode:
Click the Start menu and select Sleep, or
Press Fn + Esc.
To wake the computer, press the Power button.
Wait until the power indicator light starts blinking (indicating
that the computer is in sleep) before you move your computer.
Moving your computer while the hard disk is spinning may
cause damage or loss of data.
Shut Down
Your computer should be shut down when not in use for hours or
more. Enter the Start menu and select Shut Down to turn off the computer.
Page 14
Page 15
Basic Operation
Keyboard Functions
Your computer’s standard keyboard incorporates a numeric keypad
and function keys.
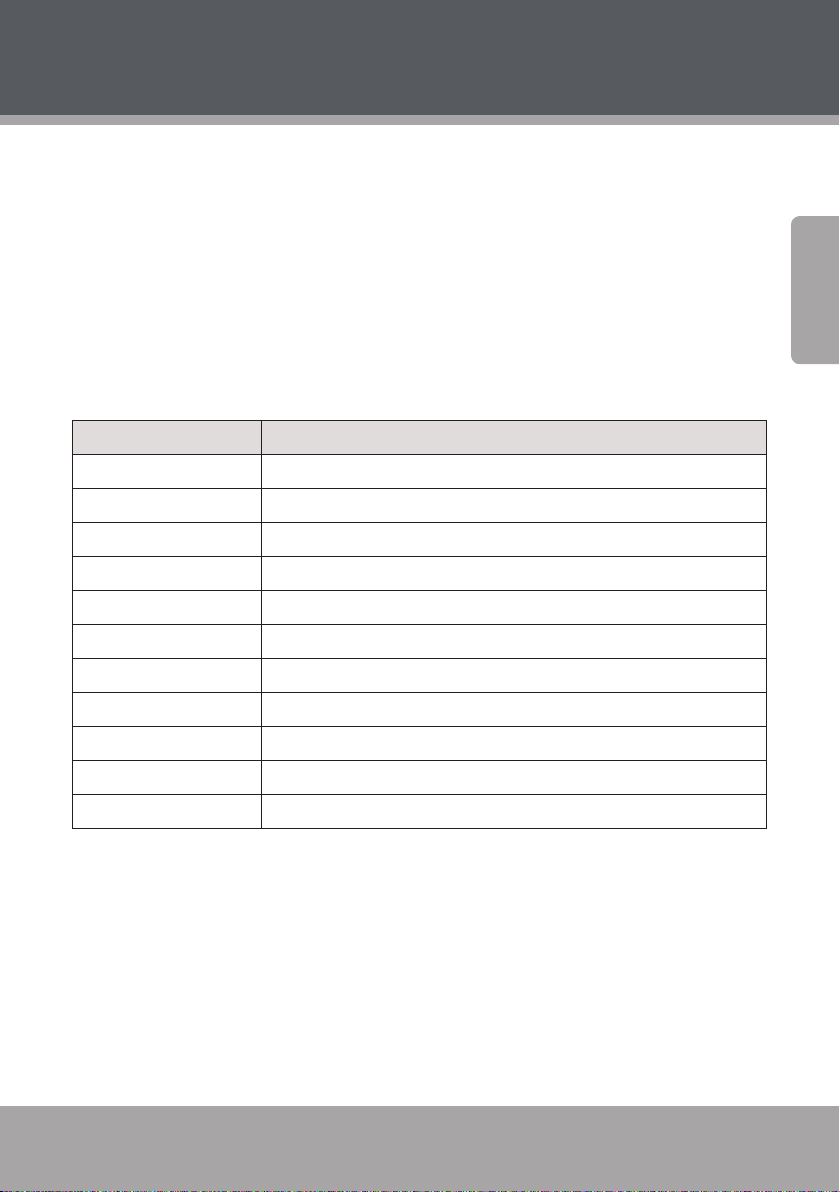
Function Key Combinations
The function keys allow you to change your computer’s operating
features instantly. See below for more information on using function
key combinations.
Key Description
Fn + Esc Put your computer in sleep mode.
Fn + F1 Enable/disable the built-in wireless internet.
Fn + F3 Enable/disable the touch pad.
Fn + F4 Turn on/off the LCD screen.
Fn + F5 Decrease display brightness.
Fn + F6 Increase display brightness.
English
Fn + F7 Shift to other connected display devices, i.e. another monitor.
Fn + F8 Mute.
Fn + F9 Decrease computer volume.
Fn + F10 Increase computer volume.
Fn + Ins/NumLk Enable/disable the Numeric keypad.
Page 15
Page 16
Basic Operation
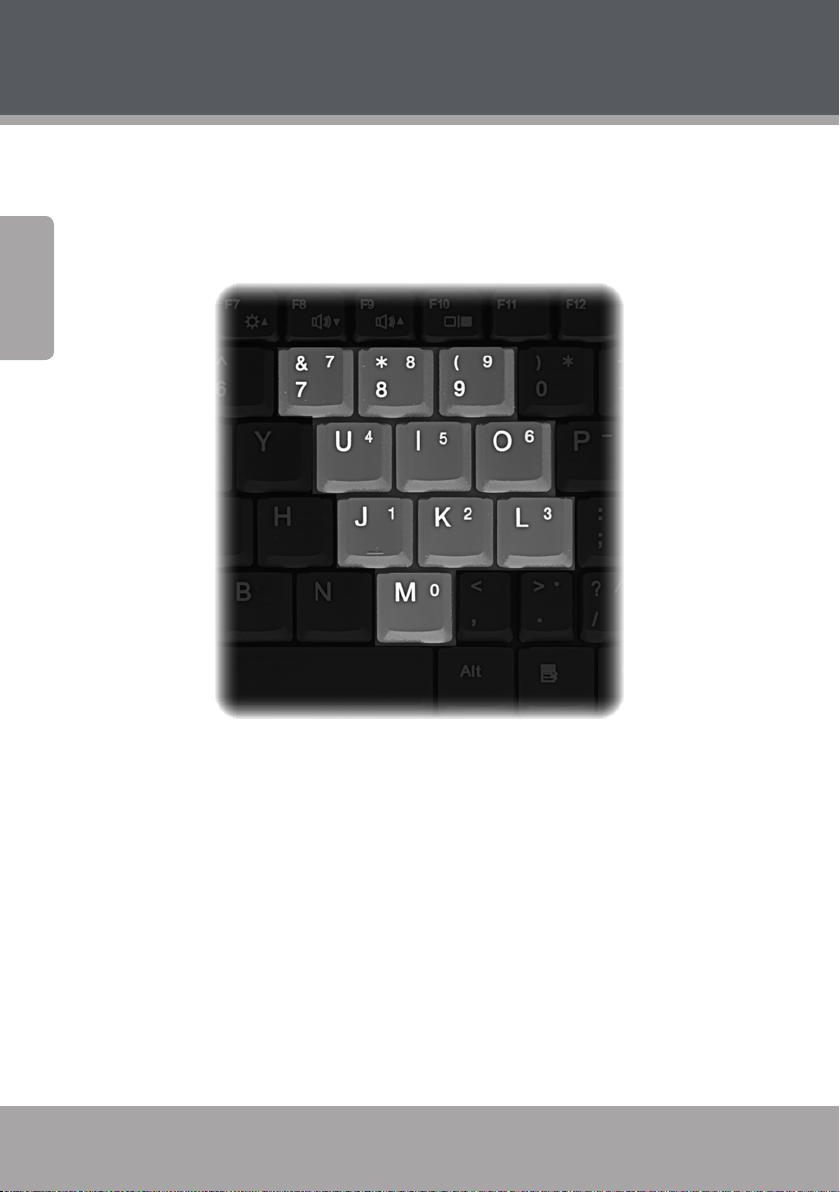
Numeric Keypad
When enabled, the keys indicated below can be used as a -key numeric keypad. To enable or disable the numeric keypad, press Fn+Ins/
English
NumLk.
Page 16
Page 17
Basic Operation
Using the Touchpad
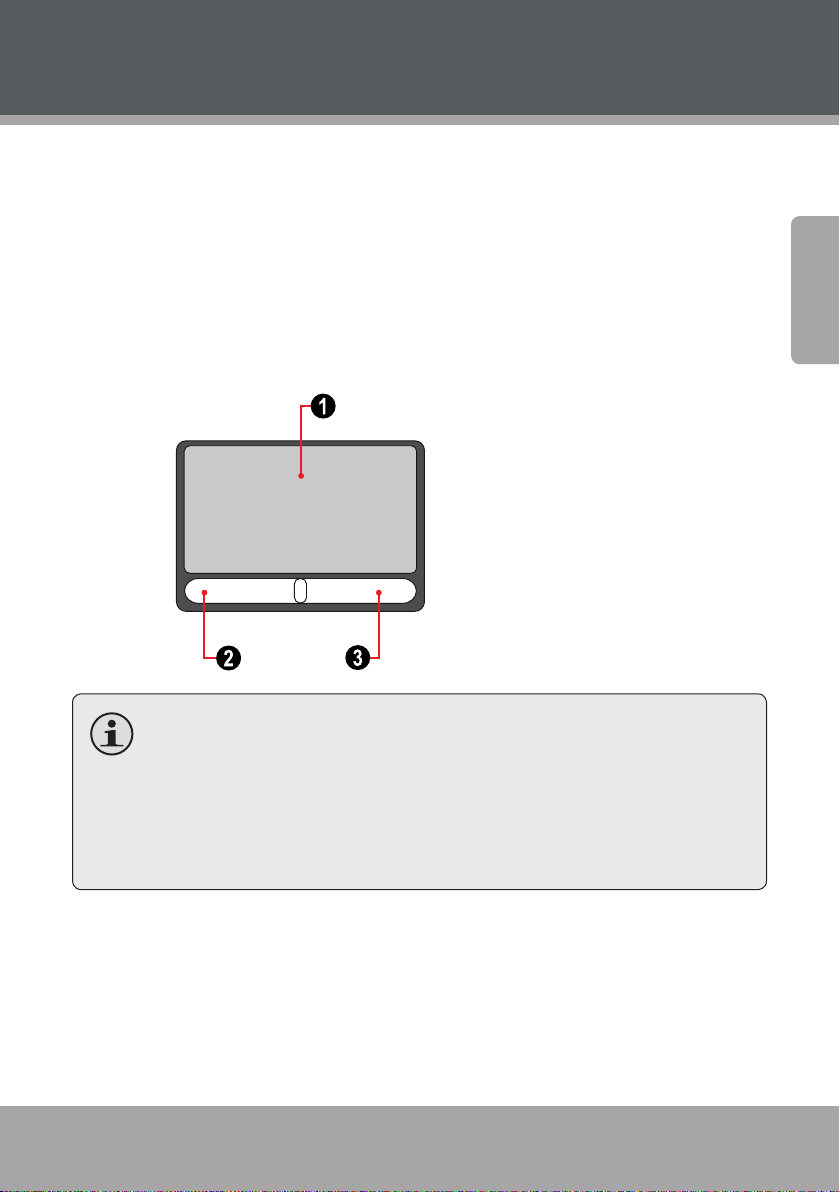
Use the touchpad and integrated mouse to navigate your computer’s
operating system. To move the cursor on the screen, slide your fingertip
over the touchpad in the direction in which you want the cursor to move.
Use the left/right click buttons on the integrated mouse just as you
would the left/right click on a conventional mouse to select objects,
open programs, or retrieve information.
1. Touchpad
2. Left click
3. Right click
Use one finger only to navigate the touchpad. Moisture or dirt
may cause the touchpad to function incorrectly.
Sharp objects or excessive pressure may damage the touch-
pad’s surface.
Do not attempt to remove the cover of the touchpad.
English
Page 17
Page 18
Features
Using Memory Cards
Your computer includes an SD memory card slot for easy transfer of
data. To insert a memory card, orient the memory card with the label
English
upward. Gently slide the card into the slot.
To remove a memory card, grasp it by the end and pull gently.
When a memory card is fully inserted, the rear half of the card
will remain outside of the card slot.
Using the Web Camera
The built-in web camera can be used for capturing photos, recording
video, or as a component of chat and conferencing applications.
Windows users will need to install a third-party dedicated applica-
tion in order to take pictures and video using the webcam.
Using the Internet
Your computer comes with LAN port for Ethernet connection or local
area network (LAN), as well as a built-in wireless connection.
LAN Port
The LAN port supports a standard RJ- connector, and allows you to connect the computer to an Ethernet connection and local area network (LAN).
Do not attempt to connect a telephone cable (types RJ11,
RJ14, RJ25, RJ61) to the LAN port. Doing so may short-circuit
your computer.
Page 18
Page 19
Features
Wireless
An antenna system is built into the display for optimal reception,
enabling wireless communication wherever you are. To connect to the
internet wirelessly, press Fn + F.
Installing Device Drivers
A compatible device driver is required to ensure correct operation and
performance of each component in your computer.
Most installations require a reboot to update the driver. Be sure
to perform this step when prompted.
Failing to reboot may compromise the system’s stability and re-
quire reinstallation of the operating system.
English
Page 19
Page 20
External Devices
Your computer includes multiple connection ports for maximum
performance and productivity.
Do not connect or disconnect any external device cables other than
English
USB cables while the computer power is on. To avoid possible damage
to attached devices, wait at least five seconds after the computer is
shut down to disconnect external devices.
Connecting a Universal Serial Bus (USB)
Device
Your computer comes with three Universal Serial Bus Ports compatible
with USB . or USB . devices such as a keyboard, mouse, camera,
hard disk drive, printer, and scanner. USB devices may be connected
and disconnected without rebooting the computer (hot swapping),
and allow specific classes of hardware to be used without requiring
individual device drivers to be installed.
When using a high power consumption USB device such as
USB HDD, use an external device power adapter to avoid system damage.
Connecting an External Display
You can connect a VGA monitor via the computer’s built-in VGA port.
To connect a VGA monitor, plug the -pin display cable into the corresponding VGA port on your computer.
To shift to other connected display devices, press Fn + F. You may
also select a device using the Control Panel Display menu.
Page 20
Page 21

External Devices
Connecting an Audio Device
Your computer includes one headphone jack for use in connecting
headphones, speakers, or other audio output devices. To connect,
insert the audio device plug into the jack.
Connecting an External Microphone
Your computer includes one external jack for connecting a microphone. To connect, insert the microphone plug into the jack.
English
Page 21
Page 22

Troubleshooting
If you have a problem with this device, please read the troubleshooting guide below.
English
Page 22
Page 23
Troubleshooting
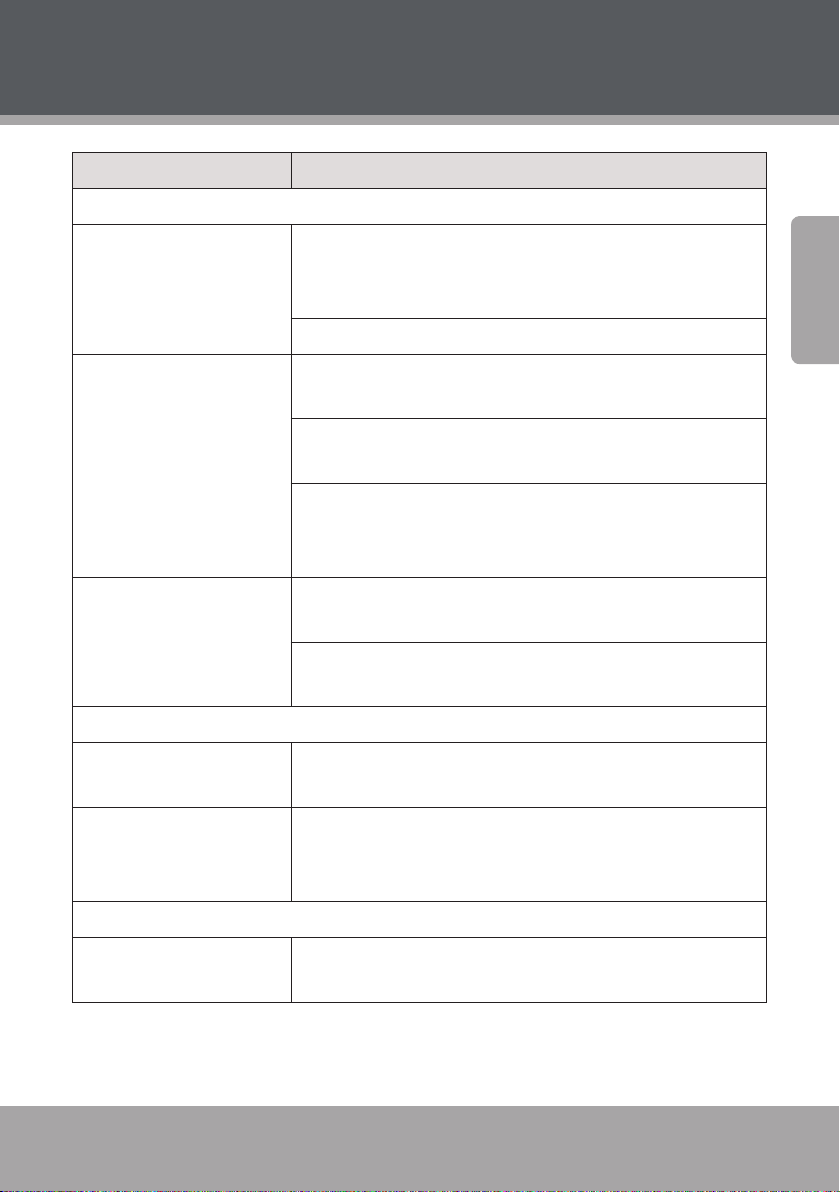
Problem Solution
Display
Computer does not turn on. If using AC power, check that the AC adapter is securely con-
nected to the computer and the power cord is plugged into a
working electrical outlet.
If using battery power, check that the battery is charged.
English
Computer turns on, but
there is no screen image.
Screen goes blank while
the computer is on.
A number appears when
you enter a letter.
All or some of the keys
on the external numeric
keypad do not work.
Confirm that the screen brightness level is not at its minimum
setting. (To increase brightness, press Fn +F7.)
If using battery power, check that the battery is installed
correctly.
If using AC power, check that the AC adapter is connected to
the computer and the power cord is plugged into a working
electrical outlet.
Screen saver may be enabled; touch the touchpad or any key to
exit screen saver mode.
If power management is enabled, the computer may have entered sleep mode. Press the power button to exit sleep mode.
Keyboard
The numeric lock function is enabled. To disable it, press Fn +
Insert.
Make sure that the external numeric keypad is securely connected to the computer.
Sleep/Hibernation Mode
The computer enters sleep
mode unexpectedly.
Page 23
Check that the battery is charged.
Page 24
Troubleshooting
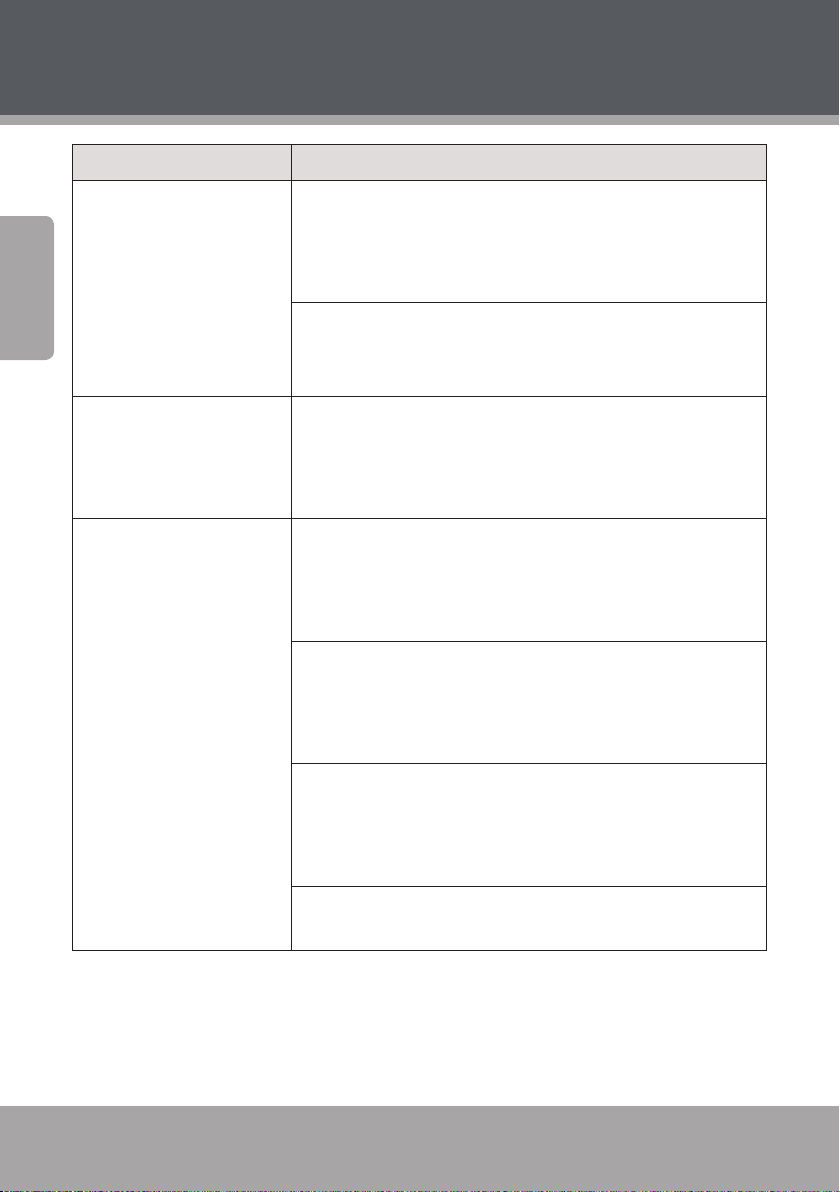
Problem Solution
English
If the processor overheats, the computer will automatically
enter sleep mode to allow the computer to cool and to protect
the processor and other internal components. Check that the
computer is properly ventilated and not hot to the touch.
Check the sleep mode settings. The computer enters sleep
mode (the sleep indicator turns on) immediately after Poweron self-test (POST).
The critical low-battery error message appears, and
the computer immediately
turns off.
The computer does not
return from sleep mode,
or the sleep indicator stays
on and the computer does
not work.
Connect the AC adapter to the computer, or replace the battery
with a fully charged one.
Check the sleep indicator light to confirm that your system is
in sleep mode. If it has turned off, your computer has gone into
hibernation mode. Press the power button to exit hibernation
mode.
Check that the battery is charged. A depleted battery will
cause the computer to automatically enter hibernation mode.
If the battery is depleted, connect to AC power and press the
power button to exit hibernation mode.
If the system still does not return from sleep mode, your system has stopped responding. Reset the computer by pressing
and holding the Power button for 4 seconds or more. Unsaved
data may be lost.
If the computer fails to reset, unplug the AC adapter and
remove, then reinsert, the battery.
Page 24
Page 25
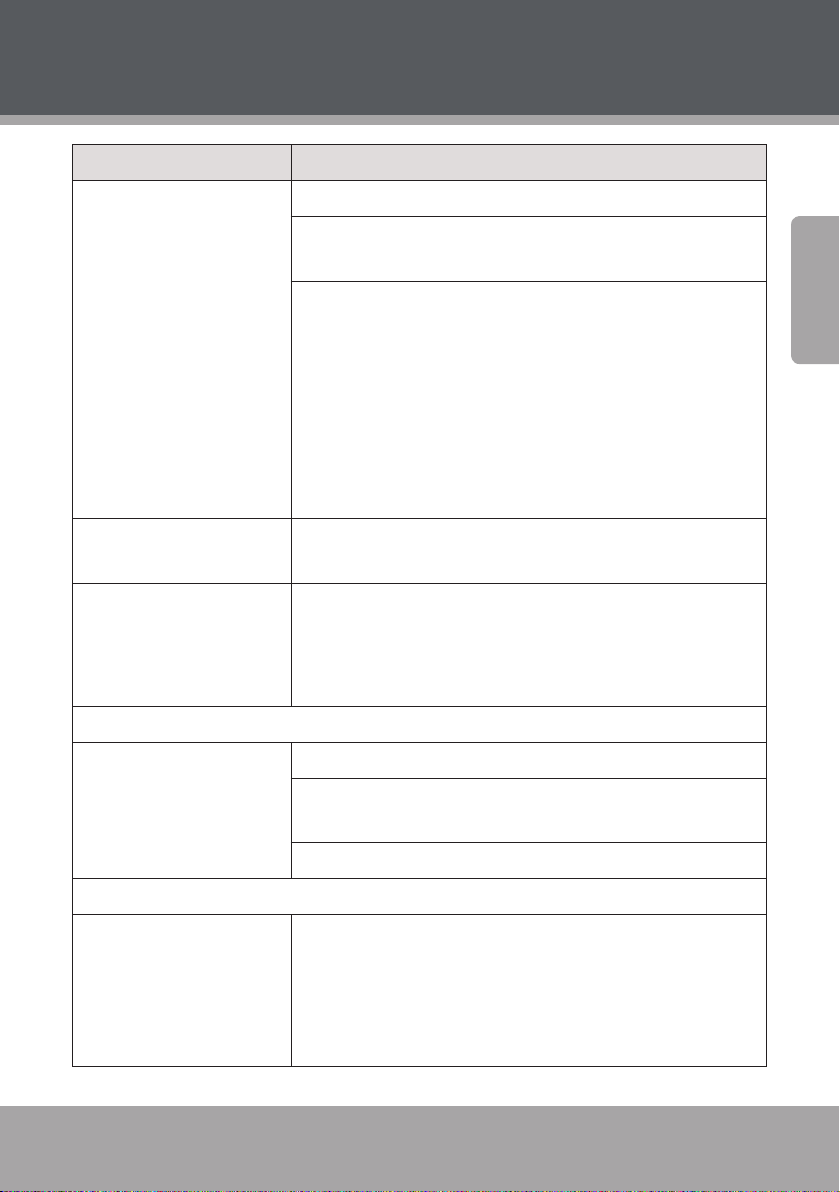
Troubleshooting
Problem Solution
The screen is unreadable or
distorted.
Incorrect characters appear
on the screen.
Missing, discolored, or
bright dots appear on the
screen every time you turn
on your computer.
No sound can be heard from
the speaker even when the
volume is turned up.
Check that screen resolution and color quality are correctly set.
Check that the monitor type is correct. This information is
available under the menu Display Settings Monitor.
Confirm that the display device driver is installed correctly. This
information is available under the menu Personalize Display
Settings Advanced Settings Adapter. The Adapter Infor-
mation window should display the correct device driver name.
NOTE: The device driver name depends on the video chip that
has been installed on your computer. Click the Properties button
and check the “Device status” box to confirm that the device is
working properly. If not, click the Troubleshoot button.
Check that your application and operating system are correctly
installed.
Check that the surface of the screen is not scratched or damaged. If there is no visible damage, these small idiosyncrasies
are a standard element of TFT screen technology and will not
affect the computer’s performance.
Sound
Confirm that the Mute function is off.
Check that no external device, such as a headphone or speaker,
is plugged into the audio output (headphone) jack.
English
Check that speakers are selected as a playback device.
Battery
Your computer shuts down
before the battery status indicator turns on, or continues
to operate after the battery
status indicator lights.
Page 25
Remove and reinsert the battery. If the problem persists, you
may need to replace the battery.
Page 26
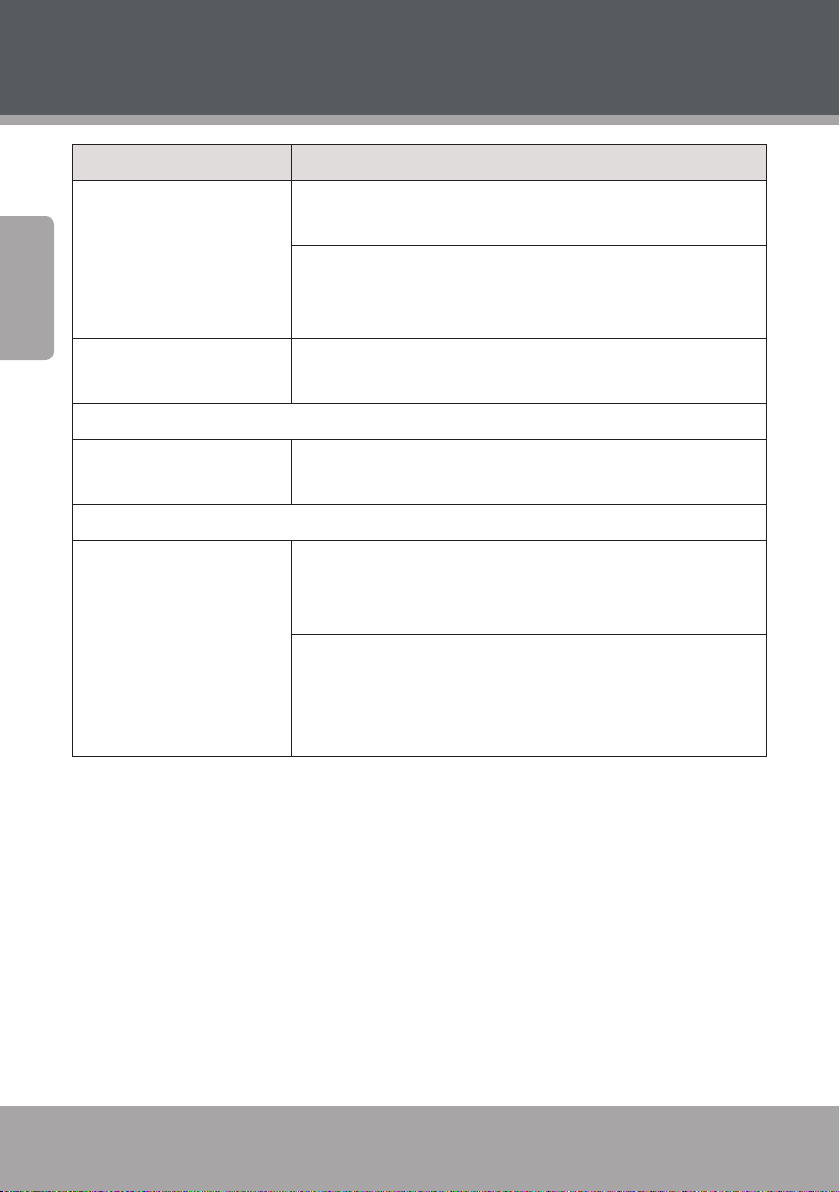
Troubleshooting
Problem Solution
The operating time for a
fully charged battery is
English
short, or the computer
does not operate with a
fully charged battery.
The battery does not
charge.
The hard disk drive does
not work.
The computer does not
respond.
Remove and reinsert the battery. If the problem persists, you
may need to replace the battery.
The surge protector in the battery might be active. Turn off the
computer for one minute to reset the protector; then turn on
the computer again.
Replace the battery.
Hard Drive
In the Boot menu in AMI Setup Utility, make sure that the hard
disk drive is included in the Boot Sequence.
Other Problems
Turn off the computer by pressing and holding the power
button for 4 seconds or more. If the computer still does not
respond, remove the AC adapter and the battery.
Your computer may lock if it enters sleep mode during a
communication operation. To prevent this from happening,
disable the sleep timer when you are working on the internet
or network.
For your safety, never attempt to repair the device yourself.
Attempting to do so will invalidate the warranty. Internal components
of the device carry a risk of electric shock.
Page 26
Page 27
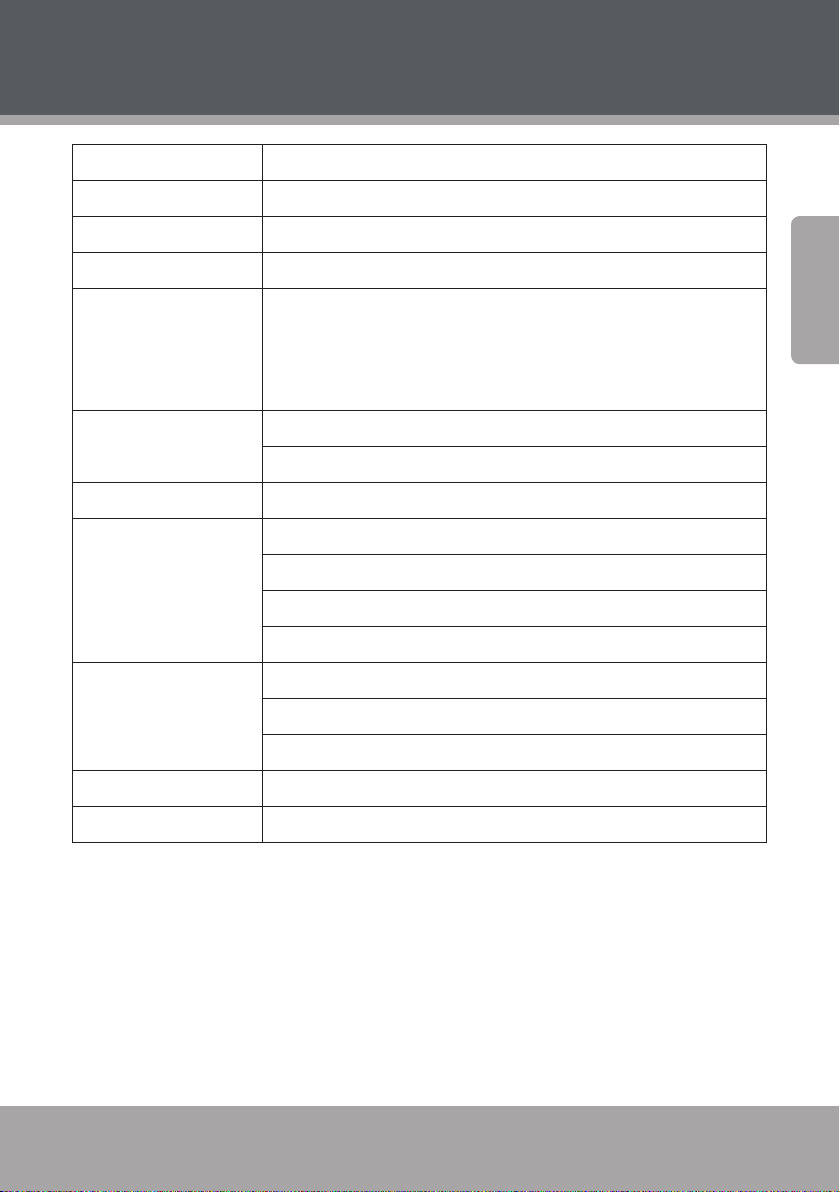
Specifications
Display Type 13.3” TFT LCD
Display Resolution 1024x600 (WSVGA)
CPU AMD Athlon™ Neo MV-40 1.6GHZ
Hard Drive 2.5” SATA 160 GB (5400 RPM)
Memory 1 GB DDRII RAM
RAM Type: PC2-5300 DDR2 SO-DIMM (667 MHz)
Installed: 1024 MB (single SO-DIMM)
Maximum: 2048 MB (single SO-DIMM)
Networking Wi-Fi 802.11 b/g/n
Ethernet 10/100 Mb
Connectivity USB 2.0 Hi-Speed (x3)
A/V Connections VGA Video Out
HDMI Output
3.5 mm Headphone Out
3.5 mm Microphone In
Additional Features Integrated Web Camera, 0.3 MP Resolution
Integrated Microphone
SD Memory Card Reader (SDHC compatible)
Keyboard US-International
Battery 3-cell Li-ion (2-3 hours runtime)
Specifications are subject to change without notice.
English
Page 27
Page 28

Page 29

FCC STATEMENT
Changes or modifications not expressly approved by the party responsible for
compliance
could void the user's authority to operate the equipment.
NOTE: This equipment has been tested and found to comply with the limits for a
Class B digital device, pursuant to Part 15 of the FCC Rules. These limits are
designed to provide reasonable protection against harmful interference in a
residential installation. This equipment generates, uses and can radiate radio
frequency energy and, if not installed and used in accordance with the
instructions, may cause harmful interference to radio communications. H owever,
there is no guarantee that interference will not occur in a particular installation.
If this equipment does cause harmful interference to radio or television reception,
which can be determined by turning the equipment off and on, the user is
encouraged to try to correct the interference by one or more of the following
measures:
-- Reorient or relocate the receiving antenna.
-- Increase the separation between the equipment and receiver.
-- Connect the equipment into an outlet on a circuit different
from that to which the receiver is connected.
-- Consult the dealer or an experienced radio/TV technician for help.
RF warning statement:
The device has been evaluated to meet general RF exposure requirement. The device
can be used in portable exposure condition without restriction.
 Loading...