

Page 1
RR
TF-TV505
Please read this manual before connection and use.
Important Safety InstructionImportant Safety Instruction
WARNING: TO REDUCE THE RISK OF FIRE OR ELECTRIC SHOCK, DO
NOT EXPOSE THIS APPLIANCE TO RAIN OF MOISTURE.
The lightning flash with arrowhead symbol, within an equilateral triangle, is
intended to alert the user to the presen ce of uninsulated “d angerous
voltage” within the product’s enclosure that may be of sufficient magnitude
to constitute a risk of electric to persons.
The exclamation point within an equilateral triangle is intended to alert the
user to the presence of important operating and maintenance (servicing)
instructions in the literature accompanying the appliance.
IMPORTANT FOR LASER PRODUCTS
CLASS 1 LASER PRODUCT
DANGER:
Visible laser radiation when open and interlock failed or defeated. Avoid direct exposure
to beam.
CAUTION:
These servicing instructions are for use by qualified service personnel only. To reduce
the risk of electric shock, do not perform any servicing other than that
contained in the operating instructions unless you are qualified to do so. Refer to
manual for servicing instructions.
POWER SUPPLY:
Connect the supplied adapter to the side of the unit in the slot marked DC 12V.
Plug the two-prong end of the power cord to an AC100-240V outlet. If you have difficulty
inserting the plug, turn it over and reinsert it, if the unit will not be used for a long time,
disconnect the plug from the outlet.
NOTE:
Before plugging the power cord into an AC outlet, make sure that all the
connections have been made.
Customer Service Hours
Monday- Friday 8:00AM ~ 11:00PM (EST) 1-800-681-2629 or 718-416-3197
Monday- Friday 6:30PM ~ 11:00PM (EST) 1-800-727-3592
Saturday- Sunday 9:00AM ~ 11:00PM (EST) 1-800-727-3592
Or Send E-Mail to: Customerservice@cobyusa.com / techsupport@cobyusa.com
Page 2
Important Safety Instruction
1. Read these instructions.
2. Keep these instructions.
3. Heed all warnings.
4. Follow all instructions.
5. Do not use near water.
6. Clean only with dry cloth.
7. Do not block any ventilation openings. Maintain well ventilated conditions around the
product. Do not put product on bed, sofa or anything that blocks ventilation. Install
according to instructions.
8. Do not install near any heat sources such as radiators, heat registers, stoves, or other
apparatus (including amplifiers) that produce heat.
9. Do not defeat the safety purpose of the polarized or grounding-type plug. A polarized plug
has two blades with one wider than the other. If the provided plug does not fit into your
outlet, consult an electrician for replacement of the obsolete outlet.
10. Protect the power cord from being walked on or pinched particularly at plugs, convenience
receptacles, and the point where they exit from the apparatus.
11.Only use attachments/accessories specified by the manufacturer.
12.Use only with the cart, stand, tripod, bracket, or table specified by the manufacturer, or
sold with the apparatus. When a cart is used, use caution when moving the cart/apparatus
combination to avoid injury from tip-over.
13.Unplug this apparatus during lightning storms or when unused for long periods of time.
14.Refer all servicing to qualified service personnel. Servicing is required when the
apparatus has been damaged in any way, such as power-supply cord or plug is
damaged, liquid has been spilled or objects have fallen into the apparatus, the
apparatus has been exposed to rain or moisture, does not operate normally, or has
been dropped.
15.Apparatus shall not be exposed to dripping or splashing and no objects filled with liquids,
such as vases, shall be placed on the apparatus.
Copyright Protection
Unauthorized copying, broadcasting, public performance, and lending of disks are prohibited.
This product incorporates copyright protection technology that is protected by method claims
of certain U.S. patents and other intel lectual pr operty rights owned by Macr ovision
Corporation and other rights owners. Use of this copyright protection technology must be
authorized by Macrovision Corporation, and is intended for home and other limited viewing
uses only unless otherwise authorized by Macrovision Corporation. Reverse engineering or
disassembly is prohibited.
Table of Contents
Table Of Contents
Important Safety Instruction
Unpacking ------------------------------------------------------------------------------------------------------------1
Main Features -------------------------------------------------------------------------------------------------------2
Unit View------------------------------------------------------------------------------------------------------------3-4
Remote Control --------------------------------------------------------------------------------------------------5-7
Power Connections----------------------------------------------------------------------------------------------8-9
Cable Connections------------------------------------------------------------------------------------------------10
TV Function-----------------------------------------------------------------------------------------------------11-13
AV Function---------------------------------------------------------------------------------------------------------14
Troubleshooting -------------------------------------------------------------------------------------------------- 15
Specifications ----------------------------------------------------------------------------------------------------- 16
Page 3
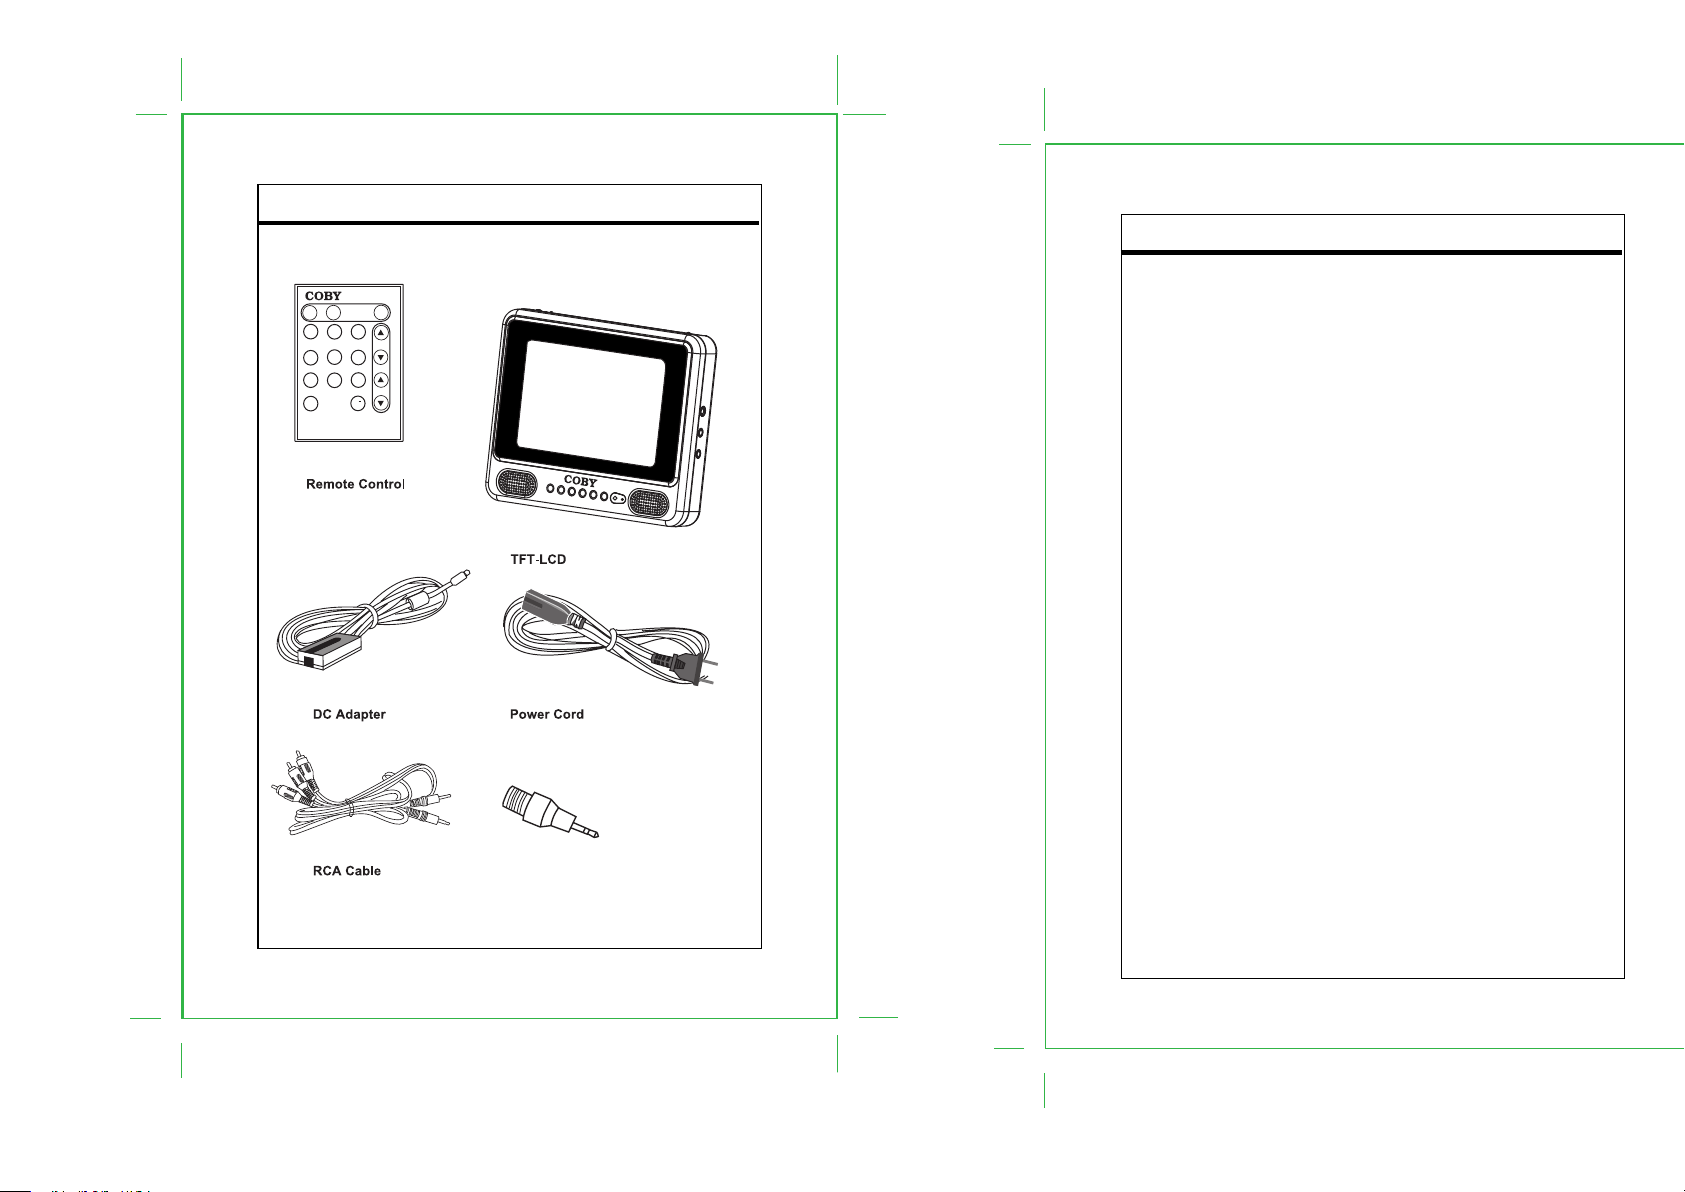
Unpacking
Please make sure the following items are included with your LCD TV/monitor. if any items are
missing, contact your dealer.
TV/AV MENU
CALL
1
2 3
Volume
5
6
4
9
7
8
Channel
RE
0
CALL
TF-TV505
Main Features
TV Mode
AV Mode
You can enjoy programs from external input sources.
High Quality Property
High Resolution
Superior sound
Built-in Dolby Digital decoder to output high quality sound effects.
Screen
Support the picture size of a normal screen (4:3).
LCD (Liquid Crystal Display)
Designed with color TFT liquid crystal display
Clearly shows the data.
Stereo amplifier
Built-in 2x1.5 W speakers.
NOTE: It is normal for a TFT screen to experience some light or dark spots appearing on the
LCD screen.
Antenna Adapter
1
2
Page 4

Front/Top/Side Panel
Unit View
Unit View
Rear Panel
5 TFT LCD TV/MONITOR
Phone
Jack
DC IN
Jack
Power
Switch
Speaker
AV/TV
MENU
VOL-
1. AV/TV button
Press to select AV or TV mode.
2. MENU button
Press to shwo menu.
3. VOL-/+ button
Press to decrease / increase volume.
Press to make adjustment while working
with menu.
4. CH -/+ button
Press to select channels.
Also work as direction buttons while working
with menu.
5. POWER Switch
Press to turn power on/off.
6. LCD Screen
Present high resolution pictures.
7. Speakers
Two speakers produce stereo sound.
LCD
Screen
RF IN
Jack
Audio In
Jack
Video In
Jack
Power
Indicator
CH+
Remote
Sensor
CH-
VOL+
8. Remote sensor
Sense remote signal.
9. Power On Indicator
In normal playback status, it lights green.
while in the standby mode, turns red.
10. RF IN Jack
Connect to external antenna to
receive TV program in TV mode.
11. VIDEO IN Jack
Connect to external video input.
12. AUDIO IN Jacks
Connect to external audio input .
13. PHONE Jack
Connect to stereophone.
14. DC 12V IN Jack
Connect to power supply
Antenna
5 TFT LCD COLOR TV/MONITOR
Stand
Using Stand
There is a stand on the back of the unit to support the player.
a) Lift up the stand from its groove.
b) Erect the unit by supporting it against the stand.
c) A slopewise viewing position is realized.
Attaching
Hole
3
4
Page 5

Remote Control Drawing
Remote Control
Remote Control
Remote Control Drawing
Using Coin Lithium Battery
To install the battery, follow below steps:
1
2
3
CALL
TV/AV MENU
1
2 3
5
4
7
0
6
9
8
RE
CALL
1. CALL:Press to show current program number.
2. TV/AV:Press to select TV or AV.
3. Numeric key pad: Press to input number.
4 . MENU: Press to enter menu setup window.
5. VOLUME+/- :Press to adjust sound level.
6. CHANNEL +/-:Press to select channel.
7. RECALL: Press to view previous program.
Volume
Channel
TF-TV505
4
5
6
RELEASE
7
RELEASE
RELEASE
RELEASE
CR2025
+
+
5
6
Page 6

Remote Control
Remote Control
Preparation of Remote Control
Take the back cover off of the remote control and insert supplied coin battery and put on the
cover. (Refer pg6 for detail)
Using Remote Control
Point the remote to the sensor by about 60 degrees of no more than 7 meters
7
Power Connections
Connect to AC adaptor
**Do not connect the power cord until all other connections have been made.
Power is supplied through the provided appropriative power adapter, one end of which is
connected to the DC IN jack on the main unit, another to wall outlet with AC100-240V.
Note:
a. If you have difficulty inserting the plug, turn it over and reinsert it.
b. If the unit will not be in use for long periods of time, disconnect the plug from the outlet.
c. In order to prolong the operation life, the intervals of continuous power on should be not less
than 30s.
AC adapter:
This AC adapter operates on
100-240V~~50/60Hz 2A Min
To DC in jack
DC OUT: 12V/2A
CALL
TV/AV MENU
1
2 3
Volume
5
6
4
9
7
8
Channel
RE
0
CALL
TF-TV505
The operating distance may vary depending to the brightness around.
Notes:
a) Do not point bright lights directly at the remote control sensor.
b) Do not place objects between the remote control unit and the remote control sensor.
c) Do not use this remote control unit while simultaneously operating the remote
control unit of any other equipment.
7
AC100-240V
8
Page 7

Power Connections
Battery pack connection
a) Match the four hooks to its attaching slots on the bottom of the main unit.
b) Slide downward to lock it into position.
c) To release the battery, press it upward.
Please refer to below diagram for better understanding.
Press it upward to release.
5 TFT LCD COLOR TV/MONITOR
Press it downward to lock.
Using battery pack
a) Loosen the screw.
b) Slide the cover downward to open the battery pack.
c) Insert ten batteries.
d) Slide the pack cover up to lock it.
e) Tighten the screw.
Screw
Press it
downward
to release.
Press it
upward to lock.
10 x "AA"
Battery
Cable Connections
Cable connections
AUDIO IN
RF IN
VIDEO IN
DVD OR VCR
Connecting an External Aerial Antenna or Cable Television
To view television channels, a signal must be received by the device from one of the following
sources:
The internal antenna
An outdoor aerial antenna
A cable television network
A satellite network
1. Connect the supplied antenna adaptor into the "RF IN" jack located on the side of this
device.
2. Connect the external antenna source to the adaptor.
Connecting Audio and Video sources (DVD Player, VCR, Game Console, Etc.)
1. Using the supplied composite cable, connect the yellow video plug into the "VIDEO IN" and
the black audio plug into the "AUDIO IN" jack located on the side of this device.
2. On the other end of the cable, connect the yellow plug into the "VIDEO OUT" and the red
and white plugs into the "AUDIO OUT" of your DVD player, VCR, game console, etc.
3. Connect audio sources (including DVD/VCR/CAMCORDER/PC) to "AUDIO IN" ports by
RCA cable.
4. Connect video sources (DVD/VCR/CAMCORDER) to the "VIDEO IN" port.
10
9
Page 8

TV Function
TV Function
Basic Operation
1. Connect the TV RF source to the RF IN jack on the unit side panel.
2. Connect the power supply cord. If the player is in standby mode, set POWER switch to "ON
3. Press the AV/TV button to select the TV mode.
4. Press CH+/- buttons to select the channel or use the number buttons directly.
5. Press VOL+/- button to adjust volume
TV Function
Parameters setup
Refer below table for detail.
NOTE: While working with setup menu, press CH-/CH+ button to highlight a desired
item and press VOL-/+ to make adjustment. Press MENU button to exit setup
window.
Parameters setup
TV Setup
1. Press MENU button. TV-MENU window appears .
2. Press VOL+/- button to select TV system fromPAL-N/PAL-M/NTSC.
NTSC TV System
TV-MENU
1. TV-SYS
2. ANTENNA
Press CH-/CH+ button
to show hidden items
3. AUTO
4. FINE
:SELE :ENTER
NTSC
MENU
:QUIT
5. SKIP
6. BRIGHTNESS
7. CONTRAST
8. COLOR
9. HUE
10. RESET
11
ITEM DISCRIPTION
ANTENNA Select antenna type from Air or Cab
AUTO Search channel automatically
FINE Select to tune picture
SKIP Select from on/off to skip unwanted program
BRIGHTNESS Adjust LCD brightness
CONTRAST Adjust LCD contrast
COLOR Adjust LCD color
HUE Adjust LCD color
RESET Select to restore setting to the default.
PAL-M/PAL-N/TV System
TV-MENU
1. TV-SYS
2. AUTO
3. MANUAL
4. FINE
:SELE :ENTER
PAL-M
MENU
:QUIT
12
Press CH-/CH+ button
to show hidden items
5. SKIP
6. SWAP
7. BRIGHTNESS
8. CONTRAST
9. COLOR
10. HUE
11. RESET
Page 9

TV Function
Parameters setup
Refer below table for detail.
NOTE: While working with menu, press CH-/CH+ button to highlight a desired
item and press VOL-/+ to make adjustment. Press MENU button to exit .
ITEM DISCRIPTION
MANUAL Search channel manually
AUTO Search channel automatically
FINE Select to tune picture
SKIP Select from on/off to skip unwanted program
SWAP Select to change channel
BRIGHTNESS Adjust LCD brightness
CONTRAST Adjust LCD contrast
COLOR Adjust LCD color
HUE Adjust LCD color
RESET Select to restore setting to the default.
AV Function
AV Function
The player has AV functions. You can enjoy programs from external input sources.
Preparation
1. Connect the external AV signal source to VIDEO IN or AUDIO IN jack.
2. Turn on the power of the unit
3. Press the TV/AV button to select AV mode.
Parameters setup
AV - Setup
1. Under the AV mode, press MENU button. AV-MENU appears .
2. Press VOL+/- button to select COLOR-SYS from PAL-N/PAL-M/NTSC.
AV-MENU
1.COLOR-SYS
2.BRIGHTNESS
3.CONTRAST
4.COLOR
:SELE :SETUP
PAL-M
MENU
:QUIT
Refer below table for detail.
ITEM DISCRIPTION
BRIGHTNESS Adjust LCD brightness
CONTRAST Adjust LCD contrast
COLOR Adjust LCD color
HUE Adjust LCD tue
RESET Select to restore setting to the default.
Press CH-/CH+ button
to show item 5
5. HUE
6. RESET
13
14
Page 10

Symptom Check and Action
No power
No picture
No sound
Color distorted
Picture and
sound are interfered
Remote control does
not work
Malfunction
Make sure the unit has been powered on manually.
Check if the power cord has been properly connected to the power outlet.
Check if the main power has been switched on.
Try another TV channel
Check if the system connection is proper and secure.
Check if the connection cables are damaged.
Increase the volume.
Check if the sound system has been properly set.
Check if the AV audio signal input cable has been connected properly.
Reset the color system of the unit.
Check if the system has been properly connected.
Check if the AV video signal input cable is connected properly.
Check if the system has been properly connected.
If using antenna, adjust the antenna.
Make sure the POWER button on the unit has been turned on manually.
Remove the obstacles between the remote control and the player.
Point the remote control towards the remote sensor on the player.
Check if the batteries of the remote control have been loaded with correct polarities.
Replace the batteries of the remote control.
Should the player develop a malfunction, unplug the player for 30 minutes.
After that, power on the player and the restore function should reset the player.
Trouble Shooting
Size 5"
TV system NTSC/PAL
AC/DC Adapter
Power consumption
Operating temperature range 10 c-40 c
Dimension 165x132x65 mm
Weight 413g
AC input 100-240V 50/60Hz
DC output (+12V / 2A)
On working 15W (Max)
Speaker 1.5 W
Specification
15
16
 Loading...