

Page 1
EN
Snapp™ HD Digital Camcorder
Instruction Manual ...........................................................................Page 2
ES
Snapp™ Videocámara Digital de Alta Denición
Manual de Instrucciones ..........................................................Pagina 30
FR
Snapp™ Caméscope Numérique HD
Manuel D’instruction .................................................................... Page 60
Please read carefully before use • Léa el manual antes de usar • Veuillez lire ce livret avant utilisation
For series /
Para la serie /
Pour la série
CAM5001
Page 2

Page 2 Table Of Contents
English
Table of Contents Â
PACKAGE CONTENTS ....................................................................................................................5
CAMERA AT A GLANCE .................................................................................................................6
Front View ........................................................................................................................................6
Top View ...........................................................................................................................................7
Left View ...........................................................................................................................................7
Rear View .........................................................................................................................................7
Right View ........................................................................................................................................7
Bottom View ....................................................................................................................................7
GETTING STARTED ...........................................................................................................................8
Install the Battery .............................................................................................................................8
Charging the Battery ......................................................................................................................8
Insert a Memory Card ....................................................................................................................9
USING THE CAMERA ....................................................................................................................10
Turning the Camera On/Off ........................................................................................................10
Changing Camera Modes ..........................................................................................................10
Page 3

Table Of Contents Page 3
English
Video Mode ..................................................................................................................................10
To Record Video ................................................................................................................. 11
Zoom .................................................................................................................................... 11
Video Size ............................................................................................................................ 11
Photo Mode ...................................................................................................................................12
To Take a Photo ..................................................................................................................12
Zoom ....................................................................................................................................12
Photo Size ............................................................................................................................12
Playback Mode .............................................................................................................................13
Playback Controls ..............................................................................................................13
SETUP MODE .................................................................................................................................14
CONNECTING TO A TV ................................................................................................................15
TRANSFERRING FILES TO A COMPUTER ....................................................................................... 17
SOFTWARE BY ARCSOFT® ............................................................................................................ 19
System Requirements ....................................................................................................................19
Installing the Software ..................................................................................................................19
About ArcSoft MediaImpression .................................................................................................21
SPECIFICATIONS ...........................................................................................................................22
Page 4

Page 4 Table Of Contents
English
TROUBLESHOOTING ......................................................................................................................23
IMPORTANT INFORMATION .........................................................................................................25
FCC Statement ..............................................................................................................................26
Important Safety Instructions .......................................................................................................27
Maintenance and Care ...............................................................................................................29
Page 5

Package Contents Page 5
English
Package Contents Â
Thank you for purchasing a Coby Snapp™ CAM HD Digital Video Camera. Please read these instructions before using your camcorder, and retain them for future reference. This package includes:
CAM camera
Rechargeable battery
HDMI cable
A/V cable
USB extension cable
Detachable hand strap
Pouch
Installation CD
Should any of the above items be missing, please contact the dealer from whom you purchased this product.
This package may contain plastic bags or other materials
that pose a hazard to children. Be sure to safely dispose of
all packing materials after opening.
Page 6
Page 6 Camera At A Glance
English
Page 6 Camera At A Glance
English
Camera at a Glance Â
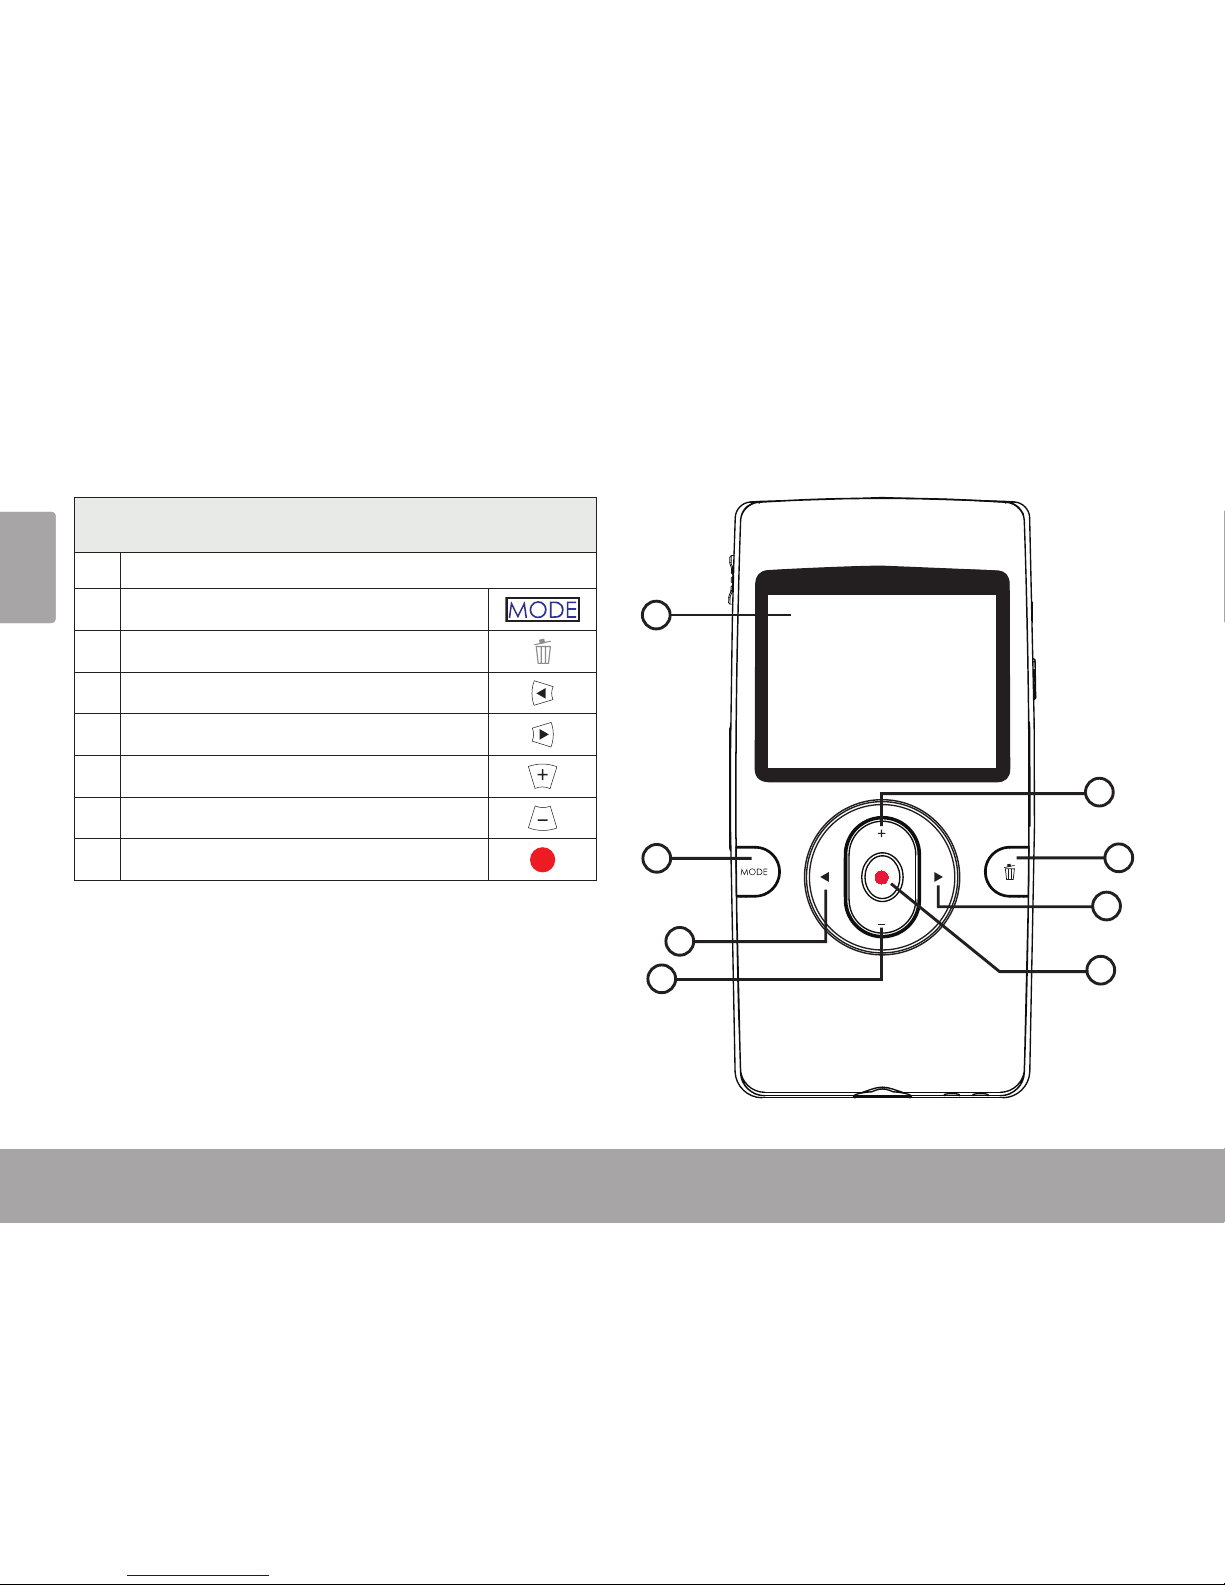
Front View
LCD screen
MODE
Delete
Left
Right
Up/Zoom In
Down/Zoom Out
Record/OK
1
2
5
6
3
4
7
8
Page 7
Camera At A Glance Page 7
English
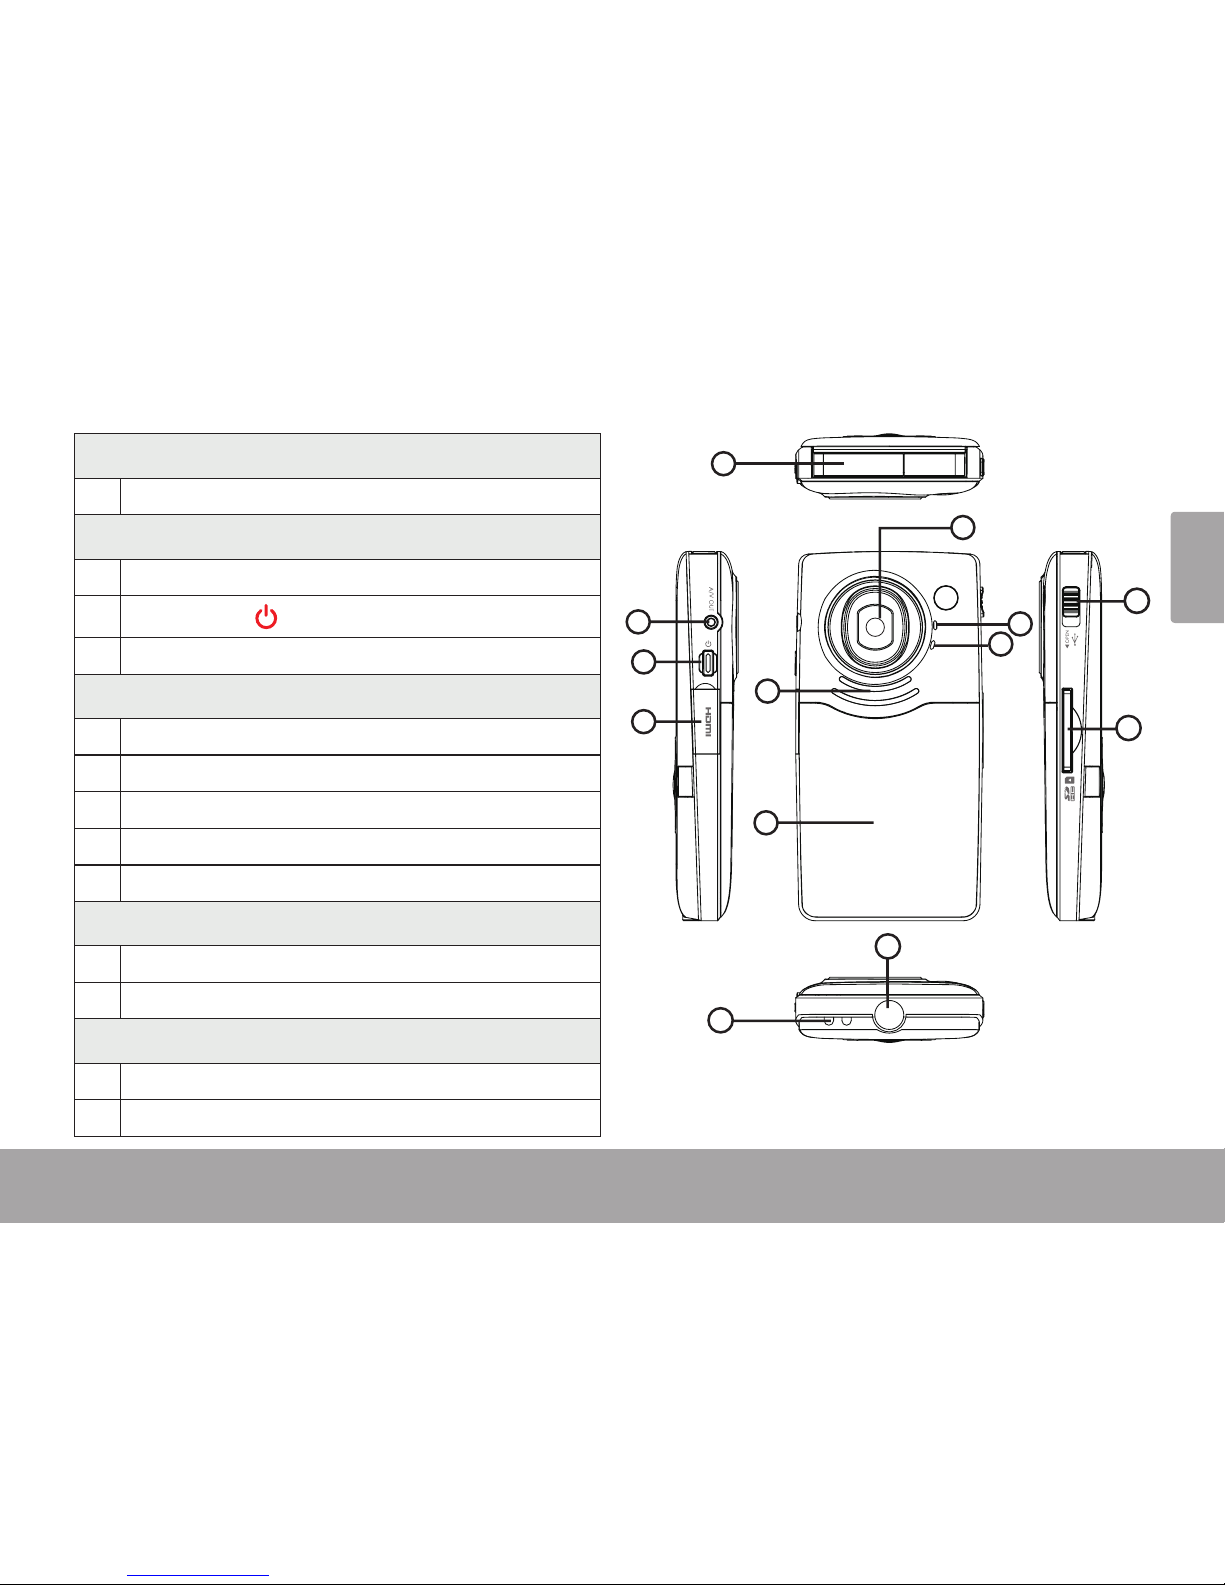
Top View
USB Plug
Left View
A/V out jack
Power
HDMI port
Rear View
Lens
Microphone
LED light
Speaker
Battery cover
Right View
USB plug switch
SD/SDHC card slot
Bottom View
Tripod mount
Hand strap mount
1
2
3
4
8
6
10
11
13
12
5
7
9
Page 8
Page 8 Getting Started
English
Page 8 Getting Started
English
Getting Started Â
Please read and complete the following steps to
begin using your digital video camera.
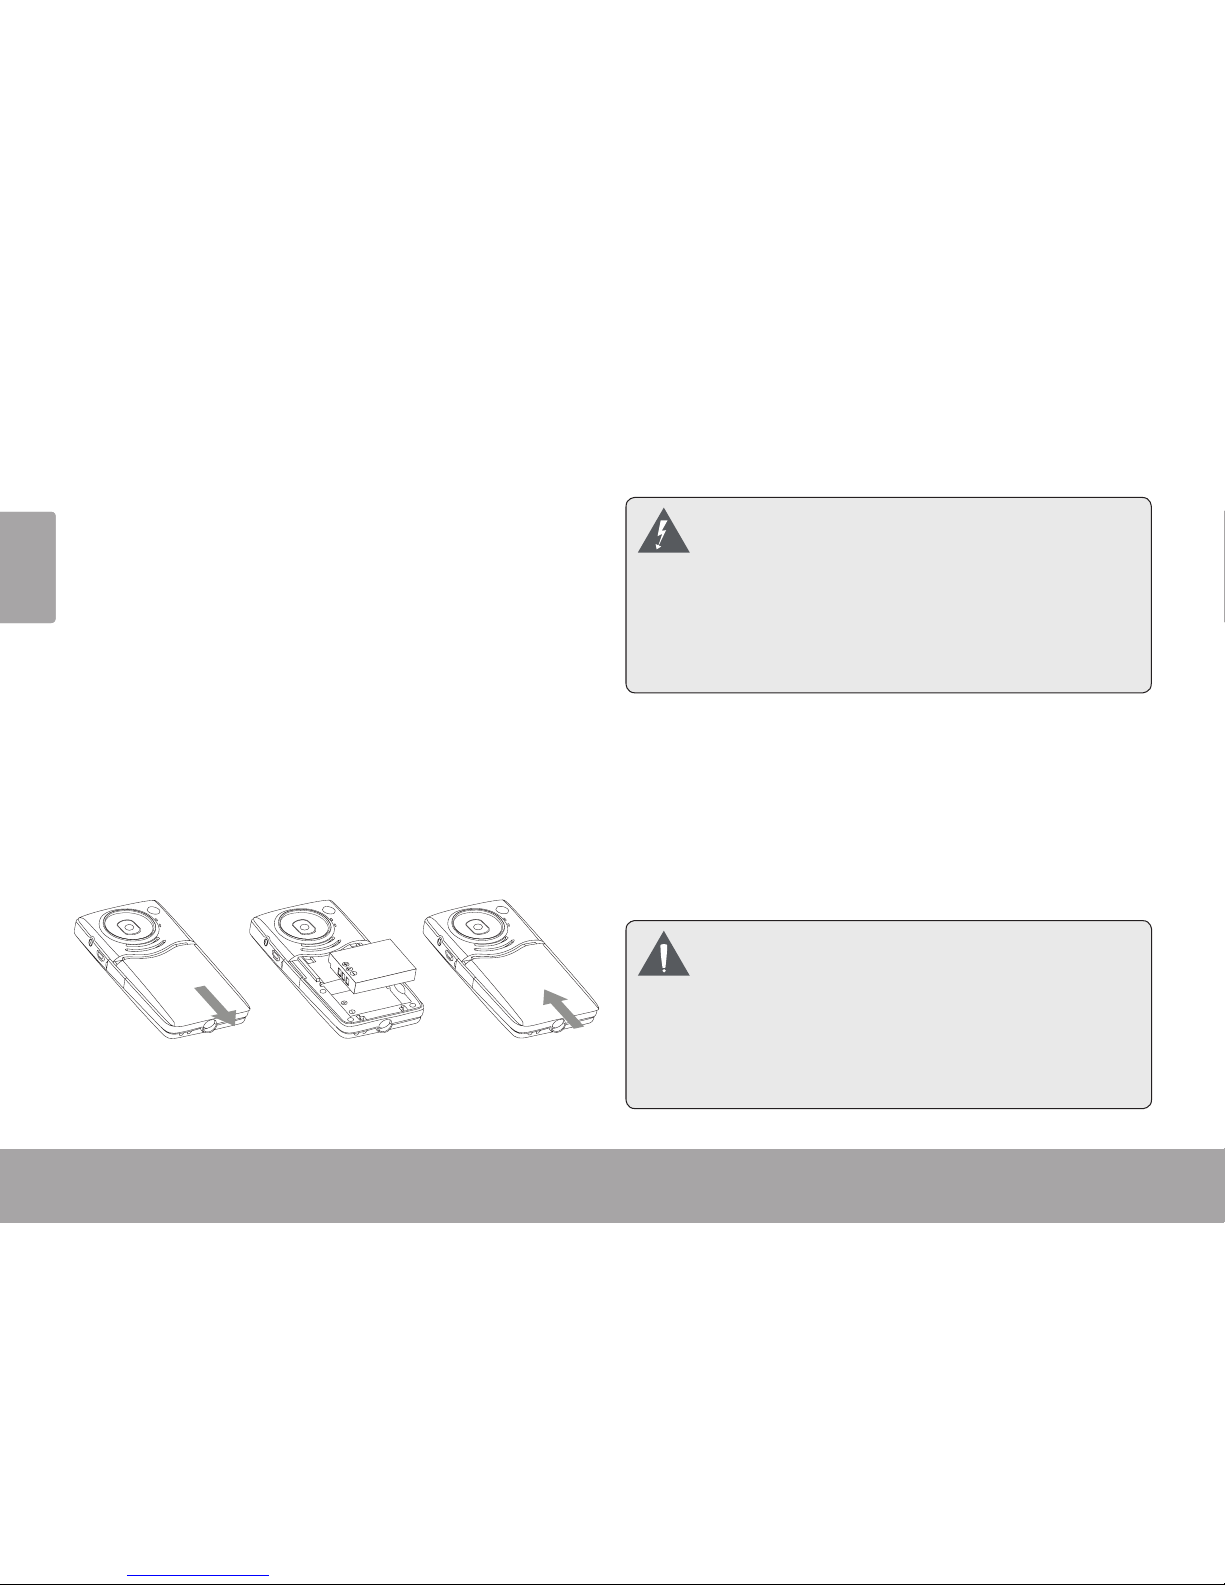
Install the Battery
Remove the battery compartment door by slid-1.
ing it toward the base of the camera.
Load the battery pack into the compartment as 2.
shown in the diagram. The text on the battery
should be visible and the metal contacts should
face left.
Replace the battery compartment door and 3.
snap it into place.
The battery used in this device may present
a re or chemical hazard if mistreated. Do
not recharge, disassemble, incinerate, or
heat the batteries. Used batteries should be
disposed of safely.
Keep batteries out of the reach of children.
Charging the Battery
Turn o the camera.1.
Connect the camera to the USB port of a com-2.
puter. The LED light will turn on while charging
and will turn o when the battery is fully charged.
Fully charge the battery before using the
camera for the rst time.
For instructions on how to connect the cam-
era to a computer, please read the “Transferring les to a Computer” section of this
manual.
Page 9
Getting Started Page 9
English
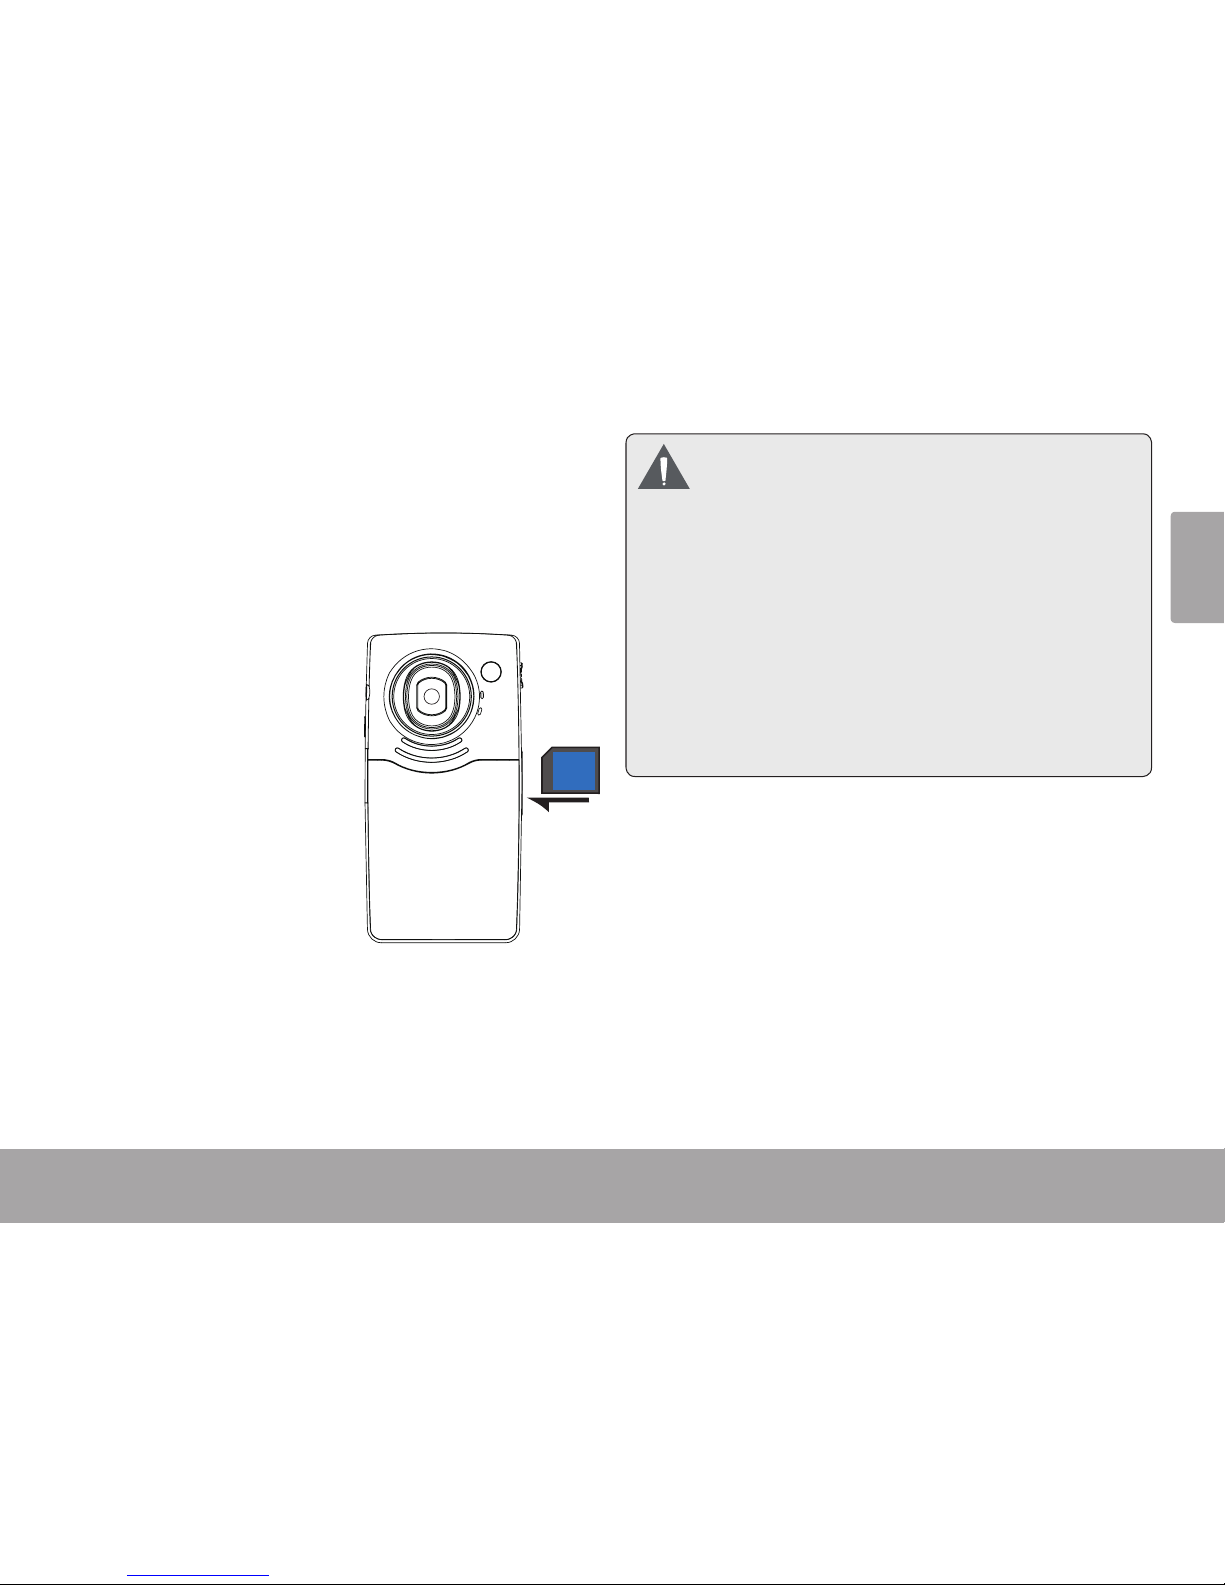
Insert a Memory Card
This camera records to SD or SDHC memory cards.
The maximum supported card size is GB.
Make sure that the write protection switch on the 1.
memory card is set to the “unlocked” position.
Install the memory 2.
card by inserting it
gently into the card
slot on the left side
of the video camera.
Push the card until it
clicks into place. Make
sure the card is properly aligned as indicated
by the marking next to
the card slot.
To release and remove the card, press the card in; 3.
it will spring out of the slot. Grasp the card by its
edge to remove it.
To avoid data corruption, turn o the digital
video camera before inserting or removing
a memory card.
Avoid touching the gold contacts of the
memory card.
Do not attempt to insert objects other than
an SD or SDHC memory card into the card
slot. A compatible memory card should t
easily into the card slot; if you encounter
resistance, check the alignment of the card.
Do not attempt to force the card in.
Page 10
Page 10 Using The Camera
English
Page 10 Using The Camera
English
Using the Camera Â
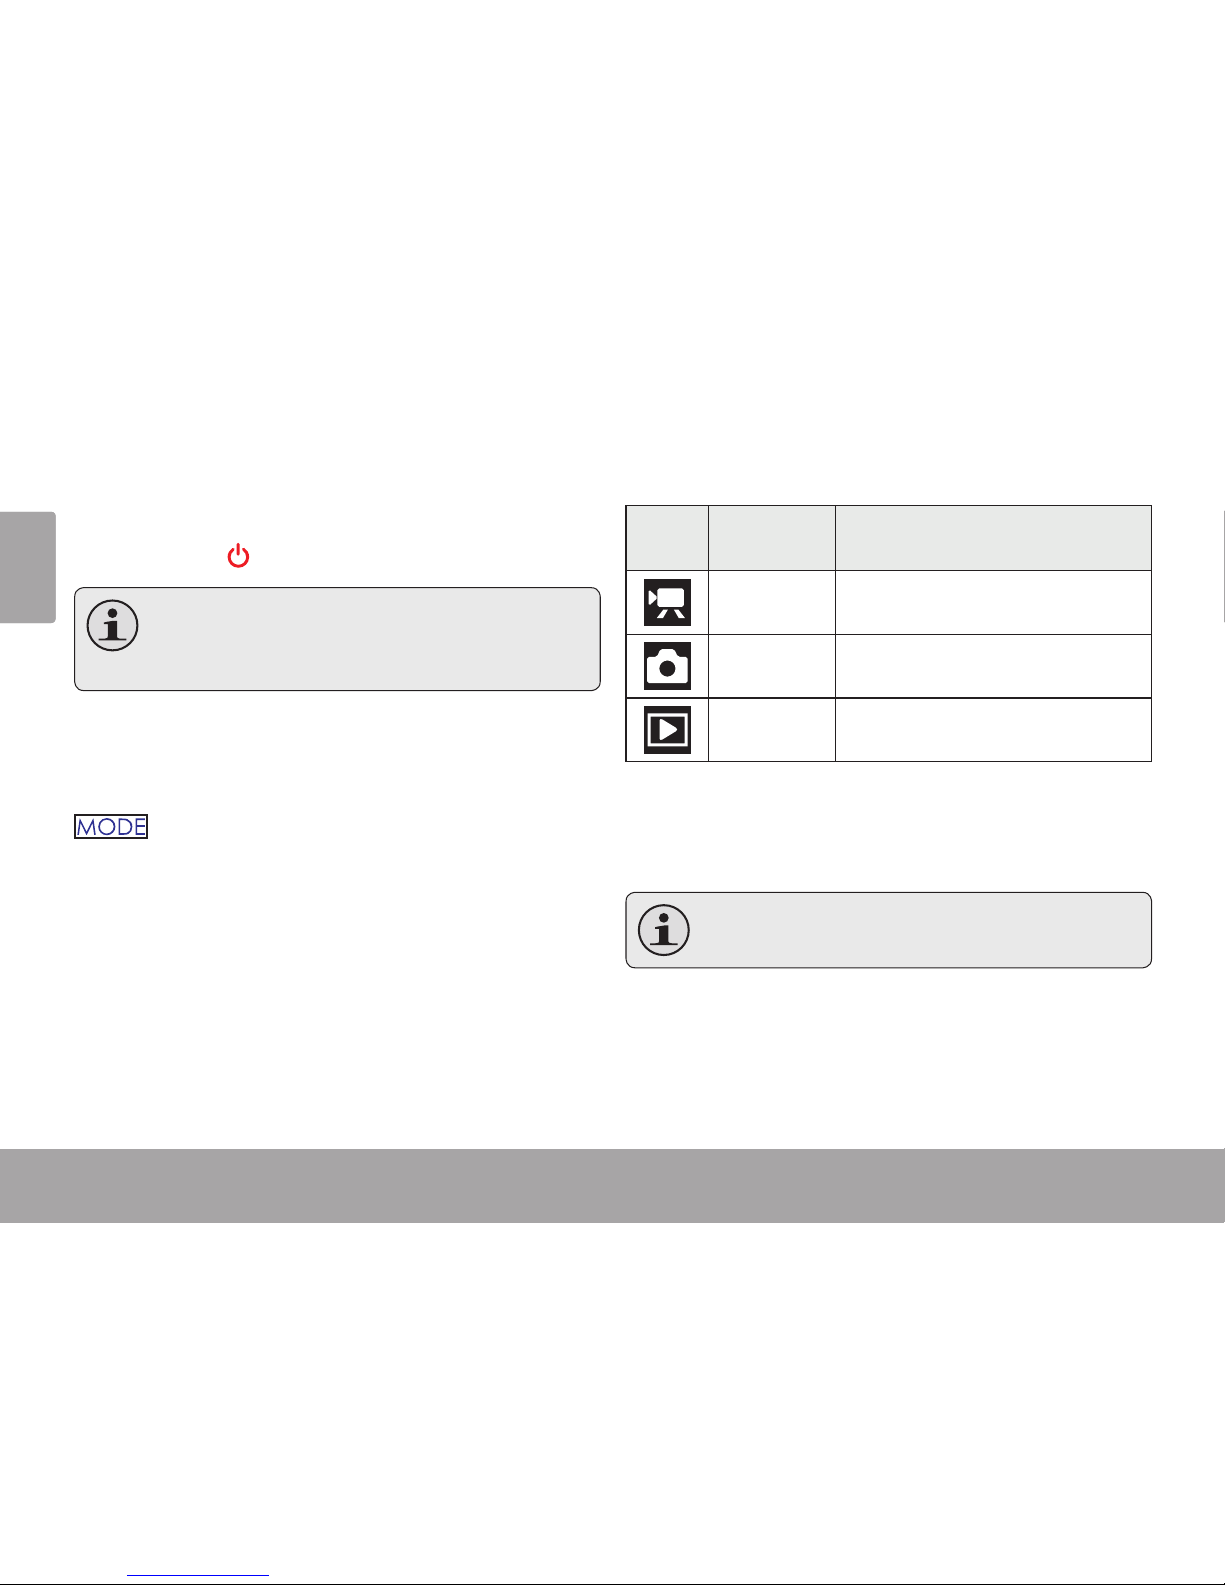
Turning the Camera On/O
Press and hold to turn the camera on or o.
To save power, the camera will turn itself
o automatically after one minute when
not in use.
Changing Camera Modes
Your video camera includes three modes. Press
to toggle between them.
The mode icon displayed on the upper left corner
of the screen indicates the current camera mode.
Icon
Camera
Mode
Function
Video Record videos.
Photo Capture still photos.
Playback Review video and photo les.
Video Mode
Place the camera in Video mode to record videos.
When you turn on your camera, it will enter
Video Mode automatically.
Page 11

Using The Camera Page 11
English
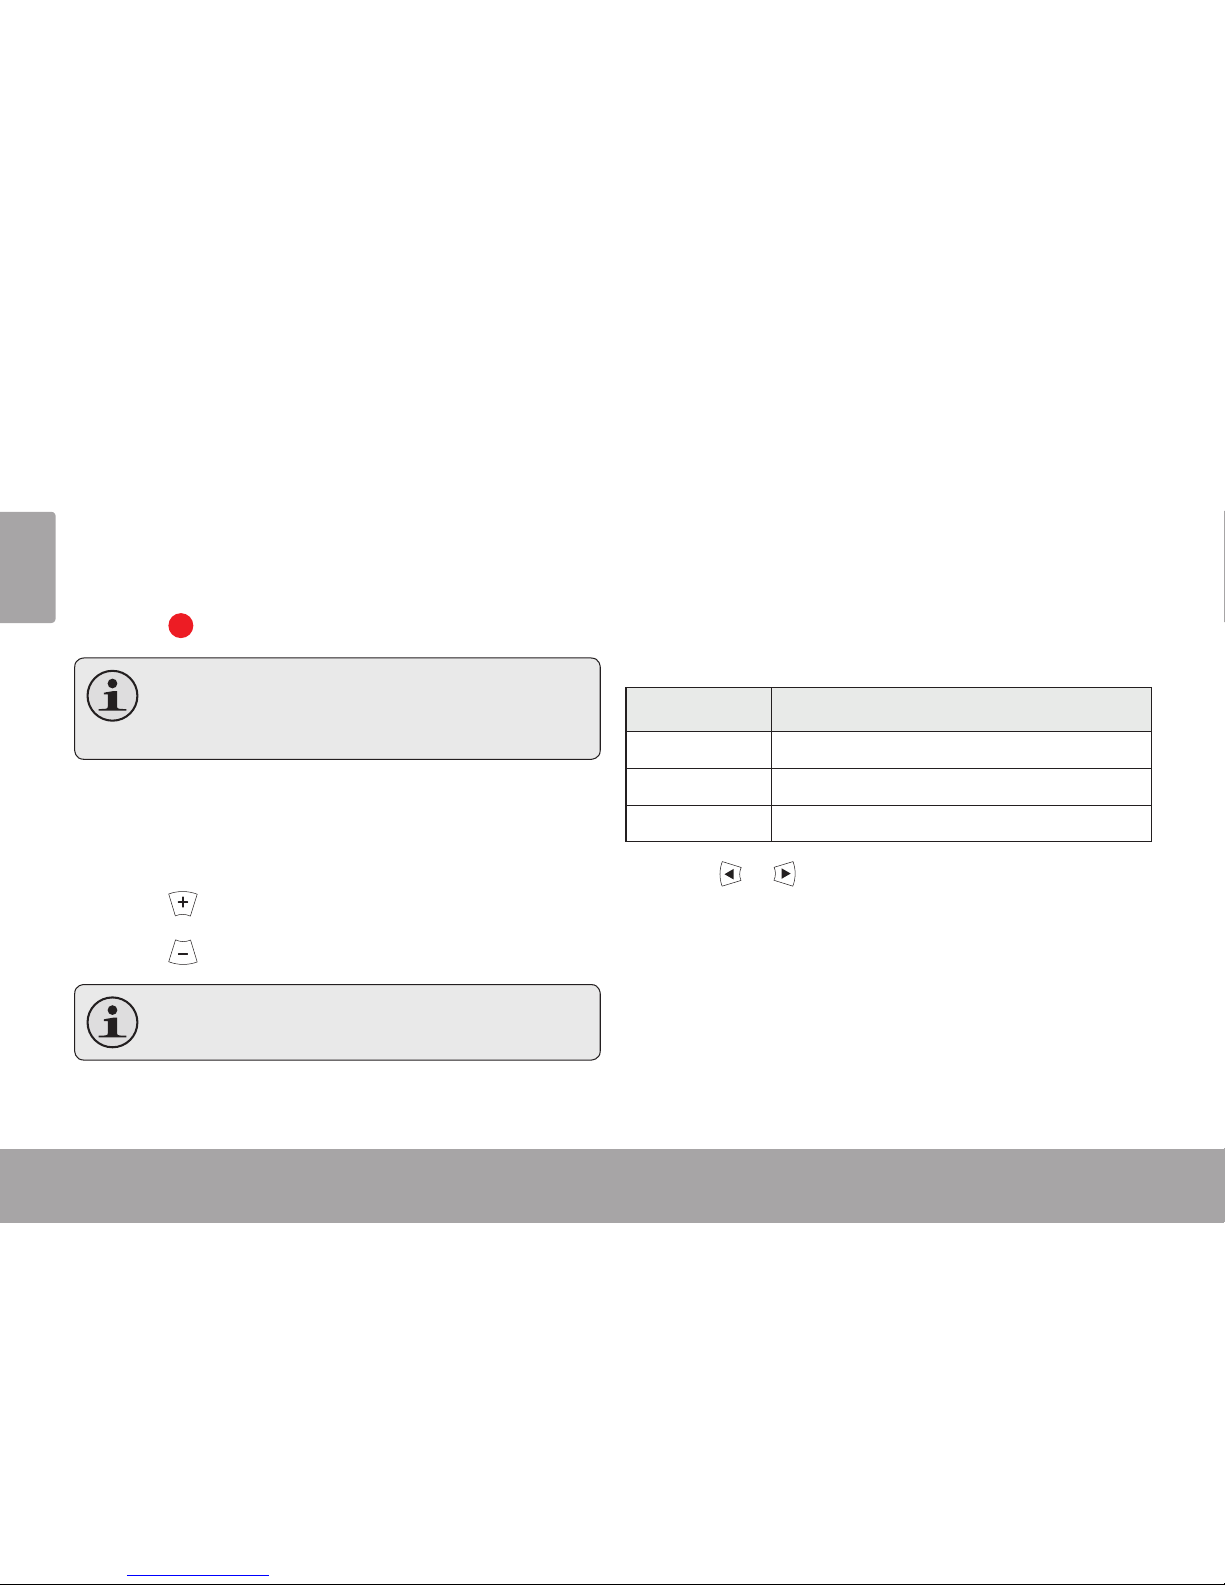
To Record Video
Press to begin recording.
Press to stop recording.
When the camera is recording, the elapsed
recording time is displayed on the upper left
corner of the screen. When the camera is not
recording, the estimated available recording time is displayed instead.
Recording will stop automatically when the
memory card is full
Zoom
To use the camera’s digital zoom function:
Press to zoom in
Press to zoom out.
The magnication level is displayed on the
upper right corner of the screen.
Video Size
The camera can record at a maximum video size
of x pixels (HD). To increase recording time,
you may wish to record video at a lower resolution.
The video size is displayed on the lower left corner
of the screen.
Video Size Resolution
HD x
D x
VGA x
Press
or to change the video size.
Recording must be stopped to change the
video size.
Page 12
Page 12 Using The Camera
English
Photo Mode
Place the camera in Photo mode to record still
photos.
To Take a Photo
Press to take a photo.
The estimated number of available photos
on the memory card is displayed on the upper left corner of the screen.
Zoom
To use the camera’s digital zoom function:
Press to zoom in
Press
to zoom out.
The magnication level is displayed on the
upper right corner of the screen.
Photo Size
The camera can record at a maximum photo size of
MP ( x ). To increase the amount of photos
you can take, you may wish to record photos at a
lower resolution.
The photo size is displayed on the lower left corner
of the screen
Photo Size Resolution
M x
M x
.M x
Press
or to change the photo size.
Page 13
Using The Camera Page 13
English
Playback Mode
Place the camera in Playback mode to review or
delete videos and photos on the camera.
Playback Controls
Press or to browse the les on the camera.
If a video le is selected, “AVI” will be dis-
played on the top of the screen and the
length of the video will be displayed on the
lower right corner of the screen.
Press to play a video le. Press again to
pause video playback.
Press and hold or to scan quickly through
the video le.
Press or to zoom in or out of a photo le.
When a photo is enlarged, press to enter
Pan mode
Press / or / to pan around the
image.
Press
again to exit Pan mode.
Press to zoom out to normal view.
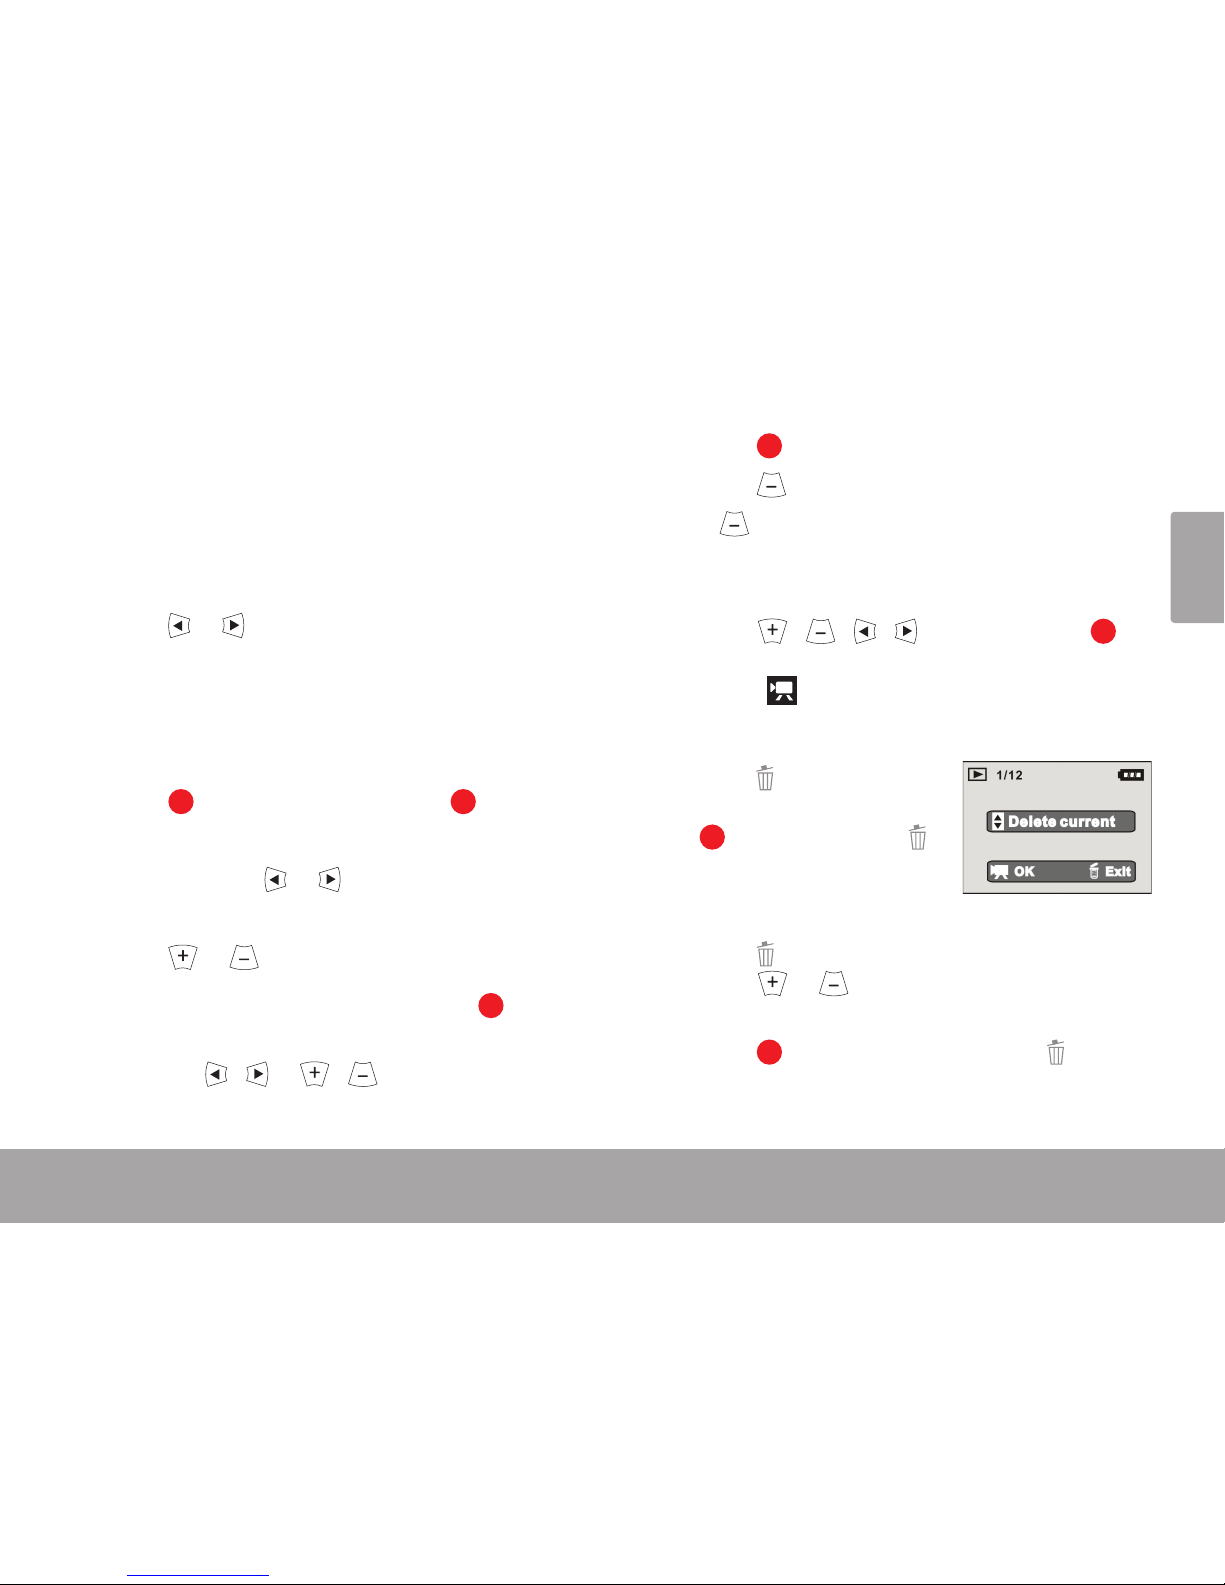
Press to view multiple les in thumbnail
mode.
When viewing les in Thumbnail mode,
press / / / to browse. Press to
select a le to view. Video les are marked
with a icon.
To delete the current le:
Press . At the “Delete
Current?” prompt, press
to delete, or press
again to cancel.
To delete all les:
Press . At the “Delete Current?” prompt,
press or ; the prompt will change to
“Delete All?”.
Press to delete all les, or press to
cancel.
Page 14

Page 14 Setup Mode
English
Page 14 Setup Mode
English
Setup Mode Â
Place the camera in setup mode to adjust the
camera’s internal options.
Setup Mode will let you adjust the following options:
Language
Date & Time
TV Out Mode
Power Frequency
View Firmware Version
To enter setup mode:
If the camera is on, turn it o.1.
Press and hold the 2. key. While holding down
the key, press and hold the key to turn the
camera on.
When you see the Coby Snapp HD screen, 3.
release the key (but continue to hold the
key).
Release the 4.
key when you see the “Date &
Time” setup screen.
To adjust the setup options:
Press 1. or to select an option to adjust.
Press 2. or to adjust the selected option.
Press 3. to save the settings and go to the next
screen, or press to cancel.
When all of the options have been set, the camera
will return to camera mode.
Page 15
Connecting To A Tv Page 15
English
Connecting To A Tv Page 15
English
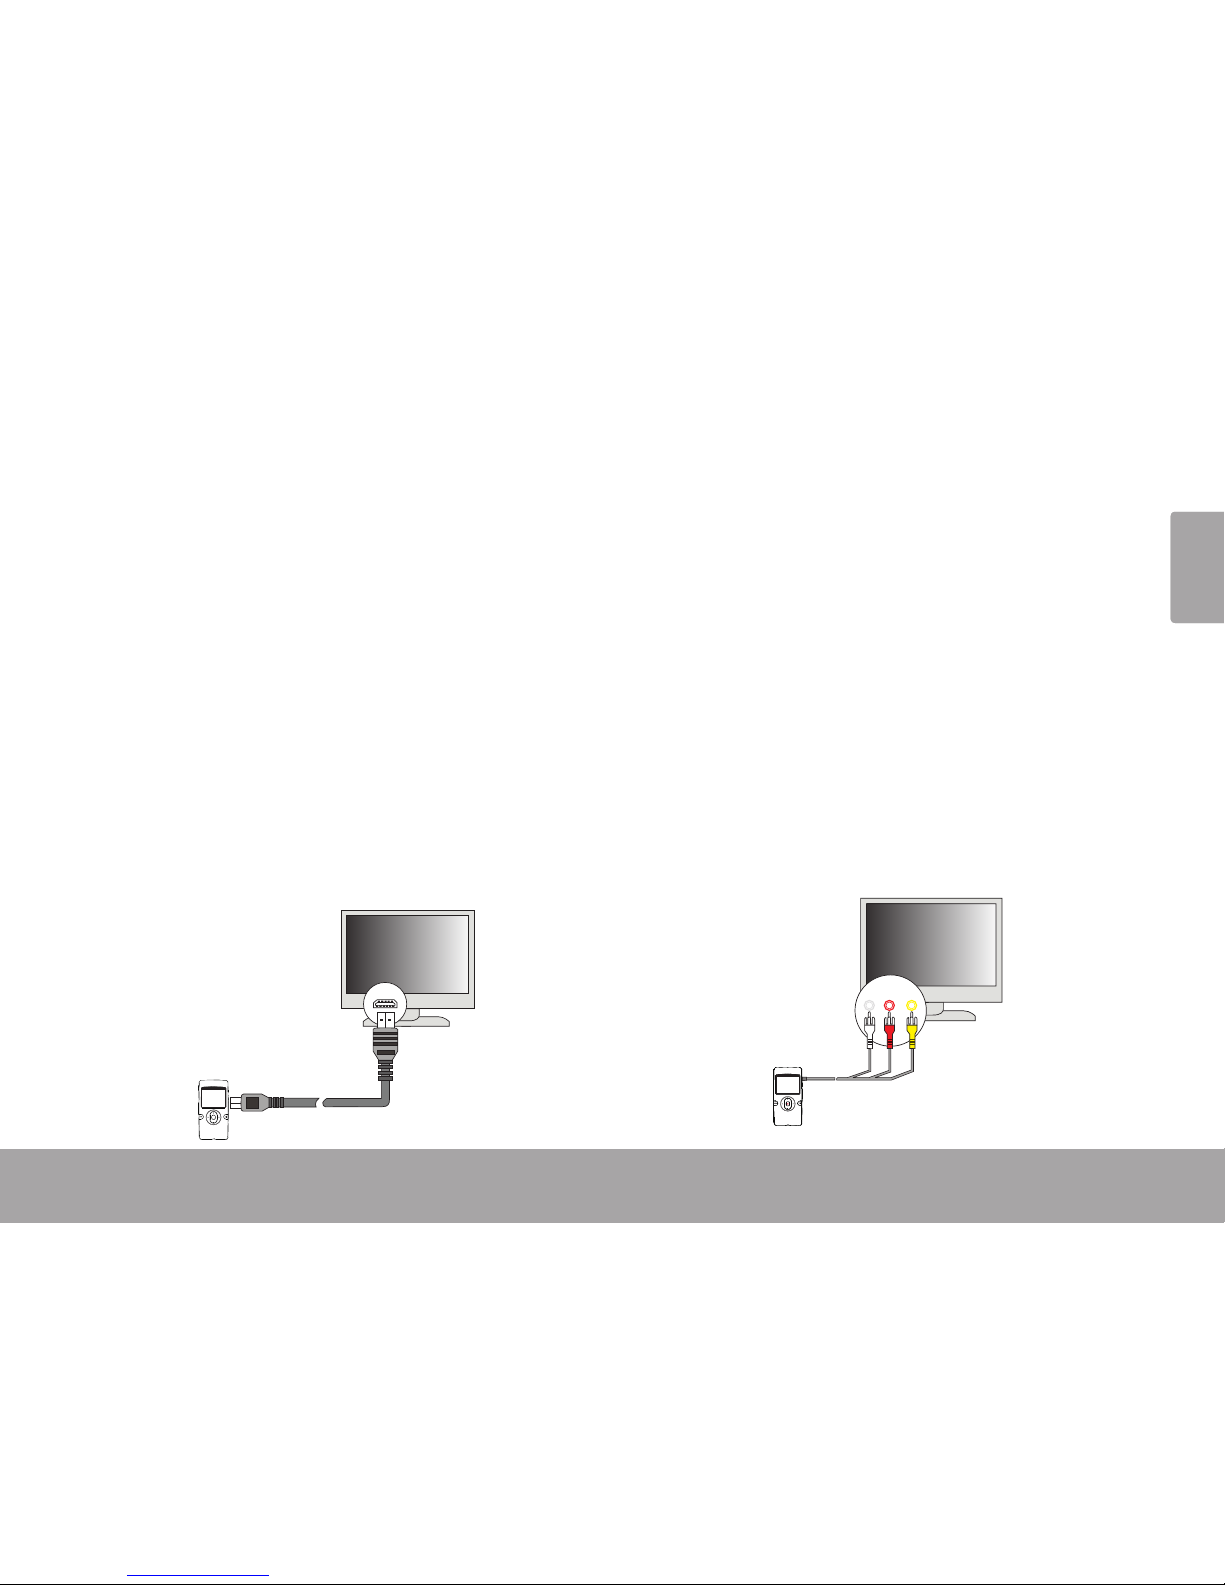
 Connecting to a TV Â
To view your video and photo les on a bigger
screen, use the included HDMI or A/V cable to
connect your camera to a television.
If your TV has HDMI input, use the included
HDMI cable to connect the camera:
Locate the HDMI input connector on your TV. 1.
Connect the large end of the HDMI cable into
the TV.
Connect the small end of the HDMI cable to the 2.
HDMI output connector of the camera.
Turn on the TV. Set the TV’s input source mode 3.
to display the HDMI signal.
HDTV
HDMI
If your TV has composite video input
(yellow/red/white connectors):
Locate the Composite Video input connectors 1.
on the TV.
Connect the cable’s yellow RCA plug to the
Composite Video In jack of the TV.
Connect the cable’s red RCA plug to the red
Audio In jack of the TV.
Connect the cable’s mini plug to the A/V output 2.
jack located on the top of the camera.
Turn on the TV. Set the TV’s input source mode 3.
to display the Composite Video signal.
W R Y
TV
Page 16

Page 16 Connecting To A Tv
English
When the camera is connected to your TV:
Turn on the camera; the camera will automatically switch to playback mode and the camera screen will 1.
turn o.
Use the playback mode controls to play videos or view photos on the TV.2.
If the TV source mode has been set properly, you will see the camera’s display on the TV screen. If you
need help setting the TV source mode, please refer to the documentation provided with your TV.
Only Playback mode is available when the camera is connected to a TV.
Page 17
Transferring Files To A Computer Page 17
English
Transferring Files To A Computer Page 17
English
Transferring Files to a Computer Â
Connect your camera to a computer to transfer les
from the camera onto your hard drive.
If you are planning to install the software
on the included CD, please install these programs BEFORE connecting the camera to
your computer.
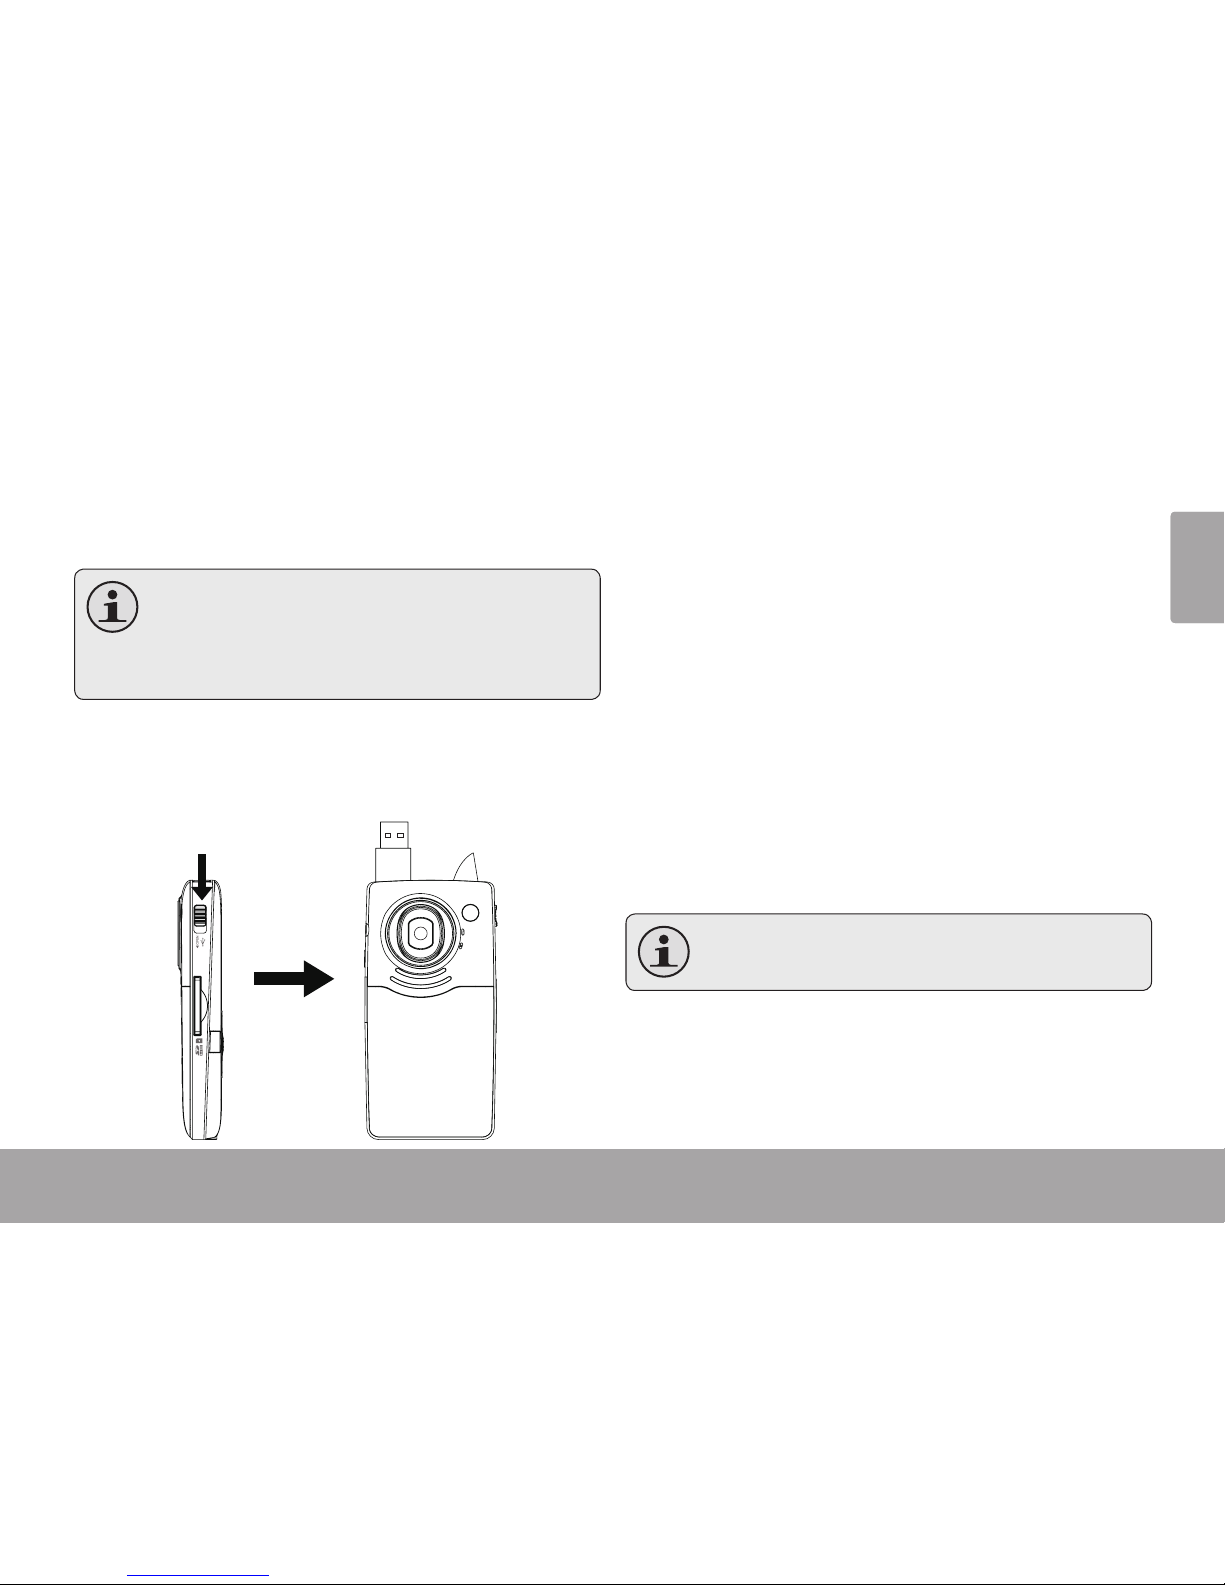
Locate the USB plug switch on the left side of 1.
the camera. Slide the switch down to release
the USB plug.
Connect the USB plug to a USB port on the 2.
computer.
If the camera is o, turn it on. Your computer 3.
should automatically recognize the video
camera as a removable disk. Follow the prompt
on your computer screen to view les on the
camera.
If no prompt appears, you may access the
camera via “My Computer” on a Windows computer, or via a Finder window on Mac OS X.
Transfer les from the camera to your computer 4.
as you would with any external disk (i.e., dragand-drop or copy/paste).
The camera must be turned on to connect to
a computer.
Page 18

Page 18 Transferring Files To A Computer
English
The rst time you connect the camera to a computer, it may take a moment for the computer to rec-
ognize and install the appropriate drivers for the camera.
A USB extension cable has been provided for your convenience. Use this cable to connect if the only
available USB ports are located on the back of your computer, or if the camera is blocked by other USB
devices.
If your computer has an SD card reader, you can simply remove the SD card from the camera and load
it into the card reader to transfer les.
Page 19

Software By Arcsoft® Page 19
English
Software By Arcsoft® Page 19
English
Software by ArcSoft Â
®
Your digital video camera comes with an installation CD which includes software for photo editing,
video editing, and uploading your videos to
YouTube™.
System Requirements
The minimum computer system requirements to
run this software are.
CPU: Pentium III GHz or equivalent
Disk Space: At least MB space free
Memory: MB or higher
Operating System: Windows /Vista/XP (with
Service Pack )
Microsoft Windows Media Player . or higher
Microsoft DirectX . or higher
Apple QuickTime® . or higher recommended
Installing the Software
The included software should be installed
BEFORE connecting the camera to your computer.
To begin installing software, insert the CD into your
computer’s CD/DVD drive.
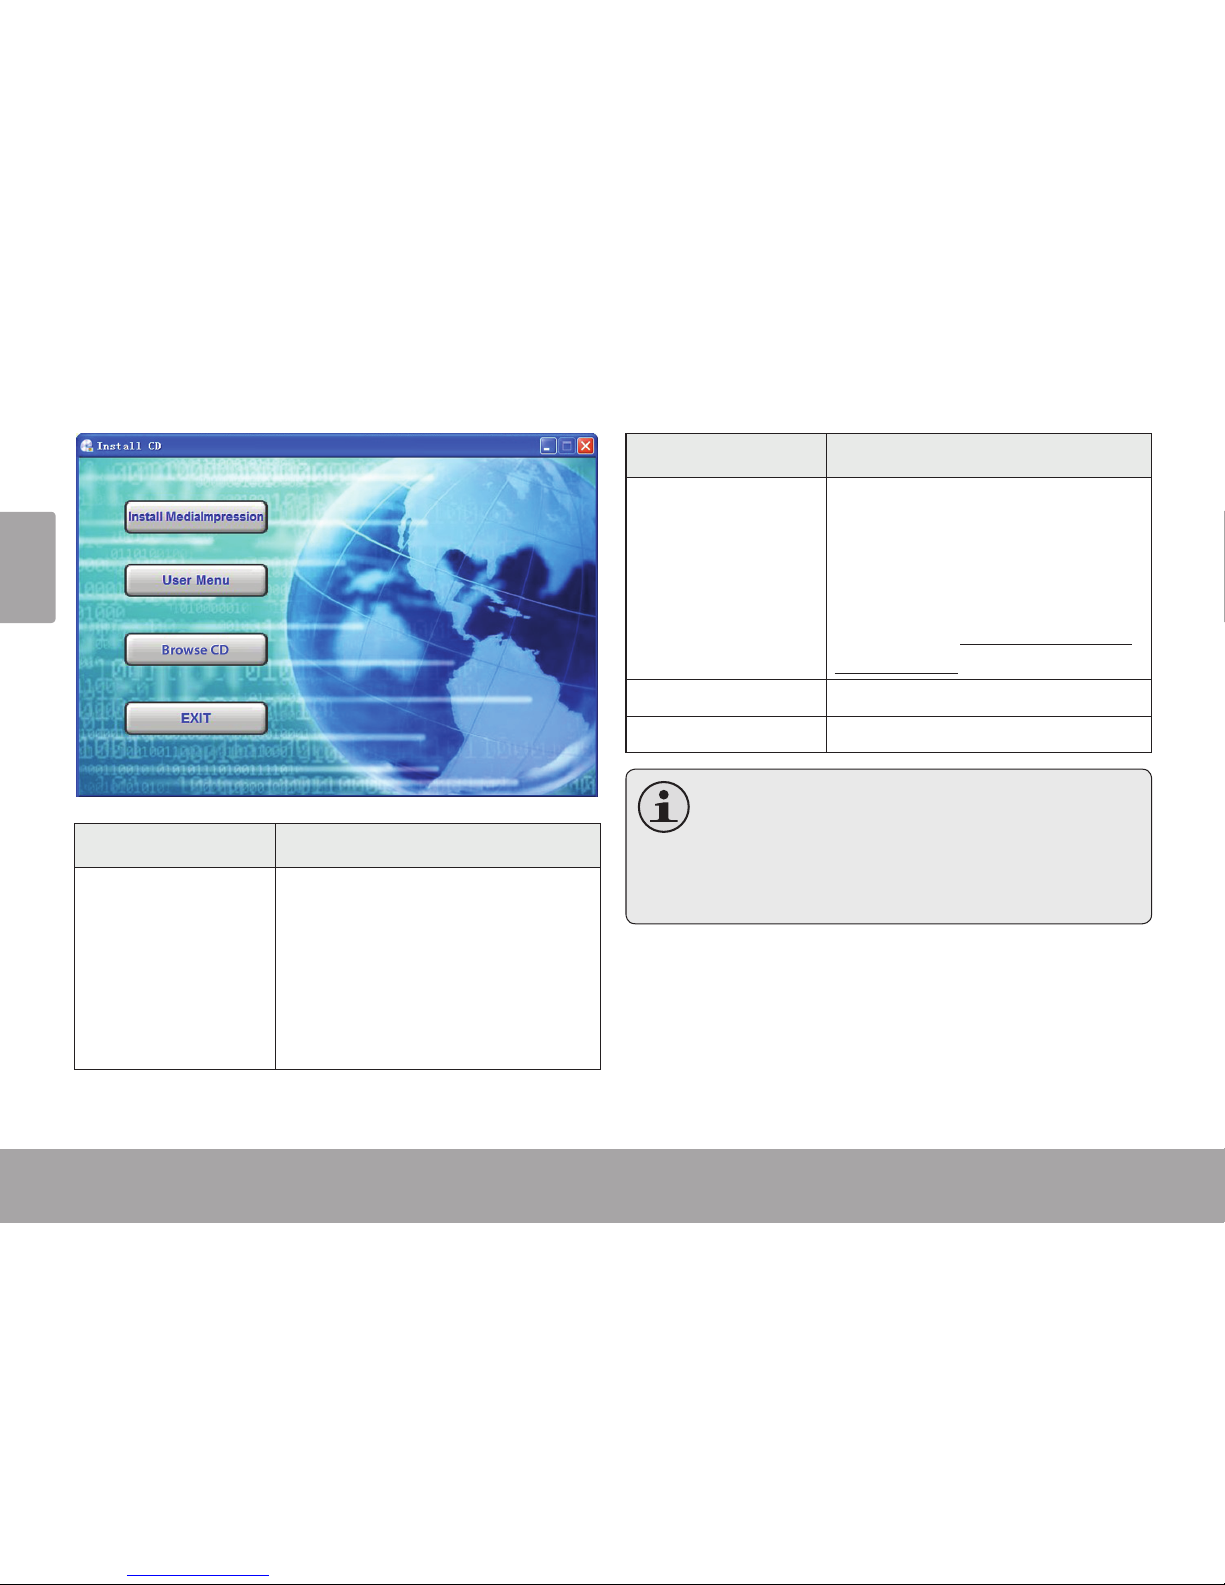
When the CD is inserted, an AutoRun menu will
appear. Click a menu option to launch the installation routine.
Page 20
Page 20 Software By Arcsoft®
English
Menu Options Description
Install
MediaImpression
Install software for editing
photos and videos, and for
uploading videos to YouTube™.
Follow the on-screen instructions to complete installation
of the selected software.
Menu Options Description
User Manual
View the user manual PDF.
To view the user manual, you
may need to download and
install the free Adobe Acrobat
reader from http://get.adobe.
com/reader/.
Browse CD Explore the contents of the CD.
Exit Exit this CD menu.
If the autorun menu does not appear auto-
matically, double-click the CD-ROM icon in
[My Computer] or [Windows Explorer], and
then double-click the le named [autorun.
exe] to start the program.
Page 21
Software By Arcsoft® Page 21
English
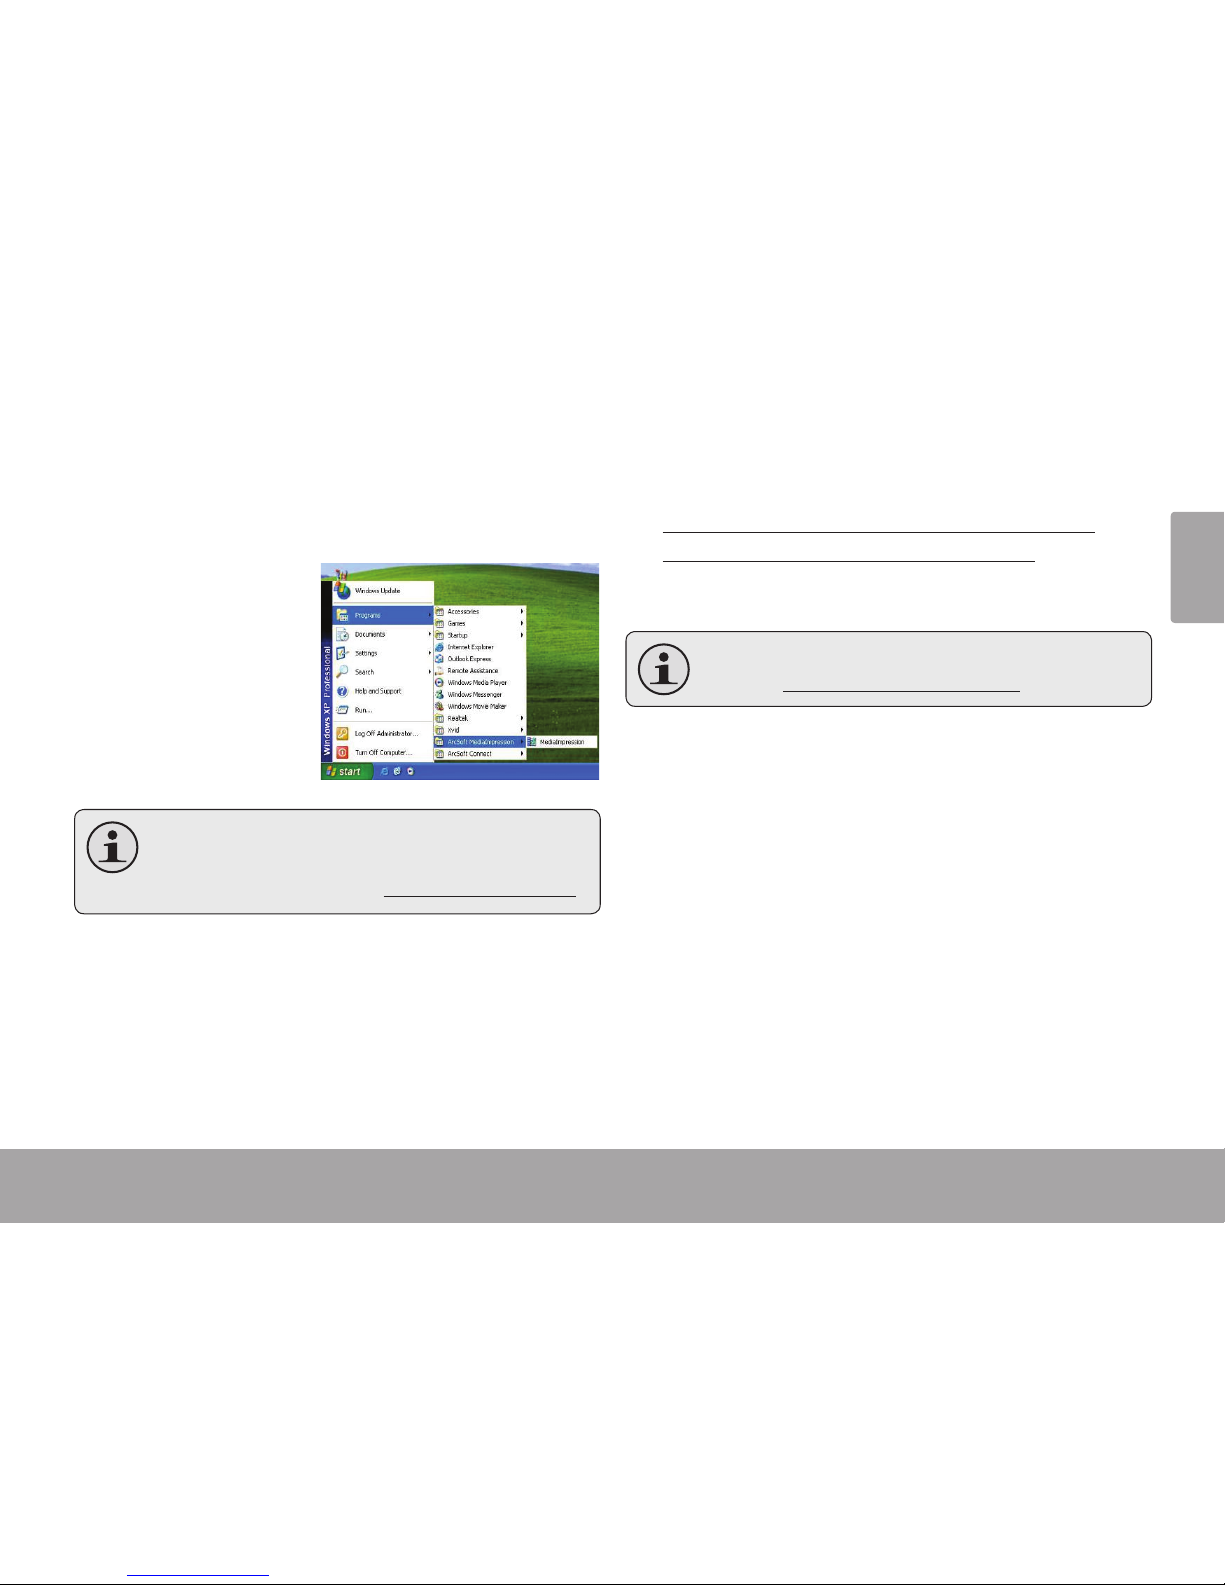
About ArcSoft MediaImpression
After MediaImpression has been installed, you can
launch the programs from the Windows Start menu.
Use MediaImpression
to edit photos and
videos. You can also
use MediaImpression
to share your videos
with family, friends,
or the world with the
YouTube web service.
To upload videos to YouTube, you must have
a valid YouTube account. Sign up for a free
account on the web at www.youtube.com.
To get acquainted with the MediaImpression software, please refer to the help le included with the
application (click on the “?” symbol in the top right
corner of the application screen).
The MediaImpression manual is available for download from ArcSoft here:
http://arcsoft.vo.llnwd.net/o/downloads/
manual/mi_manual_e.pdf#submenu
Learn more about MediaImpression on the
web at http://www.arcsoft.com.
Page 22

Page 22 Specications
English
Specications Â
Display Type 2.0” color LCD
Image Sensor 5.0 MP CMOS (2592 x 1944)
Video Resolution HD (1280 x 720)
D1 (720 x 480)
VGA (640 x 480)
Zoom 4x digital
Lens 3.1mm, f/2.8
Focus Range 1.2m ~ innity
White Balance Auto
Exposure Auto
Removable Memory
Support
SD/SDHC (up to 16GB)
Video Format MP4 (H.264/MPEG-4 AVC)
Photo Format JPEG
A/V Output Mini HDMI (720p)
Mini Composite Video/Mono
(480i)
PC Connection USB 2.0 Hi-speed
Power Rechargeable Li-ion battery
(3.7V, 800mAh)
Specications and manual are subject to change without notice.
Page 23

Troubleshooting & Support Page 23
English
Troubleshooting & Support Â
If you experience a problem with this device, please read the troubleshooting guide below and check
our website at www.cobyusa.com for Frequently Asked Questions (FAQ) and rmware updates. If these
resources do not resolve the problem, please contact Technical Support.
Address COBY Electronics Technical Support
Knowlton Way
Savannah, GA
Email techsupport@cobyusa.com
Web www.cobyusa.com
Phone --: Monday–Friday, :AM–:PM EST
Saturday, :AM-:PM EST
--: Monday–Friday, :AM–:PM EST
Camera does not power on.
Check that the rechargeable battery has been installed correctly. The text on the battery should face
up and be legible, and the gold contacts should face left.
The battery level may be low. Connect the camera to a computer to charge.
Page 24

Page 24 Troubleshooting & Support
English
The camera does not take pictures/video.
The camera’s memory or memory card may be
full. Delete several les and try again.
The memory card type may not be supported.
Make sure that you are using an SD or SDHC
memory card GB or less in size.
The memory card format may not be sup-
ported. Make sure that you are using a FATformatted card.
Image is blurry or out of focus.
Blurry images or video may result when the
camera is not held steady during recording.
Hold the camera steady and try again.
Blurry images or video may result when there is
not enough light on the subject. Try recording
in a brightly lit location.
Recorded images are not saved in memory.
Images will not save if the camera is turned o
before data has nished processing. Be sure
to allow adequate time for the image to save
completely before turning o the video camera.
Page 25
Important Information Page 25
English
Important Information Â
The lightning ash with arrowhead symbol within
an equilateral triangle is intended to alert the user
to the presence of uninsulated “dangerous voltage”
within the product’s enclosure that may be of sucient magnitude to constitute a risk of electric shock.
The exclamation point within an equilateral triangle
is intended to alert the user to the presence of
important operation and servicing instructions in the
literature accompanying the appliance.
For Customer Use:
Enter below the serial number that is located on the rear of the
unit. Retain this information for future reference.
Model No. CAM5001
Serial No.
For recycling or disposal information about
this product, please contact your local authorities or the Electronics Industries Alliance: www.eiae.org.
WARNING: To prevent re or shock hazard, do not expose
this device to rain or moisture. Dangerous high voltage is
present inside the enclosure. Do not open the cabinet.
Page 26

Page 26 Important Information
English
FCC Statement
This device complies with Part 15 of the FCC Rules. Operation is subject to the following two conditions:
(1) This device may not cause harmful interference.
(2) This device must accept any interference received, including interference that may cause undesired operation.
Note: This equipment has been tested and found to comply with the limits for Class B digital devices, pursuant to Part 15
of the FCC rules. These limits are designed to provide reasonable protection against harmful interference in a residential
installation. This equipment generates, uses and can radiate radio frequency energy and, if not installed and used in accordance with the instructions, may cause harmful interference to radio communications. However, there is no guarantee
that interference will not occur in a particular installation. If this equipment does cause harmful interference to radio or
television reception, which can be determined by turning the equipment o and on, the user is encouraged to try to correct
the interference by one or more of the following measures:
Reorient or relocate the receiving antenna.•
Increase the separation between the equipment and receiver.•
Connect the equipment into an outlet on a circuit dierent from that to which the receiver is connected.•
Consult the dealer or an experienced radio/TV technician for help•
Use of shielded cable is required to comply with Class B limits in Subpart B of Part 15 of the FCC rules.
Do not make any changes or modications to the equipment unless otherwise specied in the manual. If such changes or
modications should be made, you could be required to stop operation of the equipment.
Page 27

Important Information Page 27
English
Important Safety Instructions
Read Instructions: All the safety and operating instruc-1.
tions should be read before the product is operated.
Retain Instructions: The safety and operating instruc-2.
tions should be retained for future reference.
Heed Warnings: All warnings on the product and in the 3.
operating instructions should be adhered to.
Follow Instructions: All operating and usage instruc-4.
tions should be followed.
Cleaning: Unplug this product from the wall outlet 5.
before cleaning. Do not use liquid cleaners or aerosol
cleaners. Use a damp cloth for cleaning.
Attachments: Use only attachments recommended by 6.
the manufacturer. Use of other attachments may be
hazardous.
Water and Moisture: Do not use this product near water 7.
(e.g., near a bath tub, washbowl, kitchen sink, laundry
tub, in wet basements, or near a swimming pool and
the like).
Ventilation: Slots and openings in the cabinet are pro-8.
vided for ventilation to ensure reliable operation of the
product and to protect it from overheating. These openings should never be blocked by placing the product on
a bed, sofa, rug, or other similar surface. This product
should not be placed in a built-in installation such as a
bookcase or rack unless proper ventilation is provided or
the manufacturer instructions have been adhered to.
Power Sources: This product should be operated only 9.
from the type of power source indicated on the rating
label. If you are not sure of the type of power supply
to your home, consult your product dealer or local
power company. For products intended to operate from
battery power or other sources, refer to the operating
instructions.
Overloading: Do not overload wall outlets, extension 10.
cords, or integral convenience receptacles as this can
result in a risk of re or electric shock.
Page 28

Page 28 Important Information
English
Object and Liquid Entry: Never push objects of any kind 11.
into this product through openings as they may tap
dangerous voltage points or shout-out parts that could
result in a re or electric shock. Never spill liquid of any
kind on the product.
Servicing: Do not attempt to service this product your-12.
self as opening or removing covers may expose you to
dangerous voltage or other hazards. Refer all servicing
to qualied service personnel.
Damage Requiring Service: Unplug this product from 13.
the wall outlet and refer servicing to qualied service
personnel under the following conditions: a) when the
power-supply or plug is damaged; b) if liquid has been
spilled or if objects have fallen into the product; c) if
the product has been exposed to rain or water; d) if the
product does not operate normally by following the
operating instructions. Adjust only those controls that
are covered by the operating instructions as improper
adjustment of other controls may result in damage and
will often require extensive work by a qualied techni-
cian to restore the product to its normal operation; e)
if the product has been dropped or damaged in any
way; f) when the product exhibits a distinct change in
performance—this indicates a need for service.
Replacement Parts: When replacement parts are 14.
required, be sure that your service technician has used
replacement parts specied by the manufacturer or
have the same characteristics as the original part.
Unauthorized substitutions may result in re, electric
shock, or other hazards.
Safety Check: Upon completion of any service or repairs 15.
to this product, ask the service technician to perform
safety checks to ensure that the product is in proper
operating condition.
Heat: The product should be situated away from heat 16.
sources such as radiators, heat registers, stoves, or other
products (including ampliers) that produce heat.
Page 29

Important Information Page 29
English
Maintenance and Care
Always secure the camera with the wrist band 1.
when in use to prevent accidental damage to
the camera.
Always store the camera in the pouch provided 2.
to prevent scratches to the camera lens and
screen.
To clean the lens:3.
Blow away the dust from the surface of the a.
lens.
Gently wipe the lens clean with a microber b.
cloth designed for cleaning lenses/optical
devices. If necessary, use lens cleaner ONLY.
Never use organic solvents to clean the
camera.
Never touch the lens.4.
When storing the camera for a long period of 5.
time, remove the battery and keep the camera
in a dry and dark place.
This digital video camera is suitable for environ-6.
ments between 0°C- 40°C (32°F-104°F). Do not
expose the camera to extremely high temperatures, such as in a car parked in direct sunlight,
or to excessive humidity.
To prevent condensation, keep the camera in 7.
a sealed plastic bag when moving from a cold
place to a warm place. The camera can be removed from the bag when it reaches the indoor
temperature.
Page 30

Page 30 Índice De Contenidos
Español
Índice de Contenidos Â
CONTENIDOS DEL PAQUETE .........................................................................................................33
PANORAMA DE LA CÁMARA ......................................................................................................34
Vista Frontal ...................................................................................................................................34
Vista Superior .................................................................................................................................35
Vista Lateral Izquierda ..................................................................................................................35
Vista Posterior ................................................................................................................................35
Vista Lateral Derecha ...................................................................................................................35
Vista Inferior ...................................................................................................................................35
PARA EMPEZAR .............................................................................................................................36
Instalación de la Batería ..............................................................................................................36
Carga de la Batería ......................................................................................................................36
Instalación de la Tarjeta de Memoria ........................................................................................37
UTILIZACIÓN DE LA CÁMARA .....................................................................................................38
Encendido / Apagado de la Cámara .......................................................................................38
Cambio de los Modos de la Cámara ........................................................................................38
Page 31

Índice De Contenidos Page 31
Español
Modo Video ..................................................................................................................................38
Para Grabar Videos ...........................................................................................................39
Zoom (Acercar/Alejar) .......................................................................................................39
Tamaño del Video .............................................................................................................39
Modo Photo (Fotografía) .............................................................................................................40
Para Tomar una Fotografía ...............................................................................................40
Zoom (Acercar/Alejar) .......................................................................................................40
Tamaño de la Fotografía ..................................................................................................40
Modo de Reproducción .............................................................................................................. 41
Controles de Reproducción .............................................................................................41
MODO SETUP (CONFIGURACIÓN) ..............................................................................................43
CONEXIÓN A UN APARATO DE TV ..............................................................................................44
TRANSFERENCIA DE ARCHIVOS A LA COMPUTADORA .............................................................46
SOFTWARE PROPORCIONADO POR ARCSOFT® .........................................................................48
Requerimientos del Sistema .........................................................................................................48
Instalación del Software ..............................................................................................................48
Acerca del Software MediaImpression de ArcSoft ..................................................................49
Page 32

Page 32 Índice De Contenidos
Español
ESPECIFICACIONES ...................................................................................................................... 51
SOLUCIÓN DE PROBLEMAS Y SOPORTE ......................................................................................52
INFORMACIÓN IMPORTANTE ......................................................................................................54
Declaración de la FCC ................................................................................................................55
Instrucciones de Seguridad Importantes ...................................................................................56
Mantenimiento y Cuidado ..........................................................................................................58
Page 33

Contenidos Del Paquete Page 33
Español
Â
Contenidos Del Paquete Page 33
Contenidos del Paquete Â
Gracias por su compra de esta Snapp™ Cámara
Digital de Video de alta denición Coby CAM.
Lea estas instrucciones detenidamente antes de
utilizar la videocámara, y consérvelas para referencia futura. Este paquete incluye:
Una cámara CAM
Batería recargable
Un cable HDMI
Un cable AV
Un cable de extensión USB
Una correa para mano desmontable
Un estuche
Un CD de instalación
Si faltara cualquiera de los elementos mencionados
anteriormente, comuníquese con el distribuidor a
quien le compró este producto.
Es posible que este paquete contenga bol-
sas de plástico u otros materiales peligrosos
para los niños. Asegúrese de desechar todos los materiales de embalaje en forma
segura una vez abierto el paquete.
Page 34

Page 34 Panorama De La Cámara
Español
Panorama de la Cámara Â
Vista Frontal
Pantalla LCD
Mode (modo)
Delete (Borrar)
Left (Izquierda)
Right (Derecha)
Up (Arriba)
Down (abajo)
Record/OK (Grabar/Aceptar)
1
2
5
6
3
4
7
8
Page 35

Panorama De La Cámara Page 35
Español
Vista Superior
Enchufe USB
Vista Lateral Izquierda
Enchufe de salida A/V
Alimentación
Puerto HDMI
Vista Posterior
Lente
Micrófono
Luz de iluminación LED
Altavoz
Tapa de la batería
Vista Lateral Derecha
Interruptor del enchufe USB
Ranura para tarjetas SD/SDHC
Vista Inferior
Montaje para trípode
Montaje para la correa de mano
1
2
3
4
8
6
10
11
13
12
5
7
9
Page 36

Page 36 Para Empezar
Español
Para Empezar Â
Lea y complete los pasos que se enumeran a
continuación para comenzar a utilizar la cámara de
video digital.
Instalación de la Batería
Retire la tapa del compartimiento para baterías 1.
deslizándolo hacia la base de la cámara.
Coloque la batería dentro del compartimiento 2.
como se muestra en el diagrama. El texto escrito
en la batería debe quedar a la vista y los contactos de metal deben estar orientados hacia la
izquierda.
Vuelva a colocar la tapa del compartimiento de 3.
baterías hasta que encaje en su sitio.
La batería utilizada en este dispositivo puede
producir incendios o quemaduras químicas
si se la trata de manera incorrecta. No recargue, desarme, incinere ni caliente las baterías. Las baterías usadas deben desecharse
de manera segura.
Mantenga las baterías lejos del alcance de
los niños.
Carga de la Batería
Apague la cámara.1.
Conecte la cámara a un puerto USB de una com-2.
putadora. La lámpara LED se encenderá durante
la carga y se apagará una vez que la batería esté
totalmente cargada.
Page 37

Para Empezar Page 37
Español
Cargue la batería completamente antes de
utilizar la cámara por primera vez.
Si desea instrucciones para conectar la
cámara a la computadora, lea la sección
“Transferencia de archivos a la computadora” de este manual.
Instalación de la Tarjeta de
Memoria
Esta cámara es compatible con tarjetas de tipo
SD y SDHC. El tamaño
máximo de tarjeta de
memoria compatible con
la cámara es de GB.
Asegúrese de que el 1.
interruptor de protección de escritura de
la tarjeta de memoria
se encuentre en la
posición “desbloqueado”.
Coloque suavemente la tarjeta de memoria en 2.
la ranura de tarjetas en el lado izquierdo de la
cámara. Presione la tarjeta hasta que escuche
un clic. Asegúrese de que la tarjeta se encuentre
apropiadamente alineada de la manera que lo
indica la marca a un lado de la ranura de tarjetas.
Para liberar y retirar la tarjetas, presione la 3.
tarjeta hacia dentro; la tarjeta será impulsada
hacia fuera por un resorte. Tome la tarjeta desde
sus extremos para retirarla.
Para evitar la pérdida de la información,
apague la cámara antes de colocar o retirar
la tarjeta de memoria.
Evite tocar los contactos dorados de la tar-
jeta de memoria.
No intente colocar objetos diferentes a una
tarjeta de memoria SD o SDHC en la ranura
de tarjetas. Una tarjeta de memoria compatible debe encajar fácilmente en la ranura de tarjetas; si encuentra resistencia en el
proceso, verique la posición de entrada de
la tarjeta. No intente insertar a la fuerza la
tarjeta de memoria
Page 38

Page 38 Utilización De La Cámara
Español
Utilización de la Cámara Â
Encendido / Apagado de la
Cámara
Presione y mantenga presionado el botón para
encender o apagar la cámara.
Para ahorrar energía, la cámara se apagará
automáticamente después de un minuto
sin utilizarla.
Cambio de los Modos de la Cámara
La cámara de video posee tres modos de uso.
Presione el botón (modo) para alternar
entre ellos.
El icono de modo que se muestra en la esquina
superior izquierda de la pantalla indica el modo de
uso en el que se encuentra actualmente.
Icono
Modo de la
cámara
Función
Video Grabar videos
Foto
Capturar fotos de un
cuadro
Reproducción
Revisar los archivos de
video y fotografías
Modo Video
Coloque la cámara en el modo Video para poder
grabar videos.
Cuando encienda la cámara, accederá
directamente al modo Video de manera automática.
Page 39

Utilización De La Cámara Page 39
Español
Para Grabar Videos
Presione el botón para comenzar la grabación.
Presione el botón nuevamente para
detener la grabación.
Durante la grabación, el tiempo transcur-
rido de grabación se muestra en la esquina
superior izquierda de la pantalla. Cuando
la cámara no se encuentra grabando, se
muestra el tiempo de grabación disponible
estimado en reemplazo del tiempo de grabación transcurrido.
La grabación se detendrá automáticamente
cuando la capacidad de la tarjeta de memoria esté completa.
Zoom (Acercar/Alejar)
Para utilizar la función zoom digital (acercar / alejar)
de la cámara:
Presione el botón
para acercar la imagen.
Presione el botón
para alejar la imagen.
El nivel de ampliación se muestra en la es-
quina superior derecha de la pantalla.
Tamaño del Video
La cámara puede grabar en un tamaño de video
máximo de x píxeles (alta denición o HD)
Para incrementar el tiempo de grabación, puede
grabar videos en una resolución más baja.
El tamaño del video se muestra en la esquina
inferior izquierda de la pantalla.
Tamaño del video Resolución
HD x
D x
VGA x
Presione
o para cambiar el tamaño
del video.
Debe detenerse la grabación para cambiar
de tamaño de video.
Page 40

Page 40 Utilización De La Cámara
Español
Modo Photo (Fotografía)
Coloque la cámara en el modo Photo (fotografía)
para tomar fotografías de un cuadro.
Para Tomar una Fotografía
Presione el botón para tomar una fotografía.
El número estimado de fotografías di-
sponibles de acuerdo al espacio disponible
en la tarjeta de memoria se muestra en la
esquina superior izquierda de la pantalla.
Zoom (Acercar/Alejar)
Para utilizar la función zoom digital (acercar / alejar)
de la cámara:
Presione el botón para acercar la imagen.
Presione el botón para alejar la imagen.
El nivel de ampliación se muestra en la es-
quina superior derecha de la pantalla.
Tamaño de la Fotografía
La cámara puede tomar fotografías con un tamaño
máximo de MP ( x ). Para tomar una
mayor cantidad de fotografías, puede tomarlas en
una resolución menor.
El tamaño de la fotografía se muestra en la esquina
inferior izquierda de la pantalla
Tamaño de la fotografía Resolución
M x
M x
.M x
Presione
o para cambiar el tamaño de la
fotografía.
Page 41

Utilización De La Cámara Page 41
Español
Modo de Reproducción
Coloque la cámara en el modo Playback (reproducción) para revisar o borrar videos o fotografías
tomados con la cámara.
Controles de Reproducción
Presione los botones o tpara desplazarse
entre los archivos de la cámara.
Si se selecciona un archivo de video, se
mostrará la palabra “AVI” en la parte superior de la pantalla y la duración del video en
la esquina inferior derecha.
Presione el botón para reproducir un archivo
de video; presione nuevamente para hacer
una pausa en la reproducción.
Presione y mantenga presionado el botón
o para realizar una búsqueda rápida en el
archivo de video.
Presione los botones
o para acercar o
alejar la imagen en un archivo de fotografía.
Cuando aumente el tamaño de una fo-
tografía, presione > para ingresar en el
modo de ampliación.
Presione / o / para desplazarse
por la imagen ampliada.
Presione nuevamente para salir del
modo de imagen ampliada.
Presione el botón para alejar la imagen y
volver al modo de vista normal.
Presione el botón para ver varias imágenes
en el modo de vistas de miniatura.
Cuando se encuentre viendo los archivos
en el modo de miniaturas, presione /
/ / para navegar entre los archivos.
Presione el botón para seleccionar un
archivo para ver. Los archivos de video se
señalan con el icono de .
Page 42

Page 42 Utilización De La Cámara
Español
Para borrar el archivo actual:
Presione el botón
. Una vez que se
muestre el mensaje
“Delete Current?”
(¿borrar actual?),
presione el botón
para borrar el
archivo o presione el botón nuevamente
para cancelar.
Para borrar todos los archivos:
Presione el botón .Cuando se muestre el
mensaje “Delete Current?” (¿borrar actual?),
presione o ; en su lugar aparecerá el
mensaje “Delete All?” (¿borrar todo?).
Press para eliminar todos los archivos o
presione cualquiera para cancelar.
Page 43

ModoSetup(conguración) Page 43
Español
Modo Setup (Conguración) Â
Coloque la cámara en el modo Setup (conguración) para ajustar las opciones internas de la
cámara.
El modo de conguración le permitirá ajustar las
siguientes opciones:
Language (idioma)
Date & Time (fecha y hora)
TV Out Mode (Modo de salida del video)
Power Frequency (Frecuencia de red)
View Firmware Version (Ver versión de rmware)
Para ingresar al modo de conguración:
Si la cámara está encendida, apáguela.1.
Presione y mantenga presionado el botón 2.
Mientras mantiene presionado el botón
presione y mantenga presionado el botón
para encender la cámara.
Cuando vea la pantalla de Coby Snapp HD, 3.
suelte el botón ((pero continúe presionando
el botón ).
Suelte el botón 4. una vez que vea la pantalla
de conguración “Date & Time” (Fecha y hora).
Para ajustar las opciones de conguración:
Presione 1. o para seleccionar una
opción a ajustar.
Presione 2. o para ajustar
la opción seleccionada.
Presione 3. para guardar la conguración y
pasar a la pantalla siguiente, o presione para
cancelar.
Una vez que haya ajustado todas las opciones, la
cámara regresará al modo cámara.
Page 44

Page 44 Conexión A Un Aparato De Tv
Español
Para poder ver los videos y las fotografías en una
pantalla más grande, utilice los cables HDMI o A/V
incluidos para conectar la cámara a un aparato de TV.
Si su televisor tiene una entrada HDMI,
utilice el cable HDMI incluido para
conectar la cámara:
Busque el conector 1.
de entrada HDMI de
su aparato televisor.
Conecte el extremo
más grande del cable
HDMI al televisor.
Conecte el extremo 2.
más pequeño del
cable HDMI al conector de salida HDMI de la
cámara.
Encienda el televisor. Coloque la TV en el modo 3.
de entrada correspondiente a la señal HDMI.
Si su televisor posee una entrada de video
compuesta (conectores amarillo/rojo/
blanco):
Ubique los conectores 1.
de entrada de Video
Compuesto en la TV.
Coloque el
enchufe tipo RCA
de color amarillo
en el enchufe de
entrada de Video
Compuesto de la TV.
Coloque el enchufe tipo RCA de color rojo
en el enchufe de entrada de Audio de la TV.
Conecte el enchufe de menor tamaño al 2.
enchufe de salida de A/V ubicado en la parte
superior de la cámara.
Encienda el televisor. Coloque la TV en el modo 3.
de entrada correspondiente a la señal de Video
Compuesto.
W R Y
TV
HDTV
HDMI
Conexión a un Aparato de TV Â
Page 45

Conexión A Un Aparato De Tv Page 45
Español
Una vez que la cámara esté conectada
al televisor:
Encienda la cámara: pasará automáticamente al 1.
modo de reproducción y su pantalla se apagará.
Utilice los controles del modo de reproducción 2.
para reproducir videos o ver fotografías en la TV.
Si el modo de entrada de la TV se ha cong-
urado adecuadamente, verá la información
de la pantalla de la cámara en la pantalla
de la TV. Si necesita ayuda para congurar
el modo de entrada del televisor, consulte la
documentación provista con el aparato.
Mientras la cámara está conectada al televi-
sor, sólo se encuentra disponible el modo de
reproducción.
Page 46

Page 46 Transferencia De Archivos A La Computadora
Español
Transferencia de Archivos Â
a la Computadora
Conecte la cámara a una computadora para transferir archivos desde la cámara hacia el disco duro de
la computadora.
Si planea instalar el software del CD que
se incluye, instale los programas ANTES de
conectar la cámara a la computadora.
Ubique el interruptor del enchufe USB en el 1.
lado izquierdo de la cámara. Deslice el interruptor hacia abajo para liberar el enchufe USB.
Conecte el enchufe USB a un puerto USB en la 2.
computadora.
Si la cámara se encuentra apagada, enciéndala. 3.
La computadora debe reconocer automáticamente la cámara de video como un disco
extraíble. Siga los mensajes en la pantalla de su
computadora para ver los archivos de la cámara.
Si no apareciera ningún mensaje, puede
acceder a la cámara mediante “Mi PC” en una
computadora con sistema operativo Windows,
o mediante la ventana de búsqueda en computadoras con Mac OS X.
La transferencia de archivos desde la cámara a 4.
la computadora se realiza de la misma manera
en la que se lo hace con un disco externo (por
ejemplo: arrastrar y soltar, o copiar y pegar).
Page 47

Transferencia De Archivos A La Computadora Page 47
Español
La cámara debe encenderse para poder conectarla a una computadora.
La primera vez que conecte la cámara a una computadora, puede que la computadora tome un ti-
empo adicional para reconocer e instalar los controladores apropiados para la cámara.
Para su conveniencia, la cámara incluye un cable de extensión USB. Utilice este cable para la conexión
en el caso de que los únicos puertos USB disponibles se encuentren en la parte posterior de la computadora, o si la cámara es bloqueada físicamente por otros dispositivos USB.
Si la computadora posee un lector de tarjetas SD, puede simplemente retirar la tarjeta SD de la cá-
mara y colocarla en el lector de tarjetas para transferir los archivos.
Page 48

Page 48 Software Proporcionado Por Arcsoft®
Español
Software Proporcionado por ArcSoft® Â
La cámara de video incluye un CD de instalación
que incluye programas para la edición de fotografías, para la edición de video, y para poder
subir los videos a YouTube™.
Requerimientos del Sistema
Los requerimientos del sistema mínimos para
utilizar estos programas son:
CPU: Pentium III GHz o equivalente
Espacio en disco: Al menos MB de
espacio libre
Memoria RAM: MB o mayor
Sistema operativo: Windows /Vista/XP (con
Service Pack )
Microsoft Windows Media Player . o superior
Microsoft DirectX . o superior
Apple QuickTime®. o superior (recomendado)
Instalación del Software
El software incluido debe ser instalado ANTES
de conectar la cámara a la computadora.
Para comenzar a instalar el software, coloque el CD
en la unidad de CD/DVD.
Cuando haya colocado el CD, aparecerá un menú
de ejecución automática. Haga clic en una de las
opciones del menú para iniciar la rutina
de instalación.
Page 49

Software Proporcionado Por Arcsoft® Page 49
Español
Opción del
menú
Descripción
Install
MediaImpression
(Instalar
MediaImpression)
Instala el software para
la edición de fotografía y
video, y para subir sus videos a
YouTub e™.
Siga las instrucciones en pantalla para completar el proceso
de instalación del software
seleccionado
Manual del
usuario
Permite ver el manual del
usuario en formato PDF.
Para poder ver el manual del
usuario, puede que necesite
descargar e instalar el programa de uso gratuito Adobe
Acrobat PDF reader desde la
dirección http://get.adobe.
com/reader/.
Browse CD (Ver
contenido del CD)
Explora el contenido del CD.
Opción del
menú
Descripción
Exit (Salir) Sale del menú del CD.
Si el menú de ejecución automática no
aparece, haga doble clic en el icono del CDROM en [My Computer] (Mi PC) o [Windows
Explorer] (explorador de Windows), y luego
haga doble clic en el archivo denominado
[autorun.exe] para iniciar el programa.
Acerca del Software
MediaImpression de ArcSoft
Luego de haber instalado el software
Me dia Im pre ss ion ,
puede iniciar el programa desde el Menú
de Inicio de Windows.
Page 50

Page 50 Software Proporcionado Por Arcsoft®
Español
Utilice el software MediaImpression para editar fotografías y videos. Puede utilizar también el software
MediaImpression para compartir sus videos con su
familia y amigos, o con el mundo entero a través del
servicio de web de YouTube.
Para poder subir videos a YouTube; debe
poseer una cuenta válida de YouTube. Para
inscribirse y contar con una cuenta gratuita,
visite el sitio http://www.youtube.com.
Para familiarizarse con el software
MediaImpression, consulte el archivo de ayuda
incluido en el programa (haga clic en el símbolo “?”
en la esquina superior derecha de la pantalla del
programa).
El manual de MediaImpression está disponible
para su descarga a través de ArcSoft en la siguiente
ubicación:
http://arcsoft.vo.llnwd.net/o/downloads/
manual/mi_manual_e.pdf#submenu
También puede visitar ArcSoft en la Web
para obtener más información sobre MediaImpression: http://www.arcsoft.com.
Page 51

Especicaciones Page 51
Español
Especicaciones Â
Tipo de Pantalla LCD color de 2,0"
Sensor de Imágenes 5.0 MP CMOS (2592 x 1944)
Resolución de Video HD (1280 x 720)
D1 (720 x 480)
VGA (640 x 480)
Zoom (Acercar/Alejar) digital 4x
Lente 3.1mm, f/2.8
Rango del Foco 1,2 m a innito
Balance de Blancos Auto (automático)
Exposición Auto (automático)
Soporte de Memoria
Extraíble
SD/SDHC (de hasta 16GB)
Formato de Video MP4 (H.264/MPEG-4 AVC)
Formato de Fotografía JPEG
Salida de A/V Mini HDMI (720p)
Mini Video Compuesto/Mono
(480i)
Conexión a la
Computadora
USB 2.0 de alta velocidad
Alimentación Batería recargable de litio-ión
(3,7 V, 800 mAh)
Las especicaciones y el manual están sujetos a cambios
sin noticación.
Page 52

Page 52 Solución De Problemas Y Soporte
Español
Solución de Problemas y Soporte Â
Si experimenta un problema con este dispositivo, lea la guía de solución de problemas que se encuentra a
continuación y visite nuestro sitio Web www.cobyusa.com para obtener respuestas a preguntas frecuentes
(FAQs) y las actualizaciones de rmware. Si estos recursos no resuelven el problema, comuníquese con el
Soporte técnico.
Address COBY Electronics Corporation Soporte técnico
Knowlton Way
Savannah, GA
Correo Electrónico techsupport@cobyusa.com
Sitio Web www.cobyusa.com
Teléfonos y Horarios -- De Lunes a Viernes:
-- :AM–:PM Hora estándar del este
Sábados:
:AM–:PM Hora estándar del este
La cámara no enciende.
Verique que la batería recargable esté correctamente instalada. El texto de la batería debe quedar
hacia arriba y poder leerse; los contactos dorados deben estar orientados hacia la izquierda.
Page 53

Solución De Problemas Y Soporte Page 53
Español
Es posible que el nivel de batería esté bajo.
Conecte la cámara a una computadora para
cargarla.
La cámara no toma fotografías o video.
Es posible que la memoria de la cámara o la
tarjeta de memoria estén llenas. Borre varios
archivos e intente nuevamente.
El tipo de tarjeta de memoria puede no ser
compatible con la cámara. Asegúrese de que se
encuentra utilizando una tarjeta de memoria SD
o SDHC de tamaño igual o menor a GB.
El formato de la tarjeta de memoria puede no
ser compatible con la cámara. Asegúrese de que
se encuentre utilizando una tarjeta con formato
de tipo FAT.
La imagen es borrosa o fuera de foco.
Las imágenes o videos borrosos pueden deber-
se a que la cámara no es sostenida de manera
estable durante la grabación. Sostenga rmemente la cámara e intente nuevamente.
Las imágenes o videos borrosos pueden de-
berse a que no hay suciente luz en el sujeto.
Pruebe grabar en un sitio mejor iluminado.
Las imágenes grabadas no son guardadas
en la memoria.
Las imágenes no se guardarán si la cámara es
apagada antes de que el proceso de guardado
de la información concluya. Asegúrese de conceder un tiempo adecuado para que la imagen
sea guardada por completo antes de apagar la
cámara.
Page 54

Page 54 Información Importante
Español
Información Importante Â
La gura de relámpago que termina en punta de
echa dentro de un triángulo equilátero tiene por
nalidad alertar al usuario de la presencia de “voltaje
peligroso” sin aislamiento dentro de la caja del
producto que podría tener potencia suciente para
constituir un riesgo de choque eléctrico.
El signo de exclamación dentro de un triángulo
equilátero tiene el propósito de advertir al usuario
de la presencia de instrucciones de funcionamiento
y reparación importantes en el material impreso que
acompaña al artefacto.
Para uso de los clientes:
Ingrese a continuación el número de serie que se encuentra en la parte
trasera de la unidad. Conserve esta información para referencias futuras
Nº de modelo
Nº de serie
Para obtener información de reciclaje o eliminación sobre
este producto, comuníquese con sus autoridades locales o
con la Alianza de Industrias Electrónicas: www.eiae.org.
ADVERTENCIA: Para prevenir el riesgo de descarga eléctrica,
no exponga este dispositivo a la lluvia ni a la humedad. Adentro del
gabinete se encuentra alto voltaje peligroso. No lo abra.
Page 55

Información Importante Page 55
Español
Declaración de la FCC
Este dispositivo cumple con la Parte 15 de las Normas de la FCC. El funcionamiento está sujeto a las siguientes dos
condiciones:
(1) Este dispositivo puede no causar interferencias perjudiciales, y
(2) Este dispositivo debe aceptar cualquier interferencia recibida, inclusive aquella que podría causar funcionamiento no
deseado.
Nota: Este equipo fue probado y cumple con todos los límites para dispositivos digitales clase B, conforme a la Parte 15 de
las normas de la FCC. Estos límites fueron diseñados para brindar protección razonable contra la interferencia perjudicial en
una instalación residencial. Este equipo genera, emplea y puede irradiar energía de frecuencia de radio y, si no se instala y
emplea según las instrucciones, puede ocasionar interferencia perjudicial para las comunicaciones de radio. Sin embargo, no
hay ninguna garantía de que no ocurrirá en una instalación en particular. Si este equipo causa interferencia perjudicial para la
recepción de radio o televisión, lo cual puede determinarse al apagar o encender el equipo, el usuario puede tratar de corregir
la interferencia con una o más de las siguientes medidas:
Reorientar o reubicar la antena receptora. •
Aumentar la distancia entre el equipo y el receptor. •
Conectar el equipo en un tomacorriente en un circuito diferente del que está conectado el receptor. •
Consultar al distribuidor o a un técnico con experiencia en radio y TV para obtener ayuda.•
Se requiere el uso de cable blindado, para cumplir con los límites de la clase B, en la sub parte B de la Parte 15 de las
normas de la FCC.
No efectúe cambios ni modicaciones al equipo, excepto en caso de que así lo especique el manual. Si se deben
efectuar tales cambios o modicaciones, se le solicitará que detenga el funcionamiento del equipo.
Page 56

Page 56 Información Importante
Español
Instrucciones de Seguridad
Importantes
Lea las instrucciones: Deberá leer todas las instruc-1.
ciones de seguridad y funcionamiento, antes de poner
en funcionamiento este producto.
Conserve las instrucciones: Deberá conservar las 2.
instrucciones de seguridad y funcionamiento para
referencia futura.
Preste atención a las advertencias: Deberá respetar 3.
todas las advertencias contenidas en el producto y en
las instrucciones de funcionamiento.
Siga las instrucciones: Deberá seguir todas las in-4.
strucciones de uso y funcionamiento.
Limpieza: Desconecte este producto del tomacorri-5.
ente de pared antes de la limpieza. No utilice productos de limpieza líquidos o en aerosol. Utilice un paño
húmedo para limpiar.
Complementos: Utilice sólo complementos recomen-6.
dados por el fabricante. El uso de otros complementos
puede ser peligroso.
Agua y humedad: No utilice este producto cerca del 7.
agua (por ejemplo: cerca de una bañera, lavatorio,
lavaplatos o tina para lavar ropa, en un sótano mojado
ni cerca de una piscina o similar).
Ventilación: El gabinete posee ranuras y aberturas 8.
para asegurar la correcta ventilación del producto y
para protegerlo del recalentamiento. Nunca se debe
bloquear estos oricios al colocar el producto sobre
una cama, sofá, alfombra u otras supercies simi-
lares. No se debe colocar este producto en un mueble
empotrado, tal como biblioteca o estante, salvo que
se proporcione una ventilación correcta o se cumplan
las instrucciones del fabricante del producto.
Fuentes de alimentación: Este producto debe utilizarse 9.
sólo con el tipo de fuente de alimentación indicada
en la etiqueta de clasicación. Si no está seguro del
tipo de fuente de alimentación de su hogar, consulte
con el distribuidor del producto o con la compañía
eléctrica local. Para los productos que funcionan a
batería o con otras fuentes de alimentación, consulte
las instrucciones de funcionamiento.
Sobrecarga: No sobrecargue los tomacorrientes, al-10.
argues o enchufes de pared, ya que esto puede tener
como resultado un riesgo de incendio o descarga
eléctrica.
Entrada de objetos y líquido: Nunca introduzca objetos 11.
de ningún tipo dentro de este producto a través de las
aberturas, ya que pueden ponerse en contacto con puntos de voltaje peligrosos o provocar cortocircuitos que
ocasionarían incendios o descargas eléctricas. No derrame nunca líquido de ningún tipo sobre el producto.
Page 57

Información Importante Page 57
Español
Reparaciones: No intente reparar este producto usted 12.
mismo, ya que al abrir o quitar las cubiertas se expondría a voltaje peligroso u otros peligros. Para cualquier
reparación, póngase en contacto con el personal téc-
nico calicado.
Daños que requieran servicio técnico: Desconecte 13.
este producto del enchufe de pared y contáctese
con personal técnico calicado en las siguientes
situaciones: a) cuando la fuente de alimentación o el
enchufe estén dañados; b) si se ha derramado líquido,
han caído objetos dentro del producto; c) si el producto
ha sido expuesto a lluvia o al agua; d) si el producto no
funciona normalmente al seguir las instrucciones de
funcionamiento. Ajuste sólo aquellos controles incluidos en las instrucciones de funcionamiento, ya que el
ajuste inadecuado de otros controles puede ocasionar
daños y requerir con frecuencia un trabajo extenso por
parte de un técnico calicado para restaurar el funcionamiento normal del producto; e) si el producto se ha
caído o ha sufrido algún daño; f) cuando el producto
presenta un cambio marcado en su rendimiento; esto
indica que necesita mantenimiento.
Piezas de reemplazo: Cuando se requieren piezas de 14.
reemplazo, asegúrese de que el servicio técnico haya
utilizado las piezas de reemplazo especicadas por el
fabricante o que posean las mismas características que
la pieza original. Las sustituciones no autorizadas pueden
provocar incendio, descarga eléctrica u otros riesgos.
Controles de seguridad: Una vez completado el ser-15.
vicio o las reparaciones de este producto, solicite al
servicio técnico que realice controles de seguridad
para asegurar que se encuentra en condición de funcionamiento correcto.
Calor: El producto debe ubicarse lejos de fuentes de 16.
calor tales como radiadores, rejillas de aire caliente,
estufas u otros productos (incluidos amplicadores)
que produzcan calor.
Page 58

Page 58 Información Importante
Español
Mantenimiento y Cuidado
Mientras la utiliza, sujete la cámara con la correa 1.
para la muñeca en todo momento para evitar
daños accidentales.
Siempre guarde la cámara en el estuche provis-2.
to para evitar la aparición de rayas en la pantalla
y el lente de la cámara.
Para limpiar el lente:3.
Sople para quitar el polvo de la supercie a.
del lente.
Frote el lente delicadamente con un paño b.
de microbra especial para la limpieza de
lentes/dispositivos ópticos. Si fuera necesario, utilice ÚNICAMENTE limpiador de lentes.
Nunca use solventes orgánicos para
limpiar la cámara.
Nunca toque el lente.4.
Si piensa guardar la cámara durante un período 5.
prolongado, quítele la batería y conserve la
cámara en un lugar seco y oscuro.
Esta cámara de video digital es adecuada para 6.
entornos con temperaturas de entre 0°- 40°
(32°-104°). No exponga la cámara a temperaturas extremadamente altas, por ejemplo, la de un
automóvil estacionado bajo luz solar directa, ni
a la humedad excesiva.
Para evitar la condensación, guarde la cámara 7.
en una bolsa de plástico sellada cuando se
desplace de un ambiente frío a uno cálido.
Puede extraer la cámara de la bolsa una vez que
alcance la temperatura de interiores.
Page 59

Información Importante Page 59
Español
Page 60

Page 60 Table Des Matières
Français
Français
Table des Matières Â
CONTENU DE LA BOÎTE .................................................................................................................63
LA CAMÉRA EN UN COUP D’OEIL ............................................................................................... 64
Vue de Face ..................................................................................................................................64
Vue de Dessus ...............................................................................................................................65
Vue de Gauche ............................................................................................................................65
Vue Arrière .....................................................................................................................................65
Vue de Droite ................................................................................................................................65
Vue de Dessous .............................................................................................................................65
COMMENT DÉMARRER .................................................................................................................66
Installation des Batteries ...............................................................................................................66
Charger la Batterie .......................................................................................................................66
Insertion d’une Carte Mémoire ...................................................................................................67
UTILISER LA CAMÉRA ...................................................................................................................68
Mise en marche/arrêt de la Caméra .........................................................................................68
Changement des Modes de Caméra .......................................................................................68
Page 61

Table Des Matières Page 61
Français
Mode Vidéo ..................................................................................................................................68
Pour Enregistrer une Vidéo ................................................................................................69
Zoom ....................................................................................................................................69
Taille Vidéo ..........................................................................................................................69
Mode Photo ...................................................................................................................................70
Pour Prendre une Photo ...................................................................................................70
Zoom ....................................................................................................................................70
Taille Photo ..........................................................................................................................70
Mode de Lecture ..........................................................................................................................71
Commandes de Lecture ...................................................................................................71
MODE SETUP (CONFIGURATION) ................................................................................................73
BRANCHEMENT SUR UN TÉLÉVISEUR ............................................................................................ 74
TRANSFERT DE FICHIERS À UN ORDINATEUR ............................................................................... 76
LOGICIEL PAR ARCSOFT
®
............................................................................................................78
Exigences de Système ..................................................................................................................78
Installation du Logiciel ..................................................................................................................78
A Propos de ArcSoft MediaImpression .......................................................................................80
Page 62

Page 62 Table Des Matières
Français
CARACTÉRISTIQUES .....................................................................................................................81
DÉPANNAGE ET ASSISTANCE .......................................................................................................82
RENSEIGNEMENTS IMPORTANTS ..................................................................................................84
Déclaration FCC: ..........................................................................................................................85
Consignes de Sécurité Importantes ............................................................................................86
Entretien et Soins ...........................................................................................................................87
Page 63

Contenu De La Boîte Page 63
Français
Contenu de la boîte Â
Merci d’avoir acheté cette Caméra Vidéo Numérique HD CAM de Coby. Veuillez lire ces instructions
avant d’utiliser votre caméscope, et conservez-les pour référence future. Cette boîte comprend :
Caméra CAM
Batterie rechargeable
Câble HDMI
Câble AV
Câble d’extension USB
Dragonne détachable
Pochette
CD d’installation
Si l’un des éléments ci-dessus est manquant, veuillez contacter le revendeur auprès duquel vous avez acheté
ce produit.
Ce paquet peut contenir des sacs en plastique ou d’autres matériaux qui posent un danger pour les
enfants. Assurez-vous d’éliminer, en toute sécurité, tous les matériaux d’emballage après l’ouverture.
Page 64

Page 64 La Caméra En Un Coup D’oeil
Français
La Caméra en un coup d’oeil Â
Vue de Face
Ecran ACL
Mode
Delete (Supprimer)
Gauche
Droite
Haut
Bas
Enregistrer/OK
1
2
5
6
3
4
7
8
Page 65

La Caméra En Un Coup D’oeil Page 65
Français
Vue de Dessus
Prise USB
Vue de Gauche
Prise de sortie A/V
Alimentation
Port HDMI
Vue Arrière
Objectif
Micro
Voyant LED (DEL)
Haut-parleur
Cache du compartiment piles
Vue de Droite
Commutateur de prise USB
Fente de carte SD/SDHC
Vue de Dessous
Fixation trépied
Dragonne
1
2
3
4
8
6
10
11
13
12
5
7
9
Page 66

Page 66 Comment Démarrer
Français
Comment Démarrer Â
Veuillez lire et accomplir les étapes suivantes pour
commencer à utiliser votre caméra vidéo numérique.
Installation des Batteries
Retirez le couvercle du compartiment à piles en 1.
le faisant glisser vers la base de l’appareil.
Chargez les batteries dans le compartiment 2.
comme montré dans le diagramme. Le texte
sur la batterie devrait être visible et les contacts
métalliques devraient faire face à la gauche.
Remettez le couvercle du compartiment à piles 3.
et xez-le en place.
La pile utilisée dans cet appareil peut
présenter un danger d’incendie ou de
brûlure chimique si elle est malmenée. Vous
ne devez ni recharger, ni démonter, incinérer ou chauer les piles. Les piles utilisées
devraient être jetées en toute sécurité.
Conservez les piles hors de portée des enfants.
Charger la Batterie
Eteignez la caméra.1.
Connectez la caméra au port USB d’un ordinateur. 2.
Le voyant LED (DEL) s’allumera pendant le chargement et s’éteindra quand la batterie est complètement rechargée.
Page 67

Comment Démarrer Page 67
Français
Rechargez complètement la batterie avant
d’utiliser la caméra pour la première fois.
Pour les instructions sur la façon dont con-
necter la caméra à un ordinateur, veuillez
lire la section “Transférer des Fichiers vers un
Ordinateur” de ce manuel.
Insertion d’une Carte Mémoire
Cette caméra enregistre
sur des cartes mémoire
SD ou SDHC La taille de
carte maximum prise en
charge est GB.
Assurez-vous que 3.
le commutateur de
protection contre
l’écriture est réglé sur
la position « déverrouillé » sur la carte
mémoire.
Installez la carte mémoire en l’insérant douce-4.
ment dans la fente de carte sur le côté gauche
de la caméra vidéo. Poussez la carte jusqu’à ce
qu’elle s’enclenche en place. Assurez-vous que
la carte est proprement alignée comme indiqué
par la marquage à côté de la fente de carte.
Pour relâcher et enlever la carte, poussez sur la 5.
carte ; elle s’éjectera de la fente. Prenez la carte
par ses bords pour l’enlever.
Pour éviter la corruption de données,
éteignez la caméra vidéo numérique avant
d’insérer ou de retirer une carte mémoire.
Evitez de toucher les contacts en or de la
carte mémoire.
N’essayez pas d’insérer des objets autres
qu’une carte de mémoire SD ou SDHC dans
la fente de carte. Une carte mémoire compatible devrait rentrer facilement dans la fente
de carte ; si vous rencontrez de la résistance,
vériez l’alignement de la carte. N’essayez
pas de forcer la carte pour qu’elle rentre.
Page 68

Page 68 Utiliser La Caméra
Français
Utiliser la Caméra Â
Mise en marche/arrêt de
la Caméra
Appuyez sur et maintenez ce bouton appuyé
pour mettre en marche/arrêt la caméra.
Pour économiser la puissance, la caméra
s’éteindra automatiquement après une
minute quand elle n’est pas utilisée.
Changement des Modes
de Caméra
Votre caméra vidéo comprend trois modes.
Appuyez sur le bouton pour alterner entre
ceux-ci.
L’icône de mode achée sur le coin gauche
supérieur de l’écran indique le mode actuel de
caméra.
Icône
Mode de
la Caméra
Fonction
Vidéo Enregistrer des vidéos
Photo Prendre des photos xes
Lecture
Revoir des chiers vidéo et
photo
Mode Vidéo
Placez la caméra en mode Vidéo pour enregistrer
des vidéos.
Lorsque vous allumez votre caméra, elle
passera automatiquement en Mode Vidéo.
Page 69

Utiliser La Caméra Page 69
Français
Pour Enregistrer une Vidéo
Appuyez sur le bouton pour commencer
l’enregistrement.
Appuyez sur le bouton
pour arrêter
l’enregistrement.
Quand la caméra enregistre, le montant
total de temps d’enregistrement écoulé est
aché dans le coin supérieur gauche de
l’écran. Quand la caméra n’enregistre pas, le
montant de temps d’enregistrement estimé
disponible est aché.
L’enregistrement s’arrêtera automatique-
ment lorsque la carte mémoire est pleine.
Zoom
Pour utiliser la fonction de zoom numérique
de la caméra :
Appuyez sur pour faire un zoom avant
Appuyez sur pour faire un zoom arrière.
Le niveau d’agrandissement est aché sur
le coin supérieur droit de l’écran.
Taille Vidéo
La caméra peut enregistrer à une taille vidéo
maximum de x pixels (HD). Pour augmenter
le temps d’enregistrement, vous pouvez vouloir
enregistrer une vidéo une résolution plus basse.
La taille vidéo est achée sur le coin inférieur
gauche de l’écran.
Taille Vidéo Résolution
HD x
D x
VGA x
Appuyez sur
ou pour changer la
taille vidéo.
L’enregistrement doit être arrêté pour chang-
er la taille vidéo.
Page 70

Page 70 Utiliser La Caméra
Français
Mode Photo
Placez la caméra en mode Photo pour enregistrer
des photos xes.
Pour Prendre une Photo
Appuyez sur le bouton pour prendre
une photo.
Le nombre estimé de photos disponibles sur
la carte mémoire est aché sur le coin supérieur gauche de l’écran.
Zoom
Pour utiliser la fonction de zoom numérique
de la caméra :
Appuyez sur
pour faire un zoom avant
Appuyez sur
pour faire un zoom arrière.
Le niveau d’agrandissement est aché sur
le coin supérieur droit de l’écran.
Taille Photo
La caméra peut enregistrer à une taille photo
maximum de MP ( x ). Pour augmenter le
montant de photos que vous pouvez prendre, vous
pouvez vouloir enregistrer des photos à une résolution plus basse.
La taille photo est achée sur le coin inférieur
gauche de l’écran
Photo Size Resolution
M x
M x
.M x
Appuyez sur
ou pour changer la taille
photo.
Page 71

Utiliser La Caméra Page 71
Français
Mode de Lecture
Placez la caméra en mode Lecture pour revoir ou
supprimer des vidéos et photos sur la caméra.
Commandes de Lecture
Appuyez sur ou pour naviguer parmis les
chiers sur la caméra.
Si un chier vidéo est sélectionné, “AVI” sera
aché vers le haut de l’écran et la longueur
de la vidéo sera achée sur le coin inférieur
droit de l’écran.
Appuyez sur pour lire un chier vidéo.
Appuyez sur de nouveau pour mettre la
lecture vidéo en pause.
Appuyez sur ou ) et maintenez appuyé
pour passer rapidement à travers le chier
vidéo.
Appuyez sur
ou pour faire un zoom
avant ou arrière d’un chier photo
Quand une photo est agrandie, appuyez sur
pour entrer en mode Panoramique.
Appuyez sur / ou / pour vous
diriger à travers l’image.
Appuyez à nouveau sur pour quitter le
mode Panoramique.
Appuyez sur pour faire un zoom arrière
pour avoir une vue normale.
Appuyez sur pour voir de multiples chiers
en mode achage en réduction.
Quand vous visualisez des chiers en af-
chage en réduction, appuyez sur / /
/ pour naviguer. Appuyez sur pour
sélectionner un chier à visualiser. Les chiers
vidéos sont marqués avec une icône .
Page 72

Page 72 Utiliser La Caméra
Français
Pour supprimer le chier actuel :
Appuyez sur . A
l’invitation “Delete
Current?” (Supprimer
Actuel?), appuyez sur
pour supprimer, ou
appuyez de nouveau
sur pour annulerto.
Pour supprimer tous les chiers :
Appuyez sur . A l’invitation “Delete
Current?” (Supprimer Actuel?), appuyez sur
ou ; l’invitation se changera en “Delete
All?” (Supprimer Tous?).
Appuyez sur pour supprimer tous les
chiers, ou appuyez sur pour annuler.
Page 73

ModeSetup(conguration) Page 73
Français
Mode Setup (Conguration) Â
Placez la caméra en mode conguration pour
ajuster les options internes de la caméra.
Le Mode Conguration vous permettra d’ajuster les
options suivantes.
Langue
Date & Heure
Mode Sortie TV
Fréquence industrielle
Visualiser Version Micrologiciel
Pour entrer en mode conguration:
Si votre caméra est allumée, éteignez-la.1.
Appuyez et maintenez enfoncée la touche 2.
. Tout en maintenant enfoncée la touche
appuyez et maintenez la touche pour allumer
la caméra.
Lorsque vous voyez l’écran HD Snapp de Coby, 3.
relâchez la touche (mais continuer à maintenir appuyé la touche ).
Relâchez la touche 4. quand vous voyez l’écran
de conguration “Date & Time” (Date & Heure).
Pour ajuster les options de conguration:
Appuyez sur 1. ou pour sélectionner une
option pour ajuster
Appuyez sur 2. ou pour régler l’option
choisie.
Appuyez sur 3. pour sauvegarder les
paramètres et aller au prochain écran, ou appuyez sur pour annuler.
Lorsque toutes les options ont été dénies, la
caméra reviendra au mode caméra.
Page 74

Page 74 Branchement Sur Un Téléviseur
Français
Branchement sur un Téléviseur Â
Pour visualiser vos chiers vidéo et photo sur un
écran plus grand, utilisez le câble A/V ou HDMI
fourni pour connecter votre caméra à un téléviseur.
Si votre téléviseur a une entrée HDMI,
utilisez le câble HDMI inclu pour connecter
la caméra :
Localisez le connecteur d’entrée HDMI sur votre 1.
téléviseur. Branchez la grosse extrémité du
câble HDMI dans le téléviseur.
Branchez la petite extrémité du câble HDMI au 2.
connecteur de sortie HDMI de la caméra.
Mettez en marche la TV. Réglez le mode source 3.
d’entrée de la TV pour qu’il ache le signal HDMI
HDTV
HDMI
Si votre téléviseur a une entrée vidéo
composite (connecteur jaune/rouge/blanc):
Localisez les connecteurs d’entrée Vidéo Com-1.
posite sur la TV.
Branchez la prise RCA jaune du câble à la
prise d’Entrée Vidéo Composite de la TV.
Branchez la prise RCA rouge du câble à la
prise d’Entrée Audio rouge de la TV.
Connectez la mini prise du câble à la prise de 2.
sortie A/V située sur le haut de la caméra.
Mettez en marche la TV. Réglez le mode source 3.
d’entrée de la TV pour qu’il ache le signal
Vidéo Composite.
W R Y
TV
Page 75

Branchement Sur Un Téléviseur Page 75
Français
Quand la caméra est connectée à votre téléviseur:
Allumez la caméra ; la caméra passera automatiquement en mode lecture et l’écran de caméra 1.
s’éteindra.
Utilisez les commandes de mode lecture pour lire des vidéos ou visualiser des photos sur le téléviseur.2.
Si le mode source de la TV est réglé proprement, vous verrez l’achage de la caméra sur l’écran du
téléviseur. Si vous avez besoin d’aide à paramétrer le mode source TV, veuillez vous référer à la documentation fournie avec votre téléviseur.
Seulement le mode Lecture est diponible quand la caméra est connectée au téléviseur
Page 76

Page 76 Transfert De Fichiers À Un Ordinateur
Français
Transfert de Fichiers à un Ordinateur Â
Connectez votre caméra à un ordinateur pour transférer des chiers de la caméra sur votre disque dur.
Si vous prévoyez d’installer le logiciel sur le
CD inclus, veuillez installer ces programmes
AVANT de connecter la caméra à votre ordinateur.
Localisez le commutateur de prise USB sur le 1.
côté gauche de la caméra. Glissez le commutateur vers le bas pour relâcher la prise USB.
Connectez la prise USB à un port USB sur 2.
l’ordinateur.
Si votre caméra est éteinte, allumez-la. Votre 3.
ordinateur devrait automatiquement reconnaître la caméra vidéo comme disque amovible.
Suivez les étapes sur l’ordinateur pour acher
les chiers sur la caméra.
If no prompt appears, you may access the
camera via “My Computer” on a Windows
computer, or via a Finder window on Mac
OS X.
Transférez des chiers de votre caméra à votre 4.
ordinateur comme vous le feriez avec n’importe
quel disque externe (par exemple, glisserdéposer ou copier/coller).
La caméra doit être allumée pour se con-
necter à un ordinateur.
Page 77

Transfert De Fichiers À Un Ordinateur Page 77
Français
La première fois que vous branchez la caméra à un ordinateur, l’ordinateur peut prendre quelques
moments pour reconnaître et installer les pilotes appropriés pour la caméra.
Un câble d’extension USB a été fourni pour votre commodité. Utilisez ce câble pour le branchement si
les seuls ports USB disponibles sont situés à l’arrière de votre ordinateur, ou si la caméra est bloquée
par d’autres dispositifs USB.
Si votre ordinateur a un lecteur de carte SD, vous pouvez simplement enlever la carte SD de la caméra
et la charger dans le lecteur de carte pour transférer des chiers.
Page 78

Page 78 Logiciel Par Arcsoft®
Français
Logiciel par ArcSoft Â
®
Votre caméra vidéo numérique est livrée avec
un CD d’installation qui comprend un logiciel de
retouche photo, de montage vidéo, et qui permet
de téléverser vos vidéos sur YouTube™.
Exigences de Système
Les exigences de système informatique minimum
pour exécuter ce logiciel sont.
Unité Centrale : Pentium III GHz ou équivalent
Espace Disque : Au moins MB d’espace
disponible
Mémoire : MB ou supérieur
Système d’Exploitation : Windows /Vista/XP
(avec Service Pack )
Microsoft Windows Media Player . ou supérieur
Microsoft DirectX . ou supérieur
Apple QuickTime®. ou supérieur recommandé
Installation du Logiciel
Le logiciel inclus devrait être installé AVANT de
connecter la caméra à votre ordinateur.
Pour commencer l’installation du logiciel, insérez le
CD dans le lecteur CD/DVD de votre ordinateur.
Lorsque le CD est inséré, un menu de Lancement
Automatique (AutoRun) apparaîtra. Cliquez sur une
option de menu pour lancer la routine d’installation.
Page 79

Logiciel Par Arcsoft® Page 79
Français
Option de Menu Description
Installer
MediaImpression
Installez le logiciel pour la
retouche de photo, le montage vidéo et le téléversement
de vos vidéos sur YouTube™.
Suivez les instructions
sur l’écran pour terminer
l’installation du logiciel sélectionné.
Manuel de
l’utilisateur
Visualiser le PDF du manuel
de l’utilisateur.
Pour visualiser le manuel de
l’utilisateur, vous pouvez avoir
besoin de télécharger et installer le lecteur gratuit Adobe
Acrobat PDF à partir de ht tp: //
get.adobe.com/reader/.
Naviguer le CD Explorez le contenu du CD.
Quitter Sortez de ce menu CD.
Si le menu de lancement automatique
n’apparaît pas automatiquement, doublecliquez sur l’icône de CD-ROM dans [My
Computer] (Mon Bureau) ou [Windows
Explorer] (Windows Explorer), et ensuite
double-cliquez sur le chier s’appelant [autorun.exe] pour commencer le programme.
Page 80

Page 80 Logiciel Par Arcsoft®
Français
A Propos de ArcSoft
MediaImpression
Après l’installation
de MediaImpression,
vous pouvez lancer
les programmes à
partir du menu de
Démarrage Windows.
Utilisez
MediaImpression
pour retoucher les photos et pour le montage
vidéo. Vous pouvez aussi utiliser MediaImpression
pour partager vos vidéos avec votre famille, vos
amis, ou le monde avec le service internet YouTube.
Pour téléverser des vidéos sur YouTube, vous
devez avoir un compte YouTube valide. Pour
vous abonner à un compte gratuit, veuillez
visiter http://www.youtube.com.
Pour vous familiariser avec le logiciel
MediaImpression, veuillez vous référer au chier
d’aide inclus dans l’application (cliquez sur le
symbole “?” dans le coin supérieur droit de l’écran
d’application).
Le manuel MediaImpression est disponible pour
téléchargement de ArcSoft içi :
http://arcsoft.vo.llnwd.net/o/downloads/
manual/mi_manual_e.pdf#submenu
Vous pouvez aussi visiter ArcSoft sur le web
pour en savoir plus à propos de MediaImpression : http://www.arcsoft.com.
Page 81

Caractéristiques Page 81
Français
Caractéristiques Â
Type d'Achage Acheur ACL Couleur de 2,0”
Capteur d’image 5,0 MP CMOS (2592 x 1944)
Résolution Vidéo HD (1280 x 720)
D1 (720 x 480)
VGA (640 x 480)
Zoom 4x Numérique
Objectif 3,1mm, f/2,8
Profondeur de Foyer 1,2m ~ innité
Equilibre des Blancs Auto
Exposition Auto
Support Mémoire
Amovible
SD/SDHC (jusqu’à 16GB)
Format vidéo MP4 (H.264/MPEG-4 AVC)
Format photo JPEG
Sortie AV Mini HDMI (720p)
Mini Vidéo Composite/Mono
(480i)
Connexion PC USB 2.0 Hi-Speed
(Grande Vitesse)
Alimentation Batterie Li-ion rechargeable
(3,7V, 800mAh)
Les caractéristiques et le manuel utilisateur sont sujets à modications sans préavis.
Page 82

Page 82 Dépannage Et Assistance
Français
Dépannage et Assistance Â
Si vous avez un problème avec cet appareil, veuillez lire le guide de dépannage ci-dessous et visitez
notre site Web www.cobyusa.com pour les questions les plus fréquentes (FAQ) et des mises à jour microprogrammes. Si ces ressources ne vous aident pas à résoudre le problème, veuillez contacter le service
d’assistance technique.
Address COBY Electronics Corporation Tech Support
(Assistance Technique COBY Electronics Corporation)
Knowlton Way
Savannah, GA
Courriel techsupport@cobyusa.com
Internet www.cobyusa.com
Heures -- ou -- Lundi–Vendredi : :–: EST
Téléphoniques Samedi : :–: EST
La caméra ne s’allume pas.
Vériez que les piles rechargeables ont été insérées correctement. Le texte sur la batterie devrait être
vers le haut et être lisible, et le contacts en or devraient être vers la gauche.
Page 83

Dépannage Et Assistance Page 83
Français
Le niveau de la batterie est peut-être bas.
Branchez la caméra à un ordinateur pour la
recharger.
La caméra ne prend pas de photos/vidéos.
La mémoire de la caméra ou la carte mémoire
peut être pleine. Supprimez plusieurs chiers et
essayez à nouveau.
Le type de carte mémoire peut ne pas être pris
en charge. Assurez-vous que vous utilisez une
carte mémoire SD ou SDHC de taille GB ou
inférieur.
Le format de carte mémoire peut ne pas être
pris en charge. Assurez-vous que vous utilisez
une carte formatée FAT.
L’image est oue.
Des images ou des vidéos oues peuvent être le
résultat lorsque la caméra n’est pas restée stable
pendant l’enregistrement. Tenez bien la caméra
pour qu’elle soit stable et essayez à nouveau.
Les images ou vidéos oues peuvent être gé-
nérées quand il n’y a pas assez de lumière sur le
sujet. Essayez d’enregistrer dans un endroit bien
allumé.
Les images prises ne sont pas
sauvegardées dans la mémoire.
Les images ne seront pas sauvegardées si la
caméra est éteinte avant la n du traitement des
données. Assurez-vous de laisser susamment
de temps pour que l’image se sauvegarde complètement avant d’éteindre la caméra vidéo.
Page 84

Page 84 Renseignements Importants
English
Renseignements Importants Â
Le symbole en forme d’éclair éché placé dans un triangle équilatéral informe l’utilisateur de la présence
de “tensions dangereuses” non isolées au sein du
boîtier du produit dont l’amplitude peut constituer
un risque de décharge électrique.
Le point d’exclamation placé dans un triangle équilatéral
informe l’utilisateur que des instructions d’utilisation
et de maintenance importantes sont fournies dans la
documentation qui accompagne le produit.
Information client :
Notez ci-après le numéro de série situé sur l’appareil. Conservez
ces informations pour pouvoir vous y référer ultérieurement.
Numéro du modèle
Numéro de série
Pour de plus amples informations sur le recyclage ou la
mise au rebut de ce produit, veuillez contacter les autorités
locales ou les représentants de l’EIA (Alliance des industries
du secteur de l’électronique) : www.eiae.org.
Avertissement : An d’éviter tout risque d’incendie ou de
décharge électrique, n’exposez pas cet appareil à la pluie
ou à l’humidité. Le boîtier renferme des tensions élevées
dangereuses. N’ouvrez pas le boîtier de l’appareil.
Page 85

Renseignements Importants Page 85
English
Déclaration FCC:
Cet appareil est conforme avec la section 15 des Règles FCC. Le fonctionnement est sujet aux deux conditions suivantes :
(1) Cet appareil ne peut causer d’interférences dangereuses, et
(2) Cet appareil doit accepter toute interférence, y compris une interférence pouvant causer une action non souhaitée.
Note: Cet équipement a été testé et déclaré conforme aux limites de la classe B des équipements digitaux, conformément à la
section 15 des Règles FCC. Ces limites ont été créées pour fournir une protection raisonnable contre des interférences néfastes
au sein d’une installation résidentielle. Cet équipement génère, utilise et peut émettre de l’énergie de fréquence radio, qui, si non
installée et utilisée correctement pourrait causer des interférences néfastes aux communications radio. Cependant, il n’y a aucune
garantie qu’il n’y aura pas d’interférences. Si cet appareil cause des interférences sur la réception radio ou télé, ce qui peut être déterminé en allumant et en éteignant cet appareil, nous vous encourageons à essayer de corriger la situation de la manière suivante :
Réorientez ou changez la position de l’antenne. •
Augmentez la séparation entre l’appareil et le récepteur. •
Branchez l’appareil à une prise différente de celle du récepteur. •
Consultez votre représentant en ventes ou un technicien qualié. •
L’utilisation de câbles électriques protégés est requise pour être conforme aux limites de la classe B et la sous-partie B
de la section 15 des règles FCC.
Ne pas effectuer de changements ou de modications a cet appareil, à moins que cela ne soit indiqué dans ce manuel.
Si de telles modications devaient être faites, il faudra peut-être que vous arrêtiez d’utiliser cet appareil.
Page 86

Page 86 Renseignements Importants
Français
Consignes de Sécurité Importantes
Lisez les directives : Veuillez lire l’intégralité des con-1.
signes de sécurité et d’utilisation avant de mettre
l’appareil en service.
Conservez ces directives : Vous devriez conserver ce 2.
manuel pour référence future.
Tenez compte de ces avertissements : Vous devriez 3.
respecter tous les avertissements et toutes les instructions pour ce produit.
Suivez les instructions : Vous devez suivre toutes les 4.
directives d’utilisation.
Nettoyage : Débranchez ce produit avant de le nettoyer. 5.
Ne pas utiliser de nettoyants liquides ou en aérosol.
Utilisez un chiffon humide pour nettoyer.
Attaches : N’utilisez que les attaches recommandées 6.
par le fabricant. L’utilisation d’autres attaches pourrait
être dangereuse.
Eau et humidité : N’utilisez pas ce produit à proximité d’une 7.
source d’humidité, notamment près d’une baignoire, d’un
lavabo, d’un évier de cuisine ou de buanderie, dans un soussol humide ou près d’une piscine ou endroits analogues.
Ventilation : Les fentes et ouvertures du boîtier sont prévues 8.
pour la ventilation an d’assurer le fonctionnement able du
produit et de le protéger contre une éventuelle surchauffe.
Ces ouvertures ne devraient jamais être bloquées par un
lit, un canapé, un tapis ou similaire. Ce produit ne devrait
jamais être posé sur une installation murale, comme une
étagère, à moins que la ventilation ne soit adéquate et que
les instructions du fabricant n’aient été suivies.
Sources de courant : Branchez systématiquement cet 9.
appareil sur une source d’alimentation du type indiqué
sur l’étiquette signalétique. Si vous n’êtes pas certain
du type de courant, demandez à votre représentant
commercial ou à votre compagnie d’électricité. Pour les
produits fonctionnant avec une pile ou autres sources,
veuillez consulter les instructions.
Surcharge : Ne pas faire de multiples branchements dans 10.
les prises, avec les rallonges électriques ou des multiprises
car cela pourrait entraîner un incendie ou une électrocution.
Insertion d’objet ou de liquide : N’insérez jamais d’objets 11.
de quelque sorte que ce soit dans cet appareil par le
biais des fentes car ils pourraient entrer en contact avec
des points de voltage ou court-circuiter des éléments,
provoquant ainsi un risque d’incendie ou de choc électrique. Ne jamais renverser de liquide sur cet appareil.
Page 87

Renseignements Importants Page 87
Français
Maintenance : Ne tentez pas de réparer ce produit 12.
vous-même, ouvrir ou enlever l’enveloppe du produit
pourrait vous exposer à un voltage dangereux ou à
d’autres risques. Ne faire appel qu’à des professionnels
qualiés.
Dégâts requérant des réparations : Débranchez cet ap-13.
pareil et conez-le à un professionnel qualié dans les
cas de gure suivants : a) le cordon d’alimentation est
endommagé ou la prise est défectueuse ; b) du liquide
s’est déversé dans l’appareil ou des objets s’y sont glissés ; c) l’appareil est entré en contact avec de la pluie ou
de l’eau ; d) l’appareil ne fonctionne pas correctement
bien que les consignes d’installation aient été respectées. Effectuez uniquement les réglages indiqués dans
les consignes d’installation car d’autres réglages incorrects risquent de provoquer des dommages nécessitant
la plupart du temps l’intervention prolongée d’un technicien qualié pour restaurer le fonctionnement normal
du produit ; e) l’appareil est tombé ou endommagé ;
f) l’appareil vous semble nettement moins performant
qu’auparavant, indiquant ainsi la nécessité de recourir
à une réparation.
Pièces détachées : Si des pièces détachées sont req-14.
uises, assurez-vous que le technicien utilise les mêmes
pièces que le fabricant ou des pièces ayant les mêmes
caractéristiques que les originales. Des substitutions
non autorisées pourraient causer un incendie, une
électrocution ou autres dangers.
Contrôle de routine : Si des réparations ont été effec-15.
tuées sur ce produit, demandez au technicien de faire
les contrôles de sécurité recommandés par le fabricant
an de déterminer que l’appareil est en bonne condition
de fonctionnement.
Chaleur : N’installez pas ce produit près de sources de 16.
chaleur, notamment des radiateurs, des bouches de
chauffage, des poêles ou d’autres appareils générant
de la chaleur (y compris des amplicateurs).
Entretien et Soins
Sécurisez toujours la caméra avec le bracelet 1.
lors de son utilisation pour éviter les dommages
accidentels à la caméra.
Stockez toujours la caméra dans l’étui prévu 2.
pour éviter les rayures à la lentille et à l’écran de
la caméra.
Page 88

Page 88 Renseignements Importants
Français
Pour nettoyez la lentille:3.
Souez la poussière de la surface de la a.
lentille.
Essuyez doucement la lentille avec un chion b.
microbre destiné à nettoyer les lentilles /
dispositifs optiques. Si nécessaire, utilisez le
nettoyant pour lentille SEULEMENT.
Ne jamais utiliser de solvants organiques
pour nettoyer la caméra.
Ne touchez jamais la lentille.4.
Avant de ranger la caméra pendant une longue 5.
période de temps, retirez la batterie et maintenez la caméra dans un endroit sec et sombre.
Cette caméra vidéo numérique est adaptée 6.
pour des environnements entre 0°- 40° (32°104°). Ne pas exposer la caméra à des températures très élevées, comme dans une voiture
garée en plein soleil, ou à une humidité excessive.
Pour éviter la condensation, maintenez la 7.
caméra dans un sac en plastique scellé lors du
déplacement d’un endroit froid à un endroit
chaud. La caméra peut être retirée du sac quand
elle atteint la température intérieure.
Page 89

Coby is a registered trademark of Coby Electronics Corporation.
Printed in China.
COBY es la marca registrada de COBY Electronics Corporation.
Imprimido en China.
Coby est une marque de fabrique de Coby Electronics Corporation.
Imprimé en Chine.
Coby Electronics Corp.
1991 Marcus Ave, Suite 301
Lake Success, NY 11042
www.cobyusa.com
www.ecoby.com
CSMP120
IB v1.0
Coby is a registered trademark of Coby Electronics Corporation.
Printed in China.
COBY es la marca registrada de COBY Electronics Corporation.
Imprimido en China.
Coby est une marque de fabrique de Coby Electronics Corporation.
Imprimé en Chine.
Coby Electronics Corp.
1991 Marcus Ave, Suite 301
Lake Success, NY 11042
www.cobyusa.com
www.ecoby.com
CAM5 0 01
IB v1.0
 Loading...