

Page 1
COBY MPC7057
Setup Guide
Thank you for choosing a COBY MP3 player
!
~
This guide will cover how to
transfer your music CD’s into
your COBY
MP3
player
using Windows Media Player 11
~
This guide will also provide common troubleshooting solutions for your
C
OBY MP3
player.
Requirements
Windows Media Player 11 (WMP11)
If your computer does not have Windows Media Player installed, please download the
latest version of Windows Media Player (WMP) from Microsoft’s website
www.microsoft.com/windows/windowsmedia/player/download/download.aspx
The directions in this guide are given for Windows Media Player 11 (WMP11)
Page 2
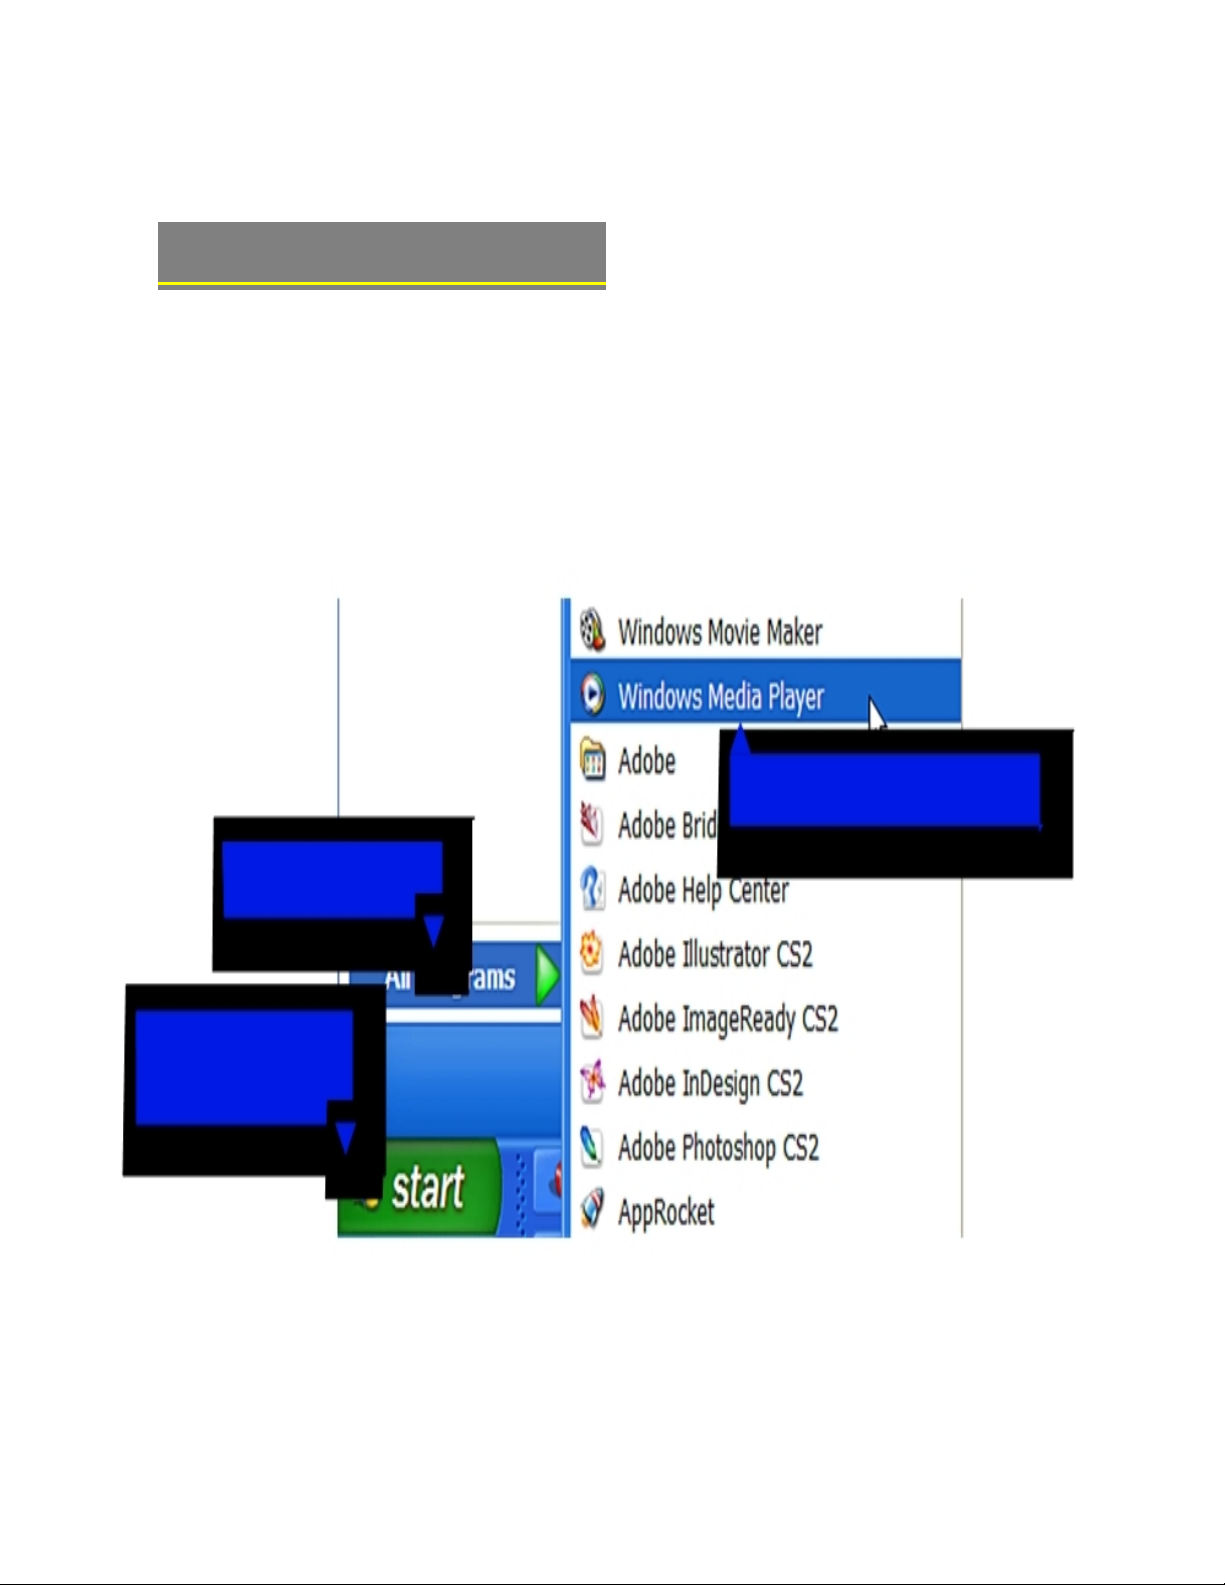
1b. Click
“
All Programs
”
1a. Click
“Start Menu”
button
1c. Click on
“
Windows Media Player”
AUDIO TRANSFER
–
Getting Started
Transfer your Music CD’s into your COBY MP3 player
1) Launch the WMP11 program.
Page 3
ª
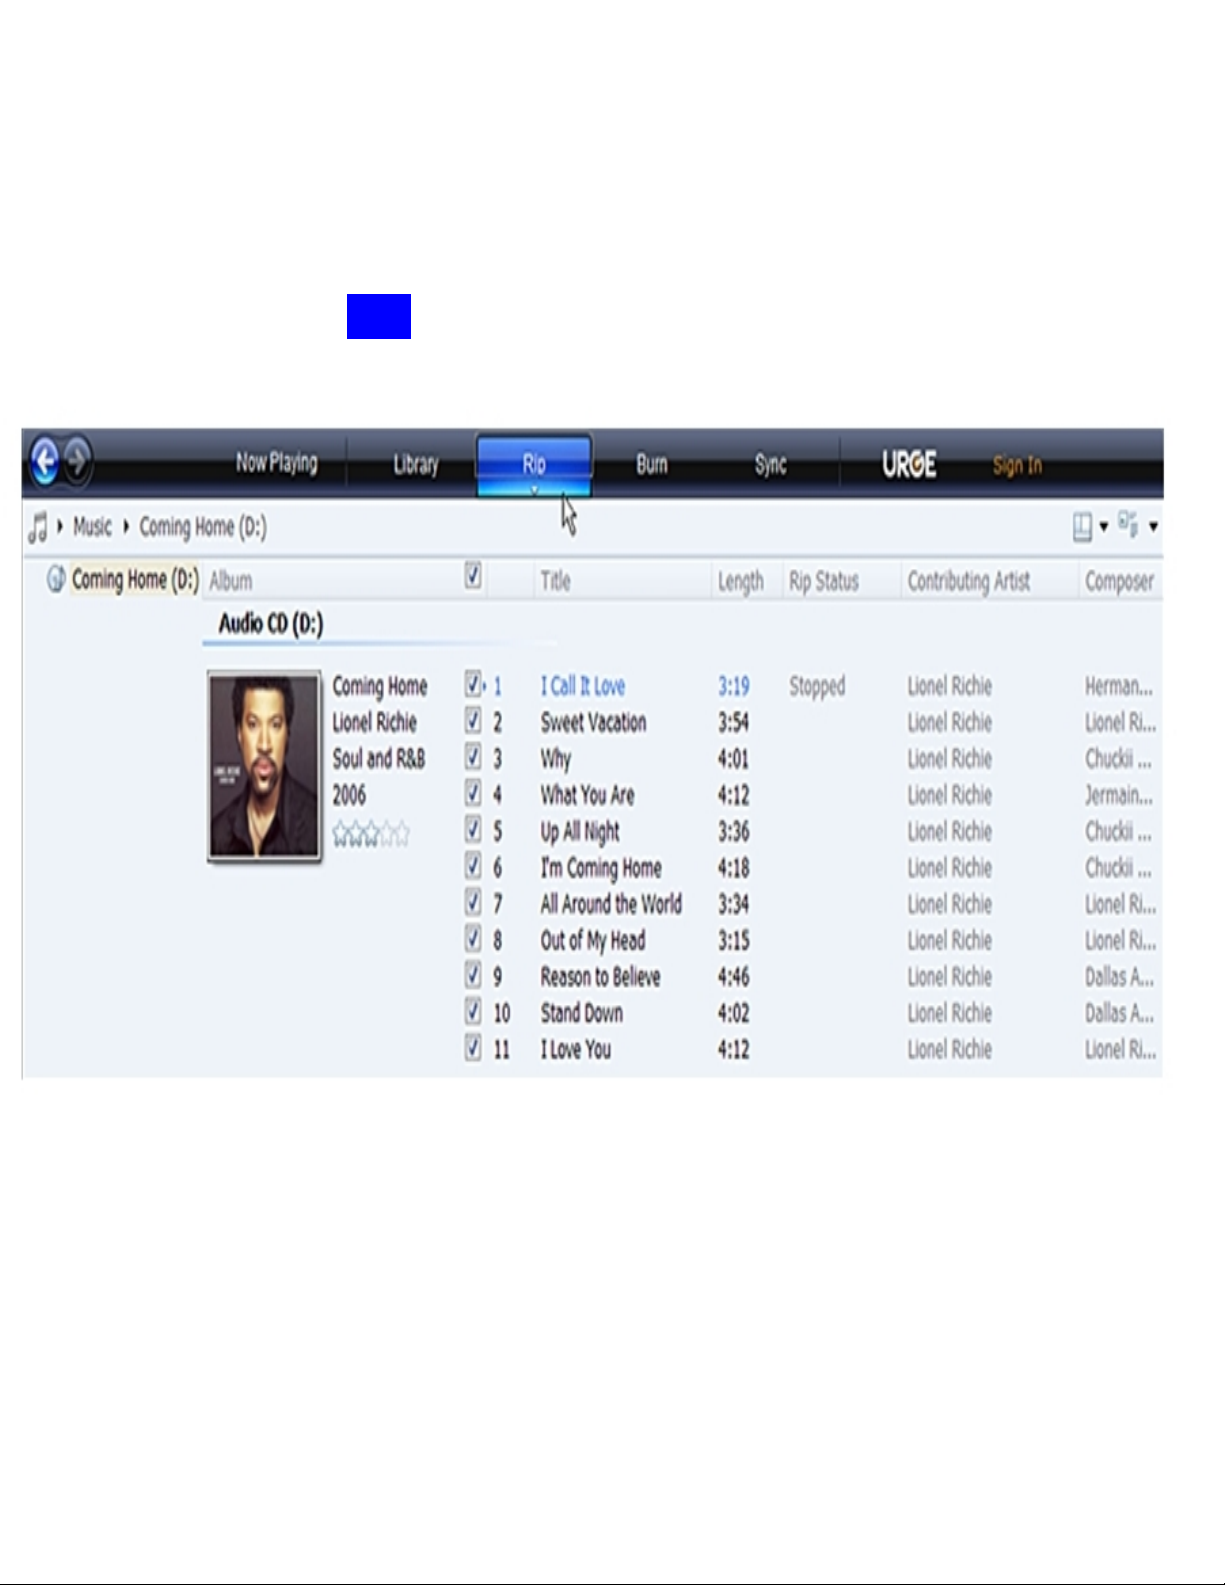
2) Put an audio CD into the CD-ROM drive of your computer.
If your computer has an internet connection,
WMP will automatically retrieve and display
the album information.
ª
Click the
“
Rip
”
tab and
select which “Title” to rip.
To rip the entire album
, check all of the check
_
Page 4
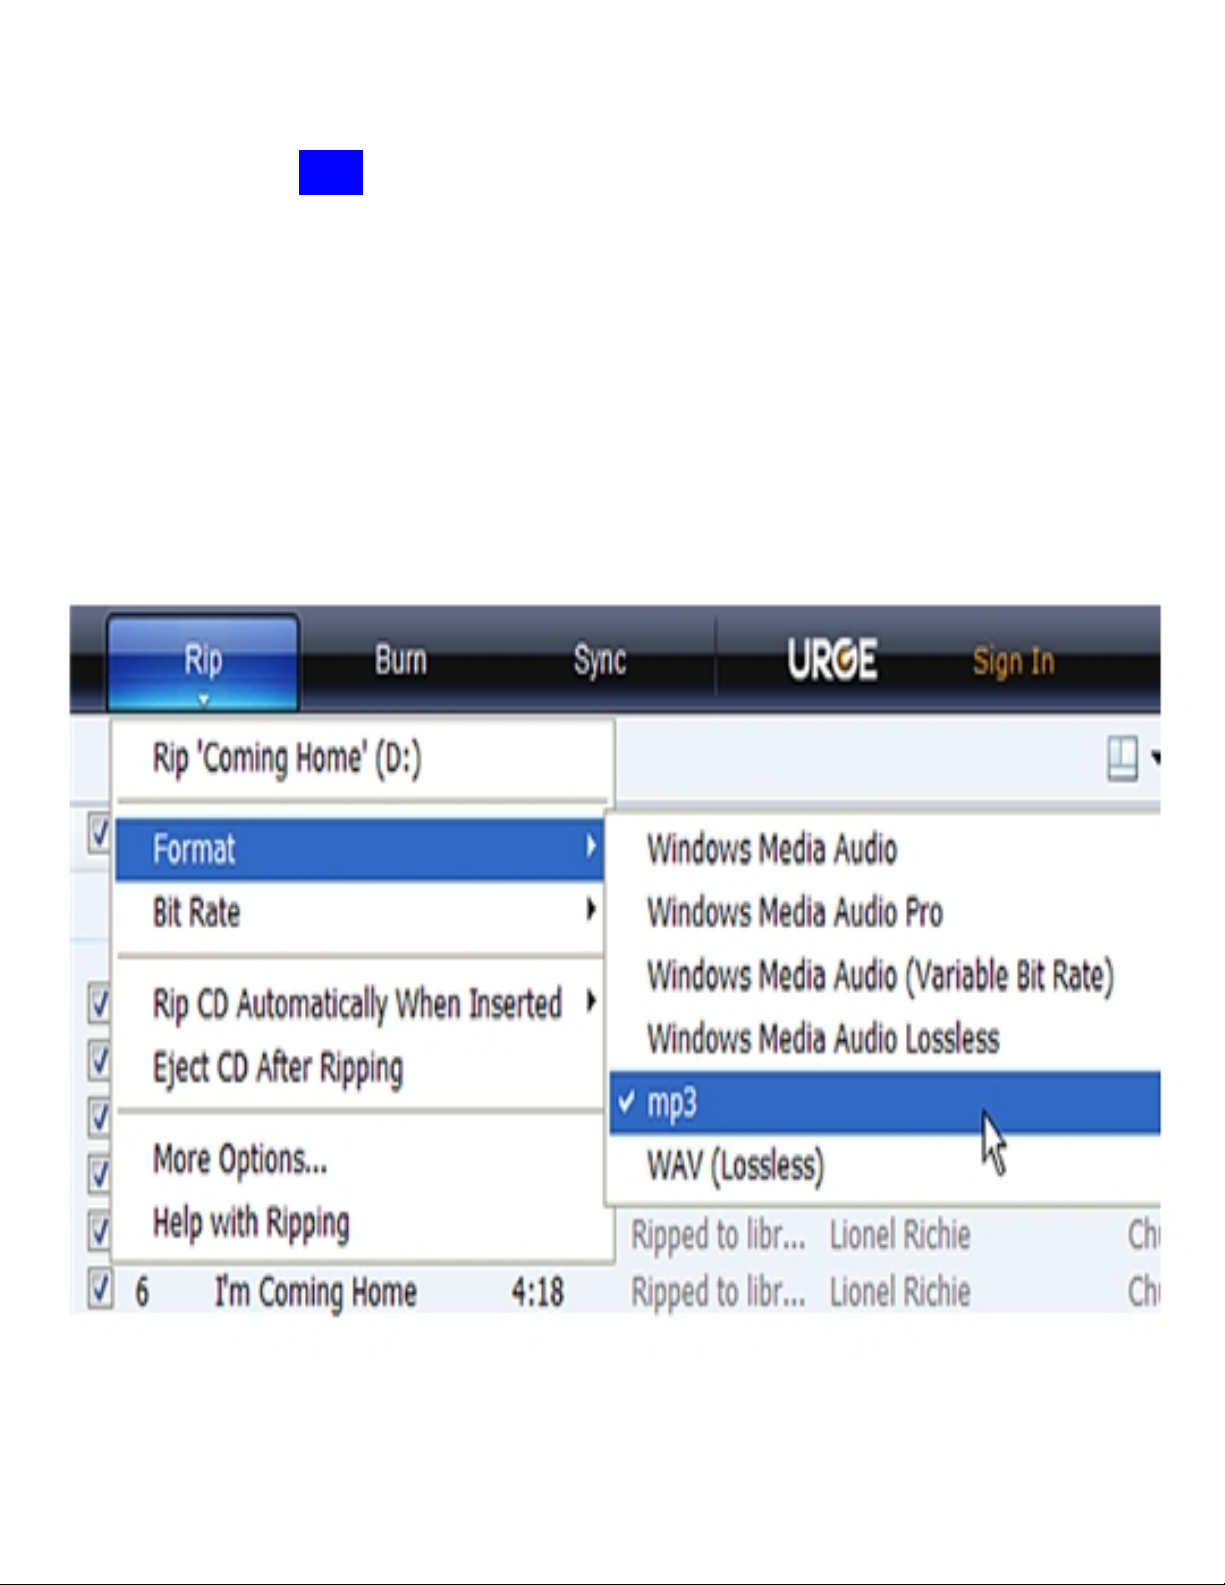
3) Set the Rip Options (optional).
ª
Click the
“
Rip
”
button to set the Rip options. The recommended Rip settings are:
²
Select “Format > mp3”
²
Select “Bit Rate > 128 Kbps”
Select “More Options” to change the directory to which WMP saves
your ripped
²
music les. WMP will save your music to your “My
Documents > My Music” folder by default.
_
Page 5
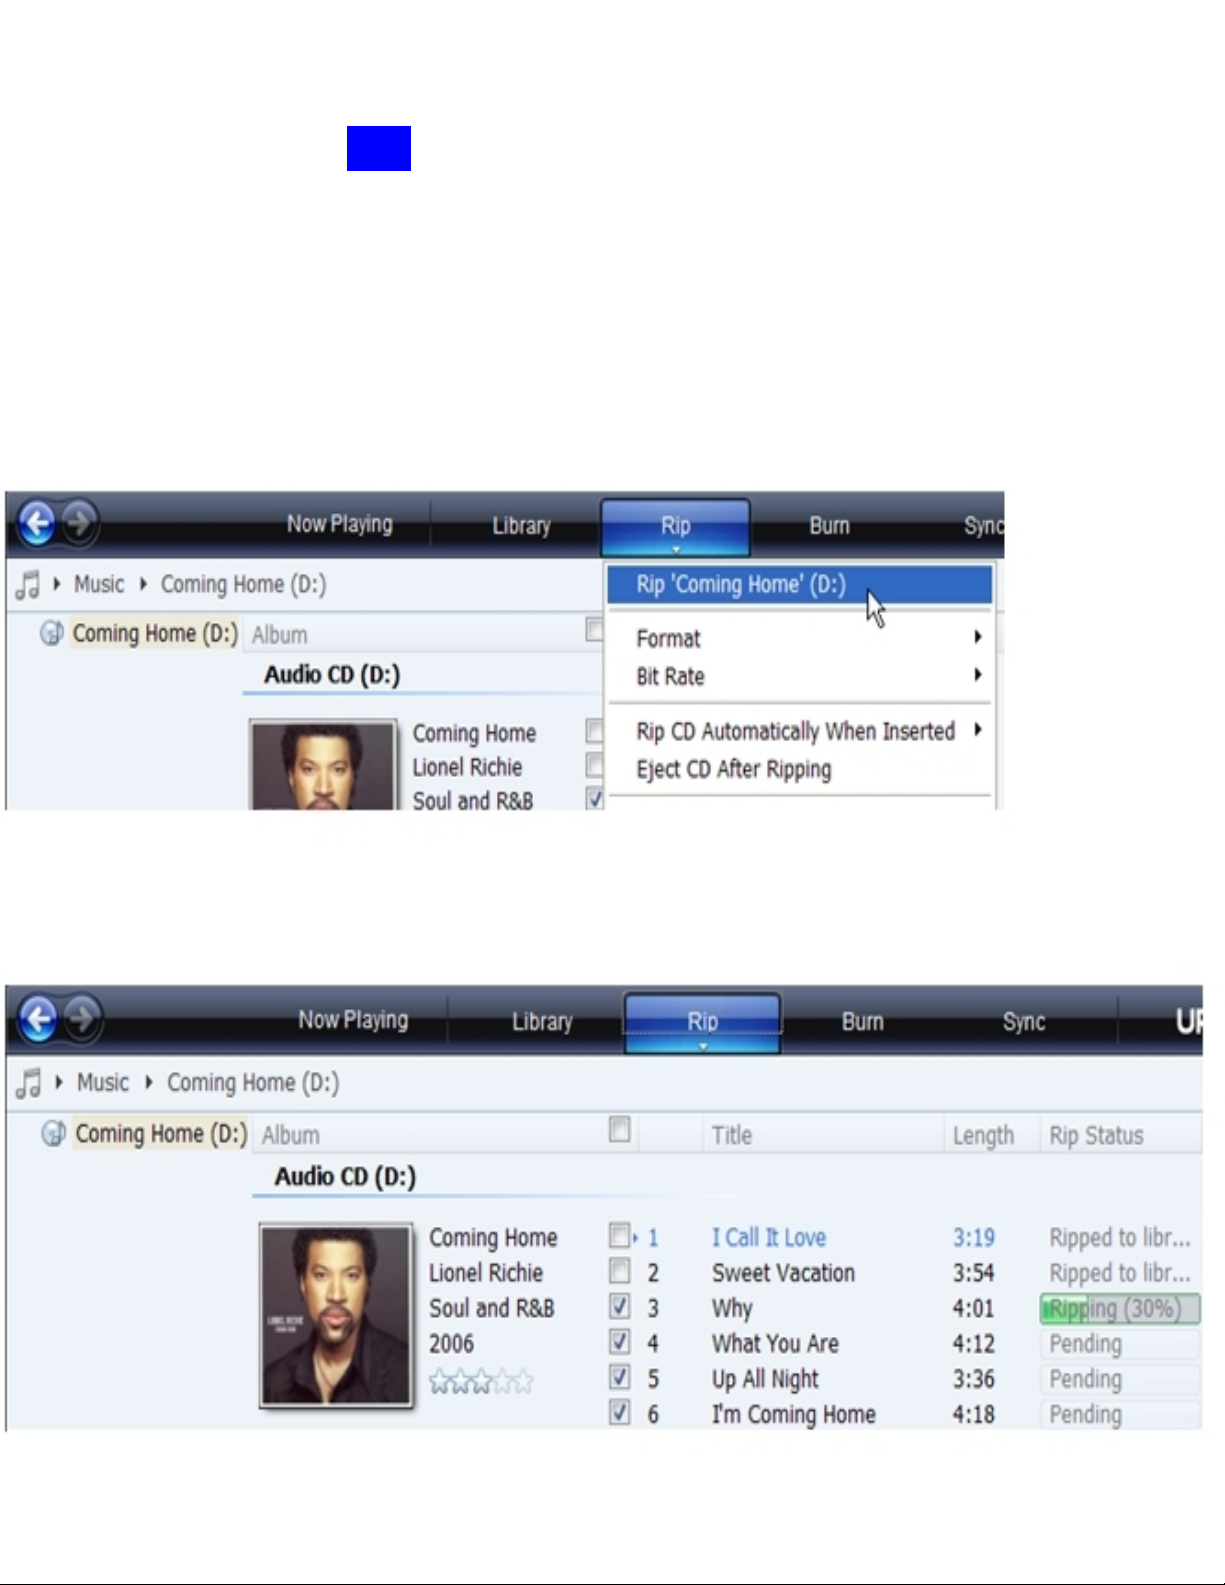
4) Start ripping the CD.
ª
Click the
“
Rip
”
button and select “Rip” to start converting the audio
CD to MP3/WMA
The ripping proces
s will take a few minutes to complete. WMP will
save the converted
music files in
your “My Documents > My Music”
folder by default.
_
Page 6
Transfer MP3/WMA Files to Your COBY Player
Once you have MP3 or WMA digital music
files
on
your computer, transfer t
hem to your COBY player
in order to listen to music anywhere.
Use WMP11 to transfer (sync) music from your computer to your COBY MP3 player.
1) Launch the WMP11 program.
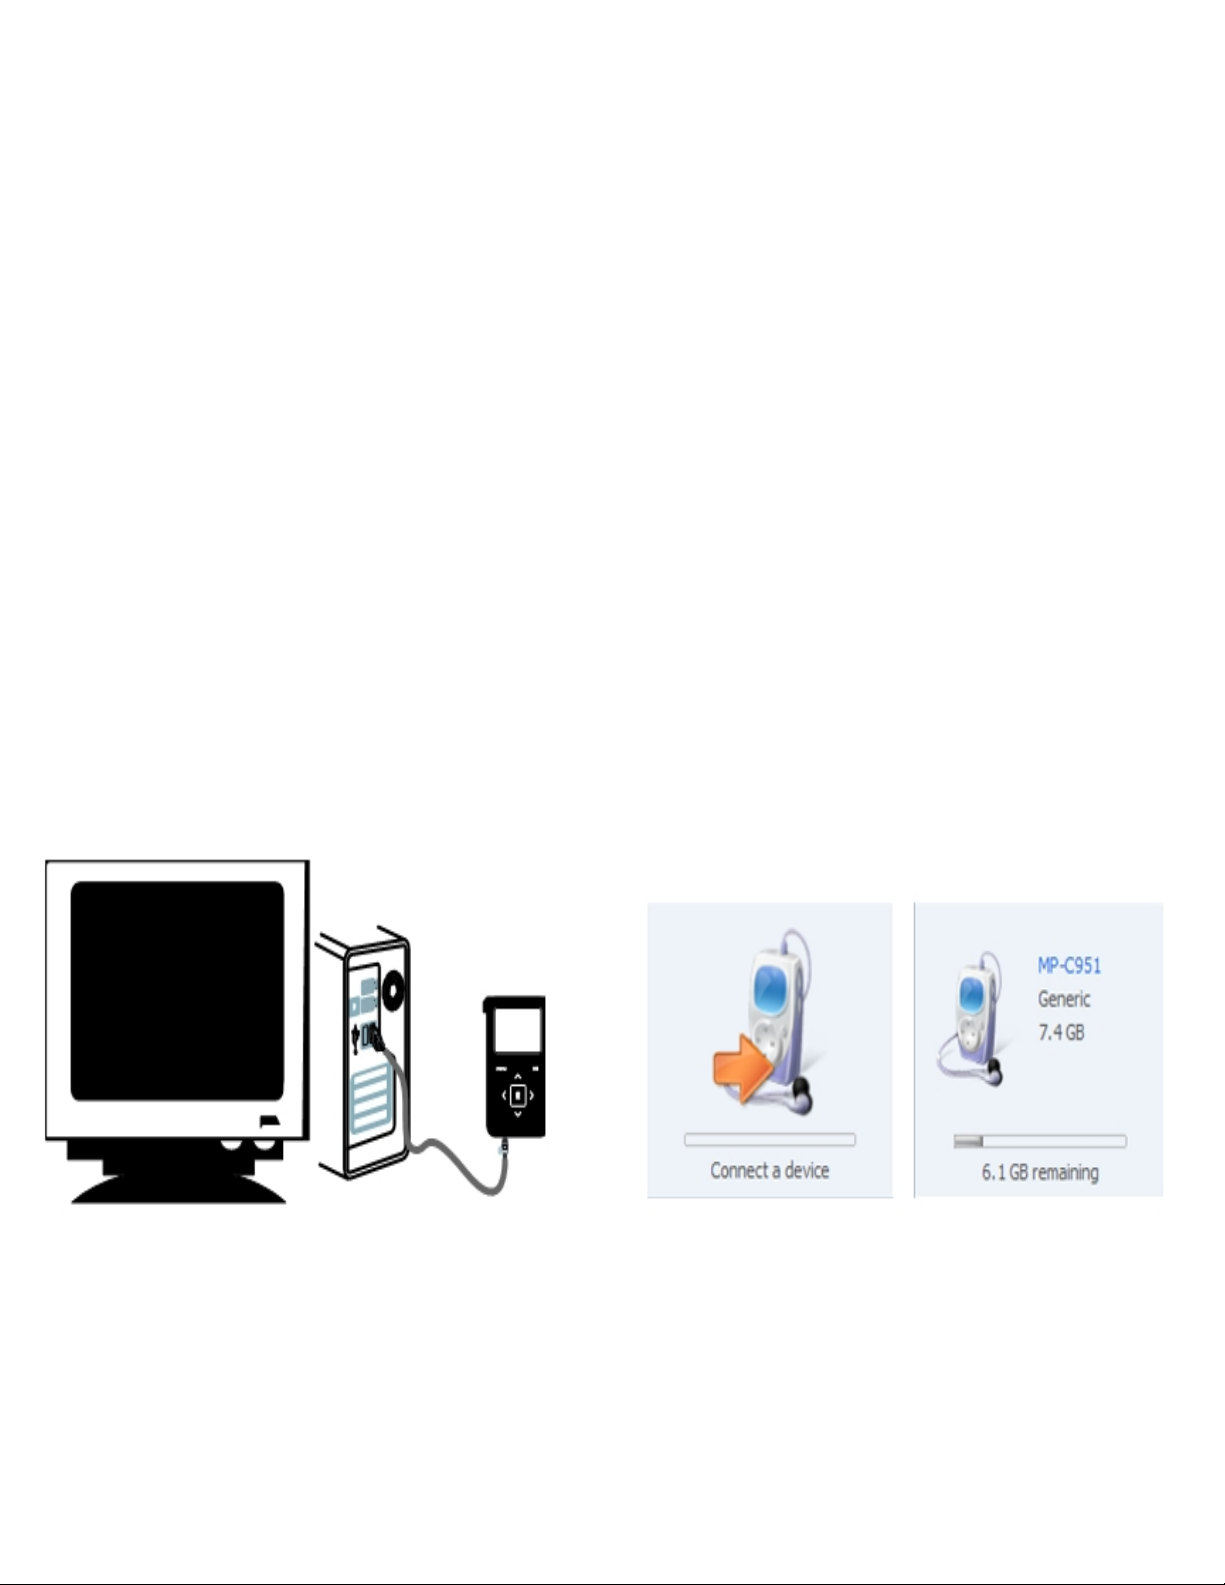
2) Connect your COBY player to a USB port on the computer.
ª
WMP11 will detect your COBY player automatically.
Page 7
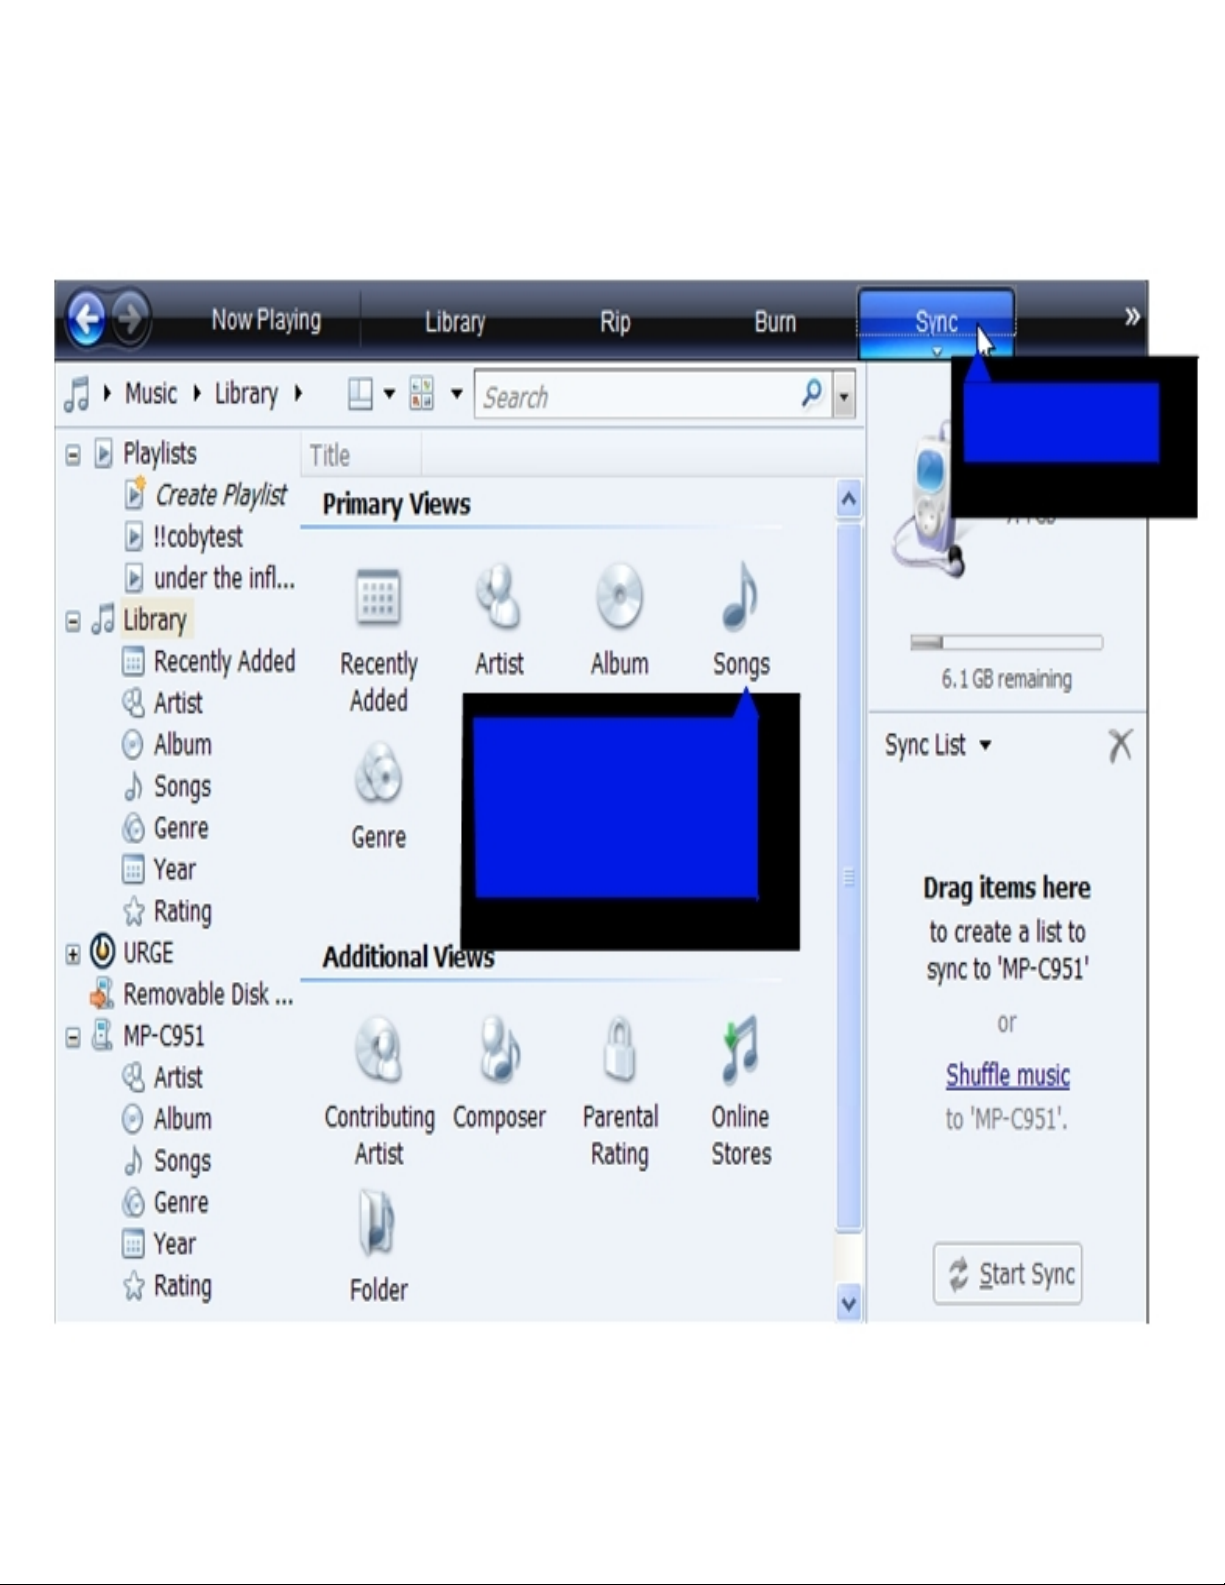
3) Browse your music library to choose songs to sync.
3a. Click
“Sync”
3b. Double-click an
icon to choose
a
view of your
Music Library
Page 8
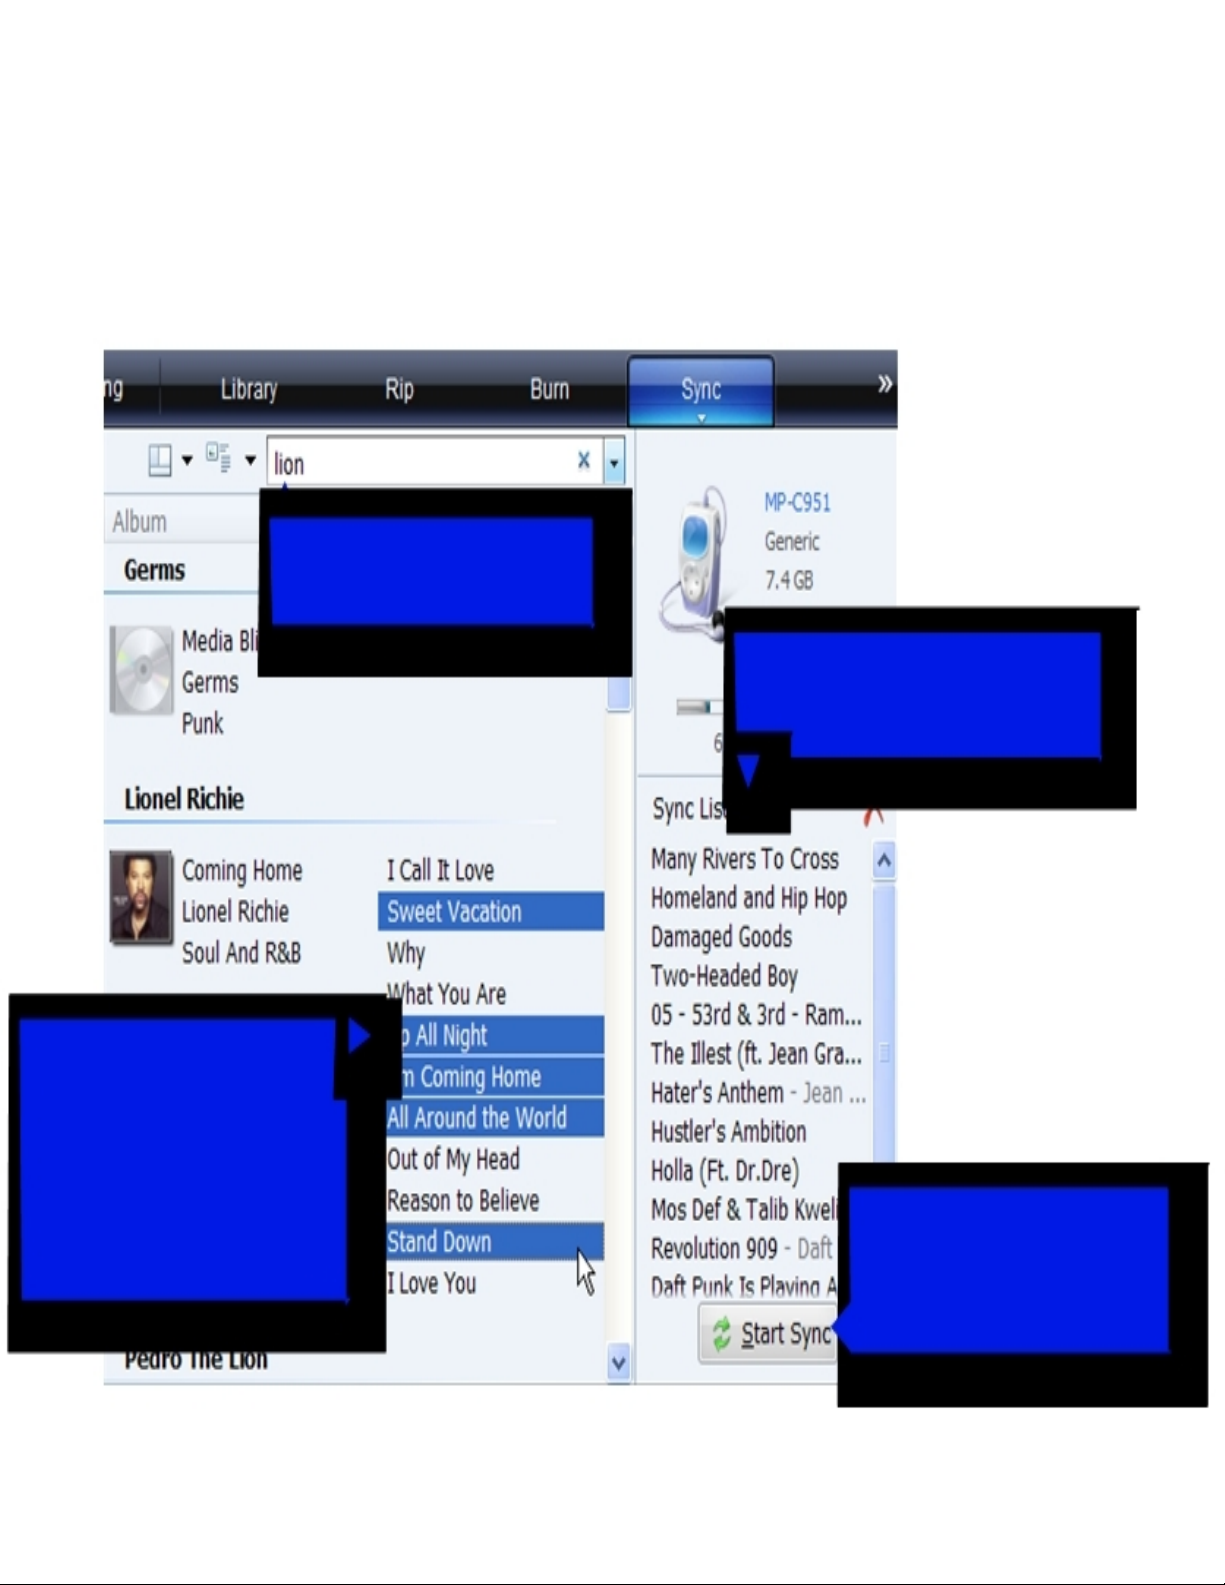
4
) Select songs to sync to your COBY player.
4a. Type in the Search
bar to
quickly find a
song.
4c. Drag the selected
tracks h
ere to
add
them to the Sync List.
4
b. Click on
a
track to
select
it
for
synchronization.
To select multiple
tracks, hold
the
CTRL or SHIFT and
click on the tracks
.
4d. Click “Start
Sync” to
transfer
the Sync List
to your COBY player.
11
Page 9

5) Disconnect your COBY player from the computer.
Once the sync process is complete, unplug your
player from the USB port of the computer. Now
you’re ready to listen to music on your COBY
player.
Page 10

VIDEO
TRANSFER
–
Getting Started
Converting your
VIDEO
files and transferring it into your player.
Install the Conversion Utility
1. Insert the D
river CD
2. Copy the “
Video Convert
ing
” folder.
3. Paste the “Video Conver
ting
” folder on your desktop.
Run the Conversion Utility
1.
On your desktop, open the “Video Convert
ing” folder.
2. Double click on the “
video2smv.exe” file.
3. The program will initialize.
Converting Video (s
ee
diagram b
elow)
1.a
Find and Select the video files to convert in the INPUT Video f
ield.
1.b
Select the directory where you want to save the converted file.
1.
c Start the conversion process
When the conversion is completed, copy and paste or
drag and drop the converted files to your MP3 player
“MVIDEO” folder
.
Done!!
Page 11

Page 12

Common Troubleshooting
Problems
Possible Solutions
No Power
*Ensure that the "HOLD" button is turned off.
*The Battery level may be too low. Charge the unit.
*Reset the unit by inserting a pin on the back of the unit
"Reset" hole.
Music does NOT Play or Freezes
*The file(s) are corrupted or damaged.
*U
nsupported file format (ACC, WAV, M4A…Etc.)
* DRM issues (If the file was obtain from a subscription
service,
be sure to transfer your DRM license to the MP3
player.
No Sound after file transfer
*Ensure that the original file plays on your computer. If not,
then you will need to obtain the codec for that file.
*Unsupported format.
Video Conversion Error
*Ensure that the original file plays on your computer. If not,
then you will need to obtain the codec for that file.
*Unsupported format.
Video Issues
*Make sure that you are using the correct output frame size
and the correct output frame rate.
*For the best output frame size, set the MTV Video Converter
to 160X128 or 160X112 @ 15fps (sports Video).
Computer does NOT recognized
the MP3 player
*Check the connections.
*Switch USB ports or DO NOT use a USB extension cable.
If
you are still having difficulty with your MP3 player, please contact
Customer Care, Hours of operation, Monday-
EST, Saturday and Sunday 9:00 AM – 5:30 PM EST. You can also reach us
online at
customerservice@cobyusa.com
1-
800-727- 3592
or
techsupport@cobyus
Friday 8:00 AM – 8:30:00 PM
a.com
Page 13

Setup Guide
Thank you for choosing a COBY MP3 player
!
~
This guide will cover how to
transfer your music CD’s into
your COBY
MP3
player
using Windows Media Player 11
~
This guide will also provide common troubleshooting solutions for your
C
OBY MP3 player
.
Requirements
Windows Media Player 11 (WMP11)
If your computer does not have Windows Media Player installed, please download the
latest version of Windows Media Player (WMP) from Microsoft’s website
www.microsoft.com/windows/windowsmedia/player/download/download.aspx
The directions in this guide are given for Windows Media Player 11 (WMP11)
COBY MPC70
57
Page 14

1b. Click
“
All Programs
”
1a. Click
“Start Menu”
button
1c. Click on
“
Windows Media Player”
AUDIO TRANSFER
–
Getting Started
Transfer your Music CD’s into your COBY MP3 player
1) Launch the WMP11 program.
Page 15

ª
2) Put an audio CD into the CD-ROM drive of your computer.
If your computer has an internet connection,
WMP will automatically retrieve and display
the album information.
ª
Click the
“
Rip
”
tab and
select which “Title” to rip.
To rip the entire album
, check all of the check
_
Page 16

3) Set the Rip Options (optional).
ª
Click the
“
Rip
”
button to set the Rip options. The recommended Rip settings are:
²
Select “Format > mp3”
²
Select “Bit Rate > 128 Kbps”
Select “More Options” to change the directory to which WMP saves
your ripped
²
music les. WMP will save your music to your “My
Documents > My Music” folder by default.
_
Page 17

4) Start ripping the CD.
ª
Click the
“
Rip
”
button and select “Rip” to start converting the audio
CD to MP3/WMA
The ripping proces
s will take a few minutes to complete. WMP will
save the converted
music files in
your “My Documents > My Music”
folder by default.
_
Page 18

Transfer MP3/WMA Files to Your COBY Player
Once you have MP3 or WMA digital music
files
on
your computer, transfer t
hem to your COBY player
in order to listen to music anywhere.
Use WMP11 to transfer (sync) music from your computer to your COBY MP3 player.
1) Launch the WMP11 program.
2) Connect your COBY player to a USB port on the computer.
ª
WMP11 will detect your COBY player automatically.
Page 19

3) Browse your music library to choose songs to sync.
3a. Click
“Sync”
3b. Double-click an
icon to choose
a
view of your
Music Library
Page 20

4
) Select songs to sync to your COBY player.
4a. Type in the Search
bar to
quickly find a
song.
4c. Drag the selected
tracks h
ere to
add
them to the Sync List.
4
b. Click on
a
track to
select
it
for
synchronization.
To select multiple
tracks, hold
the
CTRL or SHIFT and
click on the tracks
.
4d. Click “Start
Sync” to
transfer
the Sync List
to your COBY player.
11
Page 21

5) Disconnect your COBY player from the computer.
Once the sync process is complete, unplug your
player from the USB port of the computer. Now
you’re ready to listen to music on your COBY
player.
Page 22

VIDEO
TRANSFER
–
Getting Started
Converting your
VIDEO
files and transferring it into your player.
Install the Conversion Utility
1. Insert the D
river CD
2. Copy the “
Video Convert
ing
” folder.
3. Paste the “Video Conver
ting
” folder on your desktop.
Run the Conversion Utility
1.
On your desktop, open the “Video Convert
ing” folder.
2. Double click on the “
video2smv.exe” file.
3. The program will initialize.
Converting Video (s
ee
diagram b
elow)
1.a
Find and Select the video files to convert in the INPUT Video f
ield.
1.b
Select the directory where you want to save the converted file.
1.
c Start the conversion process
When the conversion is completed, copy and paste or
drag and drop the converted files to your MP3 player
“MVIDEO” folder
.
Done!!
Page 23

Page 24

Common Troubleshooting
Problems
Possible Solutions
No Power
*Ensure that the "HOLD" button is turned off.
*The Battery level may be too low. Charge the unit.
*Reset the unit by inserting a pin on the back of the unit
"Reset" hole.
Music does NOT Play or Freezes
*The file(s) are corrupted or damaged.
*U
nsupported file format (ACC, WAV, M4A…Etc.)
* DRM issues (If the file was obtain from a subscription
service,
be sure to transfer your DRM license to the MP3
player.
No Sound after file transfer
*Ensure that the original file plays on your computer. If not,
then you will need to obtain the codec for that file.
*Unsupported format.
Video Conversion Error
*Ensure that the original file plays on your computer. If not,
then you will need to obtain the codec for that file.
*Unsupported format.
Video Issues
*Make sure that you are using the correct
setting for the
Quality Level and Dimension.
*For the best video setting, set the Quality Level to High and
the Dimension to 1
28X112
Computer does NOT recognized
the MP3 player
*Check the connections.
*Switch USB ports or DO NOT use a USB extension cable.
If
you are still having difficulty with your MP3 player, please contact
Customer Care, Hours of operation, Monday-Friday 8:00 AM – 8:30:00
EST, Saturday and Sunday 9:00 AM – 5:30 PM EST. You can also reach us
online at
customerservice@cobyusa.com
1-
800-727- 3592
or
techsupport@cobyusa.com
PM
 Loading...