

Page 1
MP-C351
Portable MP3 Micro System with
512MB Integrated Flash Memory and SD/MMC Card Slot
Instruction Manual
Please read this manual carefully before operation.
Page 2
SAFETY INSTRUCTIONS
CAUTION
RISK OF E LECTRIC S HOCK
DO NOT OPEN
CAUTION : TO REDUCE THE RISK OF FIRE AND ELECTRIC SHOCK , DO NOT R EMOVE THE COVER (OR BACK)
OF THE UNIT. REFER SERVICING ONLY TO QUALIFI ED
SERVIC E PERSONN EL.
The lightning ash with arrowhead symbol within an equilateral triangle is intended to aler t
the user to the presence of uninsulated “dangerous voltage” within the product’s enclosure
that may be of sufcient magnitude to c onstitute a risk of electric shock.
The exclamation point within an equilateral triangle is intended to alert the user to the presence of important operation and servicing instructions in the literature accompanying the
applianc e.
WARNING:
To prevent re or sh ock hazard, do not expo se this devic e to rain or mo isture.
WARNING:
Handlin g the cords on this prod uct will exp ose you to lead, a chemical known to th e State of Cal ifornia to cause can cer, and
birth defects or other repro ductive ha rm. Wash hands afte r handli ng.
CAUTION :
To prevent electric shoc k, match wide blade of plu g to wide slot of outlet and f ully inser t.
For Customer Use:
Enter below the serial number that is located on the
bottom of the unit. Retain this information for future
reference.
Model No. MP-C351
Serial No.
For recycling or disposal information about this product, please
contact your local authorities or the Electronics Industries Alliance:
www.eiae.org.
- 2 -
Page 3

SAFETY INSTRUCTIONS
1. Read these instructions carefully. Keep these instructions for future reference.
2. Heed all warnings and follow all instructions.
3. Do not expose to water or moisture.
4. Clean only with a dry cloth.
5. Keep objects away from ventilation openings. Do not block ventilation openings at any time.
6. Do not install near any apparatus that produces heat such as stoves, radiators, ampliers,
etc.
7. Do not force the power plug into a wall outlet. If the plug provided does not t into your outlet,
consult an electrician for replacement of the obsolete outlet. (A polarized plug has two blades
where one is wider than the other; the wide blade is provided for your safety.)
8. Do not place heavy objects on the power cord. Protect the cord from being walked on, pinched
by objects, or torn and exposed to liquids (especially at plugs, convenience receptacles, and
the point at which they exit from the device).
9. Use only with attachments/accessories specied by the manufacturer. Use of attachments/
accessories not recommended by the product manufacturer may be hazardous.
10. Unplug the device during lightning storms. Unplug the device and remove any batteries when
the device will be unused for long periods of time.
11. Do not use this device near water. Do not place objects lled with liquids (eg, vases) on the
device.
12. Do not use headphones/earphones while cycling, driving, or operating a motorized vehicle.
13. Do not use headphones/earphones at high volume.
14. Do not drop or otherwise subject the device to impact.
15. Do not disconnect the USB cable or turn off the device while transferring les to or from your
device. Data loss may occur as a result. Users are responsible for creating backups of their
data. COBY Electronics cannot be held liable or be otherwise responsible for loss of data.
16. Do not open or attempt to repair this device. Refer all repairs to authorized service personnel.
- 3 -
Page 4

TABLE OF CONTENTS
SAFETY INSTRUCTIONS ...................................................................................................................2
TABLE OF CONTENTS ......................................................................................................................4
FEATURES ......................................................................................................................................... 6
PACKAGE CONTENTS .................................................................................................................... 7
LOCATION OF CONTROL S ............................................................................................................ 8
LCD DISPLAY ................................................................................................................................... 9
POWER SUPPLY ............................................................................................................................. 10
Battery Operation...................................................................................................................10
AC Adapter Operation ............................................................................................................10
SD/MMC CARD INSTALLATION ....................................................................................................11
CONNECT TO A COMPUTER ....................................................................................................... 12
USB Driver Installation...........................................................................................................12
Microsoft Windows 98 SE .............................................................................................12
Connecting to a Computer .....................................................................................................12
Disconnecting from a Computer ............................................................................................12
Microsoft Windows ........................................................................................................12
Macintosh OS X .............................................................................................................13
Transferring Files ...................................................................................................................13
Microsoft Windows ........................................................................................................13
Macintosh OS X .............................................................................................................13
BASIC OPERATIONS ..................................................................................................................... 14
Standby Mode ........................................................................................................................14
Power On/Off .........................................................................................................................14
Menu Navigation ....................................................................................................................14
MAIN MENU OVERVIEW .............................................................................................................. 15
NAVIGATION MODE (NAV) ......................................................................................................... 16
Navigation Controls ...............................................................................................................16
Music ......................................................................................................................................16
Voice ......................................................................................................................................16
Play List (M3U) .......................................................................................................................16
SD/MMC Card ........................................................................................................................16
MUSIC MODE (MSC) .................................................................................................................... 17
Music Controls ....................................................................................................................... 17
Repeat Play ............................................................................................................................ 17
Repeat A-B Function .............................................................................................................17
FM RADIO MODE (FM) ................................................................................................................ 18
- 4 -
Page 5

TABLE OF CONTENTS
Manual Tuning ........................................................................................................................18
Preset Tuning .........................................................................................................................18
Store Preset Stations .............................................................................................................18
Store Presets Manually ..................................................................................................18
Store Presets Automatically ..........................................................................................18
Delete a Preset Station .................................................................................................. 18
AUXILIARY MODE (AUX) .............................................................................................................. 19
Connect an External Audio Source .......................................................................................19
RECORDING .................................................................................................................................20
Voice Recording .....................................................................................................................20
Line-In Recording ..................................................................................................................20
FM Recording.........................................................................................................................21
ALARM CLOCK ............................................................................................................................. 22
TIME SET MODE (SET).................................................................................................................... 23
Clock Set ................................................................................................................................23
Alarm Set ...............................................................................................................................23
SYSTEM MODE (SYS) ..................................................................................................................... 24
EQ (Equalizer) ........................................................................................................................24
Repeat Mode..........................................................................................................................24
Display ...................................................................................................................................24
ID3 Tag ...........................................................................................................................24
Lyric ................................................................................................................................25
Contrast .........................................................................................................................25
B-Light Time (Backlight) ................................................................................................25
Language .......................................................................................................................25
Auto Off ..................................................................................................................................26
Sleep Time .............................................................................................................................26
Recording ...............................................................................................................................26
REC Mode (Recording Mode) .......................................................................................26
VAD (Voice Activated Detection) ...................................................................................26
REC Input (Recording Input) .........................................................................................27
Resume ..................................................................................................................................27
Track/Time Line .............................................................................................................27
Delete File ..............................................................................................................................27
Format ....................................................................................................................................28
Reset ......................................................................................................................................28
Information .............................................................................................................................28
Alarm Mode ............................................................................................................................28
TROUBLESHOOTING ..................................................................................................................... 29
SPECIFICATIONS ...........................................................................................................................30
- 5 -
Page 6

FEATURES
512MB Integrated Flash Memory
•
Plays Digital Music from Most Online Stores (Microsof t DRM 9 Support)
•
4 Integrated Aluminum-Cone Speakers Deliver Superior Sound
•
LCD Displays Song Title, Album, and Artist Information (ID3 Tag Support)
•
SD/MMC Card Slot Allows for Expanded Memory Capacity (SD/MMC Card Not Included)
•
Mini USB Por t for Fast File Transfers
•
FM Radio with 20-Station Preset Memory
•
Real-Time MP3 Encoding (No PC Required)
•
Digital Voice Recording through Integrated Microphone
•
Digital Equalizer Presets (Normal, Classic, Rock, Jazz, and Pop)
•
Alarm Clock Function (MP3, Radio, or Buzzer)
•
Sleep Timer
•
Mobile Music, Data, Document, and Picture Storage
•
Plug and Play: Supports Windows 98 SE (Driver CD Included), Windows ME, 2000, XP, and
•
Mac OS X
Upgradable Firmware
•
Battery Operation with 4 x “C” Batteries (Not Included)
•
- 6 -
Page 7
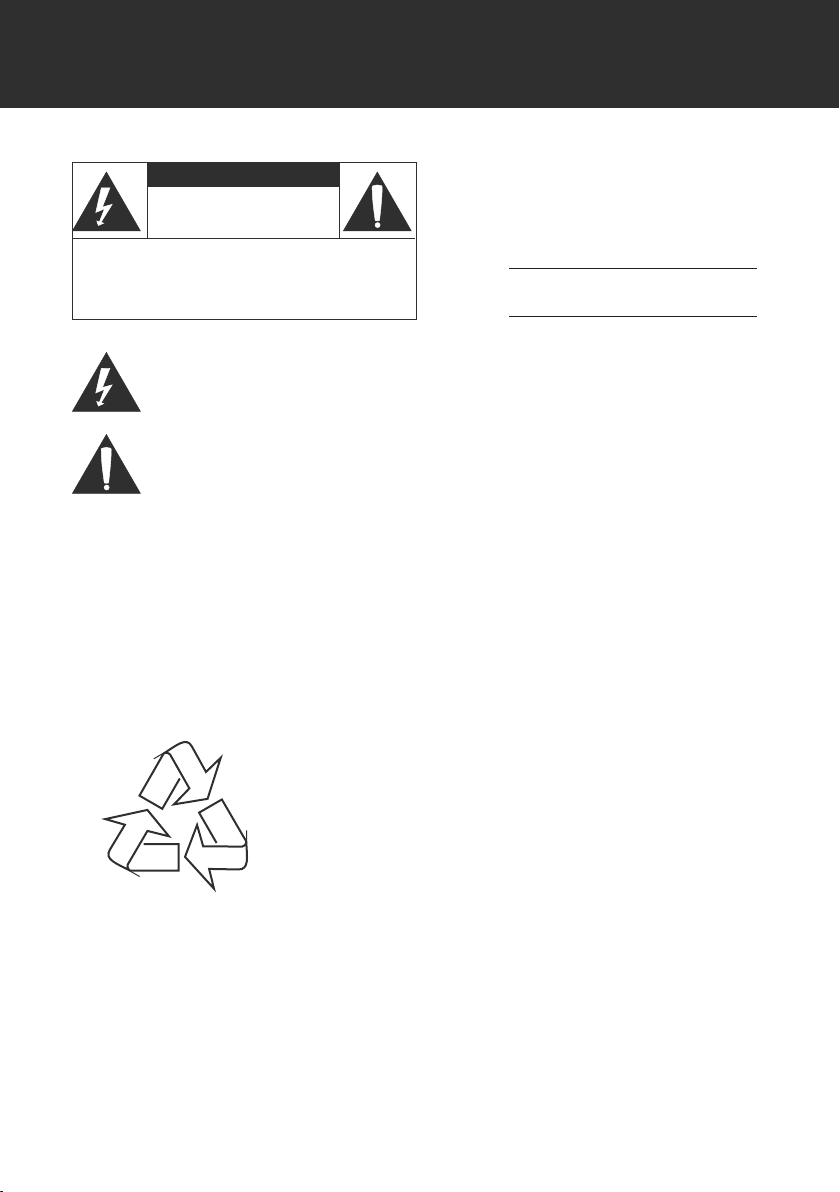
PACKAGE CONTENTS
MP-C341
Earphones USB Cable Line-In Cable
Instruction Manual
AC Adapter Installation CD
(for Windows 98 SE)
- 7 -
Page 8
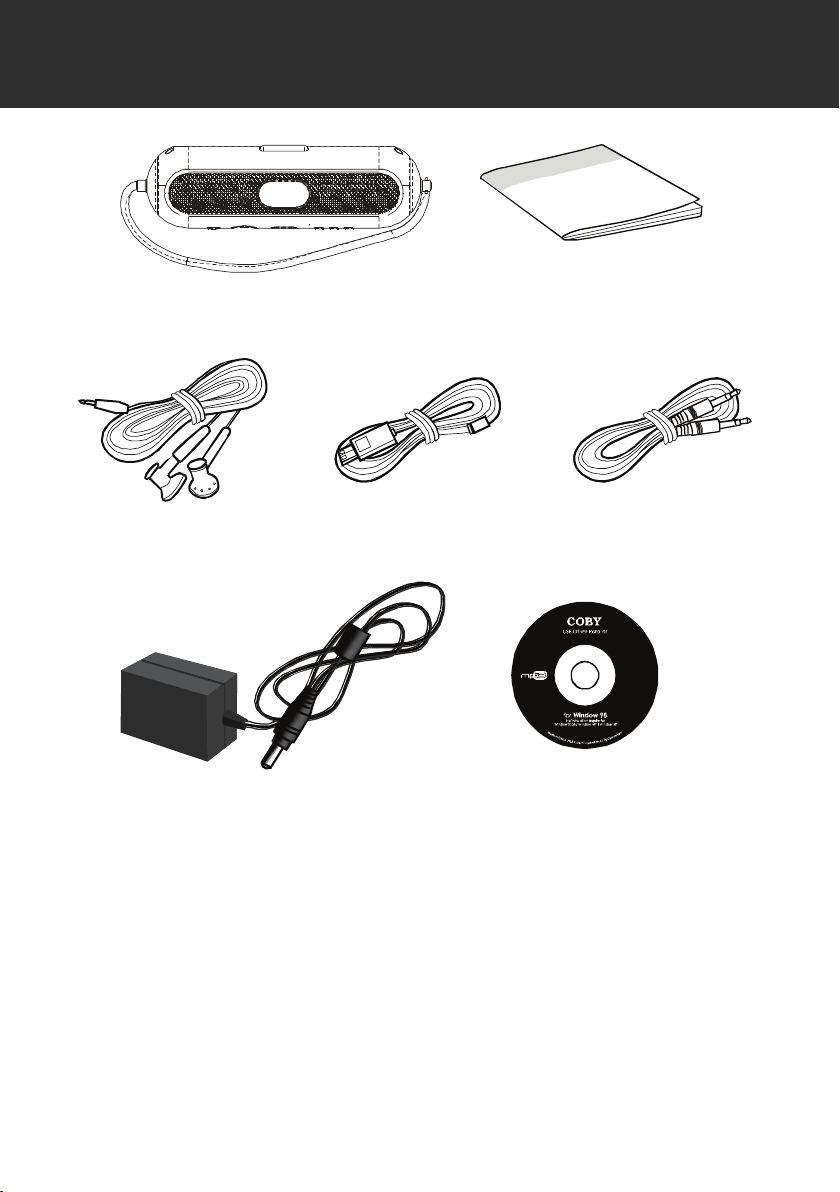
LOCATION OF CONTROLS
DC 6V
ALARM
SNOOZE
MENU
TIMEREC
EQA-B
CONNECTIONS
AUX
LINE-iN
Play/Pause
Volume - /
Navigation Down
Detachable Shoulder Strap
(unscrew to detach)
Volume + /
Navigation Up
Next /
Navigation Right
Previous /
Navigation Left
AUX Line-In
Headphone
Jack
DC Jack
USB Port
SD/MMC
Card Slot
Snooze
Record/
Equalizer
Play/Navigation
Control
Repeat
A-B
Time/
Alarm
Menu
CONNECTIONS PANEL
Slide cover open in the direction of the arrow
- 8 -
Page 9
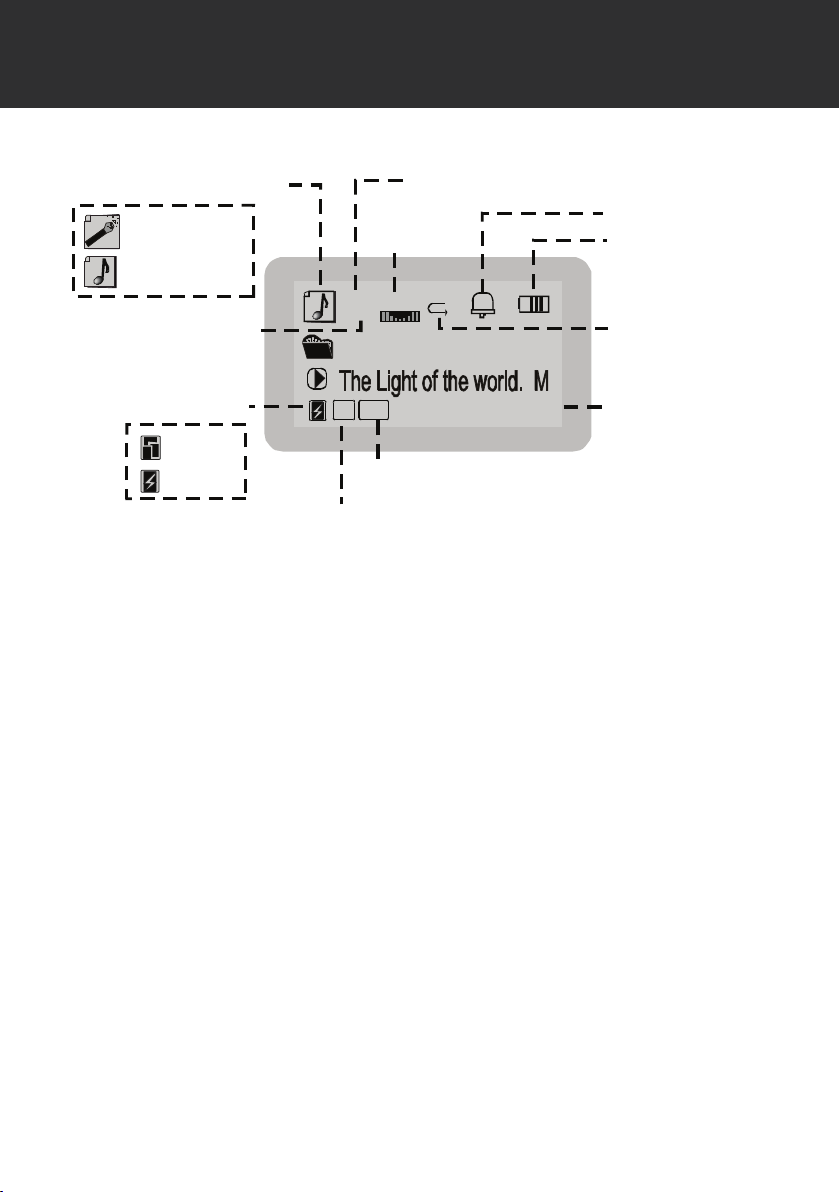
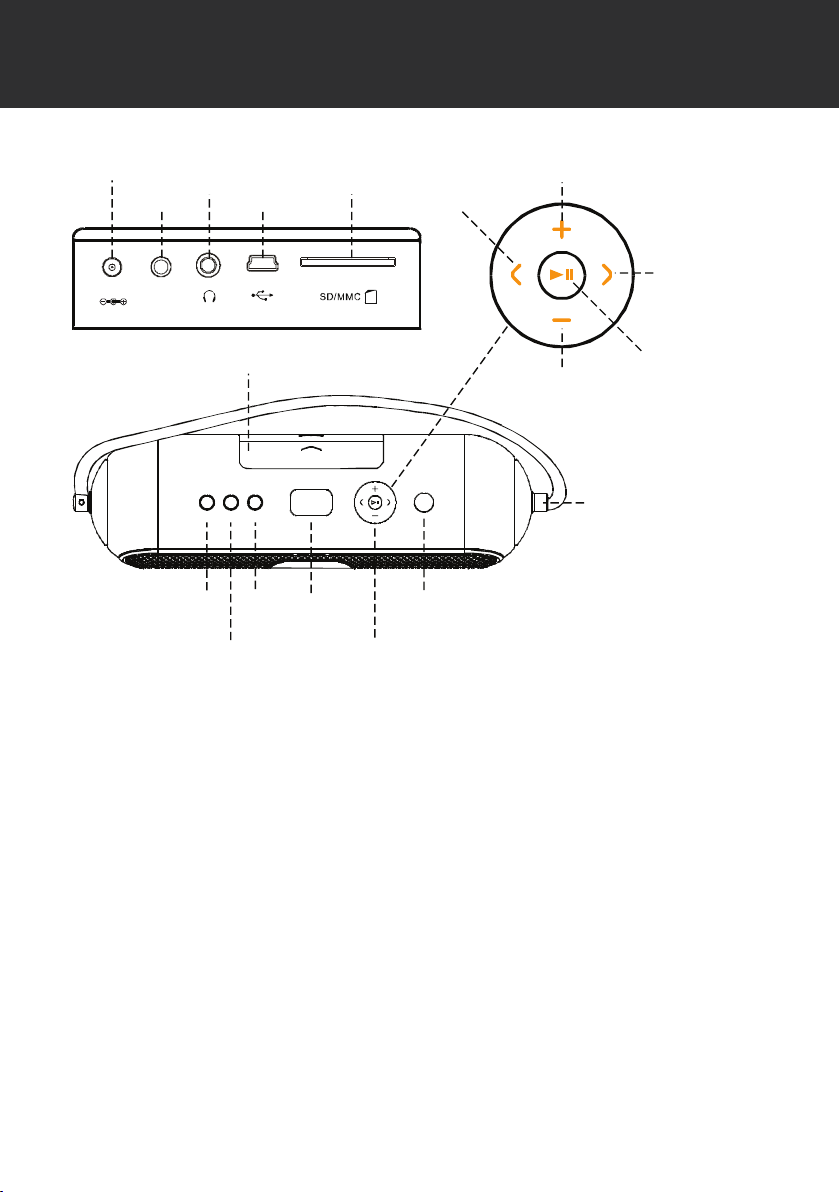
LCD DISPLAY
02 0 NORM
044
MP3 MUS IC
44
KHZ
128
KBPS
01 :16
File Type
Total Tracks
File Format
Sample
Frequency
Bit Rate
Equalizer
Elapsed Time
Play Mode
Battery Level
Current Track Number
Alarm
Voice File
Music File
WMA
MP3
- 9 -
Page 10
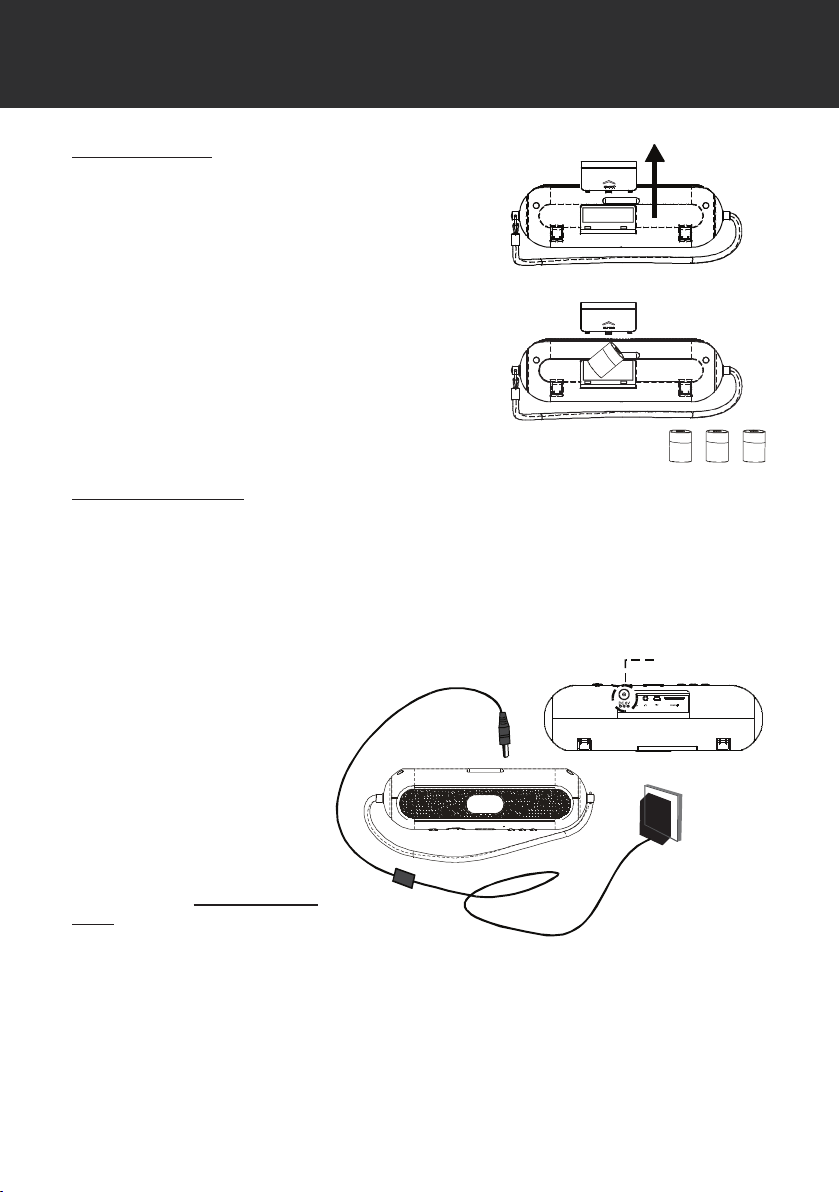
POWER SUPPLY
4 x “C” Batteries
DC Jack
Battery Operation
Open the battery compartment.
1.
To remove the cover, slide it open in the direction of
the arrow.
Insert the batteries.
2.
Insert 4 x “C” batteries, making sure to match the
polarity of the batteries (+/-) with the markings on
the inside of the battery compartment. Replace the
battery compartment cover.
AC Adapter Operation
Open the Connections panel located on the rear of the player.
1.
Slide the cover open in the direction of the arrow.
Connect the player to a power source.
2.
Plug one end of the supplied AC Adapter to the DC Jack and plug the other end into a 100 -
240V wall outlet.
NOTE:
When the player is connected with
the AC adapter, the LCD backlight
will turn on and remain lit until the
AC adapter is unplugged.
When the player is running on batteries, the LCD backlight will light
up briey each time a button is
pressed and then turn off. You can
adjust how long the LCD backlight
will remain on for through the SYS
menu (see the SYSTEM MODE
(SYS) section for details).
- 10 -
Page 11

SD/MMC CARD INSTALLATION
The integrated SD/MMC card slot lets you upgrade the player’s memory capacity easily with additional SD/MMC cards.
To install an SD/MMC card:
Open the Connections panel.
1.
Slide the cover open in the direction of the arrow.
Insert the SD/MMC card with the metal contacts facing up as shown in the diagram below.
2.
Press the card in until you hear a click.
To remove the SD/MMC card, press the card in and it will spring back out.
3.
Note:
Avoid touching the metal contacts of the SD/MMC card. Handle the card by its edges.
- 11 -
Page 12

CONNECT TO A COMPUTER
USB Driver Installation
It is not necessary to install the USB driver if your computer is running Microsoft Windows
ME/2000/XP or newer, or Macintosh OS X. Computers running these operating systems will recognize your player automatically when connected.
Microsoft Windows 98 SE
It is only necessary to install the USB driver if your computer is running Windows 98 SE.
Insert the Installation CD into your computer’s CD or DVD drive. Make sure to place the
1.
mini-CD in the center, recessed well of the drive tray.
Navigate to MY COMPUTER and double-click on the CD/DVD drive icon (usually “D:”).
2.
Double-click on the folder “Win98 USB Drivers” and then on the folder “english”.
3.
Double-click on the SETUP icon (SETUP.EXE) to start the USB driver installation program.
4.
Follow the on-screen instructions to complete the installation and then restart your computer.
5.
Note:
Mini- CDs should only be used in normal tray-loading CD/DVD drives. Mini-CDs may be used in
slot-loading drives with the proper adapter; please contact your computer or drive manufacturer
for more information.
Connecting to a Computer
To connect the player to your
computer:
Turn the player off to
1.
place it in Standby
mode.
Open the Connections
2.
panel. Connect the player to your computer with
the supplied USB cable
as shown in the diagram.
Your computer will recog-
3.
nize the player as a Removable Disk. If you have installed an SD/MMC card in the player,
your computer will recognize the card as a second Removable Disk.
Disconnecting from a Computer
Disconnect your player as instructed below to prevent data loss or corruption.
Microsoft Windows
Double-click the green arrow in the taskbar located on the lower-right side of the computer
1.
screen (Safely Remove Hardware).
Select “USB Mass Storage Device” from the list that appears and then click on “Stop”.
2.
Select “USB Mass Storage Device” from the list that appears and then click on “OK”.
3.
- 12 -
Page 13

CONNECT TO A COMPUTER
Disconnect the USB cable from the player and your computer.
4.
Macintosh OS X
On the left side of the Finder window, identify the appropriate Removable Disk icon.
1.
Click on the “Eject” arrow on the right of the Removable Disk icon.
2.
Disconnect the USB cable from the player and your computer.
3.
Transferring Files
The USB connection makes it easy to transfer music les (MP3/WMA) or any other data quickly
between the player and your computer.
Operate the player on AC power to ensure uninterrupted transmission of les.
•
Do not disconnect or otherwise interrupt the player during transmission - this could damage
•
or corrupt the player’s rmware. If the player is accidentally disconnected and is not working
properly, unplug the player and remove the batteries for 3 seconds and then try again.
Microsoft Windows
Open a Windows Explorer window. Locate the les or folders you would like to transfer from
1.
your computer. Select the les/folders with the mouse and press CTRL-C (copy) on the
keyboard.
Navigate to MY COMPUTER and double-click on the Removable Disk icon. The computer
2.
will display all les and folders currently stored in the player.
Press CTRL-V (paste) on the keyboard to transfer the les you selected in Step 1 to the
3.
player.
Macintosh OS X
Open a Finder window. Locate the les you would like to transfer from your computer. Se-
1.
lect the les/folders with the mouse and press APPLE-C (copy) on the keyboard.
Click on the Removable Disk icon located on the left side of the nder window. The com-
2.
puter will display all les and folders currently stored in the player.
Press APPLE-V (paste) on the keyboard to transfer the les you selected in Step 1 to the
3.
player.
Note:
You may also use the mouse to drag-and-drop les between the player and your computer.
If you need fur ther assistance with transferring les, please refer to your operating system’s
instruction manual or on-screen help.
- 13 -
Page 14

BASIC OPERATIONS
Standby Mode
The player will enter Standby mode automatically when it is connected to a power source.
The LCD will display the time (Clock) in Standby mode.
Power On/Off
To turn the player on, press while in Standby mode.
•
To turn the player off, press and hold .
•
Note:
To display the time while the player is on, press and hold TIME/ALARM. The LCD will return to a
normal display after a few seconds.
Menu Navigation
To access the Main menu, press MENU while the player is on.
Press / / / to move the selection left/right/up/down, respectively.
•
Press to conrm a selection.
•
Press MENU to cancel or return to the previous menu.
•
- 14 -
Page 15

MAIN MENU OVERVIEW
MENU
NAV
MSC
FM
AUX
SET
SYS
Use the Main menu to select and enter the different player modes shown below. To access the
Main menu, press MENU while the player is on.
NAVIGATION
Music, Voice, Play List (M3U), SD/MMC Card
MUSIC
FM Radio
AUXILIARY (External Audio Input)
SET (TIME SET)
Clock Set, Alarm Set
SYSTEM:
EQ, Repeat Mode, Display, Auto Off, Sleep Time, Recording,
Resume, Delete File, Format, Reset, Information, Alarm Mode
- 15 -
Page 16

NAVIGATION MODE (NAV)
Enter Navigation mode to browse the les and folders stored in the player or SD/MMC card. To enter
NAV mode, select and conrm NAV in the Main menu.
The NAV options are:
Music
•
Voice
•
Play List (M3U)
•
SD/MMC Card
•
Navigation Controls
Press / to move up/down the list of les/folders, respectively.
•
Press to conrm a selection.
•
If a folder is selected, the contents of that folder will be displayed. Press to return to
•
the previous folder.
If an audio le is selected, the player will switch to MSC mode and playback of the le
•
will commence.
Music
Select and conrm MUSIC to nd audio les (eg, MP3, WMA) in the “Root” folder of the player.
Voice
Select and conrm VOICE to nd recorded audio les in the “Record” folder of the player. The
player will place all recorded les in this folder. (See the Recording section for details about how
to record with the player.)
Play List (M3U)
Select and conrm PLAY LIST to nd playlist (M3U) les stored in the “Playlist” folder of the
player.
SD/MMC Card
If you have installed an optional SD/MMC card, you may select and conrm SD/MMC CARD to
nd any les or folders stored on the card. (See the SD/MMC Card Installation section for details
about how to install SD/MMC cards.)
- 16 -
Page 17

MUSIC MODE (MSC)
Enter Music mode to start music playback. To enter MSC mode, select and conrm MSC in the Main
menu. (Playing an audio le in NAV mode will place the player in MSC mode as well.)
Music Controls
Press to play a track. Press again to pause playback. Press or while playback is
•
paused to stop playback completely.
Press to skip to the next track; press and hold to fast forward through the current track.
•
Press to skip to the previous track; press and hold to reverse through the current track.
•
Press / to adjust the volume level up/down, respectively.
•
Press REC/EQ to cycle through the digital equalizer settings (Normal, Classical, Live, Pop,
•
or Rock).
Repeat Play
Repeat Play options can be changed in the SYSTEM menu. The Repeat Play options are Normal,
One, All, Intro, and Random. (See the SYSTEM MODE (SYS) section for details.)
Repeat A-B Function
The Repeat A-B function allows you to set a segment of a track to be played repeatedly.
Press A- B to set the star t point (A) of the track segment to be repeated. The Play Mode
1.
Indicator will display .
Press A- B again to set the end point (B) of the track segment. The segment will now play in
2.
a loop and the Play Mode Indicator will display .
Press A- B again to resume normal playback.
3.
- 17 -
Page 18

FM RADIO MODE (FM)
Enter FM Radio mode to listen to FM radio broadcasts. To enter FM mode, select and conrm FM
in the Main menu.
There are two methods of tuning into stations: MANUAL and PRESET. When the player is in
PRESET mode, the current preset station number will be displayed in the upper-left corner of the
screen. Press to change between these two modes.
Manual Tuning
Place the player in MANUAL tuning mode, then:
Press to increase the station frequency; press and hold to seek the next highest station
•
with a broadcast signal.
Press to decrease the station frequency; press and hold to seek the next lowest station
•
with a broadcast signal.
Preset Tuning
Place the player in PRESET tuning mode, then:
Press / to select the next/previous preset station.
•
Store Preset Stations
Your player can store up to 20 station presets (01 to 20).
Store Presets Manually
Place the player in MANUAL tuning mode, then:
Tune to the station you want to store as a preset (eg, 91.5).
1.
Press A- B. The Preset Station indicator on the screen will start blinking.
2.
Press / to select the desired Preset number (eg, 01).
3.
Press to conrm and store the station (eg, Preset 01 is now set to the station 91.5).
4.
Store Presets Automatically
With the player in either PRESET or MANUAL tuning mode:
Press and hold MENU. The player will automatically seek and store the rst 20 frequencies
•
with a broadcast signal. This will overwrite previously stored preset stations.
Delete a Preset Station
Place the player is in PRESET tuning mode, then:
Press / to select the preset station to delete.
1.
Press A- B to delete the preset station.
2.
- 18 -
Page 19

AUXILIARY MODE (AUX)
To AUX LINE-IN
External Audio Source
To 3.5mm Line Out/
Headphone
Enter Auxiliary mode to record or play an external device through the player’s speakers. You may
wish to connect the player to devices such as iPods® (or other MP3 players), portable media players
(PMPs), portable video game consoles, portable DVD players, or any other device with audio. To enter
AUX mode, select and conrm AUX in the Main menu.
Connect an External Audio Source
To connect an external audio source to the player:
Open the Connections panel located on the rear of the player.
1.
Slide the cover open in the direction of the arrow.
Connect the player to the external device.
2.
Locate the 3.5mm Stereo Line Out or Headphone Jack of the external device and connect
one end of the supplied audio cable to this jack. Connect the other end of the audio cable to
the Auxiliary Line-In jack located on the Connections panel.
Place the player in AUX mode.
3.
Select and conrm AUX in the Main menu.
Press play on the external device.
4.
Note:
iPod is a registered trademark of Apple Computer, Inc., registered in the United States and other
countries. All rights reserved.
- 19 -
Page 20

RECORDING
The player can record from 3 types of sources: Microphone, Line-In, or FM Radio. (See the System Mode (SYS) section for details about changing the player’s recording options.)
Voice Recording
Make voice recordings through the integrated microphone located on the front face of the player.
Set the REC Input to “MIC” (see the System Mode (SYS) section for details).
1.
Place the player in MSC mode.
2.
Make sure that playback is stopped completely.
3.
Press to pause playback, and then press or to stop playback completely.
•
Press REC to start recording through the microphone.
4.
Press to pause recording; press again to resume recording.
•
If the VAD option is set to “On”, the player will automatically pause recording when no
•
signal is detected through the microphone.
Press REC to stop and save the recording.
5.
The resulting le will be saved to the “Record” folder
•
The le will be named MICXXX.MP3 where where XXX corresponds to the numerical
•
sequence in which the recording was made (numbering starts from 001.)
Line- In Recording
Make recordings from an external device through the Auxiliary Line-In jack located on the rear
Connections panel of the player.
Set the REC Input to “LINE-IN” (see the System Mode (SYS) section for details).
1.
Place the player in AUX mode.
2.
Connect the external device to the Line-In jack (see the AUXILIARY MODE (AUX) section
3.
for details).
Press REC to start recording through the Line-In jack.
4.
Press to pause recording; press again to resume recording.
•
If the VAD option is set to “On”, the player will automatically pause recording when no
•
signal is detected through the Line-In jack.
Press REC to stop and save the recording.
4.
The resulting le will be saved to the “Record” folder
•
The le will be named LINEXXX.MP3 where where XXX corresponds to the numerical
•
sequence in which the recording was made (numbering starts from 001.)
- 20 -
Page 21

RECORDING
FM Recording
Make recordings from the FM Radio.
Place the player in FM Radio mode.
1.
Press REC to start recording the FM broadcast.
2.
Press to pause recording; press again to resume recording.
•
Press REC to stop and save the recording.
4.
The resulting le will be saved to the “Record” folder
•
The le will be named FMXXX.MP3 where X XX corresponds to the numerical se-
•
quence in which the recording was made (numbering starts from 001.)
- 21 -
Page 22

ALARM CLOCK
The player can be set to turn on and play at a predened time. (See the System Mode (SYS)
section for details about changing the player’s Alarm Clock options.)
To turn the alarm clock on, press TIME/ALARM while the player is on. The “Alarm On” indica-
•
tor will appear on the screen.
Make sure the correct time has been set (see the Time Set Mode (Set)
•
section for details).
Make sure the “Alarm On” time has been set (see the Time Set Mode
•
(Set) section for details).
Make sure to set the “Alarm Mode” (see the System Mode (Sys) section
•
for details).
Place the player in Standby mode.
•
If you are using an alarm mode other than “Buzz”, make sure to set the desired volume
•
before placing the player in Standby mode.
When the alarm turns on, you may:
•
Press SNOOZE to delay the alarm for 9 minutes.
•
Press TIME/ALARM to turn the alarm off.
•
- 22 -
Page 23

TIME SET MODE (SET)
Enter Time Set mode to set the internal Clock and Alarm time. To enter SET mode, select and conrm SET in the Main menu.
The Time Set options are: Clock Set and Alarm Set.
Clock Set
Adjust the clock to the correct time.
Enter SET mode from the Main menu and then select and conrm CLOCK SET.
1.
Press / to select which eld to adjust (AM/PM, Hour, Minute).
2.
Press / to adjust the selected (blinking) eld.
3.
Press to conrm the changes (or press MENU to cancel the changes).
4.
Alarm Set
Adjust the alarm clock time. Make sure that the clock has been set properly before using the alarm
clock function.
Enter SET mode from the Main menu and then select and conrm ALARM SET.
1.
Press / to select which eld to adjust (AM/PM, Hour, Minute).
2.
Press / to adjust the selected (blinking) eld.
3.
Press to conrm the changes (or press MENU to cancel the changes).
4.
- 23 -
Page 24

SYSTEM MODE (SYS)
Enter System mode to set the system options of the player. To enter SYS mode, select and conrm
SYS in the Main menu.
The SYS options are: EQ, Repeat Mode, Display, Auto Off, Sleep Time, Recording, Resume,
Delete File, Format, Reset, Information, and Alarm Mode.
EQ (Equalizer)
Adjust the EQ settings to optimize the way the player processes audio signals. The EQ options
are: Normal, Classic, Live, Pop, and Rock.
Enter SYS mode from the Main menu and then select and conrm EQ.
1.
Press / to select an EQ option.
2.
Press to conrm the change (or press MENU to cancel the changes).
3.
Repeat Mode
Adjust the Repeat Mode settings to change the order in which tracks are played (Repeat Play
Mode). The Repeat Mode options are: Normal, One, All, Intro, and Random.
Enter SYS mode from the Main menu and then select and conrm EQ.
1.
Press / to select a REPEAT MODE option.
2.
Press to conrm the change (or press MENU to cancel the changes).
3.
Normal: Play tracks once in sequential order.
One: Play the current track repeatedly.
All: Play all tracks repeatedly.
Intro: Play the rst 10 seconds of each track.
Random: Play tracks in random order.
Display
Adjust the Display settings to change how and what is displayed on the screen. The Display options are: ID3 Tag, Lyric, Contrast, B-Light Time (Backlight), and Language.
ID3 Tag
Turn ID3 Tag display on or off. ID3 tags are data associated with MP3/WMA les which can be
edited within most operating systems or MP3 player applications. When this option is set to “on”,
the player will display Song Titles, Artist Names, and Album Names, if available.
Enter SYS mode from the Main menu, select and conrm DISPLAY, and then select and
1.
conrm ID3 TAG.
Press / to select an ID3 Tag option.
2.
Press to conrm the change (or press MENU to cancel the changes).
3.
- 24 -
Page 25

SYSTEM MODE (SYS)
Lyric
Turn LYRIC display on or off. Lyric display requires a “.LRC” lyric le which may be found on the
internet or may be created with a Lyric le editor. Lyric les can contain synchronized timing information as well as lyric information.
Lyric les must have the same name as its corresponding music le (eg, “SongTitle1.lrc” and
“SongTitle1.mp3”) and must be placed in the same directory.
Enter SYS mode from the Main menu, select and conrm DISPLAY, and then select and
1.
conrm LYRIC.
Press / to select a LYRIC option.
2.
Press to conrm the change (or press MENU to cancel the changes).
3.
Contrast
Adjust the contrast of the display. The contrast setting ranges from 00 to 15 (00 = lowest contrast;
15 = highest contrast).
Enter SYS mode from the Main menu, select and conrm DISPLAY, and then select and
1.
conrm CONTRAST.
Press / to adjust the contrast.
2.
Press to conrm the change (or press MENU to cancel the changes).
3.
B-Light Time (Backlight)
Adjust the amount of time the backlight remains on after a button is pressed. The backlight setting
options are (in seconds): Off, 5, 10, 30, 60, or On. A setting of Off turns the backlight off completely; a setting of On will keep the backlight on continuously.
Enter SYS mode from the Main menu, select and conrm DISPLAY, and then select and
1.
conrm BACKLIGHT.
Press / to select a BACKLIGHT option.
2.
Press to conrm the change (or press MENU to cancel the changes).
3.
Language
Adjust the language that the menu is displayed in. The language options are: Chinese-s (simplied), Chinese-t (traditional), French, English, Korean, Japanese, Spanish, Dutch, German, Italian,
or Russian.
Enter SYS mode from the Main menu, select and conrm DISPLAY, and then select and
1.
conrm LANGUAGE.
Press / to select a L ANGUAGE option.
2.
Press to conrm the change (or press MENU to cancel the changes).
3.
- 25 -
Page 26

SYSTEM MODE (SYS)
Auto Off
Adjust the amount of time the player remains on after a button is pressed; the player will then enter
Standby mode to conserve power. The Auto Off options are: 30 sec, 1 min, 2 min, or 3 min.
Enter SYS mode from the Main menu and then select and conrm AUTO OFF.
1.
Press / to select an AUTO OFF option.
2.
Press to conrm the change (or press MENU to cancel the changes).
3.
Sleep Time
Set the amount of time the player will play music for before turning off automatically. This function
may be used to go to sleep while playing music. The Sleep Time options are (in minutes): Off, 10,
30, 60, and 90.
While music is playing, enter SYS mode from the Main menu and then select and conrm
1.
SLEEP TIME.
Press / to select a SLEEP TIME option.
2.
Press to conrm the change (or press MENU to cancel the changes).
3.
Recording
Adjust the Recording options. The Recording options are: REC Mode, VAD, and REC Input.
REC Mode (Recording Mode)
Adjust the quality that the player records in. The REC Mode options are: Low, Middle, and High.
Low-quality recordings will take up less memory than High-quality recordings.
Enter SYS mode from the Main menu, select and conrm RECORDING, and then select
1.
and conrm REC MODE.
Press / to select a REC MODE option.
2.
Press to conrm the change (or press MENU to cancel the changes).
3.
VAD (Voice Activated Detection)
Turn VAD on or off. When VAD is turned on, the player will record automatically when an audio
signal is detected; recording will be paused automatically when no audio signal is detected.
Enter SYS mode from the Main menu, select and conrm RECORDING, and then select
1.
and conrm VAD.
Press / to select a VAD option.
2.
Press to conrm the change (or press MENU to cancel the changes).
3.
- 26 -
Page 27

SYSTEM MODE (SYS)
REC Input (Recording Input)
Adjust the recording input source. The REC Input options are: MIC and Line. Select MIC to record
from the integrated microphone; select LINE to record from an external device connected to the
AUX LINE-IN jack (see the AUXILIARY MODE (AUX) section for details about connecting external
devices to the player.)
Enter SYS mode from the Main menu, select and conrm RECORDING, and then select
1.
and conrm REC INPUT.
Press / to select a REC INPUT option.
2.
Press to conrm the change (or press MENU to cancel the changes).
3.
Resume
Adjust how the player resumes playing tracks af ter it has been turned off. The Resume options
are: Track/Time Line.
Track/Time Line
Turn Track/Time Line Resume on or off. When Track is set to “On”, the player will remember the
last track played before it is turned off. When Time Line is set to “On”, the player will remember the
exact time-point of the last track played before it is turned of f.
While music is playing, enter SYS mode from the Main menu and then select and conrm
1.
RESUME.
Press / to select a Track option and then press to conrm. The selection will move to
2.
the Time Line option.
Press / to select a Time Line option and then press to conrm the changes (or press
3.
MENU to cancel the changes).
Delete File
Delete Music or Voice les from the player.
Enter SYS mode from the Main menu and then select and conrm DELETE FILE .
1.
Select and conrm MUSIC to delete music les or select and conrm VOICE to delete
2.
recordings contained in the “Record” folder.
The player will display les one by one (If VOICE was selected, the player will only display
3.
les in the “Record” folder. Press / to select “Yes” or “No” and then press to conrm.
If “Yes” was selected in Step 3, the player will delete the le and then display the next le in
4.
the folder. If “No” was selected, the player will simply display the next le.
Repeat Step 3 until you have nished deleting les and then press MENU to exit.
5.
- 27 -
Page 28

SYSTEM MODE (SYS)
Format
Prepare a disk (internal memory or an installed SD/MMC card) for use with the player when
necessary. Always use the Format function of the player when it is necessary to format a disk.
Formatting destroys all data on a disk so make sure to back up your data before formatting the disk.
Enter SYS mode from the Main menu and then select and conrm FORMAT.
1.
Select and conrm INTERNAL M. to format the internal memory disk or select and conrm
2.
SD/MMC CARD to format the (optional) SD/MMC card.
Press / to select “Yes” or “No” and then press to conrm.
3.
Note:
It is recommended that the player be operated on AC power when formatting a disk to ensure
that the formatting process is completed without interruption.
Do not format disks for the player with your computer’s operating system command.
Formatting will erase all the data on the disk so make sure to make copies of any data
you do not want to lose.
Reset
Resets all of the player’s options to their factory-default setting.
Enter SYS mode from the Main menu and then select and conrm RESET.
1.
Press / to select “Yes” or “No” and then press to conrm.
2.
Information
Displays information about the player.
Enter SYS mode from the Main menu and then select and conrm INFORMATION.
1.
Select and conrm F/W VERSION to display the rmware version;
2.
Select and conrm INTERNAL M. to display the memory usage of the internal memory disk;
Select and conrm SD/MMC CARD to display the memory usage of the SD/MMC card.
Press MENU to exit.
3.
Alarm Mode
Set the player mode used for the Alarm Clock. The Alarm Mode options are: Music, FM, Buzz, or
Record.
Enter SYS mode from the Main menu and then select and conrm ALARM MODE.
1.
Press / to select an ALARM MODE option.
2.
Press to conrm the change (or press MENU to cancel the changes).
3.
Note:
The “Record” option will play les in the “ Record” folder when the alarm turns on.
- 28 -
Page 29

TROUBLESHOOTING
If you have a problem with this player, please read the troubleshooting guide below and check
our website at www.cobyusa.com for Frequently Asked Questions (FAQs) and rmware updates.
If these resources do not resolve the problem, please contact Technical Support.
COBY Electronics Technical Support
Hours: Monday to Friday, 8:00 AM –11:00 PM EST
Email: techsuppor t@cobyusa.com
Phone: 800-681-2629 or 800-727-3592 or 718-416-3197
Web: www.cobyusa.com
The player does not turn on.
•
I cannot transfer les to the player.
•
•
•
•
•
Saturday and Sunday, 9:00 AM–5:30 PM EST
Ensure that the batteries are inserted correctly and are not dead, or that the player is operat-
ing on AC power.
Ensure that your computer is running a supported operating system.
If you are running Microsoft Windows 98 SE, ensure that the USB driver has been properly
installed.
Ensure that the supplied USB cable is securely attached to the player and the PC, or try using
another USB cable.
If you have connected the player through a USB hub, tr y connecting the player directly to
your computer.
Ensure that the player’s memory capacity is not full.
The buttons do not work.
Ensure that the batteries are inserted correctly and are not dead, or that the player is operat-
•
ing on AC power.
The sound quality of the music is poor.
Try playing the le on your computer. If the sound quality is still poor, try downloading the le
•
again or re-encoding the le yourself.
Ensure that the bit rate of the le is not too low. The higher the bit rate of the le, the better it
•
will sound. For MP3s, the mimimum recommended bitrate is 128kbps; for WMAs, the minimum recommended bitrate is 96kbps.
There is something wrong with the LCD diplay.
Ensure that the batteries are inserted correctly and are not dead, or that the player is operat-
•
ing on AC power.
- 29 -
Page 30

SPECIFICATIONS
Power Supply AC: 100-240V Automatic Power Switching
Internal Memory 512MB Flash
Expanded Memory Port (optional) SD/MMC Card Slot
Interface Port USB 1.1
Display Type Dot Matrix LCD
Display Resolution 128 x 64
Processor 65MIPS DSP
Supported Audio Formats MP3: 96 -320kbps, Variable Bit Rate
Recording Format IMA-ADPCM encoding
DRM Support Microsoft DRM 9 with Windows XP
FM Frequency Range 87.5 - 108.0 MHz
Audio Input 3.5mm Stereo
Audio Output 3.5mm Stereo
Signal-to-Noise Ratio ≥ 90dB
Frequency Response 20 -20,000Hz
Unit Dimensions 11.0” x 3.3” x 3.3” (WHD)
DC: 6V (4 x “C” Batteries)
WMA: 32-192kbps
SP1 and Windows Media Player
- 30 -
Page 31

- 31 -
Page 32

 Loading...