

Page 1
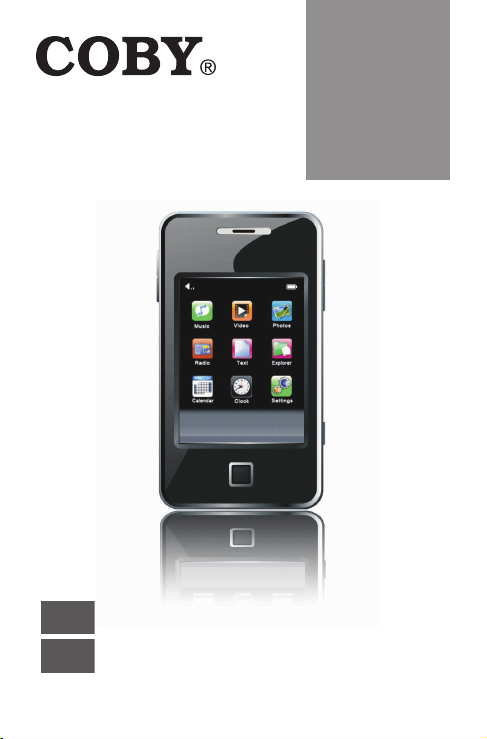
2.8” High-Resolution
MP3 & Video Player with
Touchscreen Controls
Instru ction Manu al ...................................................... Pa ge 2
EN
MP822-4G
MP822-8G
MP822-16G
Manual d e la instrucc ión .............................................Page 56
ES
Please re ad carefully b efore use • Léa el ma nual antes de usar
Page 2

Table of Contents
TABLE OF CONTENTS .......................................................2
English
PACKAGE CONTENTS .....................................................5
UNIT OVERVIEW ..............................................................6
Using the Touchscreen Controls ...................................8
Disabling the Controls (Hold) .......................................8
GETTING STARTED .........................................................10
Charging the Battery ................................................... 10
Charging with a Computer ................................10
Turning Your Player On/Off ................................. 11
Resetting the Player ............................................. 11
Installing a miniSD Memory Card (optional) ... 11
MAIN MENU ..................................................................13
Main Menu Controls ............................................ 13
MUSIC MODE ................................................................14
Music Browser Controls ........................................ 14
Now Playing Controls (Music Playback) ........... 15
Quick Option Menu ............................................. 16
VIDEO MODE................................................................. 19
Video Browser Controls .......................................19
Video Playback Controls ....................................20
PHOTO MODE ................................................................22
Photo Browser Controls ........................................22
Photo Viewer Controls .........................................23
Quick Option Menu .............................................23
Page 2 Coby Electronics Co rpo rati on
Page 3

Table of Contents
RADIO MODE ................................................................25
Radio Tuning Controls ..........................................25
Quick Option Menu .............................................26
TEXT MODE ....................................................................28
Text Browser Controls ...........................................28
Text Reader Controls ............................................29
Quick Option Menu .............................................29
FILES MODE ................................................................... 31
Explorer Controls ..................................................31
Quick Option Menu .............................................32
CALENDAR MODE .........................................................34
CLOCK MODE ...............................................................35
Setting Controls ....................................................35
SETTING MODE .............................................................. 36
Setting Options .............................................................36
Language Select ..................................................36
Memory Information ............................................36
Version ...................................................................37
Factor y Setup........................................................ 37
Personal Setup ...................................................... 37
Time Setup .............................................................37
Calibrate ...............................................................38
TRANSFERRING FILES TO THE PLAYER ..........................39
Connecting to a Computer........................................39
Transferring Files ............................................................ 40
Microsoft Windows ...............................................40
Macintosh OS X .....................................................40
www.cobyusa.com Page 3
English
Page 4

Table of Contents
Disconnecting from a Computer .............................. 41
English
Microsoft Windows ............................................... 41
Macintosh OS X ..................................................... 41
Coby Media Manager ................................................42
Microsoft Windows Installation .......................... 42
Macintosh OS X Installation ................................43
VIDEO CONVERSION ...................................................44
FIRMWARE UPGRADES ..................................................45
SAFETY NOTICES ...........................................................46
TROUBLESHOOTING ......................................................51
FEATURES .......................................................................54
SPECIFICATIONS ...........................................................55
Page 4 Coby Electronics Co rpo rati on
Page 5
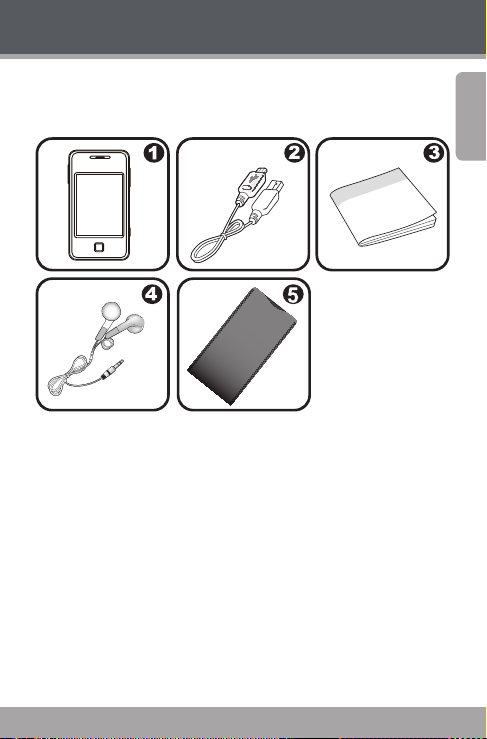
Package Contents
Congratulations on your purchase of a Coby MP822
Video MP3 Player. This package contains the following
items:
COBY Player
USB Cable
Instruction Manual
Professional Stereo Earphones
Protective Pouch
Should one of the above items be missing, please contact the retailer from whom you purchased this product.
English
www.cobyusa.com Page 5
Page 6
Unit Overview
English
4
5
1
2 3
7
12
13
8
14
6
9
10
11
Page 6 Coby Electronics Co rpo rati on
Page 7

Unit Overview
Top View
1. Neckstrap Insert
2. USB Port
Connect to a computer to transfer media les to the
player.
3. 3.5mm Headphone Jack
Left View
4. Menu Navigation: Up
5. Menu Navigation: Down
6. Stylus
Front View
7. Speaker
8. LCD Touchscreen
Tap the display with your nger to activate the on-
screen control.
9. OK Button
Bottom View
10. Reset Button
11. miniSD Card Slot
Load a miniSD memory card here to upgrade the
memory capacity of the player.
English
www.cobyusa.com Page 7
Page 8

Unit Overview
Right View
English
12. Power Button
Press and hold to power the player on/off.
13. Volume Button
14. Menu/Hold Button
Press and hold to disable the player controls. Press
again to re-enable.
Using the Touchscreen Controls
Your video MP3 player comes equipped with an easy-touse touchscreen which allows access to the player’s func-
tions. Use your nger tip or the stylus to tap the area of the
screen where a control icon is displayed. If you tap and
hold an icon, it will register as a continuous button press.
To avoid damaging the screen, do not touch it with
excessive force or with any object other than your
nger or the stylus. For best response, make sure
your hands are clean before using the touchscreen controls.
Disabling the Controls (Hold)
When the Hold button is engaged, the player’s controls
are disabled.
To disable the controls, press and hold the <MENU>
button.
To enable the controls, press and hold the <MENU>
button again.
Page 8 Coby Electronics Co rpo rati on
Page 9

Unit Overview
You may want to disable the controls to avoid
turning on the player or activating the controls accidentally when it is in your pocket or bag.
Re-enable the controls to continue.
English
www.cobyusa.com Page 9
Page 10

Getting Started
Charging the Battery
English
Your player has an
integrated rechargeable
battery. Upon initial use,
the battery should be
charged fully to ensure
optimal performance and
battery life. If the player
has not been used for a
long period of time, the
battery may need to be
recharged. Upon initial
use, the battery should be
charged fully (8 hours) to
ensure optimal performance and battery life.
The bat tery used in this device may present a re
or chemical burn if mistreated. Do not disassemble, incinerate, or heat the battery. Do not leave
the battery in a place subject to direct sunlight, or
in a car with its windows closed. Do not connect
the player to a power source other than that which
is indicated here or on the label as this may result
in the risk of re or electric shock.
Charging with a Computer
Your player can be charged through a USB computer
connection. Use the supplied USB cable to connect the
player to your computer’s USB port. The computer must
be powered on and not in sleep mode. When the player is
Page 10 Coby Electronics Co rpo rati on
USB Port
USB Port
Page 11

Getting Started
connected and charging, a USB symbol will be displayed
on the player’s screen.
When connected to a USB hub, the hub must be
self-powered to charge the player’s battery.
Turning Your Player On/Off
To turn the player on, press and hold the <POWER>
button until the screen turns on.
To turn the player off, press and hold the <POWER>
button until the screen turns off.
Resetting the Player
If your player freezes and fails to respond, or in the event
of a malfunction, you will need to perform the reset function. To reset:
1. Disconnect your player if it is connected to a
computer.
2. Use a paper clip to gently press the Reset button
located on the bottom of the player.
Installing a miniSD Memory Card (optional)
You can upgrade the memory capacity of your player by
adding miniSD memory card.
Insert miniSD card into the slot as shown in the illustration below.
www.cobyusa.com Page 11
English
Page 12

Getting Started
English
This player supports memory cards up to 2GB in
size.
Page 12 Coby Electronics Co rpo rati on
Page 13
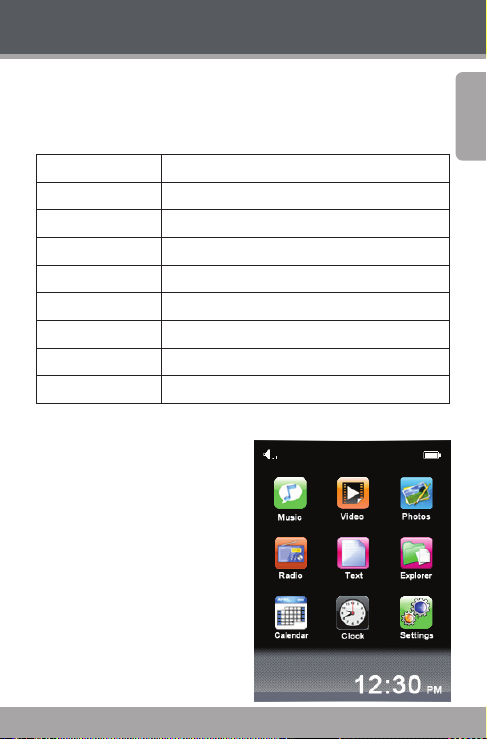
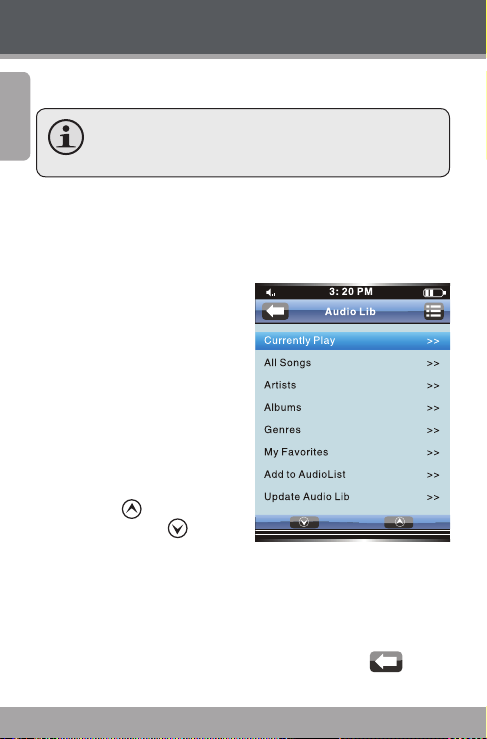
Main Menu
When you turn on the player, you will see the Main menu.
From the Main menu, you can access each of your MP3
player’s function modes. These modes are:
Music Browse and play music
Photos Browse and view pictures
Video Browse and play movies
Radio Listen to FM radio broadcasts
Text Browse and read text les
Files Browse all les
Calendar Launch the calendar program
Clock Set the internal clock display
Settings Adjust the player’s options
Main Menu Controls
Each function mode is represented by an icon on the
Main Menu screen. To enter
a mode, tap the icon with
your nger. You may also use
the player’s standard controls
to access each mode: Press
the <UP> or <DOWN> button
to move the selection, then
press <OK> to conrm.
English
www.cobyusa.com Page 13
Page 14
Music Mode
Browse for and play your music les.
English
For information about loading music onto your
player, please refer to the section “Transferring
Files to the Player”.
Music Browser Controls
When you choose MUSIC mode from the Main menu,
you will see the Music Browser screen.
You may browse
through a list using
any of the following
methods:
Press the <UP> or
<DOWN> button
on the unit.
Tap directly on an
item within the list.
Tap the Arrow Up
<
> or Arrow
Down < > icons
at the bottom of the
screen.
To conrm a selection, press <OK> or tap the
desired selection on the LCD screen.
To return to the previous screen, press the
<POWER> button or tap the Back Icon <
the top lefthand corner of the display screen.
Page 14 Coby Electronics Co rpo rati on
> in
Page 15
Music Mode
If your music les contain ID3 song information tags,
you will be able to view your music les by Ar tist, Album,
Track (song title) or Genre.
To view all les (including those that do not contain ID3
information), select “All Songs” or use the Folder Explorer
option.
If music is already playing, you will have the additional
option to return to the Now Playing screen.
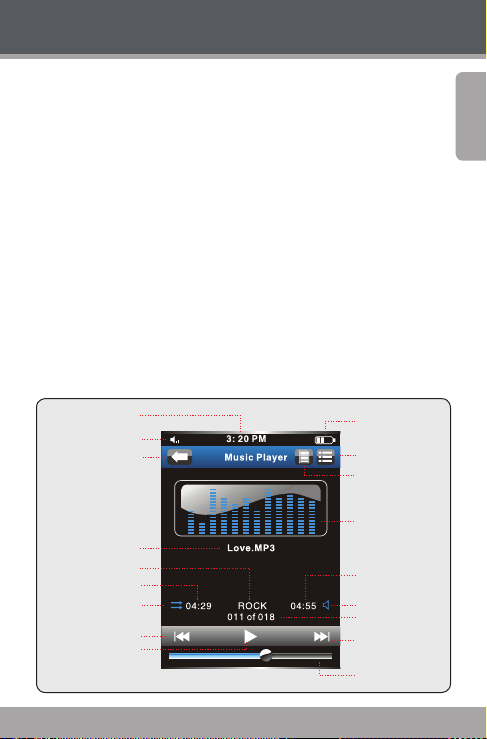
Now Playing Controls (Music Playback)
To start playing music, browse for your desired MP3 le
and tap the song title to start playback.
When a song is playing, the Now Playing screen appears:
English
Time Display
Volume Level Indicator
Back Icon
File Name
Equalizer Icon
Elapsed Time
Play Mode
Previous Icon
Play/Pause Icon
www.cobyusa.com Page 15
Battery Level
File Browser Icon
Quick Option Icon
Equalizer Frequency
Bands
Total Time
Volume Icon
Current track/
Total Tracks
Next Icon
Progress Bar
Page 16
Music Mode
Use the following controls during music playback.
English
Function Key Action
To pause/resume playback
To play the next track Tap
To forward-scan through the track Hold
To play the previous track Tap
To reverse-scan through the track Hold
To adjust the volume level
To access the Quick Option menu
(see section below for details)
To return to the Music Explorer screen
To return to the previous screen
Quick Option Menu
The Quick Option menu gives you easy access to your
player’s option settings.
Tap <
music playback.
To browse through the settings, press the <UP> or
<DOWN> button or tap <
To select a setting, press the <OK> button or tap the
desired selection on screen.
> to access the Quick Option menu during
Press <OK> or tap the
Play/Pause Icon on screen
on screen
on screen
on screen
on screen
Press <VOL>, then press the
<UP> or <DOWN> button.
Tap
on screen
Tap
on screen
Tap
on screen
> or < > on screen.
Page 16 Coby Electronics Co rpo rati on
Page 17
Music Mode
To return to the previous screen, tap < > on
screen.
Repeat Mode
Change the repeat options to adjust the order in which
tracks are played.
Item Description
Normal Play tracks in normal order
Single Play the current track repeatedly
Random Play tracks in random order
All Play all tracks repeatedly
You may also toggle between settings by tapping the
onscreen Play Mode icon.
Sound Effect (Equalizer)
Select a digital equalizer preset to optimize the way
the player processes audio signals. The options are:
NORMAL, CLASSIC, ROCK, POP, or JAZZ.
You may also toggle bet ween settings by tapping
the Equalizer icon.
English
Pre-Listen
Use this option to play only the rst section of each track.
www.cobyusa.com Page 17
Page 18

Music Mode
The settings are: Close (no section selected), 5 seconds,
English
10 seconds, 15 seconds, and 20 seconds.
Set Play Speed
Adjust the playback tempo(0.5/slowest 1.0/normal
speed 1.5/fastest).
Page 18 Coby Electronics Co rpo rati on
Page 19
Video Mode
Browse for and play your video les.
Your player suppor ts AVI les encoded with XviD
at 320 x 240 and 30 fps. Videos may need to be
encoded with the included software for device
playback.
For more information about converting video,
please refer to the section “Video Conversion”.
For more information about how to get mov-
ies onto your player, please refer to the section
“Transferring Files to the Player”.
Video Browser Controls
When you choose VIDEO mode from the Main menu,
you will see the Video Browser screen. Use the Video
Browser to nd all folders and video les loaded on your
player.
You may browse through a list using any of the
following methods:
Press the <UP> or <DOWN> button on the
unit.
Tap directly on an item within the list.
Tap the Arrow Up <
icons at the bottom of the screen.
To conrm a selection, press <OK> or tap the
desired selection on the LCD screen.
> or Arrow Down < >
English
www.cobyusa.com Page 19
Page 20
Video Mode
To return to the previous screen, press the
English
<POWER> button or tap the Back Icon <
the top lefthand corner of the display screen.
Video Playback Controls
When a video is playing, hold the player horizontally, the
Now Playing screen appears:
Video Playing Window
> in
Elapsed Time
00: 01:30 00 :10:0 0
Total Time
Use the following controls during video playback.
Function Key Action
/ , or press
To pause/resume playback
To play the next video
Tap
the <OK> button
Tap
on LCD, or
press the <DOWN>
button
Page 20 Coby Electronics Co rpo rati on
Page 21
Video Mode
Function Key Action
Hold
To forward-scan through the video
To play the previous video
To reverse-scan through the video
To adjust the volume level
To rotate the video playing window
To return to the Video Explorer screen
To view the controls when the video is playing, tap the screen
once.
on LCD, or
hold the <DOWN>
button
Tap
on LCD, or
press the <UP> button
Hold
on LCD, or
hold the <UP> button
Tap
on LCD or press
the <VOL> button, then
press the <UP> or
<DOWN> button.
Tap on LCD
on LCD
Tap
English
www.cobyusa.com Page 21
Page 22
Photo Mode
Browse for and view your photo les.
English
For more information about how to get photo
les onto your player, please refer to the section
“Transferring Files to the Player”.
Photo Browser Controls
When you choose PHOTO mode from the Main menu,
the Photo Browser screen will appear.
Use the Photo Browser to
nd folders and photo les
loaded on your player.
You may browse
through a list using
any of the following
methods:
Press the <UP> or
<DOWN> button
on the unit.
Tap directly on an
item within the list.
Tap the Arrow Up <
icons at the bottom of the screen.
To conrm a selection, press <OK> or tap the
desired selection on the LCD screen.
To return to the previous screen, press the
<POWER> button or tap the Back Icon <
the top lefthand corner of the display screen.
Page 22 Coby Electronics Co rpo rati on
Cur rent D irect ory:C :/IMA GE/
Upw ard Di recto ry
1.b mp
BMP
2.b mp
BMP
3.b mp
BMP
4.j pg
JPG
5.j pg
JPG
6.j pg
JPG
7.j pg
JPG
> or Arrow Down < >
> in
Page 23

Photo Mode
Photo Viewer Controls
To view a photo, browse through the photo list and then
tap the lename to conrm.
The following functions may be performed from the Photo
Viewer screen.
Function Key Action
To view the previous or next
picture
To rotate a photo
To access the Quick Option menu
(see the section below for more
information)
To return to the Photo Explorer
To view the controls when the photo is displayed,
tap the screen once.
Quick Option Menu
The Quick Option menu gives you easy access to your
player’s option settings.
or , or you can press
Tap
the <UP> or <DOWN> button.
Tap <OK>, or press the <OK>
button.
Tap
, or press the
<MENU> button.
Tap
, or press the
<POWER> button
English
www.cobyusa.com Page 23
Page 24

Photo Mode
Tap < > to access the Quick Option menu while a
English
photo is displayed (Photo Viewer).
To browse through the settings, press the <UP> or
DOWN> button or tap <
To select a setting, press the <OK> button or tap the
desired selection.
To return to the previous screen, tap <
Slide Setting
Enter this menu to turn slideshow mode on or off, or
to adjust the amount of time between photos during
slideshow mode.
> or < >.
>.
Page 24 Coby Electronics Co rpo rati on
Page 25
Radio Mode
Listen to FM radio broadcasts.
You must have a pair of headphones connected
to the headphone jack to receive FM broadcasts;
your player will utilize the headphone cord as an
antenna.
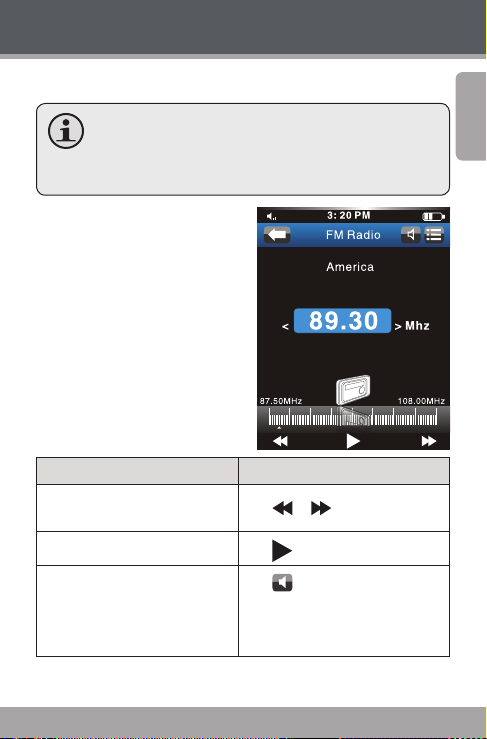
Radio Tuning Controls
When you choose RADIO
from the Main menu, the
Radio Tuning screen will
appear.
You can scan for stations,
tune to stations manually, or
tune to preset stations.
The following functions may
be performed from the Radio
Tuning screen.
Function Action
Tune to the next station manually.
Tune to the next preset station.
To adjust the volume level
Tap
or
Tap
Tap
, then tap < + > or < - >;
Or press the <VOL> button, then
press the <UP> or <DOWN>
button
English
www.cobyusa.com Page 25
Page 26
Radio Mode
English
Function Action
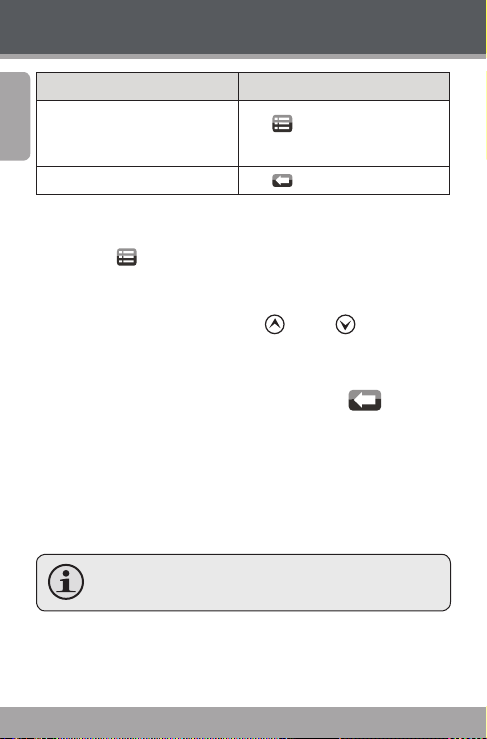
To access the Quick Options
menu (see the section below
for details)
To back to the previous screen
Tap
, or press the <MENU>
button
Tap
Quick Option Menu
Tap <
> to access the Quick Option menu on the
FM Radio screen.
To browse through the settings, press the <UP> or
<DOWN> button; or, tap <
> or < >.
To select a setting, press the <OK> button or tap the
desired selection onscreen.
To return to the previous screen, tap <
>.
Search Station
Use this function to scan for all stations within broadcast
reception range. The player will automatically seek and
save all frequencies with a broadcast signal to the Preset
Station list.
Per forming this function will overwrite any previ-
ously stored Preset Stations.
Page 26 Coby Electronics Co rpo rati on
Page 27

Radio Mode
Area Select
Set the FM frequency range area (Europe, Japan,
American).
Save Station Info
Save the current station to Preset Stations.
Read Station Info
View the Preset Station list. Select a preset from the list
to tune to the station, or delete the selected station from
the list.
Delete Station Info
Delete a single preset station from the preset list.
Delete All Station Info
Delete all preset stations.
English
www.cobyusa.com Page 27
Page 28
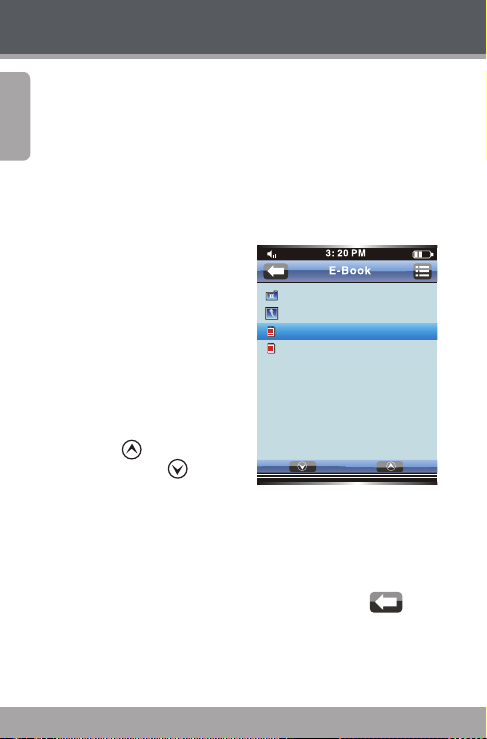
Text Mode
Read text les loaded on your player (TXT).
English
Text Browser Controls
When you select TEXT from the Main menu, the Text
Browser Screen will appear.
Use the Text Browser to locate folders and les loaded
on your player.
You may browse through
a list using any of the
following methods:
Press the <UP> or
<DOWN> button on
the unit.
Tap directly on an
item within the list.
Tap the Arrow Up
<
> or Arrow
Down < > icons
at the bottom of the
screen.
To conrm a selection, press <OK> or tap the
desired selection on the LCD screen.
To return to the previous screen, press the
<POWER> button or tap the Back Icon <
the top lefthand corner of the display screen.
Cur rent D irect ory:C :/EBO OK/
Upw ard Di recto ry
Fre iends .txt
New s.txt
> in
Page 28 Coby Electronics Co rpo rati on
Page 29
Text Mode
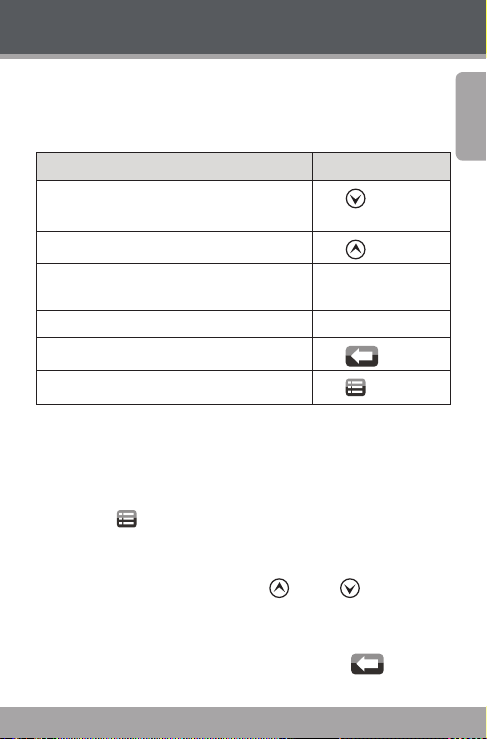
Text Reader Controls
To display a text le, select and conrm the le from the
Text Browser.
Function Key Action
Tap
To go to the next page.
To go the the previous page
To move the text display forward one line
To move the text display backward one line Press <UP> button
To return to the Text Browser screen
To access the Quick Option Menu
Quick Option Menu
The Quick Option menu gives you easy access to your
player’s option settings.
Tap <
the Text Reader screen.
To browse through the settings, press the <UP> or
<DOWN> button; or, tap <
To select a setting, press the <OK> button; or, tap
the desired selection onscreen.
To return to the previous screen, tap <
> to access the Quick Option menu from
> or < >.
, or press
<OK> button
Tap
Press <DOWN>
button
Tap
Tap
>.
English
www.cobyusa.com Page 29
Page 30

Text Mode
Auto Browse
English
Set the Auto Browse on or off.
Scroll Inter val
Set the duration of page display when the player is in
Auto display mode.
Scrol l I nt er va l
Tap < > or < > to adjust the duration in
seconds.
Tap <
Tap<
Scroll Extent
Set the auto scroll target as one page or one line.
> to conrm.
> to exit the setting without saving.
Page 30 Coby Electronics Co rpo rati on
Page 31

Files Mode
Enter Files mode to browse all folders and les loaded on
your player.
To enter Files mode, select FILES from the Main Menu.
Files and folders will be displayed in a list. If a compat-
ible le is selected, it will be played in its corresponding
mode:
Playback Mode File Type
Music MP3, WMA
Video AVI
Photo JPG, BMP, GIF
Text TXT
Explorer Controls
You may browse through a list using any of the
following methods:
Press the <UP> or <DOWN> button on the
unit.
Tap directly on an item within the list.
Tap the Arrow Up <
icons at the bottom of the screen.
To conrm a selection, press <OK> or tap the
desired selection on the LCD screen.
To return to the previous screen, press the
<POWER> button or tap the Back Icon <
the top lefthand corner of the display screen.
> or Arrow Down < >
> in
English
www.cobyusa.com Page 31
Page 32

Files Mode
Quick Option Menu
English
The Quick Option menu gives you easy access to your
player’s option settings.
Tap <
the Explorer screen.
To browse through the settings, press the <UP> or
<DOWN> button; or, tap <
To select a setting, press the <OK> button or tap the
desired selection.
• To return to the previous screen, tap <
Delete
Delete the selected le.
Delete All
Delete all les in the selected folder.
Copy
Copy the selected le to another location on the player.
Once you have copied the desired le:
Use the touchscreen controls to enter the desired
destination folder.
Tap <
Select “Paste” and tap to conrm.
> to access the Quick Option menu from
> or < >.
>.
> to access the Quick Option menu.
Page 32 Coby Electronics Co rpo rati on
Page 33

Files Mode
Cut
Remove the selected le to another location on the
player. Once you have cut the desired le:
Use the touchscreen controls to enter the desired
destination folder.
Tap <
Select “Paste” and tap to conrm.
File Information
Select to view the le storage information.
> to access the Quick Option menu.
English
www.cobyusa.com Page 33
Page 34

Calendar Mode
View the calendar.
English
Be fore using Calendar Mode, be sure that you
have set the correct date and time in Clock Mode.
Press the <UP> and <DOWN> buttons to navigate
from day to day or month to month.
Page 34 Coby Electronics Co rpo rati on
Page 35

Clock Mode
Use this mode to set the internal date and time.
Setting Controls
Date setting
Please inpu t dat a
MM/DD/YY
0 5 /1 5/2 00 9
Tap < > to select a eld to set (Month, Date,
Year).
Tap <
Press the <OK> button to conrm.
Time Setting
Tap <
Second).
Tap <
Press the <OK> button to conrm and save the set-
ting. The screen will display a “Success!” pop-up.
> or < > to adjust.
> to select a eld to set (Hour, Minute,
> or < > to adjust.
English
www.cobyusa.com Page 35
Page 36

Setting Mode
Enter SETTING mode to set your player’s system op-
English
tions.
To enter Setting mode, select SETTING from the Main
menu.
To select a setting:
Press the <UP> or <DOWN> button on the
unit.
Tap directly on an item within the list.
Tap the Arrow Up <
icons at the bottom of the screen.
To conrm a selection, press <OK> or tap the
desired selection on the LCD screen.
To return to the previous screen, press the
<POWER> button or tap the Back Icon <
the top lefthand corner of the display screen.
> or Arrow Down < >
Setting Options
Item Description
Language Select
-- Set the on-screen menu language.
Memory Information
> in
--
Page 36 Coby Electronics Co rpo rati on
View used and available memory info.
Page 37

Setting Mode
Item Description
Version
--
Factory Setup
--
Personal Setup
Auto PowerOff
Time
Freq. of Low
Power
Screen Savers
Time
Key Volume
Setup
animation UI Set the slide transition effect between the differ-
Time Setup
-- Set the internal clock of the player.
www.cobyusa.com Page 37
View the player's rmware version.
Restore all of the player's settings to their
factory-default state.
Set the durat io n of time (in mi nutes) that th e
player will remain on when it is idle. The setting
of "Close" will disable this power-saving feature.
Adjust the duration of the “Low Power” display.
This display appears on the player’s screen
when the battery is low.
Adjust the duration of time (in seconds) that
the backlight will remain on after a key press.
A setting of “Close” will keep the backlight on
continuously.
Set the Key tone on or off.
ent menu displays.
English
Page 38

Setting Mode
English
Item Description
Calibrate
-- Follow the screen signal to calibrate the touch
point of LCD.
Page 38 Coby Electronics Co rpo rati on
Page 39

Transferring Files to the Player
Connect the Coby player to a computer with the provided
USB cable to:
Transfer les to and from your player
Perform basic le management functions
Connecting to a Computer
Connect the player to your computer with the supplied
USB cable. Upon connection:
Your computer will automatically recognize the
player as a Removable Disk.
To open the player to view les, double-click the
icon that appears.
USB Port
USB Port
English
www.cobyusa.com Page 39
Page 40

Transferring Files to the Player
If you need further assistance with transferring les,
English
please refer to your operating system’s instruction manual
or on-screen help. If you are using media management
software such as iTunes, Winamp, or Windows Media
Player, please refer to their documentation for support.
Transferring with Microsoft Windows
1. Open a le explorer window. Locate the les you
would like to transfer from your computer. Select
the les/folders with the mouse and press CTRL-C
(copy) on the keyboard.
2. Double-click the “My Computer” icon on your desktop and then double-click the icon that represents
your player (e.g., MP822 / Removable Disk). The
computer will display all les and folders currently
stored in the player.
3. Press CTRL-V (paste) on the keyboard to transfer the
les you selected in Step 1 to the player.
Transferring with Macintosh OS X
1. Open a nder window. Locate the les you would
like to transfer from your computer. Select the les/
folders with the mouse and press APPLE-C (copy)
on the keyboard.
2. Click on the Removable Disk icon located on the left
side of the nder window. The computer will display
all les and folders currently stored in the player.
3. Press APPLE-V (paste) on the keyboard to transfer the
les you selected in Step 1 to the player.
Page 40 Coby Electronics Co rpo rati on
Page 41

Transferring Files to the Player
Disconnecting from a Computer
Disconnect your player as instructed below to detect data
loss or le/rmware corruption.
Microsoft Windows
1. Double-click the green arrow in the taskbar located
on the lower-right side
of the computer screen
(Safely Remove Hardware).
2. Safely Remove
Hardware: Select
“USB Mass Storage
Device” from the list
that appears and then
click on “Stop”.
Stop a Hardware
Device: Select
“USB Mass Storage
Device” from the list
that appears and then
click on “OK”.
3. When the “Safe to Remove Hardware” window appears, click the OK button and disconnect the USB
cable from the player and your computer.
English
Macintosh OS X
1. On the left side of the Finder Window, identify the
appropriate Removable Disk icon.
www.cobyusa.com Pag e 41
Page 42

Transferring Files to the Player
2. Click on the “Eject”
English
arrow on the right of the
Removable Disk icon.
3. Disconnect the USB
cable from the player
and your computer.
Coby Media Manager
Your MP3 player includes built-in Coby Media Manager
software for organizing your music and videos, creating playlists, and more. To begin organizing your media
library using Coby Media Manager, install the software
onto your computer as instructed below.
Microsoft Windows Installation
1. Connect the player to your computer using the supplied USB cable. Your computer should automatically recognize the player and display a pop-up
menu with a list of available options.
2. Select the Coby Media Manager icon to begin
installing the software on your computer.
3. Click “Next” when prompted to complete installation
and launch Coby Media Manager.
If your computer does not automatically present the
player’s options menu, open “My Computer” and
double-click on the COBY Media manager icon to
launch and install the software.
If the software does not launch, please take the following
steps:
Page 42 Coby Electronics Co rpo rati on
Page 43

Transferring Files to the Player
Right click the Coby Media Manager icon and select
“Explore” from the drop-down menu.
Double-click on the le called “coby-cometlite.exe”
to launch and install the software.
If this does not cause the installation to begin, copy
and paste the le called “coby-cometlite.exe” onto
your desktop. Double-click on the le to launch and
install the software.
The “ .exe “ file extension may not appear on
your screen depending upon your system preferences.
Macintosh OS X Installation
Open the player as you would an external disk drive,
and enter the Explorer folder.
Copy the Mac OSX Coby Media Manager folder to
your computer.
Double-click on the le called “coby-mediamanager.
dmg” to begin installing the sotftware. Follow the
prompts onscreen to complete installation and
launch Coby Media Manager.
Once insta lled, Coby Media Manager co ntains
an internal help menu which will guide you in using the software. Please refer to this menu after
installation if you need further assistance.
English
www.cobyusa.com Page 43
Page 44

Video Conversion
For movie and music synchronisation and conversion,
English
please use “Coby Media Manager” software supplied on
the player.
Coby Media Manager manual is also included on your
player.
Page 44 Coby Electronics Co rpo rati on
Page 45

Firmware Upgrades
From time to time, COBY may release rmware upgrades
to improve the performance of the Player or to add
additional features. Please check the COBY website periodically at www.cobyusa.com to see if new rmware has
been released for your player. If you are experiencing
abnormal behavior with your player, you may choose to
restore (format) your player before updating its rmware.
Do not interrupt the rmware upgrade process—
doing so could damage your player and render it
inoperable.
See the documentation that is included with the
rmware upgrade le for detailed instructions.
English
www.cobyusa.com Page 45
Page 46

Safety Notices
English
The lightning ash with arrowhead symbol within an equilateral triangle is intended to alert the user to the presence of
uninsulated “dangerous voltage” within the product ’s enclo-
sure that may be of sufcient magnitude to constitute a risk
of electric shock.
The exclamation point within an equilateral tr iangle is intended to alert the user to the presence of important operation
and servicing instructions in the literature accompanying the
appliance.
For Customer Use:
Enter below the serial number that is located on the rear of the unit. Retain
this information for future reference.
Model No.
Serial No.
WARNING: To prevent re or shock hazard, do not expose this device to
rain or moisture. Dangerous high voltage is present inside the enclosure. Do
not open the cabinet.
CAUTION: To prevent electric shock, match wide blade of plug to wide slot
of outlet and fully insert.
WARNING: Handling the cords on this product will expose you to lead, a
chemical known to the State of California to cause c ancer, and birth defects or
other reproductive harm. Wash hands after handling.
Page 46 Coby Electronics Co rpo rati on
Page 47

Safety Notices
NOTICE:
This product is protected by certain intellectual property rights of Microsoft.
Use or distribution of such technology outside of this product is prohibited
without a license from Microsoft.
Content owners use Windows Media digit al rights management technology
(WMDRM) to protect their intellectual property, including copyrights. This device
uses WMDRM soft ware to access WMDRM -protected content. If the WMDRM
software fails to protect the content, c ontent owners may ask Microsoft to revoke the software’s ability to use WMDRM to play or copy protected content.
Revocation does not affect unprotected content. When you download licenses
for protected content, you agree that Microsoft may include a revocation list with
the licenses. Content owners may require you to upgrade WMDRM to access
their content. If you decline an upgrade, you will not be able to access content
that requires the upgrade.
Protect your hearing:
Hearing experts advise against the constant use of personal stereos played at high
volume. Constant exposure to high volumes can lead to hearing loss. If you should
experience ringing in the ears or hearing loss, discontinue use and seek medical
advice.
Note: If the product suddenly has no response or powers of f, an electrostatic
discharge may be the cause. In this circumstance, please follow the procedures
below for recover y:
• Turn off the unit by pushing and holding the slide button at the right (Power
off position) for 15 seconds.
• Turn on the unit again
For recycling or disposal information about this prod-
uct, please contact your local authorities or the Elec tronics Industr ies Alliance: ww w.eiae.org.
English
www.cobyusa.com Page 47
Page 48

Safety Notices
FCC Statement:
English
This device complies with Part 15 of the FCC Rules. Operation is subject to the
following two conditions:
(1) This device may not cause harmful interference, and
(2) This device must accept any interference received, including inter ferenc e
that may cause undesired operation.
Note: This equipment has been tested and found to comply with the limits for
Class B digital devices, pursuant to Part 15 of the FCC rules. These limits are
designed to provide reasonable protection against harmful interference in a residential installation. This equipment generates, uses and can radiate radio frequency energy and, if not installed and used in accordance with the instr uctions,
may cause harmful inter ference to radio communications. However, there is no
guarantee that interference will not occur in a particular installation. If this equipment does cause harmful interference to radio or television reception, which can
be determined by turning the equipment off and on, the user is encouraged to try
to correct the interference by one or more of the following measures:
• Reorient or relocate the receiving antenna.
• Increase the separation between the equipment and receiver.
• Connect the equipment into an outlet on a circuit different from that to which
the receiver is connected.
• Consult the dealer or an experienced radio/T V technician for help
Use of shielded cable is required to comply with Class B limits in Subpar t B of
Part 15 of the FCC rules.
Do not make any changes or modications to the equipment unless otherwise
specied in the manual. If such changes or modications should be made, you
could be required to stop operation of the equipment.
Page 48 Coby Electronics Co rpo rati on
Page 49

Safety Notices
Important Safety Instructions
1. Read Instructions: All the safety and operating instructions should be
read before the product is operated.
2. Retain Instructions: The safety and operating instructions should be
retained for future reference.
3. Heed Warnings: All warnings on the product and in the operating in-
structions should be adhered to.
4. Follow Instructions: All operating and usage instructions should be fol-
lowed.
5. Cleaning: Unplug this product from the wall outlet before cleaning. Do not
use liquid cleaners or aerosol cleaners. Use a damp cloth for cleaning.
6. Attachments: Use only attachments recommended by the manufacturer.
Use of other attachments may be hazardous.
7. Water and Moisture: Do not use this product near water (e.g., near a
bath tub, washbowl, kitchen sink, laundry tub, in wet basements, or near
a swimming pool and the like).
8. Ventilation: Slots and openings in the cabinet are provided for ventila-
tion to ensure reliable operation of the product and to protect it from
overheating. These openings should never be blocked by placing the
product on a bed, sofa, rug, or other similar surface. This product should
not be placed in a built-in installation such as a bookcase or rack unless proper ventilation is provided or the manufacturer instr uctions have
been adhered to.
9. Power Sources: This product should be operated only from the type
of power source indicated on the rating label. If you are not sure of the
type of power supply to your home, consult your product dealer or local
power company. For products intended to operate from battery power or
other sources, refer to the operating instructions.
10. Overloading: Do not overload wall outlets, extension cords, or integral
convenience receptacles as this can result in a risk of re or electric shock.
11. Object and Liquid Entry: Never push objects of any kind into this product
through openings as they may tap dangerous voltage points or shout-
out par ts that coul d result in a re or electric shock. Never sp ill liq uid of
any kind on the product.
12. Ser vicing: Do not attempt to service this product yourself as opening or
removing covers may expose you to dangerous voltage or other haz-
ards. Refer all ser vici ng to qualied se rvic e personnel.
English
www.cobyusa.com Page 49
Page 50

Safety Notices
13. Damage Requiring Service: Unplug this product from the wall outlet and re-
English
fer servicing to qualied service personnel under the following conditions:
a) when the power-supply or plug is damaged; b) if liquid has been spilled
or if objects have fallen into the product; c) if the product has been exposed
to rain or water; d) if the product does not operate normally by following the
operating instructions. Adjust only those controls that are covered by the
operating instructions as improper adjustment of other controls may result
in damage and will often require extensive work by a qualied technician
to restore the product to its normal operation; e) if the product has been
dropped or damaged in any way; f) when the product exhibits a distinct
change in performance—this indicates a need for service.
14. Replacement Parts: When replacement parts are required, be sure that
your service technician has used replacement parts specied by the manufacturer or have the same characteristics as the original part. Unauthorized
substitutions may result in re, electric shock, or other hazards.
15. Safety Check: Upon completion of any service or repairs to this product,
ask the service technician to perform safety checks to ensure that the
product is in proper operating condition.
16. Heat: The product should be situated away from heat sourc es such as
radiato rs, heat re gister s, stoves, or ot her products (in cludin g ampli ers)
that produce heat.
Page 50 Coby Electronics Co rpo rati on
Page 51

Troubleshooting
If you have a problem with this device, please read the
troubleshooting guide below and check our website
at www.cobyusa.com for Frequently Asked Questions
(FAQs) and rmware updates. If these resources do not
resolve the problem, please contact Technical Support.
English
Address COBY Electronics Technical Support
Savannah, GA 31407
Email techsuppor t@cobyusa.com
Web www.cobyusa.com
Phone 800-727-3592: Weekdays 8:30AM–9:0 0PM EST
150 Knowlton Way
Saturdays 9:00AM –5:30PM EST
718-416-3197: Weekdays8:00AM–5:30PM EST
The player does not turn on.
Ensure that the player is fully charged. Try charging
the player overnight (8 hours).
Ensure that the Power switch is set to the “On”
position.
Reset the player (use a paper clip to gently press the
Reset button on the rear of the player) and try again.
The but tons do not work.
Ensure that the Hold switch is disengaged.
Reset the player (use a paper clip to gently press the
Reset button on the rear of the player) and try again.
www.cobyusa.com Page 51
Page 52

Troubleshooting
I cannot transfer les to the player.
English
Ensure that your computer is running a supported
operating system.
If using a USB extension cable, ensure that it is
securely attached to the player and the PC, or try
using another USB cable.
If you have connected the player through a USB
hub, try connecting the player directly to your
computer.
Ensure that the player’s memory capacity is not full.
Ensure that the Hold switch is disengaged.
There is no sound during playback.
Check the volume level.
Ensure that the headphones are attached securely
to the player.
The sound quality of the music is poor.
Try playing the le on your computer. If the sound
quality is still poor, try downloading the le again or
re-encoding the le yourself.
Ensure that the bit rate of the le is not too low. The
higher the bit rate of the le, the better it will sound.
The minimum recommended bitrate is 128kbps for
MP3s and 96kbps for WMAs.
Try lowering the volume of the player.
Page 52 Coby Electronics Co rpo rati on
Page 53

Troubleshooting
Ensure that the headphones are attached securely
to the player.
The player will not play my music le.
Ensure that the le is in a compatible format.
The le may be copy-protected and you no longer
have authorization to play this le. If you feel this is
in error, please contact the service from which you
downloaded the le.
The LCD characters are corrupted or something is
wrong with the display.
Ensure that the correct menu language has been set.
Reset the player (use a paper clip to gently press the
Reset button on the rear of the player) and try again.
The player has malfunctioned.
Reset the player (use a paper clip to gently press the
Reset button on the rear of the player) and try again.
Try updating the player’s rmware. Please refer to
the Firmware Upgrades section of this manual for
instructions.
www.cobyusa.com Page 53
English
Page 54

Features
Integrated ash memor y
English
Intuitive touchscreen control (stylus included)
2.8” TFT display
Plays music, video, photos and text
miniSD card slot for easy memory capacity up-
grades (miniSD card not included)
ID3 and LRC support for song and synchronized
lyric information display
Integrated FM radio
USB 2.0 hi-speed for fast le transfers
Page 54 Coby Electronics Co rpo rati on
Page 55

Specications
Display Type 2.8” Full- Color TFT @ 320x240
Memory MP822-4G: 4GB Flash
MP822-8G: 8GB Flash
MP822-16G:16GB Flash
Audio Format Support MP3, WMA
Video Format Support MPEG- 4 (AVI/XviD): 320x240@30fps
Photo Format Support JPG, GIF, BMP
Text Format Support TXT
DRM Support --
Song Info Support ID3, Windows Media
FM Frequency Range 87.5 - 108.0MHz
PC Interface USB 2.0
Plug and Play Support Windows 2000/XP/Vista
Macintosh OS X
Audio Output 3.5mm Stereo (Headphone)
Power Supply Rechargeable Lithium-Polymer
Battery
USB Charge
Unit Dimensions 2.2” x 4.0” x 0.6” (WHD)
Design, speci cati ons and manual are s ubject t o change w ithout n otice.
English
www.cobyusa.com Page 55
Page 56

Índice
ÍNDICE ...........................................................................56
CONTENIDOS DEL PAQUETE .........................................59
CONTROLES DE UN VISTAZO ........................................60
Uso de los controles en la pantalla táctil .................60
Desactivación de los controles (Espera) .................. 62
Español
PARA EMPEZAR .............................................................64
Carga de la bater ía..................................................... 64
Carga con una computadora ..........................64
Encendido/apagado del reproductor............. 65
Reinicio del reproductor .....................................65
Cómo instalar una tarjeta de memoria miniSD
(optativo) ............................................................... 66
MENÚ PRINCIPAL .......................................................... 67
Controles del menú principal ............................67
MODO DE LA MÚSICA ..................................................68
Controles del navegador de música ............... 68
Controles de reproducción actual (Reproduc-
ción de música)....................................................69
Menú de Opciones Rápidas ..............................70
MODO VIDEO ...............................................................73
Controles del navegador de video ..................73
Controles de reproducción de video ............... 74
MODO DE LA FOTO ...................................................... 76
Controles del Navegador de Fotos ................... 76
Controles del Visualizador de Fotos .................. 77
Menú de Opciones Rápidas ..............................78
Page 56 Coby Electronics Co rpo rati on
Page 57

Índice
MODO DE RADIO ..........................................................79
Controles de Sintonización de Radio ...............79
Menú de Opciones Rápidas ..............................80
MODO DE TEXTO...........................................................82
Controles del Navegador de Texto ...................82
Controles del Visualizador de Texto .................. 83
Menú de Opciones Rápidas ..............................83
MODO DE LOS FICHER .................................................85
Controles del E xplorador ....................................85
Menú de Opciones Rápidas ..............................86
MODO CALENDARIO ...................................................88
MODO RELOJ ................................................................89
Controles de conguración ............................... 89
MODO DE LA CONFIGURACIÓN ................................90
Opciones de la conguración ...................................90
Selección de idioma ...........................................90
Información de la memoria ...............................90
Versión ................................................................... 91
Conguración de fábrica ................................... 91
Conguración personal ...................................... 91
Conguración de la hora ...................................92
Calibración ...........................................................92
FICHEROS DE TRANSFERENCIA AL JUGADOR ............93
Conexión a una computadora .................................93
Transferencia de archivos ........................................... 94
Microsoft Windows ............................................... 94
Macintosh OS X ..................................................... 94
www.cobyusa.com Page 57
Español
Page 58

Índice
Desconexión de una computadora ......................... 95
Microsoft Windows ............................................... 95
Macintosh OS X ..................................................... 95
Coby Media Manager ................................................ 96
Instalación de Microsoft Windows .................... 96
Instalación en Macintosh OS X ..........................97
Español
CONVERSIÓN VIDEO ...................................................98
MEJORAS DE LOS FIRMWARES..................................... 99
PRECAUCIONES ..........................................................100
SOLUCIÓN DE PROBLEMAS ........................................106
CARACTERÍSTICAS ..................................................... 110
ESPECIFICACIONES .................................................... 111
Page 58 Coby Electronics Co rpo rati on
Page 59

Contenidos del Paquete
Felicitaciones por su compra del reproductor de video y
MP3 Coby MP822. El paquete contiene los elementos a
continuación:
1. Reproductor COBY
2. Cable USB
3. Manual de instrucciones
4. Audífonos estéreo profesionales
5. Bolsa de protección
Si faltara alguno de los artículos mencionados anteriormente, comuníquese con el minorista local a quien
compró el producto.
Español
www.cobyusa.com Page 59
Page 60

Controles de un vistazo
1
Español
4
5
6
Page 60 Coby Electronics Co rpo rati on
2 3
7
8
9
10
11
12
13
14
Page 61

Controles de un vistazo
Vista superior
1. Inserto de la correa para el cuello.
2. Puerto USB
Conéctelo a una computadora para transferir los
archivos de medios al reproductor.
3. Enchufe para auriculares de 3.5 mm
Vista desde la izquierda
4. Navegación del menú: Up (arriba)
5. Navegación del menú: Down (abajo)
6. Lápiz óptico
Parte Frontal
7. Altavoz
8. Pantalla táctil LCD
Toque la pantalla con el dedo para activar el control
en pantalla.
9. Botón OK
Vista inferior
10. Botón de reinicio
11. Ranura para tarjeta de memoria miniSD
Cargue una tarjeta de memoria miniSD para au-
mentar la capacidad de la memoria del reproductor.
Right View
www.cobyusa.com Pag e 61
Español
Page 62

Controles de un vistazo
12. Botón de la potencia
Presione y sosténgase para accionar al jugador
con./desc.
13. Botón del volumen
14. Botón del menú/del asimiento
Español
Presione y sosténgase para invalidar los controles
del jugador. Presione otra vez para volver a permitir.
Uso de los controles en la pantalla táctil
El reproductor de video y MP3 está equipado con una
pantalla táctil fácil de usar que permite el acceso a las
funciones del reproductor. Use la punta del dedo o el
lápiz óptico para tocar el área de la pantalla en donde
se muestra el ícono de los controles. Si toca y mantiene
presionado un ícono, se registrará como un toque
continuo de botón.
Para evitar dañar la pantalla, no la toque con fuer-
za excesiva o con algún objeto que no sea el dedo
o el lápiz óptico. Para obtener una mejor respuesta, asegúrese de tener las manos limpias antes
de utilizar los controles de la pantalla táctil.
Desactivación de los controles (Espera)
Cuando el interruptor Espera está activado, los controles
del reproductor están desactivados.
Para desactivar los controles, mantenga presionado
el botón <MENU> (menú).
Page 62 Coby Electronics Co rpo rati on
Page 63

Controles de un vistazo
Para activar los controles, mantenga presionado el
botón <MENU> nuevamente.
YSi lo desea, puede desactivar los controles para
evitar activarlos accidentalmente cuando el reproductor esté en su bolsillo o bolso.
Vuelva a activar los controles para continuar.
Español
www.cobyusa.com Page 63
Page 64

Para empezar
Carga de la
batería
El reproductor cuenta
con una batería recargable integrada. Luego del
primer uso, la batería debe
Español
cargarse completamente
para garantizar que el rendimiento y la vida útil de
la batería sean óptimos.
Si el reproductor no se ha
utilizado por un tiempo, se
deberá recargar la batería.
Luego del primer uso, la
batería debe cargarse completamente (8 horas) para
garantizar que su rendimiento y vida útil sean óptimos.
La batería utilizada en este dispositivo puede pro-
ducir incendios o quemaduras químicas si se la
trata de manera incorrecta. No desarme, incinere
ni caliente la batería. No deje la batería en lugares
con luz solar directa o en un vehículo con las ventanas cerradas. No conecte el reproductor a una
fuente de alimentación que no sea la indicada en
este manual o en la etiqueta, ya que puede tener
como resultado un riesgo de incendio o descarga
eléctrica.
USB Port
USB Port
Carga con una computadora
El reproductor puede cargarse a través de una conexión
USB a una computadora. Utilice el cable USB pro-
Page 64 Coby Electronics Co rpo rati on
Page 65

Para empezar
visto para conectar el reproductor al puerto USB de la
computadora. La computadora debe estar encendida y
no en modo de hibernación. Cuando el reproductor esté
conectado y cargando, aparecerá un símbolo USB en la
pantalla del reproductor.
Cuando esté conectado a un concentrador USB,
éste debe accionarse automáticamente para cargar la batería del reproductor.
Encendido/apagado del reproductor
Para encender el reproductor, mantenga presionado
el interruptor <POWER> (encendido) hasta que se
encienda la pantalla.
Para apagar el reproductor, mantenga presionado el
interruptor <POWER> hasta que se apague la pantalla.
Reinicio del reproductor
Si el reproductor se congela y no responde, o si funciona
mal, deberá reiniciar el reproductor. Para reiniciar:
1. Desconecte el reproductor si está conectado a una
computadora.
2. Use un clip de papel para presionar suavemente
el botón de reinicio que se encuentra en la parte
inferior del reproductor.
Español
Cómo instalar una tarjeta de
memoria miniSD (optativo)
Puede agrandar la capacidad de la memoria del repro-
www.cobyusa.com Page 65
Page 66

Para empezar
ductor agregando una tarjeta de memoria miniSD.
Coloque una tarjeta miniSD en la ranura como se muestra en la ilustración que aparece a continuación.
El reproductor es compatible con tarjetas de me -
Español
moria con capacidad de hasta 2GB.
Page 66 Coby Electronics Co rpo rati on
Page 67

Menú principal
Cuando encienda el reproductor, verá el menú principal.
Desde el menú principal puede acceder a cada uno de
los modos de función del reproductor de MP3. Estos
modos son:
Música Buscar y reproducir música.
Fotos Buscar y ver imágenes.
Video Buscar y reproducir películas.
Radio Escuchar transmisiones de radio FM.
Texto Buscar y leer archivos de texto.
Archivos Buscar todos los archivos.
Calendario Activar el programa del calendario.
Reloj Establecer la fecha y el horario internos.
Conguración Ajustar las opciones del reproductor.
Controles del menú principal
Cada modo de función está
representado por un ícono en
la pantalla del menú principal.
Para ingresar un modo, toque
el ícono con el dedo. También
puede utilizar los controles
estándares del reproductor
para acceder a cada modo:
Presione los botones <UP>
o <DOWN> (arriba o abajo)
para mover la selección, luego
presione <OK> para conrmar.
Español
www.cobyusa.com Page 67
Page 68

Modo de la música
Busque y reproduzca sus archivos de música.
Para obtener información sobre cómo cargar
música en su reproductor, consulte la sección
“Transferencia de archivos al reproductor”.
Español
Controles del navegador de música
Cuando seleccione el modo MÚSICA del menú principal,
verá la pantalla del navegador de música.
Puede navegar en una
lista utilizando alguno
de estos métodos:
Presione los
botones <UP> o
<DOWN> (arriba o
abajo) en la unidad.
Toque directa-
mente un elemento
de la lista.
Toque los íconos
echa hacia arriba
<
> o echa
hacia abajo < >
que aparecen en la parte inferior de la pantalla.
Para conrmar la selección, presione <OK> o toque
la selección deseada en la pantalla LCD.
Para regresar a la pantalla anterior, presione el
botón <POWER> (encendido) o toque el ícono de
retorno <
la pantalla.
Page 68 Coby Electronics Co rpo rati on
> en la equina izquierda superior de
Page 69

Indicador del nivel
de volumen
Visualización del tiempo
Indicador de hora y
de carga de la batería
Frecuencia del ecualizador
Bandas
Tiempo total
Ícono de Volume(volumen)
Pista actual
/Total de pistas
Ícono Next (siguiente)
Barra de progreso
Ícono Reproducir
/Pausa (Play/Pause)
Ícono Previous
(anterior)
Modo de reproducción
Tiempo transcurrido
Ícono Equalizer
(ecualizador)
Nombre del archivo
Ícono Back (retorno)
Ícono Quick Option
(opciones rápidas)
Ícono File Browser
(navegador de archivos)
Modo de la música
Si sus archivos de música contienen etiquetas de información de canción ID3, podrá ver los archivos de música
por artista, álbum, pista (título de la canción) o género.
Para ver todos los archivos (incluso los que no contienen
información ID3), seleccione “All Songs” (todas las canciones) o utilice la opción de explorador de carpetas.
Si ya está reproduciendo música, tendrá la opción de
regresar a la pantalla de reproducción actual.
Controles de reproducción actual
(Reproducción de música)
Para comenzar a reproducir canciones, busque el archivo MP3 que desee y toque el título de la canción para
dar inicio a la reproducción.
Cuando se está reproduciendo una canción, aparece la
pantalla de reproducción actual.
Español
www.cobyusa.com Page 69
Page 70

Modo de la música
Utilice los siguientes controles durante la reproducción
de música.
Función Activación
Pausar o reanudar la reproducción.
Español
Reproducir la siguiente pista Toque
Adelantar-buscar en la pista Mantenga presionado
Reproducir la pista anterior Toque
Retroceder-buscar en la pista Mantenga presionado
Ajustar el nivel de volumen Presione <VOL>, luego presione
Acceder al menú de Opciones
Rápidas (vea la sección que
aparece a continuación para
más detalles)
Regresar a la pantalla del
explorador de música
Regresar a la pantalla anterior
Menú de Opciones Rápidas
El Menú de Opciones Rápidas le brinda fácil acceso a
Page 70 Coby Electronics Co rpo rati on
Presione <OK> o toque el ícono
Play/Pause (Reproducir/Pausa)
en la pantalla.
pantalla.
(siguiente) en la pantalla.
PANTALLA.
rior) en la pantalla.
los botones <UP> o <DOWN>
(arriba o abajo).
Toque
Toque
Toque
(siguiente) en la
(anterior) en la
en la pantalla.
en la pantalla.
en la pantalla.
(ante-
Page 71

Modo de la música
las conguraciones de su reproductor.
Toque < > para acceder al menú de Opciones
Rápidas durante la reproducción de música.
Para navegar en la conguración, presione los
botones <UP> o <DOWN> (arriba o abajo), o toque
<
> o < > en la pantalla.
Para seleccionar una conguración, presione el
botón <OK> o toque la selección deseada en la
pantalla.
Para regresar a la pantalla anterior, toque <
en la pantalla.
Modo Repetición
Cambie las opciones de repetición para ajustar el orden
en el que se reproducirán las pistas.
Elemento Descripción
Normal Reproduce las pistas en orden normal.
Simple Reproduce la pista actual varias veces.
Aleatorio Reproduce las pistas en orden aleatorio.
Todo Reproduce todas las pistas varias veces.
También puede cambiar para alternar entre las
conguraciones si toca el ícono Play Mode (modo
de reproducción) en la pantalla.
>
Español
www.cobyusa.com Page 71
Page 72

Modo de la música
Efectos de sonido (ecualizador)
Seleccione una preconguración del ecualizador digital
para optimizar la forma en que el reproductor procesa
las señales de audio. Las opciones son: NORMAL,
CLASSIC (clásico), ROCK, POP, o JAZZ.
Español
También puede cambiar para alternar entre las
conguraciones si toca el ícono Equalizer (ecualizador).
Escucha previa
Utilice esta opción para reproducir solo la primera sec-
ción de cada pista. Las conguraciones son: Cerrado
(ninguna sección está seleccionada), 5 segundos, 10
segundos, 15 segundos y 20 segundos.
Establecer la velocidad de reproducción
Ajuste el tempo de reproducción (0.5/el más lento 1.0/
velocidad normal 1.5/el más rápido).
Page 72 Coby Electronics Co rpo rati on
Page 73

Modo video
Busque y reproduzca sus archivos de película.
Su reproductor es compatible con archivos AVI
codicados con XviD a 320 x 240 y 30 fps. Es
posible que los archivos deban codicarse con el
software incluido para poder reproducirlos en el
dispositivo.
Para obtener mayor información sobre la conver-
sión de videos, consulte la sección “Conversión
de video”.
Para obtener más información sobre cómo cargar
archivos de video en su reproductor, consulte la
sección “Transferencia de archivos al reproductor”.
Controles del navegador de video
Cuando seleccione el modo VIDEO del menú principal, verá la pantalla del navegador de video. Utilice el
navegador de videos para buscar todas las carpetas y
archivos de video cargados en su reproductor.
Puede navegar en una lista utilizando alguno de
estos métodos:
Presione los botones <UP> o <DOWN> (arriba
o abajo) en la unidad.
Toque directamente un elemento de la lista.
Toque los íconos echa hacia arriba <
echa hacia abajo < > que aparecen en la
parte inferior de la pantalla.
> o
Español
www.cobyusa.com Page 73
Page 74

Modo video
Para conrmar la selección, presione <OK> o toque
la selección deseada en la pantalla LCD.
Para regresar a la pantalla anterior, presione el
botón <POWER> (encendido) o toque el ícono de
retorno <
Español
la pantalla.
Controles de reproducción de video
Cuando está reproduciendo una película, sostenga el
Reproductor horizontalmente, aparece la pantalla de
reproducción actual.
Ventana de reproducción de video
00: 01:30 00: 10:00
Tiempo transcurrido
> en la equina izquierda superior de
Tiempo total
Utilice los siguientes controles durante la reproducción
de videos.
Page 74 Coby Electronics Co rpo rati on
Page 75

Modo video
Función Activación
Pausar o reanudar la reproducción.
Reproducir el siguiente video Toque
Adelantar-buscar en el video Mantenga presionado
Reproducir el video anterior Toque
Retroceder-buscar en el video Mantenga presionado
Ajustar el nivel de volumen
Girar la ventana de reproducción
del video
Regresar a la pantalla del explorador
de video
Para ver los controles cuando se reproduce el video,
toque la pantalla una vez.
/ , o presione
Toque
el botón <OK>.
botón <DOWN> (abajo).
o mantenga presionado el
botón <DOWN> (abajo).
botón <UP> (arriba).
o mantenga presionado el
botón <UP> (arriba).
Toque
el botón <VOL>, luego
presione los botones
<UP> o <DOWN> (arriba
o abajo).
Toque
botón <MENU> (menú).
Toque
, o presione el
, o presione el
; o presione
, o presione el
,
Español
,
www.cobyusa.com Page 75
Page 76

Modo de la foto
Busque y vea sus archivos de fotos.
Para obtener más información sobre cómo
cargar archivos de fotos en su reproductor,
consulte la sección “Transferencia de archivos
al reproductor”.
Español
Controles del Navegador de Fotos
Cuando seleccione el modo FOTO del menú principal,
aparecerá la pantalla del navegador de fotos.
Utilice el navegador de fotos para buscar carpetas y
archivos de imágenes cargados en su reproductor.
Puede navegar en una
lista utilizando alguno
de estos métodos:
Presione los
botones <UP> o
<DOWN> (arriba o
abajo) en la unidad.
Toque directa-
mente un elemento
de la lista.
Toque los íconos
echa hacia arriba
<
> o echa
hacia abajo < > que aparecen en la parte
inferior de la pantalla.
Cur rent D irect ory:C :/IMA GE/
Upw ard Di recto ry
1.b mp
BMP
2.b mp
BMP
3.b mp
BMP
4.j pg
JPG
5.j pg
JPG
6.j pg
JPG
7.j pg
JPG
Page 76 Coby Electronics Co rpo rati on
Page 77

Modo de la foto
Para conrmar la selección, presione <OK> o toque
la selección deseada en la pantalla LCD.
Para regresar a la pantalla anterior, presione el
botón <POWER> (encendido) o toque el ícono de
retorno <
la pantalla.
Controles del Visualizador de Fotos
Para ver una foto, busque en la lista de fotos y luego
toque el nombre del archivo para conrmar.
Las siguientes funciones pueden realizarse desde la
pantalla de visualización de imágenes.
Función Activación
Ver la imagen anterior o
siguiente
Girar una foto Toque <OK>, o presione el
Acceder al menú de Opciones Rápidas (ver la sección
a continuación para mayor
información)
Regresar al explorador de fotos
> en la equina izquierda superior de
o ; puede
Toque
presionar el botón <UP> o
<DOWN> (arriba o abajo).
botón <OK>.
Toque
, o presione el botón
<MENU> (menú).
Toque
, o presione el
botón <POWER> (encendido).
Español
www.cobyusa.com Page 77
Page 78

Modo de la foto
Para ver los controles cuando se muestra una
foto, toque la pantalla una vez.
Menú de Opciones Rápidas
Español
El Menú de Opciones Rápidas le brinda fácil acceso a
las conguraciones de su reproductor.
Toque <
Rápidas mientras se muestra una foto (visualizador
de fotos).
Para buscar en la conguración, presione los
botones <UP> o <DOWN> (arriba o abajo), o toque
<
Para seleccionar una conguración, presione el
botón <OK> o toque la selección deseada.
Para regresar a la pantalla anterior, toque <
Conguración de las diapositivas
Ingrese a este menú para activar o desactivar el modo
de diapositiva, o para ajustar el tiempo entre cada foto
durante el modo de visualización de diapositivas.
> para acceder al menú de Opciones
> o < >.
>.
Page 78 Coby Electronics Co rpo rati on
Page 79

Modo de radio
Escuche transmisiones de radio FM.
Debe tener un par de auriculares conectados al
enchufe correspondiente para recibir transmisiones de FM; su reproductor utilizará el cable del
auricular como antena.
Controles de Sintonización de Radio
Cuando seleccione el modo
RADIO del menú principal,
aparecerá la pantalla de
sintonización de la radio.
Puede buscar estaciones,
sintonizarlas manualmente
o sintonizar las estaciones
preconguradas.
Las siguientes funciones
pueden realizarse desde la
pantalla de sintonización de
radio.
Función Acción
Sintonizar la siguiente estación
manualmente.
Sintonizar la siguiente estación.
Toque
Toque
o .
Español
www.cobyusa.com Page 79
Page 80

Modo de radio
Función Acción
Ajustar el nivel de volumen
Español
Acceder al menú de Opciones
Rápidas (vea la sección que
aparece a continuación para más
detalles)
Regresar a la pantalla anterior
Menú de Opciones Rápidas
Toque <
rápidas en la pantalla de Radio FM.
Para buscar en la conguración, presione los
botones <UP> o <DOWN> (arriba o abajo), o toque
<
Para seleccionar una conguración, presione el
botón <OK> o toque la selección deseada en la
pantalla.
Para regresar a la pantalla anterior, toque <
Búsqueda de estaciones
Utilice esta función para buscar todas las estaciones
dentro del rango de recepción de transmisión. El
reproductor busca y guarda automáticamente todas
las frecuencias con señal de transmisión en la lista de
estaciones preconguradas.
Page 80 Coby Electronics Co rpo rati on
> para acceder al menú de opciones
> o < >.
, luego toque < +
Toque
> o < - >, o presione el botón
<VOL>, luego presione los
botones <UP> o <DOWN>
(arriba o abajo).
, o presione el
Toque
botón <MENU> (menú).
Toque
>.
Page 81

Modo de radio
Esta función sobreescribirá las estaciones pre -
conguradas y almacenadas anteriormente.
Selección de área
Establezca el área de frecuencia de FM (Europa, Japón,
América).
Guardar información de la estación
Guarde la estación actual en las estaciones preconguradas.
Leer la información de la estación
Visualizar la lista de estaciones preconguradas.
Seleccione una estación precongurada en la lista para
sintonizar la estación, o para borrar la estación seleccionada en la lista.
Borrar la información de la estación
Borrar una sola estación precongurada en la lista
precongurada.
Borrar toda la información de la estación
Borrar todas las estaciones preconguradas.
www.cobyusa.com Page 81
Español
Page 82

Modo de texto
Lea archivos de texto cargados en su reproductor (TXT).
Controles del Navegador de Texto
Cuando seleccione el modo TEXTO del menú principal,
aparecerá la pantalla de navegador de textos.
Español
Utilice el navegador de textos para buscar carpetas y
archivos cargados en su reproductor.
Puede navegar en una
lista utilizando alguno de
estos métodos:
Presione los
botones <UP> o
<DOWN> (arriba o
abajo) en la unidad.
Toque directamente
un elemento de la
lista.
Toque los íconos
echa hacia arriba
<
> o echa hacia abajo < > que apare-
cen en la parte inferior de la pantalla.
Para conrmar la selección, presione <OK> o toque
la selección deseada en la pantalla LCD.
Para regresar a la pantalla anterior, presione el
botón <POWER> (encendido) o toque el ícono de
retorno <
> en la equina izquierda superior de
la pantalla.
Cur rent D irect ory:C :/EBO OK/
Upw ard Di recto ry
Fre iends .txt
New s.txt
Page 82 Coby Electronics Co rpo rati on
Page 83

Modo de texto
Controles del Visualizador de Texto
Para mostrar un archivo de texto, seleccione y conrme
el archivo desde el navegador de textos.
Función Activación
Ir a la página siguiente.
Ir a la página anterior
Mover el texto en la pantalla un renglón
hacia adelante.
Mover el texto en la pantalla un renglón
hacia atrás.
Regresar a la pantalla del navegador
de texto
Acceder al Menú de Opciones Rápidas
Menú de Opciones Rápidas
El Menú de Opciones Rápidas le brinda fácil acceso a
las conguraciones de su reproductor.
Toque <
Rápidas en la pantalla del lector de texto.
Para buscar en la conguración, presione los
botones <UP> o <DOWN> (arriba o abajo), o toque
<
Para seleccionar una conguración, presione el
botón <OK> o toque la selección deseada en la
pantalla.
www.cobyusa.com Page 83
> para acceder al menú de Opciones
> o < >.
Toque
, o presione
el botón <OK>.
Toque
Presione <DOWN>
(abajo).
Presione <UP> (arriba).
Toque
Toque
Español
Page 84

Modo de texto
Para regresar a la pantalla anterior, toque < >.
Navegación automática
Active o desactive la función de navegación automática.
Inter valos de desplazamiento
Español
Establezca la duración de la visualización de las páginas
cuando el reproductor esté en el modo de visualización
automática.
Scrol l I nt er va l
Toque < > o < > para ajustar la duración en
segundos.
Toque <
Toque <
guardar los cambios.
> para conrmar.
> para salir de la conguración sin
Límite de desplazamiento
Establezca el límite del desplazamiento automático en
una página o un renglón.
Page 84 Coby Electronics Co rpo rati on
Page 85

Modo de los cher
Ingrese al modo Archivos para ver todas las carpetas y
archivos cargados en su reproductor.
Para ingresar al modo Archivos, seleccione FILES
(ARCHIVOS) desde el menú principal.
Los archivos y las carpetas aparecerán en una lista. Si
selecciona un archivo compatible, el archivo se reproducirá en su modo correspondiente.
Modo de reproducción Tipo de archivo
Música MP3, WMA
Video AVI
Foto JPG, BMP, GIF, PNG
Texto TXT
Controles del Explorador
Puede navegar en una lista utilizando alguno de
estos métodos:
Presione los botones <UP> o <DOWN> (arriba
o abajo) en la unidad.
Toque directamente un elemento de la lista.
Toque los íconos echa hacia arriba <
echa hacia abajo < > que aparecen en la
parte inferior de la pantalla.
Para conrmar la selección, presione <OK> o toque
la selección deseada en la pantalla LCD.
www.cobyusa.com Page 85
> o
Español
Page 86

Modo de los cher
Para regresar a la pantalla anterior, presione el
botón <POWER> (encendido) o toque el ícono de
retorno <
la pantalla.
Menú de Opciones Rápidas
Español
El Menú de Opciones Rápidas le brinda fácil acceso a
las conguraciones de su reproductor.
Toque <
rápidas en la pantalla del explorador.
Para buscar en la conguración, presione los
botones <UP> o <DOWN> (arriba o abajo), o toque
<
> o < >.
Para seleccionar una conguración, presione el
botón <OK> o toque la selección deseada.
Para regresar a la pantalla anterior, toque <
Borrar
Borre el archivo seleccionado.
Borrar todo
Borre todos los archivos en la carpeta seleccionada.
Copiar
Copie el archivo seleccionado en otra ubicación en el
reproductor. Una vez que ha copiado el archivo deseado:
> en la equina izquierda superior de
> para acceder al menú de opciones
>.
Page 86 Coby Electronics Co rpo rati on
Page 87

Modo de los cher
Utilice los controles de la pantalla táctil para
ingresar a la carpeta de destino deseada.
Toque <
Rápidas.
Seleccione “Paste” (pegar) y toque para conrmar.
Cortar
Extraiga el archivo seleccionado y colóquelo en otra
ubicación en el reproductor. Una vez que ha cortado el
archivo deseado:
Utilice los controles de la pantalla táctil para
ingresar a la carpeta de destino deseada.
Toque <
Rápidas.
Seleccione “Paste” (pegar) y toque para conrmar.
Información del archivo
Selecciónelo para ver la información de almacenamiento
del archivo.
> para acceder al Menú de Opciones
> para acceder al Menú de Opciones
Español
www.cobyusa.com Page 87
Page 88

Modo calendario
Ver el calendario.
Antes de utilizar el Modo Calendario, asegúrese
de que ha establecido la fecha y la hora correctas
en el Modo Reloj.
Presione los botones del <UP> y del <DOWN> para
Español
navegar día a día o mensualmente.
Page 88 Coby Electronics Co rpo rati on
Page 89

Modo Reloj
Utilice este modo para establecer la fecha y la hora
internas.
Controles de conguración
Conguración de la fecha
Please inpu t dat a
MM/DD/YY
0 5 /1 5/2 00 9
Toque < > para seleccionar el campo que desea
ajustar (mes, día, año).
Toque <
Presione el botón <OK> para conrmar.
Conguración de la hora
Toque <
ajustar (hora, minuto, segundo).
Toque < > o < > para ajustar.
Presione el botón <OK> para conrmar y para guardar
la conguración. La pantalla mostrará una ventana
emergente con el mensaje “¡Exitoso!”
www.cobyusa.com Page 89
> o < > para ajustar.
> para seleccionar el campo que desea
Español
Page 90

Modo de la conguración
Ingrese al modo CONFIGURACIÓN para establecer las
opciones de sistema de su reproductor.
Para ingresar al modo Conguración, seleccione
SETTING (CONFIGURACIÓN) desde el menú principal.
Para seleccionar una conguración:
Español
Presione los botones <UP> o <DOWN> (arriba
o abajo) en la unidad.
Toque directamente un elemento de la lista.
Toque los íconos echa hacia arriba <
echa hacia abajo < > que aparecen en la
parte inferior de la pantalla.
Para conrmar la selección, presione <OK> o toque
la selección deseada en la pantalla LCD.
Para regresar a la pantalla anterior, presione el
botón <POWER> (encendido) o toque el ícono de
retorno <
la pantalla.
> en la equina izquierda superior de
Opciones de la conguración
Item Description
Selección de idioma
-- Congure el idioma del menú en pantalla.
Información de la memoria
-- Vea la información disponible de la
memoria.
> o
Page 90 Coby Electronics Co rpo rati on
Page 91

Modo de la conguración
Item Description
Versión
-- Vea la versión del rmware del reproductor.
Conguración de fábrica
-- Restaure todas las conguraciones del
Conguración personal
Tiempo de apagado automático
Frecuencia de baja
potencia
Duración de los
salvapantallas
Conguración del
volumen del tono
Animación UI Establece el efecto de transición de las
reproductor a su estado predeterminado de
fábrica.
Congura el tiempo (en minutos) que permanecerá encendido el reproductor cuando
esté sin funcionar. La conguración en
“Close” (cerrado) desactivará esta función
de ahorro de energía.
Ajuste la duración de la visualización de la
“energía baja”. Esta visualización aparece
en la pantalla del jugador cuando la batería
es baja.
Ajusta el tiempo (en segundos) que
permanecerá encendida la retroiluminación
después de pulsar una tecla. La con-
guración “Close” (cerrado) mantendrá la
iluminación encendida continuamente.
Activa o desactiva la función de tono.
diapositivas entre las visualizaciones
diferentes del menú.
Español
www.cobyusa.com Pag e 91
Page 92

Modo de la conguración
Item Description
Conguración de la hora
-- Congura el reloj interno del reproductor.
Español
Calibración
-- Calibrar la pantalla táctil LCD. Acceder
a esta función, luego tocar la pantalla
cuando lo indique el cursor. Aparecerá un
mensaje de “¡Exitoso!” cuando complete la
calibración.
Page 92 Coby Electronics Co rpo rati on
Page 93

Ficheros de transferencia al jugador
Conecte el reproductor Coby a una computadora con el
cable USB provisto para:
transferir archivos desde y hacia su reproductor; y
realizar funciones básicas de administración de
archivos.
Conexión a una computadora
Conecte el reproductor a su computadora con el cable
USB provisto. Cuando conecte el reproductor:
Su ordenador reconocerá automáticamente al
reproductor como un Disco Extraíble.
Para abrir el reproductor y visualizar archivos, haga
doble clic en el icono que aparece.
USB Port
USB Port
Español
www.cobyusa.com Page 93
Page 94

Ficheros de transferencia al jugador
Si necesitara asistencia adicional para transferir archivos,
por favor, diríjase al manual de instrucciones del sistema
o a la ayuda en pantalla. Si está utilizando un programa
multimedia tipo iTunes, Winamp o Windows Media Player,
por favor, diríjase a su documentación para más ayuda.
Español
Transferir con Windows Microsoft
1. Abra una ventana de explorador de archivo. Localice
los archivos que desearía transferir a su ordenador.
Seleccione los archivos/carpetas con el ratón y
presione CTRL-C (copiar) en el teclado.
2. Haga doble clic en “Mi PC” de su escritorio y luego,
doble clic en el icono que represente el reproductor.
En el ordenador aparecerá todos los archivos y
carpetas actuales almacenadas en el reproductor.
3. Presione CTRL-V (pegar) del teclado para transferir los
archivos seleccionados en el Pso 1 del reproductor.
Transferir con Macintosh OS X
1. Abra una ventana. Localice los archivos que le
gustaría transferir de su ordenador. Seleccione los
archivos/carpetas con el ratón y presione APPLE-C
(copiar) en el teclado.
2. Haga clic en el icono de Disco Extraíble localizado
en la parte izquierda de la ventana. En el ordenador
aparecerán todos los archivos y carpetas almacenadas recientemente en el reproductor.
3. Presione APPLE-V (pegar) en el teclado para
transferir los archivos seleccionados en el Paso 1 del
reproductor.
Page 94 Coby Electronics Co rpo rati on
Page 95

Ficheros de transferencia al jugador
Desconexión de una computadora
Desconecte el reproductor tal como se indica a continuación para detectar la pérdida de datos o la corrupción
de archivos/rmware.
Microsoft Windows
1. Haga doble clic en la echa verde de la barra de
tareas ubicada en el lado inferior derecho de la
pantalla de la computadora (Quitar hardware con
seguridad).
2. Quitar hardware son
seguridad: Seleccione
de la lista que aparece
“Dispositivo masivo de
memoria USB” y luego
haga clic en “Detener”.
Detener un dispositivo de
hardware: Seleccione de
la lista que aparece “Dispositivo masivo de memoria
USB” y luego haga clic en “Detener”.
3. Cuando aparezca la ventana “Quitar hardware con
seguridad”, haga clic en el botón OK y desconecte
el cable USB del reproductor y de la computadora.
Español
Macintosh OS X
1. En la izquierda de la ventana de búsqueda, identi-
que el disco removible correcto.
www.cobyusa.com Page 95
Page 96

Ficheros de transferencia al jugador
2. Haga clic en la echa
“Eyectar” a la derecha
del icono del disco
removible.
3. Desconecte el cable
Español
USB del reproductor y de la computadora.
Coby Media Manager
El reproductor MP3 incluye el software de administración de medios de Coby para organizar su música y
videos, crear listas de reproducción y mucho más. Para
comenzar a organizar su biblioteca de medios utilizando
el administrador de medios de Coby, instale el software
en su computadora como se indica a continuación.
Instalación de Microsof t Windows
Conecte el reproductor a su computadora utilizando
el cable USB provisto. La computadora debe
reconocer automáticamente el reproductor y debe
mostrar una ventana emergente con una lista de
opciones disponibles.
Seleccione el ícono Coby Media Manager (adminis-
trador de medios de Coby) para comenzar a instalar
el software en la computadora.
Haga clic en “Next” (siguiente) cuando sea indicado
para completar la instalación y active el administrador de medios de Coby.
Page 96 Coby Electronics Co rpo rati on
Page 97

Ficheros de transferencia al jugador
Si la computadora no presenta automáticamente
el menú de opciones del reproductor, abra “Mi PC”
y haga doble clic en el ícono del administrador de
medios de COBY para activar e instalar el software.
Si el software no se activa, siga los siguientes pasos:
Haga clic con el botón derecho del mouse en el
ícono del administrador de medios de Coby y
seleccione “Explorer” (explorador) en el menú
desplegable.
Haga doble clic en el archivo llamado “coby-
cometlite.exe” para activar e instalar el software.
Si esto no inicia la instalación, copie y pegue el ar-
chivo llamado “coby-cometlite.exe” en su escritorio.
Haga doble clic en el archivo para activar e instalar
el software.
Es probable que la extensión “ .exe” no apa-
rezca en la pantalla dependiendo de las preferencias del sistema.
Instalación en Macintosh OS X
Abra el reproductor como abriría un disco externo, e
ingrese a la carpeta del explorador.
Copie la carpeta del administrador de medios Coby
para Mac OSX en su computadora.
Español
www.cobyusa.com Page 97
Page 98

Ficheros de transferencia al jugador
Haga doble clic en el archivo llamado “coby-media-
manager.dmg” para comenzar a instalar el software.
Siga las indicaciones que aparezcan en pantalla
para completar la instalación y active el administrador de medios de Coby.
Español
Una vez que instale el administrador de medios
de Coby, encontrará un menú de ayuda interno
que lo guiará para utilizar el software. Consulte
este menú luego de la instalación si necesita más
ayuda.
Page 98 Coby Electronics Co rpo rati on
Page 99

Conversión video
Para la sincronización y la conversión de películas y
música, utilice el software “Coby Media Manager” (administrador de medios de Coby) provisto en el reproductor.
El manual del administrador de medios de Coby también
está incluido en un archivo en el reproductor.
Español
www.cobyusa.com Page 99
Page 100

Mejoras de los rmwares
De tanto en tanto, COBY puede publicar actualizaciones
de rmware para mejorar el rendimiento del reproductor
o para agregar nuevas funciones. Revise el sitio Web de
COBY con regularidad en www.cobyusa.com para ver si
se ha publicado nuevo rmware para su reproductor. Si
su reproductor funcionara anormalmente, puede optar
por restaurar (dar formato) a su reproductor antes de
Español
actualizar el rmware.
No interrumpa el proceso de actualización del
rmware, ya que hacerlo podría dañar el reproductor y hacer que ya no funcione.
Consulte la documentación incluida con el archivo
de actualización para obtener instrucciones detalladas.
Page 100 Coby Electronics Co rpo rati on
 Loading...