

Page 1
USB-Stick MP3 Player
MP-300-1G
MP-300-2G
MP-300-4G
Instruction Manual
Please read t his m anua l care ful ly bef ore op eration
Page 2
www.cobyusa.com Page 3
Precautions
The lightning ash with ar rowhead symbo l within an equil ateral triangl e
is inten ded to aler t the user to the presenc e of uninsulate d “dangerous
voltage” withi n the product ’s enclosure th at may be of suf cient magnitude to co nstitute a risk of electr ic shock.
The exclamatio n point within an equilateral triang le is intended to alert
the u ser to th e presence of impor tant oper ation and servicing instructions in t he literature ac companying the a ppliance.
For Cus tomer Use:
Enter bel ow the serial numb er that is located on the unit. Retain t his information for
future r eference.
Model N o. MP-30 0
Seria l No.
WARNING:
To prevent re or shock hazard, do not expose thi s device to rain or moistur e. Dangero us high
voltage is prese nt inside the encl osure. Do not open the cabin et.
CAUTION:
To prevent elec tric shock, match wide b lade of plug to wide s lot of outlet and fully inser t.
WARNING:
Handlin g the cords on this p roduct will exp ose you t o lead, a chemical known to the Stat e
of C alifornia to caus e cancer, and birth defects or other reproductive harm. Wash hand s
afte r handling.
For recycl ing or disposal infor mation about this product, ple ase contact your loc al
author ities or the Elec tronics Indus tries Alliance: ww w.eiae.or g.
Page 2 Coby Electron ics Co rpo rati on
Page 3

Precautions
PROTECT YOUR HEARING:
Hearing exper ts advise agains t the constant us e of personal ster eos played at high vo lume.
Consta nt exposure to high volumes c an lead to hearin g loss. If you shoul d experience
ringin g in the ears or hear ing loss, disco ntinue use and see k medical advic e.
NOTICE :
This product is protec ted by certain intell ectual property rights of Microsoft . Use or distribution
of such tec hnology outsi de of this produc t is prohibited wi thout a license f rom Microsof t.
www.cobyusa.com Page 3
Page 4

www.cobyusa.com Page 5
Important Safety Instructions
Read Inst ruct ions: All the safety and operating instructions should b e re ad
1.
before th e produc t is operat ed.
Retai n Instru ction s: The safety and opera ting instr uction s should be retained
2.
for futur e referen ce.
Heed War ning s: All warni ngs on the pr oduct and i n the opera ting inst ructi ons
3.
should be a dhered to.
Follow In stru ction s: All opera ting and usa ge instr uction s should be fo l-
4.
lowed.
Cleani ng: Unplug t his produc t from the wal l outlet befo re cleanin g. Do not use
5.
liquid cl eaners o r aeroso l cleaner s. Use a dam p cloth fo r cleanin g.
Attac hment s: Use only at tachm ents reco mmende d by the manufa cturer. Use
6.
of other at tachm ents may be ha zardou s.
Water and Mo istur e: Do not use this produc t near water (e.g., near a bath tub,
7.
washbow l, kitchen sink, laundr y tub, in wet baseme nts, or near a swimm ing
pool and t he like).
Acces sorie s: Do not plac e this prod uct on an
8.
unstabl e cart, stand, trip od, bracket, or t able. Use
only w ith cart s, st ands, tripo ds, br ackets, or tables
recomm ended by th e manufac turer or s old with
the product. Any mounting of the product should
follow the manufacturer ’s instruction s and sh ould
use a mounti ng acces sory r ecomme nded by the
manufac turer.
A product and ca rt combi nation sho uld be moved with
9.
care. Qui ck stops, exc essive fo rce, and un even surf aces
may cause t he produ ct and car t combination to ove rtur n.
Ventila tion: Slots and openin gs in the cabin et are provided f or ve ntilati on to
10.
ensure reliable operati on of th e product and t o protect it fr om overheating.
These openi ngs should never be blocked by placin g the product on a bed, sofa,
rug, or othe r s imilar surface. This produc t should not be placed in a built-in
install ation suc h as a bookcase or r ack unles s proper vent ilation is pr ovided or
the manuf acture r instruc tions ha ve been adhe red to.
Power Sou rces: Th is produc t should be o perated o nly from t he type of p ower
11.
source indicated on the rating label. If you are not sure of the t ype of power
supply to y our home, c onsult yo ur produ ct deale r or loca l power co mpany. For
produc ts intend ed to ope rate fro m batte ry powe r or othe r sourc es, refer to the
operati ng instr uction s.
Grounding or Pola rizati on: This product may be equipped with a p olarized
12.
alternating- current line plug that has one bla de wider than the other. This plug
will only t into the power outlet in one dire ction. This is a safet y feature. I f you
are unable to insert the plug fully into the outlet, try reversin g the direction of the
plug. If the plug should still fail to t, contact an electrici an to replace the obsolete
outlet. Do not defeat the safety purp ose of the polarized plug.
Page 4 Coby Electron ics Co rpo rati on
Page 5
Important Safety Instructions
Power- Cord Protection: Power su pply cords should be routed so that t hey
13.
are not likely to be walked on or pinc hed by items plac ed upon or again st them,
paying p arti cular at tention to co rds at plugs, convenie nce re ceptac les, a nd at
the point w hich they ex it from t he produc t.
Protec tive Atta chmen t Plu g: The product may be equipped with an at tach -
14.
ment plug with over load pr otecti on. This i s a safet y feature . See the o perati ng
instru ctions for replac ement or directi ons to reset the protective devic e. If
replac ement of t he plug is r equired , be sure th e serv ice tech nician h as used a
replac ement plug th at has the same over load prote ction as the or iginal pl ug as
speci ed by the man ufactu rer.
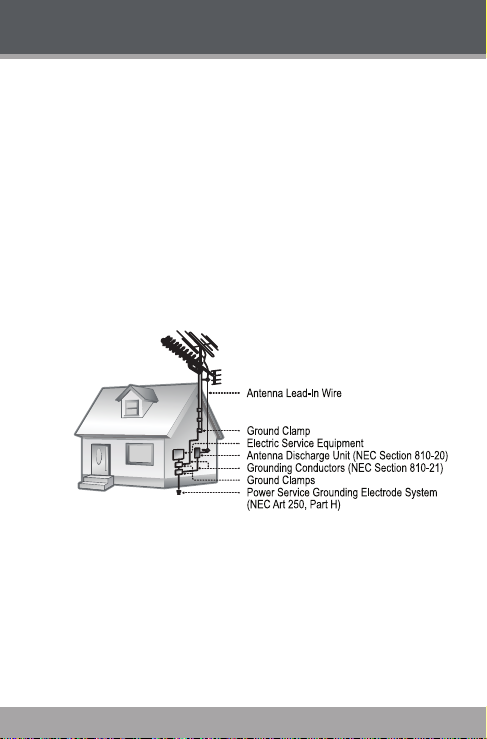
Outdo or Antenn a Groundin g: If an outside antenna is connected to the
15.
produc t, be sure the an tenna s ystem i s grou nded so as to pr ovide s ome p rotectio n ag ainst voltage surges and buil t-up static c harges. Article 810 of the
Nationa l Electr ical Code, ANS/ NFPA 70 provides inform ation with regard to
proper g roundin g of the m ast and s uppor ting st ructur e, groun ding of t he lead in wire to a n antenna -disc harge uni t, size of gr ounding conduc tors, lo catio n of
antenna -disc harge unit, conn ection to ground ing electro des, and requirem ents
for the gro unding el ectro de (see gure).
Light ning: For a dded pro tectio n for this p roduct , unplug i t from th e wall outl et
16.
and dis connec t the antenna or cab le syste m durin g a lig htning storm or when
it is left una ttende d and unused fo r long peri ods of time. Th is will preven t damage to the pr oduct du e to lightni ng or power- line surg es.
Power Lin es: An o utside an tenna sys tem shoul d not be lo cated i n the vic inity
17.
of overhe ad power li nes or othe r elect ric light o r power circuits, or where it
can fall into such power lines or circu its. When installing an o utside antenna
system, ex treme c are shoul d be taken to ke ep from to uching su ch power l ines
or circu its, as co ntact wi th them mi ght be fata l.
Overl oading : Do not overload wa ll outlets, ex tension c ords, or integ ral conve -
18.
nience r ecepta cles as th is can res ult in a ris k of re or ele ctric s hock.
www.cobyusa.com Page 5
Page 6

www.cobyusa.com Page 7
Important Safety Instructions
Objec t and Liquid Entry: Never push objects of any kind into this pr oduct
19.
through openings as t hey may touch da ngerou s voltage points or sho ut-out
parts that could resul t in a re or electri c shoc k. Ne ver spi ll liq uid of any kind
on the pro duct.
Serv icing: Do not attempt to service this product yo urself as openin g or re-
20.
moving c overs may expo se you t o dange rous vol tage o r other hazar ds. Refe r
all ser vicing to q ualie d serv ice pers onnel.
Damag e Requiri ng Servi ce: Unplug this prod uct from the wall outlet and refer
21.
servi cing to qualie d servic e personne l under the following co ndition s: a) when
the pow er-suppl y or pl ug is da maged; b) i f liqui d has be en spil led or if obje cts
have fallen into the prod uct; c) if the product has been expo sed to rain or water;
d) if th e prod uct do es not operate norma lly by f ollowin g the o perati ng inst ructions. Ad just only t hose con trols th at are cover ed by the ope rating in struc tions
as imp roper adjustm ent of other contr ols may result in d amage and wi ll of ten
require extensive work by a quali ed technician to restor e t he produc t to its
normal operat ion; e) if t he prod uct has been dr opped or damag ed in a ny way;
f) w hen th e prod uct exh ibits a dist inct c hange in pe rfor mance —this indicates
a need for se rvic e.
Replac emen t Part s: When r eplace ment par ts are r equired , be sure t hat your
22.
servi ce tec hnicia n has u sed rep laceme nt par ts sp ecied by the manufa cturer
or h ave th e sa me c haract eristi cs a s th e or iginal part. U nauthor ized substitu-
tions may r esult in r e, electr ic shoc k, or other h azards .
Safet y Chec k: Upo n compl etion o f any ser vice or repai rs to t his pro duct, a sk
23.
the serv ice tech nician to pe rfor m safety ch ecks to ensur e that the prod uct is in
proper op eratin g condit ion.
Wall or Ceil ing Moun ting: Th e product sh ould be mount ed to a wall or ceilin g
24.
only as rec ommend ed by the man ufactur er.
Heat: The product should be situ ated away from heat sources such a s ra-
25.
diators , heat registers, stoves, or other products (incl uding ampli ers) that
produc e heat.
Page 6 Coby Electron ics Co rpo rati on
Page 7

Table of Contents
PRECAUTIONS ................................................................. 2
IMPORTANT SAFETY INSTRUCTIONS ..............................
TABLE OF CONTENTS .......................................................
PACKAGE CONTENTS .....................................................
FEATURES .......................................................................
GETTING STARTED .........................................................
MP-300 at a Glance .................................................... 11
Top View ................................................................ 11
Bottom View .......................................................... 11
Front View .............................................................. 11
Right View .............................................................. 11
Play Mode Display ...............................................12
Record Mode Display .......................................... 12
Connecting Headphones ..........................................13
Connecting Power ....................................................... 13
Loading a Battery ................................................13
USB Power .............................................................. 14
Using the MP-30 0 Controls .......................................... 15
Power On/Off ........................................................ 15
Hold Switch ............................................................ 15
Reset Function ...................................................... 15
Navigating the Menu Interface ......................... 16
Main Menu ........................................................................
PLAY MUSIC ...................................................................
Play Music Controls ...................................................... 17
Repeat A- B Mode ................................................18
SETTING
FOLDER ..........................................................................
Folder Controls .............................................................. 21
.......................................................................... 19
www.cobyusa.com Page 7
10
11
17
21
4
7
9
Page 8

www.cobyusa.com Page 9
Table of Contents
USB CONNECTION ........................................................22
Connecting to a Computer........................................22
Transferring Files ............................................................23
Disconnecting from a Computer .............................. 24
FIRMWARE UPGRADE
ABOUT MP3/WMA FILES ...............................................
TROUBLESHOOTING ......................................................
SPECIFICATIONS ...........................................................
Microsoft Windows .......................................24
Macintosh OS X ............................................25
....................................................26
27
28
31
Page 8 Coby Electron ics Co rpo rati on
Page 9
Package Contents
1
4
2
5
3
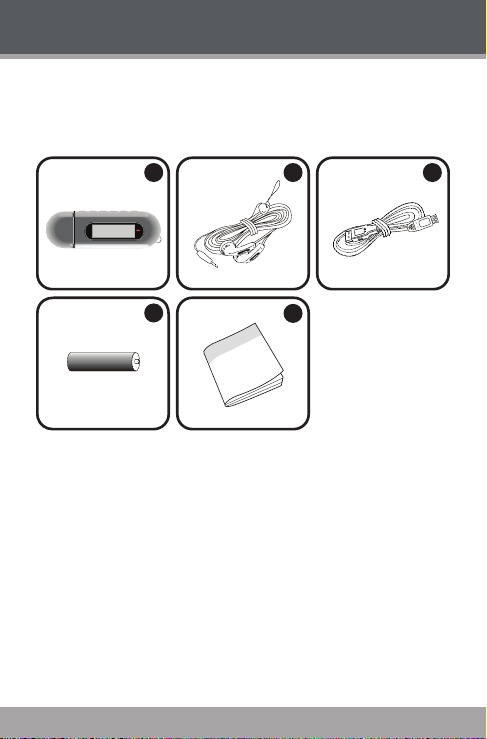
Please make sure that the items listed below are included
in the package. Should an item be missing, please
contact the local retailer from which you purchased this
product.
MP-300
1.
Stereo Earphones
2.
USB Extension Cable
3.
1 x “AAA” Battery
4.
Instruction Booklet
5.
www.cobyusa.com Page 9
Page 10

www.cobyusa.com Page 11
Features
Integrated Flash Memor y
High-Contrast LCD Display with Backlight
Plays MP3 and WMA Digital Music Files
ID3 support for song information display
Mobile Data Storage Function
USB 2.0 for Fast File Transfers
Page 10 Coby Electron ics Co rpo rati on
Page 11

Getting Started
11
10
12
1
2
3
4
6
5
MP-30 0 at a Glance
Top View
MENU button
1.
Volume +
2.
Volume -
3.
Previous/Reverse
4.
Next/Forward
5.
Play/Pause/Stop
6.
Bottom View
HOLD Switch
7.
USB Cap
8.
Battery Cover
9.
Front View
LCD Display
10.
Neckstrap Hook
11.
Right View
Headphone Out Jack
12.
www.cobyusa.com Page 11
Page 12

www.cobyusa.com Page 13
Getting Started
Play Mode Display
Record Mode Display
Page 12 Coby Electron ics Co rpo rati on
Page 13

Getting Started
Connecting Headphones
Connect headphones/earphones to the Headphone
Out jack for private
listening.
Lower the volume
level before connect-
ing headphones, then gradually increase the volume
for comfortable listening.
Hearing experts advise against the constant use of
personal stereos played at high volume.
Constant high-volume use can lead to hearing loss.
If you experience ringing in your ears or hearing loss,
discontinue use immediately and seek medical advice.
Connecting Power
The MP-300 operates on 1 x “AA A” batter y for music
playback.
Loading a Battery
Remove the USB Cap.
1.
Remove the Battery
2.
Cover.
Insert 1 x “AAA” battery,
3.
taking care to match the
“+” and “–” polarities of the
battery with the markings
inside the battery compartment.
www.cobyusa.com Page 13
Page 14

www.cobyusa.com Page 15
Getting Started
Replace the Battery Cover.
4.
USB Power
When the MP-300 is connected to a computer’s powered
USB port, it will draw power over the USB connection.
Page 14 Coby Electron ics Co rpo rati on
Page 15

Getting Started
Using the MP-300 Controls
Power On/Of f
To turn your player on, press . The LED indicator
will light.
To turn your player off, hold for at least 3 sec-
onds. The LED indicator will darken.
Hold Switch
The Hold feature locks (disables) your player’s controls to
prevent accidental key presses when it is in your pocket
or bag.
To lock the player’s controls, slide the HOLD switch
to the right in the direction of the arrow. A Lock icon
will be displayed on the screen.
HOLD
To unlock the player’s controls, slide the HOLD
switch to the left.
Reset Function
You may reset your player if it should freeze or otherwise
behave abnormally.
Disconnect your player if it is connected to a
1.
computer.
Remove the battery from the player. Wait 10
2.
seconds, and then replace the battery.
www.cobyusa.com Page 15
Page 16

www.cobyusa.com Page 17
Getting Started
Power on your player. Your player has now been
3.
reset.
Navigating the Menu Interface
It is easy to use the MP-300 controls to select menu op-
tions, items, and les on your player.
To move the selection cursor (highlight), press the
arrow keys. To move quickly in any direction, press
and hold the arrow keys.
To highlight the previous item to the left (or up),
press .
To highlight the next item to the right (or down),
press .
To conrm and enter the current selection, press
.
To return to the previous screen, press .
Page 16 Coby Electron ics Co rpo rati on
Page 17

Play Music
Enter PLAY MUSIC mode from the
Main Menu to play digital MP3 or
WMA music les.
PLAY MUSIC mode will play all compatible au-
dio les on your player, regardless of directory.
Play Music Controls
Use the following controls during music playback.
Key Function
Press
Hold (2
seconds)
Press Play the next track.
Hold
Press Play the previous track.
Hold Reverse through the current track.
Press Decrease the volume level.
Press Increase the volume level.
Press Start Repeat A-B Mode.
Hold Return to Main Menu.
Start/Resume track playback.
During playback, press to pause
playback.
Stop track playback completely.
Fast-forward through the current
track.
www.cobyusa.com Page 17
Page 18

www.cobyusa.com Page 19
Play Music
For more information about how to get music
onto your player, please refer to the section
“Getting Started > Connecting to a Computer >
Transferring Music to Your MP-300”.
For more information about digital MP3 and
WMA music les, please refer to the section
“About MP3/WMA Music Files”.
Repeat A-B Mode
Set a segment of a music track to repeat in a continuous
loop. During playback:
To set the starting point “A” of the loop, press .
To set the end point “B” of the loop, press again.
The loop will now play from point “A” to point “B”.
To resume normal playback, press again.
Page 18 Coby Electron ics Co rpo rati on
Page 19

Setting
Enter SETTING mode from the Main
Menu to change your player’s internal
option settings.
The Setting Menu contains 11 options.
To select an option, press or . To conrm and
enter, press .
To exit the Setting Menu, press .
Item Description
Equalizer
Repeat Mode
Contrast Set the contrast level of the display.
Backlight
Backlight
Color
Power Set
Set a digital equalizer preset. The options are
Normal, Pop, Rock, Classic, Jazz, and Bass.
Set a Repeat Mode option. The options are Normal, Repeat One, Repeat All, Shufe Repeat, Dir
Normal, Dir All Repeat, Dir Shufe Repeat.
Set the backlight option to change the duration of
time (in seconds) that the backlight will remain on
after a key press. A setting of “Off” will disable the
backlight completely. A setting of “On” will keep
the backlight on continuously.
Set the color of the backlight. A setting of “Color
All” will change the backlight color with each key
press.
Set the Power Set option to change the duration
of time (in minutes) that the player will remain on
when it is idle. A setting of “Disable” will turn this
power saving feature off.
www.cobyusa.com Page 19
Page 20

www.cobyusa.com Page 21
Setting
Item Description
Set the Recording Quality level for Voice or FM
Record Set
Langauge Set the Language that the menus appear in.
Version View your player’s rmware information.
Info View your player’s memory information.
USB Mode
recordings. The options are 32Kbps (lowest
quality), 44Kbps, 64Kbps, and 88Kbps (highest
quality). Higher quality recordings will take up
more memory than lower quality recordings.
Set the USB mode to MSC or MTP. For more
information on USB modes, see the “Connecting
to a Computer” section of this manual.
While the player is connected to a computer,
you can change the USB mode by pressing and
holding .
Page 20 Coby Electron ics Co rpo rati on
Page 21

Folder
Enter FOLDER mode to view, play, or
delete les on your player.
You can also connect your player to a computer to easily
manage your le library.
Folder Controls
A director y tree will be displayed on-screen upon entering FOLDER mode from the Main Menu.
Use the following controls in FOLDER mode.
Key Function
Press Select the next le or folder (down).
Press Select the previous le or folder (up).
If a folder is selected, the folder’s contents will
be displayed.
If a le is selected, an option box will be
displayed:
Press
Press Return to Main Menu.
Select “Play Now” to play the selected le.
•
Select “Delete?” to delete the selected le, and
•
then select “Yes” to conrm the deletion.
If the icon is selected, the previous folder’s
contents will be displayed.
www.cobyusa.com Page 21
Page 22

www.cobyusa.com Page 23
USB Connection
Connect the MP-300 to a computer to:
Transfer les to and from your player.
Perform basic le management functions.
If you are using Windows 98 SE, you must install a USB
driver. Download the driver from the Coby website at:
www.cobyusa.com.
Connecting to a Computer
Make sure the
1.
player is turned off.
Remove the USB
2.
Cap and plug the
MP-300 directly into
your computer’s
USB port. You may
choose to use a USB extension cable to connect to a
computer.
Your computer will automatically recognize the
player as an MSC Device. An icon representing your player will appear as a “Removable
Disk” when you open “My Computer”.
It may take Windows several minutes to rec
ognize and set up the device the rst time it is
connected depending on your hardware con-
guration.
-
Page 22 Coby Electron ics Co rpo rati on
Page 23

USB Connection
Transferring Files
Connect the MP-200 to a computer.
1.
Open the computer’s le browser (e.g., “Windows
2.
Explorer”).
Select the music les to transfer and drag-and-drop
3.
them onto the “Removable Disk” icon that repre-
sents your MP-300.
You may also transfer les from your MP-300 to
a computer.
Do not disconnect the MP-300 or otherwise in-
terrupt the le transfer process. Doing so may
corrupt your les and/or the player’s rmware.
Please refer to the documentation that came with
your computer or operating system for more information and support regarding music transfer
and le management over a USB connection.
www.cobyusa.com Page 23
Page 24

www.cobyusa.com Page 25
USB Connection
Disconnecting from a Computer
Follow the steps below to prevent data loss or corruption.
Microsoft W indows
Double-click the green arrow
1.
in the taskbar located on the
lower-right side of the computer
screen (Safely Remove Hardware).
Safely Remove
2.
Hardware:
Select “USB Mass
Storage Device”
from the list that
appears and then
click on “Stop”.
Stop a Hardware
Device: Select
“USB Mass Storage
Device” from the list
that appears and
then click on “OK”.
Select “USB Mass Storage Device” from the list that
appears and then click on “OK”.
When the “Safe to Remove Hardware” window ap-
3.
pears, click the OK button and disconnect the USB
cable from the player and your computer.
Page 24 Coby Electron ics Co rpo rati on
Page 25

USB Connection
Macintosh OS X
On the left side of the Finder window, identify the
1.
appropriate Removable Disk icon.
Click on the “Eject” arrow on
2.
the right of the Removable
Disk icon.
Disconnect the USB cable
3.
from the player and your computer.
www.cobyusa.com Page 25
Page 26

www.cobyusa.com Page 27
Firmware Upgrade
From time to time, COBY may release rmware upgrades
to improve the per formance of the MP-300 or to add
additional features. Please check the COBY website
periodically at www.cobyusa.com to see if new rmware
has been released for your player. If you are experiencing
abnormal behavior with your player, you may choose to
restore (format) your player before updating its rmware.
Do not interrupt the rmware upgrade pro-
cess—doing so could damage your player and
render it inoperable.
See the documentation that is included with the
rmware upgrade le for detailed instructions.
Connect your player to the computer.
1.
Download the latest rmware for your player from
2.
www.cobyusa.com. Save this le to the computer.
Double-click the downloaded le (you may need a
3.
le compression utility installed on your computer).
In the window that appears, double-click the le
“factory4.exe” to star t the upgrade utility.
Follow the on-screen instructions to start the
4.
upgrade process.
When the upgrade is complete, disconnect your
5.
player from the computer.
Turn on your player to complete the rmware
4.
upgrade process.
Page 26 Coby Electron ics Co rpo rati on
Page 27

About MP3/WMA Files
For more information about digital MP3 and WMA les,
please visit our website at w ww.cobyusa.com.
www.cobyusa.com Page 27
Page 28

www.cobyusa.com Page 29
Troubleshooting
If you have a problem with this device, please read the
troubleshooting guide below and check our website
at www.cobyusa.com for Frequently Asked Questions
(FAQs) and rmware updates. If these resources do not
resolve the problem, please contact Technical Support.
Address COBY Electronic s Technical Suppor t
Email techsupport@cobyusa.com
Web www.cobyusa.c om
Phone 800 -727-359 2: Weekdays 8:00AM–11:00PM EST
56- 65 Rust Street
Maspeth, NY 11378
Weekends 9:0 0AM –5:3 0PM EST
718-416-3197: Weekdays 8:00AM– 5:30PM EST
The player does not turn on.
Ensure that the battery retains a charge. Try replac-
ing the battery with a new one.
Try resetting your player (remove and replace the
battery).
Ensure that the Hold switch is disengaged.
The buttons do not work.
Ensure that the battery retains a charge. Try replac-
ing the battery with a new one.
Ensure that the Hold switch is disengaged.
Page 28 Coby Electron ics Co rpo rati on
Page 29

Troubleshooting
I cannot transfer les to the player.
Ensure that your computer is running a supported
operating system.
If you are running Microsoft Windows 98 SE, ensure
that the USB driver has been properly installed.
If using the supplied USB extension cable, ensure
that it is securely attached to the player and the PC,
or try using another USB cable.
If you have connected the player through a USB
hub, try connecting the player directly to your
computer.
Ensure that the player’s memory capacity is not full.
Ensure that the Hold switch is disengaged.
There is no sound during playback.
Check the volume level.
Ensure that the headphones are attached securely
to the player.
The sound quality of the music is poor.
Try playing the le on your computer. If the sound
quality is still poor, try downloading the le again or
re-encoding the le yourself.
Ensure that the bit rate of the le is not too low. The
higher the bit rate of the le, the better it will sound.
The minimum recommended bitrate is 128kbps for
MP3s and 96kbps for WMAs.
www.cobyusa.com Page 29
Page 30

www.cobyusa.com Pag e 31
Troubleshooting
Try lowering the volume of the player.
Ensure that the headphones are attached securely
to the player.
The player will not play my music le.
Ensure that the le is in a compatible format.
The le may be copy-protected and you no longer
have authorization to play this le. If you feel this is
in error, please contact the service from which you
downloaded the le.
The LCD characters are corrupted or something is
wrong with the display.
Ensure that the correct menu language has been
set.
Try resetting your player (remove and replace the
battery).
The player has malfunctioned.
Try resetting your player (remove and replace the
battery).
Try updating the player’s rmware. Please refer to
the Firmware Upgrades section of this manual for
detailed instructions.
Page 30 Coby Electron ics Co rpo rati on
Page 31

Specications
Display Type 128 x 32 Dot-Matrix LCD with Backlight
Memory Integrated Flash Memory
Audio Format Support MP3, WMA
DRM Support --
Song Info Support ID3
FM Frequency Range 87.5 - 108.0MHz
PC Interface USB 2.0 Hi-Speed (MSC)
Plug and Play Support Windows 98SE/2000/ME/XP or newer
Audio Output 3.5mm Stereo (Headphone)
Power Supply 1 x “AAA” Battery
Unit Dimensions 2.2” x 2.87” x 0.82” (WHD)
Specications and manual are subject to change without
prior notice.
MP-300-1G: 1GB
MP-300-2G: 2GB
MP-300-4G: 4GB
Mac OS X
www.cobyusa.com Pag e 31
Page 32

Coby Electronics Corporation
56- 65 Rust Street
Maspeth, NY 11378
ww w.cobyusa.com
ww w.ecoby.com
Coby is a re gis tered t rademar k of
Coby El ectronic s Corporat ion.
Printed in Ch ina.
30 01GAL
30 02GAL
30 04GAL
 Loading...