

Page 1
Digital Photo Album
Quick Start Guide
DP-240
240AC
Page 2

Introduction
Thank you for purchasing a Coby DP-240 Digital Photo Album. With a high-resolution screen,
internal storage memory, and an SD card slot that accepts memory cards from many digital camera manufacturers, you can view and share your memories with your friends wherever you go.
This Quick Start Guide is provided to help you get started quickly with your photo album; for
more detailed instructions, please refer to the Instruction Manual.
Coby Ele ctron ics Cor p. [2] www.cobyusa.com
Page 3
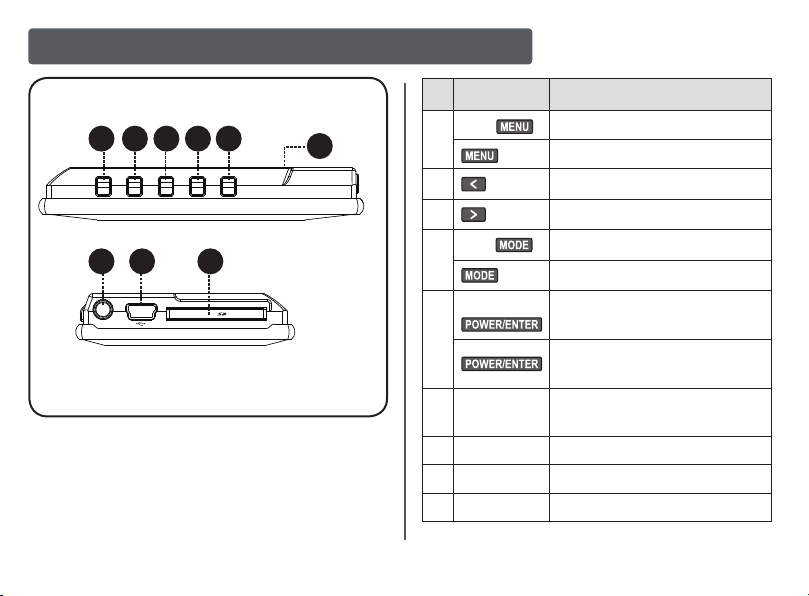
Controls at a Glance
1 2 3 4 5
6
7 8
9
Top View
Right View
Key Description
Hold
1
2 Left / Previous
3 Right / Next
Hold
4
Hold
5
6 Reset
7 -- 3.5mm Headphone Jack
8 -- USB 2.0 Port
9 -- SD/SDHC/MMC Card Slot
Go to Main Menu
Return to previous screen
View option menu (if available)
Change mode (if available)
Power On / Off
Play / Pause
Enter (conrm)
Use paper clip to press the
Reset button when necessary.
Coby Ele ctron ics Cor p. [3] www.cobyusa.com
Page 4

Charge your Digital Photo Album
The album has an integrated rechargeable battery. The battery should be charged fully
(2 hours) before initial use to ensure optimal performance and battery life.
Your photo album can be charged through a PC-USB connection. Plug one end of the USB
cable into the album’s USB Port and plug the other end into the USB port of a powered-on
computer.
The battery used in this device may present a re
or chemical burn if mistreated. Do not disassemble,
incinerate, or heat the battery.
Do not connect the album to a power source other
than that which is indicated here or on the label as
this may result in the risk of re or electric shock.
Coby Ele ctron ics Cor p. [4] www.cob yusa.com
When connected to a USB hub, the hub
must be self-powered to charge the
album’s battery.
Page 5

Transfer Photos & Music to the Photo Album
MS Windows Macintosh OS X
To transfer photo and music les to your photo album, connect it to a computer.
The photo album will be detected as a Removable Disk drive by the computer.
●
To copy photos and music to the photo album, simply drag and drop the les onto the
●
Removable Disk icon.
Disconnect the album from the computer when you have nished transferring your les.
Your Coby photo album supports JPG, GIF, and BMP photo les.
●
Your Coby photo album supports MP3 and WMA music les.
●
Coby Ele ctron ics Cor p. [5] www.cob yusa.com
Page 6

Install an SD Memory Card (Optional)
To view photos from an SD, SDHC, or MMC memory card, insert the card into the card slot with
its metal contacts facing up.
Your Coby photo album supports SD and MMC memory cards up to 2GB in size.
●
Your Coby photo album supports SDHC memory cards up to 32GB in size.
●
Coby Ele ctron ics Cor p. [6] www.cob yusa.com
Page 7

Turn on the Photo Album
Press & Hold
for Power
Thumbnail Index
IMG001.JPG
View your Photos
Press and hold until the LCD
screen turns on.
During photo display:
Press or to view the previous or
●
next photo, respectively.
Press to toggle slideshow
●
mode on or off.
Press to return to the Thumbnail
●
Index.
The screen will begin to display any photos
that have been stored on the album’s internal
memory automatically.
If no photos have been stored, the album will
enter the Main Menu screen.
Coby Ele ctron ics Cor p. [7] www.cob yusa.com
Page 8

Selecting Internal or Card Memory
PHOTO MUSIC SETUP
To change between internal or card memory:
Press and hold to return to the Main Menu screen.
1.
Press to toggle between internal or card memory.
2.
After you have selected the memory source, press or to select Photo or Music mode,
then press to conrm.
Coby Ele ctron ics Cor p. [8] www.cob yusa.com
 Loading...