

Page 1
CS-MP150
Digital Alarm Clock/Radio with
iPod® Docking Station
INSTRUCTION MANUAL
Please read this manual carefully before operation
Page 2
www.cobyusa.com Page 3
PRECAUTIONS
The lightning as h with arrowhead symbol within an e quilateral triangle
is inten ded to aler t the user to the presenc e of uninsulate d “dangerous
voltage” within the product ’s enclosur e that may be of su fcient magnitude to co nstitute a risk of electr ic shock.
The exclamatio n point with in an equilat eral triang le is intende d to alert
the u ser to th e presence of impor tant oper ation and servicing instructions in t he literature ac companying the a ppliance.
For Cus tomer Use:
Enter bel ow the serial numb er that is located on the unit . Retain this information f or
future r eference.
Model N o. CS- MP150
Seria l No.
WARNI NG:
To prevent re or shock hazard, do not expose thi s devic e to rain or moist ure. Dangerous high
voltage is presen t inside the enclo sure. Do not open th e cabinet.
CAUTIO N:
To prevent elec tric shock, match wide bl ade of plug to wide sl ot of outlet and fully inser t.
PROTECT YO UR HEAR ING:
Hearing experts advise against th e constant use of p ersonal stereo s played at high
volume. C onstant exposur e to high volumes ca n lead to hearing l oss. If you should
experi ence ringing in t he ears or hearin g loss, discont inue use and seek me dical advice.
Should any trouble occur, remove the power source and refer servicing to qualied personnel.
For recycl ing or disposal infor mation about this product, plea se contact your loca l
author ities or the Elec tronics Indus tries Alliance: www.eiae.org.
Page 2 Coby Electron ics Cor por ation
Page 3

IMPORTANT SAFETY INSTRUCTIONS
Read Instruc tions: All the safe ty and ope rating instruct ions should be read
1.
before th e product i s operate d.
Retai n Instr ucti ons: The s afety an d operat ing instr uctio ns should be retai ned
2.
for futur e referenc e.
Heed Warnin gs: All warnings on t he pro duct an d in th e opera ting in struct ions
3.
should be a dhered to.
Follow In struc tion s: All opera ting and usa ge instr uctions s hould be fo llowed.
4.
Cleani ng: Unpl ug this product from th e wall ou tlet bef ore cle aning. D o not use
5.
liquid cl eaners or a erosol c leaners . Use a damp clo th for cle aning.
Attac hment s: Use only attac hments recomm ended by the manufa cturer. U se
6.
of other at tachme nts may be haz ardous.
Water a nd Mois ture: Do n ot use this p roduct n ear water (e.g., n ear a bath t ub,
7.
washbow l, kitchen sink, laundry tub, in we t baseme nts, or n ear a swi mming
pool and t he like).
Acces sorie s: Do not place this product on an unstabl e
8.
cart , stand, tripod, bracket, or table. Use only with
cart s, stands , tripo ds, bracke ts, or ta bles rec ommended by the m anufact urer or s old w ith the p roduct. Any mou nting of the product should fo llow the
manufac turer’s inst ructio ns and should use a mounting acces sory reco mmended by the manufa cturer.
A produ ct and cart combin ation s hould be moved with
care. Q uick stop s, excess ive forc e, and unev en surf aces may caus e the produ ct and car t combination to ove rturn .
Ventila tion: Slot s and openings in the cabin et are provided for venti lation to en-
9.
sure rel iable op eration of the product and to p rotect it from overheat ing. The se
opening s sho uld nev er be blocked by placin g the product on a bed, s ofa, rug,
or ot her similar surface. This produc t sh ould not b e pla ced in a built-in i nstallation such as a bo okcase or rack unless pro per ve ntilatio n is provided or th e
manufac turer inst ructi ons have been a dhered to.
Power S ources: This product should be ope rated on ly fro m the t ype of power
10.
source indicated on t he rating label. If you are not sure of the type of power
supply to your home, consult your product dealer or lo cal p ower co mpany. For
produc ts inte nded to operate fro m bat tery power or othe r sour ces, r efer to the
operati ng instr uctions .
Ground ing or Pola rizat ion: This pr oduct may be equipped with a p olariz ed
11.
alterna ting- current line plug th at has one bl ade wi der tha n the other. Th is plug
will on ly t in to the p ower out let in on e direc tion. T his is a safety feature. If you
are unable to inser t the plug fu lly i nto t he o utlet, try rever sing the direct ion o f
the plug. If the plug should sti ll f ail t o t , c ontact an elect rician to repla ce the
obsolet e outlet. D o not defeat t he safety p urpose of t he polar ized plug.
www.cobyusa.com Page 3
Page 4
www.cobyusa.com Page 5
IMPORTANT SAFETY INSTRUCTIONS
Power- Cord Protectio n: Po wer supply cords should be rou ted so that they
12.
are not like ly to be wal ked on or pin ched by ite ms place d upon or ag ainst the m,
paying particular attention to cords at plugs, convenience receptacle s, an d at
the point w hich they ex it from the p roduct .
Protec tive Attachme nt Plug: The prod uct may be equippe d w ith an attac h-
13.
ment plug w ith overload protection. This is a safety feature. See the op erating instruc tions for repl acement or direc tions to reset the prote ctive device. If
replac ement of the plug is require d, be sure th e ser vice t echnici an has used a
replac ement plu g that ha s the sa me overlo ad prote ction as the or iginal pl ug as
speci ed by the manu facture r.
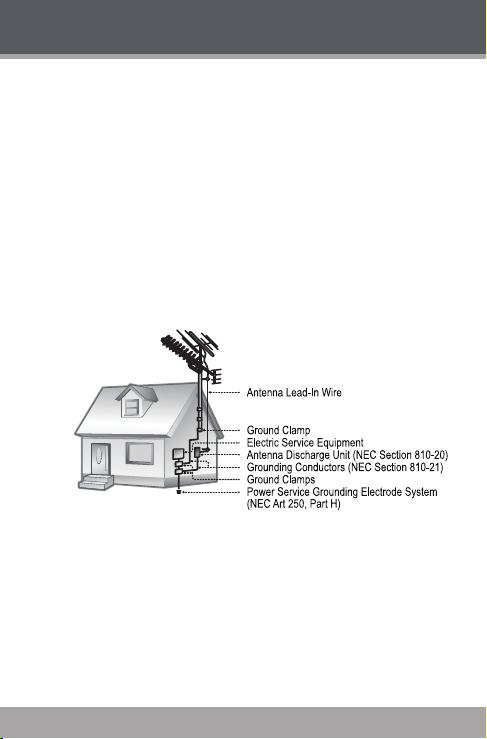
Outdo or Ante nna Grou nding: I f an outsid e antenna is c onnect ed to the pro d-
14.
uct, b e sure the ant enna sys tem is grounde d so a s to pr ovide s ome pr otectio n
against voltage s urges and built- up st atic charges . Ar ticle 810 of th e Nat ional
Electr ical Co de, ANS/ NFPA 70 provide s informa tion wit h regard to pr oper
groundi ng of the mast and su pport ing struc ture, grou nding of the lea d-in wir e to
an ant enna-d ischarg e unit , size of groundin g con ductors , loc ation of ant ennadischar ge unit, connection to gr ounding electrode s, and require ments for the
groundi ng electr ode (see gur e).
Light ning: Fo r adde d prote ction for thi s prod uct, u nplug i t from the wall out let
15.
and disc onnect t he antenna or cable system dur ing a ligh tning sto rm or whe n it
is left unat tended an d unused for lon g periods of ti me. This will pr event damage
to the prod uct due to li ghtning or p ower-line s urges.
Power Lines: An ou tside a ntenna system s hould not be locate d in the vi cinity
16.
of overh ead powe r lines o r other electr ic light or power circui ts, or w here it c an
fall into such pow er lines or circui ts. When inst alling an outsi de antenna syste m,
extrem e care should be taken to keep from touching such power line s or circuits,
as conta ct with th em might be fa tal.
Overl oading: Do not overload wall out lets, ex tension cords, or integ ral conve -
17.
nience r eceptac les as this c an resul t in a risk of r e or electr ic shock .
Page 4 Coby Electron ics Cor por ation
Page 5

IMPORTANT SAFETY INSTRUCTIONS
Objec t and L iquid Entr y: Never push objects of any kind into this product
18.
through openin gs as they may touch dangerou s voltage points or shout- out
parts that co uld result in a re or electric shock. N ever spill liquid of any kind
on the pro duct.
Serv icing: Do not at tempt to serv ice this produ ct yoursel f as opening or remov-
19.
ing covers m ay ex pose you to dangerous voltage or othe r hazards . R efer all
servi cing to qua lied ser vice personne l.
Damag e Requir ing Ser vice: Unplug this p roduct f rom the wall o utlet and r efer
20.
servi cing to qua lied se rvic e person nel under t he follow ing cond itions: a) whe n
the p ower-supp ly or plug is d amaged; b) if liquid has been s pilled or if obj ects
have fallen i nto the prod uct; c) if the pr oduct has b een expose d to rain or wate r;
d) if the produ ct do es n ot ope rate normall y by follow ing t he op erating instructions. Adjust only t hose c ontrols that are cove red by the op erating instru ctions
as i mproper adjustment of other controls may result in damag e an d wi ll of ten
require extensive work by a qualie d technic ian to re store the produc t to its
normal operation; e) if t he pr oduct has b een dr opped or da maged in any way;
f) whe n the pro duct exhi bits a di stinct c hange in p erfor mance —this indicate s a
need for se rvic e.
Replac ement Parts: W hen re placeme nt par ts are req uired, be sur e that your
21.
servi ce technic ian has used repla cement par ts speci ed by the manufact urer or
have t he sa me ch aracter istics as the origin al par t. Unautho rized substitutions
may result i n re, elec tric shoc k, or other h azards .
Safet y Ch eck: Upon c omplet ion of any servi ce o r repa irs t o this product, ask
22.
the ser vice technic ian to pe rform safety checks to ensure that the produc t is in
proper op erating c onditi on.
Wall or Ceilin g Mount ing: Th e produc t should be mount ed to a wa ll or ce iling
23.
only as rec ommend ed by the manuf acturer.
Heat: The produ ct s hould be situated away from heat sour ces such as r adia-
24.
tors, heat re gisters, sto ves, or other prod ucts (incl uding ampli ers) that produ ce
heat.
The prod uct shoul d be situate d away from CR T televisio n monitor s.
25.
www.cobyusa.com Page 5
Page 6

www.cobyusa.com Page 7
TABLE OF CONTENTS
PRECAUTIONS .............................................................................. 2
IMPORTANT SAFETY I NSTRUCTIONS ........................................... 3
TABLE OF CONTENTS ................................................................... 6
PACKAGE CONTENTS .................................................................. 8
FEATURES ...................................................................................... 9
GETTING S TARTED ...................................................................... 10
CS- MP150 at a Glance........................................................................ 10
Top View..................................................................................... 10
Rear View ................................................................................... 10
Remote Control .......................................................................... 11
Connec tions ......................................................................................... 12
iPod ............................................................................................ 12
Computer (USB) ........................................................................ 12
Television (Composite V ideo) .................................................... 12
Auxiliary Device ......................................................................... 12
Power ......................................................................................... 13
Using the C S-MP150 Controls ............................................................ 14
Power On/Off ............................................................................. 14
Adjusting the Volume ................................................................. 14
TIME & ALARM FUNC TION ........................................................15
Settin g the Time ................................................................................... 15
Settin g the Alar m ................................................................................. 15
Settin g the Alar m Mode ....................................................................... 16
Snooze/A larm Off ................................................................................16
Sleep ....................................................................................................16
Settin g the Backlight Brightness ......................................................... 16
iPOD FUNCTION......................................................................... 17
Basic Operation ................................................................................... 17
iPod Controls ....................................................................................... 17
AUXILIARY (AUX) FUN CTION .................................................... 18
Basic Operation ................................................................................... 18
Page 6 Coby Electron ics Cor por ation
Page 7

TABLE OF CONTENTS
RADI O FUNCTION...................................................................... 19
Basic Operation ................................................................................... 19
Tuning .........................................................................................19
Reception ................................................................................... 19
TROUBLESHOOTING................................................................... 20
SPECI FICATIONS ........................................................................22
www.cobyusa.com Page 7
Page 8

www.cobyusa.com Page 9
PACKAGE CONTENTS
Congratulations on your purchase of the Coby C S-MP150 Digital
Alarm /Clock Radio with iPod® Do cking St ation.
Please make sure the following items are included in the package. If
any items are missing, c ontact your loca l dealer.
CS- MP150 Main Unit
Remote Control
AC/DC Power Adapter
3.5mm Line-in Cable
USB Cable
iPod Doc k Adapters
nano
2G nano
Mini
10GB - 30GB
40GB - 6 0GB
5G 30GB
5G 60G B
Instruction Manual
Page 8 Coby Electron ics Cor por ation
Page 9

FEATURES
iPod Doc king System synchronizes, charges, and plays your
favorite iPod music
2” Full- Range Stereo Speakers
High- Contr ast Digital LCD Time and Date Display with Dimmable
Backlight
Alarm Clock with Snooze/Sleep Function
Wake to your iPod, radio, or buzzer
Digital AM/FM Radio
3.5mm Audio Line -In Jack for use with any portable audio device
Composite Video Out Jack for use with i Pod Video
USB Por t for synchronizing with your PC/Mac
Univers al docking adapter s include d
Full Function Remote Control
www.cobyusa.com Page 9
Page 10

www.cobyusa.com Page 11
GETTING STARTED
1415161718
1
2
3
695
4
12
11
7
8
10
13
CS-MP150 at a Glance
Top View
Volume Dial
1.
Open (Do ck Lid)
2.
Display
3.
Audio
4.
AM/FM
5.
Sleep
6.
Power
7.
Time Set
8.
Alarm Set
9.
Tune Down
10.
Page 10 Coby Electron ics Cor por ation
Tune Up
11.
Alarm M ode
12.
Snooze/ Dimmer
13.
Rear View
14.
15.
16.
17.
18.
Headphone Out
USB Por t
Composite Video Out
DC 12V Power In
3.5mm AUX Line In
Page 11

GETTING STARTED
1
3
6
9
12
13
15
16
17
5
2
4
8
7
11
10
14
18
19
Remote Control
stand by: Power On /Off
1.
2.
mute: Mute speakers
3.
iPod: Acc ess iPod mode
4.
aux: Acc ess Auxiliary mode
5.
am/f m: Access radio mode
6.
time set: Set clock time
7.
alarm mode: Set alarm
mode (wake to iPod, buzzer,
FM radio, or A M radio)
8.
alarm set: Set alarm time
9.
menu: Access iPo d menu
10.
enter : Conrm iPod menu
select ion
11.
sleep:
Set the Sle ep timer /
Turn the alarm off
12.
snooze/dimm er:
Delay alar m for 9 minutes /
Set backlight brightness
13.
Volume -
14.
Volume +
15.
Up
16.
Previous
17.
Play/Pause
18.
Next
19.
Down
www.cobyusa.com Page 11
Page 12

www.cobyusa.com Page 13
GETTING STARTED
Connections
iPod
Press OPEN to open the Dock Lid
Select t he iPod Dock Adapter t hat corresponds to your iPod. Press
the adapter label- side up into the recessed docking bay.
Plug your iPod into the iPod dock.
Computer (USB)
Your CS- MP150 can sy nchronize les between your iPod and c omputer over the USB connecti on. Please refer to your iPod or iTunes
documentation for more information.
Televi sion (Composite Vi deo)
Your CS-MP150 can play videos and photos over the Composite Video
Out connect ion when used with a compatible iPod with Video Playback.
Please refer to your iPo d documentation for more information.
Auxiliary Device
Use a 3.5mm male- to-male line-in cable to connect the line -out o r
headphone out jack of an audio device to the CS-MP150 3.5mm
AUX Line- In jack.
Page 12 Coby Electron ics Cor por ation
Page 13

GETTING STARTED
Power
This adapter should be used with 100-24 0V 60/50Hz AC wall outlets.
Plug the supplied AC adapter into an AC 100-240V electrical wall
outlet.
Connec t the other end of the adapter to your device’s DC 12V
Power In jack.
To turn the player on, press STANDBY/POWER .
Do not connect the power plug to a power outlet
other than that which is indicated here or on the
label as this may result in the risk of re or electric
shock.
Do not handle the power plug with wet hands. Do
ing so may cause electric shock.
Use only AC adapters of the type specied here.
Failure to do so may case a re or damage the
player.
-
www.cobyusa.com Page 13
Page 14

www.cobyusa.com Page 15
GETTING STARTED
Using the CS-MP150 Controls
Power On/Off
To turn your player on or off, press STANDBY/POWER
Adjusting the Volume
When your player is in audio playback mode, press or
to adjust the volume level up or down, re spectively.
You may also turn the volume dial on the main unit to adjust the
volume level.
Press MU TE on the remote to mute the sound. Press MUTE again
to restore the sound.
Page 14 Coby Electron ics Cor por ation
Page 15

TIME & ALARM FUNCTION
Sett ing the Time
Set the clock time an d date of your pl ayer.
Press TIME SET to enter time set m ode. The “hour” di git will
1.
start ashing.
Press or to adjust the hour value. Pres s TIME SE T
2.
when nished— the “minute” digit will start ashing.
3.
Press or to adjust the minute value. Press TIME S ET
when nished— the “mont h” digit will start ashing.
4.
Press or to adjust the month value. Pre ss TIME S ET
when nished— the “date” digit will start ashing.
Press or to adjust the date value. Press TIME SET
5.
when nished.
Sett ing the Ala rm
Set the alarm time. With the Power on:
1.
Press AL SET once to turn off the alarm if the alarm has been set.
2.
Press AL SET again to enter alarm set mode—t he “hour ” digit
will start ashing.
Press or to adjust the hour value. Pres s AL SET when
3.
nished —the “ minute” digit will start ashing.
4.
Press or to adjust the minute value. Press AL SET
when nished.
5.
After t he alarm has been set, p ress AL M ODE to set the alarm
mode to wake to (Radio FM, R adio AM, iPod, or Buz zer).
If you are waking to the radio (AM or FM), make
sure to tune to the desired station prior to setting
the alarm.
If you are waking to audio (Radio FM, Radio AM,
Buzzer, or iPod), make sure to adjust volume to a
desired level prior to setting the alarm.
www.cobyusa.com Page 15
Page 16

www.cobyusa.com Page 17
TIME & ALARM FUNCTION
Sett ing the Ala rm Mode
Set the alarm mode to wake to (Radio FM, Radio AM, iPod, Buzzer).
You can set the alarm mode while setting the alarm, or press AL MODE
at any time to change the alarm mode setting.
Snooze/Alarm Off
When the alarm turns on, press SNOOZE to delay the nex t alarm
for 9 minute s.
To turn the alar m off completely:
Press ALARM S ET on the main unit, or;
Press SLEEP on the remote control.
Sleep
The Sleep function turns off the player af ter a set amount of time to
allow you to sleep to music.
While the player is on, press SLEEP. The display will show “15” to
indicate that the player will tur n off in 15 minutes.
Press SLEEP again to change the amount of time before the player
turns of f (15, 30, 45, 60, or OFF).
Sett ing the Back light Brightness
You can set the bac klight br ightness to 3 levels: Off, Bright, Brighter.
When the player is on, press SNOOZE/DIMMER to c hange the
backlight brightness level.
Page 16 Coby Electron ics Cor por ation
Page 17

iPOD FUNCTION
Play your favorite iPod music when a compat ible iPod is docked to
your CS-MP150.
The iPod dock w ill charge, play, and sync your iPod. Please see the
documentation provi ded with your iPod for more informati on about
iPod play an d sync features.
Basic Operation
1.
Connec t a compatible iPod to the docking station.
2.
Turn the player on. To enter i Pod mode, press IPO D on the
remote (or press AUDIO o n the main unit to toggle between
iPod and AUX m odes).
3.
iPod playback will start.
iPod Controls
You can use the remote to control iPod functions, o r you can use your
iPod’s controls directly.
To access the i Pod menu, press MENU.
To move the selection up or down, press or , respecti vely.
To enter (conrm) a selection, press ENTER.
To return to a previous screen, press M ENU.
Press during playback to pause. Press again to resume
playback.
Press to skip to the previous t rack.
Press to skip to the next trac k.
www.cobyusa.com Page 17
Page 18

www.cobyusa.com Page 19
AUXILIARY (AUX) FUNCTION
Play any externa l audio device (e.g., MP3, cassette player, etc.) when
it is connected to your CS- MP150.
Basic Operation
Use the Line-In c able to connect an ex ternal auxiliar y audio
1.
device to your CS- MP150’s Auxiliar y Audio Line-In jack.
Turn the player on. To enter AUX mode, press AUX on the
2.
remote (or press AUDIO o n the main unit to toggle between
iPod and AUX m odes).
Use the co ntrols on your exter nal device to start playback.
3.
You must use the externa l audio device to control play-
back
To avoid distortion, do not set the volume from the exter-
nal audio device to ver y high levels.
Page 18 Coby Electron ics Cor por ation
Page 19

RADIO FUNCTION
Listen to FM or AM radio broadcasts.
Basic Operation
Turn the player on. To enter FM radio mode, press AM/FM. To
1.
switch to A M radio mo de, press AM/FM again.
Tuning
To tune to a lower station frequency, press . To auto sc an for
the next lowest station frequency, press and hold .
To tune to a higher st ation frequency, pres s . To auto scan for
the next hi ghest station frequency, press and hold .
Recept ion
For FM broadcasts, ex tend the FM antenna fully and adjust its
position for best r eception.
For AM broadcasts, the unit should be positioned for best signal
strength (the AM antenna is built into the unit).
www.cobyusa.com Page 19
Page 20

www.cobyusa.com Page 21
TROUBLESHOOTING
If you have a problem with this devic e, please read the troubleshooting
guide below and check our website at ww w.cobyusa.com for Frequently
Asked Q uestions (FAQs) and rmware updates. If these resources do
not resolve the problem, please contact Technical Support.
COBY Electronics Technical Support
Address: 56- 65 Rust S t.
Hours: Monday to Friday, 8:30 AM–11:00 PM EST
Phone: 800 -681-2629 or 718- 416-3197
Email: techsupport@cobyusa.com
Web: www.cobyusa.c om
Maspeth, NY 11378
Saturday to Sunday, 9:00 AM–11:00 PM EST
There is no power to the devic e.
Ensure that the power cord is securely connected to the unit and the
proper wall outlet.
There is no sound.
Try adjusting the volume.
Ensure that the player is in the proper mode (iPod, AUX, Radio).
Ensure that headphones are not connecte d to the unit.
Ensure that the Mute function is not enable d.
The sound is distor ted.
The unit may be positioned too closely to a large appli ance (e.g., a
TV or ref rigerator). If possible, tur n the appli ance of f or move the
unit to another location.
Ensure that the radio is in broadc ast reception range.
Decrease the volum e level.
Page 20 Coby Electron ics Cor por ation
Page 21

TROUBLESHOOTING
The remote control doesn’t work.
Ensure that there are no obstacles between the remote and the
player.
Point the remote at the remote sensor on the main unit.
Strong light (e.g. direct sunlight, uoresc ent lights, strobe lights)
may inter fere with the remote signal.
Ensure that the batte ries in the remote ret ain a charge and have
been inst alled correct ly.
Try replacing the remote’s batteries.
www.cobyusa.com Page 21
Page 22

www.cobyusa.com Page 23
SPECIFICATIONS
Power Supply
Tuning System
Audio Output
Audio Input
Video Output
PC Inter face
Output Power
DC 12V
100-240V AC Adapter
AM: 520 - 1710kHz
FM: 87.5 - 108MHz
Stereo Speakers (x2)
3.5mm Headphone
3.5mm Auxiliar y Line- In
iPod Dock (with adapters)
nano
2G nano
Mini
10GB - 30GB
40GB - 6 0GB
5G 30GB
5G 60G B
Composite Video
USB
6W x 2
Speci cations and manua l are subje ct to chang e withou t notice.
Page 22 Coby Electron ics Cor por ation
Page 23

NOTES
www.cobyusa.com Page 23
Page 24

COBY Electronics Corp.
56- 65 Rust Street
Maspeth, NY 11378
ww w.cobyusa.com
ww w.ecoby.com
 Loading...